Keith_W
-
Posts
1,145 -
Joined
-
Last visited
Content Type
Profiles
Forums
Gallery
Events
Everything posted by Keith_W
-
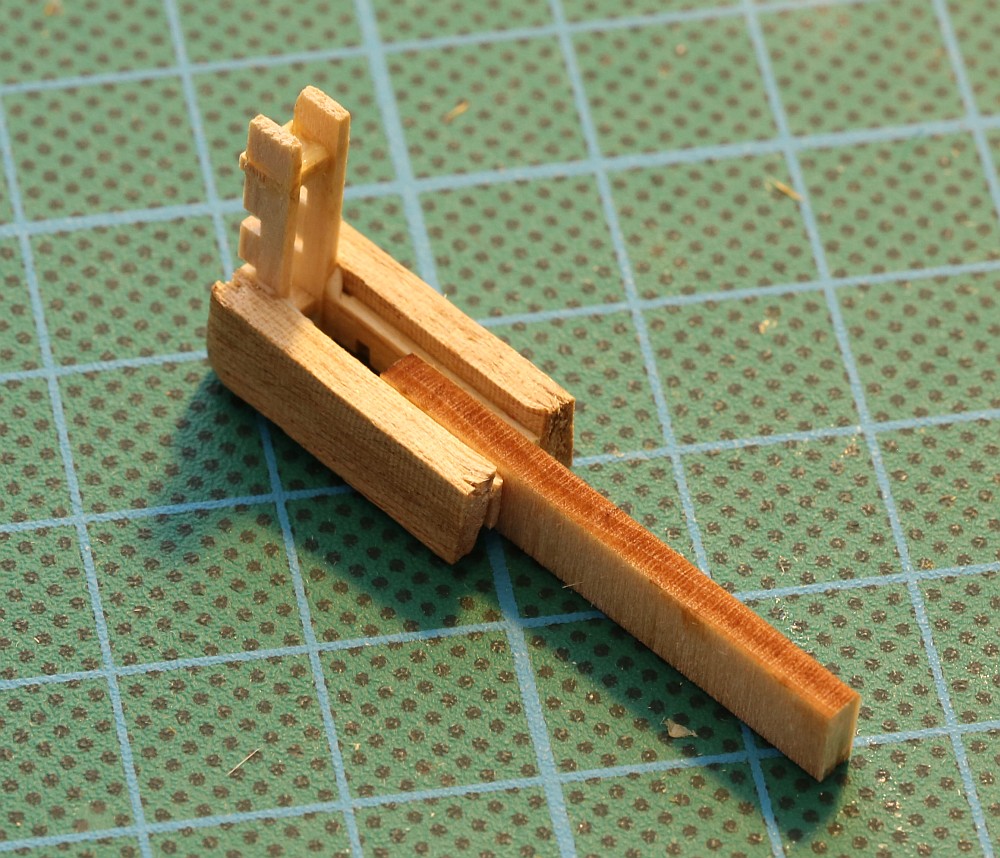
 Meredith, I am building this boat as well. I was wondering how you made the hinges and lock in the toolbox? Would you be able to post a close-up?
 -
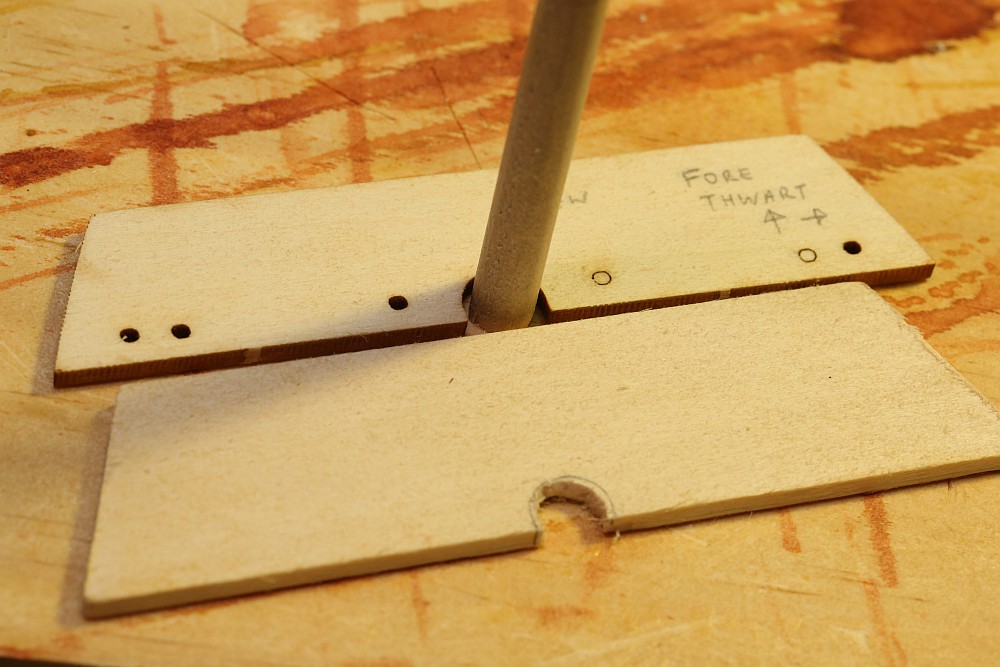
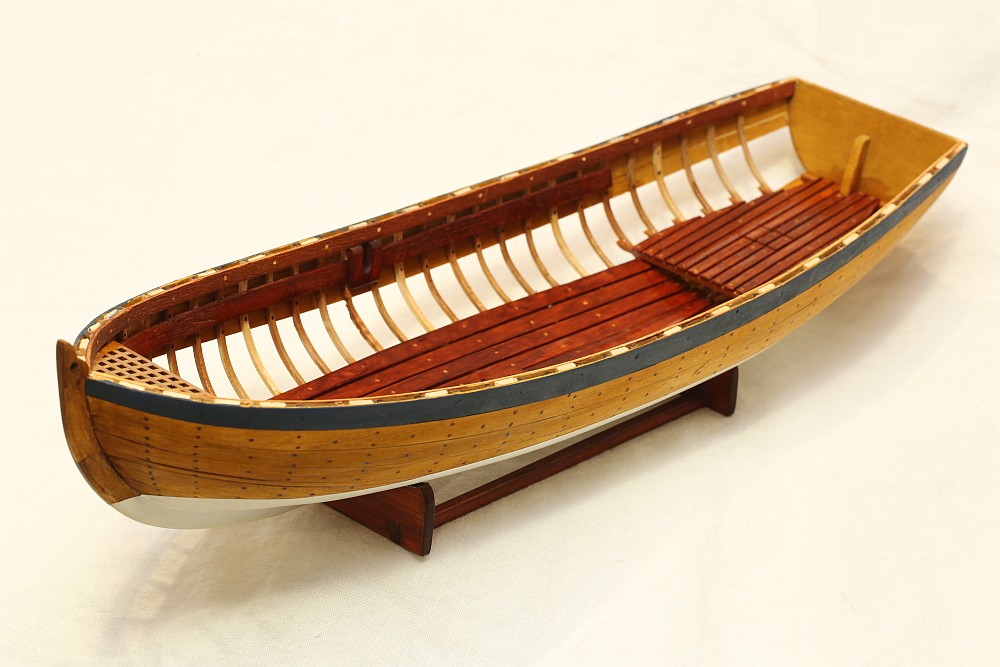
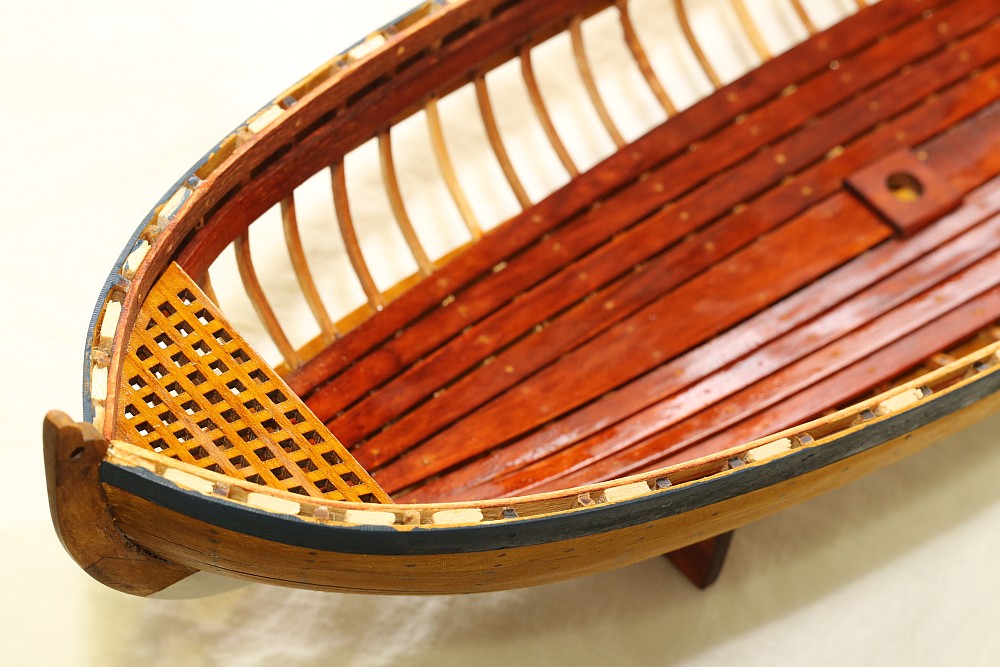
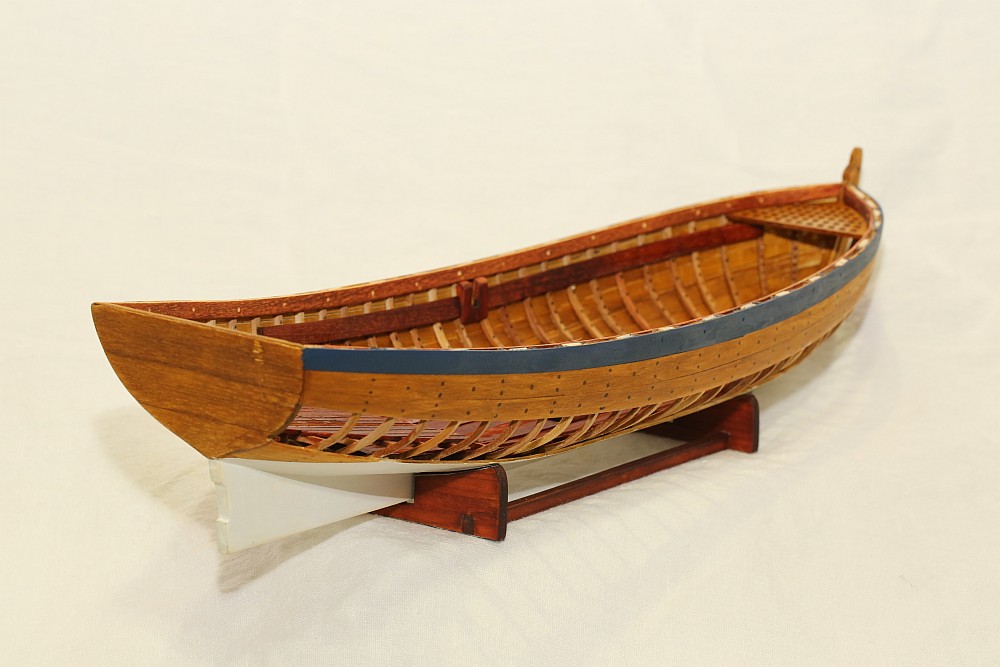
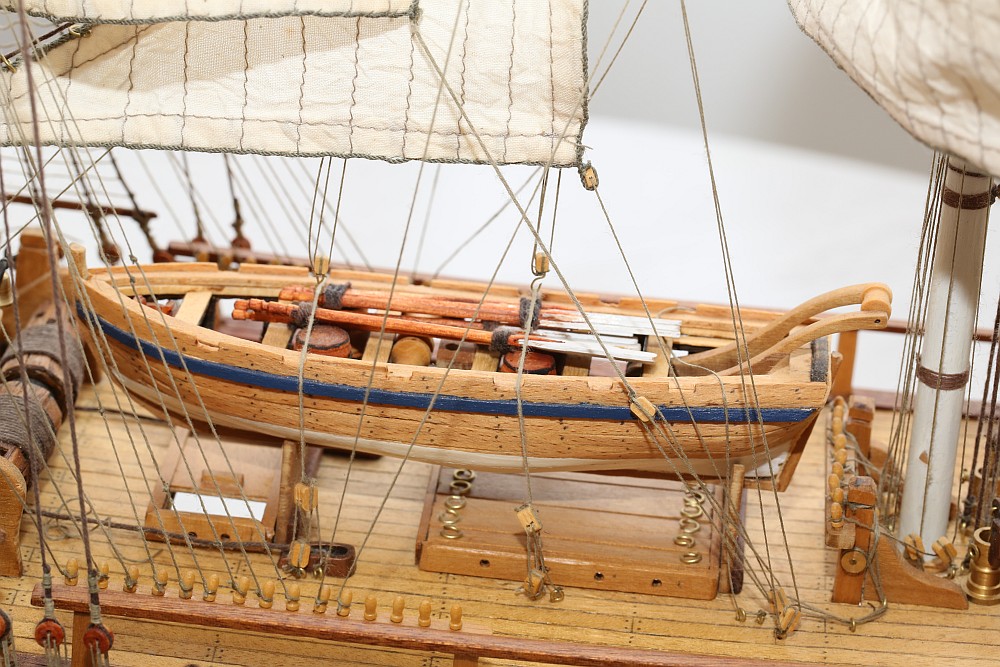
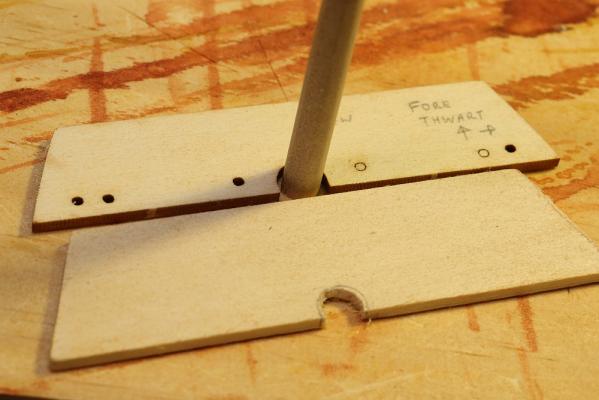
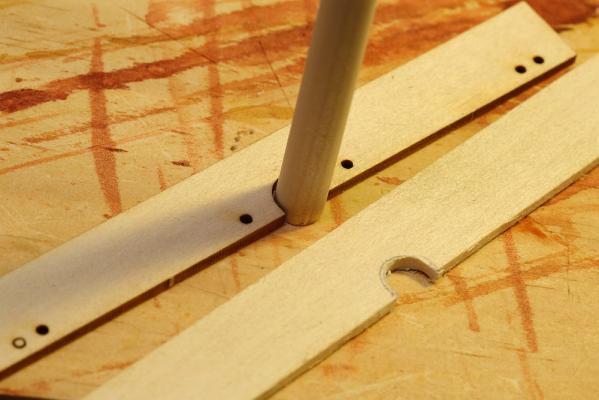
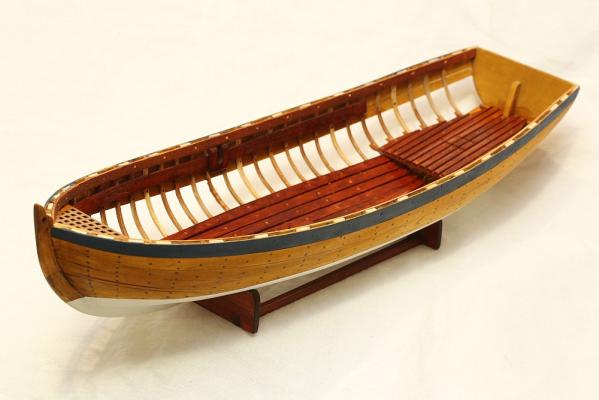
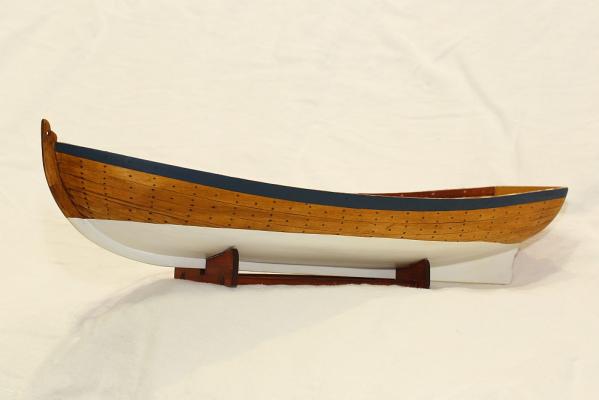
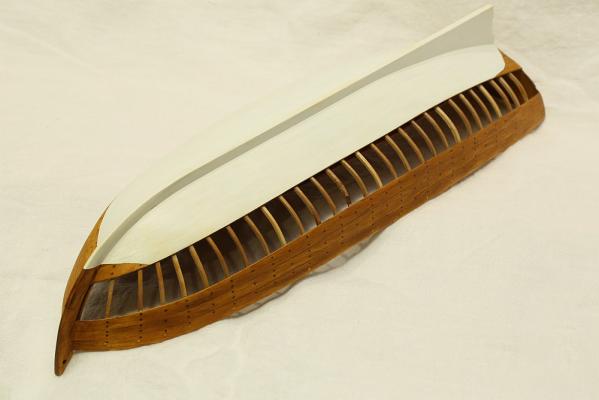
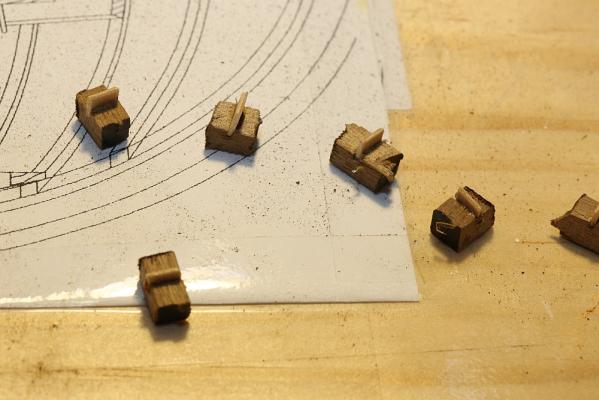
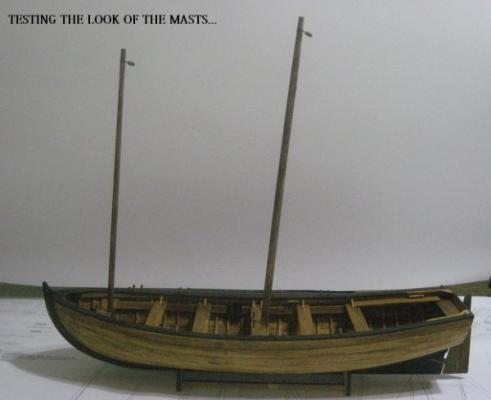
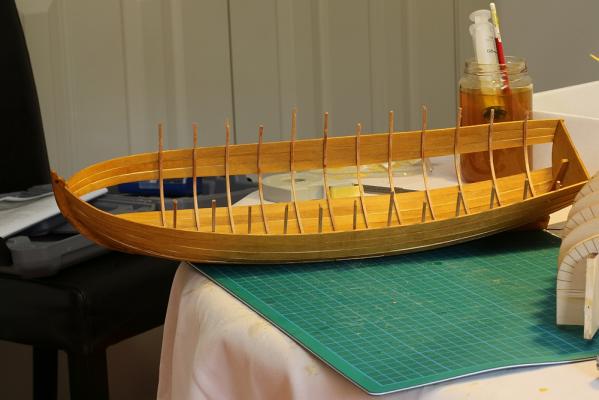
Finished early today. Rushed home, ripped my tie off, and within seconds was changed from an urban work drone and into my dingy modelling clothes Today, I fabricated new thwarts for positions #1 and #4, and completed much work done yesterday. This is the fore thwart (position #1). The reason why I need a new one is because I did not read the instructions properly! It says to position the foremast stay in relation to the fore thwart to achieve the correct rake. Well, I positioned my foremast stay according to the plans. When I came to test fit the fore thwart, the mast raked forwards! As you can see, my new fore thwart is much wider than the one provided in the kit. It doesn't need to be that wide - in reality I probably need a couple of mm less. I will trim it when I come to fit the fore thwart so that it sits snug against the grating. You should probably note that the thwart provided in the kit is too large for the mainmast - see the gaps around the dowel in the picture? The diameter of the fore thwart fits the mainmast perfectly though. On the other hand, the thwart for the mainmast fits perfectly. This is pictured with my new #4 thwart. And finally, here are some pictures of the boat as of right now. I painted on a blue stripe to match my Bounty. The planks look slightly shiny because they have just been given a coating of Tung Oil. I have to wait for the oil to cure before proceeding, so that's all for tonight. Hmm, maybe I have time to start tapering the dowels for the masts ... The instructions remind you that this is a working boat, and should not be finished "like a yacht". Well, it's MY boat, so i'll finish it like a yacht if I want to

- 78 replies
-
- 5
-

-
- model shipways
- bounty launch
- (and 1 more)
-
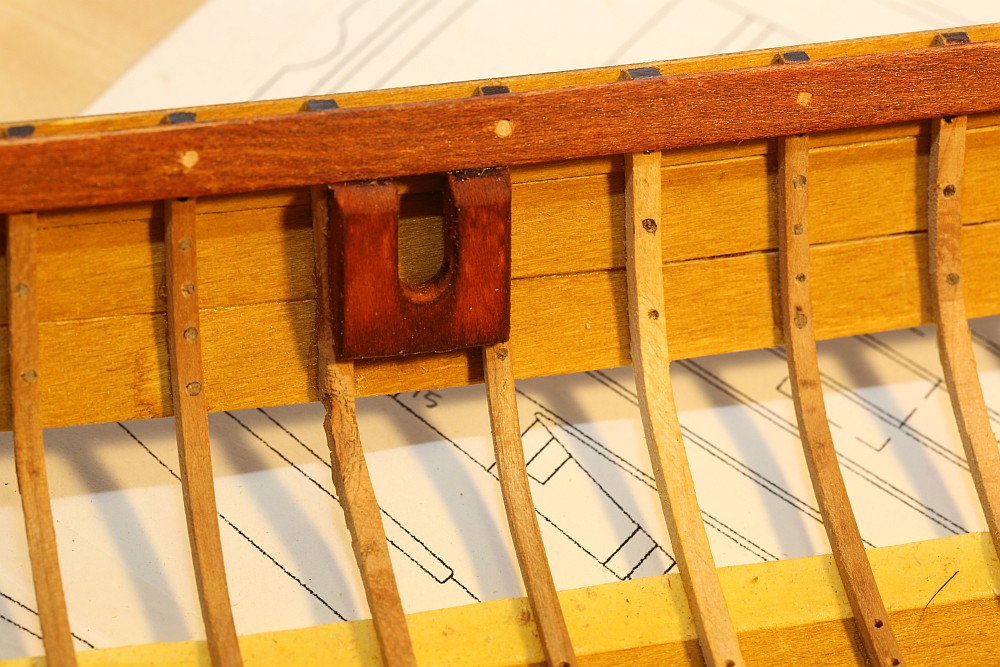
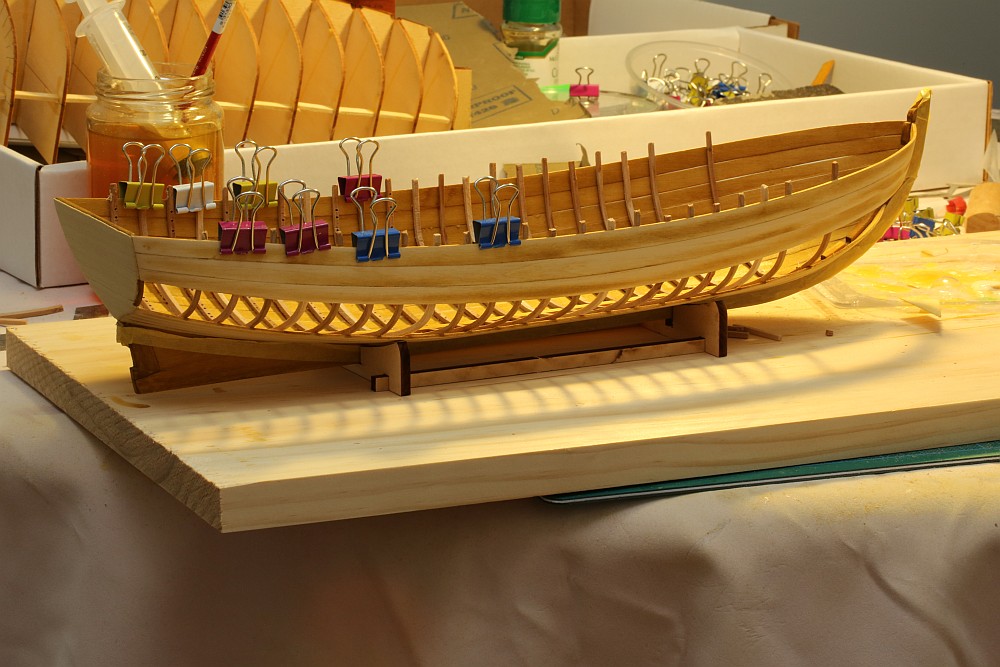
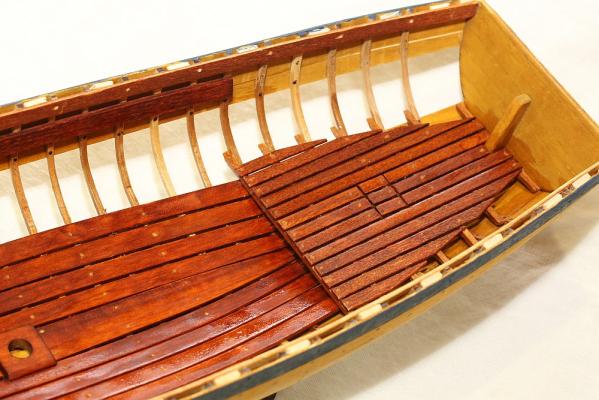
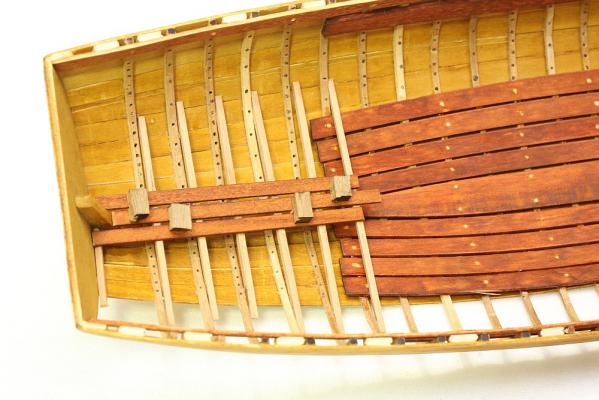
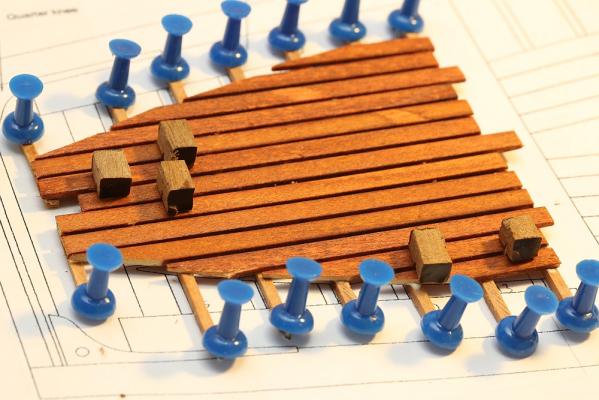
Thanks Tom and Jeff. I managed to do more work tonight - sober this time, and not hung over In my previous post I described how to get a nice, crisp finish on a treenail. The first photo shows the treenail pushed through a plank. Note the top of the treenail is rather dull and has some stain. The second photo shows the proud area chiselled off - it now looks brighter. After 5 coats of paint, I removed the masking tape. Not bad, but there are some errors which need to be cleaned up. I have also installed the thwart risers. I did not show a picture, but I also dry fit the thwarts at this stage. All the other build logs have noted that either the thwarts are not wide enough, or the boat became more wide after removal from the jig. Well, I have the same problem! I measured the boat at 2mm wider than it should be - enough for the thwarts to fall off. 2mm isn't such a bad error, I could correct it simply by squeezing the boat together. I will have to fabricate some new thwarts anyway to accomodate the repositioned mainmast. Thankfully there is enough spare material in the kit to do so. But - I think I will squeeze the boat when installing the thwarts. There should be enough glue power in the thwarts to hold the boat together. I followed usedtosail's method of making the quarterdecks. First, I fit all the beams. Then, I laid down the center planks (along with spacers, as you can see). I then removed the quarter deck and transferred it to the plans, where I pinned it down. From there it was easy to trim the planks to fit as I went along. It would have been extremely fiddly to build it on the boat! I should note that MS specified 1/4" planks for the quarterdeck, but they didn't supply any! Instead, they supplied 3/16" planks. Also, despite promising to supply "enough" square cherry dowels, I had just enough to install the frames with none left over. Fortunately I had spare square dowel from another kit. I went ahead and built the quarterdeck with the 3/16 planks. If I am not happy with the result, I will ask MS to send me 1/4" planks. Tomorrow - I will treenail the quarterdeck.


- 78 replies
-
- 3
-
-
- model shipways
- bounty launch
- (and 1 more)
-
Yeah, I agree. I would be happy if I built that.
-
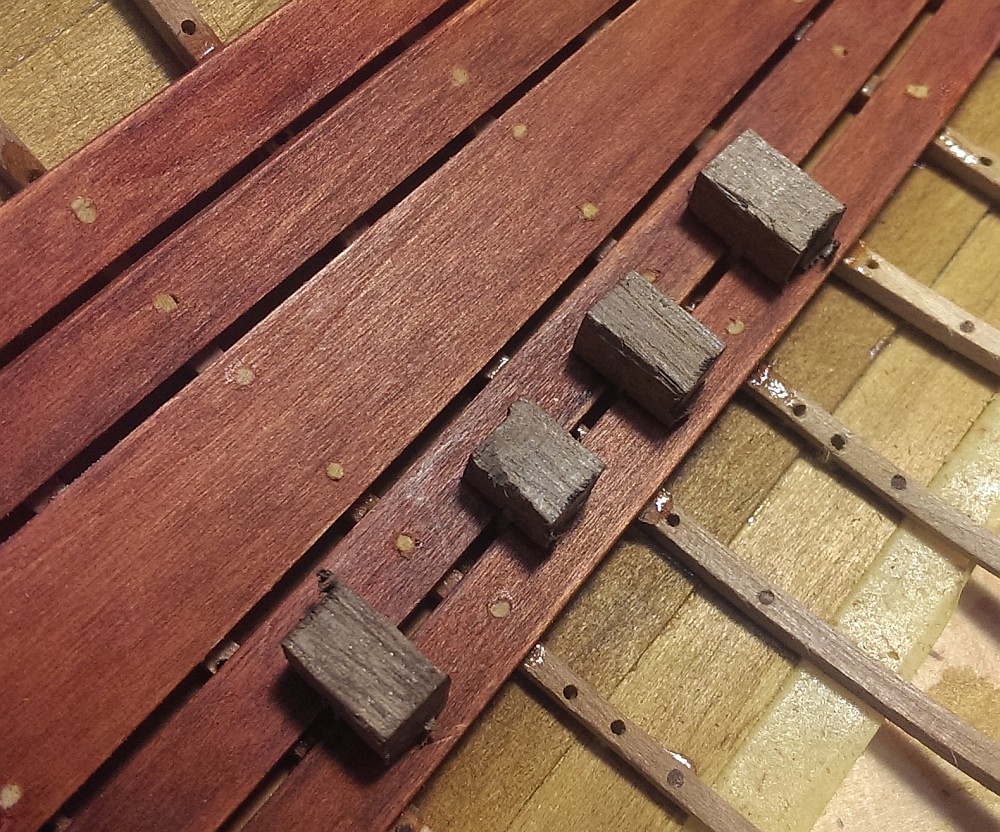
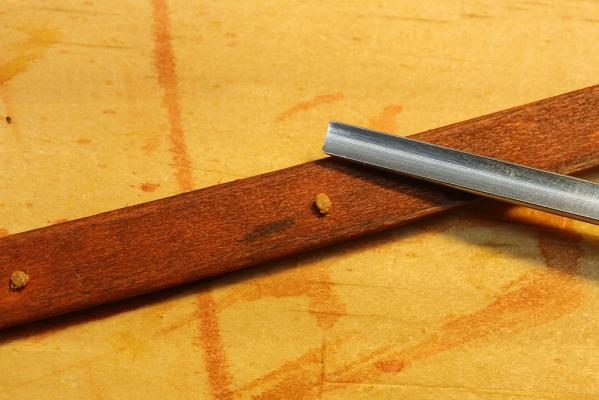
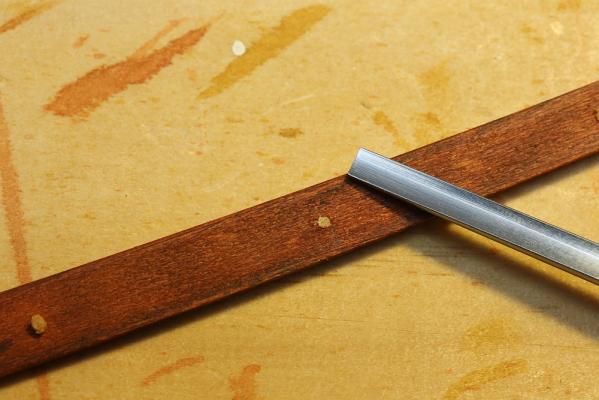
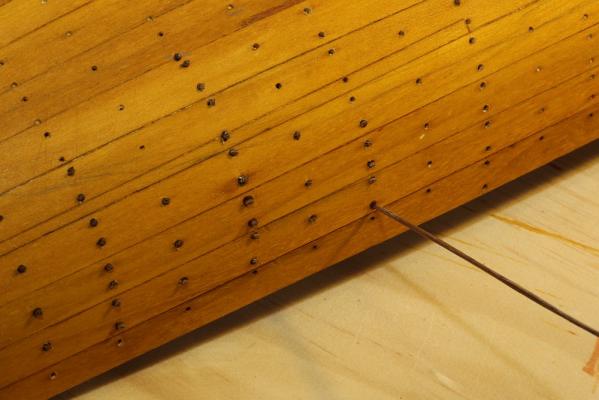
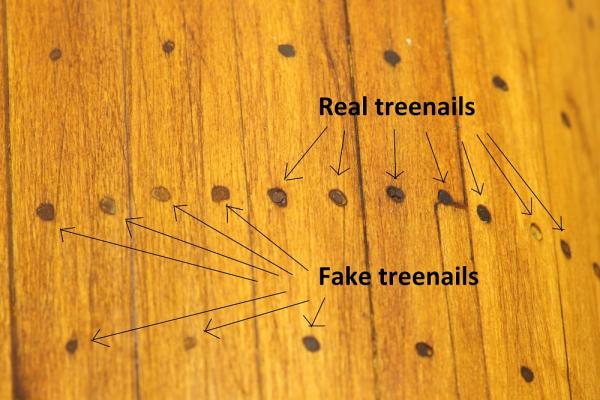
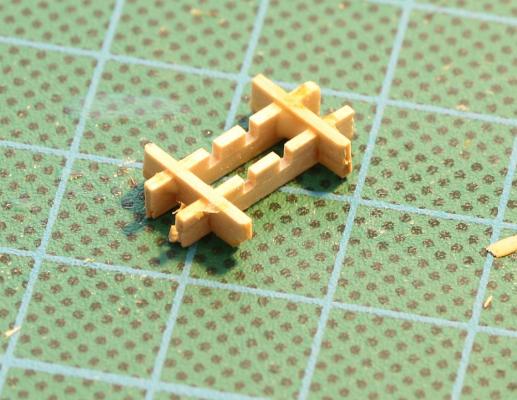
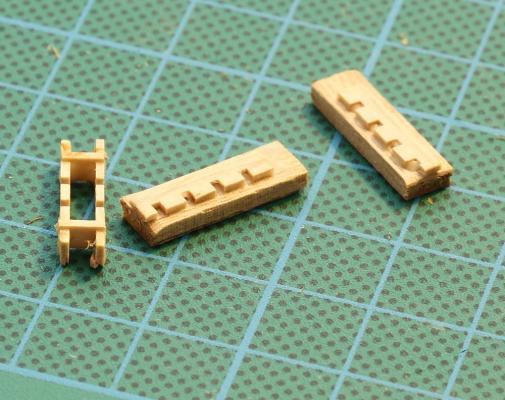
That's fine esion, if you are almost finished i'll wait for your completed model Before I went for my NYE party yesterday I managed to mask off the bottom of the boat and apply 3 layers of white paint. When I came home (blind drunk, at 3AM) I managed to add another layer, miraculously without spilling paint all over myself, the floor, or the boat. I left the paint to dry, had a shower, then went to sleep. I woke up at close to noon with a nasty hangover but that didn't stop me from trudging down into my modelling room to do more work. Wasn't such a good idea, given how many mistakes I made today. The reason why I am going so slow is because I have gone treenail crazy and i'm treenailing everything: The sheer clamps and windlass holder have been treenailed and installed. Note that the wood has been stained, yet the treenail sits flush and crisp against the plank. How to get a crisp finish - stain the wood and allow to thoroughly dry. Drill the hole for the treenail, then dip the treenail in slightly diluted PVA glue (I use 9:1 PVA to water). Push the treenail through and allow it to sit slightly proud, about 0.1mm. You will note that simply by pushing the wet treenail through stained wood, the surface of the treenail will be slightly stained! When the PVA glue is dry, chisel off the proud area, then lightly sand with 800 grit sandpaper - this will leave you a crisp treenail. The center floorboard was likewise treenailed. I made a little jig to help space the planks evenly. The pictures are self explanatory. This is where I am up to right now. Note that I have moved the mainmast closer to the windlass. Tomorrow after work - i'll complete the floorboards, sand back the painted area and give it another coat of paint.


- 78 replies
-
- 3
-
-
- model shipways
- bounty launch
- (and 1 more)
-
1. You are correct, the planking as depicted in that picture is a compromise to make construction easier. Real planks are not shaped like triangles, nor do they terminate as sharp points. Take a look at some of the other build logs, especially the scratch built logs to see how planks are tapered. 2. You can make a complete dogs breakfast of the first layer of planking if you want, and then use a lot of woodfiller and sand it like crazy. That's what I did with my first kit! The second layer will hide all your sins. But really, you should look at your first layer as a practice run for your second layer. Try as best as you can to follow good practice - you will learn heaps.
-
ROYAL CAROLINE 1749 by Doris - 1:40 - CARD
Keith_W replied to DORIS's topic in - Build logs for subjects built 1501 - 1750
Doris, it seems like such a shame to hide all your work under a roof. May I suggest that rather than make a roof, you make a clear plastic covering instead? You can buy a sheet of polycarbonate, heat it up in an oven, then bend it over a mould.- 883 replies
-
- 3
-
-
- royal caroline
- ship of the line
- (and 1 more)
-
Yes, you need to soak your ribs for more than an hour. I soaked mine for 24 hours then steam bended them. Take a look at this post.
-
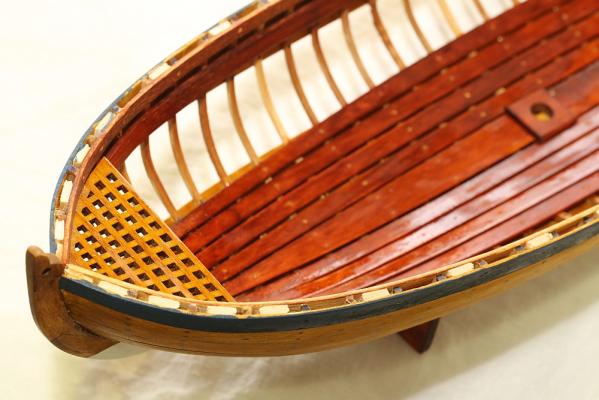
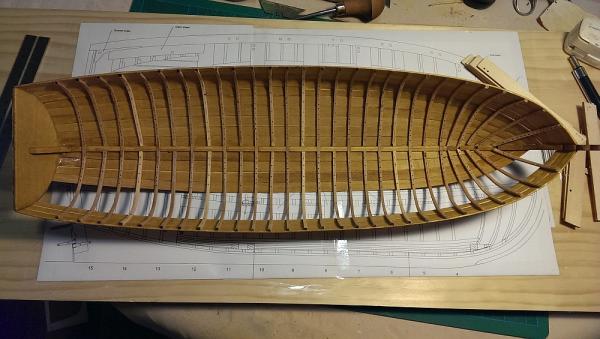
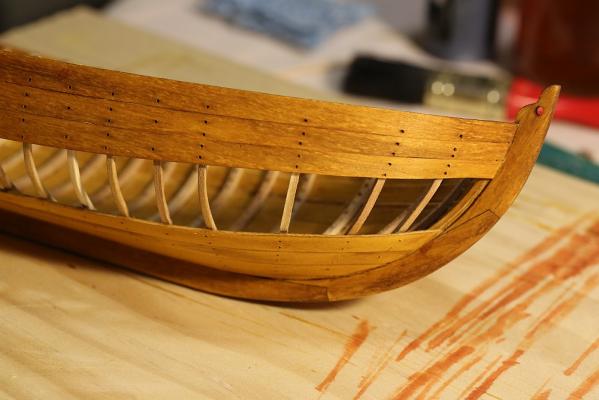
Finally, before I go to bed ... a couple of pictures of the boat as it is right now. As you can see, the treenails go all the way through the planks and into the frames. The accuracy of some of my drilling leaves much to be desired, but fortunately most of the mistakes will be hidden under floorboards and thwarts. With the last pic, you can really see the difference between the simulated treenails and the real treenails made of walnut dowel. You can also see that the two added cant frames makes the bow of the boat look more pleasing. Yes, there is a lot of glue at the transom - this area will be hidden anyway. I am thinking of adding more glue as insurance!
- 78 replies
-
- 1
-
-
- model shipways
- bounty launch
- (and 1 more)
-
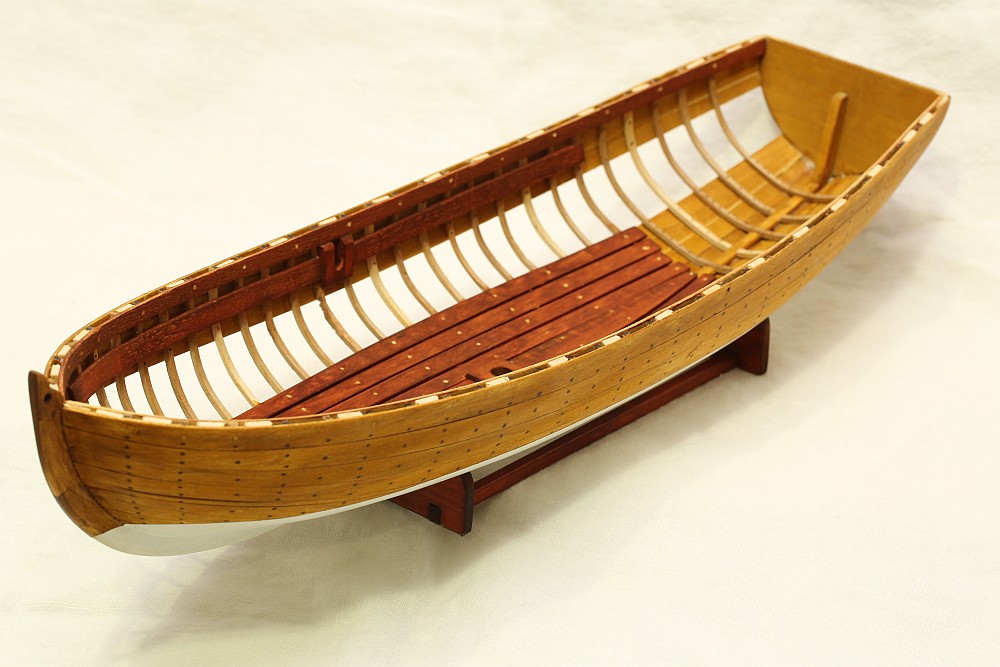
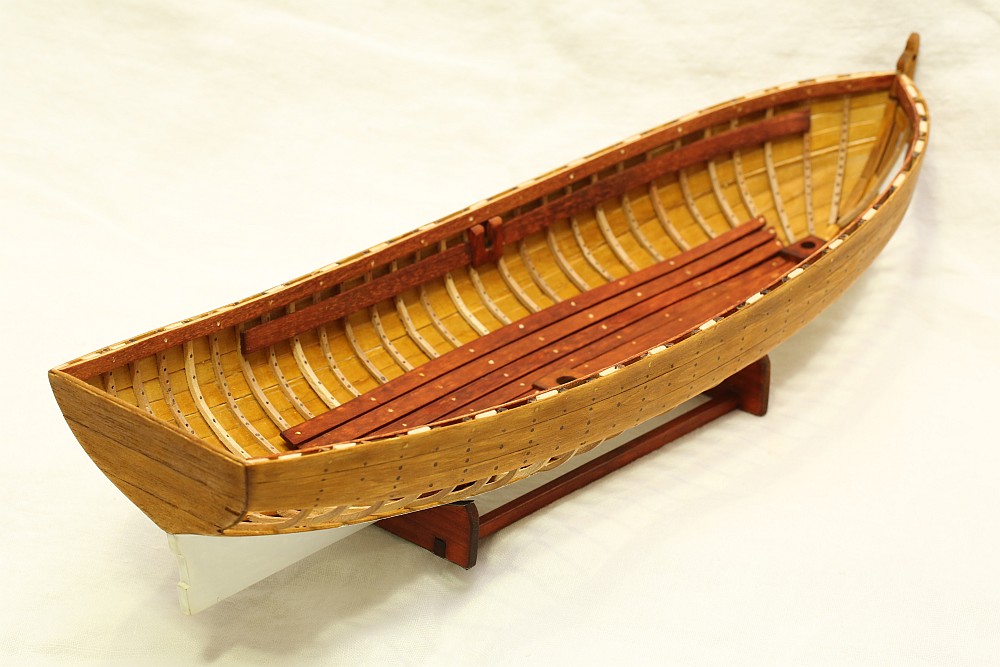
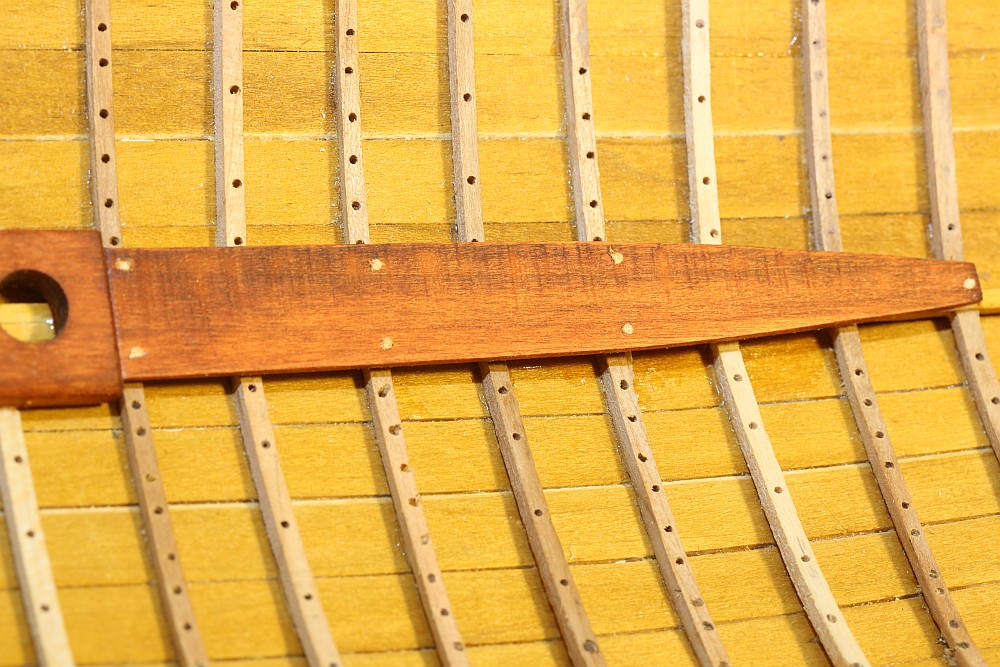
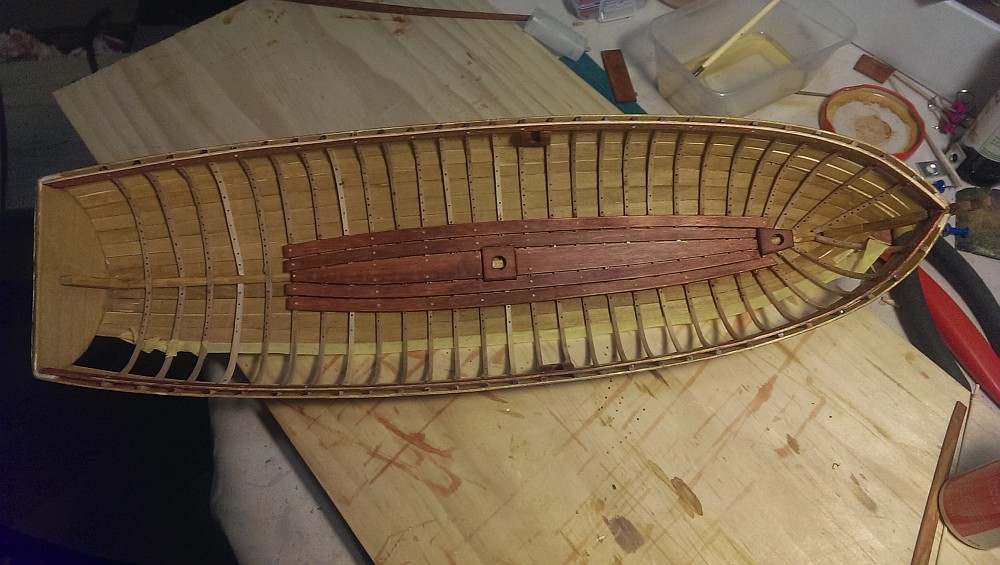
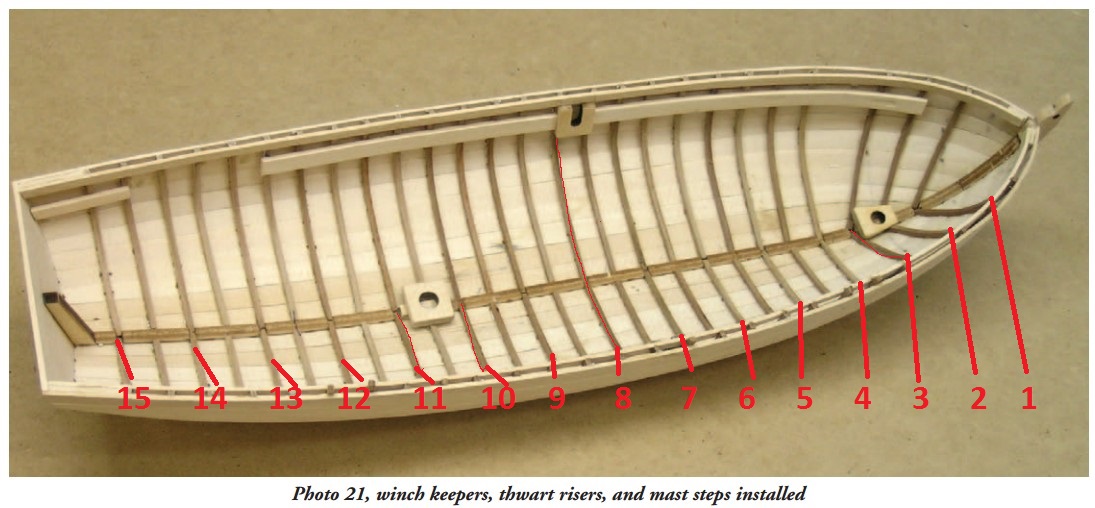
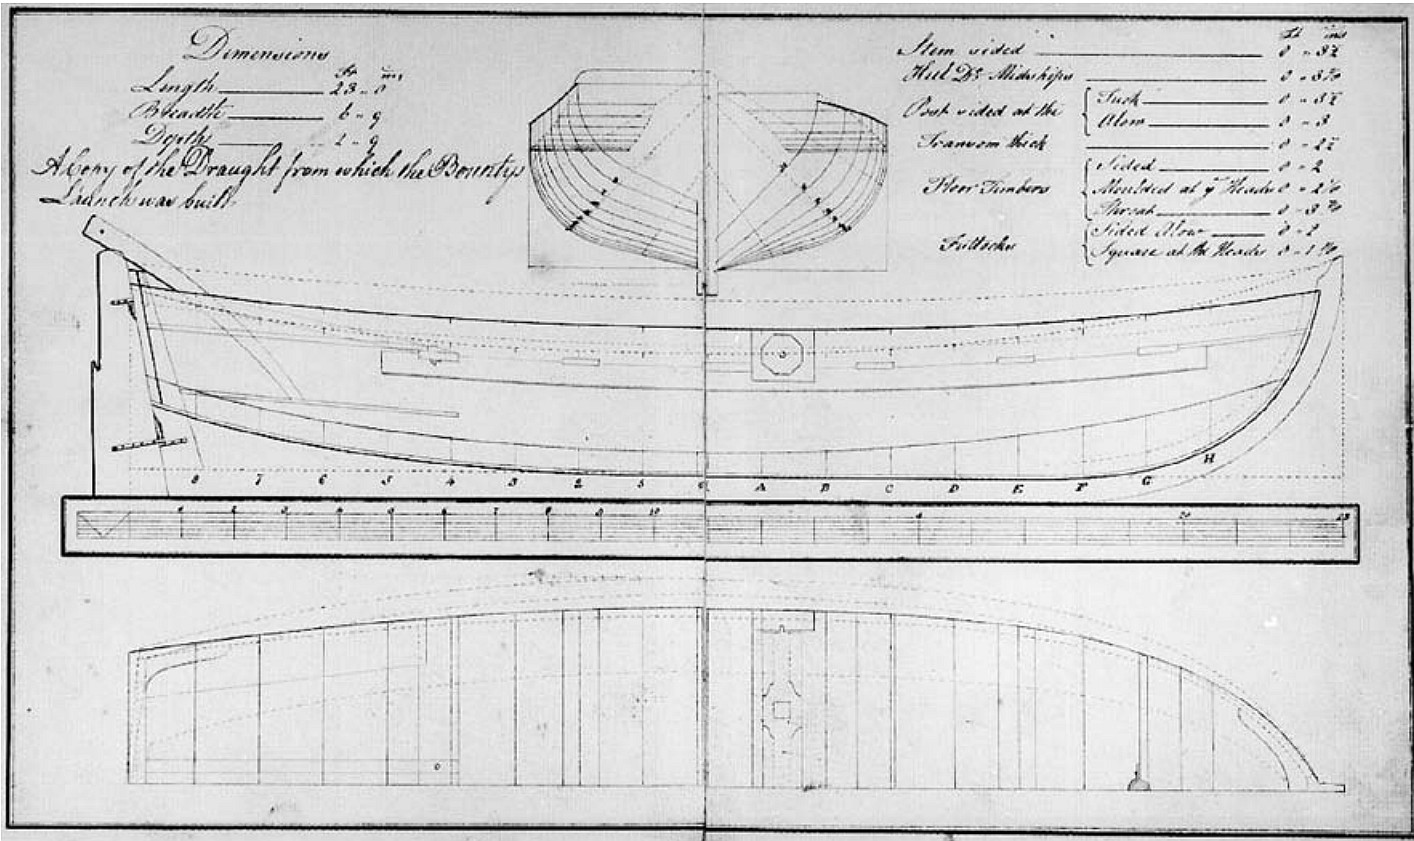
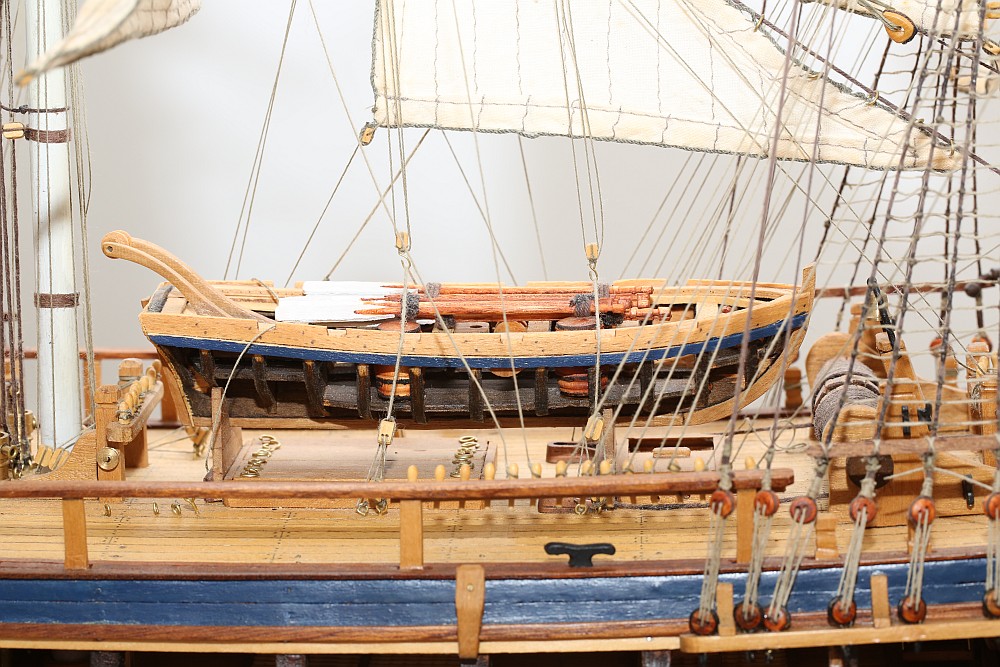
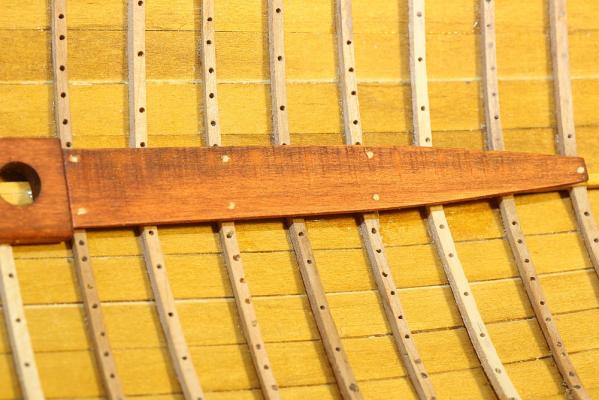
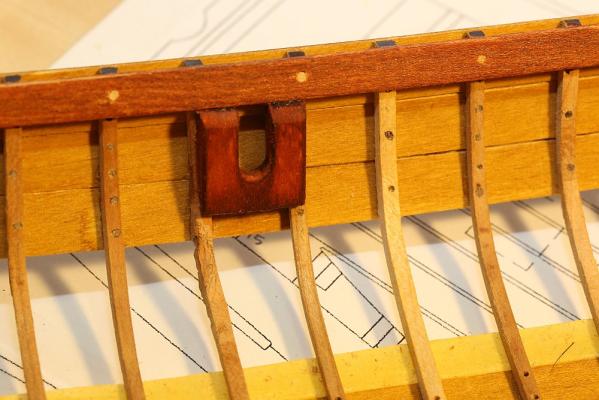
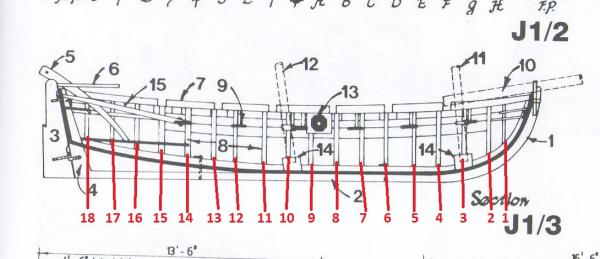
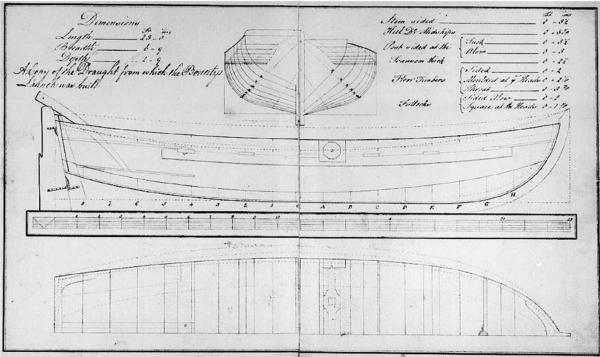
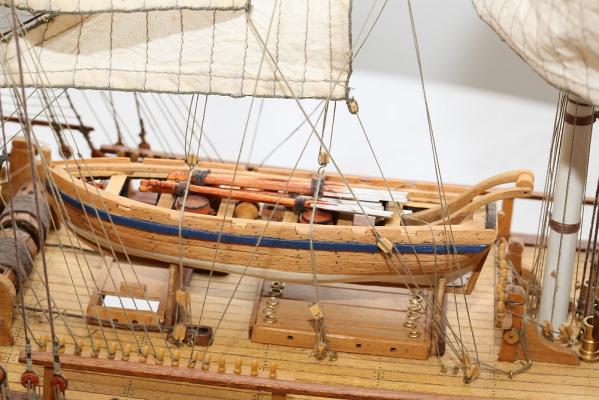
Thanks for the comments guys. Esion, if you could post a build log of your boat that would be helpful. The hull is now completed, and I am about to start installing the floorboards, etc. I have been poring over the other Bounty Launch build logs on MSW with a microscope, and I note that Mario (Cap'n Rat Fink) repositioned the masts on his boat (see here). Did he make the right decision? Photo 1: Model Shipways. This is an image from the Bounty instructions (the plans are too big to fit in my scanner). I have numbered the frames 1-15 as per the convention in the manual, but if you count the tween frames there should be 26. However, as noted in an earlier post I added two frames, so I have 28. Note the position of the mainmast relative to the windlass holder. Photo 2: National Maritime Museum. This is an image of the plans of the Bounty Launch from the National Maritime Museum. The positions of the foremast and mainmast are not indicated on these plans. Photo 3: AOTS: Bounty. These are the plans from Mackay's AOTS: Bounty. I have numbered the frames for convenience. Comparing the three plans, a number of observations can be made: 1. The number of frames in each set of plans is radically different. MS has 26, NMM has 16, and AOTS:Bounty has 18. Also, the frames on the bow are canted on the MS kit, whereas they are straight on NMM and AOTS:Bounty. 2. The position of the windlass (expressed as a ratio to the length of the ship - larger number means the windlass is closer to the bow) is 0.55:1 on the MS kit, 0.56:1 on the NMM plans, and 0.55:1 on Mackay - all three sources agree. 3. The position on the mainmast, again using the same convention, is 0.38:1 on the MS kit, and 0.49:1 on Mackay. You can see the difference just eyeballing the photos. 4. Mackay depicts a bowsprit - this is not included in the MS kit. I have to decide whether or not to create one. Mario decided that the Launch is too small to include a bowsprit, but I will probably go with Mackay's plans. 5. The MS kit does not include a crane, or a windlass (but they do include plans, but not material for fabricating one if you wish). The booklet says that the crane and windlass were probably left on the Bounty when Bligh was set adrift - so these items were not included. Do I make my own? Decisions, decisions ... 6. Mackay depicts six thwarts and six oars per side. The oarlocks on Mackay are simply cutouts on the sheer plank. The NMM plans do not depict any oars or oarlocks, but does depict six thwarts. However - MS includes five thwarts and five pairs of oars. The oarlocks on Mackay are dowels insert in the gunwale. Interesting decision by MS - it is not too late in my build to severely kitbash and try to get my Launch to look more like Mackay's, but the very thought of fabricating a new gunwale takes the wind out of my sails. I will probably stick with MS - the gunwale they included looks nice. I now have to decide whether to paint the inside of the Launch or not. My original idea was to stain the planks and floorboards, thwarts, etc. different coloured stains to make them stand out, but I am not sure if I should introduce another colour (perhaps red). Nobody knows how the interior of the Launch was painted, so I suppose that gives me considerable artistic license! It will probably end up as an aesthetic decision, more than anything else! Now after all that, did Mario make the correct decision? Take a look at his boat: Now take a look at what it would look like if built to the instructions provided by MS: I think there is no question that the mast should be closer to the windlass. It even looks more correct. Unfortunately, repositioning the mainmast means that all sorts of things have to be fabricated or shifted - new thwarts have to be made, holes filled and moved, etc. My homework for tonight is to study the plans and see if I have enough material to do it.


- 78 replies
-
- 2
-
-
- model shipways
- bounty launch
- (and 1 more)
-
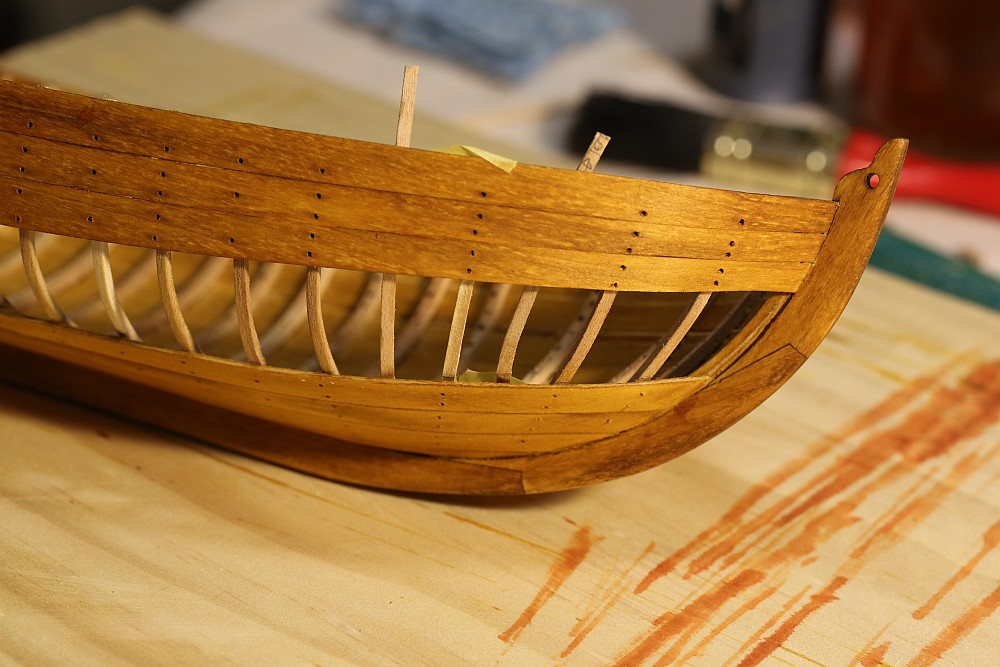
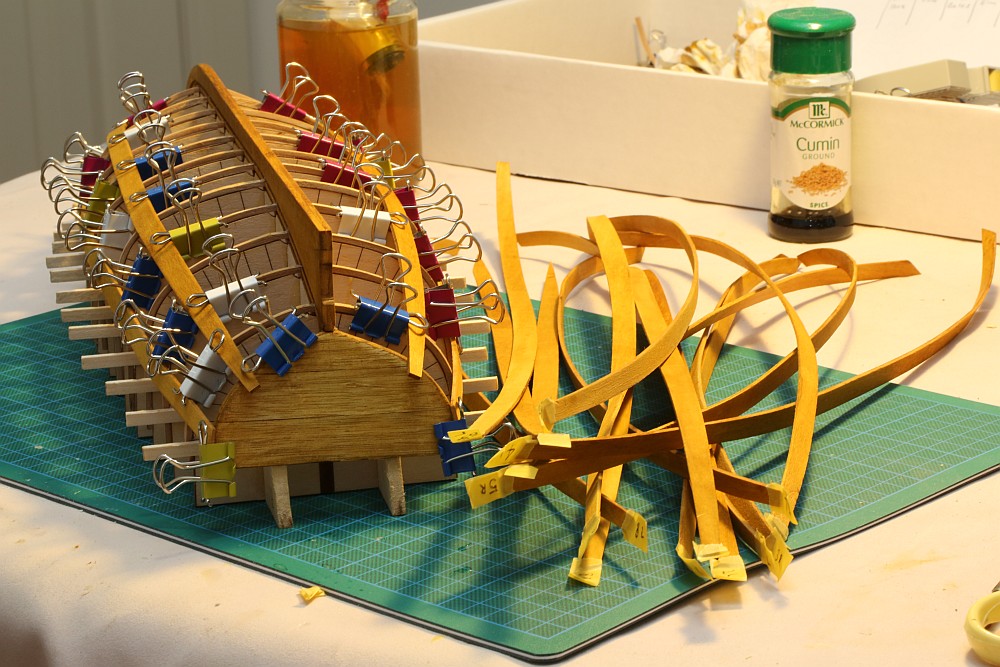
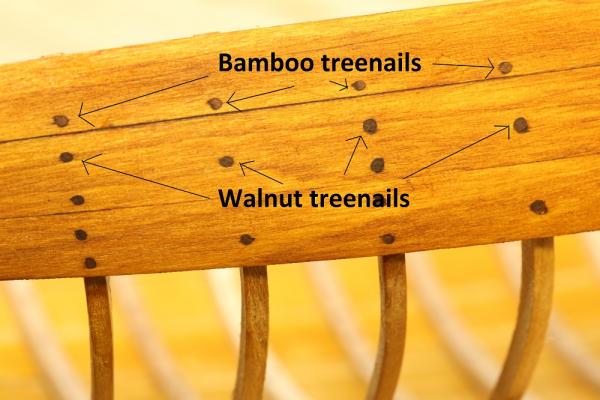
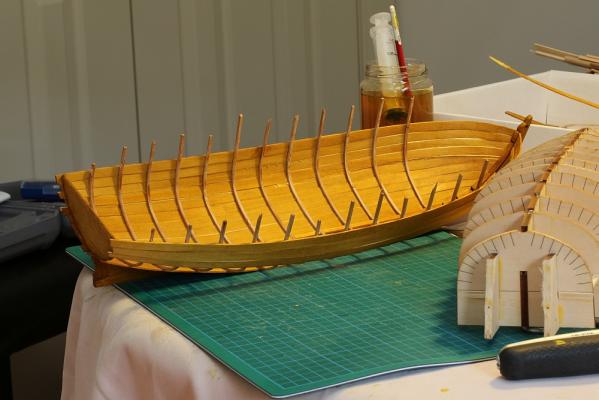
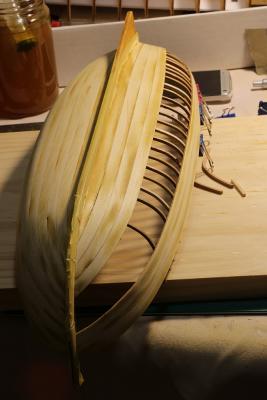
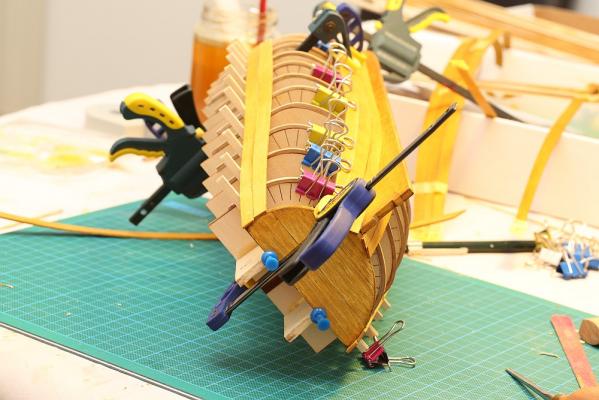
Thanks Jeff-E Anyway, I managed to do more work yesterday and today. After installing the cant frames, I noted that there is a gap between frames 2-3, and 3-4 as per the plans. I then checked with McKay's AOTS Bounty and saw that the boat as depicted by MS differed from McKay. I am not sure which is more correct, but it sure looks strange - especially since the frames are visible on my build. ... I therefore bent a couple more ribs and taped them in place. They look MUCH better in my opinion. I therefore glued them in place. After the hull was sanded down, I drilled dozens of little holes and started plugging them with treenails. I thought I would hate putting treenails in, but it's actually quite fun. Unfortunately, I ran out of walnut dowel to make treenails, so I had to substitute. This meant studying the plans to see which treenails were going to be visible. Anything below the waterline was not critical - I planned to paint it. That left the internal treenails. I made some more treenails with bamboo, and thought I would simulate treenails with woodfiller. I was concerned that the treenails would look different, so I only used bamboo and woodfiller treenails on areas that would be painted over. Here is the hull after drying, about to start sanding. Sanding is complete, and I stained the wood again. Once stained, it is quite difficult to tell the difference between bamboo and walnut, but I can tell you that it is MUCH easier to draw walnut through a drawplate than bamboo! It is just a more pleasant wood to work with. This photo shows the difference between the walnut treenails and the simulated treenails using woodfiller. It doesn't really do justice - the real treenails look MUCH better in real life - it just looks more defined and sharper.


- 78 replies
-
- 4
-
-
- model shipways
- bounty launch
- (and 1 more)
-
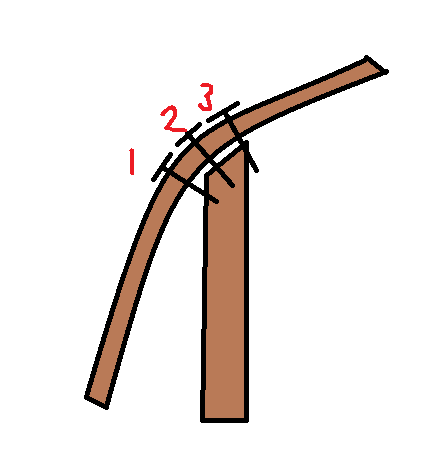
Capt, this is why I suggest you practice planking on a more simple boat before attempting the Bounty. It is a difficult kit, one that even experienced modellers may not find easy. I whipped up a quick diagram in Paint to illustrate: This shows a plank meeting a bow frame. The bow frame has been tapered to accept the plank. Note how the nails in position (1) and (3) grab on to a tiny amount of wood. You should ideally place the nail in position (2), but if your nails are long they will still exit the wood. This is why you should be adding material to fill in space in between the frames in front. Needless to say, you need to shape it to conform to the run of planks as well. What parts do you need to paint or varnish? I can't tell you. Study the plans carefully. Are you going to position your model high up so people might see the underside of the decks? Then you need to finish the underside of your decks (I didn't, since my model is low). Don't just look at my build, there are umpteen others on MSW which are better.

- 265 replies
-
- 1
-
-
- finished
- artesania latina
- (and 1 more)
-
When to stain wood?
Keith_W replied to Keith_W's topic in Painting, finishing and weathering products and techniques
Capt Al make sure you use a water based stain, NOT an oil based stain. You won't be able to glue anything onto an oiled surface. -
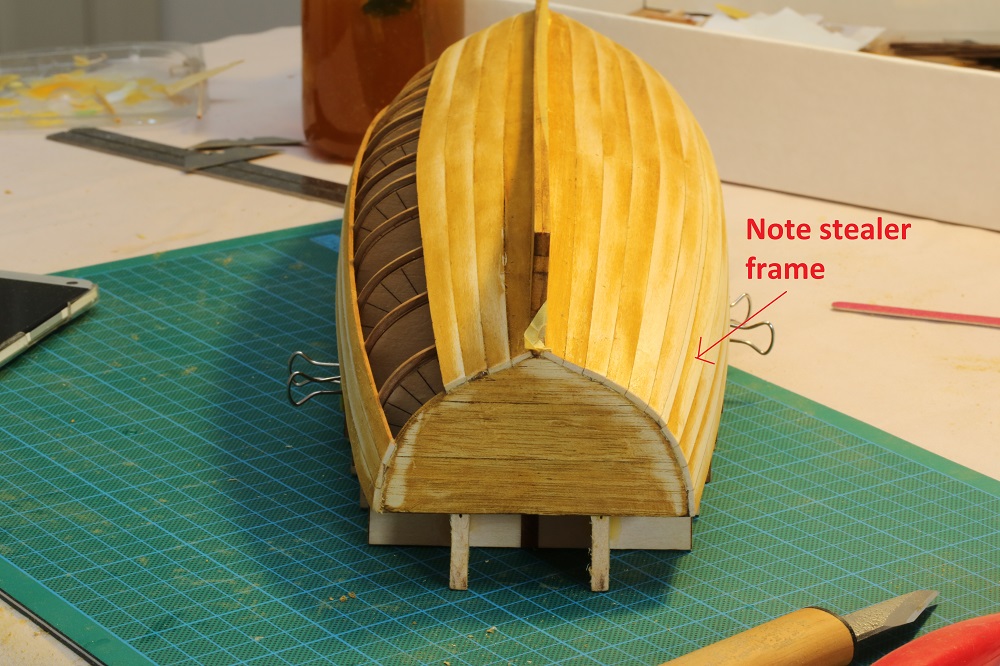
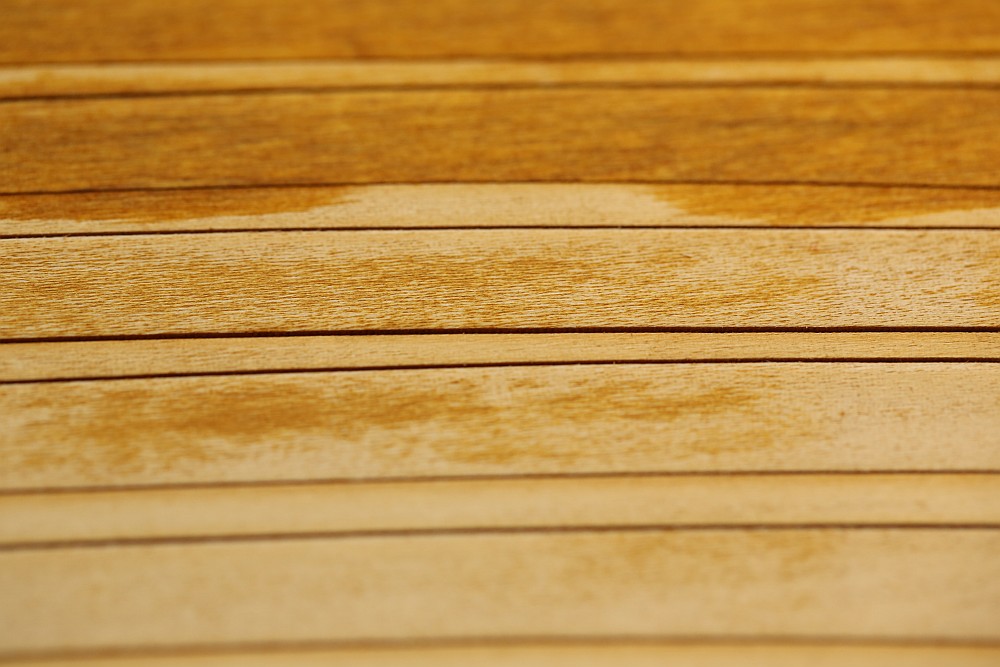
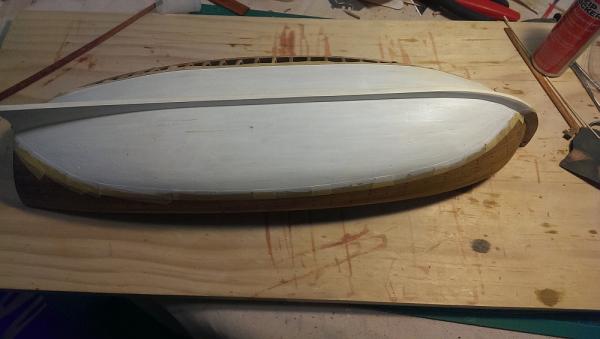
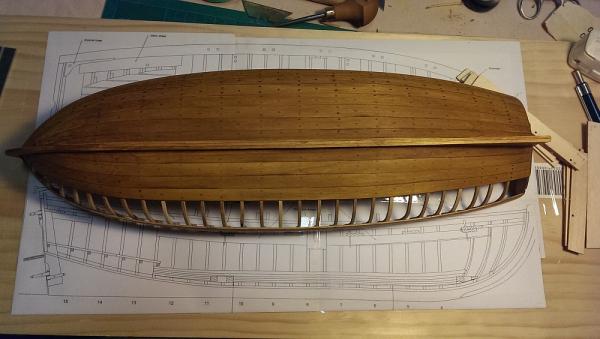
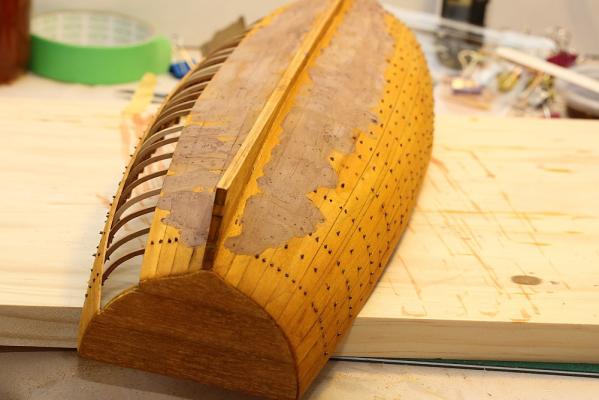
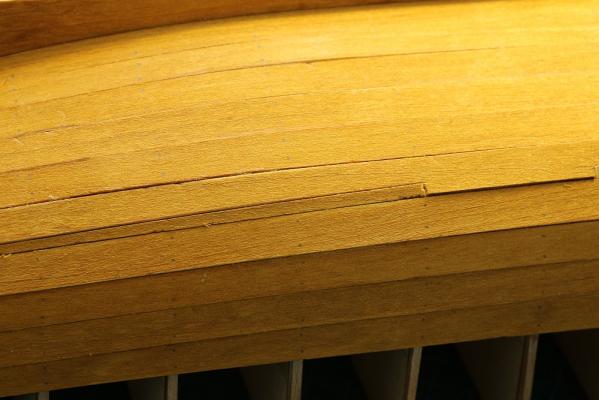
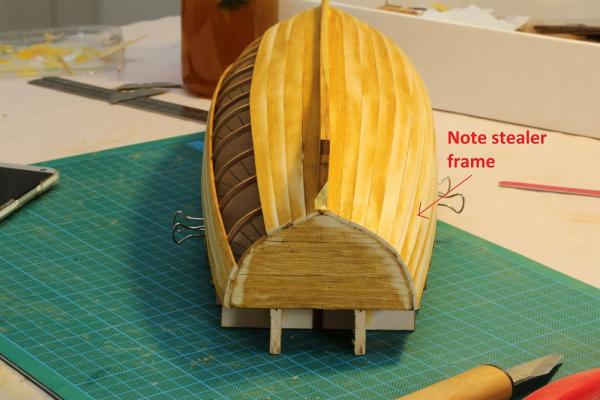
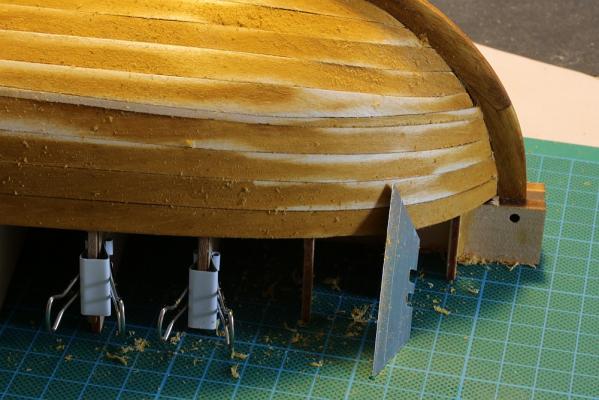
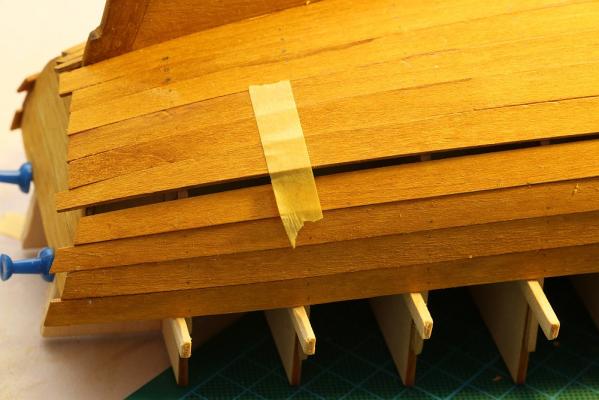
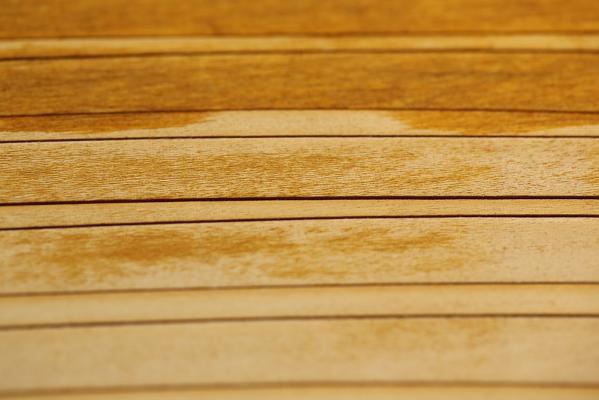
Thanks Brian. Had another productive day modelling. The gap in planking noted yesterday: ... has now been fixed. Once it is nicely sanded the damage shouldn't be too bad: Now that I have finished planking, time to pop the glue joints and see if I stuck the boat to the jig. To my immense relief, it came off the jig with no drama! The above two pictures show the port and starboard side. As mentioned earlier, it was my intention to build an "admiralty" style model. Yes, I know that admiralty style models usually leave the planking off on the port side instead of the starboard side, but Artesania's HMAV Bounty has the planking left off on the starboard side. Since it is my intention to display this model next to that one, I copied the planking. I left off planks 5, 6, 7 to achieve this effect. I popped off the guide tags and mounted the hull back on the jig to provide a nice sturdy surface for sanding. After reading several build logs on MSW, I decided I would try scraping the hull with a Stanley knife blade instead of sandpaper. It works really well! I did switch to sandpaper later to achieve a smoother finish though. After successively finer grits of sandpaper (down to 1200 grit) ... the hull was as smooth as a baby's bottom! Note the stealer frame, it seems to blend in pretty well. I managed to do all this without having to resort to a single drop of wood filler. I didn't take a picture, but I veneered over the transom to hide those exposed planks. Right now I am installing the tween and cant frames. After this, drill holes for treenails and then stain the hull again.


- 78 replies
-
- 2
-
-
- model shipways
- bounty launch
- (and 1 more)
-
Nice! I am writing a photography guide for MSW. Would you mind if I used your photo? I'll attribute it, of course.
-
ROYAL CAROLINE 1749 by Doris - 1:40 - CARD
Keith_W replied to DORIS's topic in - Build logs for subjects built 1501 - 1750
I just love your work. Of all the Royal Carolines I have seen, yours is the most "Royal".- 883 replies
-
- 2
-
-
- royal caroline
- ship of the line
- (and 1 more)
-
Yes Capt, Melbourne is a great city to live in. Great restaurants, lots of music, art, and culture. Ethnically diverse, but unlike other ethnically diverse cities, everyone gets along. I love it here As for your boat, when I built it I pinned the planks to the ribs using a nailer. No additional material behind the rib is necessary. In fact you will find that glue on its own is strong enough to hold the planks to the hull without nails. I DO recommend adding material to the bow, if you are planning to nail. That's because the ribs in the bow are straight, but the planks are at an angle - which means the nails might be grabbing mostly air before it touches a rib. I simply broke off bits of wood from the templates, glued them together and sanded them to shape. Have you installed the lower decks yet? You absolutely need to do so - these decks provide much needed rigidity to the frame. Remember when you are installing the decks to insert the dowels for the masts to maintain alignment. In fact, you should periodically check for alignment using the masts as you are building your ship. If your keel distorts, it will pull the decks out of alignment and your masts won't be straight ... if they can go in at all. Don't ask me how I know If you need more help, feel free to post pictures with questions. Everyone else: come on, I know there are others out there who have built this ship! Please chip in and help!!
-
Your photography is beautiful, Dan. So clean that your boat looks more like a rendering than a photograph! Would you mind sharing your setup? Oh yes, boat's not bad either
-
Hi Captain, the launch in the Bounty kit is not enough for a trial run of planking. You will encounter different problems when planking the actual ship. You do raise another point which I forgot to mention earlier - the open frames of this kit makes it more difficult to plank than a "normal" plank on bulkhead ship, because it is much less rigid. One thing most books on planking will warn you about is to plank both sides of the boat symmetrically, otherwise you risk warping the boat - the planks on one side will stretch the boat and distort it. It may not be apparent on my finished kit, but this certainly happened to me, despite being aware of it and taking precautions to avoid it. What makes this kit in particular more difficult than other kits is the planking. Take that away, and it should be doable. The rest of the modelling is not difficult, but it is time consuming.
-
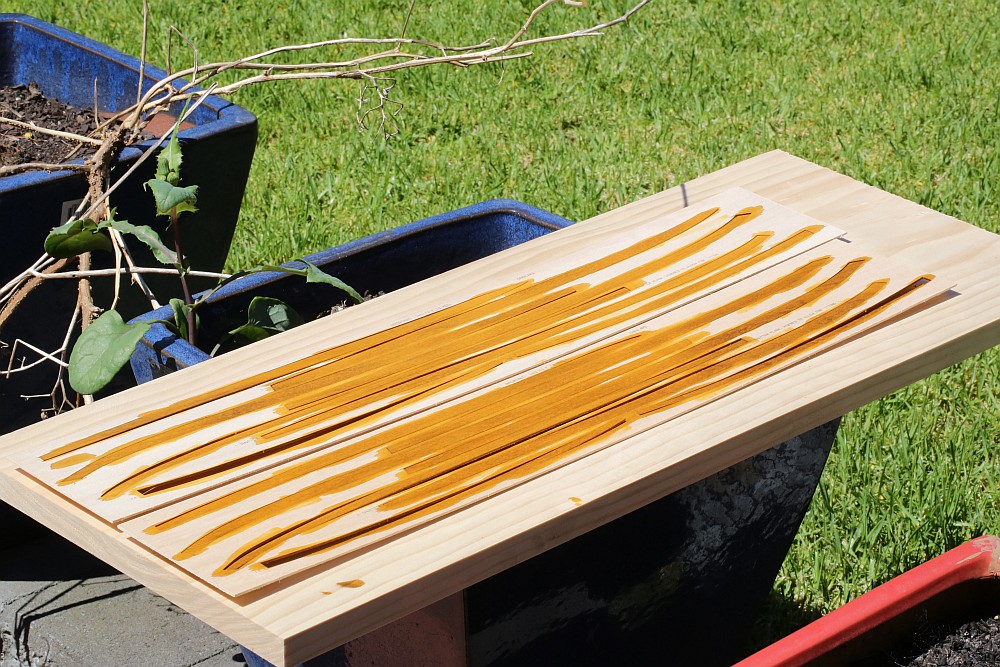
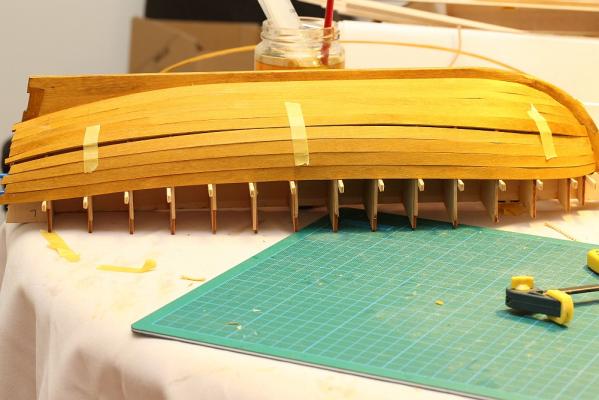
Thanks Cap'n Bob, Dan, Tom, Jeff, and Scott. I have had the whole week off for Christmas, Boxing day, and New Years - no prizes for guessing what I have been doing I pre-stained the planks prior to installation. As you can see from the photo, the wood is porous enough to let the stain seep through from the other side. I deliberately stained some planks more aggressively than others to give some variation in colour between the planks when it is assembled. I am very happy with the colour of the stain - it is exactly what I wanted. After 24 hours to allow the stain to dry, I soaked the planks and steam bent them, again using the frame as a jig. It took me a whole day to bend all the planks, and then I waited 24 hours for the planks to dry. In previous models I have attempted to install planks which have not been thoroughly dried. Bad mistake to make - wet planks expand. When they dry, they contract - leaving unsightly gaps in the planking. Given this is a single planked boat, I did not want this to happen. Planking begins! The picture shows the garboard plank fitting snugly in the rabbet. Since I am planning to treenail this boat, I thought I would make a treenail marking jig. I used some spare grating material from another kit. The pictures are self explanatory. Planking continues. I was have read the other Bounty Launch build logs thoroughly and was very careful to follow the planking marks. The instructions suggest you can either alternate between planking from the garboard up and sheer down, or plank from the sheer down. I decided to alternate - so: 1, 10, 2, 9, 3, 8 ... etc. I note that usedtosail had a problem with his shutter plank (see here). Well, I encountered the same problem. It appears as if the shutter plank is not the same size as depicted on the plans. Unlike Tom, I do not have any spare basswood in order to cut myself a new plank. I will have to install a stealer. I am quite annoyed that I have to install a stealer on a kit which features laser cut strakes, but then none of the other modellers reported a problem - so perhaps it is my own fault. I'm not quite sure where I went wrong, but a word of warning for anybody planning to build this launch. Watch out for this - if it appears that you need to trim wood at the stern, DON'T. At least not until you get to test fit the shutter plank. I am also annoyed that the stealer will be above the waterline. I was planning to paint the kit at the waterline, and stain everything above it. The stealer will unfortunately be quite visible! In any case, I don't want to deal with it tonight. That will have to be a job for tomorrow. I'm off to bed now.


- 78 replies
-
- 2
-
-
- model shipways
- bounty launch
- (and 1 more)
-
Hi Captain, welcome to MSW. When I started boat modelling, I was like a kid in a candy store. Kids in candy stores have appetites that are greater than their wallets, and likewise I had an appetite which was greater than my skills. I have built this kit myself (see my signature). Please take my advice - this kit should NOT be attempted unless you have some skills with planking. This model is single planked and is mostly unpainted. Furthermore, the curves around the bow and stern are difficult to form because the planks twist both upwards and by 90 degrees. But more than that, the instructions by Artesania are extremely sketchy and considerable research is required before you can finish the model. Any mistake you make with planking will show up. And if you make a mistake, you can not resort to wood filler or a second layer of planking to hide your mistakes. I built 2 kits prior to attempting the Bounty, and even then I still made plenty of mistakes. I would suggest you pause, buy a simpler kit (preferably one which is double planked OR painted) - and practice on that first. Either that or get someone local to help you. Please note I am not disparaging you in any way. These skills can be acquired, but they are often acquired after making mistakes.
-
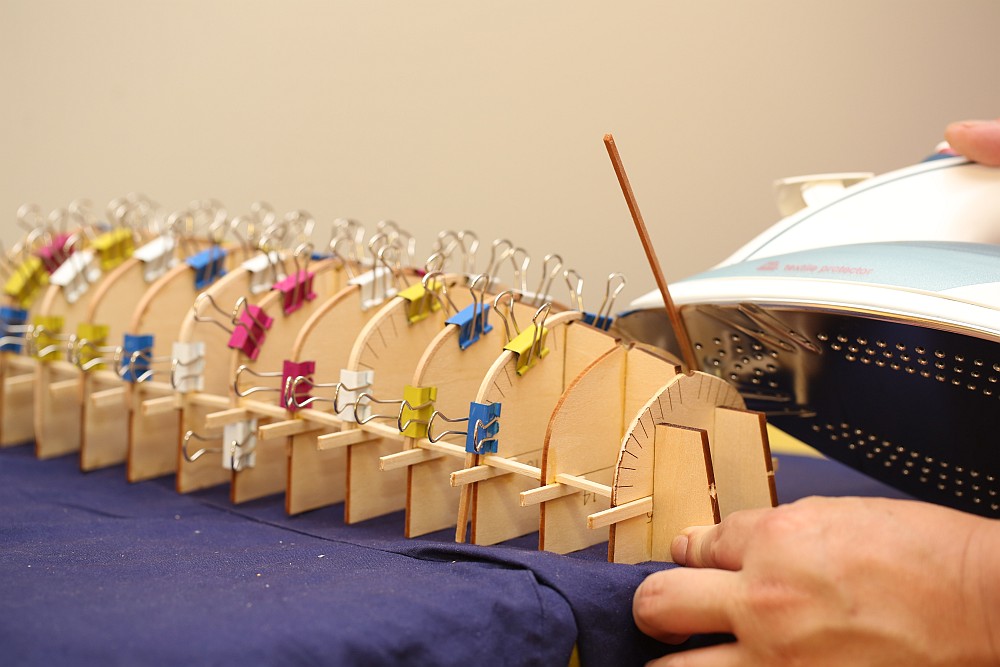
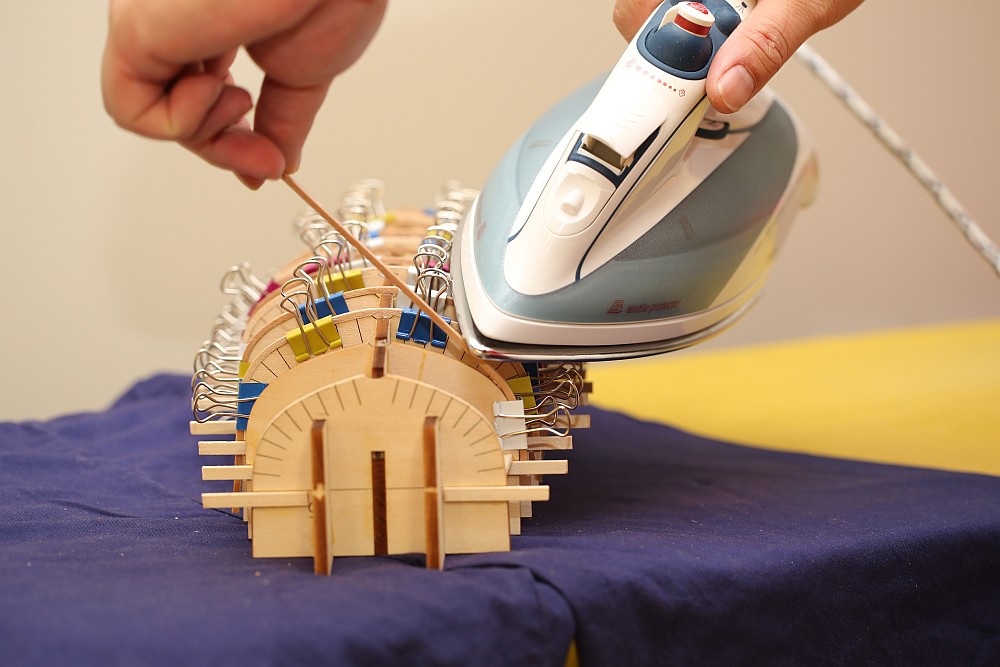
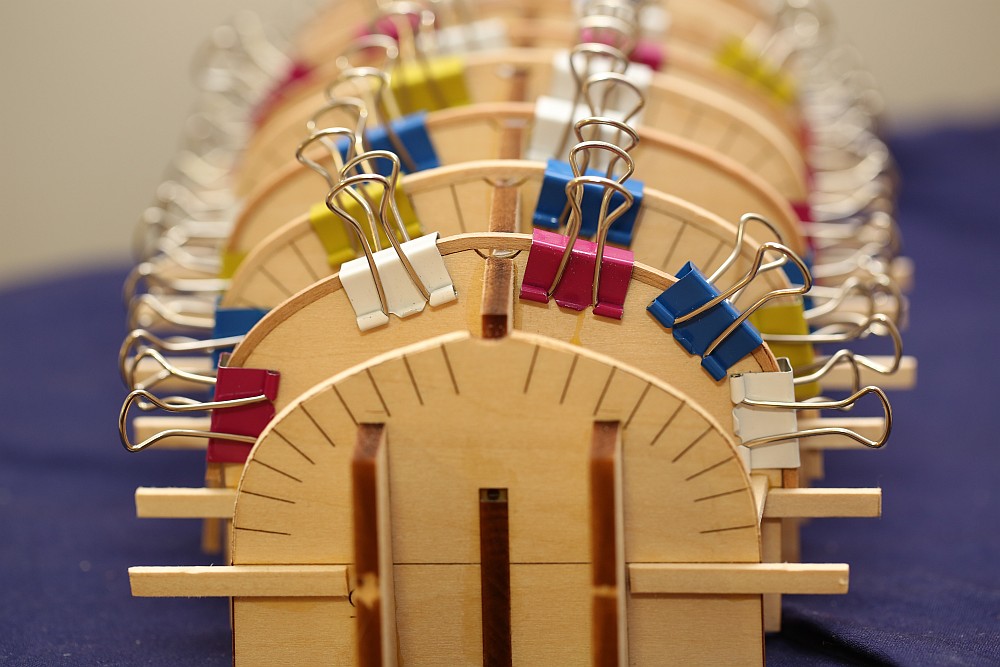
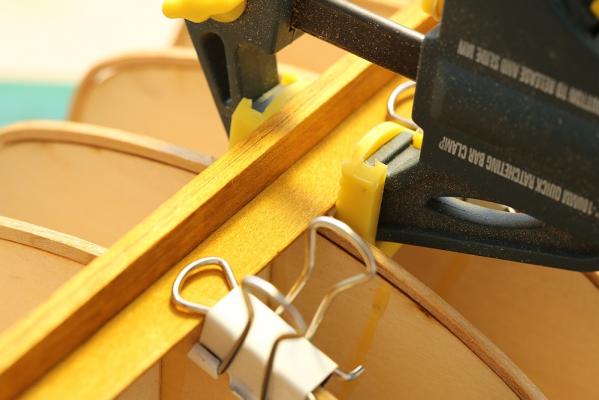
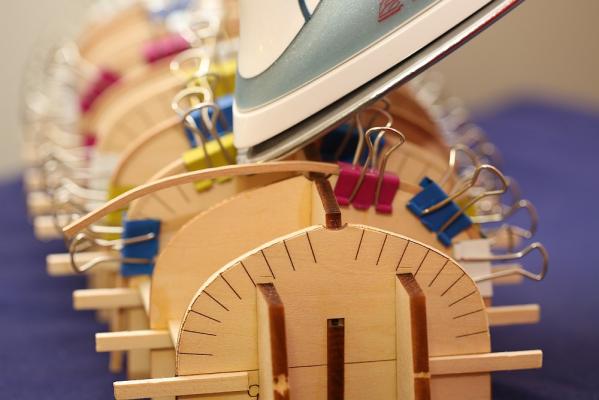
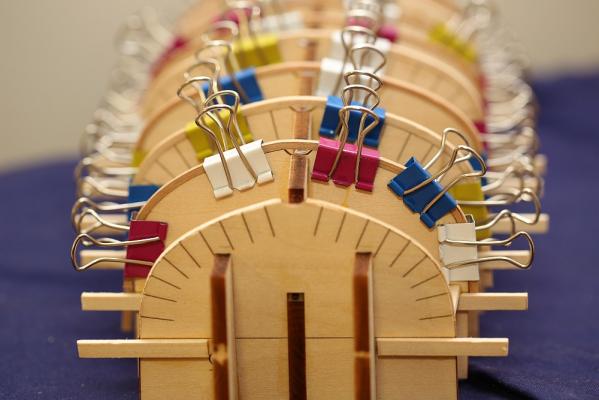
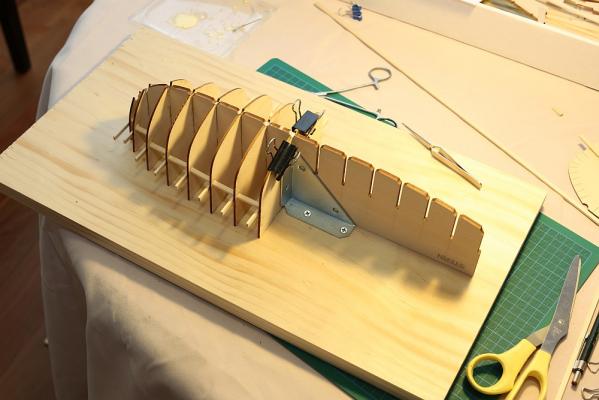
While I am waiting for my planks to dry, I started bending the frames, using the construction jig as a guide. I know that all of us have our own way of bending frames, but I have never seen this method described on MSW or anywhere else, for that matter. It is far from my role to teach you experienced modellers how to suck eggs, but it may be useful for beginners. So here it is, step by step. Soak the wood for 24 hours, then clamp one end on the frame. Using a steam iron, press down on the plank for a few seconds. The wood will soften and bend easily. Once the wood bends, clamp it down before attempting the next curve. Almost there ... Finished. Note how tight the plank is to the jig. Leave it to air dry for 24 hours, then remove the clamps. I believe that this method has quite a few advantages over other plank bending methods: - you already own the equipment (you do own a steam iron, don't you?), - pressing the plank between the iron and the jig lessens the risk of breaking the plank, - very tight bends, and very precise fit can be achieved - the iron is not as hot as a soldering iron, so it won't scorch the wood When I removed the clamps, the plank was curved so tightly to the jig that I had to gently pry it off. Anyway, this is where I am up to. Will continue the build log as the model progresses.


- 78 replies
-
- 10
-
-
- model shipways
- bounty launch
- (and 1 more)
-
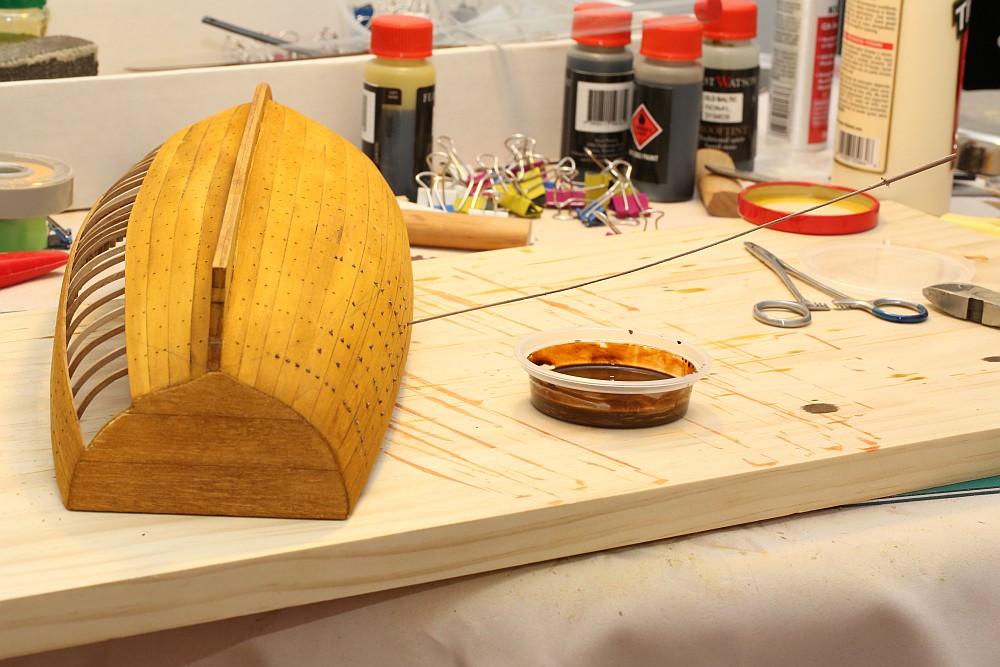
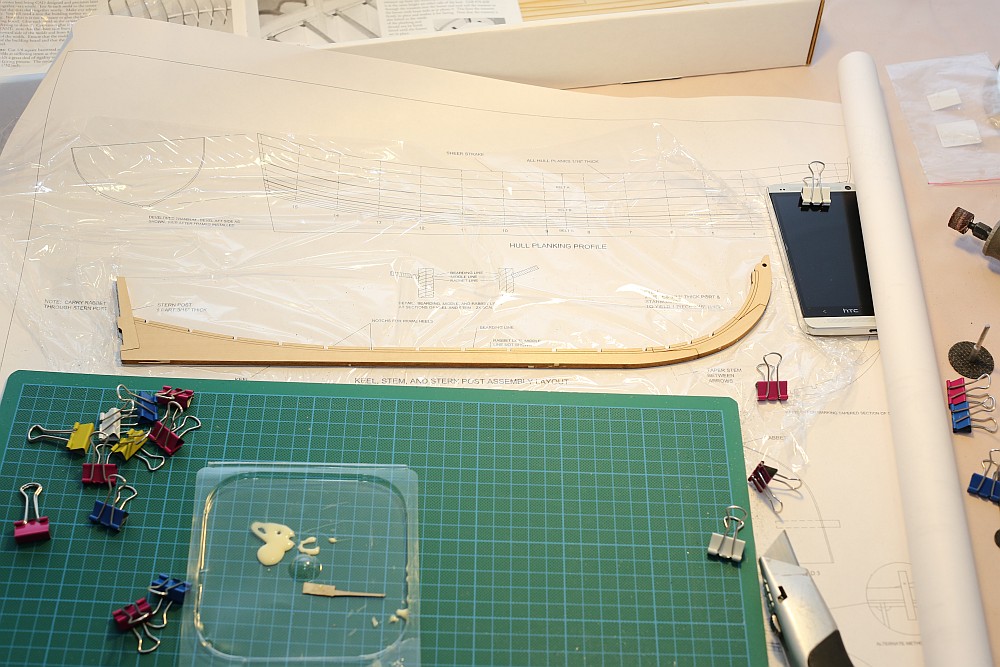
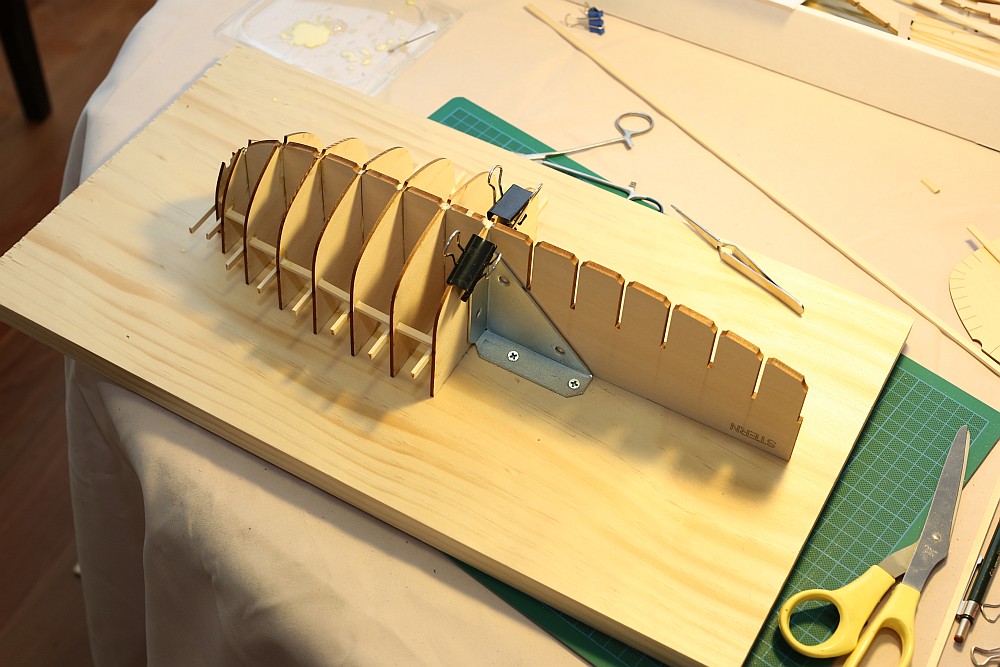
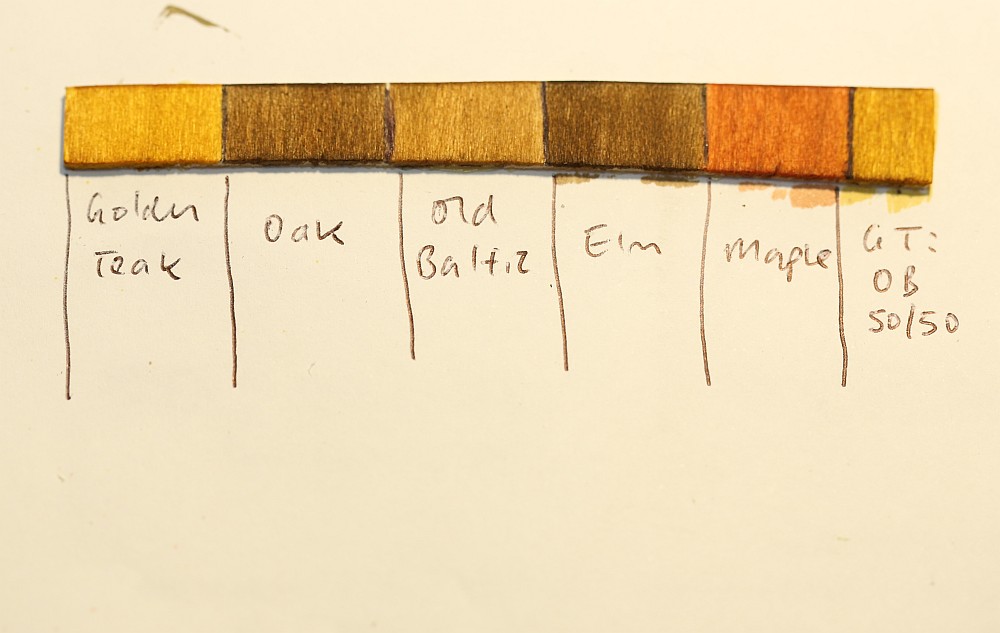
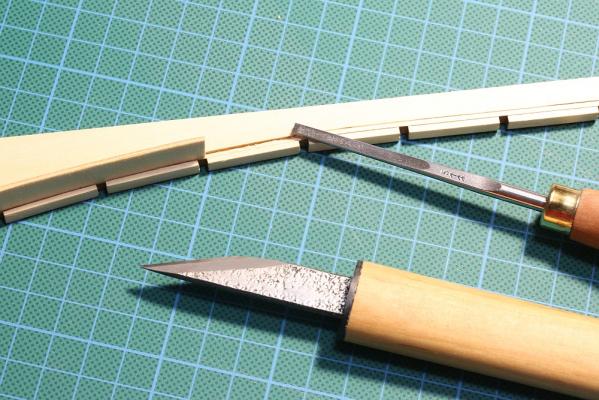
First step is to build the keel. There are 7 parts to this keel, and they need to be joined precisely. The instructions suggest to use the plans as a guide, with some plastic wrap for protection - so that's what I did. The next step was to build my building board and assemble the construction jig. I bought the squares from a hardware store. After the glue on the keel had dried, I cut out the rabbet. The kit designers made it easy by inscribing the rabbet line in laser. It was a simple matter of removing the material with a chisel. I bought this chisel for this project, and I was surprised by how sharp it was. It goes through wood like butter. Next to it is my Japanese carving knife, also incredibly sharp. Rabbet completed. I stained a scrap piece of wood with a selection of stains. Oak and Elm look too similar, and both are too dark. Maple is too red. Old Baltic was acceptable, but too brown. Golden Teak was close to the finish I wanted (a light honey wood), but it was too bright. I decided to mix Golden Teak and Old Baltic 50:50 (panel on the far right) to obtain the finish that I wanted. Having decided on the finish, I then stained the planks prior to construction.


- 78 replies
-
- 2
-
-
- model shipways
- bounty launch
- (and 1 more)
-
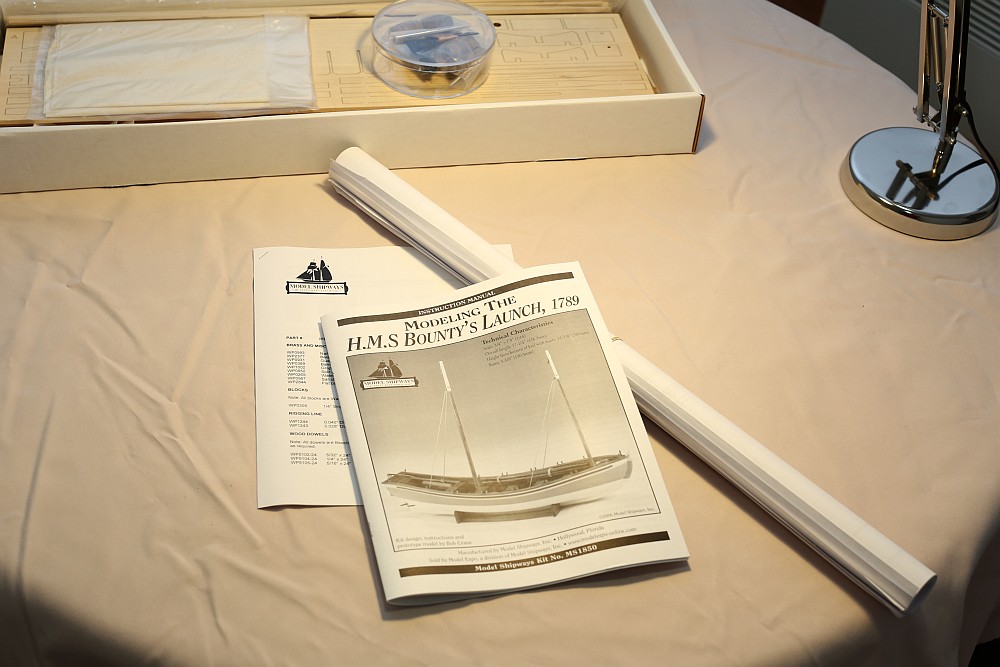
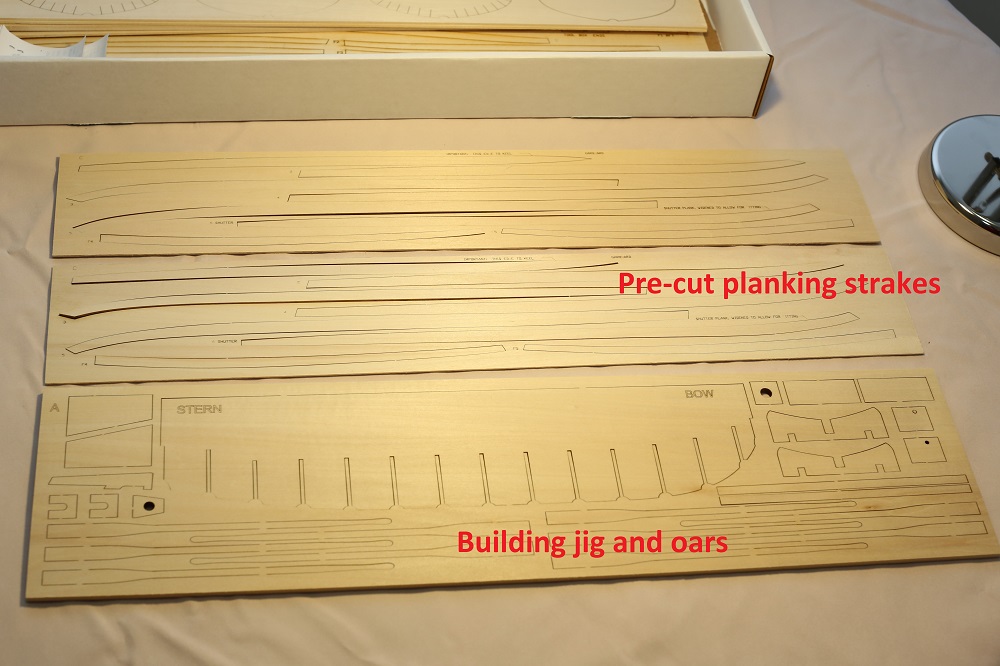
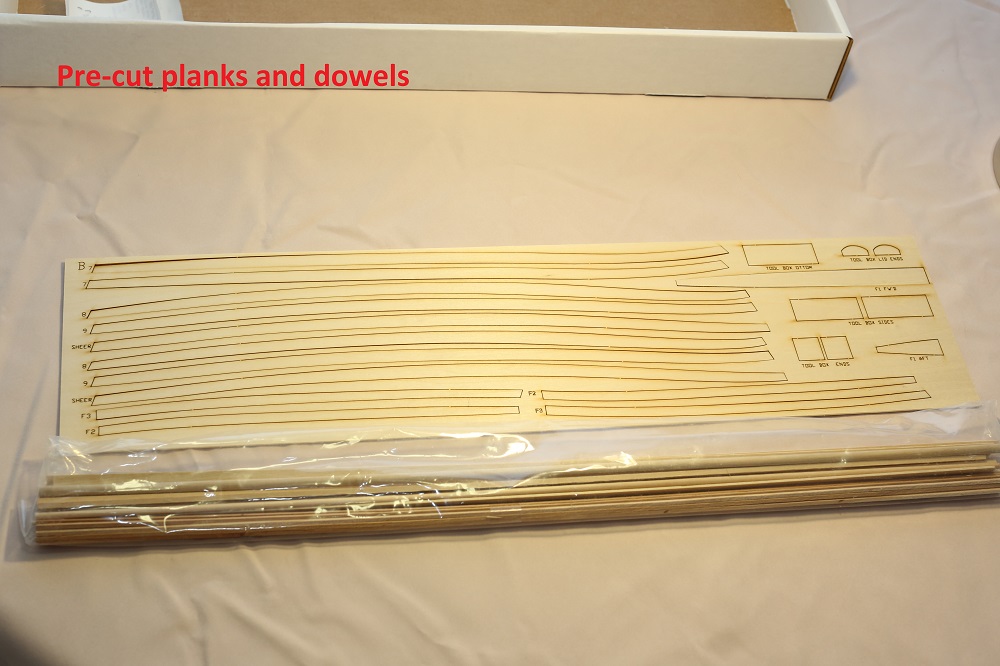
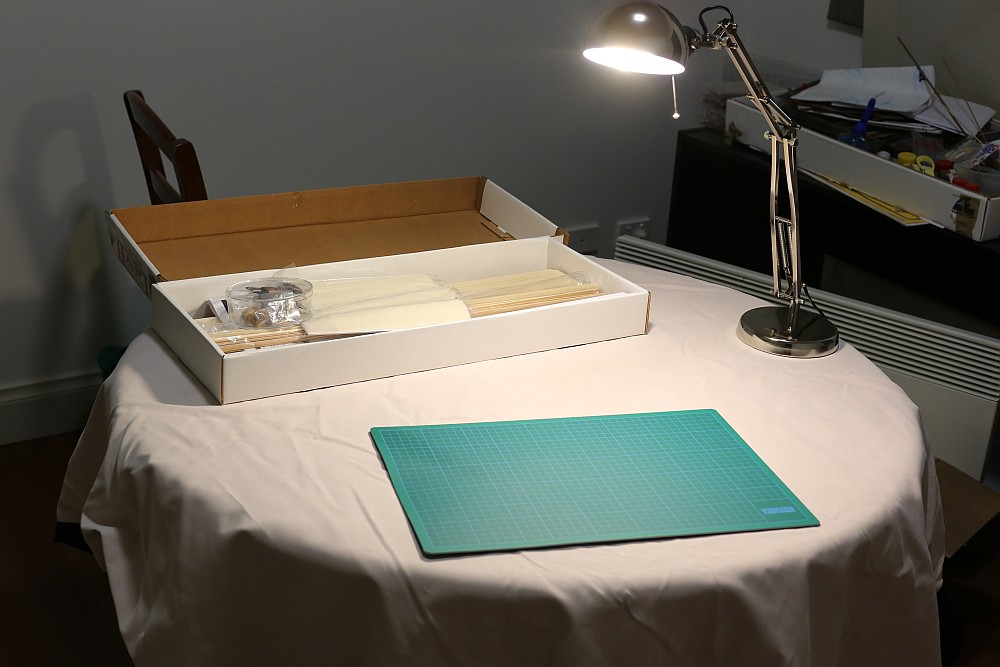
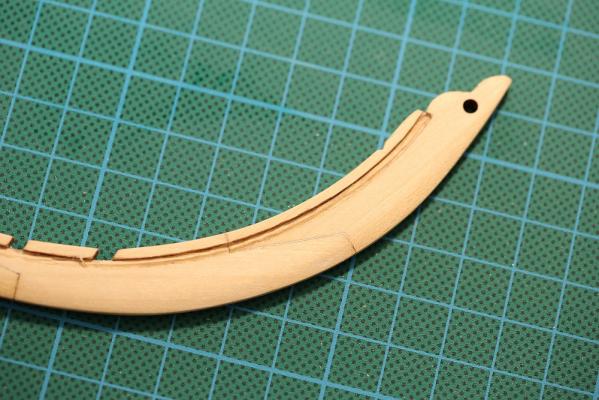
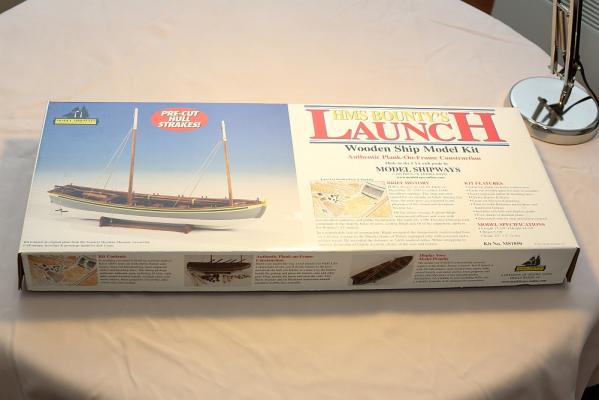
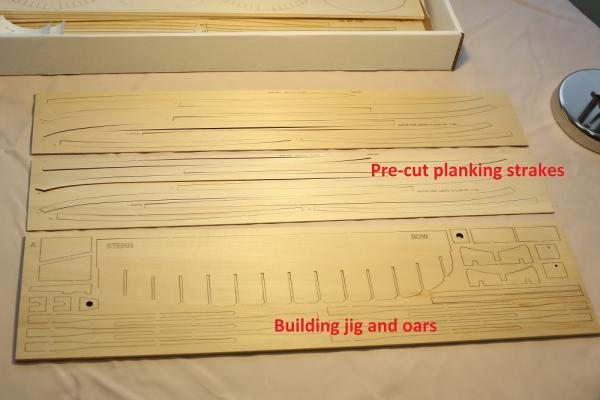
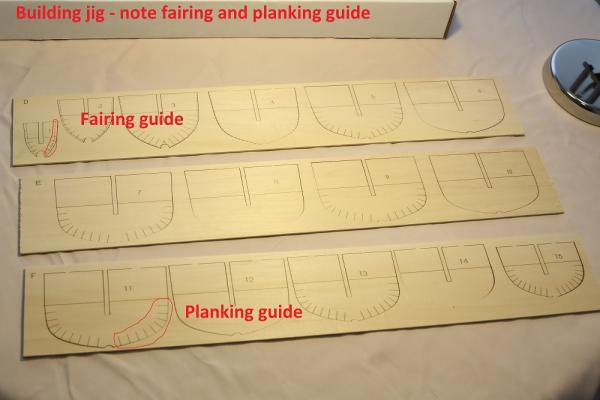
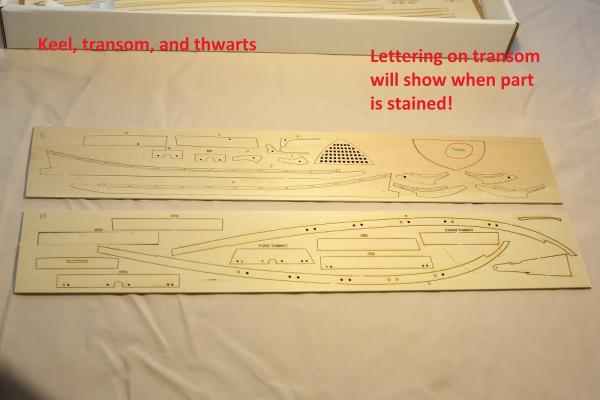
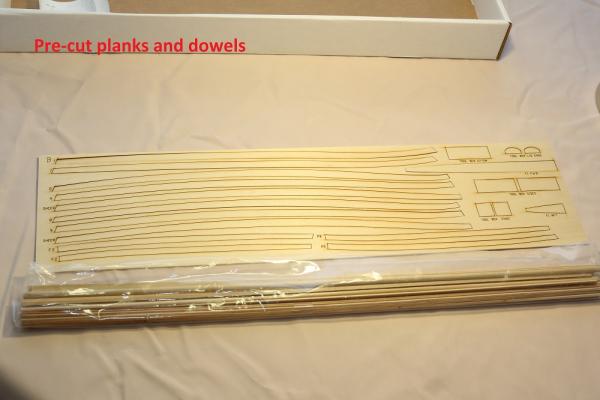
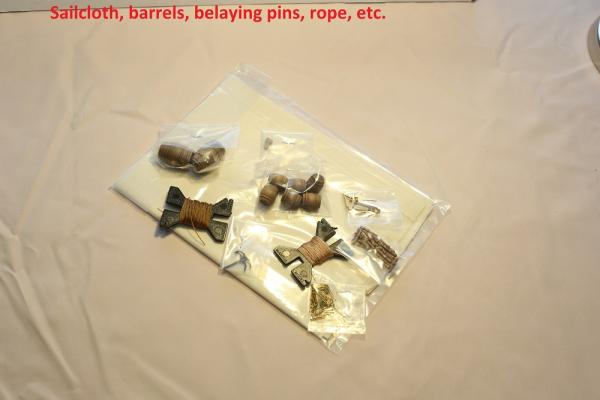
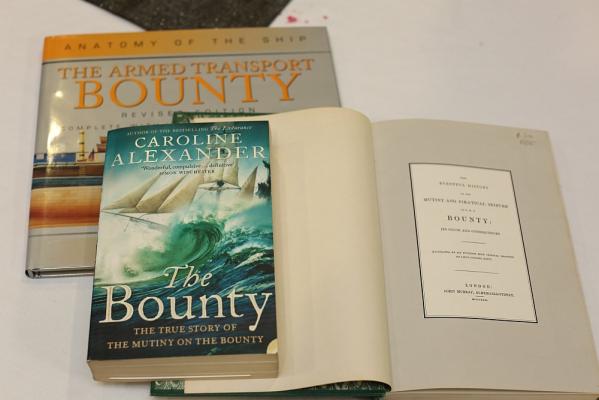
I can honestly say that if I was not a member of MSW, it would not have occurred to me to build this boat. After admiring usedtosail's build, I did a search and found a wealth of other builds on MSW. I have pored over them in detail, and I managed to gain an appreciation of the kit's idiosyncrasies even before I started. These are the other build logs on MSW: Cap'n Rat Fink Meredith Tom Bombadillo usedtosail Many years ago, when I built the Artesania Bounty, I built a Launch as well. Here it is: What I wish to do is build a larger model of this launch, with missing planking on the starboard side, showing off the frames, admiralty style. I also plan to ignore the paint scheme as suggested by the kit (which I find to be rather ugly) and finish the boat to my liking. Along the way I will hopefully be guided by some reading material: Anyway, on to the model and unboxing photos. Photograph of the box. Instruction manual and plans. The manual can be downloaded from MS' website here. Up to now, I have been building kits by Artesania, Amati, etc. and have come to expect poor quality instructions in poor English. I was blown away by the detail in these instructions for such a simple boat. They even specify what type of blade you should use to carve the rabbet! Unfortunately, everything is in Imperial units, so I have been keeping my metric converter busy. The model is built on a jig. Pre-cut planking strakes are supplied. Bulkheads for the construction jig. Note the planking guide and fairing guide. The instructions tell you to fair the bulkheads to the dotted line. Easy enough to do. More parts. Note that the all builders of the Launch on the other logs complained about the laser lettering on the Transom, and here it is! Awful decision by the kit designer. I tried to sand the lettering off, but it goes down way too deep. Short of painting the transom (I wish to leave it stained and unpainted), some solution has to be found. More pre-cut planks. Finally, the sailcloth and various little accessories. ... and my pristine (for now) workplace with my new modelling lamp We're all ready, let's get started.


- 78 replies
-
- 1
-
-
- model shipways
- bounty launch
- (and 1 more)
-
If your Gorilla glue looks like this: ... then according to their webpage here it is a PVA glue. Agree that the solution is to unglue it - making incisions in the joint helps the alcohol penetrate faster. If you say that the last three frames are square with the other frames, but the deck is twisted - perhaps the frames are installed at an angle? I hope you haven't started to fair those frames yet!