HOLIDAY DONATION DRIVE - SUPPORT MSW - DO YOUR PART TO KEEP THIS GREAT FORUM GOING!
×


Keith_W
-
Posts
1,145 -
Joined
-
Last visited
Content Type
Profiles
Forums
Gallery
Events
Everything posted by Keith_W
-
dude ur grammar lolz u need to use some punctuation rofl. yes u can get part to aftermarkit part for the kit but mebbe try other mfrs so u can avoid the plastic lol
-
I don't know about this particular boat, but Billings is one of the oldest kit makers in the business. On the plus side, most of their kits are really accurate and faithful to the original. On the minus side, the kit materials are rather cheap - the wood is ply, and the fittings are plastic. Most other kit manufacturers include much better wood and fittings. There is nothing more ugly on a model than unpainted plastic, so make sure you paint it
-
 Albert, you should definitely edge glue the planks. The frames on this model are effectively cosmetic and do not contribute very much to the rigidity of the model at all.
 -
Bugra, Alde, Tim, and Curtis - thank you for your kind comments! I just got home from work. On the way back, I stopped by a sewing store and picked up a brand new sewing machine, the cheapest I could find. Well, it was actually the second cheapest. THE cheapest machine was $50 less, but it was in hot pink with little white flowers on it. I didn't want to look like an overaged male playing with a little girls sewing machine (yes, get that image out of your head right now!!!). I coughed up the extra cash and bought the next model up. Please don't ask me if I plan to put Hello Kitty stickers on it. I need the machine to make the sails. Now I should be able to finish the model! There will be very little work this weekend - the Admiral will be home all weekend and I dare not bring my new sewing machine out. Right now it's well hidden in the store room.
- 78 replies
-
- 2
-

-
- model shipways
- bounty launch
- (and 1 more)
-
Proxxon Micro MBS 240/E Band Saw Review
Keith_W replied to Blue Ensign's topic in Modeling tools and Workshop Equipment
Thanks for posting this review. I would like to ask - what is the advantage of buying a band saw over a scroll saw? -
That's enough!!! Less talking, more sawdust!
- 625 replies
-
- 4
-
-
- bounty launch
- model shipways
- (and 1 more)
-
I hold a bulb blower in one hand and a broad paintbrush with the other. As I loosen the dust with the paintbrush, a puff of air from the blower gets it off the model.
-
Pete and others, it is far from my intention to bash Euromodel. Like I said before, I am thinking about building a Euromodel kit next. Thanks to your excellent build logs and what I can see on MSW, I can gain some insight into what's in the kit and what isn't. I don't buy into the scratch building argument. If one were prepared to invest a lot of time and expense buying third party parts, you could raise a kit from Artesania to the level of a Caldercraft. In fact, that is precisely what Canoe21 is doing with his AL Victory. For me, an expensive kit should mean that it comes with more in the box. I was looking at the Friedrich Wilhelm and thinking that I would have to buy a third party boat, anchors, gun carriages, eye hooks, lanterns, and wood. And maybe learn to carve because it appears as if the horseman is printed on plywood, instead of a cast part. Learning of this fills me with disappointment, because this is not what I would expect in a premium priced kit. I can honestly tell you that I was looking forward to buying a Friedrich Wilhelm until I learnt this. I am still keeping an open mind though - which is why I am asking if I am missing something. If the Royal William comes with 5kg of metal decorations, and pre-tapered masts - then I can see where the money has gone and I would be prepared to buy that kit. I don't mind the expense, as long as I know that I am getting more if I pay more.
-
You might get more replies here if you moved some posts from the other thread. I might be stirring the pot a little here by asking this question - but where does the money go with these kits? I've been told that the quality of materials is very good. After reading the PDF's on Euromodel's website quite extensively, it appears that the frames are made of ply, the planks made of walnut, and the masts made of limewood. This is the same as most other kit manufacturers out there. I've also been told that the quality of fittings are excellent, but then we've seen the anchors appear to be oversized and awkwardly thick, and the lanterns and windows are made from cast metal instead of the photoetched parts we see on other kits. We have also been told that Euromodel offers you "scope to improve the model", but it looks to me as if this means that the quality of the offering is substandard. For example, the rigging of the gun carriage is really simple, and (if the build log is to be believed) they do not supply eye hooks and you have to supply your own. Caldercraft supply enough material to build a fully rigged gun carriage out of the box. Another example - the beakheads on the Wilhelm Friedrich kit are supplied as a block of wood from which you need to carve the beakhead. Some might see this as a challenge, but you could also ask if Euromodel couldn't be bothered to go through the trouble of laser cutting this for you. Yet another example - the boats on some of their kits are made from cast resin. Even Artesania Latina supply parts for a plank on frame model for a ship's boat. I suppose there is the quality of the instructions, but to me that does not justify spending close to A$2100 for Royal William when the competition offers much more detail out of the box for much less money. The Caldercraft Victory includes copper sheathing in the box (which adds substantially to the cost), is a much bigger boat than any of the Euromodels, and costs A$1400, i.e. it is 30% cheaper. I really think I am missing something here. Can someone tell me what's so different about these kits?
-
Guten tag, Herr Max. The PDF's prepared by PiratePete for the Friedrich Wilhelm can be found here: http://www.euromodel-ship.com/eng/friedrich-wilhelm-i-i.php#axzz2tUPv2o20 All the others are here. Click on the links on the left. http://www.euromodel-ship.com/eng/interpretive-info.php#axzz2tUPv2o20
-
Pete, I can tell you that I downloaded all your PDF's onto my tablet and I read them in bed every night before I go to sleep. When my alarm went off this morning I found myself dreaming about how i'm going to paint that little horseman on the Friedrich Wilhelm Re: the lanterns and windows - paint is no substitute for being able to see through it. I am not sure if I can fabricate wooden parts that small. If I were to tackle the kit, I would probably solder brass strips together and then sand them down to the required thickness.
-
Pete, I would like to thank you for going through the trouble of providing the interpretative files which are found on Euromodel's website. I am researching my next build and I would like to tackle either the Friedrich Wilhelm or the Royal William. I am a little disappointed by some of their fittings, e.g. the lanterns and the windows - but there is no reason why I can't scratch build them myself. Well, apart from severe lack of skill, I suppose. It would be nice if these parts were photoetched instead of cast metal, IMO. A photoetched window frame looks much more realistic, and there is no easy way for modellers to make their own photoetched parts.
-
marking water line
Keith_W replied to ross's topic in Painting, finishing and weathering products and techniques
Lisa, I have found that Tamiya masking tape is ideal. You need to rub it with a fingernail to get it down into the nooks and crannies before you start painting. As added insurance, make sure you build up paint slowly at the area which is masked - a large wash of thin paint is more likely to seep under the tape or between the planks due to capillary action. I have another way of marking the waterline. I mark where the line should be fore and aft, and also make a couple more marks in between using the plans. I then use a thin strip of plank and tape it to the model, using the marks as a guide. At once you can see what the waterline looks like. No need to use shims, no need to level the model, no need to erase pencil marks (which are surprisingly hard to get off) if you mark your waterline wrongly. -
Hi Steve, I will be pulling up a chair to watch. Make sure your Launch is nice and watertight, I hear there are a lot of sharks over there in Perth As for scarphing for small boats like these, I too asked that question. However I have not been able to find any evidence for it. My build was heavily influenced by the Huon Pine boat builders of Tasmania. I have seen quite a few of these boats, and none of them have scarph joints. I took my inspiration for the honey coloured wood and treenails from them, but the two tone wood colours were my idea. Frankly, probably not authentic - but it does look good! You are right that the windlass (and the crane) were probably not on the ship when Bligh was cast away. Those things were used for retrieving the anchor or towing the Bounty out of tight spots or when there was not much wind. They were probably either thrown overboard or left on the ship. I note that your kit is a little different from mine - different box, and your instructions are in colour! I was a little baffled when my instructions referred to the "colour" of the wood several times ... when my instructions were in black and white. Good luck with your build, I can't wait to see what you come up with.
- 625 replies
-
- 1
-
-
- bounty launch
- model shipways
- (and 1 more)
-
Tung Oil Finish?
Keith_W replied to cdogg's topic in Painting, finishing and weathering products and techniques
Quite a few people here use Tung Oil. Wipe it on, then leave it for 10 minutes, then wipe off the excess. Leave it for 24 hours to "cure", then give it another coat. You will get a beautiful matt finish and it deepens the colour of the wood. Make sure you don't plan to glue anything on afterwards, because most glues have trouble sticking on to the oiled surface. As always, experiment on some scrap wood before applying it to your model! -
You referring to Caldercraft using a lot of plywood? Nothing wrong with it IMO, as long as it is structural and not on display.
-
Well done Mike, she looks spectacular! Love the treenailing!
-
Mike, stains are meant to be wiped on, not brushed on. You can try this: fold a piece of gauze over itself several times until it is quite compact, then clamp it with a hemostat. Then use a syringe or pipette and drop some stain on the gauze. Wipe the gauze on your boat, then reload.
- 137 replies
-
- 1
-
-
- finished
- model shipways
- (and 1 more)
-
I don't know CF, i've never tried using a Chapstick. In fact I have not coated any of my lines, ever. Maybe it's something I should start doing
-
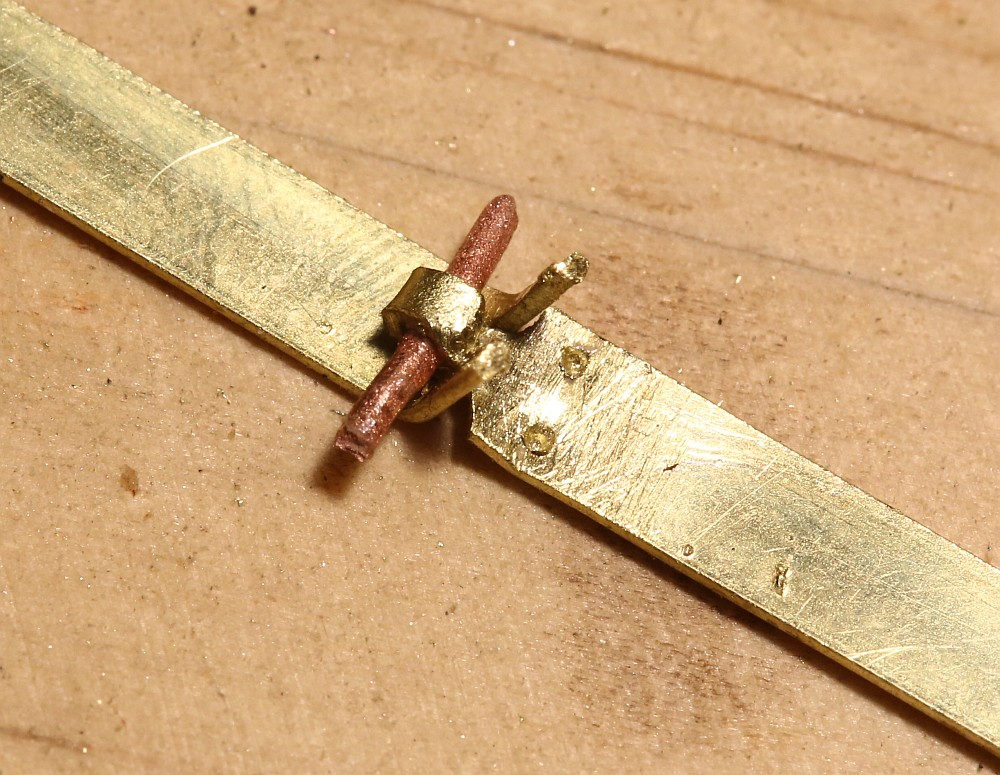
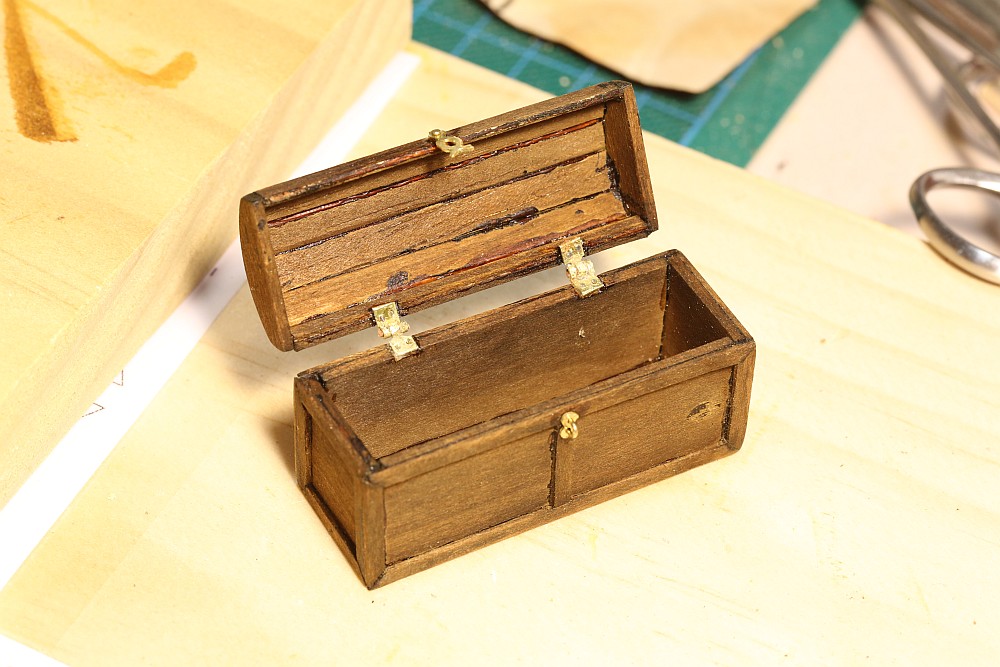
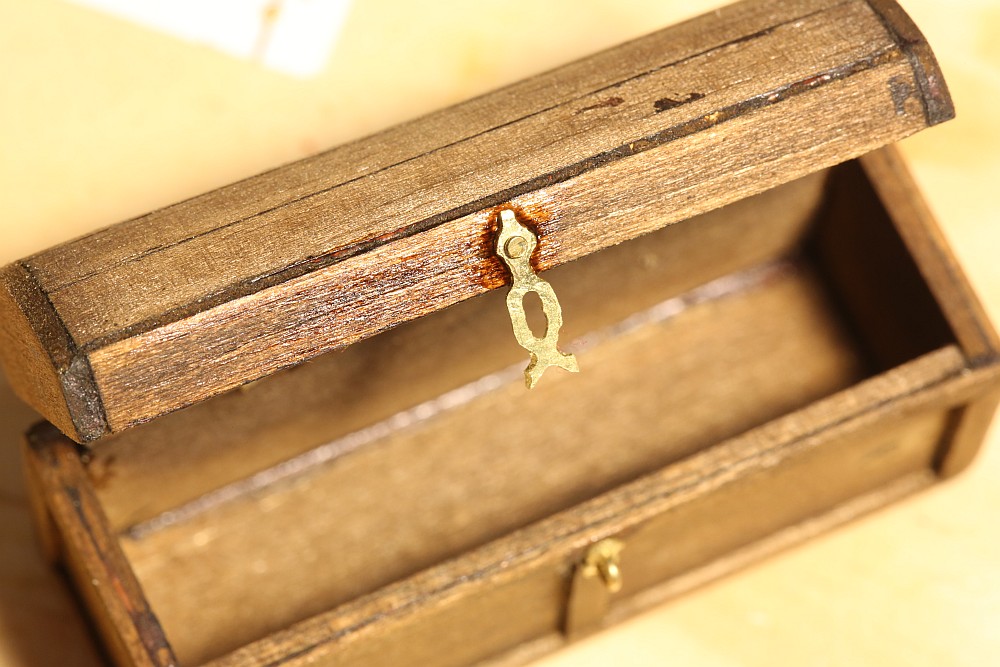
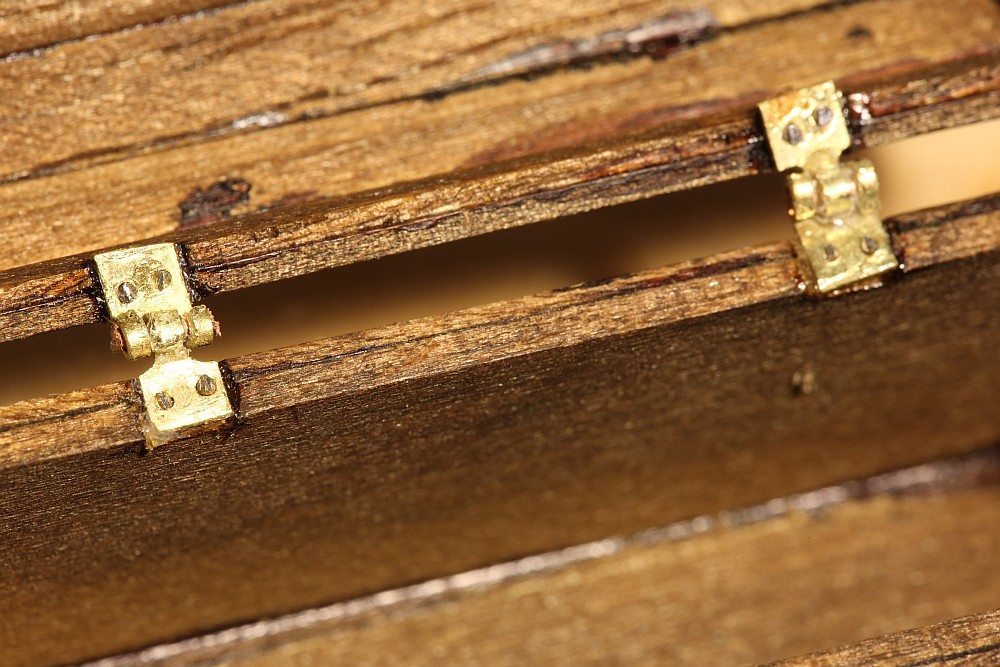
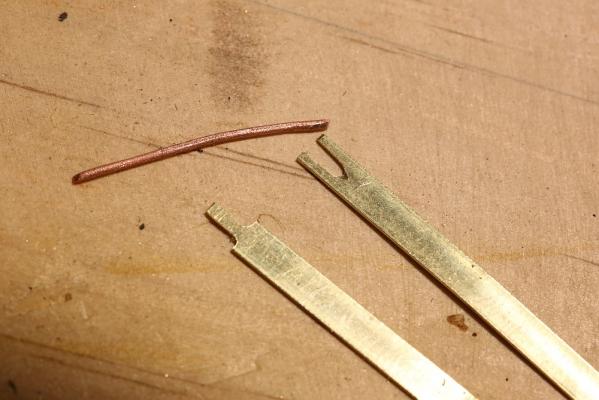
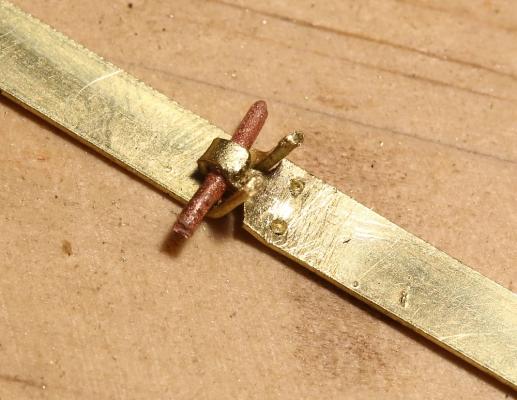
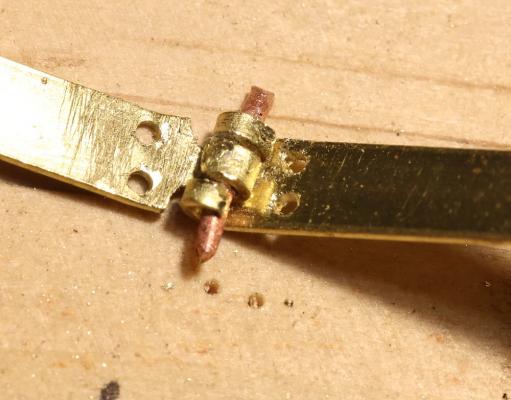
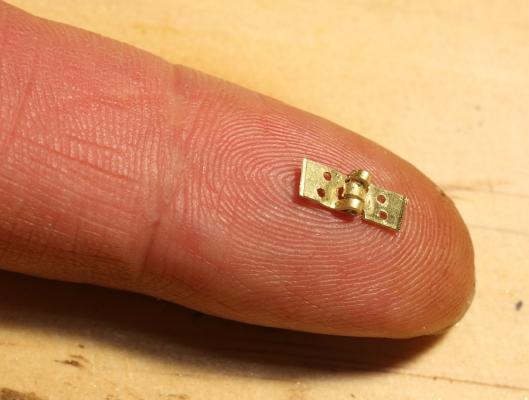
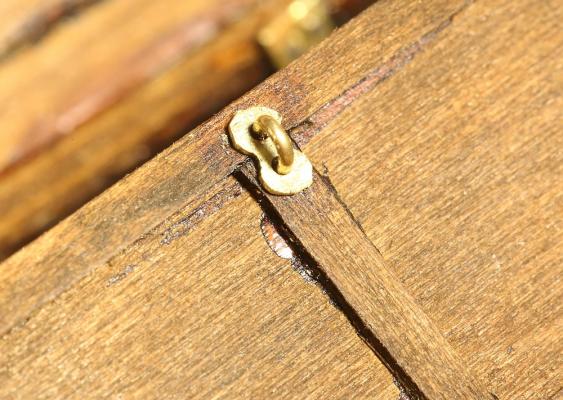
Thanks for all the comments and likes, everyone! Anyway, I did some work on the carpenter's chest. I modelled it in the open position. I took inspiration from Cap'n Rat Fink's chest here: http://modelshipworld.com/index.php?/topic/849-hms-bounty-launch-by-teleman-116-bashed-completed/?p=12090 (copied the hollow lid idea), as well as Meredith's hinges here: http://modelshipworld.com/index.php?/topic/2160-hms-bounty-launch-by-meredith-modelshipways/?p=143922 At the time I was wondering whether I could make metalwork as fine as hers, but as it turns out ... I can't. Try as I might, I am not able to make two "F" shapes in the supplied brass strip, so I made an "I" and a "C" instead. Still, I think the result looks OK. Here are some pictures for your viewing pleasure or amusement. Probably the latter


- 78 replies
-
- 8
-
-
- model shipways
- bounty launch
- (and 1 more)
-
New Video on Basic Soldering for Scale Models
Keith_W replied to P_Budzik's topic in Metal Work, Soldering and Metal Fittings
Excellent tutorial, thanks for posting. Soldering has been a REAL source of frustration for me, and your video has helped me understand why I keep failing. That point about heat sinks and the difference between modelling and electronics is a good one. Looks like I need a more powerful soldering iron. -
Thanks Dan, Richard, and Bindy. Senior Salt, I know how to turn round objects from square stock using my Dremel. But I want to reserve something to do with my lathe when I get it I don't mind putting my project on hold for a short while.
-
Thanks for the reply, Chris. I thought that you had finished the Victory and delivered it to Amati? I take it you are working on the plans and instructions? Do you have any other pictures of the interior? Anyway, you've helped me make a decision. I'll build another kit while I wait for yours
-
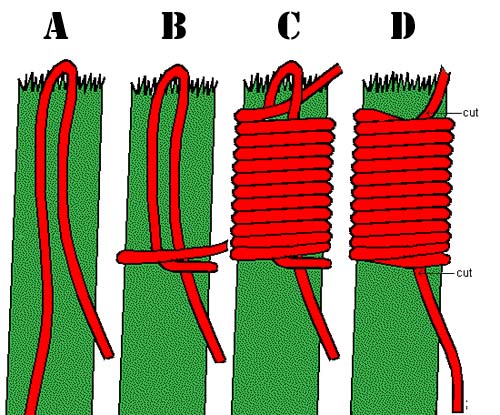
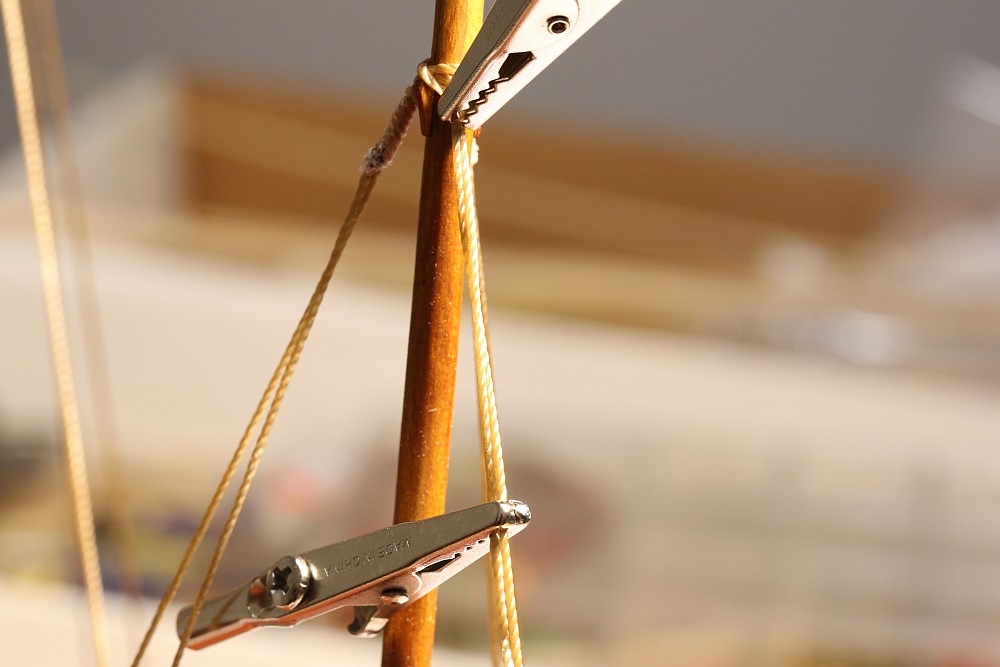
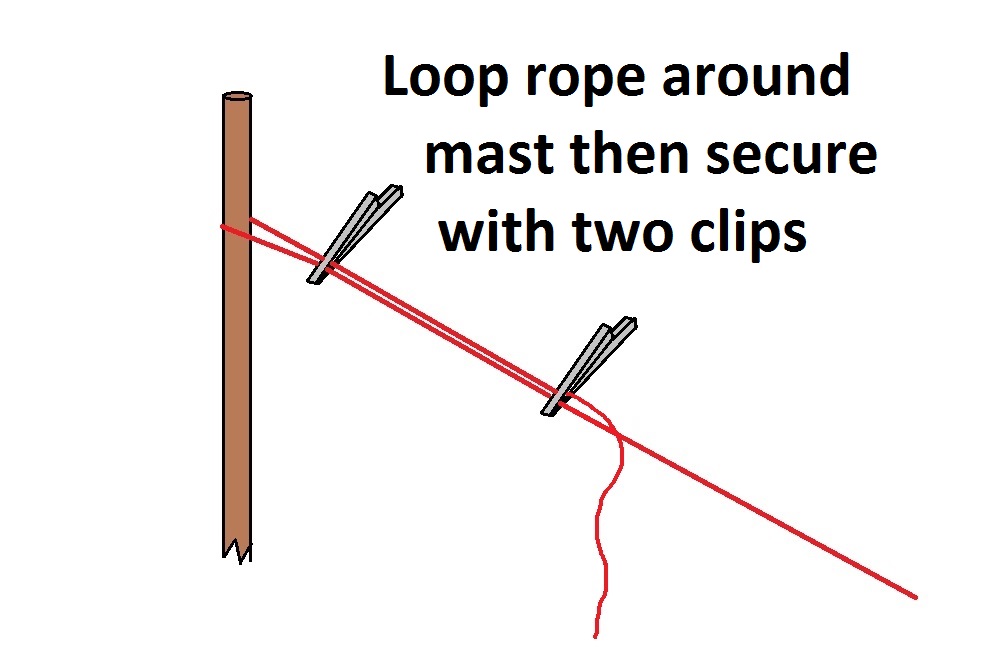
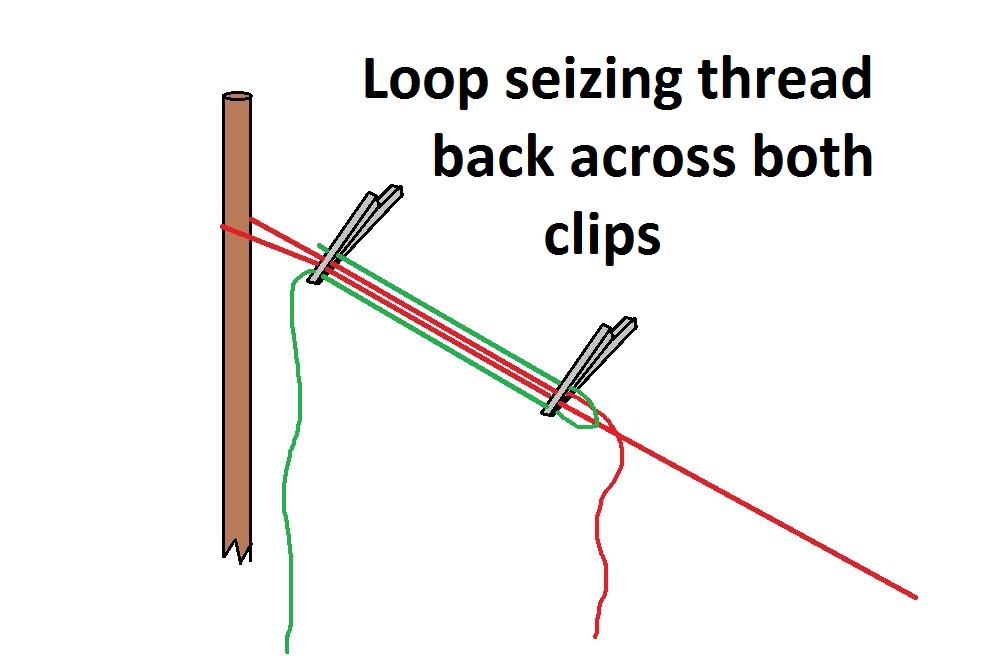
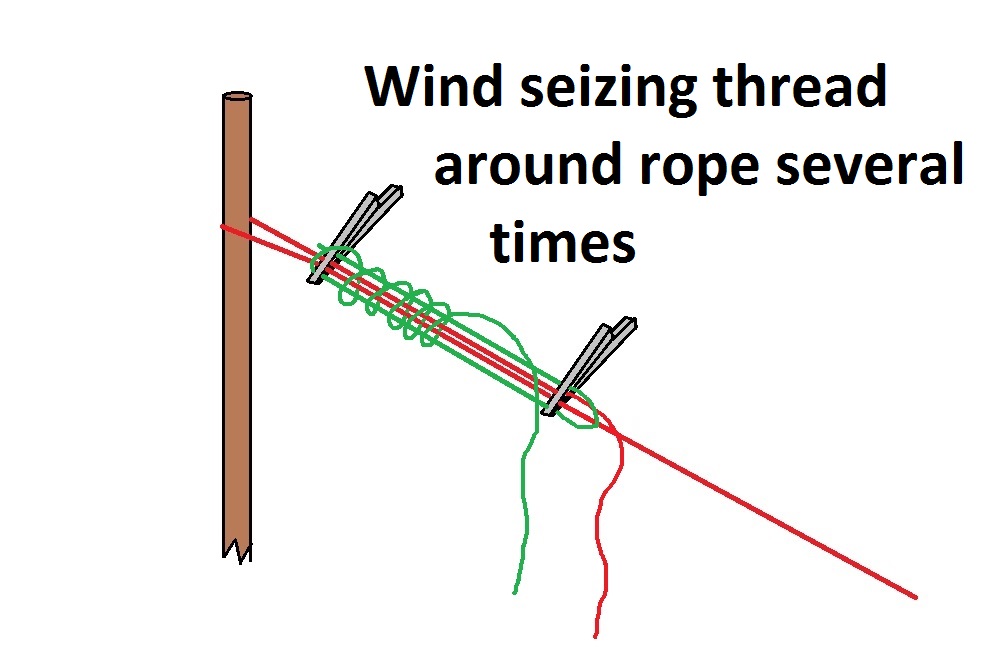
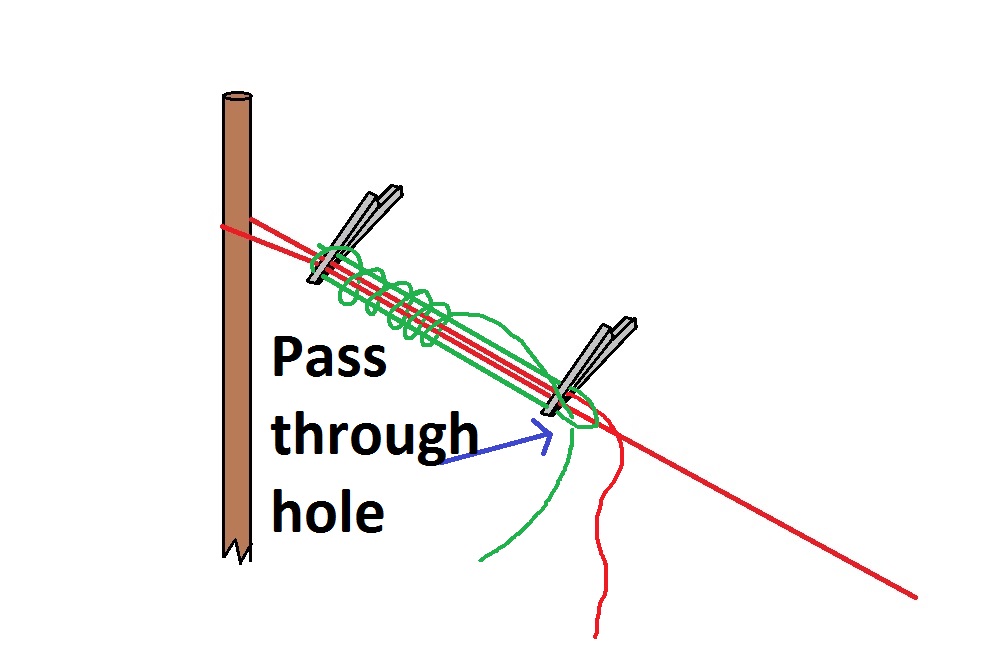
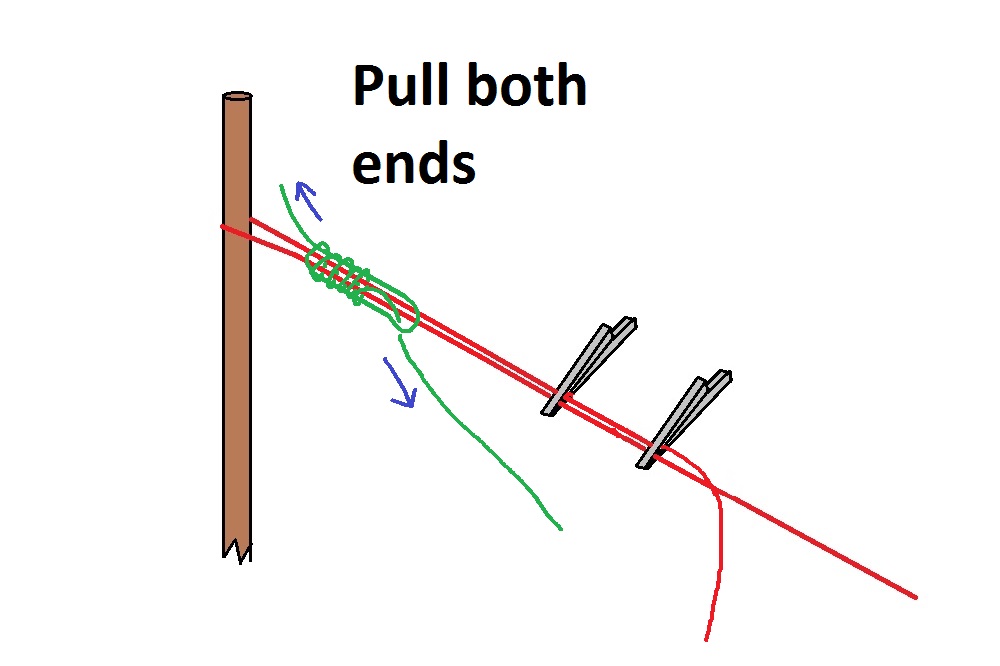
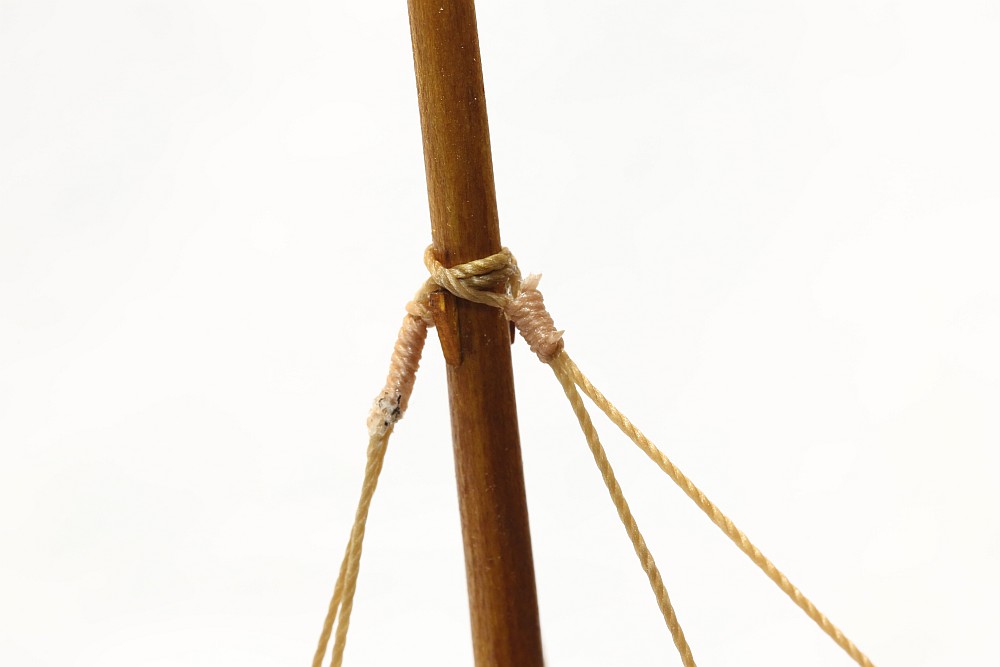
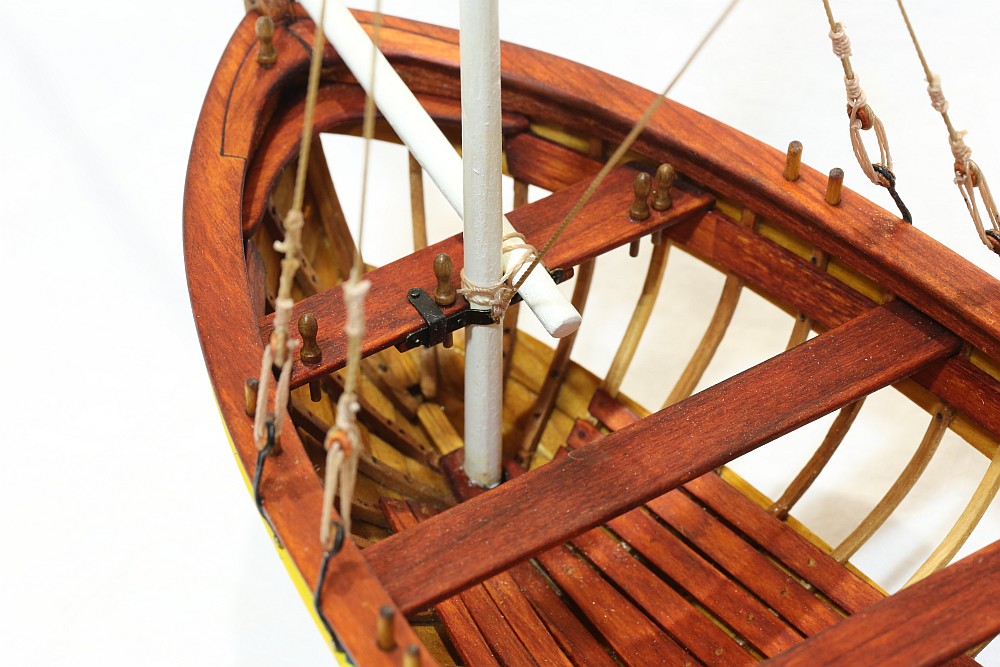
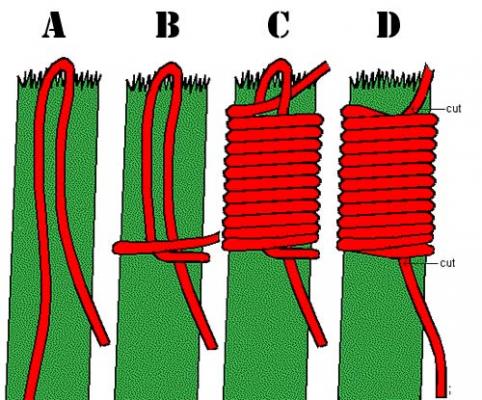
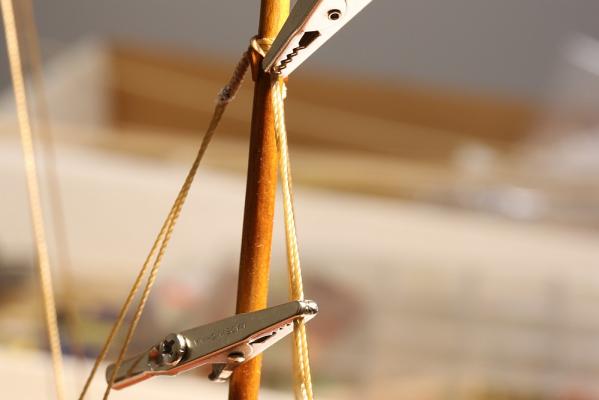
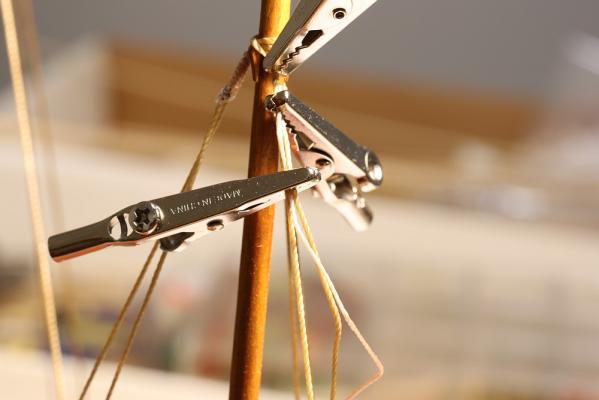
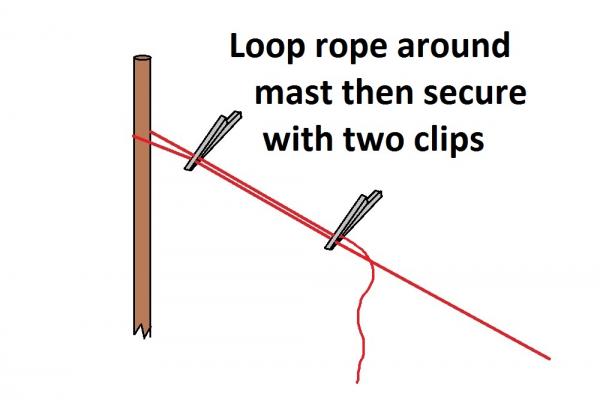
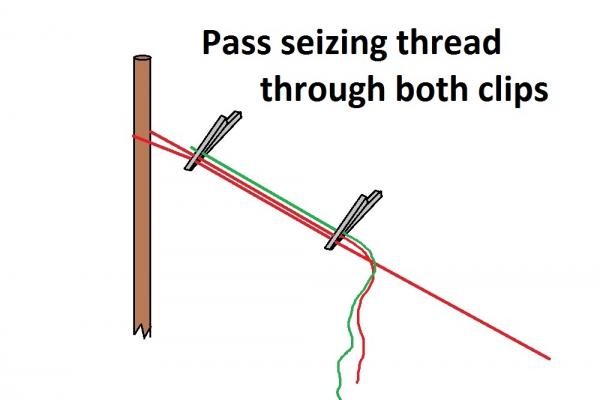
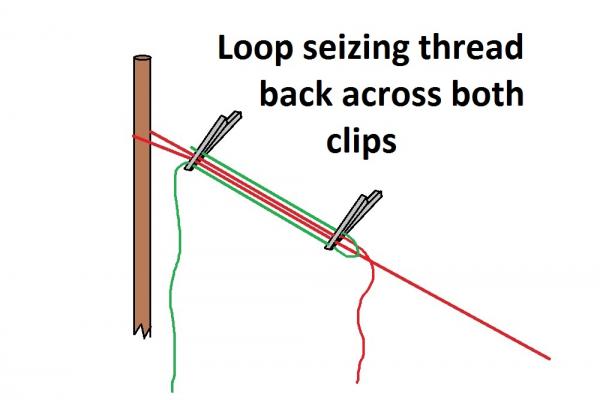
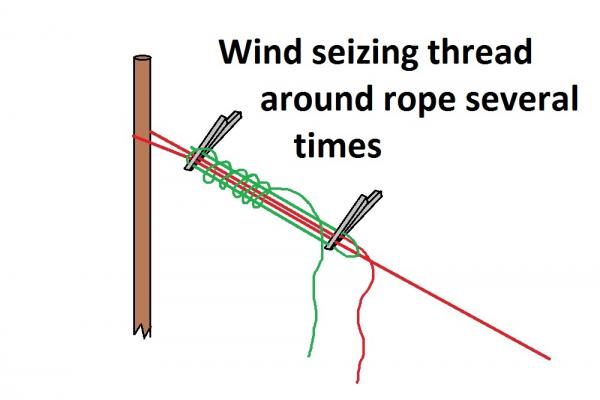
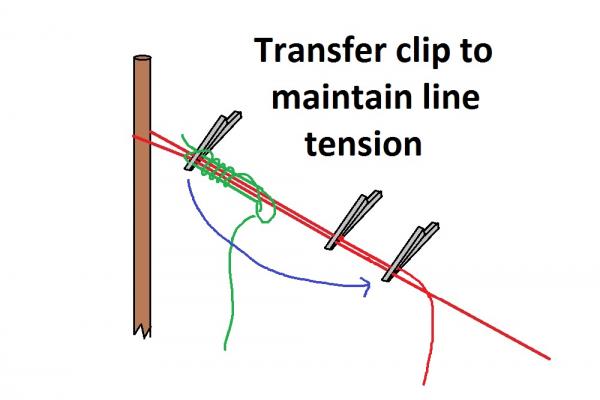
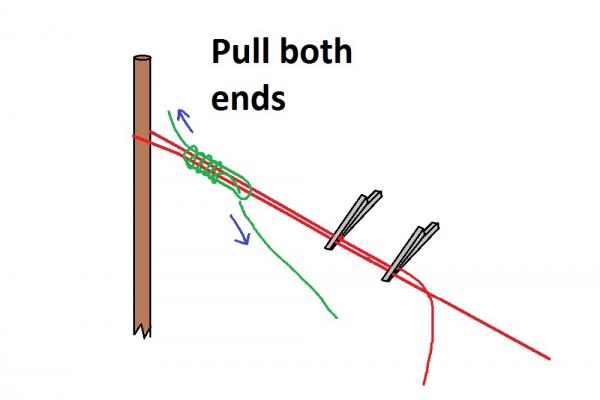
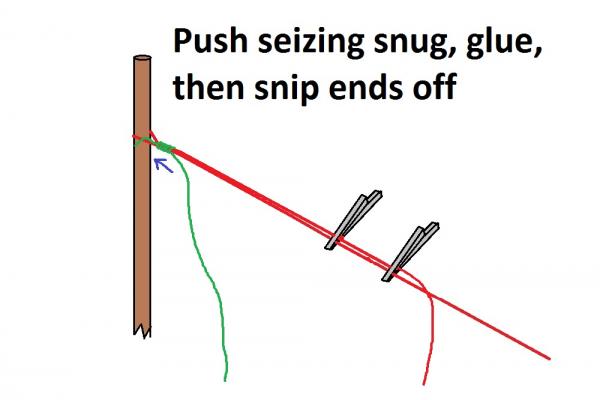
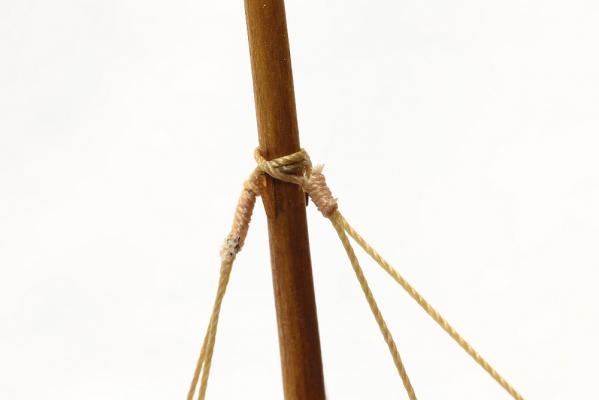
I'm back from my trip, so I have continued some work with this boat. Over the weekend, I completed the standing rigging. I have seized shrouds many times in the past, but I have never been satisfied with the results. This is the theory: So how do you do that in miniature scale on a ship model? The answer is to use crocodile clips, like this: If you can't see what's happening, I have created a series of diagrams that show how the seizing is accomplished. The text and pictures are self-explanatory. This is the result: I also added an eye bolt for the mainmast stay. Mackay's plans indicate that this was present, but did not indicate where it was attached - so I took a guess. The boat as of tonight: Next I should tackle the spars and sails, but I am thinking of buying a cheap sewing machine to help me make the sails. The sails are therefore on hold until I do a bit of research and learn how to sew on spare cloth. Neither can I attempt making the oars, because I want to reserve that for when my new lathe arrives. I suppose i'll just make the toolbox and a few other little accessories while I wait. It also appears that I have run out of rigging thread. Let's hope that my local hobby shop stocks the same thread used by Model Shipways.


- 78 replies
-
- 14
-
-
- model shipways
- bounty launch
- (and 1 more)