Keith_W
-
Posts
1,145 -
Joined
-
Last visited
Content Type
Profiles
Forums
Gallery
Events
Everything posted by Keith_W
-
 Thanks for the answer, Tom.
 -
Chamfer a plank
Keith_W replied to Thom's topic in Planking Techniques's Click Here for Topics dedicated to planking!!!!
Thanks Joe, I want the milling machine for other things as well. I find sanding these planks to be quite fiddly and I can't get precise results, which is why I was wondering if it could be more precisely done. I have been looking at vices and clamps for milling machines, and i'm not sure if there is one that would allow you to bevel a plank. Are you aware of one? Anybody? -
Chamfer a plank
Keith_W replied to Thom's topic in Planking Techniques's Click Here for Topics dedicated to planking!!!!
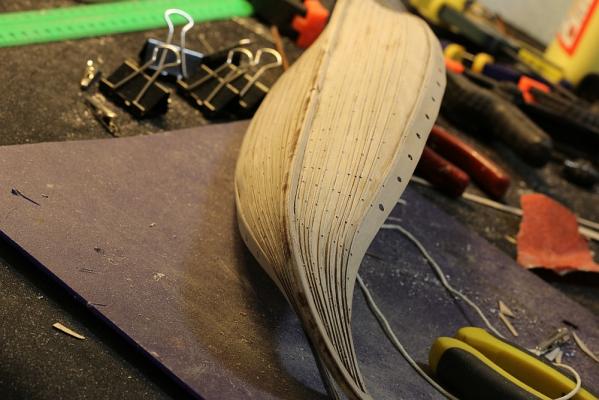
Sorry for the gravedig. I have built several models and I have always found plank bevelling to be a pain in the backside. I lack the patience to sand back each plank, so with the last model I built I used my Dremel. The problem is that I got unevenly bevelled planks. Short of purchasing a disc sander, has someone come up with a plank bevelling jig where you can use a power tool? My next purchase is a milling machine ... would it be possible to use that to bevel planks? -
Lovely new machine, that's on my wish list too! Frank it's a Proxxon MF70. Specs list is here: http://www.proxxon.com/en/micromot/27110.php
-
Hi Tom, after following your build I think I might go with this kit as my next model. I do have a question though - I do not like wood stains because I have found that they tend not to stain evenly, and the stain gathers around dips or corners. If I build this boat, I would leave it unstained. I can't really tell from your photographs, but do you think that the wood as supplied in the kit looks good enough to leave unstained?
-
Thanks Pat and Mark. I did a bit of exploring on this site last night and came across numerous build projects. Even something as simple as a Bounty pinnace has been built to a standard that I can not hope to equal - let alone the numerous Royal Carolines or Victories. I really do have to improve my skills - and yes I did think about building one of those little boats from Model Expo. Steve, the base and pedestal were from Artesania Latina. I did a bit of fishing on their website to look for it. I came across a couple of "soporte de peana, forma de pez" (base support in the form of a fish) items, but I am not sure which one it is: http://www.artesanialatina.net/articulo.aspx?ref=8817&des=soporte-de-peana-forma-de-pez-vertical-1-uds http://www.artesanialatina.net/articulo.aspx?ref=8818&des=soporte-de-pez-forma-de-pez-horizontal-1-uds I think it may be the horizontal one. It is made from white metal and coated with brass paint. I widened the channel using my Dremel, and I was surprised by how easily I could shape it. It is not apparent in the picture, but I drilled a hole all the way through the pedestal and into the base and inserted a sawn off nail from there into the hull, which I had previously reinforced to accept the stand. The base is also from Artesania, but I would not recommend it. It is MDF with veneer on top. You can see from the pictures that the sides look a little ugly. If you have a router, you are probably better off buying a nice plank and making your own base.
-
Hi Ken, this post here is a link to my Viking ship which shows how I stiffened my sails. I soaked it with a dilute solution of 40% white glue then hung it to dry: http://modelshipworld.com/index.php?/topic/4311-viking-ship-drakkar-by-amfibius-amati-scale-150/?p=130603 This links to my HMS Bounty, completed 6 years ago. The sails were stiffened with the same method: http://modelshipworld.com/index.php?/gallery/image/5688-241c8923-ps/ I don't mind the wrinkles, I like the way it looks. In fact, I crushed the sails with the Bounty to add more wrinkles. How to keep the rigging taut - after you lay out all the running rigging, tie it loosely around the belaying pins. Once all the rigging is done for that sail, tighten them one by one to take up the slack.
-
Beautiful little boat. If I were you, I would stiffen the sails and put some wind in them. Another advantage of stiffened sails is that it holds your running rigging tight and with less slack.
- 110 replies
-
- 1
-

-
- armed virginia sloop
- model shipways
- (and 2 more)
-
Thank you for taking the trouble of making that video. I would suspect that with those twisted eye bolts, they would have more purchase when installed - larger surface area for glue to adhere to. They are probably more difficult to pull out than a normal hook made from straight wire?
-
Thanks Pat. Everything that you see (with the exception of the display stand) came with the kit. Even though this boat was much simpler than the Bounty, I still learnt a lot from it. I am thinking I might have to attempt a couple more small projects before I try something more ambitious. Ever since I joined MSW, my expectations of what is possible has gone up. I am no longer content to build another model to the same standard as my Bounty - it has to be even better. That means I have to acquire more skills and probably more tools!
-
Thanks everyone. Wackowolf i'm not sure what ship i'll build next ... I have wanted to built the Victory all my life, but I don't think I have the skills yet. I'm thinking of doing the Royal Caroline ... she's a beautiful ship. Not sure which version to build ... Panart perhaps?
-
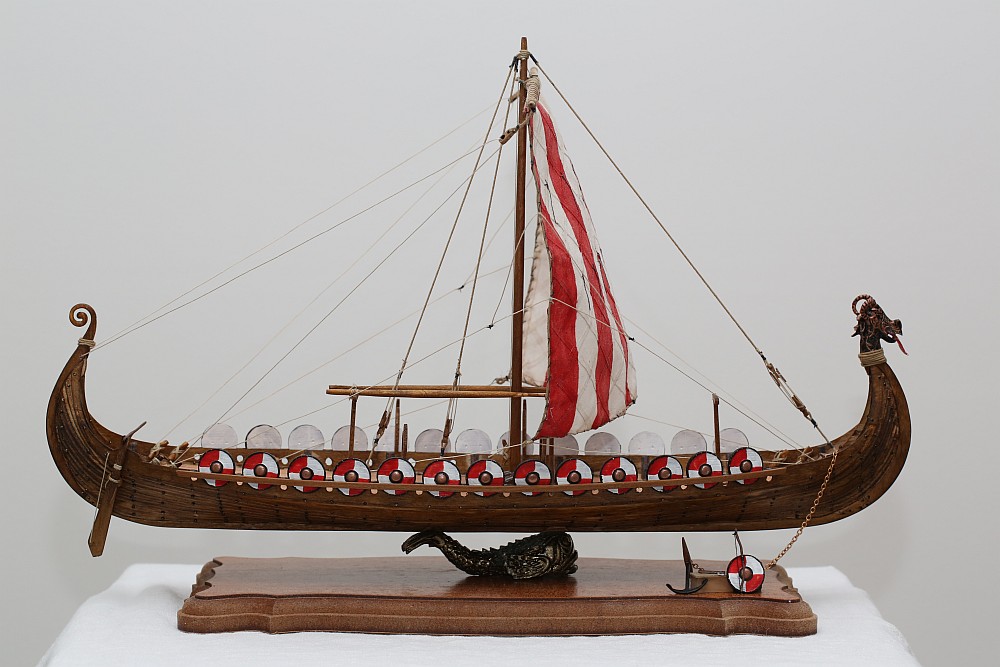
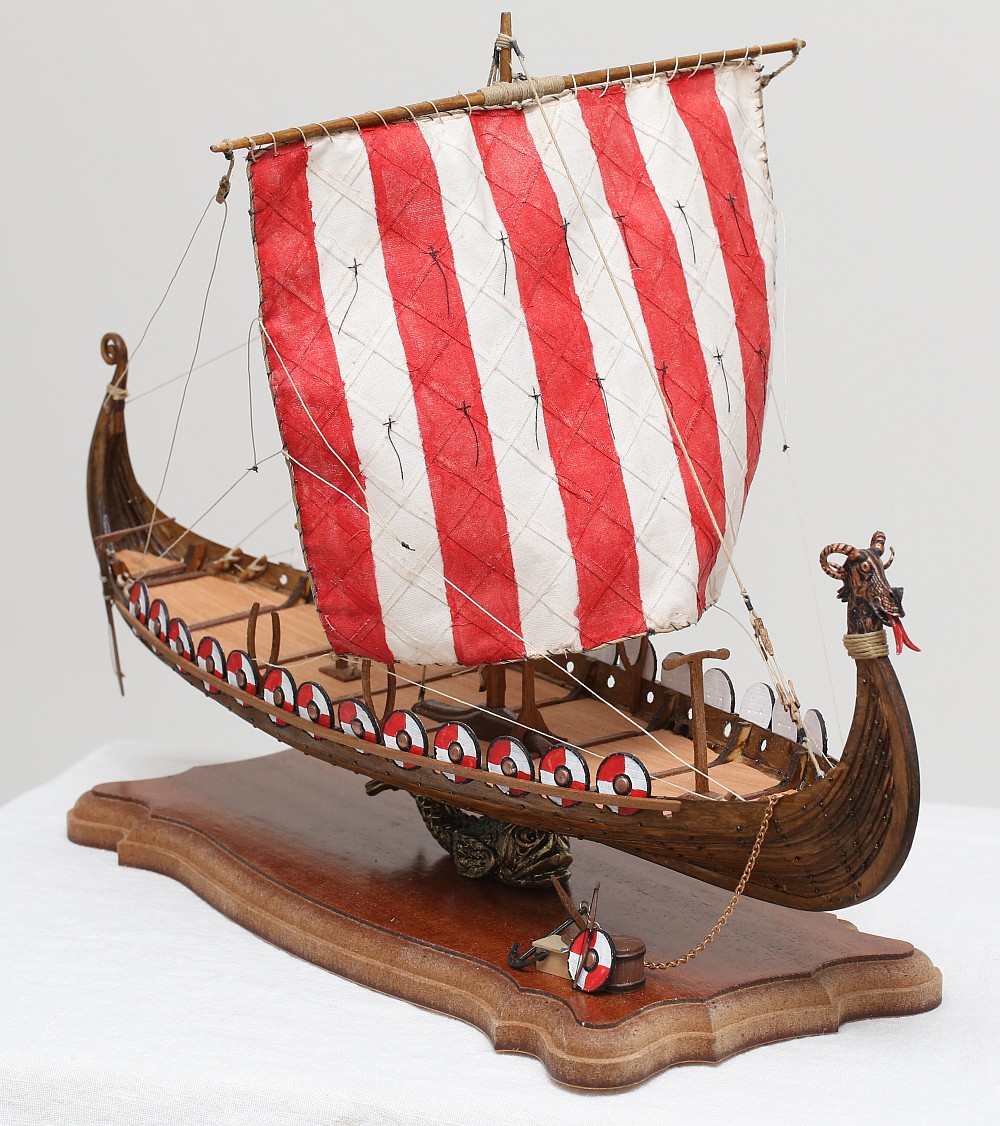
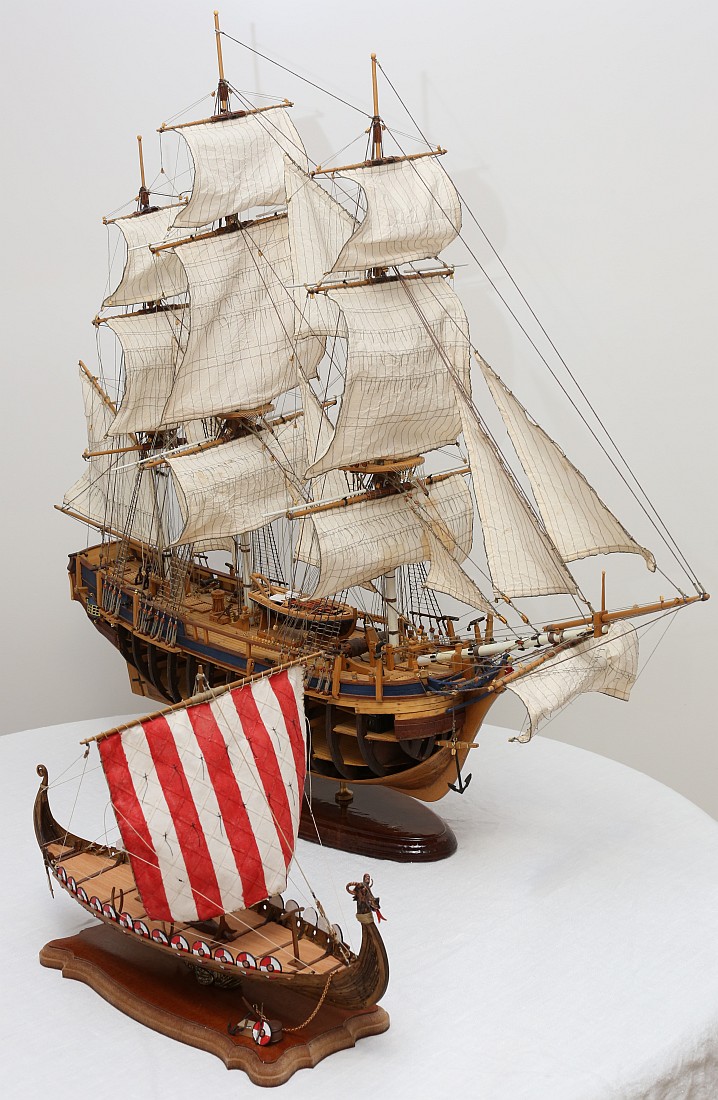
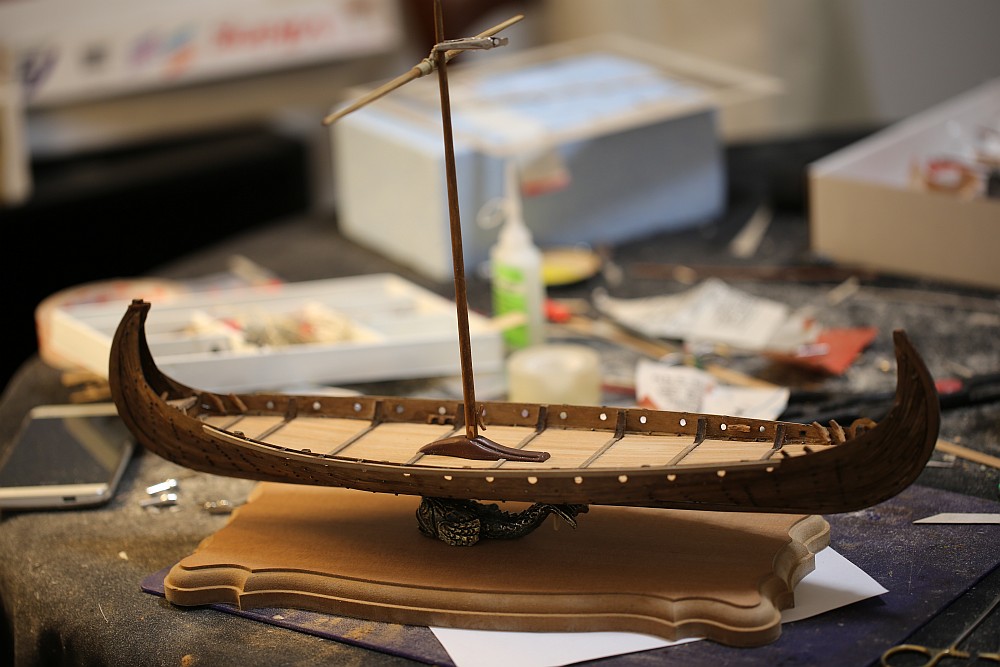
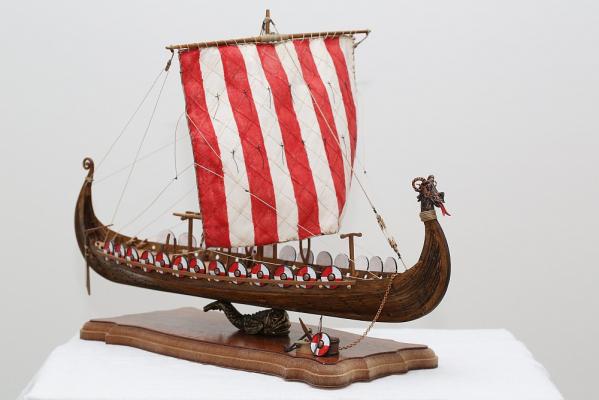
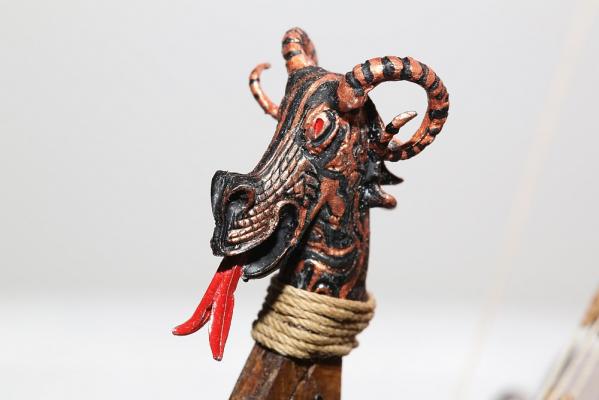
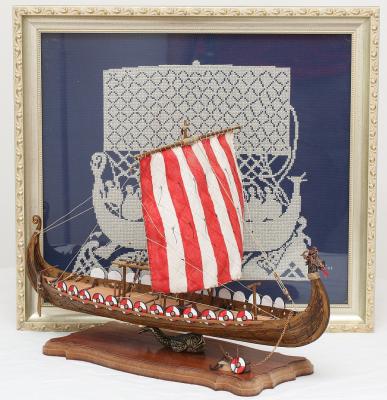
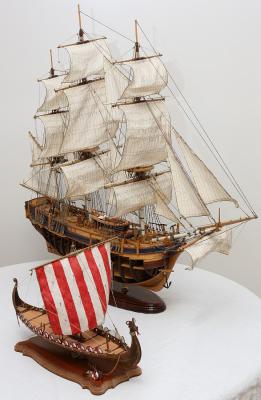
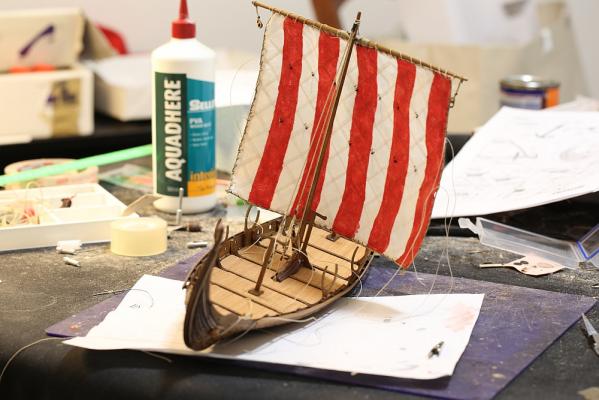
All finished. Some shots in my home studio. In front of a Viking cross-stitch given to me by my friend's wife more than 10 years ago. With my other ship - the HMS Bounty. The scale of both ships is roughly comparable. The Bounty is 1:48, the Viking ship is 1:50.


- 38 replies
-
- 12
-
-
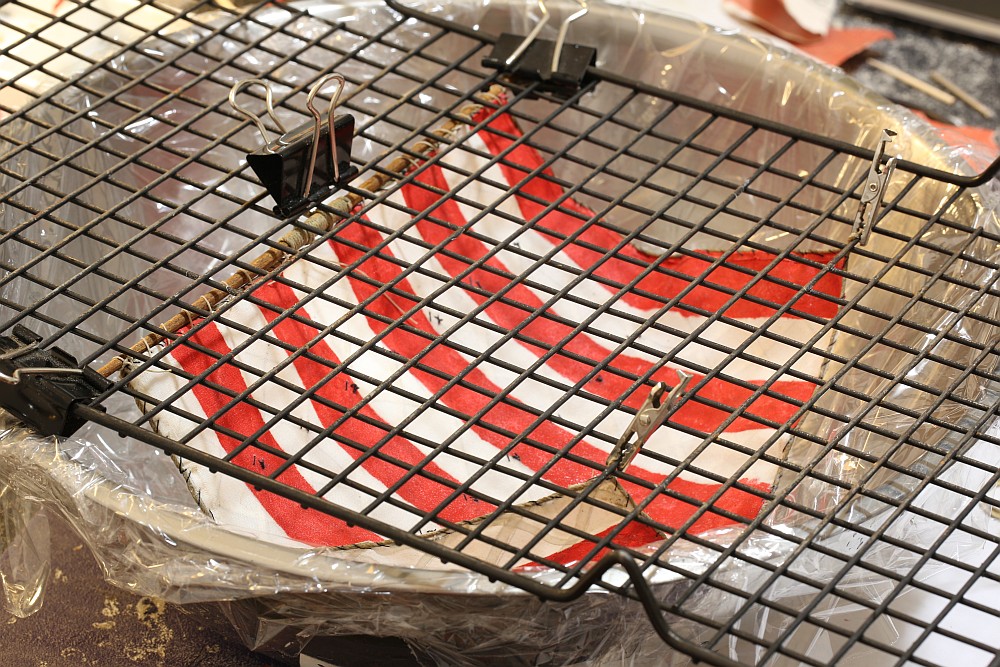
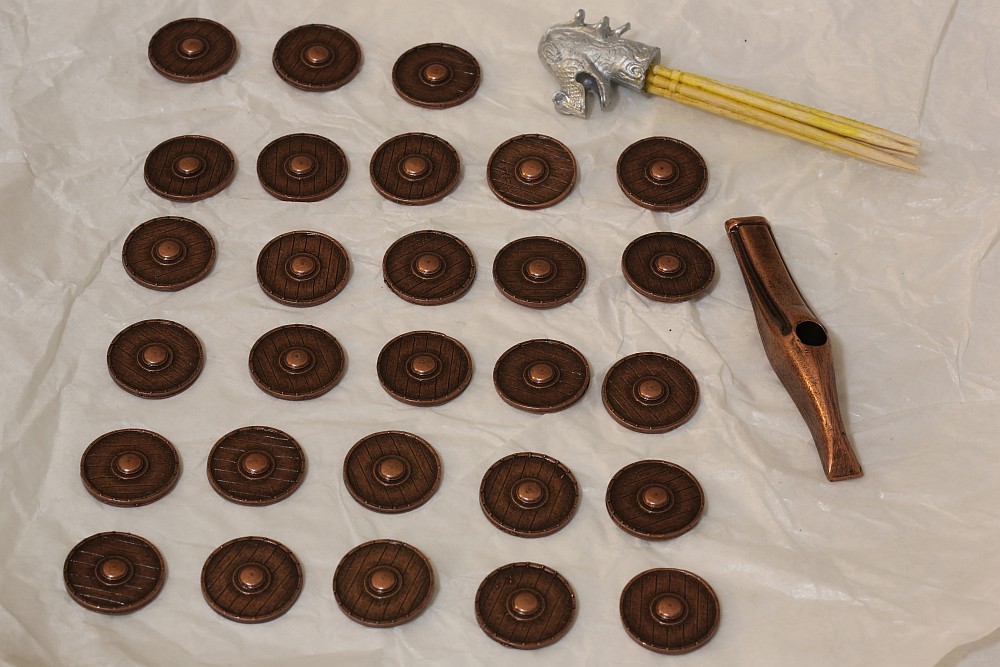
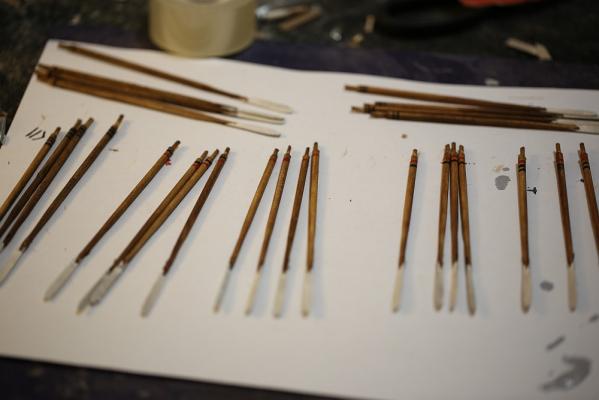
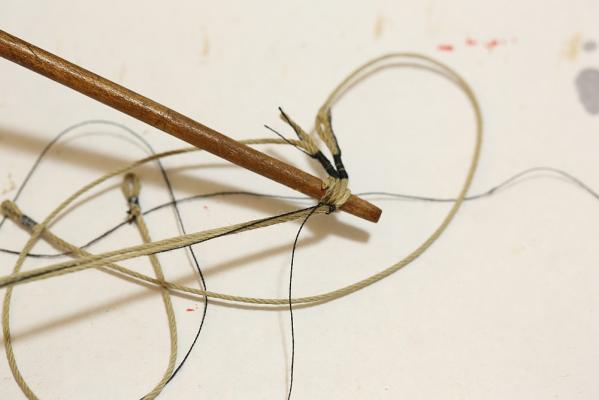
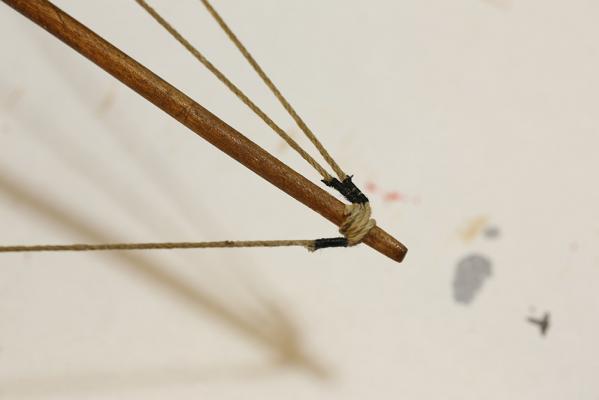
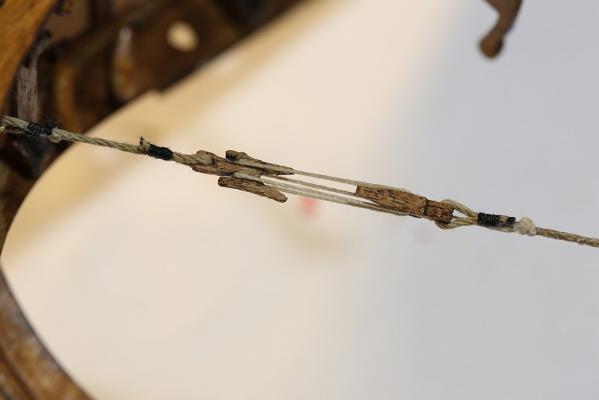
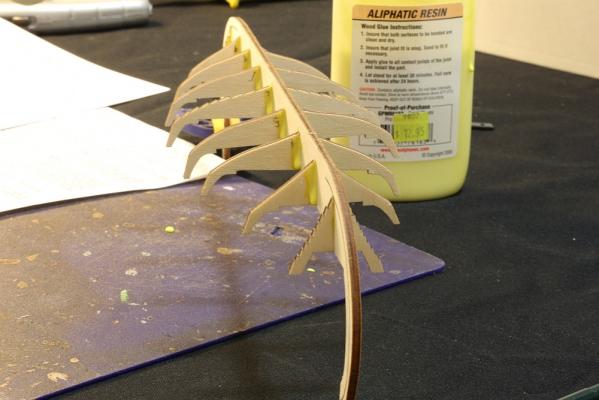
Oh well. Looks like this build is getting no love. For those who care (all 3 of you) ... the ship has been completed. Rigging of main spar including seizing. Progress to date. Oars completed. They are all of different sizes, so I painted stripes representing I - VII on them. Attaching the rope to the sail. ... and then the sail to the yard. The sail complete, it was soaked in a 40% solution of white glue then left to dry on a jig to give a windblown appearance. Rigging of mainmast complete. Almost near the finish line! Rigging complete, last step is to glue the shields on.


-
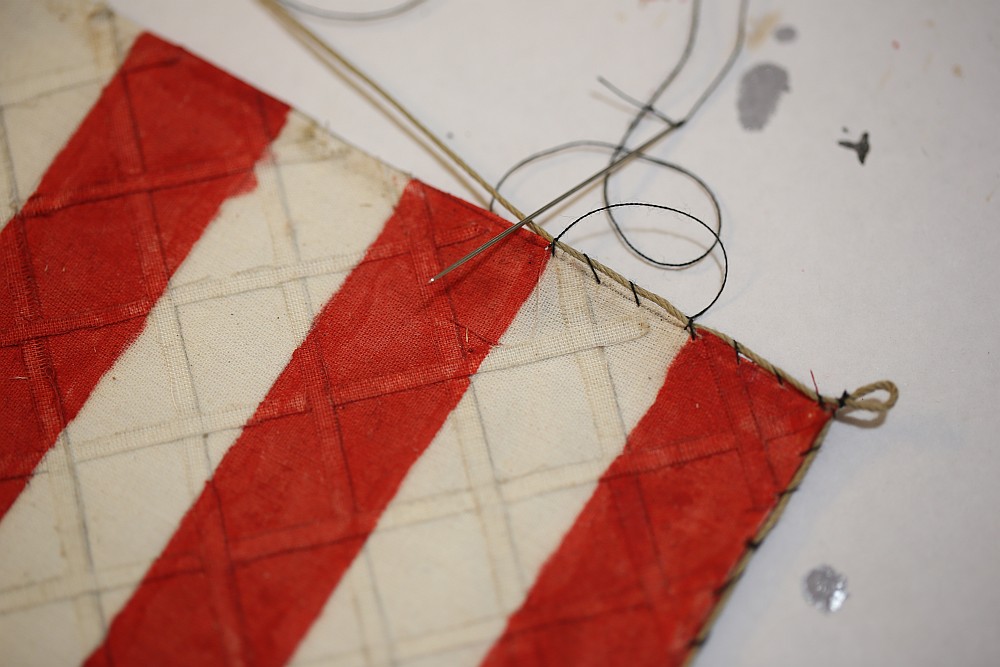
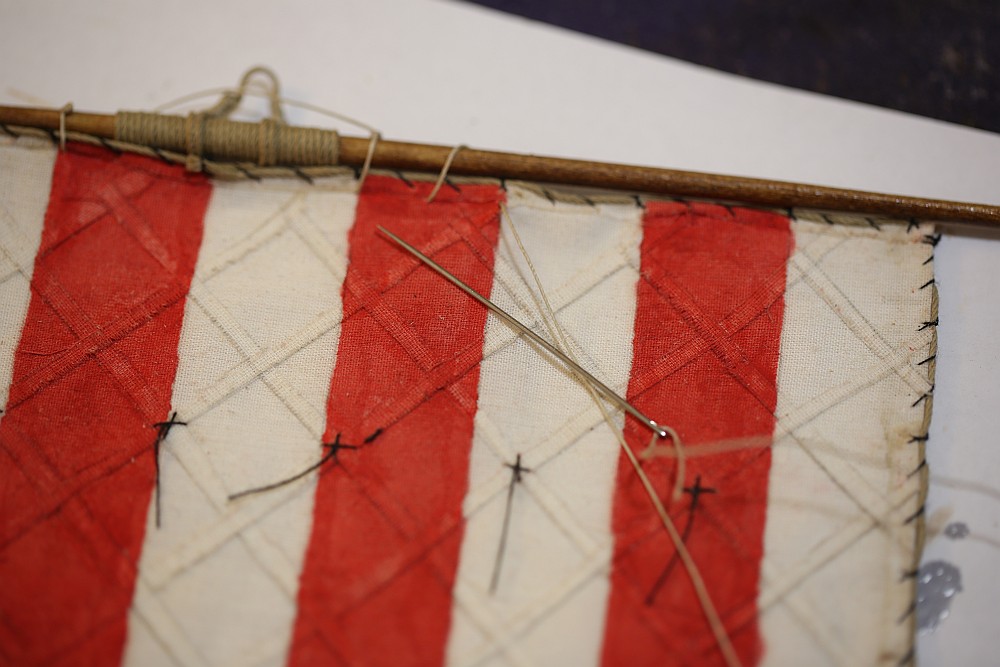
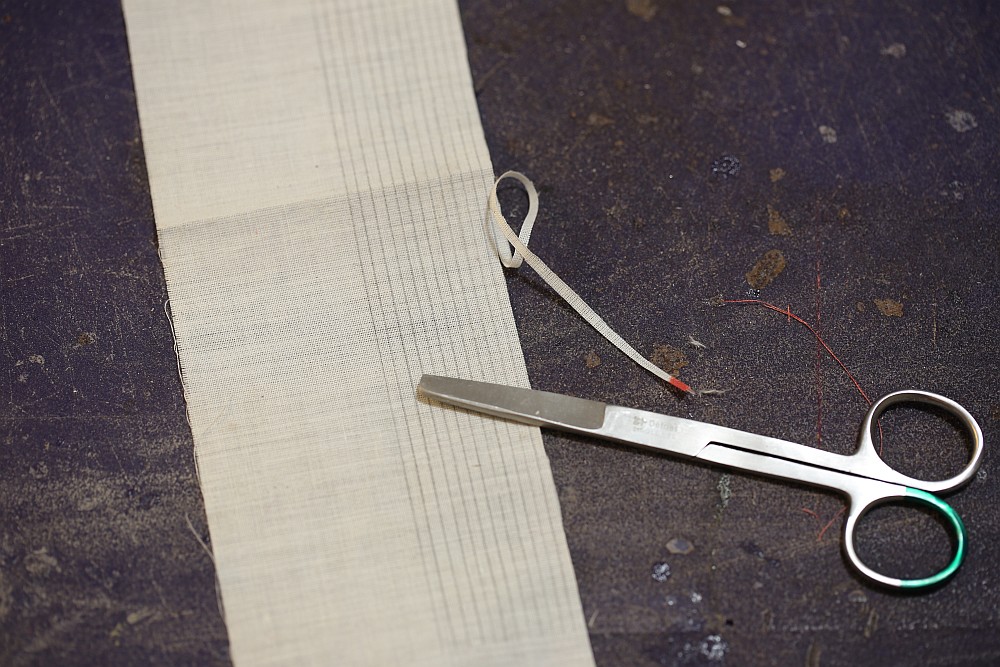
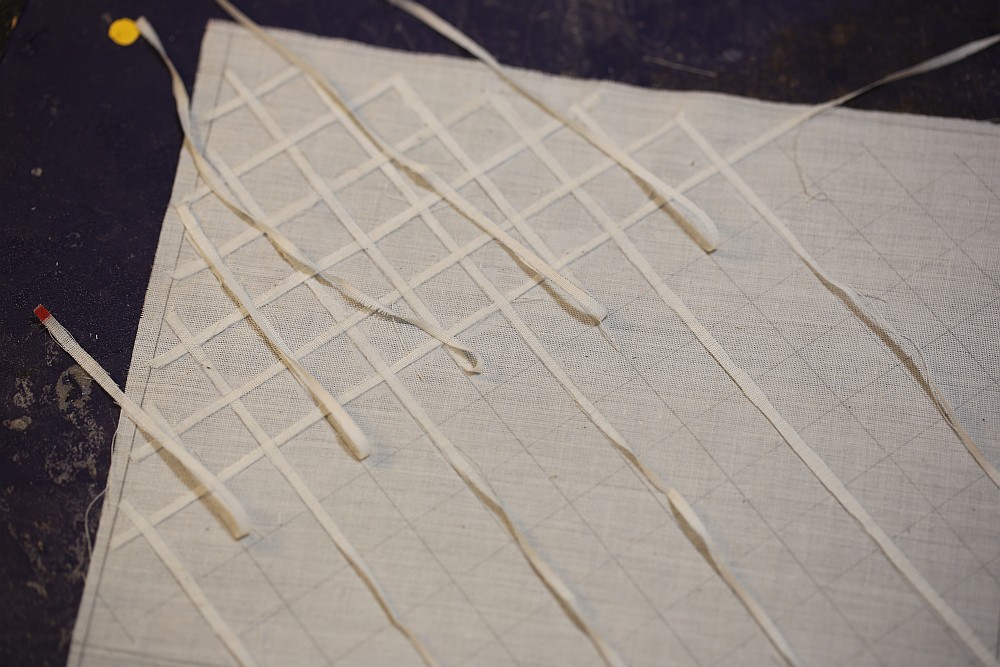
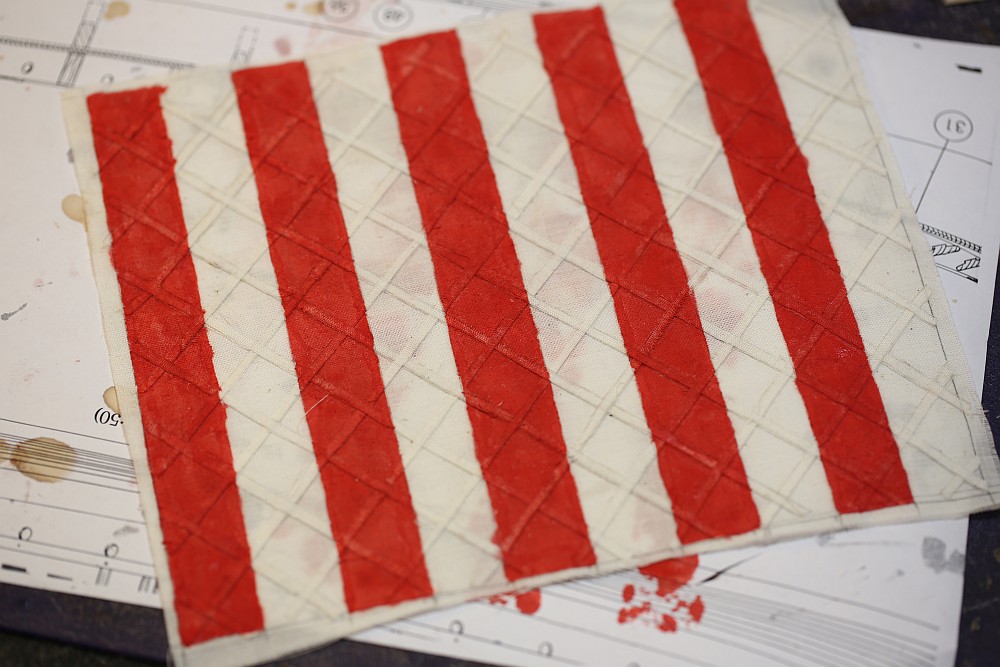
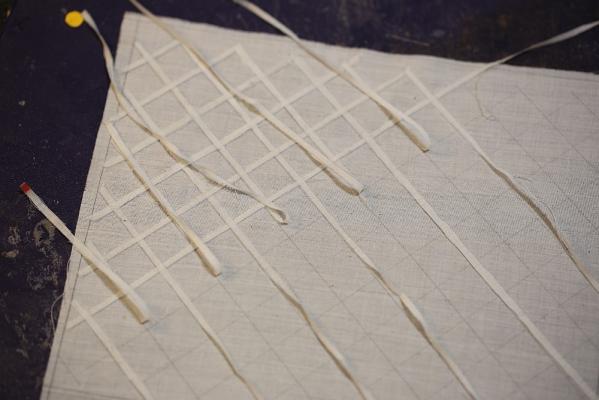
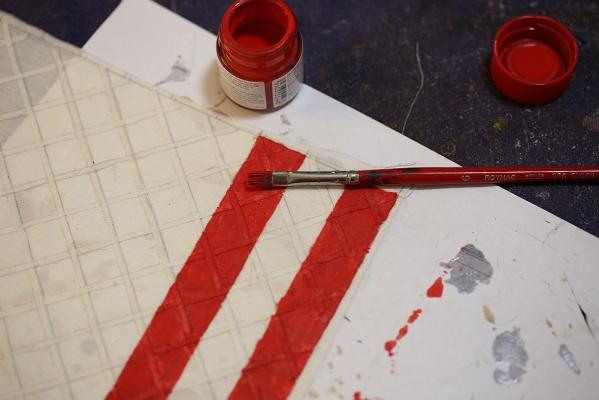
Hull completed, started on the sails. First, cut the sails to size then cut ribbons from spare sailcloth. Glue the ribbons to the sailcloth in a criss-cross pattern. I could have simply ignored the weaving (since it is not apparent when the sail is painted), but I wanted to ensure that the ribbons would not come off when I soak the sail again later. Red stripes painted on the sail. Painting completed. In retrospect I should have chosen an odd number of stripes rather than an even number. It would have made the sail look more balanced. Nothing I can do about that now. Still, it looks great (in my humble opinion!).

-
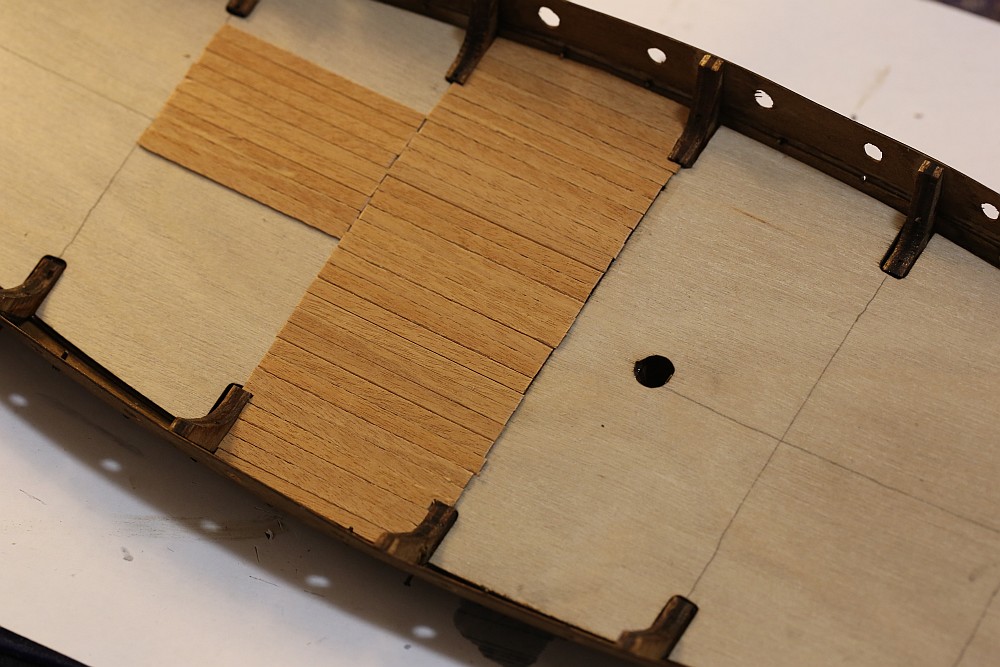
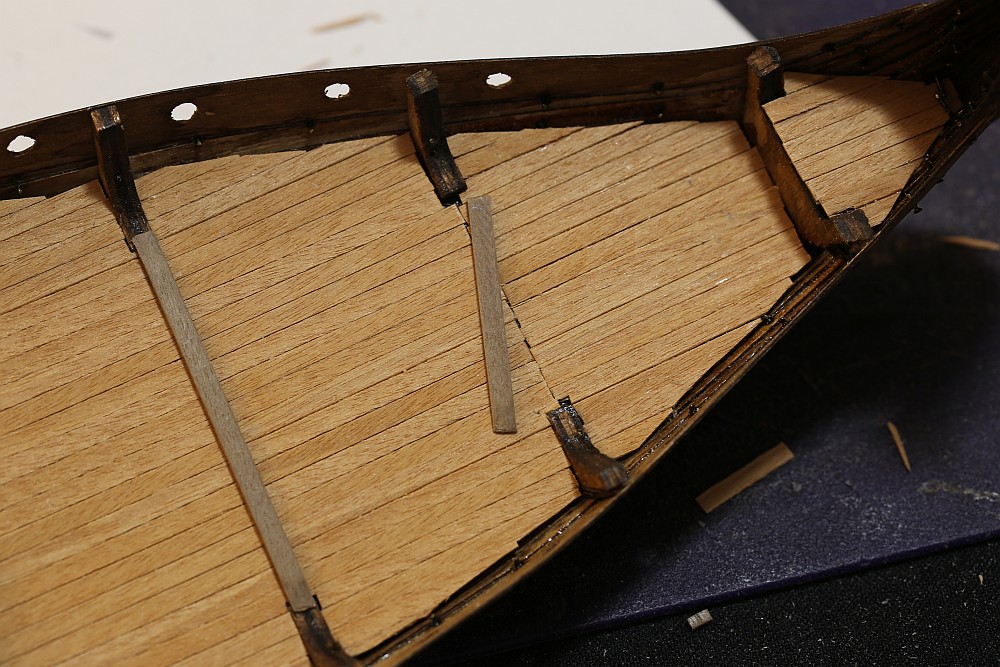
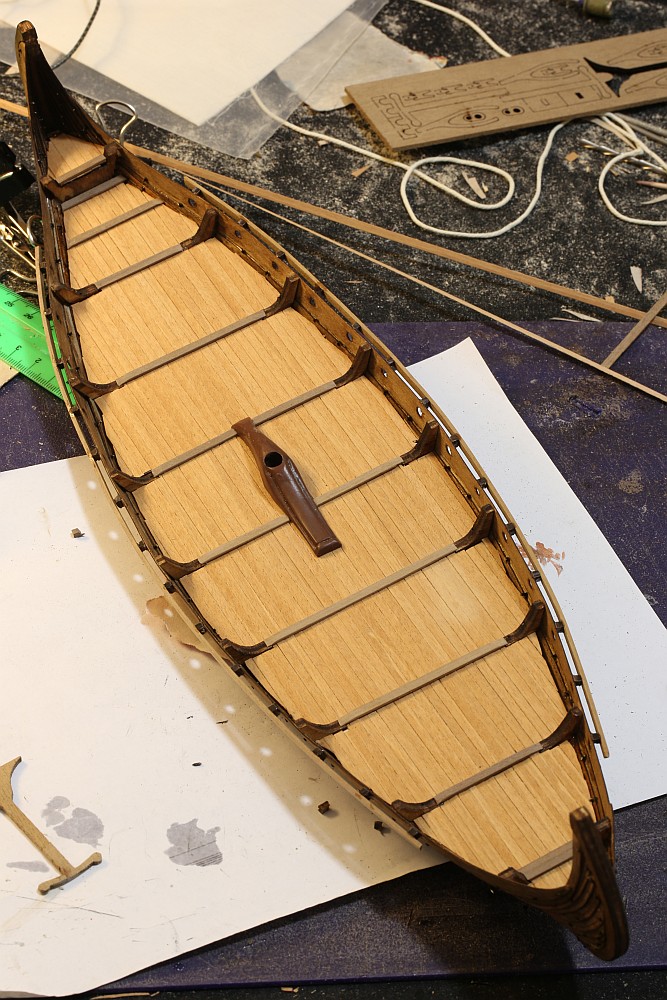
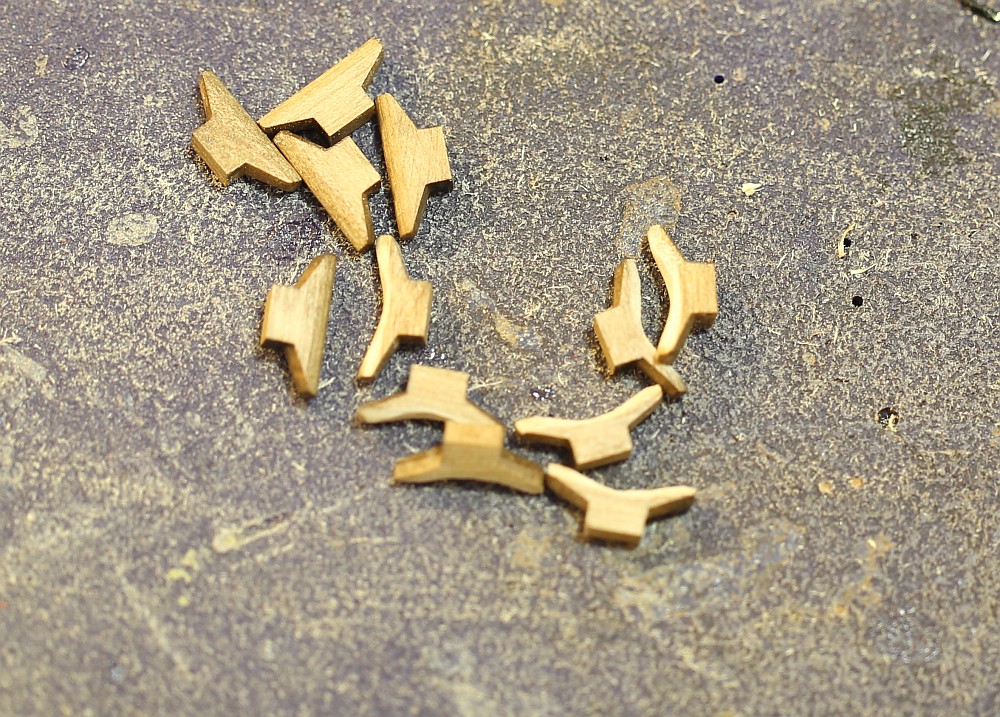
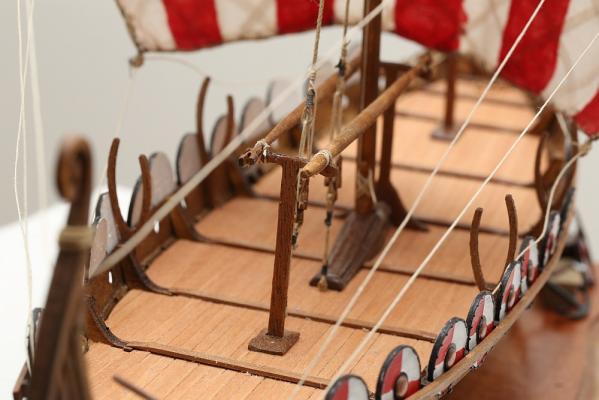
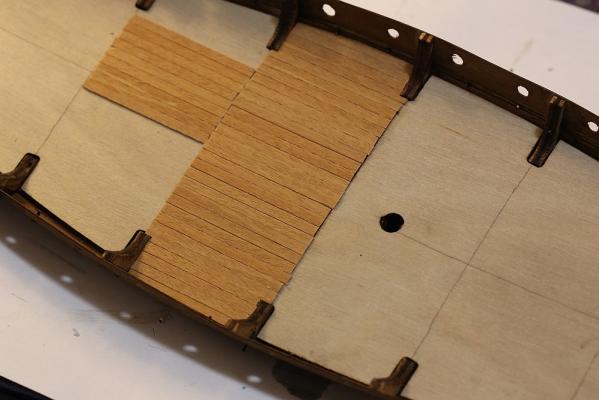
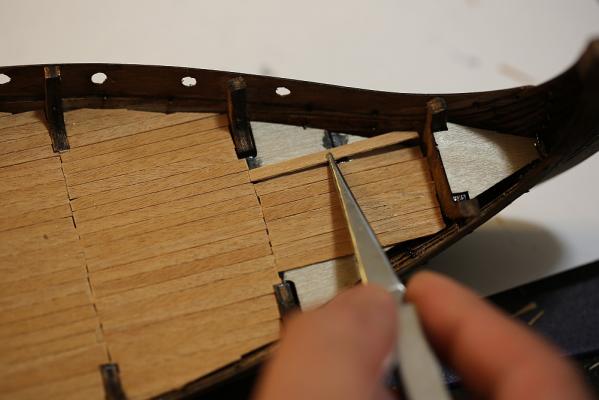
Thanks everyone. I've made more progress on this kit so here are some updates. The hull is complete, so I started on deck planking. I decided to stagger the planks 50% of the width compared to the row before it. Deck planking completed, installing crossbeams. Attachment for the shield rails. Shield rails attached. This build is going extremely smoothly - must be the easiest model I have ever made! Shaping the cleats. As supplied in the kit in the top left, shaped cleats on the bottom right.


-
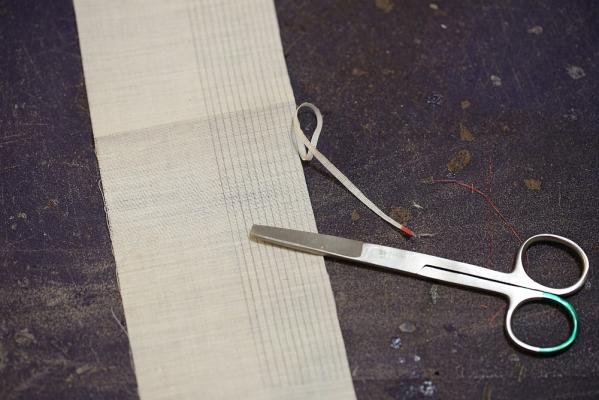
After mountain the sails to the yard, soak the sail in a solution of white glue (30% glue, 70% water). Then hang the sail on a jig to dry. When dried, the sail will be stiff and take on the shape that you want. If you do not like the shape, simply soak and hang it again.

-
Hello Mat! I recently completed this ship, but I built mine from the kit. I suspect that you have more skills than I do, but if you need any help or any clarification with the instructions, let me know. How are you planning to carve the figurehead if this is a scratch build? Where in Australia are you? I am in Melbourne. I will still be in possession of this model for a few more days before I give it to my friend as a gift He doesn't know yet!
-
Help needed A/L Viking Ship - moved by moderator
Keith_W replied to The Motley Man's topic in Wood ship model kits
You are in luck - I just rummaged through my modelling room and came across the photo booklet. It's not a booklet, it is a large colour printed sheet with photos on it. I can either email you the photos, or snail mail them to you. I don't need the instructions returned, you can have it. -
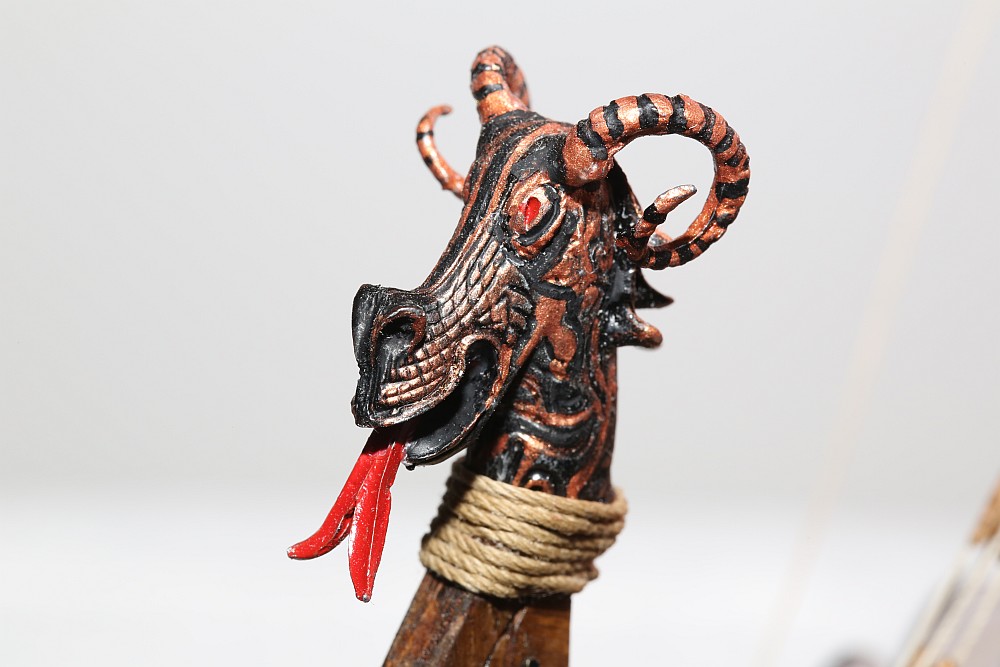
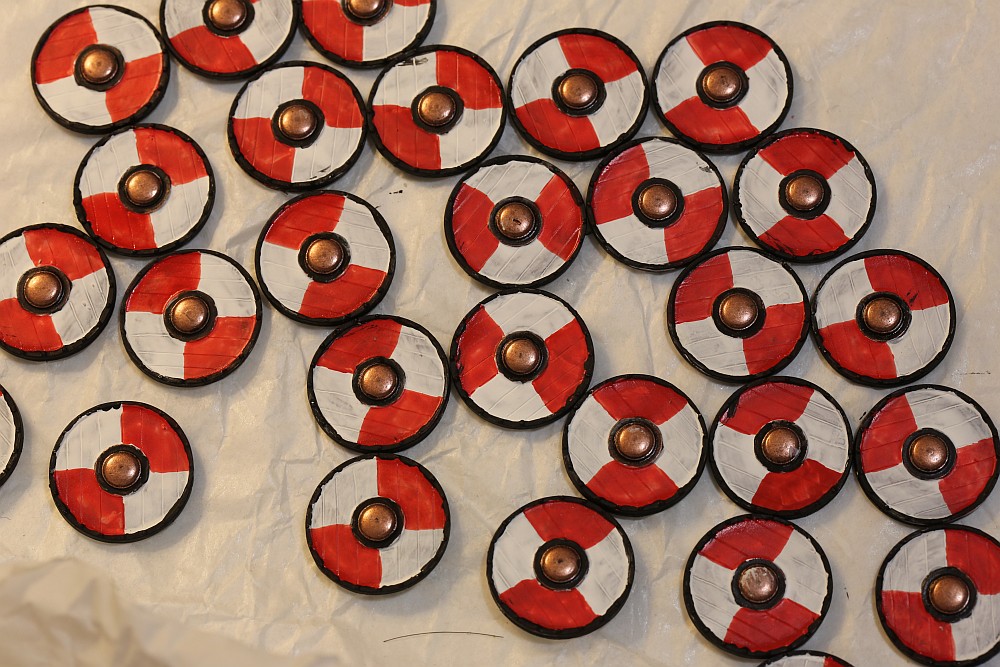
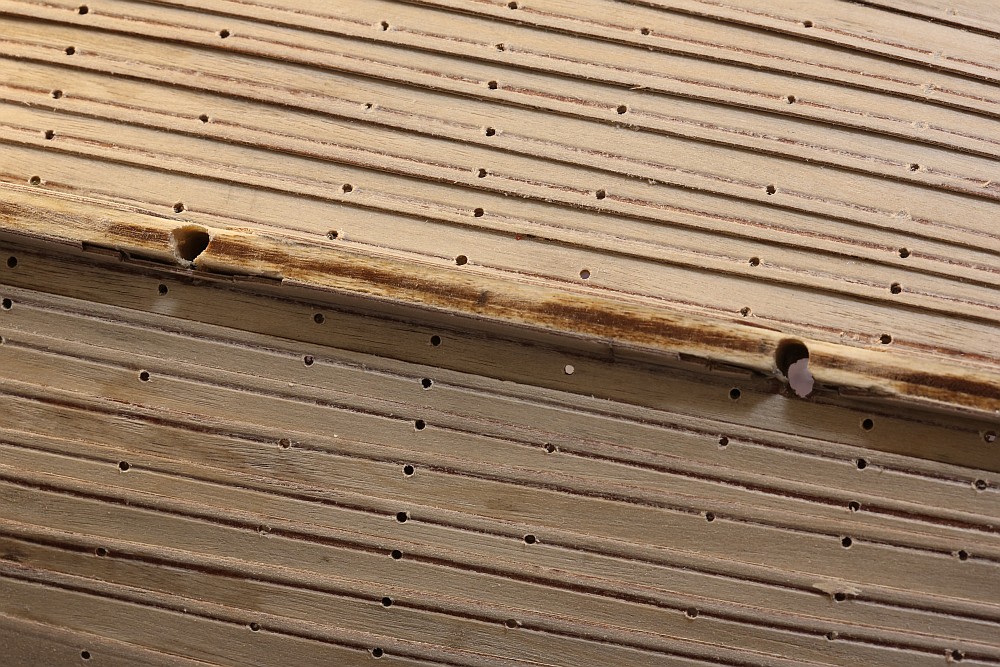
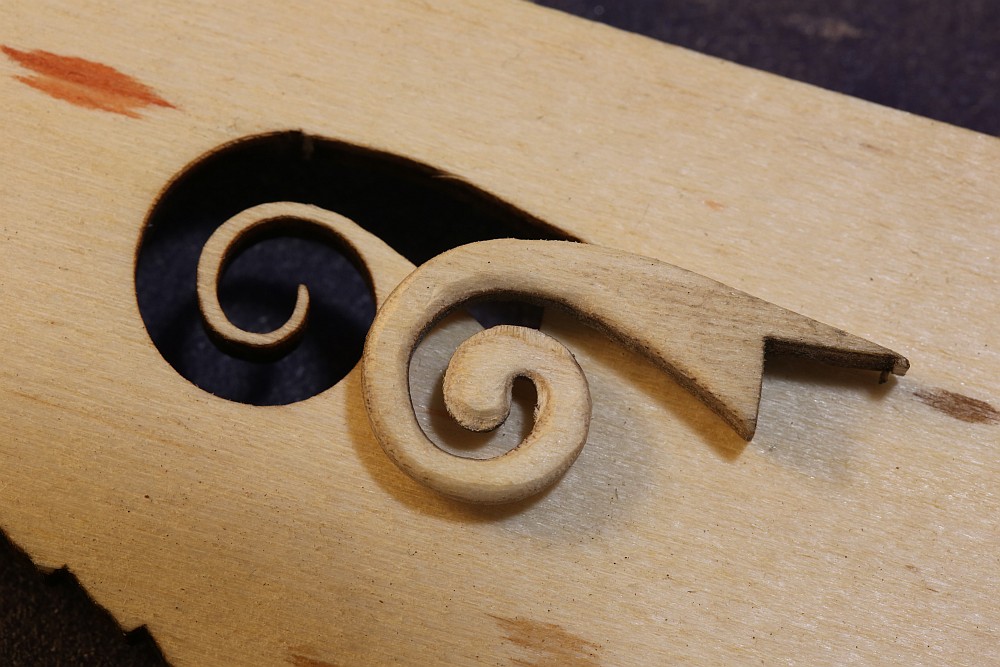
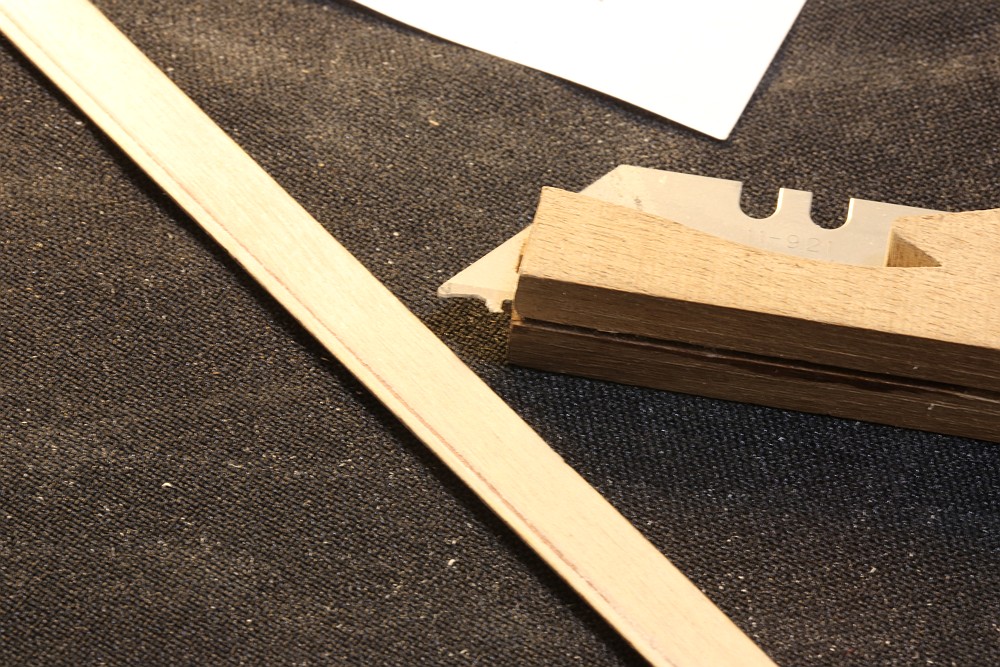
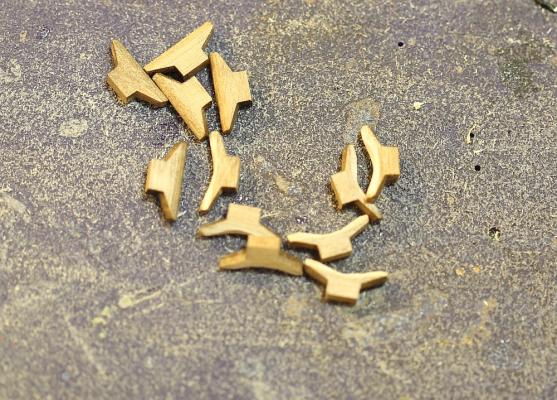
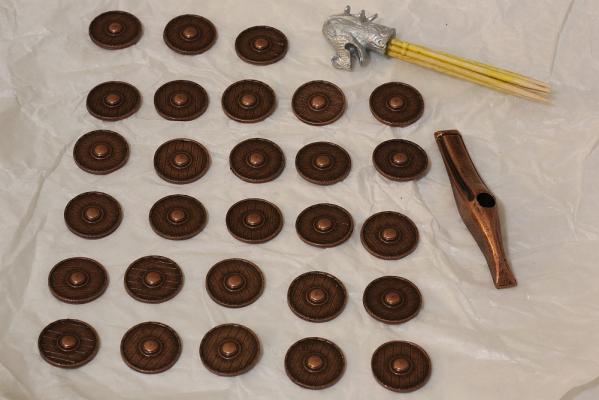
Richard, I will make an album to show off my Bounty in good time. I think I need to dust it off and get some new photos. Casey, the planking is completed. I suppose I COULD get some alternative wood and use the laser cut planks as a template, but that would involve buying a scroll saw which I do not currently own, and have no place to put it. Not to mention, my wife would clobber me to death if I bought a new toy. Anyway, here are more pictures. I decided to take a break from woodwork and paint some shields. They were first sprayed with an etching metal primer. These are too small and too irregularly shaped to use masking tape, so I had to paint them freehand. That's why they look ... hand painted! I wonder how people get such neat lines on small items, they must have really steady hands! Hull planking completed. I decided to cover up the ugly naked wood they supplied for the keel. I drilled some holes for nails. You can see that I did not do as good a job with the planking as I had hoped - some of the planks were not installed straight. Lesson learnt. The kit supplies an alternative scroll for the tail. The lower picture shows a comparison between the scroll attached to the keel and the more ornate alternative scroll. With the help of a Dremel and a small sanding cone I shaped the scroll so that it looks nicer. More updates to follow.


-
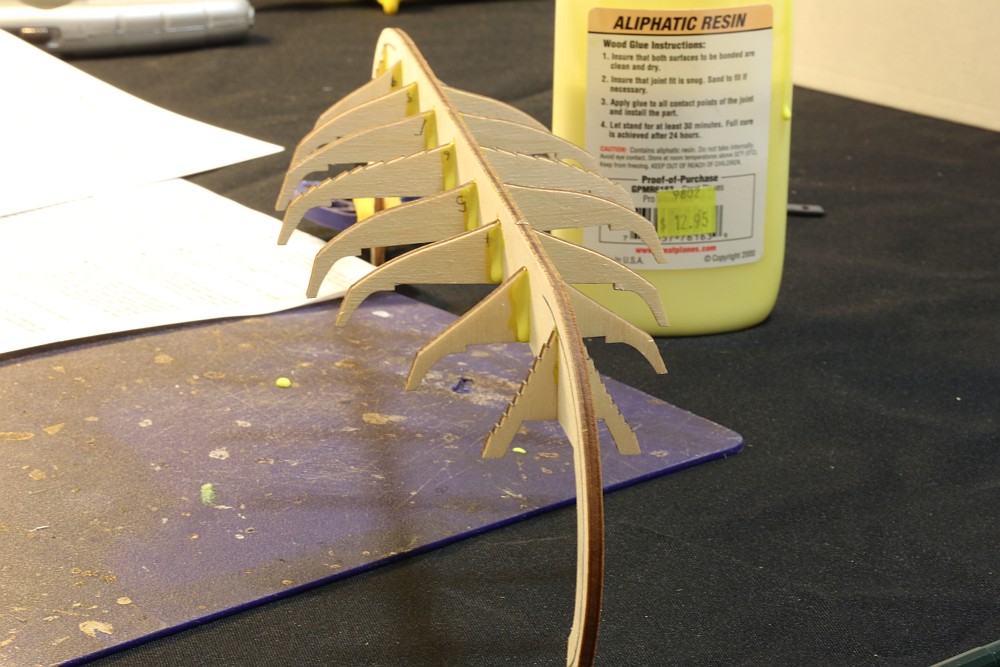
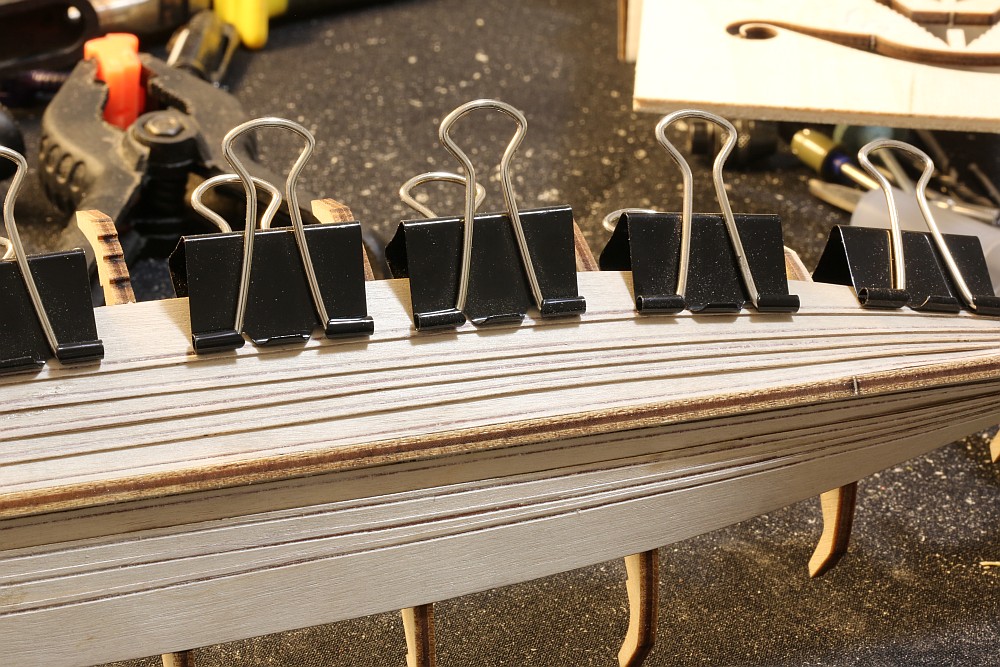
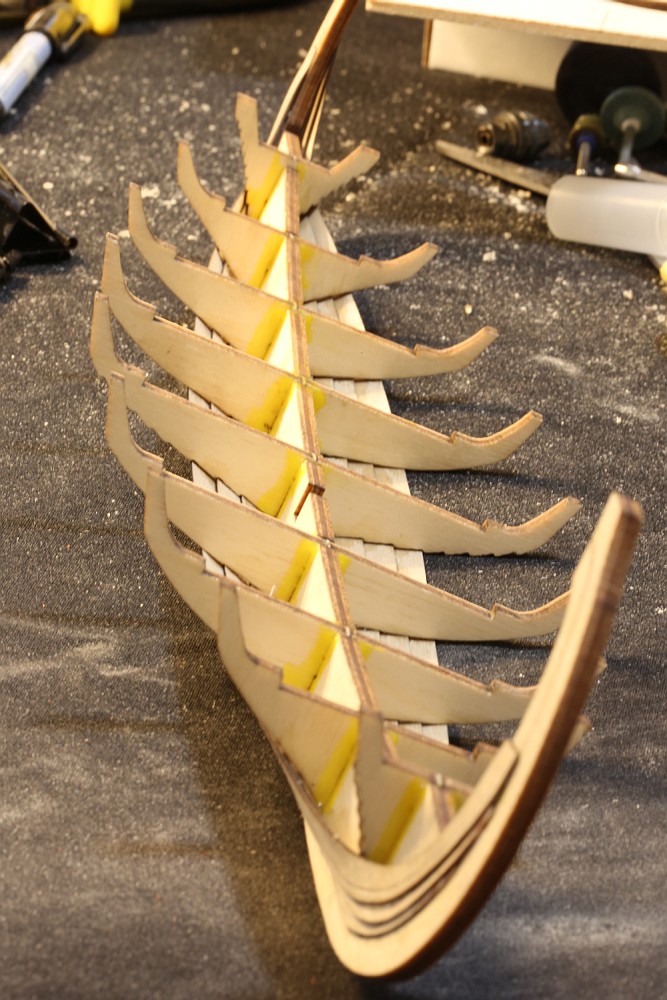
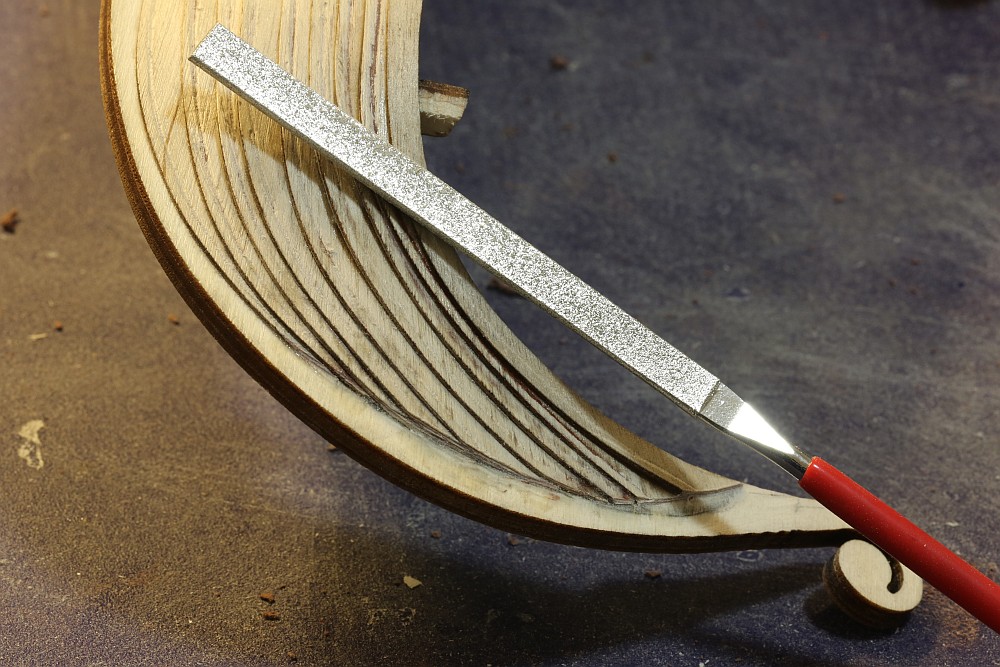
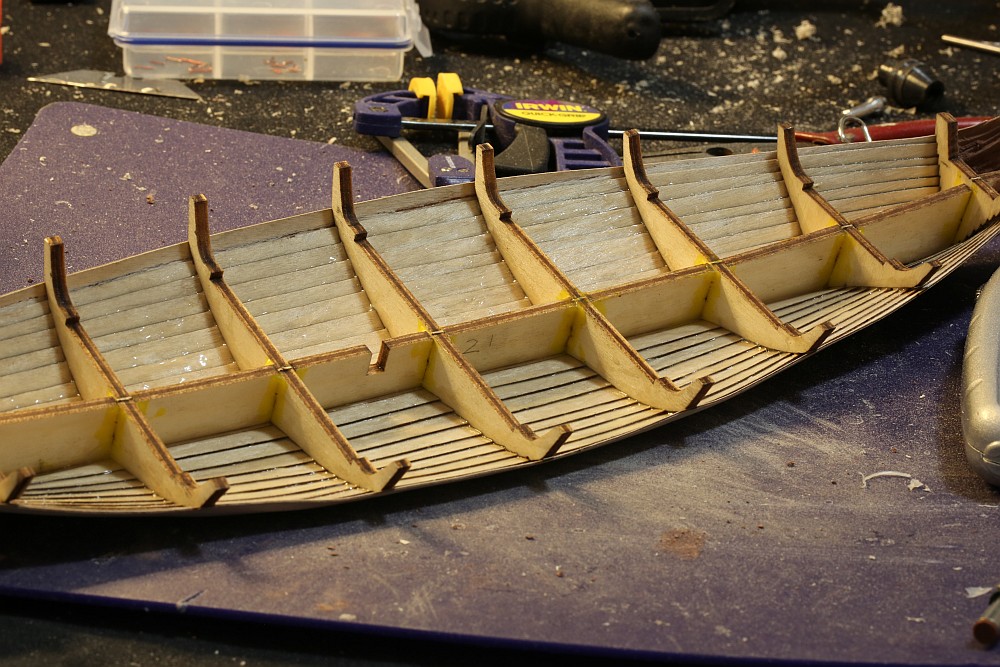
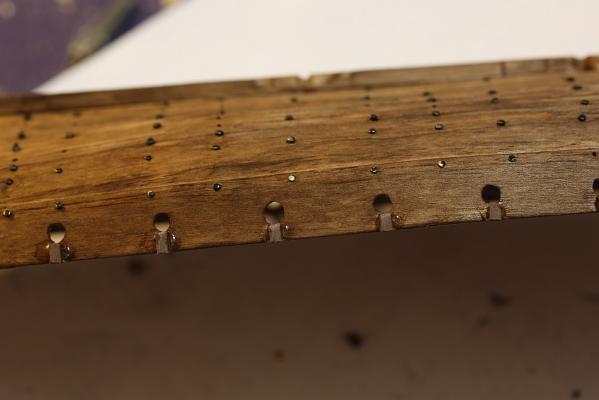
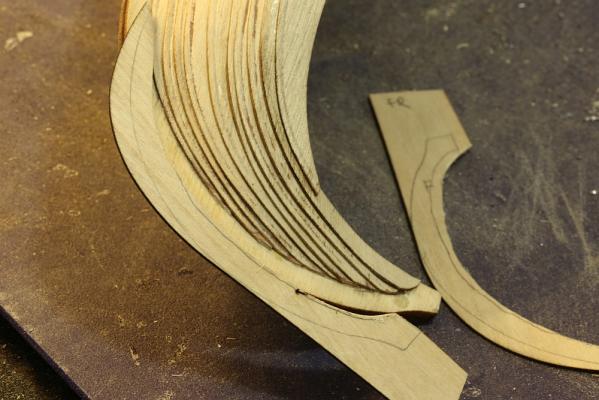
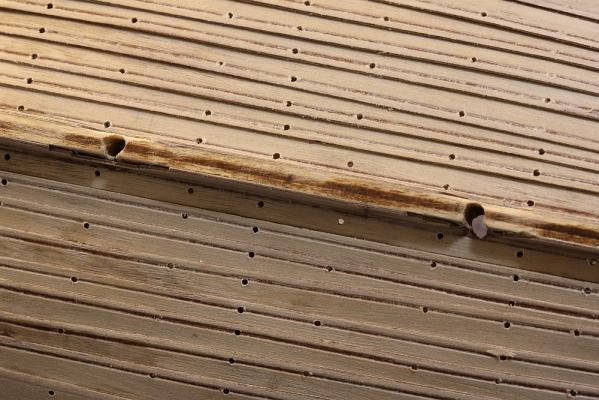
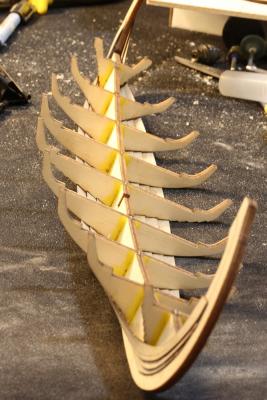
A boring shot of the frames going on the keel. Note that this is the actual keel - there is no false keel in this model. I quickly realized that the ugly laminated wood is going to be on full display! I made a simple scribing tool by shaping a blade and attaching it to a jig. As you can see, scratching the wood removes the top layer and exposes the laminate underneath. I only realized that this was a mistake after I scribed one plank. I gritted my teeth and decided to do all of them. I can think of a way to hide it later. Planking continues. The planks fit the frame like magic with no struggle at all. I was worried about my first clinker boat, but if you do what the manual suggests you will have no problem. Once again, note the laminated appearance of the keel. Shaping the planks at the stern to follow a smooth curve. Note that sanding the planks also reveals the darker coloured laminate underneath. Thanks to the pre-cut planks, getting to this stage took me no time at all. Within the space of a weekend, I was able to complete the planking up to this point.


-
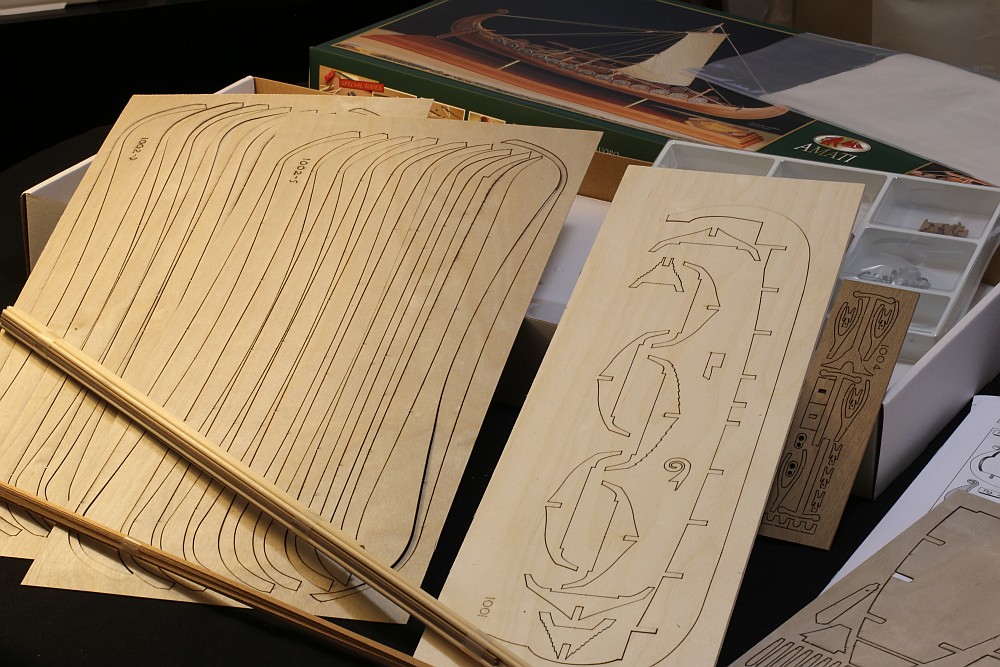
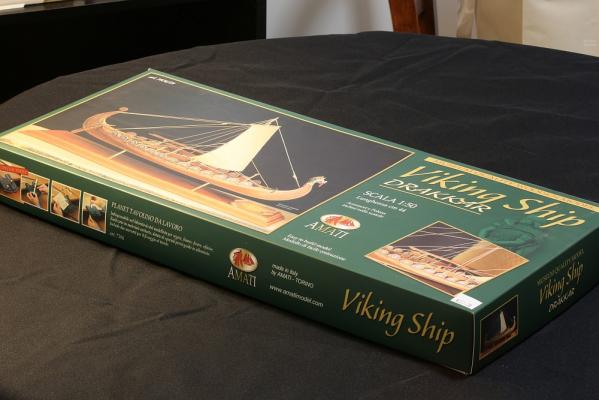
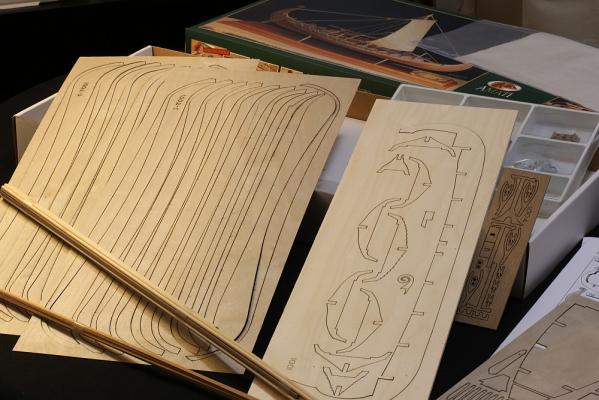
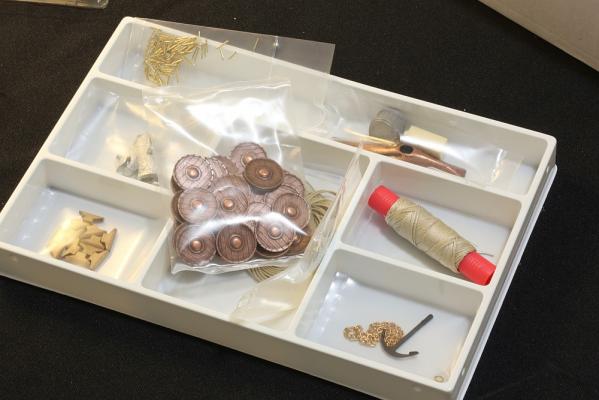
Hi my name is Keith, and I thought I should make a post to prove that I actually build ship models rather than just lurk! This is my fourth ship model. The first two were abandoned due to catastrophic failures, the third (Artesania HMS Bounty) was completed, and this is my fourth. Four models over the space of 20 years and my amateurish skills hardly qualify me as being even worthy to browse this site, let alone post. I am in fact about 75% through the build - I now know that this model is not going to be a failure, so I can avoid the shame of starting a build log and not finishing it. This is why I am posting! I made this thread for two reasons - first, to help others who may be contemplating building a Viking ship. Second, to solicit feedback on the mistakes I have made along with suggestions for improvement. This boat is intended to be a gift for my friend. He is half Swedish, looks like a giant Viking, and makes jokes about his heritage. I did some research as to which kit to buy. I am aware of three. Artesania Latina was quickly ruled out because it is too basic and does not look authentic. That narrowed it down to either Billings or Amati. The Billings model is of the Oseberg ship, which is sitting in a museum. From what I can see, it looks like a pretty accurate model with some very nice details. However, I do not like Billings' excessive use of plastic. The kit that I inspected had plastic parts which were not moulded properly, so it did not leave a good impression. I therefore took a punt and ordered the Amati kit from the local hobby shop (Float A Boat). To my knowledge, this kit is based on a fictional ship with no original in existence. This doesn't bother me, but it may bother you. Anyway, on with the boat. First, some unboxing photos. The box in my pristine (for now) modelling area. Box contents (L-R): planks, planks, frame, deck furniture, deck, instructions. All laser cut. Only after I started working on the model did I realize that the quality of wood supplied was rather poor. I am not sure what wood was supplied, it is some kind of laminate. Box wood, perhaps? I have more detailed photos later. The manual was surprisingly good. I am used to the poor efforts of Artesania Latina. By comparison, this manual (in Italian, with a separate sheet in English) was clear, well labelled, and well translated. Accessories. Everything present and accounted for - let's get started!
-
Nice work, she's coming along very well.
-
Wow you make us look like hacks!
-
How to fix glue blotches?
Keith_W replied to ArthurB's topic in Painting, finishing and weathering products and techniques
I would like to hear the answer to this as well. The same problem afflicts my model. S.Coleman, the blotches that you see are areas where the stain has failed to stain the wood because of the glue. Even if you scrape off the glue post hoc, you will still be left with a lighter area. -
Interesting that the sculptor gave that male figure a pronounced pair of breasts. What's the story behind that?