


FredSC
-
Posts
49 -
Joined
-
Last visited
Content Type
Profiles
Forums
Gallery
Events
Everything posted by FredSC
-
 Thanks, Bob. I've got it. You'd think I would be used to awkward by now. Good luck with Speedy. Fred
 -
I started Granado in 2014 (long story). Like anything left for a long time you forget what you were doing and how you were doing it. I've been reviewing your log and it seems that everyone who has done a Granado log has done an amazing job. Right now I'm stuck attaching the Spritsail yard standing lift. Are there one or two 30mm pendants from the yard attached to a 3mm deadeye lashed to the bowsprit? From the directions, it looks like 2, but then there would have to be two deadeyes lashed to the bowsprit, which looks like it would be a little awkward. Can't tell from your photos and would appreciate advice. Fred
-
Still limping along with Granado. I'm about to step the masts. The manual says to first "temporarily drill and pin the yards in place on the masts". The yards are then removed until later. Question: what is the point of the drilling and pinning since it doesn't seem to relate to the later attachment of the yards? Can it be safely omitted or will I regret it if I don't do it?
- Show previous comments 1 more
-
-

Some people (not all) drill holes in the masts to accept yards with pins. I do it. It makes it easier to rig things that way without having to worry about having to use the rigging to keep everything square and straight. I highly recommend doing it that way. I'd drill the holes in the mast now off the model, but leave the yards off until all of the standing rigging is finished.
Hope that's clearer.
-
-
My New Found Respect for Table Saws
FredSC replied to AON's topic in Modeling tools and Workshop Equipment
Alan, I don't have a table saw and I'm not getting one. Even so, there must be a half dozen morals to your story. Thanks for sharing them and I hope you heal up fast. My Dremel Micro is about all the power I can handle. Fred -
Richard, Great idea, but isn't it awkward when you get up for a beer, lunch, whatever?
-
HMS Granado Caldercraft or Victory models
FredSC replied to Gundorph's topic in Wood ship model kits
Take a look at Timmo's and Joe V's Caldercraft Grenado build logs. They are spectacular. I'm doing Grenado now (not at all spectacular) and think Caldercraft has put together a fine kit. I wouldn't know how to compare it to the Victory kit without having done that too. -
I just saw your query. I certainly can't answer it, but I know that I share your issue. I'm guessing that the "answer" may be what you are happy with. Purists might say that every detail must be perfect, whether it can be seen or not. I can't do that, but for now, I'm happy with the best that I can do. Maybe with more experience, more help from others here, who knows.... But it is fun doing it, and that matters.
-
Hi, Christine. To each his (or her) own, and I'm sure some people have good results with nails. I never have; the planks split; the nails won't go in; etc. There are commercially available planking vises, or, as JM suggests, you could make your own. After you have soaked the planks and bent them with an iron, a commercially available plank bender (sort of like a soldering iron with a round attachment on the end, a tool that crimps the back side (that I have found works pretty well), or something else; after the planks are bent, gluing and clamping should do the job. Good luck.
-
Ron, All really good points.
-
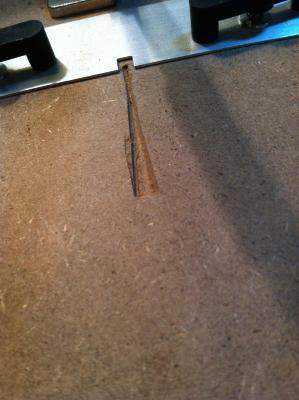
Just got the NWSL "Chopper II" It is obviously much sturdier than the Micro-Mark "Chop-It" and the cutting arm exhibits no sway (result of not long use of "Chop-It" shown below). As others have noted ,since the surface is a movable and replaceable cutting mat (as opposed to fiberboard), grooving of the surface should not be a problem. Since the "Chopper II" differs from the NWSL original "Chopper", direct comparison with the alleged MM "Chop-It" knock-off is not possible. However, just on the face of it, "Chopper II" is a far superior tool.
-
Andy, If yours is the Micro-Mark, I'm not sure how you could have tightened the handle. No matter how much I tried, I couldn't tighten it enough to eliminate the wobble that left I deep v in the base. My new NWSL "Chopper II" should arrive any day.
-
So as not to pile on Micro-Mark, I'll keep this factual and let everyone draw their own conclusions. A couple of years ago I purchased the Micro-Mark "Chop-It", unaware, as with many other things, that there were alternatives for the same function. The base of the "Chop-It" appears to be fiberboard. The way the cutting arm is attached results in a slight, inherent wobble. The consequence of these two factors is that after brief use, the fiberboard is deeply scored. This results in bending the piece before it is cut. The way the blades fit, they appear to be specially made. It was only about a week ago in following an MSW thread that I learned that NorthWest Short Line (as the name implies, supplying railroad modelers) sells "The Chopper" and "Chopper II". The MM "Chop-It" appears remarkably similar to the NWSL "Chopper". It further appears that the NWSL folks believe that MM unfairly copied their "Chopper"and are selling an inferior knock-off (see hornet 3/26/15 post). Because I find the MM "Chop-It" unsatisfactory, today I ordered the NWSL "Chopper II" Product review to follow after it arrives. P.S. If I could realistically look forward to another 20 years or more of modelling, I'd almost certainly purchase the full line of Jim Byrnes power tools and really get into it. Alas, .... So, it seems the thing to do is get the right hand tools (plus the Dremel rotary) to build the best possible models from kits.
-
Mihal, terrific work. I'll have to add Pegasus to my, growing, list of builds to do.
-
Blackening Very Small Pieces
FredSC replied to FredSC's topic in Metal Work, Soldering and Metal Fittings
Thanks, Derek. That sound like a good way to do it. -
Blackening Very Small Pieces
FredSC replied to FredSC's topic in Metal Work, Soldering and Metal Fittings
Thanks, David and Hornet. -
I have Birchwood Casey blackening for cannons, etc., but wonder what is the best way to blacken the many very small pieces that come on 0.5mm and 0.9mm brass sheets. I suppose they could be spray painted, but suspect the paint might crack when the piece is bent. Is it best to treat the sheets with Casey Brass Black in some sort of nearly flat dish before detaching the pieces?
-
Is there a better #11 blade handle
FredSC replied to roach101761's topic in Modeling tools and Workshop Equipment
Clark, Thanks for the review. The more information and opinion the better. Of course, I now have to re-consider how to go. Maybe for the costs involved it's best to be fully equipped, as I frequently tell the Admiral about all sorts of things. -
Is there a better #11 blade handle
FredSC replied to roach101761's topic in Modeling tools and Workshop Equipment
Thanks, Phil. As one would expect, a thorough set of findings and conclusions. For now at least, I think I will not be going surgical, but will carry on with X-acto and Excel handles and blades. -
Meet Your NRG Directors and Officers
FredSC replied to tlevine's topic in NAUTICAL RESEARCH GUILD - News & Information
Thank you all. It looks like NRG is in good hands. -
I use them and they work really well. I don't know how they get to be "self healing", but they really are. I may have it wrong, but I think about 36" square goes for about $30. They are durable until you get so much glue, paint, etc., on them that replacement is a good idea. I'm on my fourth build with the same one.
-
Is there a better #11 blade handle
FredSC replied to roach101761's topic in Modeling tools and Workshop Equipment
Should be a useful thread: What blade for what task? -
Blackening brass problem
FredSC replied to Maury S's topic in Metal Work, Soldering and Metal Fittings
Thanks, Dan. I'm convinced. There's nothing like actually seeing it. -
Blackening brass problem
FredSC replied to Maury S's topic in Metal Work, Soldering and Metal Fittings
Query: If Admiralty black acrylic (which I have used) works as well as blackening, why go to the extra trouble? -
Is there a better #11 blade handle
FredSC replied to roach101761's topic in Modeling tools and Workshop Equipment
Looking forward to Phil's after-use findings and conclusions. -
Is there a better #11 blade handle
FredSC replied to roach101761's topic in Modeling tools and Workshop Equipment
I've got a bunch of X-acto handles & blades and have real difficulty neatly and precisely cutting hull and deck planks, etc. Do scalpels work sufficiently better to warrant investing in additional new stuff?

