Thistle17
-
Posts
1,054 -
Joined
-
Last visited
Content Type
Profiles
Forums
Gallery
Events
Everything posted by Thistle17
-
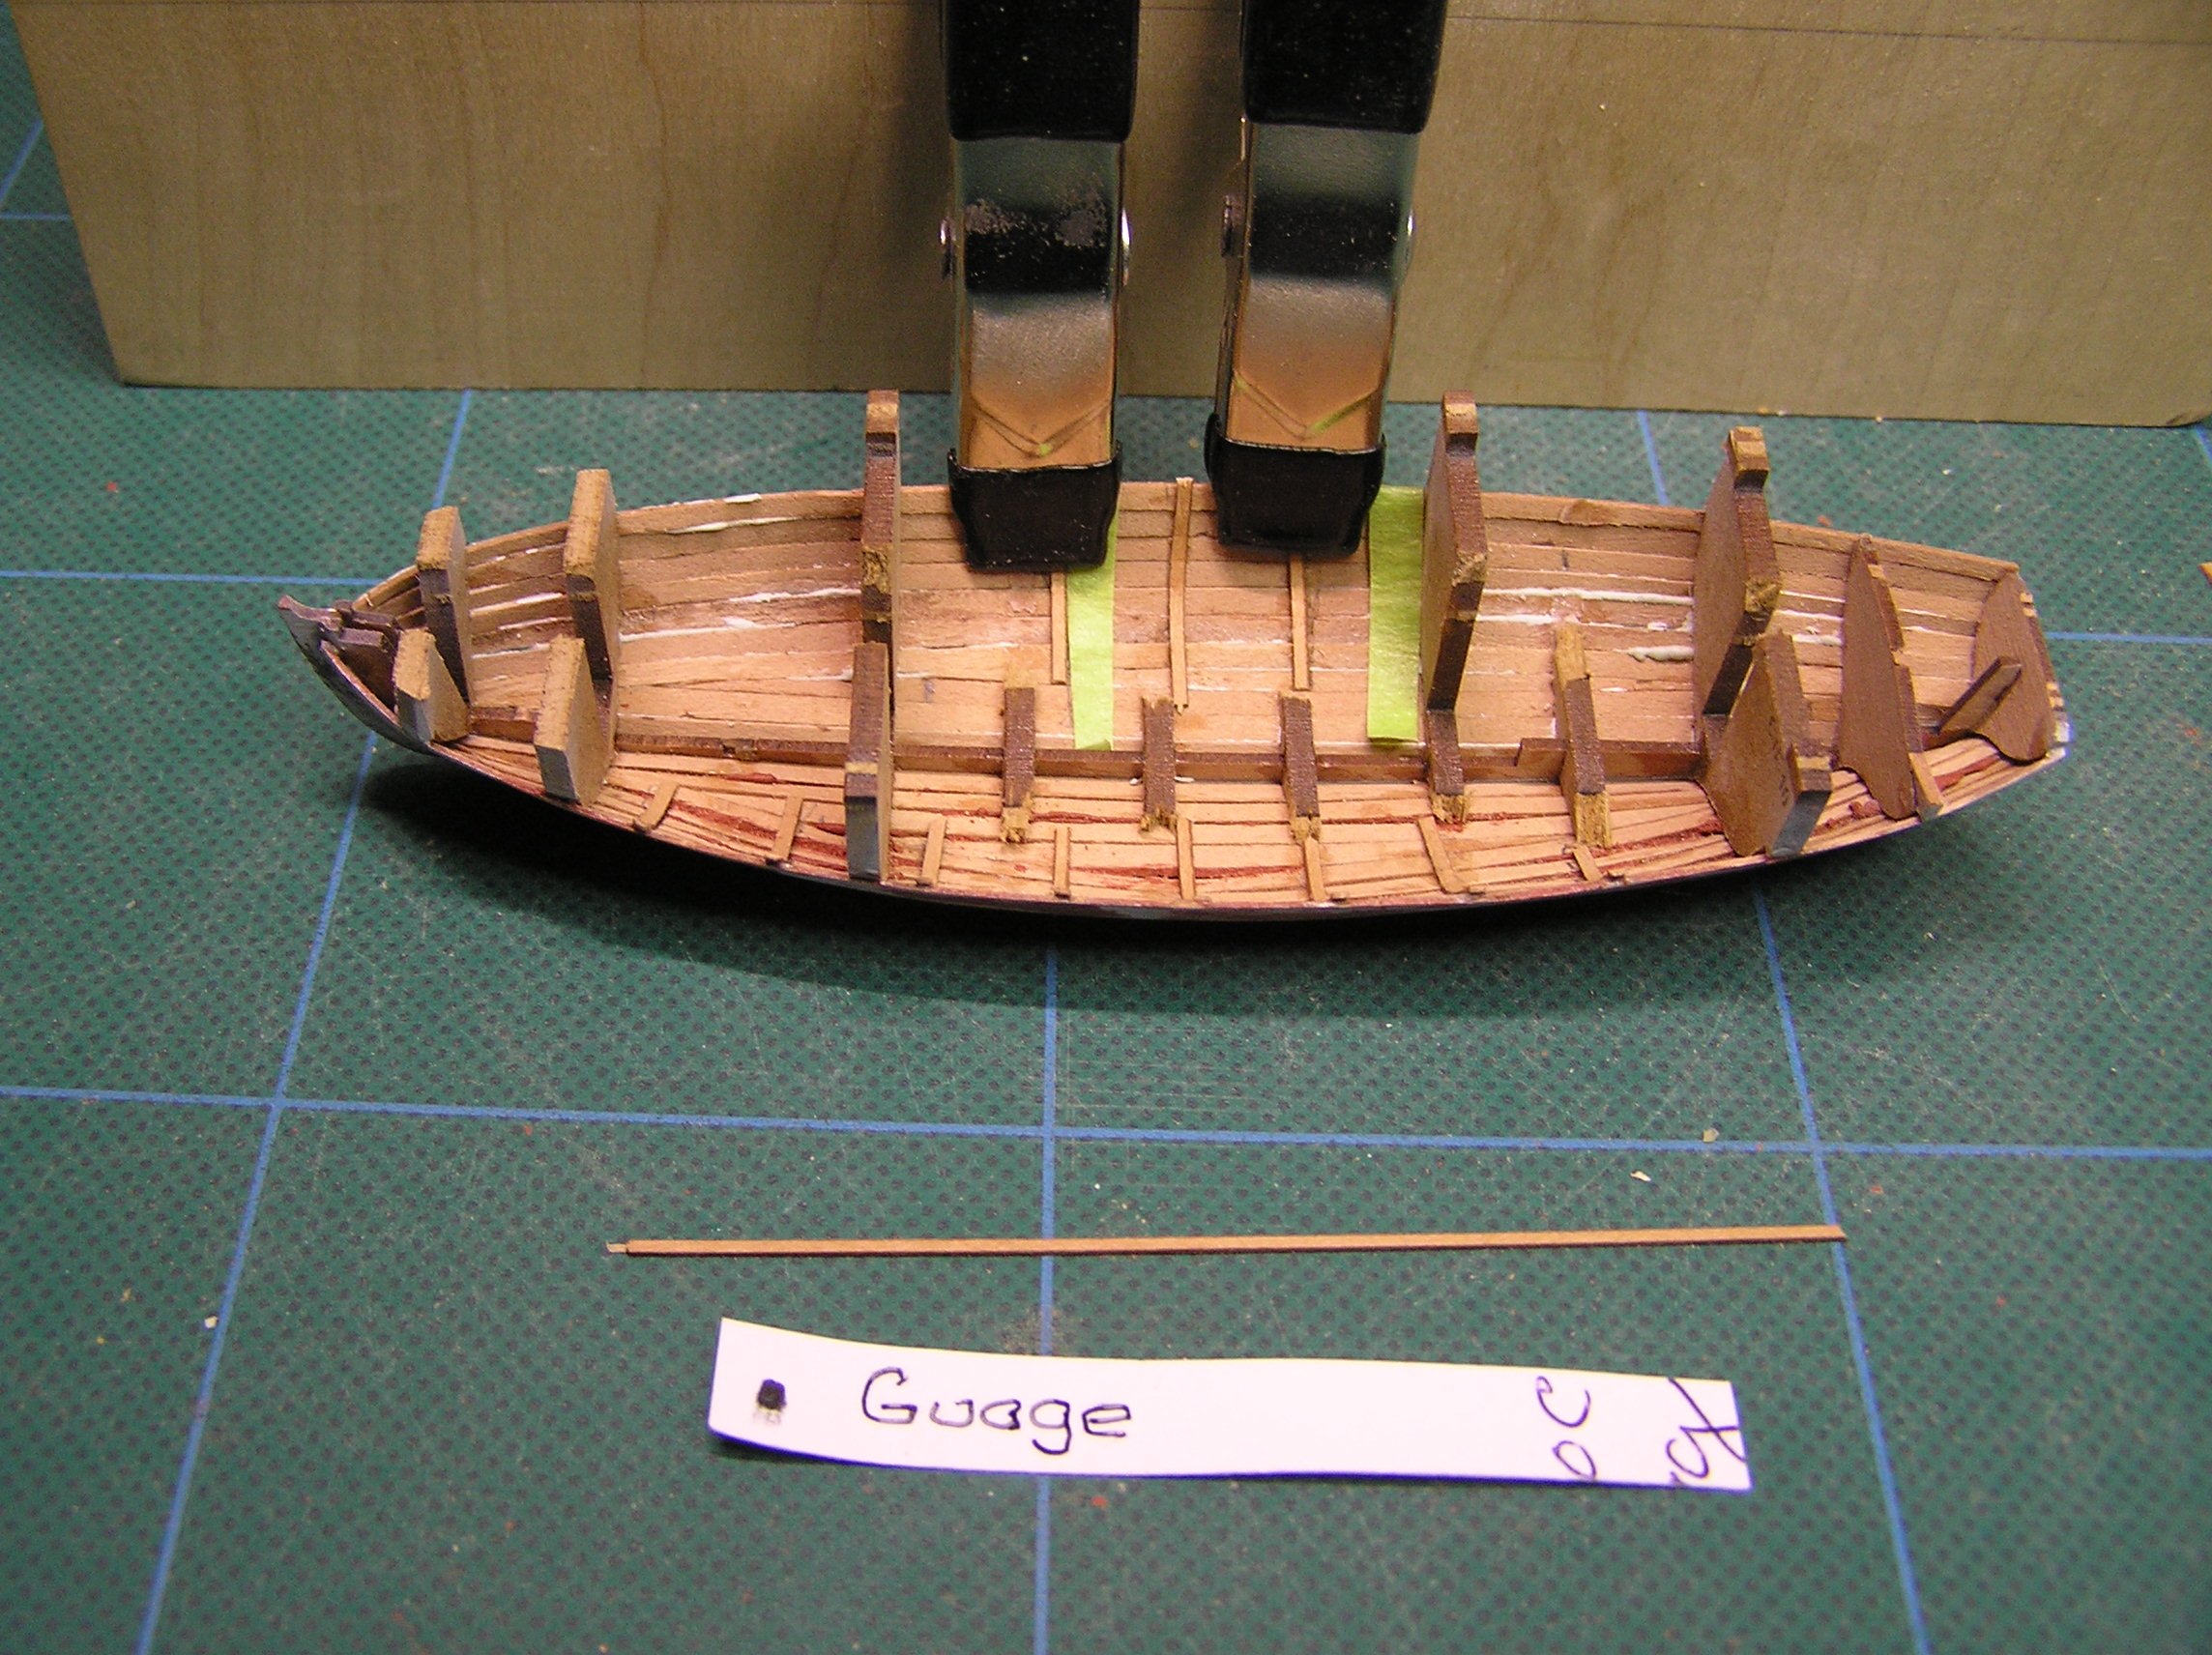
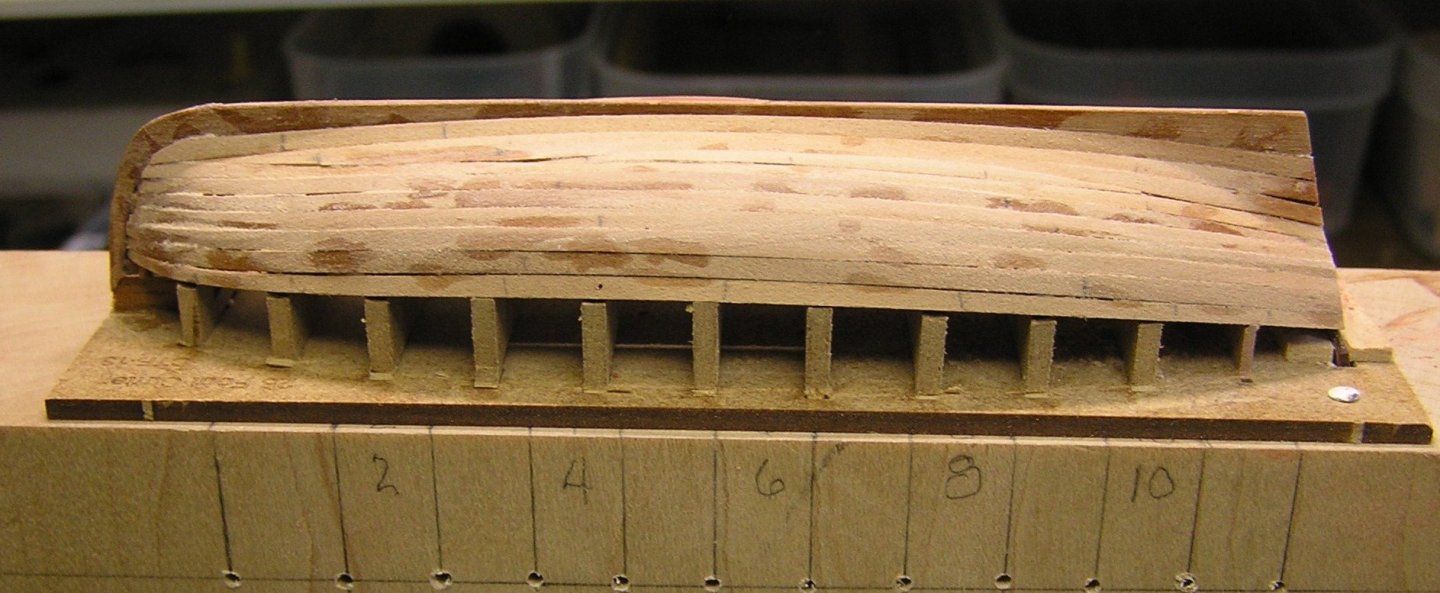
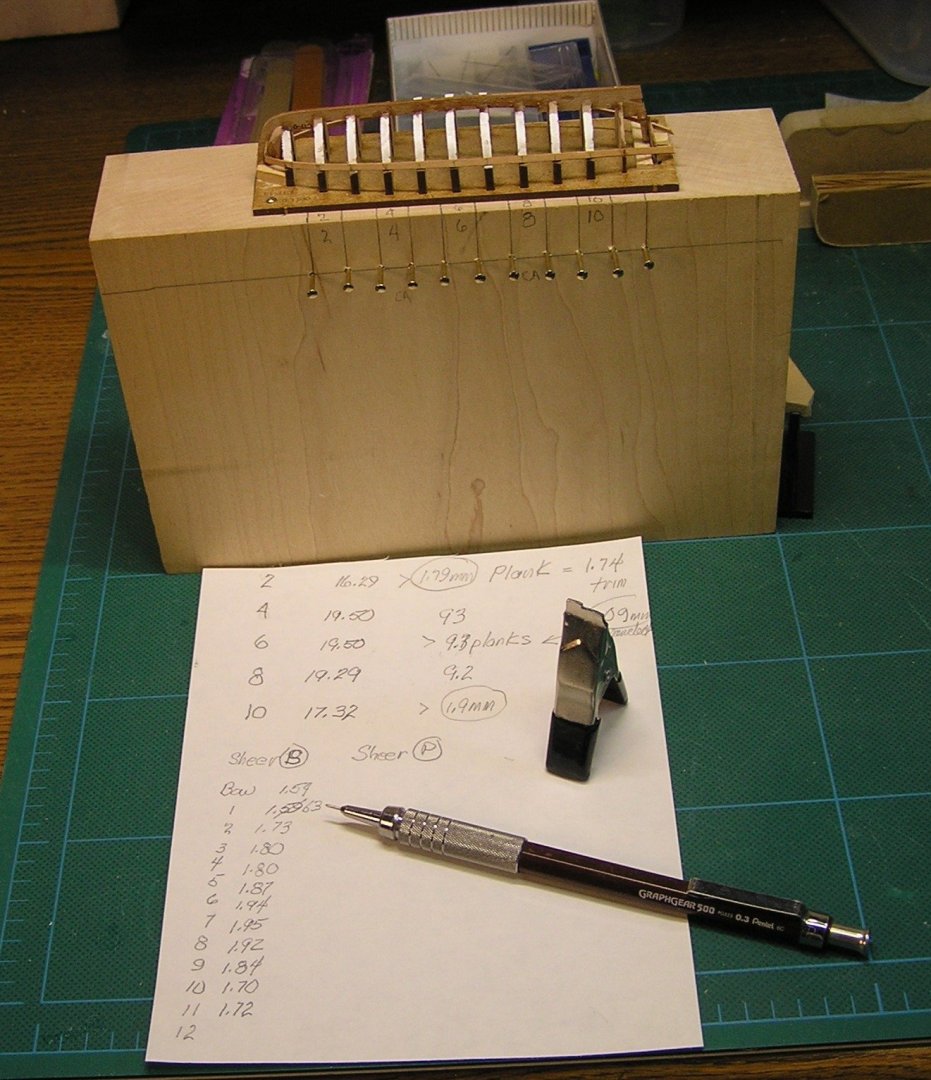
 Live and learn. After completing the hull planking the assembly was removed from its substrate and work began removing bulkheads. This was done with a caution as I had only glued planking to every even bulkhead, and numbers 1, 11 and transom. It was obvious this had to be done quite carefully given my gluing schedule. I began with midship bulkheads 5 through 7 which were completely removed. It should have been of no surprise that some of the planks were seen to separate a tad (hence the tape). Obviously without the ribs this was a given. Ribs were added to stabilize the hull shape in this area. As I proceeded I realized I did not have to remove but half a bulkhead, port or starboard, to add the ribs thereby maintaining a better stablized hull. I will mention that the ribs had to be wetted to prevent cracking as they were formed to the interior. PVA was used so that placement could be accurately achieved. A simple paper guage was fashioned to lay the ribs. At this point only every other rib has been placed. I must add I used the method of scaling the instruction sheet by 5% of the layout shown to get a correct placement layout (the instruction sheet drawing is stated to be for a 24 ft cutter). This idea came from one of the other MSW modelers. You will note the seepage of filler into the inner hull area. I have been carefully scraping this away as I go along. In the remaining build, my last one, I will return to gluing down planks at all bulkheads yet still apply the bulkhead removal I stated above. My planking conformity should minimze any filler need.
- 6 replies
-
- 3
-

-
- cutter
- ships boat
- (and 1 more)
-
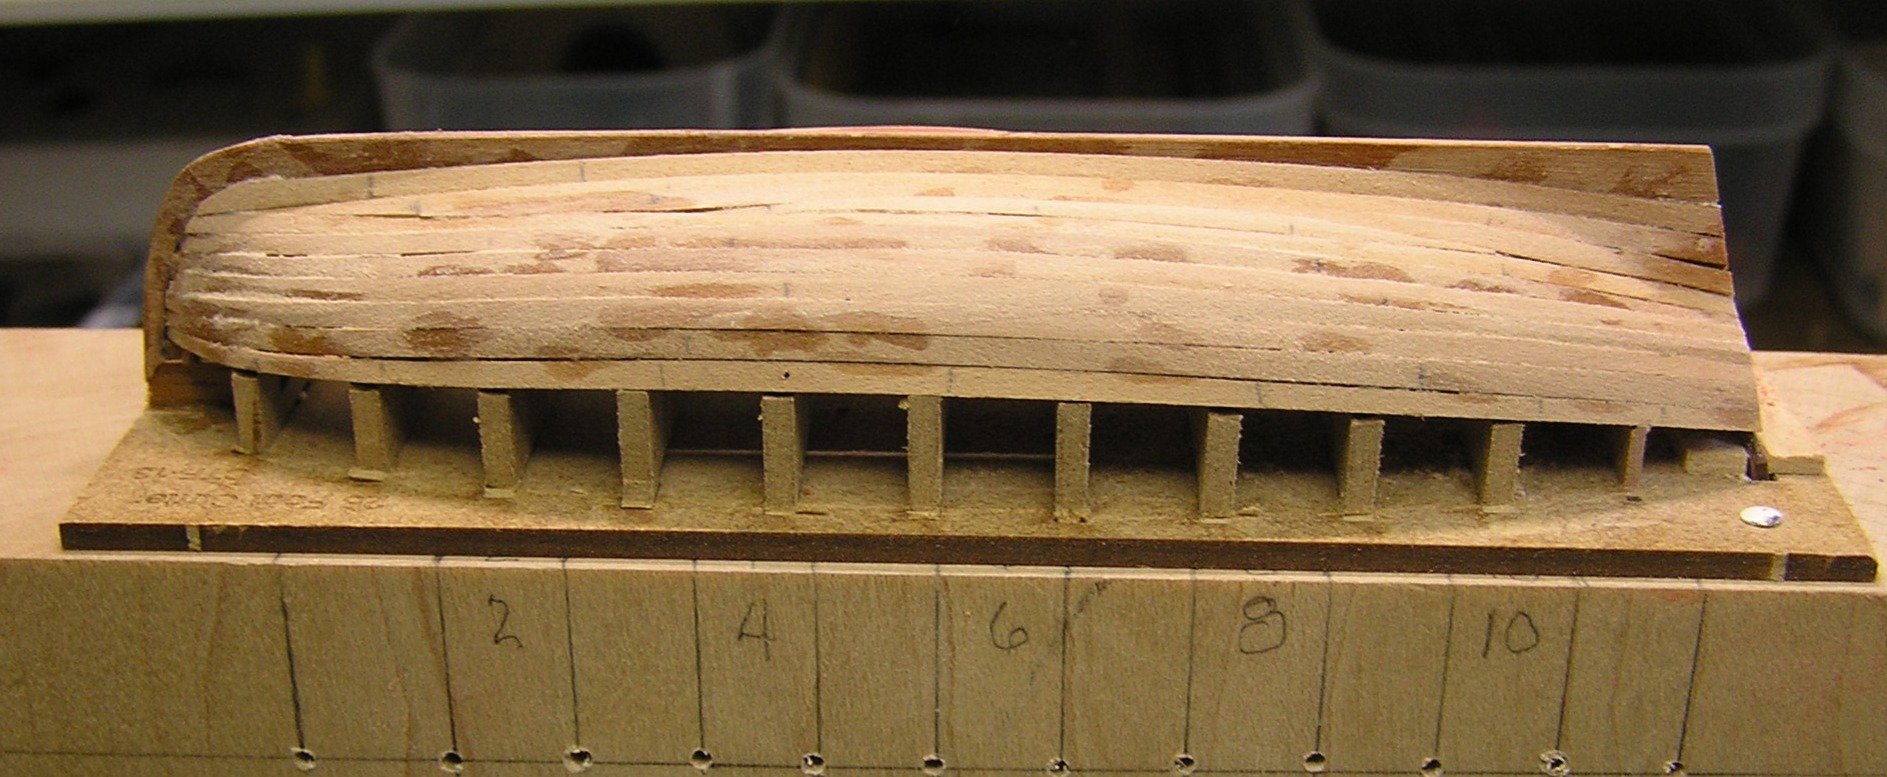
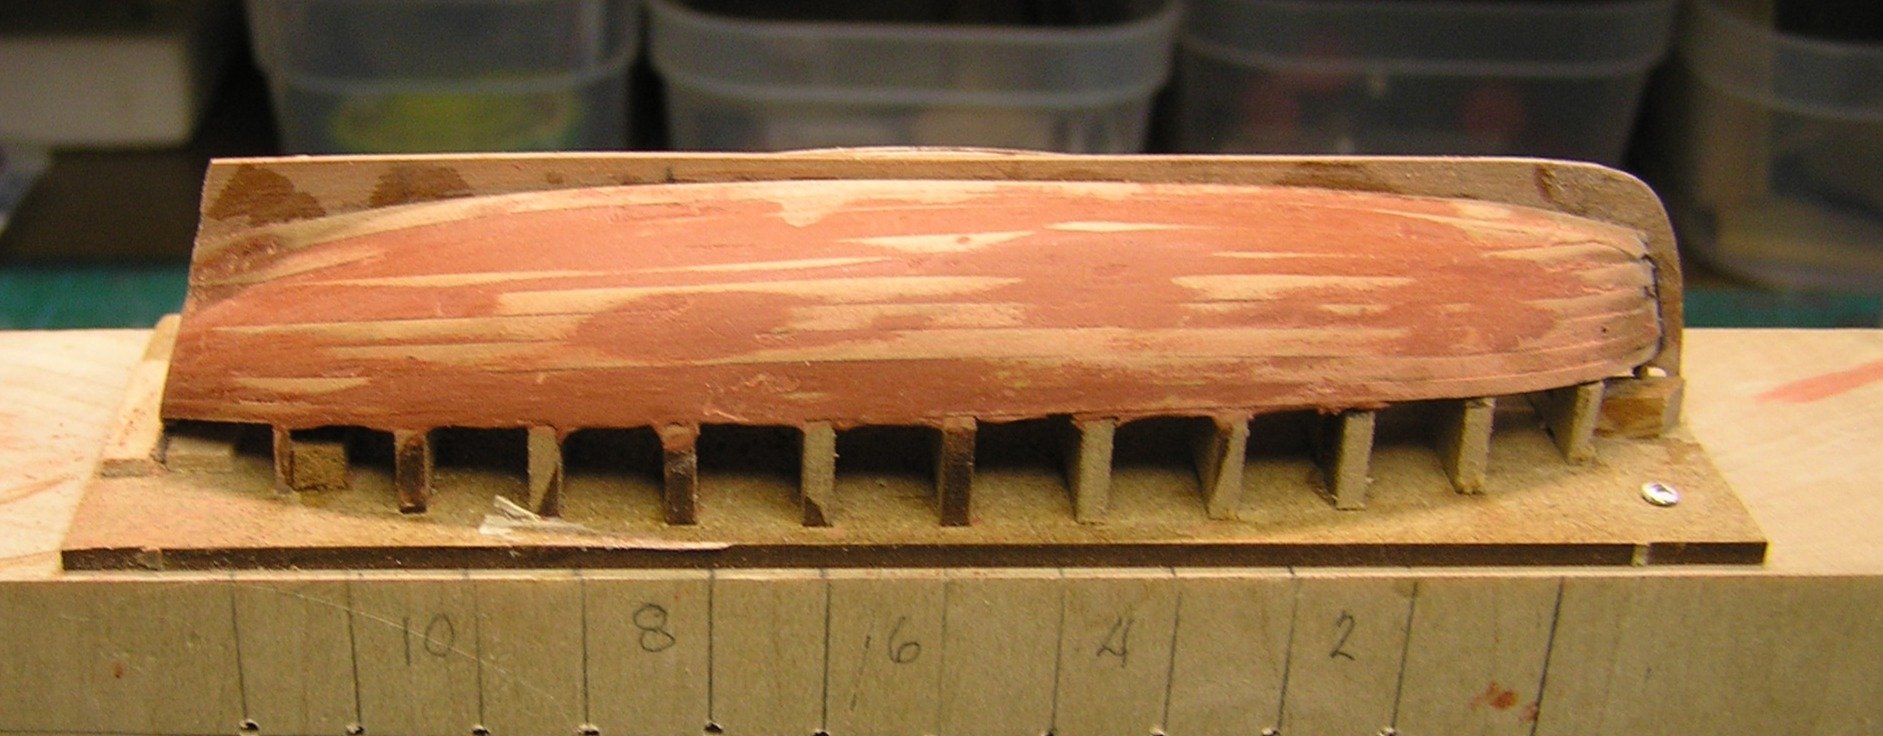
Yet another update. I am finding this project a challenge at every step. The 1:64 scale, the parts size and of course my ability give me repeated pause. The attached photos display the current state of the 1st 25 cutter fully planked. The port side as you can see required a good deal of fairing with the glazing compound. I experimented as previously related with minimal attachment to the bulkhead and I got what I deserved. i.e. a not too pleasing outcome from the garboard to meet the planking from the sheer . Hence the glazing cosmetic required. On the starboard side I gave into more gluing to the bulkheads and glued every even bulkhead as well as the bow and stern elements called out prior. The result is better but still needs the glazing coverage as well. I have since primed the entire hull and will have to deal with the "holidays" I have found. Joe

- 6 replies
-
- 1
-
-
- cutter
- ships boat
- (and 1 more)
-
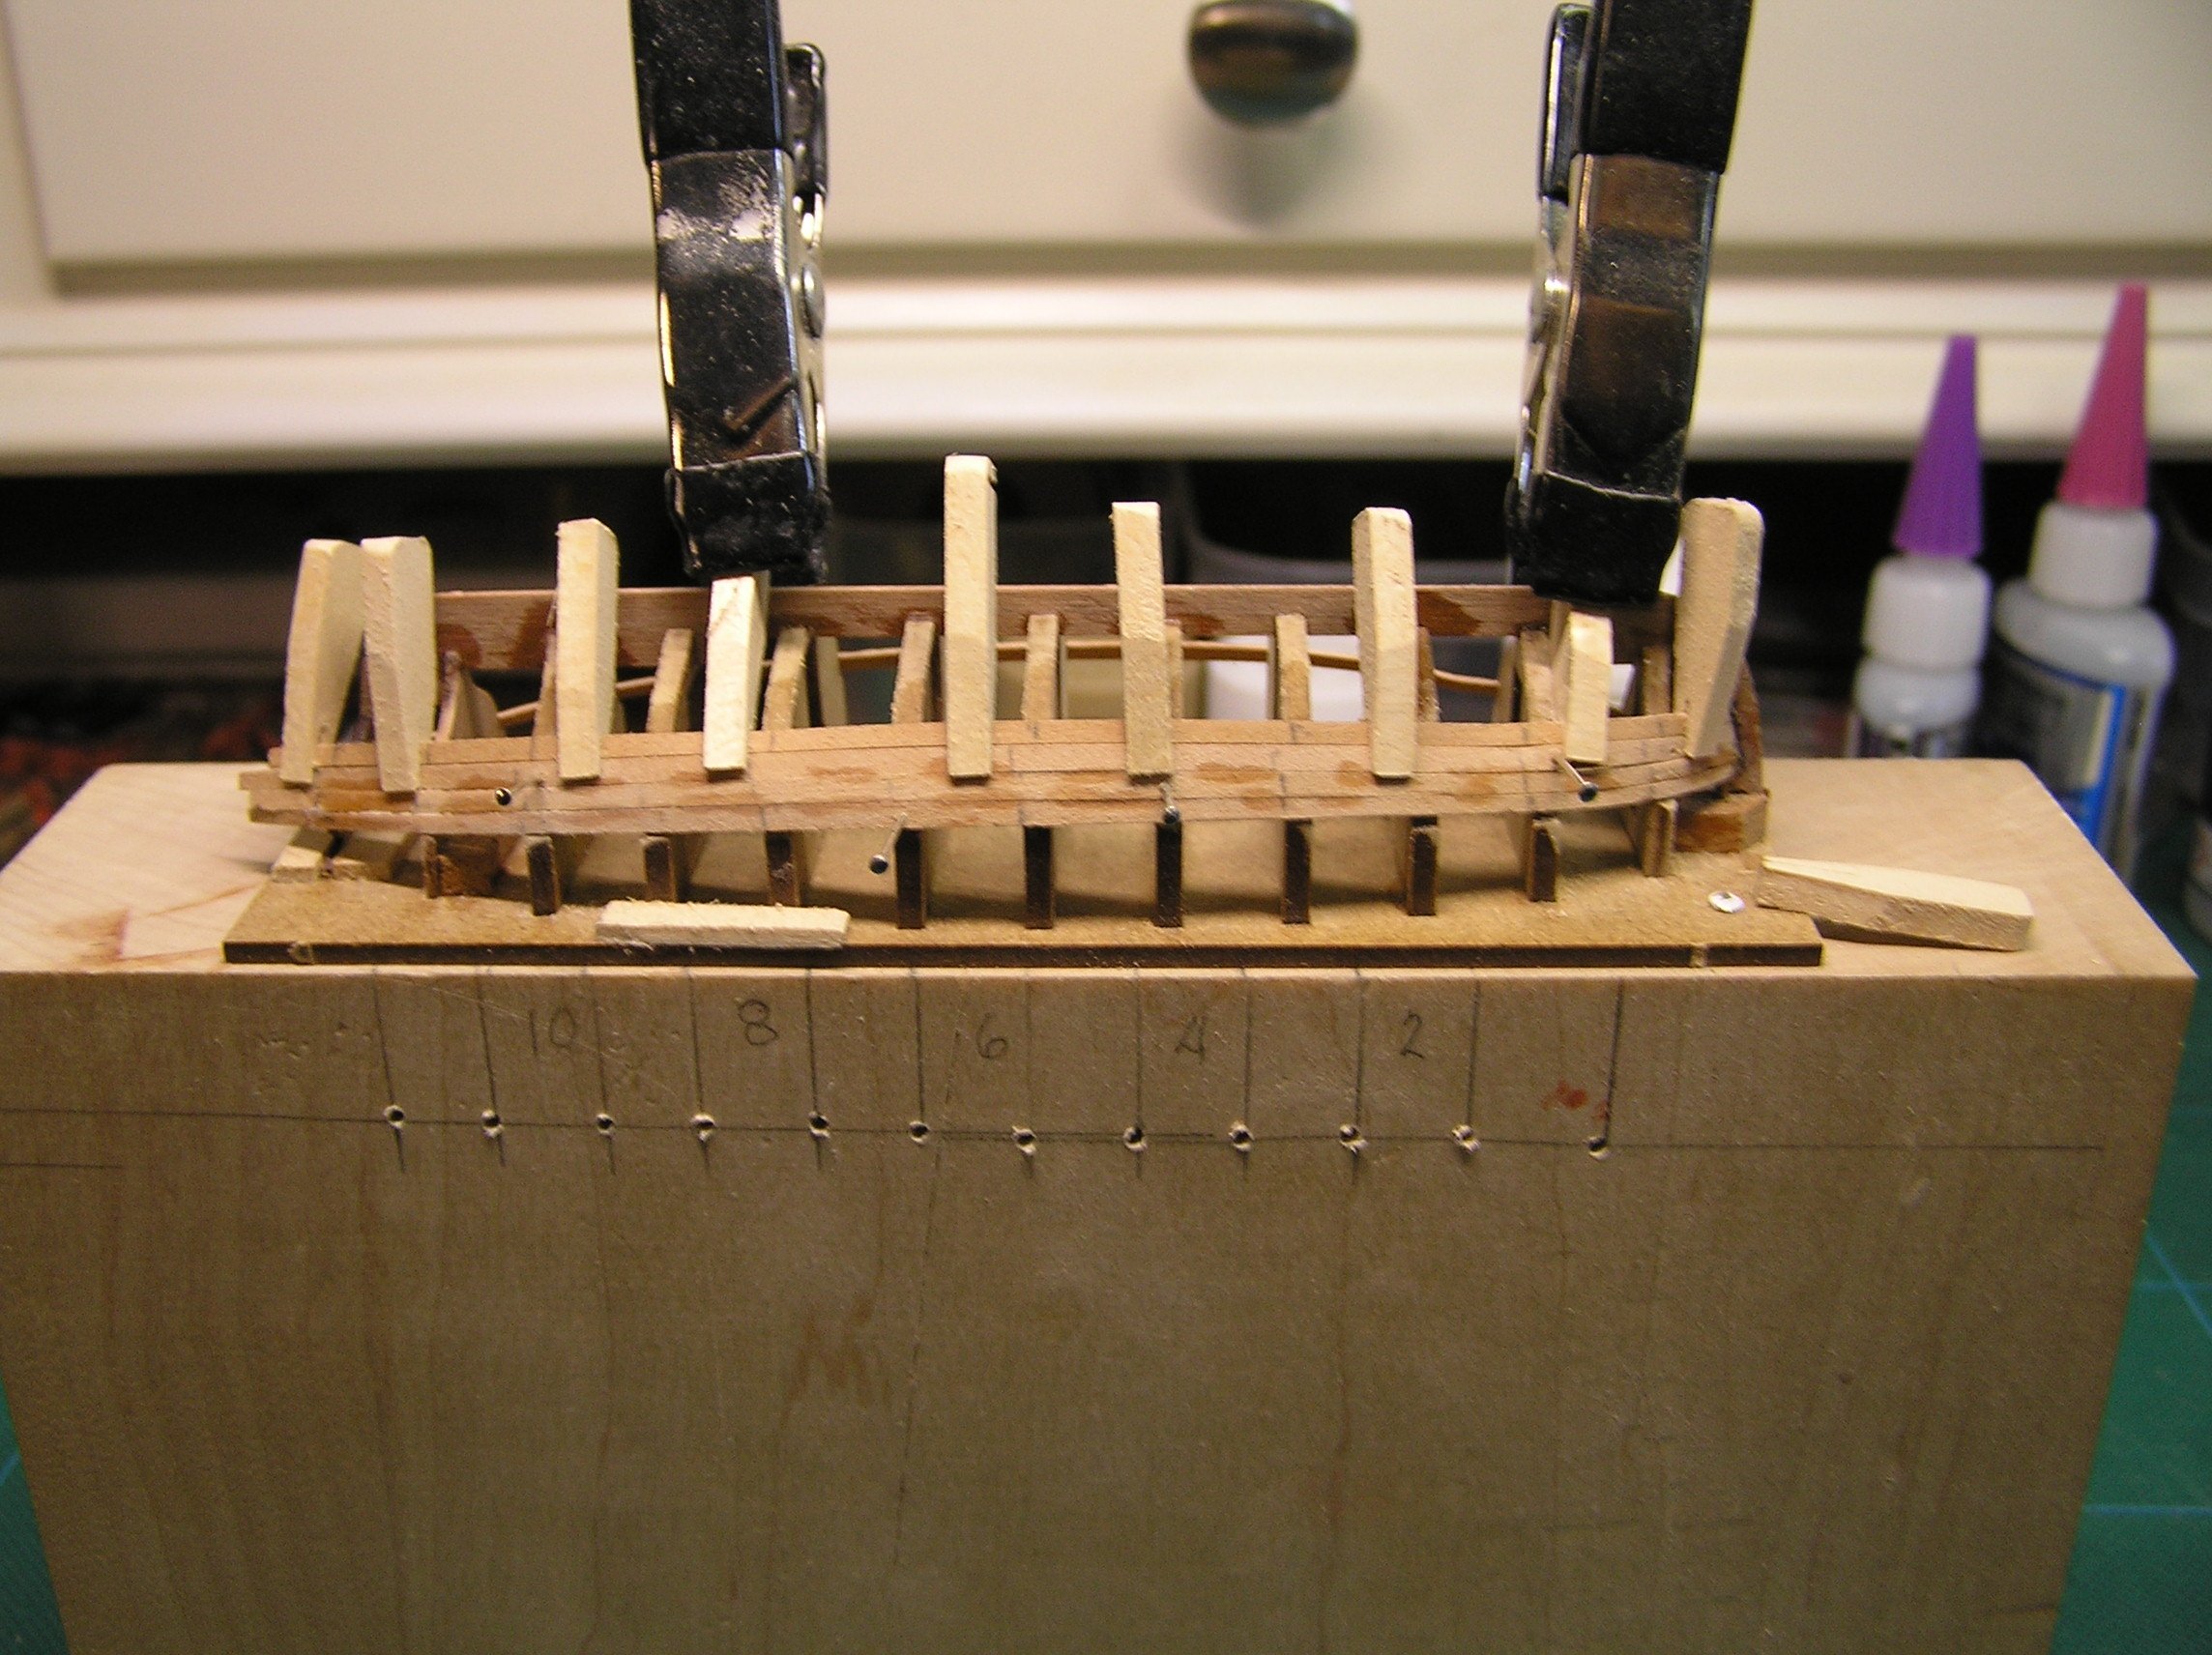
A brief update on the build of the Vanguard cutters. I continue to experiment with methods to improve the build. First some revised approach thoughts above and some new experiences: 1. I had some trouble with former alignment and their height to keep the "keel" straight. Some of the slots for the substrate had to be filed to slightly shift the keel position. I had not encountered that with the 22 foot unit. Secondly I had some engagement problems with 3 of the formers with the "keel". To compensate I had to raise the formers off the substrate slightly to have the two elements mate sufficiently 2. The bow fillers that have to be edge sanded were paired and sanded as a unit on opposing sides. That small act gave a more symmetrical taper to either element. Secondly they were set back away from the bow slot just a tad enabling a much easier transition to the plank lay there and after. 3. I was hesitant to glue every bulkhead to a plank. Instead I opted to skip every other bulkhead except #'s 1,2,11 and 12. I was able to use the rather crude but effective plank clamps to improve plank pair edge alignment as shown in the photo. They are however of very limited use at the turn of the bilge. I resorted to drilling the planks and former and inserting a pin to hold them in place temporarily. 4. A drop of the fast setting CA in between the home made clamp areas and two adjoining planks yielded a relatively pleasing plank pair edge permanent conformity. 5. There is a point where one runs out of plank "real estate" at the bow to continue planking towards the garboard. Once there one has to begin planking from the garbaord towards the existing planking. I found it impoosible to add drop planking anywhere so I was left to plank wwith minimal taper in the bow from the garboard. Eventually one runs in speared plank ends. What helped this time was to alternate where the taper landed i.e. the upper or lower plank. This gave a more natural transition of the intersections. Joe.

- 6 replies
-
- 1
-
-
- cutter
- ships boat
- (and 1 more)
-
Here it is April and I have little to show that I think is worthwhile. I built up the 22 foot cutter to the point where it is off the forms and smoothed on the outside. I started out using a cream like filler from DAP but despite what the tub says about drying to a firm substrate I would disagree. I then resorted to my standby, Nitro Stan, glazing compound, an auto body product. The results were musch improved. Yet the results of the overall work just do not meet my reuirements. It has been put aside for the time being. In the back of my mind when I started the 22 footer I had thought if I foul it up I have sacraficed just one of the 3 projects. My "scarfice fly" so to speak. A learning endeavor. So at this point I pushed back and analyzed where I could improve the build(s). Here is what worked and what I need to work to improve: 1. The elevated building block provided a stable platform and was easily moved about. Fastening the substrate to the block worked. The nails were of little use in securing planks. 2. Painting the formers with white paint was a mistake. Paint residue inside the hull was a clean up problem. I will opt to use a clear barrier that is not paint. 3. Edge gluing proved to work reasonably well. Cleanup externally was easy. I will be attempting some clean up internally as I move along. I will stick with PVA as it is a bit more forgiving when respositioning. I plan to use CA at the bow and the permanent bulkhead and transom. 4. Plank tapering worked. I could have taperd planks to around 1 mm fore and aft for a better result. 5. Planks were damped only in the bow area to achieve the desired form. More on this a bit farther on. Here are a few considerations for the planking stage of the 25 footers. 1. Before positioning the formers in the substrate I accurately measured the linear run of the even numbered formers, the numer 1 former and the permanent bulkhead and transom. Using auto detail tape accurately placed on the elements I recorded the end points of the tape and placed them on a story board. These were measured with a caliper. This provides a decent tapering schedule. 2. All planks will be overall dampened and temporaily fastened to the formers to dry before gluing. 3. I will experiment with steelers and drop planks to see if I can avoid slivered planking. I will update as I proceed. Joe
- 6 replies
-
- 2
-
-
- cutter
- ships boat
- (and 1 more)
-
This is a goft Paul! Thank you so much. I have had help from David Bennett from the the NC Maritime Museum had shared some info with me that had given me pause. He related that these boats could be piloted by one individual who also manged the forward and main sails. That alone would be a handful. But when looking at a deck overflowing with the days catch one has to wonder how any line forward of the main storage hatch could be adroitly manipulated. With no sheer poles, nor side rails I am going to have to add cleats around each mast to satisfy the logical needs. One last question who is USVMYG? Joe
- 201 replies
-
- 4
-
-
- Oyster Sharpie
- first scratch build
- (and 1 more)
-
Just stumbled across your build. What a treat to see your process and product! I have in my possession a Florida Sharpie that was built by an unknown modeler that I have been working on (it needed some repair). It is also scratch from Chapeles collection. Part of my problem has been how to finish off the haliyards etc. as there are obvious restrictions. The smithsonian plan I have shows no rigging. Was wondering what your reference was. Joe
- 201 replies
-
- 5
-
-

-
- Oyster Sharpie
- first scratch build
- (and 1 more)
-
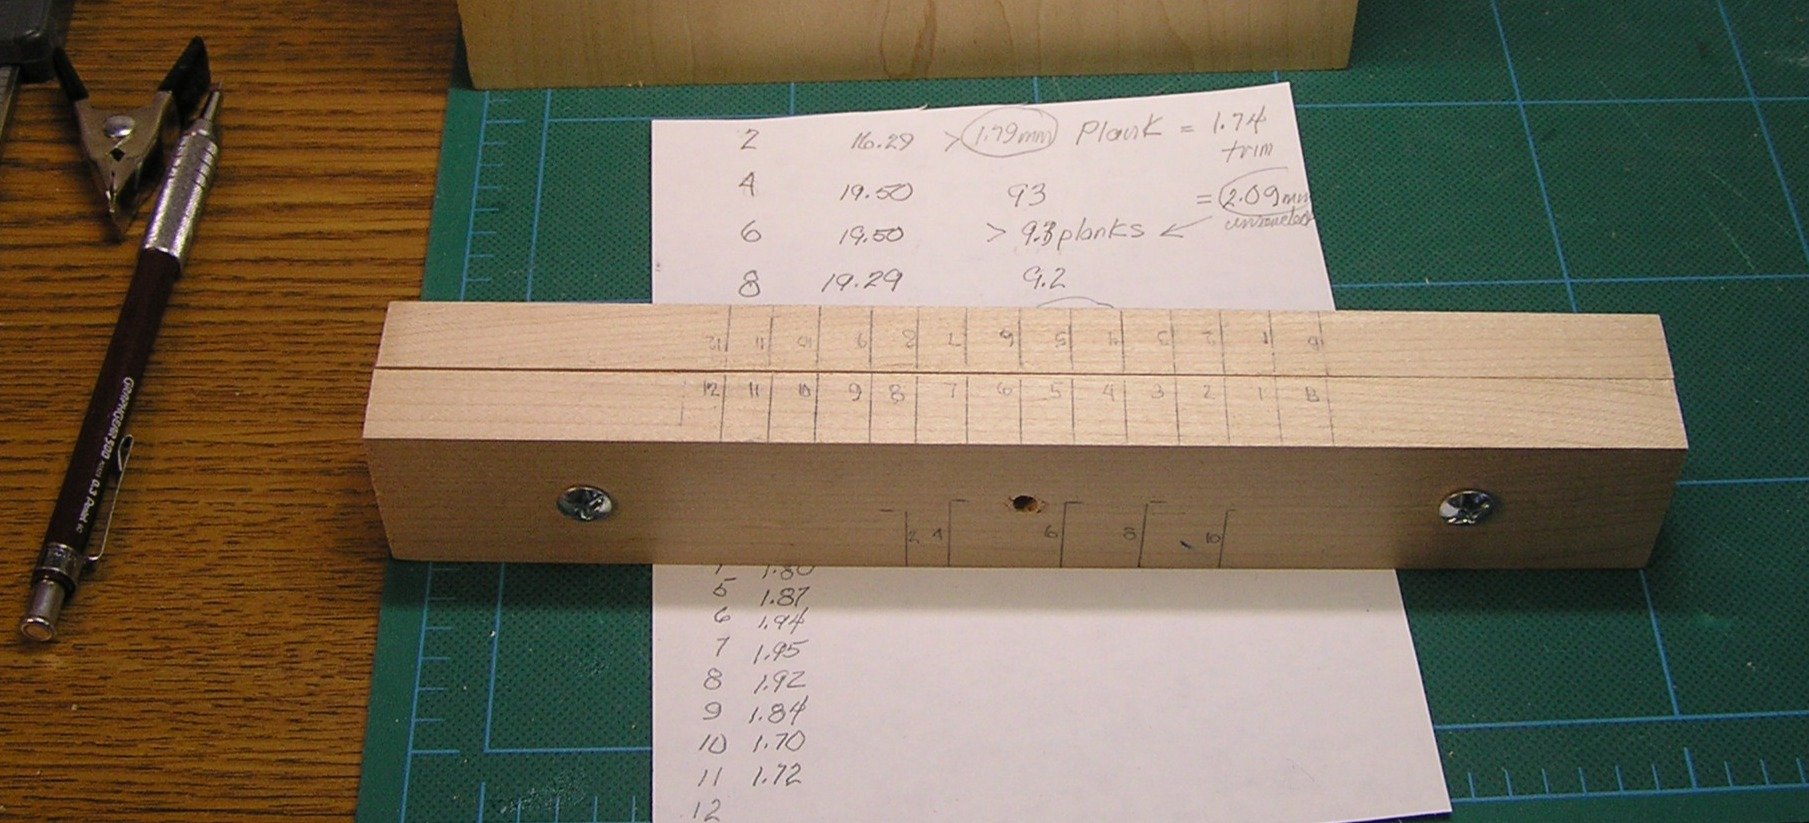
Let me say at the outset I am not evaluating the kit or its design and manufacture. I will however record my experience of the build with these kit(s. Like all Vanguard kits I am aware of, the assembly is POB using mdf as the bulkhead material. It was easy enough to assemble the substrate and bulkhead. . At first I assembled the bulkheads with all members from 6 forward facing the bow and members 7 through 10 facing stern. Given the nature of laser "machining" finish I thought I would benefit by preserving the proper bulkhead edge when fairing. Hiowever upon installing the keel there seemed to be a bit too much intereference in mating. The solution was to orient the bulkheads all facing the bow. Residual fit problems were lessened but the fore more bow bulkhead had to be thinned to fit the keel slot. I installed the permanent bulkhead ahead of the transom and faired the hull. Prior I did brace the keel stem as shown. The support height is just shy of the sheerline. During fairing I could feel some of the bulkheads moving on the substrate so several were secured with some PVA. Also using diluted PVA on the keel-bulkhead joints loosened and were ultimately secured with a surgically placed drop of CA, The transom is an extremely delicate part and is easily separated from its substrate restraints. Even with very deklicate sanding with 220 paper to slightly taper the edge of the transom it broke away taking part of the keel vertical support. It was easily repaired and I moved on. In planking I took a very deliberate approach. However I did not "line off" to create planking bands given the dimmuitive surface area. Instead I measured and recorded the surface length of each bulkhead. That would have been more accurately done on free standing bulkheads I might add. Then taking as near an accurate measurement of a plank width I determined the number of planks at bulkhead 6. Each bulkhead forwad and aft that was measured and recorded gave me a measure of the taper required of the plank as a percentage. Using a shop made plank holding device the sheer planks were fabricated. After recording mid bulkhead points on the end of a maple block I fastened the build to the platform. I drilled out and press fitted pins to hopefully aid in holding subsequent planks down as I progress. I elevated the build so I wasn't bent over the bench. It also stabilizes the build . In a close up of the bulkheads you will note they have been painted. I am a bit unsure of this measure to ease the breakawy of bulkheads when turned over but at this point yet another cautionary measure. In placing the sheer strakes I did use CA at the bow, the stationary bulkhead and transom. In addition a small drop of CA was placed at bulkheads 4 and 8 to keep the plank starter from moving. I am planning on using PVA to edge glue subsequent planks. The plank holding jig is shown below. It is held together with 2 screws. There is a dado running down the inside faces and a spline is located so the plank protrudes at the top. I have recorded the bulkhead positions on the top surface. Before sizing, planks are dampened for the first few inches and formed on the hull. Each bulkhead ,location is marked on the plank in place. When dry the plank is removed and aligned on/in the jig. A sanding block is used to taper the plank at its correct locations based on the taper reduction calculated. Joe

- 6 replies
-
- 5
-
-
- cutter
- ships boat
- (and 1 more)
-
I had debated entering any data that I acquire as I build 3 of these kits for a special project I have begun. After all what could I add that either hasn't been documented by others. Those of you who have gone before me know well the challenges of these kits. I would offer that their size and the nature of the parts would challenge one regardless of the skill level. I am finishing a model of the Niagara that was gifted to me by the family of a friend and fellow modelr who has left us. The model hull, masts, spars, bow sprit, all deck furniture and cannon are complete Some minor exceptions are needed as well as 3 major ones. None of the small boats have been fashioned. It has sat under a plastic cover for almost 3 1/2 years until I finally got my head around completing it to a "reasonable" end stage. I will explain. I do not have the room nor time to finish the model fully rigged. Hence I am completeing it sans the masts, spars and rigging. I have completed a case for the model, teaching myself how to work with arcrylics and I built a proper base with the expert and kind guidance of members of the Midwest Model Shipwrights. The model of the Niagara is beautifully executed. Notably missing are those life boats. I experiented with the Model Shipways lift method of completing them but was not at all satisfied with the results. The carving did not deter me but detailing at the correct scale dissuaded me. I researched a number of options and finally decided to purchase the Vanguard small boats; namely 3 cutters one 22ft cutter and 2 25 ft cutters. The plans call for 2 cutters and 1 yawl but built up size led me to this compromise selection. As I record this information I realize I have left off one more missing element. No port and starboard davits have been installed. The spare parts I have is one davit short so I am fabricating my own. More to come as I build these bioats. Joe In ensuing segments I will detail how I am going about fabricating these devilish little boats. Joe

- 6 replies
-
- 4
-
-
- cutter
- ships boat
- (and 1 more)
-
I responded on Schooners MS thread that his steps and tips were of great value to me. I had not read your postings at the time. Your approach overlayed with his are going to save me a good deal of headache. These little boats are certainly a challenge for their size and can get one in some trouble without this acquired knowledge. Thank you. Joe
- 22 replies
-
- 1
-
-
- 24 ft Launch
- Vanguard Models
- (and 1 more)
-
It occured to me to give one last try to see if anyone had built any of the Vanguard small boats. Just changing a few search words andIi found your detailed posting. I acquired 3 of the cutters to finish off a Niagara model I am doing as a tribute to a passed member. He never got past the hull completion. I experimented with the stacked Model Shipways small boat builds and was completely unimpressed. I am on my first cutter and I found the directions wanting. I even reached out to Vanguard and he recommended CA. I like your approach better. Your tips are of immense value and I shall keep refering to your methodology. Thank you so much. Joe
-
Haven't visited this portion of the site for some time Frank. Life has been a whirlwind of distractions and other ventures. I put Winchelsea away after I became frustrated with my attempts at executing a build of comensurate quality as others. I am my own worst critic. In the mean time I actually bought from a fellow MSW member a complete and brand new skeletal package of her and Chapter 1. I am going to start over. I may offer my current work to someone in our group after I advance the new one to this stage hoping to incorporate what was right and do over what was wrong. I may write an epitaph here and start a new thread. Have yet to decide. What is that saying? "If at first you do not succeed........!" Joe
-
Hello Alan. I have just been contacted by a private owner in Dansville NY that has a model of the Conrad. He wants to give it away. I was looking for a source for the ship's plans. Do you recall how you got them or if you would give me the contact info for the present receipent?
Regrds Joe Lorenzo
-

The ship Joseph Conrad is one of the two you can actually go on at the Mystic Seaport Museum in Mystic, Connecticut. Their museum web site is: mysticseaport.org. Check their museum shop/store for any plans they have. I make regular visits to their site as my favorite ship there (Charles W. Morgan) is next to the Conrad.
Hope this helps,
Allen
-
-
-
-
Ron I haven't tuned in for some time. Life events have diverted me. Not surpirised to see your work progress with exceptional execution. You continue to amaze me with your ability to work with hand tools! Joe
-
Pete I stumbled on your build and it was a lucky find. very nice work. I have wanted to build the 12 1/2 haven for some time. I would like to doit scratch. Do you know of any plans out there that do not cost a fortune like the Wooden boast plans? Thanks Joe (Thisthle17)
BTW any more progress on your build?
-
Paul I plan to follow your build progress. I acquired the Florida Shapie Fishing Schooner that is recorded on this site. Panel #33 is where I finished off about a year ago. Still some rigging to do and a case. I acquired it from the estate of a fellow modler who found it in n antique shop about 5 years ago. The model is scratch and is done equistely so I am challenged to achieve the quality it deserves. David Bennett of the NC Museum sent me some pictures of rigging of models in his collection you may wish to study. The rigging of these vcessels is relatively simple but there are some gaff hauls that I have yet to find a home for since there are no logical termination points but at the masts. Joe
- 201 replies
-
- 7
-
-
- Oyster Sharpie
- first scratch build
- (and 1 more)
-
I attendd a session of the Modelswrights of Niagara yesterday and was made aware of this procedure. I am about to go through this procedure on my Byrnes saw which was upgraded with the wider table top. I shared the very problems you all relate and I have a drawer full of tortured blades due to the misalignment of the fence. As I think back this all became a problem when the table top was replaced. Of course I was not aware of this procedure. I will feedback my experience for others. Joe
-
I am sorry somehow I did not look close enough at themachining method as I seemed to think it was a laser. So another comment is that I had some blow out on the fback side of the material from the router cutter. I had to add some "face material to that side for those that became "cheeks" of gun ports. It turned out that the .015 material thickness deficit became a non problem when compared to the drawings as I used .015 AYC. Joe
-
Welcome to the group 'Archie"! I too took the route of fabricating my own bulkheads and "strong back". However I chose a CNC router route. It did not go well for a number of reasons. A couple of cautions. I did not have the witness marks for the gun ports added in. I hand scribed them using the drawings. Are your bulkheads laser cribed? Secondly the drawings depict 1/4" bulkheads. The material I used was .015 thinner. Where this showed up was in the transom area. Chuck has cleverly designed the transom assembly parts so when assembled yield a well registered framework. Check your work carefully and if you go to "Stuntflers" build you will see he had to build out the last bulkheads to align correctly as they were .015 shy as well. These are just cautions that I learned the hard way. Joe
-
Fine model! Fine woodworking! They do work together don't they! Joe
-
You are a brave and determined heart! I too gave up on my first build of Winchelsea after too many compromises. I started with my own frames, strongback etc and although relatively sucessful error started to creep in and things went slowly downhill from there. I am poised to start again but your restart is impressive. I will surely follow your journey! Joe
-
Indeed Gleen virtually impossible to get all the char off given the thickness of the stock and the "dwell" time of the laser. I too had to call it a day before i went too far. Joe
- 840 replies
-
- 3
-
-
- winchelsea
- Syren Ship Model Company
- (and 1 more)
-
Glenn on Cheerful I ganged 4 canonn wheels of like diameter on a screw of prpoer diameter. Placed a nut on screw end to secure them. I placed the wheels so that the "fatter" diameter of two wheels faced each other. Then I carefully but ever so lightly turned/sanded them on my lathe. The key is to keep the pairings together once removed. Worked fairly well. Joe
- 840 replies
-
- 6
-
-
- winchelsea
- Syren Ship Model Company
- (and 1 more)
-
You set the bar quite high Glenn. And I must compliment your photography once again. It compliments your model work so well. Joe
- 840 replies
-
- 4
-
-
- winchelsea
- Syren Ship Model Company
- (and 1 more)
-
Glenn tune into Emser on You Tube you will see what grabs me about him! Joe
- 840 replies
-
- 4
-
-
- winchelsea
- Syren Ship Model Company
- (and 1 more)