


davec
-
Posts
382 -
Joined
-
Last visited
Content Type
Profiles
Forums
Gallery
Events
Everything posted by davec
-
 Chuck - thanks so much. Would have been great to have this before making rope for Hannah - spent weeks figuring out recipes and how to color. And I do remember morope - beautiful looking stuff, but if I ever forgot to superglue prior to cutting, major unravelling. I have your rope rocket and am looking forward to getting my Sharpie to the rigging stage so I can try it. Dave
 -
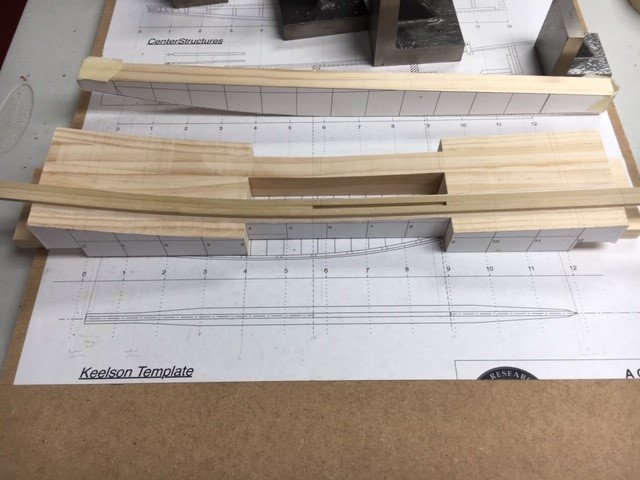
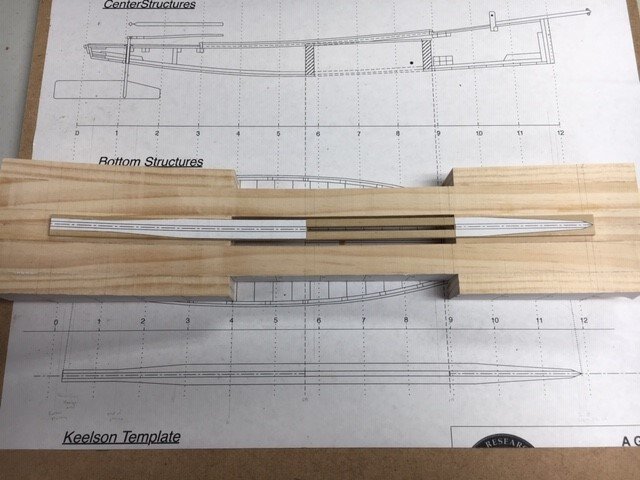
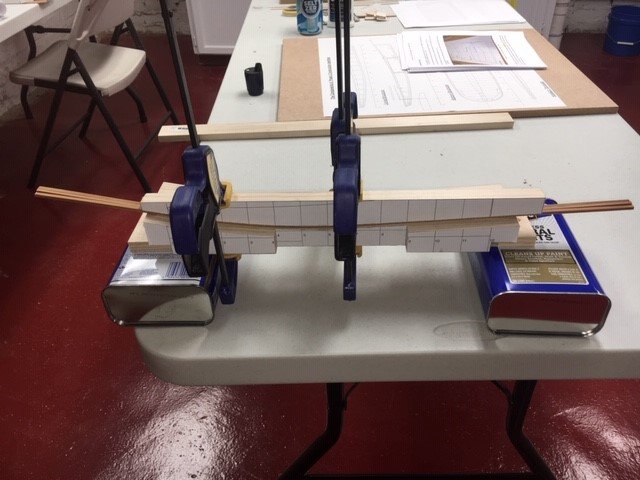
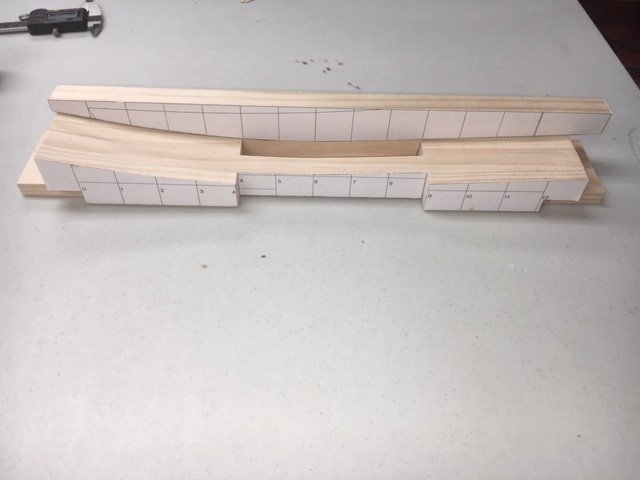
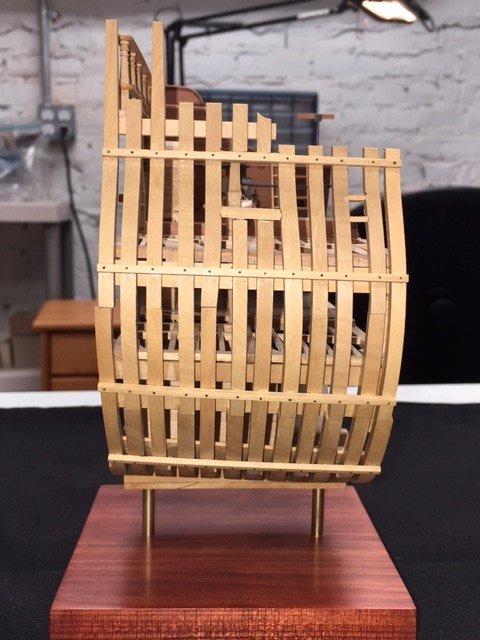
Took a week to get the keelson strips bent. Kept soaking them and clamping them in the jig to dry, but they didn't fully conform. Finally took my plank bender, heat bent them, then clamped them, and they kept the appropriate shape. Important lesson learned - lots of other parts to bend. Next time will start with the heat and get them shaped in a few hours. Very different from planking a hull, where you only need to get them close, then glue in place to keep the final shape. Major step - up until now have just made jigs. Now I have an actual part of the model.
- 75 replies
-
- 15
-

-
I use the band saw to slice billets from large blocks of wood. I put the billets through a thickness sander, then slice them into the final planks with a mini table saw. The band saw is nowhere near precise enough to cut final planks.
-
The saw that Chris posted about is the same Dewalt I use. It is awesome- couldn't agree more.
-
I have both a scroll saw and 14" band saw. While I bought the band saw with the intent of doing lots of things with it, the scroll saw has met my all my needs for precise cutting of small parts. I have a Dewalt, which I really like. There is some vibration (can't see how you could avoid having some), but not enough to affect ability to cut. The band saw gets left set up with a resaw blade to rip thin sheets when milling wood. Way safer than a table saw, so it was worth the investment for this alone. If I was only going to buy one tool, it would be the scroll saw. It could be replaced by a coping saw, but I have limited time to model, and cutting all the frames by hand would turn my projects from years to decades.
-
Glad to see you enjoying your retirement and back to work on your model. I built Hannah as my first scratch build (log lost when MSW crashed around 2012). Yours is coming along great!! Love all the interior details you are adding. Dave
-
Jointer question/recommendation
davec replied to davec's topic in Modeling tools and Workshop Equipment
Thanks everyone for their great thoughts. Still thinking about the jointer and hoping to get some thoughts about whether a 6" benchtop machine would meet my needs, and if so, which one to get. Bob and Roger - will keep an eye out for an older machine, but shopping during the pandemic is limiting, and a new machine would be a lot easier to get. They don't seem to sell 4" any more - 6" seems to be the standard. I'm assuming that if a 4" would work, then a 6" would as well. Any issues with boxwood or pear on these machines? Is the motor powerful enough for really hard wood? I agree with Marks' concerns about wasting wood, but think a single side done with a jointer may decrease waste compared to what I am currently doing. Agree with Bob that pushing pieces that are even a little bit wobbly through a band or table saw is something to be avoided. I need both hands and all fingers for work. Without a flat reference side, I often end up with billets a little thicker than they need to be going through the thickness sander, then still have to get a square edge on the piece once sanded to thickness. I don't need furniture smooth on the edge, just enough to have a flat surface against the band or table saw fence. I appreciate Mark's concerns about the amount of waste in jointing at 36" surface, but I'm thinking that if I work in my more usual 20-24", there shouldn't be as much lost. There is always a lot of waste in milling, and I'm hoping jointing one side will be safer and a little less wasteful than what I'm doing now. The sled is neat, and would work great if I was working with planks. I'm milling 3-5" wide pieces of 10/4 and 12/4 raw material, and don't see it working very well for pieces this shape. Also not sure I can get the blade high enough on the table saw if the pieces is sitting up on top of a sled, and really don't like ripping where I would need to work close to a blade that high on the table saw. Using an aluminum bar also makes me a little nervous. Seems like it would need to be screwed to the bottom of the piece, and this would result in losing some of the potential strips/billets from the screw holes. Also would require working between the blade and fence, which I don't like to do while ripping, especially with the blade elevated high. Regarding the hand plane, agree that there is always more than one way to do things. Would like to continue to explore the jointer unless there is good reason to think it would not work with a bench top machine. While I would be getting it for a single intended task, somehow I always find other uses for new tools in the workshop. Again, many thanks for all the great responses. Dave -
I mill my own wood, and am contemplating buying a jointer. The blocks I start with don't always have a flat side, which can make slicing into billets challenging. I don't want to get a big free standing jointer - they look like they weight 250+ pounds, and setting one up myself and moving it around the shop would be a pain. They are also really expensive. I'm trying to sort out if one of the benchtop ones would meet my needs. I work in 24-30" lengths, so I don't need big in- and out- feeds. I also don't think I would be working with anything wider than 6", so one of the 6" bench top ones would meet my needs in terms of capacity. I would be mostly milling hard woods like pear and boxwood. Does anyone know if these smaller machines are powerful enough to do this? If they would be adequate, any recommendations as to which one? It looks like all the major tool makers (Grizzly, Delta, Jet, Porter-Cable, etc) make one. Any better than the others, or have specific features that would help for my really limited purposes? I don't see my self building furniture or needing to work with big boards on the machine. thanks!! Dave
-
Little more work yesterday. Milled the wood for the chines, including the 9 degree angled side. I have the tilting table for the Byrnes saw. I don't get to use it often, but it works great. I also milled the 1/16" sheet for the bottom planking. After the keelson pieces soaked overnight, they were clamped into the jig. I work overnight tonight, so hopefully they will be dry and ready to shape and assemble over the weekend. The instructions say to screw the jig to the building board. I will do that after this step. Much easier to clamp with access to both top and bottom of the jig.
-
Michael and Cricket - many thanks. I took a look at Cricket's 1:8 Sharpie build log - really impressive. I milled wood yesterday and have it soaking overnight for the keelson. Finished with jigs and starting on the model itself. Dave
-
I agree with what everyone has said here about using a scroll saw for finer curve cutting. I have a Dewalt that I am really happy with. I also have a 14" Delta bandsaw with a ~2 hp motor. I bought it for multiple uses, but have ended up using it only for resawing billets. I put a 1" resaw blade on it, and have it adjusted so it cuts straight with a fence. I don't really like swapping blades on it (big long blades with tons of teeth that have to get folded up to store - too much opportunity for cutting myself). I have not had anything with curves that I couldn't cut on the scrollsaw, and need to resaw frequently enough that it is nice to have everything set up and adjusted on the bandsaw when needed. 14" is way more than big enough to resaw anything you would need for model ships. I don't put anything wider than 3" through the thickness sander, and this is easy for the band saw.
-
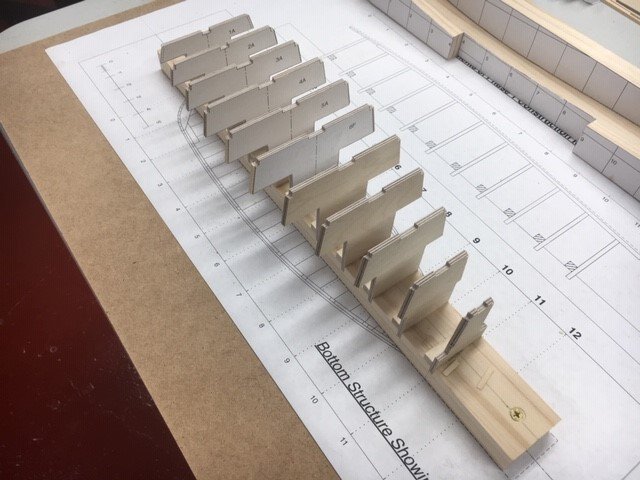
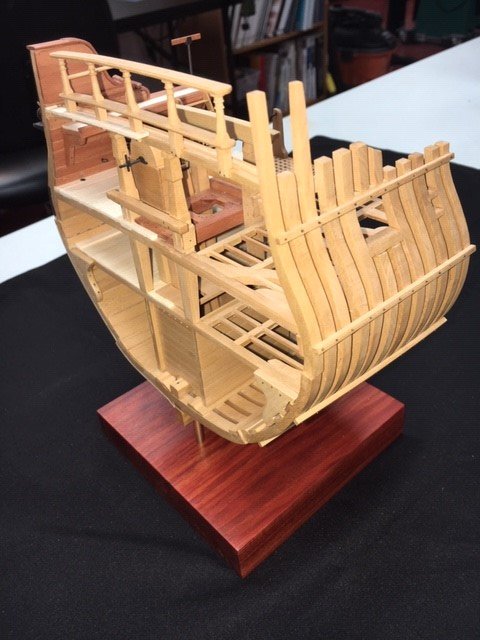
I picked the East Coast Oyster Sharpie for my next project using the plans and practicum by Bill Strachan and available from the NRG. Everything is outlined at https://thenrg.org/genericsharpie.php, and the practicum has tons of pictures. It is so well illustrated that I will probably limit the build log a little and not include things that are well outlined in the practicum, which is available on the NRG website for free. The plans are beautiful, the build looks like it won’t take 6 years like my last one did, and it looks like a very different kind of project, which will make a good break. I’m a little nervous as there are only two logs on MSW, and they both stop fairly early in the build. I started back in February with big plans to keep the project moving along, then COVID-19 hit. I work in health care, so rather than extra time to model at a social distance, work has been completely consuming in terms of patient care and pandemic preparation and management. I mostly go to the workshop at the end of a long day to decompress. Working while tired has led to a lot of re-do’s already. Not sure if late 19th century Sharpie’s had names, but this one will be christened “Corona”. So far, I’ve made the two building jigs. There have been a few discrepancies between the plans and practicum, and I’m starting to work off the plans with the instructions more as a guide. Jig 2 went together easily. The first jig needed some shims on frames 5 and 6. Not sure what happened as I cut to the line in terms of frame shape. I had a nice smooth curve along the top, but needed to shim the sides of frame 5 and 6 around 1/64 and 3/64 retrospectively. With the shims, I have a smooth curve along the sides as well. There are also some slight discrepancies between the as built jig and the profile on the plan, but given that everything seems fair, I don’t expect it will cause a problem later. From this point on, I’ll be building the model instead of jigs, so will include more pictures. I have enough boxwood left over from the cross section, so plan to use it. I usually use contrasting wood colors, but have wanted to try a model using a single type of wood. I will finish in wipe on poly. I think the rigging and metal work should have enough contrast to keep it visually interesting.
- 75 replies
-
- 12
-
-
For scale sized planks, thickness sander alone should be fine. I have the Byrnes, and before that used a Preac (same idea, much smaller motor). I haven't had any times with pear, boxwood, holly, cherry, or ebony where the thickness sander didn't get me to a usable billet. I have a tool buying addiction and haven't come up with any reason to justify buying the miniature planer.
-
Making extremely tiny fittings
davec replied to BETAQDAVE's topic in Metal Work, Soldering and Metal Fittings
I think your idea about doing it in one piece still make sense, but you need something different from a needle file to shape inside the hooked ends. Escapement files are smaller than needle files, and might fit. You could also try a jeweler's saw with a blade the same thickness as the notch. If you go down the multiple piece route, would not try to punch square holes. It would be easier to use wire of a diameter that could be filed down to the right shape and thickness. Would drill holes for the wire, and solder the wire in place then file the shape and bend it into place. Would probably need to silver solder to have a strong enough joint. Could also shape and bend the wire separately, then solder into place. -
Echo by davec - FINISHED - cross-section
davec replied to davec's topic in - Build logs for subjects built 1751 - 1800
Many thanks everyone for all of the likes and very kind words. John – base is Chakte Coc – cut from one of the boards I got at the club auction last year. Was really happy with how it looked sanded and finished. Druxey and Michael – I think the next build will be the NRG East Coast Oyster Sharpie. I bought the plans when they came out. It is a neat looking boat, and as a project, looks manageable in the time I have over the next year or two. I like the connection to Mystic Seaport – went there often when I lived in Boston. Long term, I want to build the rest of Echo (as in the whole ship), but that needs to wait until I have more than an hour or two each week to work on it. Slow progress on the cross section or Sharpie is still visible as progress. I worry I might get frustrated adding a part per week to a many thousand part project. I haven't seen any finished Sharpies other than the prototype, so it should feel like I am working on a subject that hasn't been built by a lot of other people. Greg – wood palette is pure Harold Hahn. Hard to improve on his choices. Boxwood and Pear are really good to work with, and the Holly and Ebony are great contrast. I’m thinking that the Sharpie will be just boxwood. I think for the simpler model, one uniform color with the rope and metal fittings as contrast will look better. I think I have just enough left over. Toni and Michael – looking forward to seeing your cross sections. Toni – wouldn’t call what you have done ‘procrastination’ – Atalanta is amazing, and the Swallow and half hull are great projects! Vince – just finished reading your “Purpose-built confederate blockade runner”- Congratulations on finishing it – huge project. Anyways, hoping to do some shopping over the weekend for some of the things I need to get started on the Sharpie, and will start a build log once there is something other than a roll of plans to show. As with Echo, expect slow progress, although I hope it goes more like the last 3 months than the preceding 3 years. -
Echo by davec - FINISHED - cross-section
davec replied to davec's topic in - Build logs for subjects built 1751 - 1800
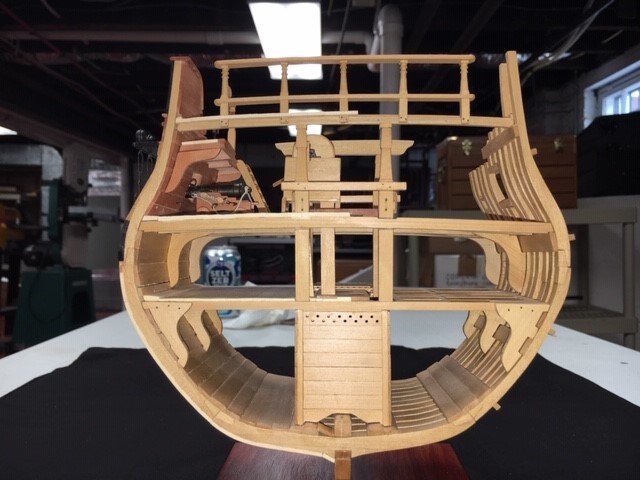
Something very odd has happened. My box of parts to install is empty. I’ve come to the last page of the instructions. Apparently – I’m done. It’s a little bit hard to believe. I started the model Christmas 2012. The build log started so long ago that it was on the initial MSW and was lost in the crash. It was supposed to be an easy, short project to get me ready for building a full plank on frame model. I thought it was only going to take a year or so, and was so overconfident that I started it before finishing Hannah. I was going back through my log, and found Ryland’s post really amusing: He was correct, only 6 years off. The model will be at the show in 2 weeks. I was really happy with this as a project. Many thanks to David and Greg for developing the plans and doing the framing workshops. I learned an incredible number of things building the cross section, and am in a really different place as a modeler than before. It made a great project incorporating a lot of different techniques and was nice because the incremental progress was always visible even though I had so many other things going on that I couldn’t work on it very regularly.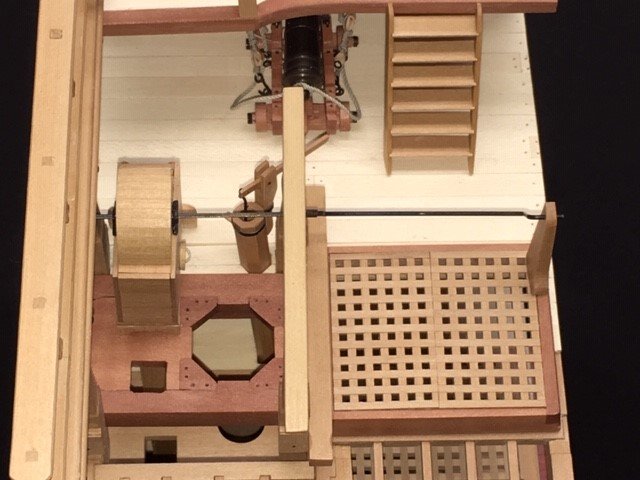

- 127 replies
-
- 12
-
-
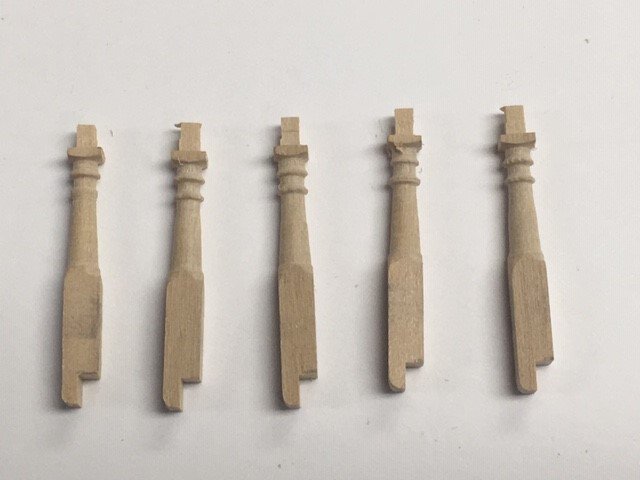
I have their tree nail maker and their lathe duplicator. The treenail maker, while fast, performs variably depending on what kind of wood you use. Some woods break really easily and have fragments that clog the tip. It did OK with boxwood and cherry, but badly with holly. It also doesn't go small enough to be accurate at 1/4" scale. I use it when I need to make .025" dowel, but have switched to bamboo and a Byrnes drawplate for treenails- the drawplate can go much smaller in diameter. I was initially really disappointed with the lathe duplicator. I could not get it to work for duplicating brass cannon barrels, and put it away for several years. I suspect it is something I was doing wrong, particularly grinding the cutting tip. I resurrected it a few weeks ago - it works great for wood. Was really happy with using it to make identical posts for my cross section. Now that I have had good results on wood, will try it on metal again.
-
Twisting blade on MicroMark saw?
davec replied to Rcboater Bill's topic in Modeling tools and Workshop Equipment
Using a blade that is too thin for the material could come into play, and might be more noticeable with harder wood. The blade being dull can also definitely cause it. I had the same problem on my Byrnes. When I was ripping planks, the width began to vary and thin along the length of the plank. I was worried that I had thrown something out of alignment on the saw. I'd been using the same .040" blade since I purchased the machine. I replaced the blade and problem went away. Someplace on the website (unfortunately not in the articles and download section - it is attached to a post in https://modelshipworld.com/topic/20499-new-to-table-saw/ but I kept getting error messages when I tried to attach it here) is a great document by Jeff Hayes who used to operate Hobby Mill with recommendations for blade size for different thickness materials. Definitely want to be using different thickness and toothed blades for different thickness woods. Might want to replace the blade and see if the problem goes away (or use a thicker blade). Can't hurt to have a spare. If the one you are using isn't dull now, it eventually will be. -
Echo by davec - FINISHED - cross-section
davec replied to davec's topic in - Build logs for subjects built 1751 - 1800
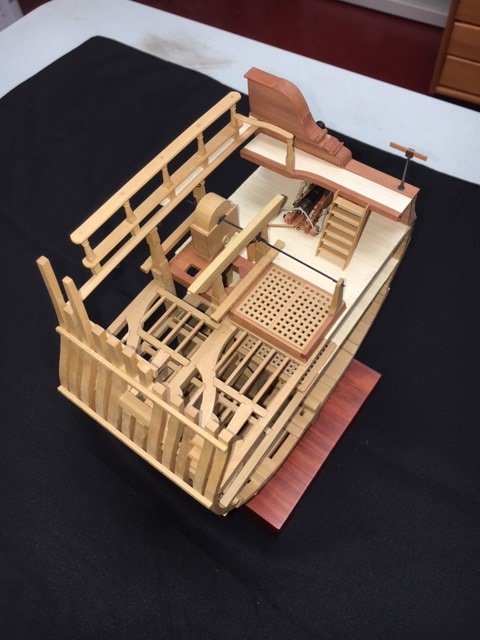
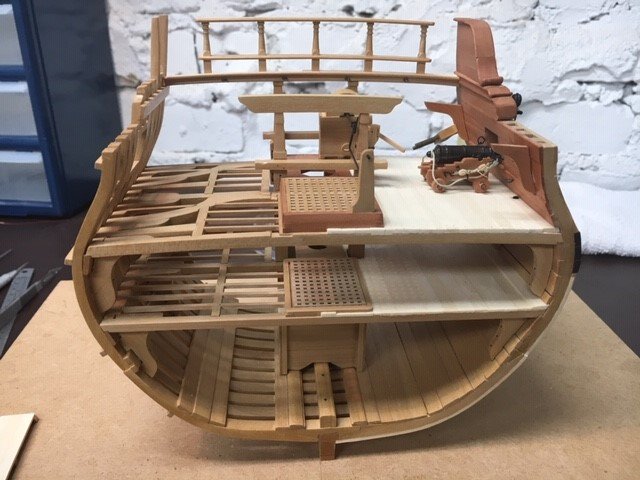
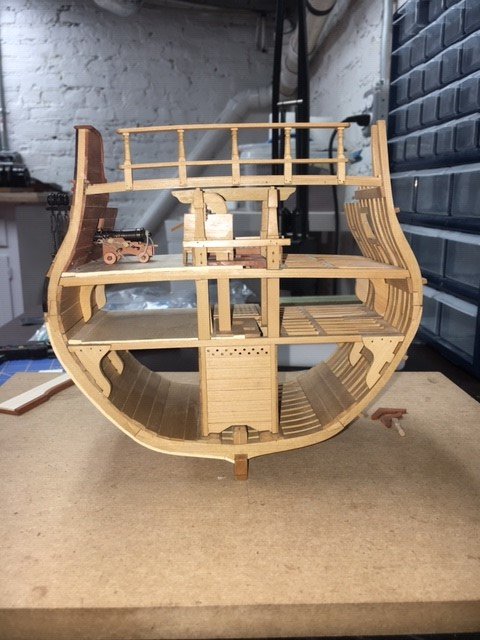
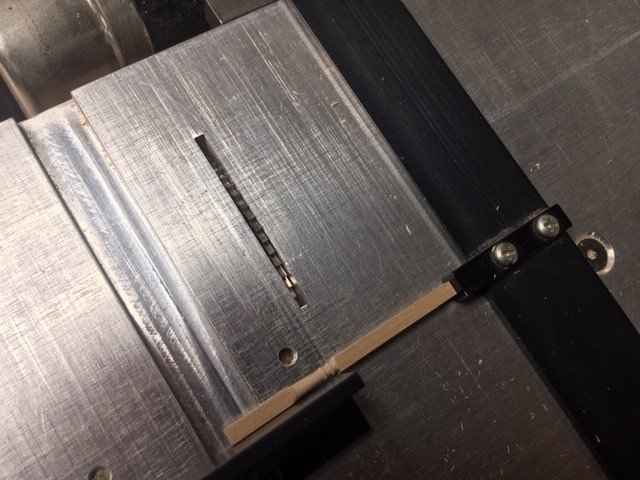
Breastwork installed. Quarterdeck installed on finished side. I made and installed the waterway, then glued the planks together. I made a cardstock pattern for where the notches for the stanchions needed to be. I double back taped the decking to a piece of sacrificial wood, then made the notches with the table saw. Gangway knees, gangway, newel post, and railing installed. I'm working on the ladder to the gangway now. Just the ladder, finish to the newel post and rail, stand, and touch up to complete.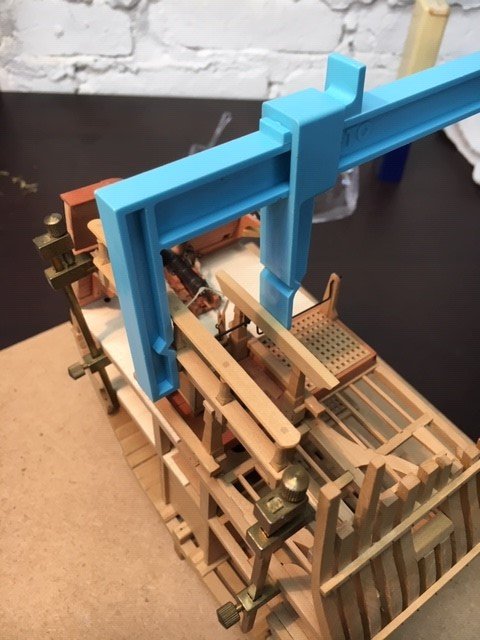
- 127 replies
-
- 12
-
-
Similar evolution - folding table in corner of basement between dryer and cat litter box (lint and cat hair on everything - very bad for finishes) to single unfinished basement room, to 2 1/2 finished basement rooms (converted part of garage) to new house with single large basement room with as much floor space as prior 2 1/2 rooms, but much easier to use efficiently. Only took 25 years. My family has been very tolerant, but I think I've finally reached the limit.
-
Echo by davec - FINISHED - cross-section
davec replied to davec's topic in - Build logs for subjects built 1751 - 1800
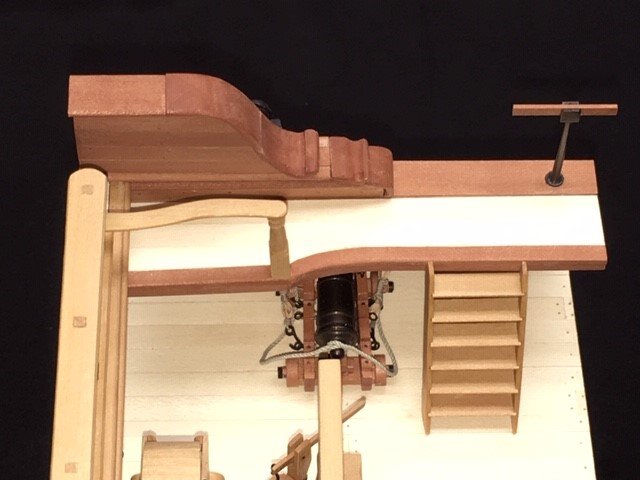
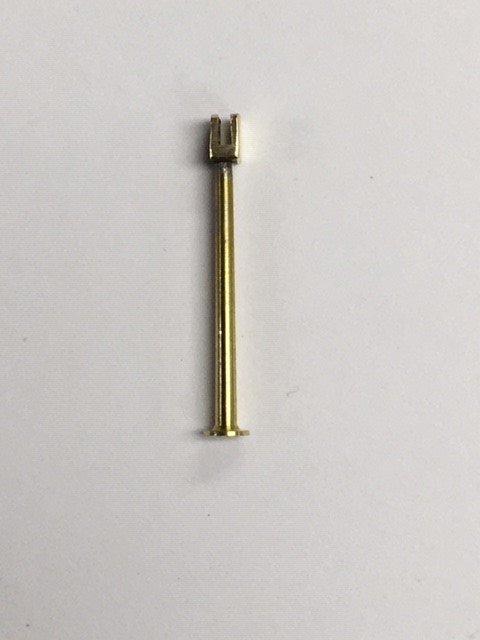
Michael - many thanks! I need one waist stanchion, so spent the morning doing some metal work. Very gratifying – got to use the taper attachment on my lathe for the first time. The post is turned from 1/8” brass. This was a major advance for me – no chatter, and got an acceptably smooth finish that took only a little sanding to get smooth. Usually turning metal on the lathe is an exercise in frustration. I cut the piece off about a scale 1” from the end of the taper to form the base. The bracket that holds the rail was made from 1/8” bar stock. I used a slitting blade to cut the slot, then raised the blade and parted the piece off. Even the soldering worked right the first time. I wanted to do more, but had so much go smoothly that I thought I should quit while I was ahead. Will hopefully go back to the workshop later and mill the quarterdeck waterway, install and blacken the bolts in the quarterdeck breastwork, and blacken the stanchion.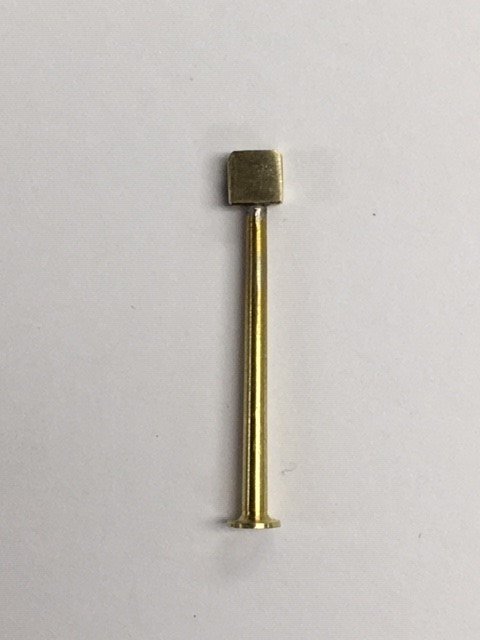
- 127 replies
-
- 10
-
-
Echo by davec - FINISHED - cross-section
davec replied to davec's topic in - Build logs for subjects built 1751 - 1800
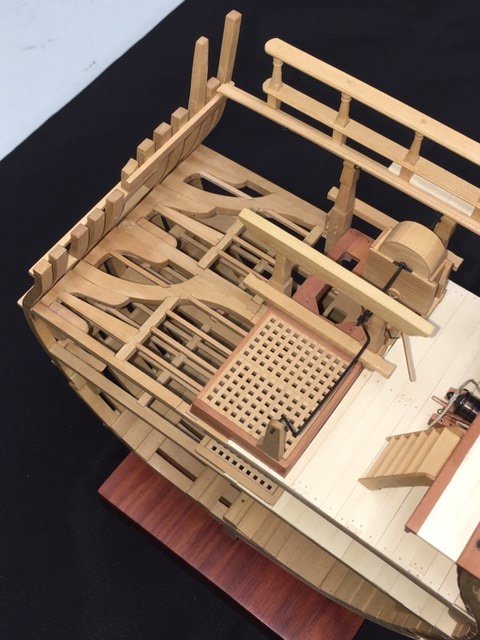
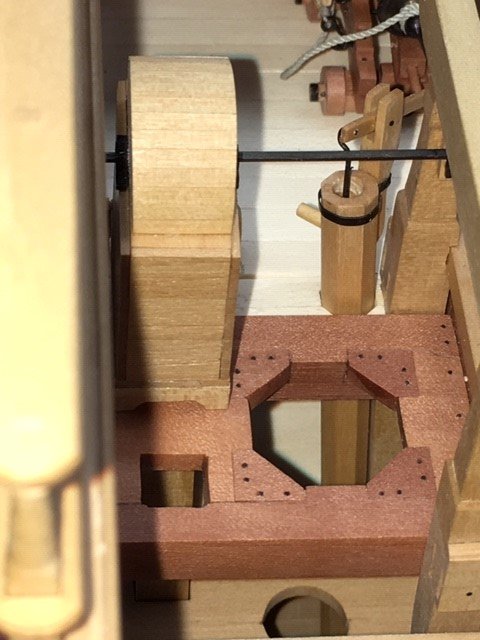
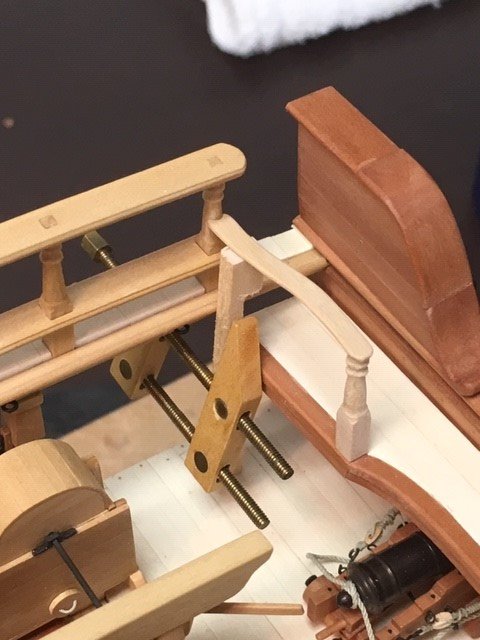
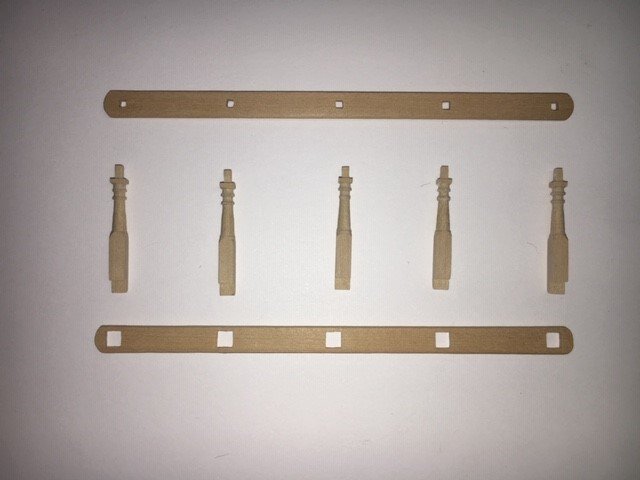
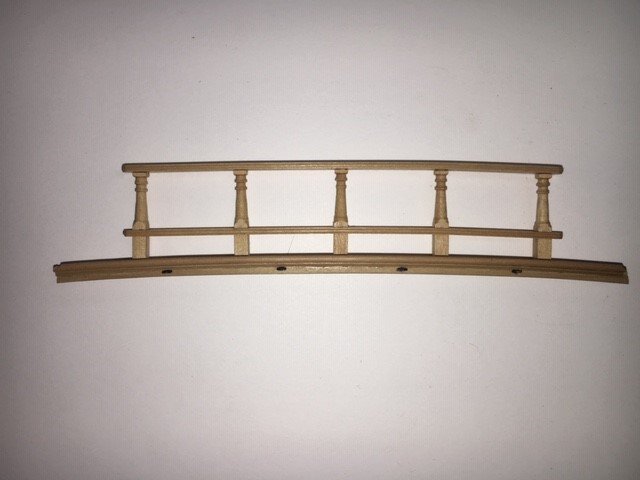
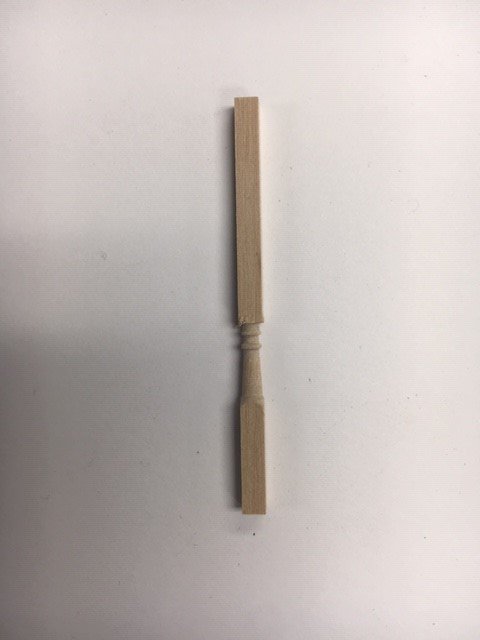
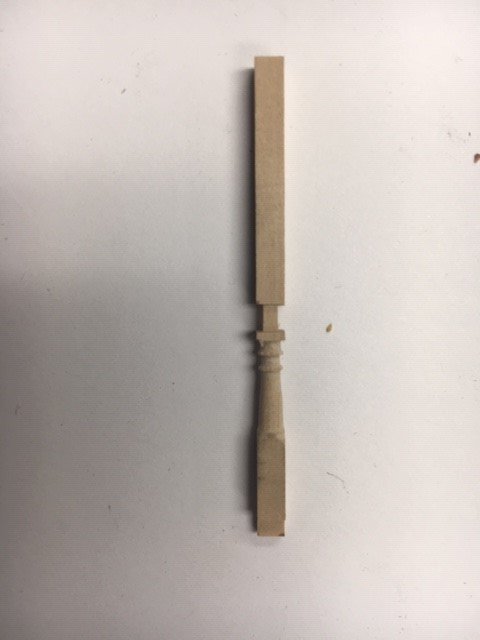
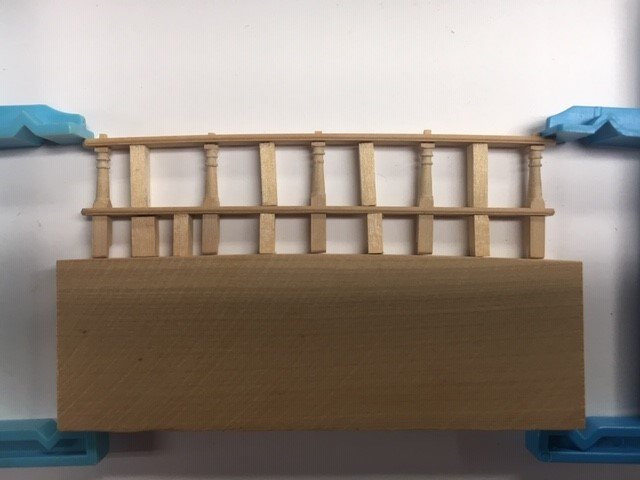
Greg - agree those are amazing looking hooks. Would love to know how he is able to photo etch rounded edges. I’ve been working on the quarterdeck breastwork. I turned the spindles on my lathe with a vandalay duplicator. Was pretty pleased with how it worked. It has been sitting in a drawer since a frustrating attempt to use it to turn brass cannon barrels 7 or 8 years ago. Works much better on wood. I cut the upper tenons with my preac table saw, then reset it and did the half lap joints. The railings took a while. I cut them to shape and scraped the molding around the edge. I also used some escapement files on the molding around the end grain. I drilled 1/16” holes at the centers of the posts, then filed square openings. A square drill bit would be a really useful invention. I bent the upper rail to shape. The lower rail was much more delicate, and broke at one of the openings when I tried bending. The curve is gentle enough that it held shape with the glue joints. I cut a form the shape of the quarterdeck beam and used it to glue the upper rail to the posts in a curve. Once it was dry, I used spacers and glued the lower rail in place. I clamped it to the upper rail so it followed the same curve. I glued it to the quarterdeck beam that I made a few years ago, drilled for the bolts, and brushed on minwax wipe on poly. I’m considering redoing. I will be installing the gangway. When I looked at the breastwork as drawn, it was a little narrow and left a gap between the end of the rail and the edge of the gangway. I used the drawing in TFFM, which looked closer. The clearances at the sides look a little narrow. After I finished, I realized it was probably drawn on the NMM plans. Sure enough it was, about halfway in between the two drawings in length. I have the breastwork leaning in place in the picture. The bit pins supporting them are a few mm too short, and will need some extensions. I think I will install the gangway, and see how the spacing looks. I’m assuming the crew was pretty thin – if it looks like it was usable, I will install it as is. If not, will need to go back to filing square holes, which I’m not looking forward to.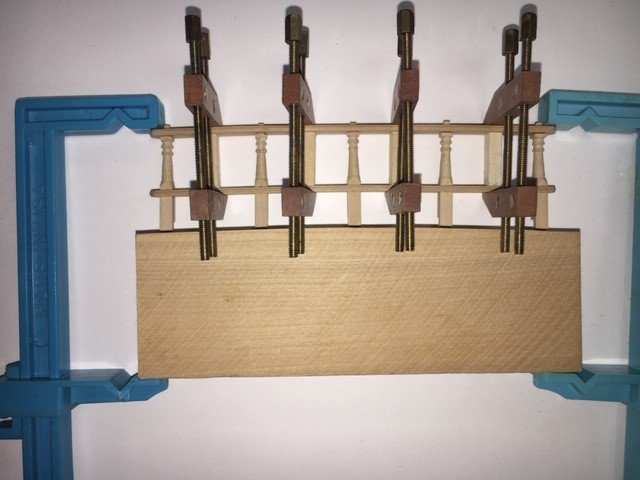
- 127 replies
-
- 15
-
-
Echo by davec - FINISHED - cross-section
davec replied to davec's topic in - Build logs for subjects built 1751 - 1800
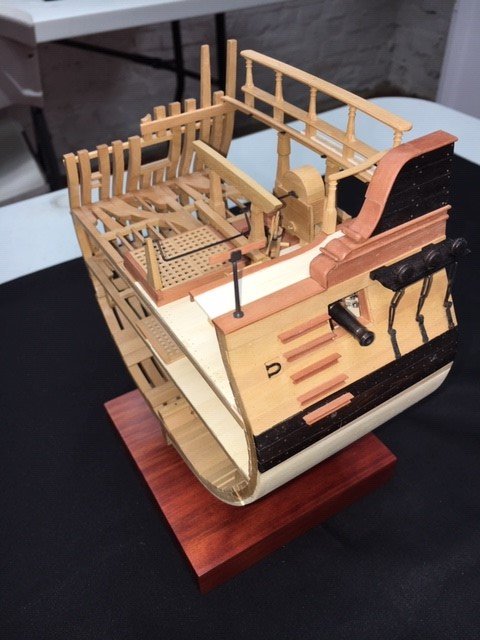
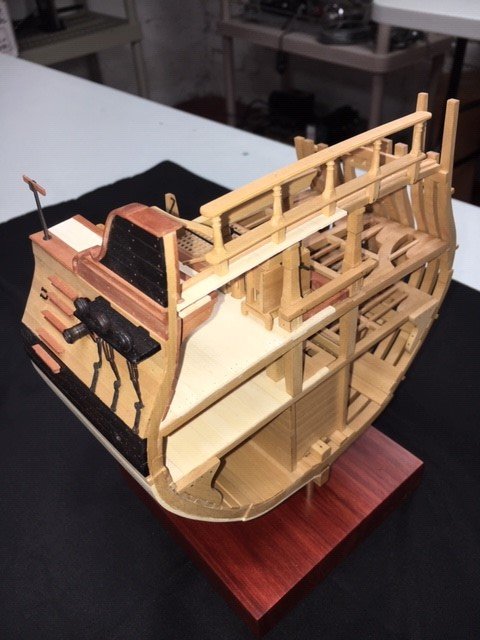
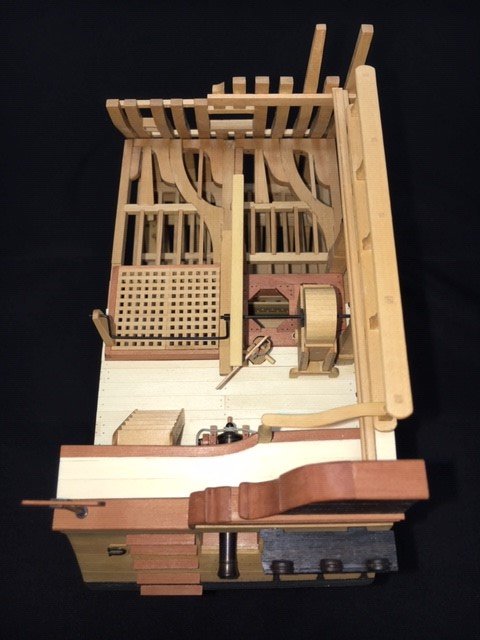
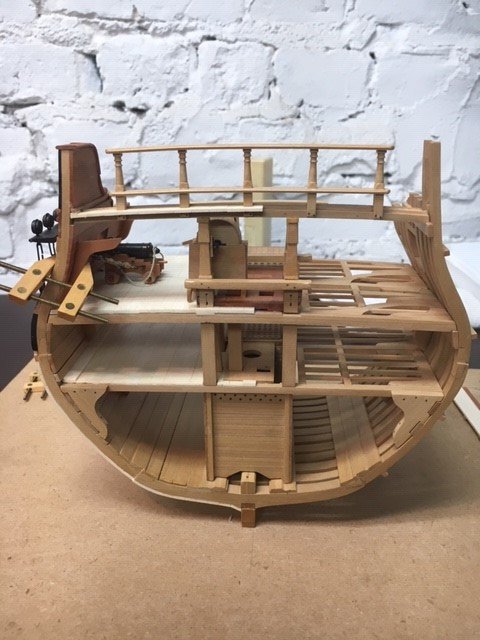
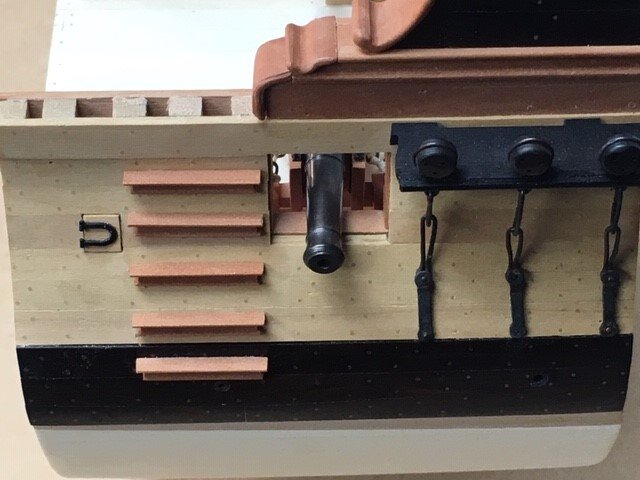
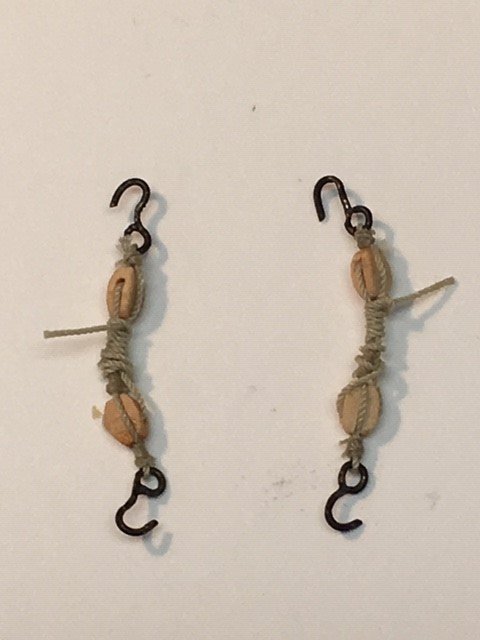
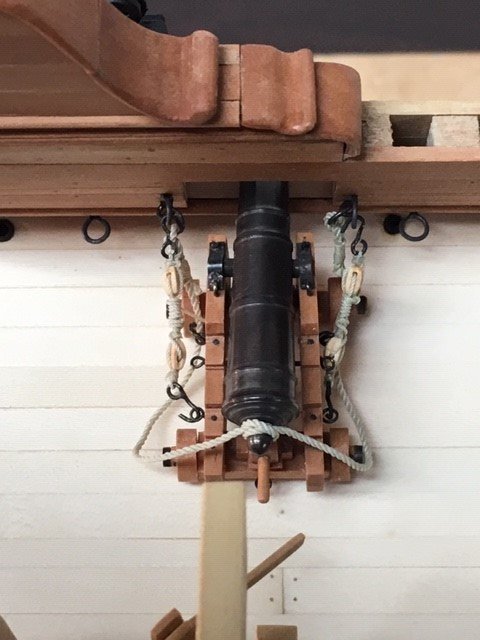
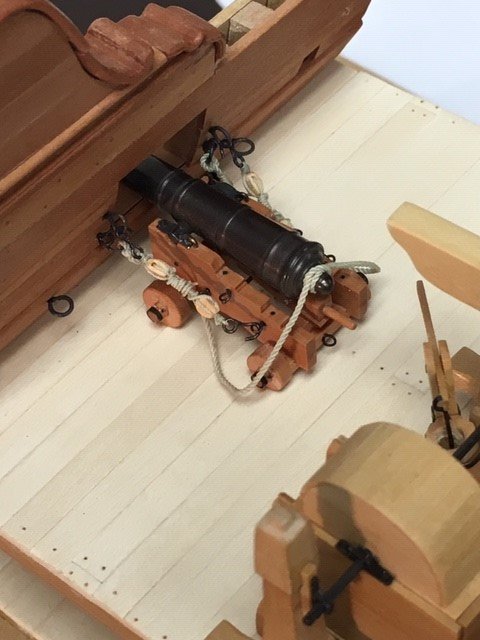
The gun is rigged and installed. Rigging is morope left over from a prior build. I bought a rope rocket from Chuck to make rope, and started putting it together on New Year’s Eve. Got to the part where you need the really small Allen wrench, and found mine got lost in the move. While I was digging around looking for it, I found he morope. I’d forgotten how nice it looks, and how hard it is to work with. Led to a few compromises. The breech rope is a little on the short side. It is 3 times the bore length like it is supposed to be, but that isn’t long enough to really reload the gun. I tried making it longer, but didn’t like the way it looked – the morope just hangs in a non realistic way. I also wanted to have the gun run out. Morope doesn’t coil well (won’t absorb dilute white glue), so I frapped the tackles. This was probably done for storage, not when they were run out, but I wasn’t sure what to do with the ends. Not sure there is a right answer – can’t imagine there were situations where the gun was run out, but the rope was left in a coil on the deck. I’m also not really happy with the hooks. Even silver soldered, they look like bent wire. The ringbolts should be recessed, but I didn’t think of it when I had better access to the bulwarks. I couldn’t figure out how to do it now that the pumps and bits are in place. Looking for suggestions for doing any of these things better next time (other than the obvious – use different rope material and recess the holes for the ringbolts at the same time I drill them). I’ve got the gangway and knees ready to install. The holes in the bulwark are for the locating pins for the knees. Completion in sight – very short list of incomplete tasks: need to slightly extend the bit pins the quarterdeck beam sits on (sometime a few years ago I made them about 1/16” short), make the quarterdeck and gangway railings, and ladder to the gangway.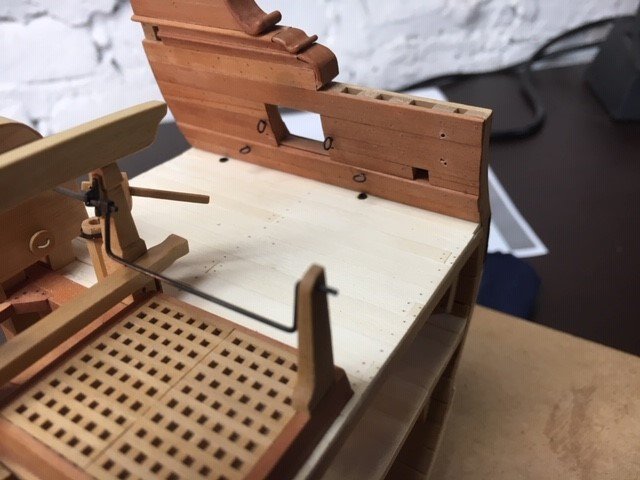

-
Echo by davec - FINISHED - cross-section
davec replied to davec's topic in - Build logs for subjects built 1751 - 1800
Thanks everyone for the likes and kind comments. Greg - definitely agree that for anything more complicated that a sixth rate (or maybe even just one side of a sixth rate) this would start getting very tedious. I've decided to add the gangway to the finished side. It turned out to be good practice with patterns to get all the angles and joints on the knees right, and will make this model a little bit different from the other finished echo cross sections. Will hold on installing until the gun rigging is complete and the gun installed - don't want to make access to installing all the rings and ringbolts difficult. Hoping to get the breeching and gun tackles rigged and installed today before going back to work tomorrow. Happy new year everyone! Dave
-
Echo by davec - FINISHED - cross-section
davec replied to davec's topic in - Build logs for subjects built 1751 - 1800
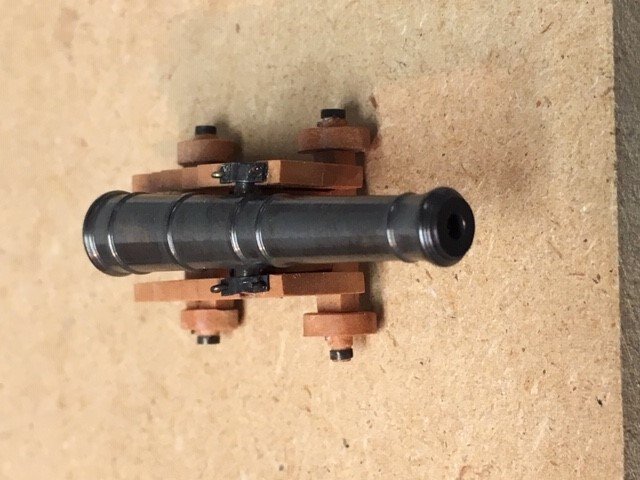
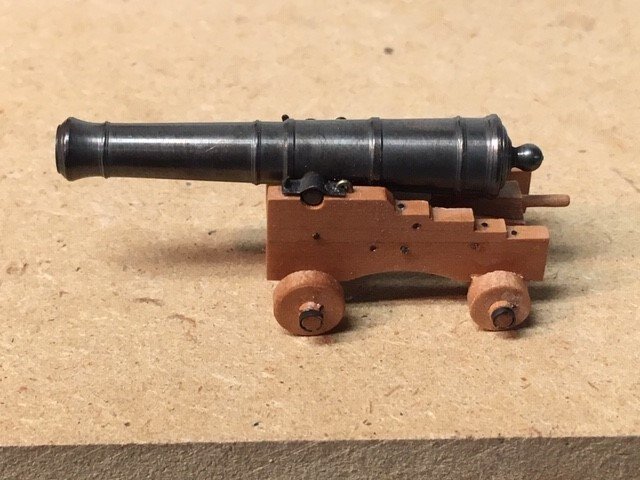
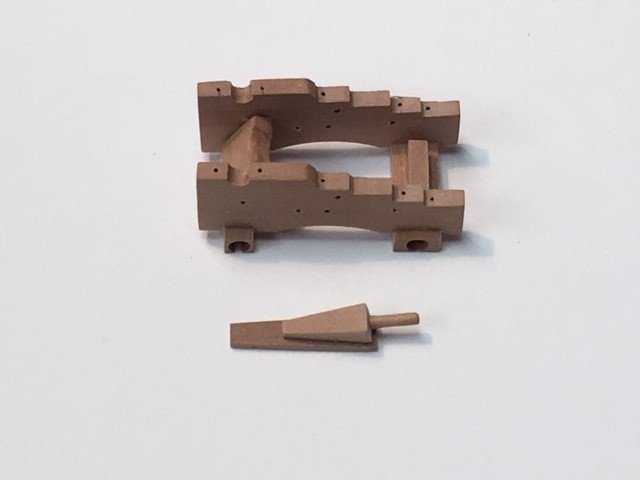
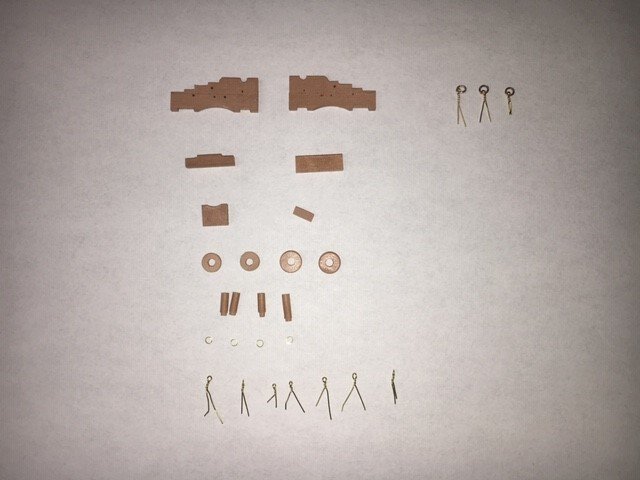
I have been thinking about the next project, and avoiding ones with lots of guns because I am intimidated by the repetition. I think the only thing worse might be building just one. The workshop turned into an armory this month. These guns have lots of parts- I think I count 44 not including the rigging and gun barrel. After figuring out how to make each part, I realized making more than one of each wouldn't have been too bad. The barrel is not scratch - it is an Admiralty Models one that I bought when I purchased the plans from David and Greg. It is beautifully turned, and it didn't make sense for me to try to turn one when I already had such a good one. The wooden parts are all swiss pear, and most of the metal work is brass. I used a few pieces of copper when I wanted to blacken in place. All plans and dimensions were from TFFM. Andrey Kudin's Le Fleuron videos were also helpful (worth watching if you haven't seen them yet), particularly for rolling the axle caps and milling the ogee under the quoin- he has lots of neat techniques. Getting much happier with my metal blackening and silver soldering, and lathe turning the axles and wheels worked much better than previous efforts - way less in the scrap bin than usual. .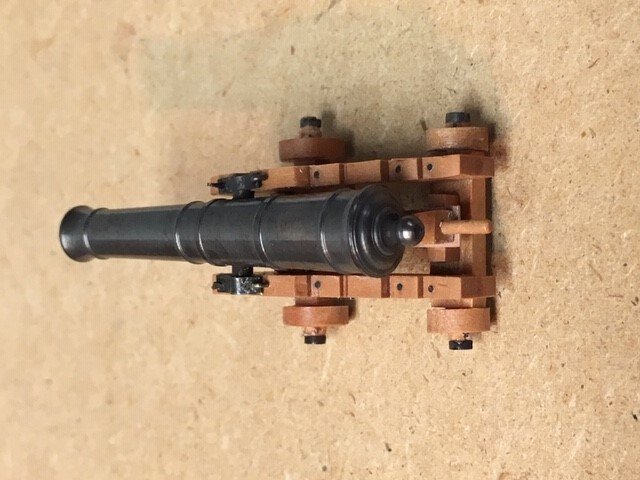
- 127 replies
-
- 17
-