HOLIDAY DONATION DRIVE - SUPPORT MSW - DO YOUR PART TO KEEP THIS GREAT FORUM GOING! (Only 13 donations so far - C'mon guys!)
×


davec
-
Posts
382 -
Joined
-
Last visited
Content Type
Profiles
Forums
Gallery
Events
Everything posted by davec
-

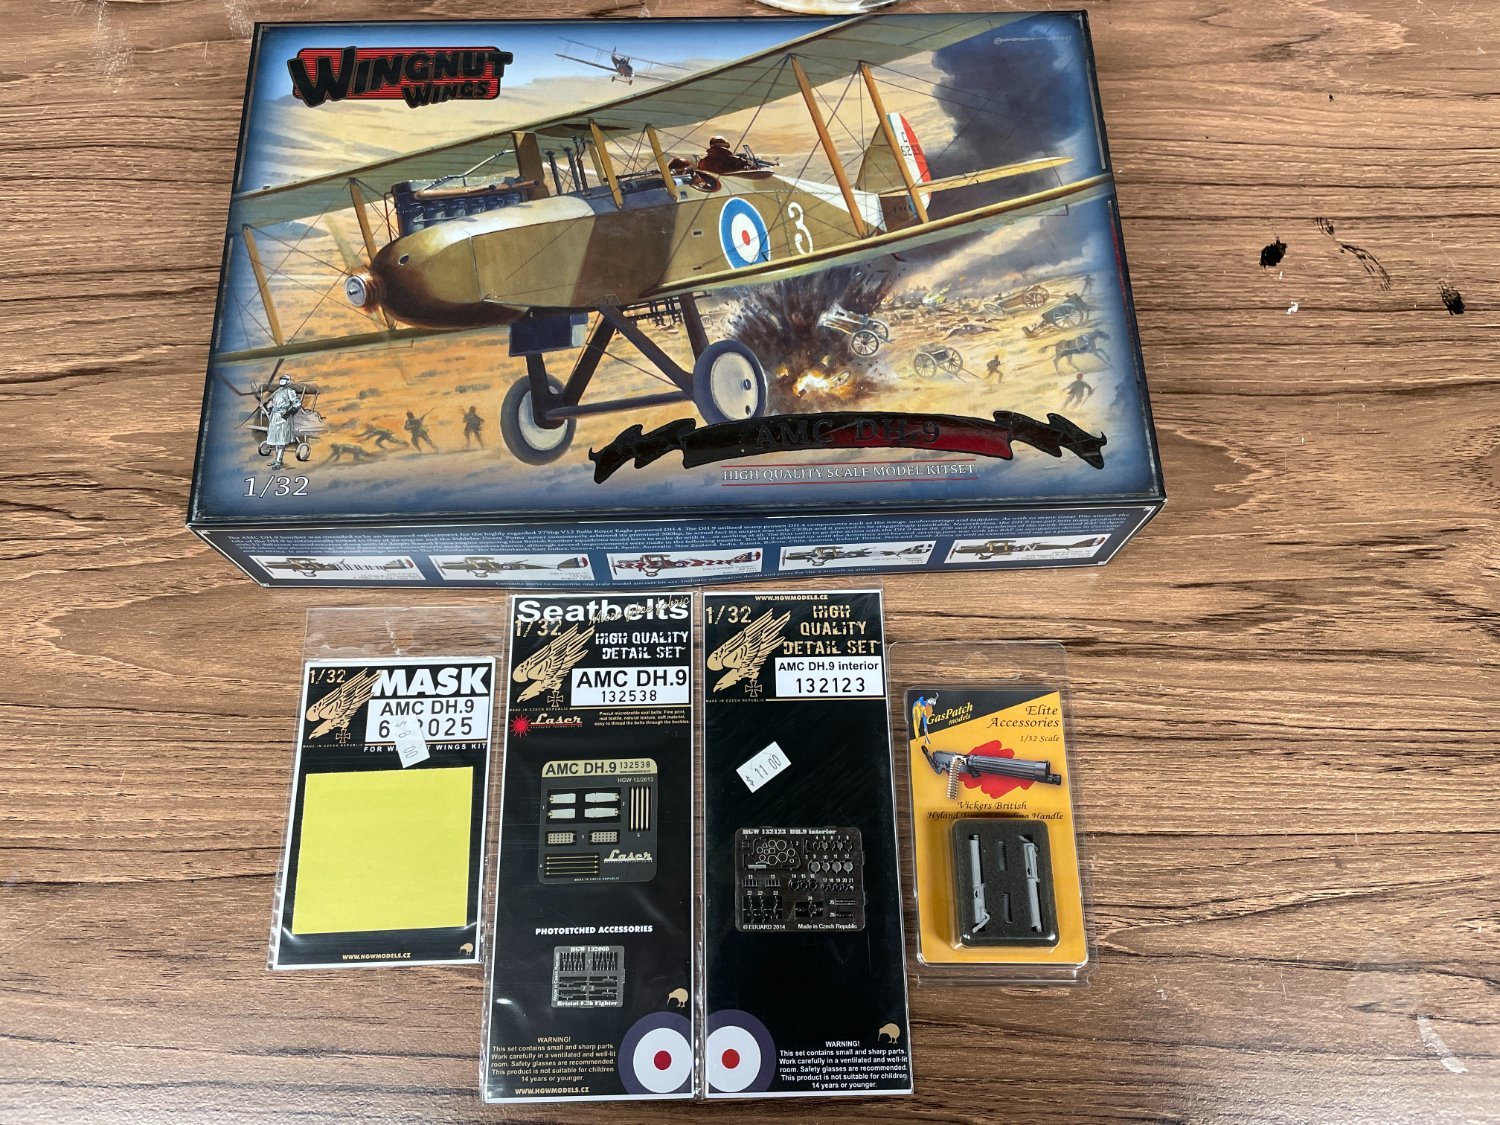
AMC DH9 by davec - FINISHED - Wingnut Wings - 1/32
davec replied to davec's topic in Non-ship/categorised builds
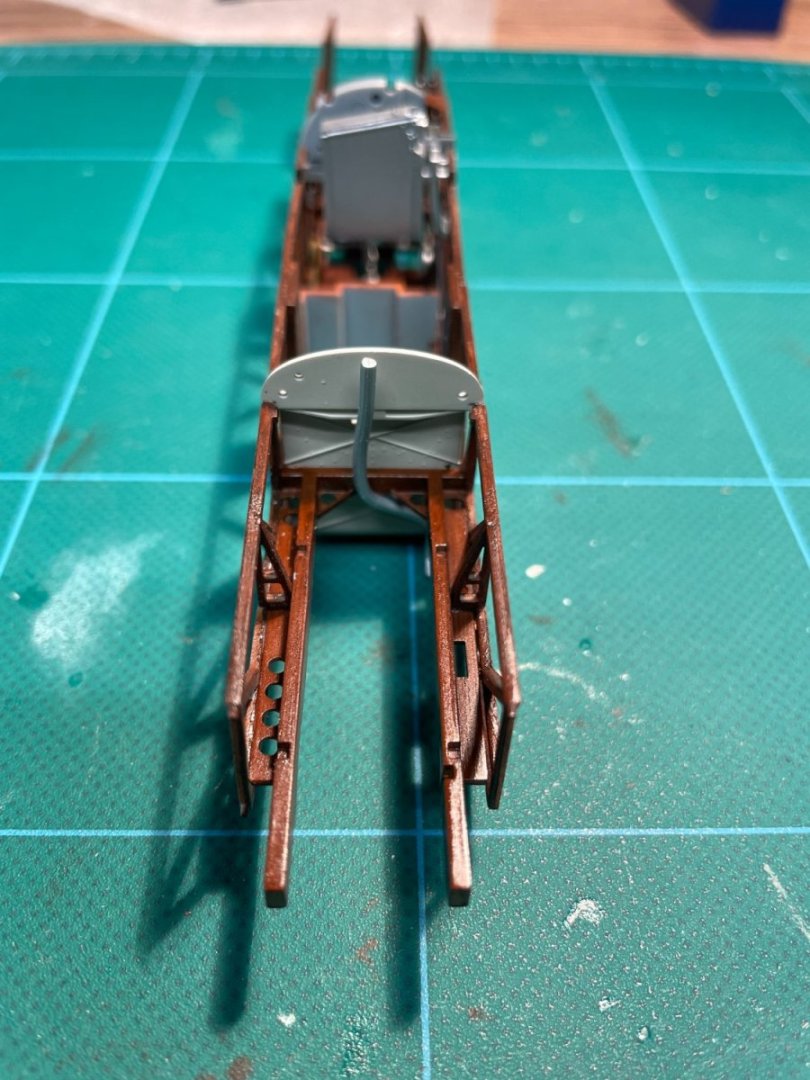
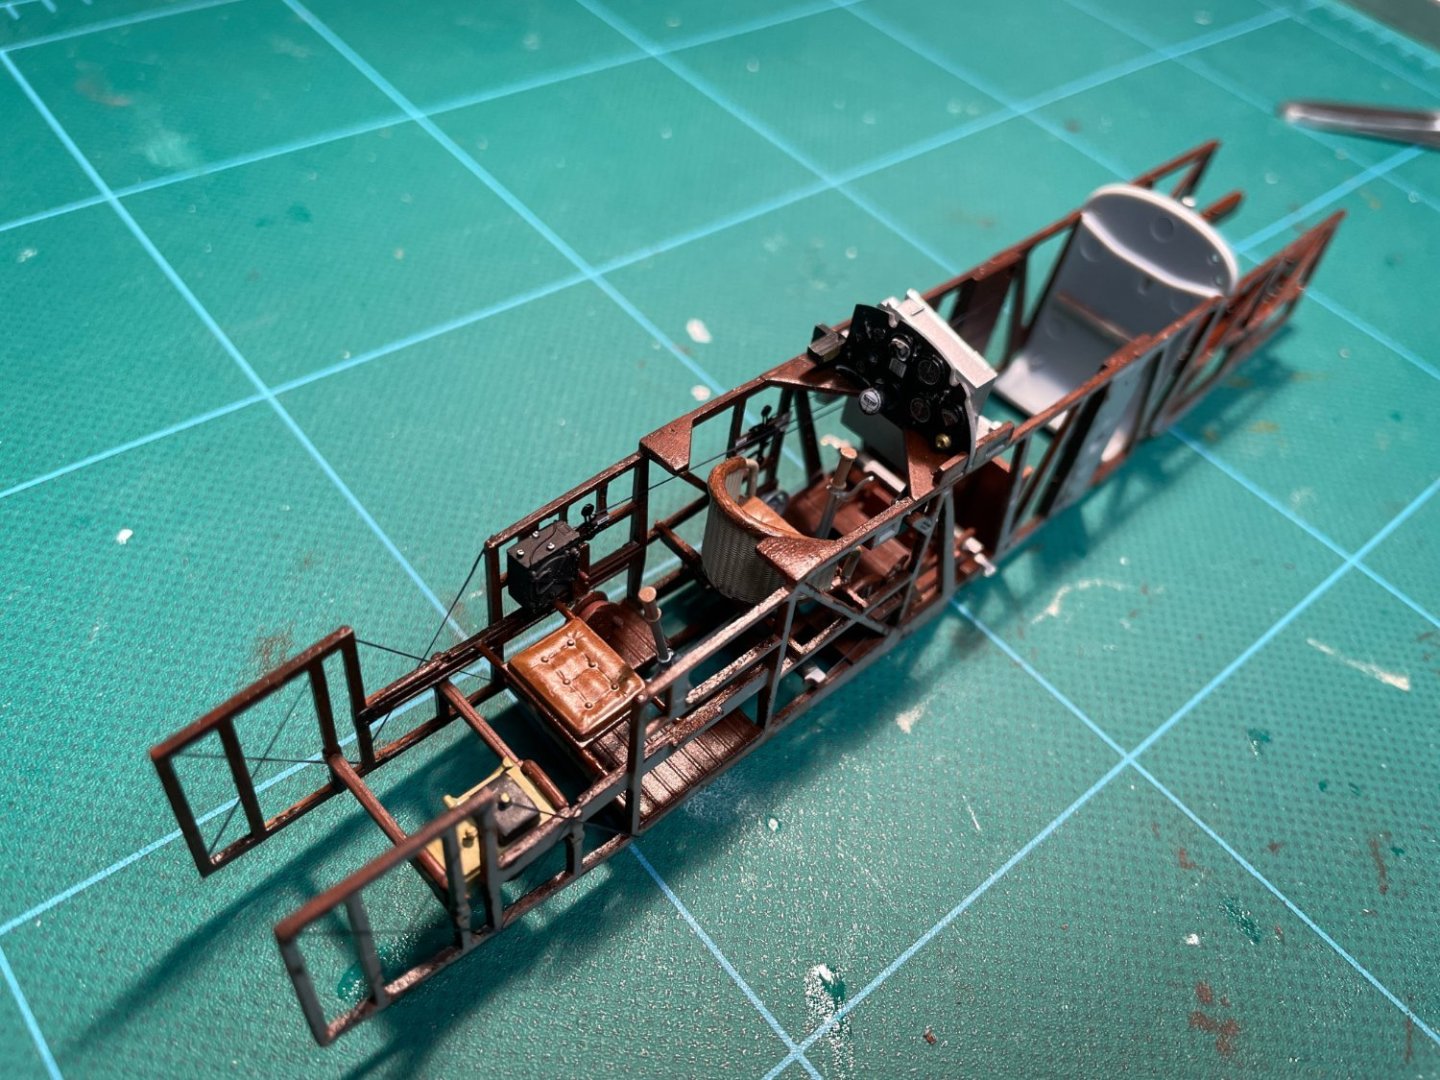
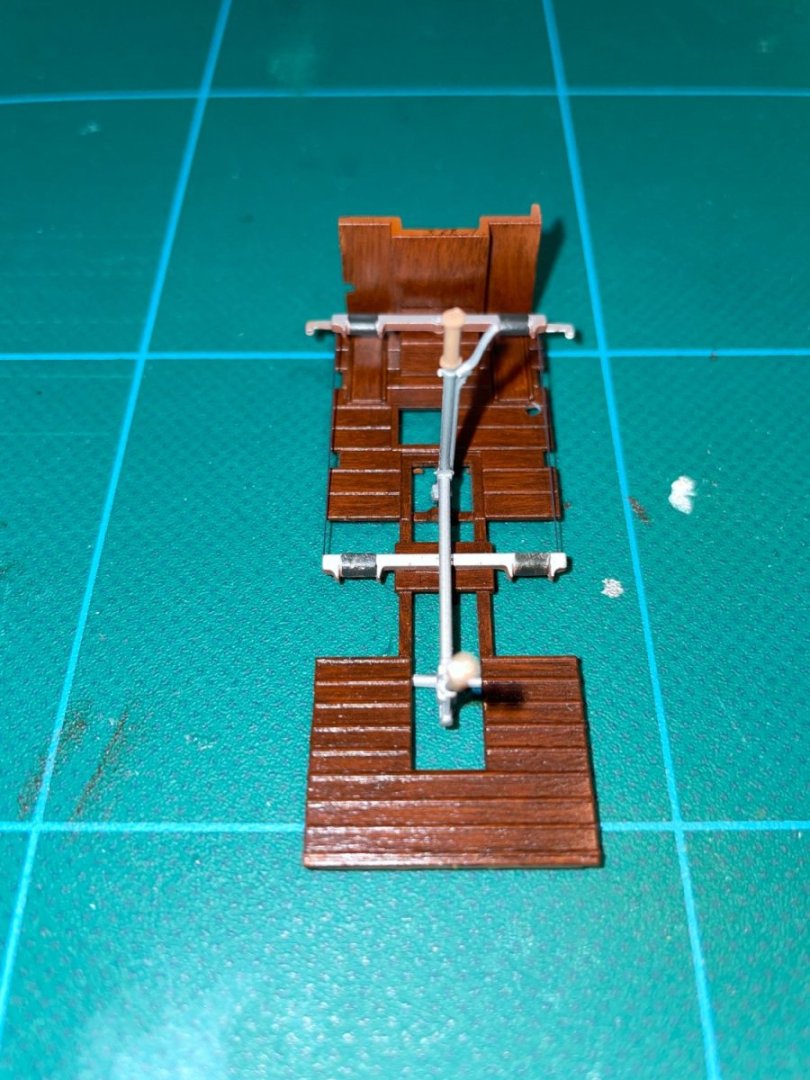
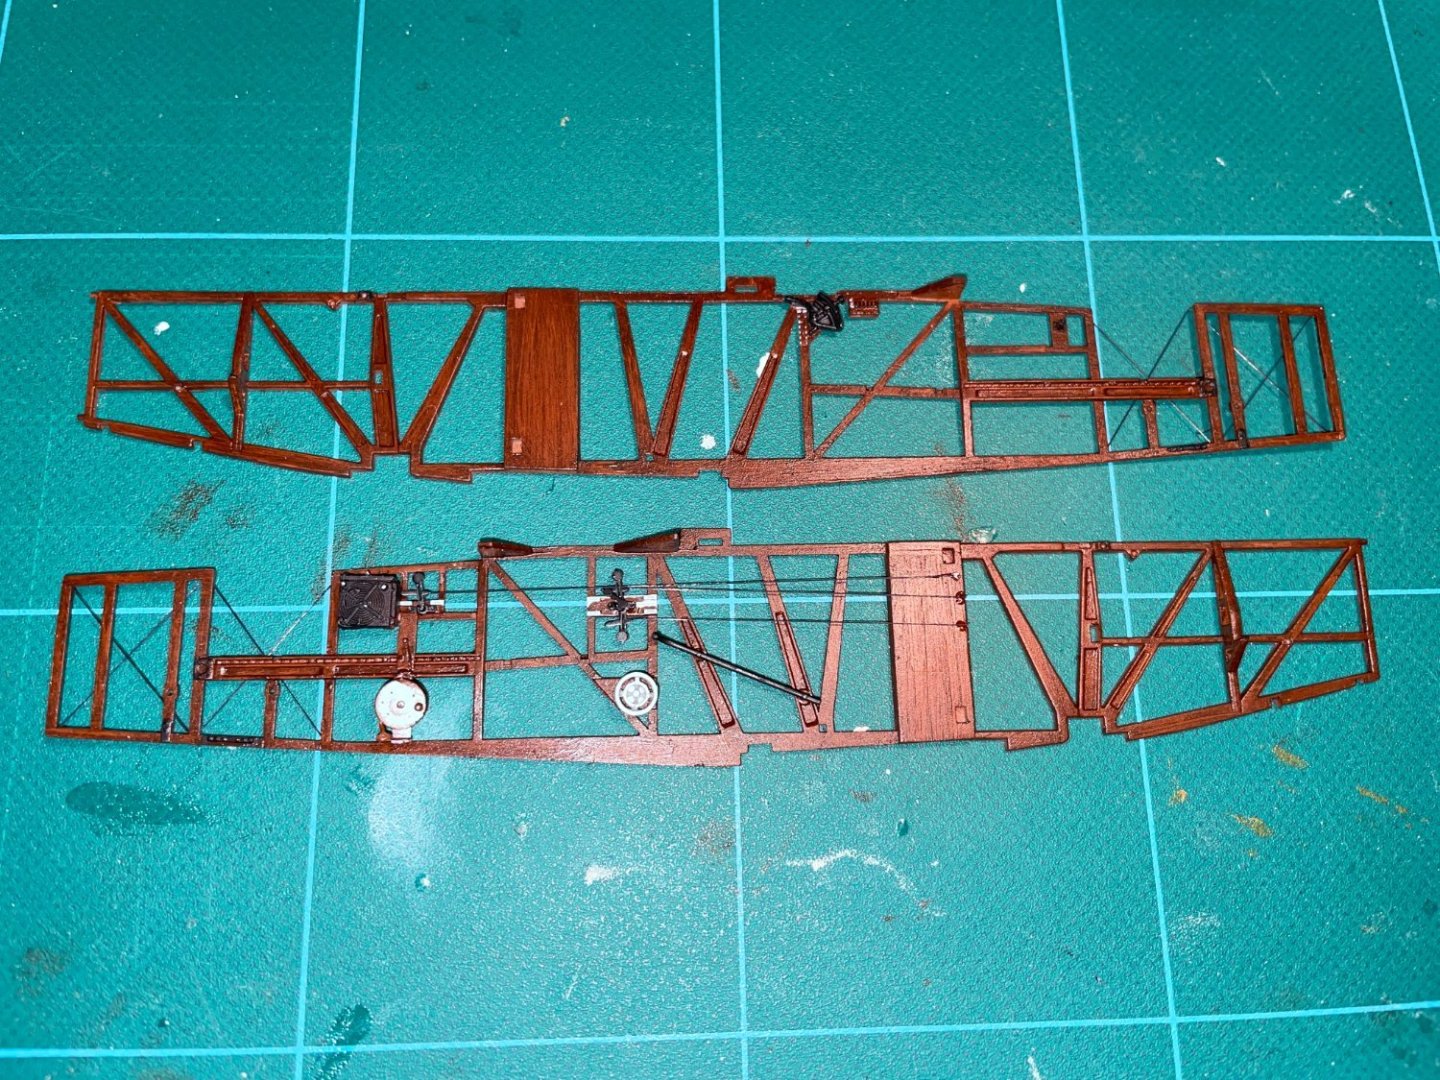
Thanks everyone for the comments and the likes. Javlin - special thanks for the compliment about the woodgraining, which is something I put a lot of time into. The cockpit is starting to come together. This part is always slow for me. The parts fit great with no paint on them – WNW kits have amazing tolerances. Wood graining takes four coats of paint (basecoat/oil streaking/clear tint/clear flat). The streaking is brushed and adds extra thickness. When two wood grained parts get attached to each other, there can be 8 layers of paint in between (4 on each side) before cleaning. In the past when I haven’t paid enough attention to scraping paint, I’ve had fit issues getting the fuselage halves together. Tamiya has a clear flat base that I might try adding to the clear yellow or orange tint to see if I can drop a layer (and save time – for parts where I have to paint the two sides separately, it can take a week of painting to get the parts wood grained). So far, so good, but I won’t know for sure until I button up the fuselage, hopefully this weekend.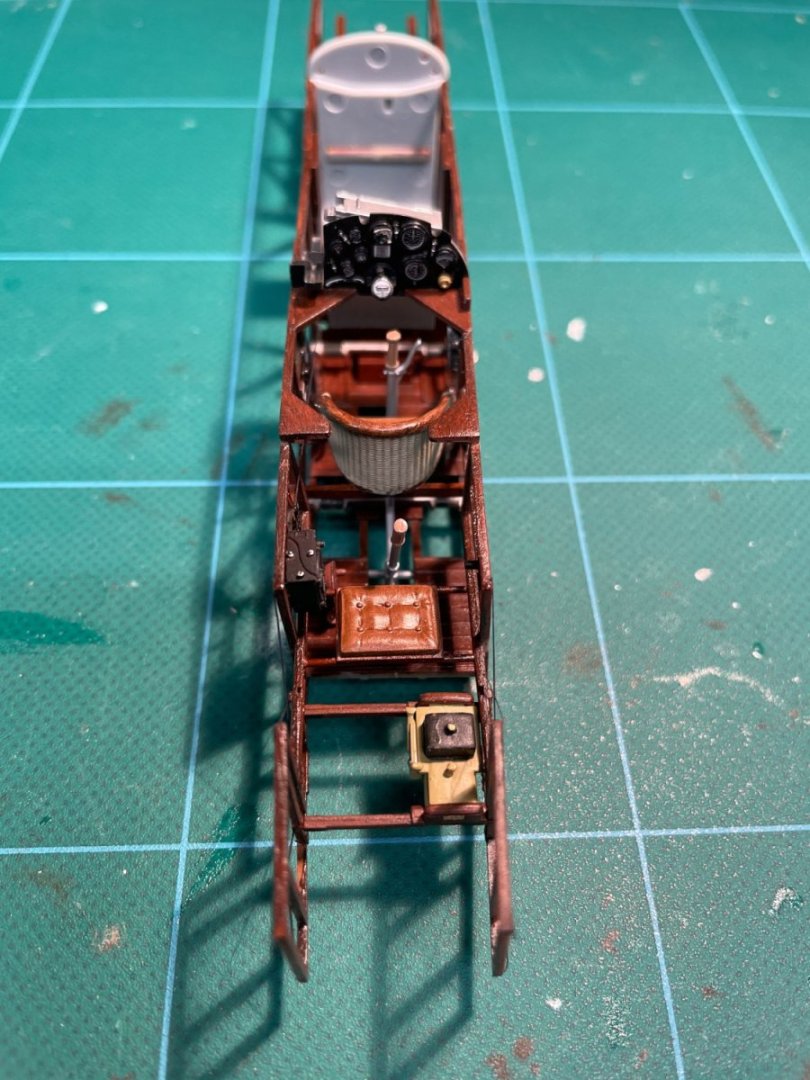
- 43 replies
-
- 22
-

-

-
Very impressive - carronades and rigging came out great!!
-
AMC DH9 by davec - FINISHED - Wingnut Wings - 1/32
davec replied to davec's topic in Non-ship/categorised builds
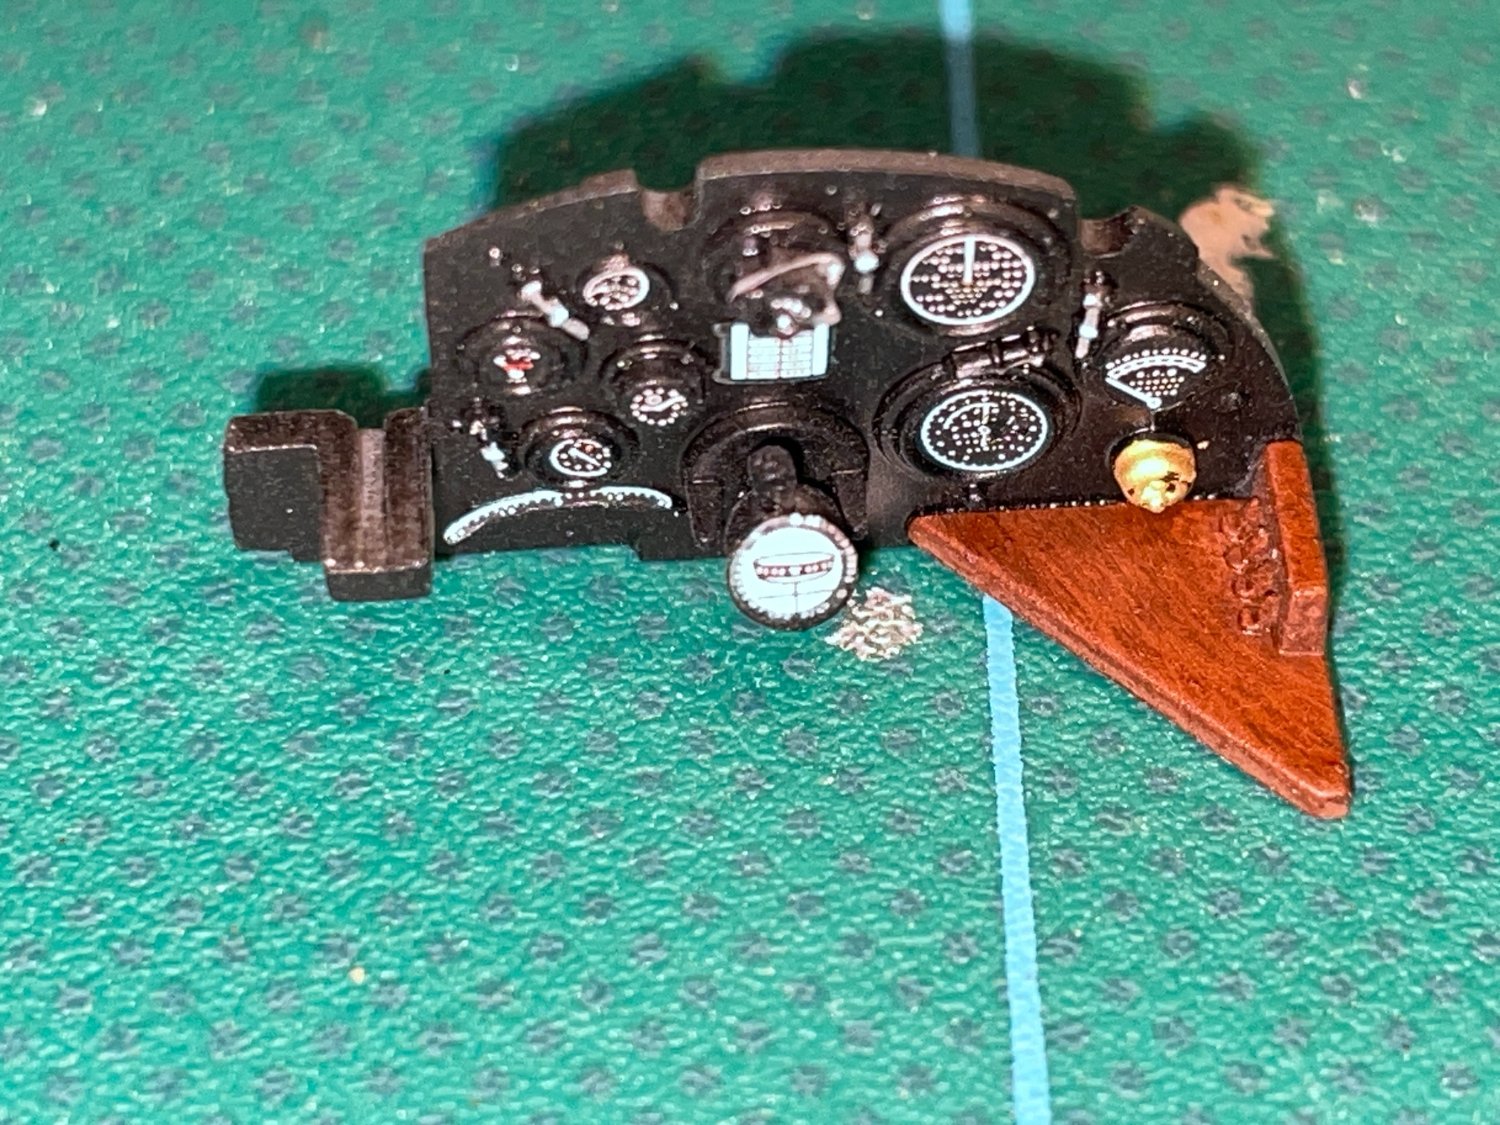
Hi Paul - The guns that come with the kit are extremely well detailed. The gaspatch ones are even more detailed, but you have to look really closely to appreciate it. I bought the Vickers gun when I tried to build the model before, so I already had it. Given how good the kit parts are, I'm not sure I will keep upgrading them, although I would definitely use the gaspatch guns if I was building another company's kit. I like the HGW fabric belts as an alternative to the photoetch ones that come with the model. I also like the masks - I find making my own masks for windshields and other clear pieces really tedious and high risk for failure. I end up using some of the photoetch detail parts but not others. This was my first experience with one of their instrument panels. I got about three quarters through putting it together and decided it wasn't as nice as the molded one that came with the model. I used the instrument levers.- 43 replies
-
- 10
-
-
I’ve been working on world war 1 airplanes at the same time I was working on the Sharpie. I tried build logs on one of the WW1 airplane sites, but wasn’t very good at keeping up with them there. I’ve been watching the great work on plastic non-ships here and thought maybe if I put my logs on one site I’d be better about maintaining them. I particularly like the Wingnuts kits. I had purchased around 15 while they were in or phasing out of business, then inherited many more when my dad, who collected but didn’t build them, passed away two years ago. I started the AMC DH9 on New Years. I have a few aftermarket things. I’m going to build the lobster scheme: Wingnut Wings - 1/32 AMC DH.9 There is a little history here. I tried building this scheme a long time ago when WNW was still in business. I had just gotten a stencil cutter and thought I would make stencils and paint instead of using the decals. It turned into a little bit of a disaster with a lot of paint bleeding under the masks. I ended up tossing the incomplete kit not realizing wingnuts would go out of business. I got another DH9 from my dad’s collection so am giving it another try, this time with the decals. I find on the WNW kits that getting going with the simulated wood and leather on the interior takes a while before anything starts coming together. I've been putting some time in for the past month between work on the display case for the Sharpie and just reached the point where I thought there was anything worth taking pictures of. I started putting together the photoetch instrument panel, but decided it wasn’t as nice as the one that came with the kit.


- 43 replies
-
- 23
-
-
-
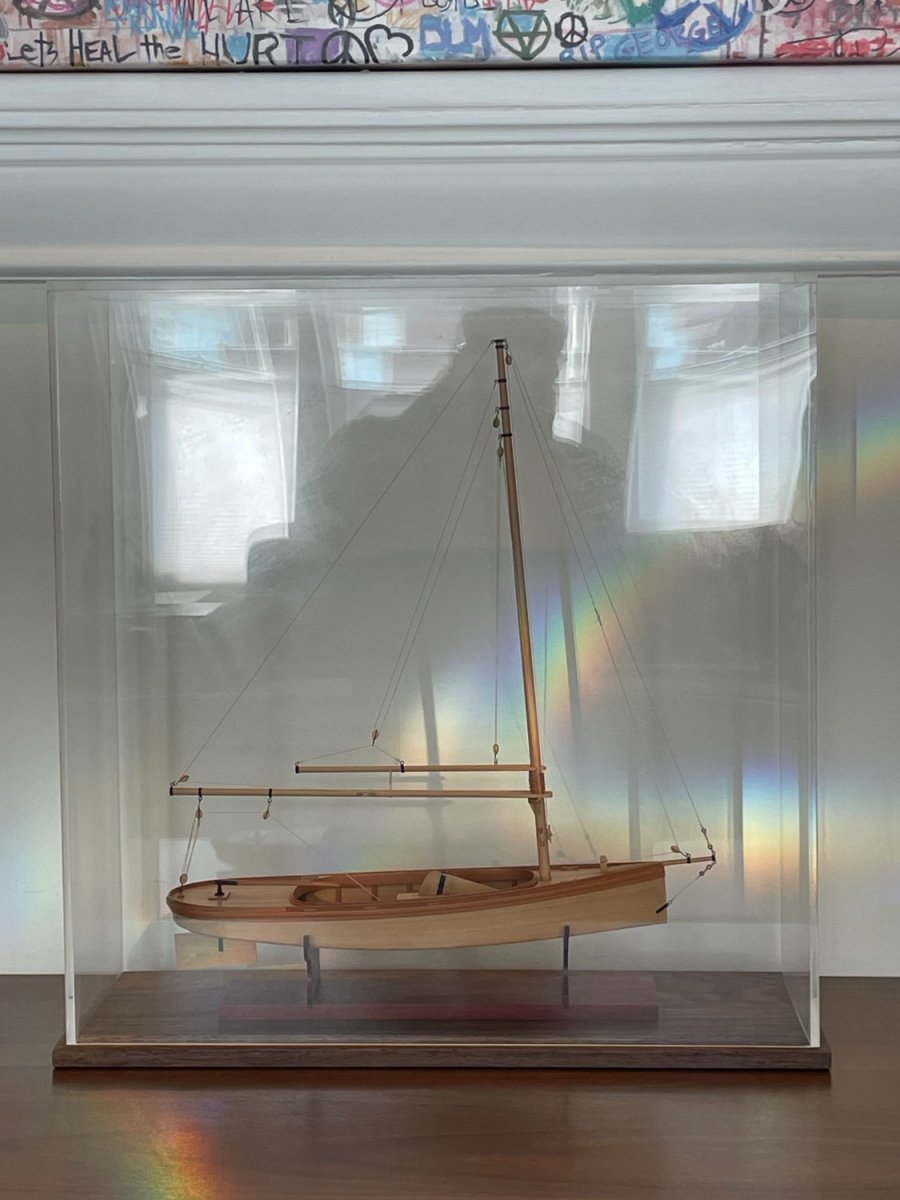
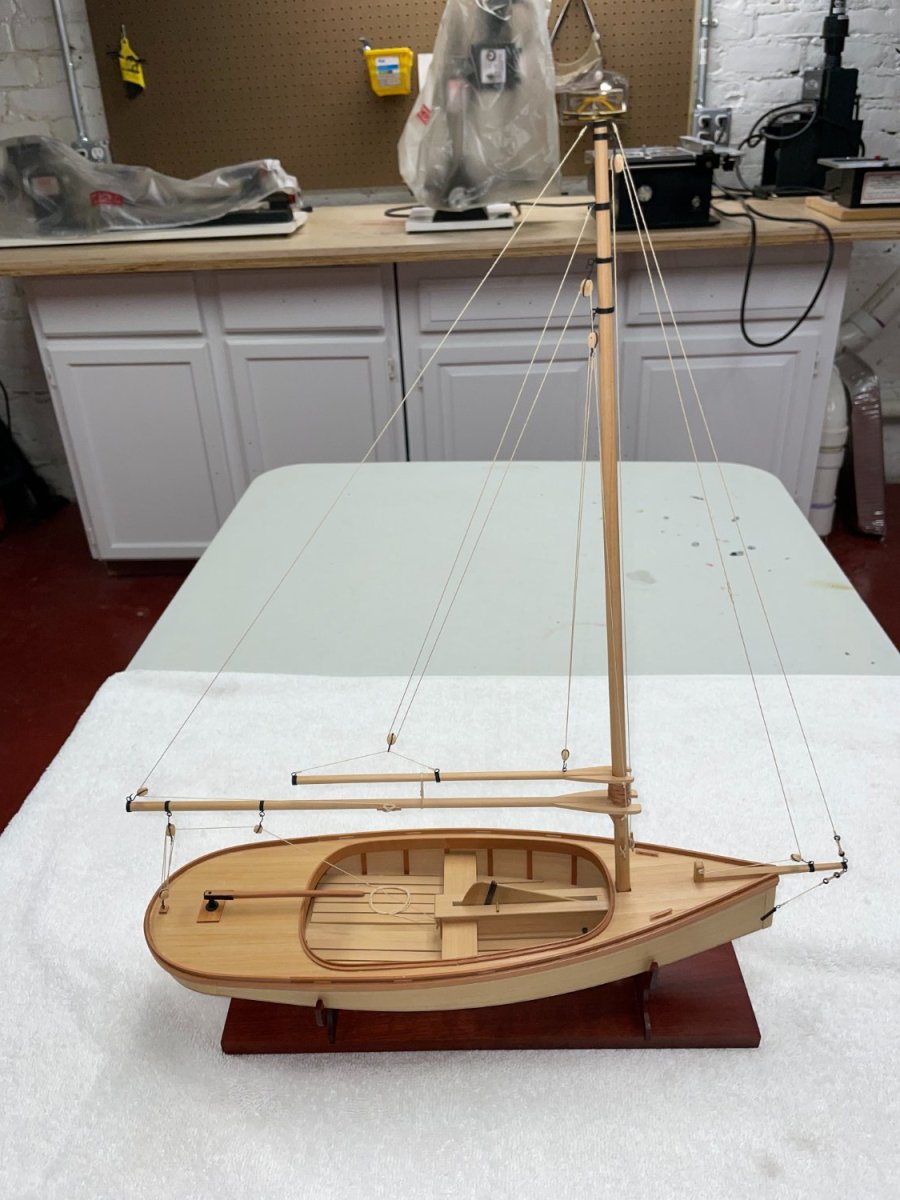
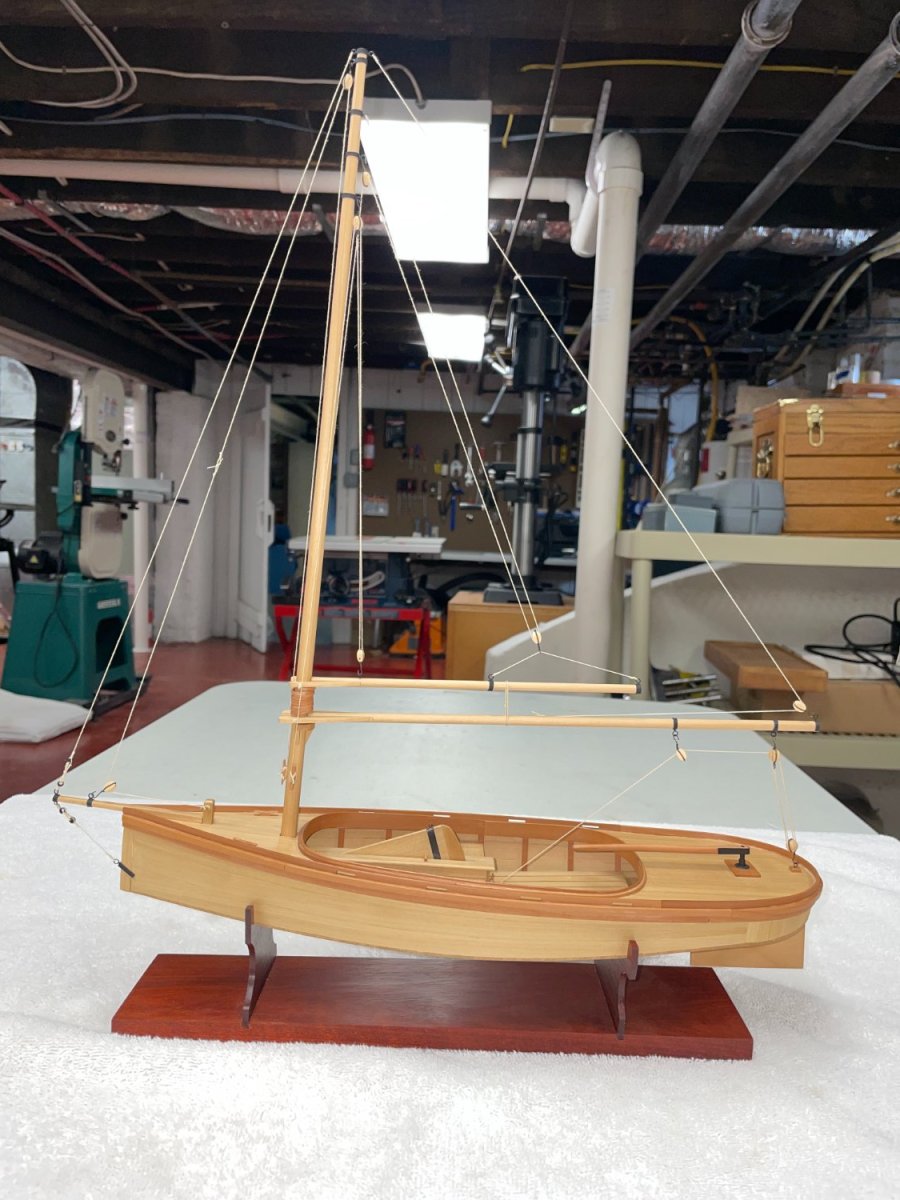
The Sharpie has its new home. The display case was my second adventure with acrylic after making some additional shelves for one of my display cases, and the first time I tried gluing it. I'm very happy with how the display case came out. It is 1/4" acrylic with a peruvian walnut base. I still have some fogging to rub out from where I sanded and polished the joints, but they are on the side and not that visible. I got to use the acrylic table saw blade and router table I got for Christmas - it was a fun project.

- 75 replies
-
- 15
-
-
-
JD - not sure how I never came across this log before - amazing project. The eagle carving is magnificent! Dave
-
Gene - Olympia came out spectacularly! Congratulations on finishing. Tons of amazing details all executed flawlessly. The figures and water are tremendous. I've enjoyed seeing the progress at the club meetings and hope I get to see her in person. What's next? Dave
-
Great to see you back at work. Your cross section is coming out awesome! A friend from my club who does a lot of photo etching helped me with photoetch hinges for my cross section. Micromark sells a photoetch kit that could be an option if you want to go down the photoetch route- I've used it to make some similar parts. Toni's suggestion about painted card would also work great. Completely agree with your frustration with metal blackening. I can't understand why with the same brass, prep, and solution sometimes it works great and sometimes it doesn't. I switched to flat black paint.
-
Beautiful work - not sure how I missed this. I just finished a much smaller sharpie. Looking forward to seeing your progress. Dave
- 201 replies
-
- 2
-
-
- Oyster Sharpie
- first scratch build
- (and 1 more)
-
I don't make masts and spars on the lathe. For those I tend to mark out square stock and shape with planes and sandpaper. I use the lathe for a lot of other things: display pedestals, gun barrels, spindles for railings. . . I haven't made any fixtures, but I did adapt a vanda-lay duplicator. I haven't gotten it to work well for metal, but it work pretty good for duplicating wooden parts.
-
Your building board and jigs are very impressive - looks like they will work great!
- 174 replies
-
- 2
-
-
- Vigilance
- Sailing Trawler
- (and 1 more)
-
Looks like Sherline stopped selling them, even though they still have them in their cover image for their wood turning accessories. Best bet would probably be to wait until a used one comes up on ebay. Alternatively, it looks like there are some accessories for other mini lathes that might be able to be mounted in a sherline tool post: https://www.littlemachineshop.com/products/product_view.php?ProductID=1685&category= or cross slide t-slot: https://www.littlemachineshop.com/products/product_view.php?ProductID=2949&category=
-
Great work! Congratulations on finishing!!
- 50 replies
-
- 3
-
-
- 18th century longboat
- model shipways
- (and 1 more)
-
Again, thanks for the kind comments - I really appreciate them. Chuck - your rope walk was amazing! Much better results than the much more complicated/expensive machine I was using before, and much more fun to use. I need to go a little tighter next time, but that was me, not the machine. I highly recommend for anyone planning to make their own rope. Dave
-
Welcome! Looking forward to seeing your build! Dave
-
Thanks everyone for the very kind comments. I will post pictures of the case when done. I ordered the acrylic sheet yesterday. It should arrive this weekend. My daughter is in town, so I probably won't start work on it until after she heads home. Ryland - I'm planning on bringing the model to the club meeting this month. I'll probably put the plans/books/printed out practicum/jigs/building boards up at the club auction in February - hopefully someone in the club will be interested in building it.
-
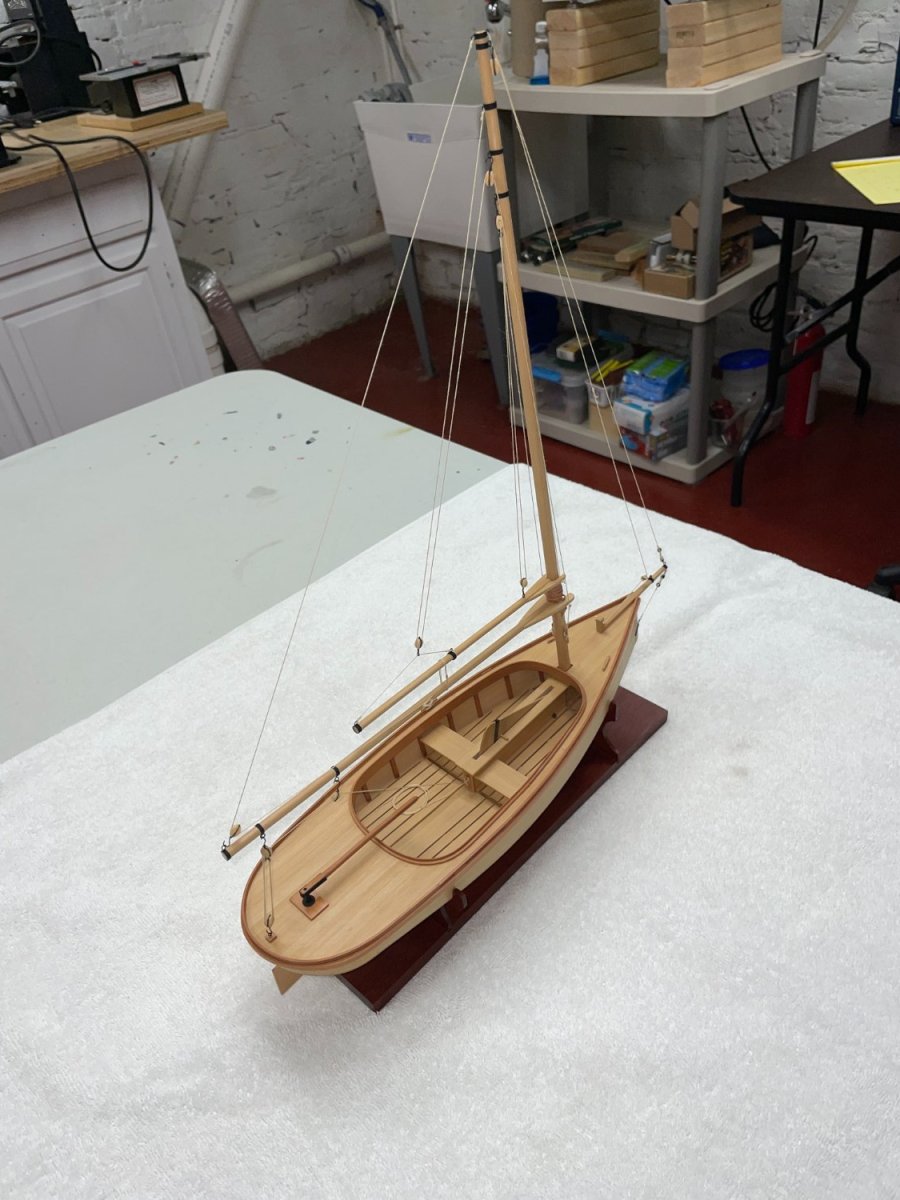
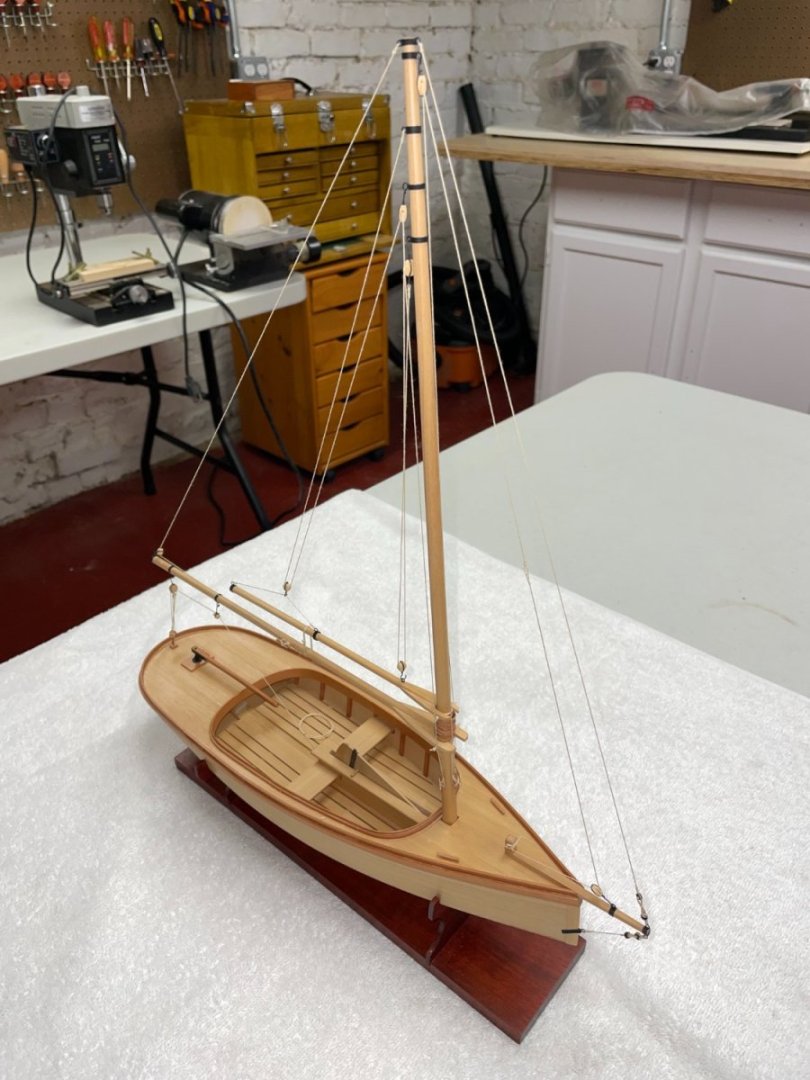
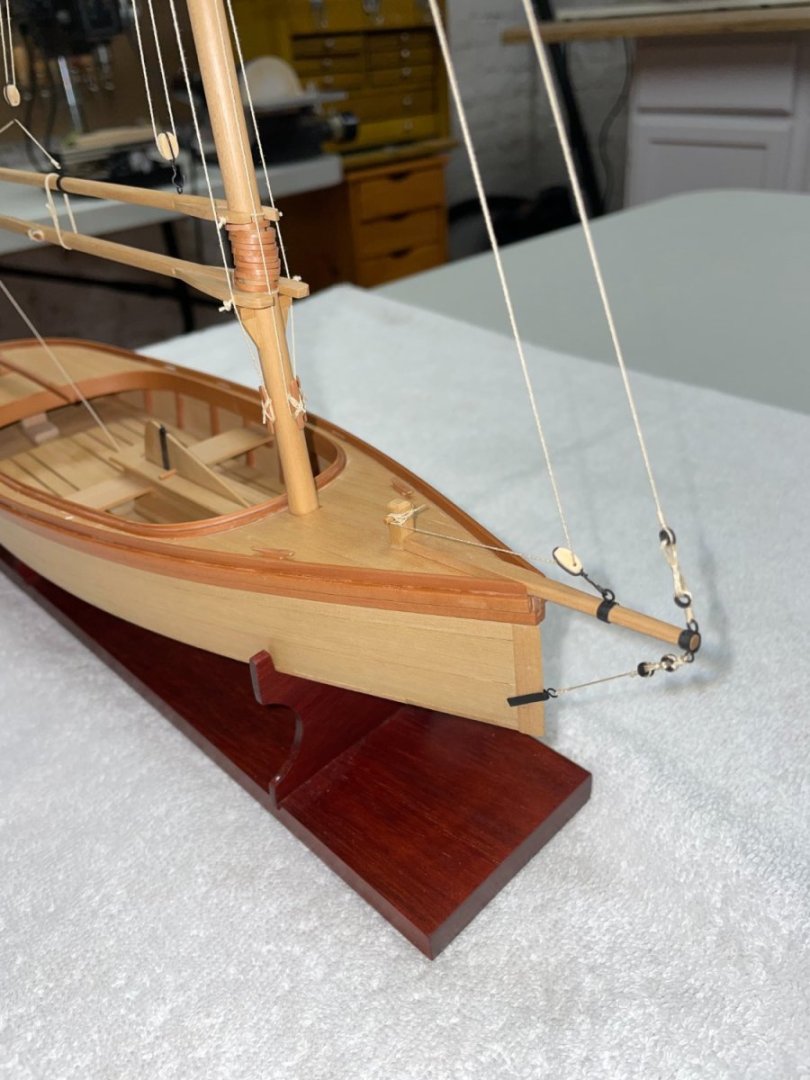
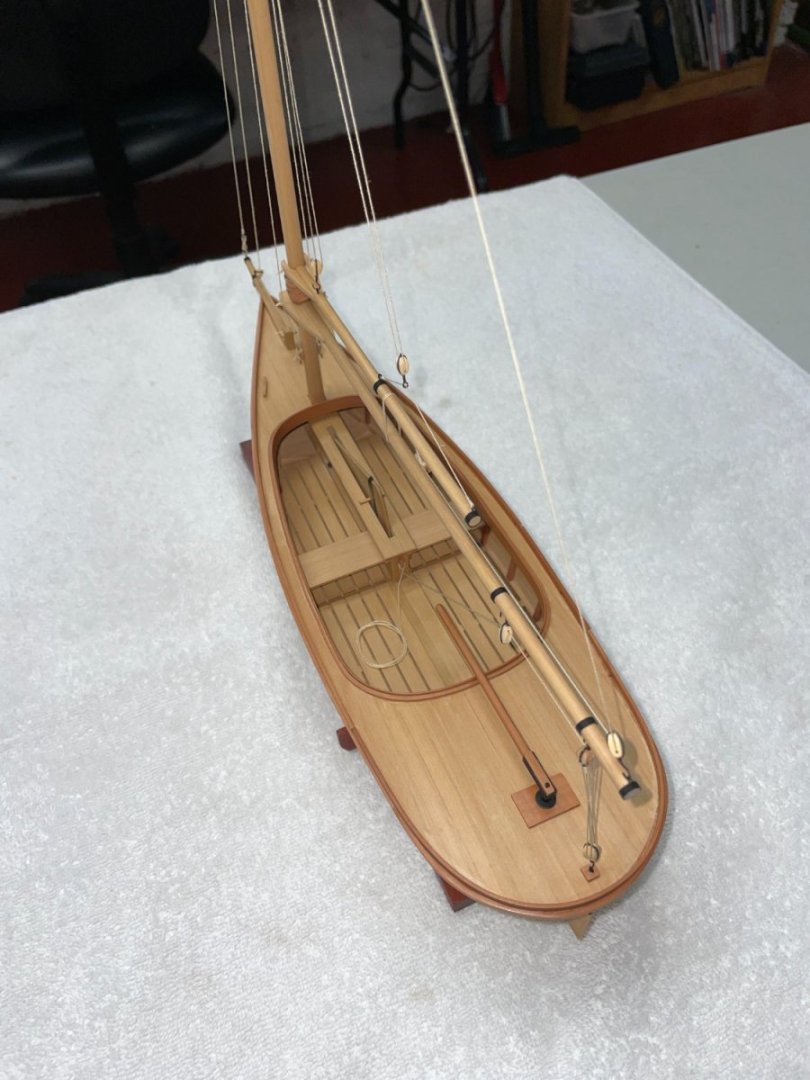
No log entries in two years, but I have been slowly plugging away a few minutes a week. I had a pretty steep learning curve silver soldering the brass fittings for the masts and figuring out how to make the mast hoops. Rope was made with Chuck Passaro’s rope rocket. Rigging relies heavily on John Leather's The Gaff Rig Handbook. When the book didn't have the necessary detail, I defaulted to the advice from the Mystic Seaport staff restoring their Sharpie - "These boats were built in people's backyards with what they could make or get from their local hardware store." I did not want to make sails and there is no rigging exerting downward pressure on the gaff, so rather than having limp rigging, I lowered the gaff as if a mainsail was about to be attached. Both kids were with their partner’s families this Christmas, so I got to spend some concentrated workshop time and finished this morning. Next project is a case – I got some good tools for Christmas (router table, acrylic cutting table saw blade) so I should be able to build one. I made some acrylic shelves for my display case, so I’ve got the cutting and edge polishing down, and just need to sort out the gluing. Happy New Year Everyone!


- 75 replies
-
- 18
-
-
-
Fixing the model to the base makes packing the model for shipping much easier. It wasn't something I thought about when I was building my first few models. I fortunately used pedestals and attached the models to their bases. I ended up moving from MA to VA, and was able to pack and ship the models without breaking them. Not something I thought about when building, but all models get moved eventually.
-
Curtiss BF 2C-1 by CDW - FINISHED - Hasegawa - 1:32 scale
davec replied to CDW's topic in Non-ship/categorised builds
they shipped me decals 2 weeks ago and responded to my email. they seemed very open -
Curtiss BF 2C-1 by CDW - FINISHED - Hasegawa - 1:32 scale
davec replied to CDW's topic in Non-ship/categorised builds
I ordered from yellow wings last month. No automated response or update to my order. I emailed to inquire. I got a nice, quick response that the decals had been shipped. The decals arrived the same day, 8-9 days after the original order. -
Band Saw Recommendations
davec replied to ChrisLBren's topic in Modeling tools and Workshop Equipment
I use the grizzly G0555 like Jim does. The 1 hp motor has been enough for me. I cut boxwood and pear in approximately 2' lengths and rarely more than 3" thick, just for my own model ship projects. I'm not in business like Chuck, and only cut a few dozen billets each year. If you are going to be cutting thicker wood, cutting high volume, or doing heavy duty wood working, the Laguna is a beautiful machine, but probably more than necessary if you are milling wood just for yourself at the pace most of us build. I agree with the comment about bench top machines - I tried one and had to return it. The comments about the blades are interesting. I have a 3/4" resaw blade. It works fine for my purposes. -
John Van Horn's book Emma C Berry in photographs: the slade dale collection, 1931-1941 has pictures from the 1930's. This is later than you have in mind, but ECB is rigged as a schooner. It looks like the lashing on the left is what was used. Dave
-
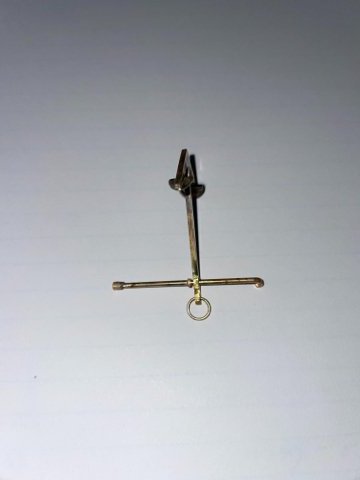
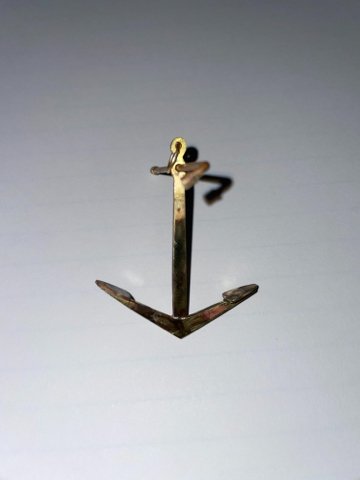
I just finished a fisherman's anchor for my sharpie. Sheet brass, rod, and tubing. metal cutting blade on a scroll saw (I don't have the patience for doing it with a jeweler's saw), lots of filing, and some soldering. Needs to be cleaned up for painting.
-
Byrnes Saw Mini Sled
davec replied to Roger Pellett's topic in Modeling tools and Workshop Equipment
Roger - which blade do you use for cutting the brass? thanks!! Dave