HOLIDAY DONATION DRIVE - SUPPORT MSW - DO YOUR PART TO KEEP THIS GREAT FORUM GOING! (Only 20 donations so far - C'mon guys!)
×


davec
-
Posts
382 -
Joined
-
Last visited
Content Type
Profiles
Forums
Gallery
Events
Everything posted by davec
-
 rare woods usa sells real boxwood (buxus species). Castello Boxwood is awesome wood for ship modeling, but is a different species despite the name. For ordering in the US, I'm still really happy with Gilmer Wood in Oregon, which regularly stocks Castello. There is a fair amount listed on their site https://www.gilmerwood.com/categories/38-boards-and-blanks/products?utf8=✓&filter=Boxwood&category= They seem to have more than just what they list on the website, and are really helpful if you call them and tell them what you are looking for. They only sell as billets, but their wood has flat (or nearly flat) and perpendicular sides, which makes it pretty easy to work with using just a band saw and thickness sander. I bought a 6' foot 2x4" 10 years ago, which was enough for Hannah and the Echo Cross section, and should run out as I finish the Sharpie. I've ordered twice since then, and continue to be happy with their quality and service. Dave
 -
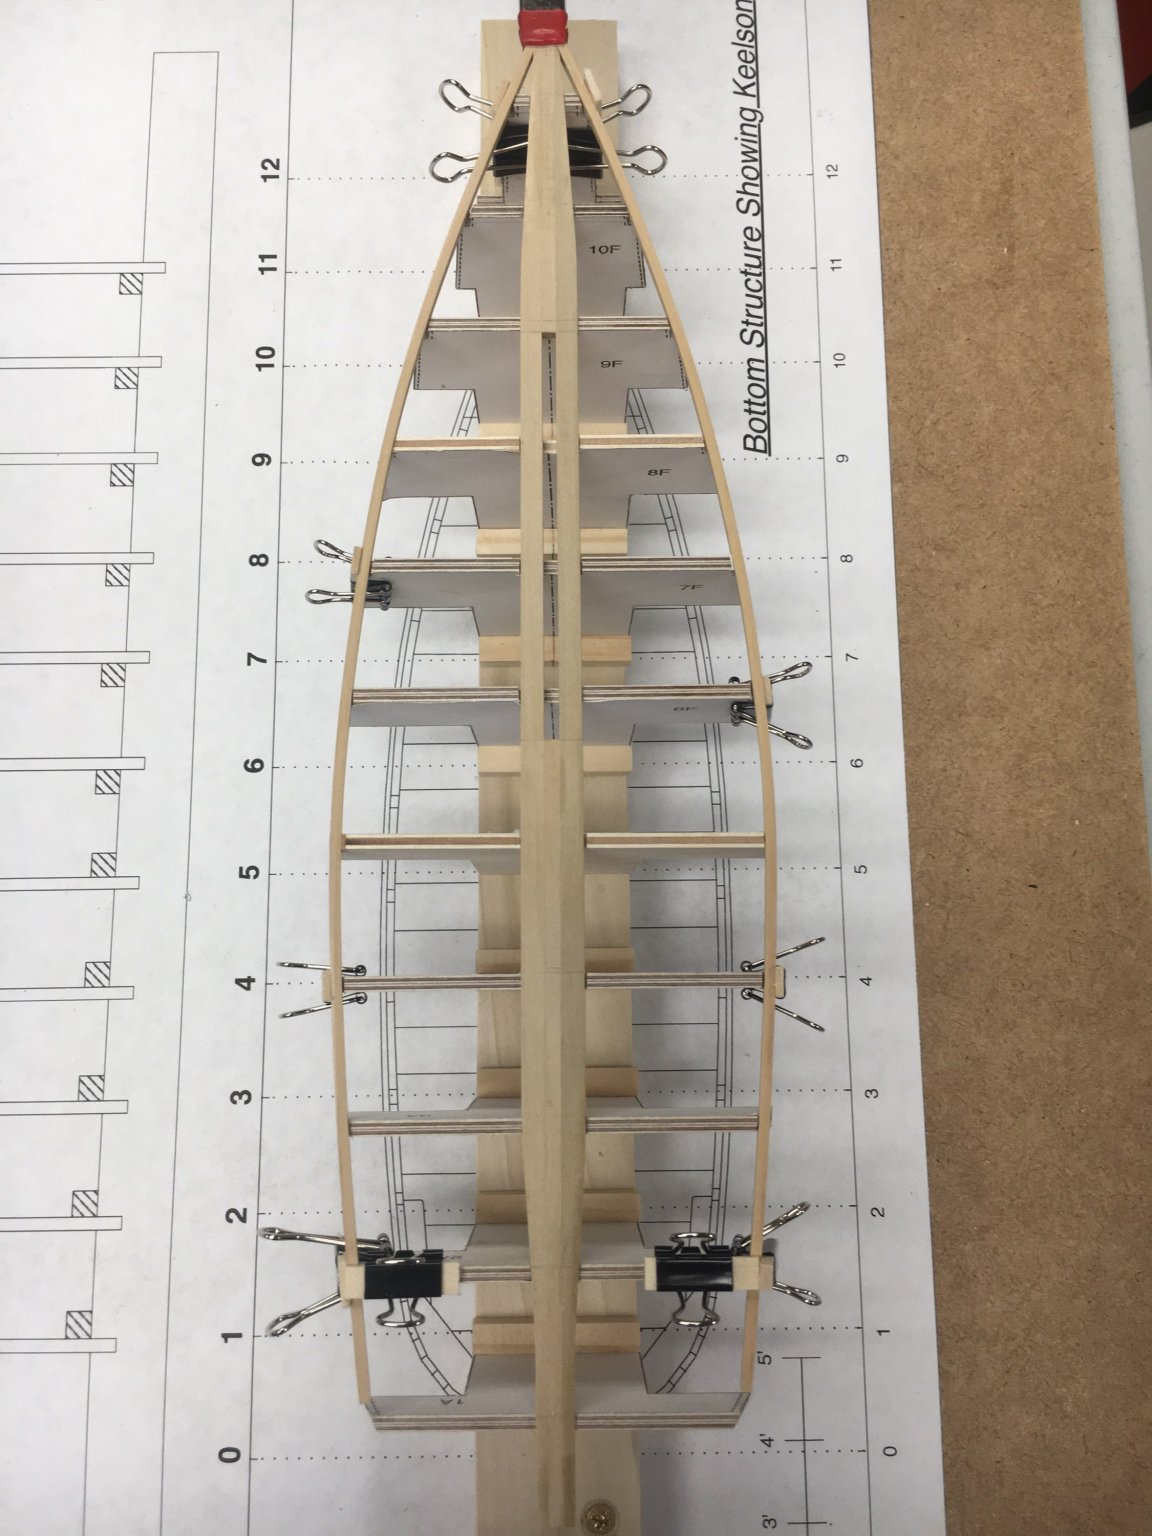
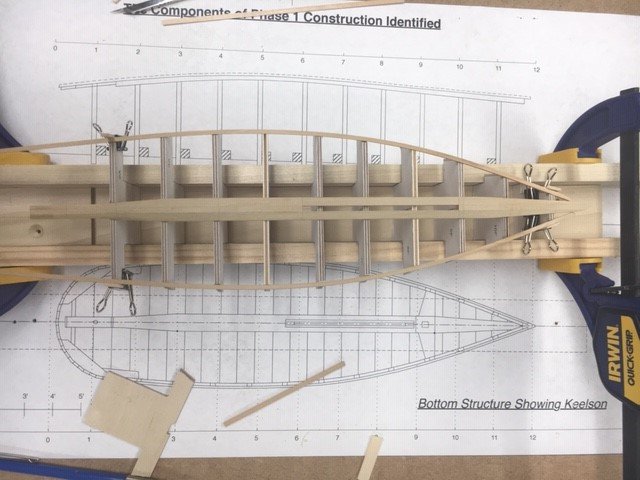
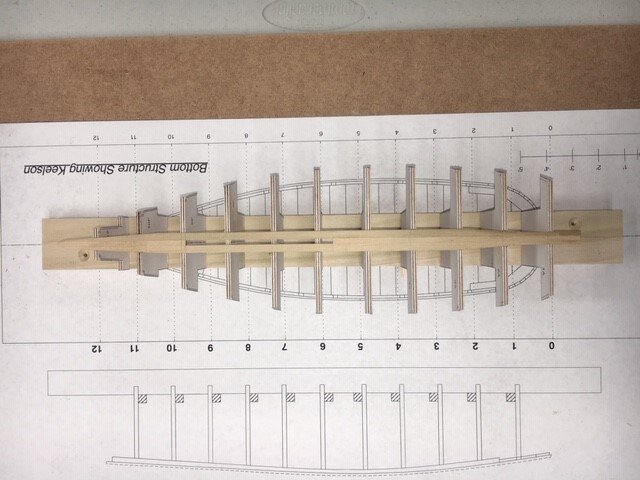
I made some decisions and some progress. I’ve committed to planking upside down over the molds. I glued the chines to the keelson and glued three bottom planks in place. This seems adequate to hold the shape for the bottom of the boat. It allows me to take the hull on and off the mold, and gives enough access to the chines to fine tune the templates for the side planks. I modified mold #11 to accommodate the horizontal stem support, and installed the vertical and horizontal supports and the inner stem piece. I didn’t have high expectations about being able to use the planking templates that came with the plans. Seems like very small variations in cutting and assembling the molds would require the templates to be revised, and I’m sure I introduced many. I’m also not planning on painting, so the joints will be visible, and I want them to look good. This is one of the problems with building a model instead of a real boat, where a gap would have been expected and filled with caulking. I started with the pattern that came with the plans, and have modified it pretty significantly to get the right fit along the chine. I started with just the bottom plank, then realized I’d be better off making a template for the entire side planking, then divide it into three planks. I’ve gotten some good use of a set of ship’s curves that have been sitting in a drawer since I got them at an auction a few years ago. The template in the picture is the fourth iteration. I think one more and I’ll be ready. I also need to decide which stern planking option I’m going to use. The monograph gives two choices, vertical and angled. I'll need to decide before cutting the planks because the option drives how the aft edge of the planks get cut.
-
Hi Jim - The boards aren't on the website. I emailed them with what I was looking for. They seem to have other wood in stock that they don't post, and what they post is aimed at a lot of different interests (wood turners, instrument makers. . .). A lot of other woodworkers want the opposite of what we do - prominent grain in interesting patterns. I emailed them looking for tight grain and nice color, as well as a similar piece of swiss pear. If they don't have anything in stock that is right, they have been great about emailing when something comes in. I've ordered from them twice before, and been really happy with their service and quality. It would be great to be driving distance from them. When I lived near Boston, I used to drive up to Yankee Lumber on the north shore. It was fun to see all the different kinds of wood, and be able to pick out what I was going to buy in person. It wasn't very economic - whatever I saved in shipping got used up in lunch at Woodman's fried clams, which was nearby. Now that I moved south, I don't have any place like that in driving distance, and have to be satisfied with seeing the look on the UPS driver's face as he carries shrink wrapped 2x4's up the steps. Dave
-
Some progress over the course of the week, none of which really merits pictures: Milled a bunch of 1/16" sheet for the side planking Milled wood for the horizontal and vertical stem support logs. I used the dimensions from the plans, not the monograph, which are different. I think the monograph simplified by using commercially available stock sizes. I shaped the inner and outer stems. The monographs instructions for taping sheet stock to a big block to hold while shaping with a disc sander worked really well. Left to myself, I would have used a plane or chisel, which would have taken longer and probably not been as uniform when done. I couldn't figure out how to get set my tilt table on my table saw to the necessary angle (22.5 degrees, which would require setting the table to 67.5 degrees) I ordered a copy of Chapelle's Boatbuilding, and have slowed down to read it, something I regret not doing prior to starting. It is a great read, and really helpful. 70 years old but a classic. The plans come with patterns for the side planking. I cut out the patterns for the lower plank, which doesn't line up perfectly, but will give me a pretty good starting point for shaping the plank. Biggest issue is deciding whether to plank upright like in the monograph, or upside down over the molds. I'm still heavily leaning towards upside down. To do this I will need the stem attached to the keelson. The jig wasn't designed for this, but will only need a slot in the forward most mold to fit the horizontal stem support log. I'm also trying to decide how much bottom planking to install prior to fitting the first side plank. I need to install a few to keep the chines aligned vertically with the keelson. Leaving the bottom mostly unplanked will give a lot better visibility for fine-tuning the pattern and first side plank. I'm thinking of installing bottom planks at the bow, aft end of the chines, and front and back of the centerboard slot, then fitting the first side planks, completing the rest of the side planks, and finishing planking the bottom, before turning the hull upright to finish. When I'm done overthinking things, I'll start cutting and gluing. Dave
-
Jaager- Many thanks! I misinterpreted what they said when I first read it, and agree with your interpretation. Thanks for clarifying. I hadn't given a lot of thought to which direction I milled my wood in, and your comments have really helped me think about which direction I mill in terms of grain pattern on the sides of the wood that will be visible on the model, as well as how it will work for planing and chiseling. Many thanks! Dave
-
I'm using up the last of my Castillo boxwood supply on my current model, and looking to buy enough for my next project, which will likely be a fully framed Swan or Echo class ship in 1/48. I've been in touch with Gilmer Wood, who as usual, are being tremendously helpful. I mill my own wood, and have been happy with with what I have purchased from them in the past. The pictures they sent me of the billets look great. They also sent a description "perfectly flatsawn (quartersawn on the edge)." This isn't something I have considered before. Is flatsawn the best choice for milling scale lumber, or should I be requesting quartersawn? By the time I get the wood down to scale lumber sizes, does it even matter? The wood has been milled to 2x4" stock in 33" lengths. thoughts? thanks! Dave
-
Sharpie by Jim T - Scale 1:16 - SMALL
davec replied to Jim T's topic in - Build logs for subjects built 1851 - 1900
Hi Jim - great to see you building again. I learned all sorts of things reading your log that will help me move forward - would be great to have someone else working on the same model at the same time. Dave -
Like what you did with the seams, and I really like the color scheme and shade of red. It might be darker than you planned, but still looks like a great color. Beautiful work!
-
absolutely amazing - beautiful work! The simulated splices look great.
-
Hi Jim - Just went back and reread your build log. Amazing work. Your sharpie is really coming along beautifully. I'm also really impressed at your building pace - your first post was 4/1. My copy of Chapelle's boatbuilding finally came in the mail, a little delayed by COVID. I like how many of the original building practices you've used. Dave
-
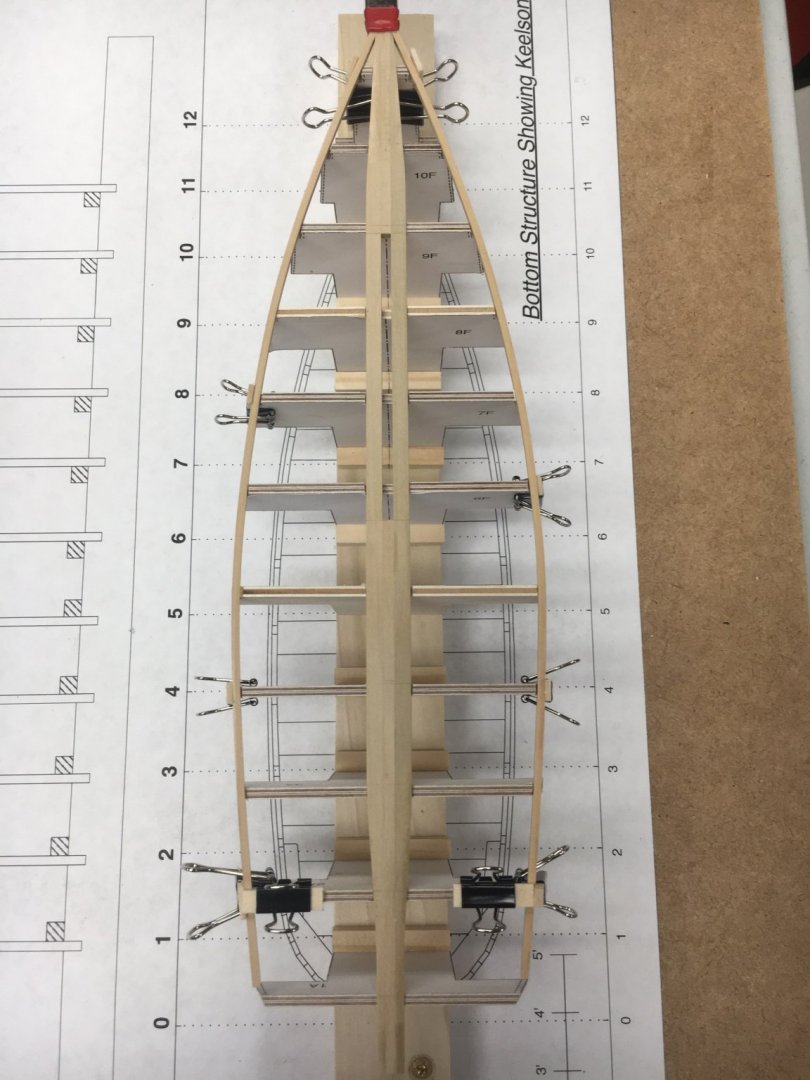
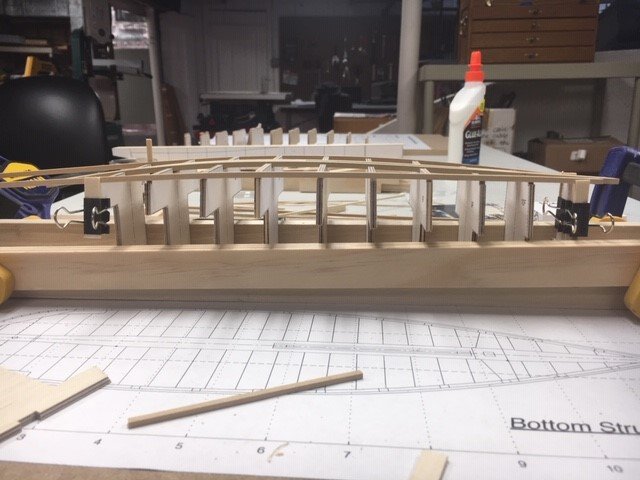
I think the jig is ready. I've included a picture, even though it looks like all the other pictures, including the jig in the trash can. You can't see it well, but the chines are symmetric, follow a smooth curve, and line up with the molds on the sides. On top, they also line up with keelson. I'm working overnight, so won't touch it again until later in the week, but I'm ready to start attaching the planks for the bottom of the hull. I'm going to deviate from the monograph and try to do the side planking on the mold. If that works, will flip it over after to do the stern planking. Optimistic.
-
Hi John - Thanks for your comments, and I definitely agree with not being too much of a slave to the plans. I do worry about cumulative error. I usually end up allowing little deviations, which snowball to bigger ones when I have to correct for the previous ones. Here where I am making adjustments this early, by the time the model is done, it could end up with wings, wheels, and a Bofors gun. Will post some pictures later, but yesterday I glued the jig together, shaped the keelson at the bow, sanded the keelson and chines , and milled scale 1x8" planks for the hull bottom. Plan for today is to do a small amount of final adjustment to the chine slots and heat bend the chines so they don't need a lot of clamping. Dave
-
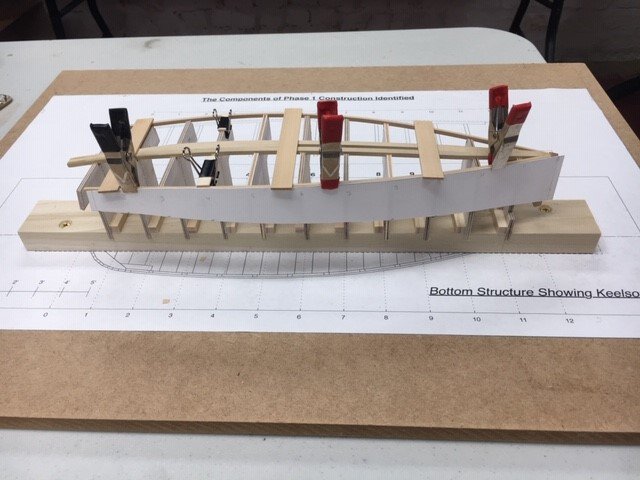
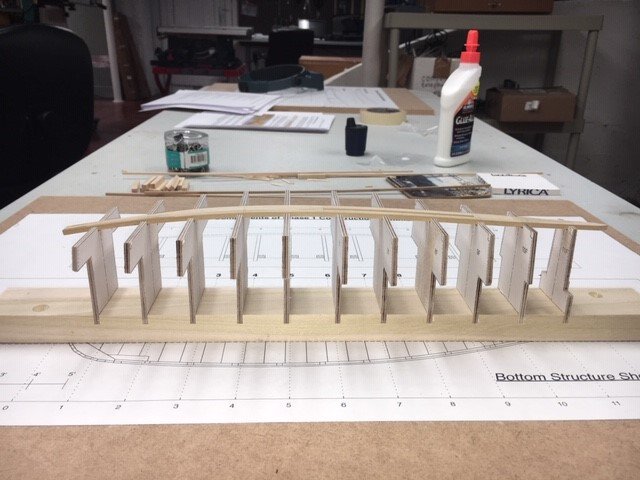
Made more sense in this instance to adjust the size of the molds than to move them. Because some of the sections were drawn to the outer plank width, they were too wide, and shifting them wouldn't correct for this. I think I have them adequately adjusted. Nothing in the pictures is glued yet, but I think I have both the upper and outer curves adequately fair, and as close to the plans as possible. I ended up redoing sections 5 and 8. I am a hair (around scale 1") wider than the plans at these two points, but it gives me a fair enough curve that I only need clamps at the two ends to hold everything in place. I will need to adjust the keelson, which looks like it is also drawn to the outer hull at the bow (this may have been deliberate to allow extra wood for adjustments). I will need to do a little minor shimming (cut my chine slots a little too big at #7) but I think it is time to glue everything in place. With everything clamped instead of glued, there is a little give, so I may need to do some final adjustments once everything is completely rigid.
-
John - thanks for the better picture. I just need to have my model come out as nice as your mold. Have you ever brought that model to a club meeting? I don't remember seeing it. Mark, John, and Jim - Thanks for the suggestions about preventing the hull getting glued to the mold. As I think ahead, I'm mostly going to have to be really careful with glue application. Any glue that comes out from under the chine will be visible, and will be very dry and hard to remove by the time I take the hull off the mold. I plan to bevel the corner of the edge of the chine notch under the side planking, but mostly I'm going to have to avoid glue squeezing out under the edges. Looking forward to some time over the weekend. I've been picking away at the jig over the week. I have all but one section both lining up with the inner planking line from the plans and having the chine follow a nice smooth curve through the notches on the other as cut sections without extra clamping. I'm having minor trouble at section #5, which ends up being a little too narrow if I use the width from the plans. I'll try adjusting the adjacent notches a little more to see if I can compensate and use the section as drawn. If not, I will make a new #5 that is a little wider so that everything follows a smooth curve. The hull would be a little wider than the plans just at this section, but it seems better to do that than force fit the planking with a lot of clamping.
-
Jim - I agree the monograph does jump around some. It seems like the authors tried a bunch of things as they developed their build techniques, wrote as they went, and didn't always remove all the text about false starts. It would have been very interesting to see it as a build log which included the different things the authors tried. I think they also needed to use pictures from later in the build to show details of things they didn't photograph at the time. They put a lot of time into this project, and took on something a lot different than the other tutorials and practicums that are available. It is a cool project, even though there is a fair amount early on to puzzle out. It looks like it will be pretty straightforward once the hull bottom and side planking are done. Glad you took out your model. Hope you start again. Dave
-
Jesse - Beautiful model - congratulations on finishing! Dave
- 1,306 replies
-
- 1
-

-
- syren
- model shipways
- (and 1 more)
-
Michael - Looks awesome, including the painting!! I agree with JD. I switched from plastic cars to wooden ships 20 years ago to get away from painting, which I found really frustrating. Didn't help that I was doing it in the basement with the dryer lint and cat hair. Dave
- 221 replies
-
- 2
-
-
- queen anne barge
- Syren Ship Model Company
- (and 1 more)
-
Hi Jim - The monograph does build it upright. Maybe I should be less nervous and just build it the way they did. Just looks like it would be hard to keep everything symmetric and aligned. To me it looks like they originally intended to use the jig as a mold, then gave up. It is in the right general shape for a mold, and they even take us through precisely beveling the sides. It doesn't work as a mold using the templates as printed, but it is SO close. Minor adjustments in heights of the stems of the middle section templates and narrowing a few of the templates to the inner planking line seems to make everything work. It was initially frustrating, since once the jig is glued together it is hard to make the adjustments. Rebuilding it adjusting each template separately is a lot easier. The other thing that threw me off was figuring out what dimension the chines should be. The monograph gave two different options. You clearly figured this out already. I initially put the 9 degree bevel on 1/8" square stock. When I redid it as 3/32x1/8" it worked much better with the chine notches as drawn on the templates. Another instance where the plans were clearer than the monograph. I'd like to try building it on the mold. It was the way the real boat was made, and both the build by John Cheevers above and in Jim Cricket's log did it this way, with results I'd love to come close to. I'm having fun experimenting. When I mail ordered the replacement plywood, buying a 5 sheet pack was the best deal, so I have plenty of material to play with. I'm leaning towards not relying heavily on the monograph, and more on the plans and how the original boats were built. If I plank on the mold, I will need to install all the inner workings after the planking, which is also different than the monograph. Dave
-
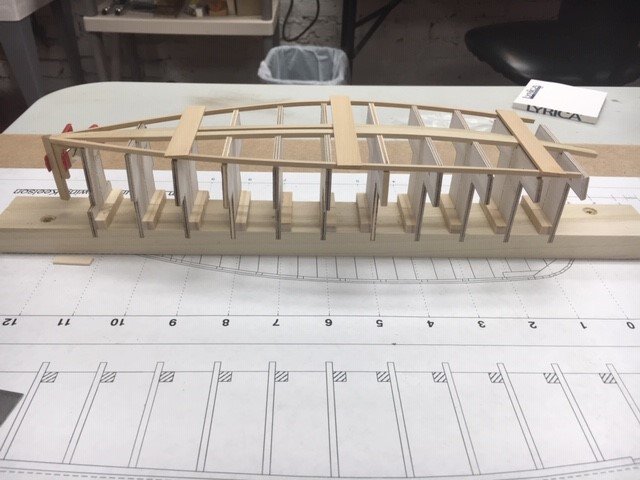
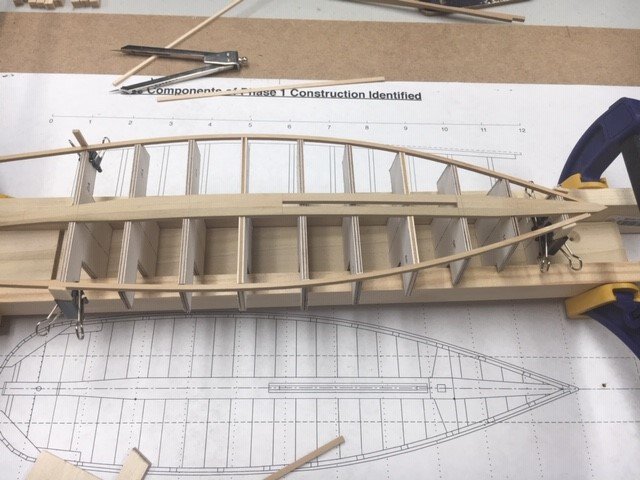
Substantial progress over the weekend. I cut new section templates, and used the keelson and jig 2 to adjust the curve on top (the bottom of the hull). When I get it all done, will list all the adjustments to make it easier for the next builder. The 3 templates at either end follow the right curve, but the ones in the middle needed some shimming, except #8, which needed some substantial lowering. I notched the templates for the keelson, which now sits 1/32" above the jig like it is supposed to. The picture from above doesn't show well because of perspective and distortion from my cell phone camera, but the outside curve now follows the plan. The molds should extend to the inner planking line. Most did, but a few went to the outside of the hull. Once adjusted and beveled, a strip along the edges follows a nice smooth curve. I've been working on the chine notches. I have some irregularities to work out (would much rather try to shape boxwood than plywood), but am getting close to getting them right. I've been clamping small boards along either side of the base to keep everything aligned. It lets me remove the section templates to adjust them individually. This jig has been a lot of work, but at the very least will let me get the flat bottom of the hull right. I doubt the rest of the build would go well if I don't have the right shape and size for it. If the jig works the way it should, I should also be able to use it as a mold for the planking.
-
Hi Jim - So glad that you checked in, and that you didn't stop because of problems. Definitely much more motivating and easier to solve problems if someone else is building. I hope you start again. Dave
-
Hi Jim - I think I am going to end up doing using both the jig as designed and some separate cross section molds at planking time. This boat is a little different than yours in that the bottom is completely flat side to side. Chines and keelson need to be in the same plane. The new jig will let me hold everything coplanar to build the floor. It will be the same design as the first one, except I will make sure the curve at the top conforms to the shape of the keelson and other jig, as well as the shape of the chines laterally. I could definitely build a boat on this jig, but it would end up a different shape than the plans. I'm not sure about the implications of that for fitting other pieces later, and am trying to remain faithful to the design. I realize this may not have been the case with building the real boat. Not sure if I can build the whole hull upside down on the jig. The jig is designed so the chines and keelson project up around 1/32" above the level of the jig, so I don't need to worry about the bottom planking getting glued to the jig. I can't figure out how to do the same on the sides. I think the jig will be useful for shaping the side planks. My tentative game plan will be to use the jig to help shape the planks. I will briefly try to see if I can glue the planks on without getting glue near the jig. If this isn't feasible, I will attach the side planks to the model with if flipped over like you suggest, using two or three molds (cross sections from the jig) to hold everything in place while it dries. The other advantage of this is it would let me follow most of the rest of the monograph as written. John - how did you build over your mold without the hull getting glued to the mold? I milled the base for the new jig last night, and will start making some cross sections with some of the plywood I have on hand. The new plywood should arrive tomorrow. As with doing most things the second time, it is going faster and coming out better. I think it will be worth it in the long run. Dave
-
I just purchased a blade adaptor from Jim Byrnes to replace the one I lost when it fell on the floor and rolled away. He charged $5, and the shipping was very reasonable. It just came in the mail, which means the one I dropped should turn up shortly.
- 68 replies
-
- 14
-
-

-
Making Rope Coils with a Jig by Peta_V
davec replied to ccoyle's topic in Masting, rigging and sails
great method and tremendous explanation! thanks! -
Michael - thanks! John and Jim- Agree that the boat should be buildable over molds even though the monograph doesn't do it that way. The current mold doesn't have the right contour along the top, and the sides don't quite agree with the plans. Because everything is glued in place, it seems like it would be easier, faster, and more accurate to redo from scratch. I can rebuild it in a couple of hours so it works right, instead of frustrating myself trying to make this one work. John - I may call you if I get stuck, but I'm optimistic - just wish I didn't have to wait for the plywood to come in the mail thanks! Dave
-
John and Michael - many thanks. My plank bender is one of those soldering iron thingies - the one I used had a big round head that was deep enough to shape the three pieces of the keelson at the same time. I’m beginning to run into some problems, and getting an idea why there are only two build logs, and I’m already as far as one of them stopped. Looks like there are some issues coming up related to Jig 1 and building the bottom of the boat and the initial planking. According to the monograph (link in the first post), the side planking appears to be done in three strakes, without any frame to hold the shape. The more I look at it, the more difficult it looks, especially if I am going to end up with the 9 degree slope in the plans. The second build log ends just before the side planking, and I’m guessing this is why. Jim Cricket’s build is planked over formers, which looks way more straightforward. It looks like Jig 1 was designed to be used to shape the hull, but doesn’t get used that way in the monograph. There are a few pictures that use two cross sections from it when adding the last planks, but never the whole thing. The jig ends up only used to hold the keelson and chines coplanar while making the bottom of the hull, which is flat side to side, but curved fore and aft. The instructions say to shape Jig 1 to follow a smooth curve, but it can’t be just any smooth curve, it should conform to Jig 2. One the bottom of the hull is finished, it is flipped over, placed on Jig 2, and the rest of the build is done on the second jig. The surfaces of Jig 1 and Jig 2 should be mirror images of each other. They weren’t, and they are far enough off that the keelson and chines don’t fit vertically in the slots in Jig 1 through their whole lengths. I might be able to fix that problem with a lot of shims and clamping and be able to build the flat bottom of the hull, but the jig won’t be useful for helping to plank. I’ve ordered more 1/8” plywood, which is supposed to arrive Monday. I miss being able to just drive to the hobby shop. I’m going to redo Jig 1. Looks like the easier thing to do would have been to make jig 2 first. It is the simpler of the two to make. It follows a single curve, and I’m comfortable I followed it, My plan is to redo jig 1, using jig 2 flipped upside down as a guide to adjust the heights of the cross sections of jig 1 to get the top surfaces to follow the right curve. Once I have that right, I will notch the cross sections for the keelson and chines. As the other builders noted, the section templates are a little too wide at some points, and the chine notches need to be moved inward. This isn’t a problem for shaping the bottom of the hull, but makes the sides of the cross sections stick out past the edge of the chine, making the jig too wide to use to shape the side planks. Once the chine slots are cut in the right place, I can hopefully shape the outside of the section templates to the intended shape of the inner side of the planking, and use the jig to help plank. Even if I can’t get it to work for the planking, getting the tops of the cross sections in the right plane to hold the chines and keelson will make building the flat bottom a lot easier.