davec
-
Posts
383 -
Joined
-
Last visited
Content Type
Profiles
Forums
Gallery
Events
Everything posted by davec
-
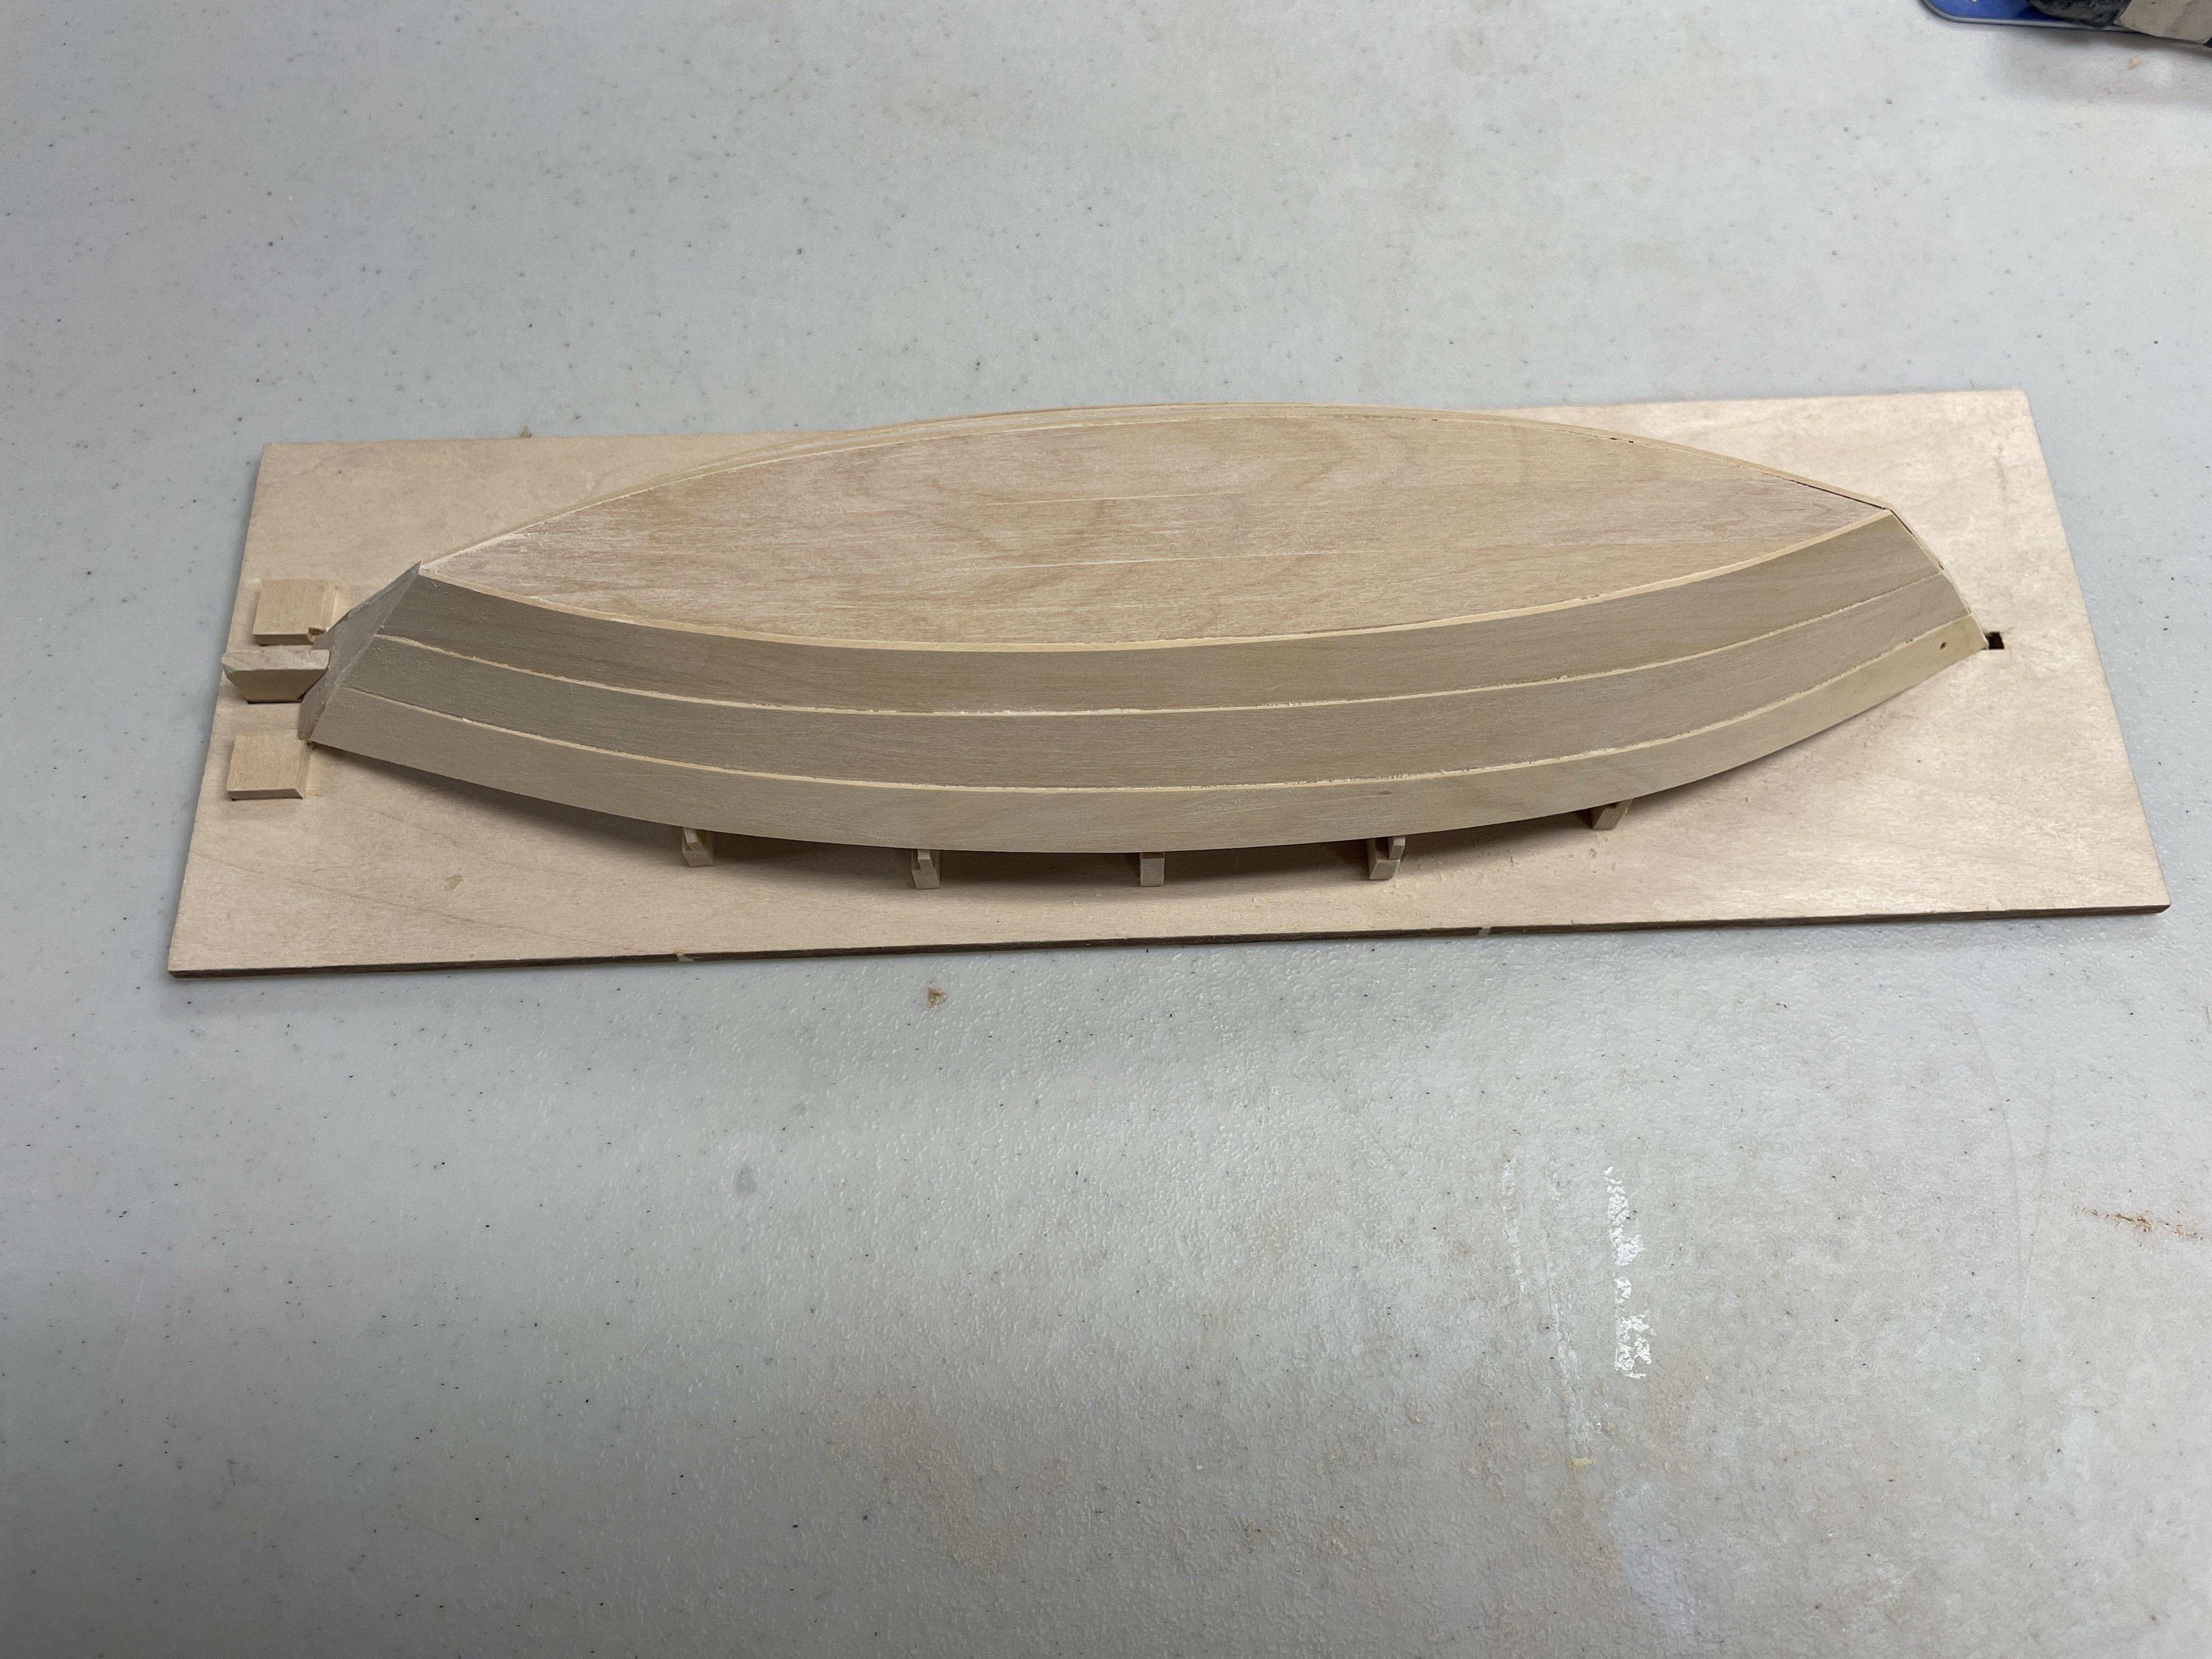
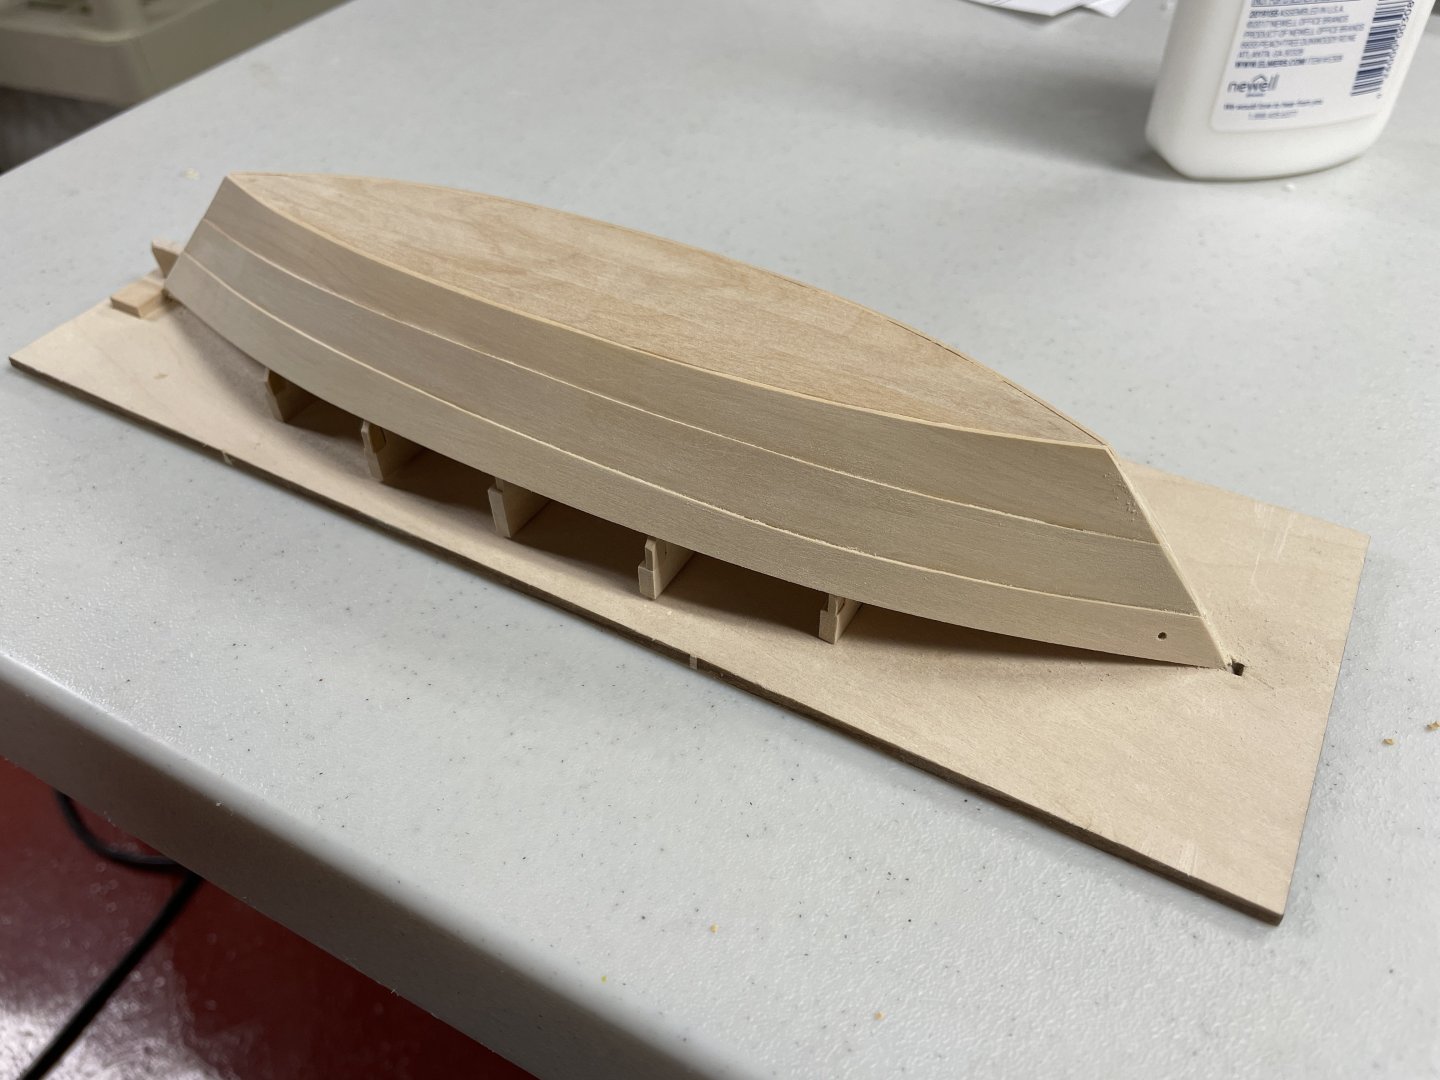
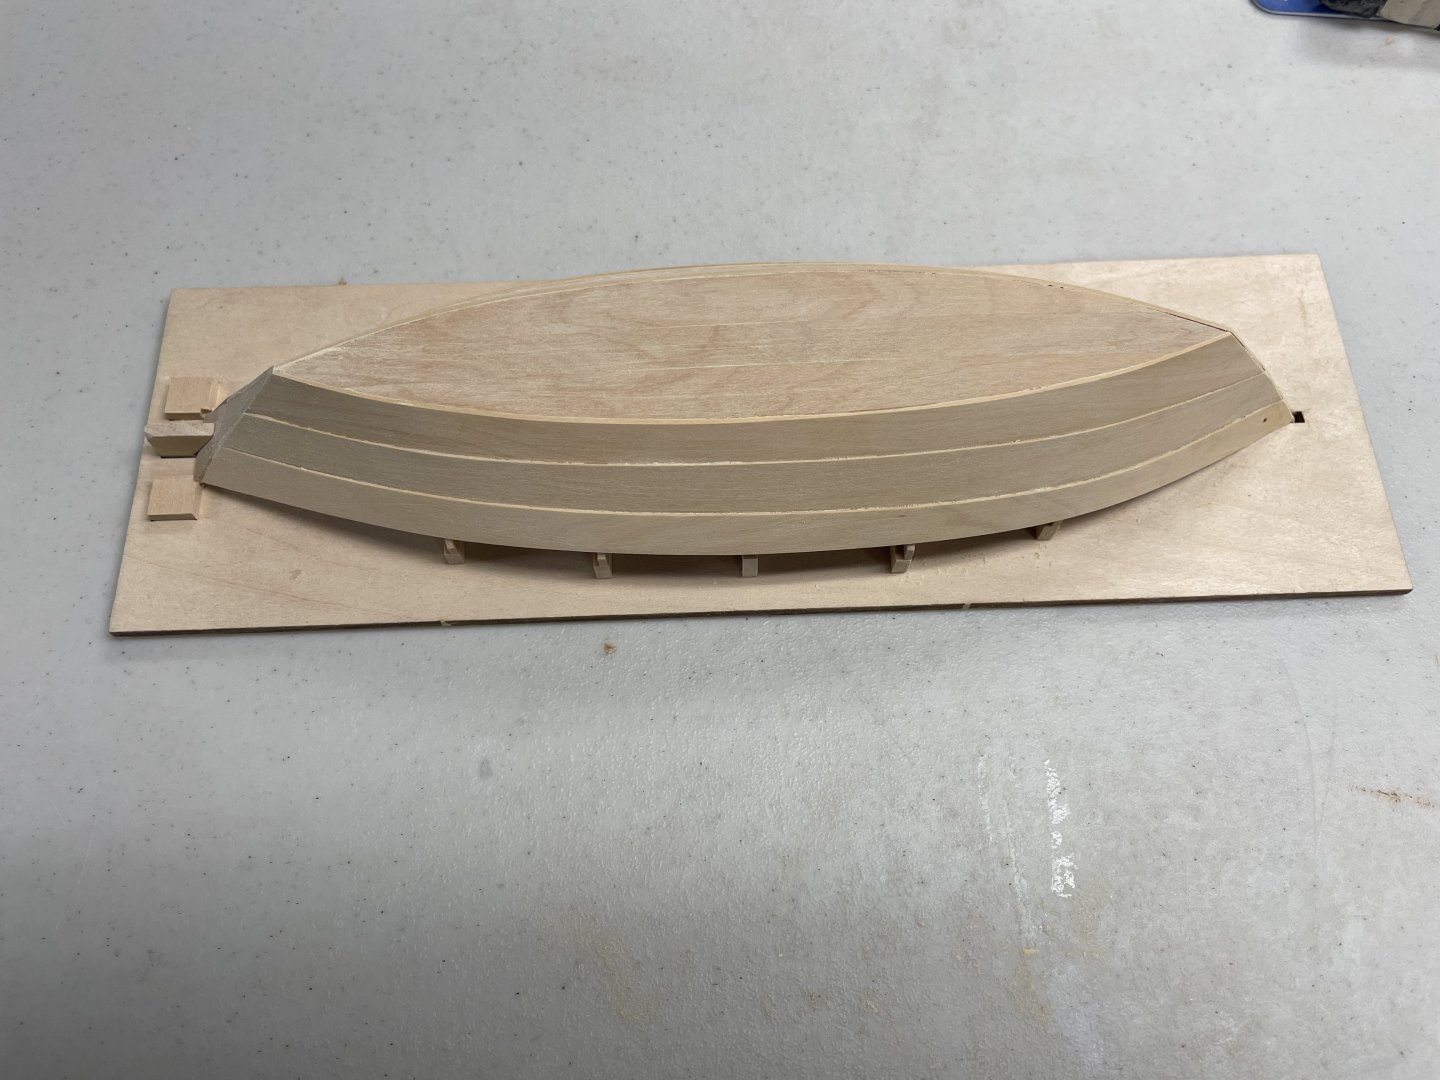
 Back in business - shear planks replaced. I've been afraid to look at how much glue I will need to clean up on the inside, but the outside cleaned up well enough that I think I can use a clear finish. I'm trying to decide between swiss pear, cherry, and natural pear for the contrasting wood. I really like swiss pear, but am thinking of going with one of the other woods just so it looks different from my other models.
- 32 replies
-
- 10
-

-
- Grand Banks Dory
- Model Shipways
- (and 2 more)
-
Finish sequence
davec replied to shipman's topic in Painting, finishing and weathering products and techniques
Agree that some testing would be in order. As long as the paint adheres over the clear finish, would think about applying the clear first. Seems like sealing the wood would make it less likely that the thinned paint will soak into wood in places beyond where you brush it. -
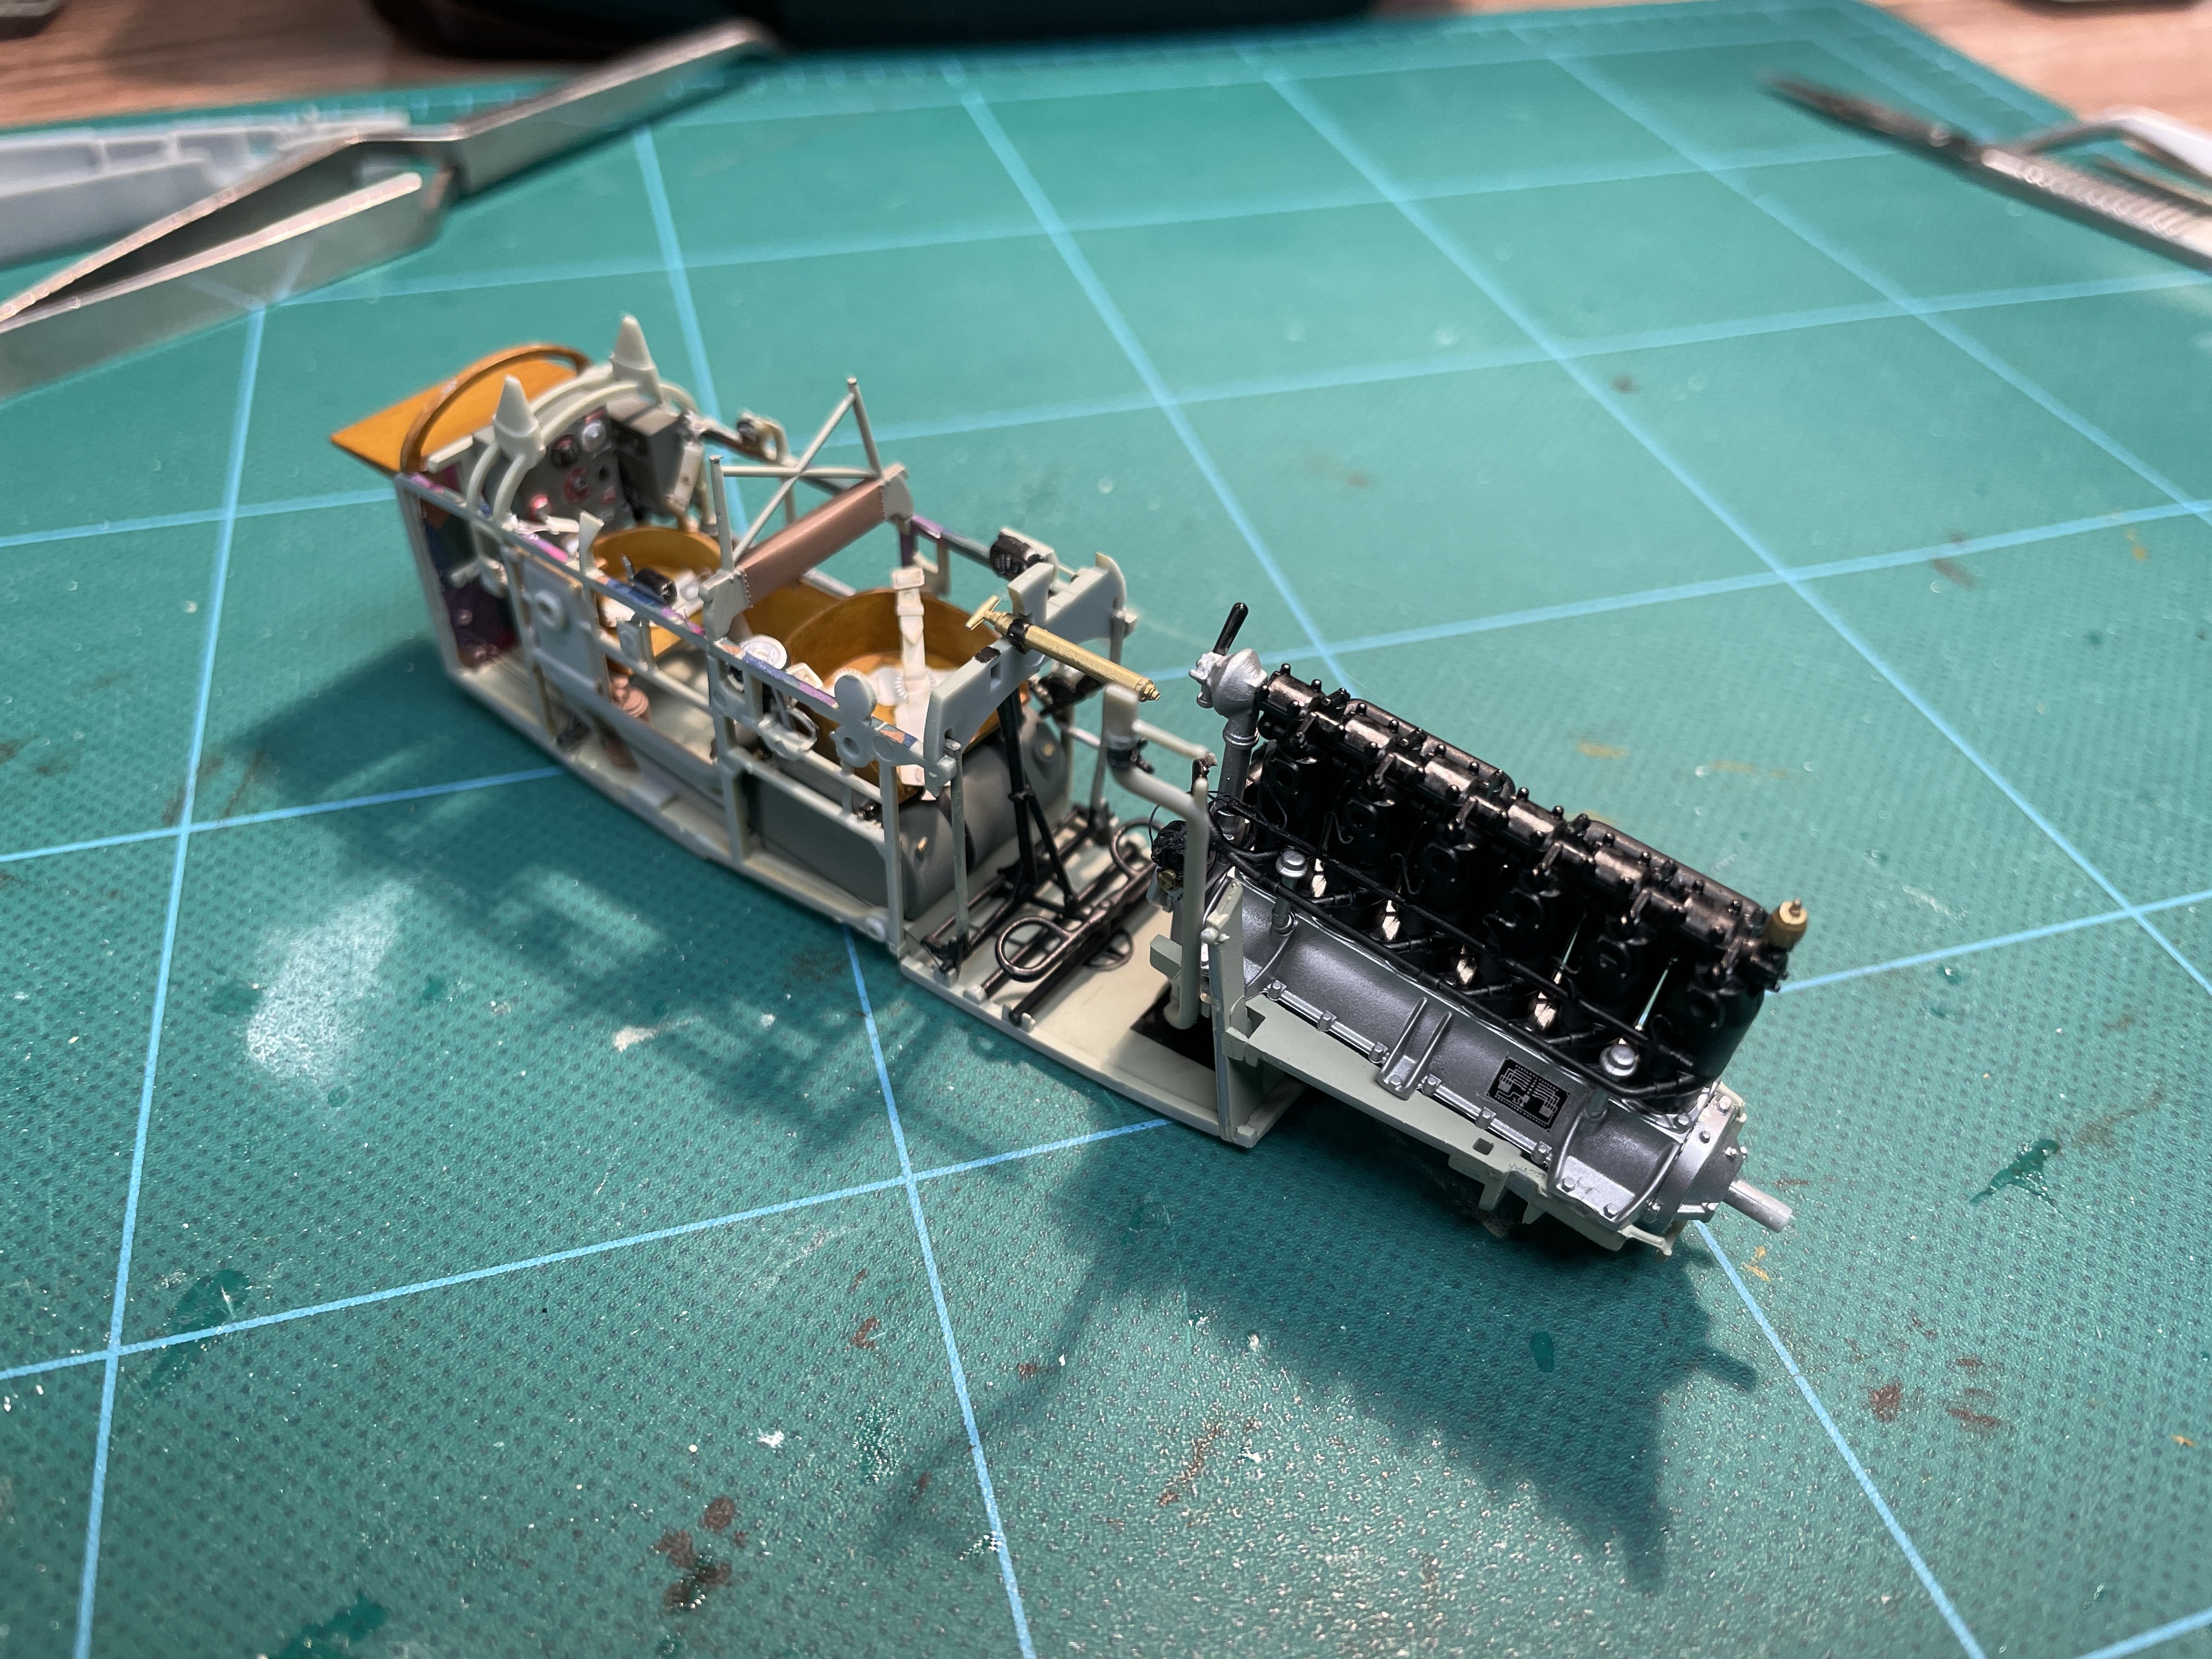
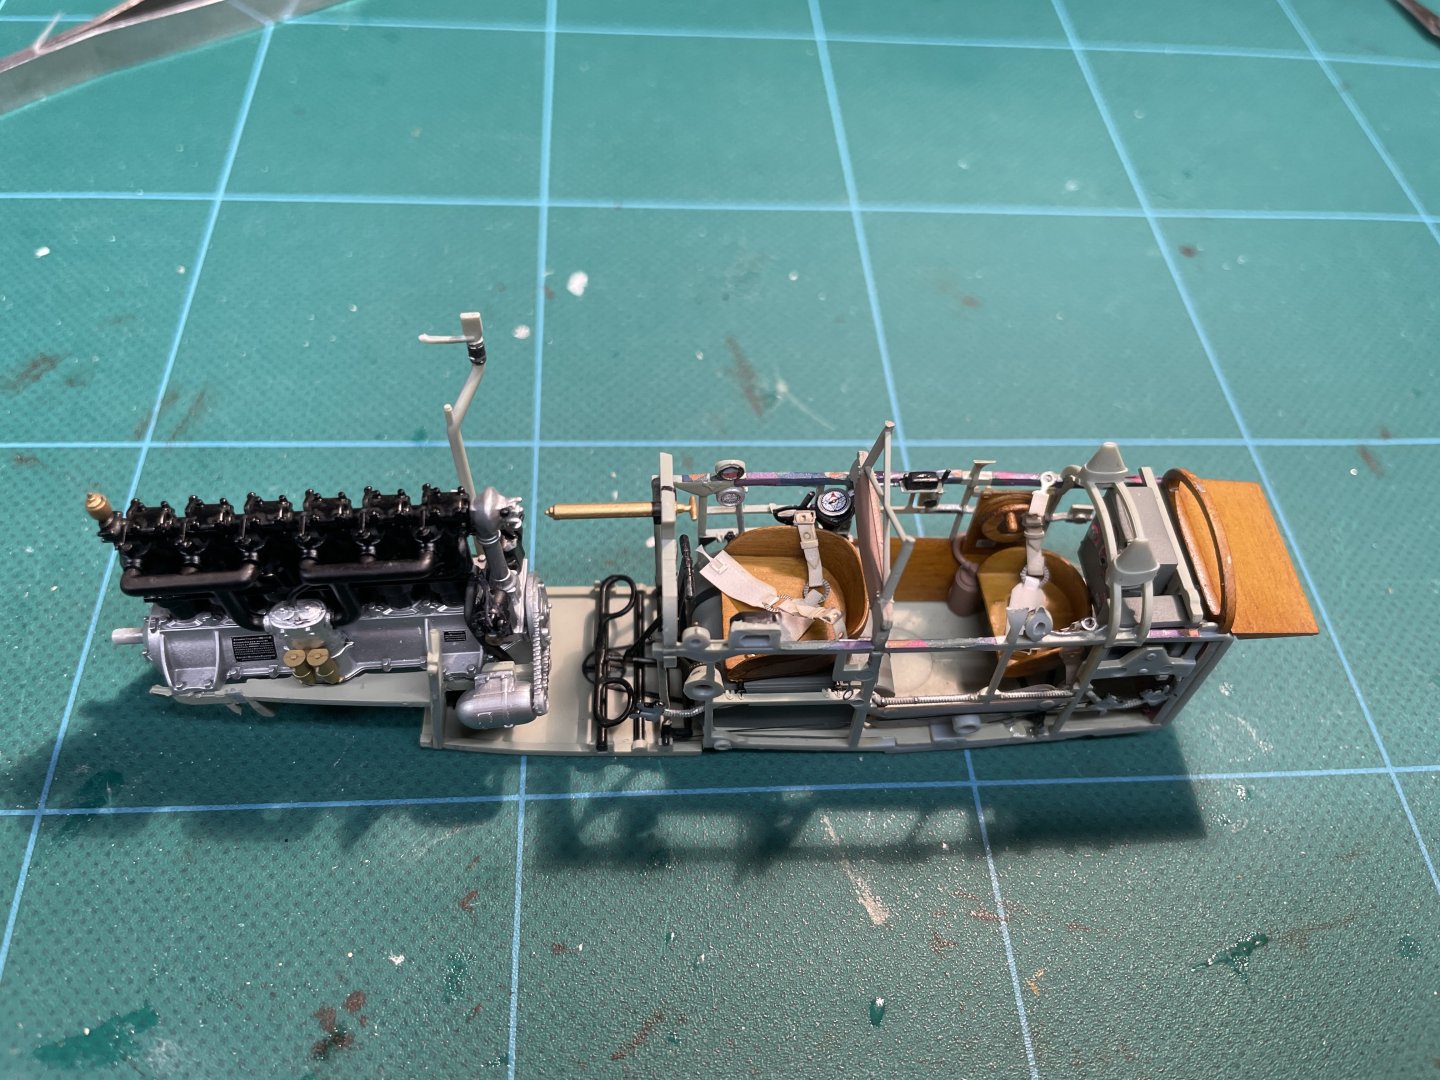
Engine in place, and finally feeling like things are moving along. Not happy about most of the engine wiring and didn't spend a lot of time with extra detail in the engine compartment as none of it would be visible. I'm looking forward to the next WNW build as I think I can finally wire the engine in a way that does it justice. I've got the insides of the fuselage painted and will hopefully glue it together later today. I test fitted and everything still closes up OK with the engine installed.

- 40 replies
-
- 12
-
-
Came out great - congratulations on finishing!
-
The rivets do look really cool.
-
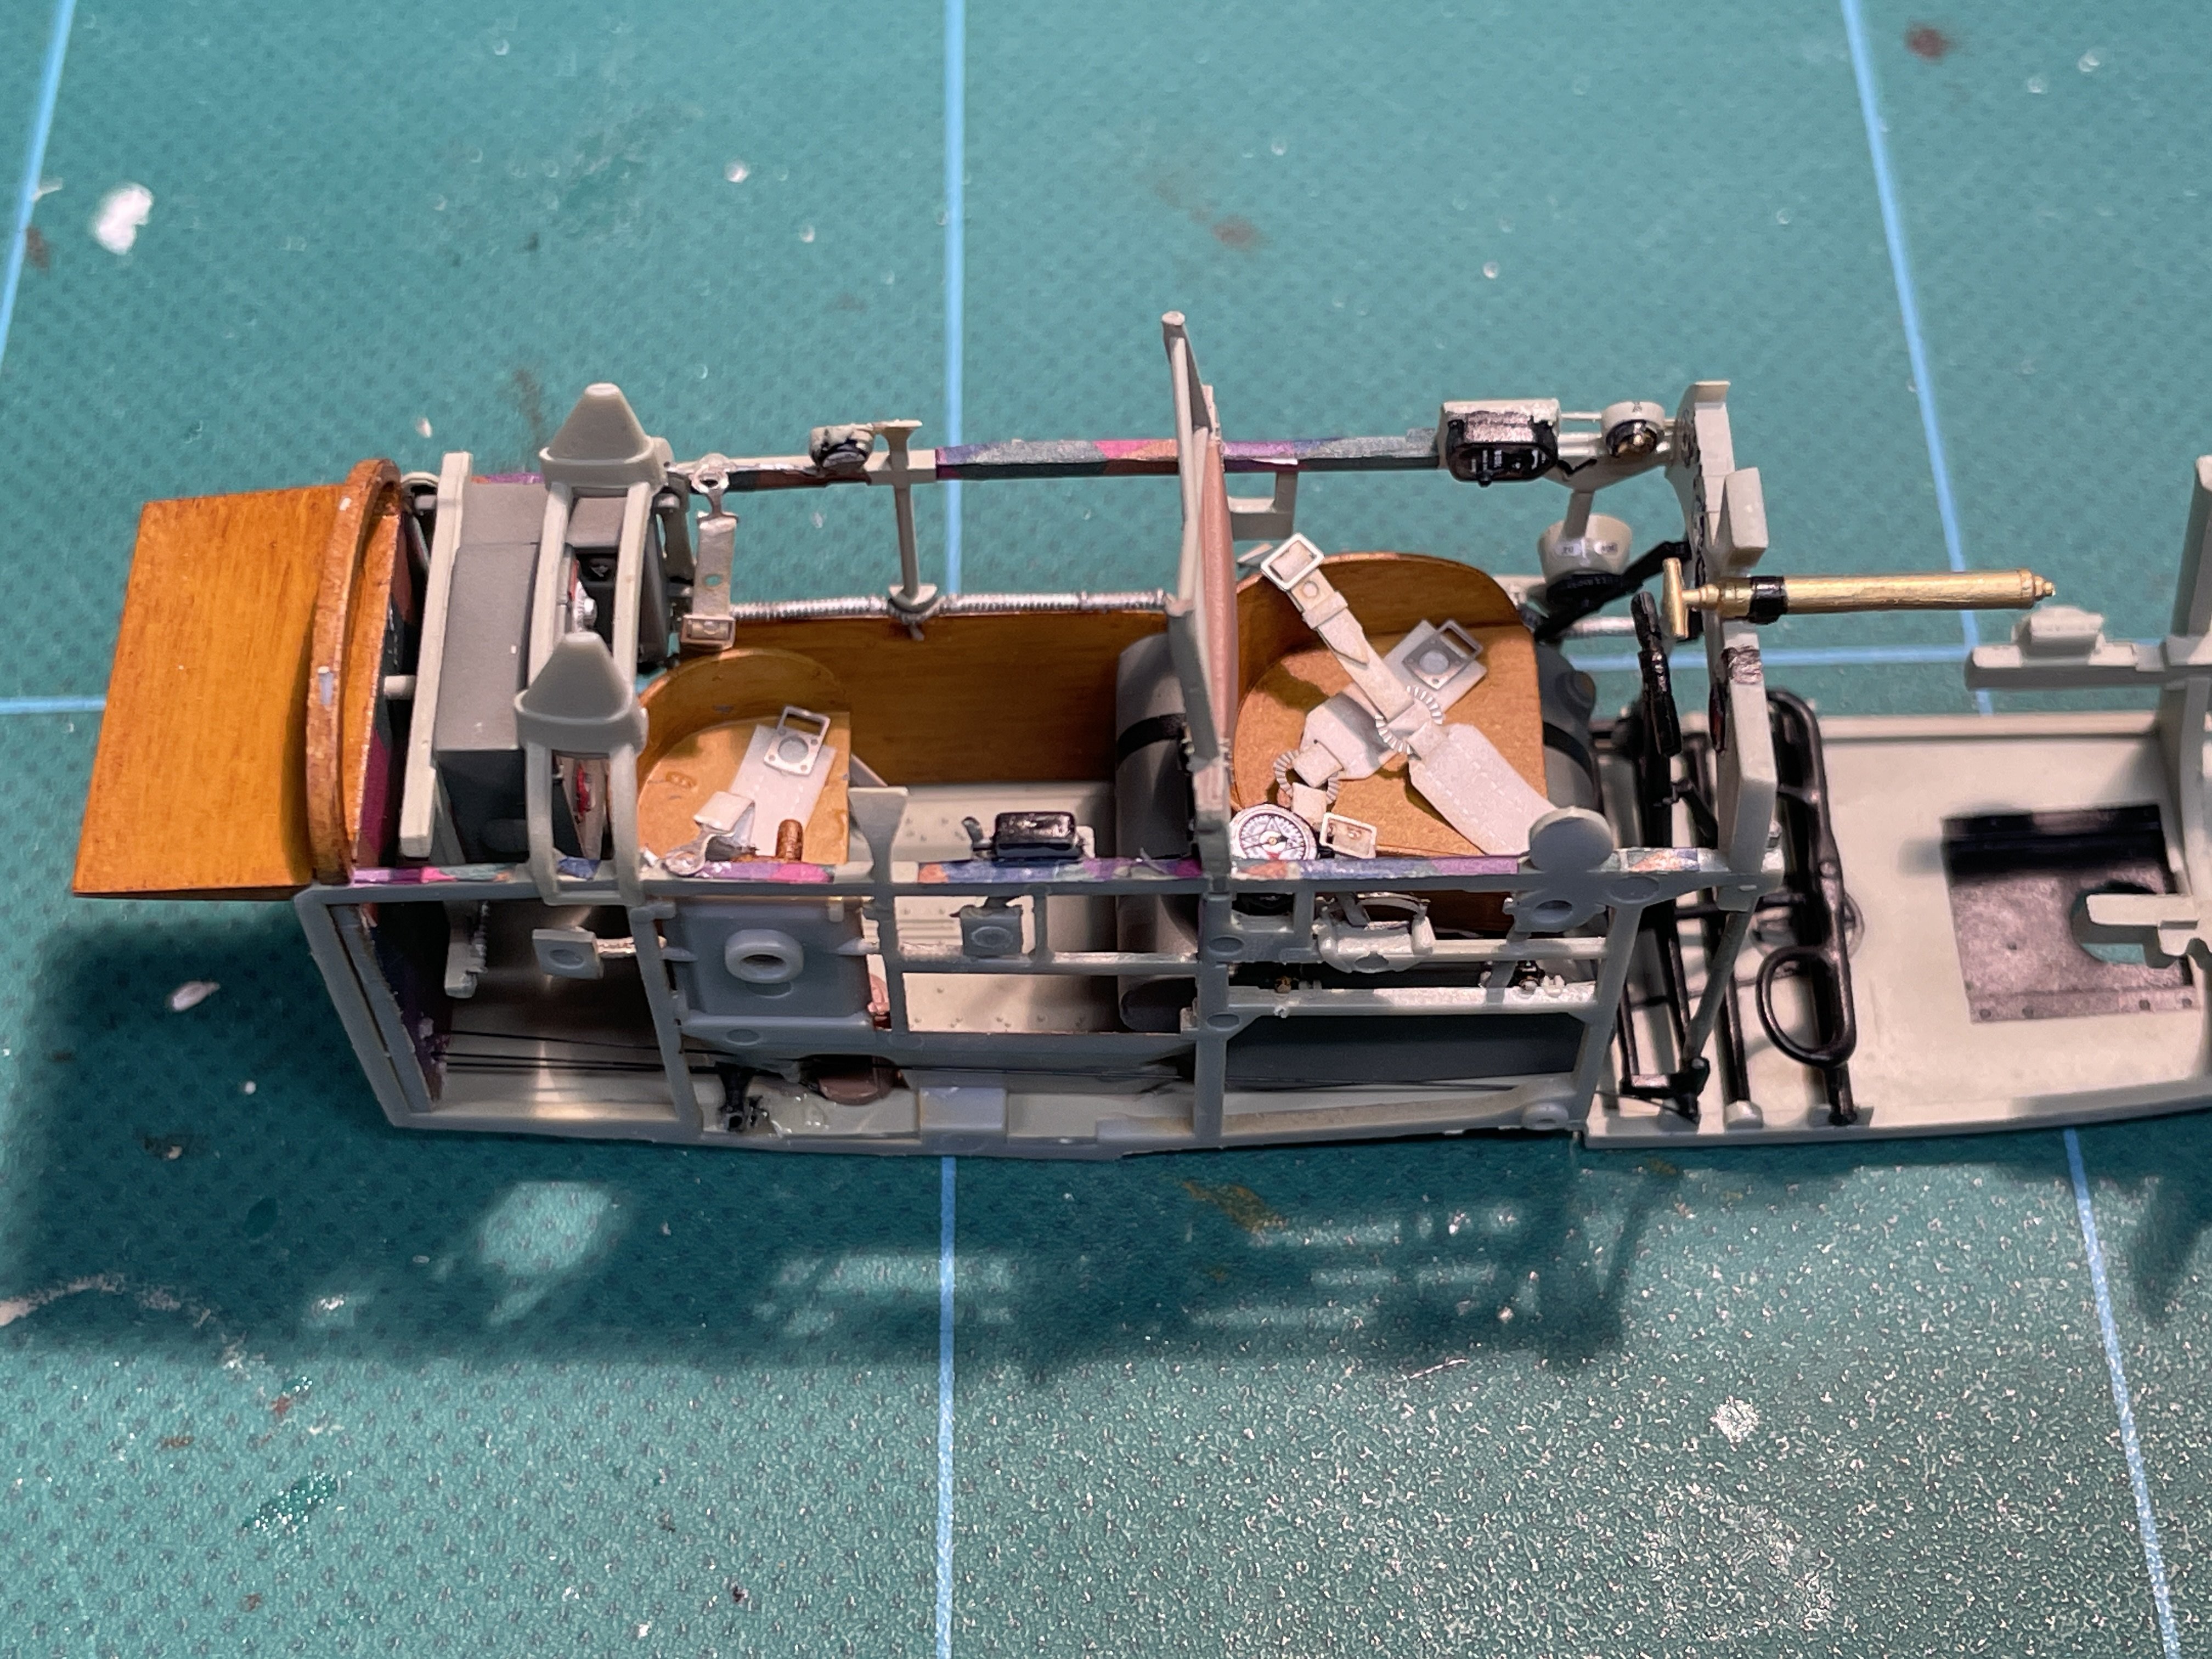
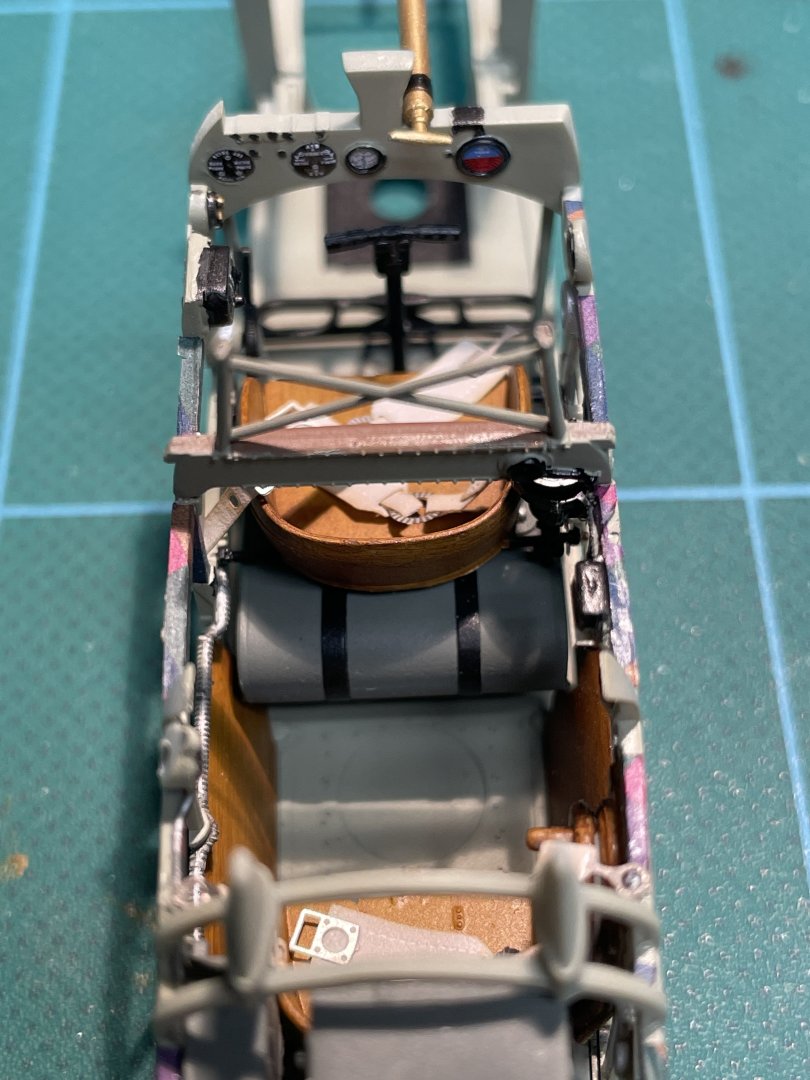
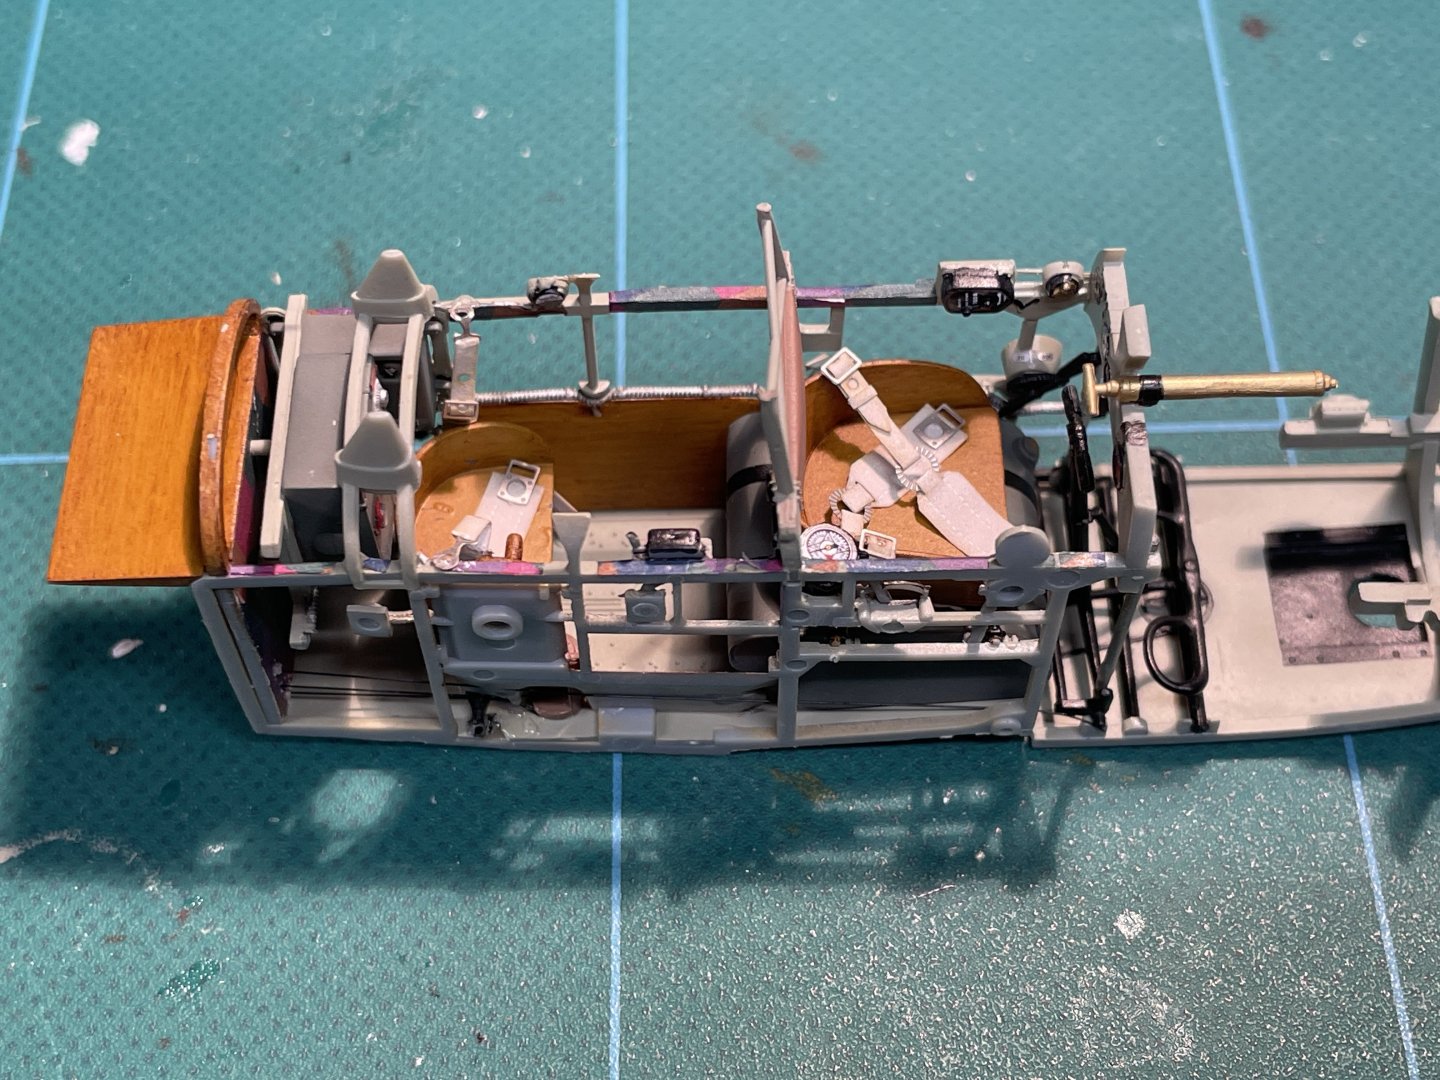
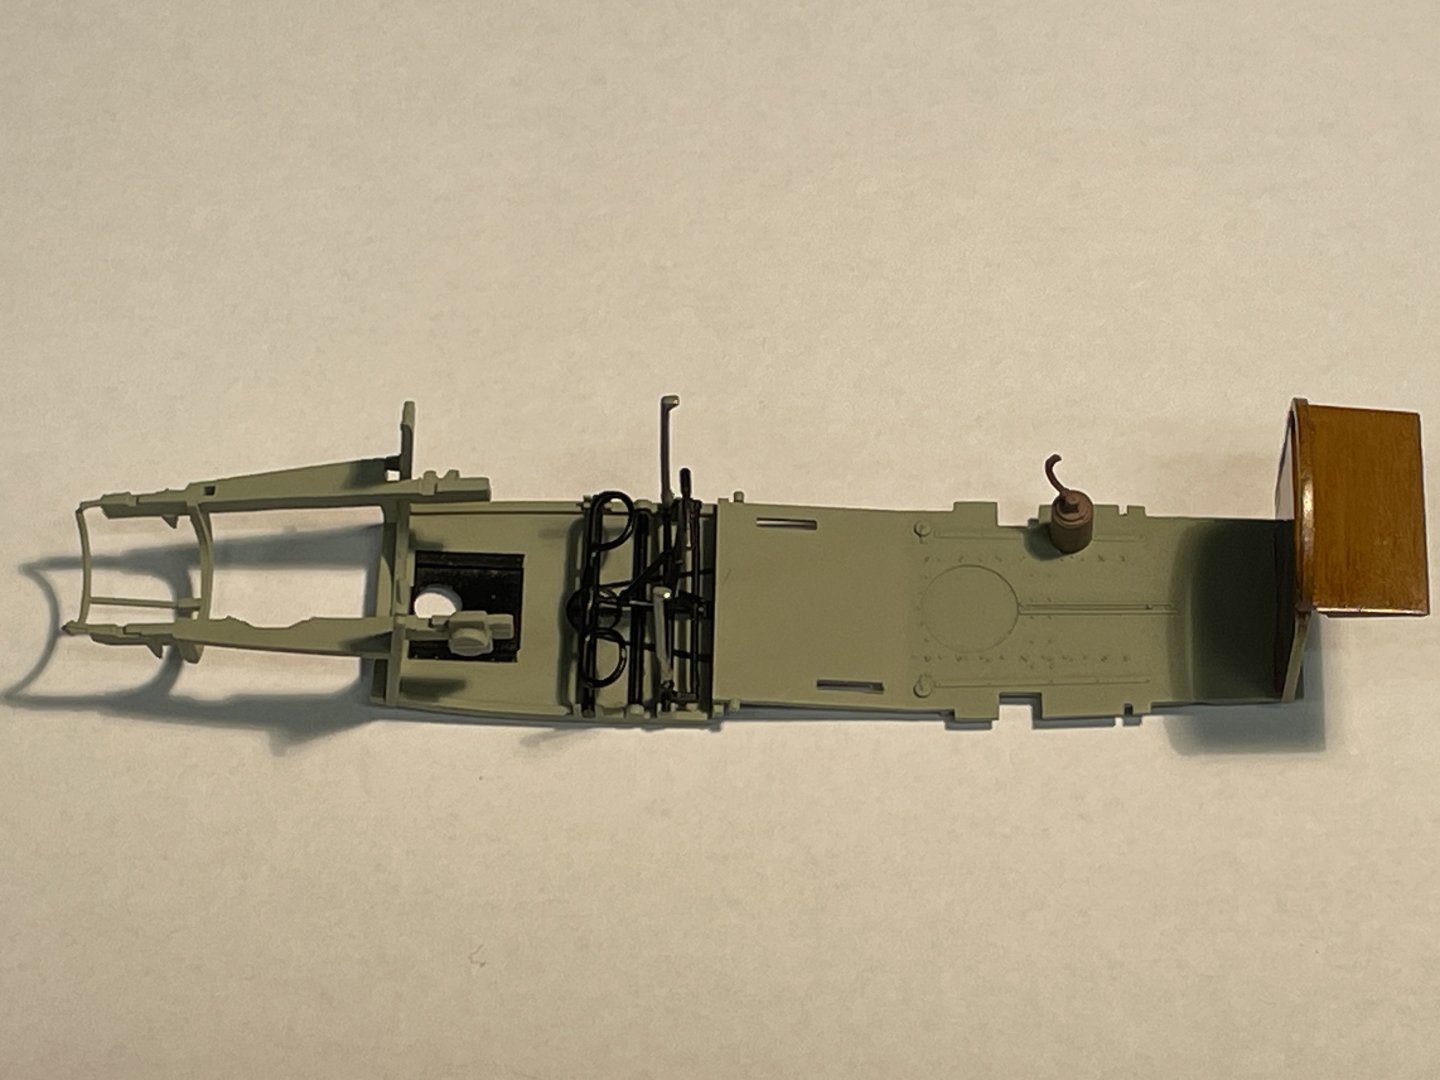
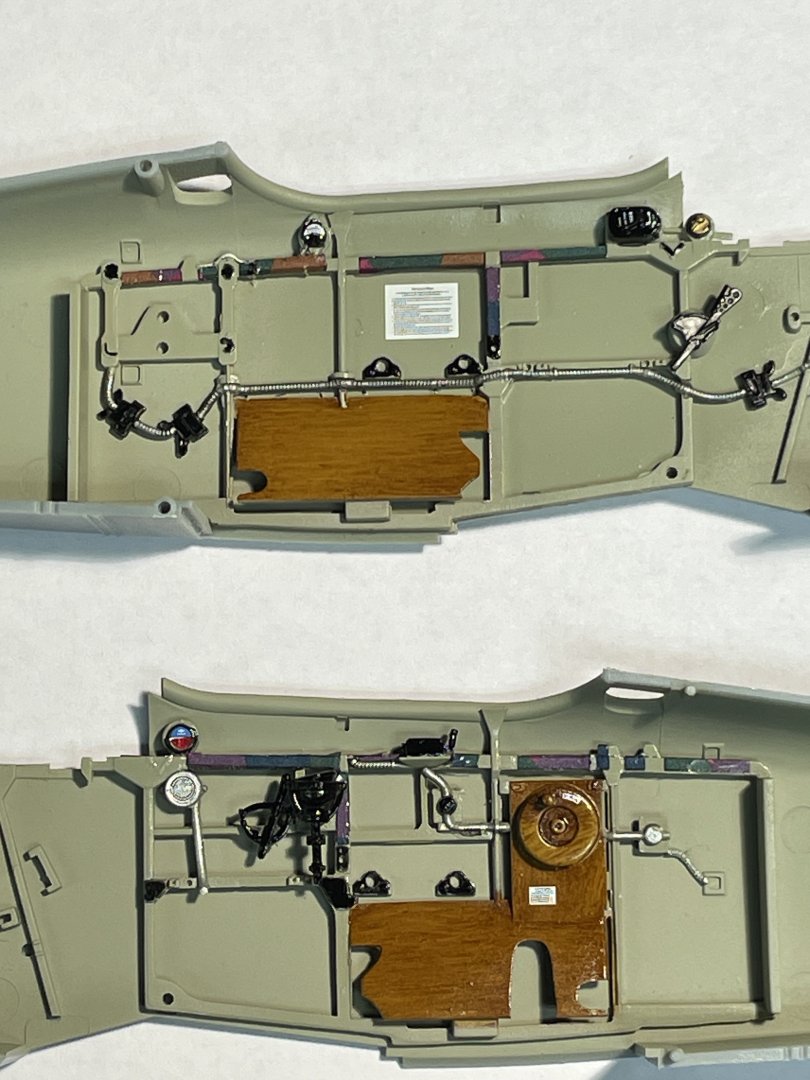
Thanks everyone for the comments and thumbs ups. The woodwork is just artists oils. I've used Rob's tip about the photoetch before (great tip) but on this one most of the openings were easy to thread through except one that was so tight that the belt needed trimming. Belts are installed and I've finished as far as the end of step 2. There is some rigging, which will be completely invisible once the fuselage is buttoned up (as will most of the other detail). I've been careful scraping paint and test fitting, and the fuselage seems to close up without a lot of tension. I have some business travel coming up, but am hoping that after 8 weeks of slow progress on the cockpit that it will start to look like an airplane in a few weeks.

- 40 replies
-
- 16
-

-
-
looks great! I can never get my brushing to look that good.
-
Congratulations on finishing. The model came out beautifully. Glad she will be displayed somewhere a lot of people can see her.
- 97 replies
-
- 4
-

-
-
- Enterprise
- Tamiya
- (and 2 more)
-
Other than a single 1/48 Eduard kit I haven't built anything WW1 other than WNW, so I can't really comment on "best." I will say they are amazing in terms of their research, detail, and engineering. They were a little bit on the expensive side, but they occupy me for 3-4 months each, so worth the cost. Copper State Models has gotten a great reputation as an alternate with the same quality. I have one of their Nieuport's on the shelf and am looking forward to finding out how good they are.
-
Thanks for the thoughts about Roden. Not sure my pile of wingnuts kits will ever be finished, but if I ever work through them, I will try one. My dad's stash had a lot of Roden models, but keeping the wingnuts ones alone gave me as many WW1 planes as I will have time to build. I'm looking forward to seeing your progress. Looks like your model is coming along great!!
-
Looks awesome! I especially like the planes and figures.
- 97 replies
-
- 4
-
-
-
- Enterprise
- Tamiya
- (and 2 more)
-
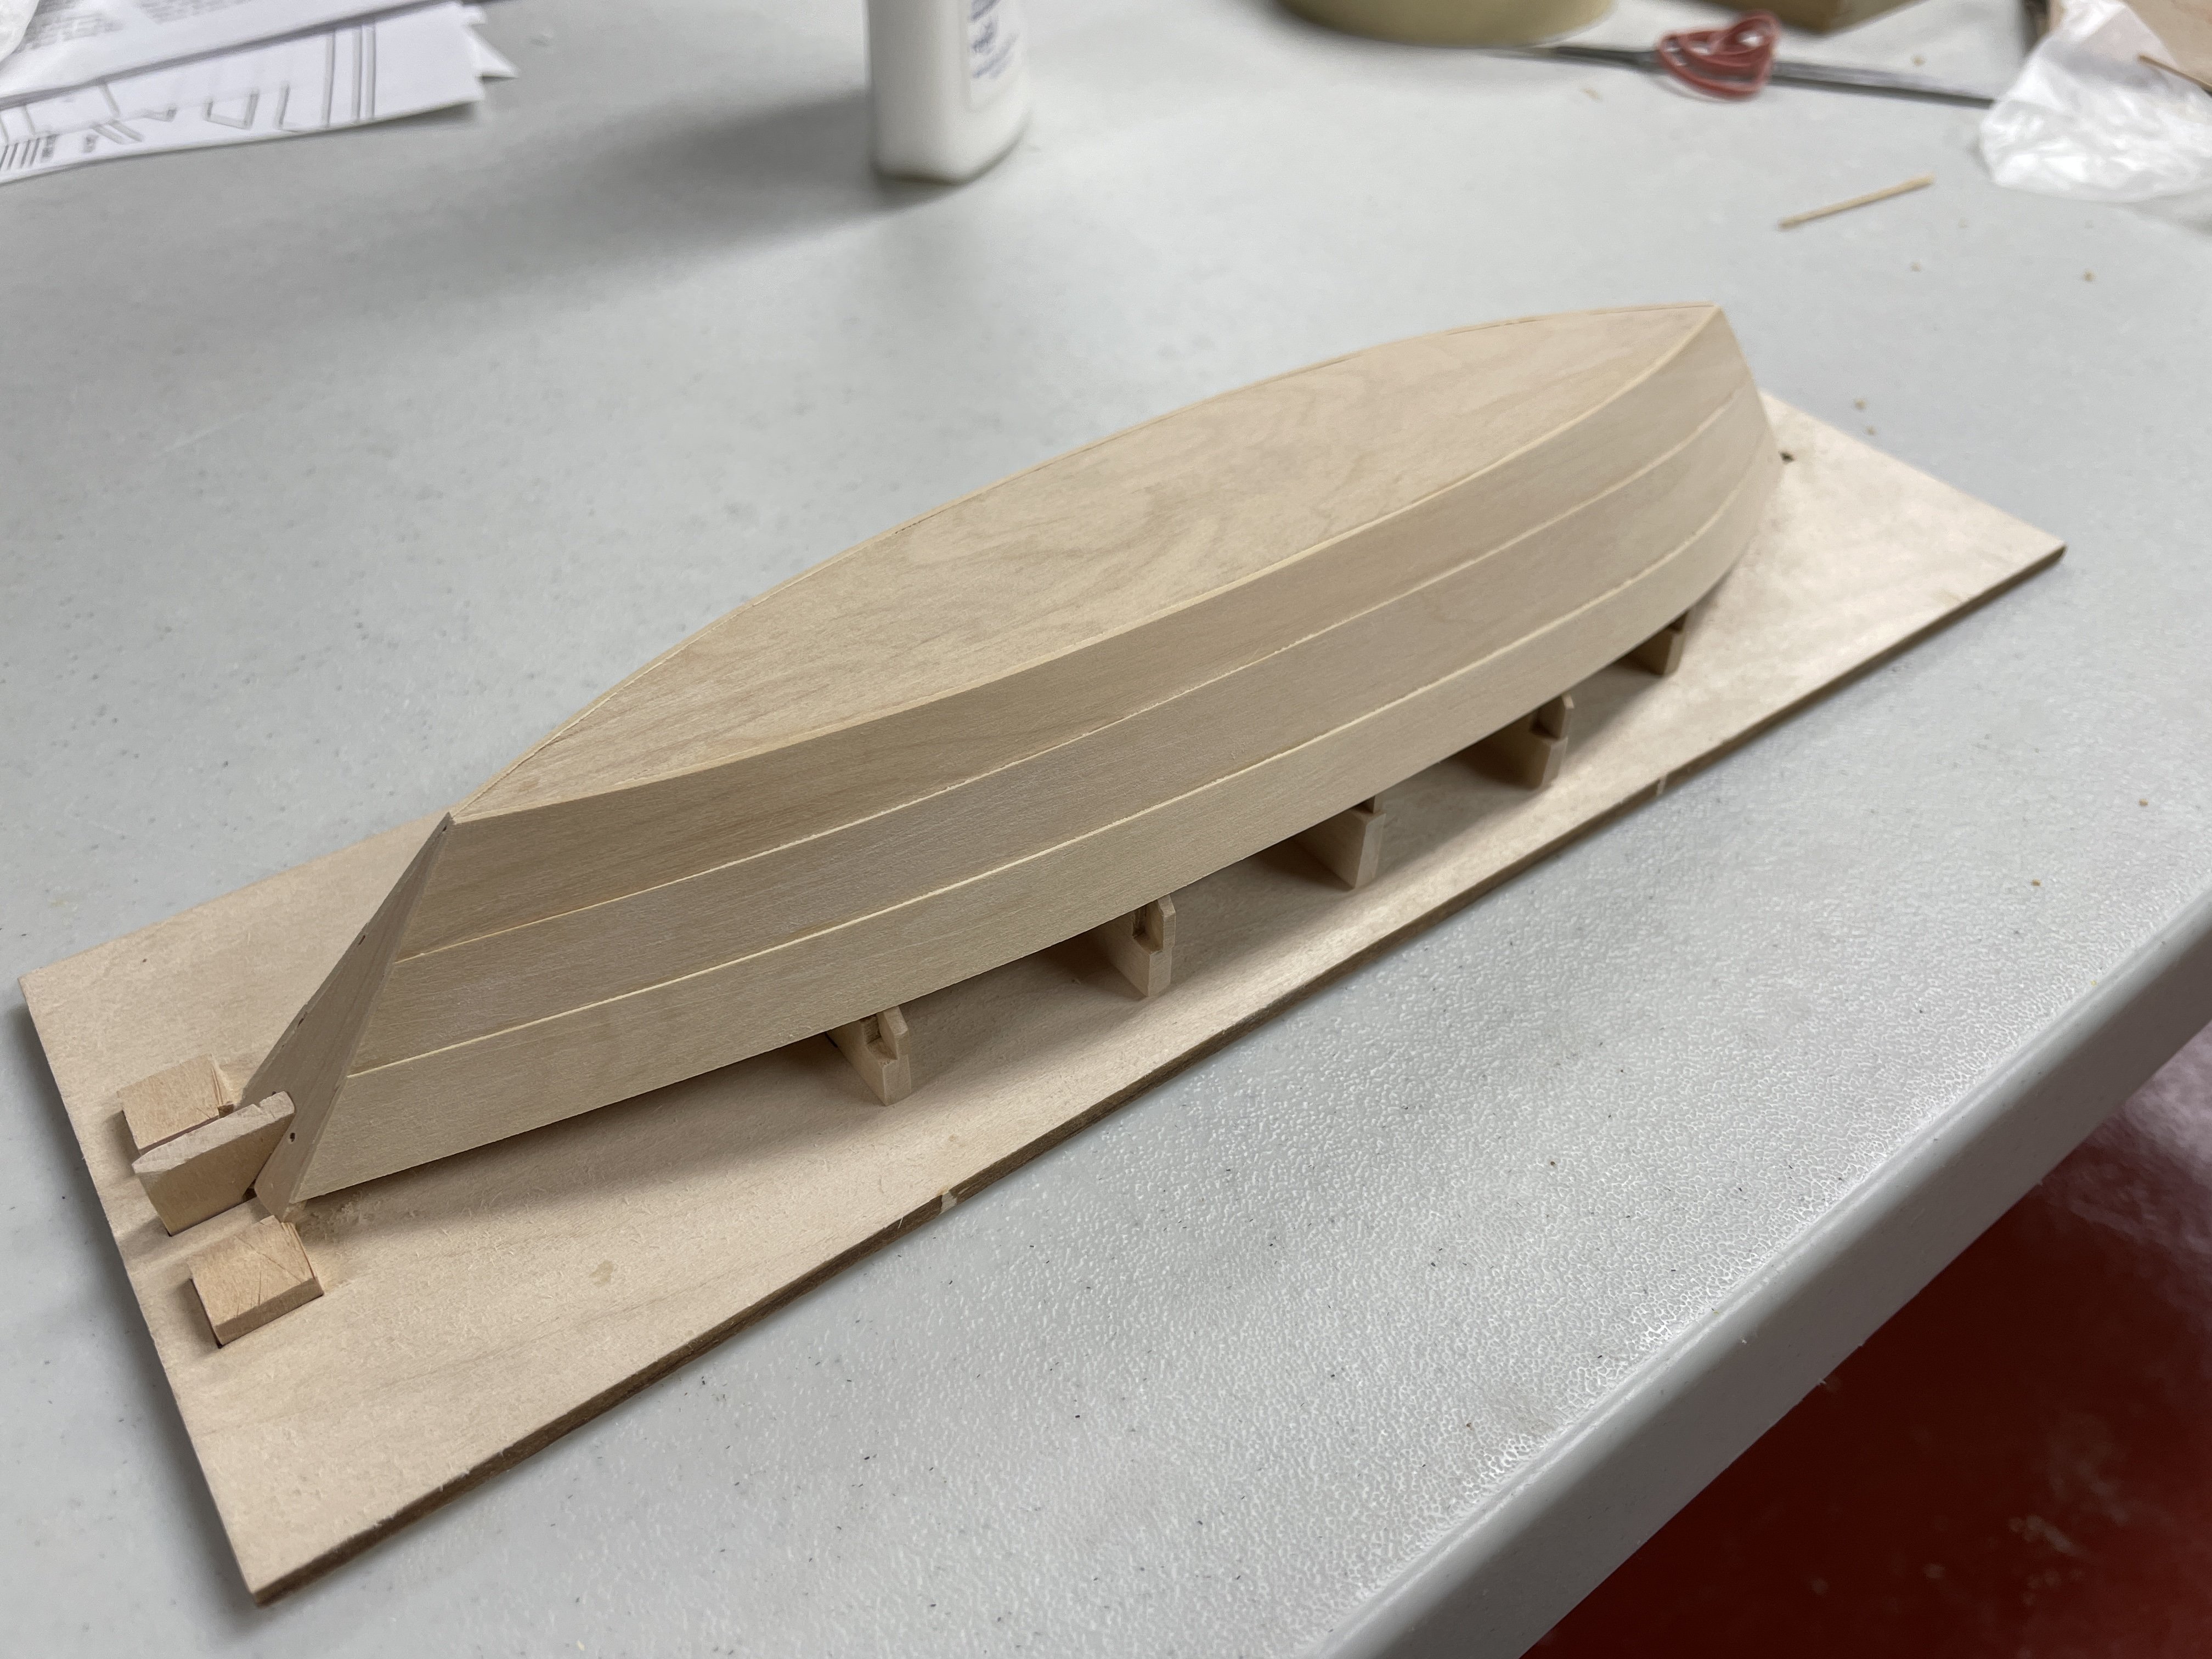
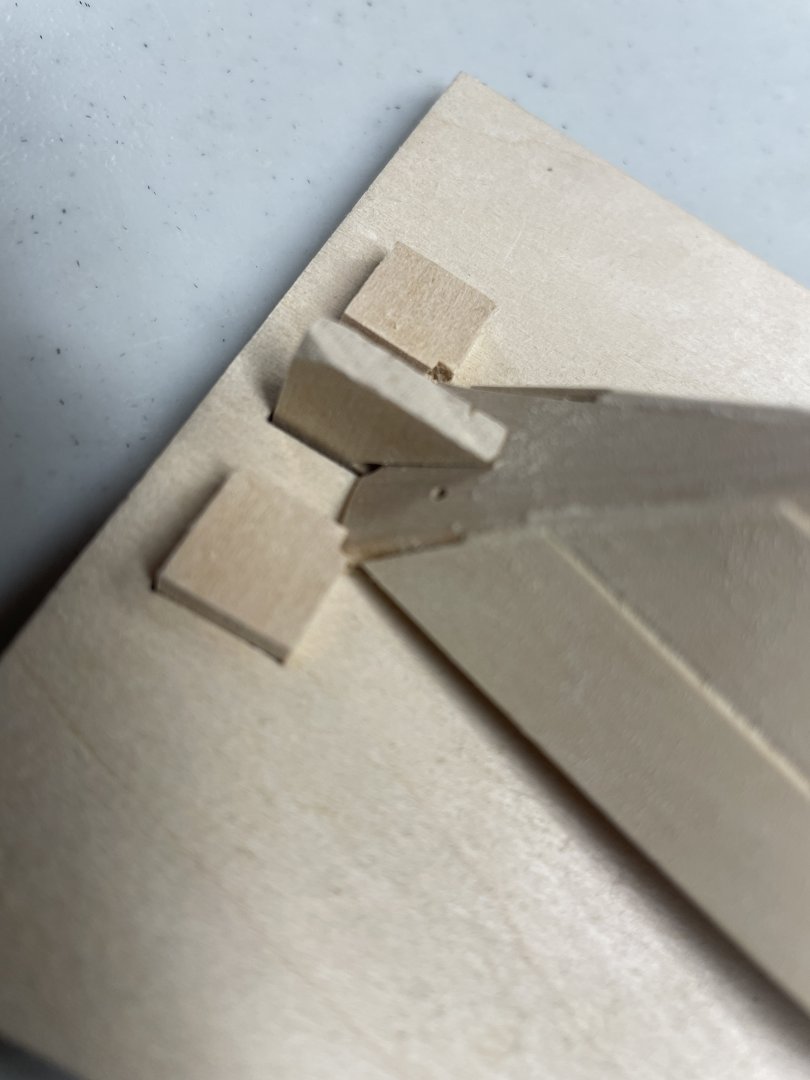
I picked this up again. I've redone the frames and started planking. I had some visible glue spots, but they seem to sand away with 320 paper, so I think this will come out ok with a clear finish instead of paint. Somewhere along the way I must have done something a little off because the sheer plank was about 1 mm short. No pictures yet, but I debonded the too short planks and cut slightly longer ones. Will post some more pictures once I bend and install the new planks.
- 32 replies
-
- 6
-
-
- Grand Banks Dory
- Model Shipways
- (and 2 more)
-
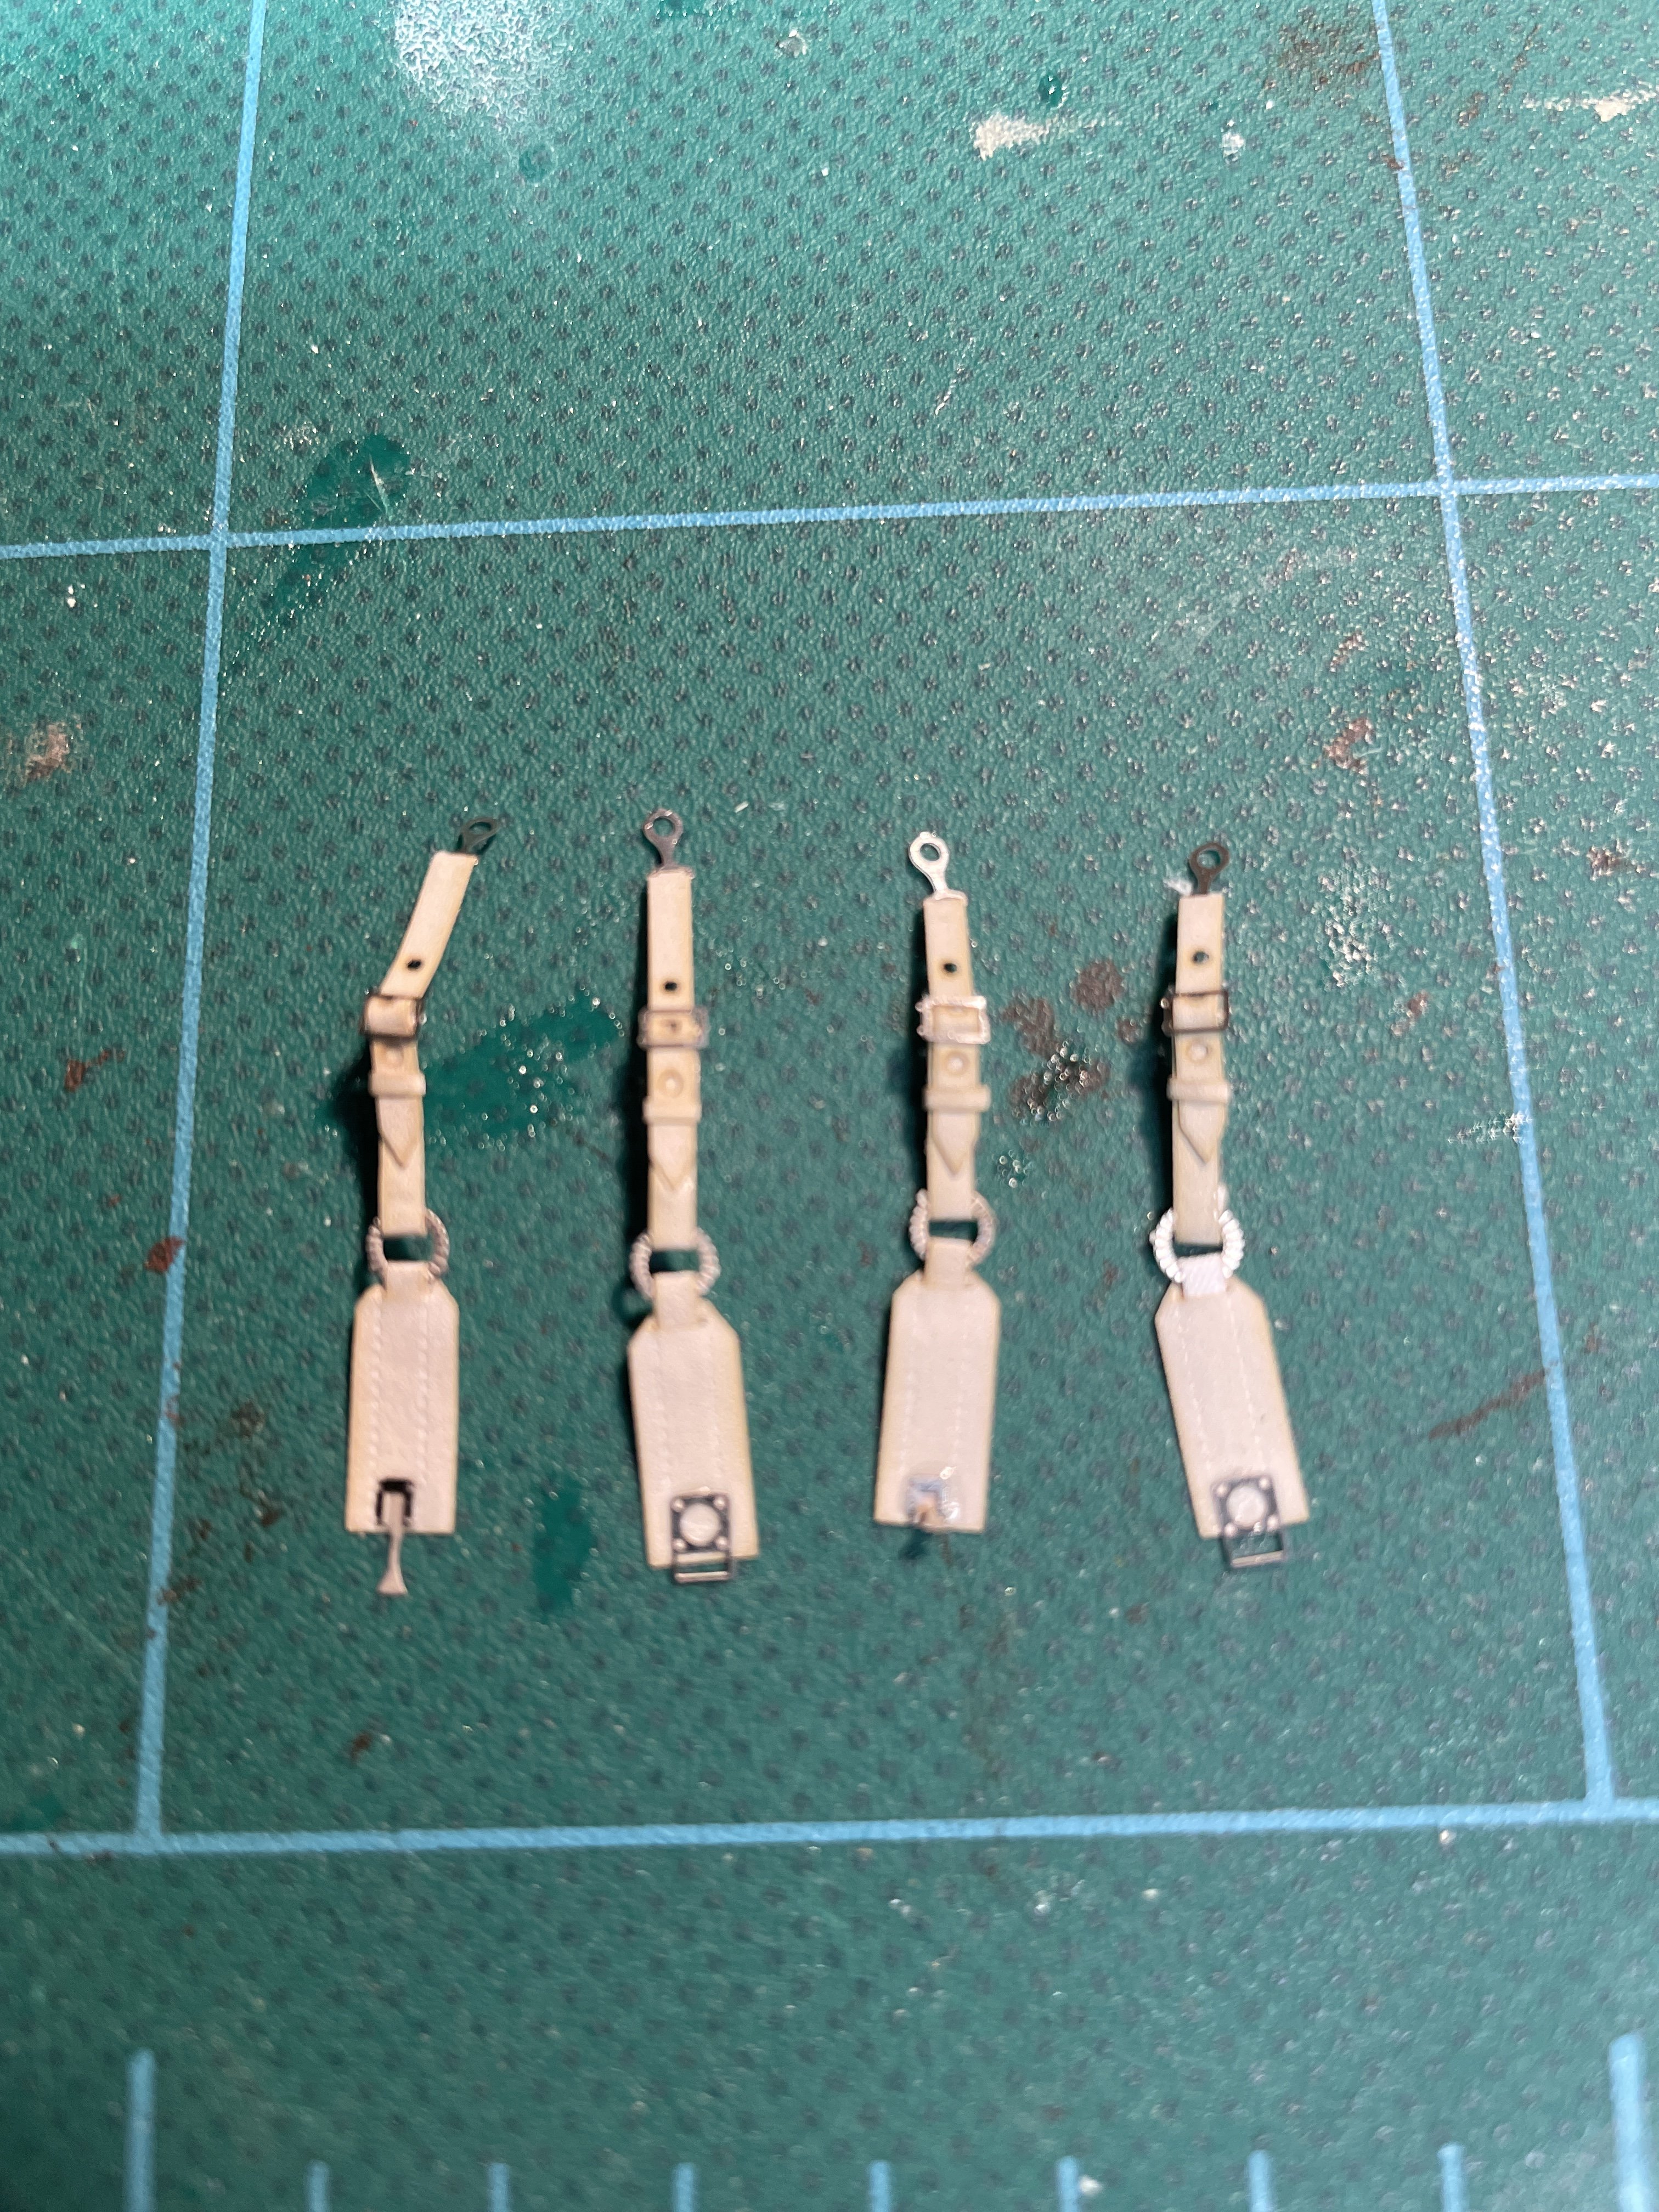
I've assembled as far as the end of step 1 and put together the HGW seatbelts. Four belts without any of the tiny photoetch parts shooting across the workshop, which is a victory for me.


- 40 replies
-
- 19
-
-
Great looking model - congratulations on finishing!!!
-
Hi Hamilton - your cross section is looking great! I remember having the same feeling about all the three dimensional relationships at this point, especially the pump shafts which slant in two dimensions. I think the original shipwrights made adjustments as they went to get everything to fit, and probably didn't build the well until after the shafts were in place, which isn't an option at 1/48 scale. I found the practicum did have nearly all the information between the text and diagrams, but purchased the plans from NMM (I'm hoping to build the complete model someday) and used some reference books for some additional information. Please let me know if I can help as you work through things. Your approach of making a lot of the parts before doing any final installations should work great here. Dave
-
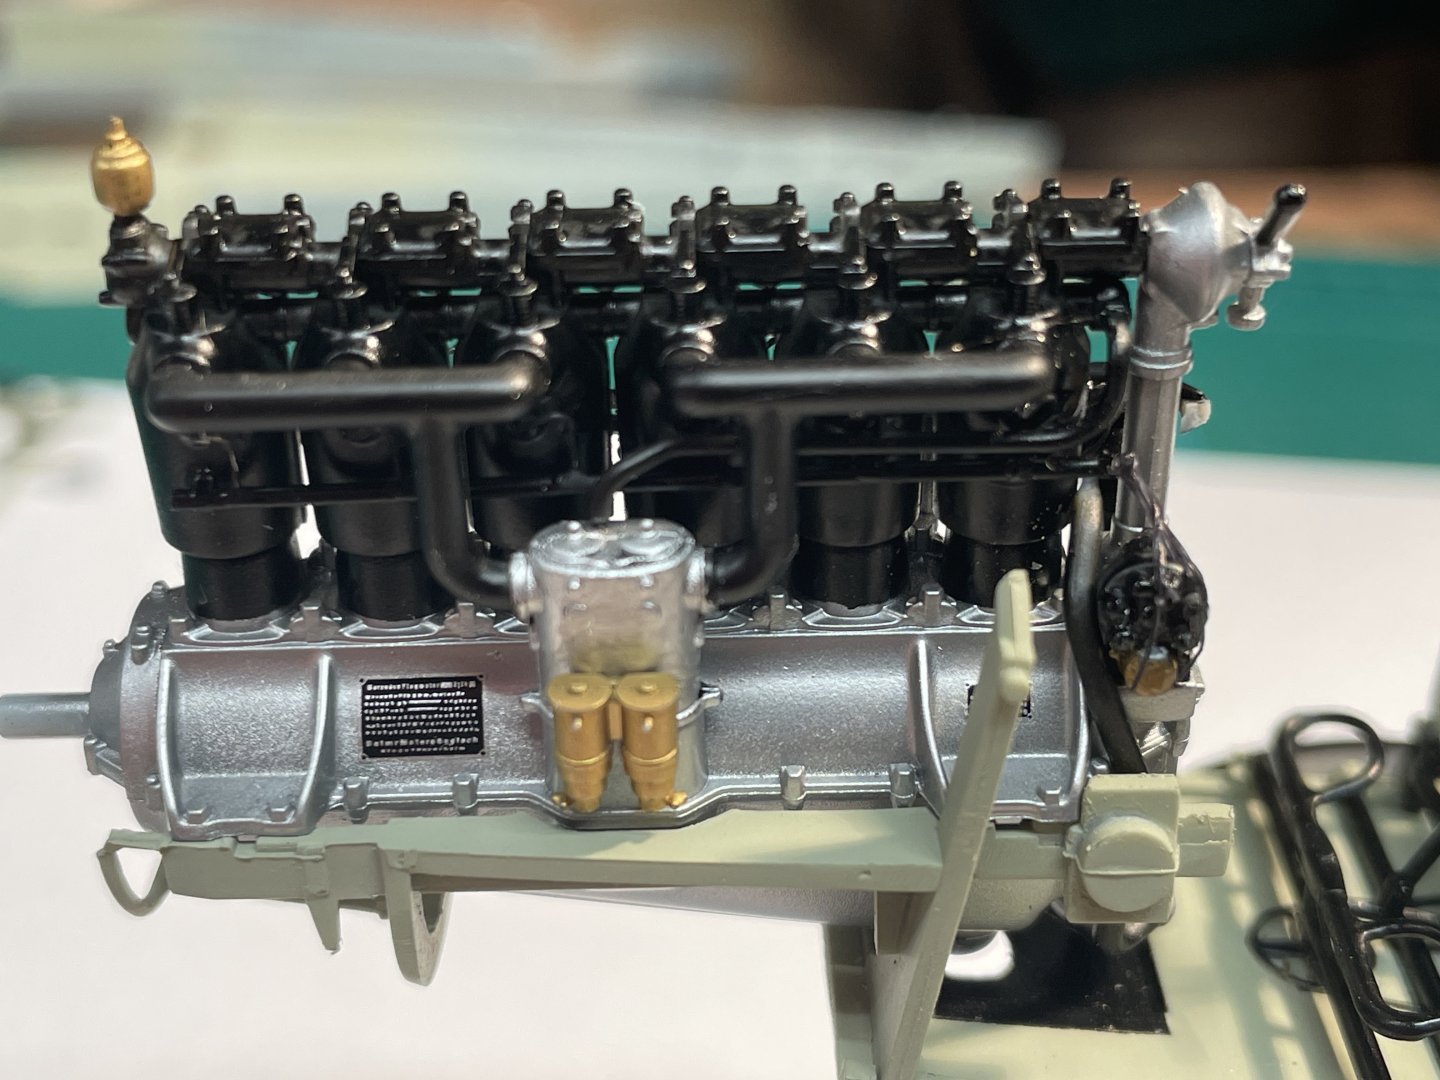
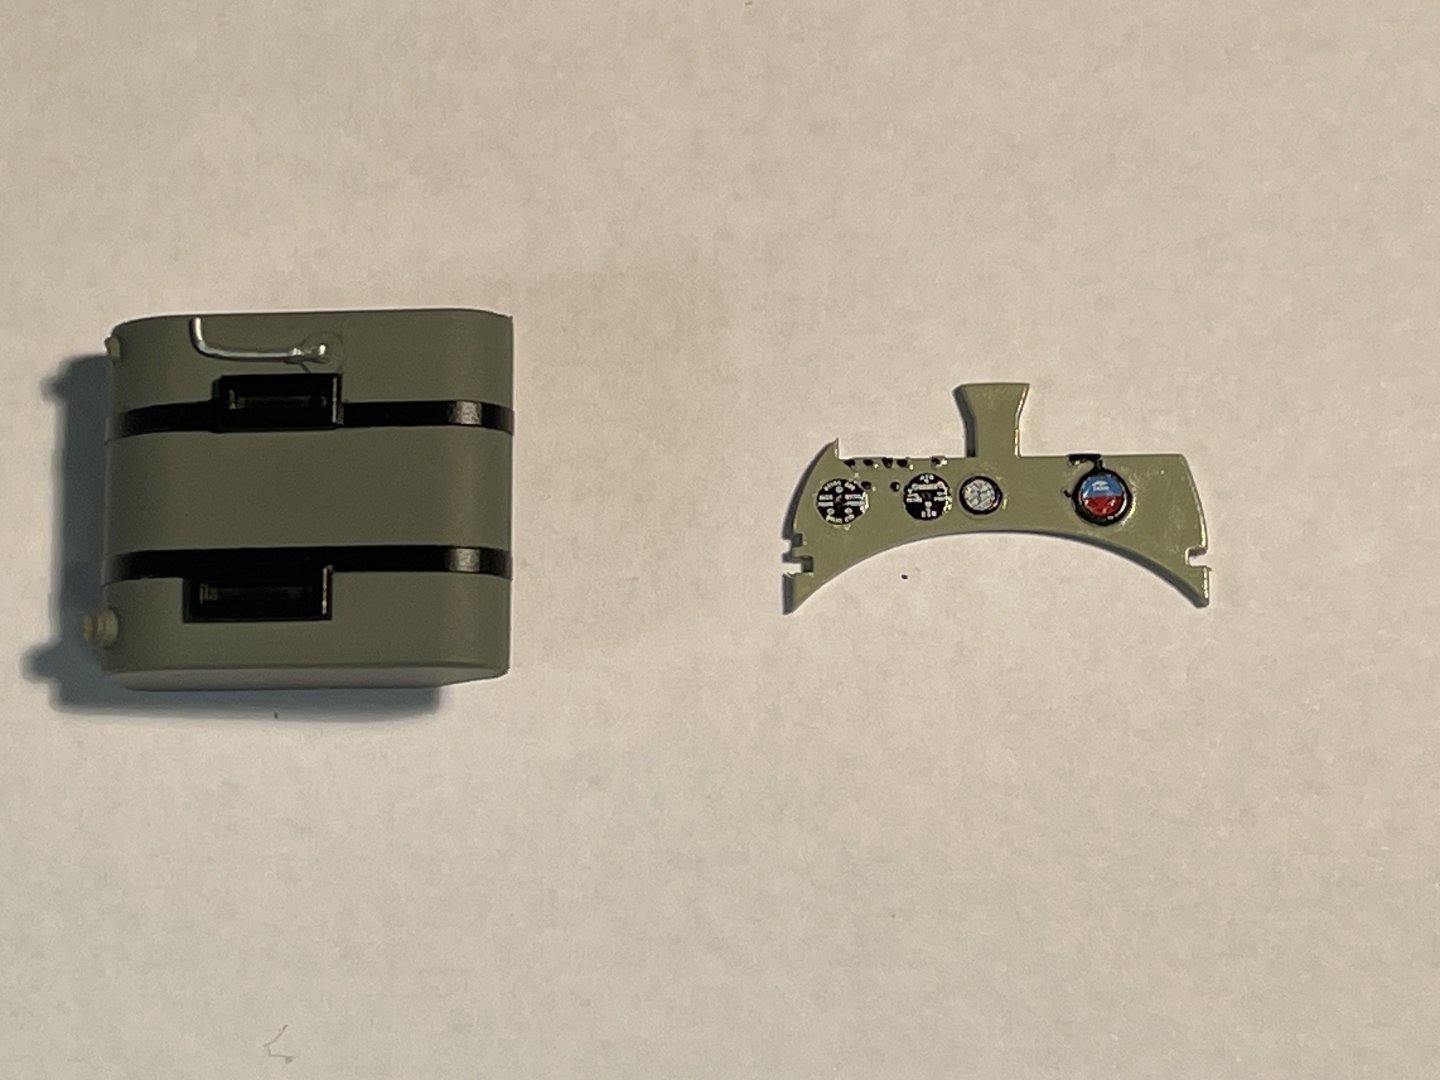
I did some work on the engine. Biggest step forward for me was coming up with a way that works for me to wire the engine. I had previously used EZ line, which I used on the distributor. I have found this really hard to work with - it is so thin and soft that my fine forceps don't grasp it, and it takes a while for superglue to dry on it, so usually I made a mess. I ordered some .2 mm lead wire and used it between the spark plugs and the pipe the wires run through. It worked great. I did not show the other side, which was my first attempt and where the wires are too long, the bends too sharp, and there is some visible glue. This side I got the length right and bends that look realistic. I found the wire much easier to work with than EZ line and I think looks a lot better. The manifold hides a lot of the wires, but the first and third are pretty easy to see. The engine will mostly be covered by the cowl panels, but this was a good learning experience and a path forward for my next plane with a more visible engine. Anyone planning on building the D scheme (Mike) or any of the other variants with the D.IIIa engine should be aware that there is an error in the instructions that is not in the errata on the WNW website. The kit contains parts for Mercedes D.III and D.IIIa engines. The main difference between the variants is the right side of the cylinders. The D.III engine uses parts E2 and E16. The D.IIIa engine uses parts E25 and E16. Unfortunately, the instructions for the D.IIIa has a picture of E25, but it is labeled E2. I did not catch until long after the wrong part was glued in place. Not an issue as I plan to build with the cowl covers in place, but it would be a problem if I wanted to leave the engine uncovered.
- 40 replies
-
- 15
-
-
-
Ferrari 250 GTO by CDW - Model Factory Hiro - 1:12 Scale
davec replied to CDW's topic in Non-ship/categorised builds
I'm looking forward to watching this build progress - MFH kits look amazing. -
I've been working a few minutes a day on the model, but it has taken a while to get to the point where there was anything worth sharing. As with most WNW kits, a huge amount of work is on the interior. I had thought this would go faster because there was a lot less wood graining, but there is still a lot going on inside. I've just finished decals, so there is a lot of gloss that will need a coat of clear flat. Even though this is one of the more recent WNW kits, I've found it slower going. A few of the delicate parts were broken on the sprue and needed repair. Color call outs in the instructions are less detailed. Not sure if their research and instruction was declining as they were getting closer to closing or if there just wasn't as much information. I think there is only one surviving plane. A lot of the decal information is on the painting and rigging diagram. If I hadn't looked ahead, I would have missed a lot of the lozenge decals in the cockpit, which would have been a lot harder to place once the cockpit was assembled.
- 40 replies
-
- 16
-
-
-
SPAD XIII c1 by modeller_masa - Roden - 1/32 - PLASTIC
davec replied to modeller_masa's topic in Completed non-ship models
looks great!! -
Gantry style building board dimensions advice
davec replied to davec's topic in Modeling tools and Workshop Equipment
Druxey, Chris, and Gregory - many thanks for the continued really thoughtful and helpful comments. This has gone in a different direction than I originally intended, but the material discussion is also tremendously helpful. I used MDF for my last 3 building boards and it worked well. Locally I can only source melamine covered particle board as shelving, and if I needed something wider or longer than the biggest available shelf, would definitely use MDF again. MDF is about the weight (around 3# per board foot for 3/4") as plywood or melamine covered particle board and cost as the melamine shelving. I've used melamine shelves for the bases for my mill and lathe and the protective coating has held up well. I think I may go with it for the coating. -
Gantry style building board dimensions advice
davec replied to davec's topic in Modeling tools and Workshop Equipment
My concern isn't ability to sand the plywood smooth, it is to get it to be a flat surface. The 2'x4' birch plywood at home depot and lowes is pretty warped - looks like it gets stored standing up. Even screwed to a pine frame, I worry it will still not be flat. Gregory - I have some of the plywood you recommend, which I agree is good stuff and use for a lot of things. For the building board I need something thicker (at least 1/2" if not 3/4") and larger. If Birch plywood has advantages over melamine I can splurge and buy a sheet from woodcraft, which looks better quality. Are there other advantages to birch plywood over melamine? - it will cost about twice as much and there will be a bunch of sanding and painting to get the smooth white surface that the melamine shelf comes with. -
Gantry style building board dimensions advice
davec replied to davec's topic in Modeling tools and Workshop Equipment
Hi Druxey - I hadn't thought much about the material and had planned to go with the melamine because a lot of the gantry boards here use it as does the book I was working from. I tested a piece I have, and the melamine sees to hold a pencil mark well. When I looked at plywood at my local hardware stores, I'm not sure it will give me as level a surface even with reinforcement underneath and a lot of sanding. I could go with birch plywood from woodcraft, but it would be much more expensive and only slightly lighter (3 lb per board feet instead of 3.5). Many thanks! Dave -
Gantry style building board dimensions advice
davec replied to davec's topic in Modeling tools and Workshop Equipment
I'm probably overthinking this (my standard). After some further thought, I think I will work off the plans in Ed Tosti's Naiad book (20" width). He uses a 48" board, which is longer than I need. The Swan Class books suggest 8" longer than the length between perpendiculars. The contract for the ship I am considering says 116'2" for "Ships's Extream Length" which is a little more than the length between perpendiculars. This would give me a 37" length. At 3.5 pounds per board feet for 3/4" melamine over particle board, this would give an 18 pound melamine board. The reinforcing wood underneath will add a few pounds and the model itself should be fairly little in comparison. something this size and weight (under 25 pounds) should be adequately portable for a few trips a year without compromising building. I'd appreciate any thoughts or warnings before I start cutting wood. Thanks! Dave -
Gantry style building board dimensions advice
davec replied to davec's topic in Modeling tools and Workshop Equipment
No Idea - I was watching while you were posting about your developing your building board. It is amazing, and I'm very interested in how it works for you. I think I will go with a more traditional building board as they seem to be adequate for the building of many amazing models and reasonably easy portability is a priority for me. The distance from the parking lot to the room at the maritime museum where the club meets is far enough that size will make a difference. J Palmer - you are working with the kind of building board I am planning, and again, I will probably mock something up. I am interested in how much of the space lateral to the t-tracks you think is essential. I actually bought a melamine shelf last winter when I started thinking about this. I wanted to use 3/4" for rigidity and at the time the widest one I could find locally was 15 1/2". I was about to arbitrarily just make my board this width, but saw the local hardware store is now stocking 23 1/2" x 48", which I can cut down to whatever size I need. Again, thanks to everyone for their input. This is really helpful. Dave -
Gantry style building board dimensions advice
davec replied to davec's topic in Modeling tools and Workshop Equipment
Mike - building a mock-up is a great idea. I'd still like some advice from people who have used the building boards as I'm not sure I know all the things to try on the mock-up Adam - If I can get by with something 16" wide, that would be great for portability. It looks like your t-tracks are around 12" apart, which would let me use the gantry design in Ed Tosti's book on the Naiad. The TFFSM books suggest having the board be 8" longer than the length of the hull. As that doesn't depend on the gantry or the t-track, I'm planning to use that to determine the length. I'm starting with a 48" shelf, so I can shorten as much as I need to. I want to make sure I have adequate width next to the hull for height gauges and such, and it looks like you have that with your 16" board. Many thanks! Dave