-
Posts
590 -
Joined
-
Last visited
Content Type
Profiles
Forums
Gallery
Events
Posts posted by vossy
-
-
-
Well done! I love Columbus's Ships. I am currently doing the Mantua Santa Maria after having already done the Amati Santa Maria.
Chris
- Keith Black, Dave_E, Knocklouder and 1 other
-
 3
3
-
 1
1
-
So James, are all hull and deck planks pre-cut and shaped for this kit?
Chris
- thibaultron, mtaylor and Canute
-
 3
3
-
-
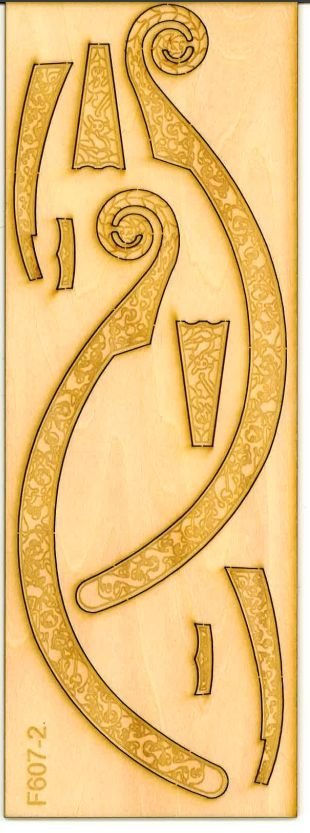
Hi all, I have a very old kit of the Billings Oseberg BB720. Unfortunately it comes with pretty average plastic fittings for the head and stern decorative
pieces and also the shields. I have contacted Billings direct in Denmark and can get replacement wooden head and stern pieces. As I live in Australia
the cost is somewhat prohibitive (around $90 AUD). The shields I reckon I can make myself from wood, but these pieces present a totally different
challenge. I am wondering if anyone has seen these on the market anywhere else. Attached is a picture of the said pieces.
Cheers
Chris.
-
Looks great David. Happy New Year and have a safe trip.
Chris
-
-
-
Hi Jim. Number 1 rule for me is build a vessel that interests you. Try to stay away from more complex hull types such as Victory, Bounty, Endeavour. ie. anything with a bluff bow.
Don't expect the instructions to go from A - Z with no problems in between. Indeed, some manufacturers will only provide somewhat rudimentary instructions, and often not in
English.
Don't worry if your build doesn't come out looking exactly like the exquisite picture on the box. These are models most likely built by "expert" modellers and photographed by
"expert" photographers.
Have fun!
Chris.
- Keith Black, Canute, mtaylor and 1 other
-
 4
4
-
-
Whatever color stain you end up applying to the model, the final result will be determined greatly by the original unstained color of the wood you are applying it too.
Personally I like a lot of my older vessel to have a darker look. Given that most, if not all, have been planked with walnut strips in various color tones, I find that if i apply
1 or 2 coats of semi gloss walnut stain this enriches the bare wood and gives it a nice darker shade. Stain is expensive, at least where I live, so doing test patches can be
prohibitive. Dont just rely on the samples you see in hardware stores and paint shops to determine final color. You dont know what substrate those samples were before
they were stained. My guess is that they wont be walnut strips. Plus, I also use water based stain. I think that raising the grain just a little gives a more authentic appearance.
Also it saves on cost for clean up of brushes etc. and has less odour.
Chris
- Canute, Knocklouder and mtaylor
-
 3
3
-
-
Sorry I could have sworn you did Bounty. Anyway, I have the Mantua 1:50 Santa Maria heavily bashed and just about to get onto the masts. I decided to leave off the over the top metal
decorations and brass railings etc. as I thought they looked out of place on such a vessel. Most of the metal parts I have replaced with wooden parts I made from various offcuts. I didn't
do a log but will put up pics in the gallery once it is completed. Also pulled out the Amati Bounty that I have that was about half way through some very dodgy first planking. I figure I
should be able to rescue it and produce a pretty good piece. Also have to finally put a few masts and basic rigging on the Riverboat to finish her off.
Chris.
-
Hi David, she is looking good. I was looking at your completed build list. Did you not do the Amati 1:60 Bounty at some stage? I thought you did a build log on it?
Chris.
-
Hi, from what your photo is showing it appears that you are trying to bend the plank against the grain. This is wrong. The planks should lay flat against the first planking layer. To achieve the slight upwards curve on the finished model it is necessary to taper the planks as you go ie. remove small amounts from the top edge of the fore and possibly aft section of each plank. Unless your model is a bluff bowed vessel such as the Victory, Endeavour, Bounty etc. with second layer planking as thin as yours, 0.6mm you probably wont have to use any plank bender on the vessel. But you will have to taper as you go.
Chris.
-
I wish you well and look forward to watching you build her. I may get this particular model myself one day.
Chris
- Keith Black and Dave_E
-
 2
2
-
1 hour ago, mtaylor said:
I believe sails/no sails, furled/unfurled are modeler's choice, Scratchie. Some leave sails off due to complexity and also hiding deck details. A lot of variables as to why or why not but I've never heard the "lost in battle" one.
Mark, I totally agree with you that the sails furled/unfurled option is totally a modellers own choice.. Personally I like ships with no sails due to a number of reasons including cost and quality of sails and cloth available, and mostly the fact that they tend to hide many hours of very fiddley rigging work. However a thought occurred that maybe the modelling community could start a trend that was begun by sculptors of soldiers and their horses. In my country, Australia, drive through any town, big or small, and you will see statues of soldiers on their horses, mainly WW1 era. A statue that depicts a soldier on a horse in which the horse has all 4 of its feet on the ground denotes that both rider and horse survived the battle. If the horse has 1 foot off the ground it denotes that the rider was injured in the battle, and if the horse is rearing or has 2 feet off the ground it denotes that the rider was killed in the battle. Anyway, bit of trivia I guess.
Chris.
- halituzun, thibaultron and mtaylor
-
 3
3
-
-
Definitely keep it and try to clean it up a bit. Who cares if it doesn't represent an actual real life vessel. I have numerous models that I have painstakingly made myself that are, to me anyway, good representations of historical vessels, and at least 3 versions of my favorite vessel, Santa Maria, which may, or may not, be good representations of her. No-one really knows as there are no verified pictures of her or Columbus for that matter. Who's to say that your find is not a true representation of an early vessel? Having said all that I also have a small wooden sailboat about 10 inches long that my sister bought for me about 6 years ago. It is a simple model with a solid hull, small square wooden cabin and a single mast and sail. It was carved on a beach in Queensland, Australia by a local craftsman from a single piece of driftwood and is among my favorite models.
If you like your find, clean it up, find it a place in your home, and treasure it.
-
-
Thanks. I did the Amati Santa Maria years ago and had awful trouble with this part. Looked like a big lumpy mess on mine, but yours looks really good I reckon. Also I dont know if its just the picture you took, but yours also look like they have been tarred, which I guess might have been the case on the real thing? Anyway, great job.
-
Really nice David. Got any pics where you tie them off at the upper end?
-
-
Looking amazing David. I actually really like models such as the Victory that show some of the gunports closed as well as open. Also once she is finished and fully rigged I doubt anyone will even notice the missing rigging in the gunport lids.
Chris


Looking for suggestions for a good pin pusher
in Modeling tools and Workshop Equipment
Posted
I have always found that a small modellers tack hammer does a better job.
Chris