


UpstateNY
-
Posts
466 -
Joined
-
Last visited
Content Type
Profiles
Forums
Gallery
Events
Posts posted by UpstateNY
-
-
P.S. Maybe I am forced to do the little boats because I'm not very good doing big it ))
Hi Igor,
I have a hard time believing this...

I only see SIB's in your signature, but if you ever decided to do a larger build, I expect the build and its detail level would be stunning!
Cheers,
Nigel.
-
-
-
-
Hi Igor,
Wow..those boats are all great! Wonderful work.
My boat is certainly large by your standards, but as I've never made something like this before, large is probably a good place to start!
Thank you very much for the link showing your other method. I am wondering if I can actually carve a decent base to frame the boat around. Your other method looks easier for me to try for a first build as I can build it up from flat sections. Appreciate all the help!
Cheers,
Nigel.
-
Hi Nigel,
Yes, I think you all understand correctly.
What size boat need to you?
Best Regards!
Igor.
Hi Igor,
Thanks for the confirmation!
Ships boat will have a length of 5.5cm with a max beam of perhaps 1.5 cm. Still working on the design, but pretty big by your standards!
Steam winch you just made looks awesome!
Cheers,
Nigel.
-
Hi Igor,
Nothing so advanced as that tiny boat! I just want to make a ships boat for my Red Dragon Chinese junk.
If I understand your pictures, you made up your ships boats by forming a bottom layer and then shaping it. You then added the thwarts, bow and stern pieces and used them to support the final layer of planking.
Is that right or did I miss an important step?
Cheers,
Nigel.
-
Hi Igor,
Love the detail work in this build and I am still recovering from the pictures of your completed bridge! Great stuff!
Ships boats also look wonderful and thank you for showing your method for making them. I hope you don't mind if I borrow your method to make a boat for my build!
Cheers,
Nigel.
-
Thank you for sharing your pictures Jack and only an hour or so down the road on the Hudson in Saugerties!
Very interesting to see more references of how the junk sails are rigged. The AL plans also show more battens bracing the sails than I see in your pictures as well as the reference images I posted.
Cheers,
Nigel.
-
Again thanks for the nice comments everyone!
Hi Janet,
Yes, I agree nice thing about this kit is you can do so many different things with it. It is simple enough for a beginner like me, but also offers many ways to add extra details here and there. I think your build is fabulous exactly the way it is and I just wish my work was half as clean as yours. Vivian was also doing some really cool things on her Dragon build and I am hoping she will post her progress again one day.
Look forward to seeing your sails. As I said above, I am going with red...exactly what shade to choose however will be a fun thing to decide!
Cheers,
Nigel.
-
In case it helps you out on the masts, I am using some pins made from nails with their heads cut off to help hold my mast alignment as the glue dries.
I predrilled the holes into my frames early on in my build, but you may still be able to drill these holes if your frames aren't too far below the deck.
Just a thought to add to those from George, Jesse and Chris.
Cheers,
Nigel.
- GLakie and mattsayers148
-
 2
2
-
-
-
Nice modification...looking forward to seeing them finished on your build.
Thanks for sharing your idea of using cane to make the hoops as well!
Cheers,
Nigel.
- mattsayers148, GLakie, Jack12477 and 2 others
-
5
-
Thanks for the kind comments guys!
Gotta second that !!
I have no clue precisely what a Chinese anchor of this period would look like, but anything which appears distinctly non-Western would look much better on your build.
Me neither and I also don't know what period AL used as a design basis for the Dragon so there are certainly no claims from me regarding any sort of historical accuracy. I am just having fun making these details.
 .
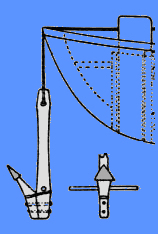
. Next up, before I get back to masts and rigging, is I want to make the ships boat more interesting. I found the below picture on the web I am trying to figure out how to build.
I am also re-thinking the railing design from a few posts back. The turned style doesn't look so good when set just over the very square design of the windows I just made. No worries, but a redo is probably in order there...
Cheers,
Nigel.

-
-
Hi All,
Firstly, thanks to all for their kind comments and of course for the likes!
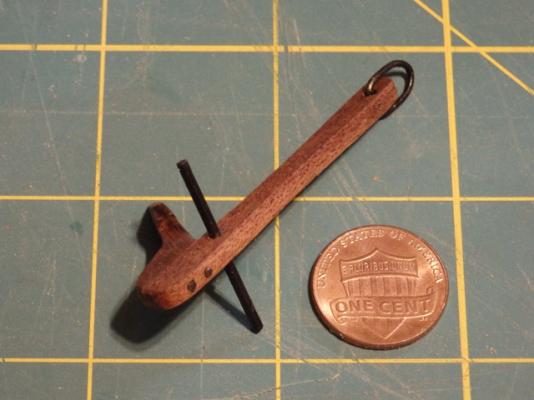
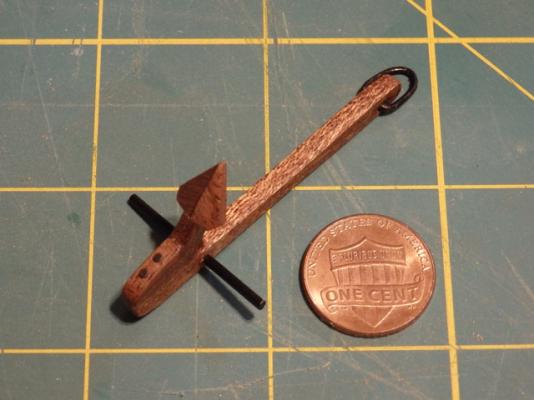
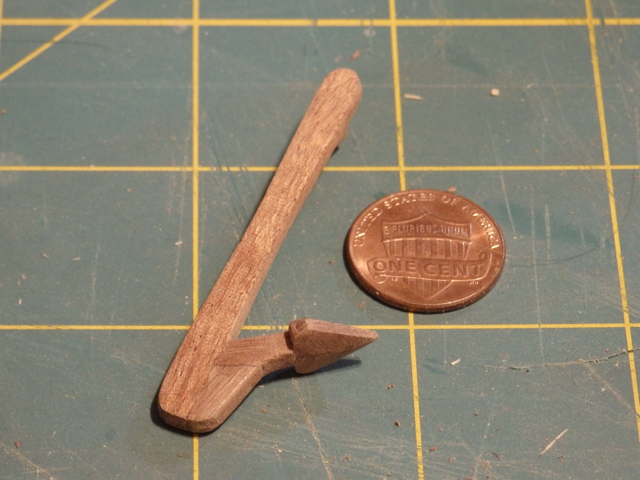
Over the past few days, I've enjoyed myself making another anchor as the kit provided anchor also started to looked a little too western. After a few minutes searching on the web, I found a nice reference. I made up the main pieces from the left over wood from the kit's laser cut pieces. I then spent a few hours slowly shaping the anchor using my needle files until I matched the design as closely as I could. Finally, I added some metal work to complete the anchor.
Cheers,
Nigel.


- NMBROOK, Dimitris71, xken and 8 others
-
11
-
-
-
Hi Martin,
She is turning out beautifully..wonderful work. Being a paint with wood fan, l also really like the color contrasts you used on the hull.
Enjoy your holiday!
Cheers,
Nigel.
-
Many thanks Patrick and Janet. Appreicate the kind words very much.
Janet,
I am very much looking forward to seeing your update.. Perhaps try the link below on how to upload images in case it helps.
http://modelshipworld.com/index.php/topic/540-how-to-add-pictures-in-your-posts-and-pms/
On the sails, I am going with red. I'll use the kit white sail material to practice on as will be quite a learning curve
and then find a finer material to use for the final sails as the kit material seems rather heavy. Below is an image of a junk called the Aqua Luna in Hong Kong harbor I will be using as a reference.
Cheers,
Nigel.

- Omega1234, Dimitris71, CaptainSteve and 1 other
-
4
-
Hi Danny,
I think your photos convincingly show why putting a finished model in a case is a good idea! I can't even see the deck in your second shot!
I've a soft spot for the Norske Love as it was my dream build while I was floundering along doing my very 1st build (a Billings Krabbencutter - never finished) way back when as a teenager. That build may now be in even worse shape somewhere in my parents loft back home in London!
Will follow along as know you will be doing a fantastic job as you restore her.
Cheers,
Nigel.
PS. Note to self...no CA!
- mattsayers148, GLakie, mtaylor and 2 others
-
5
-
Thanks for the kind words Robb... support is much appreciated!
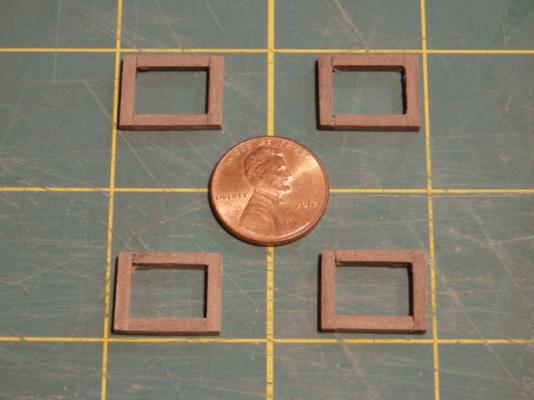
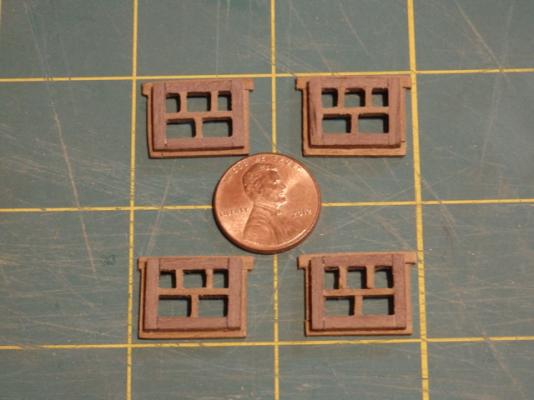
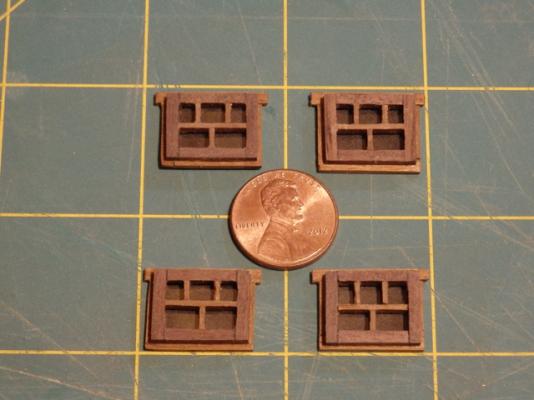
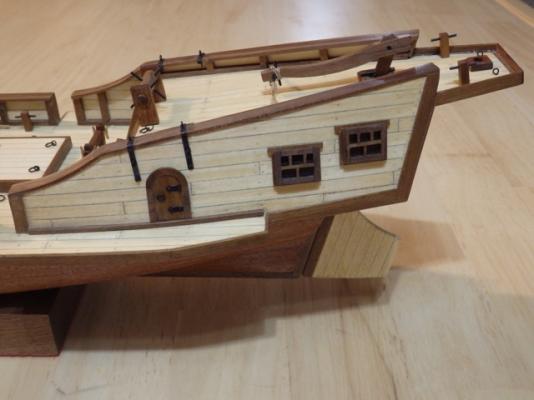
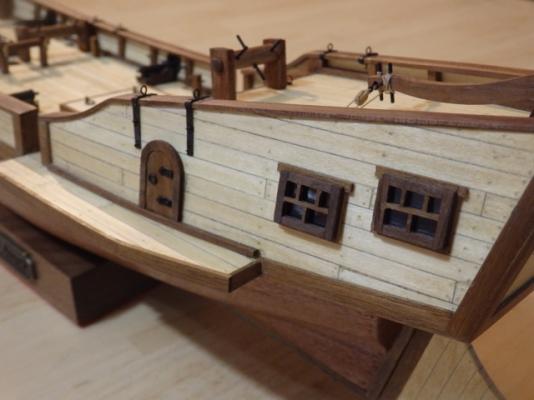
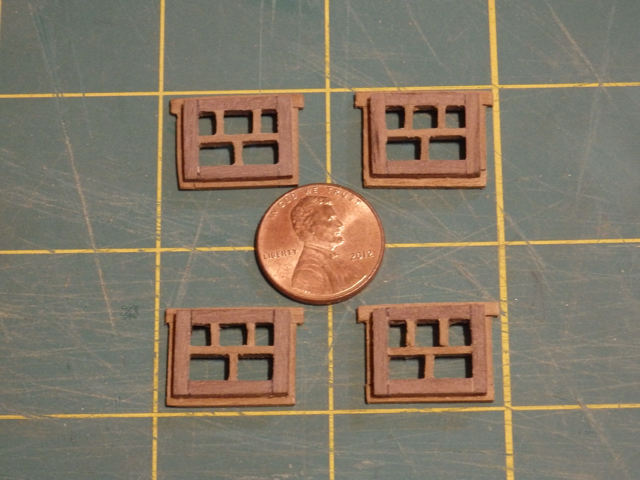
As for progress, this weekend I managed to finish the cabin windows. The cast windows were very small and western looking so I had a go at scratch building my own.
First step was to make some frames out ~2mm square walnut strip. Window design was added from cut down 1x5mm walnut strips glued into the frame so only the 1mm edge was visible. Once the glue was completely dry, I filed down the 1mm strips down until they were about 0.7mm in width to lighten up the look of the window.
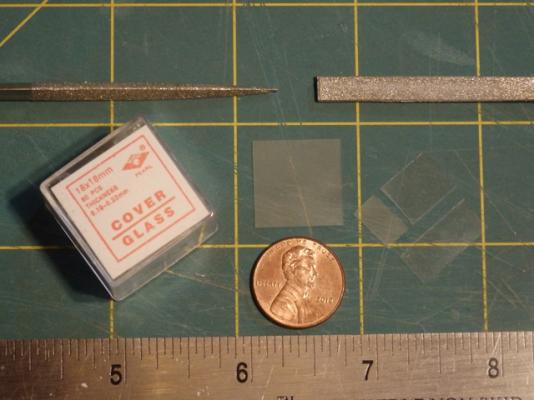
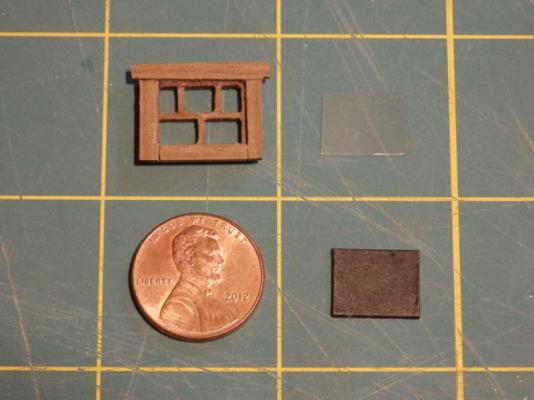
An outer frame was made from 1mm thick walnut and glued so it formed a recess when viewed from the back. Glass microscope cover slips (~0.2mm thick) were scored using the tip of a diamond needle file to make a window pane to fit into this recess. A flat diamond file actually worked quite well to file the cut panes to fine tune the fit. Finally, some card was painted matt black and glued into the recess to gently hold the glass in place before the windows were finally glued onto the cabin.
Overall I am pretty pleased with the way these turned out! Hopefully the nice reflections from the glass panes show up in the attached photos.
Images below and thanks for reading!
Cheers,
Nigel.
- Griffon, Omega1234, CaptainSteve and 8 others
-
11
-
Hi Igor,
So another of your small jewels is complete and at rest in her bottle, other than the seal of course! Really enjoyed this build and love the look of the "waves" in the bottle. Seems to allow the ship herself to stand out more.
Lovely work and congratulations!
Cheers,
Nigel.


Cutter Cheerful 1806 by rafine - FINISHED
in - Build logs for subjects built 1801 - 1850
Posted
Hi Bob,
Looks awesome to me...lines on the Cheerful are lovely. She looks like she is really a fun build.
Cheers,
Nigel.