HOLIDAY DONATION DRIVE - SUPPORT MSW - DO YOUR PART TO KEEP THIS GREAT FORUM GOING! (Only 13 donations so far - C'mon guys!)
×


BenF89
-
Posts
316 -
Joined
-
Last visited
Content Type
Profiles
Forums
Gallery
Events
Everything posted by BenF89
-
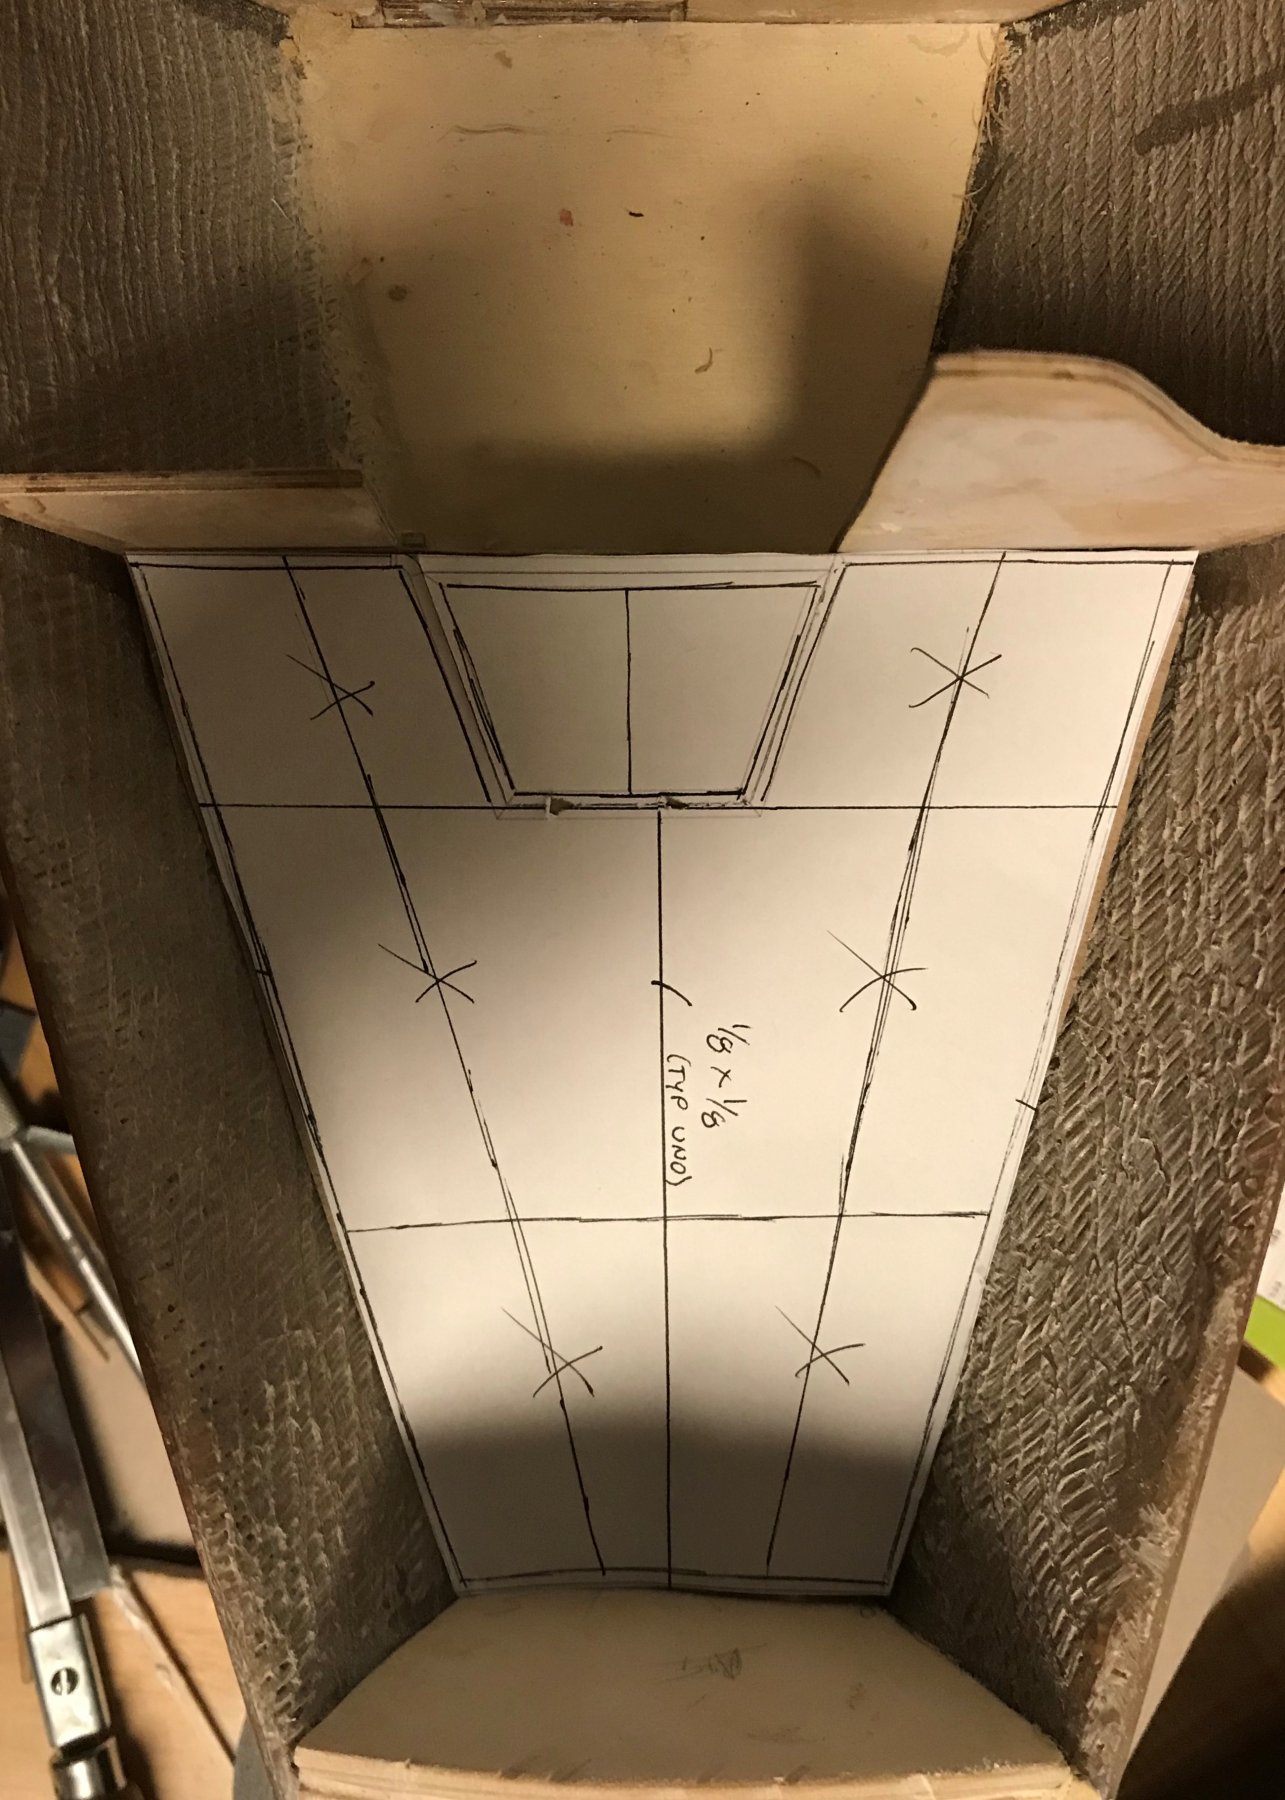
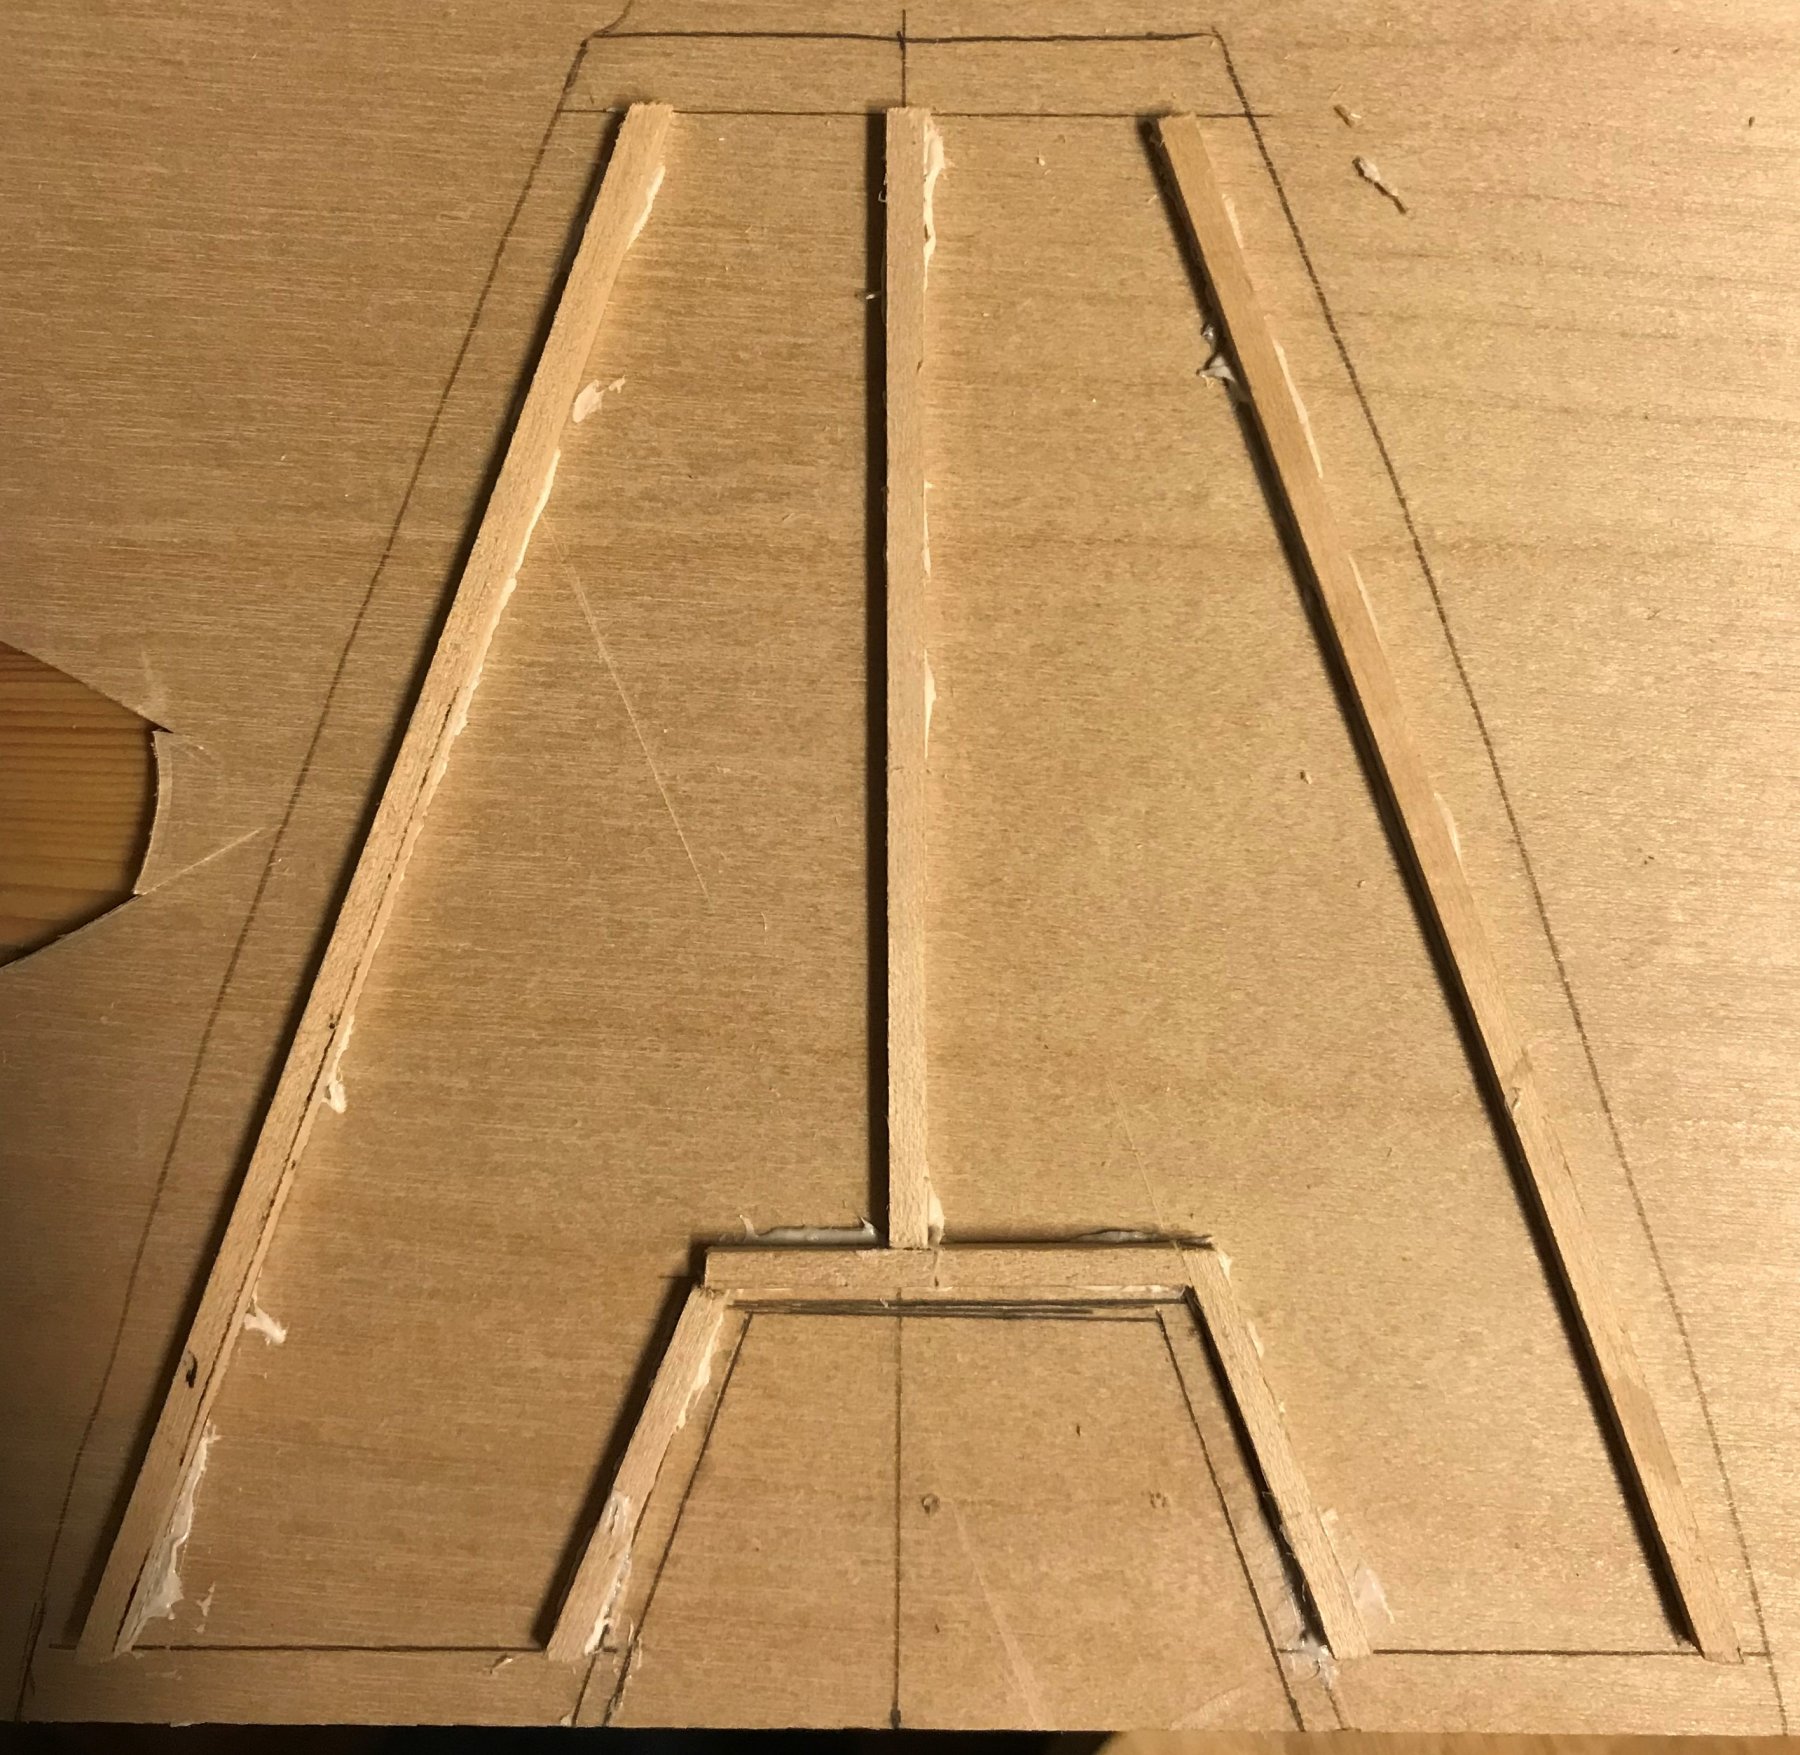
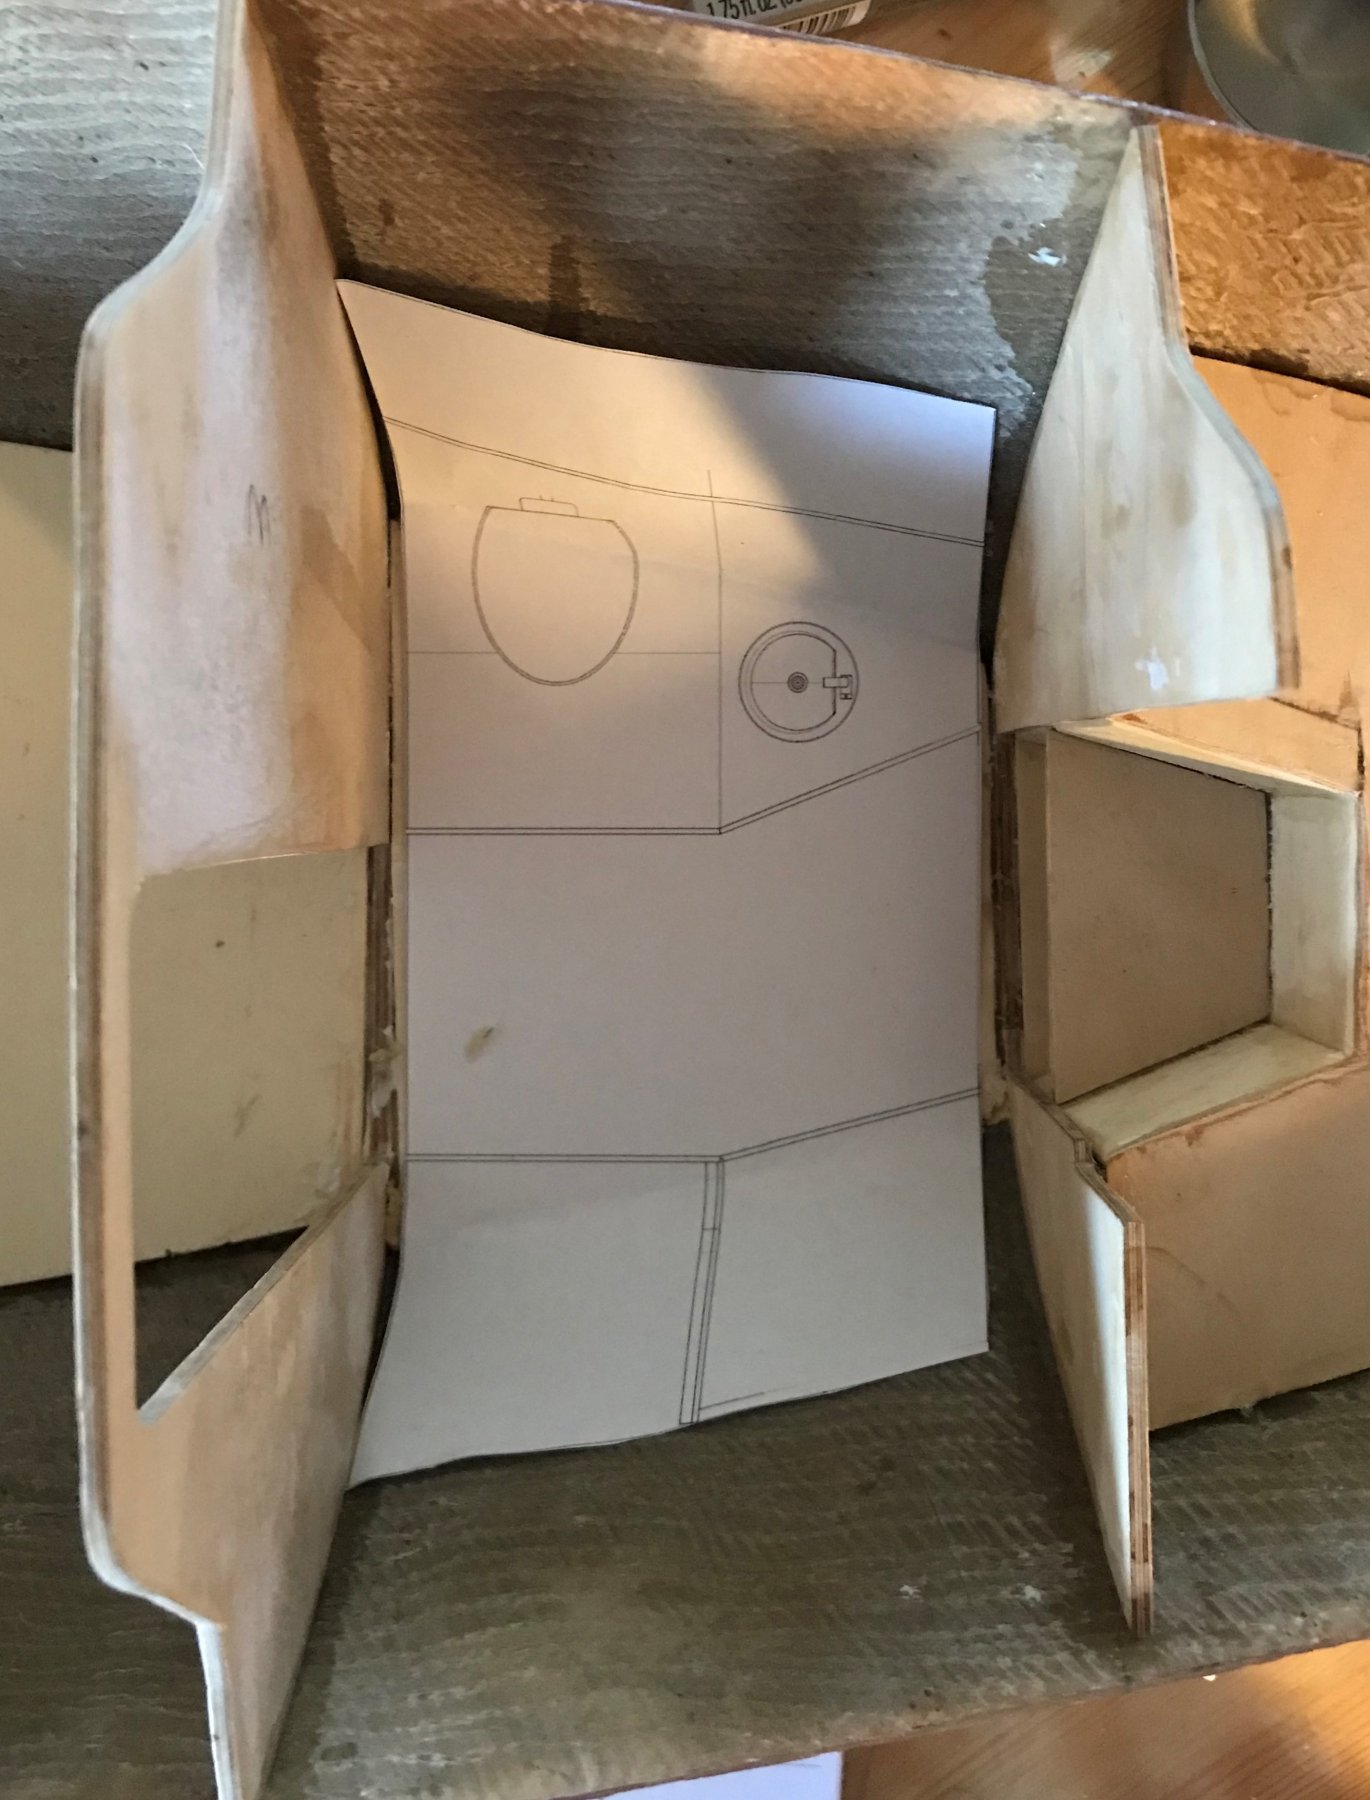
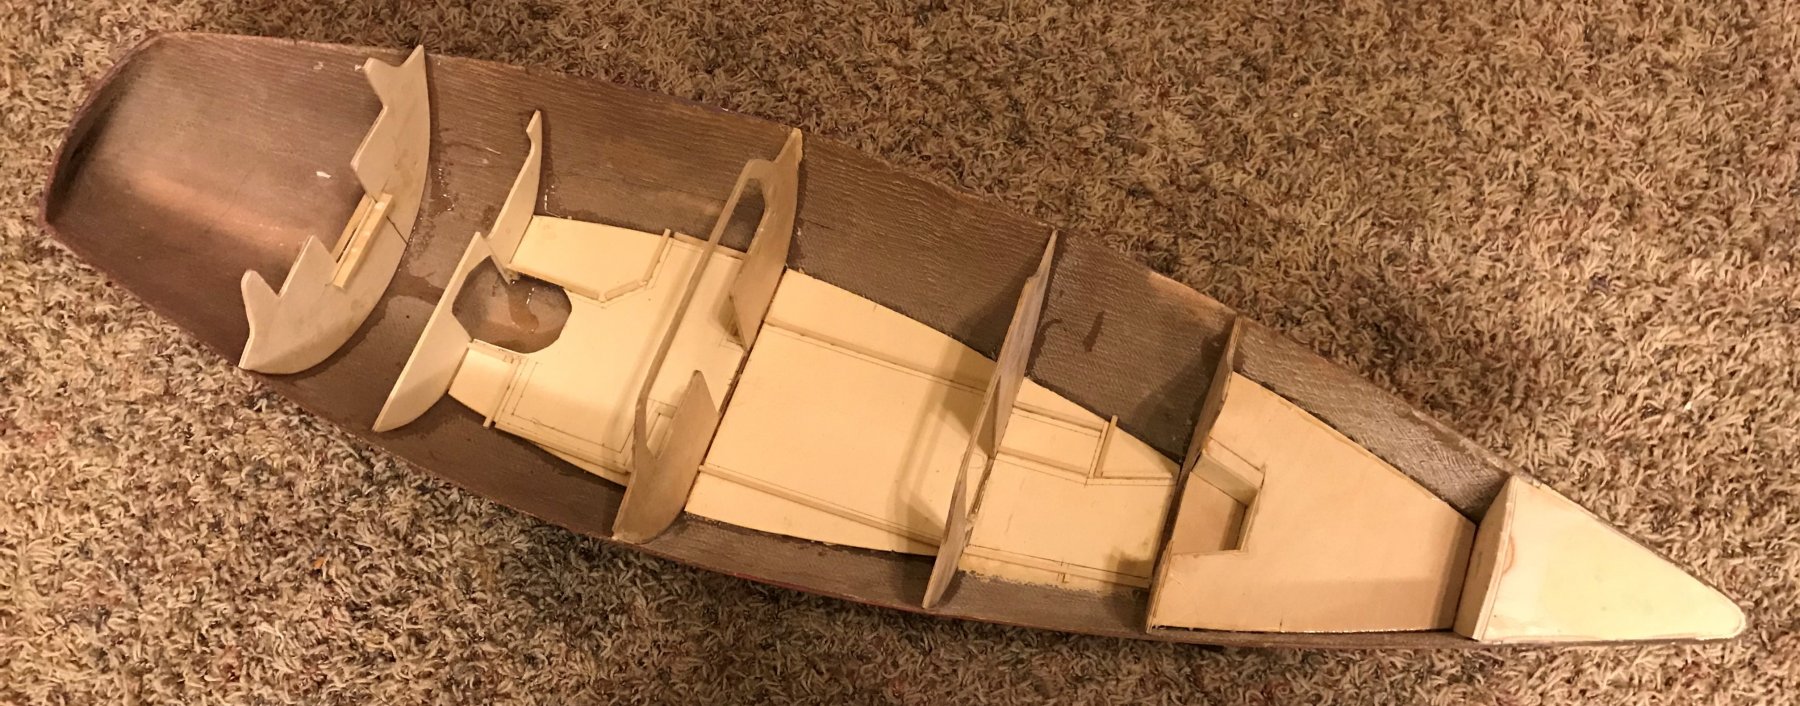
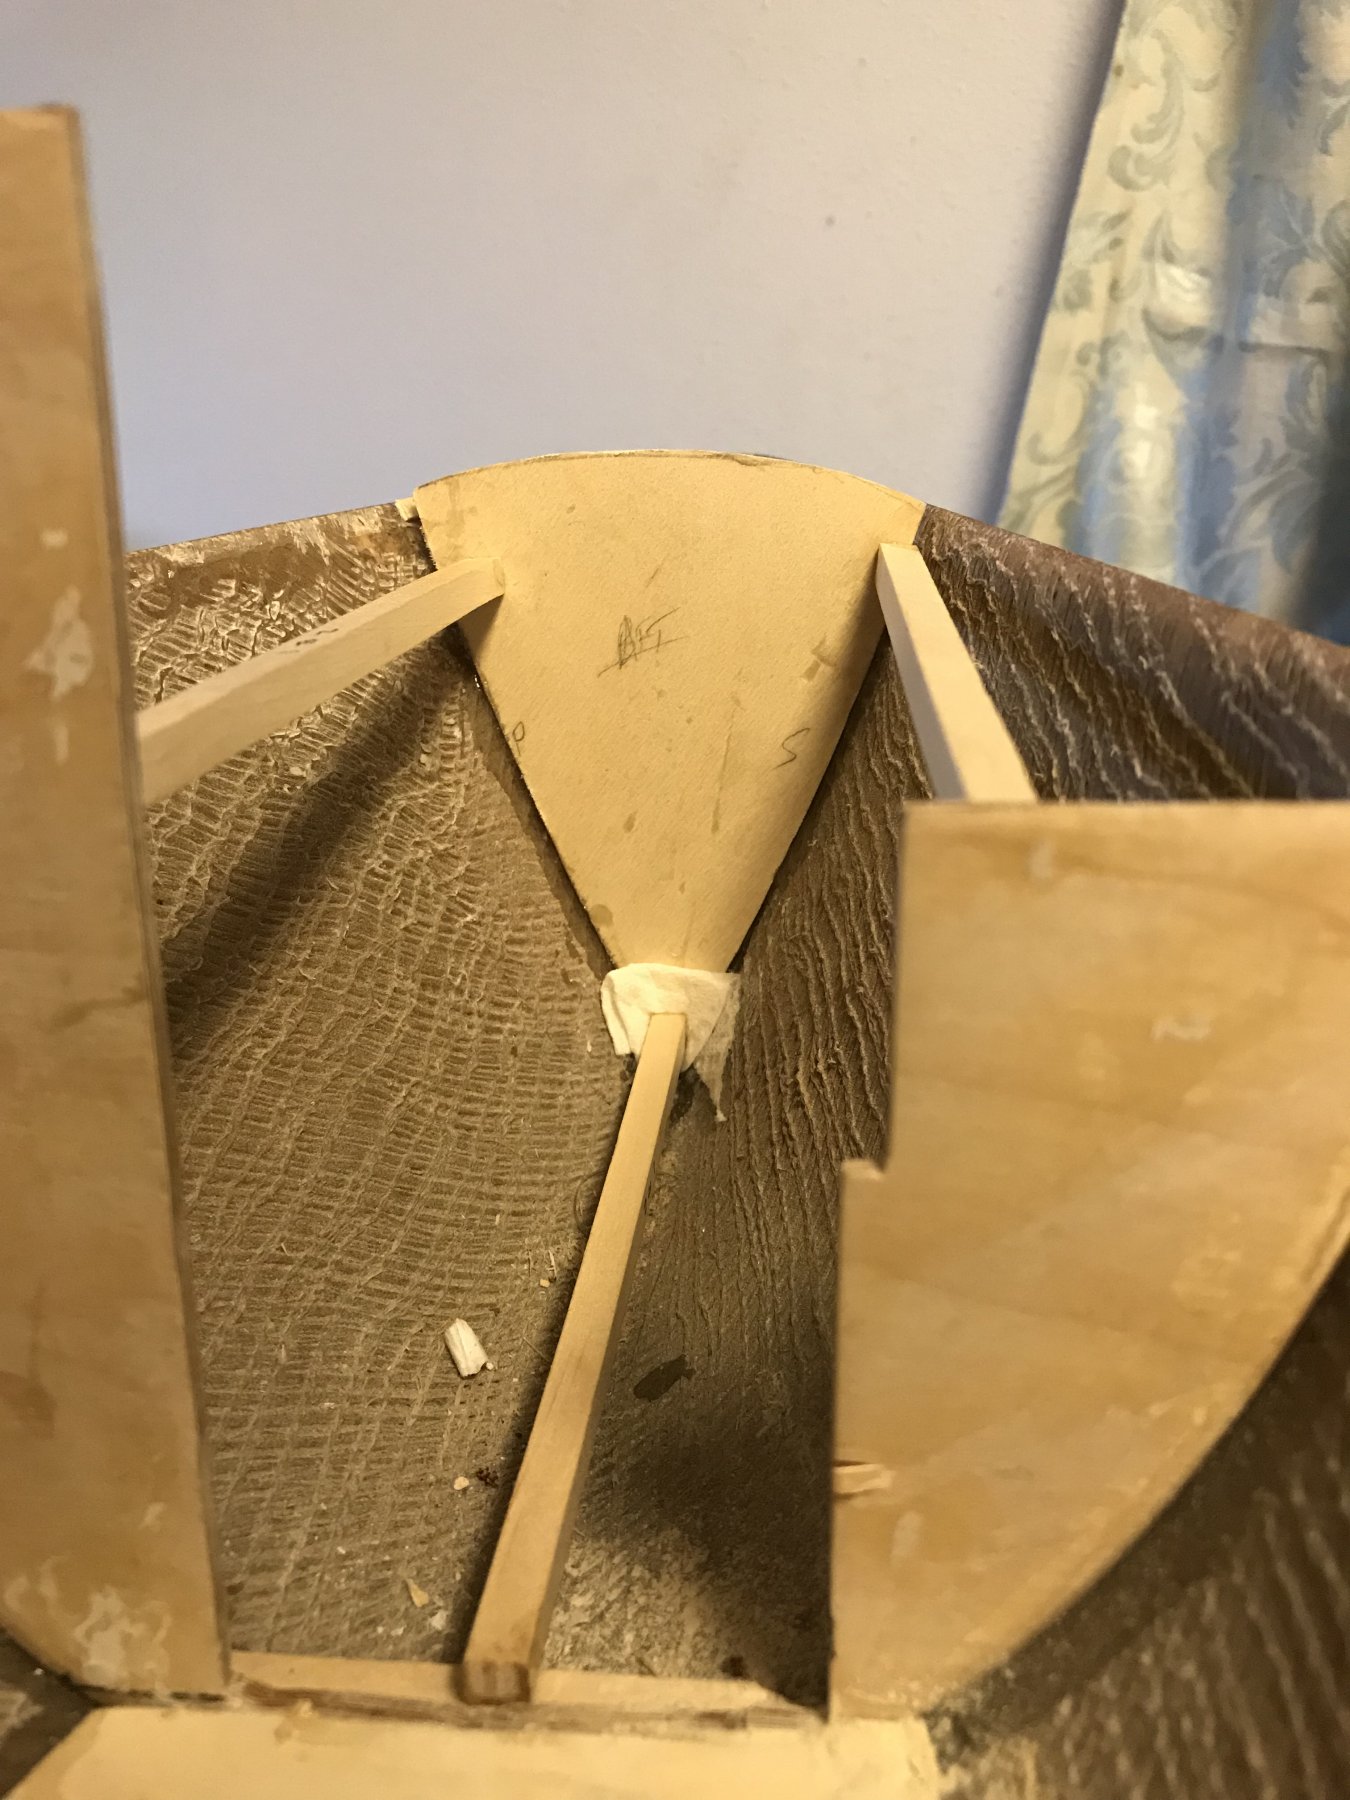
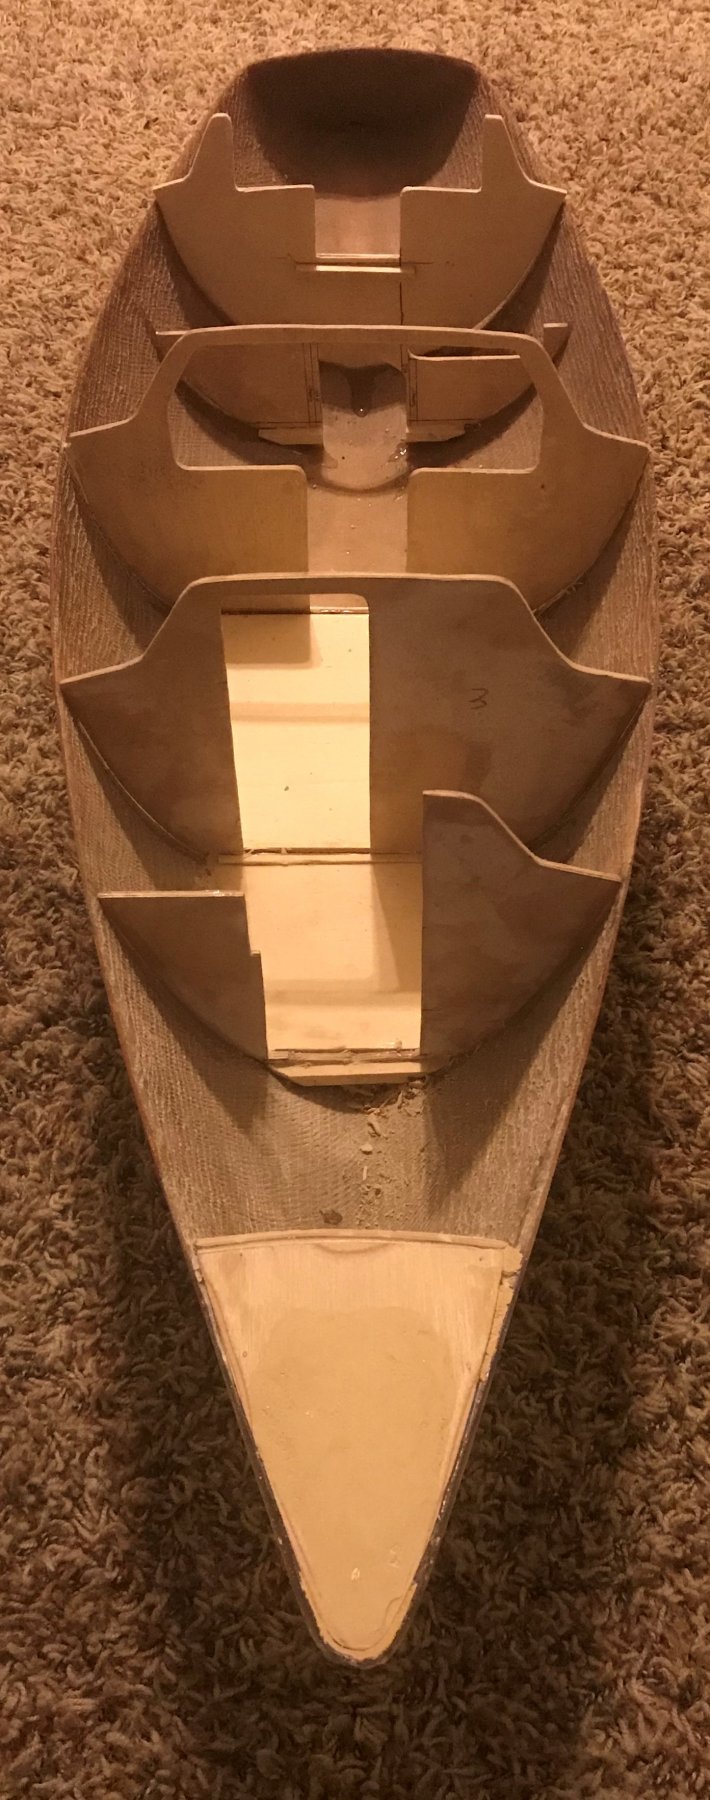
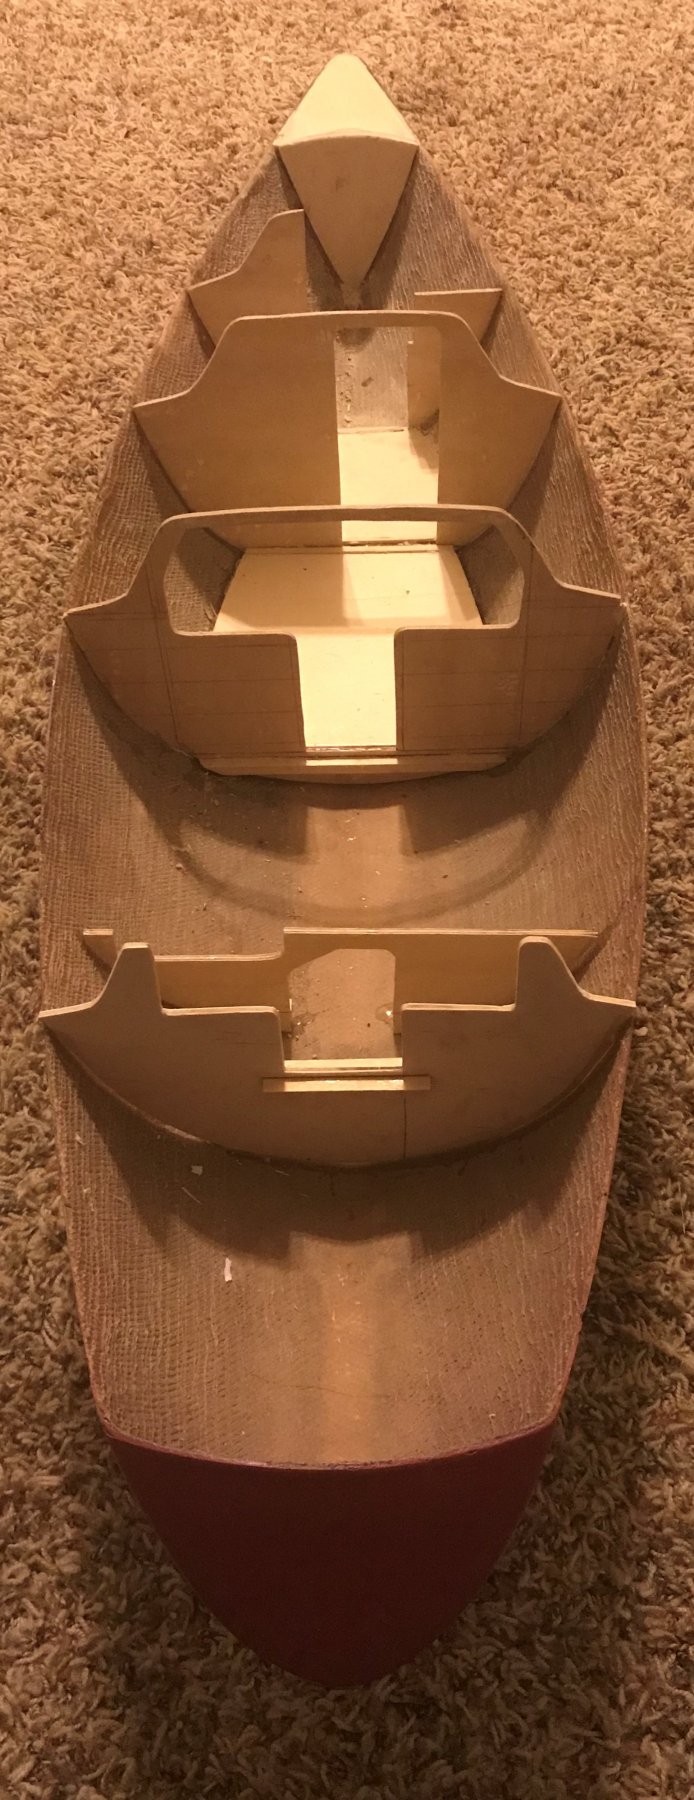
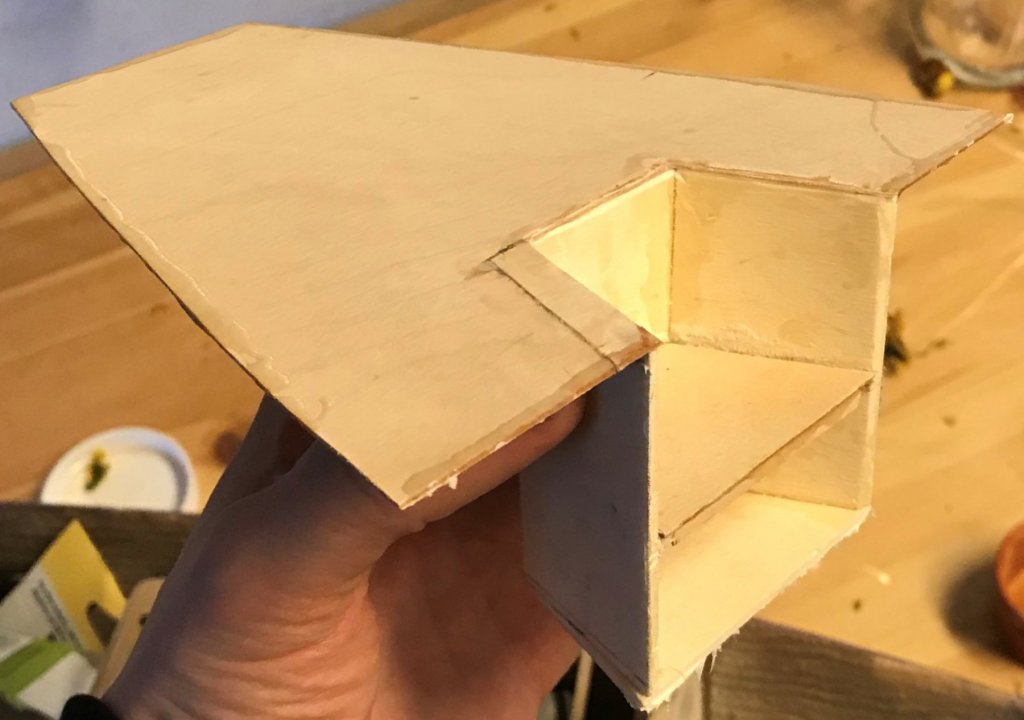
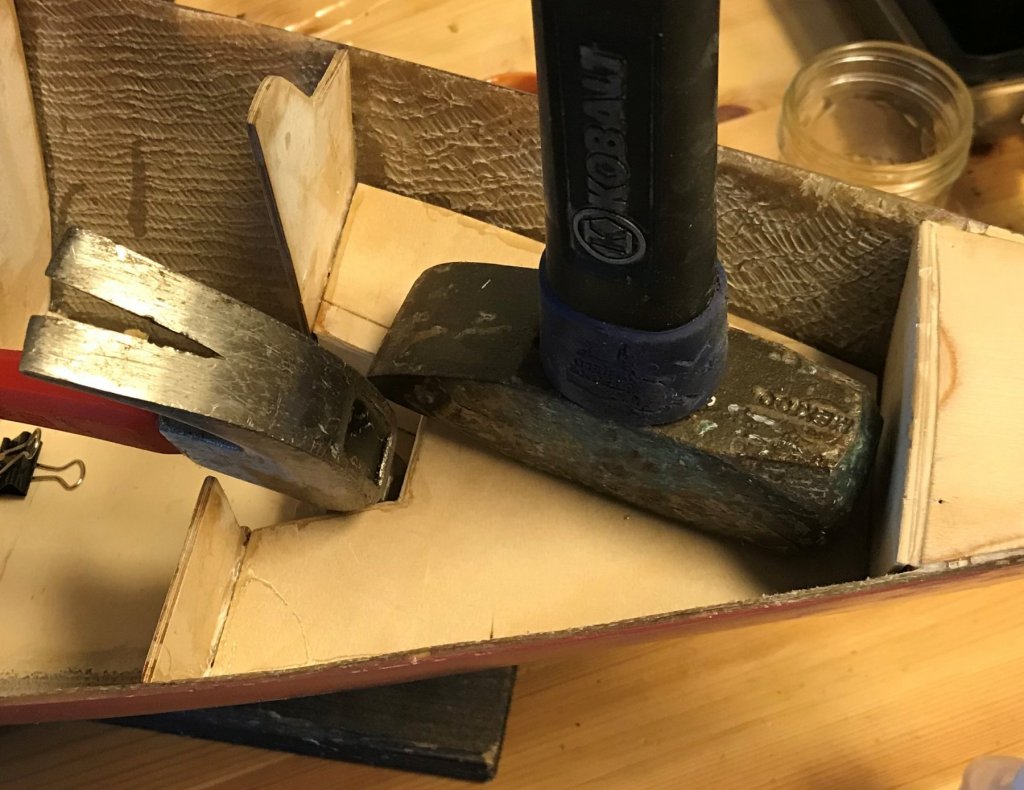
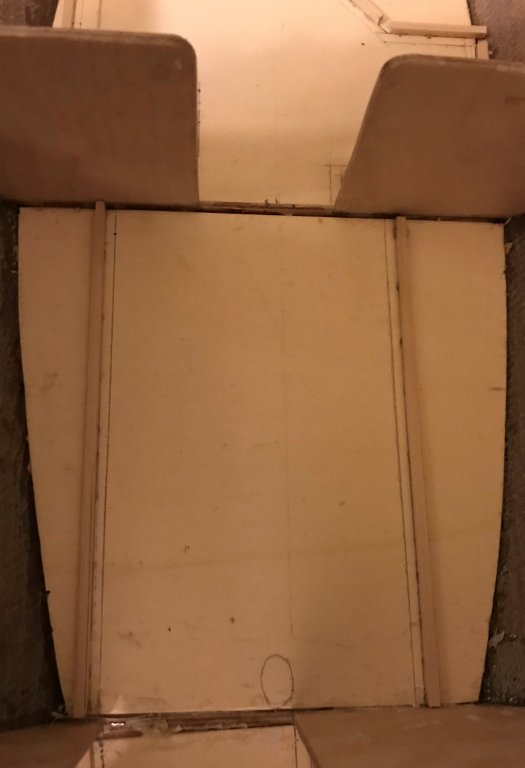
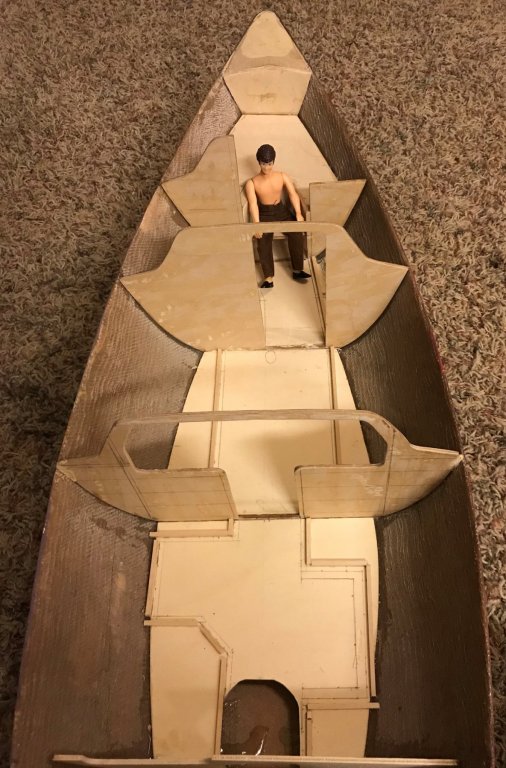
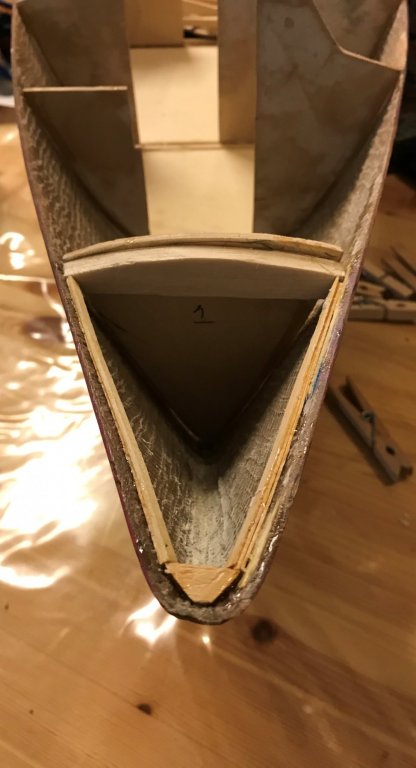
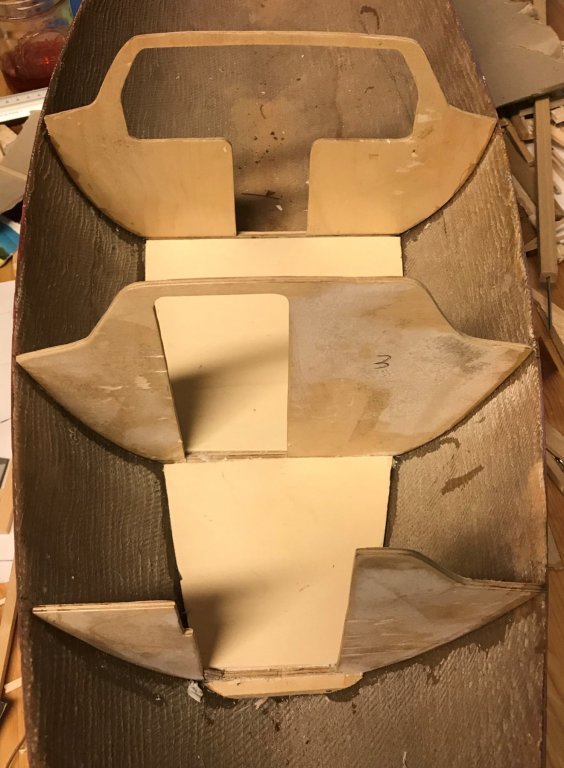
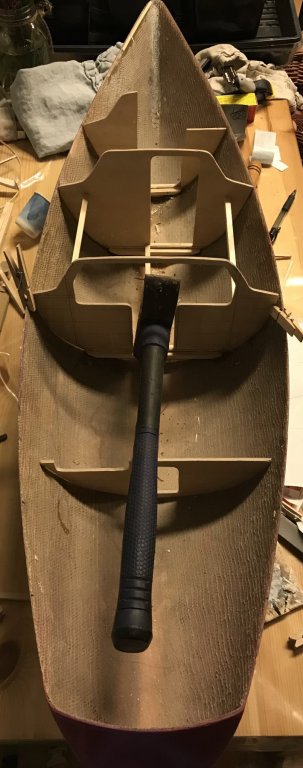
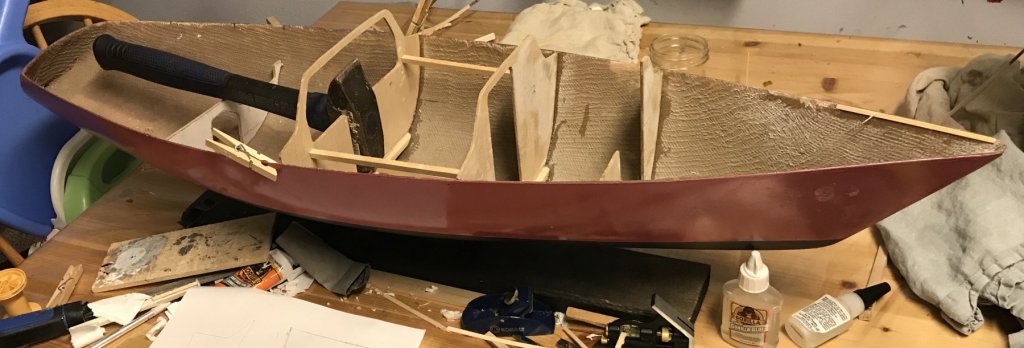
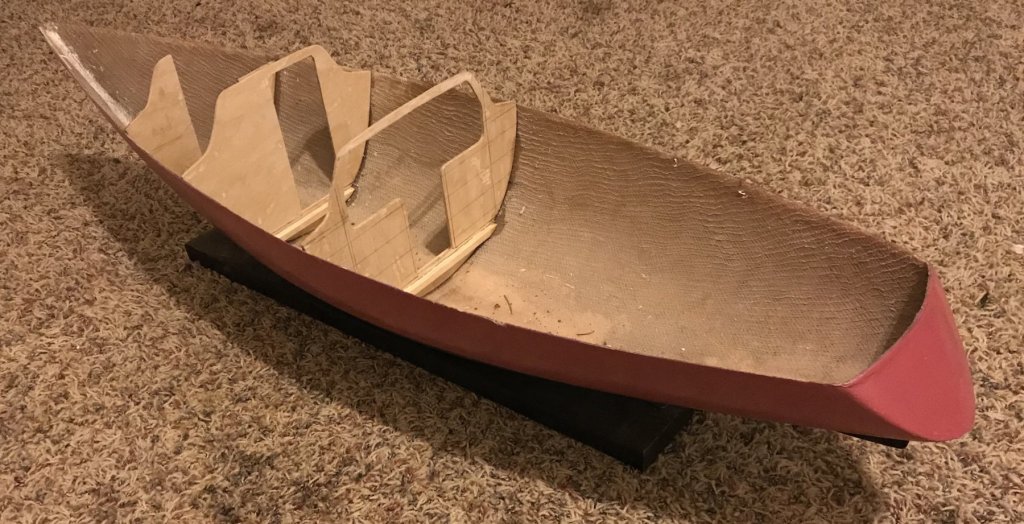
 INTERIOR LAYOUT/FURNISHINGS WORK - FORWARD BERTH AND JOINERY GUIDES Had another little sprint of progress over the week/weekend. First, I installed the forward vee-berth. I started by installing 'tabs' to support the upper part of the berth. I also took the plan (printed at model scale) and laid out my basic idea for stiffening the 1/32 inch material that forms the berth. Installing Tabs and Checking Fit While the tabs were setting, I laid out the stiffening on the 1/32 inch sheet. Vee Berth Stiffening After some templating, troubleshooting, and a little frustration, out popped the vee-berth assembly, which was installed in the boat. Vee Berth Assembly and Installation (My hammers do serve more as weights than hammers these days....) My next step was to start planning the build of the rest of the interior, so as to not make it more complex than needed, nor 'build myself into a corner' so to speak. I started by using the plans to mark out the interior boundaries. I laid the plan in, and then 'punched' along the bulkhead lines, then connected the dots with a straight edge and pencil. Laying Out Head and Locker Bulkhead Locations I offset the bulkhead lines by 1/8" to account for material thickness, and marked a line to place 'footing tabs', to guide bulkhead placement and provide a good installation joint. I'll eventually do the same on the vertical bulkheads, essentially 'framing out' the boundaries of the furniture. The below series of pictures is a space-by-space look at the footings on the deck, aft to forward: Looking aft: Galley (Starboard Side) and Quarter Berth/Nav Station (Port Side) Settee/ Mid-Berths Lockers (Starboard side) and Head (Port Side). You may notice I decided to simplify the lockers forward - rather than a 'jog' in the bulkhead, like with the head on the port side, it just runs in a straight line from bulkhead to berth. Here's an overall of the boat, showing the whole arrangement: All Interior Layout Footings Finally, I decided to have some fun. One of the owners has decided to come by to check on the progress. He seems happy. And, here's the view from his perspective: Next will be continued planning, and probably getting the verticals 'framed out' before I start laying the bulkheads in.
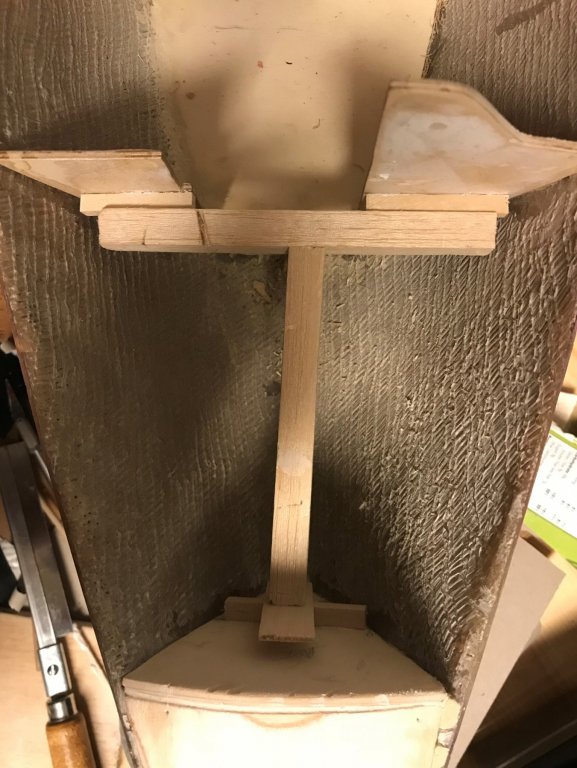


-
I'm sure you've seen this link, Patrick, but 'low, squat, and powerful' seems to be exactly what the artist-designers had in mind. https://www.palmerjohnson.com/design-2 Of course, as you're finding in your small-scale project, it doesn't come without construction challenges, even at full scale (so I've heard). Complex hull forms are innovative, for sure, but the tooling, materials, and build methods have yet to catch up... If only it was as easy full-scale to carve out a solid block and glass over it! With 3D printing and computer-controlled milling, it's probably not too far off for full scale type work.
-
Looking forward to following another build from the beginning!
- 171 replies
-
- 6
-

-
- krabbenkutter
- authentic models
- (and 1 more)
-
Glad I found and caught the tail end of this project! Absolutely fascinating - I'm a Naval Architect, and our senior design project in school was a containership design. They're rare models, though, so it's really fun to see one here! Looks excellent!!
-
I agree with Pat and Druxey - what a great way to have something small as a 'touchstone' to keep the memory of your friend. It's such a great way to add personality, and to make the whole scene 'real.' It's those little things that are what will make this 'diorama about a bridge' so compelling - it's really a diorama about the place and capturing a moment of the life within and around it, with depth and story that may never be known or appreciated, but just being 'there' adds that hard-to-pin-down lifelikeness that makes one connect with the whole thing. Great job, and wonderful tribute.
-
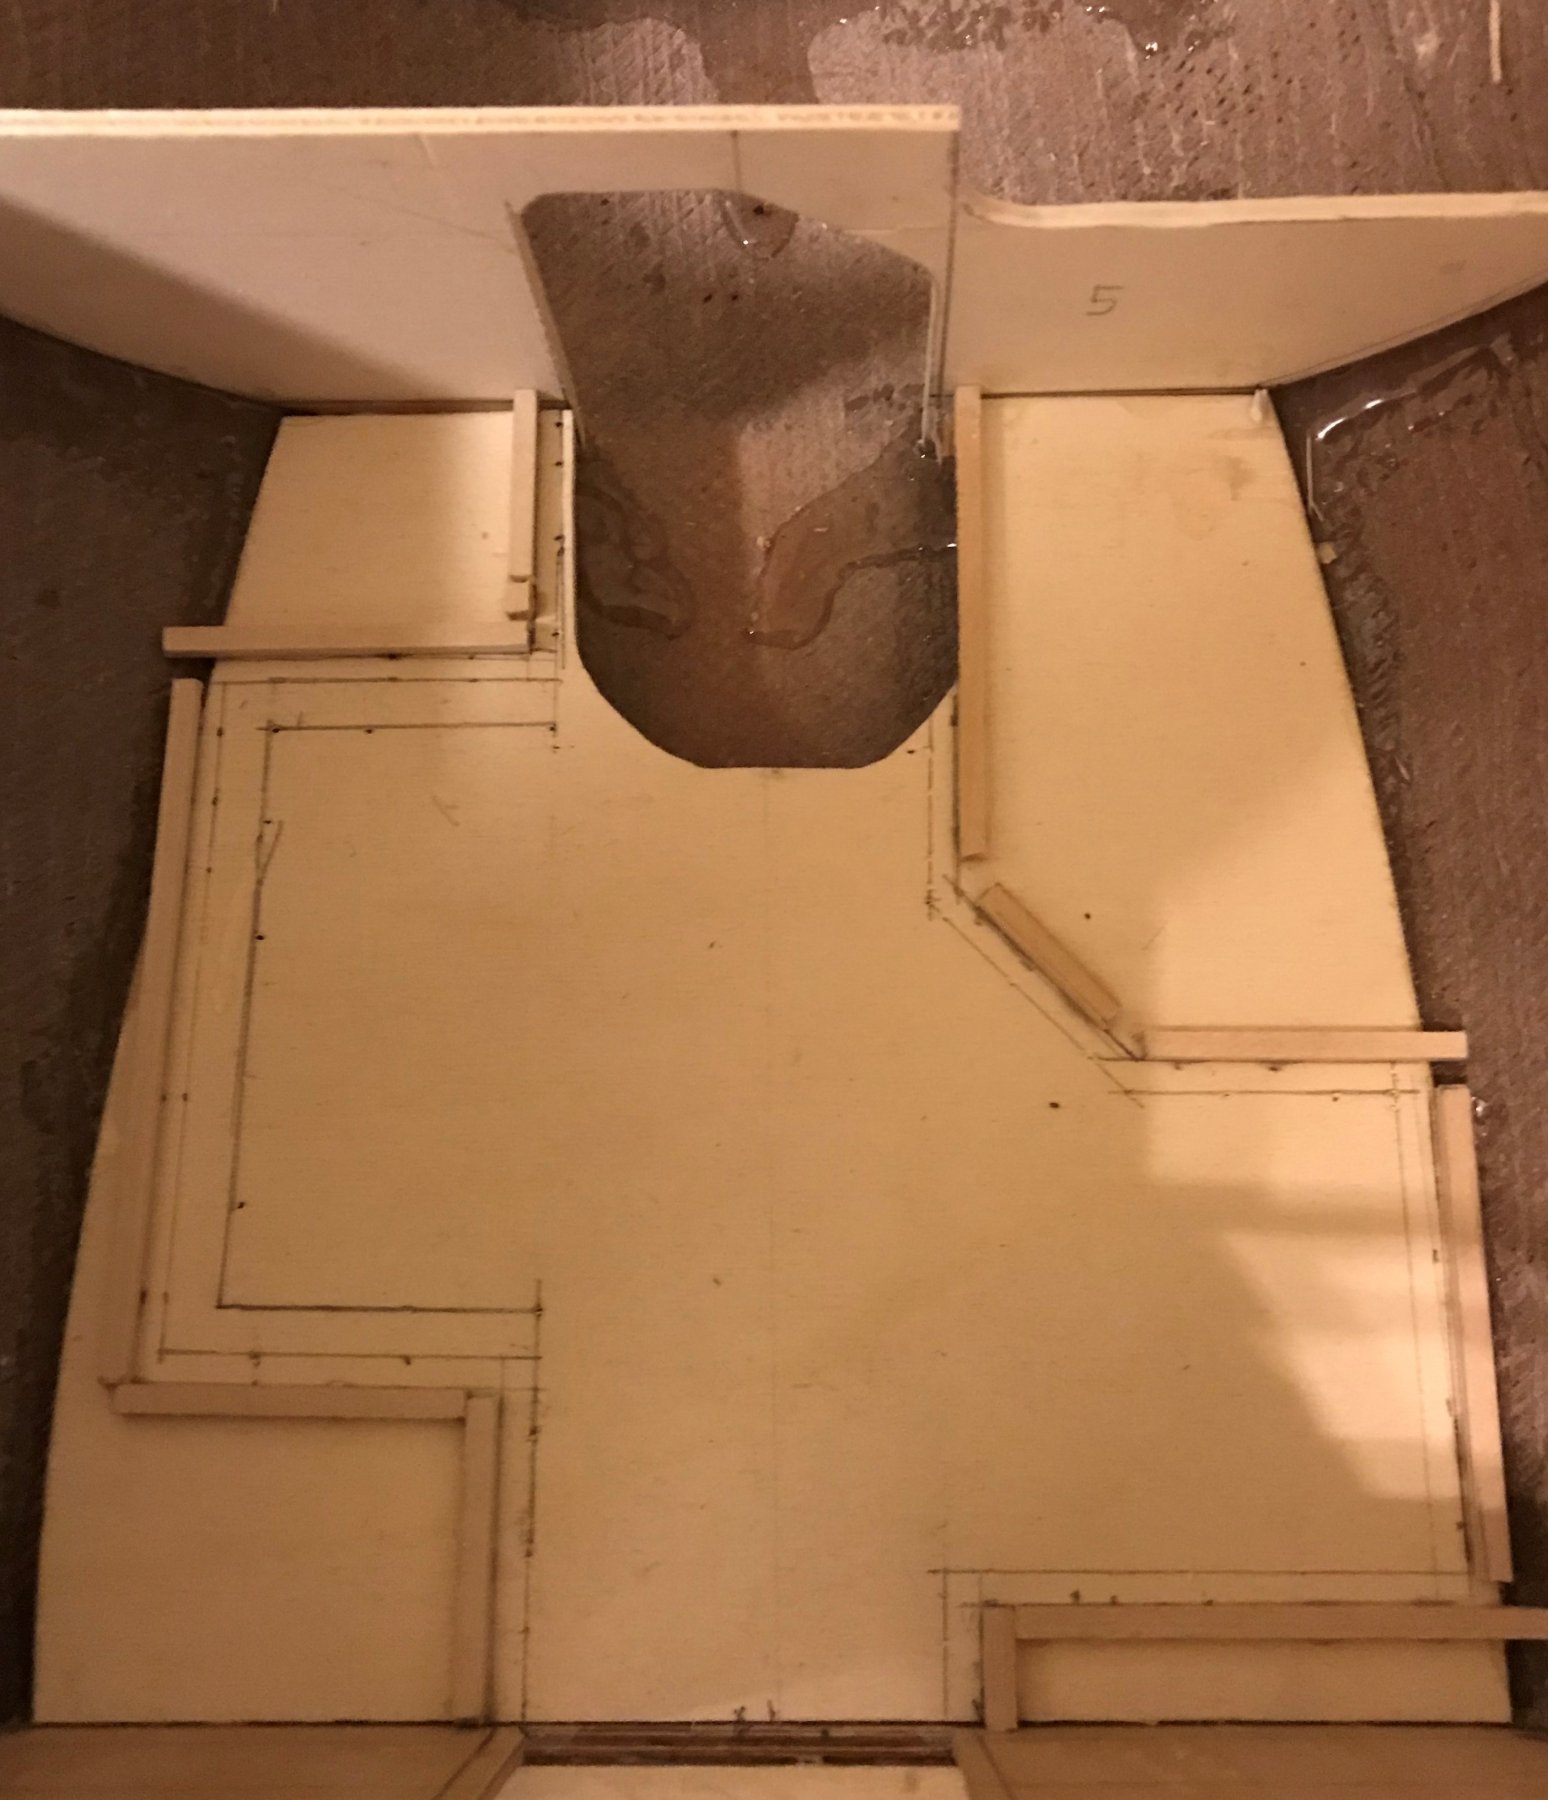
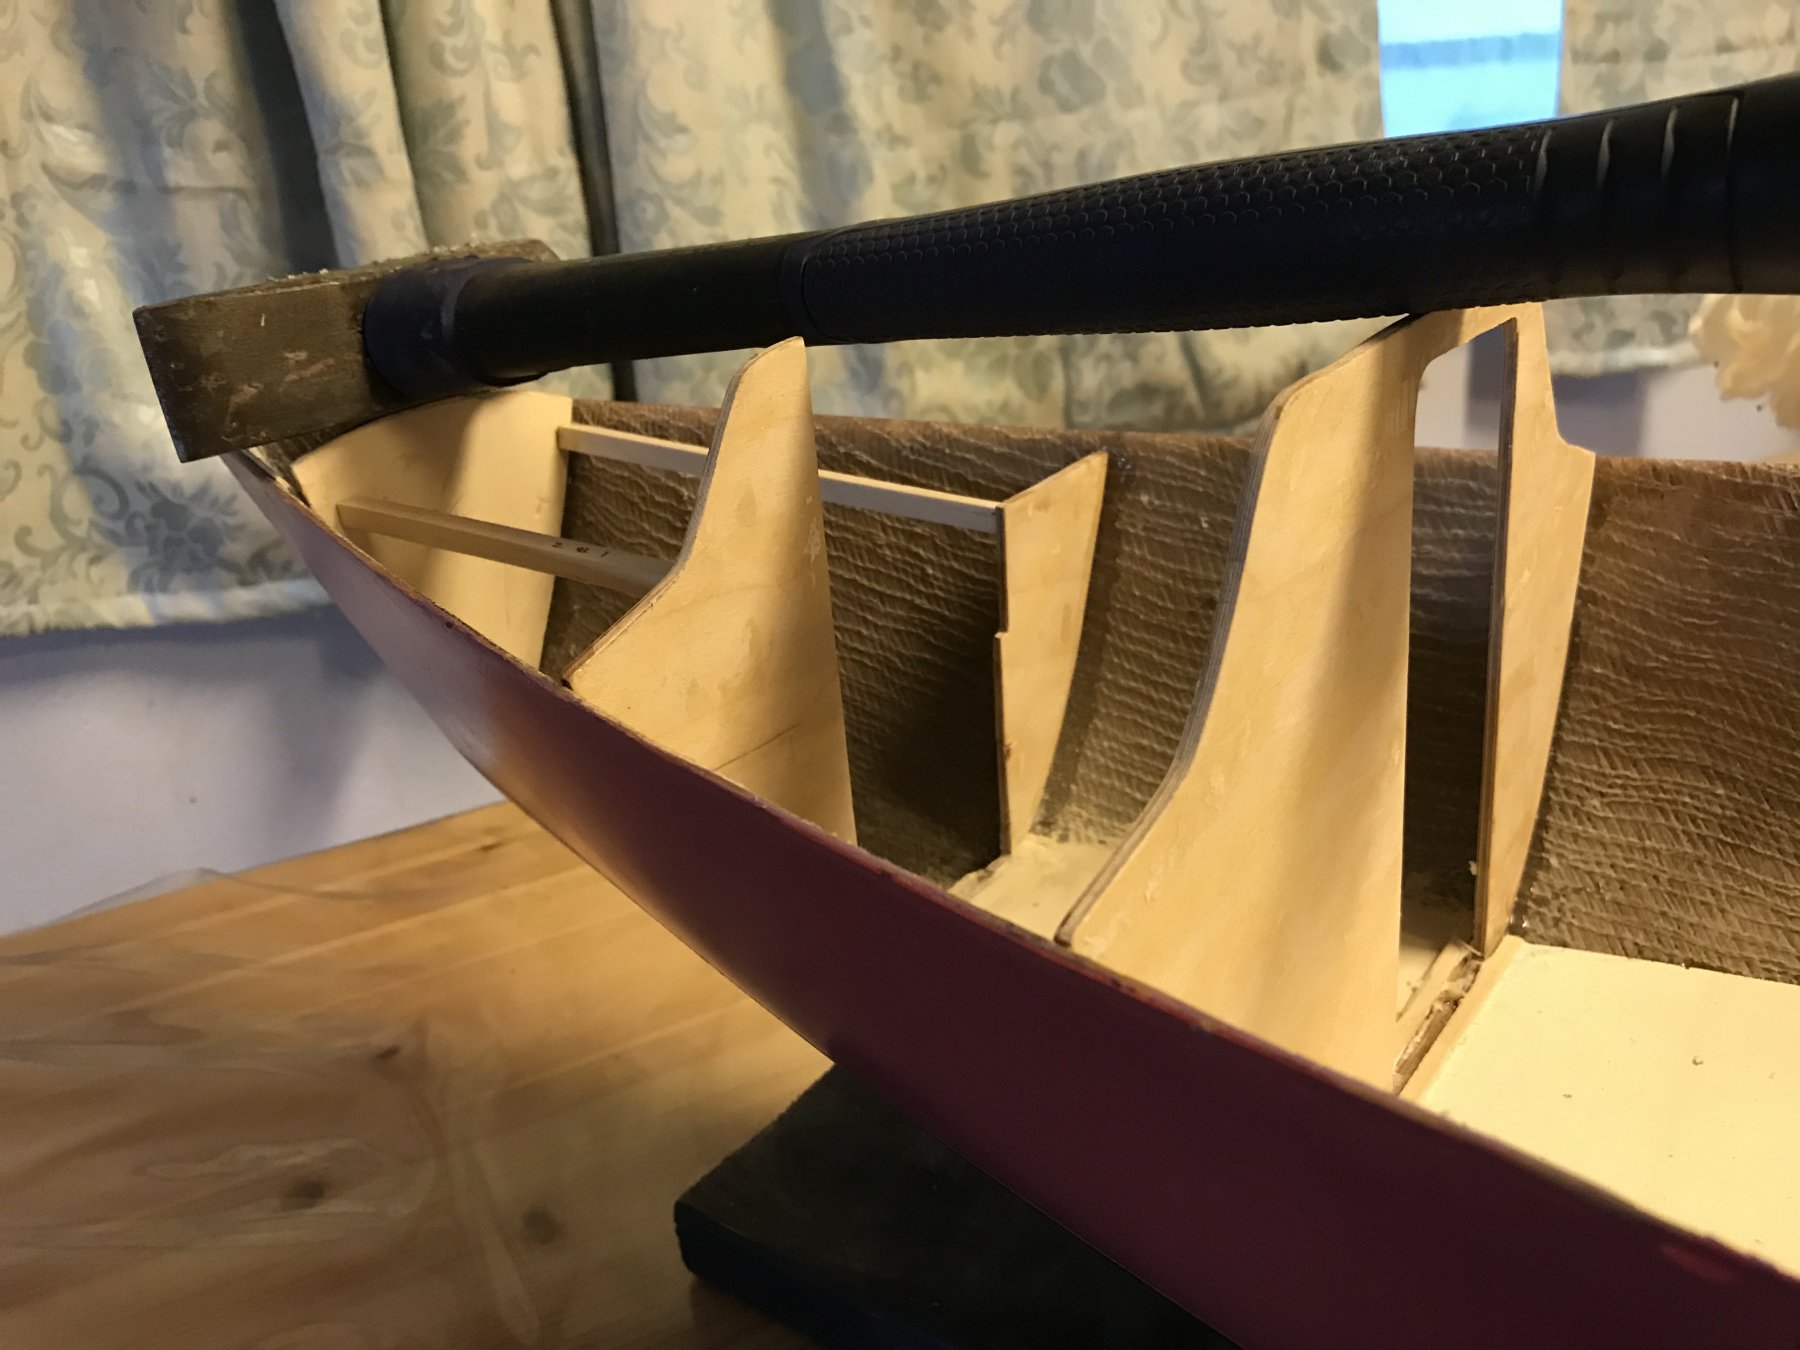
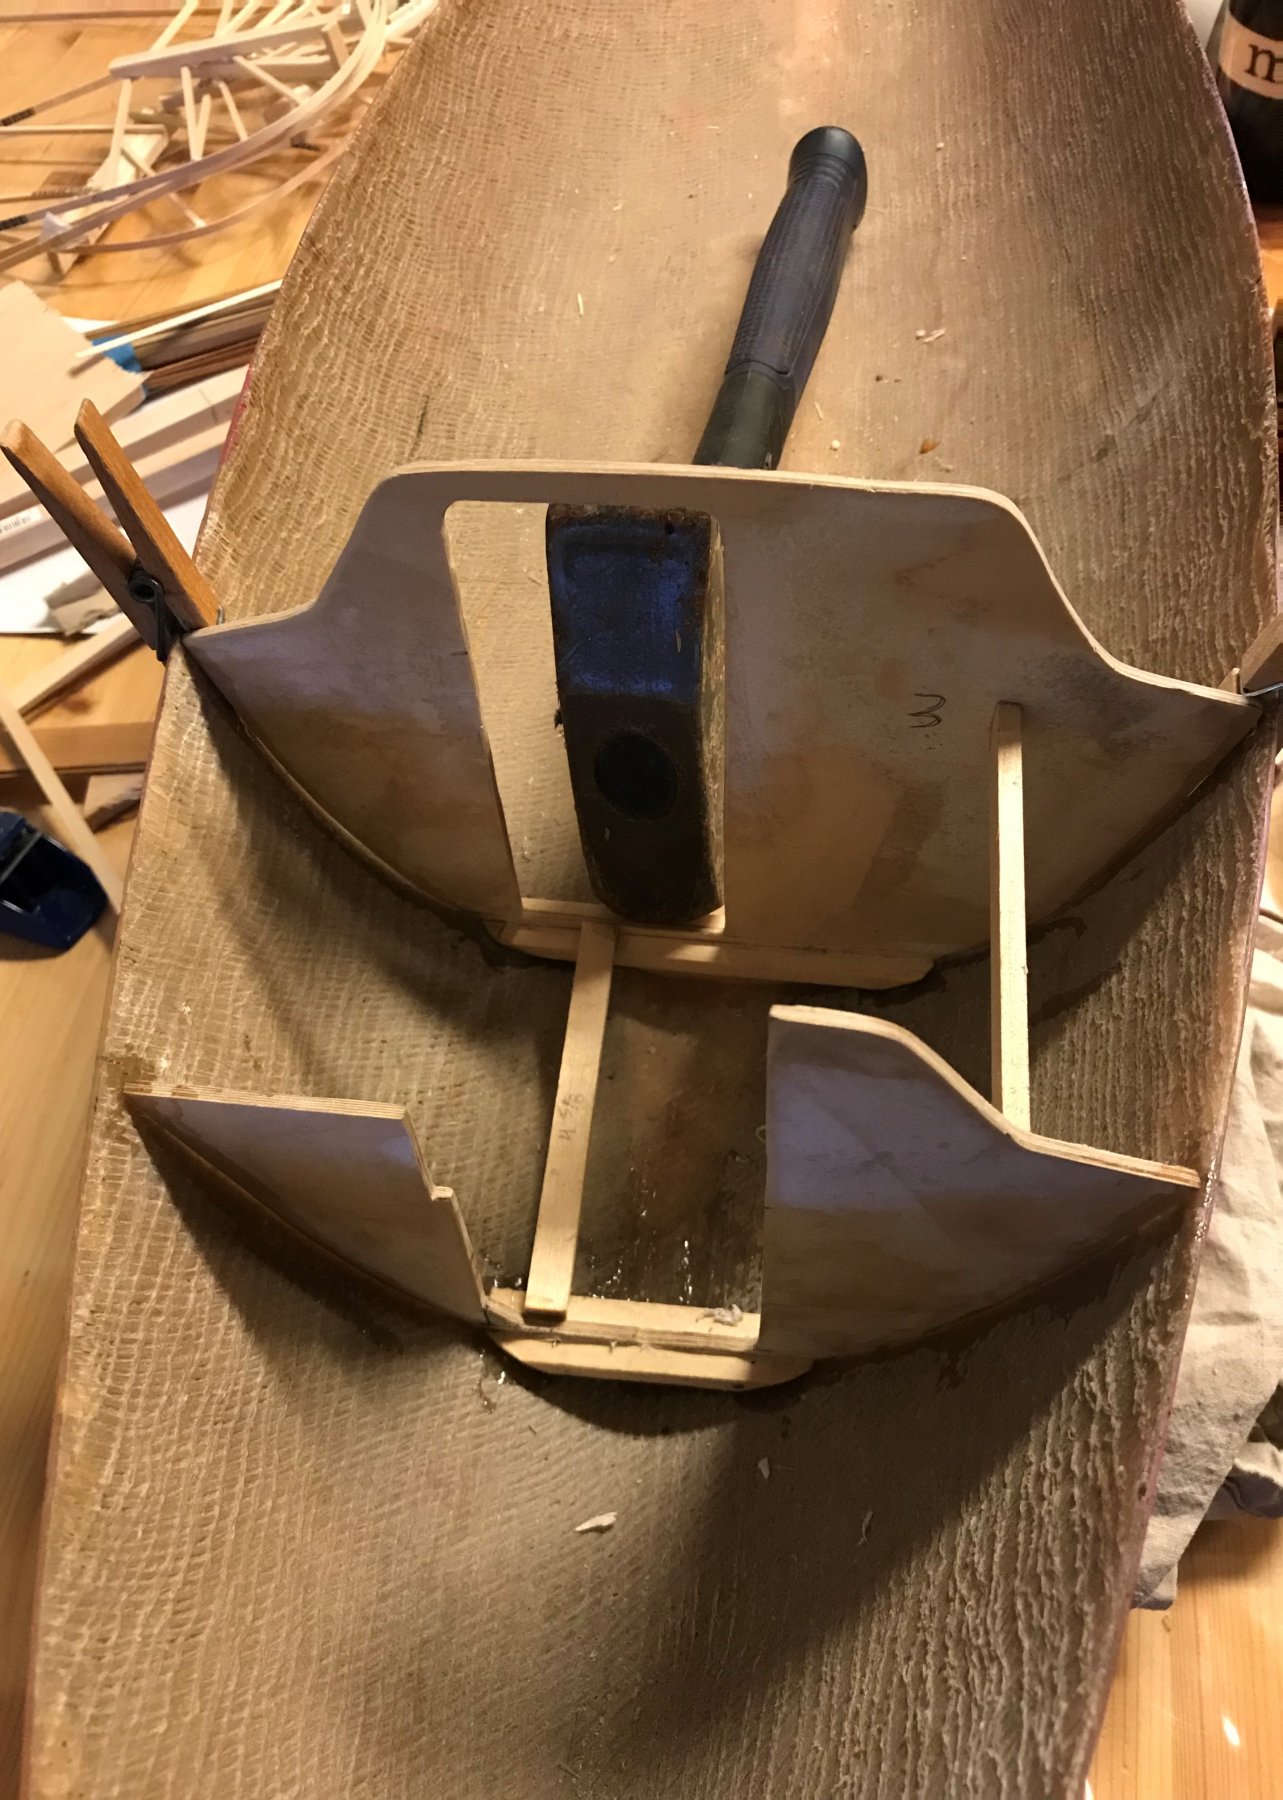
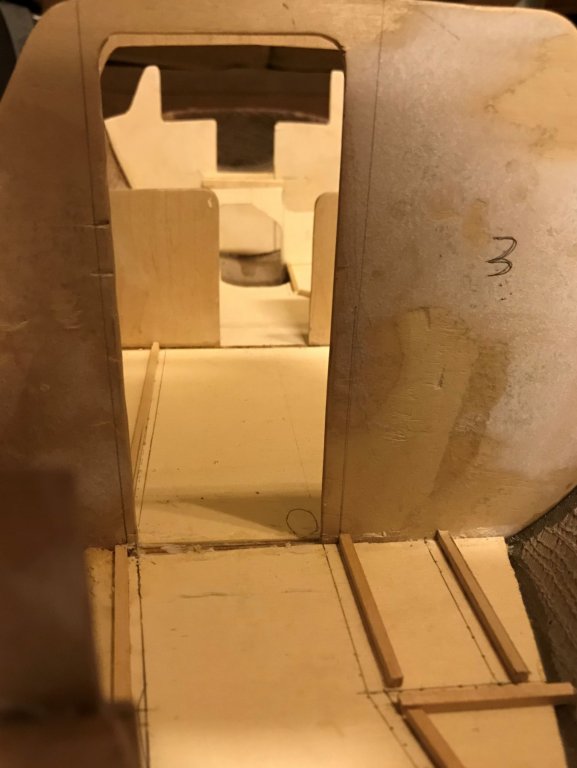
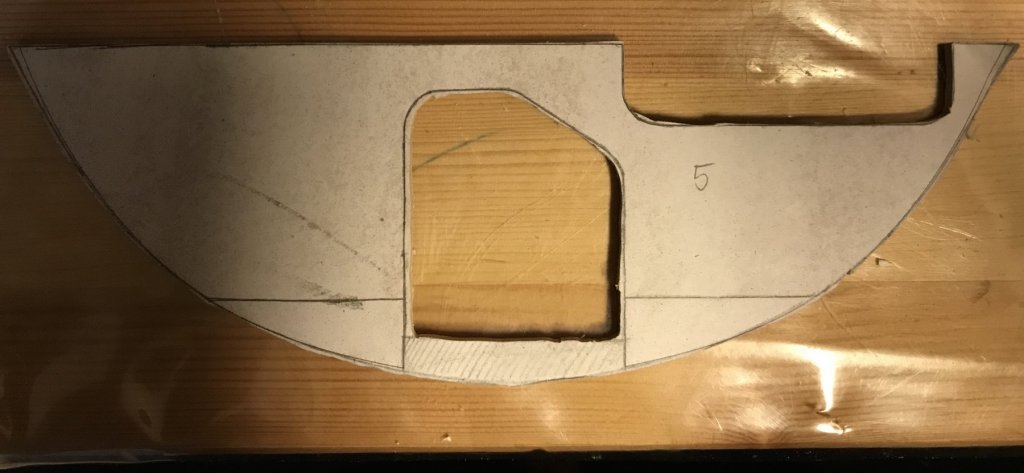
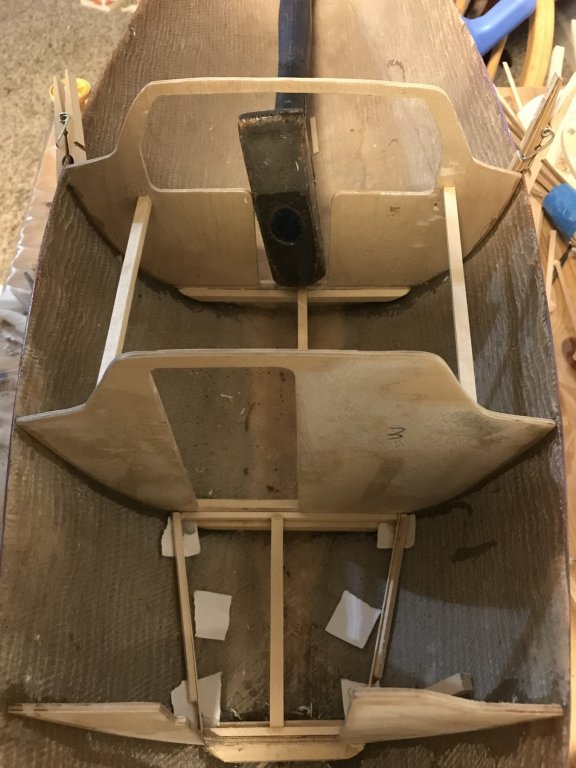
BULKHEAD 5 RE-DO/ AFT INTERIOR DECK Small update. Last night I removed Bulhead 5, and even though it came out well, I decided to re-trace and re-cut it, since it fit so poorly. I also considered something Popeye had said about setting decks going along, and decided I had enough information to template the section of deck that needed to fit between Bulkhead 4 and Bulkhead 5. So I cut that, too. And, yeah - it helped a lot in setting the bulkhead. Now, rather than fiddling with bracing that kept falling down and shifting all over the place, the deck fit in beautifully, and I could throw my small square up against the bulkhead to make sure it was plumb. Or, at lease square to the deck. All things considered, as much work as it is to build a hull, I can't wait to do it if only because I'll know what all the shapes are! Then I can set the deck and square off of it, like I wanted to here in the first place... Anyway, here's a picture from last night, with the deck and bulkhead just fitted in place. And, I did make sure the bulkhead was level (or at least parallel to the other bulkheads) this time. I actually glued them in this morning, after trimming out the deck landing on Bulkhead 5 where the deck is open. Bulkhead 5 and Aft Interior Deck - Dry Fit Check
-
I realize I'm late to the party, but what a cool ship! Looking forward to seeing the continuation. I love the stoves, too - really neat!
-
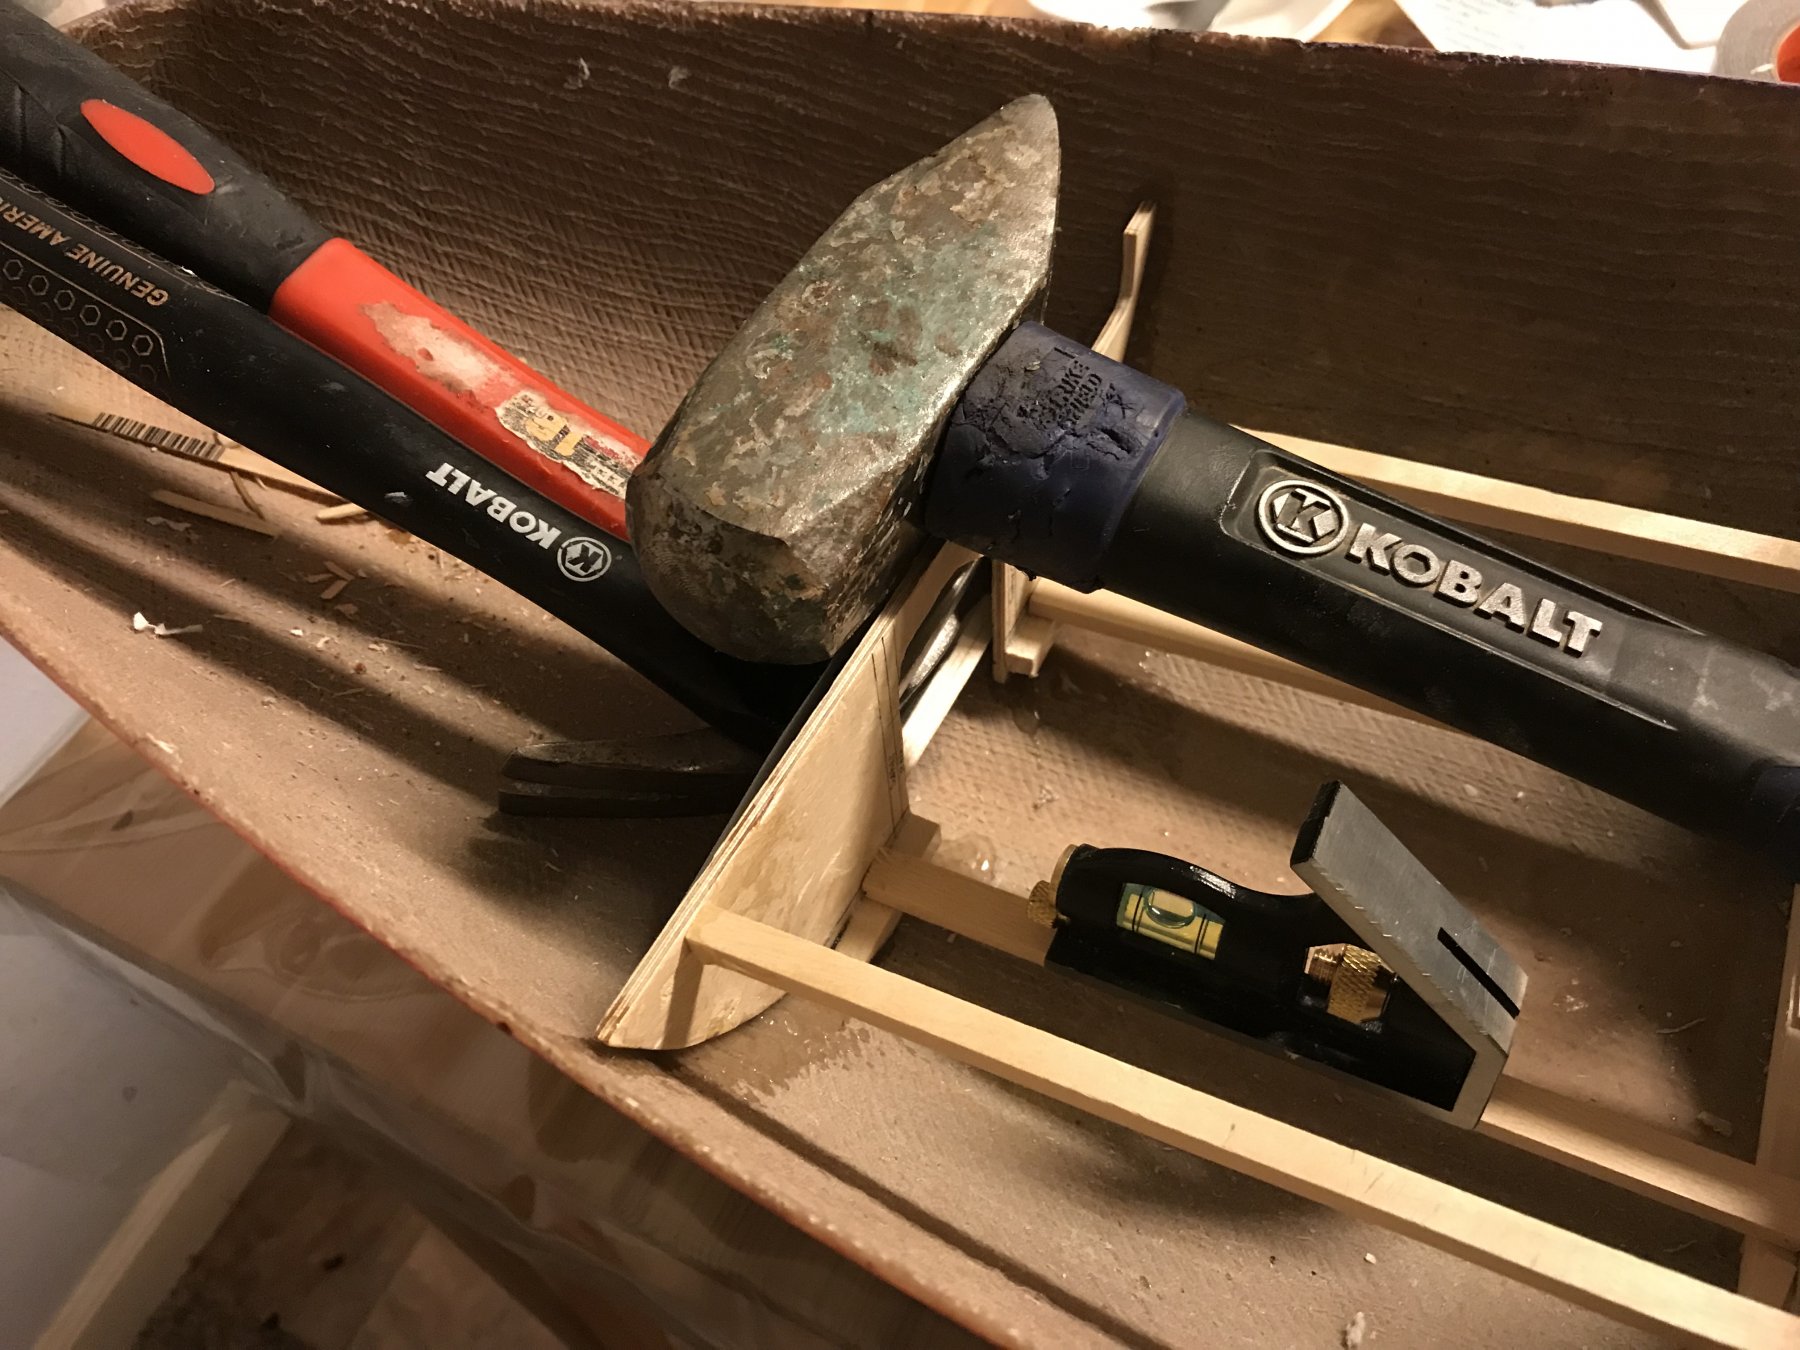
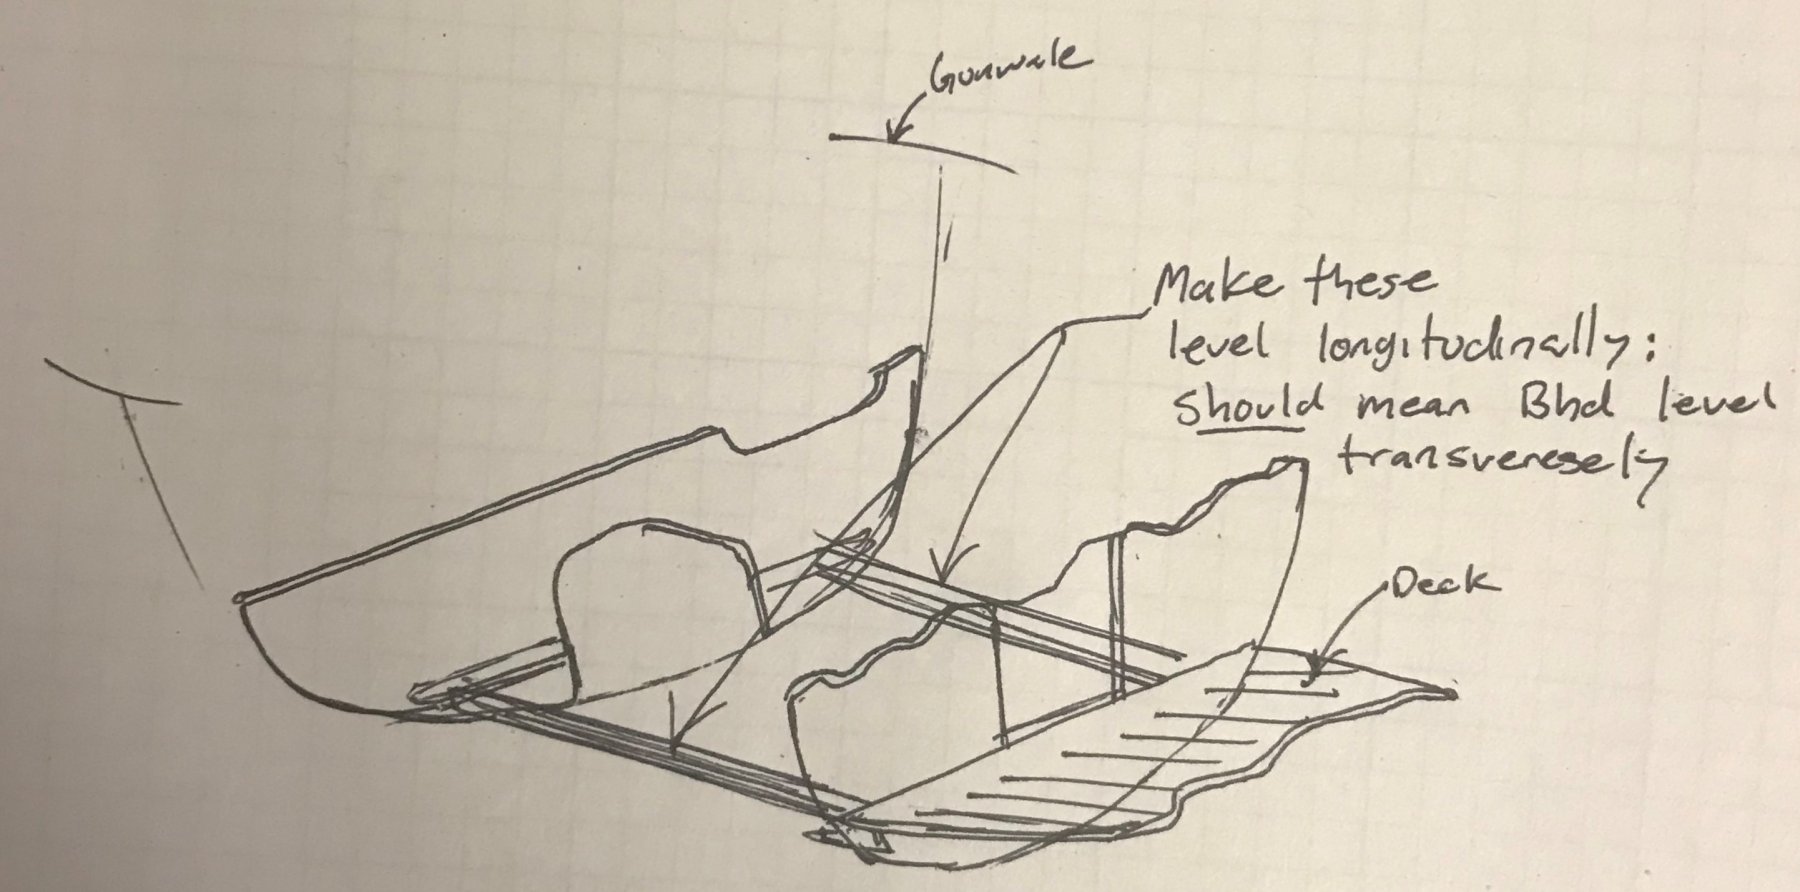
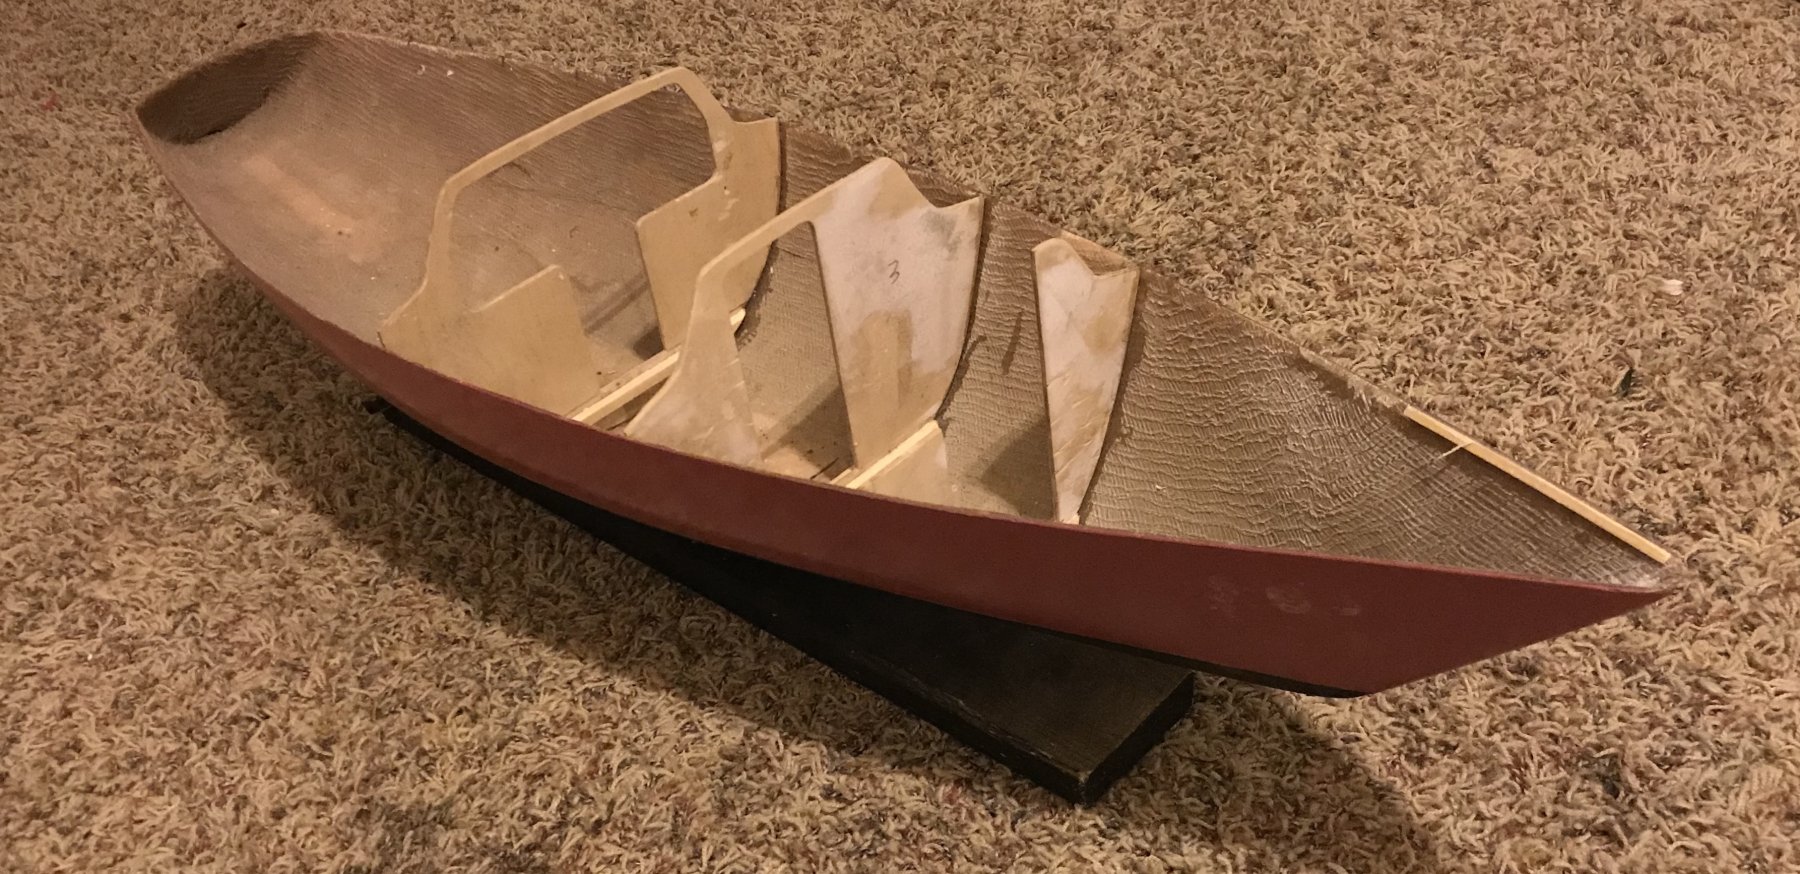
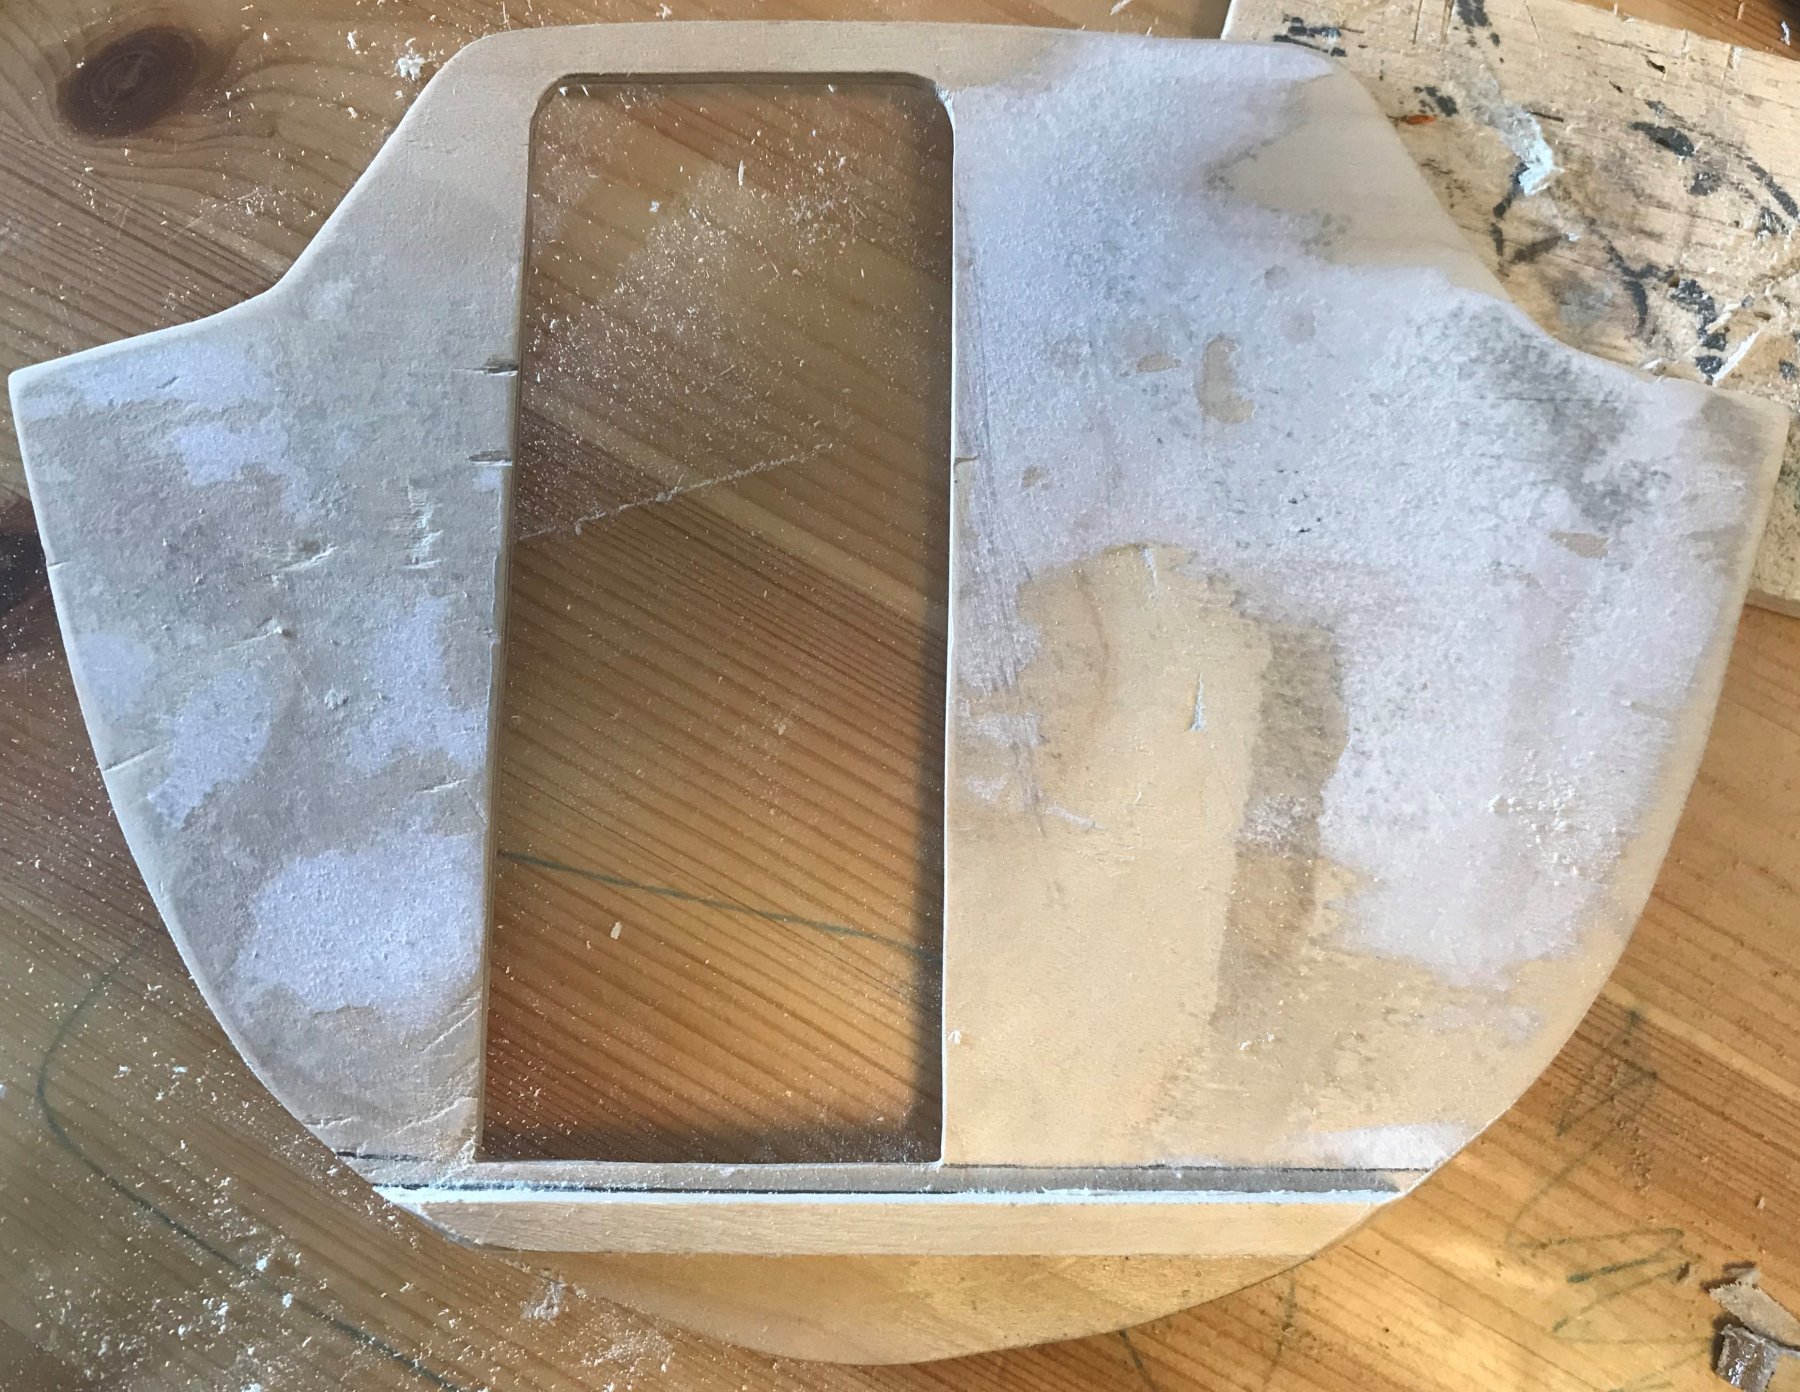
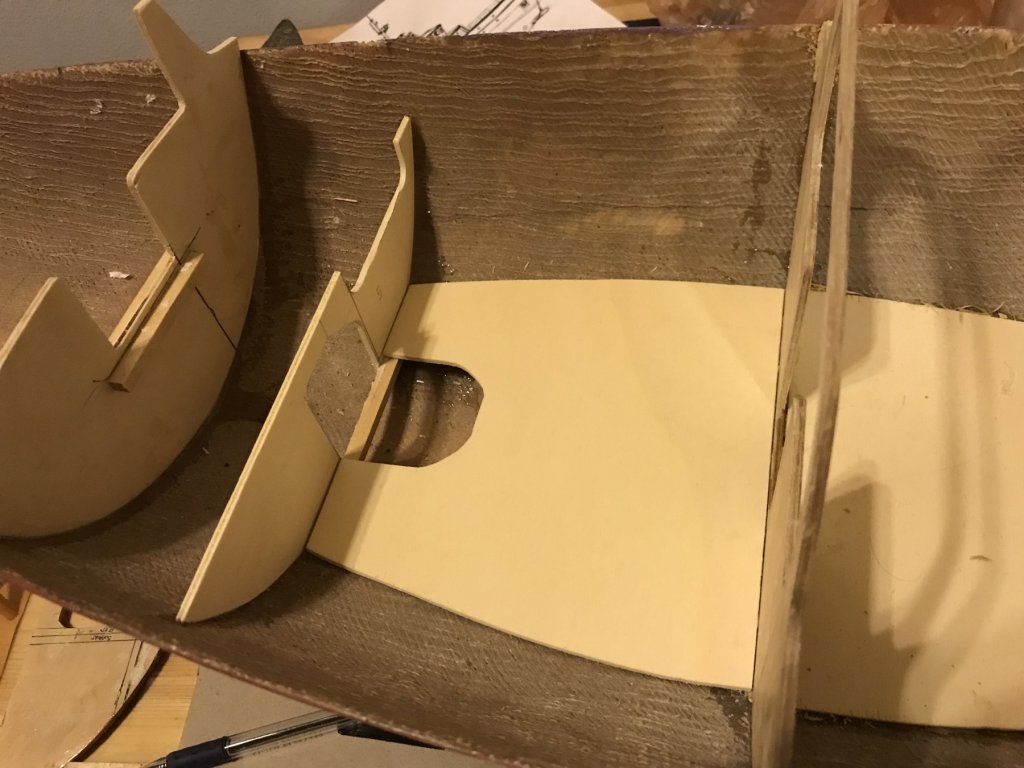
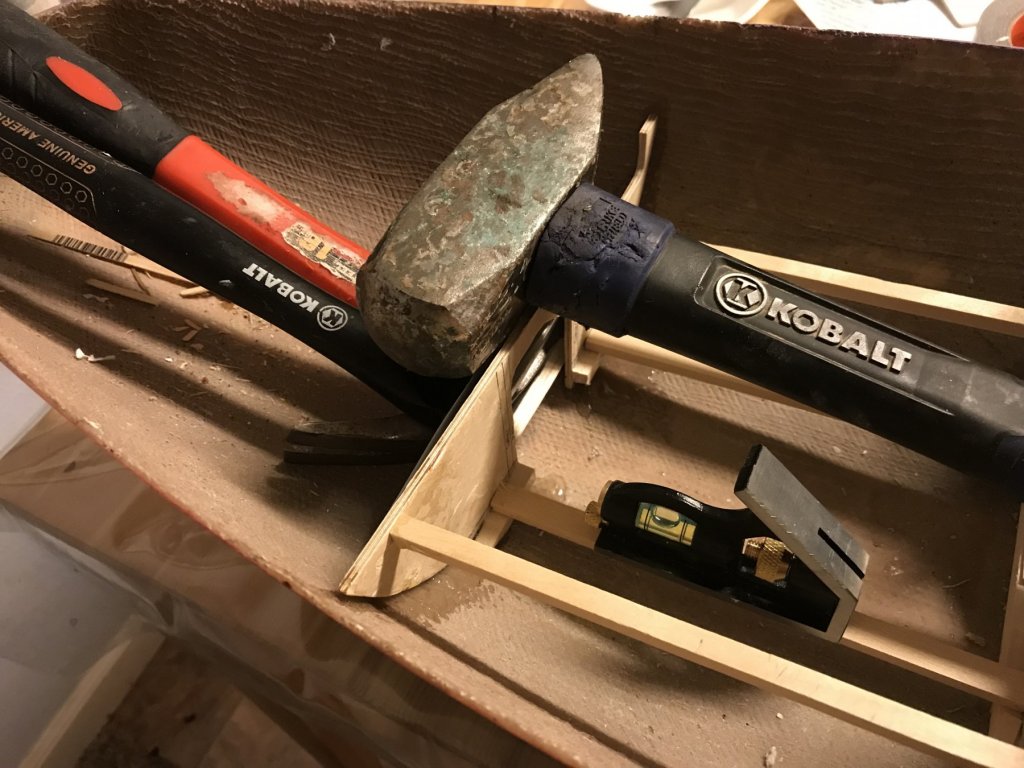
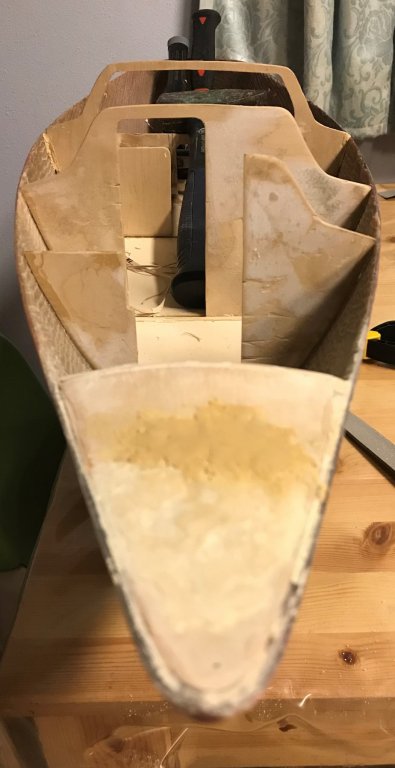
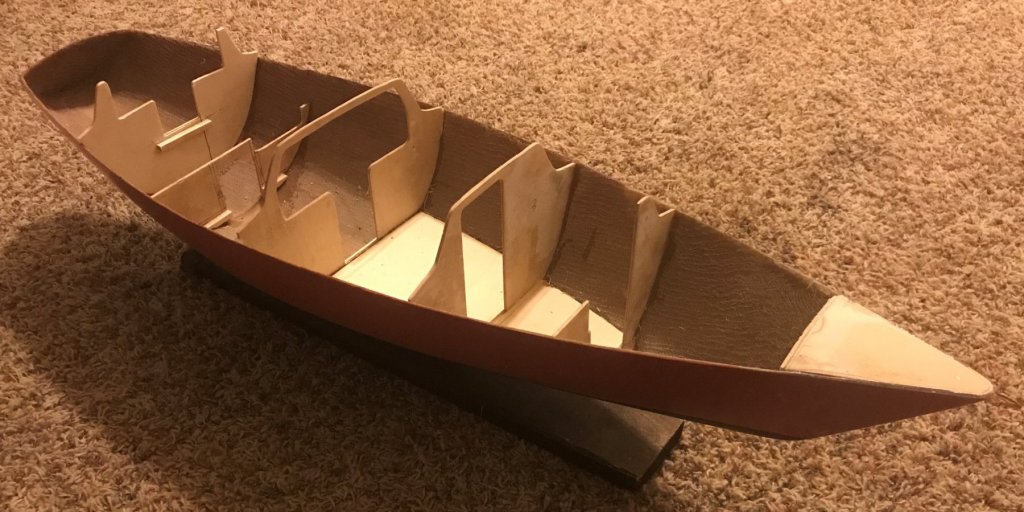
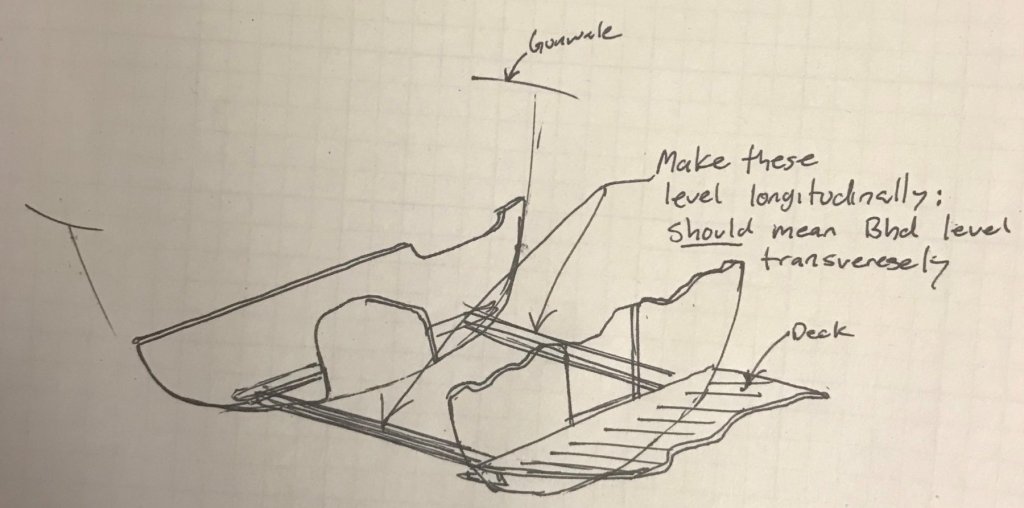
MORE BULKHEADS AND DECKS I had a very productive weekend with the boat. I installed three bulkheads, and the foredeck. I'll have to cut out and re-install one of the bulkheads , though - more on that in a bit. First, the forward bulkhead (no. 1). I ended up re-cutting this one; my original just didn't fit. Like at all. So I re-checked my carved template, and retraced it (without second guessing myself this time.) I made the bulkhead a bit taller than the sheer line, since my template didn't go all the way up to the gunwale. Then I used a strip of 3/16 inch x 1/32 inch basswood to mock in camber, used it to put a pencil line on the bulkhead, and the cut the top to match the camber. Finally, a bit of filing and sanding, and using braces to set the distance from Bulkhead 2 to shove it in place: Forward Bulkhead Installation Next, I decided to get the foredeck on. I used 1/32-inch ... something that I had lying around (basswood maybe? I forget...). But I needed to make sure it had the camber, and I needed a gluing surface. So, I carved a piece of balsa to the shape of the camber, and trimmed the sides to the hull, and set it in a deck-thickness (or so) down from the top of the bulkhead. Then I used some 1/32 inch and 1/16 inch strips laid up along the hull set down from the gunwale a deck thickness to form a 3/32" gluing surface. Finally, I carved a small chunk to get a good glue joint at the stem. Two pictures below - first, in process, then, finished. Installing Foredeck Landing I cut the foredeck and put it in place, then trimmed and filed and sanded down the top of the bulkhead to be flush with the deck. However, using my huge mallet to give the pressure required for the glue to set resulted in my thin 1/32" wood being 'dented' - there was a large depression in the middle of the deck. So I spent a bit of time over a day or two puttying and sanding until I had a smooth, continuously cambered deck. A picture in-process is below: Foredeck Filling and Fairing in Process In the background of the picture, Bulkhead 5 is being set. This is the one I'll have to replace. It's a short bulkhead, since the top part is angled forward (forming the back of the 'cabin'. As such, there was no way to line up the gunwale, and it was hard to 'eyeball' the level-ness. So I tried to level it by making sure it was level longitudinally to the next bulkhead forward at deck height port and starboard. I realize that's a confusing sentence. Here's a sketch, followed by a picture of the process: Setting Bulkhead 5 Of course, the use of the words 'tried to' and 'should' are great foreshadowing that it didn't work. Once I set in Bulkhead 6, for which I was able to use the gunwale and my eye-gauge to check level, the un-levelness of Bulkhead 5 became glaringly apparent - it is totally wonky compared between 4 and 6. So, I'll cut it out and re set it. Fortunately (?) it fit so poorly there really isn't much glue holding it in at all, which should make it easy to get out! Finally - here are some shots of the current state of the boat after the flurry of work this weekend. Bulkhead 6 is in place, and the foredeck is filled and sanded smooth. (You can kind of see the crookedness of Bulkhead 5 in the shot from the stern...) Current State of Model


-
Looks great, Patrick! Very impressive! I think you’ve captured the essence of that hull wonderfully.
-
Yes, I’ve already been thinking about using some type of trim or molding to define the perimeter of the walking-flat sections of deck (i.e., the part of the deck that’s visible once everything is built in). It would provide a transition from the horizontal of the deck to the vertical of the furniture or bulkheads. I’ve printed a bunch of model-scale plan, profile, and section cuts of the various spaces, and I’ve started to make notes on my ‘production design’ details. So that stuff should start showing up on the build table soon! Of course, I inevitably need more supplies. Just another excuse to run to the hobby store....
-
I thoroughly enjoyed following along - it's exactly the kind of thing I like, designing and planning without something to 'measure' against (no real boat). It's a blast to see it unfold!
-
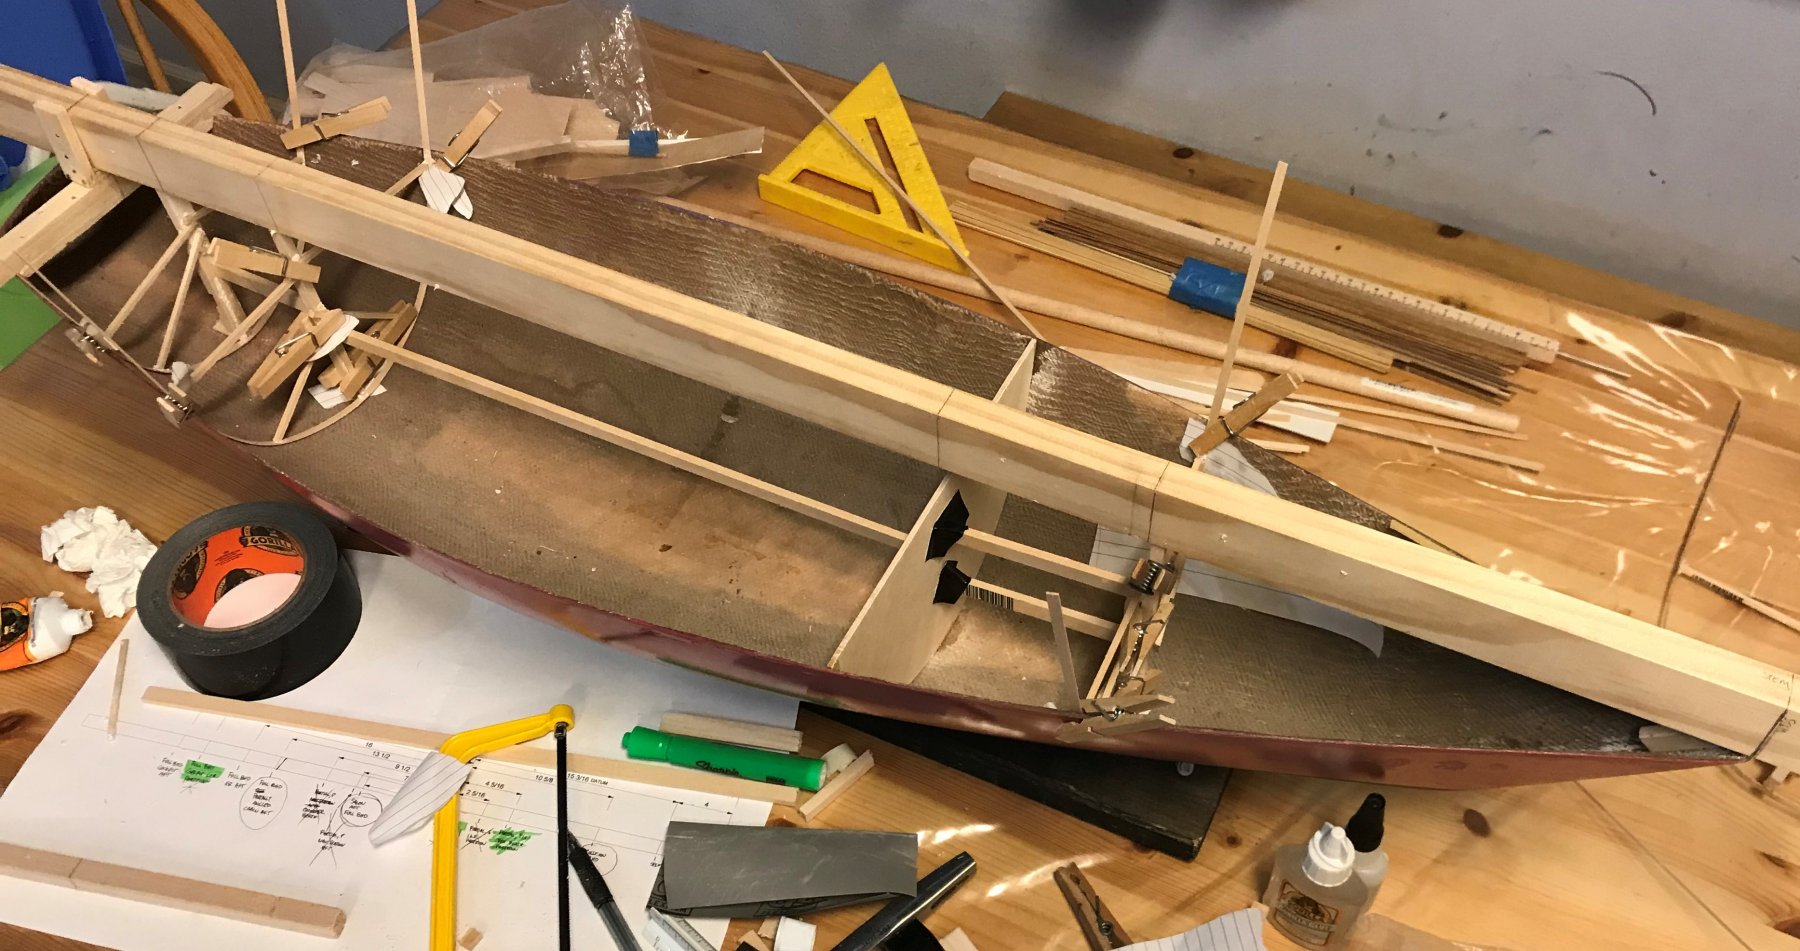
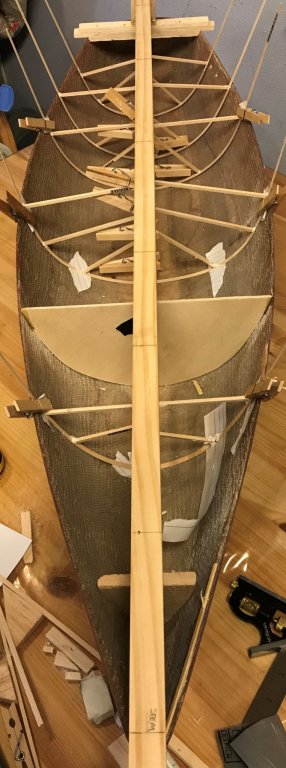
INSTALLING DECKS - PART 1 Last night I cut and installed the forward section of deck, and then templated, cut, and installed the second section of deck. I changed my method for the template for the second section - rather than fuss with glue, and wood which didn't want to stay where I put it, and also risk gluing the template to the boat, I decided to use a cereal box and rough in the shape, until it was basically right - similar to what I did in foam for the whole deck a while ago. First and Second Deck Sections in Place I'm not worried about gaps between the deck and the hull since they'll be hidden behind the furniture (for the most part). The one spot so far where the intersection may be visible, I just filled with wood filler. Everything will eventually be planked over, too, so that adds another means of hiding imperfection in these pieces. I did find that the deck level at bulkheads 2 and 4 are higher than 3, so I'll need to add some filler/putty to make it all level. It's not too bad, but I don't want it to cause problems as I try to start fitting in the furnishings. I'll probably get the next bulkhead aft installed, and the third section of deck, before starting that process.
-
I'm loving all the little creative details - it really is a 'fun' boat, haha!
-
Well, the original plan was to do a continuous deck, and add the bulkheads above, but I couldn’t convince myself of a good way to get the shape of the deck, whereas making templates of the bulkheads seemed more straightforward, and with the bulkheads placed, I could template and install the deck in sections. If I was confident of the shape of the deck from the beginning, it would have certainly been easier to set that in level, and square and set everything off of it. In hindsight, it would have been a little better to do a bulkhead further aft, one that I could wedge against the hull. Then I could have braced the middle one from each side. But, like you said - fits in odd but ends well
-
Thanks Patrick! Yeah, I feel the same way - the arrangement is nearly materializing in front of me as the bulkheads start going in. It's really exciting, after so much time trying to figure out how to get from my mental picture to reality.
-
Whew! Looking at how fast she was coming together, I feared I'd missed the whole saga - glad to see I can follow along with the rest. Looks like a unique project - glad to see you're able to bring some of it back for us 'newbies'
-
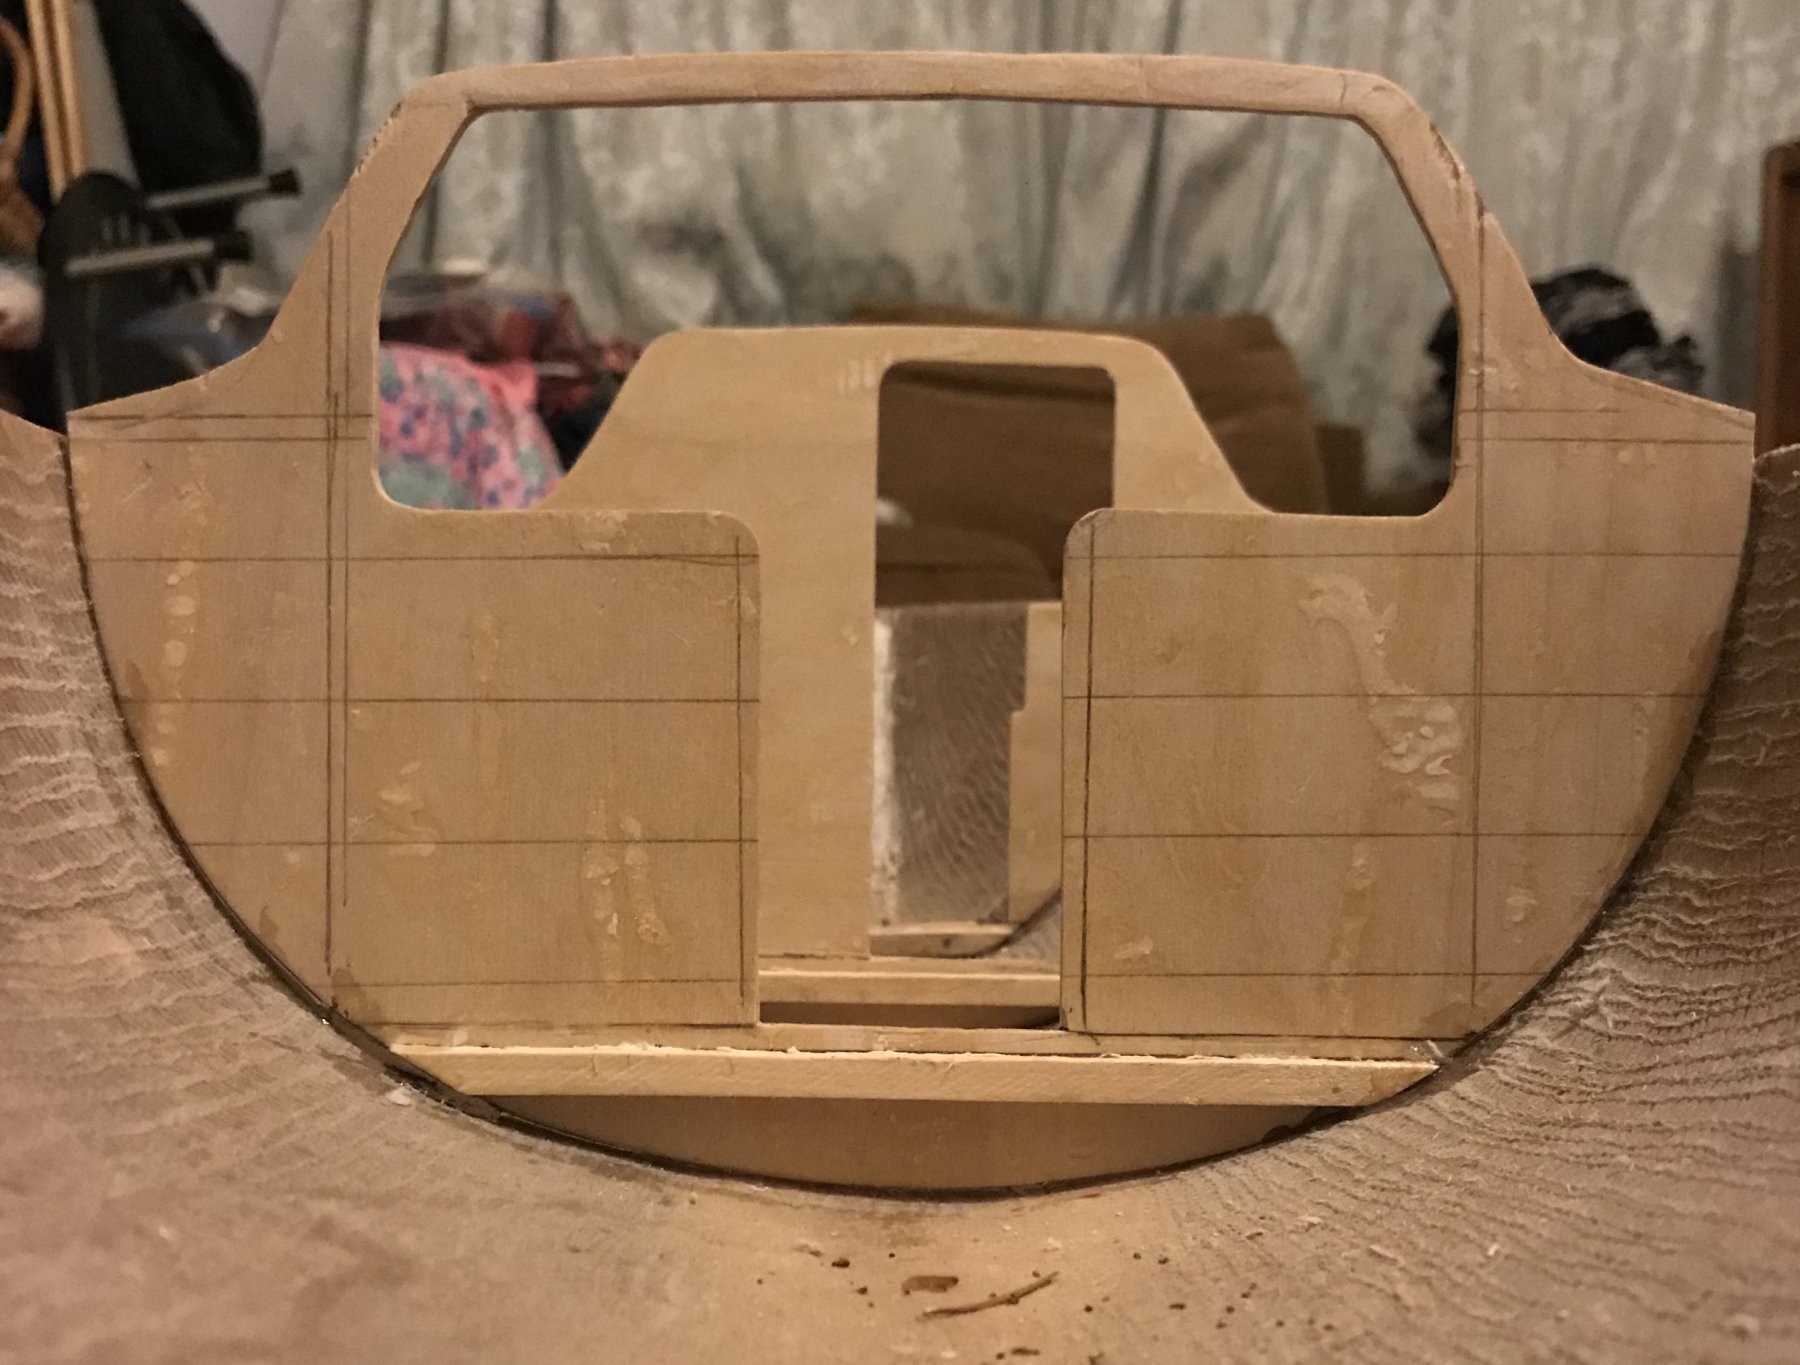
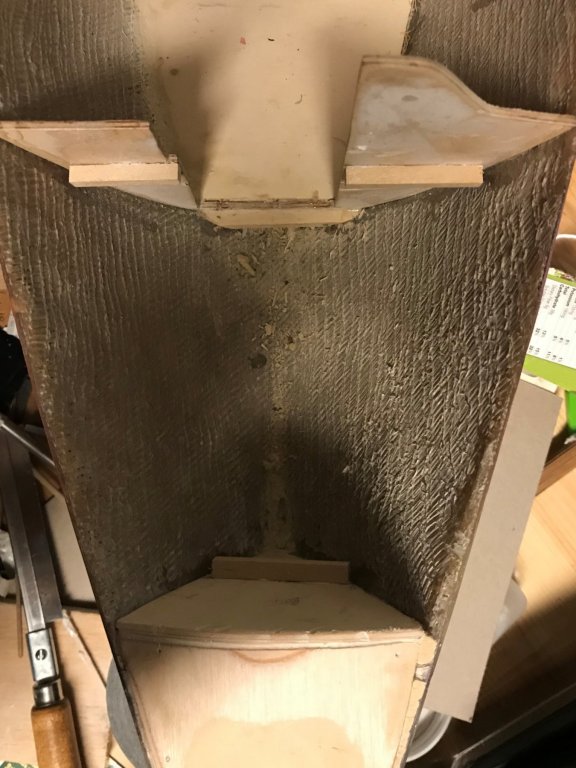
FITTING BULKHEADS - PART 2 I fit Bulkhead 4 into the hull last night. It involved much frustration, since (1) it didn't fit in quite right, because I think I had some things misaligned when I traced the template, and (2) this section of hull doesn't have a lot of shape longitudinally, so the darn thing wanted to slide allover the place. There was nothing to wedge it into. But, I did get it in and glued up. Installing Bulkhead 4 - Top: Profile, Bottom Left: Bow, Looking Aft, Bottom Right: Stern, Looking Forward With Bulkhead 4 in place, I turned my attention to two other tasks. First, I laid out a template for the section of deck between bulkheads 2 and 3. My approach is similar to what I did with the bulkheads - thin strips along the hull supported by transverse braces. The second thing I did was start prepping Bulkhead 5, which can be seen test-fit in the boat in a couple of the pictures above. And - for the sake of intellectual integrity, here's a picture of the rough-cut bulkhead before getting cleaned up: Bulkhead 5 Rough-Cut So there's a bit of work to be done. I got most of the outside (well, where it touches the shell) cleaned up and started on the inside. (Just as a note: this bulkhead is short because the top section of it has an angle forward which would form the forward end of the cockpit/aft end of the 'house'. I'm going to wait to do that piece until I've set in some of the longitudinal structure which defines the angle.) Finally, here are some pictures of the overall boat so-far, away from the work station:


-
Thanks Patrick, but there was a bit of filing and sanding that had to happen before they were put in. I didn't take close ups of the raw-cut pieces for a reason... And, we'll see how smooth the sailing is. But it does feel that all the legwork up front (and the many hours of just pondering) are starting to bear fruit.
-
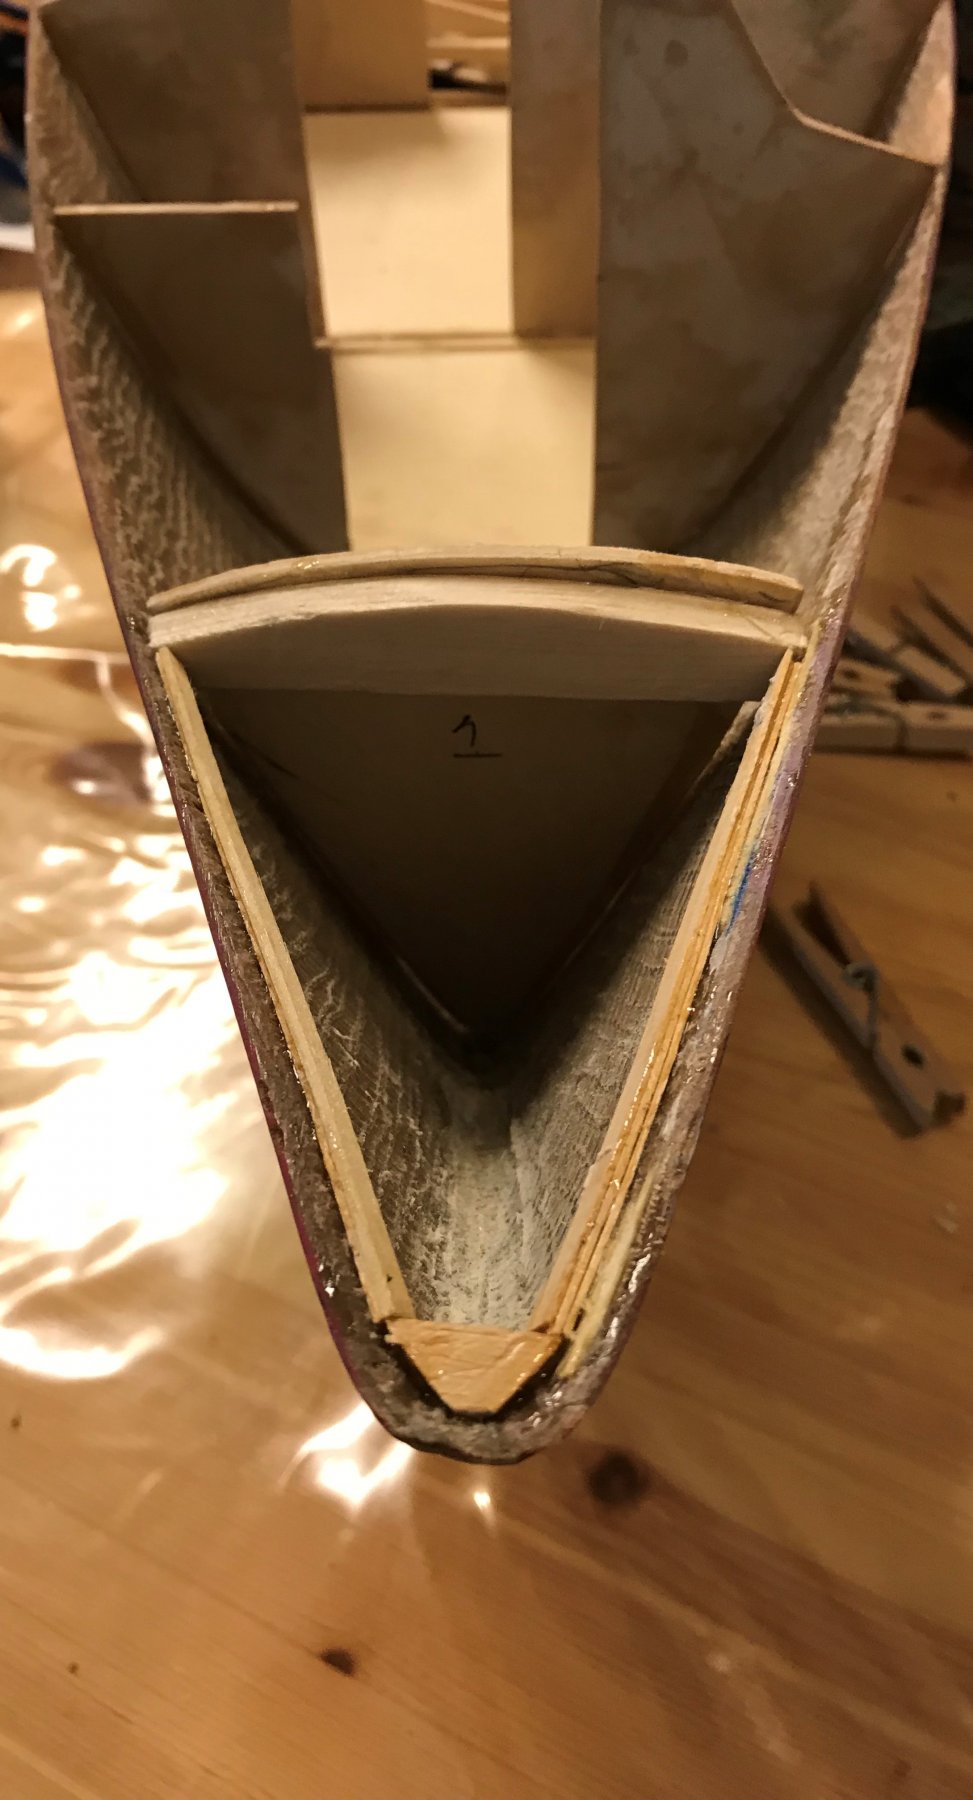
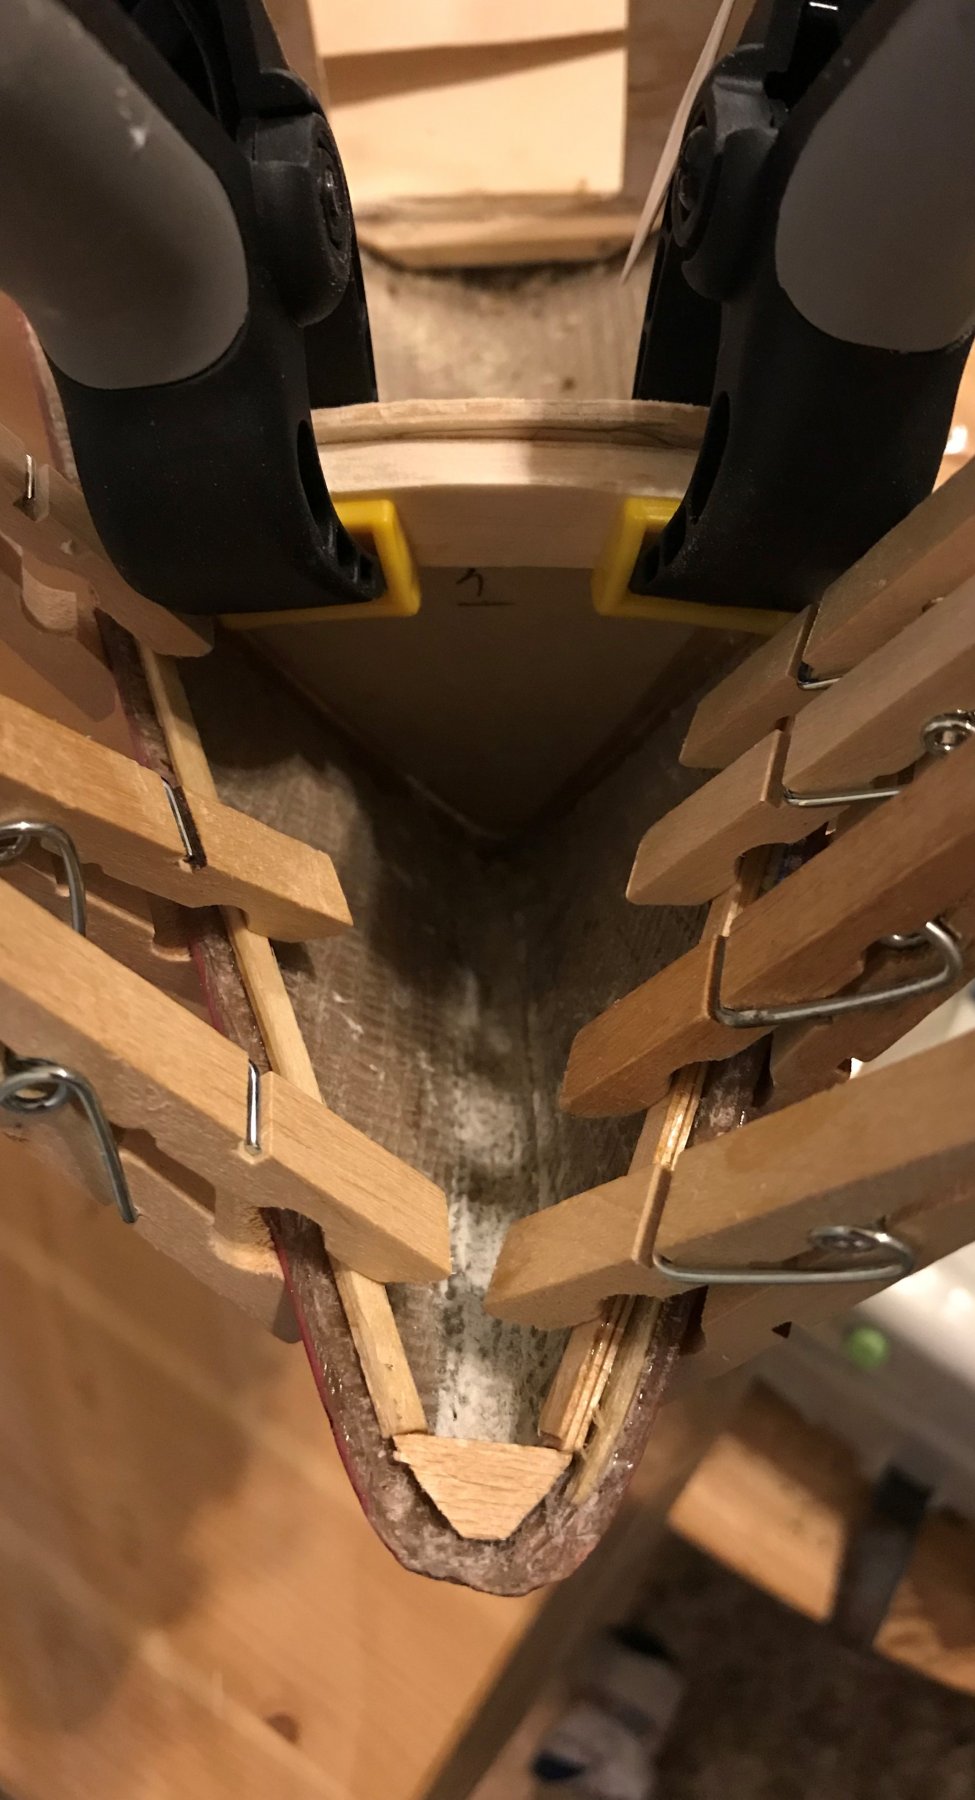
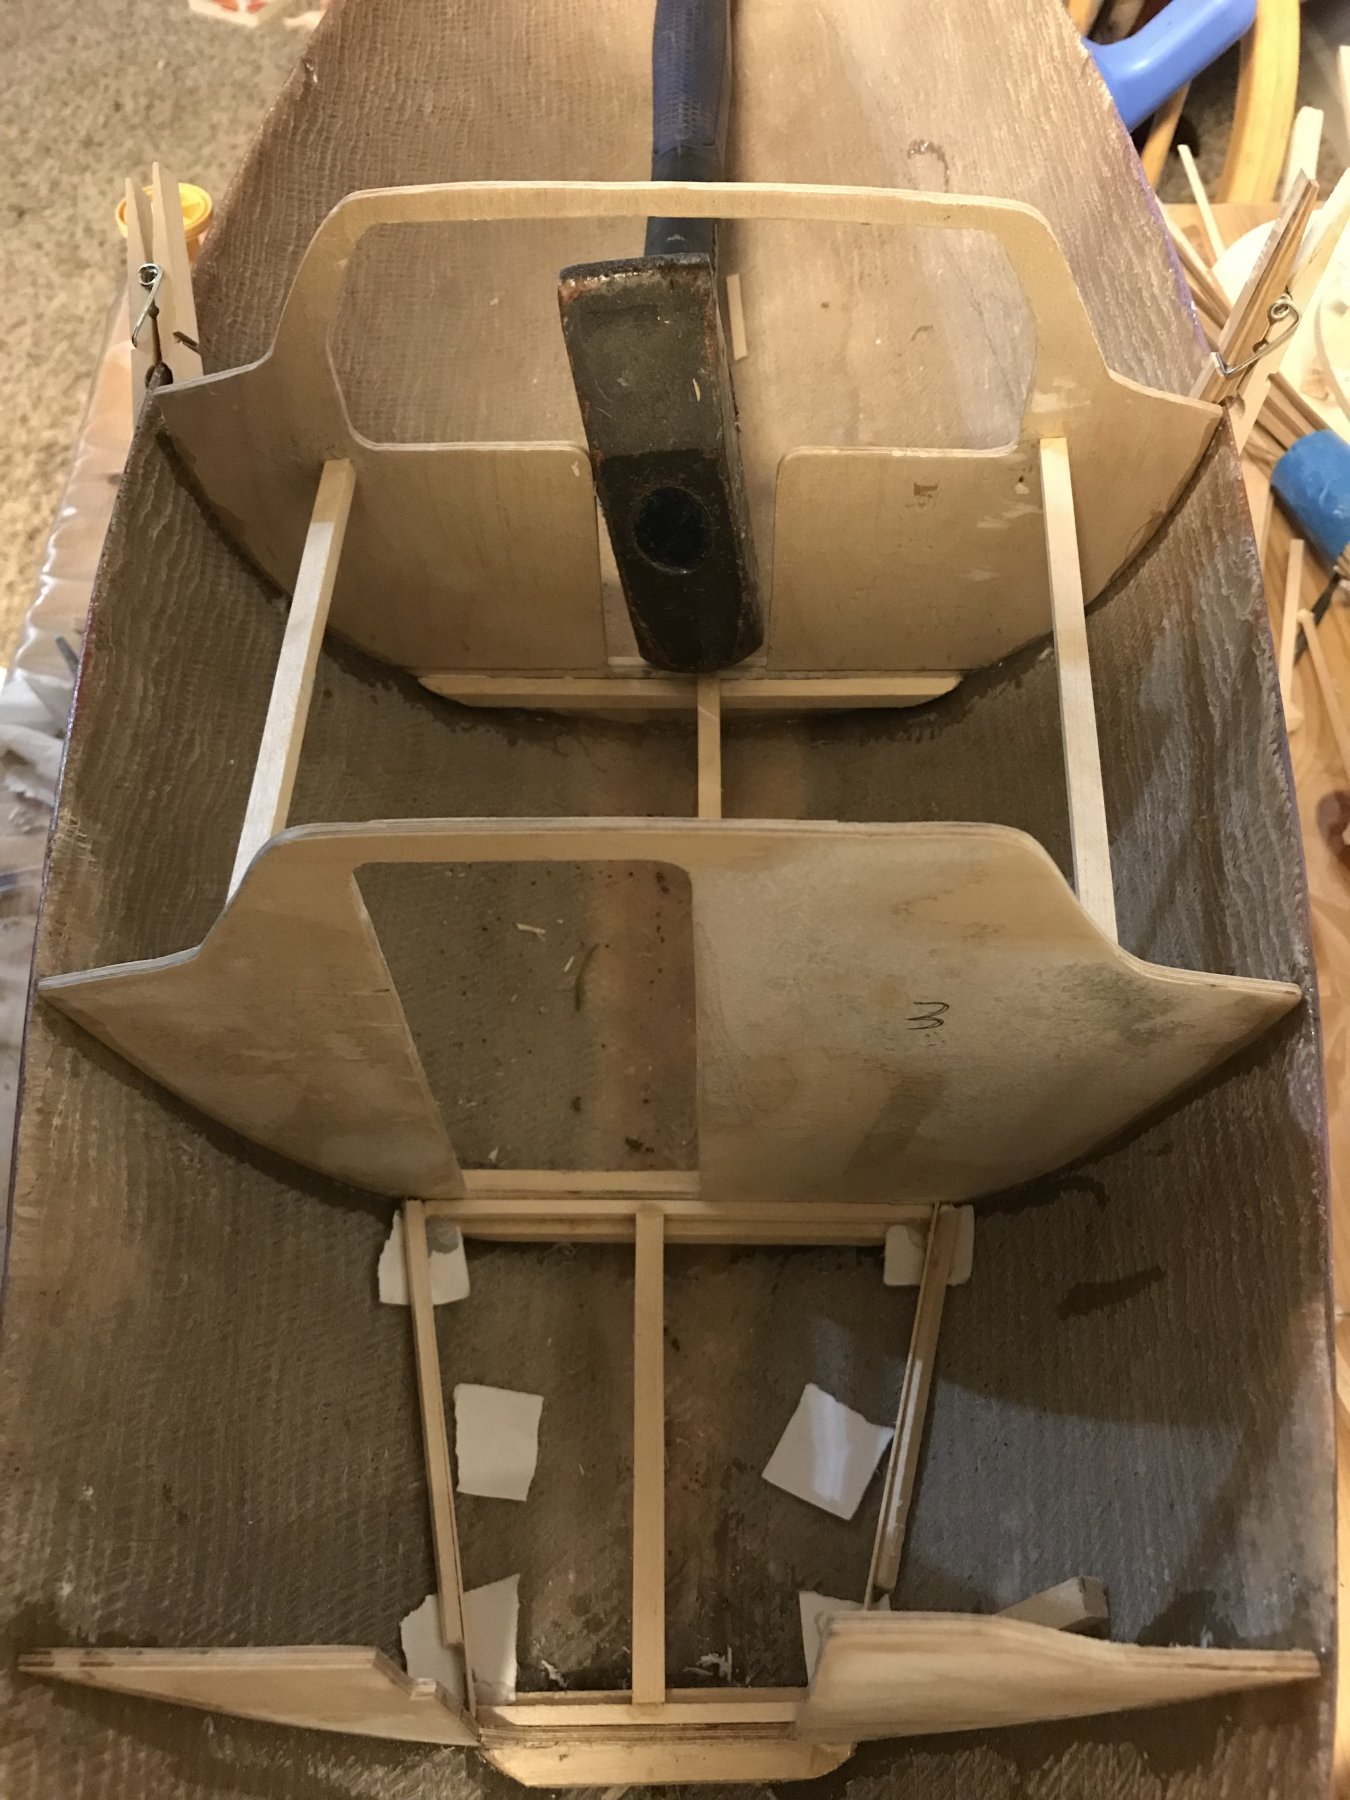
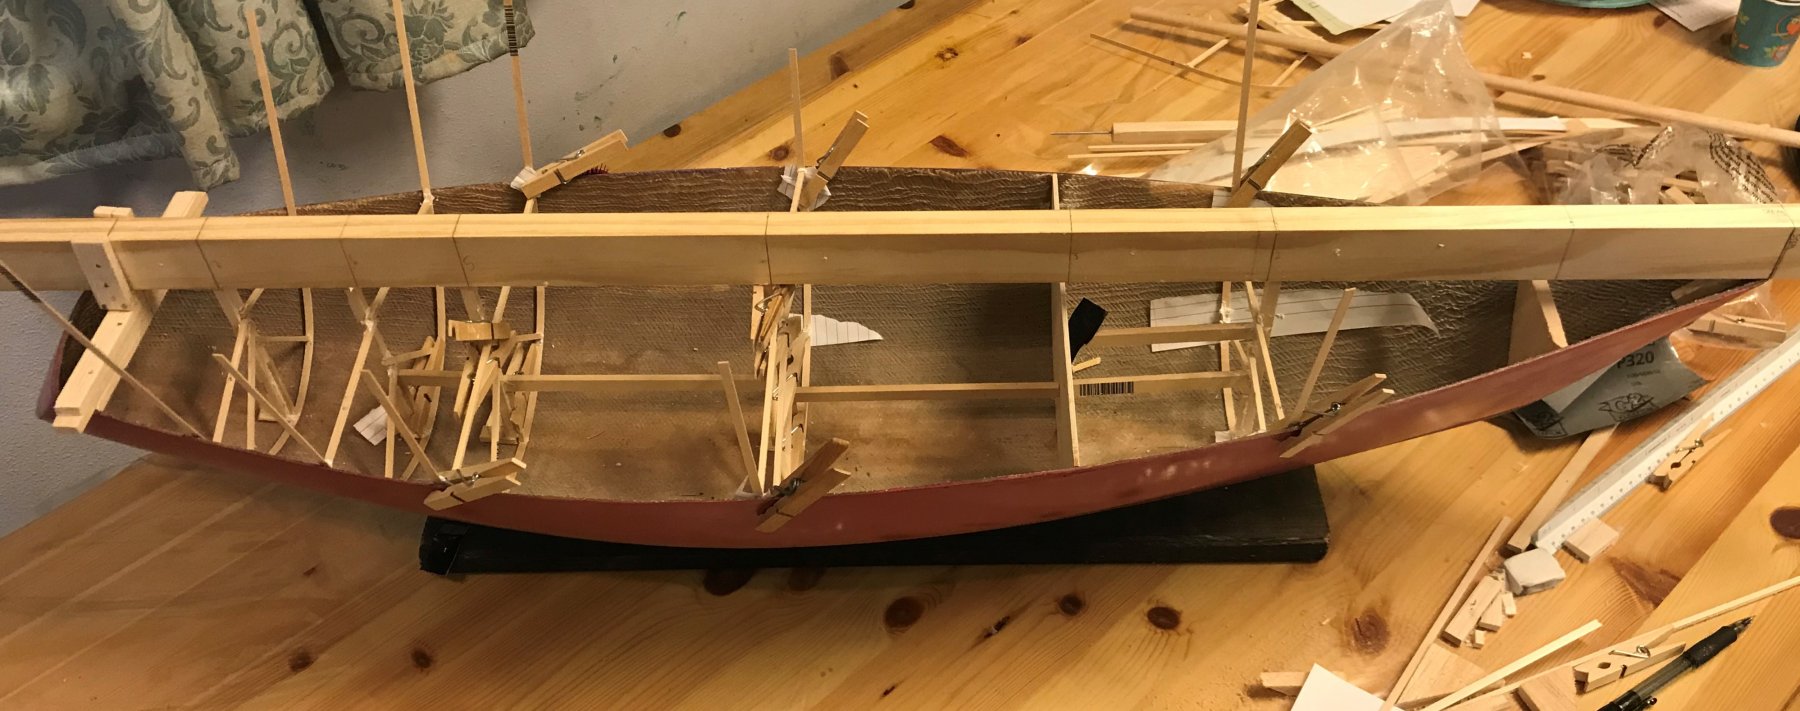
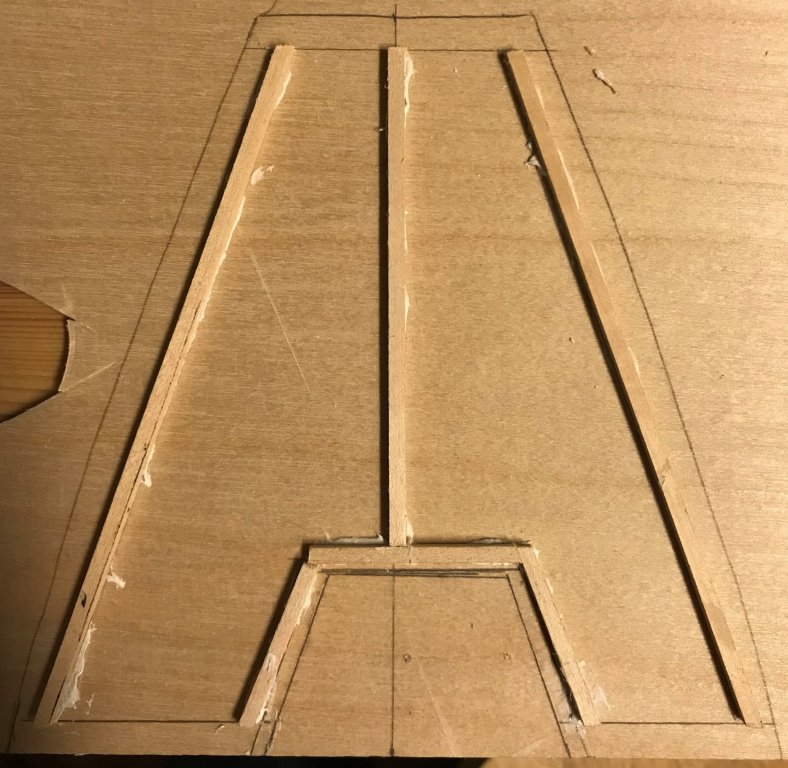
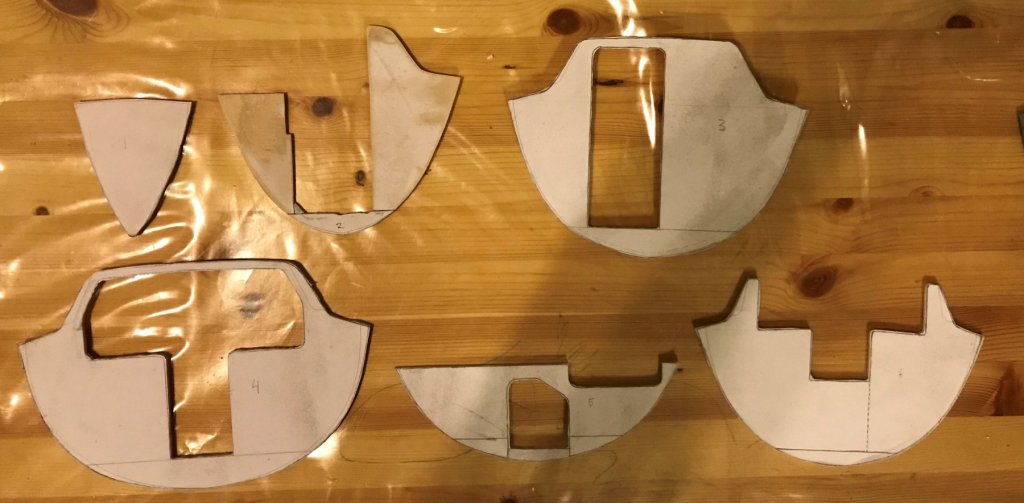
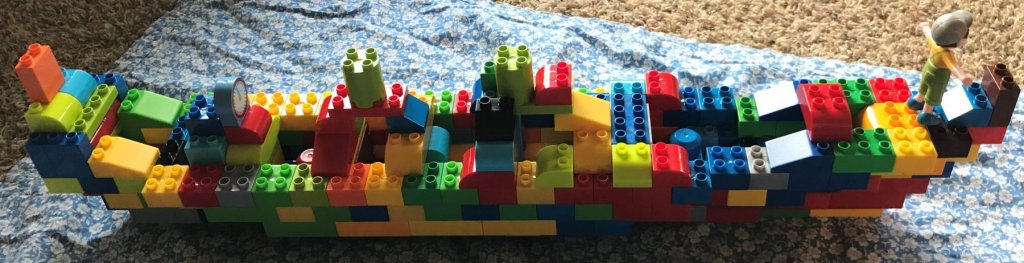
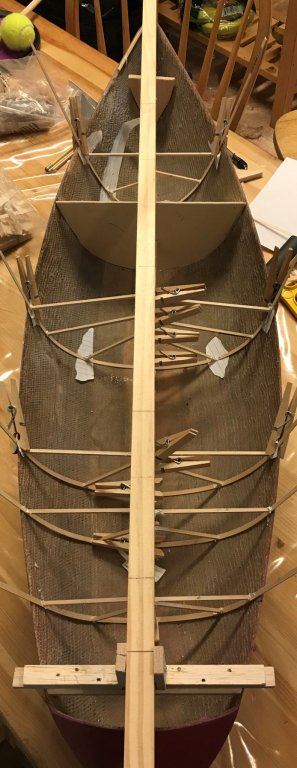
Thanks for the responses everyone! I appreciate the 'company' on my hit-and-miss adventure of a project. And I hope the patience will be paid off, because 3 years, 2 months, and 15 days after I started this build log, I put the first bulkheads in the hull! CUTTING AND FITTING BULKHEADS As mentioned above, I first traced out the templates onto my pre-printed patterns derived from the 3D design model. None matched perfectly, which I anticipated. In all cases, when I lined the bottom of the template up with the bottom of the pattern, the gunwale was quite a bit lower than I had estimated. So I had to do some adjustment of the deck and cabin overhead shape to compensate. Since I'm not putting a real cabin on top, I didn't worry about re-fairing the whole thing in the computer; I just winged it. With only a couple bulkheads even showing a complete transverse section, it won't even be noticed if they aren't quite right relative to each other. (Side note: I've mentioned this before, but in a great sense of irony, this project is helping me put my perfectionist tendencies into check - I'm allowing it to be a learning process, since it's not a display model - it's a doll house to be played with. So I do the best I can, and catalog away what works and what doesn't for next time...) Then I cut out most of the bulkheads: Bulkheads 1 - 6 Cut Once the number 2 bulkhead was cleaned up, I set it in the boat. I used spacers set based on the distance from my temporary 'datum' bulkhead to ensure it was spaced correctly and square. I used a steel mallet to apply clamping weight while the glue set. Bulkhead 2 Installation While I was waiting for that bulkhead to set, I prepped bulkhead 3, which replaced the temporary. I had a heckuva time getting the glued-on paper off at first, before I figured out how to effectively peel it back to get the bulk off, and then remembered I had a small plane I used to get spots where it wouldn't completely come off. This worked well for bulkhead 4 (which is much 'cleaner' than 3) .... but for bulkhead 3, I sanded. A lot. I eventually got it to where I was happy enough, given that I'll end up planking over the bulkhead to give it a 'finished interior' look. Also note I did move forward with the plan of having a landing either side of the bulkhead for the deck. The landing block is spaced down from the deck level 1/8", which is the thickness of the deck plate. This (should) make the deck plate flush with the cutouts in the bulkheads, so that when I plank over the deck plate, I can run planks continuously through, again giving a 'finished' look. Bulkhead 3 ready for installation. Once Bulkhead 2 had set, and 3 was ready, I installed bulkhead 3 using the same process as bulkhead 2, but with the added step of adding clothespins to keep the bulkhead from falling aft. With number 2, the hull is narrowing forward, so the spacers alone can press it into the hull to keep it in place. With number 3, the hull is widening aft, so the spacers don't have the same effect. The clothespins keep it from moving aft, while the spacers are there to keep it square to the other bulkhead. Bulkhead 3 Installation While Bulkhead 3 set, I started the process of prepping bulkhead 4. The cleanup part went better, as I figured out better ways of getting the paper off. A test fit of the bulkhead revealed it didn't fit right, though. Some investigation demonstrated I hadn't quite got the shape right near the gunwale - the template captured it correctly, but I didn't cut it quite right. I also noticed that (as I feared) the landings for the decks aren't quite aligned/level, either longitudinally bulkhead-to-bulkhead, or transversely. I don't think I'll end up chopping anything out, given my commitment to being ok with imperfection, and my desire to move forward. I think part of the issue was that I didn't put in a centerline mark, so I didn't really have a good reference line to square against when adding the landings or installing the bulkheads. Another lesson learned for next time. For now, I'll shave and shim to get everything aligned, so long as everything looks mostly right. I may even leave it un-level to maintain squareness between the vertical openings (like the door in bulkhead 3) and the deck. ______ P.S. - I did get to build another model over the weekend, with some helpers. I built the hull, and then they helped put the 'superstructure' and features above and within the hull. Our challenge was to use every block we have. We did. Of course, she didn't last long. After a tragic collision with another vessel, she began to sink and break apart. Fortunately, the pieces of wreckage were used to quickly make life boats and rafts for the passengers, which consisted of some small people dolls (like the one above), a wooden duck, a couple wooden horses, a pink and a purple pony, a horse, and a small plastic dog. All were saved.


-
Hi Patrick! Excited to see the ‘genesis’ of this project!(...sorry, I can show myself out...) In all seriousness, it looks like you’re off to a great start. I like the approach of tackling the side hulls as their own assembly. That said, how are you ensuring they stay securely joined as you carve away to fair them into the main hull? I suppose a strong glue might be enough given how soft balsa is. Also, the main hull looks great - I think you’ve nailed the bulb and the entry/flare of the forward sections. Plus you’ve got that combination of smooth and angular that makes this hull stand out. Looking forward to seeing the progress!
-
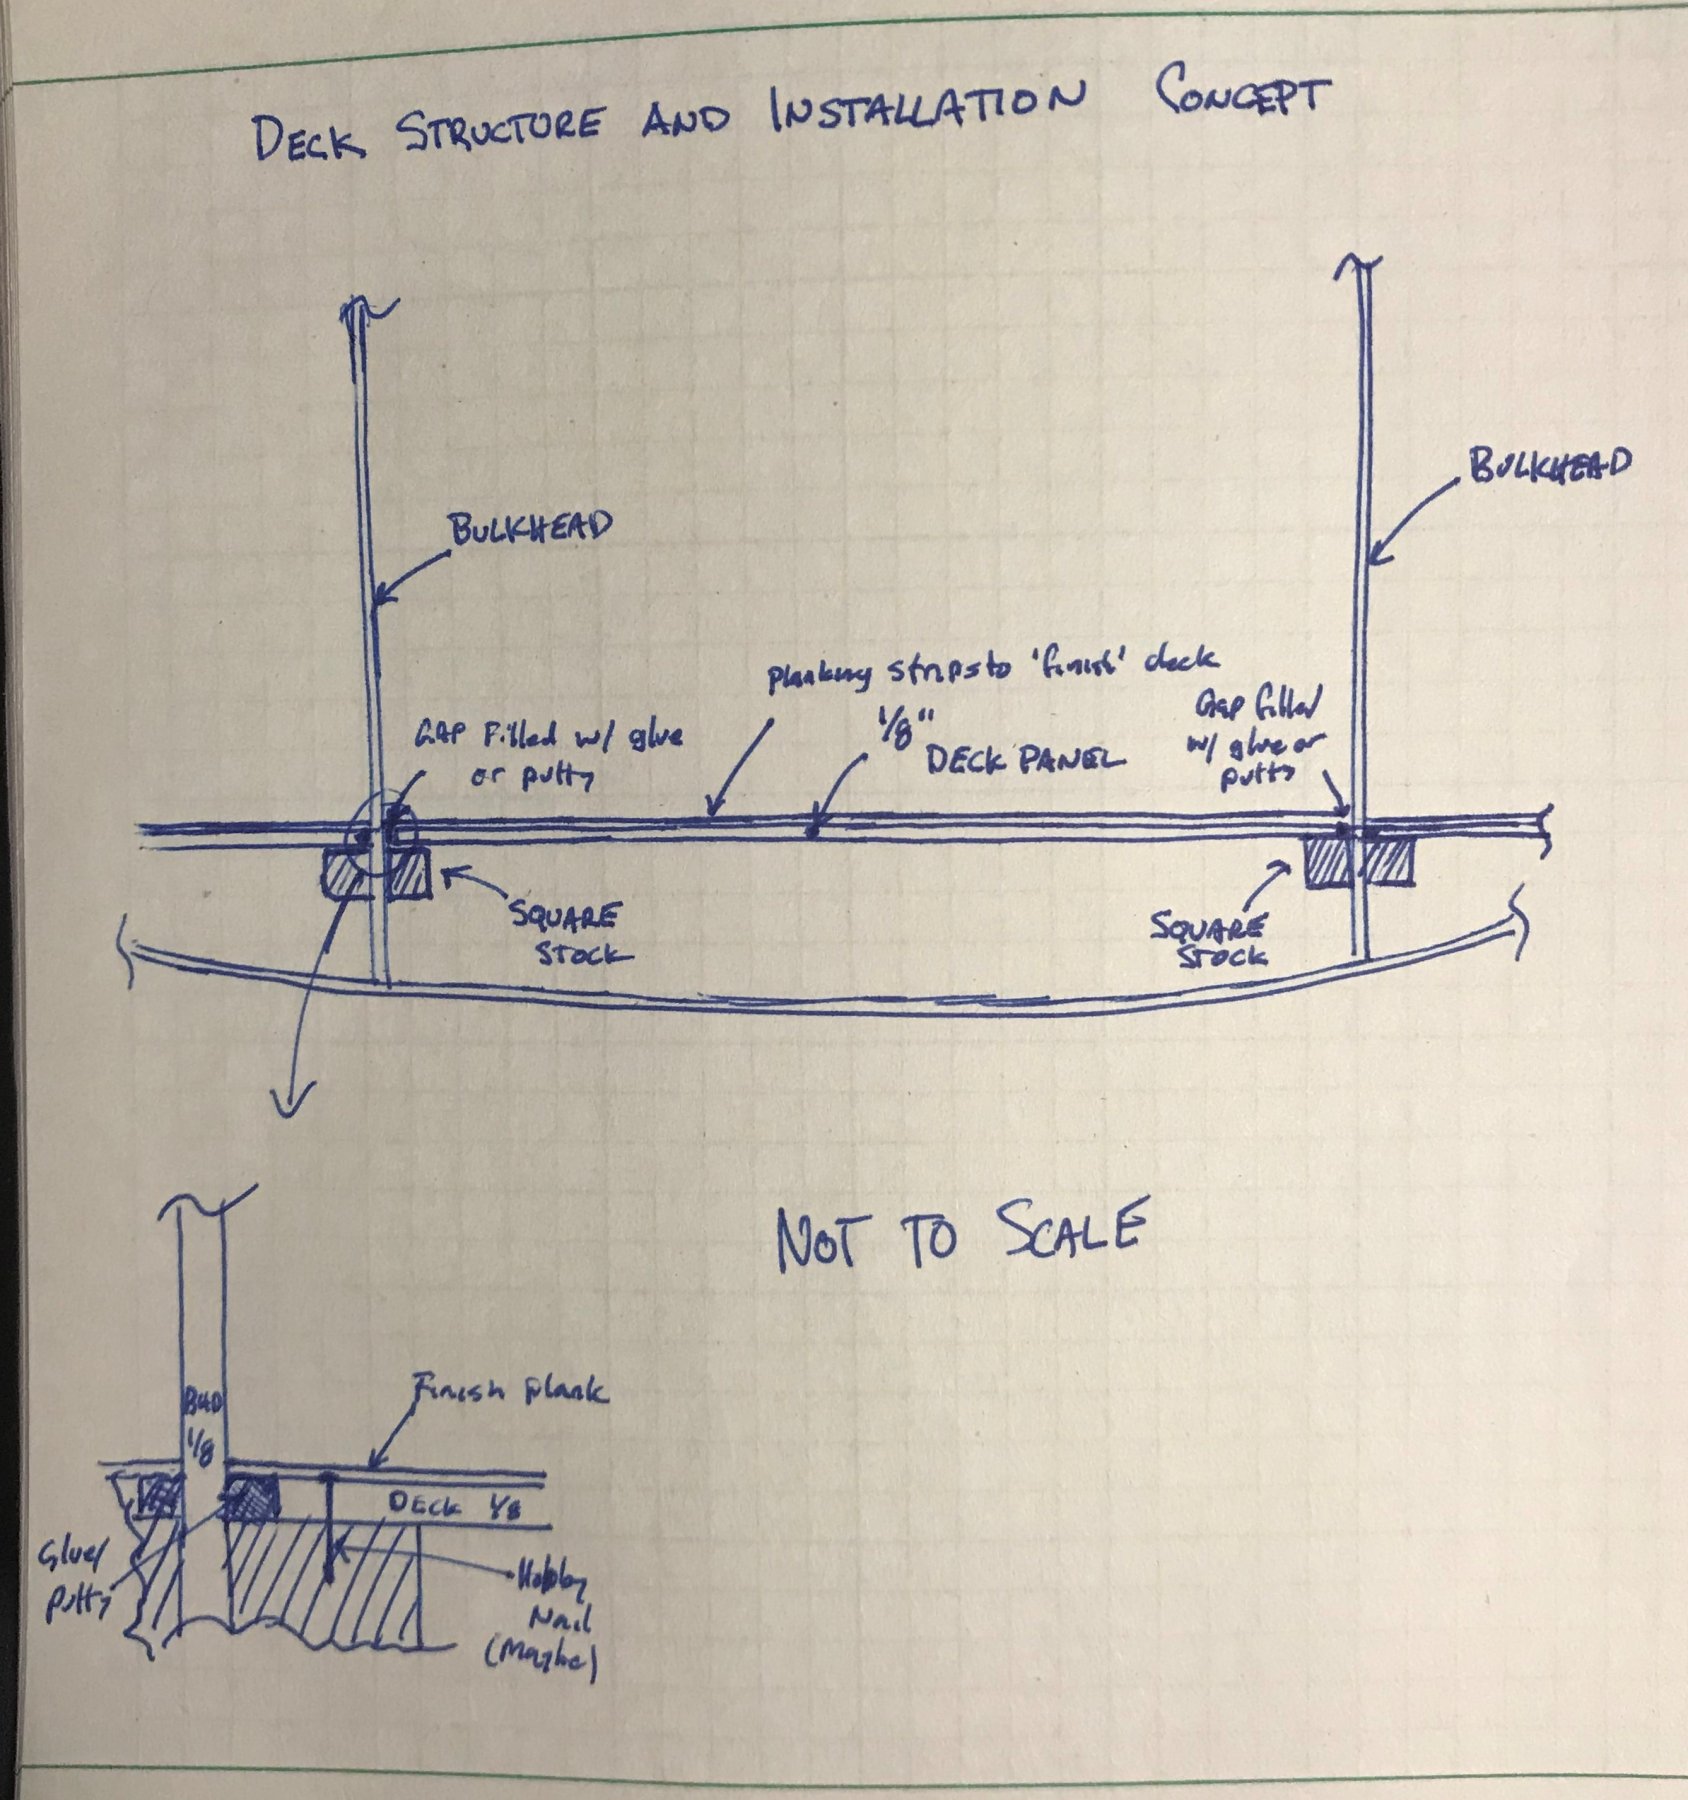
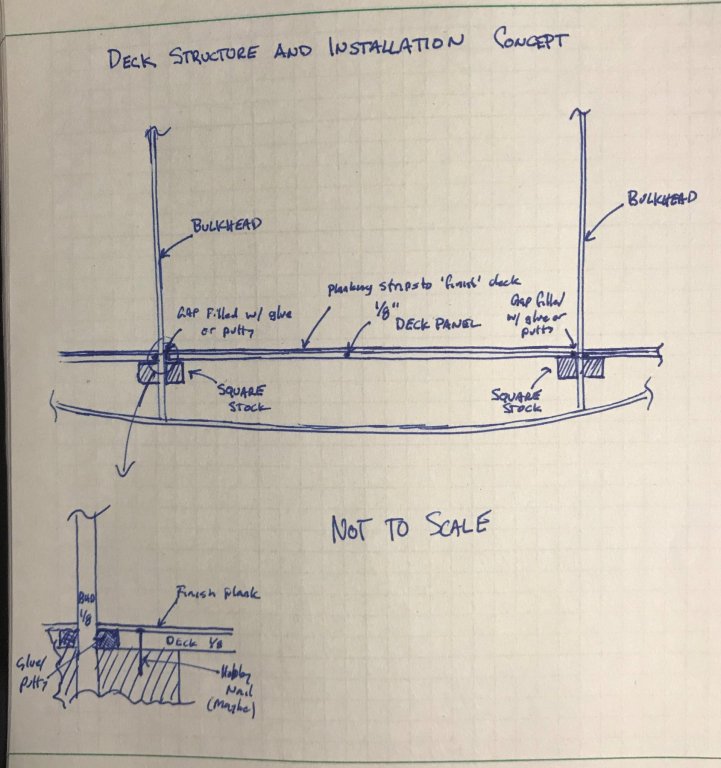
Thanks all for the comments and likes! Pressing forward... BULKHEAD TEMPLATES COMPLETED My mother-in-law is in town and staying with us this week, but as part of her visit she got a hotel room nearby for a couple nights and took our two older kids (almost 5 and almost 3) to stay with her. So, with just the baby, there was a bunch of time over the weekend to make progress. I was able to finish making templates for all the major bulkheads. (There's technically still one at the very far aft I couldn't do, since the blocking for the big centerline beam-jig-thing is in the way, but it's not a critical bulkhead to the arrangement; it has more to do with aft cockpit than the below-deck interior.) The first picture shows in-process how I used the temporary full bulkhead. It did two things for me. Bulkhead Templating In Process (1) It allowed me to cut a length of a basswood plank to the distance from the 'datum' bulkhead to the one I was templating. Setting the cut plank square to the datum, I moved it out to the gunwale, port and starboard. This gave me a centerline point (measured along the jig with a tape measure) and a point on each side that I used to align the 1/32 strip used to make the shape. (2) As can be seen in the picture, I used that same length of plank to set the distance to the vertical support of the bulkhead template. That's the long length of plank running from the 'datum' bulkhead to the first template aft of it. Once I had a couple templates set, I also used what I trimmed off the plank as a spacer between the templates, so that the verticals were set to be vertically plumb/square to the jig and each other template. The result of the whole process is seen in the following pictures. I ended up not using the strips for the forward most bulkhead; I found that a crudely carved and sanded balsa block got me close enough (I think....) Bulkhead Templates Complete The next step is to transfer these templates back to the patterns I've made from the model, come up with a consistent way to line them up, and then re-adjust the cut pattern to match. And then I can cut the bulkheads! My current problem is that I need to get my 'production design caught' up to my progress - I haven't quite worked out the details of how I'm attaching the deck (which I'm told is an important component of below-deck arrangement). My current idea is a kind of horizontal 'beam' each side of the bulkhead that the main deck panel rests on: Deck Installation Concept Any gap between the deck panel and the bulkhead can be filled with glue or putty and sanded flush, and then finish planking will go over top. The challenge I see with this approach is that the work of putting the deck beams on the bulkhead would be best done off-boat, but then there's the risk they don't line up correctly. But, putting them on in the boat could be a challenge because space would be restricted, I'd be working from above, and it would be hard to ensure square/level. The other challenge would be space - near the ends of the boat, there probably won't be enough room between the deck and the hull for the support - the deck itself will be nearly resting on the hull. So that's another thing to ponder through. Finally, I'm debating whether or not running a couple longitudinal (or even angled) deck beams as far outboard as I can to support the edges of the decks would be beneficial, or if the rigidity of the 1/8th won't make that necessary.


-
Patrick, She's absolutely magnificent. I'm actually worried I won't be able to pull off in a 1:12 scale sailboat what you've done in a superyacht that fits in the palm of your hand! The ability to take a (usually lacking in detail) 2D general arrangement and turn it into a 3D representation of the space with all the different interactions blows me away every time I see it. Absolutely magnificent. As far as guess work in figuring out the hull for your next project - half of designing a boat in the first place is guess work! Oftentimes we do have some numbers to help with the guesses, but that doesn't change the fact that naval architecture is, truly, a combination of art and science, both equally significant in the development of a proper boat. Thus, your guess work adds to the hull a dimension of personality and individual interpretation truly fitting a great designer/builder. Really looking forward to it!
-
Wow. I'm continually blown away by how realistic this looks. If the river water was there, I'd be hard pressed to explain to people that they were looking at a model. The photographic distance blur of your second-to-last picture especially made me look twice - it's only the lack of water in the river that betrays the fact this is a diorama and not a source photo... Amazing.