HOLIDAY DONATION DRIVE - SUPPORT MSW - DO YOUR PART TO KEEP THIS GREAT FORUM GOING! (Only 13 donations so far - C'mon guys!)
×


BenF89
-
Posts
316 -
Joined
-
Last visited
Content Type
Profiles
Forums
Gallery
Events
Everything posted by BenF89
-
 Clever Idea, Ron. Looks good!
 -
Sheer, yes - the ‘bend upward’ of the deck towards the bow when looking at the side. It’s a tricky line to get correct, even when designing, since it curves in two directions- in towards the centerline, and up (or, in some cases, down). Get it just a little off and there’s a can’t-quite-place-it ‘wrongness’ about how the boat looks.
- 1,090 replies
-
- 6
-

-
- showcase models
- vendetta
- (and 2 more)
-
Wow, sounds like me! We love making sourdough bread, and there IS always outside work to be done! As for the model, I think all the praise is well deserved, and it’s such a meaningful way to honor the memory of your father. Well done
- 378 replies
-
- 11
-
-
- java
- pacific crossroads
- (and 2 more)
-
My temporarily shelved Edmund Fitzgerald is my boat. So there’s two. That just leaves the other two kids, and the Admiral. Though she would probably rather have me build (or finish) the grape arbor/trellace/pergola thing we started 3 years ago in our back yard...
-
Hahaha! Yeah, I was actually having a similar conversation with the Admiral last night about whose boat it will be. We concluded that the ‘doll house’ will be for my daughter, but as with literally anything else in the house, that distinction probably won’t matter much. That said, the cat’s not totally out of the bag on why I’m ‘building the boat’ and it could easily be presented more generally to both of them. The pink hull may complicate that, but that’s overcomable. (My other suggestion to the Admiral was a second project to even it out. That idea wasn’t received as warmly - especially since then the third would feel left out when he gets older... ) Glad you found the build and thanks for following along!
-
Holy smokes! (No pun intended) That looks really great- reminds me of the famous picture looking down on the USS Iowa firing a broadside. I agree with your wife- very life like. Nice work!
- 378 replies
-
- 9
-
-
- java
- pacific crossroads
- (and 2 more)
-
Hi Patrick! Thanks - I like the overheads, too. Puts it into perspective for me, too! I usually have some manner of tools, or scrap, or 'junk' stored in the boat (you know, like a real boat would have!) and so I don't even always see it all interacting together. As for the name - I've started thinking about it, and I think she'll be unnamed until my daughter 'receives' it, and she'll provide the name.
-
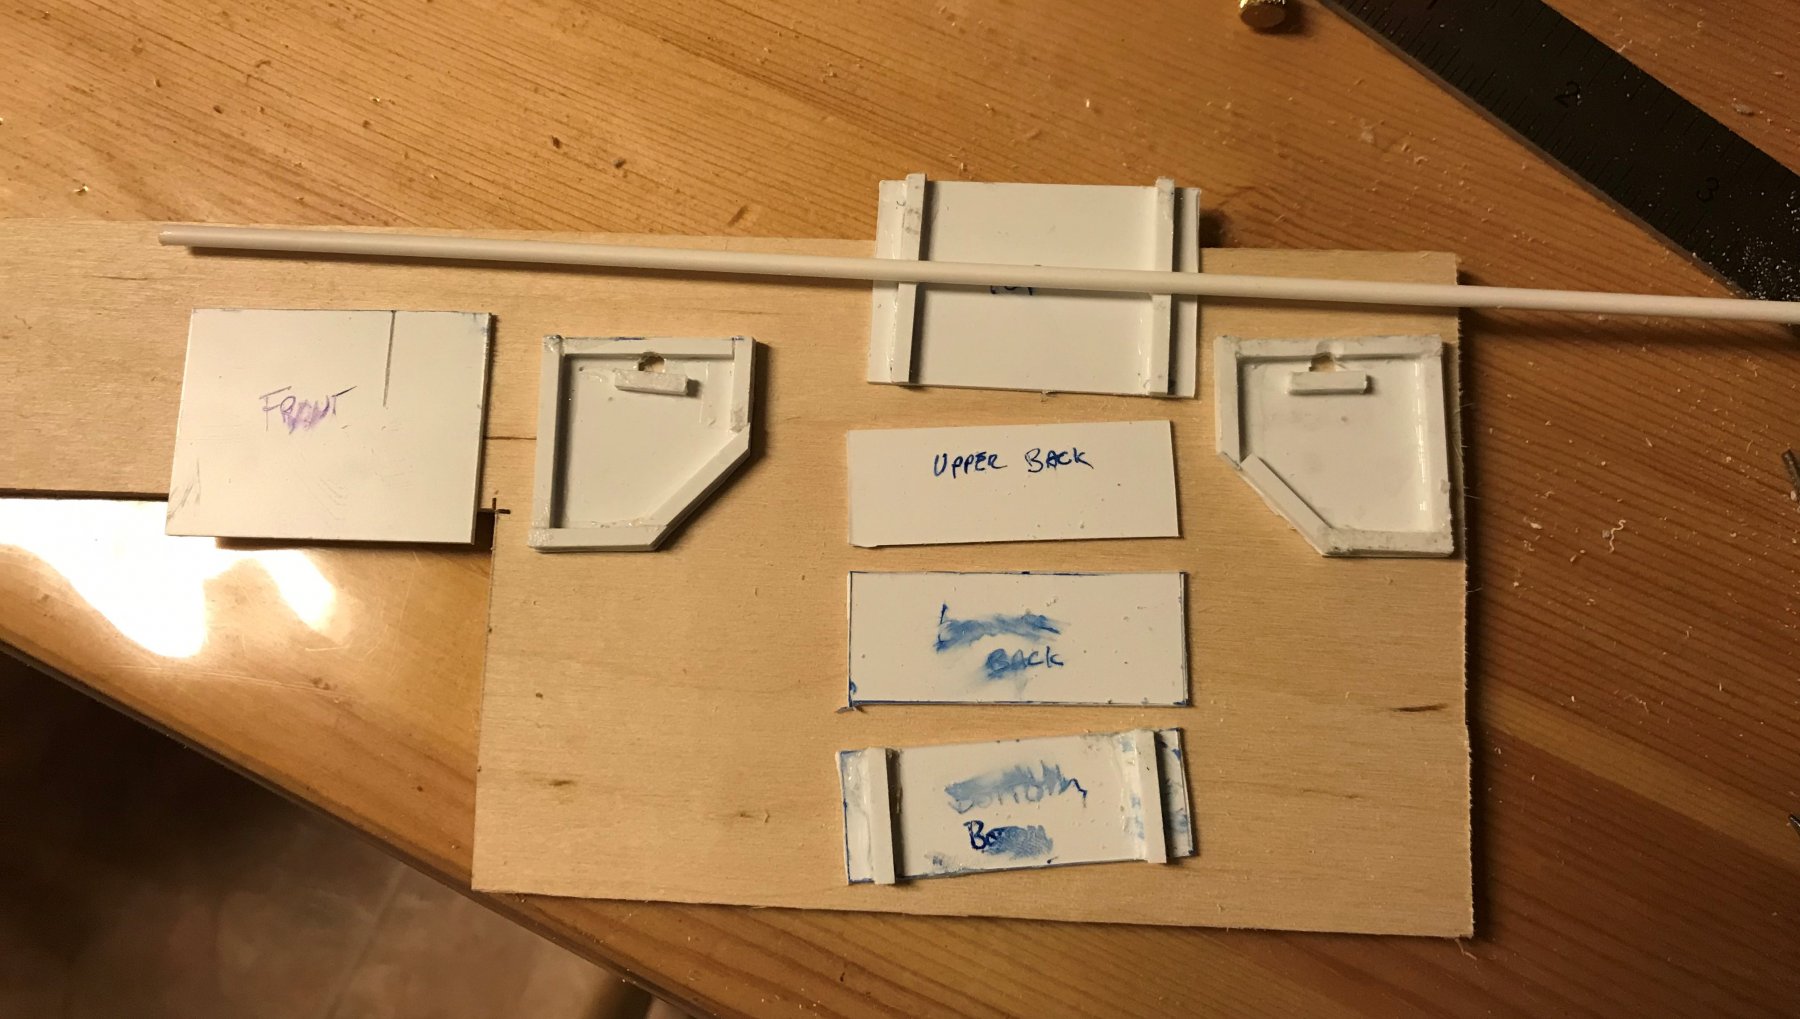
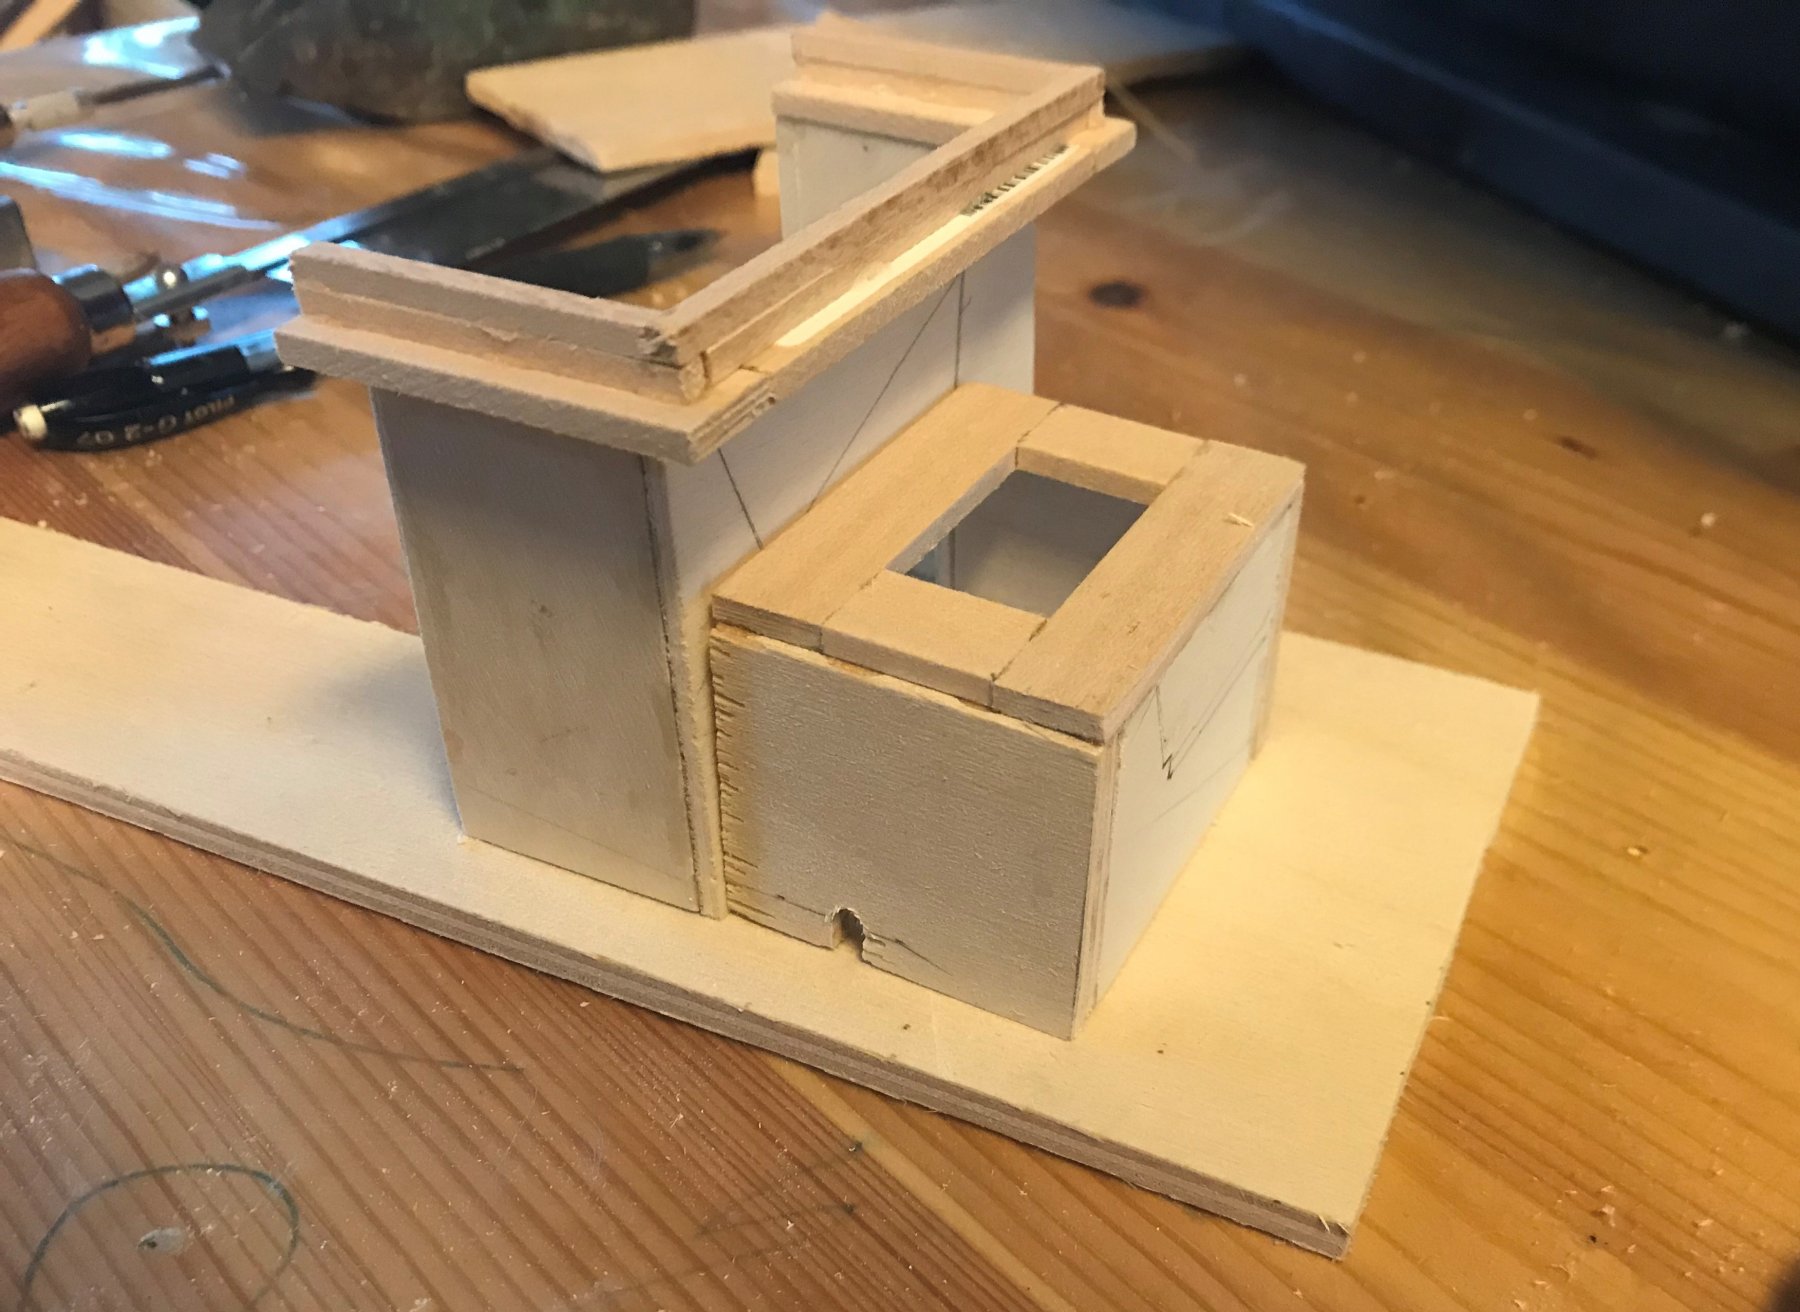
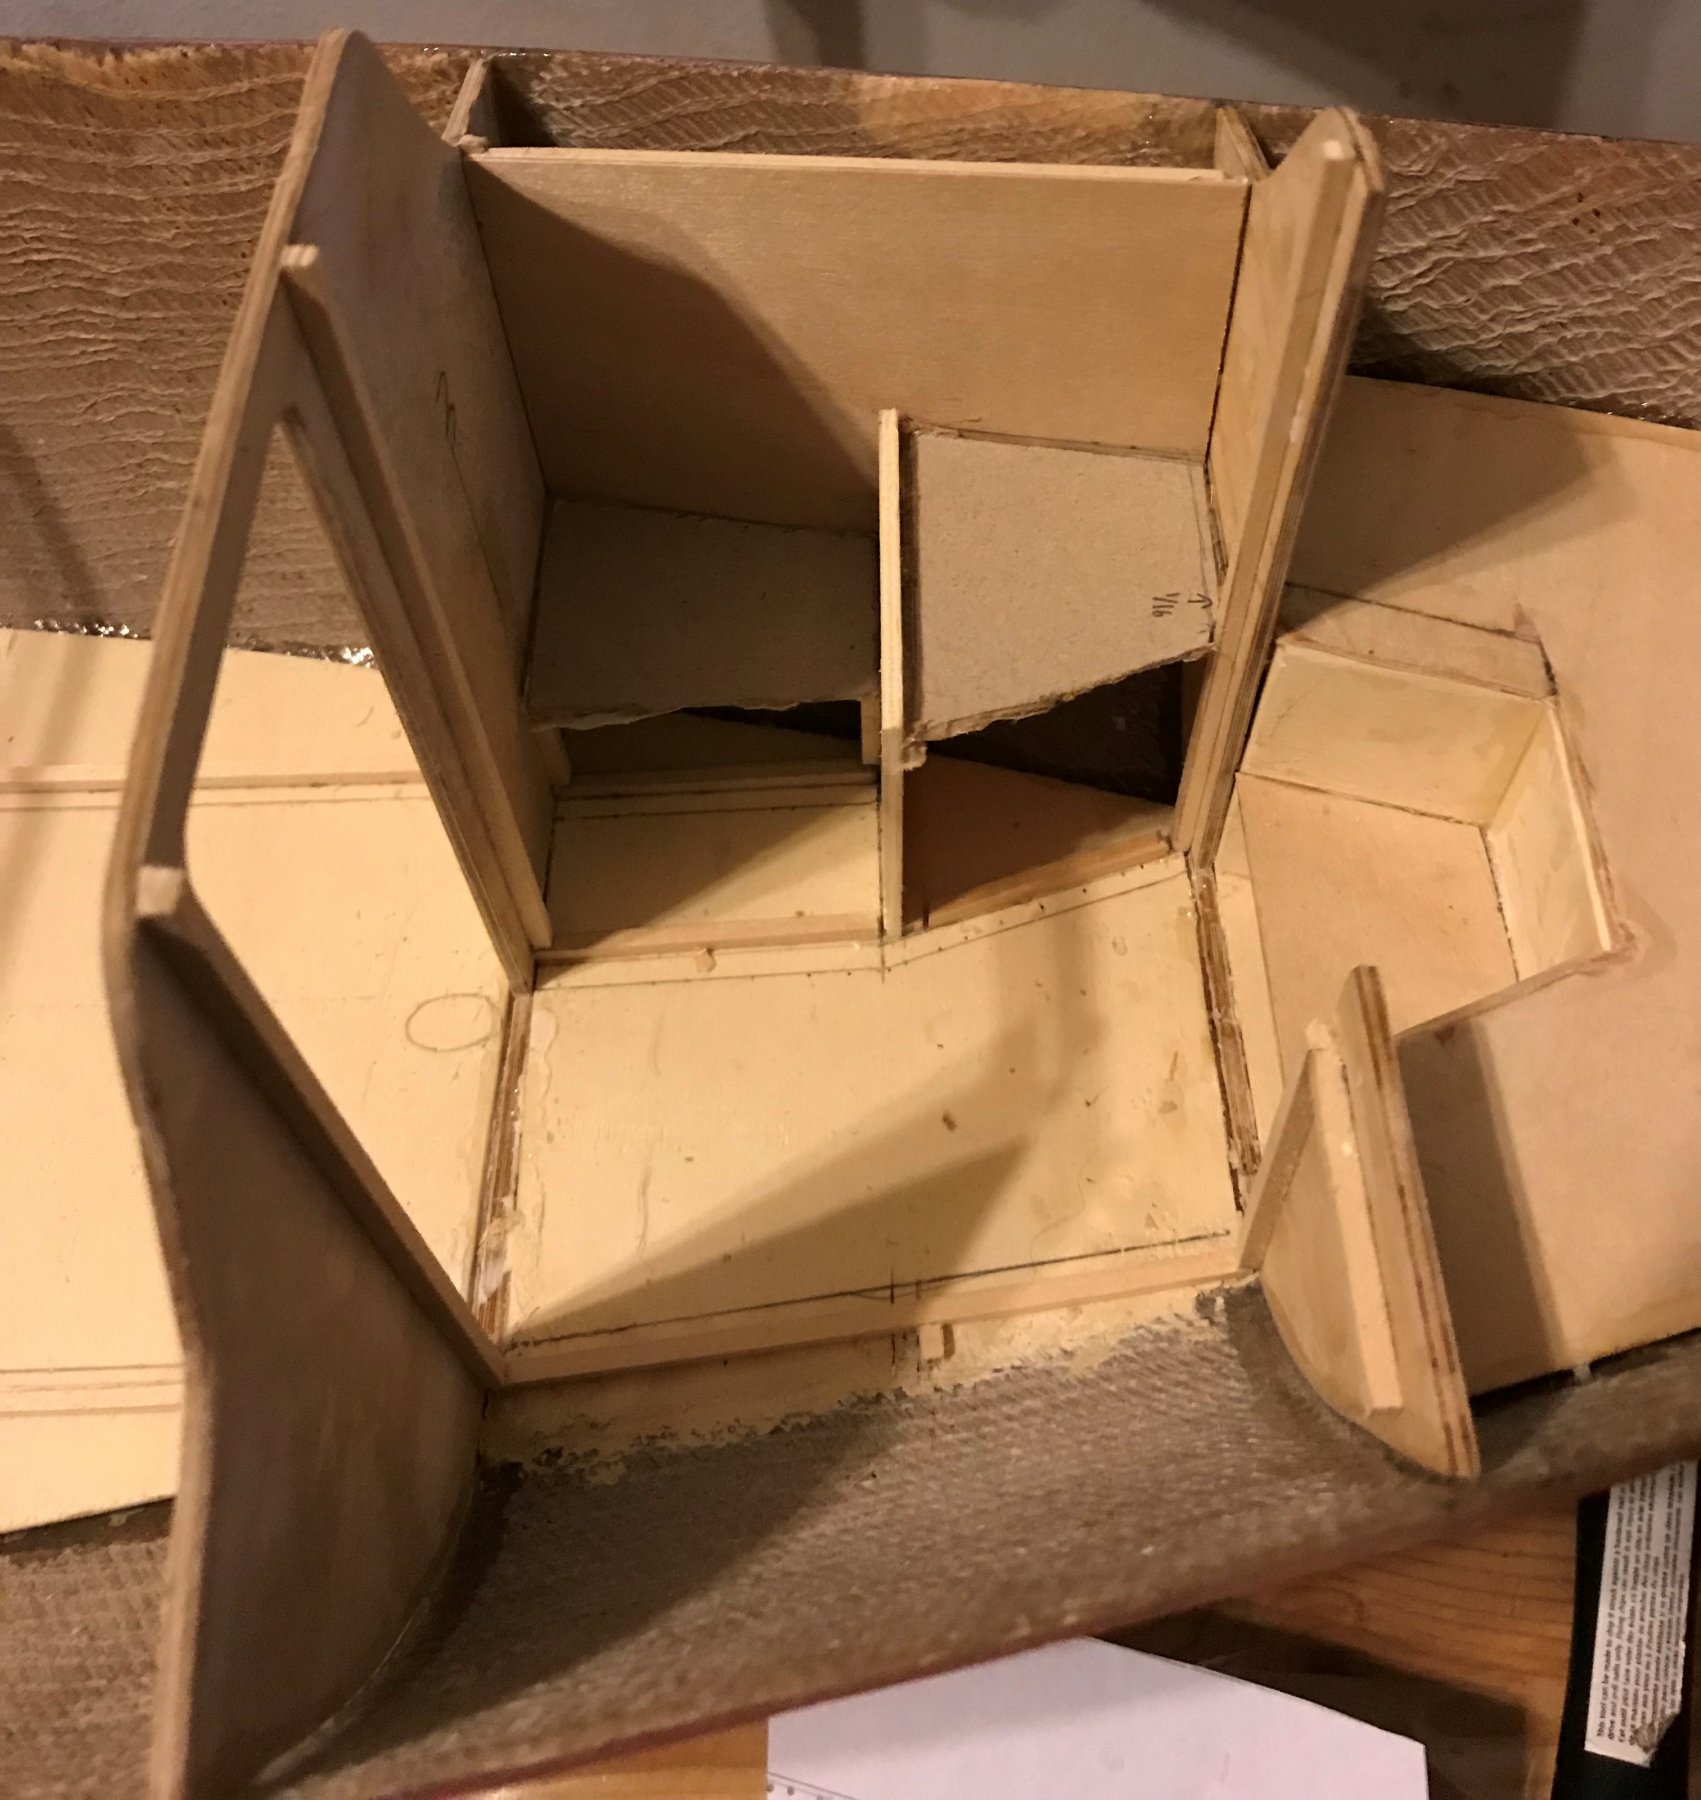
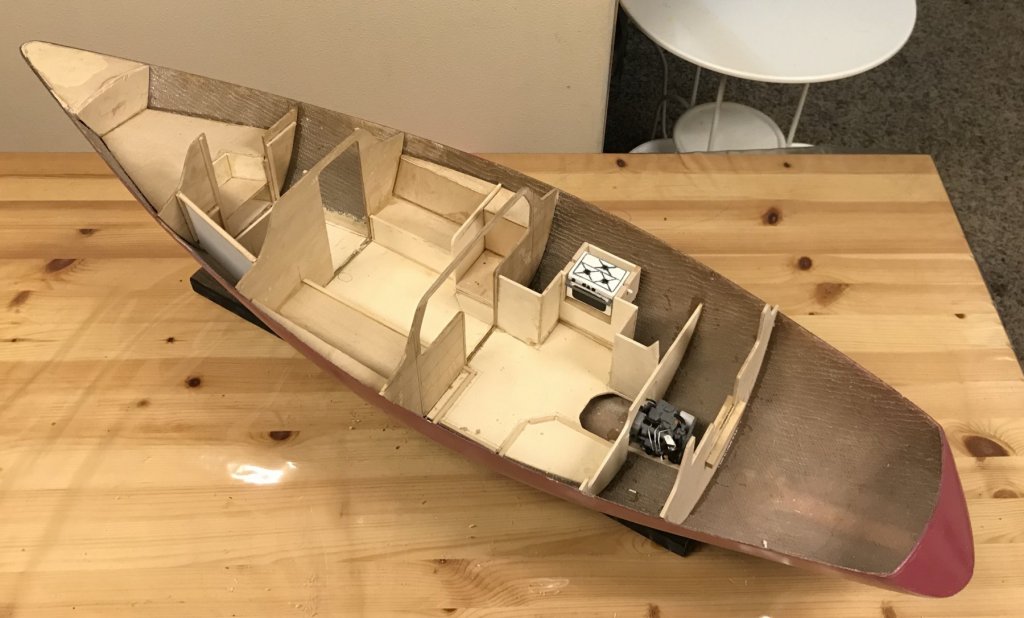
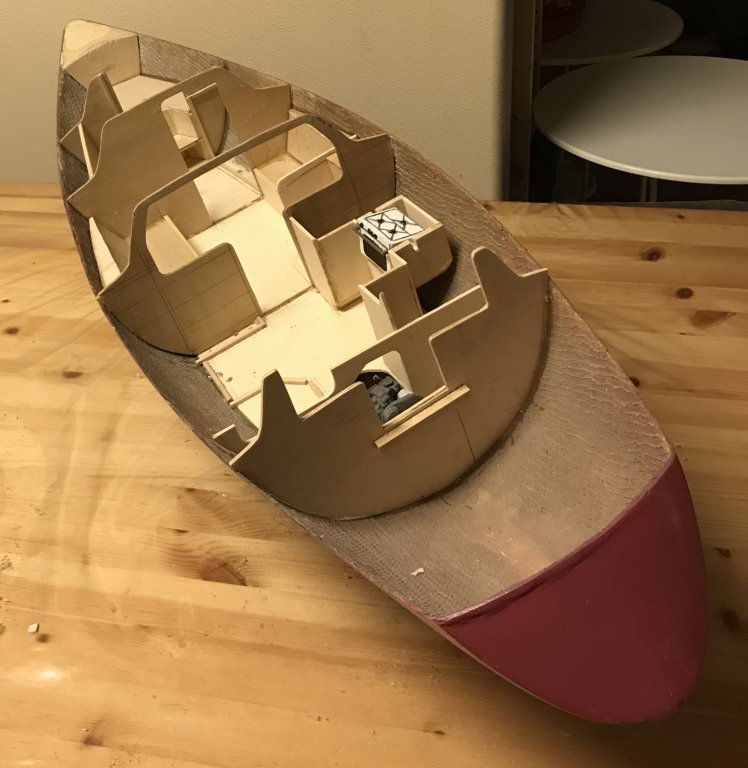
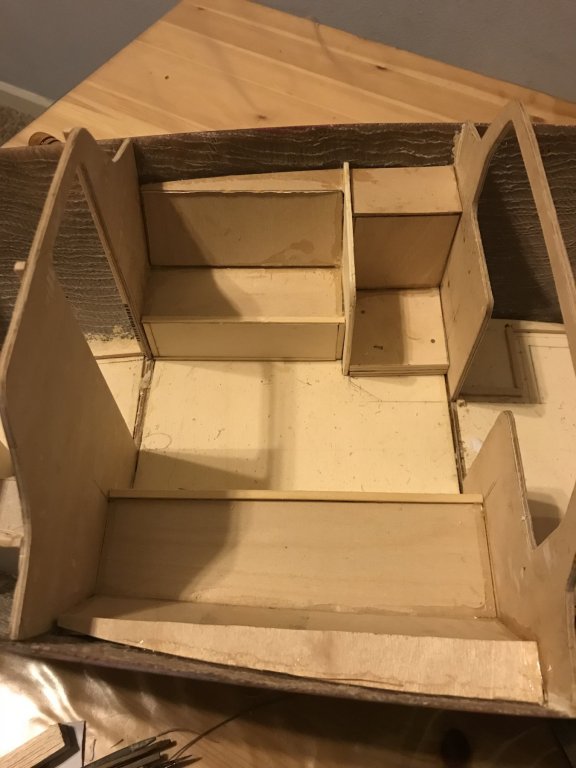
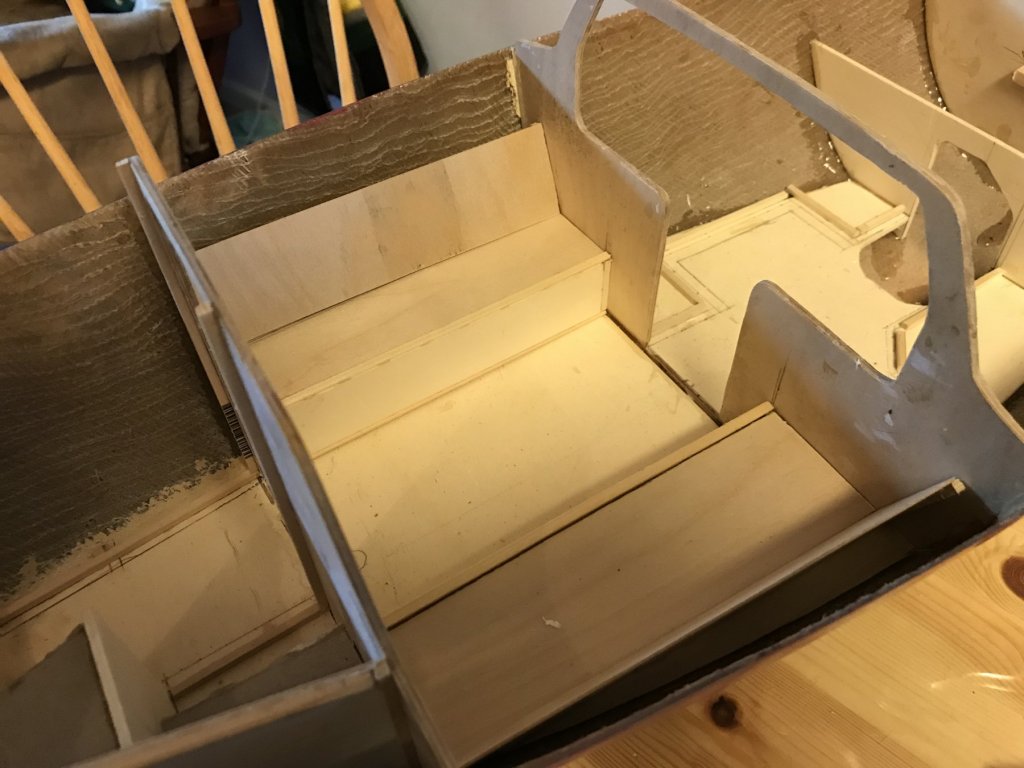
INTERIOR LAYOUT/ FURNISHINGS WORK- GALLEY PART 4 Small update: got the inboard walls of the galley cut, and installed the ‘U’ assembly and the two walls: Inboard Walls Installed And, a couple ‘overview’ shots- I placed the engine temporarily, to get a sense of how it will fit. Not sure when I’ll install it permanently. The second picture has the boat propped up it induce a heel; you can see the gimbaled stove in action! Till next time...
-
Looking really great. I love all the details! Just curious- what’s the tall cylinder at the forward end of the forward platform?
-
I love the sense of movement conveyed just by having the officer posed halfway through the hatch. Gives life to the model!
-
Thanks, Patrick! It was a lot of fun to do some 'detail' work again. It's interesting how there are different challenges doing a larger scale boat and a small scale model. I find I like a mix of both, and I guess I was missing the 'little details' part that I enjoyed so much doing the engine.
-
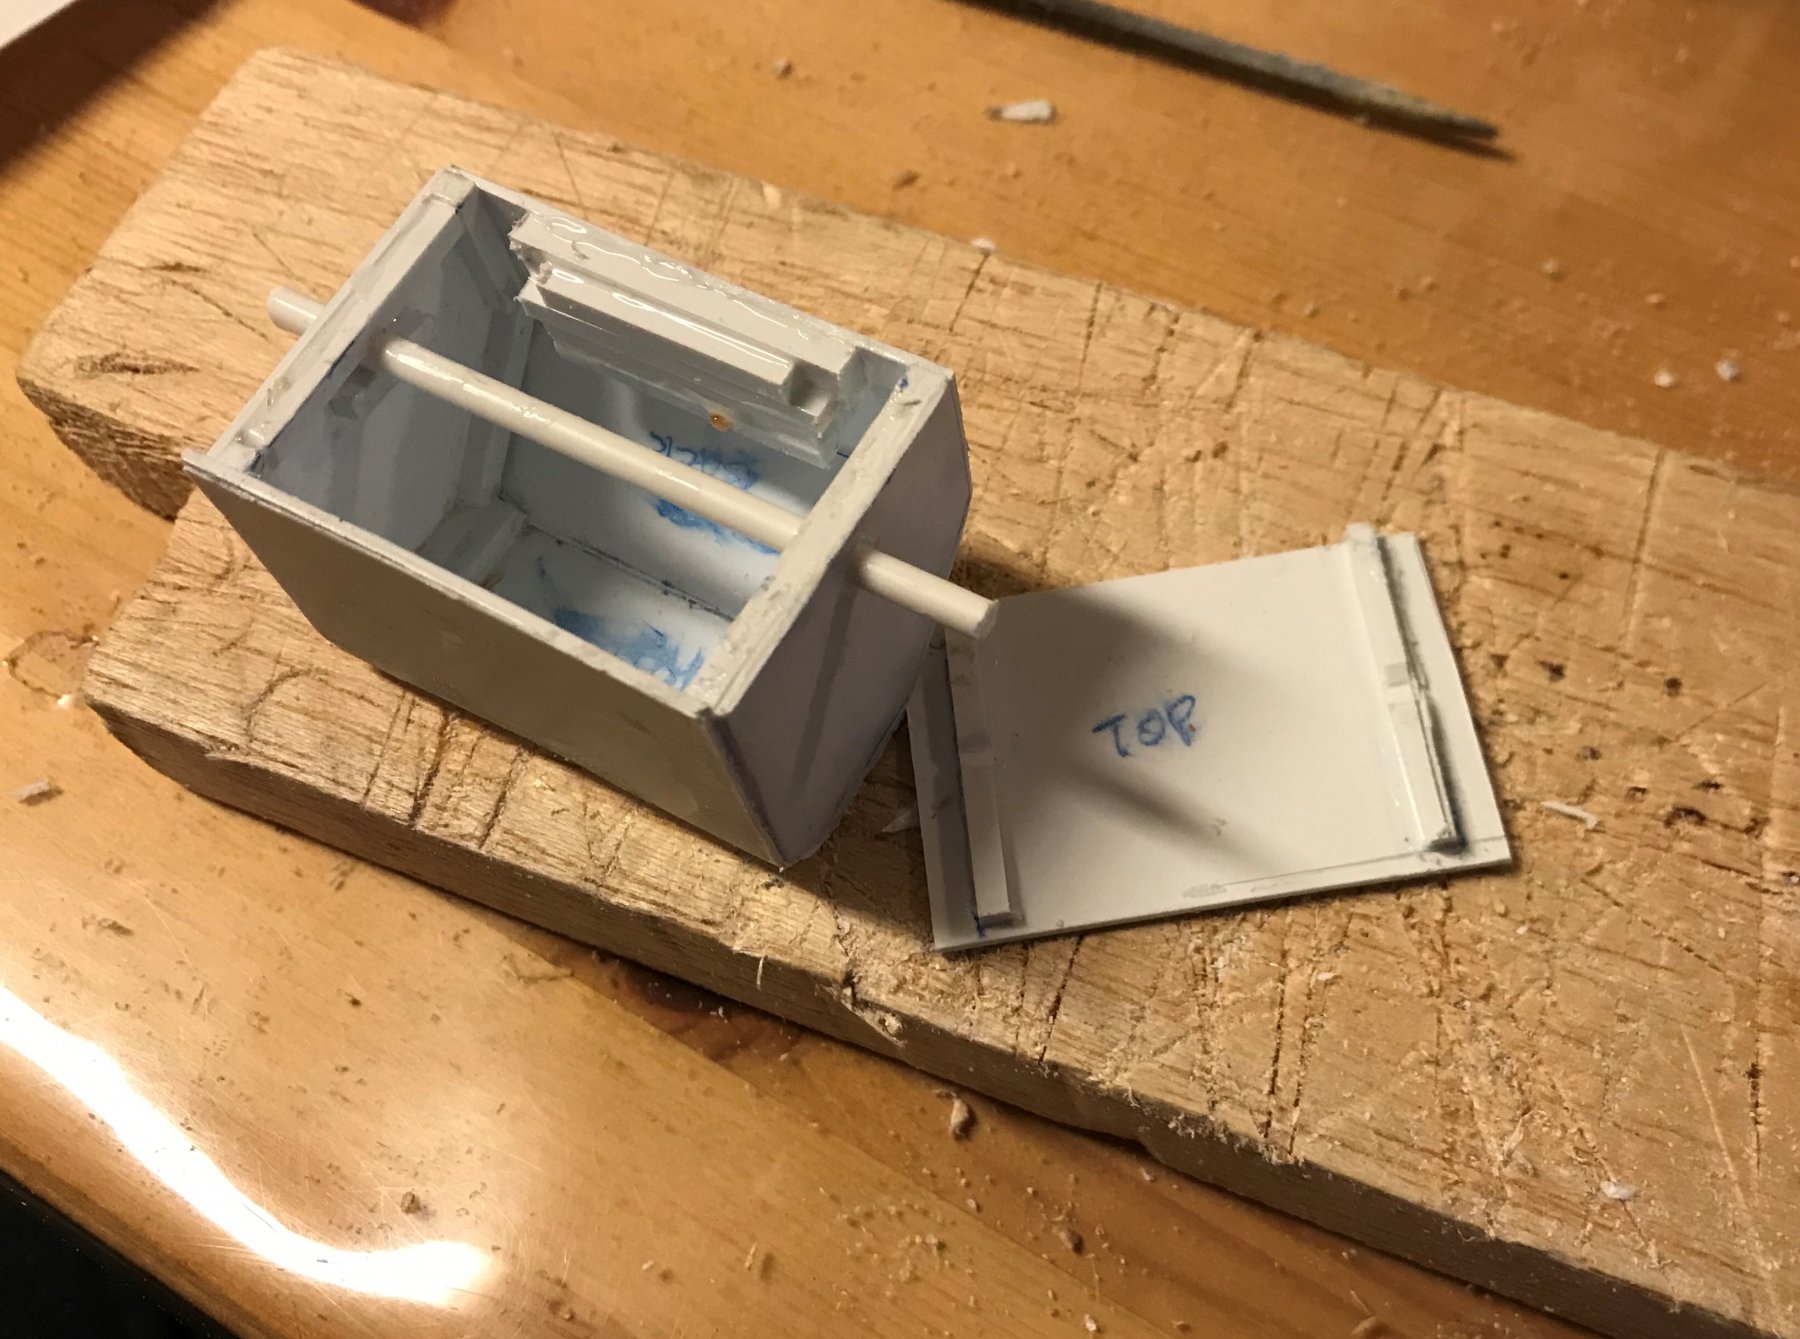
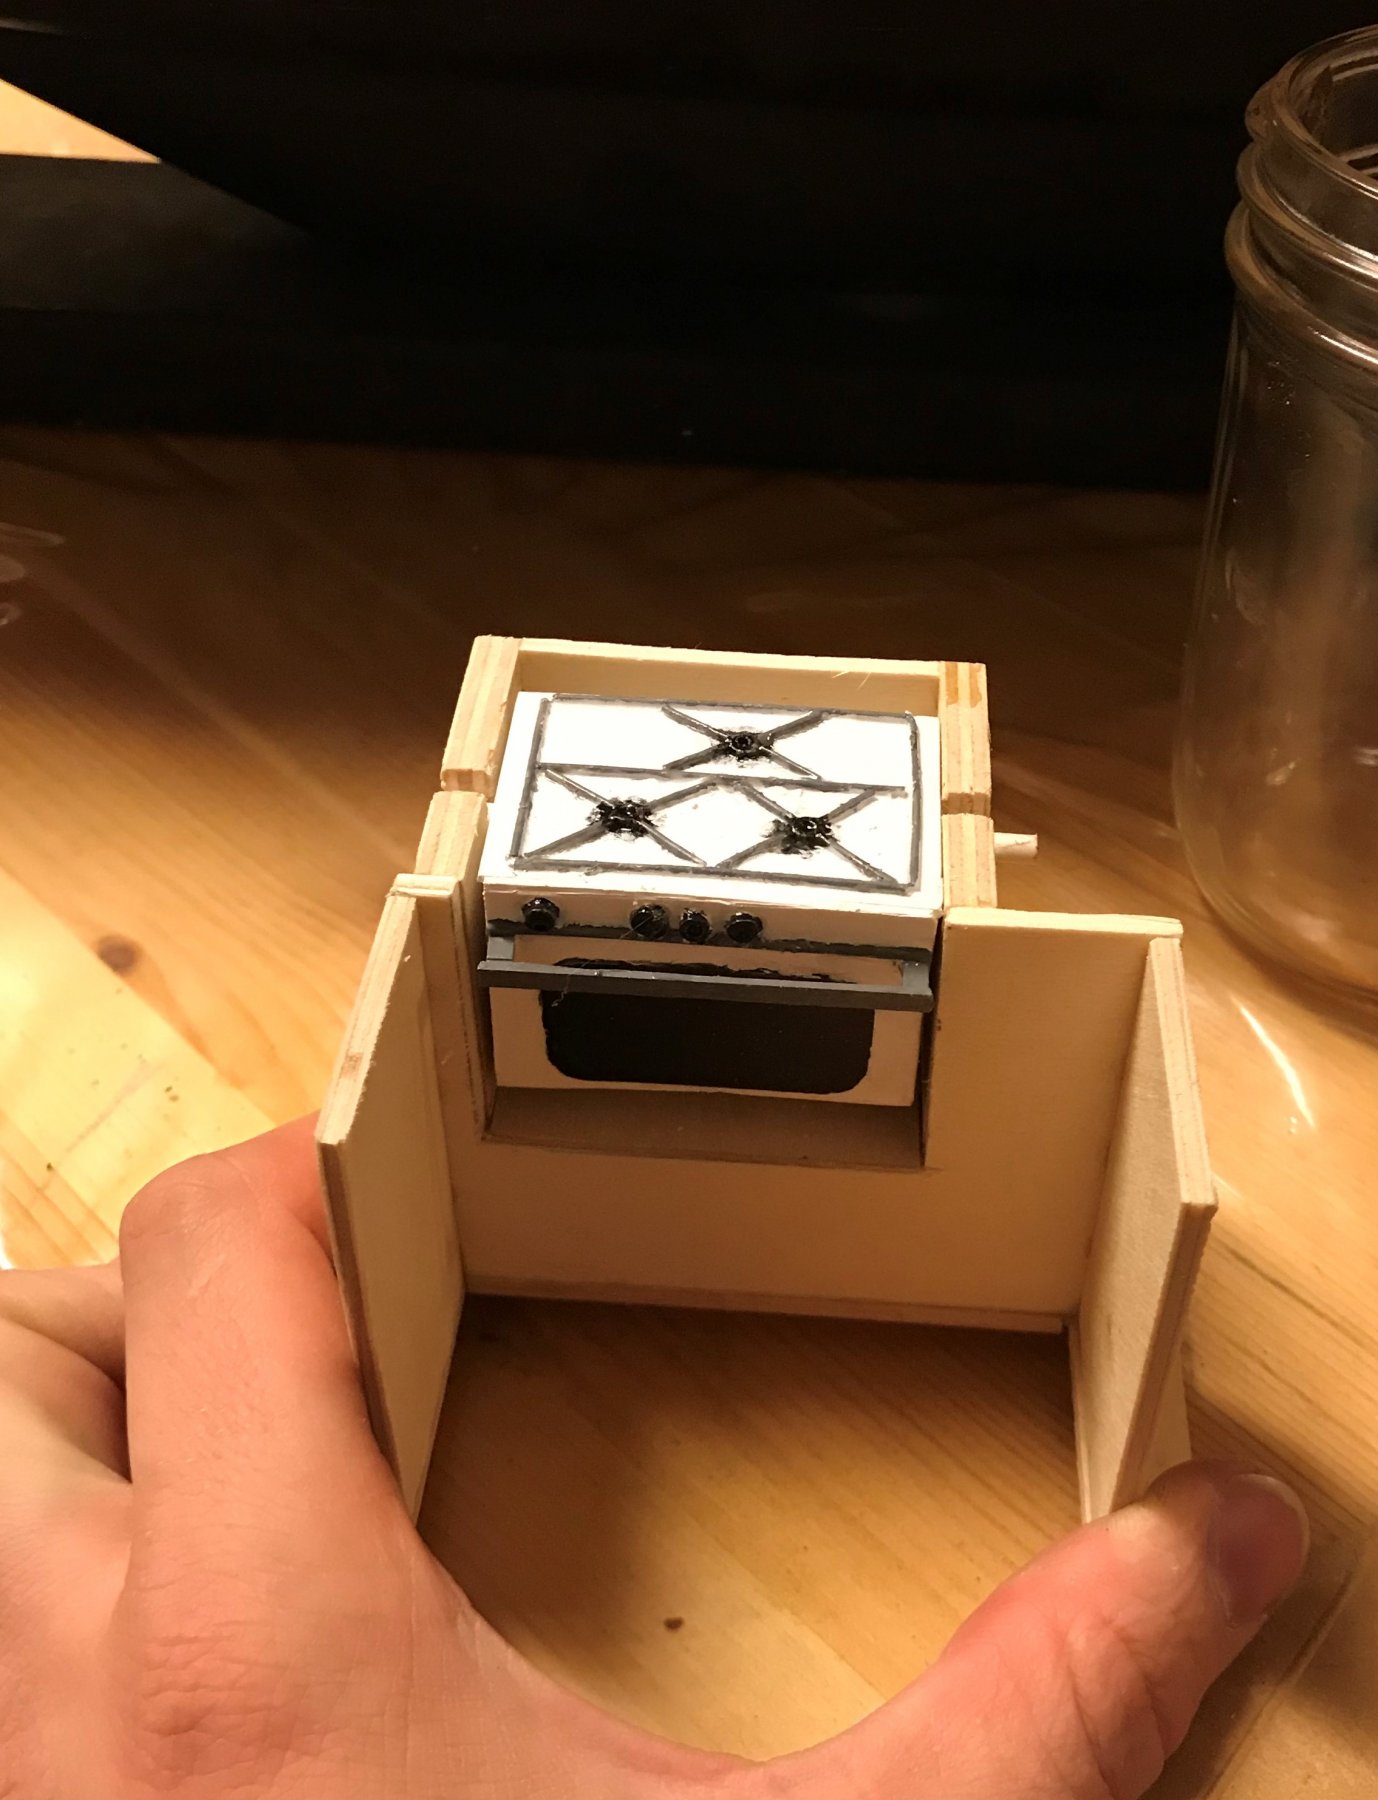
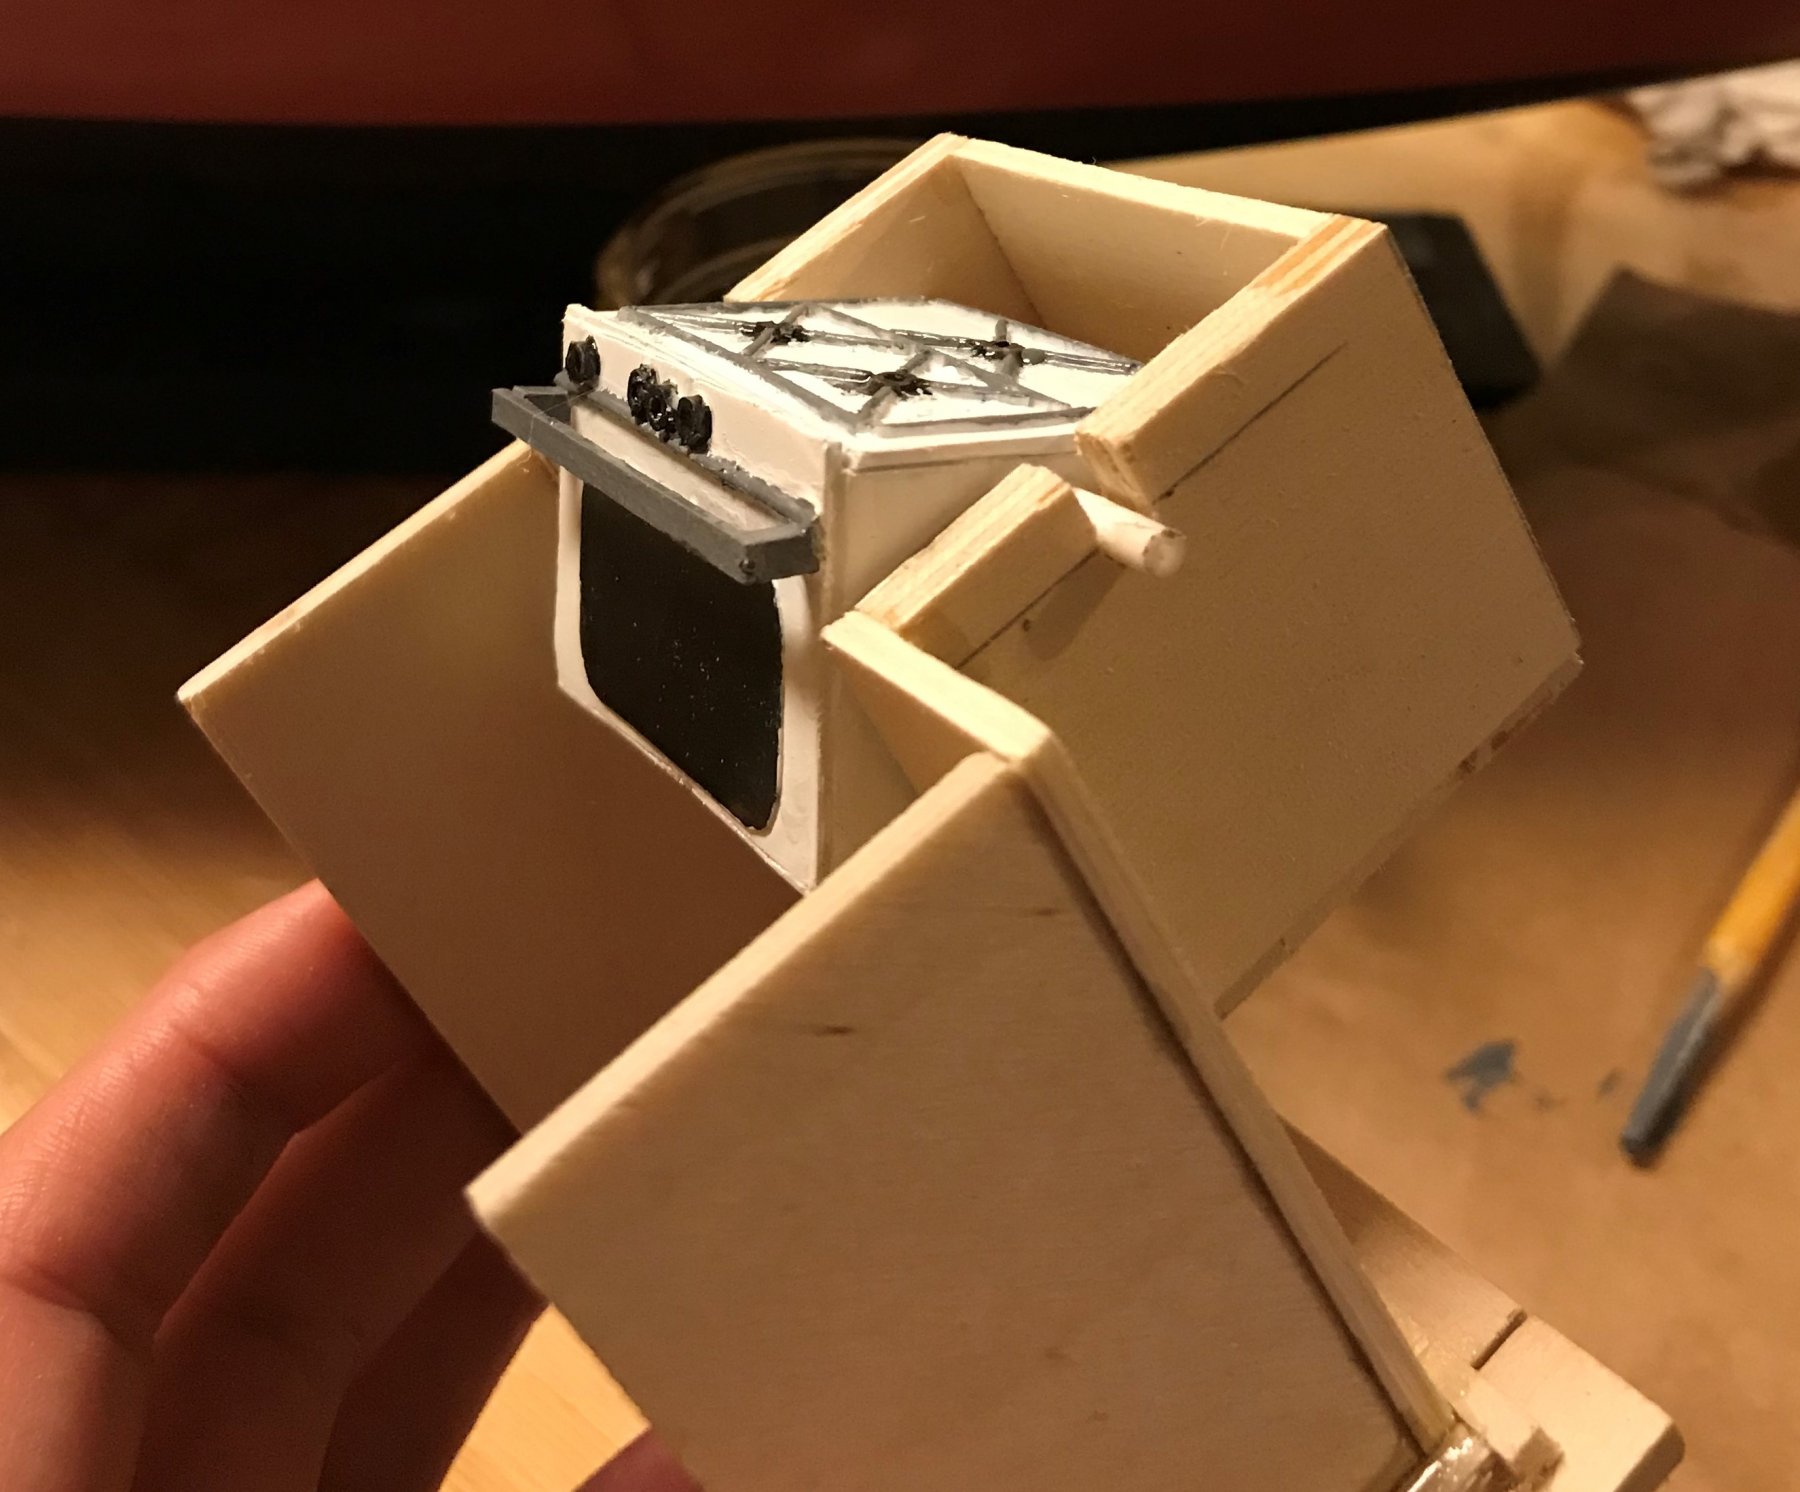
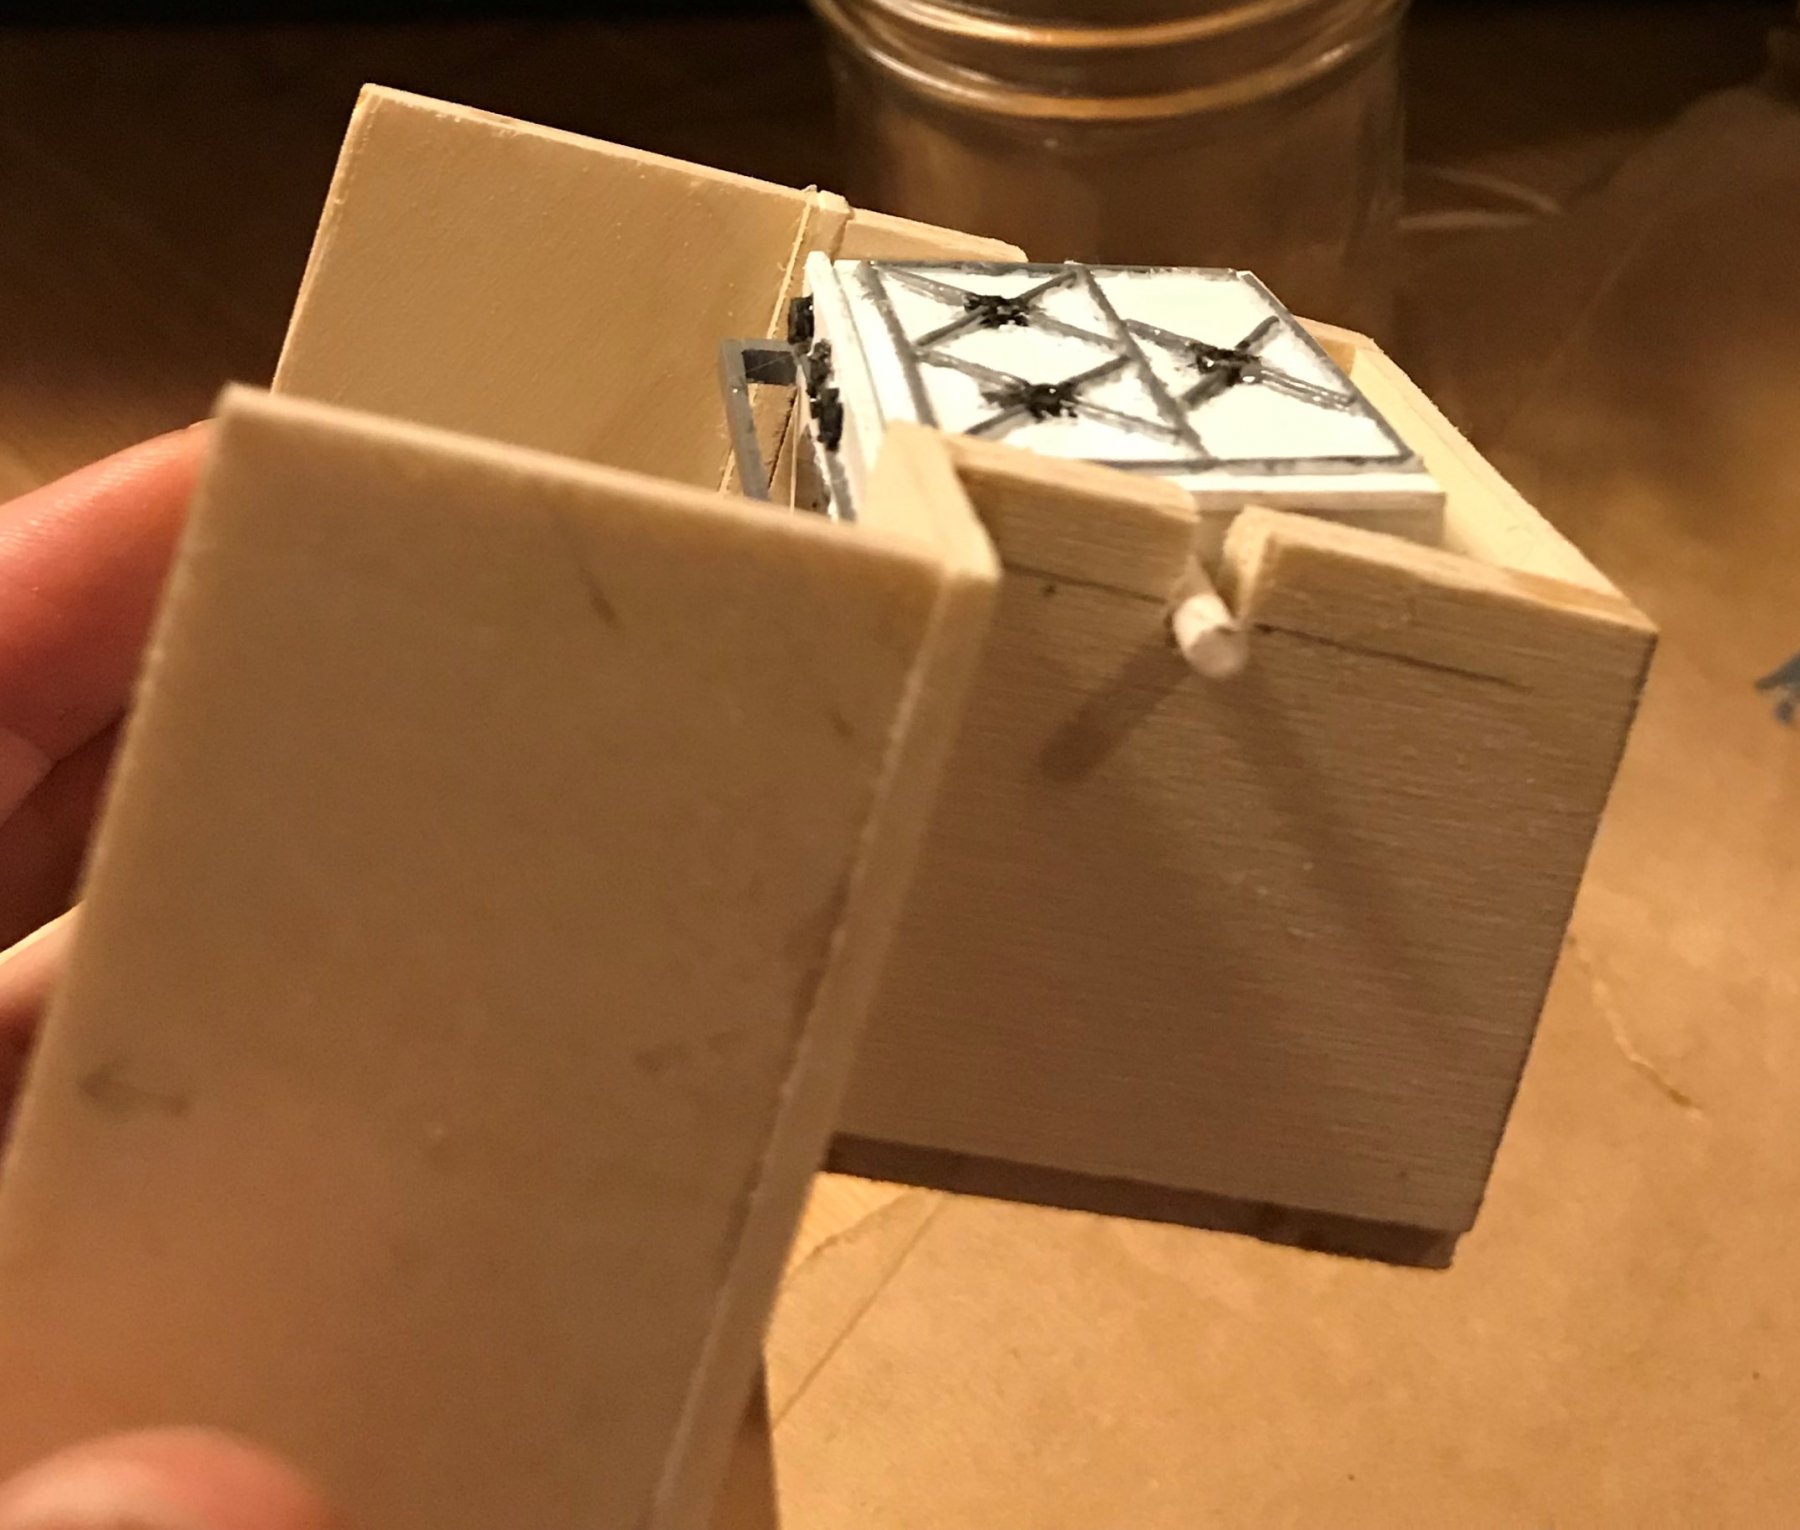
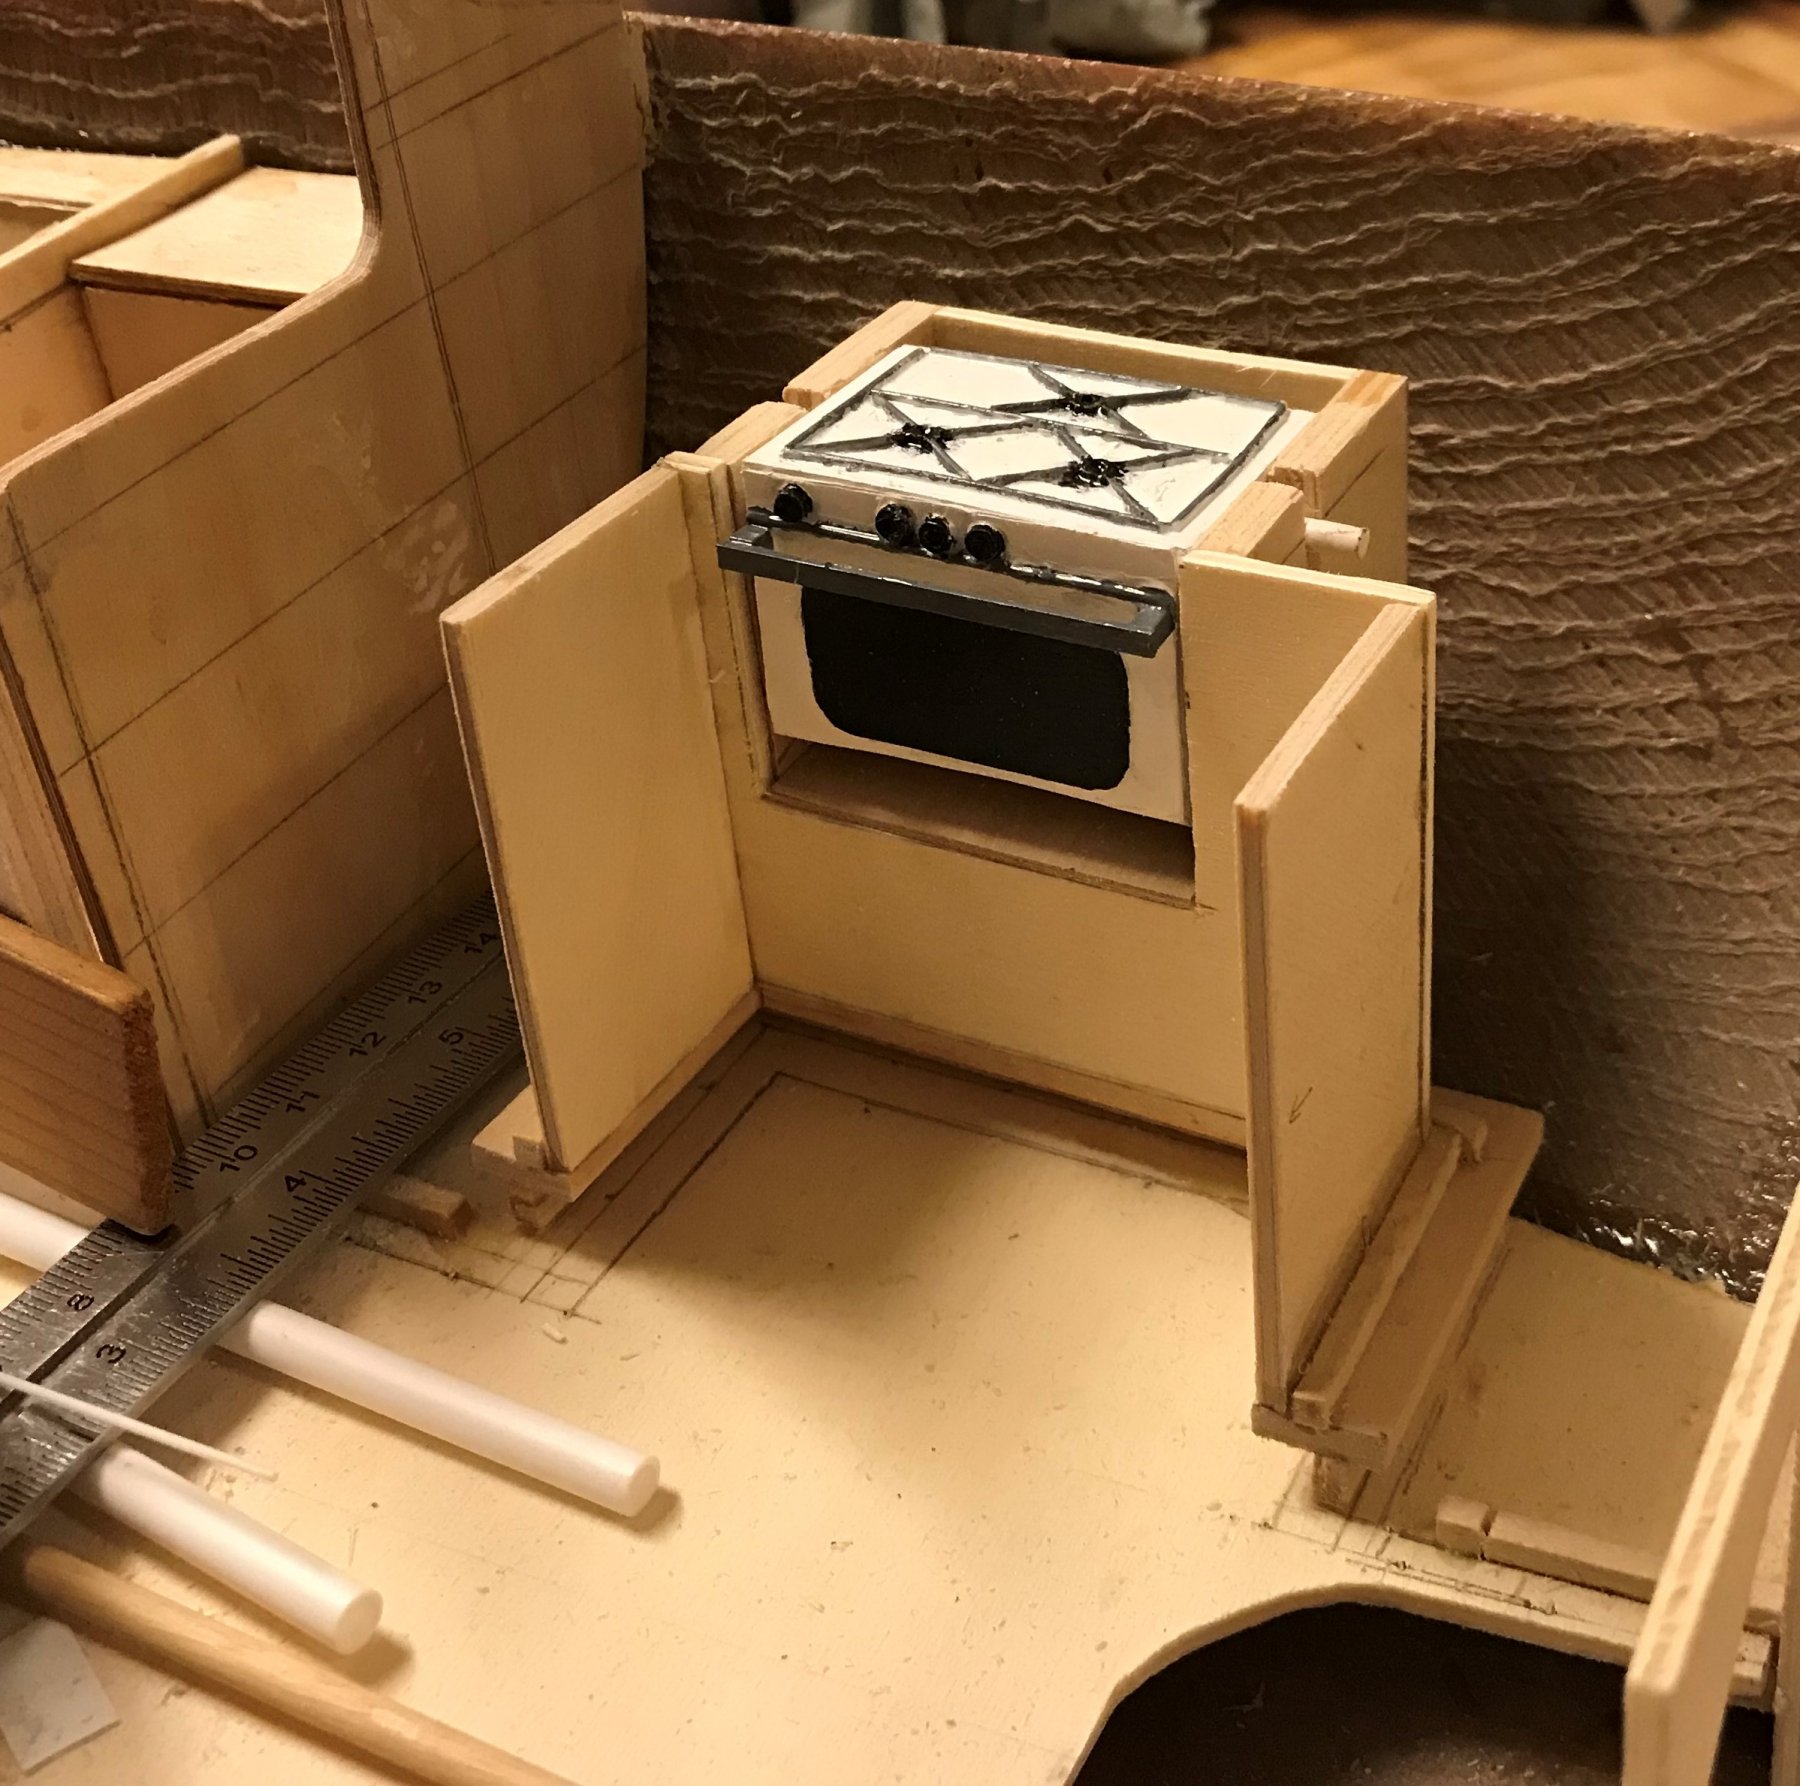
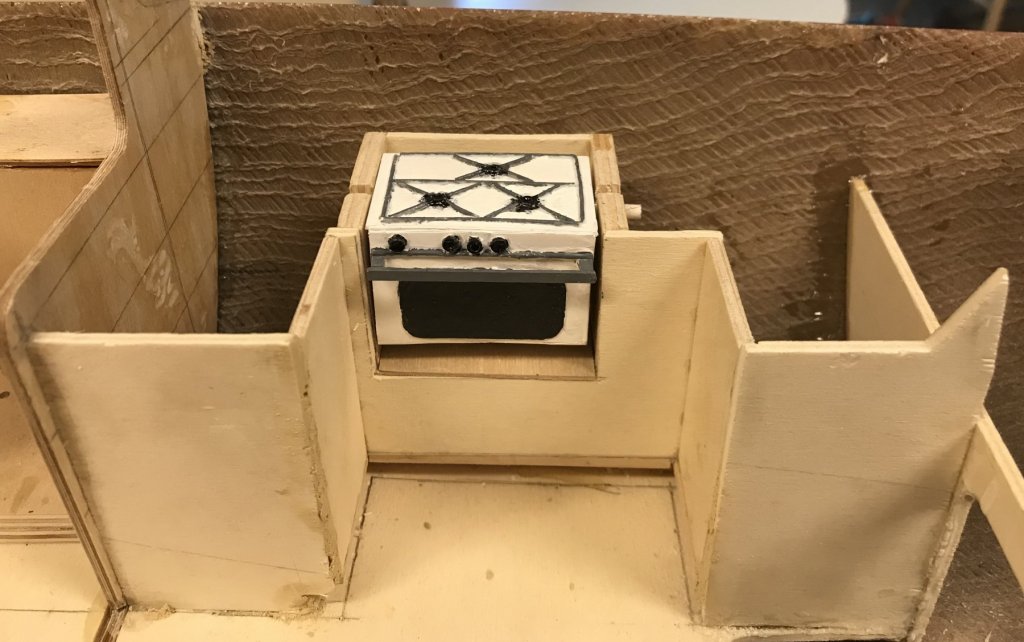
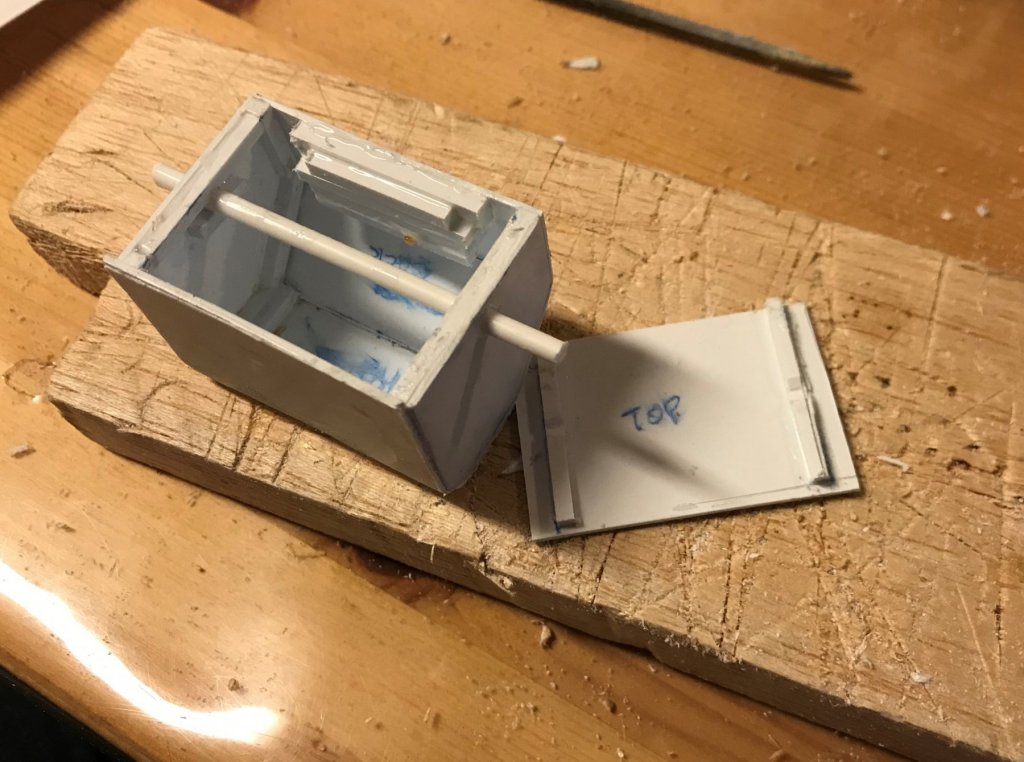
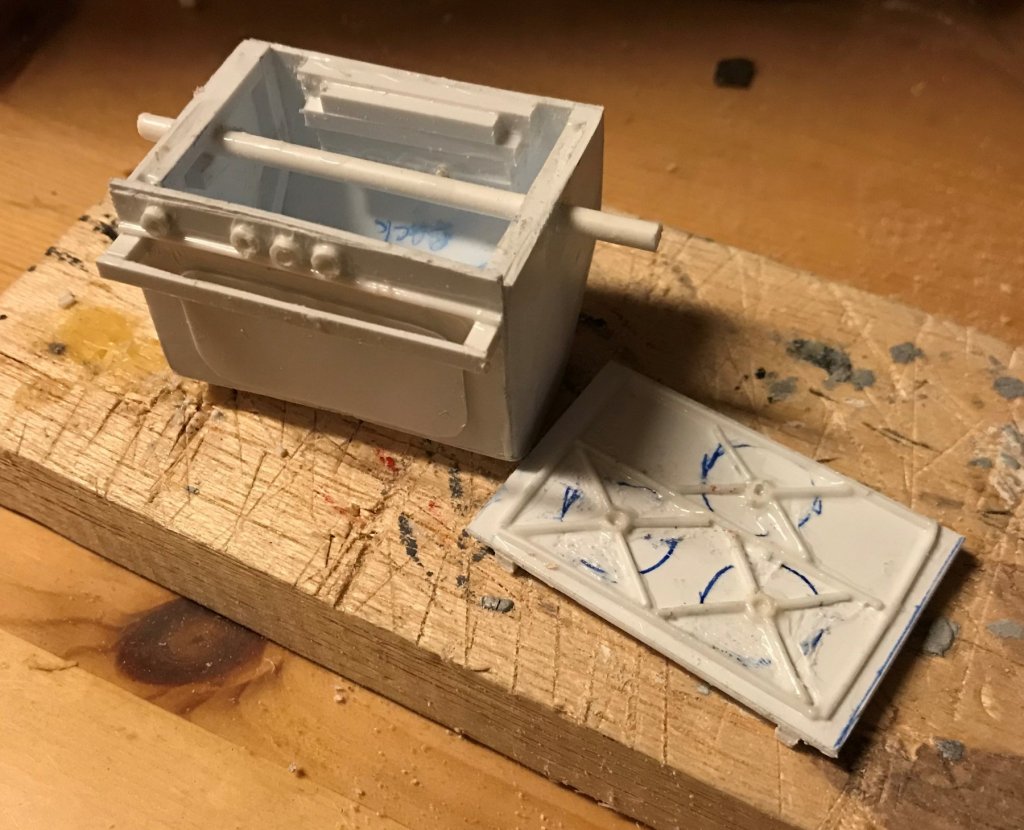
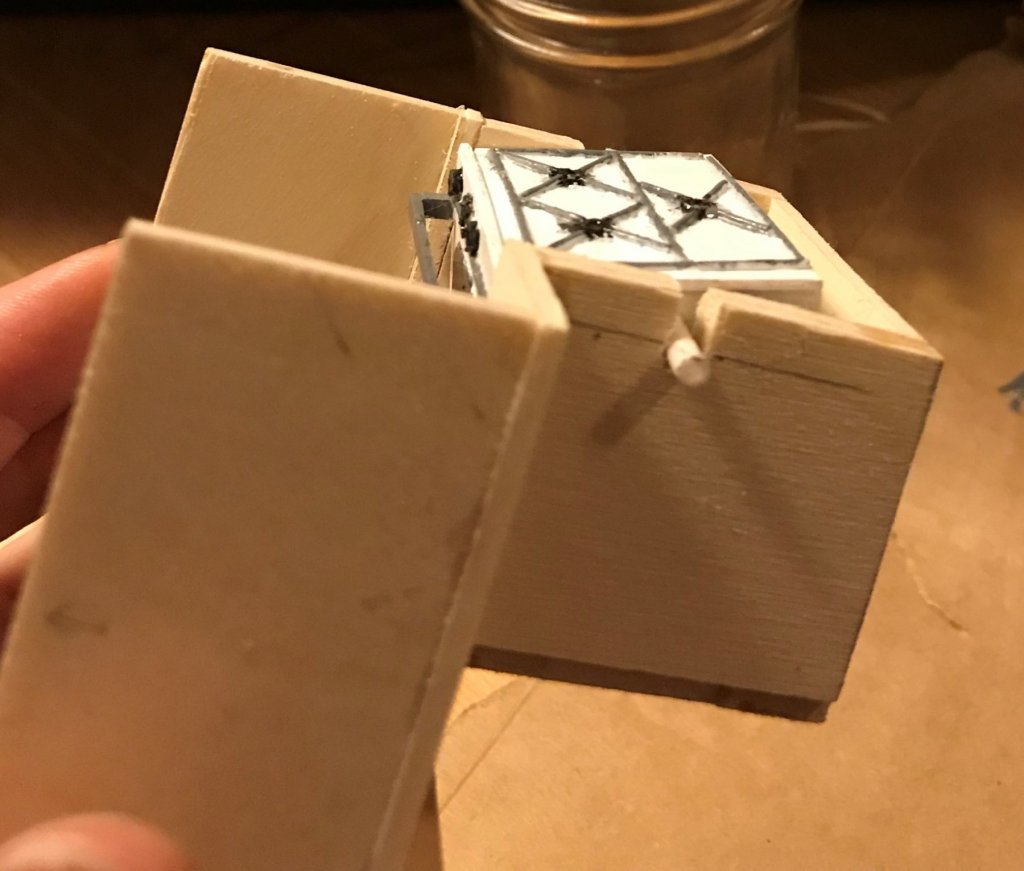
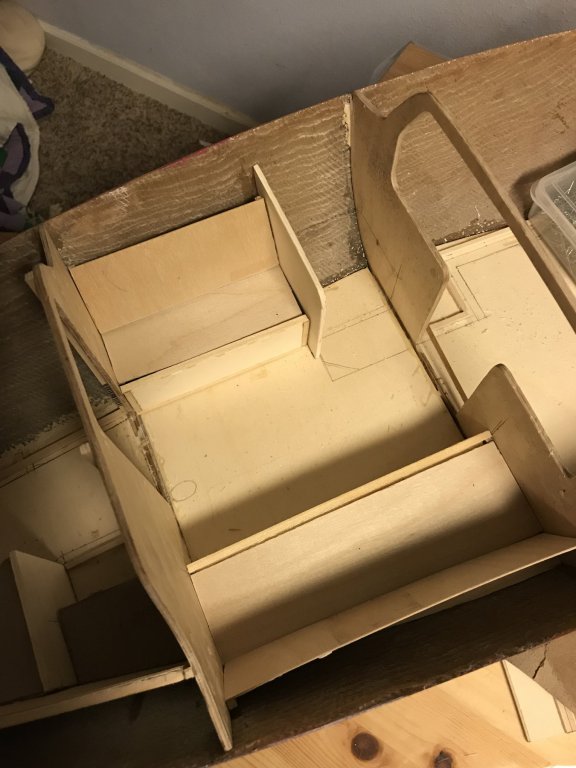
INTERIOR LAYOUT/FURNISHINGS WORK - GALLEY PART 3 As I mentioned in the previous post, I was distracted from finishing the cabinet work in the galley by the arrival of some polystyrene sheet I had ordered. I had never scratch built something from bare sheet before, and I had an idea of what I wanted to do first. To be fair, it is something that I would have needed to do sooner rather than later to finish the galley arrangement, since it impacts the counter top. It's bit of a mini-model, kind of like the Yanmar engine that I did a year or two ago. I started by cutting out the parts, measuring from the drawings I made out of the design model: Mini-Model Parts Cut I used some 1/8 x 1/8 square stock polystyrene I had laying around to help with lining parts up, similar to the furnishings in the boat. I had to leave the top off until the very end, so I could access the inside to add weight to balance the assembly when it's suspended. Assembly Phase 1 With the basic assembly put together, I started to add the details: Assembly Phase 2 By now it's obvious (and, may have been from the beginning) that I've made the gimballed galley stove. It was part of my initial vision to have a truly gimbaled stove. I painted up the stove, did my final rebalancing to make sure it sat right in the gimbal slots, and then attached the top. The Admiral decided on the white stove (even though most I've seen are just stainless steel). It does make it look more 'cute' and less 'industrial', so I'm OK with it. Below is the stove seated in its cutout, and a couple pictures demonstrating that it does in fact rotate to stay level as the boat heels: Galley Stove in Place Gimbal demonstration Finally, a shot of the galley assembly (so far) placed in the hull: Galley Assembly in Boat Next step is to pick up where I left off with the Galley assembly; I need to add the inboard facing walls that connect it to the fore and aft bulkheads. Then, I need to figure out the sink - that's the other item that will hold up the counter top. Although, I'll probably do much of the finish work (staining/varnishing, and marking out cabinet doors and such) before doing the counter top, since I don't want the sink or stove to get in the way of the staining (or, get stained!). So that may be a little ways off - I still need to install the rest of the joinery and the floor and bulkhead paneling before doing any finish staining.


-
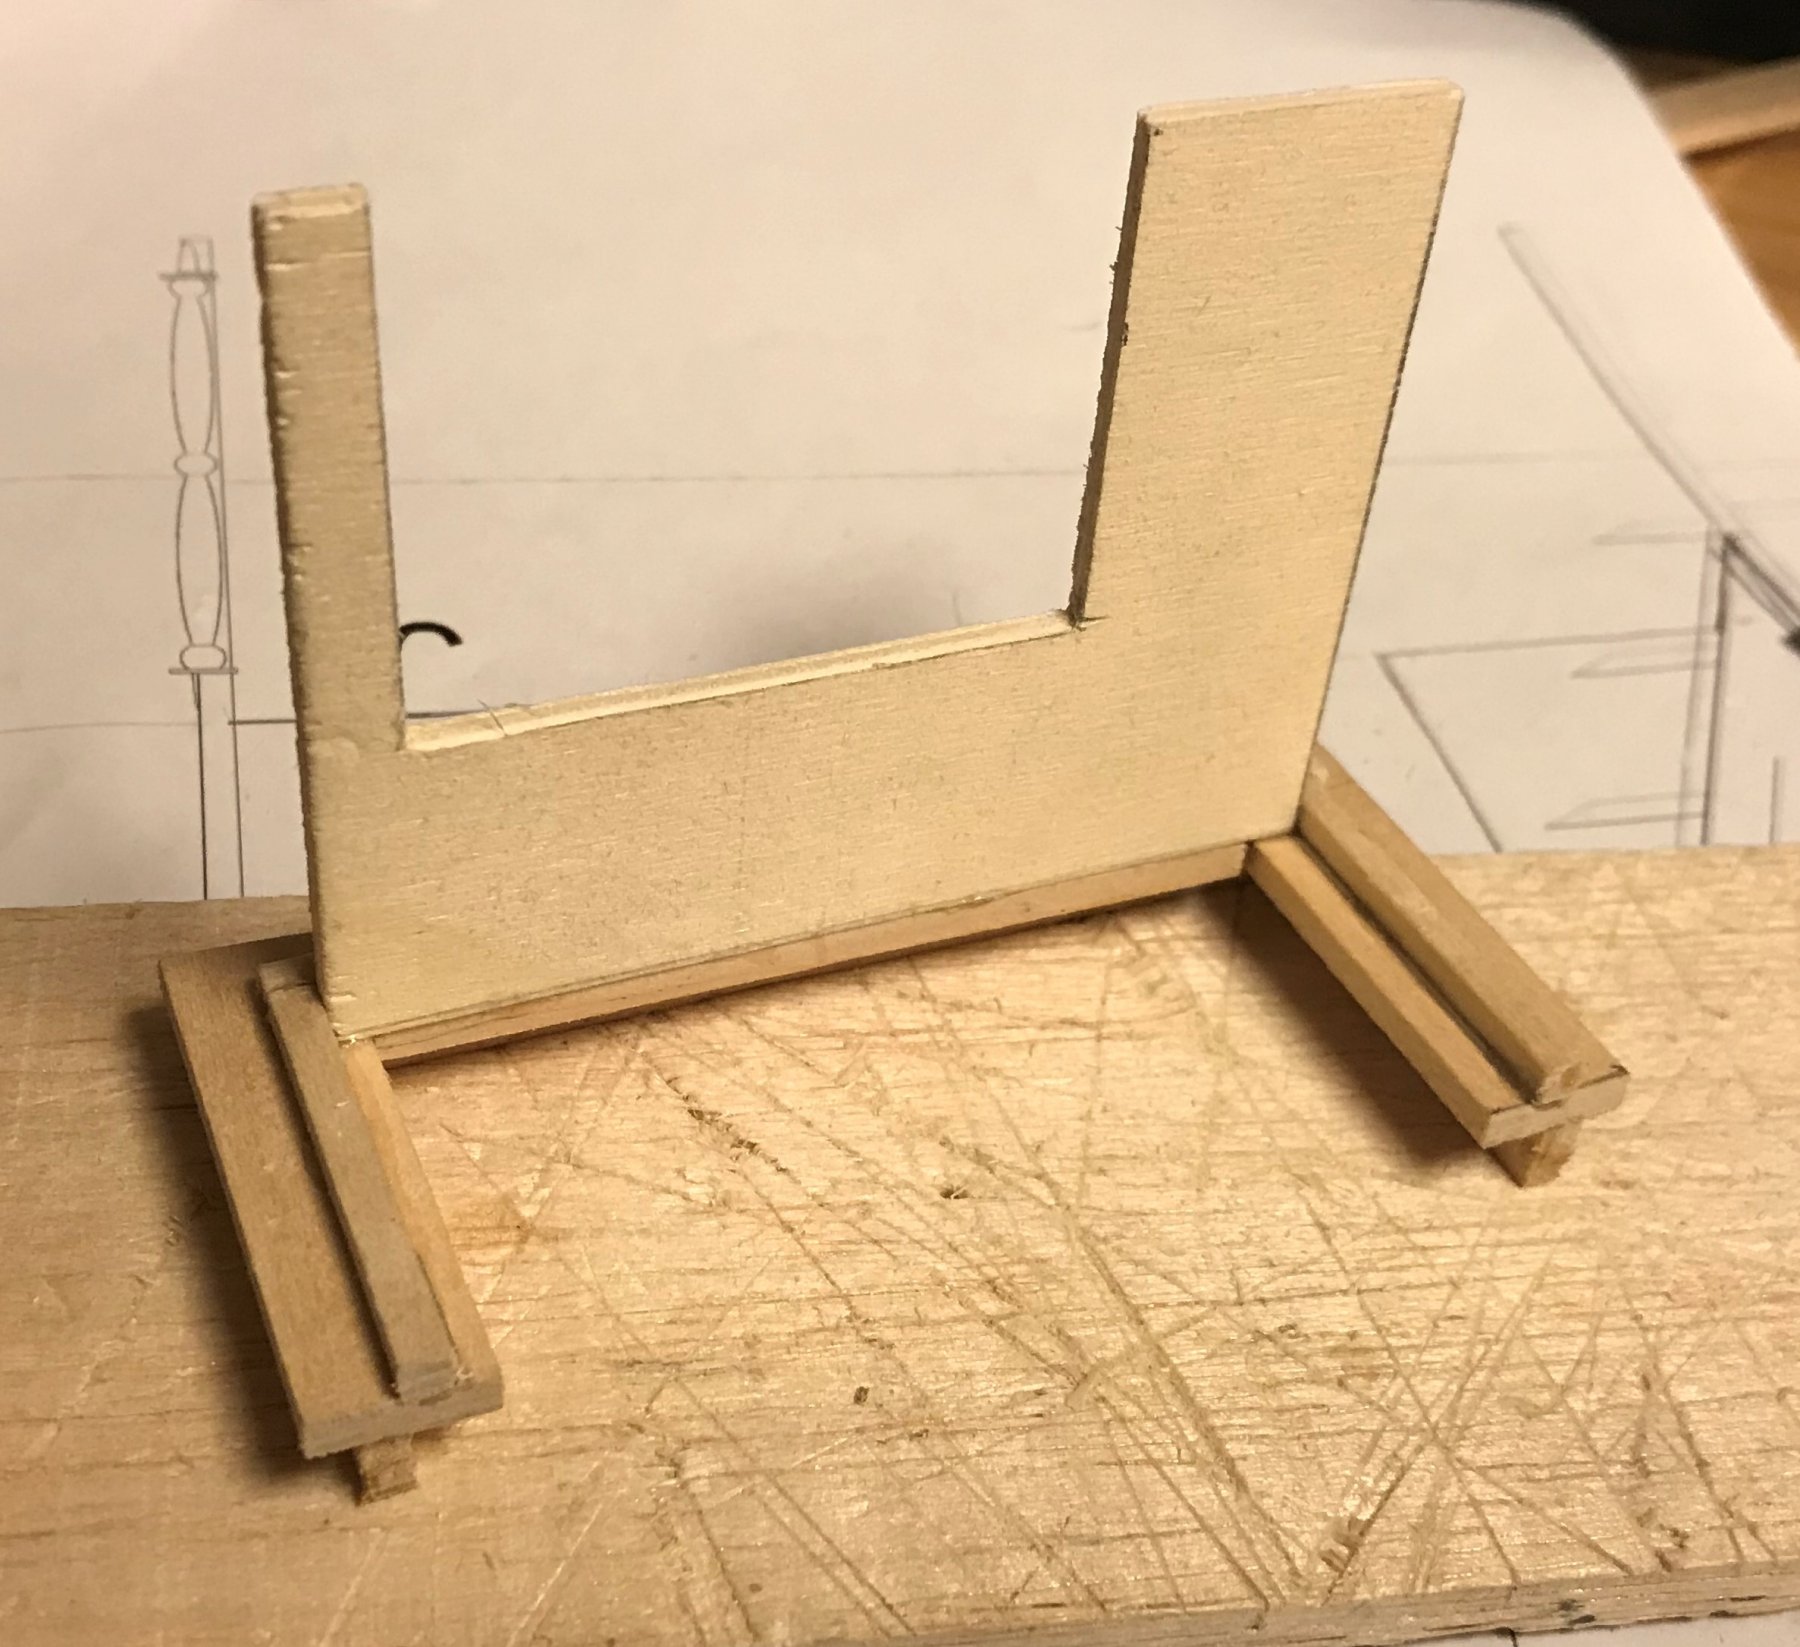
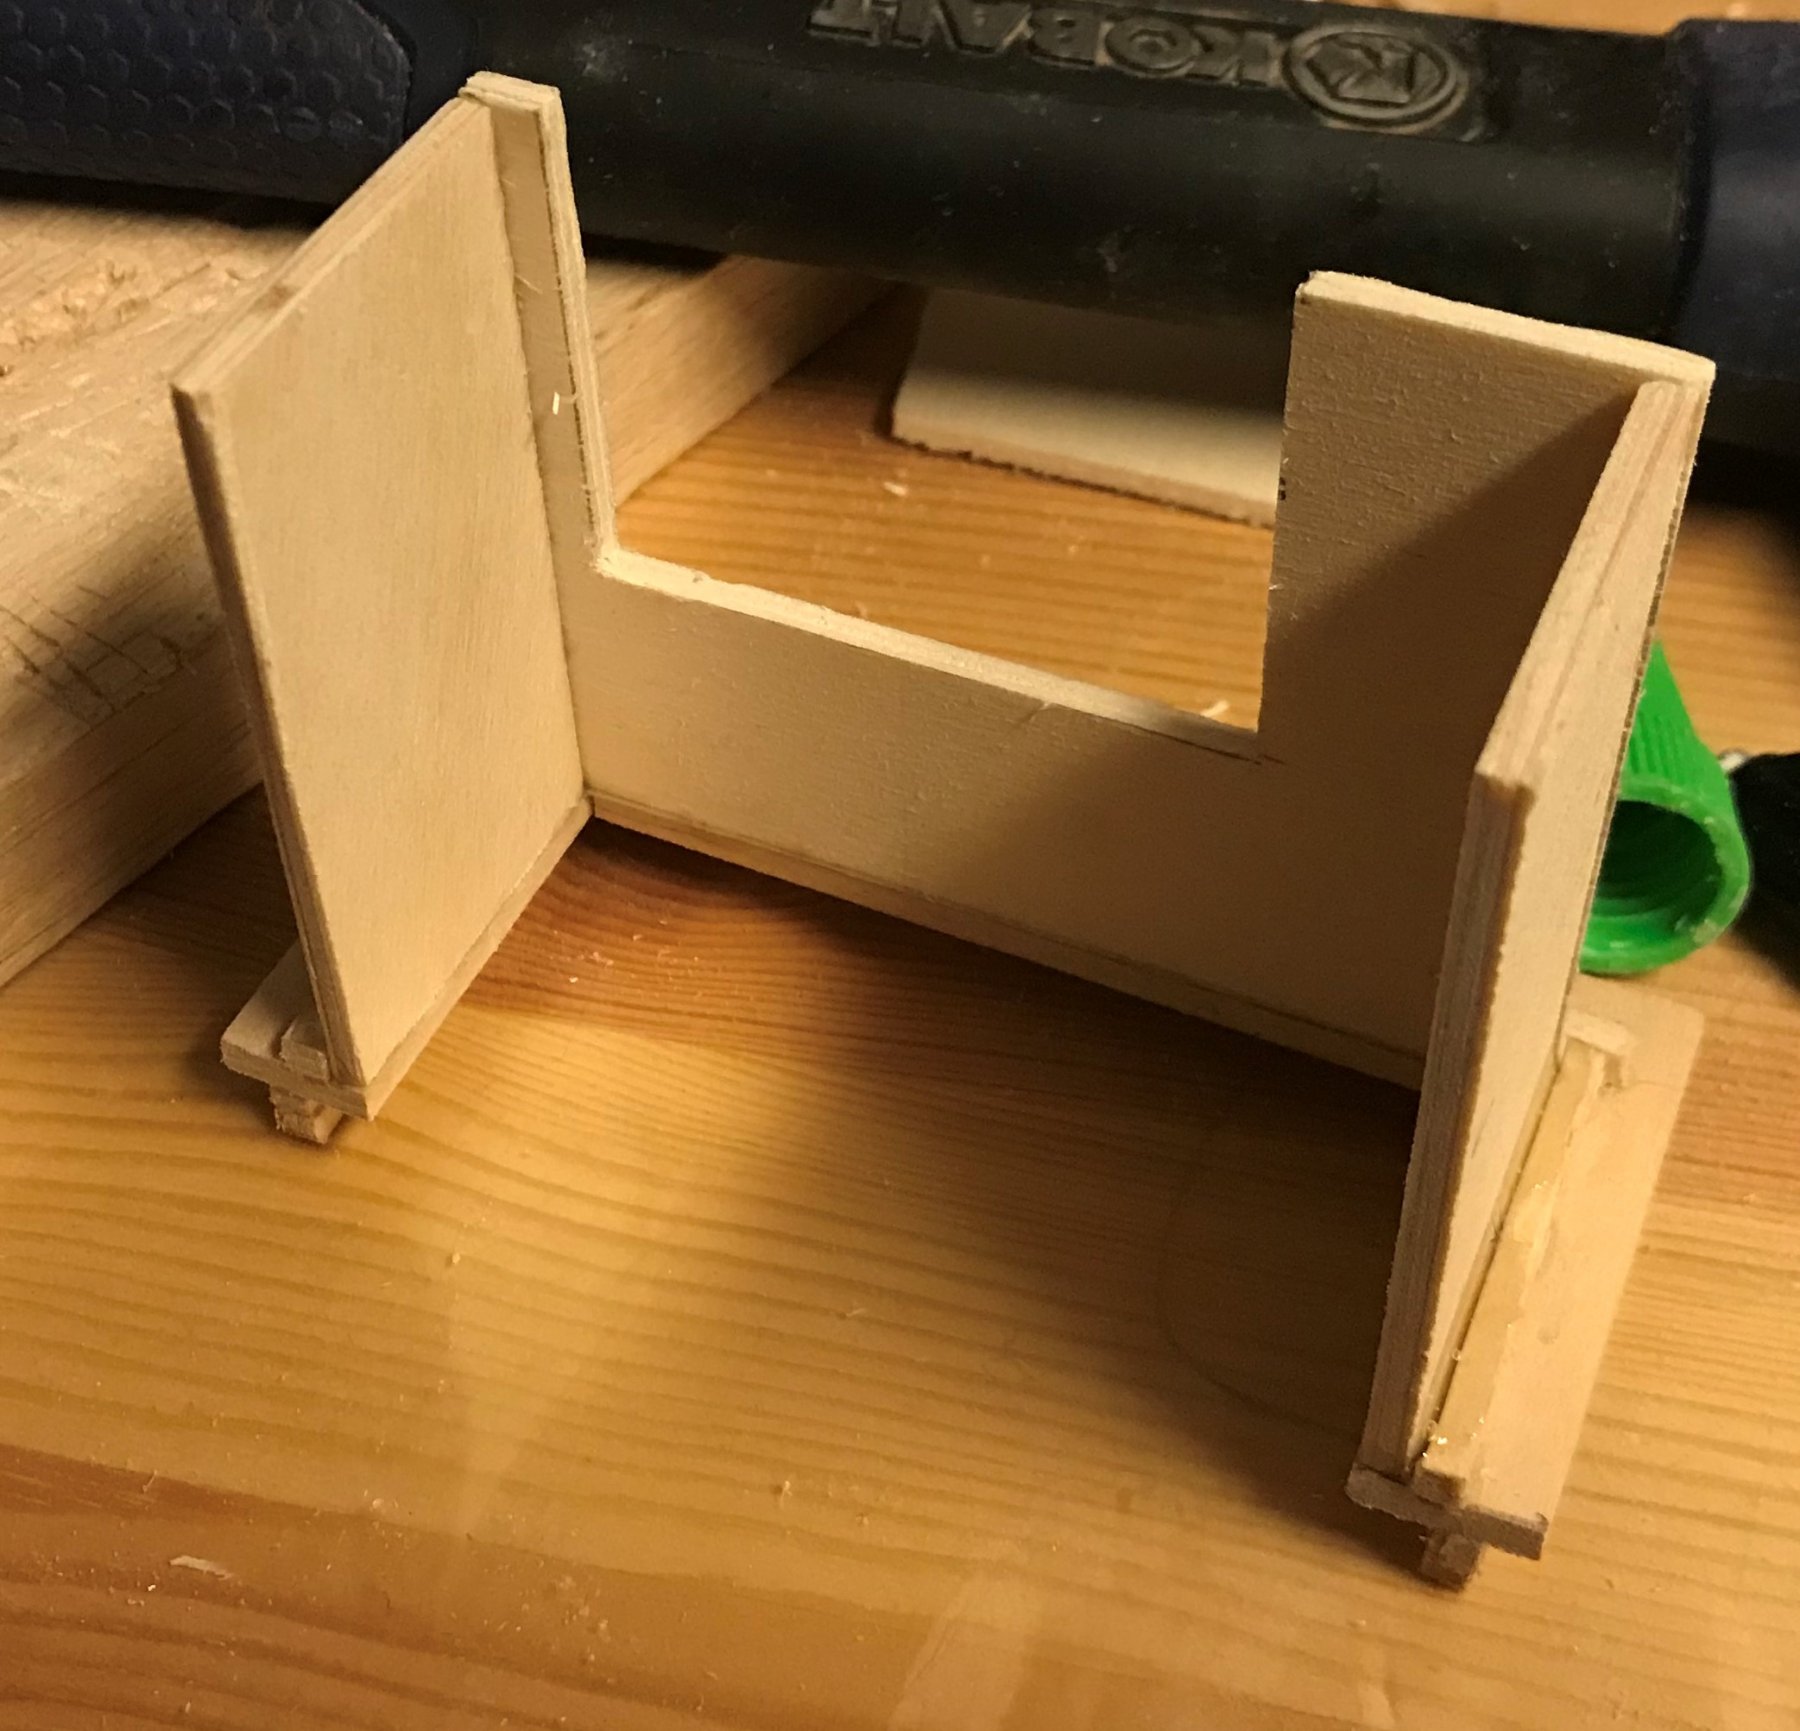
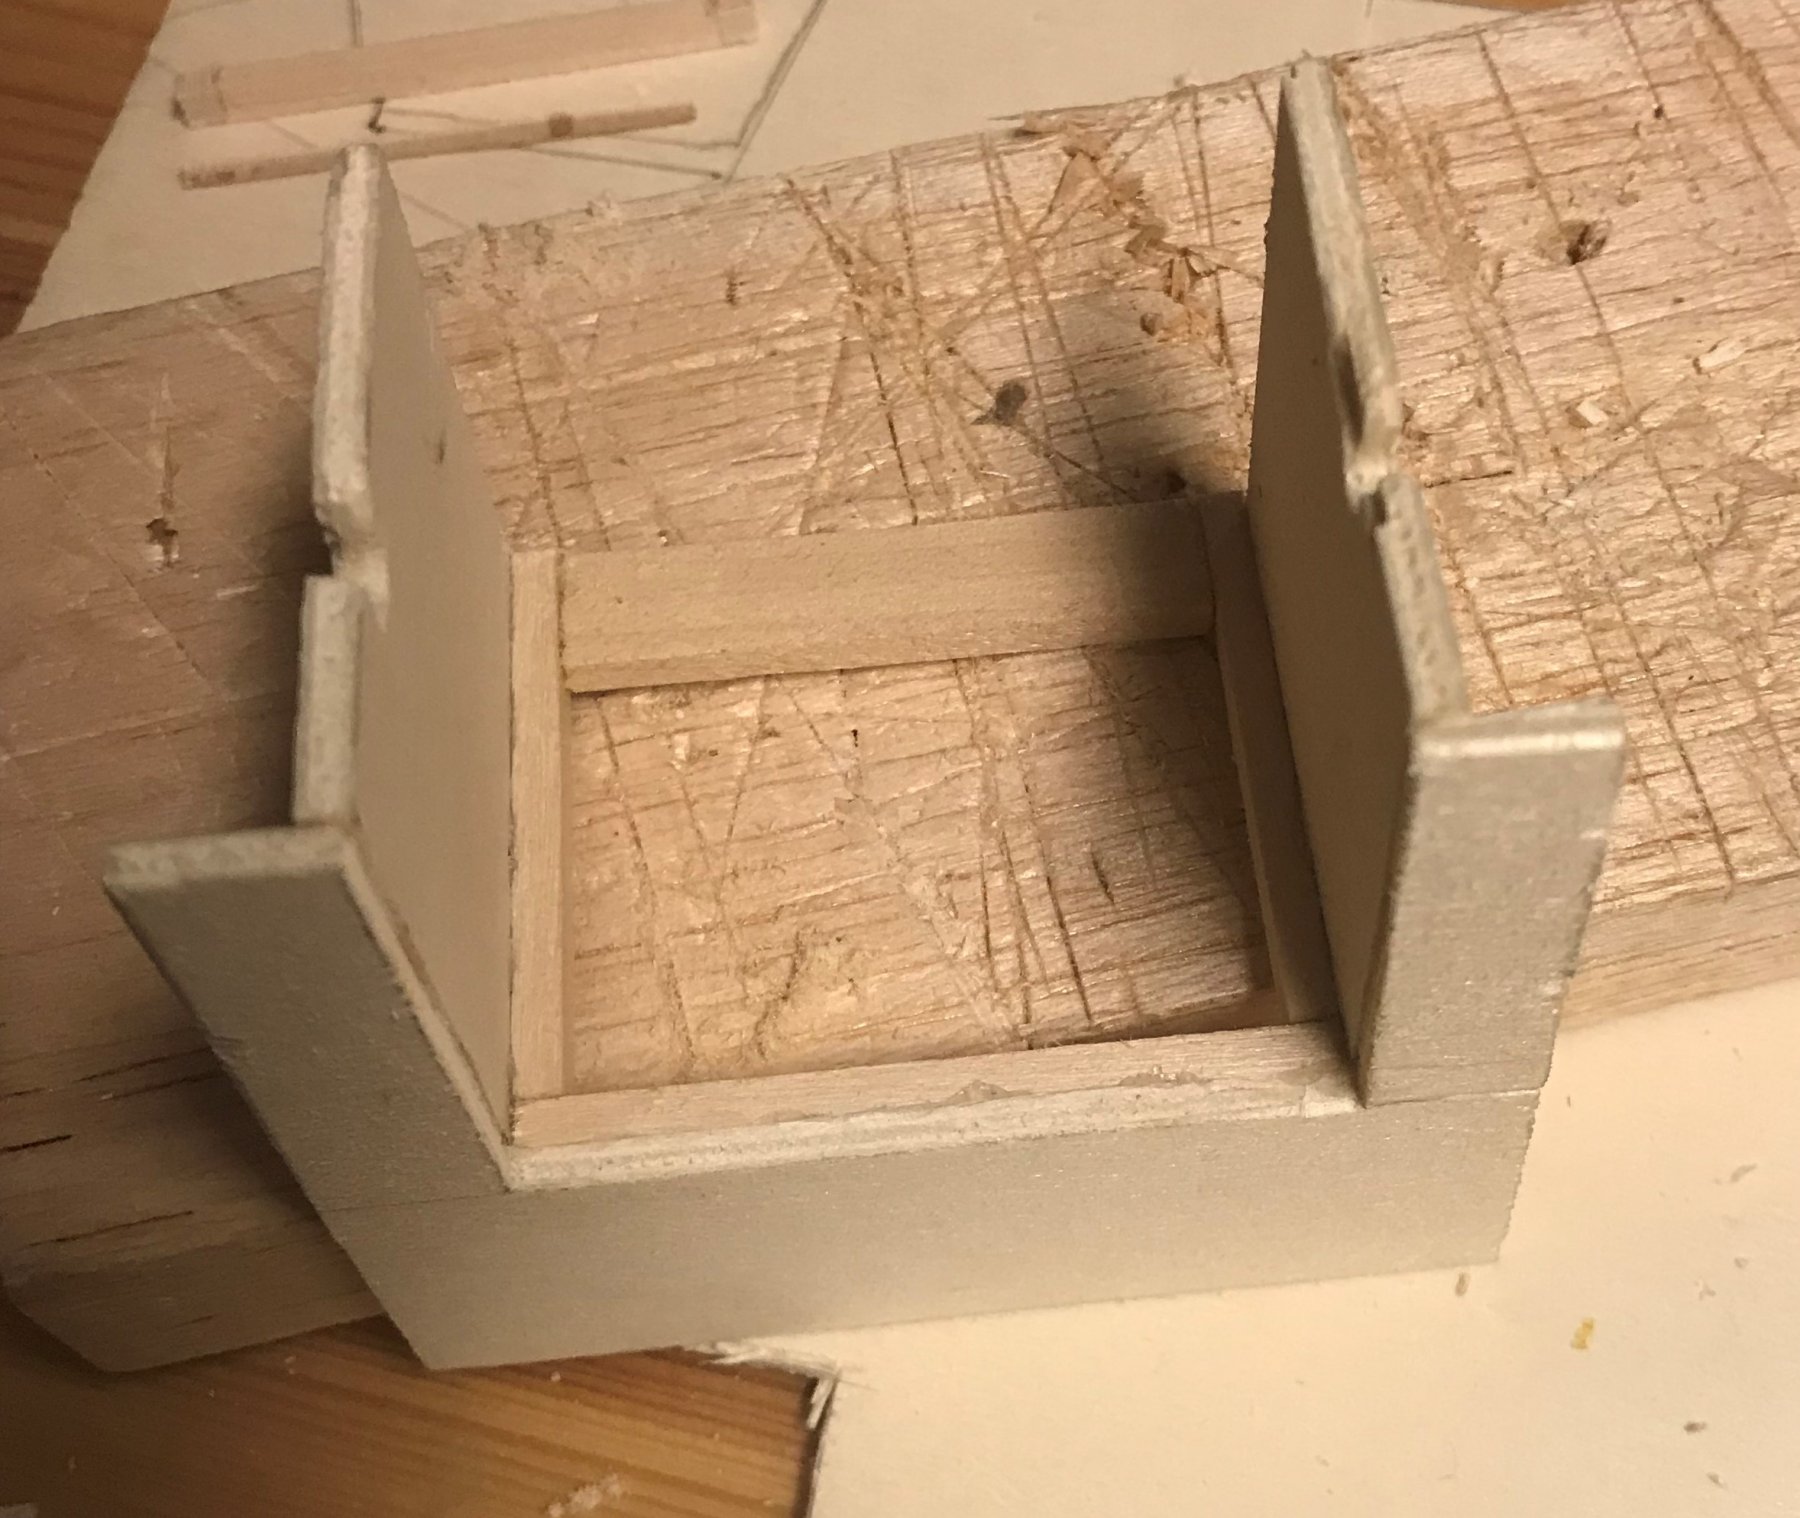
Thanks, guys, for following along and the encouragement! I'm excited to share the next couple things I've put together. INTERIOR LAYOUT/FURNISHINGS WORK - GALLEY PART 2 I decided to start over with the galley. It was a good learning experience, and the second time around a couple design and process changes made it a lot better. I started the same way, making the base. But this time, I built-up two pieces of 1/8" x 1/8" rather than ripping down a 1/8" x 1/2" (I don't have 1/8" x 1/4", and I was too impatient/cheap to get it. But that's its own problem...). I also set the pins using the drawing, rather than just using them to hold the already cut pieces. A minor change, but one which ensured everything was straight and square. Then, I cut the back piece of the 'U'. I made an aesthetic design change, moving the stove all the way to the forward side, to free up some otherwise useless counter space. The below picture was taken at that point in the process: Galley Rebuild - Base and Back Face Next, I cut and installed the sides, going slowly and making sure that everything was straight. Sides Installed So far, so good. Next came the real challenging part, that gave me headaches last time - the stove pocket. Since there is no real inside to the cabinets, I decided to use 1/4" thick craft plywood to make the sides. For one, it's less prone to bending, and secondly it has a relatively large, flat surface to mount to. I cut the pieces with the scroll saw, to ensure that the cuts were straight through the thickness (I tend to induce a bevel when I use my hand saw). I also made the entire base out of 1/8" x 1/2", again to get wide flat pieces to keep the base square and help with keeping the walls straight. The finished stove pocket assembly is below: Stove Pocket Assembly Finally, I had to attach it to the galley. Before, I had tried to build supports off the bottom of the stove pocket which landed on the galley base; that didn't work, so this time I set the whole thing upside down, so the top would be flush. That worked pretty well. Attaching Stove Pocket to Galley Assembly The only other thing I've done with the galley assembly since putting this together last week was to add the solid bottom to the stove pocket, which is just a piece of 1/32" basswood. This is because I got a bit distracted on a mini-project (for the boat) inspired by the arrival of some sheet polystyrene I had ordered... More to follow


-
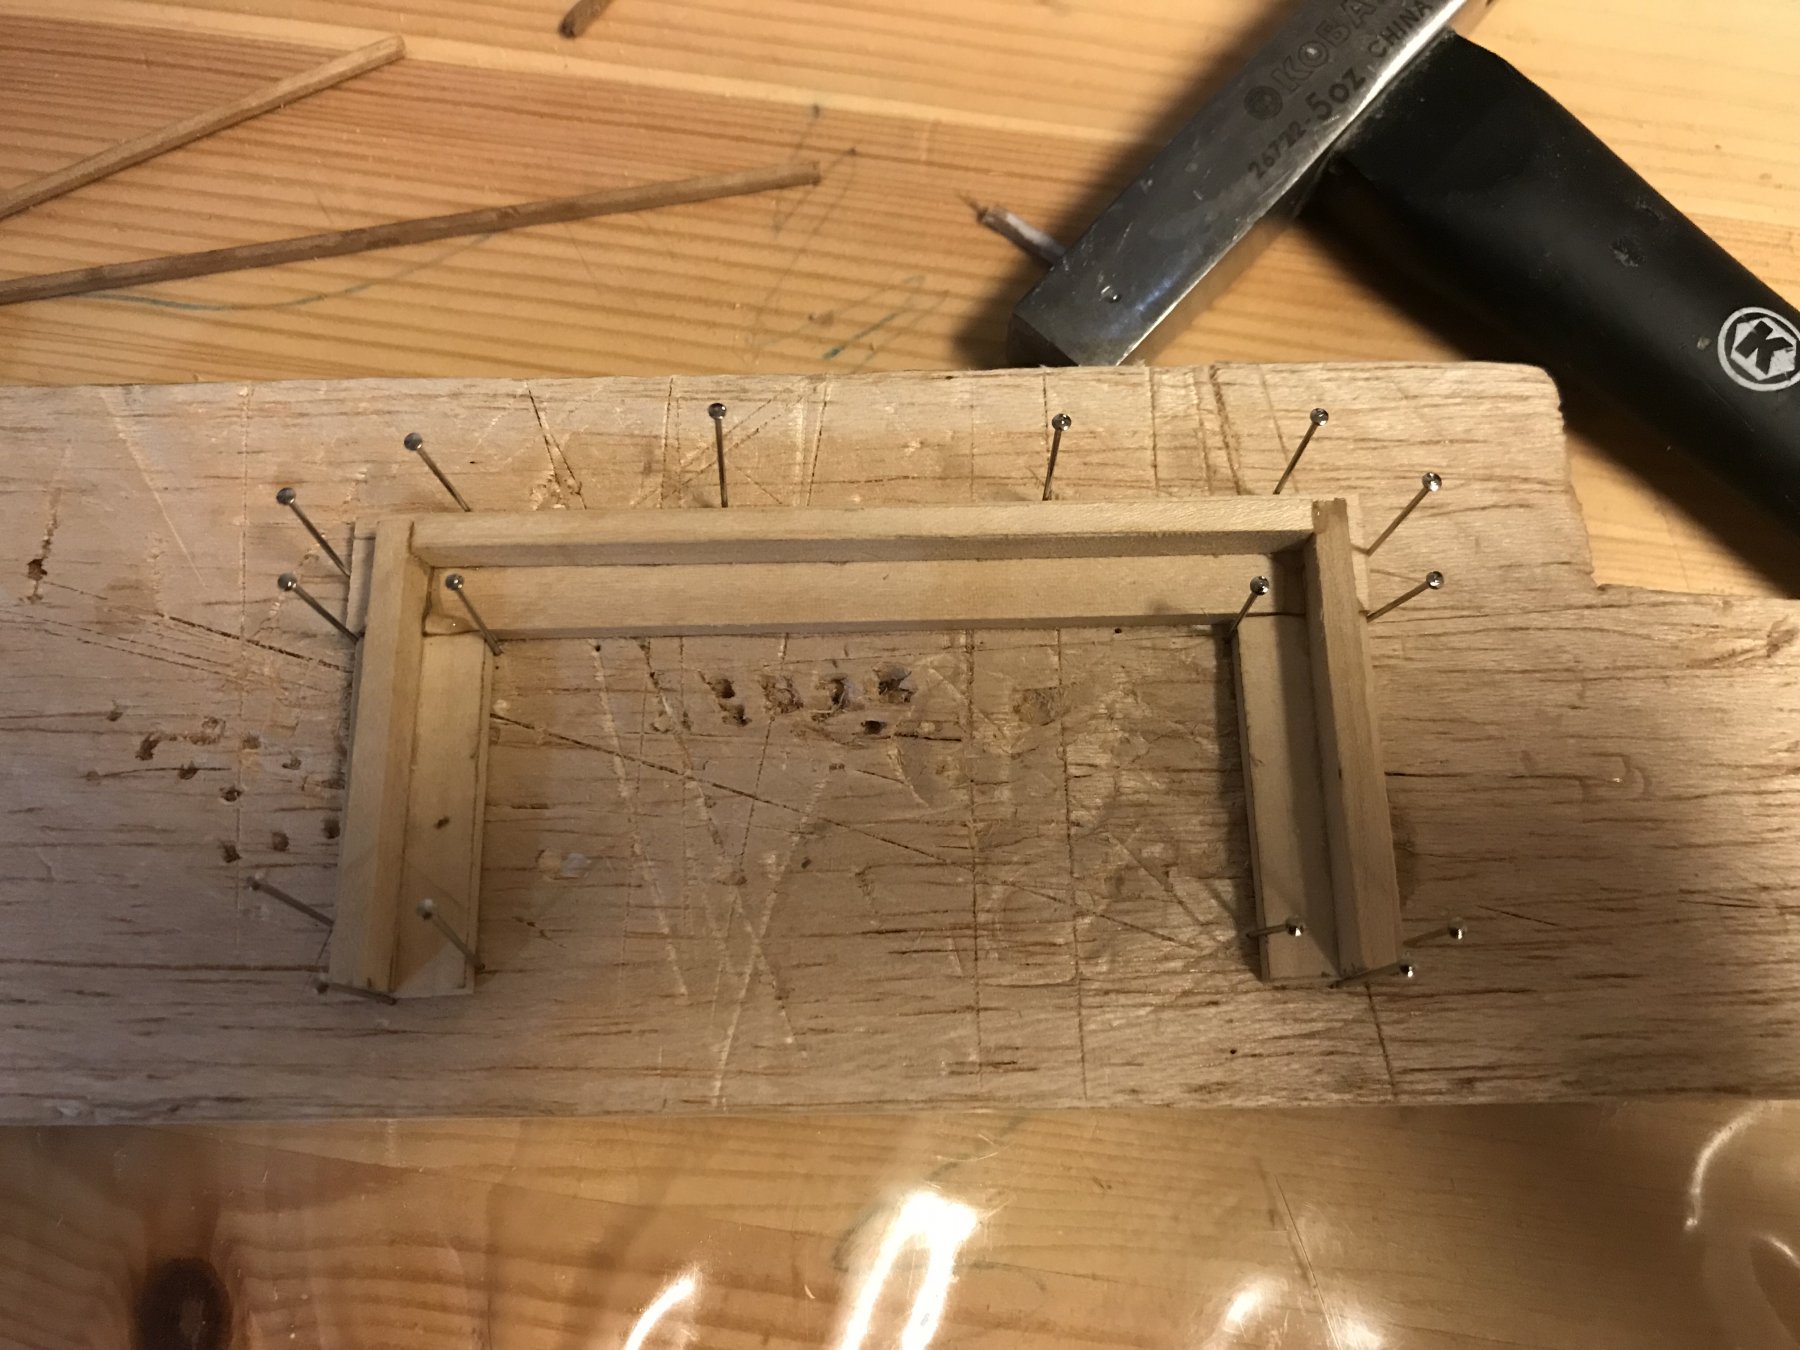
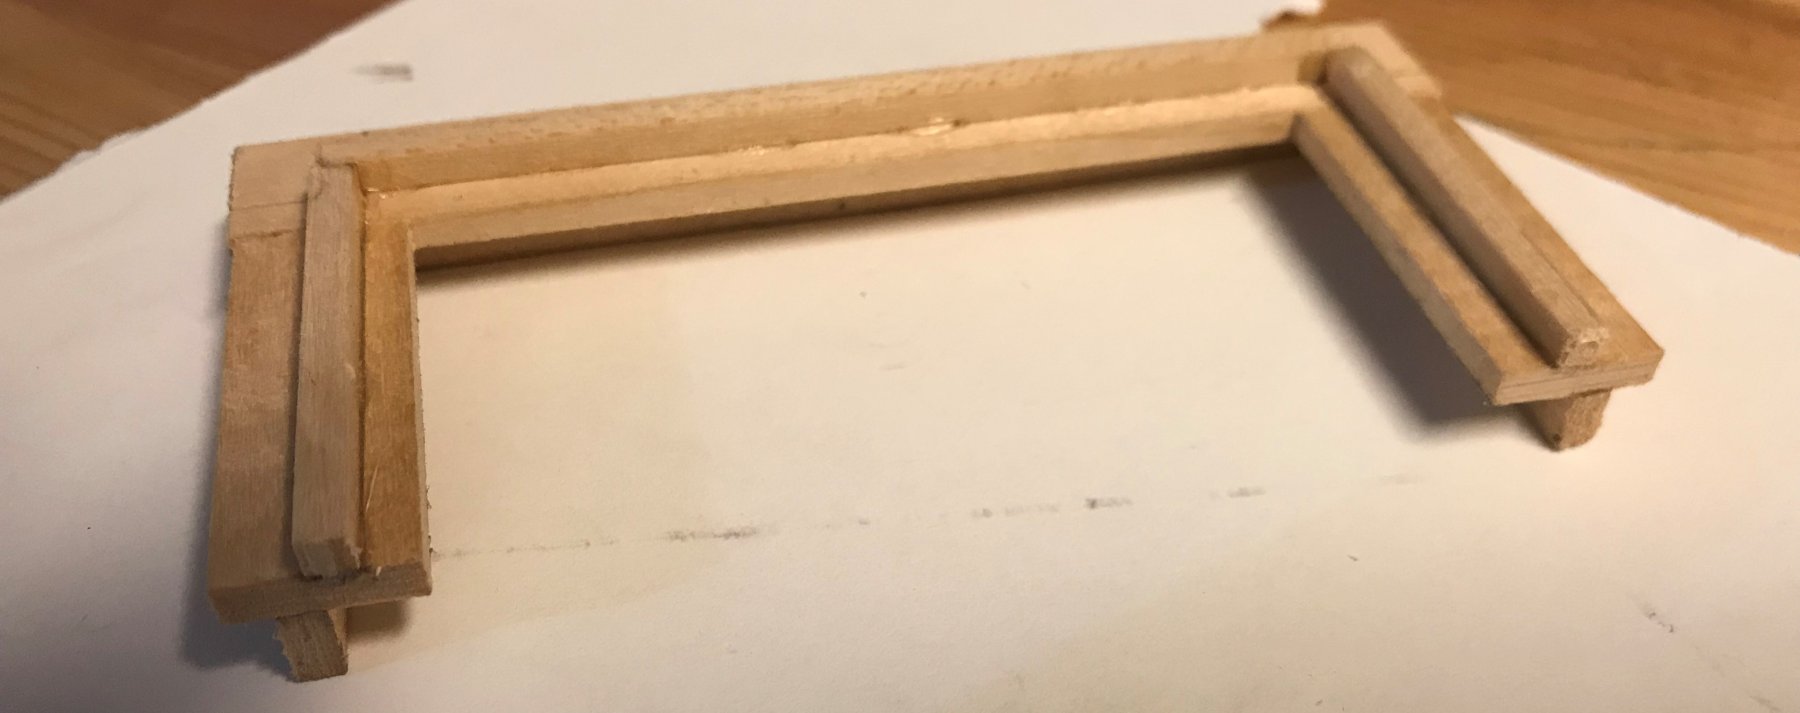
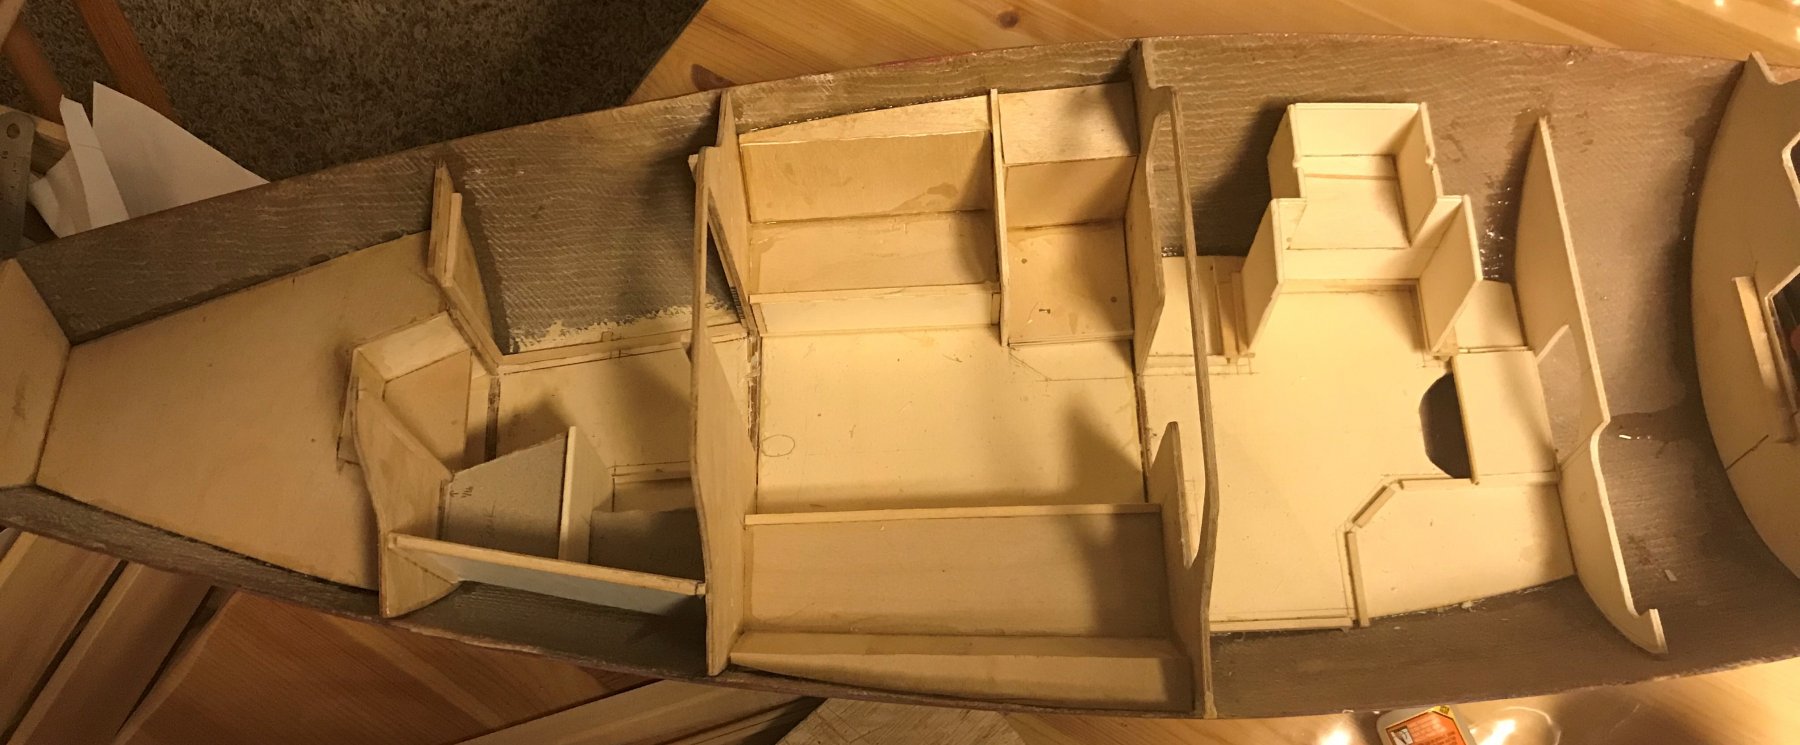
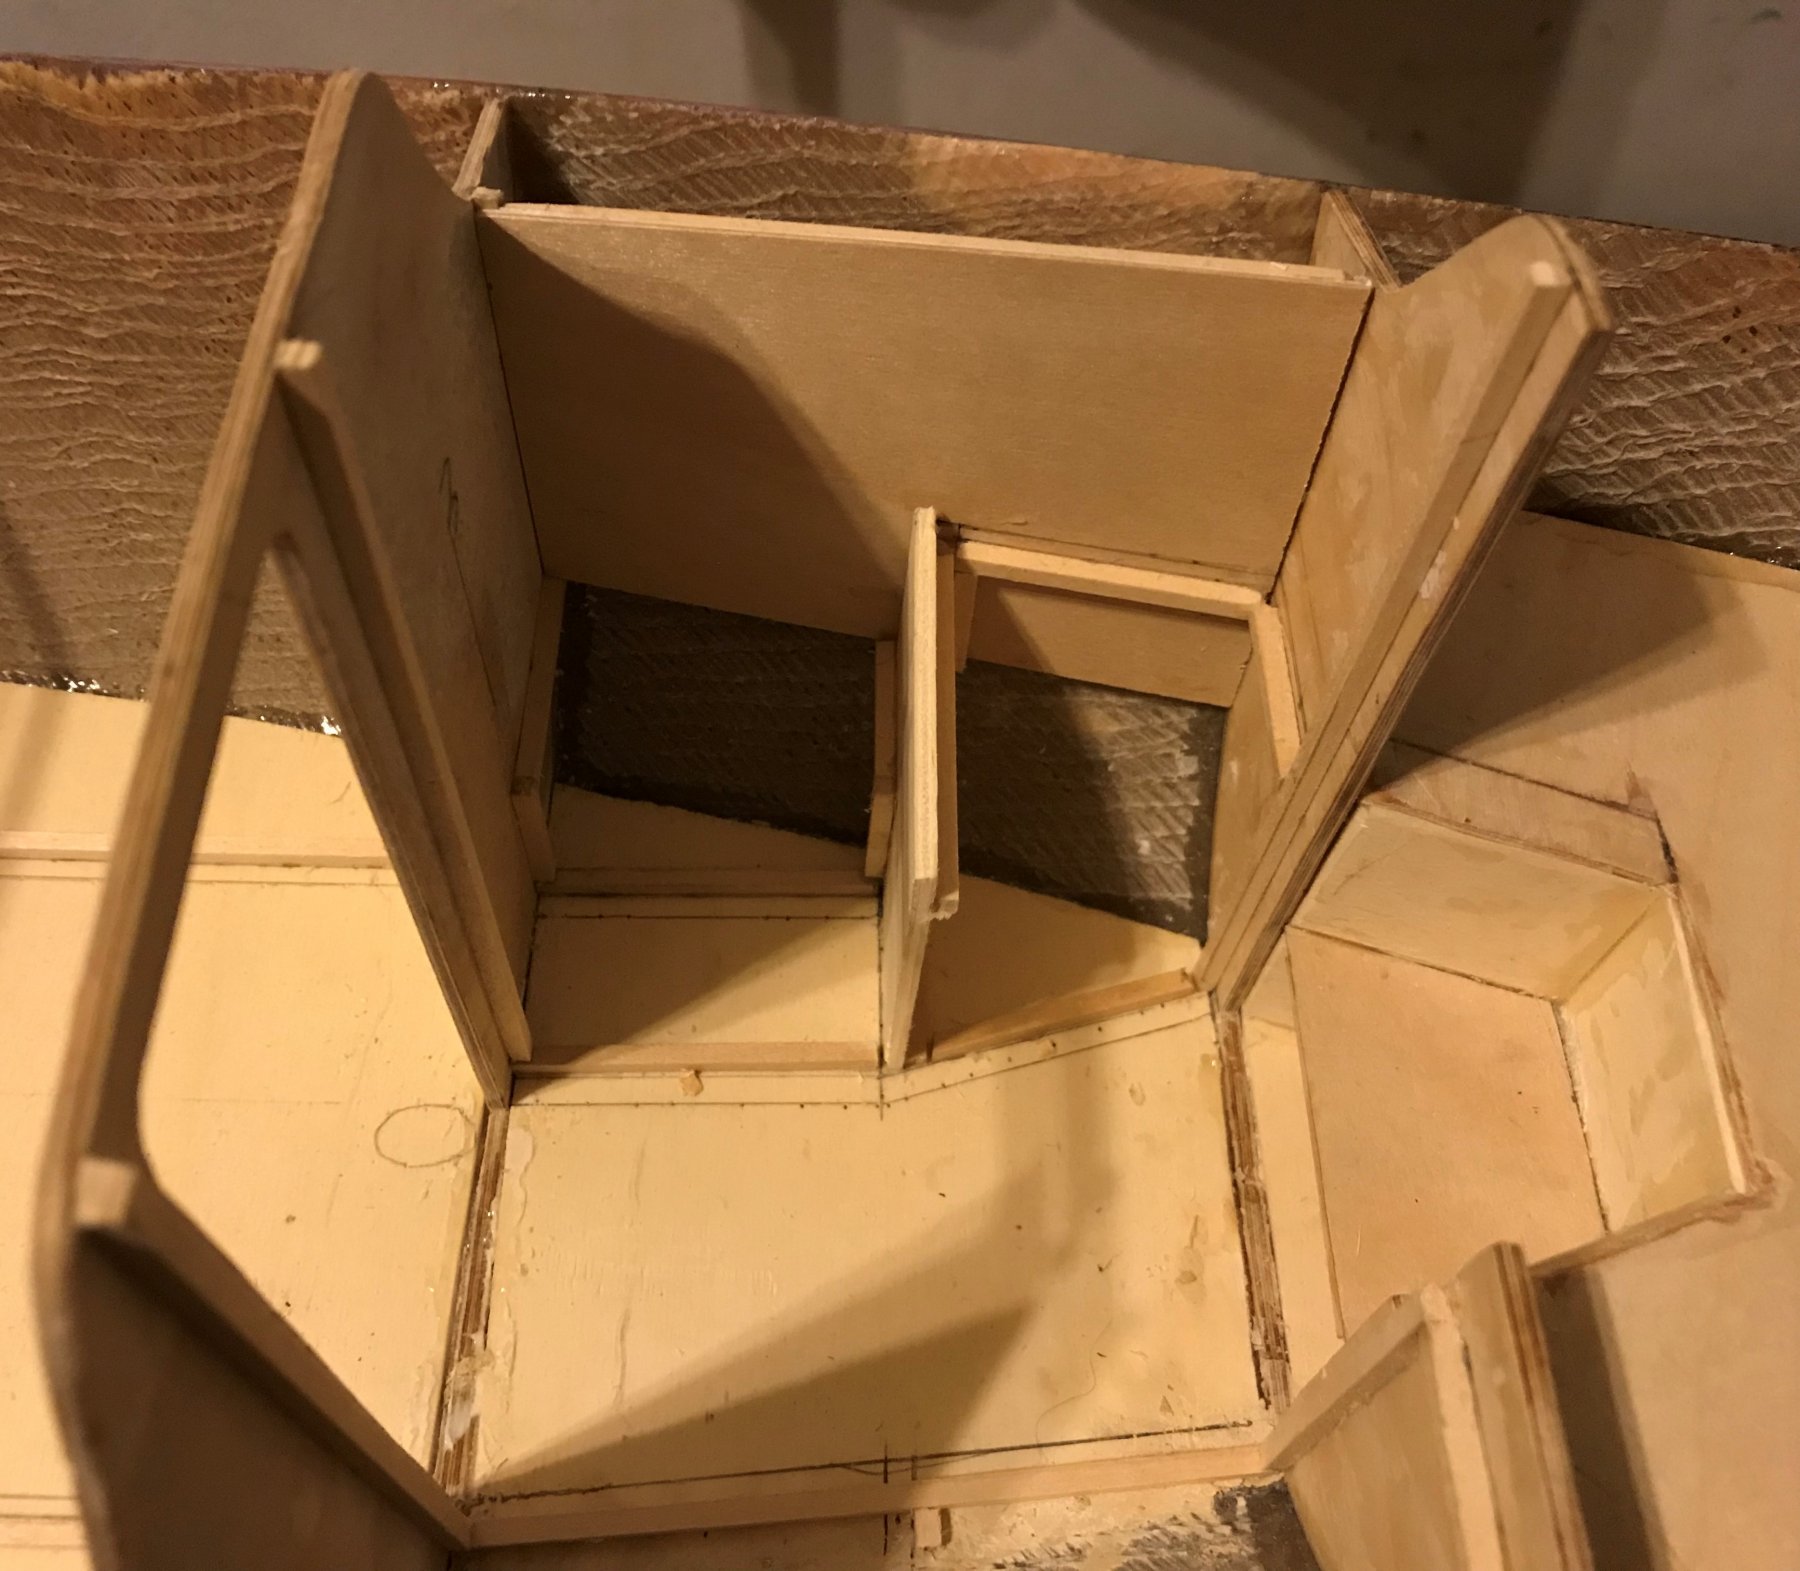
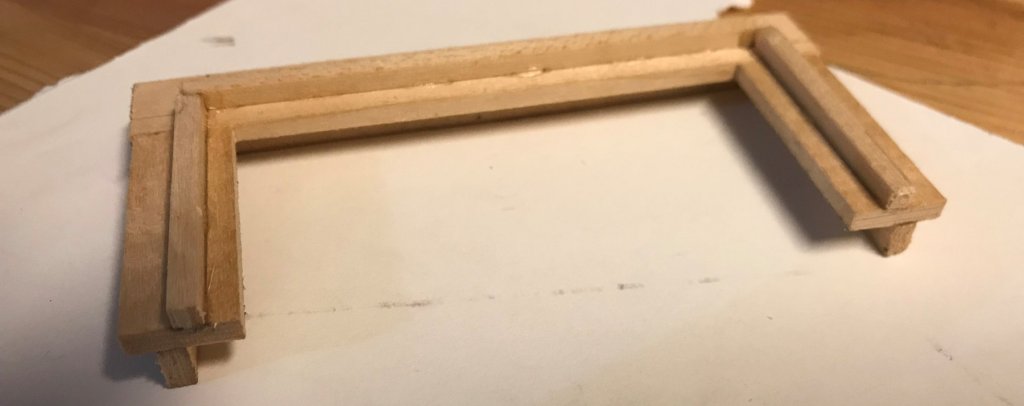
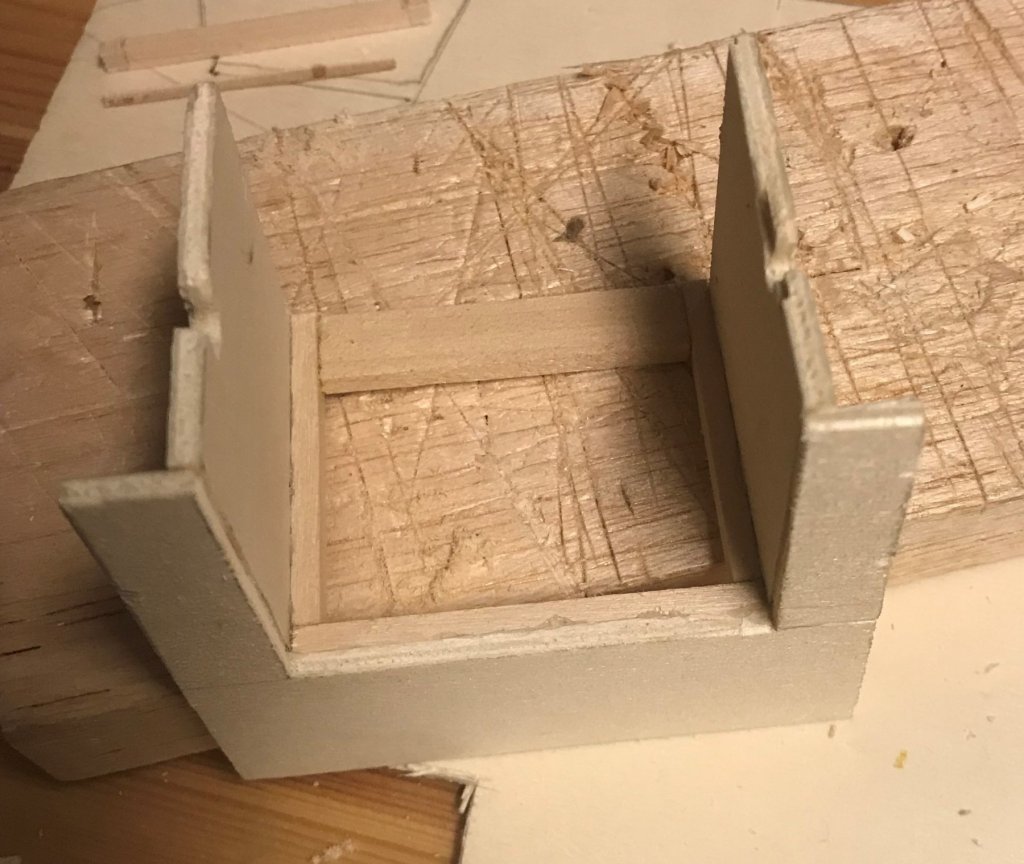
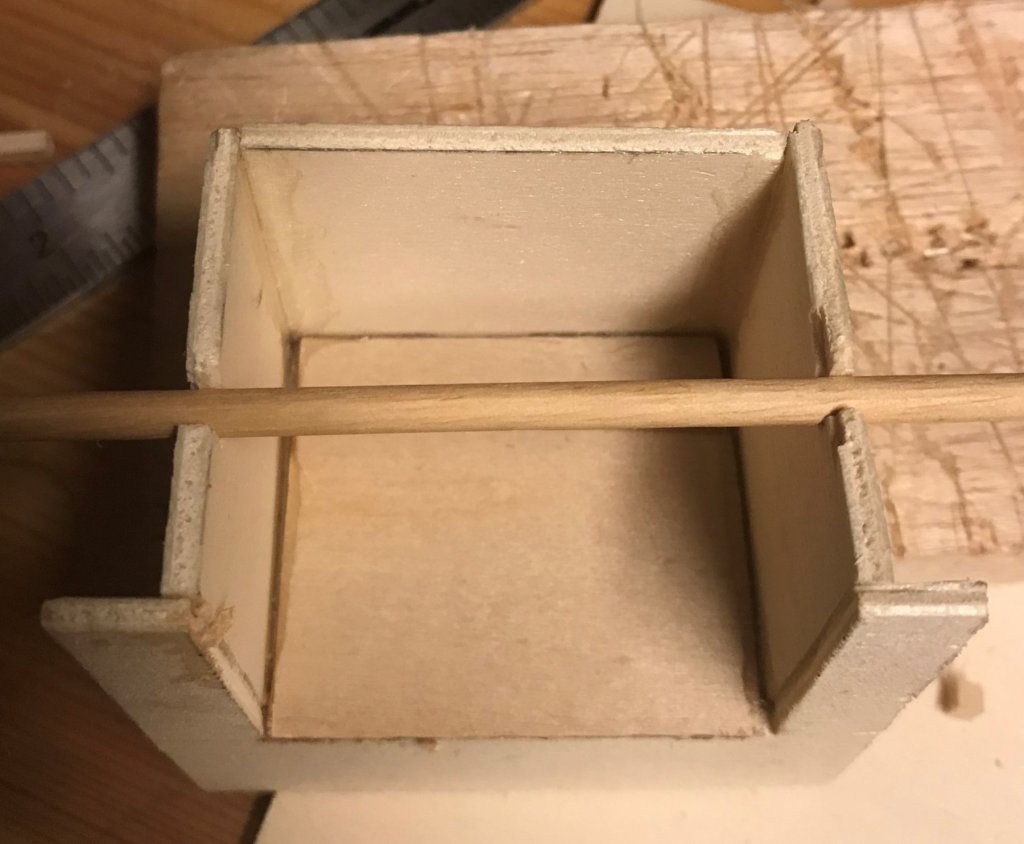
INTERIOR LAYOUT/FURNISHINGS WORK - GALLEY PART 1 I started work on the galley by tackling the under-cabinet toe-kick thing. I set the pieces on a balsa block, and used pins to keep the piece in the right shape while glue set: Galley Toe-Kick Jig And here it is assembled, with guides added to the top for placing the cabinet walls: Next I started on the notch for the galley stove, which will be free to rotate transversely (like on a real sailboat, to accommodate for heel). I began with the cabinet face, then I did the back and sides kind of all at once, using a mix of 1/8" x 1/8" and 1/8" x 1/2" basswood as tabs/guides to set the pieces relative to each other, and to provide a place to secure the bottom of the notch. Below is an 'in-process' picture: Galley Stove Notch In-Process And here's the completed notch, with a 5/32" dowel running through - the dowel will make the 'gimbals' for the stove. Galley Stove Notch Complete Finally, I added the cabinet walls which make the sides of the galley 'U' shape: Galley 'U' And here's a 'big-picture' shot of the boat, current state (note - the galley is just placed in, not glued in yet) Current State of Interior Fit-Out This brings everything up-to-date with what I have done. I tried to do more with the galley last night, mainly adding the last two cabinet wall sections connecting the 'U' assembly to the fore and aft bulkheads, but ran into a bunch of alignment problems trying to fit it into the boat. Lots of things not quite square. So I am going to have to do some manner of fixing, and I'm debating starting over with the whole assembly. It'd be a bummer, but (1) this is actually a pretty complicated shape with lots of 90 degree angles, which needs to also fit into a space which doesn't quite have 90 degree angles, and (2) this would be the first whole-sale scrapping of an interior assembly, which given how much is done isn't too bad. I expected far worse. I'll take another look at it tonight, and determine the scope of making this work. I've already got some ideas of how to improve fit and shape if I have to take a hack at it again...


-
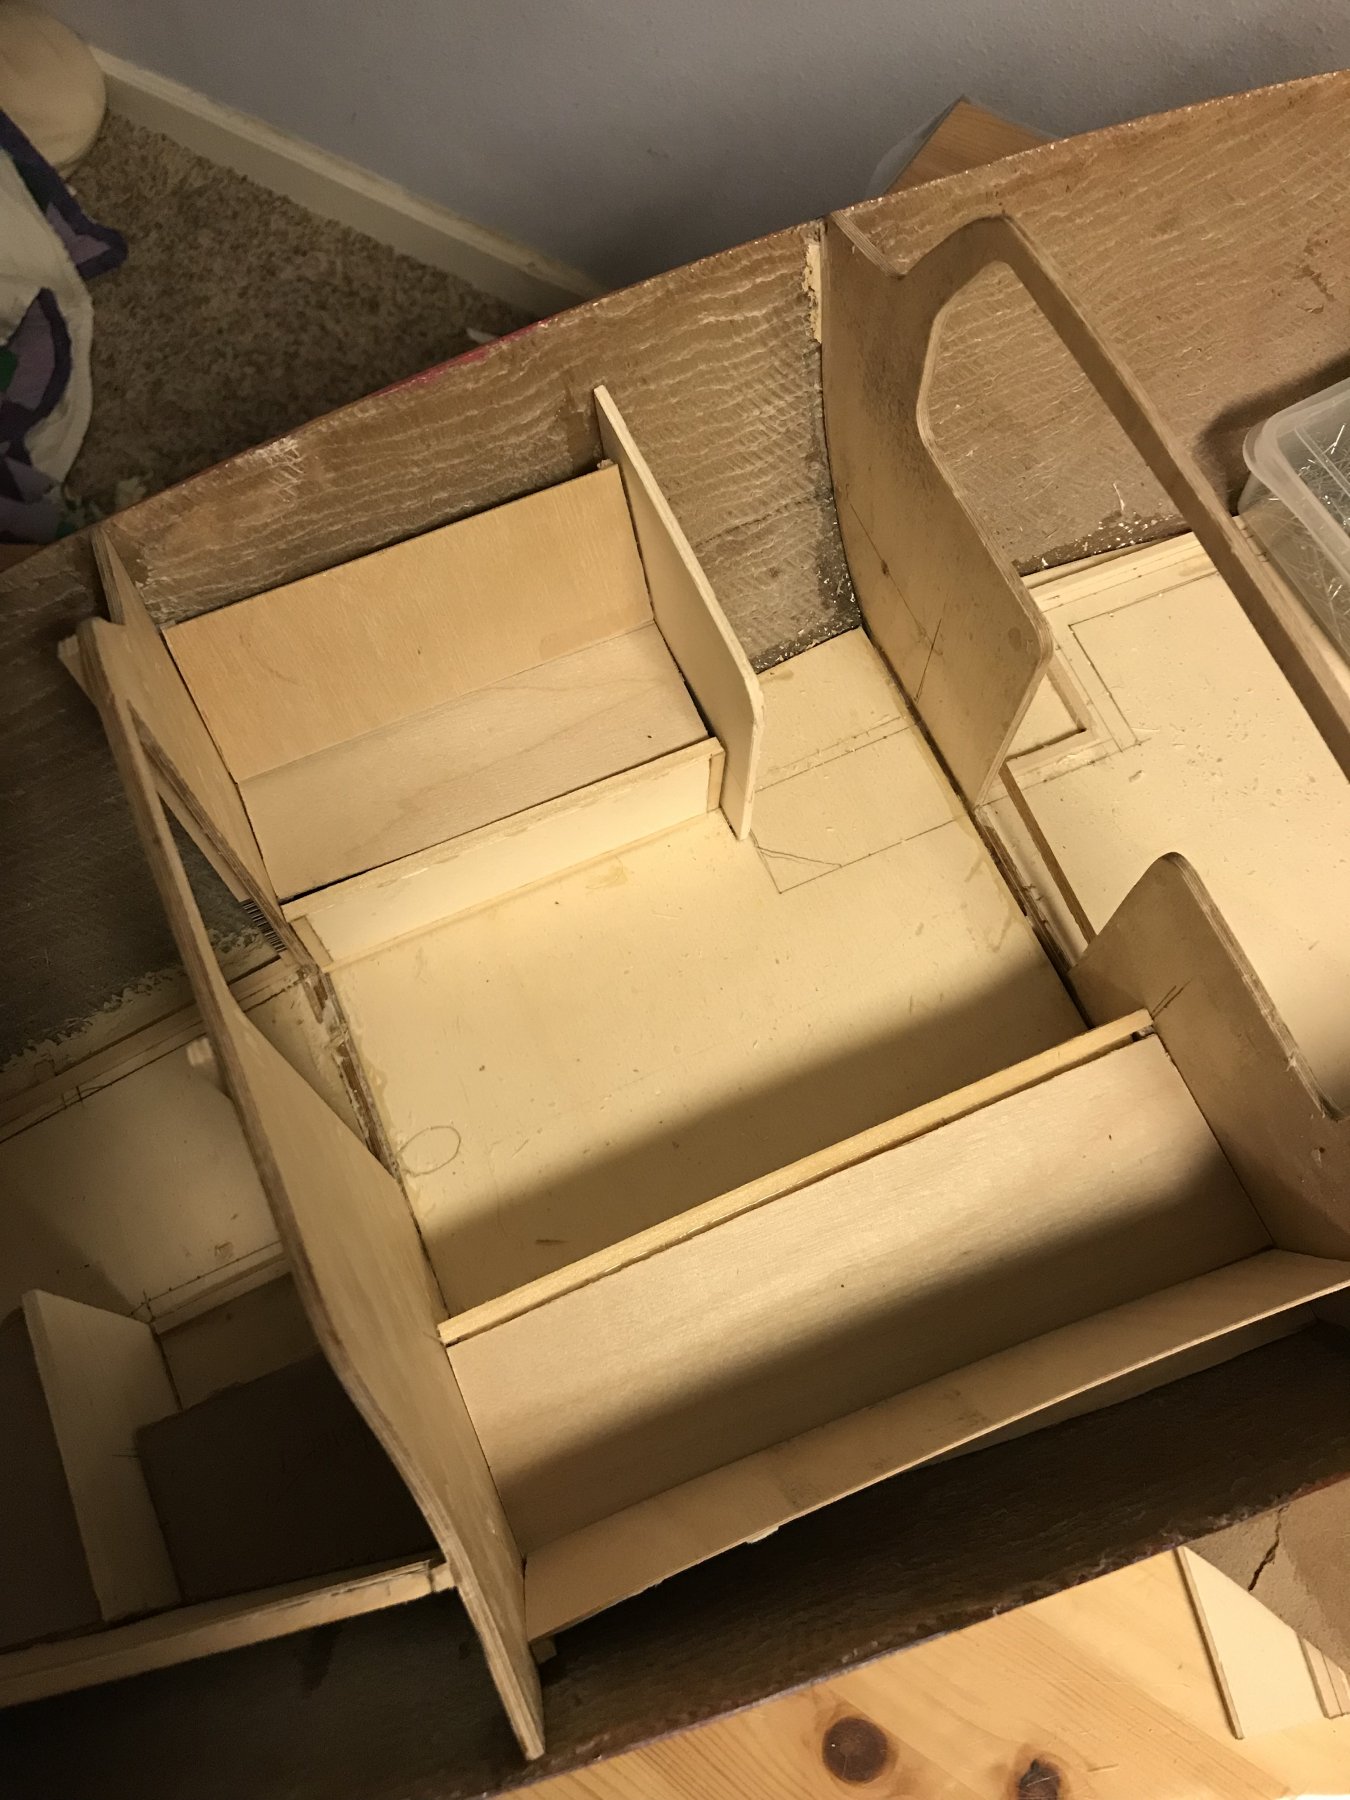
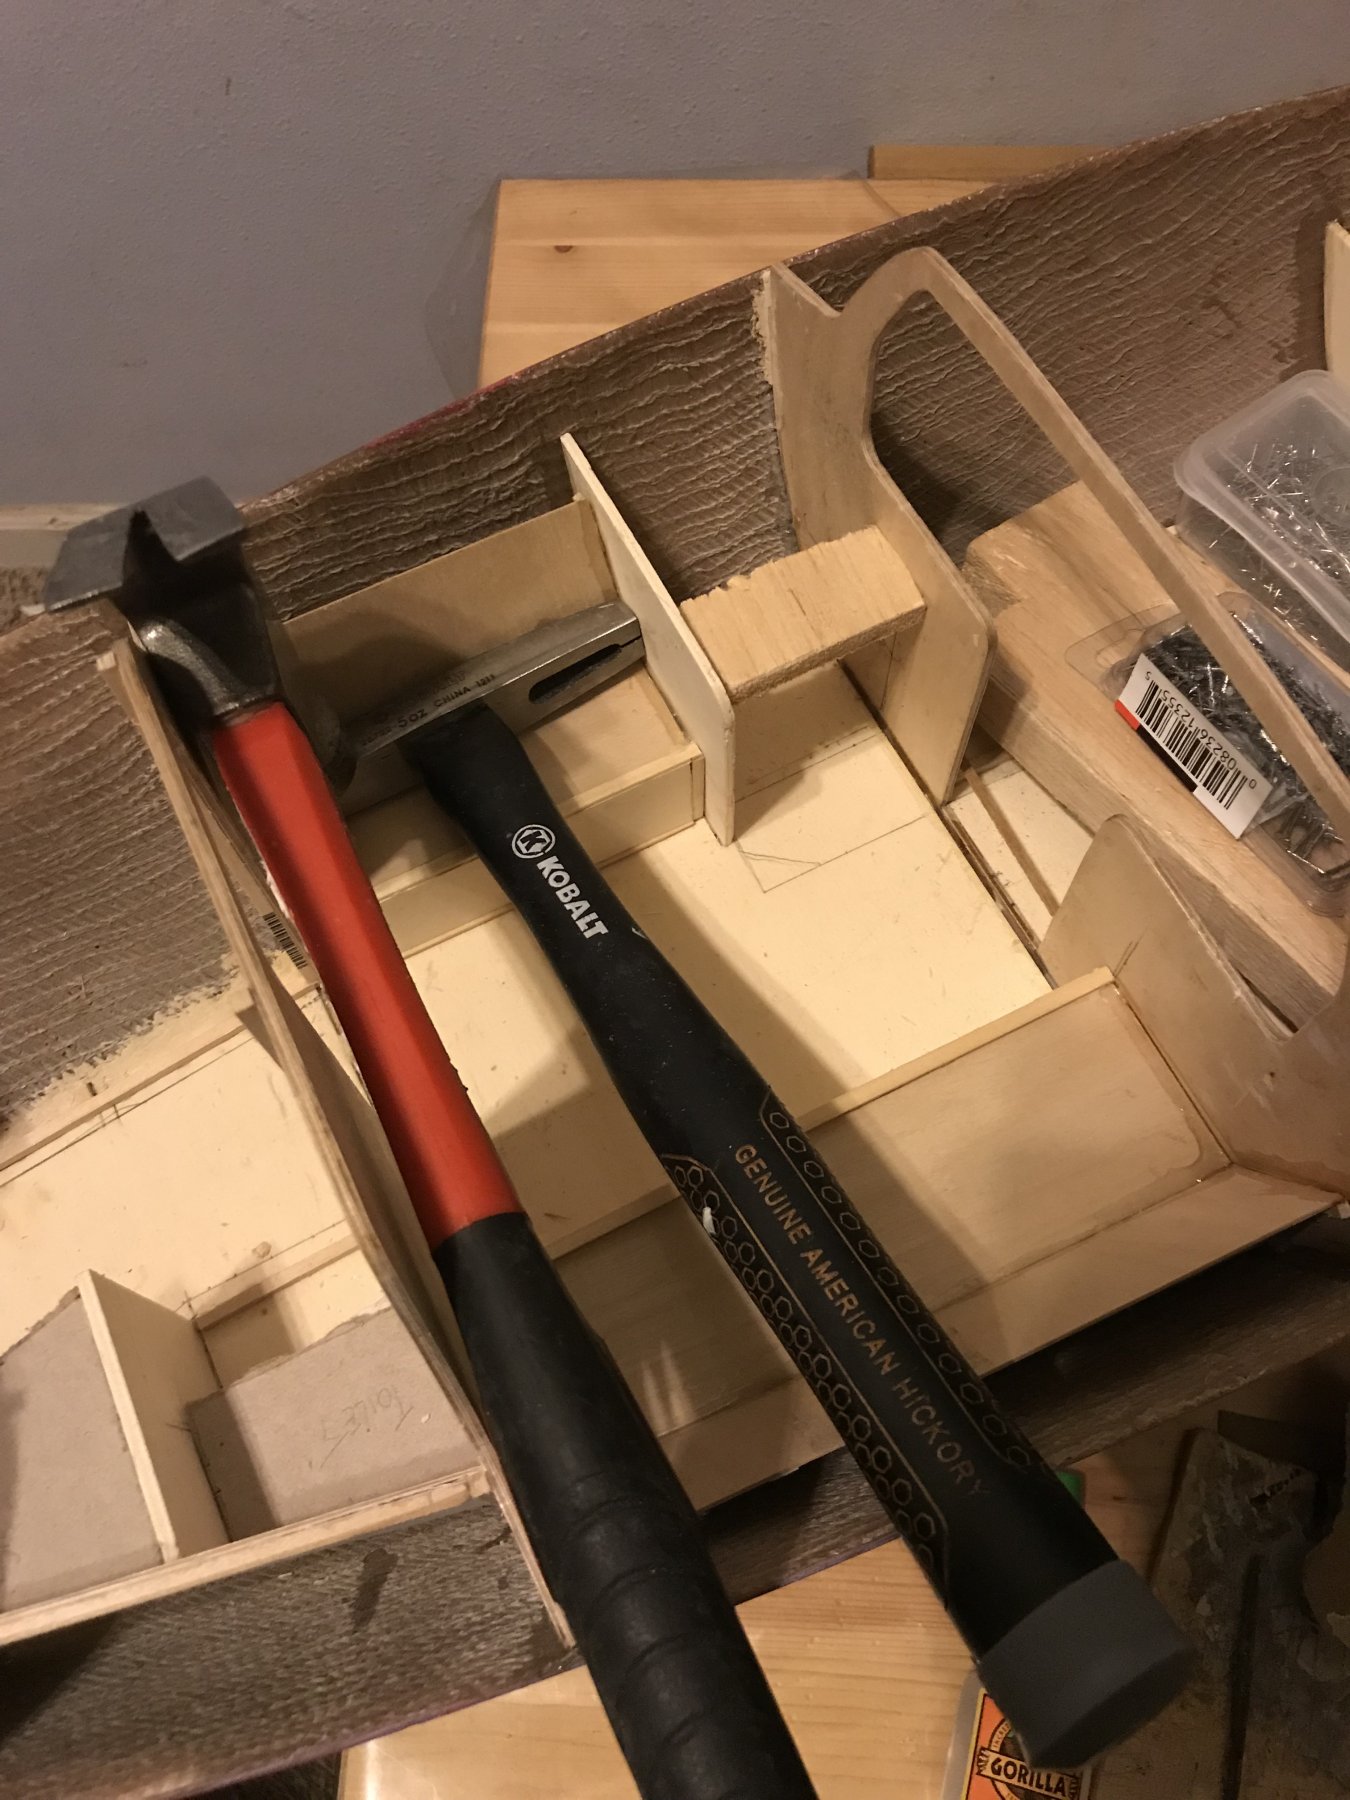
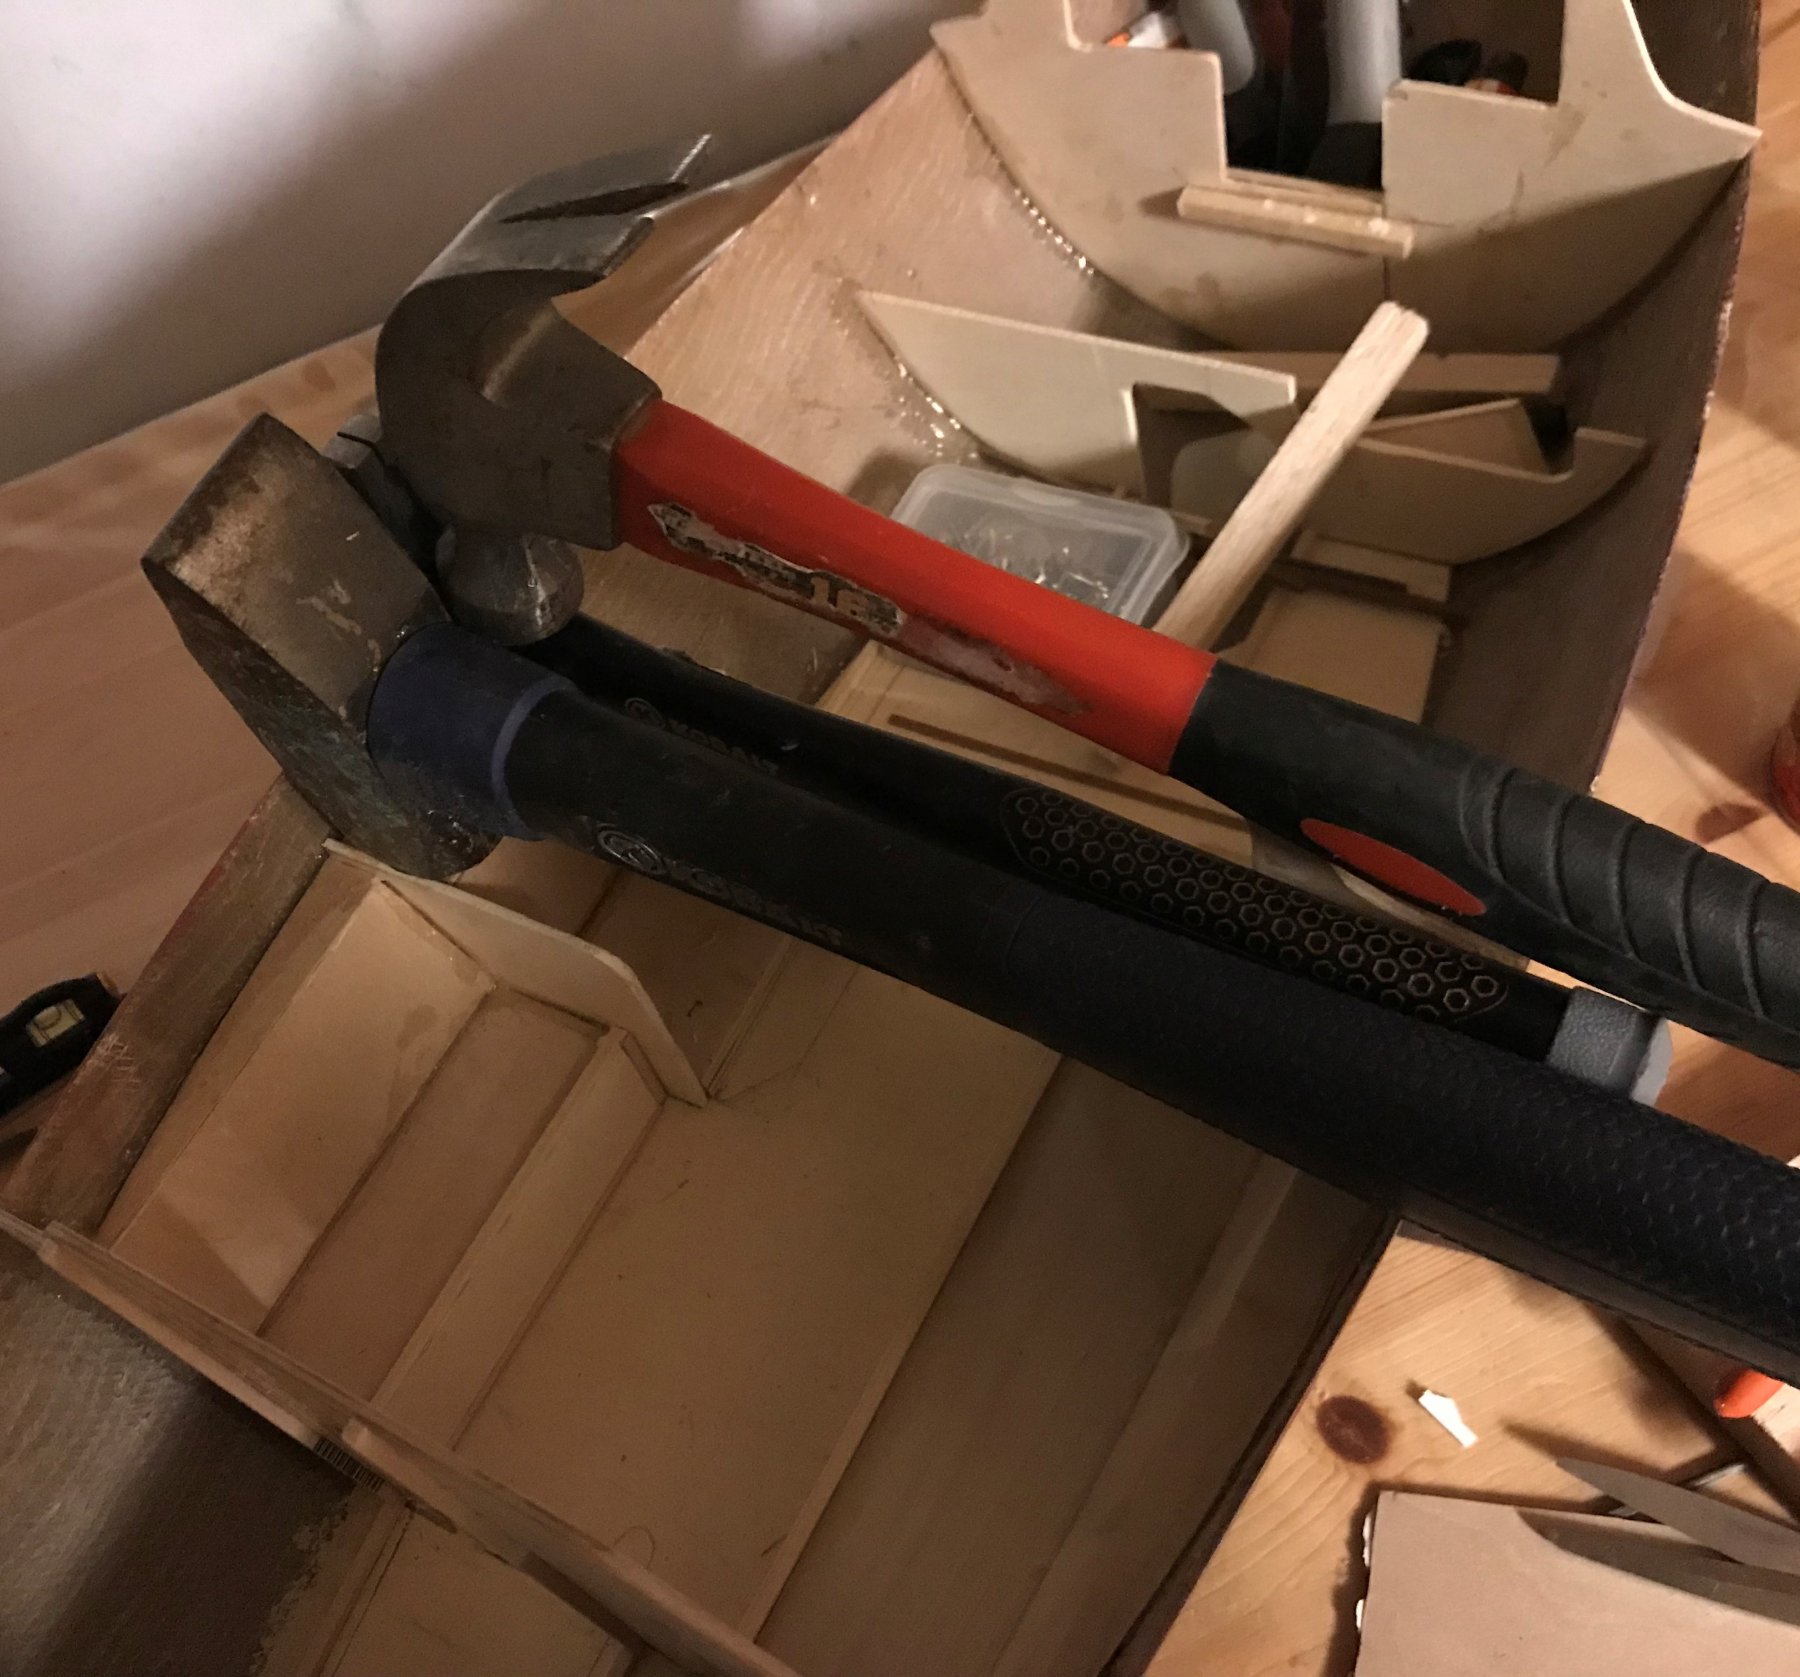
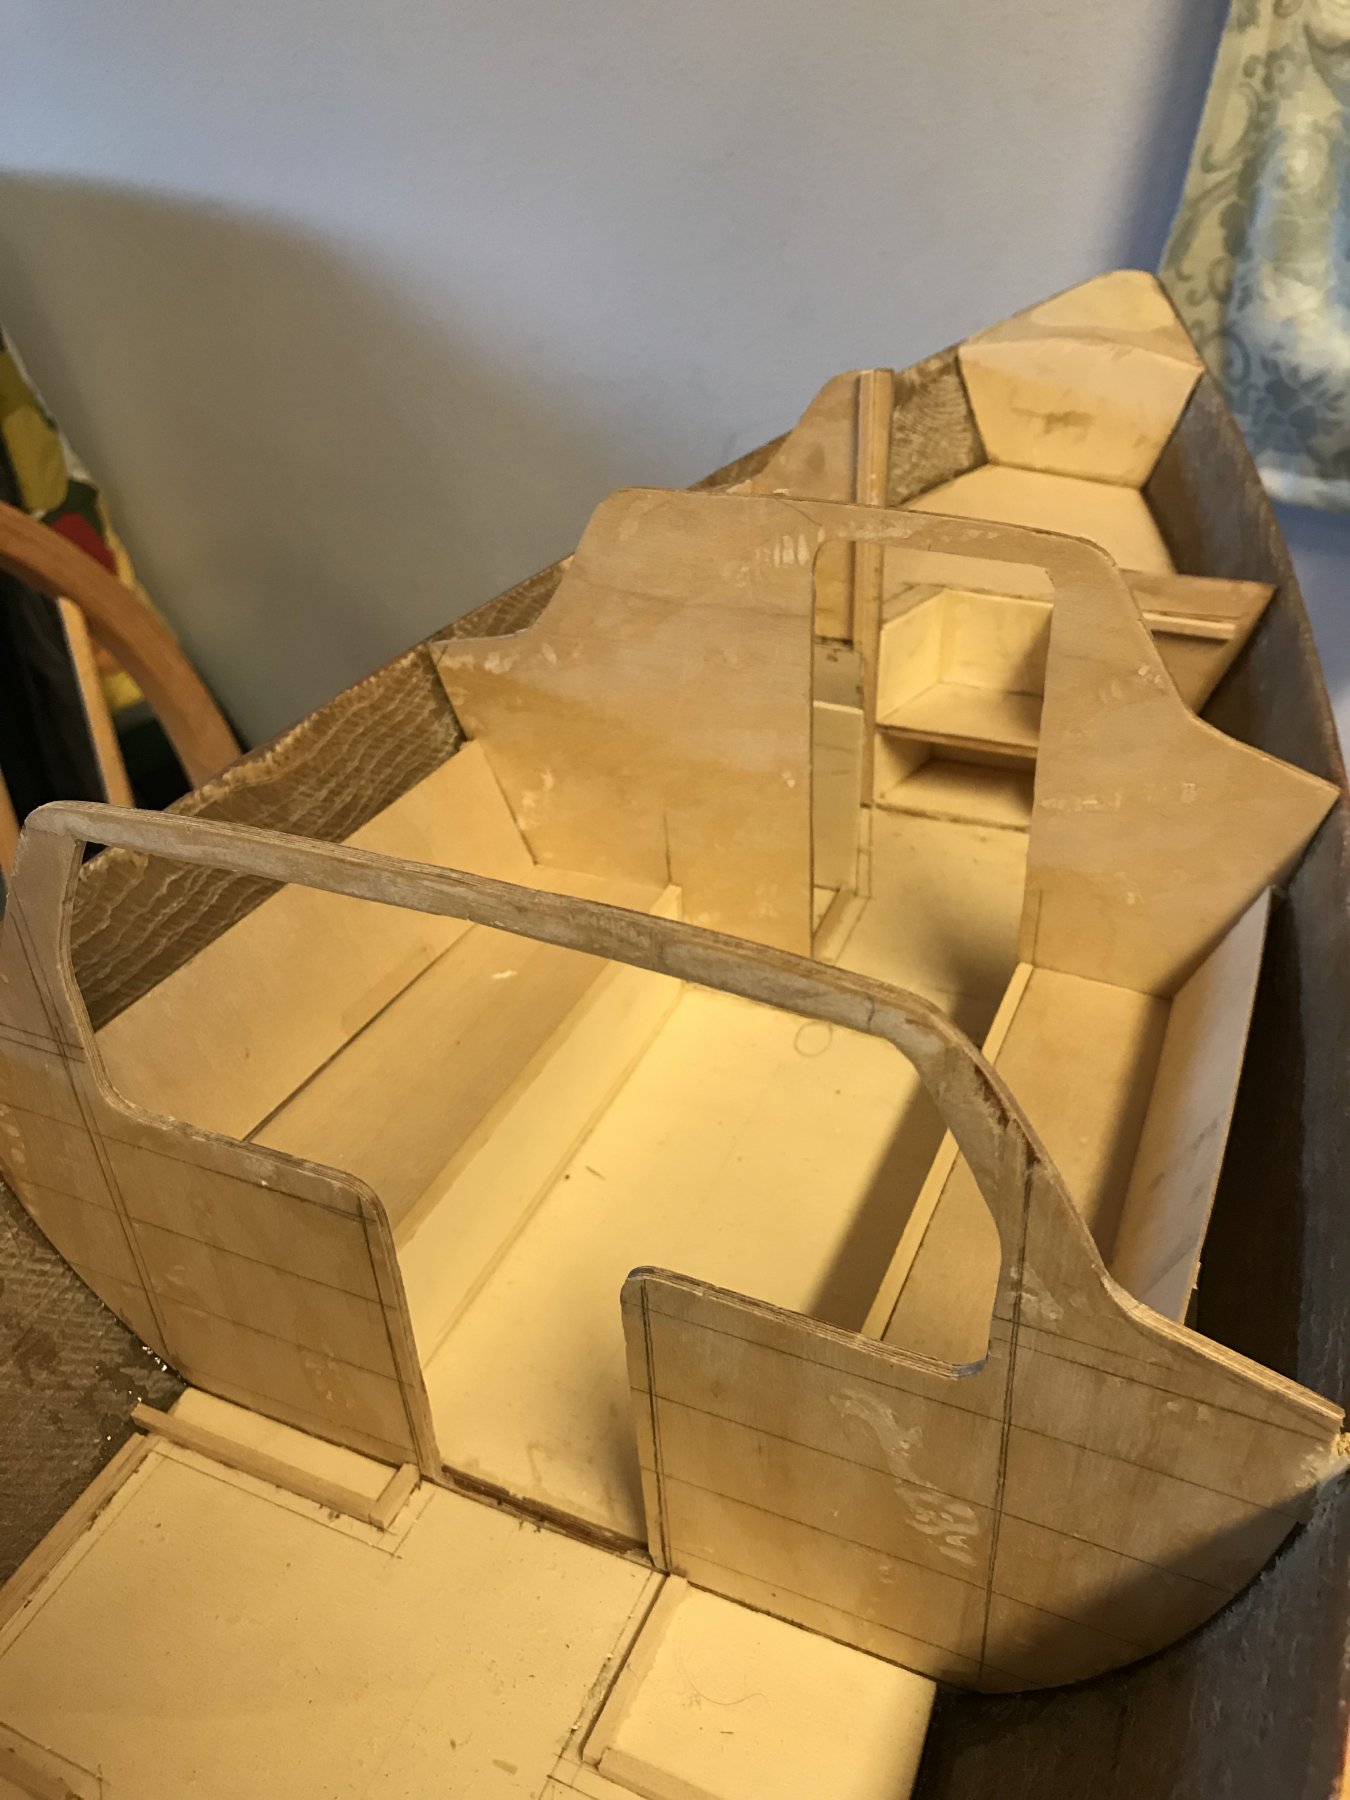
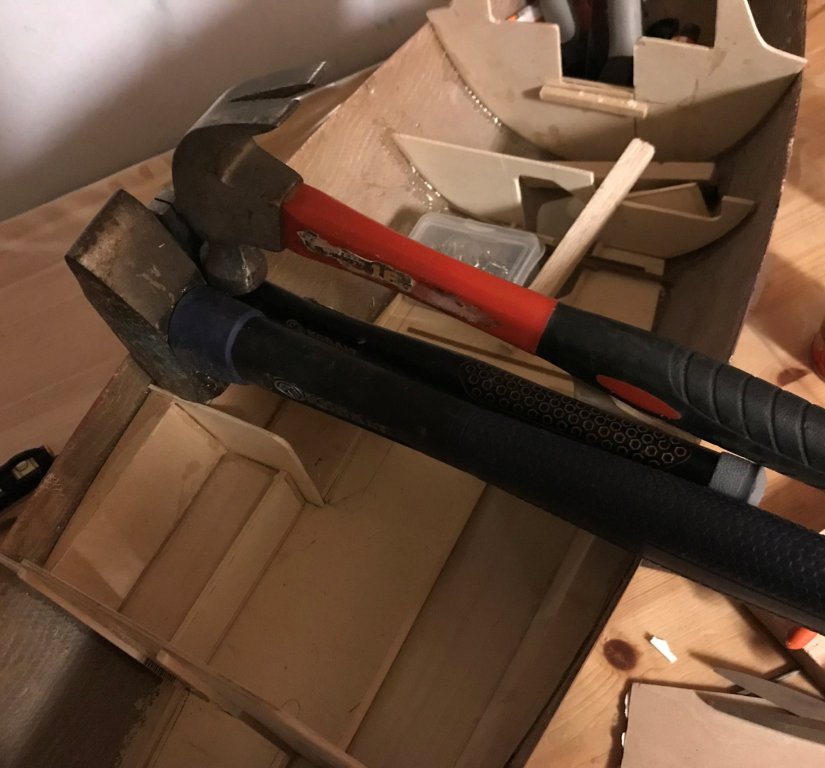
INTERIOR LAYOUT/FURNISHINGS WORK - SETTEE PART 2 The first step in generating the new arrangement was to make the partition between the starboard settee bench and the space for the wood stove. This involved a couple tries with cardboard templates, and then tracing onto the work piece and scroll sawing out. (Many of the small pieces with generally straight lines I have been hand cutting, saving the scroll saw for larger or more complicated pieces.) Then, I had to trim down the starboard settee bench, re-do the cut end to have the same 'style' as the forward end, and then take the guide tabs off the aft bulkhead and relocate them to the partition. The below picture shows the partition in place, and the settee benches dry fit (again). Redesigned Settee Dry Fit Once satisfied that everything fit the way I wanted, I permanently installed it, including the parts for the stove hearth itself. (I had done a little research on solid fuel stove installation in boats, so I made sure that there was the proper raised platform and clearances from the sides and back). Installing Settee and Hearth You can see a little bit of improvisation in the lower picture. The piece I was installing wasn't big enough to fit the two larger hammers; just the largest and then the little hobby hammer that weighs almost nothing. So I piggy backed the middle hammer on top. If it works, right? Here's a shot of the completed space: Settee and Hearth Installed I'm really happy with how it turned out. I think it does add a lot more visual interest to the space. I will eventually get some polystyrene plastic that has 'tile' impressions to line the hearth and make it look like a tile backing, with a small section of deck acting as a hearth pad, too (you can see it outlined on the deck). And the settee needs cushions. But, other than the finishing details like that, I was ready to move on to the next space aft.

-
That last shot really emphasizes how slender those old destroyers were! No wonder they rolled like crazy... Is the white stuff at the bottom of the masts some sort of ‘stcky goop’ to temporarily position the mast to check fit/look? Also, it’s interesting to see that even in early Twentieth century steel shipbuilding, the mast still has construction details reminiscent of wooden sailing ships- like the transition from the mast to the topmast.
- 1,090 replies
-
- 8
-
-
- showcase models
- vendetta
- (and 2 more)
-
Oh! I'll follow along, too! I built a Tirpitz model once, when I was a teenager. But, it ended up looking more like the ship AFTER the RAF bombed her...
-
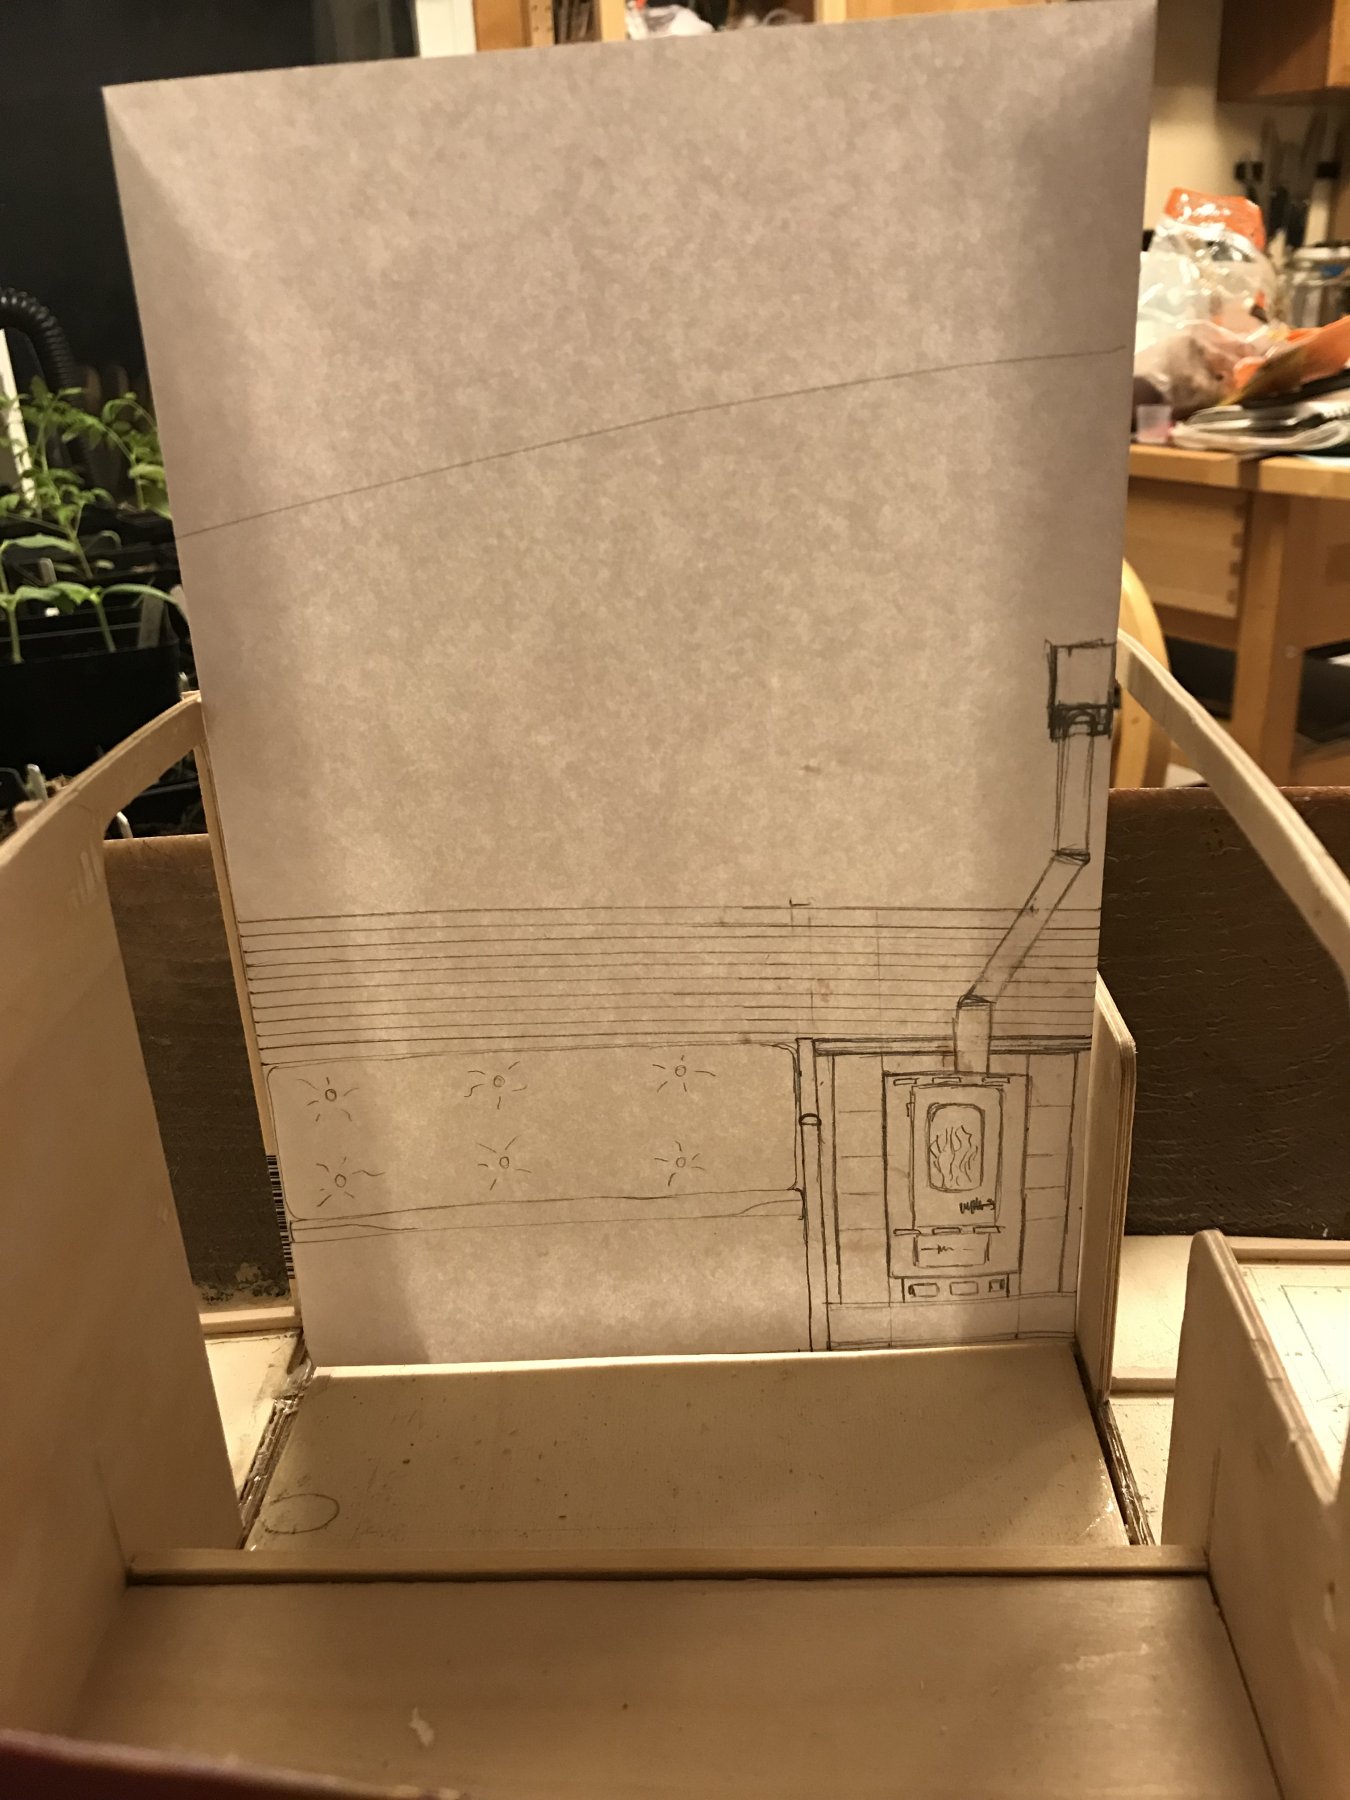
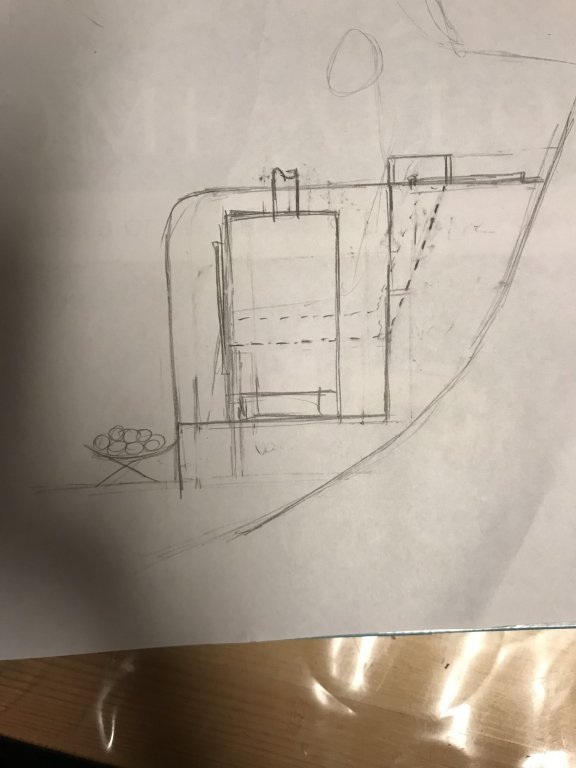
[I've made a bunch of progress, just haven't had the chance to post an update. I'll break the work I've done since the last post over a couple entries.] INTERIOR LAYOUT/FURNISHINGS WORK - SETTEE PART 1 I started with the next space aft of the head, which is the settee, or salon, or whatever those 'yachty' people call it (I guess the space is the salon, and the actual furniture piece is the settee? I dunno. I should probably know this... ) Anyway, I decided to wait on finishing out the head space until I get the sink and head fixture selected or made. So, I cut out the various pieces of the settee benches and put reference tabs as appropriate on the pieces and the fore and aft bulkheads, then 'rough-fit' the assemblies into the boat. As seen in the dry-fit pictures below, the original design calls for two bench style seats, one of which is a little wider and can serve as an 'at sea' berth, or guest berth, or something. I think, technically, they both could if I built in the mechanism to deconstruct and reconstruct the benches into berths. But - 5 year old's play set. Nope. Dry-Fit of Settee Components However, I was somewhat unsatisfied with the arrangement for two reasons. One, it lacks interest. Yes, it mimics most boat interiors of this size, and when finished out with wood stains and varnishes and cushions and odd fruit arrangements they look fine, but it is kind of boring. Second, we've been discussing adding a wood stove for heating/cooking to our home, and that had me thinking about the charm of a small wood stove heater on boats. So, I did an on-the-fly re-design. My rationale is that it's a customized boat meant for living on, and so seating/berthing space is sacrificed for charm and visual interest. The revised plan is below. Design Revision to Starboard Settee to Accommodate Wood Burning Stove I haven't worked out exactly what I'm going to do with the chimney pipe in the actual model, since I imagine doing it wrong will result in an 83.7% chance of immediate destruction. But I really liked the overall concept (and, importantly, so did my Admiral, who had the 'doll boat' idea in the first place). So that's what I moved forward with. More to follow...


-
I hop on MSW after a couple days, see a new topic, and BAM - two ships half built already! Since I already have been given (repeatedly) VERY clear direction from the Admiral that I can't do anything until the two projects I do have are done, I'll join the crowd in the rafters - this is shaping up to be a fun comparison build, with a good bit of enjoyable banter!
- 1,090 replies
-
- 8
-
-
- showcase models
- vendetta
- (and 2 more)
-
Oh, true - that's an excellent point. I totally overlooked that. Thanks John! (And thanks Dan for being patient with our navigation lights tangent!)
- 287 replies
-
- 5
-
-
- michelangelo
- ocean liner
- (and 1 more)
-
My point was having the lights available in that combination may allow a variety of signals - not necessarily that they would all be illuminated all the time. (You could put just red over red to signal Not Under Command or Aground). Plus, I've heard about larger commercial ships displaying red/white/red lights in restricted channels - if a tanker is draft-limited in the middle of a channel, she doesn't have anywhere to go, so red/white/red is appropriate. Probably less common with a liner, but probably still required to be available to the commander of the ship. (Heck, we had to put a removable light mast with that signal and a bunch of others, like towing, on an 85 foot patrol boat, since they're international signals and if they're in certain situations, they have to display them.) All that said, this only matters if the lens of the glass is colored, such that a red light would still look red even if it's off. If it's a colored bulb/filament, with the lights off, they would probably just look silver. So that may be the best route for a display model?
- 287 replies
-
- 5
-
-
- michelangelo
- ocean liner
- (and 1 more)
-
She's a good looking hull! I like your idea of using the fine tips for the putty. I might have to try that one.
- 171 replies
-
- 5
-
-
- krabbenkutter
- authentic models
- (and 1 more)
-
It's possible they're red and white. It wouldn't be unreasonable for them to be in the configuration red/white/red. That combination would allow for a variety of the standard international rule signals.
- 287 replies
-
- 4
-
-
- michelangelo
- ocean liner
- (and 1 more)
-
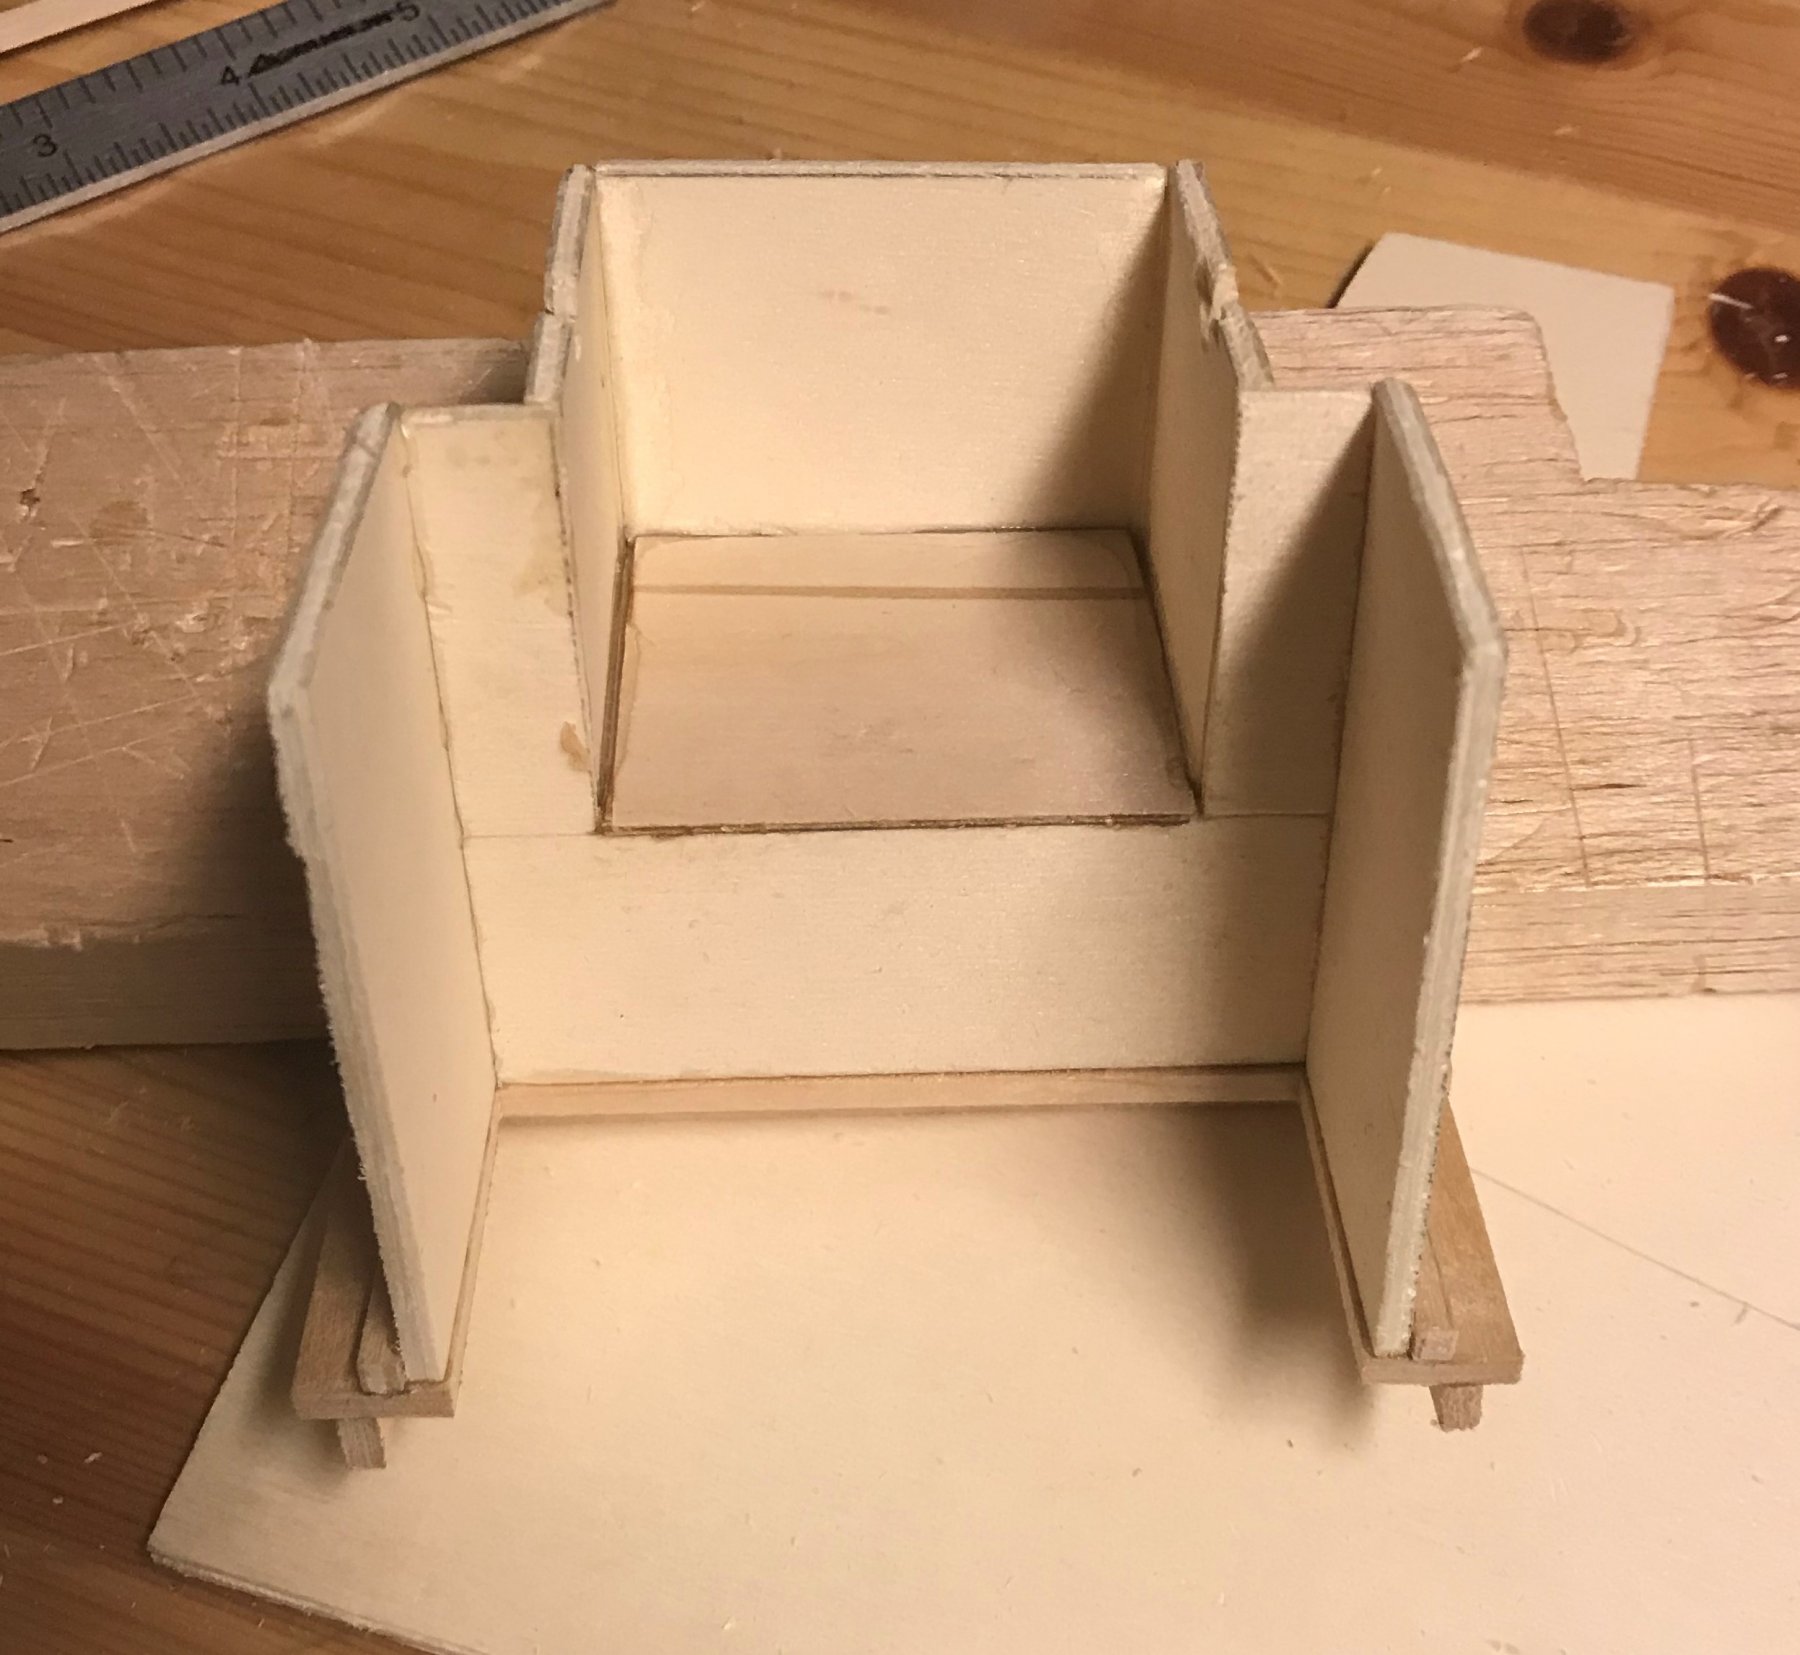
Thanks guys for the support! I'm having a blast seeing it all come together. INTERIOR LAYOUT/FURNISHINGS WORK - HEAD PART 1 Did a little bit more last night - started on the head, port side forward. I began by laying out 'tabs' on the forward and aft bulkheads to define where the various walls and shelves land. Then I added the outboard bulkhead, which had a couple more tabs on it to help define the sink/vanity shelf. Finally, I added the front of the sink/vanity, also with tabs to help define the top and the 'box' where the head itself goes. Head Interior Joinery In-Process Next, I used some cereal box cardboard to template the head platform and sink/vanity shelf. Head Platform and Sink Shelf Template Next step will be to do the sink shelf, and the two pieces which form the head platform. It has been a fun challenge to think several steps ahead to determine the right order to put things in - starting with those bulkheads or walls which can be placed only with guides on the bulkheads already in place, and then building out, so that as each piece is added with additional defining 'tabs', there is no piece to put in which I have to fumble with to place. It just sets in where the guides define it to be. Figuring out that right order of operations is tricky! Plus, I have to avoid building myself into a position where I can't get tools or hands in to do additional work. For this reason, I'll probably leave off the inboard walls, which separate the space from the rest of the boat, until I've done everything I need to do in that space. The locker face/dresser opposite to the head will probably be one of the last things built for that same reason. Till next time!