


kurtvd19
-
Posts
3,049 -
Joined
-
Last visited
Content Type
Profiles
Forums
Gallery
Events
Everything posted by kurtvd19
-
If you get a dust collector unit that hands from the ceiling you will also need another fan to set up a rotation of air in the room. I have a unit and was not happy with the dust it was missing and did some research (read several articles on dust control in woodworking magazines) and found that for optimum effectiveness there needs to be a circulation of air in the room. The recommendation is to have the other fan blowing opposite the hanging unit on the other side of the room. Doesn't need to be a big fan just need to get the air on the other side of the room moving. After setting up the other fan the effectiveness of the unit increased noticeably. Kurt
-
 This works with brass and copper wire too. Kit's provide wire in a looped roll - impossible to use in that form. I don't know if I have ever felt the stretch but by exerting a steady pull the wire stays straight when it's pulled tight enough. If it's not straight - pull again with a bit more force. Kurt
 -
Welcome. Thank you for your support. Kurt
-
Are you stropping the blades periodically as you work? As soon as the blade is the least bit less than razor sharp strop it and the edge is back. Stropping reduces the frequency of resharpening. Kurt
- 15 replies
-
- 10
-

-
Chris: Check out the rope Chuck sells at Syren Ship Model - so much better than the stuff from the kit. Kurt
-
99.9% of dowels supplied in kits are great for use in the garden to hold up small plants. The 0.1% are the straight ones. Best to use square stock and make it round using small planes - also easier to do the flat areas when you start with flat stock. Best way to avoid ever having the mast warp is to glue up 4 pieces into square stock and work from there. First step in making it round is to knock off the 4 corners making it 8 sided - leave the 8 sided part alone at the proper area and round off the rest of the mast. Just my opinion and Dennis Miller and I might both be wrong... Kurt
-
Mike: It has really turned out nice. A very good model. The term for the planky, boarding rampy sort of thing is landing stage. And you did a good job on it too - wasn't that fun to rig into place? Kurt
- 225 replies
-
- 7
-
-
- chaperon
- model shipways
- (and 1 more)
-
Mike: I like your boats. Nice job on the planking. You took it beyond what I did with the ones from mt build. Kurt
- 225 replies
-
- 5
-
-
- chaperon
- model shipways
- (and 1 more)
-
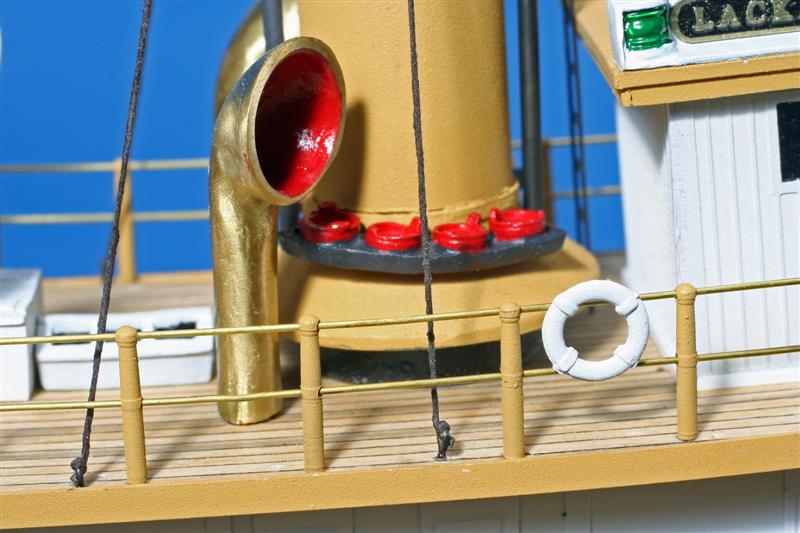
Mike: Yeah, the fire buckets sit in a rack with a hole in the top board to hold the buckets upright. Sometimes they hung buckets from brackets or stands. The photo of my model of the Bluejacket kit of the tugboat Lackawanna shows fire buckets in the rack at the base of the stack. Sorry, being a retired FD Chief I assumed everybody just knew this. Kurt


- 225 replies
-
- 9
-
-
- chaperon
- model shipways
- (and 1 more)
-
Mike: The planks of the wheel are called Bucket Boards. I don't know if that term was used in the kit instructions or not but it's common usage. When you mentioned a bucket for water, one thing I meant to add to the model and never got around to it was a couple of racks of fire buckets carried on the roof of the boat to stop fires started by sparks from the stacks. I don't remember if these were included in the kit or not. They might have been included in the kit and I didn't use them because they most likely had flat bottoms as the kit pieces usually have - fire buckets had round bottoms - and were painted red. The round bottoms were to make them useless for anything else so the crew would know they were where they were supposed to be and not being used to swab decks or something. Kurt
- 225 replies
-
- 7
-
-
- chaperon
- model shipways
- (and 1 more)
-
Chris: Use the piece of wood that surrounds the laser cut keel piece as the "scrap" it is the same thickness and is big enough to allow practice. Did you know that BB rode a Gold Wing to (at least some) of the Harley events he covered for the magazine? Ran into him at both a Harley meet and at the Newport RI Yacht Show (when he covered it for Attitudes and Latitudes) and stopped at our tent. Kurt
-
Mike: Looking Good! I like the dark buckets - good contrast.
- 225 replies
-
- 3
-
-
- chaperon
- model shipways
- (and 1 more)
-
Galley Washington by Mike40 - 1:48 - POF
kurtvd19 replied to Mike40's topic in - Build logs for subjects built 1751 - 1800
The only thing that's going to change is the scale of the cut-offs that you will be saving. It's amazing how many will wind up being used someplace on some model. Will be watching. Thanks, Kurt -
I anybody wants to get some of the discontinued Dockyard Micro Chisels I saw a bunch at a wood show this past weekend from a shop in Bettendorph, IA. I bought a bunch of rotary carving bits from them at very reasonable prices. They had the Dockyard tools on display and they are still shown on their web site. http://www.thewoodcraftshop.com There is also a nice dedicated strop for sharpening these tools with all of the curves and angles. Kurt
-
Mike: It's looking great. The pilothouse work is right on! Kurt
- 225 replies
-
- 3
-
-
- chaperon
- model shipways
- (and 1 more)
-
The only thing magical about that tool is it's ability to steal money year after year from unsuspecting modelers. Kurt
-
OC Test the same combination off the model. The Rustoleum problem was tested with many different paints over it with the same results - the color coats failed to cure/dry - enamels, and acrylics. Maybe they have changed again - that's the problem, they seem to change quite often with poor results. They may have solved the problem, but too late for me to ever try them again. And I can assure you somebody is reading this thread and saying we are nuts that they have never had a problem - and they probably didn't have one - yet. If it tests OK on similar materials in the same layering sequence then it's OK - but test off the model first. Kurt
- 68 replies
-
- 4
-
-
- Arleigh Burke
- BlueJacket Shipcrafters
- (and 1 more)
-
Stay away from Rustoleum. They have changed their formulation and all sorts of bad stuff happens when you put any thing else on it - even acrylics. I will never have Rustoleum in the shop again nor will several other guys I know who learned the hard way. Kurt
- 68 replies
-
- 7
-
-
- Arleigh Burke
- BlueJacket Shipcrafters
- (and 1 more)
-
Be careful of the You Tube videos as some are excellent and others are absolutely horrible and one can get far off track if one of the bad ones is followed. Once you are a bit experienced you can tell the good from the bad but until then sample a bunch to see if there is any agreement between them. Kurt
-
We had a bent hull structure that was used as an example of what not to do, that had been planked on one side and then the other, shown at a NRG Symposium. It had a very visible curve that would never be corrected w/o removing all of the planking. I was surprised that anybody would proceed with the planking of the second side - obviously this was from a modeler with out a club or other input that blindly followed the instructions "plank the hull". Dave is correct that with the blocks added between bulkheads this could not happen as the blocks essentially turn the keel/bulkhead assembly into a solid hull. Kurt
-
Jack: Practice with two pieces of flat stock with some flux and Stay-Brite. Set them end to end with one piece overlapping the other - with the flux between the two pieces where they overlap with just a bit of squeeze out at the end of the piece on top and some small bits of the solder atop the flux right at the joint. Heat the brass where it is two layers thick just a bit back from where it overlaps. When the brass gets hot enough the flux will melt and shortly after that the solder should flow. When it flows remove the heat - the job is done at that point and heating it longer will hurt the joint. Let it cool a bit, use a pliers or tweezer to pick up the part and dip it in water. You should have a good joint. Once you see the solder melt and know what to look for you should be good to go. Remember the solder will flow to the heat. If the solder balls up you got it hot before the metal. Hope this helps. Take care, Kurt
- 250 replies
-
- 6
-
-
- willie l bennett
- model shipways
- (and 1 more)
-
Glen: I sure wish I had been with Mitch when he visited the INA and your shop the other day. It would have been great to see you and Kevin again - and these two models in person. Mitch told me just how cramped the model shop is with both of the models taking up most of the floor space. I understand he had to borrow your optivisor to see the end of the ball mills you used to do the doors and that he's really sort of taking your word that there is actually a ball at the tip of the mill. Kurt
- 701 replies
-
- 11
-
-
Mike: It's looking good. Alignment can be a bear but in the end it all fits together quite well. Kurt
- 225 replies
-
- 2
-
-
- chaperon
- model shipways
- (and 1 more)
-
Ken: Glad you got to see the ship. It was supposed to be one of the NRG Conference visits while in San Diego next week - planned long ago but they moved up their touring dates and it will not be in San Diego next week. Love the foggy photos. And the canopy brass work is fabulous I am sure those at the conference next week will be looking it over closely. Kurt
-
Can i live without a BYRNES TABLE SAW
kurtvd19 replied to shihawk's topic in Modeling tools and Workshop Equipment
Bill: I am not sure that this article is in SN2 or not. I took it from the CD set - easier to find. But, the Shop Notes are sure filled with good tips. Kurt
