kurtvd19
-
Posts
3,049 -
Joined
-
Last visited
Content Type
Profiles
Forums
Gallery
Events
Everything posted by kurtvd19
-
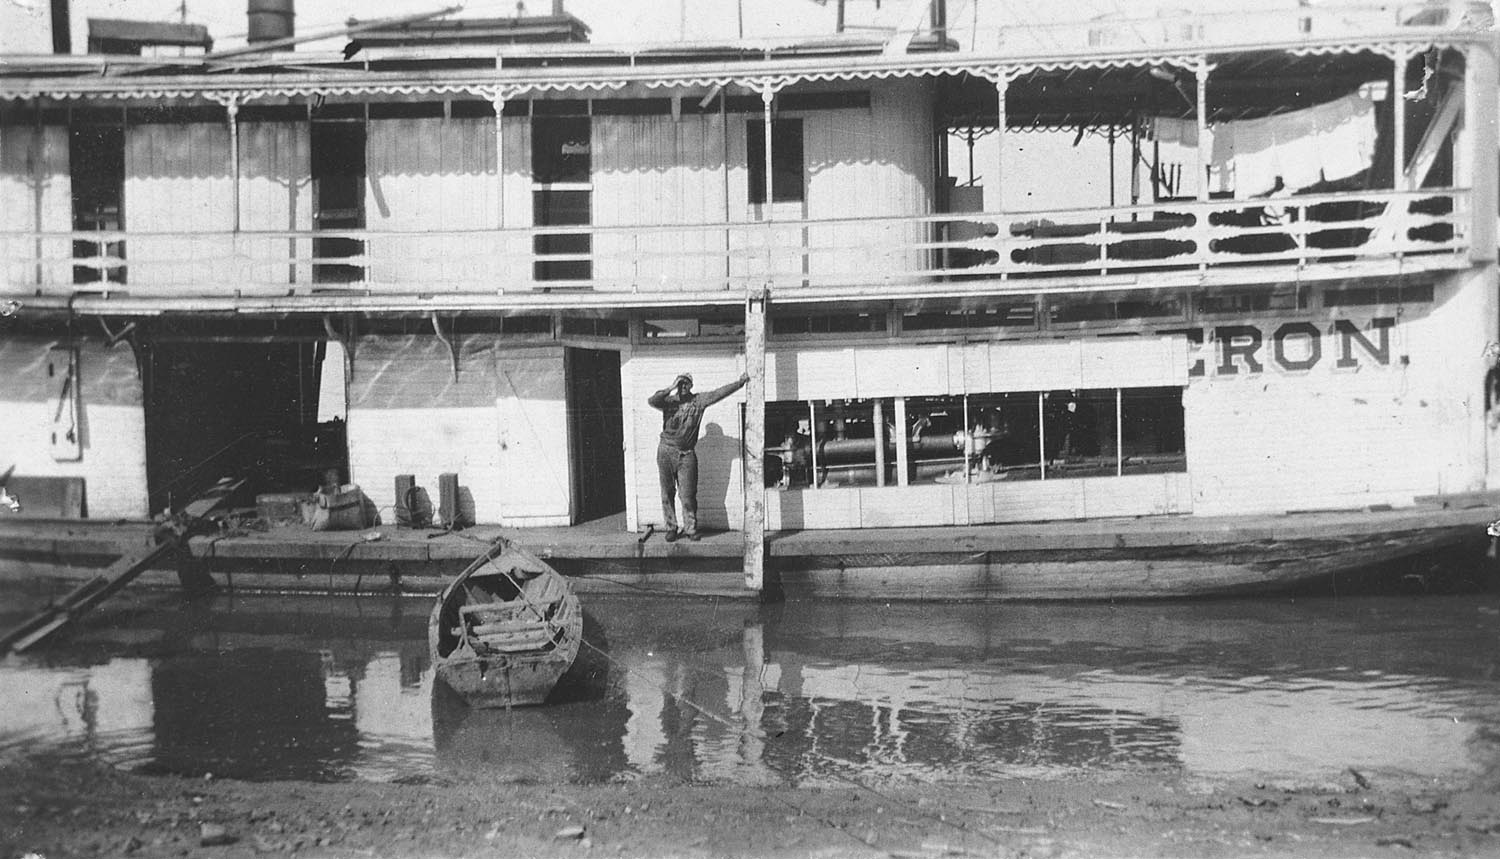
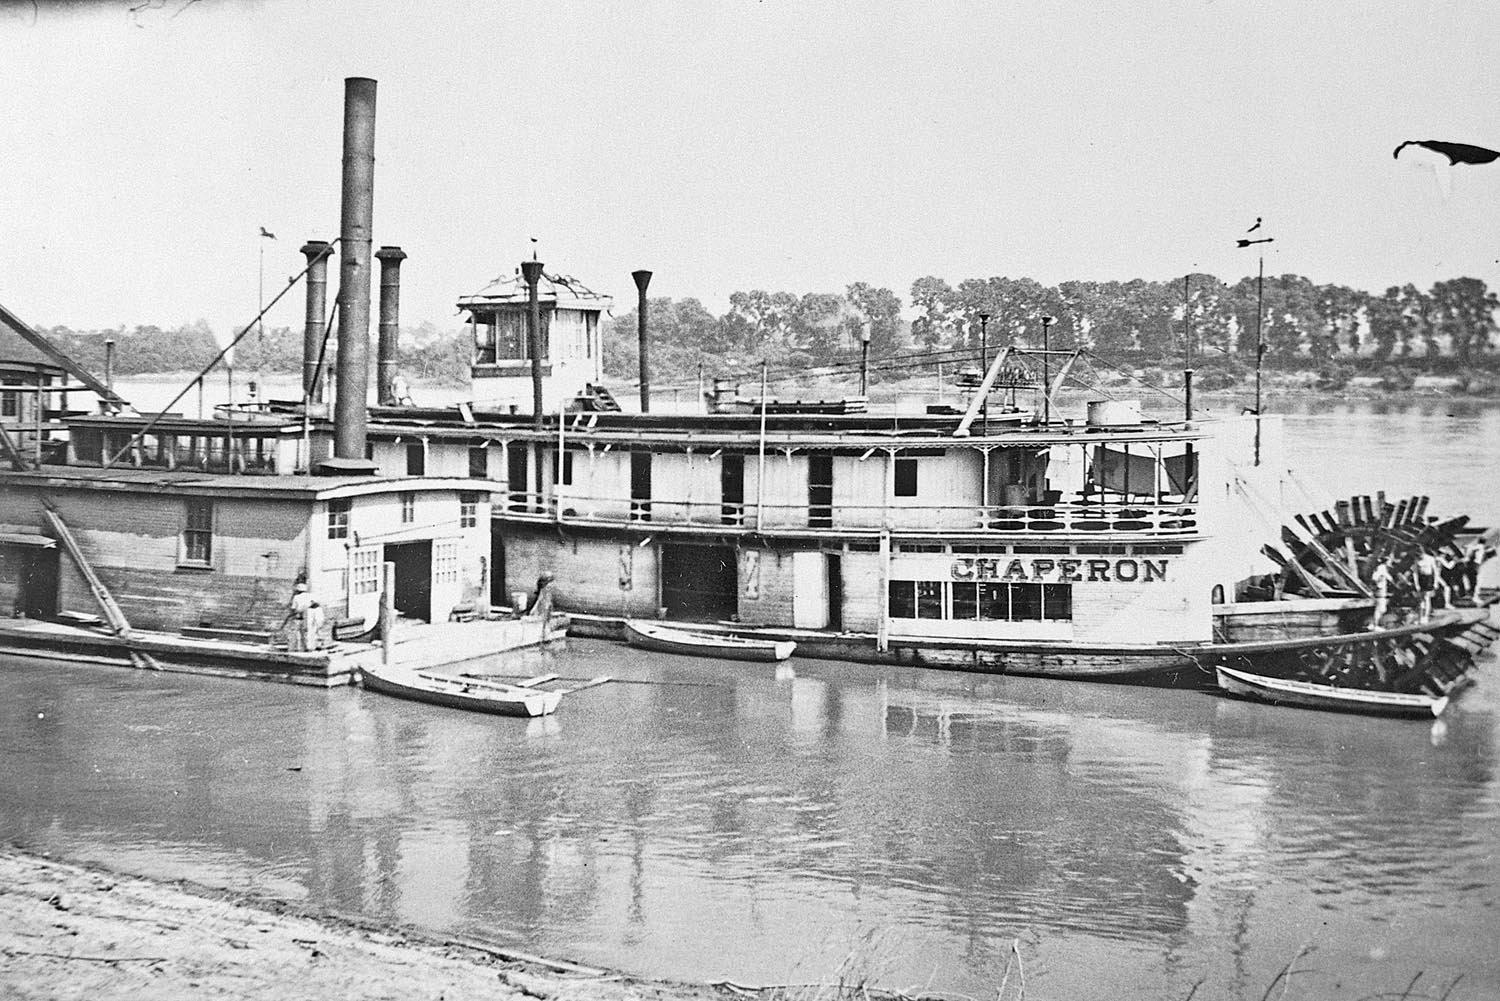
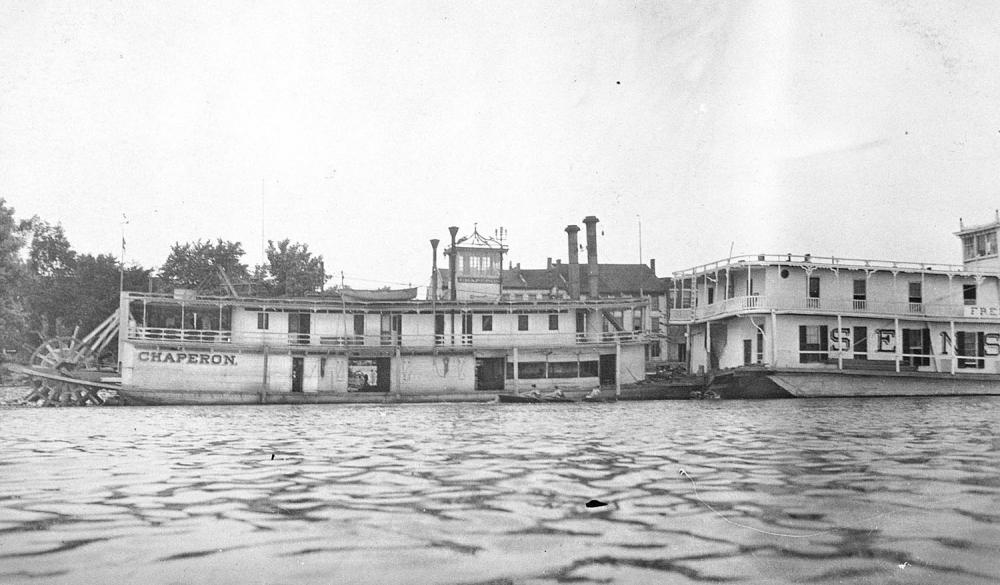
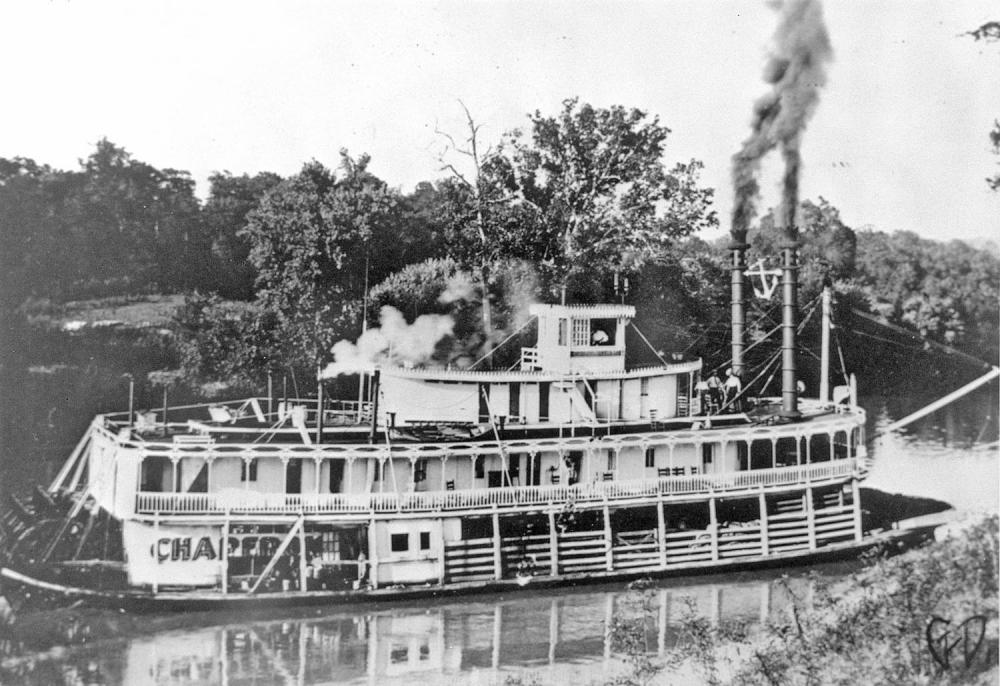
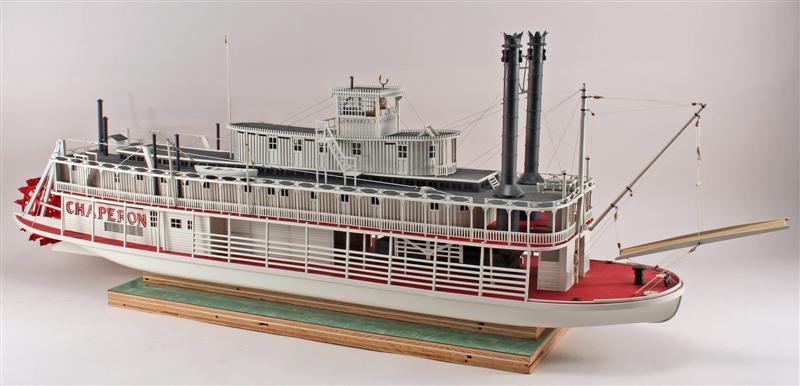
 I agree 100% with Cathead on the colors. Red was by far the most common deck color though brown was also used. Most hulls were white but black was also used. Check the photos I had posted of the Chaperon to see the white hull, but the photo I posted of the model made by Sam Parent had a black hull and made a very attractive boat. If you are going to model the Chaperon as the Chaperon then I would definitely go with the white hull but if you change the name use black or white. Kurt
- 225 replies
-
- 5
-

-
- chaperon
- model shipways
- (and 1 more)
-
Steamboats and other rivercraft - general discussion
kurtvd19 replied to Cathead's topic in Nautical/Naval History
Yeah, Cathead, I agree - very interesting and I am going to do some checking on the sources Roger has cited. I figured a boat was a boat - but being wider than average sure makes sense for the use. The Chapelle book though is the one I do not have! Kurt- 281 replies
-
- 3
-
-
- Steamboats
- riverboats
- (and 3 more)
-
Mike: Do not dread planking this hull. It's pretty straightforward. I wet the planks that needed fitting for about 2 minutes, clamped them in place till dry and then glues them in place - no stress on the glue joints. Just be careful with clamping force as the basswood can crush easily when wet. Kurt
- 225 replies
-
- 6
-
-
- chaperon
- model shipways
- (and 1 more)
-
Glenn: The window frames are fantastic. I love the technique you used - and I will copy it when the need arises for windows. The same for the fantastic doors and the milling technique used for the rails & stiles. Definite outside of the box thinking came up with these techniques. Thanks for sharing. Kurt
-
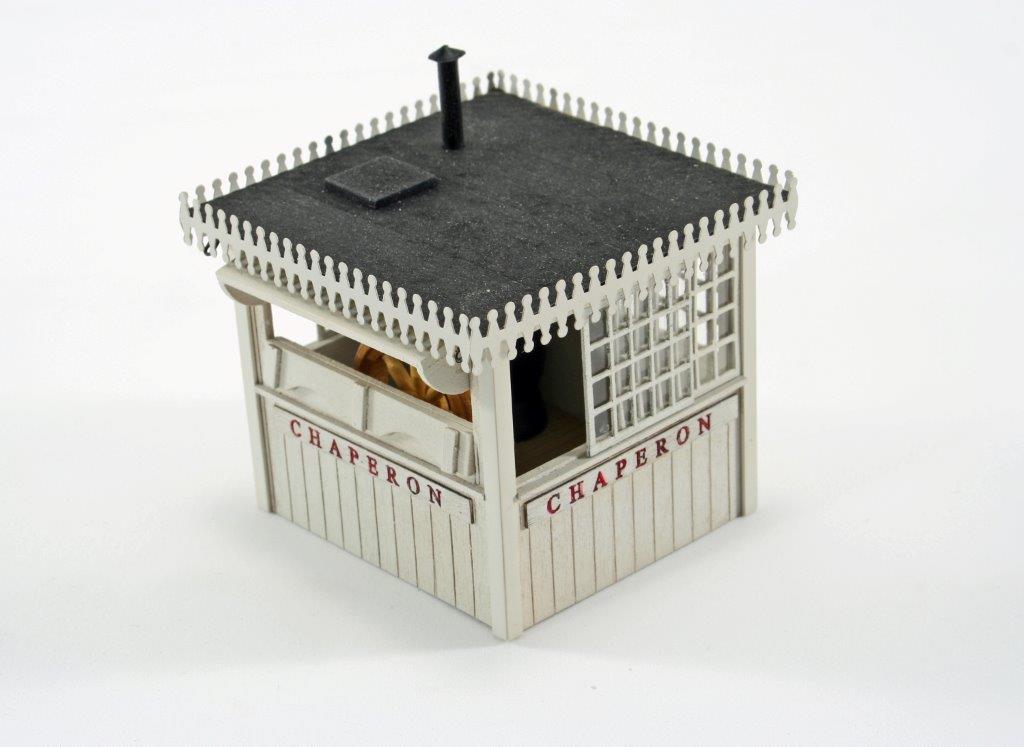
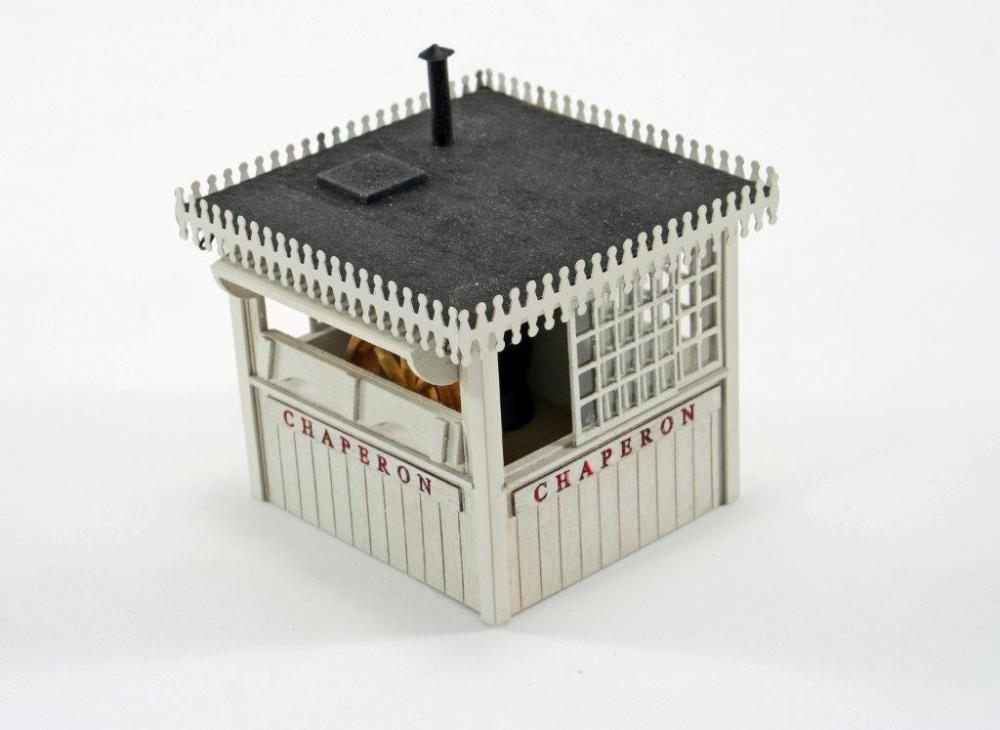
Mike: The photo shows a flat roof - covered with simulated tar paper - and it matches the photos of the real Chaperon I posted earlier. I am confused by your description of the roof. The decorations surrounding the roof are kit supplied. The photo is of the pilot house prior to it being installed onto the model. I tend to keep the installation of small pieces until later in the build when possible, to avoid knocking bits off during construction. Mike, it's only my opinion, but I do not like the King of the Mississippi kit as I think it's unrealistic . However, that's my opinion and if you like it by all means go ahead with it. There is only one person you need to please with the model you build - YOU. You are the Captain of your boat and you can paint it the color you like, add anything you like and make it YOUR model. I am curious as to what the others think about the KotM kit. Take a look at the Train Troll web site for some realistic small towboat / tug kits. I just built the Smokey Duck kit and saw all of their kits (assembled) at the last NRG Conference. I have the Smokey Duck in it's case displayed atop the Chaperon's case. Same scale and it makes a great contrast. But the kit is among the best engineered kits I have built and I will build more. www.traintroll.com Kurt
- 225 replies
-
- 3
-
-
- chaperon
- model shipways
- (and 1 more)
-
Mike: When you get to the pilothouse I will post some photos of the changes to make to the kit. Here is the altered pilot house. Kurt
- 225 replies
-
- 8
-
-
- chaperon
- model shipways
- (and 1 more)
-
Roger: W/o taking over Mike's build - I read your comments about the flat bottomed boats with interest - makes perfect sense. And I don't dispute that this might have been the most common type of boat carried. Like I said it makes sense. But I thought that this was something I should have caught doing my research. So I went to my file on the Chaperon to see what the photos I have might tell me about the boats on the Chaperon. I have a whole bunch more of the Chaperon than what I have posted here. And some show only a direct side view of the boats on the Chaperon and from a profile I can't tell if they are flat bottomed or not though some show a low rake angle at the bow which makes me think you are partly correct as related to the Chaperon. However, the photos I have attached of the Chaperon do show that the boats in the photos are not flat bottomed boats with large flares. They do have flat transoms unlike the kit boats though one photo (bottom photo) does show a boat almost identical to the kit boats. These are the photos from my collection with the best views of the boats - most don't even show the boats due to angles and some are too fuzzy to tell. So, at least in the case of the Chaperon the kits boats can be used with some authenticity. But, I am going to look into this further. You don't per chance have any idea of what issues of the Journal might have had the plan(s) you referred to? Maybe we should take this to the other forum on general discussion STEAMBOATS & OTHER RIVERCRAFT - GENERAL DISCUSSION so Mike's build log isn't taken over by this? Although if we keep it to the Chaperon it's a fit here. Take care, Kurt


- 225 replies
-
- 13
-
-
- chaperon
- model shipways
- (and 1 more)
-
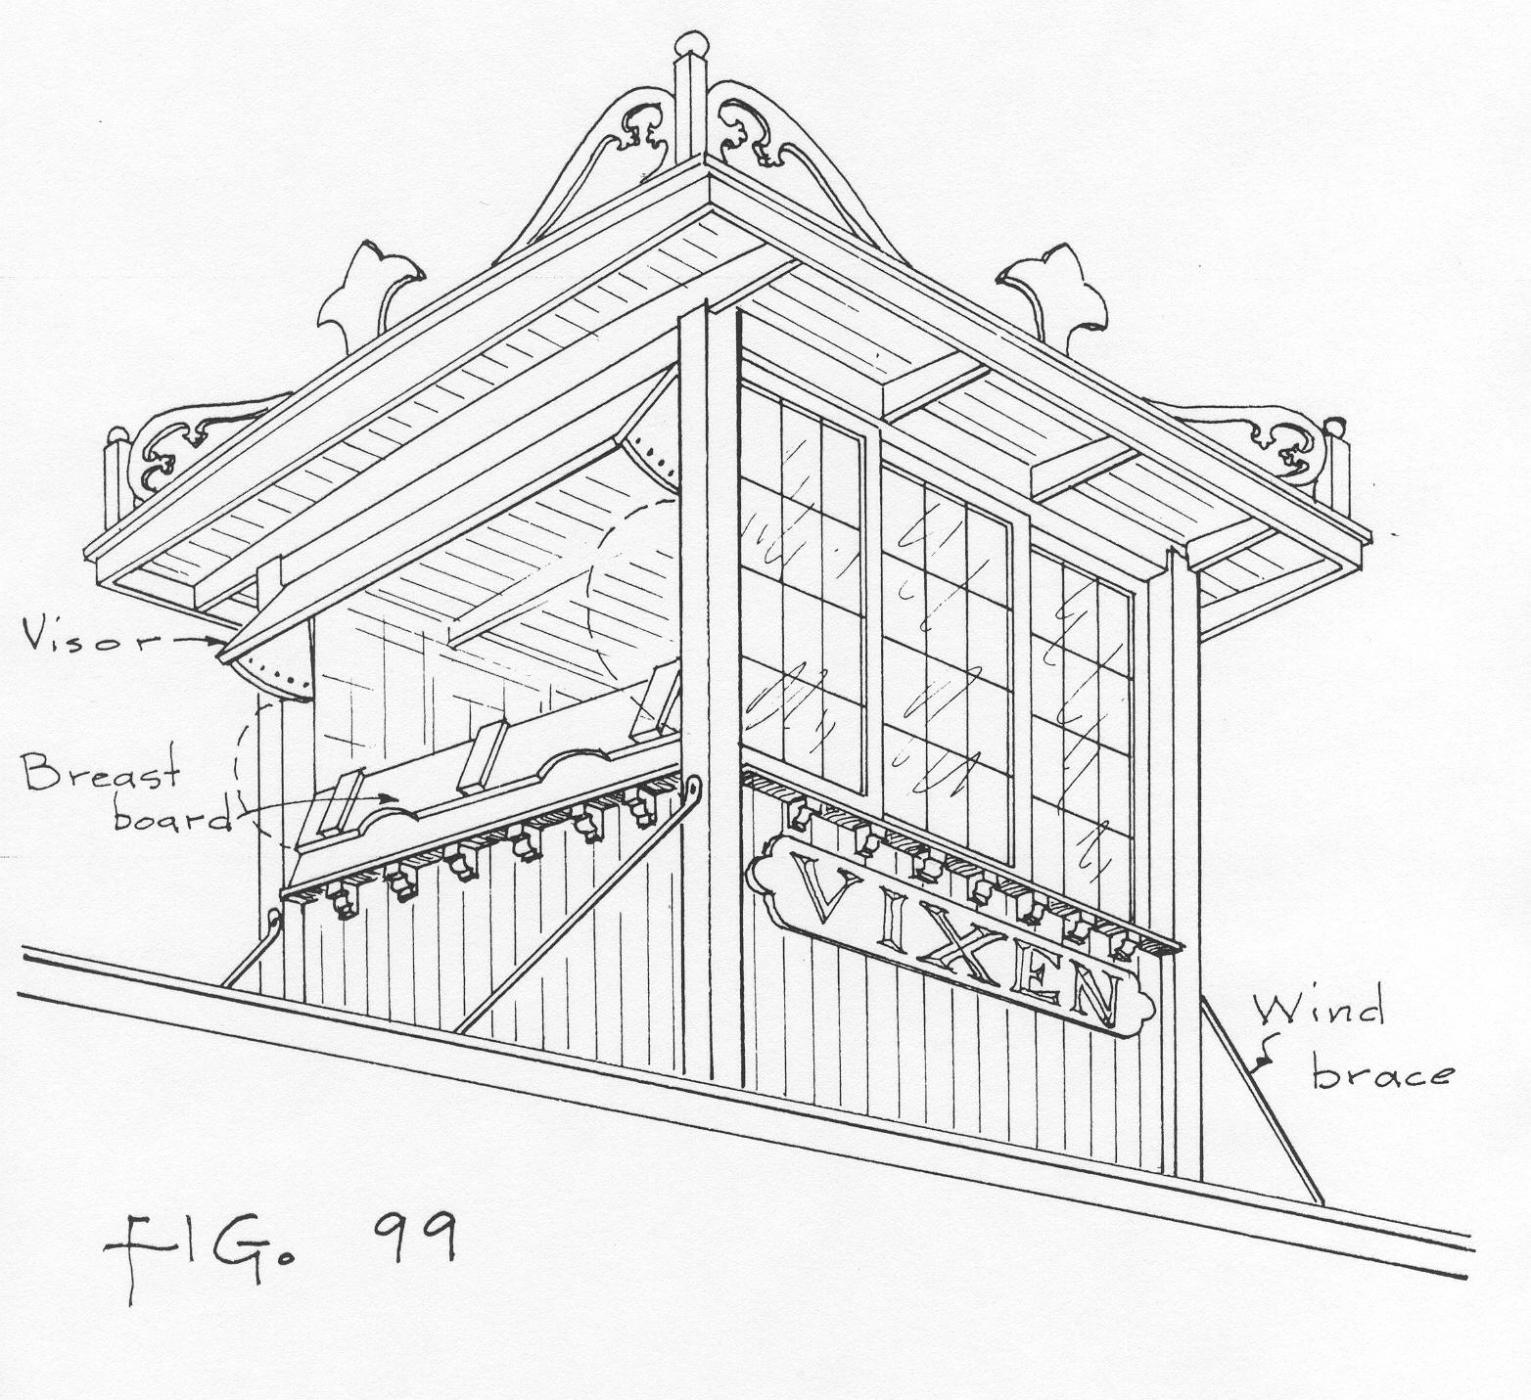
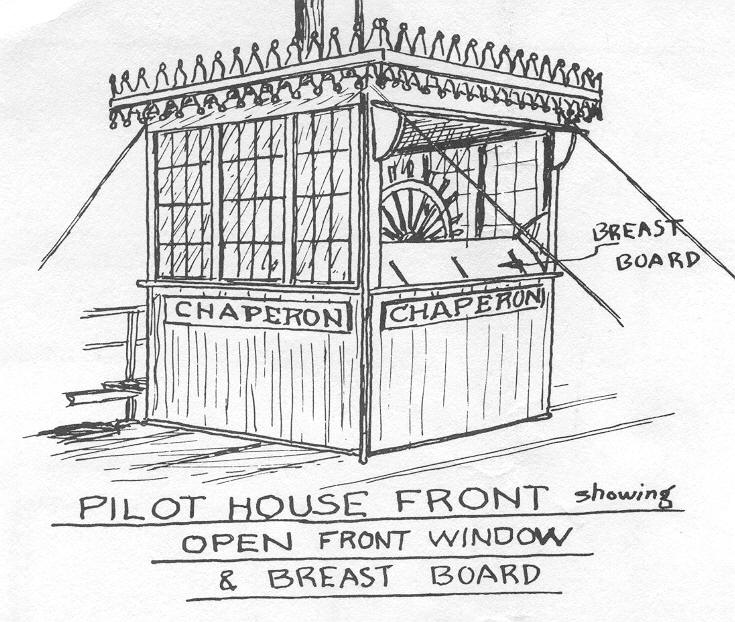
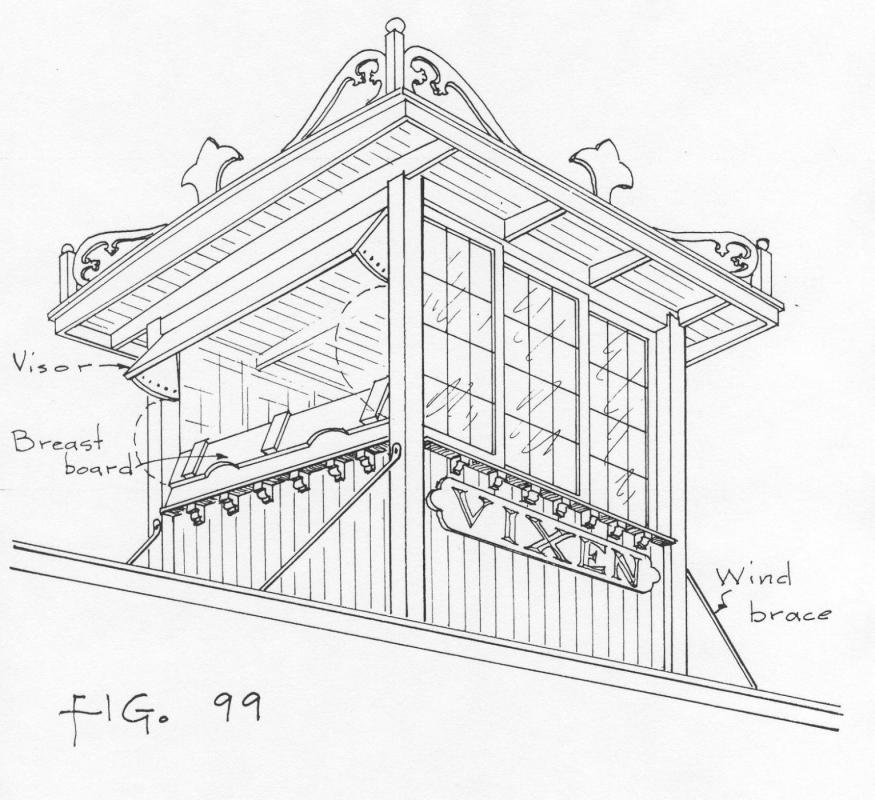
Mike: I will be following. Don't hesitate to ask anything about this build. I did a 6 issue build of it in Ships in Scale magazine and if I don't remember any specific detail I have all my text and photos to fall back on. I probably have a photo of just about anything you might run into building the Chaperon and will be glad to post to help. I mentioned that these riverboats didn't use the small panes of glass for windows in the pilothouse. The drawings below are of the original Chaperon plans and then the drawing (Fig. 99) from Alan Bates' Steamboat Cyclopedium showing the typical arrangement of windows. They agree very closely but the kit provides small window panes for the front "window" area that never actually had any sort of window glass. The front frame pieces were cut down and used to make sliding windows on the sides as shown on the Fig. 99 drawing from the Bates book. Kurt
- 225 replies
-
- 7
-
-
- chaperon
- model shipways
- (and 1 more)
-
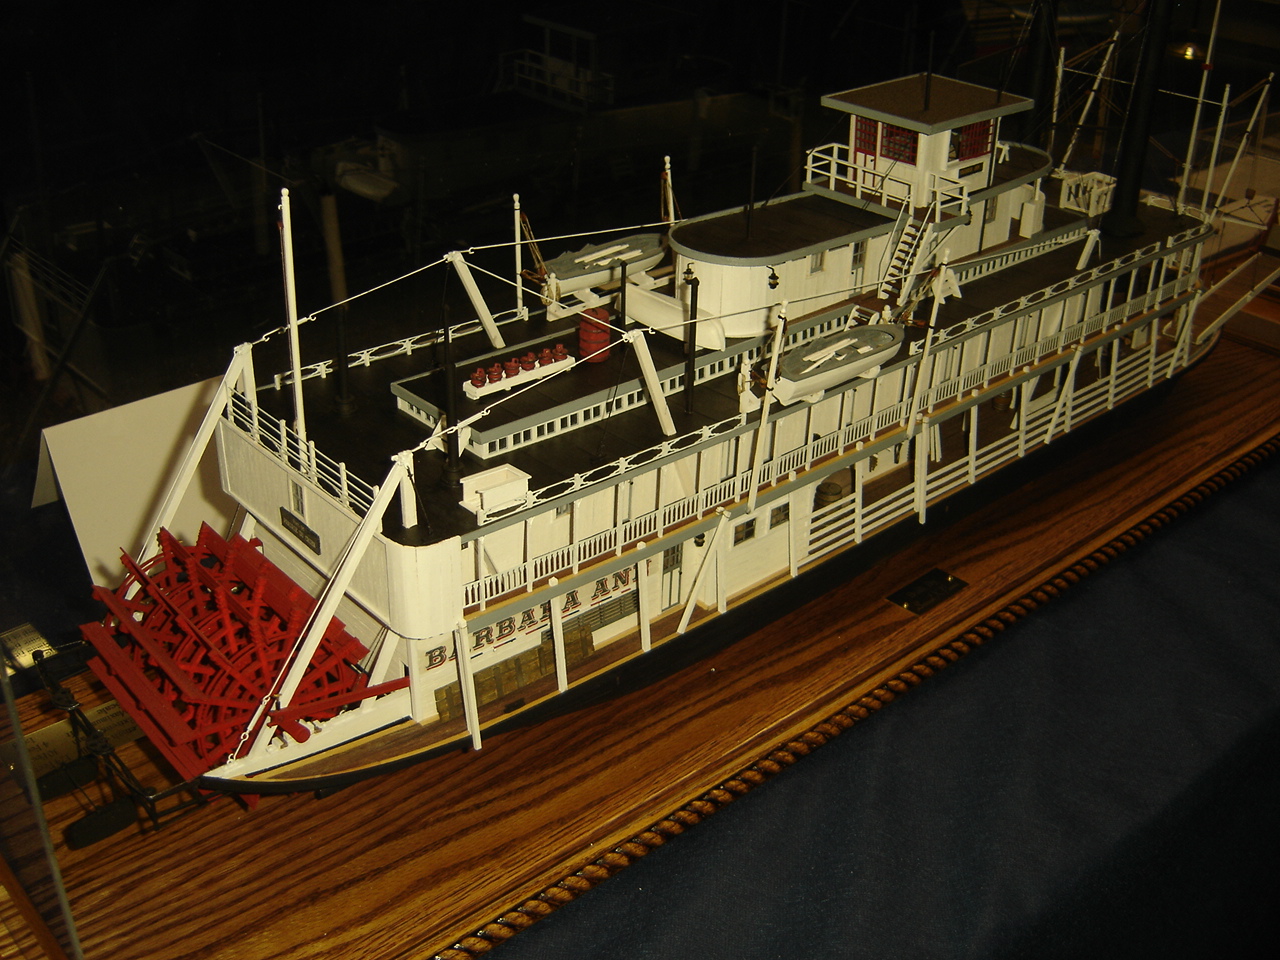
Mike: This is just my opinion of the kit - offered as another viewpoint not argument. I built the Chaperon when it was first released. I thought it was one of the best engineered kits produced and except for rigging materials I didn't find that the materials provided were not of good quality - with the exception of the very small square strip wood meant to represent the battens on the board and batten cabin siding. I replaced this with cherry strips I cut. I know that woods can vary from time to time so your might not be as good as mine were. As to the plans, I thought they were exceptionally well done - the isometric views can help the builder see the model in 3D unlike the standard 2D 3 views of most plans. The plans provided adequate full size drawings for the parts that needed to be sized to the plans. There are inaccuracies - the hog posts do not extend down into the hull. The pilothouse windows need to be reworked - small panes of glass were not used in the front windows of riverboats. But, the faults do not take away from this kit being by far one of the best riverboat kits on the market. I had a lot of research materials for this boat as well as a prototype of the original kit that Model Shipway's never actually produced - 1/8" scale, solid hull. I knew the inaccuracies of the original plans and shared details with the kit designer - not all were corrected as the kit was pretty far along in development but it turned out to be a great kit in my opinion. The photos attached are of my model - the bow on view - and the other is of the model built by Sam Parent that was entered in the 2016 contest at the WI Maritime Museum. Sam's model corrected the hog posts and added the monkey rudders behind the stern wheel - this was a feature found on many riverboats but not on the original Chaperon - he named the model Barbara Ann after his wife. Sam added a lot more details than I had included - it is a great model - and earned a gold medal. Anyway, I know you will enjoy building the Chaperon. I will be happy to share details of the pilot house windows and the hog chains and their turnbuckles. I could not believe that the kit included photo etched turnbuckles! Flat brass at this scale just doesn't cut it. Take care, Kurt

- 225 replies
-
- 14
-
-
- chaperon
- model shipways
- (and 1 more)
-
Survey of wooden Mississippi riverboat kits.
kurtvd19 replied to skipper1947's topic in Wood ship model kits
Thanks for the compilation. The Chaperon did not operate on the Mississippi River. It was used mostly on the Yazoo River and Ohio River. It very well could have been used on the Mississippi as there were many similar boats on the Mississippi. Kurt -
Steamboats and other rivercraft - general discussion
kurtvd19 replied to Cathead's topic in Nautical/Naval History
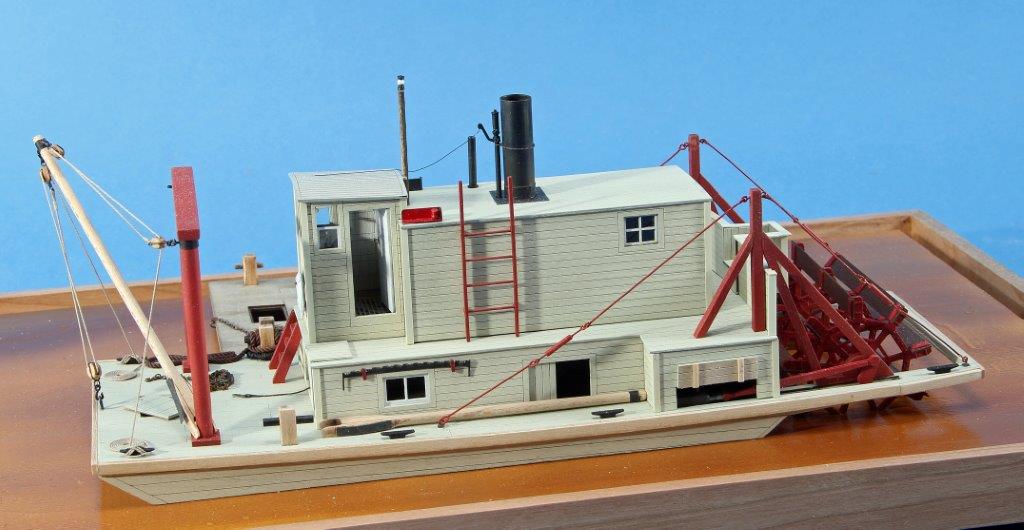
Cathead: One point that was covered is that there must be a good market to make the mfg take the risk. There are not enough of us building riverboats to be considered a viable market. The Chaperon kit is the sole kit with good scale fidelity and good engineering and I think the sales of it have been good but I don't think that Marc's going to do another riverboat kit soon - if ever - as there just aren't enough of us to matter. Here are some photos of what I think is the best engineered riverboat kit I have ever seen - and built. It's a 1/48 scale waterline kit by Train Troll - I got it at the NRG Conference in Mystic last year. Kit name is the Smokey Duck. Train Troll will be a vendor at the 2016 NRG Conference in San Diego in October. Laser cut parts that are by far the best of any kit I have worked with or examined. His market is mainly RR modelers - a much bigger segment of the modeling world than we are. I think when more boat builder see this guy's stuff he's going to become better know to us. Check out the web site. Every one of his models is great and the detail stuff he has is outstanding. Kurt

- 281 replies
-
- 6
-
-
- Steamboats
- riverboats
- (and 3 more)
-
Steamboats and other rivercraft - general discussion
kurtvd19 replied to Cathead's topic in Nautical/Naval History
Cathead: Yes, IPMS accepts wood models. As each chapter is pretty much just loosely associated with the IPMS-USA they all get their charter from the IPMS-USA and must follow their rules that include all models. There are some that are less accepting than others but I think it's more an area interest in that there are IPMS car clubs where all the members model only cars/trucks and there are aircraft centered clubs too. But nobody is turned away (at least to my knowledge - and I am sure the national group would not take kindly to hearing of such a practice). The model shown on the current cover of the Journal was an IPMS winner - Best Nautical - at the 2015 Nationals and it took 2nd place in the Recent Master's Competition at the WI Maritime Museum's show. 20 years ago the thought of a plastic model on the cover of the Journal would have had some old timers having heart attacks. The same sort of thing happened within IPMS when they opened their competitions to all media. They had to with the use of photo etch, etc. You can check the IPMS web site where they list all the shows scheduled. You just missed a show in Branson, MO. The IPMS-Gateway (St Louis) group has their show on September 10. ipms-gateway.com/invite2016html I don't remember where you are in relation to St. Louis but this might be something to put on your go to list. Kurt- 281 replies
-
- 4
-
-
- Steamboats
- riverboats
- (and 3 more)
-
Steamboats and other rivercraft - general discussion
kurtvd19 replied to Cathead's topic in Nautical/Naval History
Cathead: Other than IPMS shows the model shows are few and far between. Model boats/ships have won the top awards at the IPMS chapter I belong to about 4 or 5 of the last 6 years and one of the local club members attended an IPMS event the same weekend as Manitowoc a bit NW of Chicago and came home with 4 of the top awards. So, while IMPS shows don't have a lot of ships/boats they know good models when they see them. The only non IPMS shows I know about in MO are radio control boats in the St. Louis area by the St. Louis Admirals - I think their regatta is coming up in September. They have a web site. I used to belong and drove down to meetings twice a year in addition to the regatta. The regatta's today are much smaller but they draw some outstanding boats. The r/c models are very good and are judges on scale merits - but all must run on the water to be judged. David is right, get on I55 north to 294 to Manitowoc next May and see a great show. And check the MSW topic below where everybody can post notices of upcoming shows/contests. NAUTICAL RESEARCH GUILD NEWS, Model Ship Clubs and Exhibitions and Events, Museums and Museum Ships Kurt- 281 replies
-
- 4
-
-
- Steamboats
- riverboats
- (and 3 more)
-
Steamboats and other rivercraft - general discussion
kurtvd19 replied to Cathead's topic in Nautical/Naval History
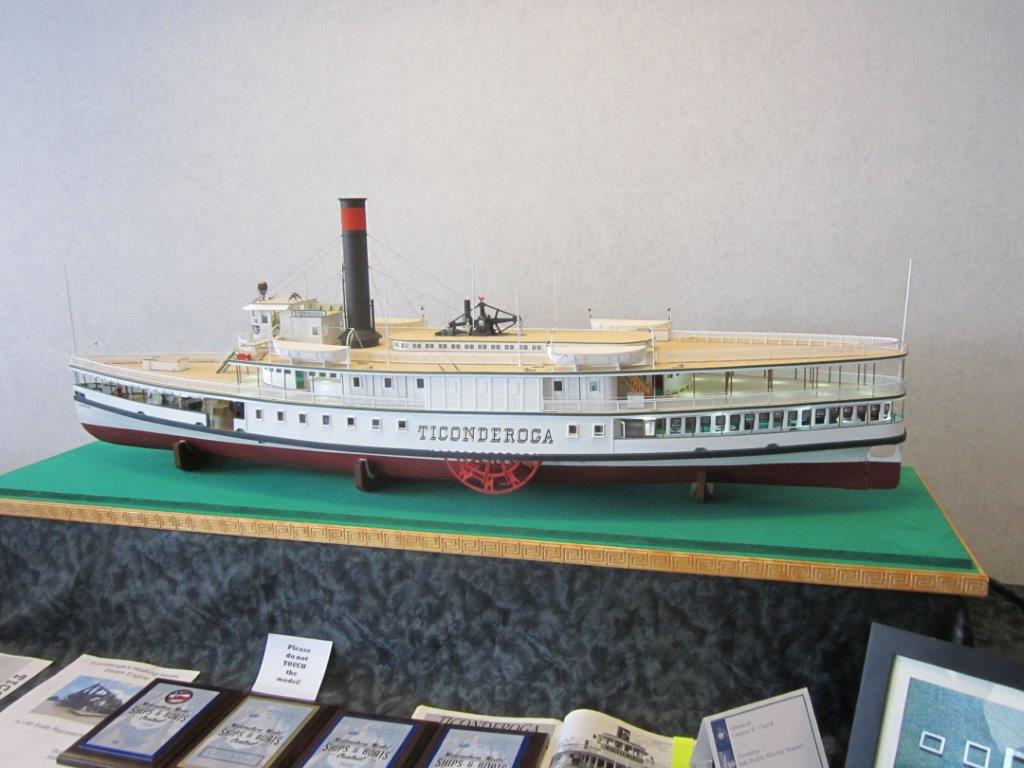
The model shown below won a Gold Medal at the recent show/contest at the WI Maritime Museum in Manitowoc, WI, and was also the Best of Show Best Paint and Modeler's Choice winner. It's over 4' long, fully lit with LED's and the fully detailed walking beam engine would have won a gold medal all by itself. Alex Deery of Canada is the modeler. Justthoughthis group would be interested in seeing it. Kurt
- 281 replies
-
- 9
-
-
- Steamboats
- riverboats
- (and 3 more)
-
Glenn: Your calculations were right (of course) on the fitting of the boiler deck. Building off the model sure saved a lot of time - and surely made the work go easier. Very impressive. thanks for sharing. Kurt
- 701 replies
-
- 10
-
-
Mick: Very nice work and good progress. I truly enjoy your posts on this build. Every time I send a set of these plans out I hope to see another build log pop up here on MSW. Your posts will certainly help to answer any questions that might come up in alter builds. I have told several purchasers about your build log but with the various aliases used I have no way of knowing if they are looking in or not - their loss if not. Take care, Kurt
- 504 replies
-
- 5
-
-
- washington
- galley
- (and 1 more)
-
Look up Woody Joe kits on a Google Search. Clare Hess has had a couple of build logs on these kits. Can always be more kits - but didn't know if you were aware of these kits. Kurt
-
Best Paint Brush?
kurtvd19 replied to mikiek's topic in Painting, finishing and weathering products and techniques
If you are using Acrylics use a good synthetic brush - they will last a lot longer than natural bristles. With solvent based paints you can use either with good life. If you use both types of paint I recommend having separate sets for solvent based and the Acrylic based. If you paint much with brushes investigate how to properly care for them - cleaning and storing. Always use a good quality brush cleaner - I have used The Masters Brush Cleaner and Preserver for years. You would be surprised just how dirty your brushes are if you get some of this stuff, follow the directions with your stored brushes and watch the dirt come out of your clean brushes. I will leave the recommendation of brands and types to others - I haven't bought a new brush in years (see above about proper cleaning) and I have no idea if the ones I have on hand are still made. I use an airbrush almost exclusively now. Kurt -
Chuck: Great idea. I will be following this with great interest. Kurt
-
Lloyd Warner, former NRG Chairman, who owns Warner Woods West has retired from block making. Lloyd recently dropped his ad in the Nautical Research Journal and told me he's only making blocks for himself from now on. Lloyd had stopped selling wood and linen thread some time ago. Kurt
-
Need Community's Input on Best Kit Manufacturer
kurtvd19 replied to Bandue's topic in Wood ship model kits
Any of the newer Model Shipway's kits sold by Model Expo - US made, US designed. You can download most of the instruction manuals from these kits from their web site - gives one a good iea of the kit's complexity and you can see right away how well the instructions are done. Kurt- 10 replies
-
- 2
-
-
- Kits
- model kits
- (and 1 more)
-
Toni: Excellent work. I didn't get a chance to tell you that Atalanta received several votes for People's Choice at Manitowoc - even though it was in display only. Bill got a couple too. Kurt
-
Dan: Looking good. To avoid chipping the paint make sure that you file/sand on the hull only on the inboard stoke - lift for the outboard stoke. Should be able to avoid and chipping. You might want to apply some masking tape at the edge, mark it and sand to the line - again sanding only on the inboard stroke. For the fit of the deck you might want to bevel to top edge of the hull, when sanding it, to fit the angle of the bulwarks/deck camber. Also. I am sure you are going to put some sort of deck / hull clamp at the top edge of the hull to provide gluing surface for the deck - you might want to add it first to stiffen the hull edge and then do your sanding so the clamp's top edge is sanded to fit the deck camber at the same time you clean up the hull's top edge. Kurt
-
Need Community's Input on Best Kit Manufacturer
kurtvd19 replied to Bandue's topic in Wood ship model kits
Also, what is your interest? Type of ship - merchant or warship? Period? With a few guides you will get much better answers. Given what you have said my answer would be definitely buy a US made kit. In my opinion best bang for the buck and no important stuff lost in the translation. But if Bluejacket or Model Shipway's don't make a kit that interests you then you have to buy something from across the water. If so then check out Ages of Sail here in the US - they import almost all the foreign made kits. Kurt- 10 replies
-
- 6
-
-
- Kits
- model kits
- (and 1 more)
-
Steamboats and other rivercraft - general discussion
kurtvd19 replied to Cathead's topic in Nautical/Naval History
Dave: No problem with them being posted. Just was curious. I have a lot of the HAMMS plans - boarders might have been cropped a bit. Kurt- 281 replies
-
- 2
-
-
- Steamboats
- riverboats
- (and 3 more)