


kurtvd19
-
Posts
3,043 -
Joined
-
Last visited
Content Type
Profiles
Forums
Gallery
Events
Everything posted by kurtvd19
-
 The guys in my local IPMS club who use enamels wait 2 - 3 weeks before doing the sanding / polishing of their paint jobs. Dry to the touch does not mean fully cured. Another reason I use acrylics. Kurt
- 7 replies
-
- 3
-

-
- paint
- drying time
- (and 1 more)
-
Experience with BlueJacket metal toners?
kurtvd19 replied to Cathead's topic in Metal Work, Soldering and Metal Fittings
That stuff you were using sounds like something that should only be used outdoors - hope the workbench was in the garage at least. Kurt -
Toni: Looking good - of course. I was glad that you brought one of the cannons to the last meeting. Outstanding. Chuck's cannon Monograms on the barrels are unbelievable Kurt
-
Elijah: Good thinking on using the tape to lay down a straight line. It's looking good. Kurt
- 701 replies
-
- 2
-
-
- phantom
- model shipways
- (and 1 more)
-
I second Bill's recommendation to get the NWSL original version. Micro-Mark has a habit of buying from the name manufacturer to test the market and then they blatantly rip off the name brand - even down to the name of the rip off being very similar - in this case the NWSL's name is True-Sander. Same goes for the NWSL's Chopper = MM Chop-it and NWSL's The Duplicator = MM Duplicate-it. Micro-Mark did the same thing with Badger Air Brushes - you will certainly never see an actual Badger Air Brush sold at MM again because of this type of practice. In the case of the Badger Air Brush copies people are always bringing/sending the knock offs to Badger for repair. Of course they can't fix them - they were garbage to start with and the real parts don't fit. Kurt
-
Elijah: I am sure the set up as it is will mark a point on the hull at any point along the station line. Just make 3 or more pencil point dots on a station line and then connect them using a flexible straight edge of some sort. A business card might work or a strip of styrene. Kurt
- 701 replies
-
- 3
-
-
- phantom
- model shipways
- (and 1 more)
-
Glen: Post a photo or two of the wreck model - that shows the condition as found pretty darn good. Kurt
-
The CD index shows the following listings Kurt HMS Victory, Pt. 1 : McClure, Gene No. 05, MAY JUN 1984, Page 30 HMS Victory, Pt. 2 : McClure, Gene E. No. 06, JUL AUG 1984, Page 14 HMS Victory, Pt. 3 : McClure, Gene E. No. 07, SEP OCT 1984, Page 14 HMS Victory, Pt. 4 : McClure, Gene E. No. 08, NOV DEC 1984, Page 41 HMS Victory, Pt. 5 : McClure, Gene E. No. 09, JAN FEB 1985, Page 31 HMS Victory, Pt. 6 : McClure, Gene E. No. 10, MAR APR 1985, Page 34 HMS Victory, Pt. 7 : McClure, Gene E. No. 11, MAY JUN 1985, Page 20 HMS Victory, Pt. 8 : McClure, Gene E. No. 12, JUL AUG 1985, Page 16 HMS Victory, Pt. 9 : McClure, Gene E. No. 13, SEP OCT 1985, Page 09 HMS Victory, Pt.10 : McClure, Gene E. No. 14, NOV DEC 1985, Page 76 HMS Victory, Pt.11 : McClure, Gene E. No. 15, JAN FEB 1986, Page 14 HMS Victory, Pt.12 : McClure, Gene No. 16, MAR APR 1986, Page 64 HMS Victory, Pt.13 : McClure, Gene E. No. 17, MAY JUN 1986, Page 10 HMS Victory, Pt.14 : McClure, Gene No. 28, MAR APR 1988, Page 04 HMS Victory, Pt.15 : McClure, Gene E. No. 29, MAY JUN 1988, Page 09
-
I just confirmed with Ken Goetz that he used press type lettering for his markings. Ken's a local club member and we got to see the progress of this model going together each month until it got too big with the rigging and all to haul to meetings each month. These markings were nicely done but I had to ask him how he did them with the memory being what it is anymore - I just say that the hard drive is full and some data's going to be lost to store new data. Kurt
-
Kurt, A few posts back you mentioned having a trove of fittings from old school ship model companies such as A.J. Fisher.I have a set of plans for their three Island tramp steamer that I would enjoy building.Do you suppose a set of fittings is residing in your collection? It is very likely that some if not all of the fittings are in one of the Fisher drawers. The only problem being that they are labeled only with part numbers - some have a short description as to the type of part. But most are in old manila envelopes and need to be opened to see what is inside. If you have part numbers and descriptions I could look, but to say you need a capstan or winch or ventilator doesn't help w/o the part number. At least until the day comes where I can sort these all out. And day was used figuratively as I think if I was able to sit and work 8 hour days at sorting it would take a month or so to organize these parts in clear envelopes with part numbers and sizes with descriptions so that if I was looking for a capstan I could look in the capstan area or if I needed a specific part number it could be found - time I just don't have and will not have until I step away from the NRG stuff that I enjoy as much as building and writing. If you have part numbers I will look for them - it will take a bit - but let me know. Send me a PM with the info. Kurt
-
Some time ago I had dry transfers done up for ships names. Proper arc to the art work so it laid down right on the transom for transfer. Straight for the bow. Had them done in gold and white. I was doing this for dozens of models at the same time so it was economical. I recently saw some DIY dry transfer sheets. White was shown. When (or if) I remember where I saw these I will post them but a google search might just turn them up. Ken, last week I was looking at the photos you sent me of the ladder wagon. There will be a lot of firefighters wanting that kit. Kurt
-
Looking good Dan. It pays to take the time to redo something you know just isn't as good as you can make it. Don't leave duct tape on too long or it will leave residue. For the time you are working on it no problem. Just don't use it and leave the model for a week or two (or even longer) before getting back to it. The stuff sticks better the longer it's on until all the adhesive is wicked into the part and when the stiff tape is removed all sorts of adhesive is left behind to gum up the wood. Ask me about this at the meeting and I will tell you how I know.... My tape holders by my desk always have a roll of duct tape as well as blue painter's tape for those jobs that need a good hold that will not loosen. I consider both as essential tools. Kurt
-
Ken: Thanks. Yes, I was amazed that the cast threads worked so well when I assembled the pumper. The detail was amazing on all the cast parts for that kit. I told a buddy of mine about the horse drawn hearse and the high quality cast parts that will be in that kit (from your masters) and if it's ever produced he wants one built. Kurt
-
Yeah, the kit piece is never going to be better than the master. GIGO applies to kit pieces too. I got some bollards in a tug kit that were nowhere near round. Very much an oval shape and way too thin on the thinner side of the oval to even attempt to make them round by filing. It would have been an exercise in futility to ask the manufacturer for new parts - the replacement would not have been better as it wasn't a matter of an incomplete fill - the molds were worn out. I inherited a bunch of old parts from a club member. He worked part time for a downtown Chicago hobby shop that closed in the late 60's or so and he got all the ship fittings - fills a whole bunch (27) drawers of a cabinet that just fit in my mini-van. All the parts are in extremely dusty/dirty manila envelopes of the day. Opening them up is a real treat because most of the parts are of very good quality. Brass castings, brass turnings, multi-part brass pieces soldered together. Names like Boucher, A J Fisher, Marine Models, Billings, Model Shipways. Now, none of these parts are newer than 1970 or earlier. Of course, some are better than others, but they were all better than the average parts in a lot of today's kits. Amazing quality - maybe it's because these were all made in the USA (exception being Billings) Not any signs of the dreaded white lead disease - maybe it's because these were all made in the USA? (same exception) I wish I could use some of these parts as masters and make up new fittings in the metal spin casting machine I also inherited from the same guy. Even if I could do it legally there just isn't enough time left. Kurt
-
Elijah: Yes, that's a wing nut. If you don't have the wing nut you can make the same sort of tool by using a clamp to clamp the upright and the pencil holder at the correct position. Saves making the slot. Kurt
- 701 replies
-
- 2
-
-
- phantom
- model shipways
- (and 1 more)
-
Elijah: I have some cherry veneer in my shop that you can have enough of to do the planking if you want it. Let me know. Picked it up for a job that fell through. Kurt
- 701 replies
-
- 5
-
-
- phantom
- model shipways
- (and 1 more)
-
Work station clutter
kurtvd19 replied to Senior ole salt's topic in Modeling tools and Workshop Equipment
I try to clean up as soon as I notice too many tools on the workbench rather than in their proper place and I try to always use the shop vac when cutting or sanding. However, nothing works as good as having the monthly club meeting here in my shop - it forces me to do a fairly thorough clean up at least one a month. Kurt -
Scalpel and tool storage
kurtvd19 replied to planktonette's topic in Modeling tools and Workshop Equipment
Here is a photo of two handles I prefer over the stamped metal disposable handles. Each cost under $10 on eBay. The metal one is the better of the two but there is a different plastic handle that looks very similar to the red handle but costs a lot more that some prefer. I can use the metal handled one show for hours w/o any issues but the stamped metal ones hurt my hand after just a few minutes. Kurt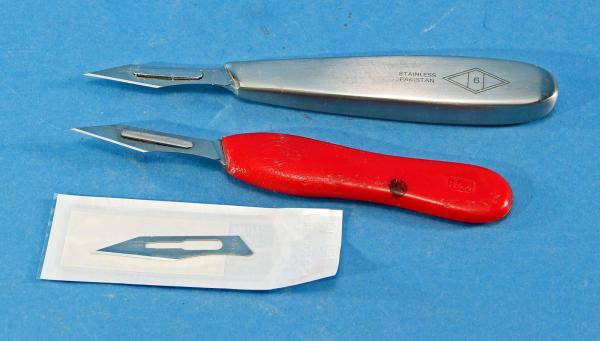
-
Elijah: Dave was and still is a member of the NRMSS and was Secretary for many years until he had to drop the job due to health and now his living in IA. Kurt
- 701 replies
-
- 2
-
-
- phantom
- model shipways
- (and 1 more)
-
Experience with BlueJacket metal toners?
kurtvd19 replied to Cathead's topic in Metal Work, Soldering and Metal Fittings
Cathead: Call Bluejacket tomorrow and ask them. They are quite helpful and will surely tell you if the product will do what you want and how to do it. Kurt -
Cathead: Again - great model and thanks for sharing the building with us. The Arabia is an interesting subject. I don't know of any sort of plans for it. Would probably have to be mostly conjecture and practice of the day to arrive at a model. If you know of any sort of plans please let me know. Take care, Kurt
-
Cathead: Congratulation on completing a great model. Can't wait to see the rest of the photos. The name board and name on the side look great. Kurt
-
Nice work on the Grasshopper spars Cathead. I have seen them on only one other model that I can remember. A very nice touch and great explanation on their use. The only way I can think of to make them hang realistically would be to weight them like you did while coating the rigging with very thin white glue and letting the glue set up with the weighted spars hanging. I did this with the landing stage on the Chaperon - hanging off the bow and not heavy enough to weight down the rigging w/o help. The only problem with what I did, (and you took the precaution that will make sure you don't have a similar problem by attaching them to the side of the hull) was that when the cased model was dropped about 6 inches at the NRG St. Louis conference the landing stage broke loose from one of the lines as it was able to swing freely being held only by rigging. It was very difficult to reattach the lines after they were cut to size - I had to resort to using some C/A in place of a knot on one line. Kurt
-
Elijah: Welcome to the NRG. Mary processed your membership this morning. Look for your membership card in the mail. Kurt
- 701 replies
-
- 4
-
-
- phantom
- model shipways
- (and 1 more)
