dafi
-
Posts
2,434 -
Joined
-
Last visited
Content Type
Profiles
Forums
Gallery
Events
Everything posted by dafi
-
 Thank you SIrs! Happy new year! And what better way to celebrate than with a proper demolition, something I had already planned for some time. In September 2010, I was quite happy for one more rare occasion again, to be able to glue a part coming straight from the casting branch, just as the god of molds created it, directly to the model without pimping or without any further fuss. See here it is, the little crown ... ... by now I'm pretty sure that was not placed there around 1805. Probably an invention of 1920, when restoring to the Trafalgar state, for lack of better knowledge at that time. As the beam is called cathead, there usually was a cat's or lion's head on it in the initial phase. At the time of the Victory's construction, however, a kind of compass rose was common, sometimes also an anchor. Since the 1765 model of the Vic shows this compass rose and also the 1805 model, which was wrongly called "Victory", had such a rose, I felt quite confident to skip my sweet little crown with a light heart. I made a compass rose out of modeling clay, and since the dimensions were tiny and tight, I printed the outlines on baking paper and was thus able to easily form to the true dimensions and to detach the fragile structure. Once fit test on a replacement cathead with a specimen that proved too thick ... ... and I bravely swung the blade. The new part was quickly glued in place ... ... and still a little paint was put on it. And as a gif it gives a little impression of the depth effect. Enjoy 🙂 I know I've had other demolition orgies before, I just got out of practice 😉 All the best, Daniel
 -
And last but not least the best known version, the ship as it stands today in Portsmouth. Like new from the egg, no wear or tear, a nice museum ship as expected 😉 But even though all the anachronisms and contradictions towards the few contemporary sources still an amazing artifact that allows a bit of time traveling 🙂 But still I think no one today can imagine the true hardship and discomfort and dangers of those days. Physical, emotional and psychological. Once a death bringing fighting machine, today it is a tourist attraction. Families and playing kids instead of powder monkeys and expendables wear parts ... Here are some more details to enjoy. But even this museum ship is undergoing the flux of changes. While bringing it back to the Trafalgar condition, the color "yellow" was misinterpreted and a cadmium yellow was applied, still to be found in many kits descriptions. Once it was understood that "yellow ochre" was meant the ship was changed to the buff seen on many contemporary paintings. Sometimes the chain irons were included in the stripe scheme, sometimes they were complete black. Newest research suggests a terra cotta tone for the hull, believing that the usual yellow ochre was short in the yard and the paint was stretched with red and white. Also the hammock netting I saw already dark and light, the name on the stern I know in 3 different versions - even though I personally strongly believe it was omitted at Trafalgar for intelligence reasons - the stern davits were fitted in the past and taken down again. And much more ... So this means, even if one builds a model of the museums ship, one has quite well determinate, what year it is meant to represent 😉 In this sense I might close this small side project and wish you all a happy new year! Stay healthy!!! XXXDAn PS: I still am waiting for those furious screams of panic once they adopt more research onto the ship in P., taking down the Feathers of Wales and the side davits, build the solid forecastle barricade and best of all, close the side entry port ...
-
In the repair of 1814 to 1816 the Victory was fitted with the new round bow and solid hammock cases. About 1837 the Feathers of Wales were fixed on the stern, still being there today. In 1859 the ship got the last set of wooden mast, later on the steel masts from HMS Shaw. Somwhere in the 1860 the planking was removed and the new planking was flush, wales omitted. Also that time she most possibly got the stern decoration that can be seen on the early photographies. But these were only the outer signs, on the inside the hanging magazines were already removed by 1814 and every change in duty caused bigger changes in the internal layout. There are hundreds of pictures of the pre 1920 Victory, an appearance that lasted more than a 100 years, but still this is one is the version that is the least often build as a model ... The planking was flush, the rigols were straight and the ports had window frames. In the upper and lower batterie there were still some historical guns from Trafalgar on display. In the middle battery there were 7 salute guns of modern design, 4 on one side, 3 on the other. The chain boards were shortened, the number of shrouds reduced. All along the hull there were waste pipes going down. Picturesque are all the stove pipes going up 🙂 The officer is wearing a 1910 uniform with flat cap and short jacket, his camera is a contemporary Agfa-Photo-Box. The sailors have their uniforms with large hat and extra large collar, one in white, one in blue 🙂 The inspiration for this scene is the sailor from submarine C34, looking up to the chains. In those days it was quite common for a submarine to be docked alongside, as their generators supplied electricity for the older ship. But was this sailor from C34 seeing? Possibly something like this.
-
The most iconic appearance of the Victory is the one of Trafalgar. And this is also the most obscure one, as it lasted the shortest and was almost not documented. Contemporary sources are very thin, as the great repair took place under pressure of time in the height of the raging war, and proper documentation did not take place or at least is not known. Quite sure is, that the channel boards were moved on top of the ports, and of course the stern was most possibly closed in. Most actual details can be found in Turner´s sketches as he draw some scribbles after the ship came back. Nicely seen is the build barricade of the forecastle, other details like the anchor lining are more obscure and subject of interpretation and discussion. Also th be guessed are the thinner black stripes and the yellow gunport lids. Biggest ongoing discussion is the color of the yellow. Today a light terra cotta, in contrast to the usual yellow buff as seen in contemporary paintings. The actual guess is that the yards were short on buff and stretch it with red and white witch was available. Any way my personal believe is that ships of that age - as we were before industrial RAL definitions - were much more a patchwork of different colors, just always the surprise which shade would come out of the barrel of paint. That is also the story I am telling here, the two sailors applying the shade of ochre that the ship is painted today 🙂 Our Royal Marine now wears the new uniform introduced from about 1800 onwards, with round head, no revers and no swallow tails. The other sailors wear still no uniform yet. Difficult to see on Turners oeuvre is the anchor lining. But still a quite too useful installation to miss it out. On the channel boards one can see the partner for the short fishing davit. For the 68 pounder carronade - taken over in 1804 from the Kent - the railing on the barricade has a hinge to protect it from the muzzle flash and to facilitate handling. And as mentioned already before, thanks to @Morgan for all his great hints and input!!!
-
Thank you Sirs 🙂 🙂 And here come some more detail shots. First the in my humble opinion most beautiful appearance of this ship 🙂 The channel boards still in the lower position underneath the ports, the painted friezes and the hull paid with rosin. The Royal Marine still wears the uniform from about 1780, with the tricorn, the long swallow tails on the coat, the broad revers and the stockings. The holystoning gentlemen did not wear a special uniform yet. This was the time by the way, that the holystoning of the decks became quite excessive. If the Victory was still carrying the original bronze guns or the newer iron cast ones in 1780 I could not yet finally judge. But to show the changes of the ship through the years I opted for the original version for this display. Other nice details are the anchor lining, the 4-piece irons with the eyebolts in between and the bolster for the long fishing davit in between the timber heads. Also a nice detail is the lanyard of the fore gunport lid that is guided elegantly up to the timberhead of the forecastle 😉 Based on the contemporary model from the Victory from 1765. https://collections.rmg.co.uk/collections/objects/66473.html XXXDAn
-
Grande Finale 🙂 Finally I found the time to do the last beauty shots of my little series of my 5 slices.. It was a most exciting project, that started with simply trying out new resin, took off by itself, and developed into nice display on the history of that grat ship. Already longer finished was the rigged version of a 1805 first rate. Now come the version as build from about 1780, the actual state of my research for the iconic 1805 version, the black and white version of past 1910 and the latest version of the museums ship in its past 2016 look. Here the overview. Travelling times in 4 pictures 🙂 We start with the beauty of the as build version, with its nice friezes and - not visible - the wonderful carvings on head and stern. The best known version is the least known by far. Done under pressure of time there is no known documentation. Here shown is the intermediate result of my research so far. The biggest changes were suffered from 1814 on to 1920. The planking was removed and the new one was flush without any wales. The bow was reconstructed as a round bow, the hammocks got build cases and the masts were replaced by smaller steel ones with a reduced number of shrouds. Seen by todays eyes a pity but still the historical version that lasted the longest. And of course the version that is the best known, the almost complete reconstruction in Portsmouth 😉 Even with many anachronisms and differences to contemporary sources, this ship gives a nice impression onto how ships may have looked in the old days, a pleasure to be there and see 🙂 XXXDAn
-
Hello @jock2000 Nice to hear from you! Yes that is correct. you can use Heller as reference, they did the positioning nicely. All the best, happy modeling, Daniel
-
Cäptn dafi´s log, addendum: At the last stop in the Victory-Univers we were able to complete the crew. First we got the much needed cleaning team ... ... and then still came Cäptn dafis superior in form of the admirability herself. Final spurt 🙂 XXXDAn
-
Hello @97Bill, as I am far off having started the yards, I have no idea about the dimensions yet. My guess is 80 cm height, length 100 cm+ and the width 35 cm (65+ with stunsails). @Kelp I used the copper in the exact width and ran them down in long lines, not single plates. A toothpick was great to form the overlap of tiling. And it holds perfect to the date, several years already on there. XXXDAn
-
The only gun drill on film I know that is quite true is on Master and Commander , especially on the bonus disc. All other ones are not very trustable, the idle members just standing around "bored", also having all the space in the world, as the neighbor crews are missing ... I tried some time ago to give a better impressen onto this topic here: XXXDAn
-
Very nice 🙂 XXXDAn
-
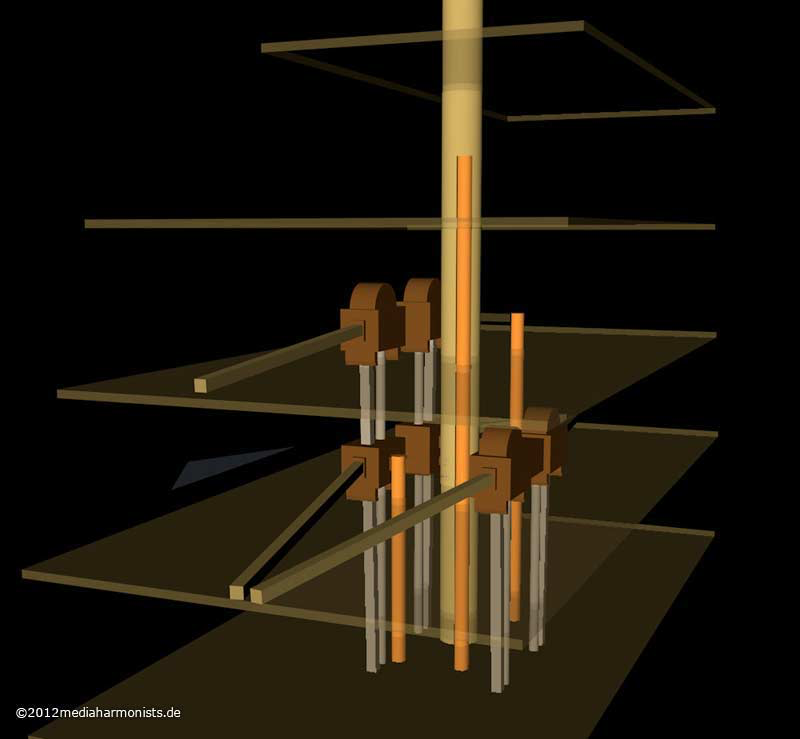
As there is an ongoing discussion about Victory´s midship section at the very moment, I would like to bring up this topic again, that still puzzles me. And I think others too 😉 I also realised, that I never presented the renderings I did those days trying to understand the possible setup on the Victory in about 1788 to 1805. As said before, a mere guess based upon the available sources. The 3 light brown tubes are the elm tree pumps. For the "long" pump I opted for no cogwheel in the lower deck, therefor no half round hood. All the best, DAniel

-
-
Have a look at NMM for plans of other first, second and third rates of that period. All layouts are identical. Just look for the bigger changes in the layout and when they took place. Then you should be able to create a quite accurate and true model :-) For the deck section in front of the main mast, you have a great reference in the 1765 models displayed in NMM. XXXDAn
-
Paper on HMS Swift: British Sloop-of- War lost off Patagonia 1770
dafi replied to bruce d's topic in Nautical/Naval History
Thank you for showing! XXXDAn -
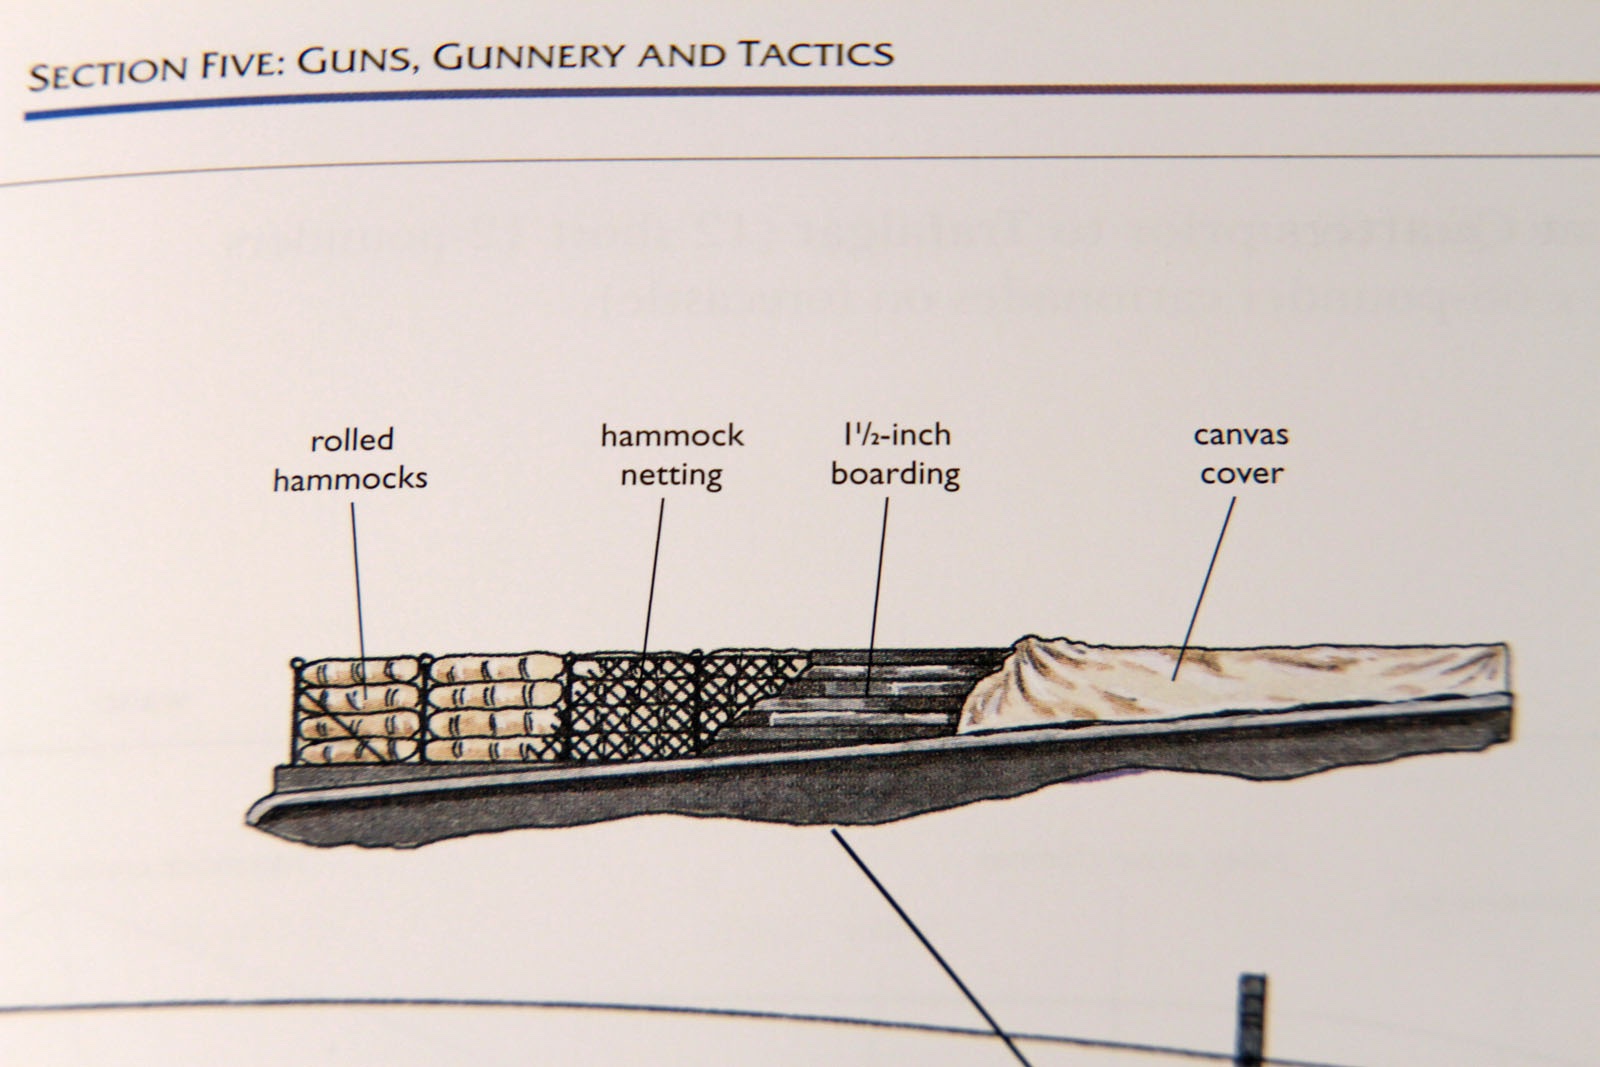
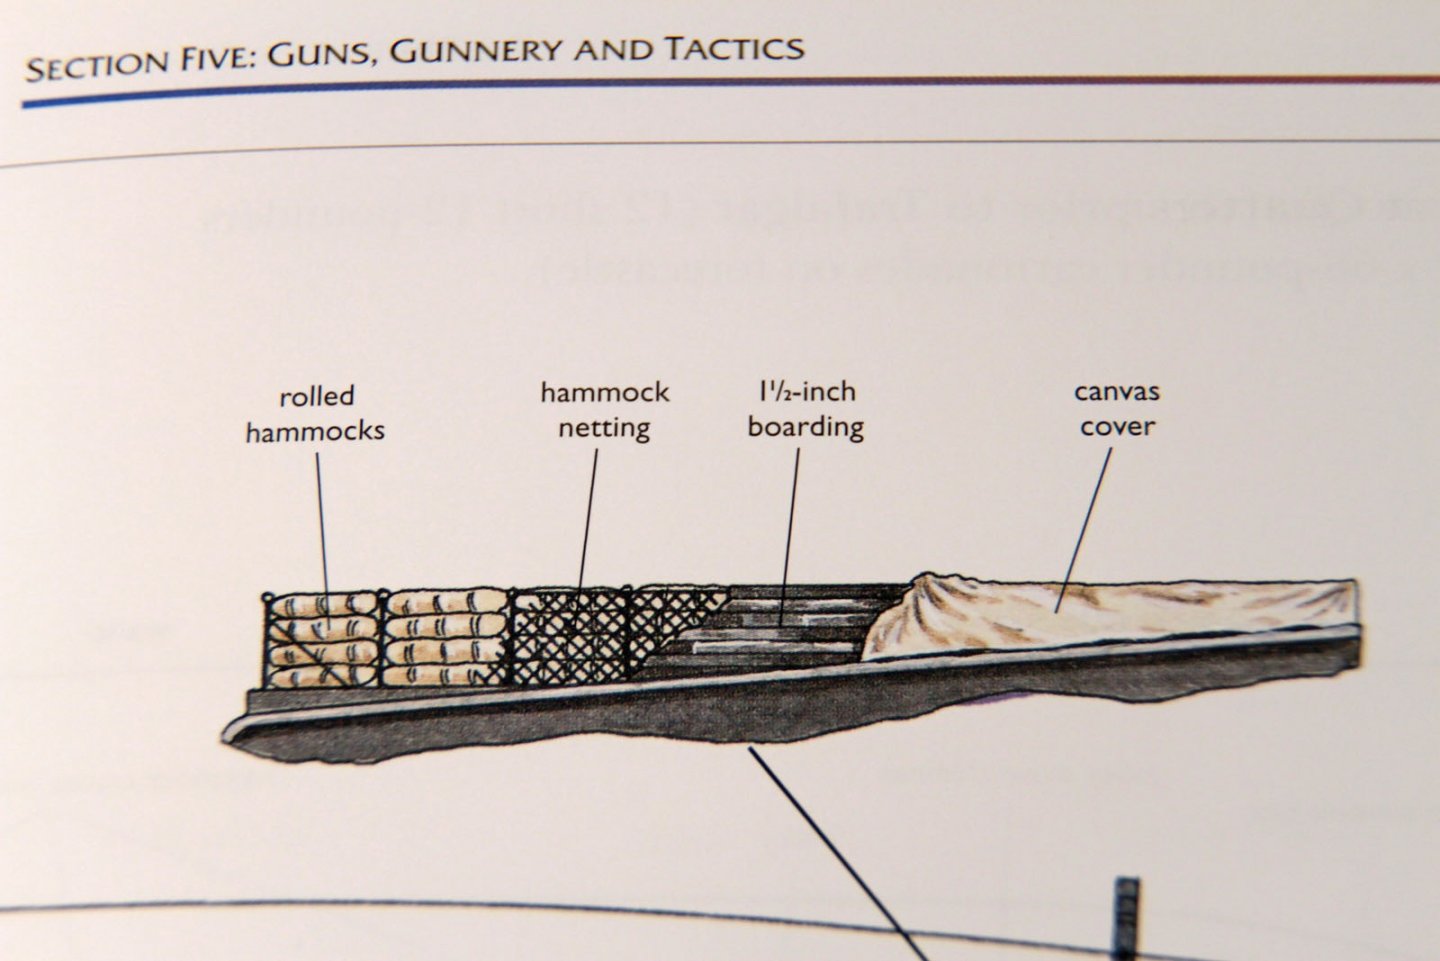
Dod you consider to show the hammocks in a covered mode? Just a block of balsa or foam in the right dimensions, and some paper handkerchiefs with some PVA applied can do a great job in your scale to represent the canvas cover. Here is a tarred version 🙂 https://collections.rmg.co.uk/collections/objects/66307.html XXXDAn
-
As I am a very shy and ´umble person, I forgot to present myself 😉 So I looked for a template ... https://www.mediaharmonists.de/bilder/Sammler33/Utrecht-170527_3805-(1).jpg ... carved a tiny bit ... https://www.mediaharmonists.de/bilder/Sammler33/IMG_1141-(1).jpg ... and here it is the small minni-me 🙂 https://www.mediaharmonists.de/bilder/Sammler33/IMG_1147-(1).jpg https://www.mediaharmonists.de/bilder/Sammler33/IMG_1149-(1).jpg Even with my silver medal present 😉
-
Thank you for the nice comments and likes! Final spurt: Marines approx 1770 onwards Marines approx 1800 onwards Royal Navy Offizier approx 1910 with his Agfa-box-camera ... ... and two sailors.
-
Stoves/Ovens on ships in the 1600s and Onward
dafi replied to acaron41120's topic in Nautical/Naval History
In our german forum we have a nice collection of fire hearths throughout the centuries. 🙂 https://www.segelschiffsmodellbau.com/t4032f643-Kochen-auf-See-Herde-und-Feuerstellen-auf-Schiffen-2.html#msg176014 Note: Registration needed to see the page XXXDAn -
Wooden structures on plastic - with me the first thing to be scratched of as long as it is not minimum scale 1:4 🙂 See my Vic, made a great difference. XXXDAn
-
There are plenty of different scalers. And each gives different results, so one has to try out to find the wanted effect. I use pen scribers, the back of cutter blades - there are different thicknesses - , the back of scalpel tips and scalers from the dental purposes. And use a sttel ruler 🙂 Use each time a blank sheet and try out, sometimes it is scribing, sanding and rescribing 🙂 Another tip: Replace the 3 part section by a fresh sheet from the hobby shop. It is much easier. Take te oriinal decks as template for the outside form, then scribe without having to bother for all the disturbing things on the deck and then just do the openings. Like tis it is easier to scribe and one has not to bother the 2 split-lines. Those always tend to leave traces as the joint react differently to the scribing tool than the rest of the line. XXXDAn
-
As far as I know this picture was taken about 1880, no spanish flue yet in sight. Boats being hoisted out with the help of the yards. XxXDAn
-
Just another off topic to the picture in the first post: Have you realized all the people painting the ship? There are two man on top of the davits in question, two are painting the main topmast, two are painting the fore topmast and there were more doing works in the missing parts of the picture 🙂 XXXDAn
-
Small remark off topic: One can easily identify the area of the impact, as there is the external gangway on the left and the small platform just left of the hole 🙂 XXXDAn