HOLIDAY DONATION DRIVE - SUPPORT MSW - DO YOUR PART TO KEEP THIS GREAT FORUM GOING! (Only 24 donations so far out of 49,000 members - C'mon guys!)
×


aydingocer
-
Posts
916 -
Joined
-
Last visited
Content Type
Profiles
Forums
Gallery
Events
Everything posted by aydingocer
-
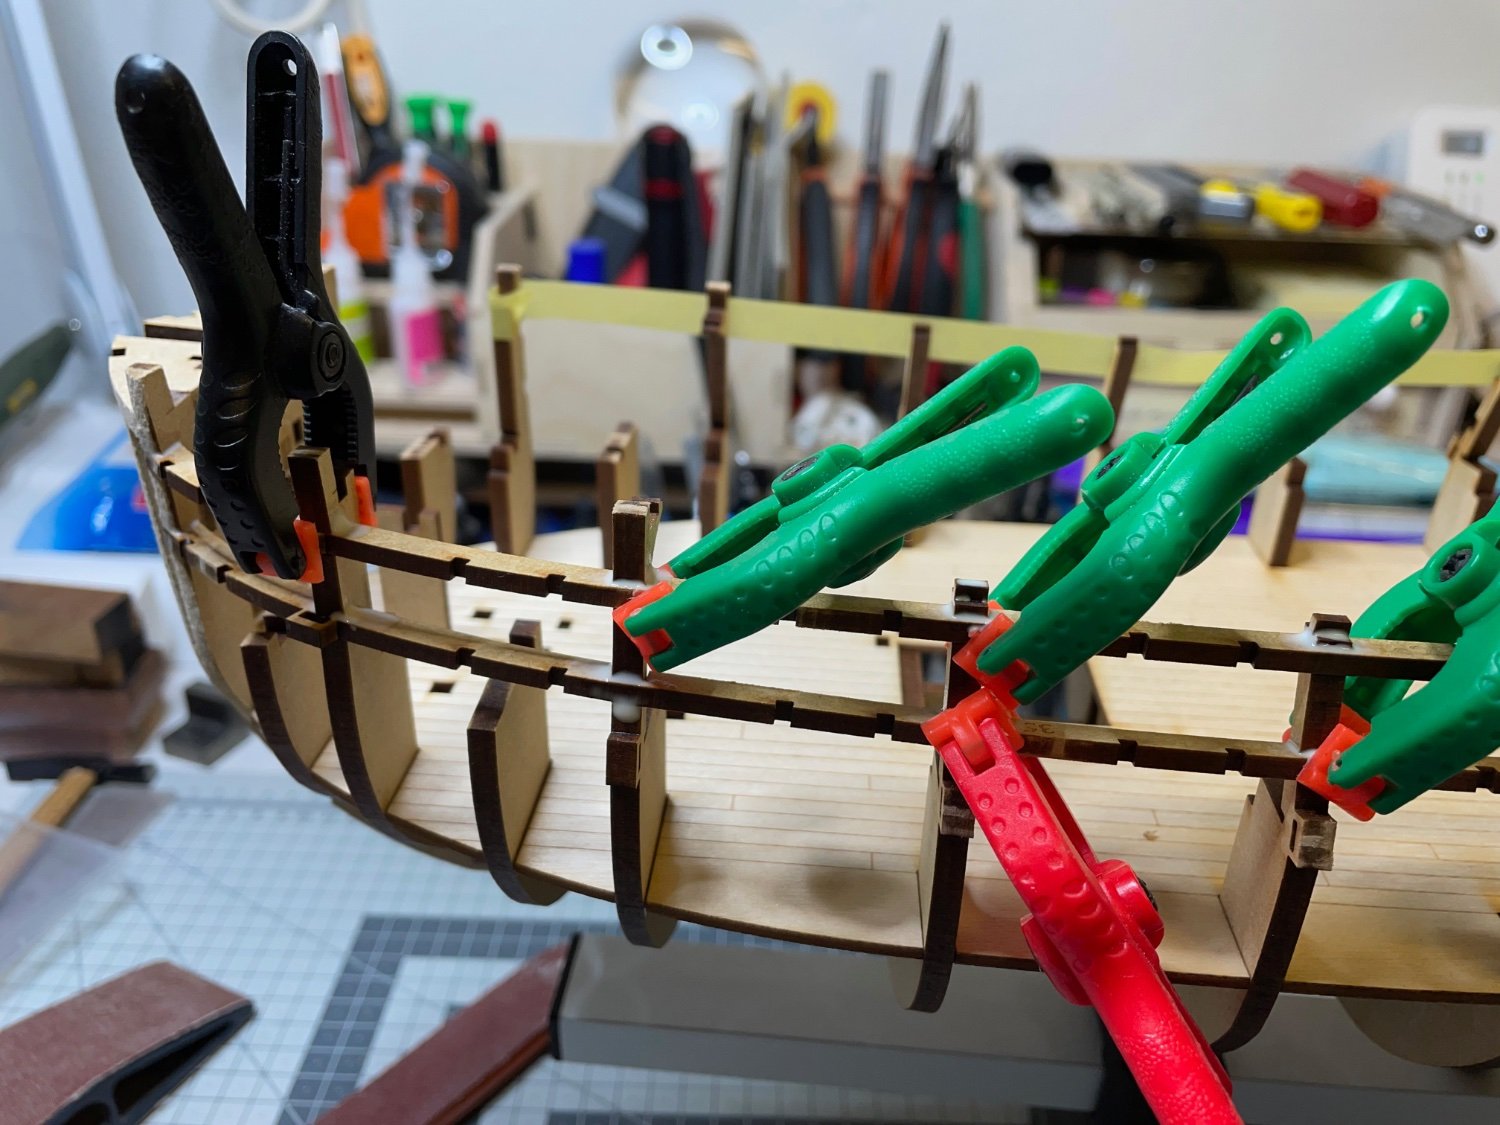
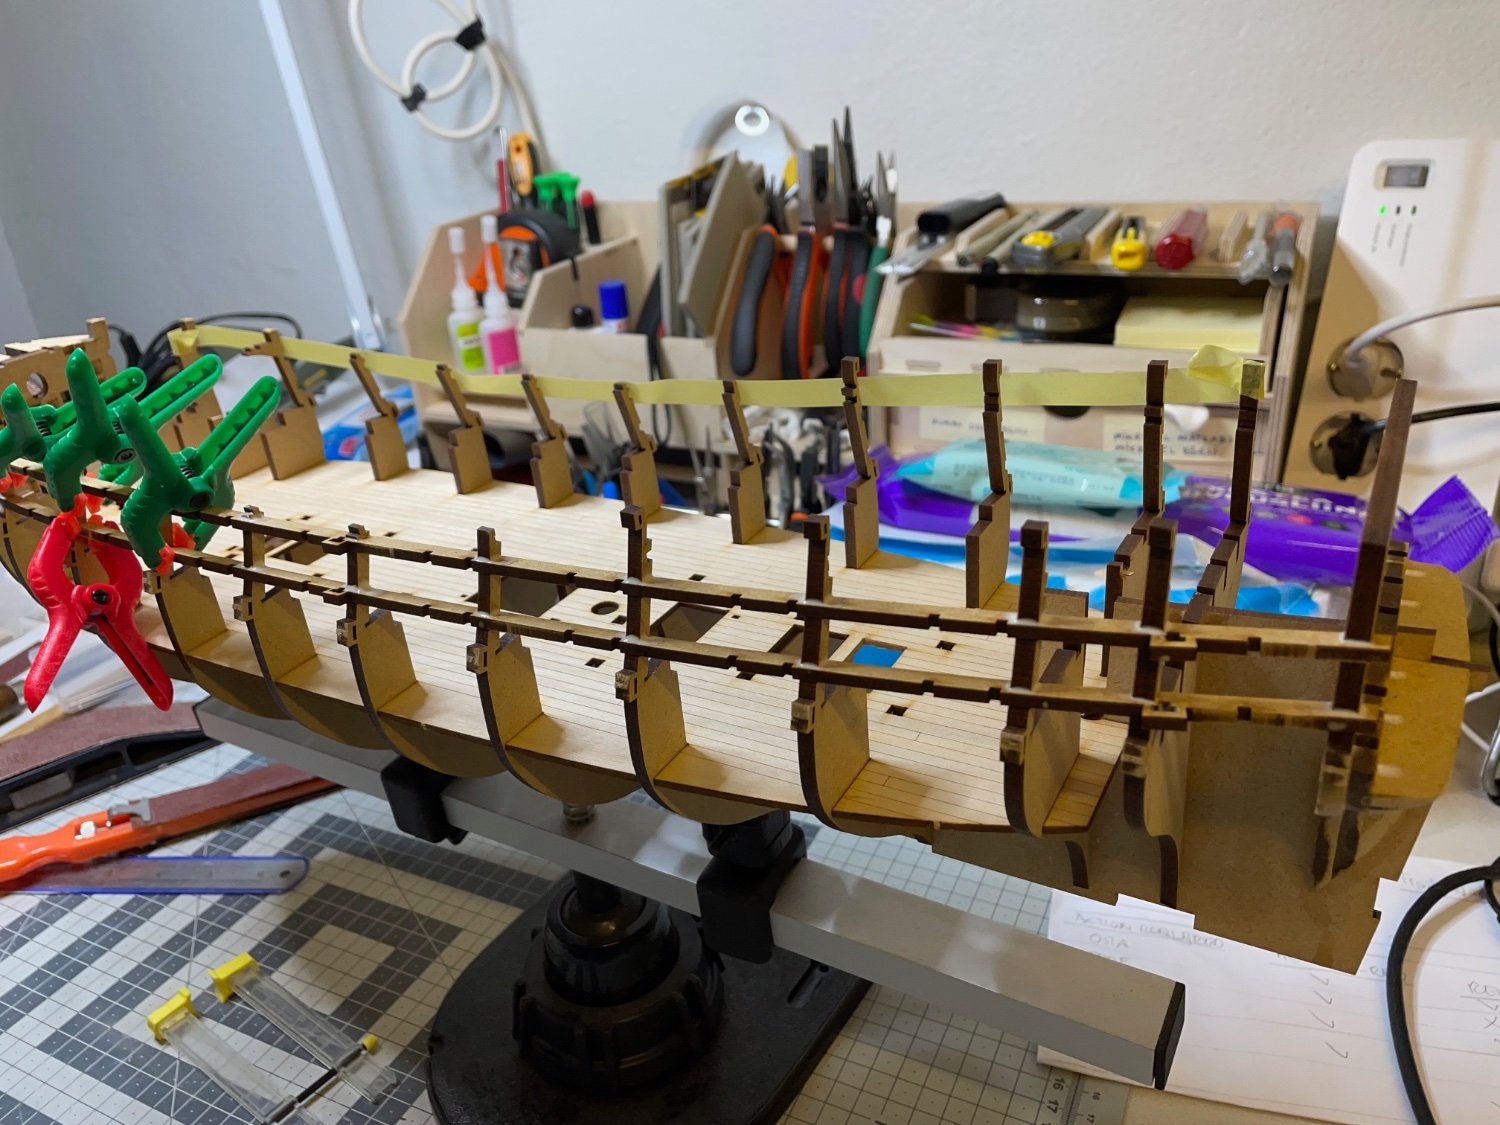
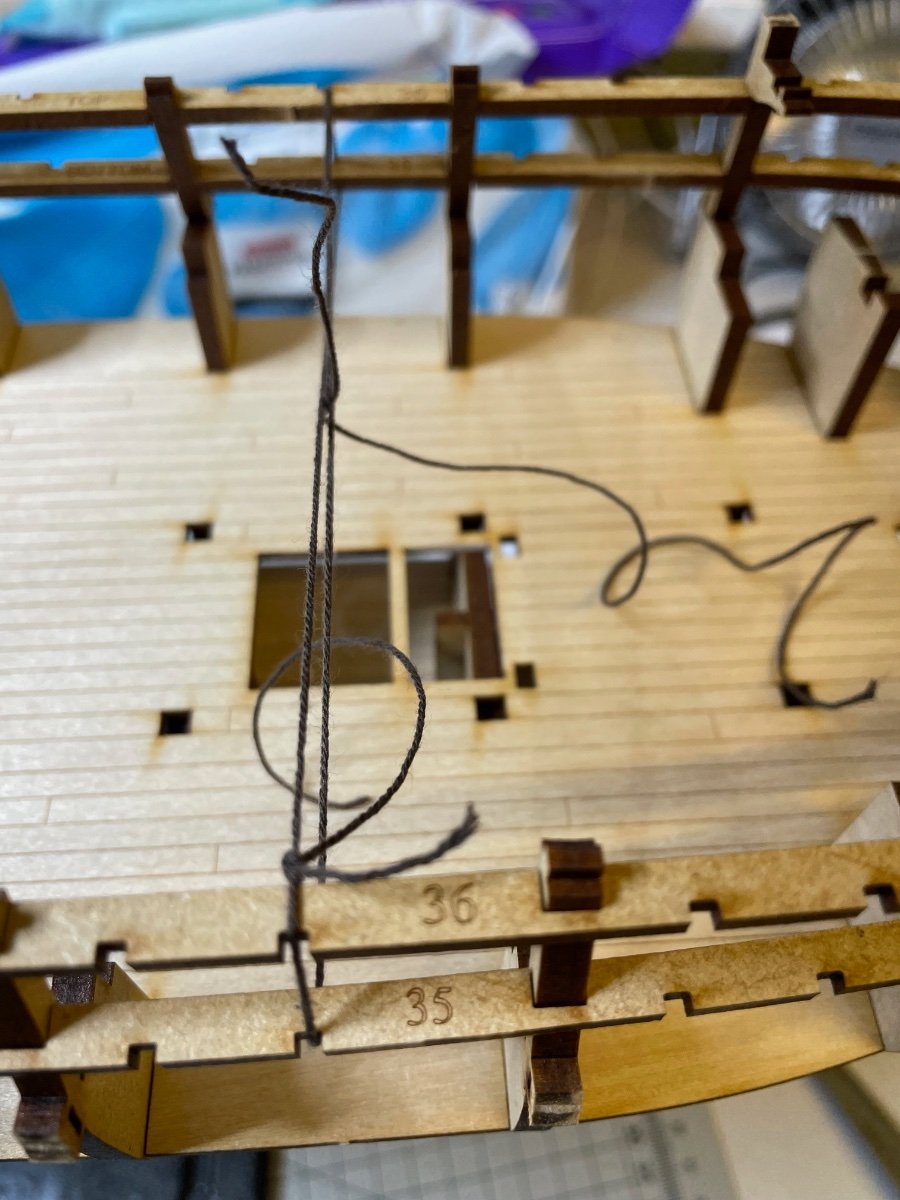
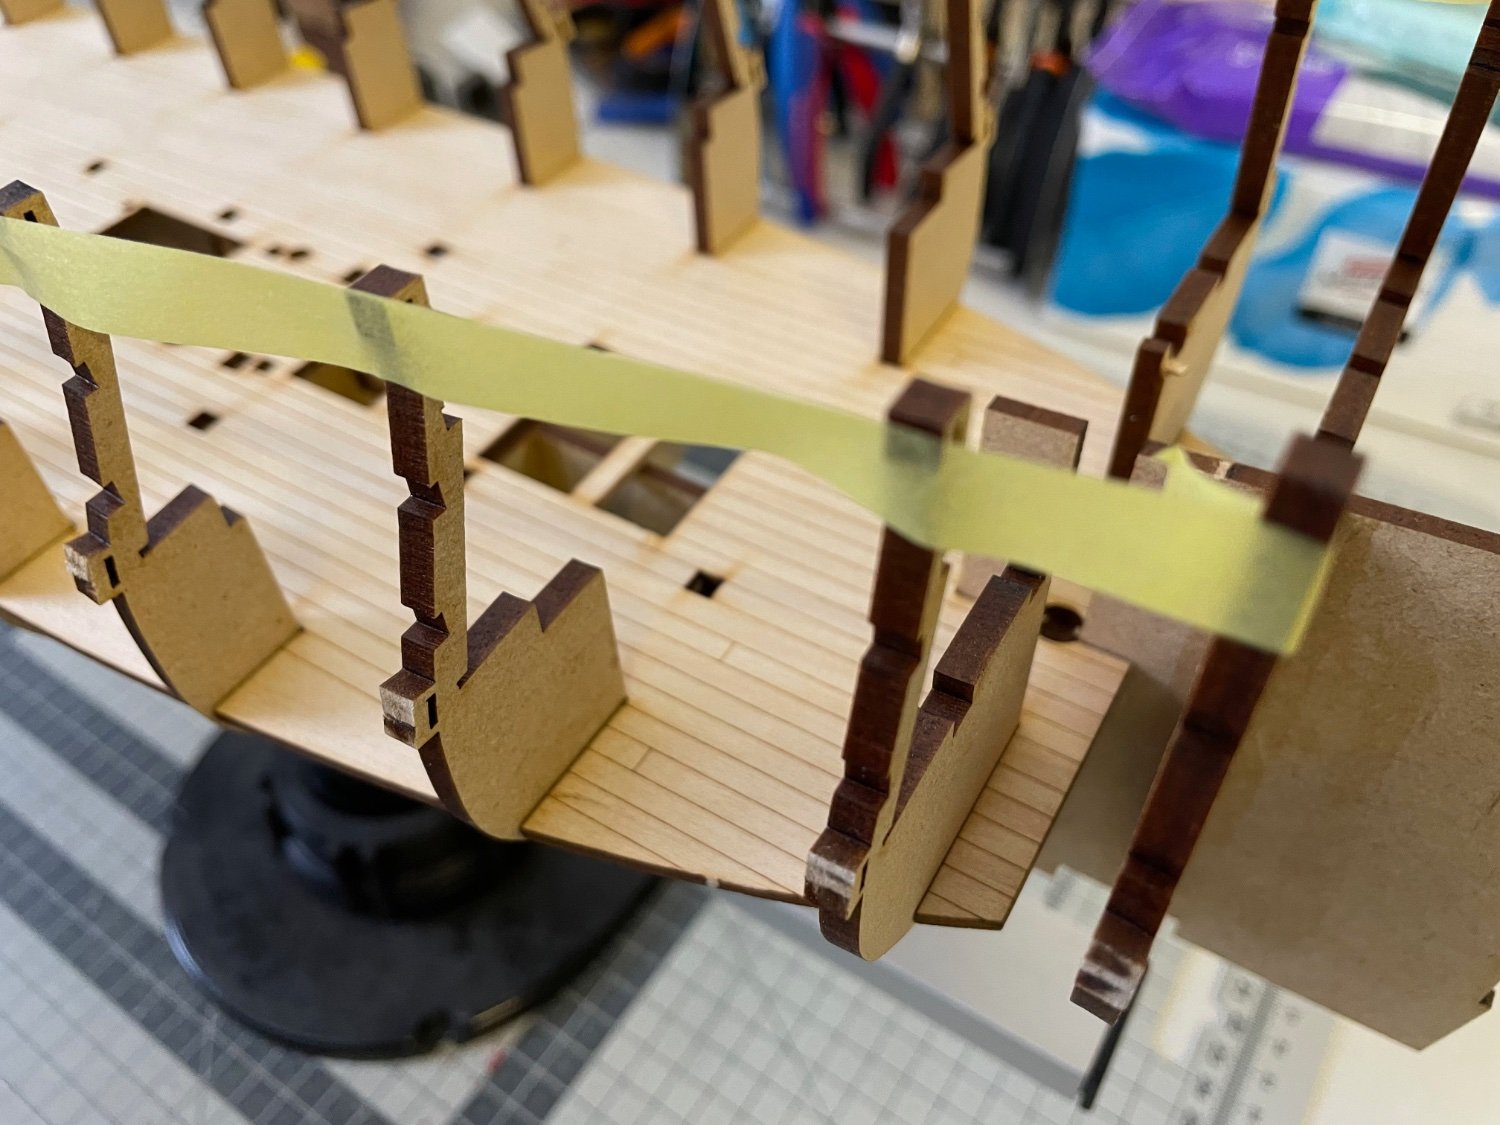
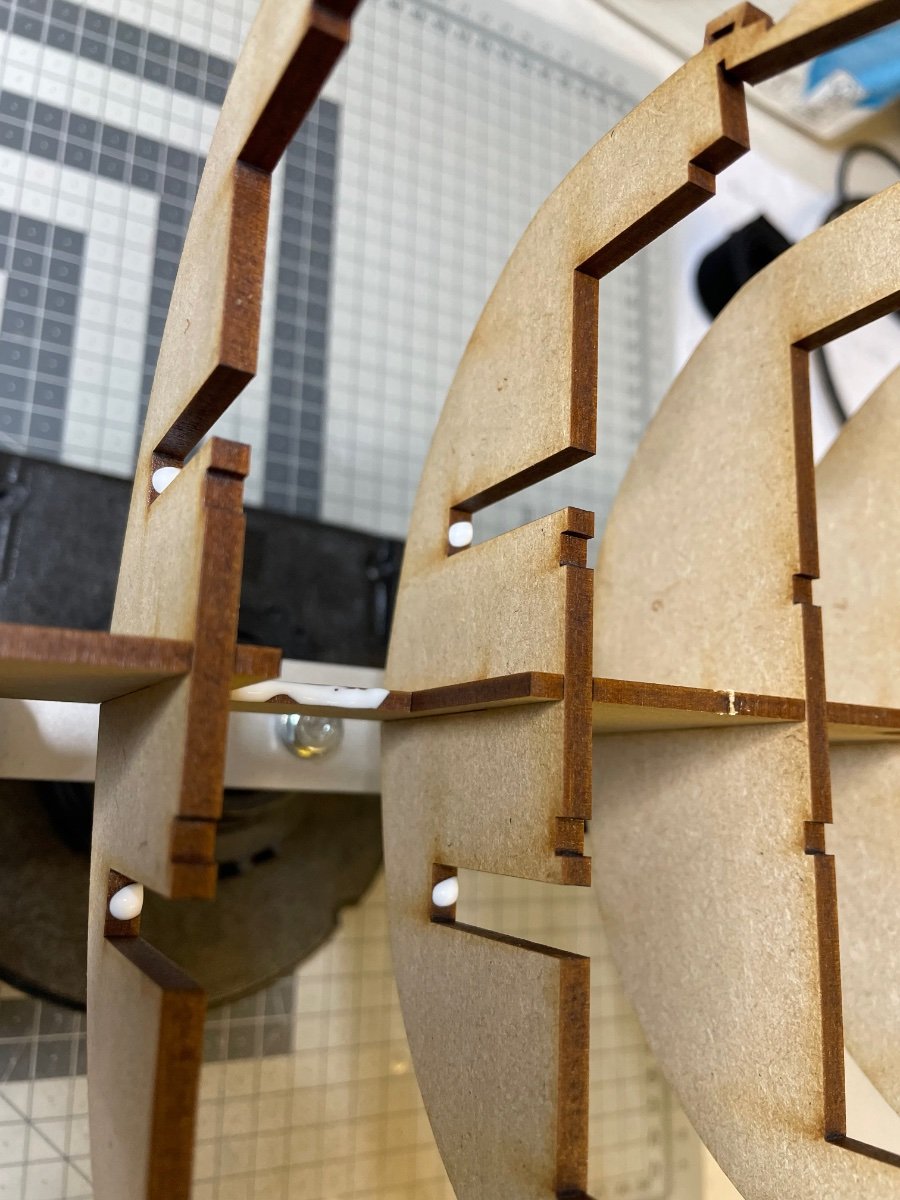
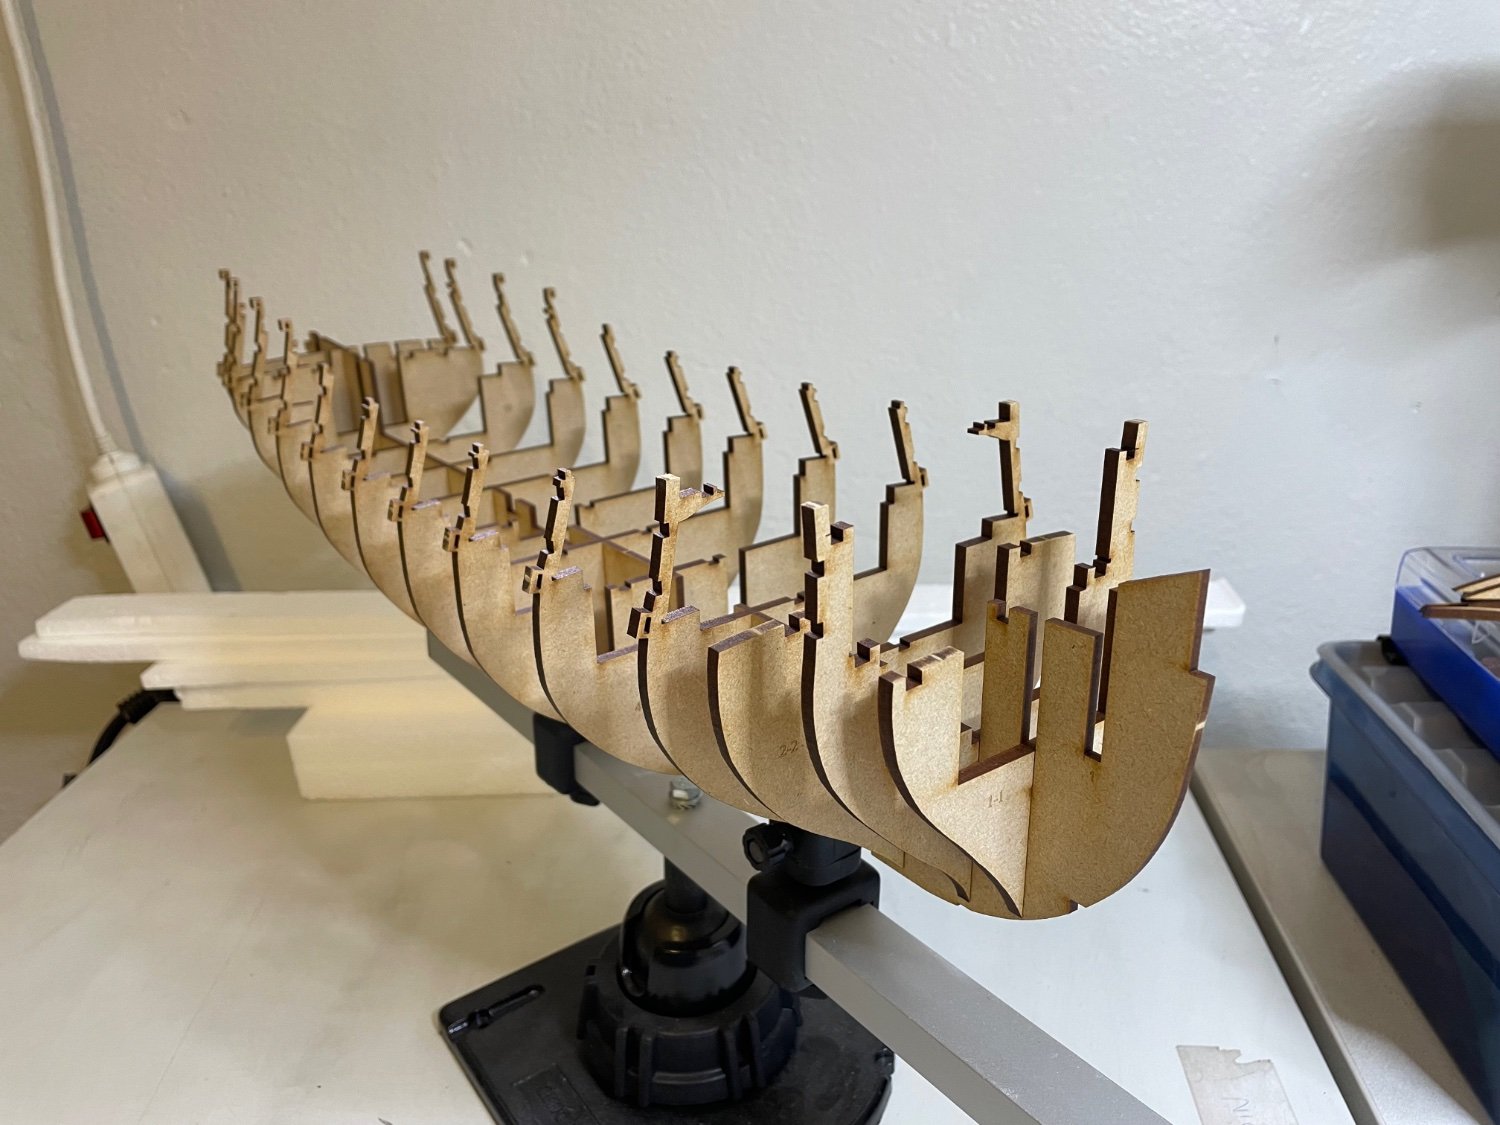
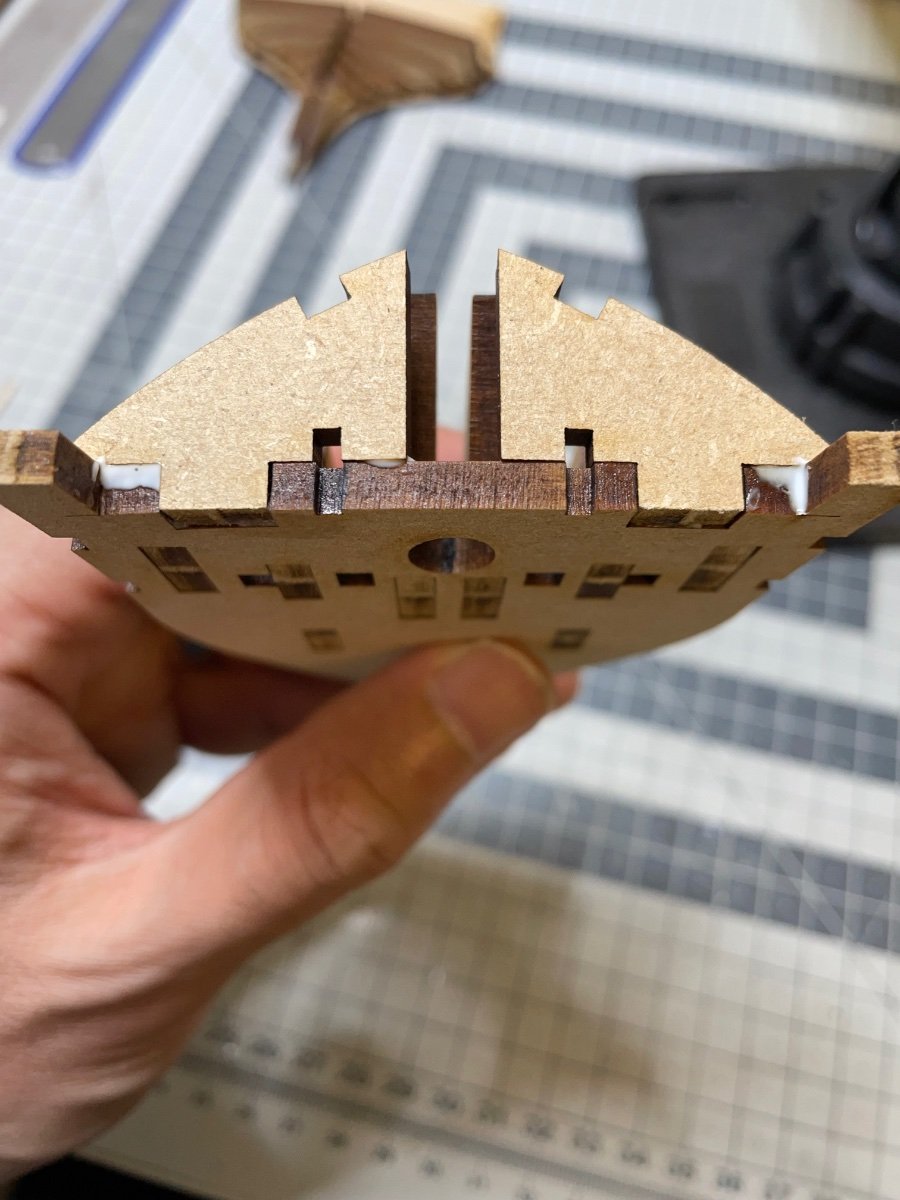
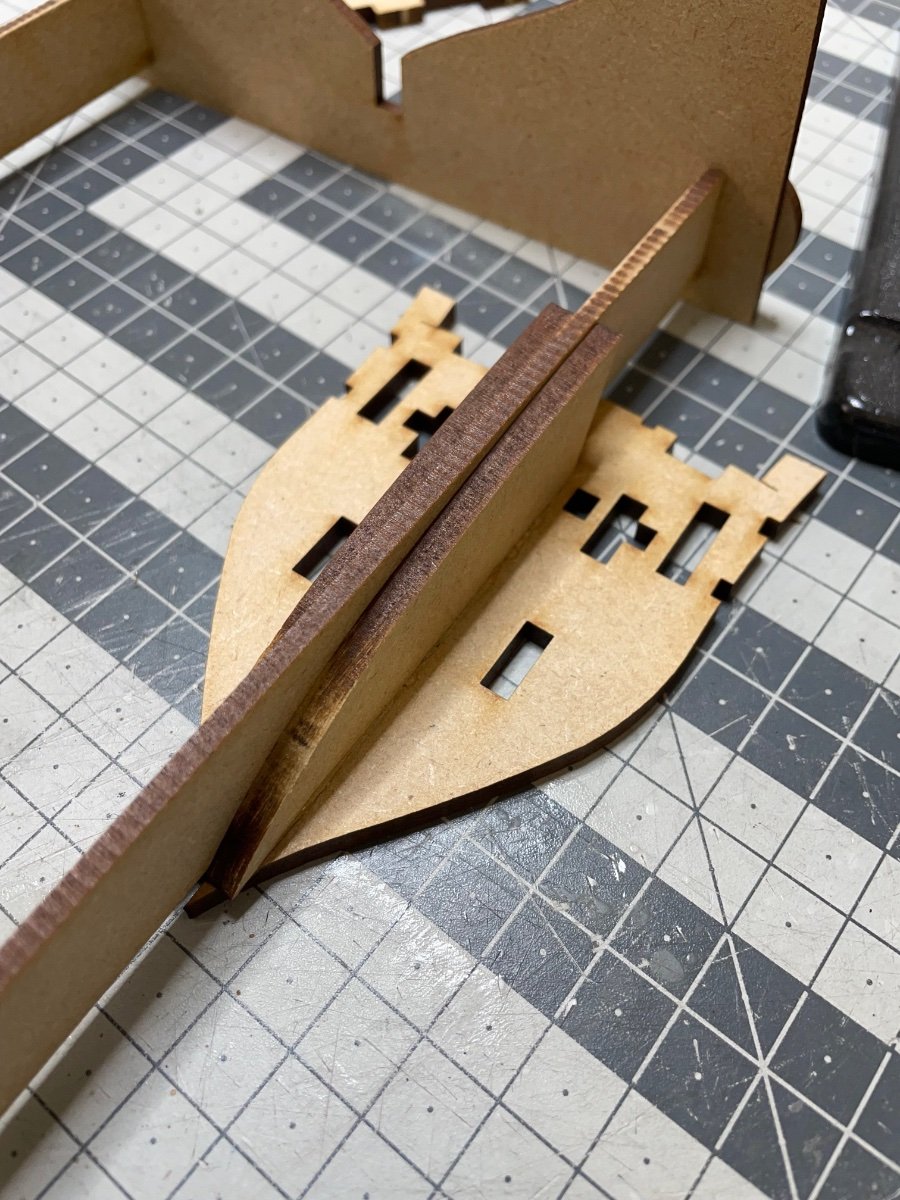
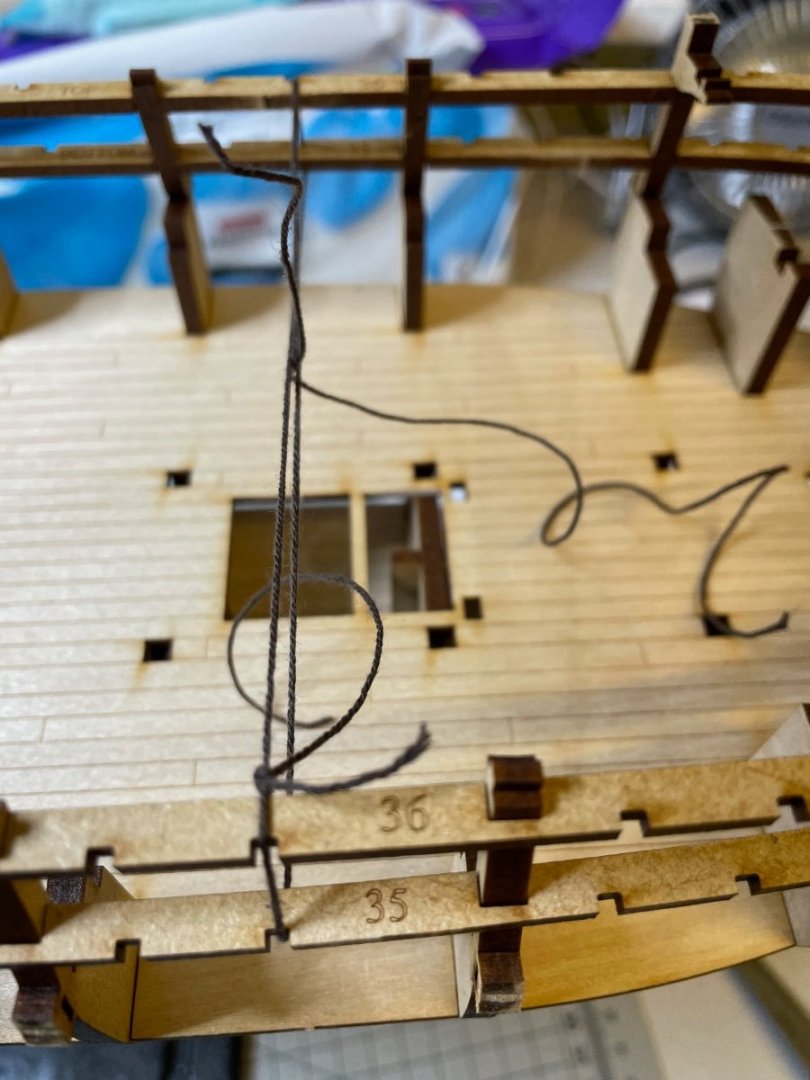
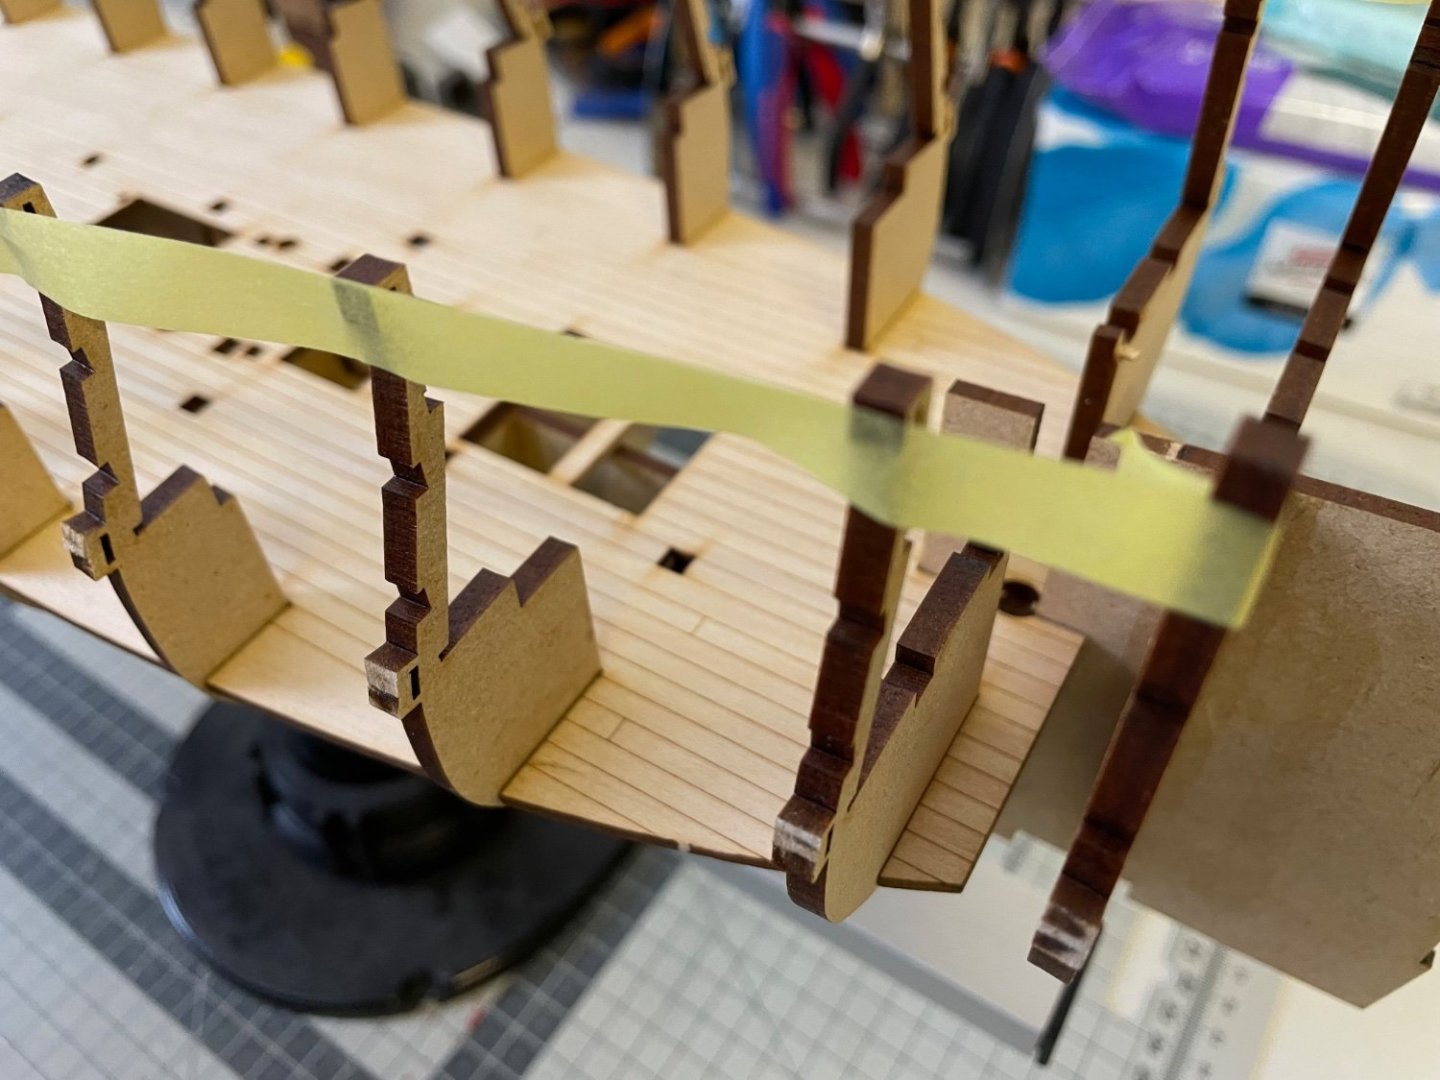
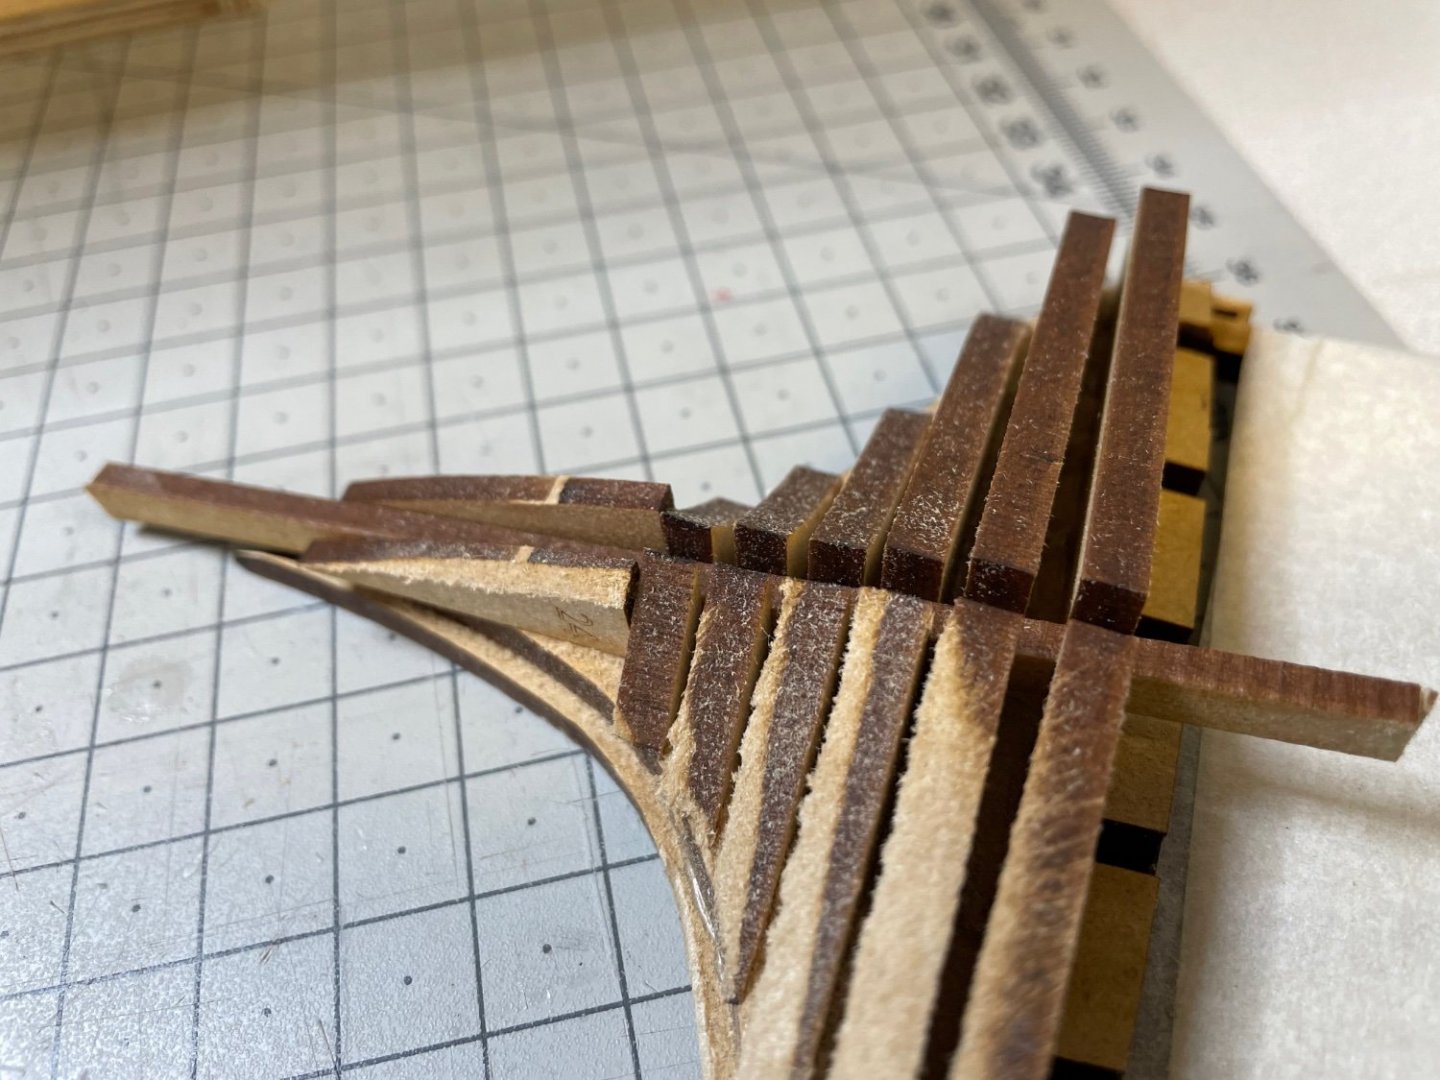
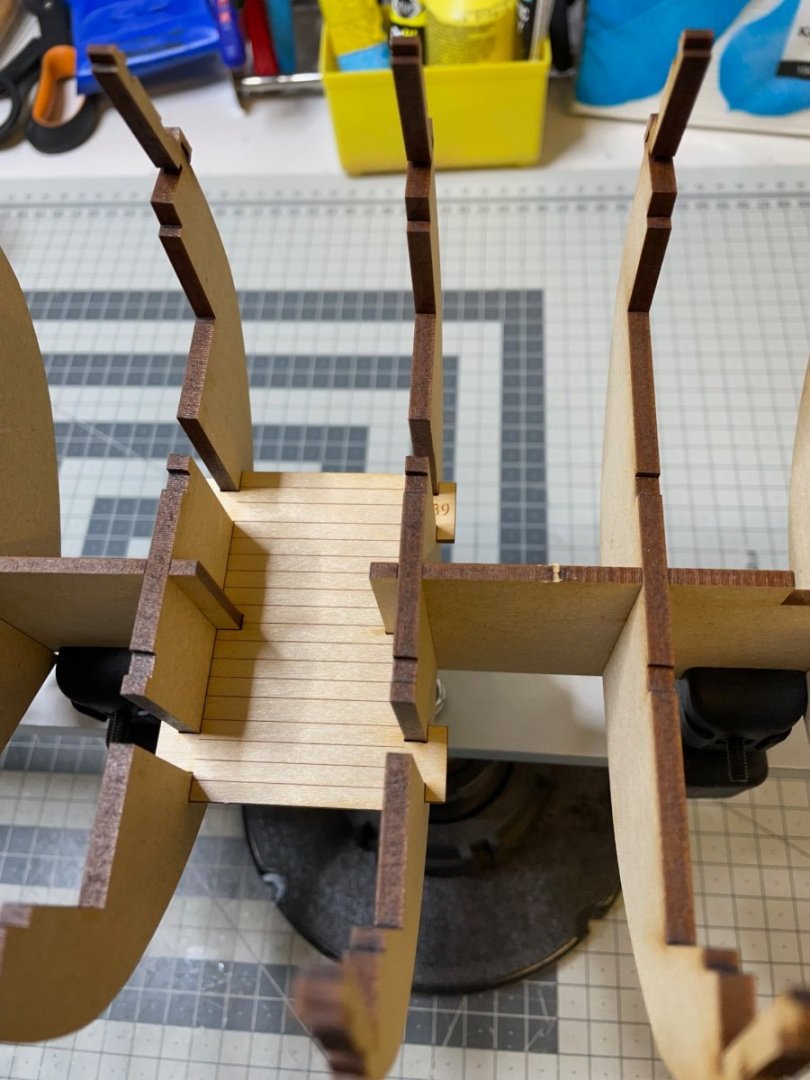
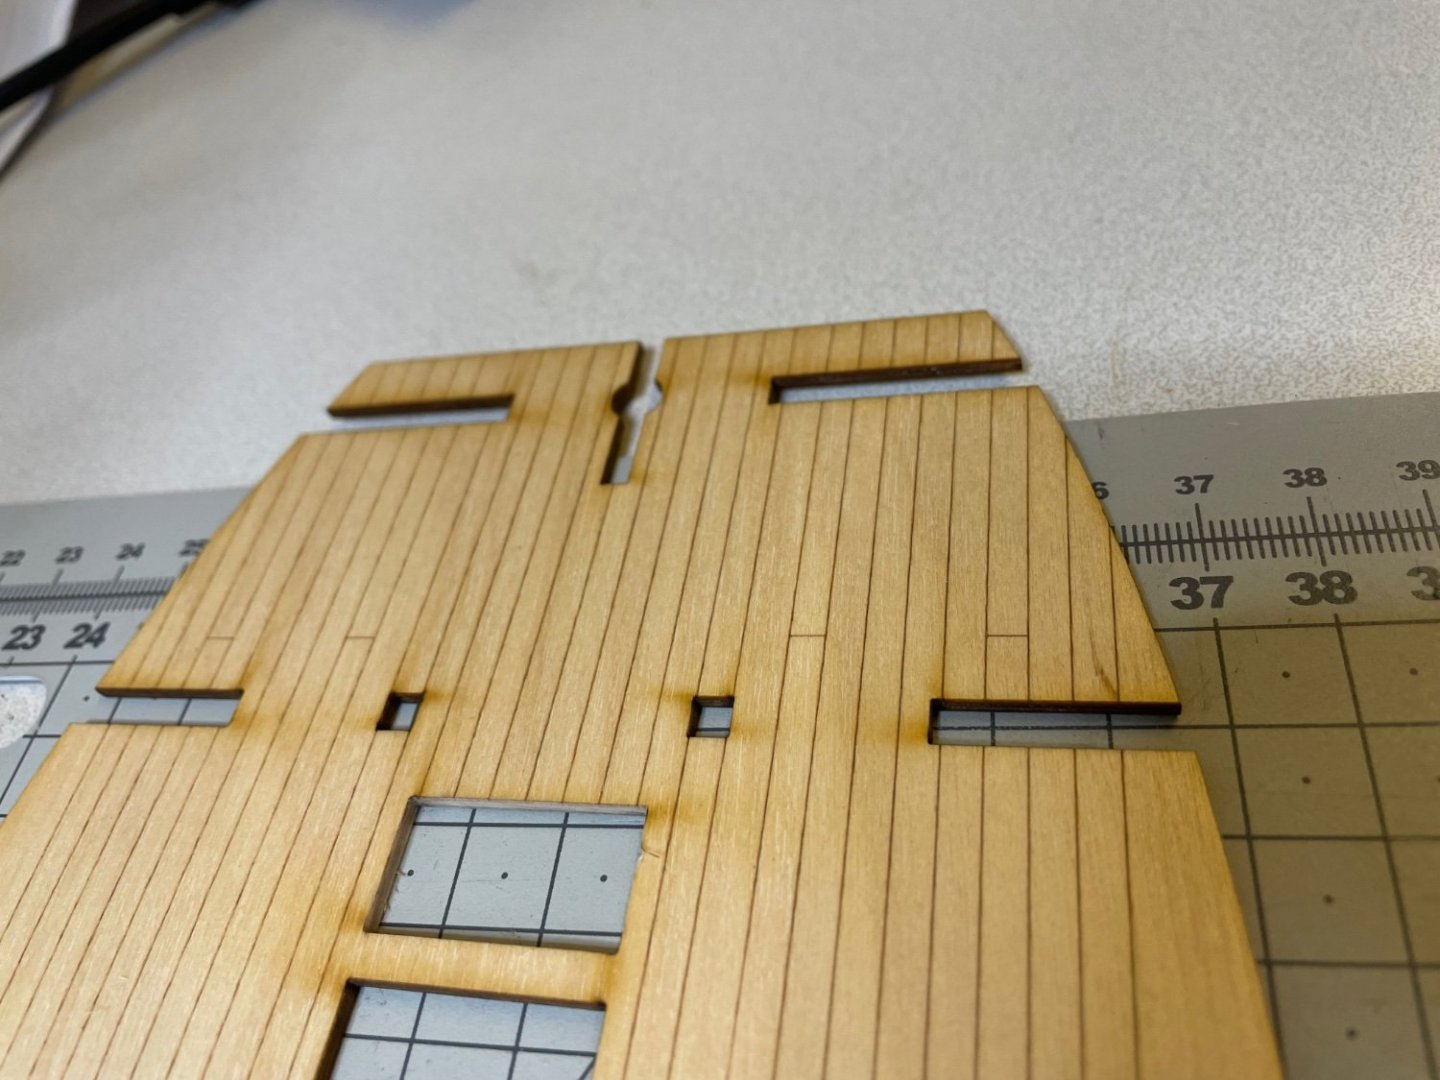
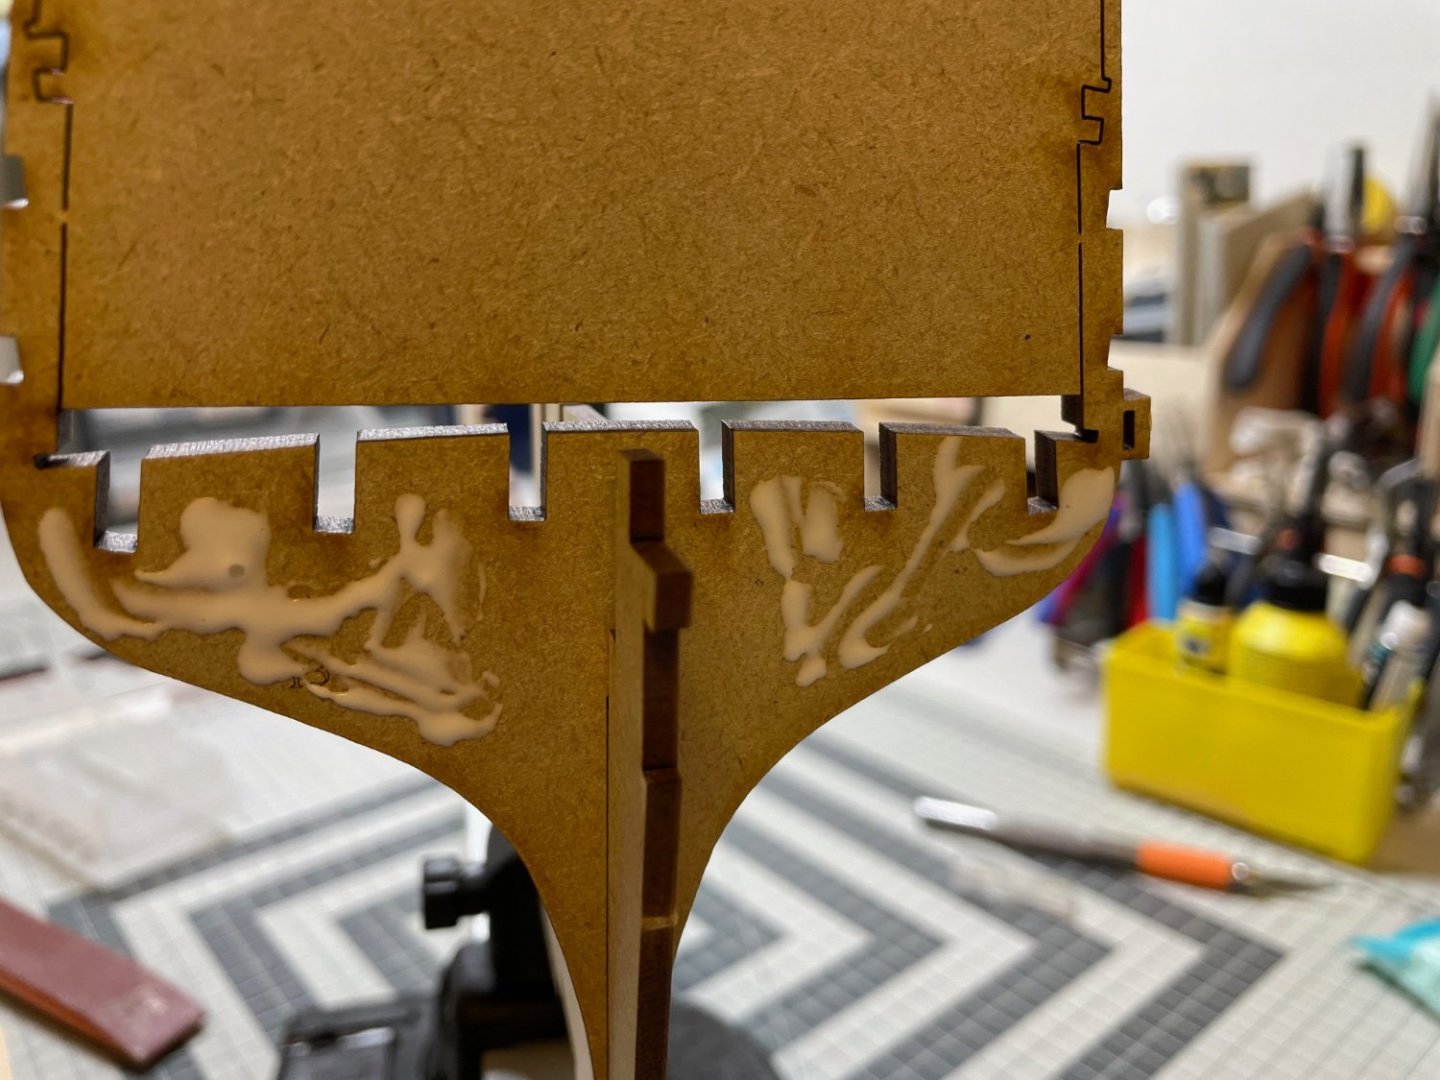
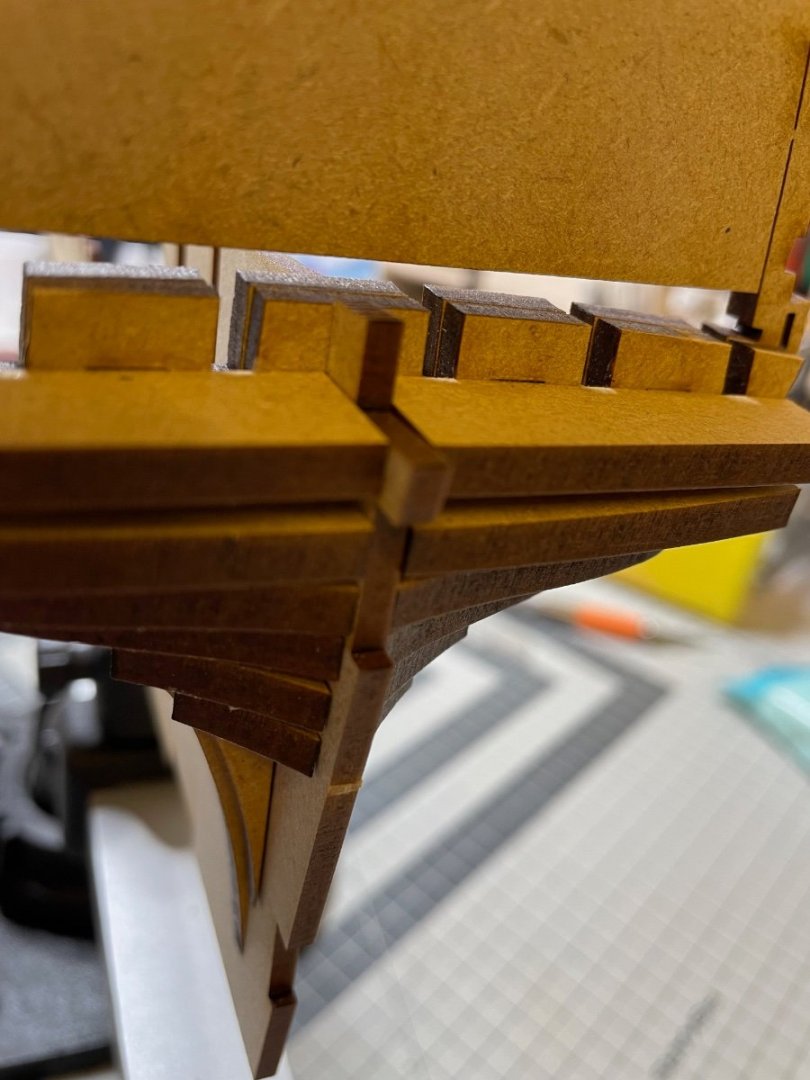
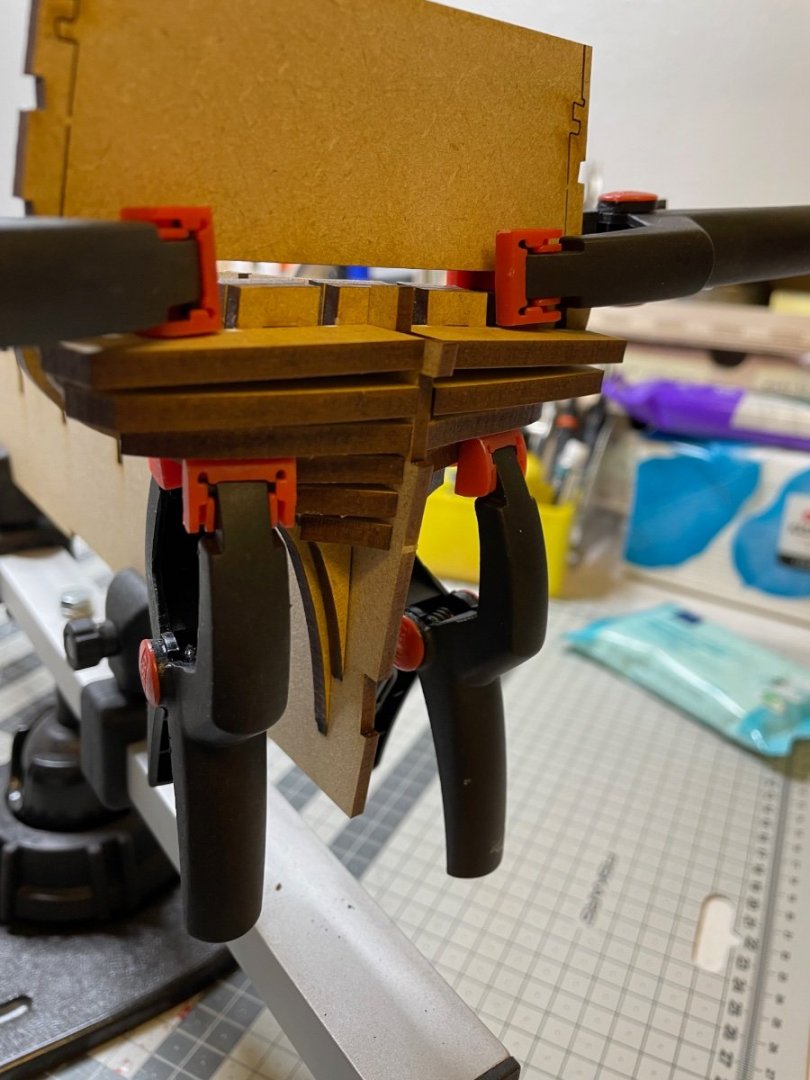
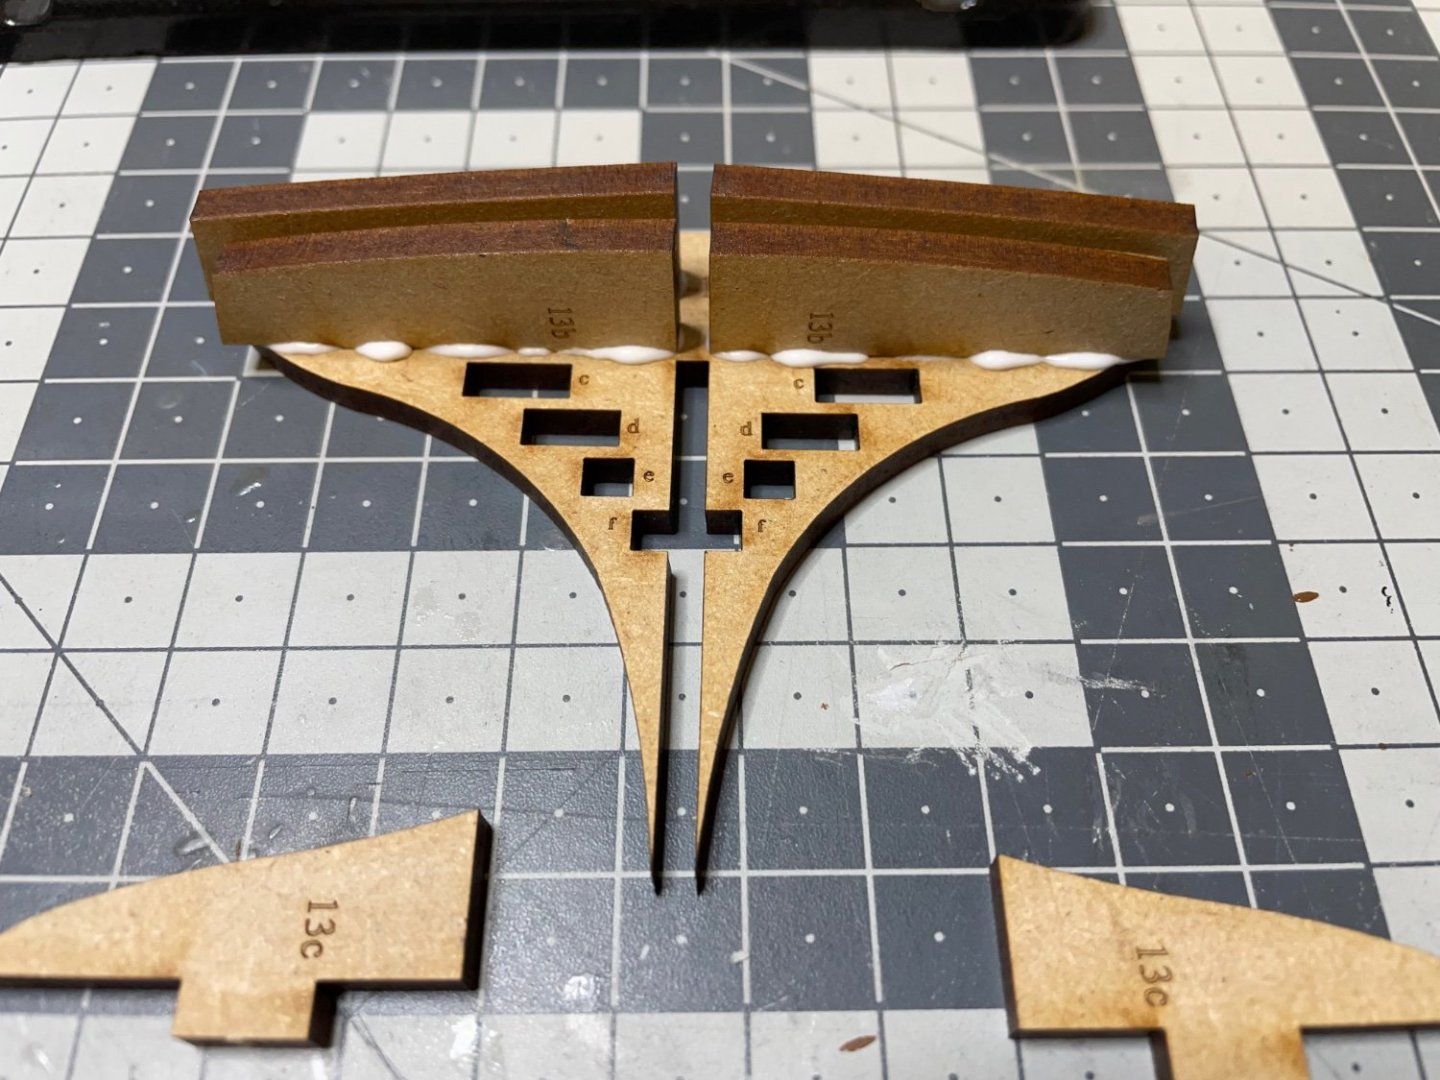
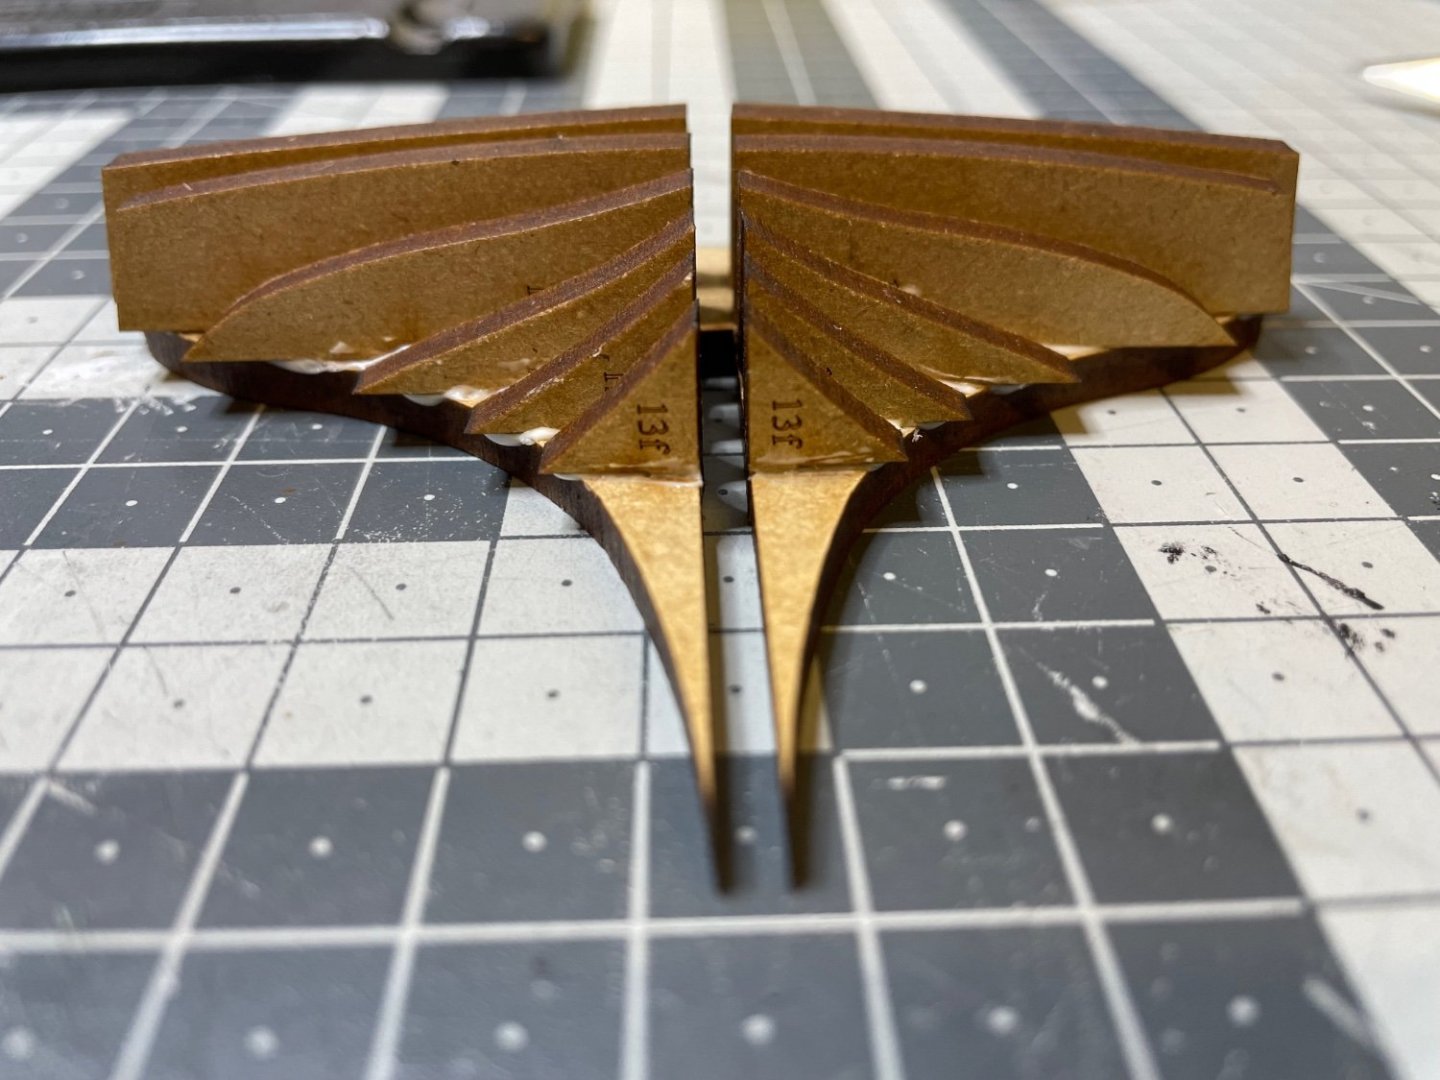
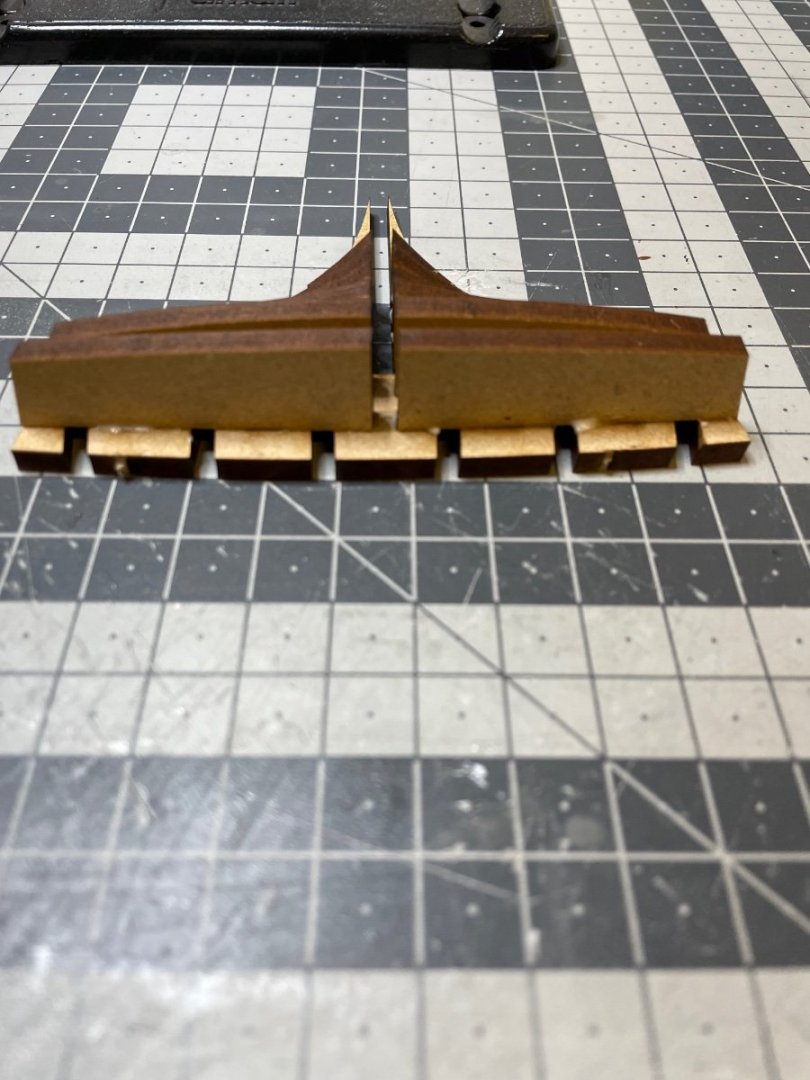
 BUILD DAY 5 / 3 hrs / Total: 7 hours Today I actually spent around 2 hours but I also added 1 hour to my log for yesterday's activity. Photos 61-63: Longitudinal Gun Port Frames in place. Overall they fit quite precisely and they stay almost entirely in place without any support. I still needed to peg with a few clamps to prevent small displacements, mostly less than 1mm, while the glue dries. You'll need to use quite low pressure clamps, just enough to hold them in place. Squeeze them a little too much and the frames can easily twist even slightly and lose the correct horizontal position. Not to mention the risk of breaking these delicate parts. In some sensitive parts I tied with a thread to keep them in place like in the photos. Following the instructions, I did one side first, in my case the port side, waited until glue is dry and then did the other side. I brushed diluted glue in the joints here as well.

- 426 replies
-
- 4
-

-
- Vanguard Models
- Sphinx
- (and 1 more)
-
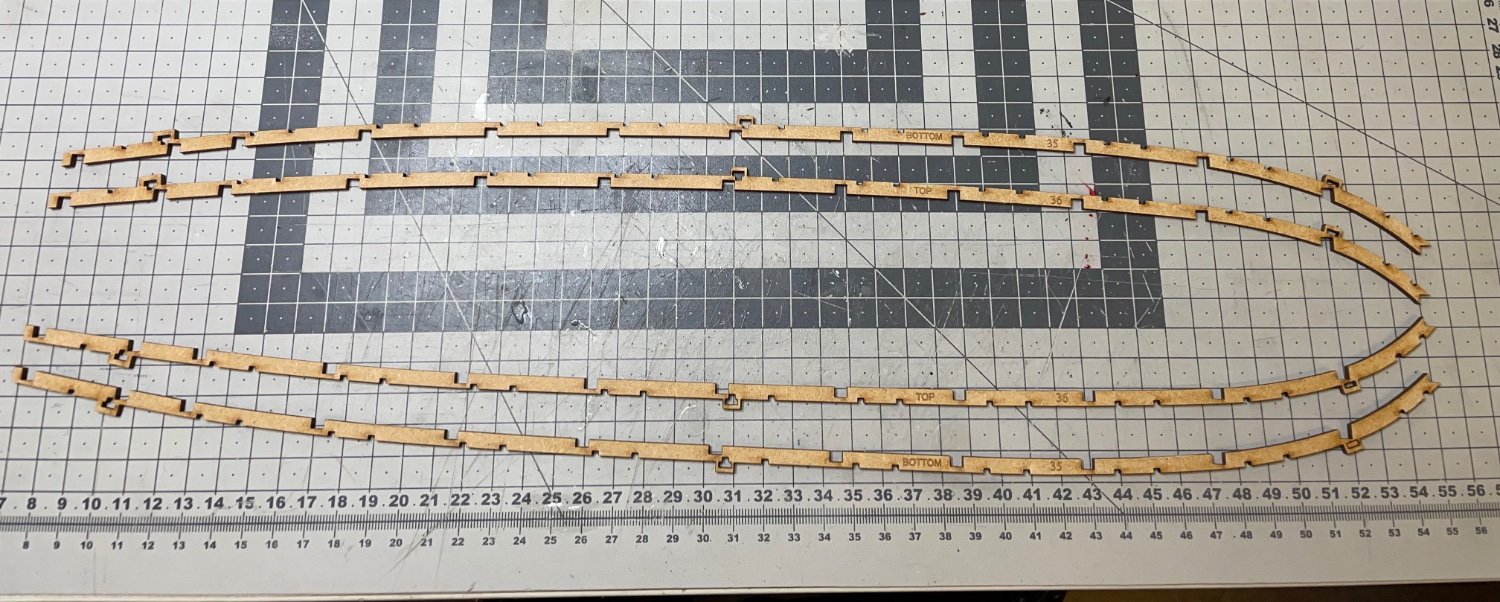
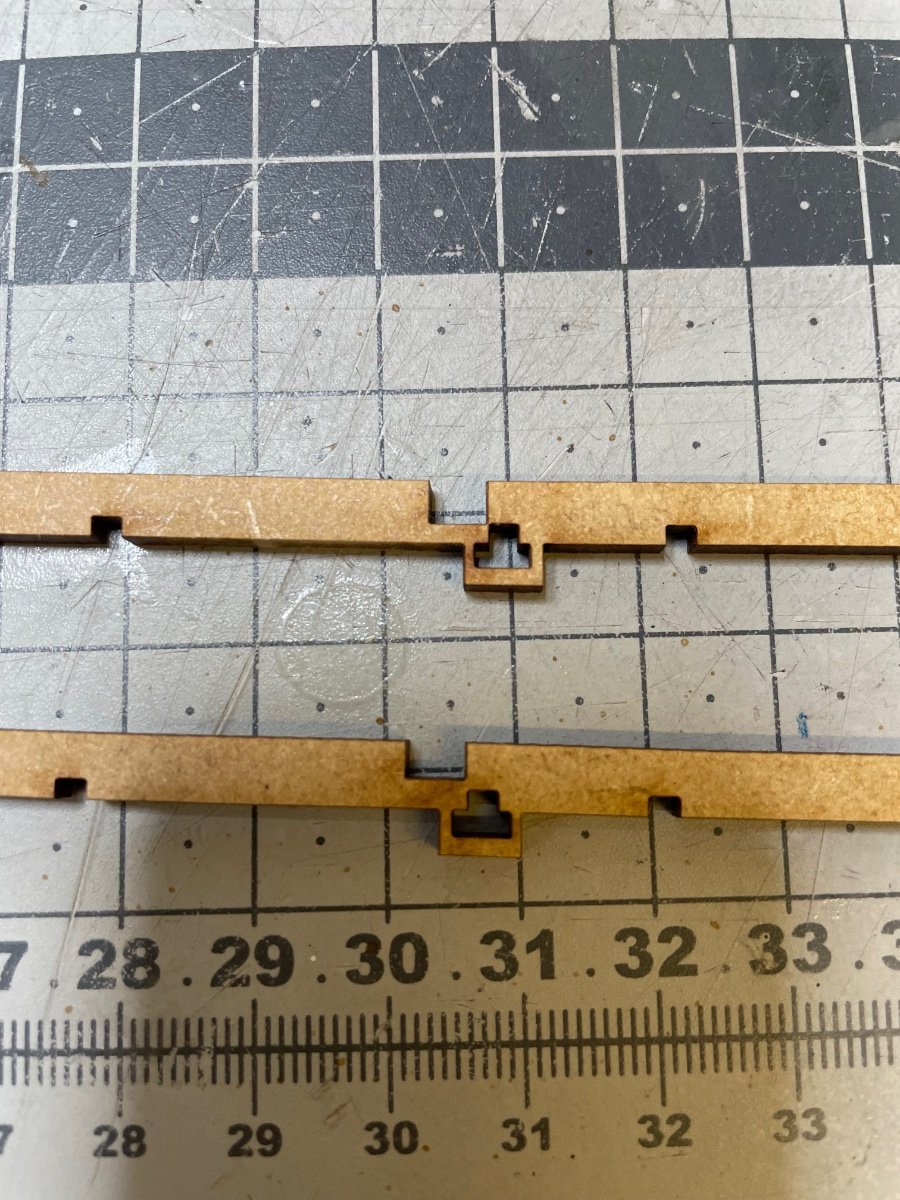
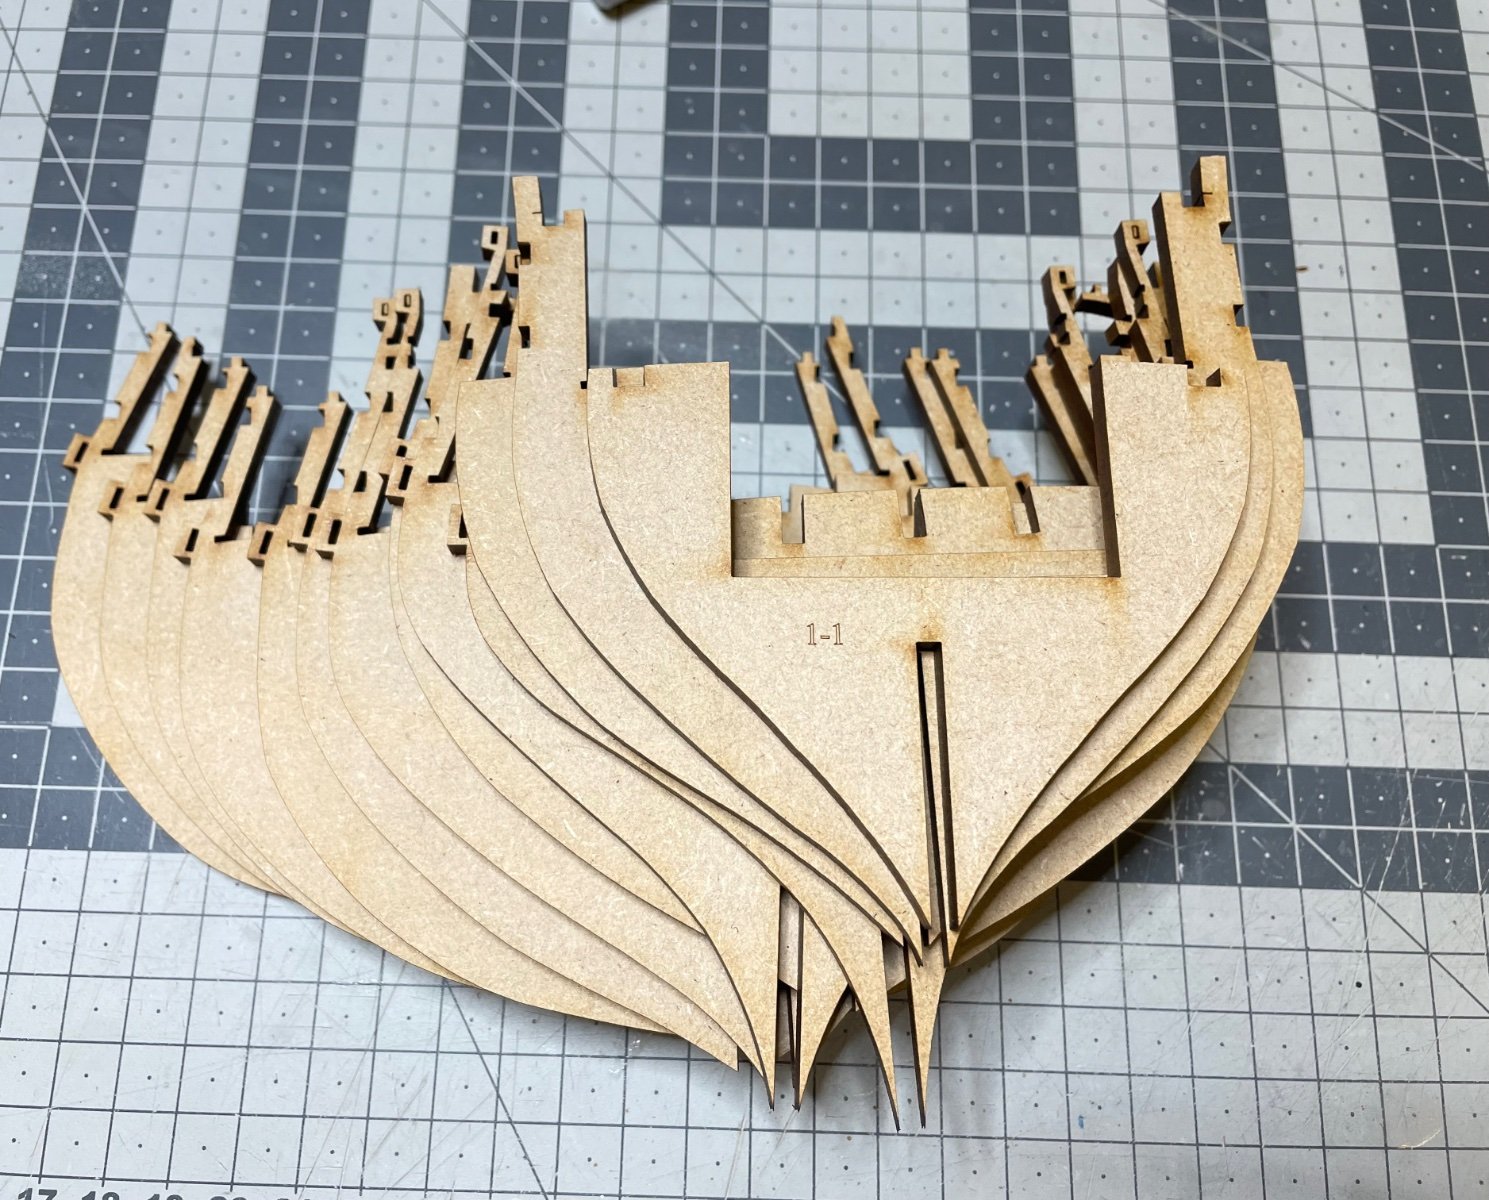
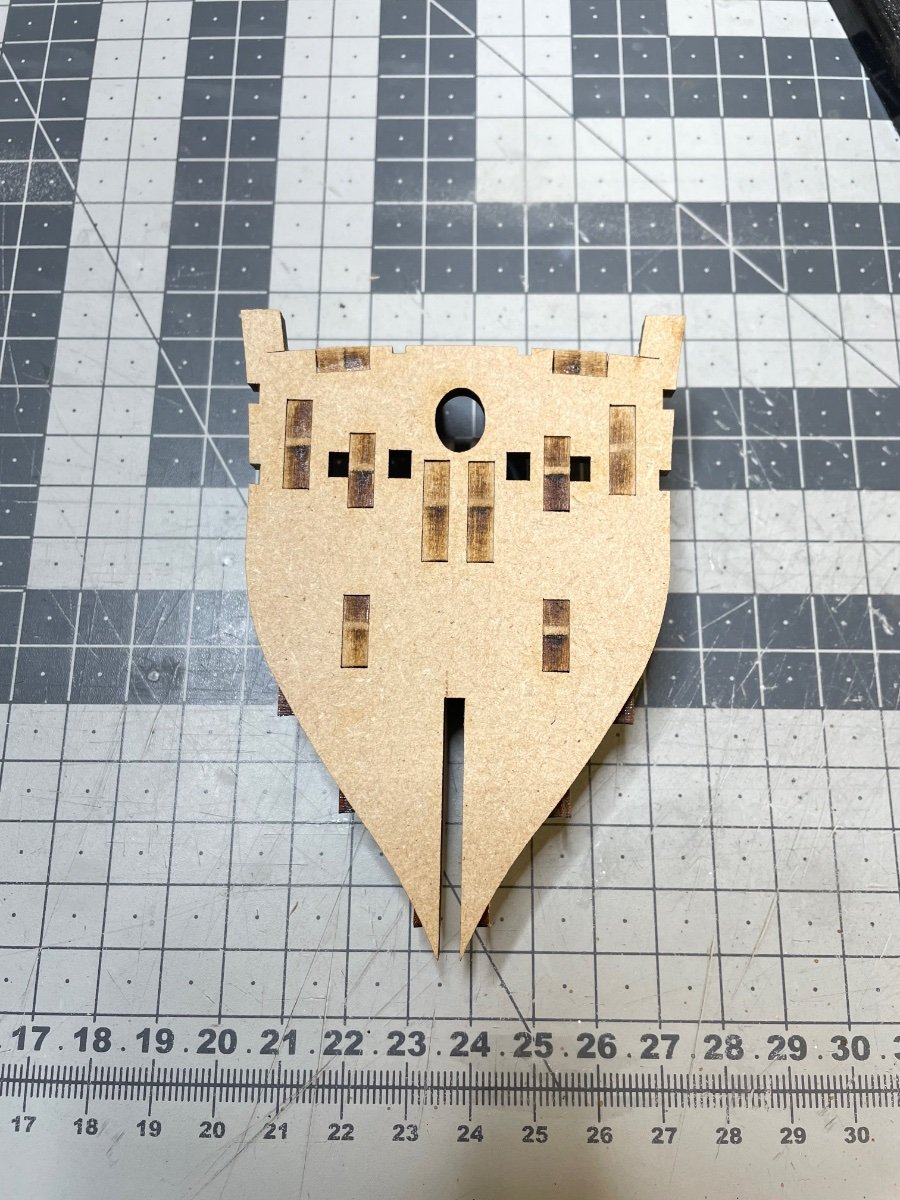
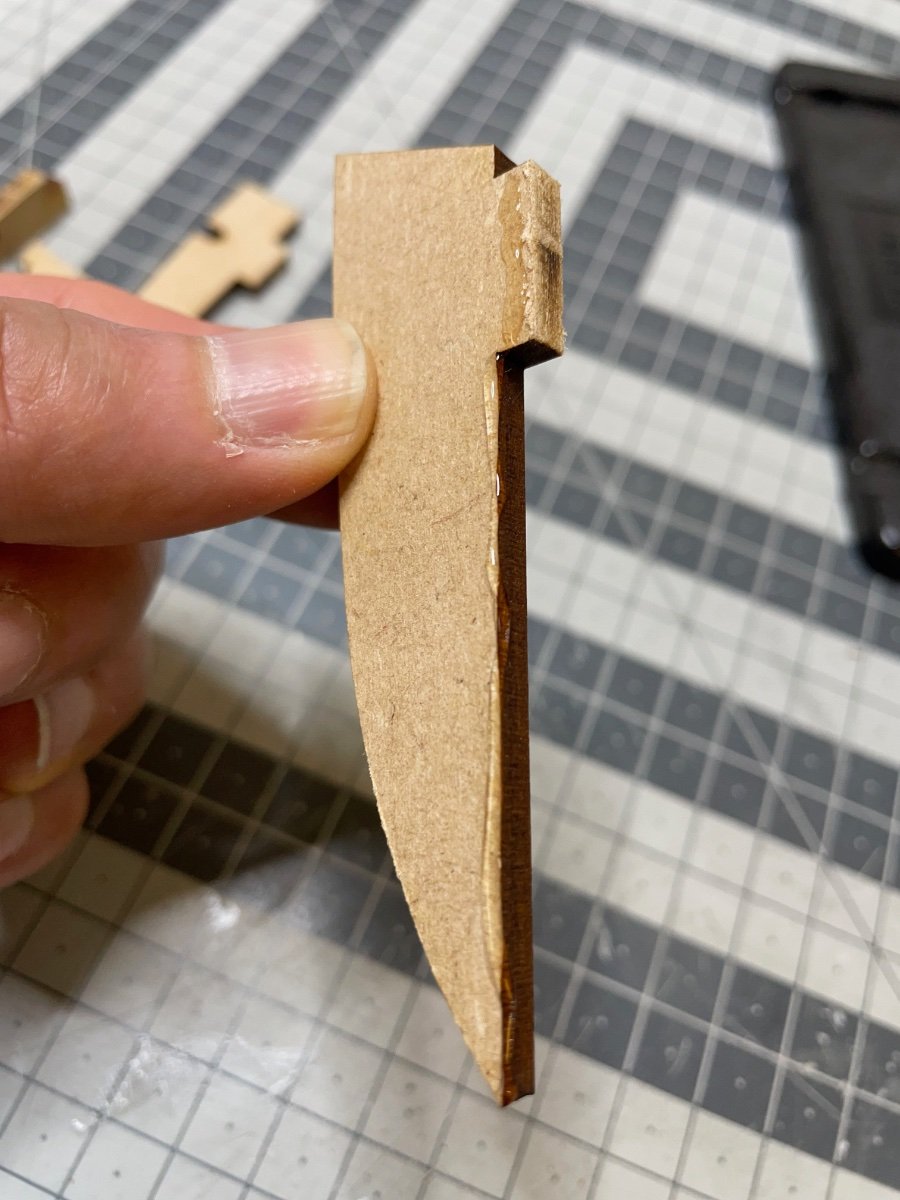
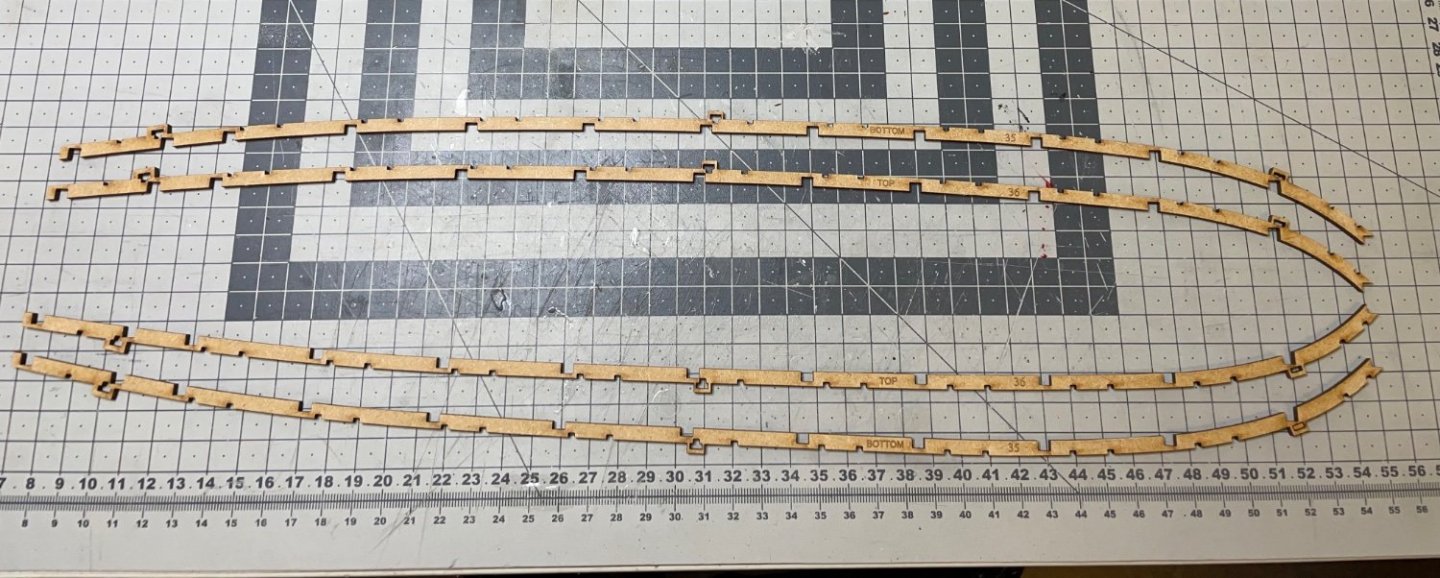
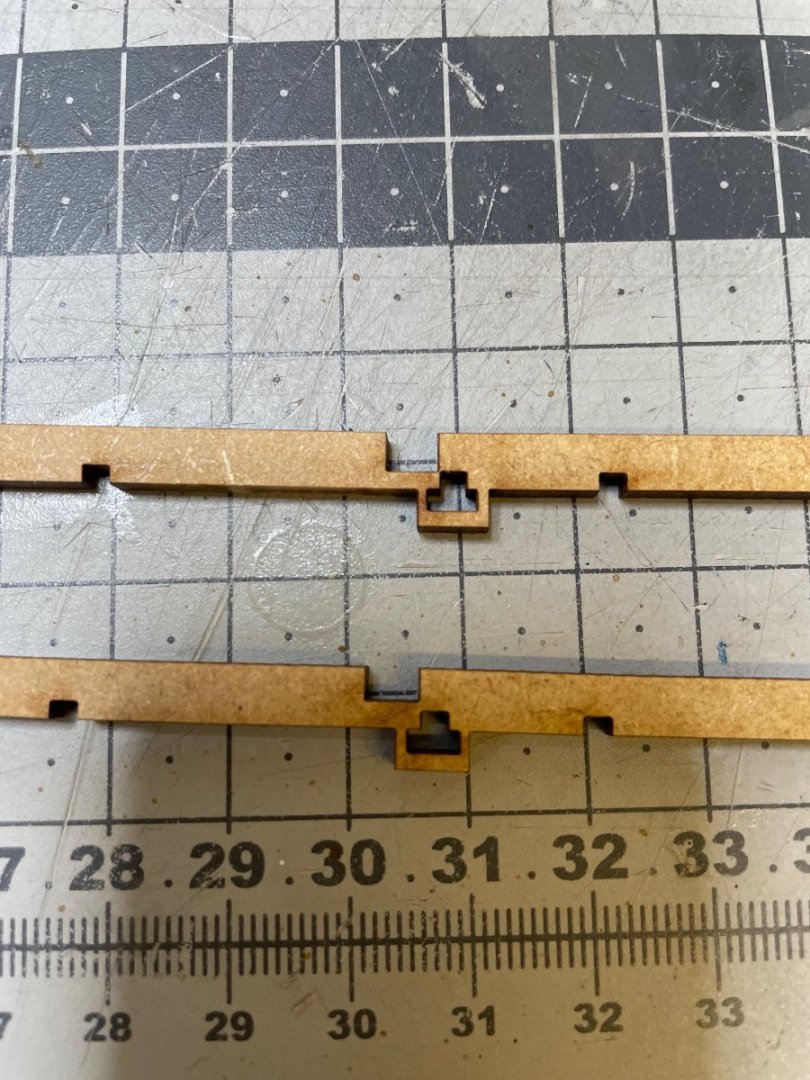
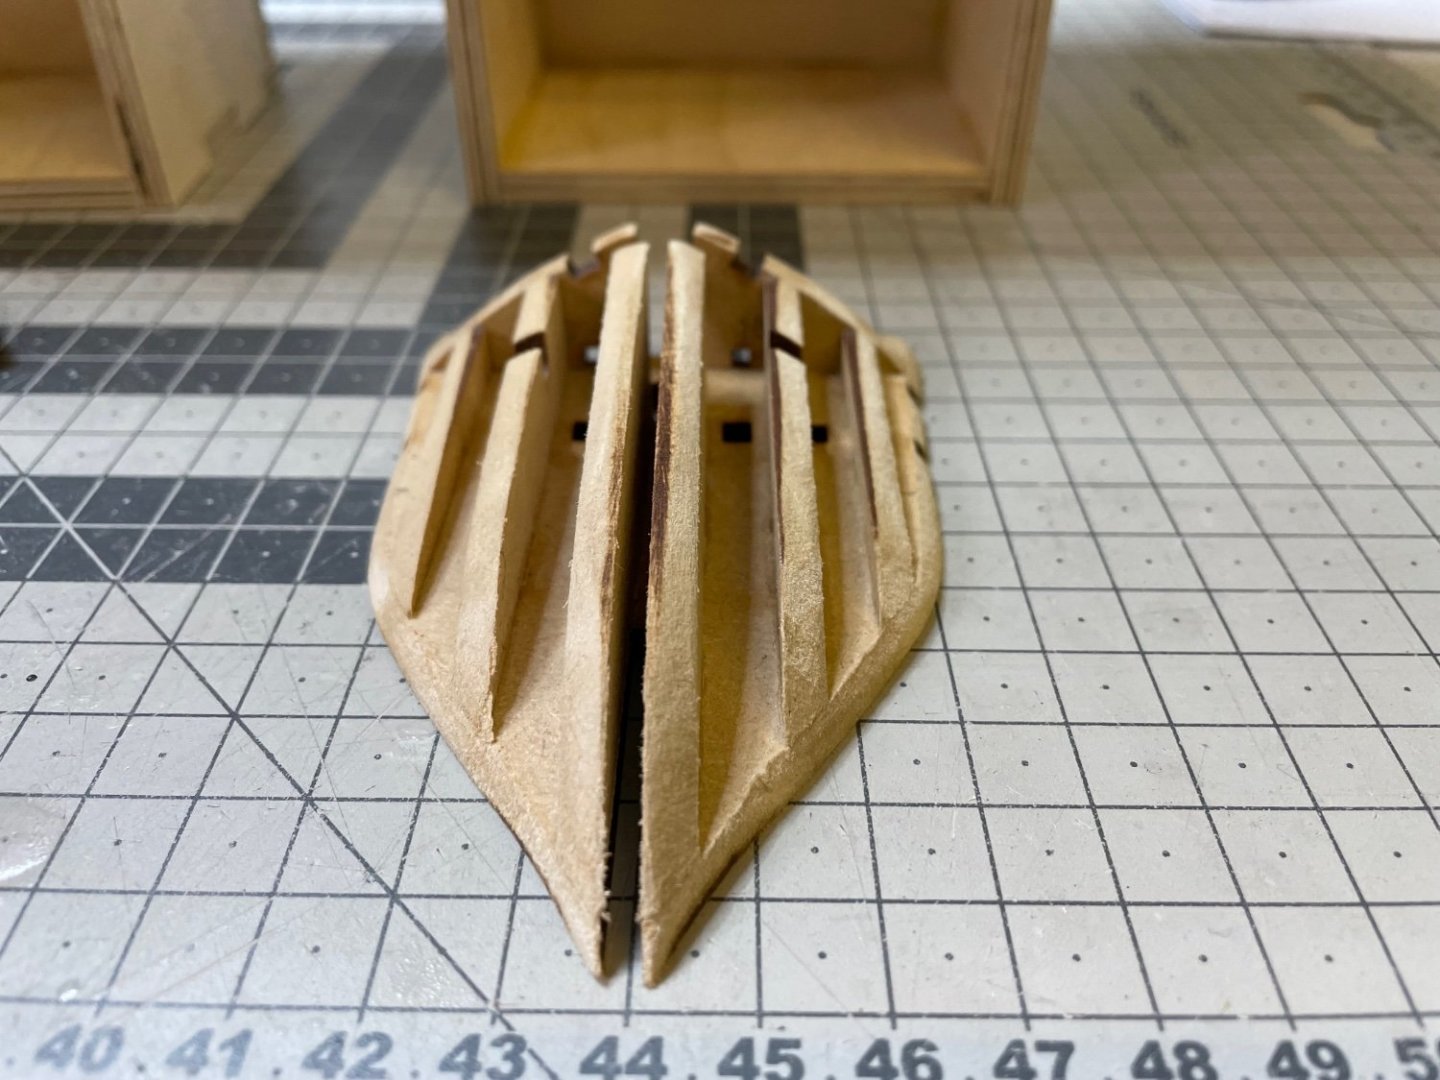
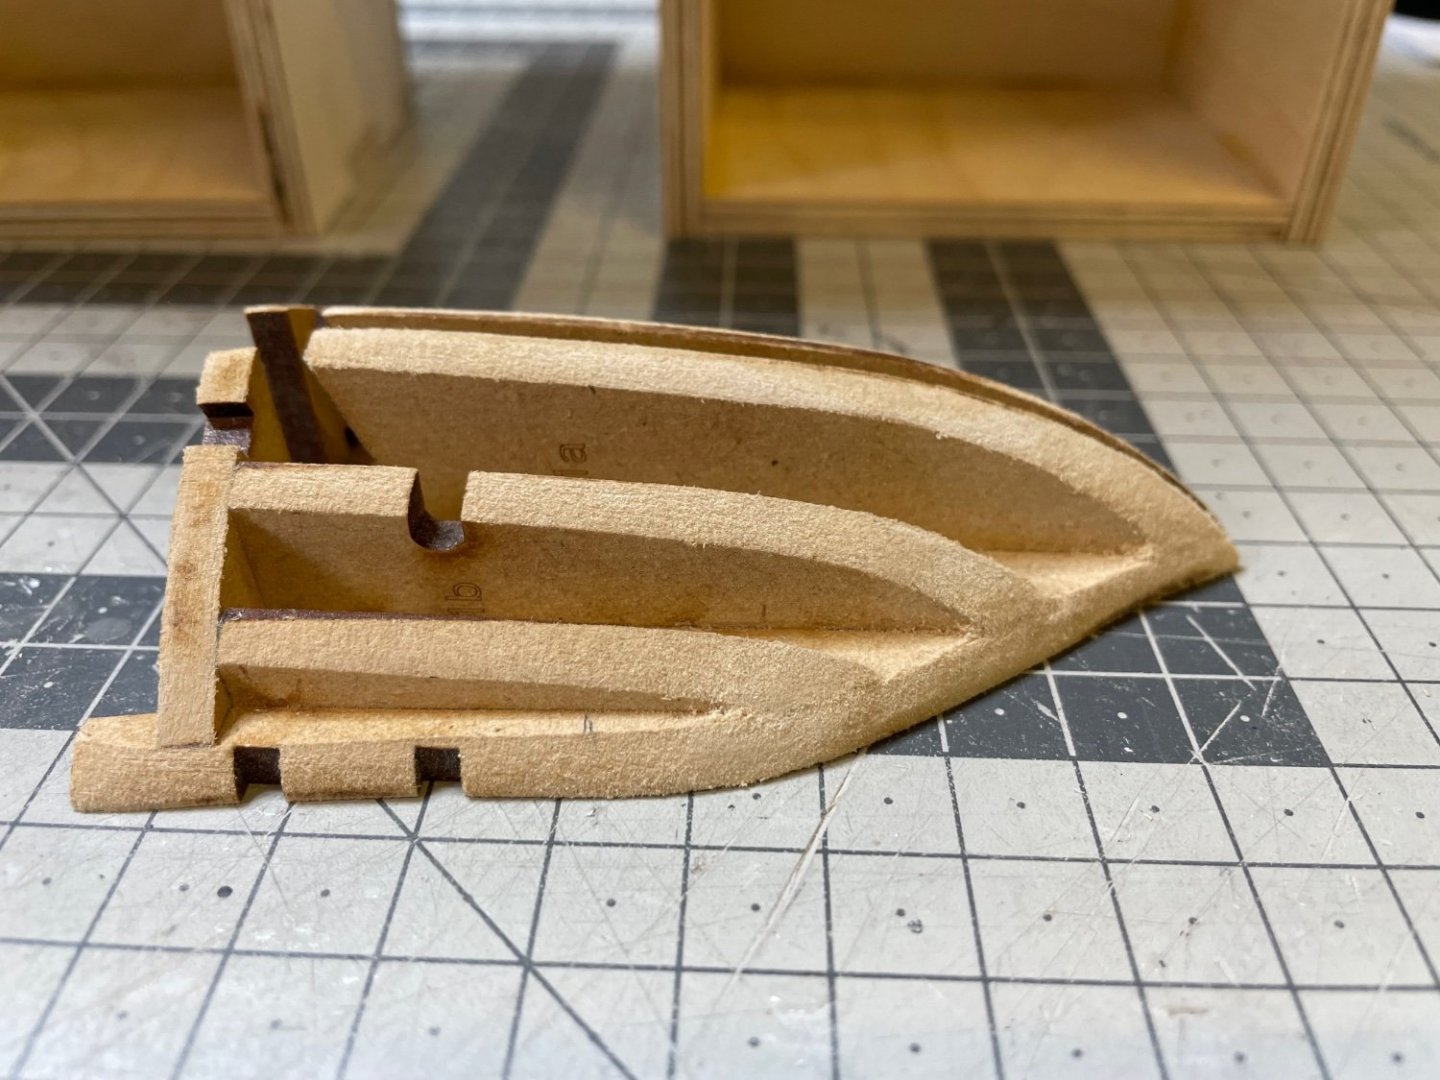
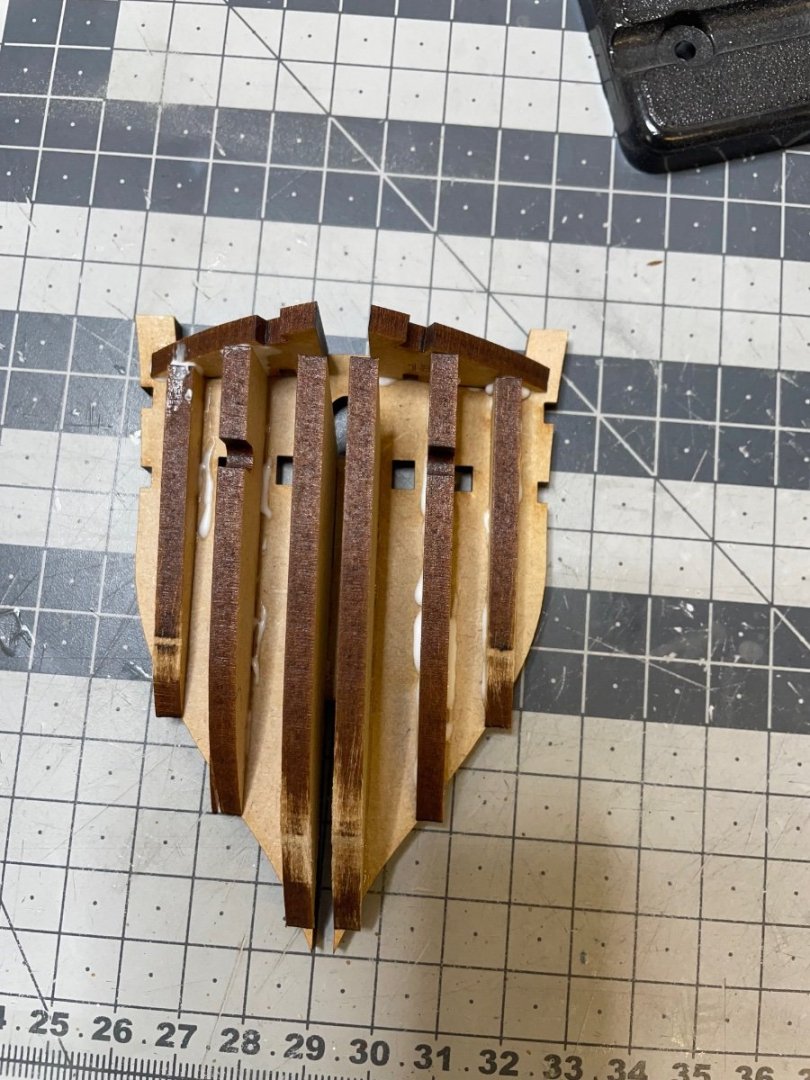
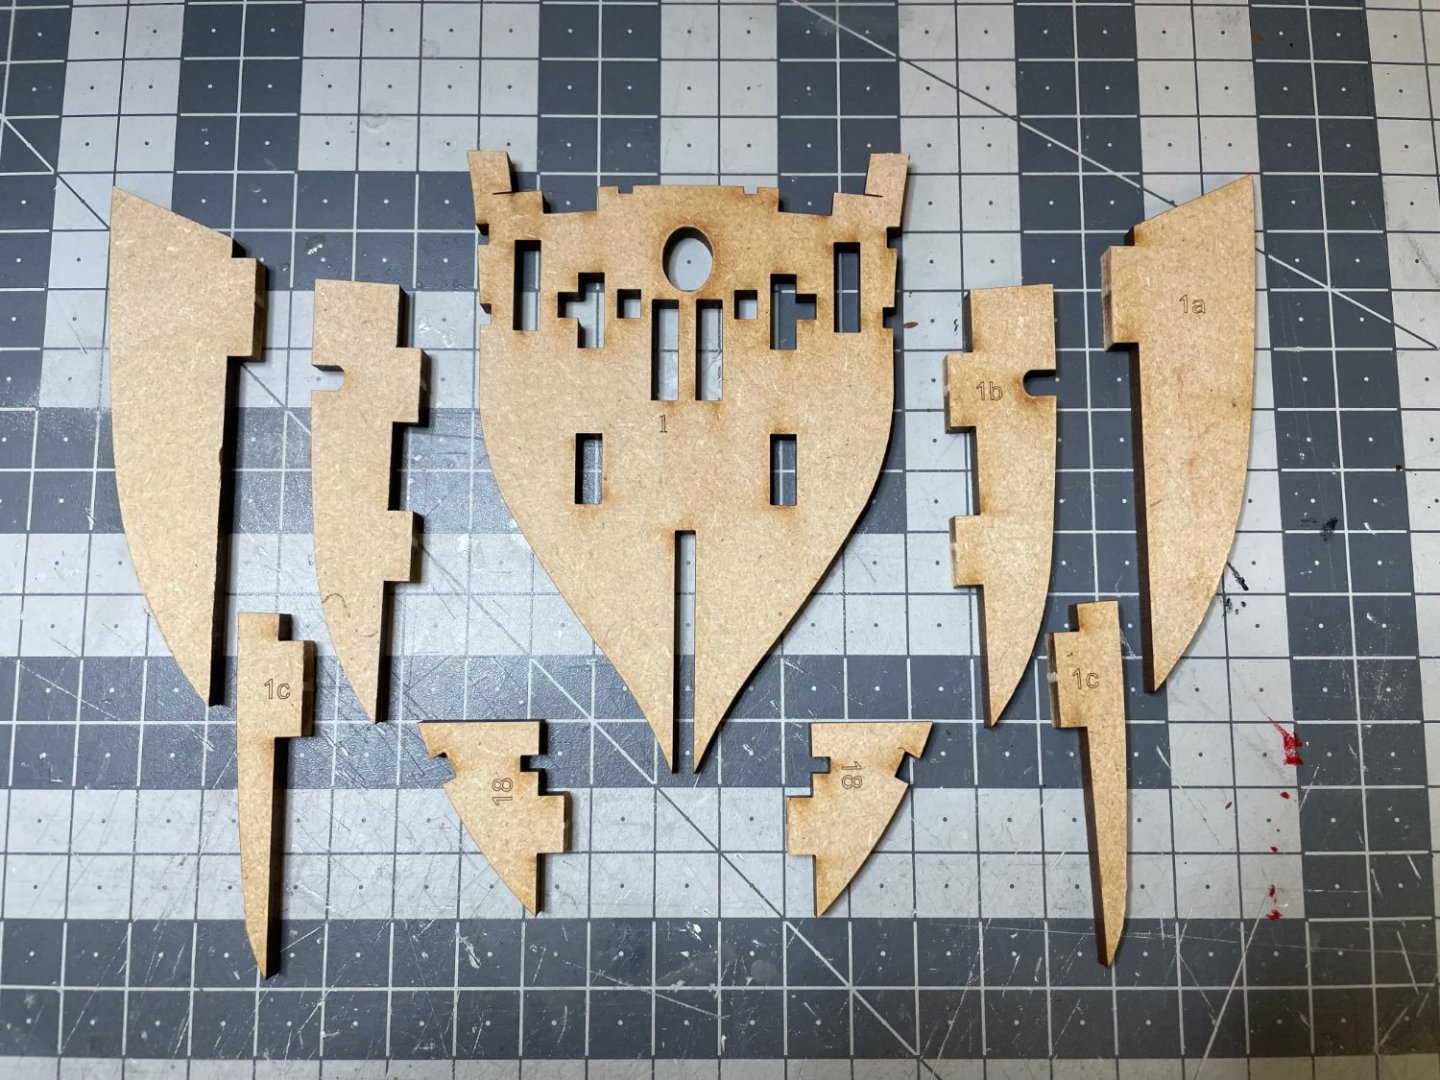
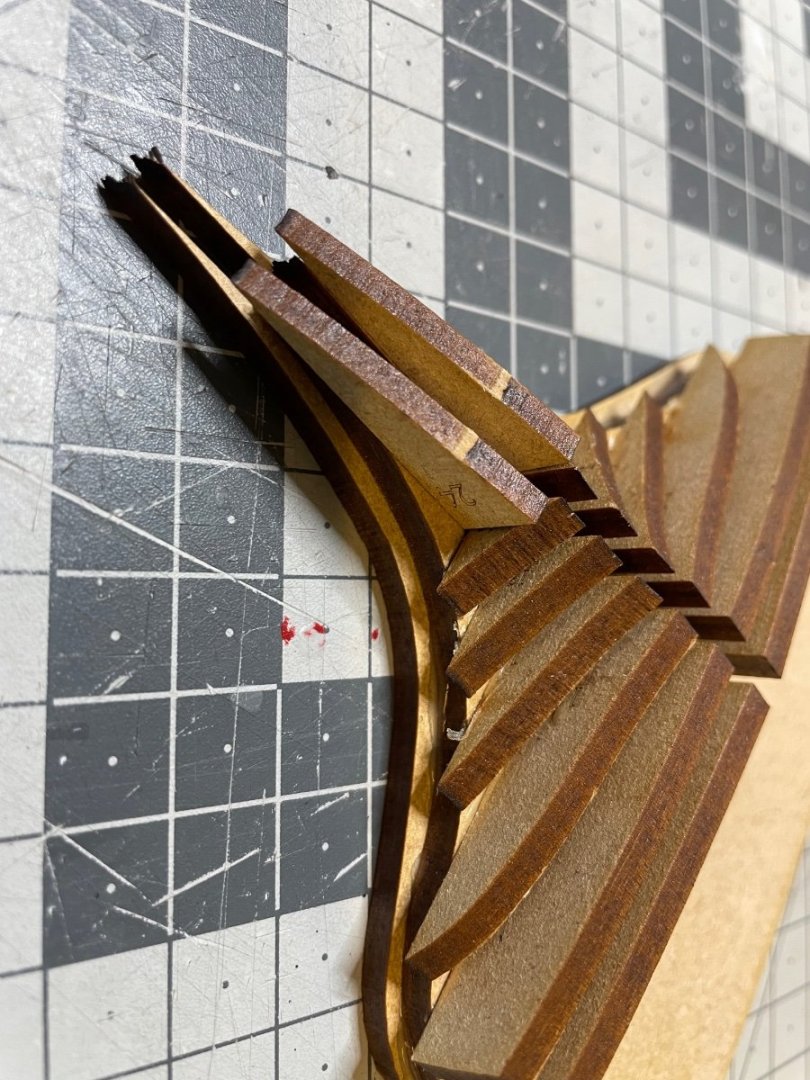
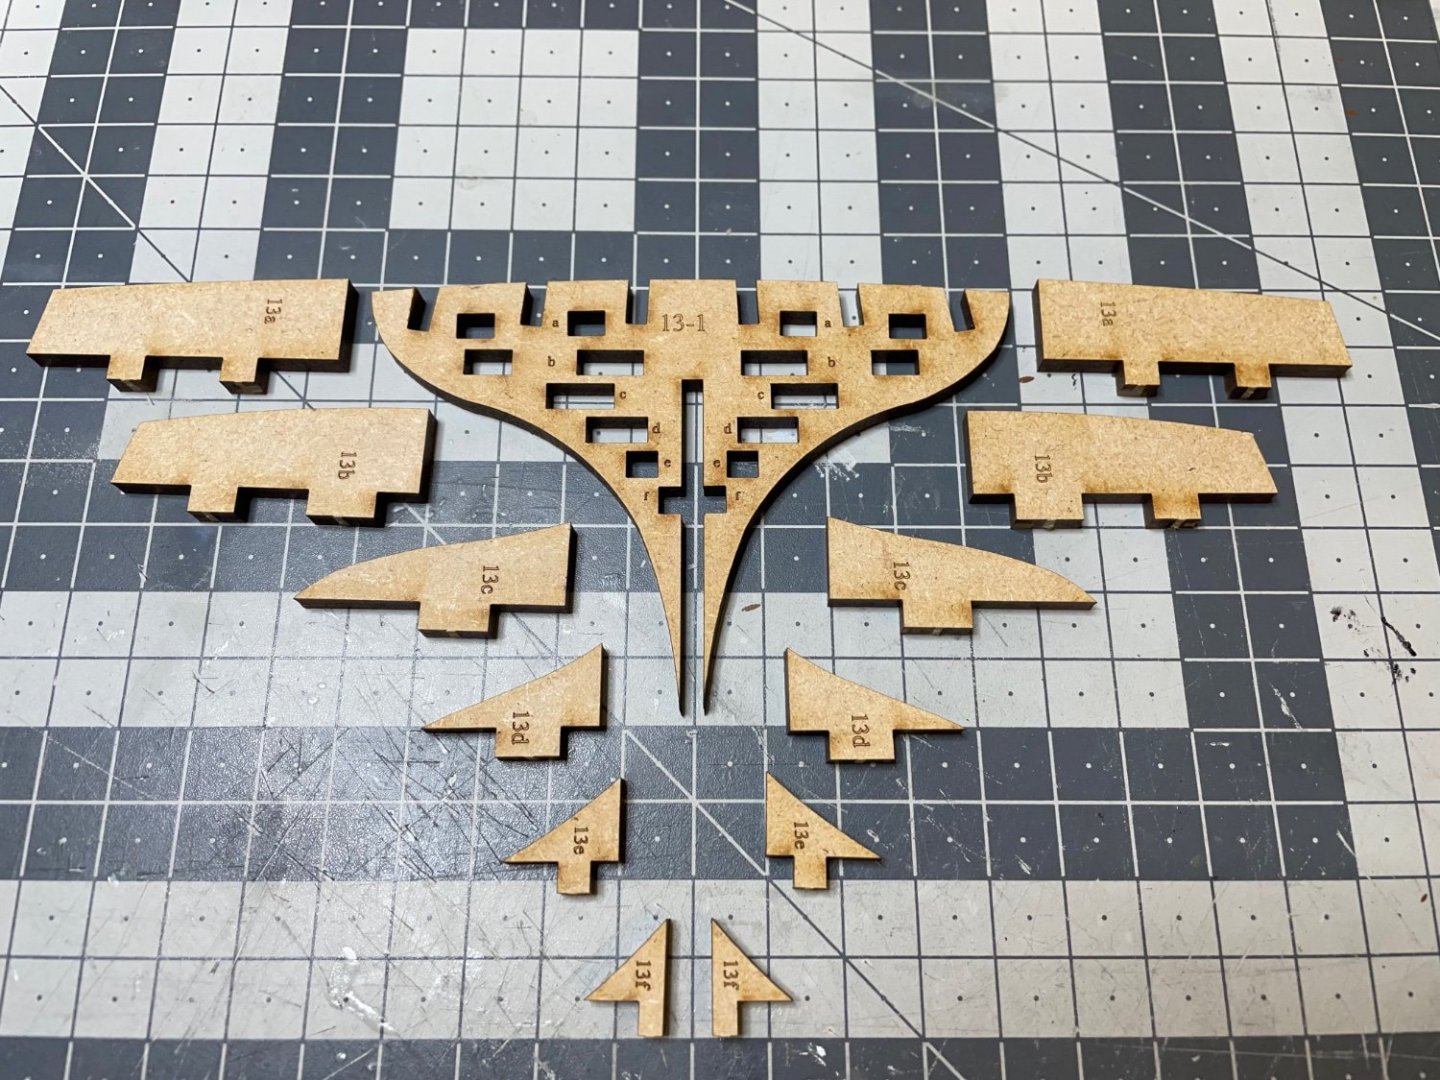
I had some free time today and I decided to move on a little while the hull is drying. Photo 59: So called Longitudinal Gun Port Frames. One lower and one upper for each side, marked conveniently on the parts. As pointed out in the instructions, these are very delicate parts and they should be handled with care. I passed several gentle strokes on the tabs with my X-acto knife on each side of the board to remove them from the MDF sheet. Photo 60: If you don't believe me when I say they are delicate, check this close shot:
- 426 replies
-
- 5
-
-

-
- Vanguard Models
- Sphinx
- (and 1 more)
-
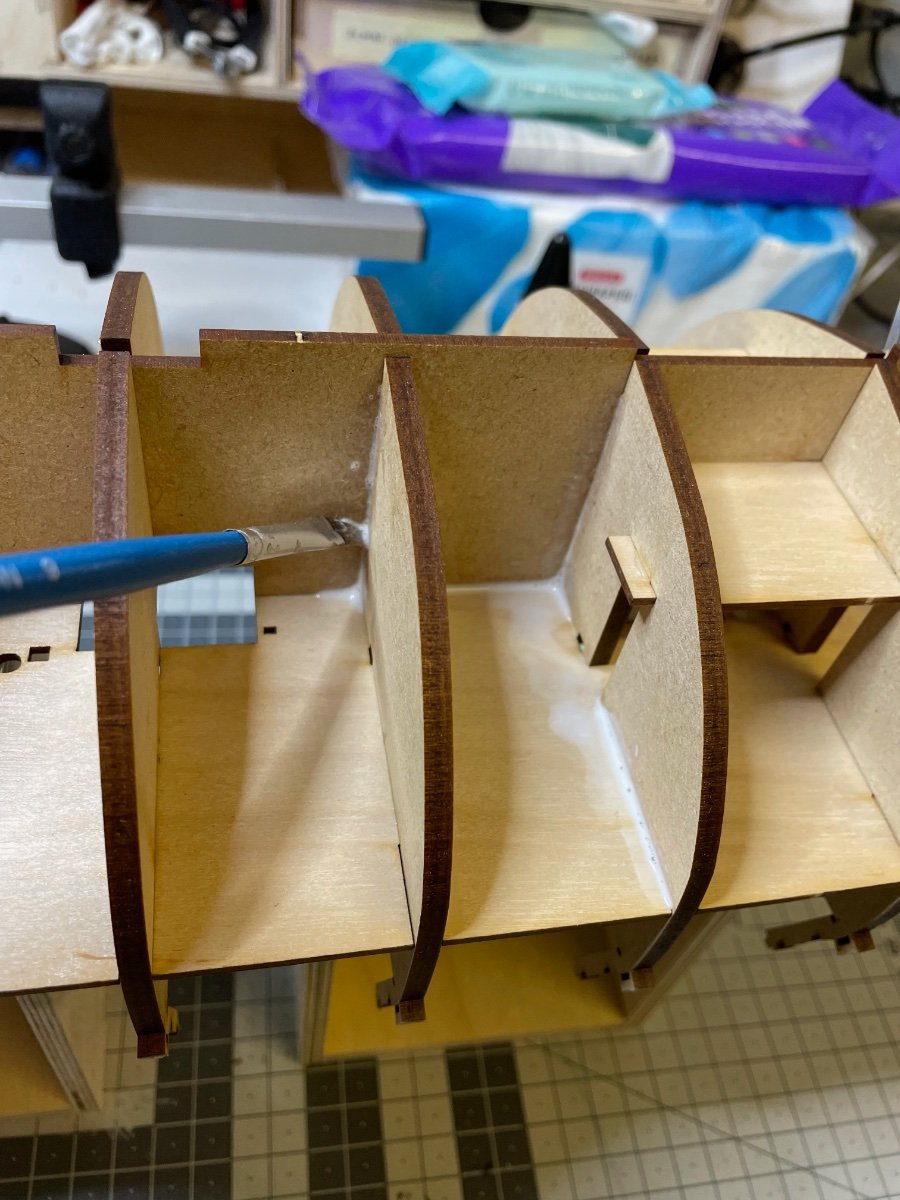
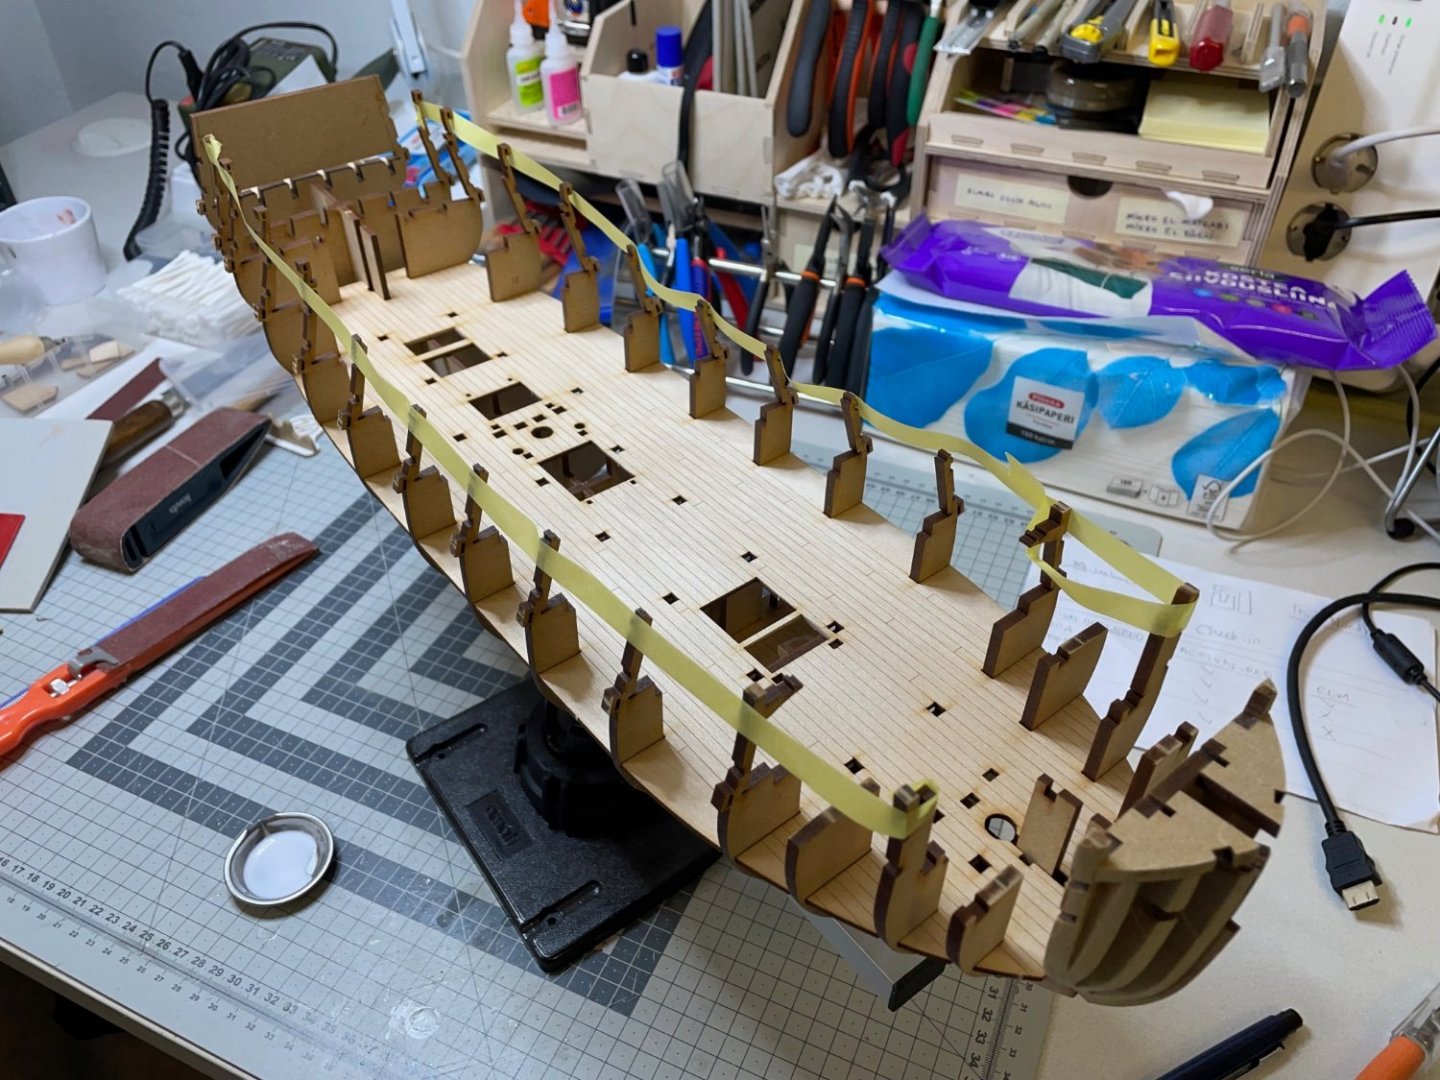
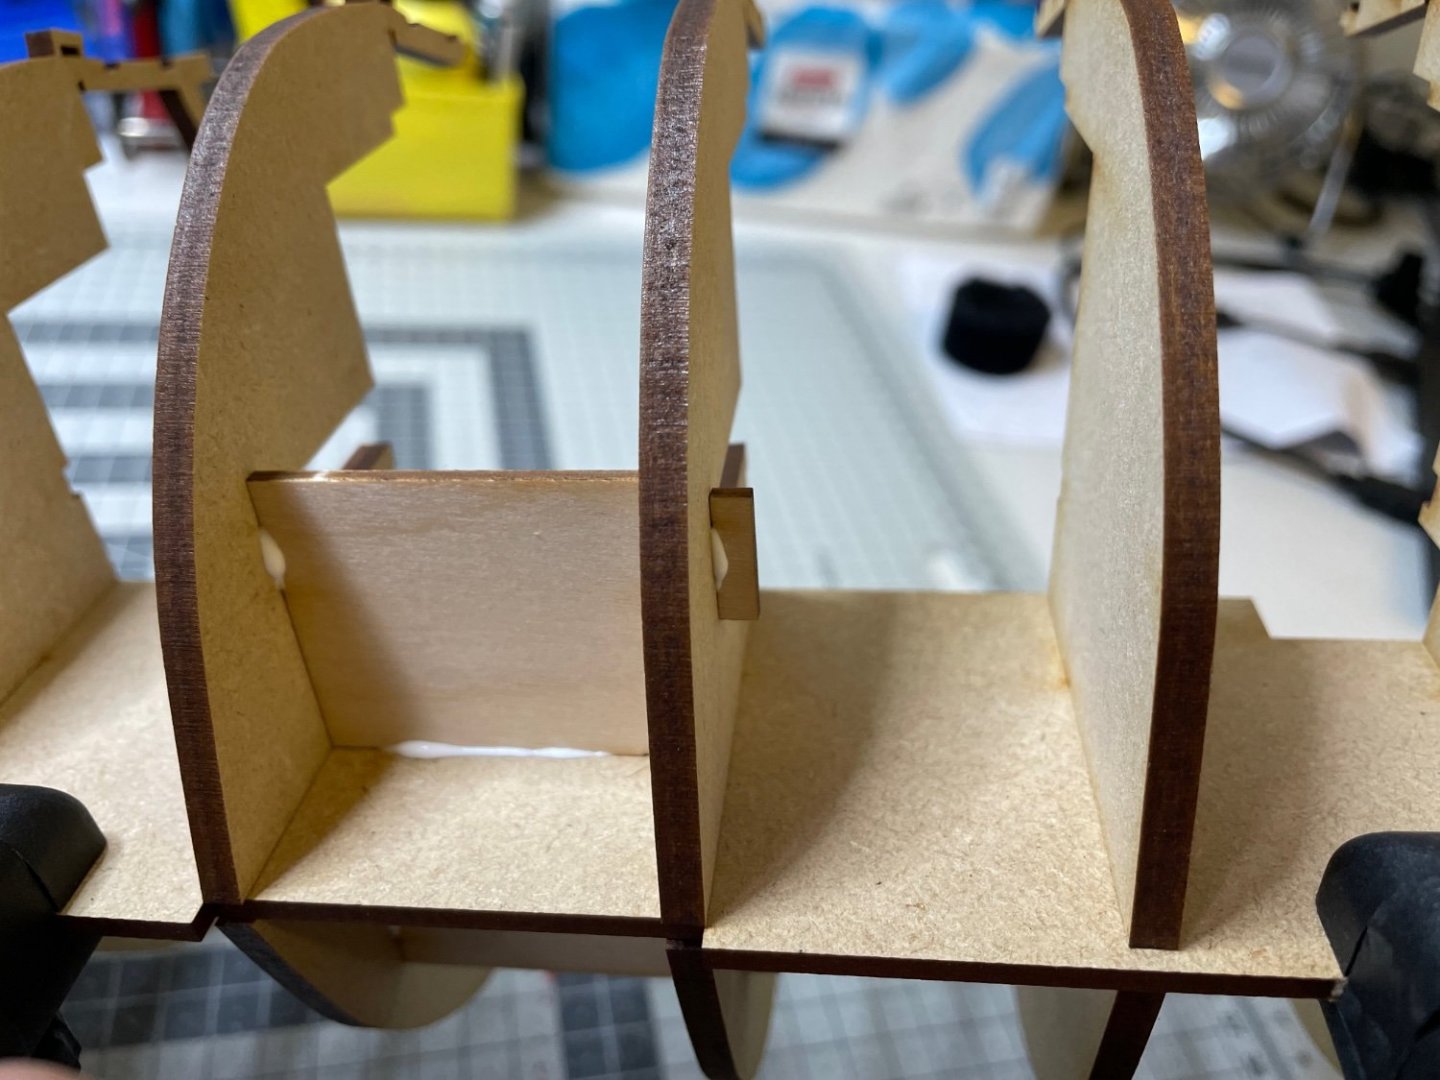
I checked the hull after leaving the brushed glue to dry overnight (as instructed in the manual) and looks like this brush-in-diluted-glue method worked perfectly! Not a single loose joint. Strongly recommended. 💯 Photo 57: I have been hitting my hand to the fragile bulkhead ears when I am moving around. Not a lack of proprioception😄 I hope, but when you are concentrated to a task, you lose sense of your surroundings. So I decided to use a colourful tape to make them more visible, like a "crime scene" fence. Photo 58: I have also installed the bow and stern assemblies in place, using the same brush-in gluing method and my hull starts to take a shape now. It will rest now until dry.
- 426 replies
-
- 5
-
-
- Vanguard Models
- Sphinx
- (and 1 more)
-
I am getting one of these "Bosch EasyCurvSander 12". I will share my experinces here. I

- 426 replies
-
- 3
-
-
- Vanguard Models
- Sphinx
- (and 1 more)
-
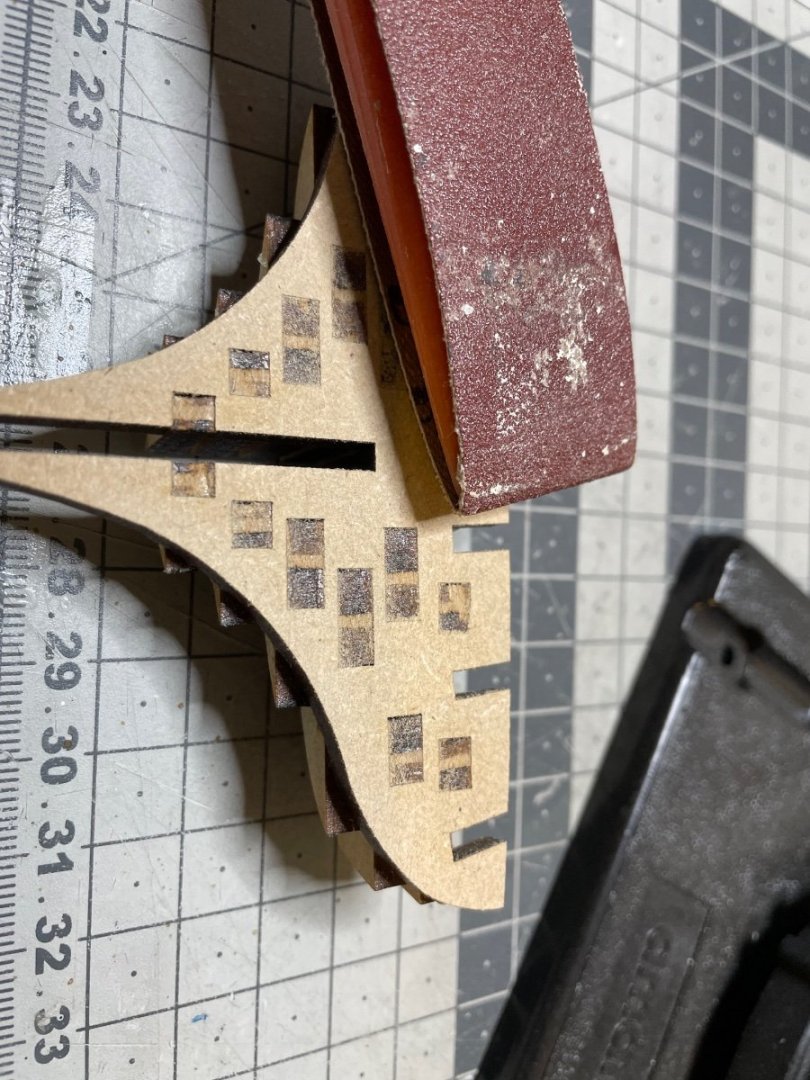
Photos 52-56: Sanding the bow and stern assemblies. I don't really enjoy sanding (does anyone?) and am quite impatient when it comes to sanding, I wish I could hire someone to do this for me 🤣. Realising I am on my own, I read through James' and Chris' recommendations in other build logs in this forum and finally gave it a go. I didn't use any rotary tool, instead I started with very rough sand paper (those they use on belt sanders, that work more like a rasp rather than sandpaper) and gradually proceeded with finer grade paper, testing the curve with planking the strip. I think overall they came out good: symmetrical and in full contact with the planking strips. I don't want to over sand before they are in place on the hull. I can do fine tuning then, if need be. It took about one hour to sand both assemblies. The 3mm scrap MDF piece below in the middle is to support the two parts #24 while sanding:


- 426 replies
-
- 9
-
-
- Vanguard Models
- Sphinx
- (and 1 more)
-
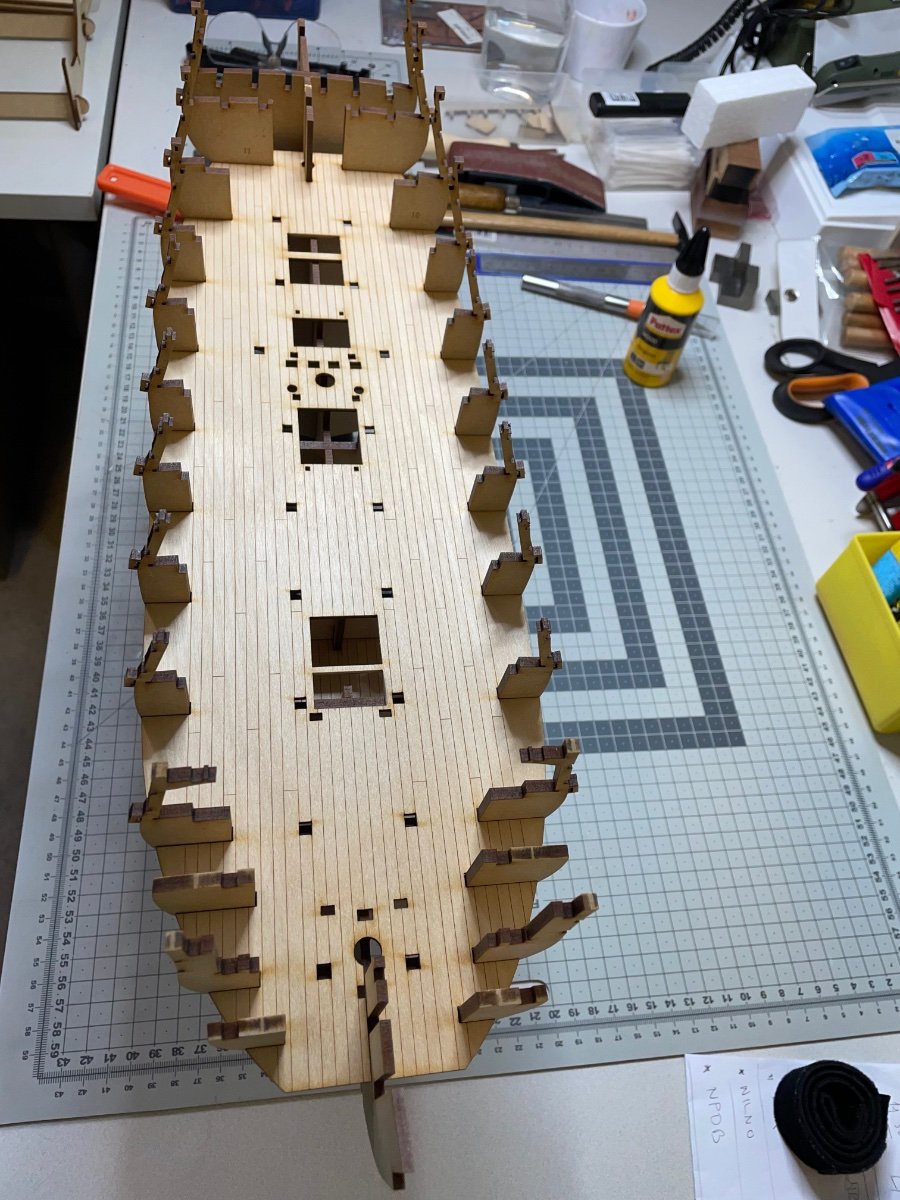
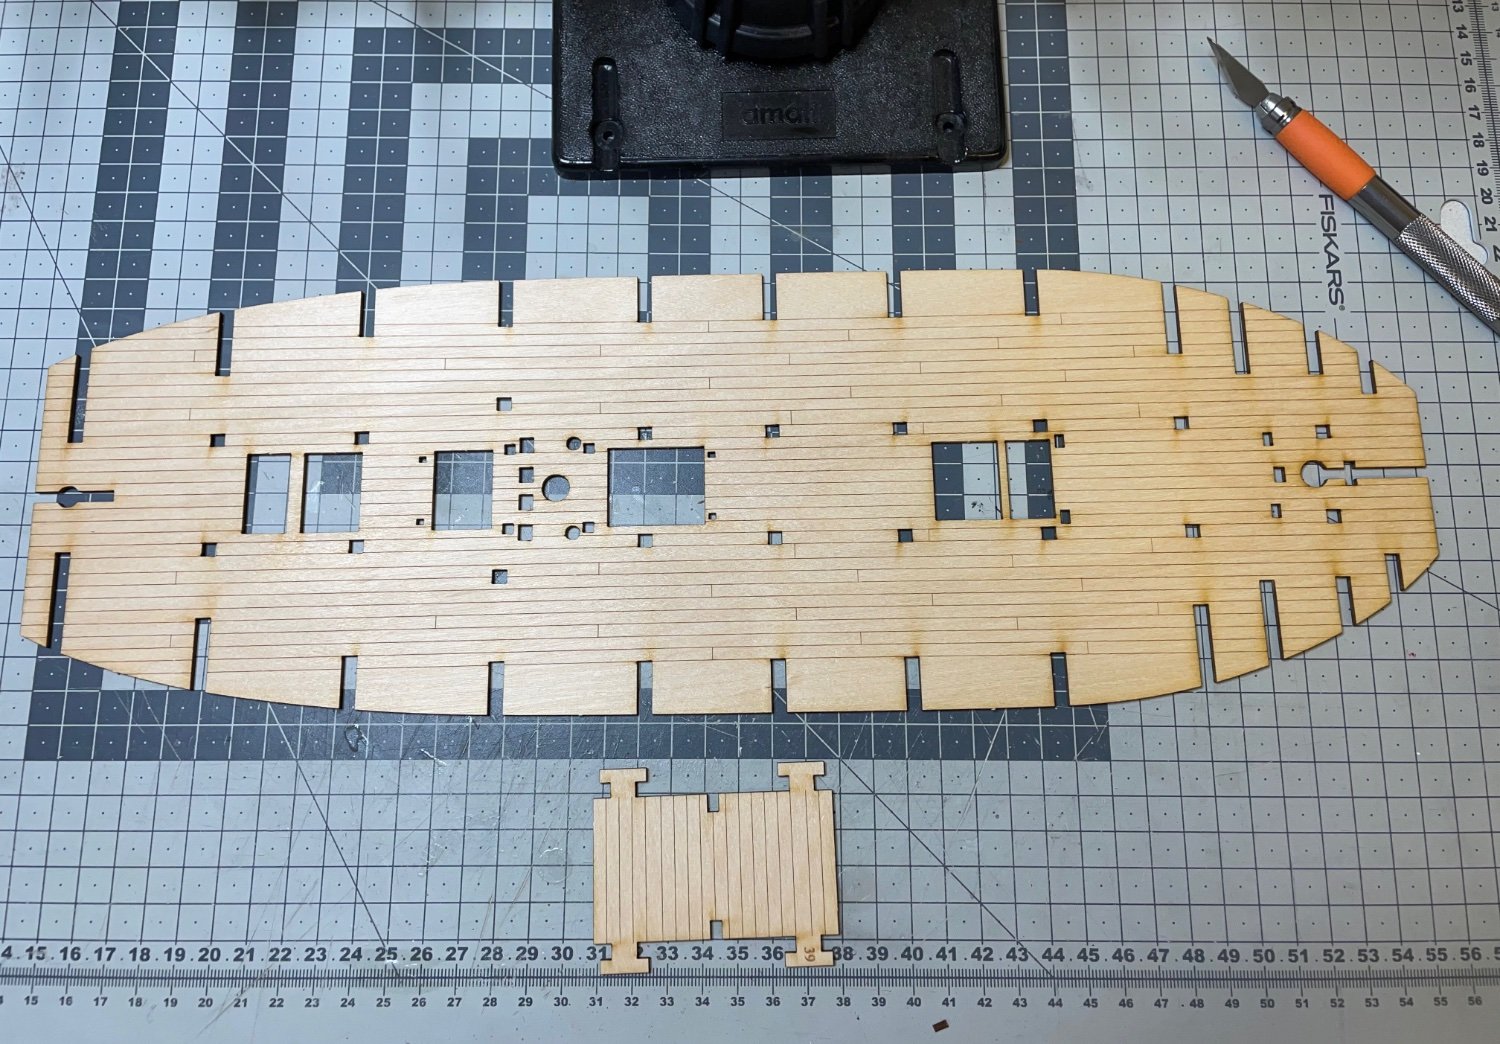
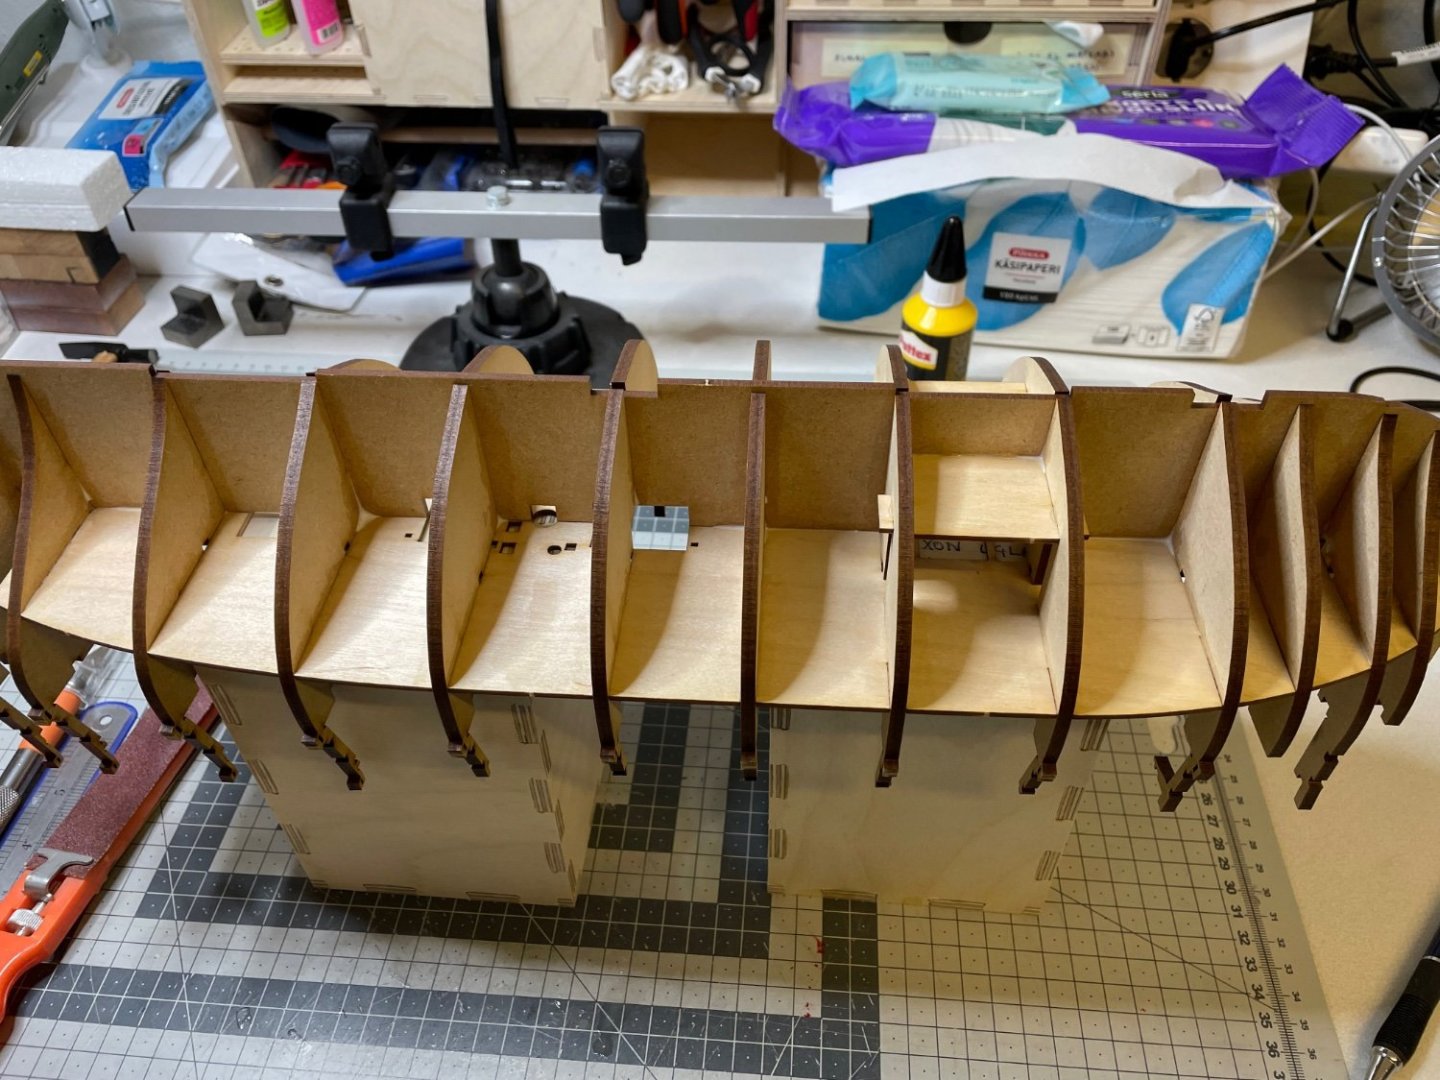
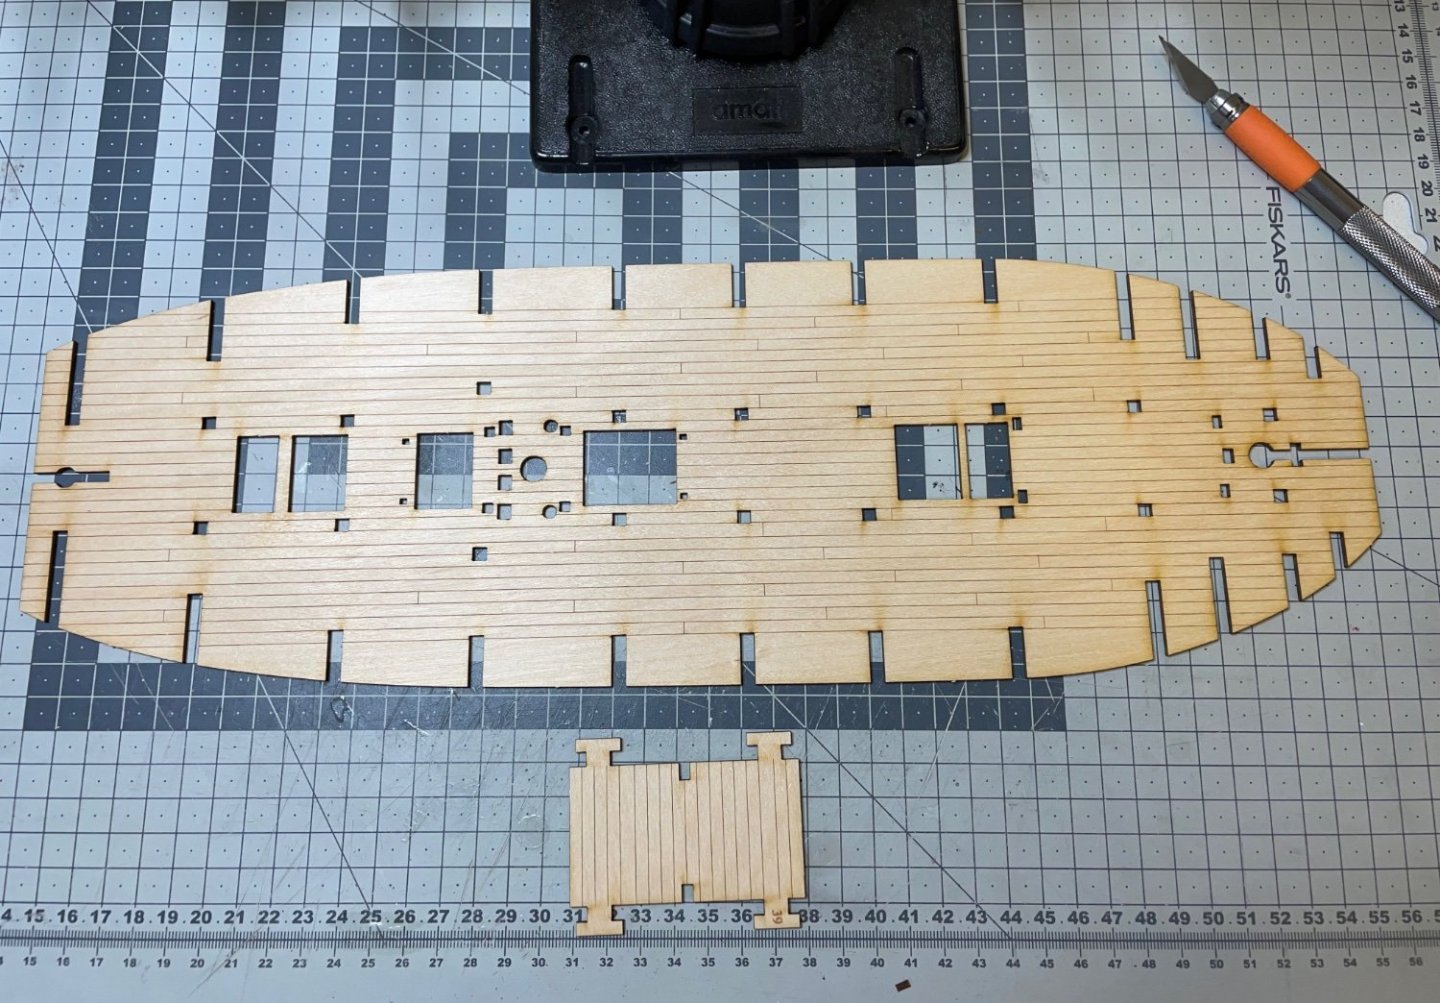
Photos 48-49: Installing the lower deck in place. With careful adjustments of the bulkheads it fit in rather easily. Photos 50-51: Bulkheads and lower deck are all in place and ready for gluing. I followed the method recommended in the manual: Diluted white wood glue around 50-50 with water (about milk consistency) and brushed it at the joints. It will rest overnight to cure properly. That's when I will know if the method has worked for me or not 😄.


- 426 replies
-
- 5
-
-
- Vanguard Models
- Sphinx
- (and 1 more)
-
Photos 45-47: Gluing the orlop section in place, applying the glue in the right spots. Fits accurately with no problem.

- 426 replies
-
- 4
-
-
- Vanguard Models
- Sphinx
- (and 1 more)
-
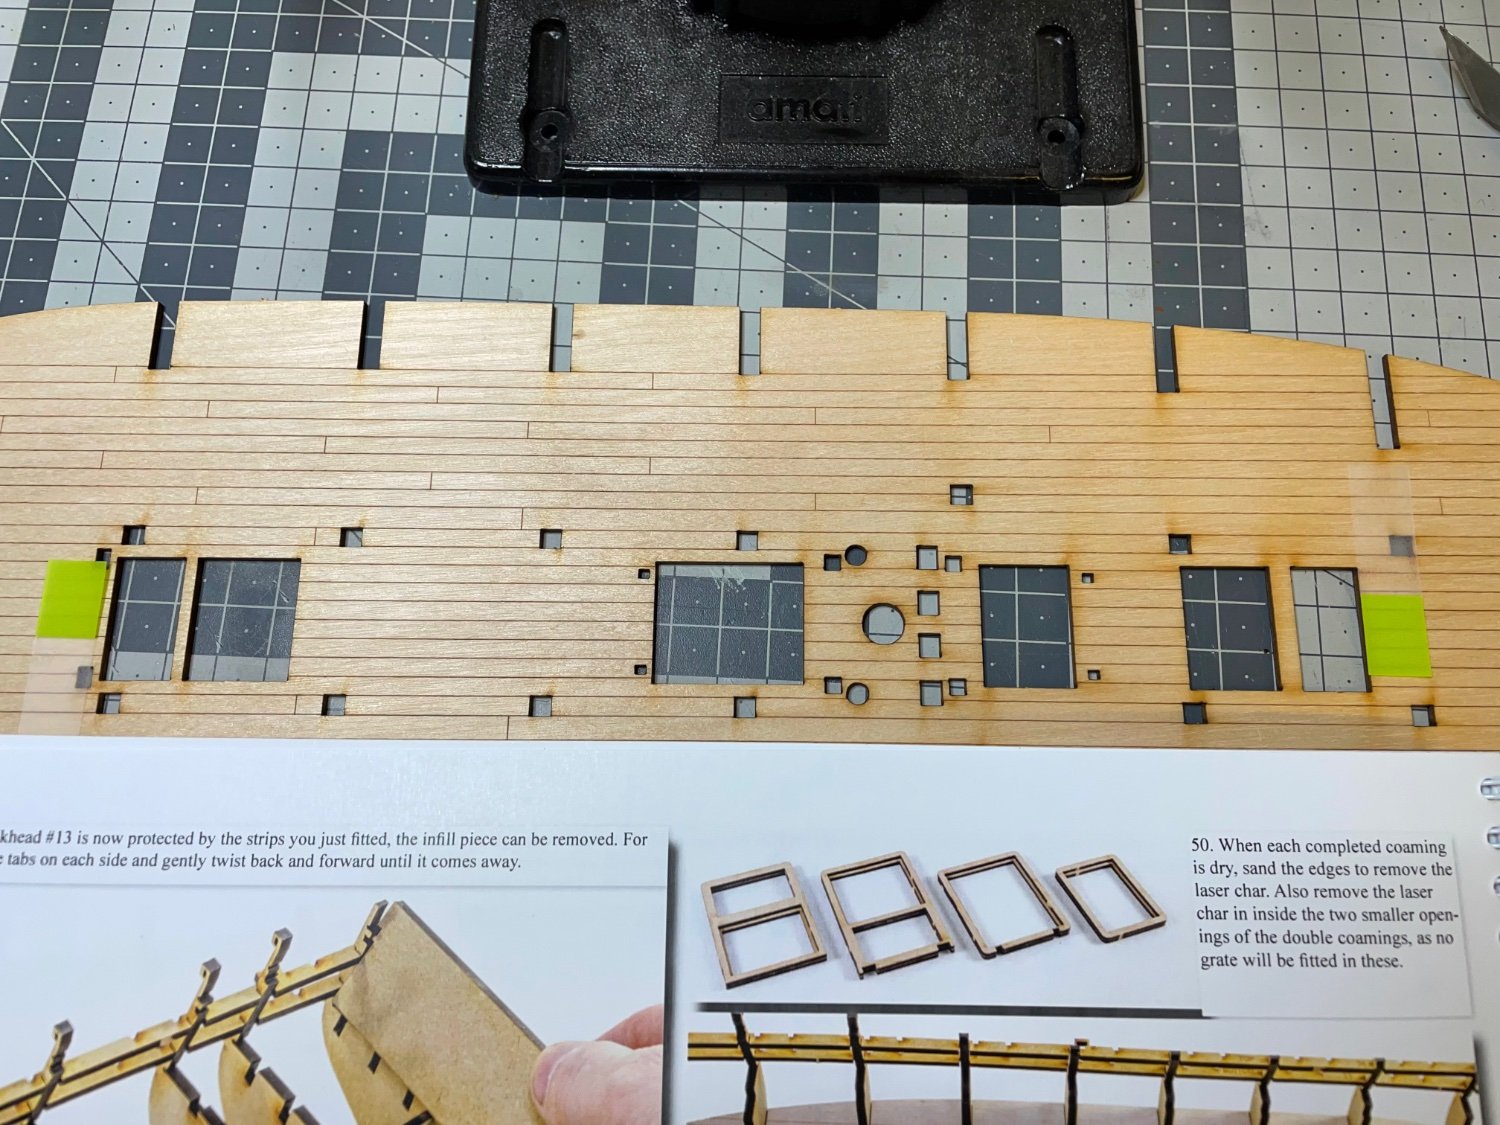
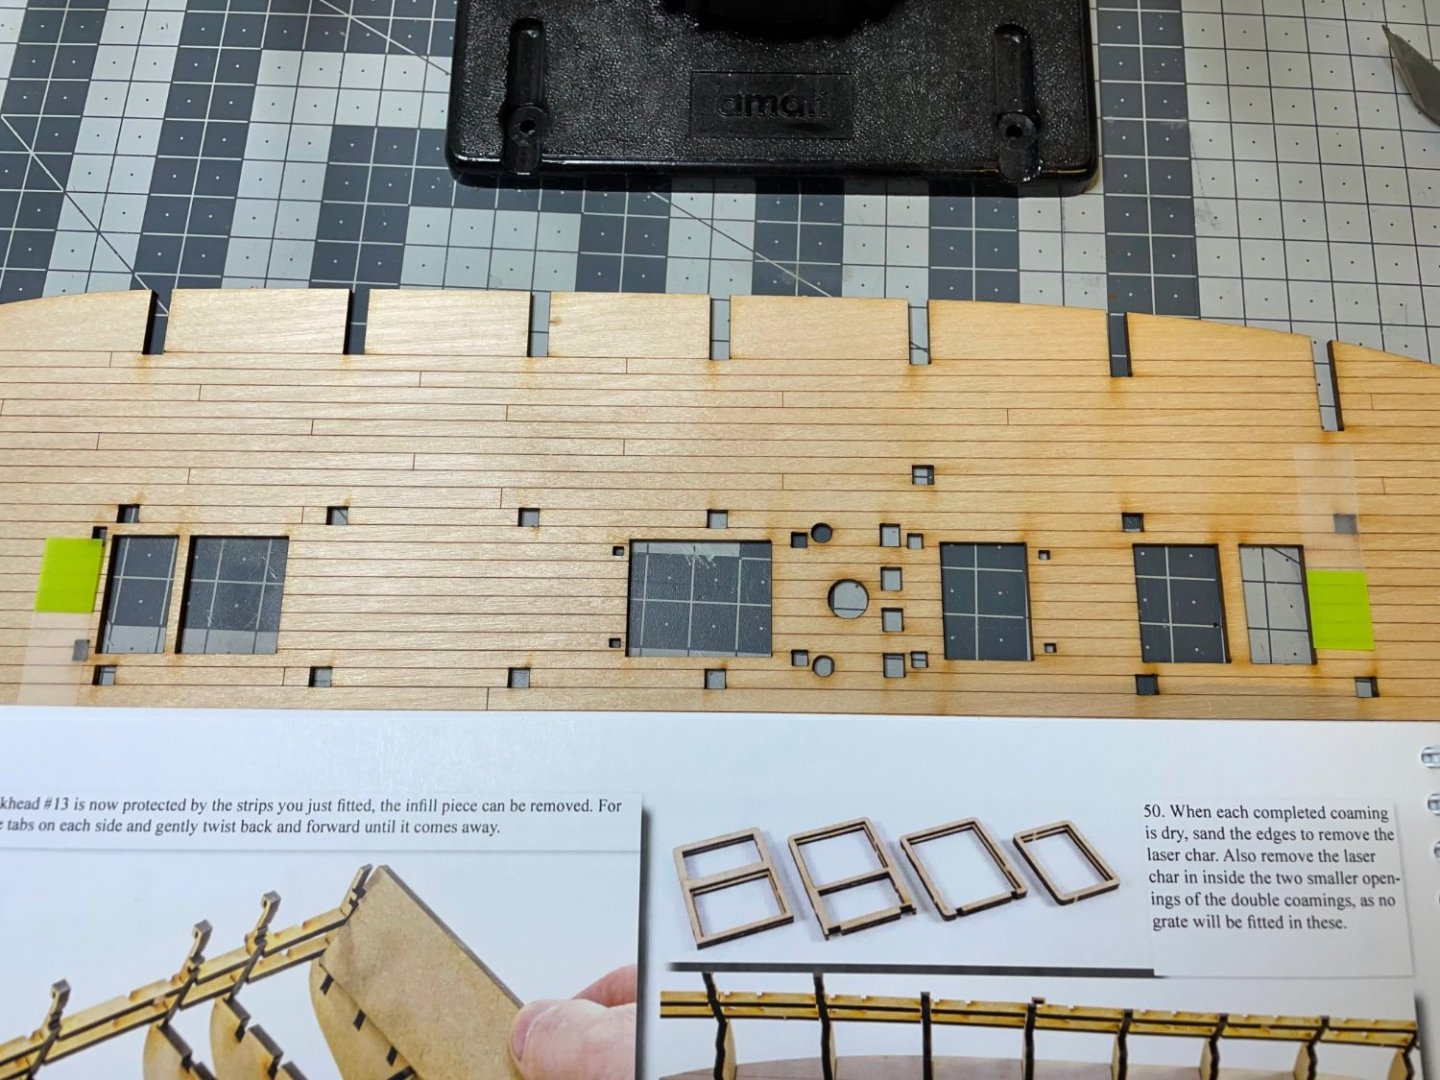
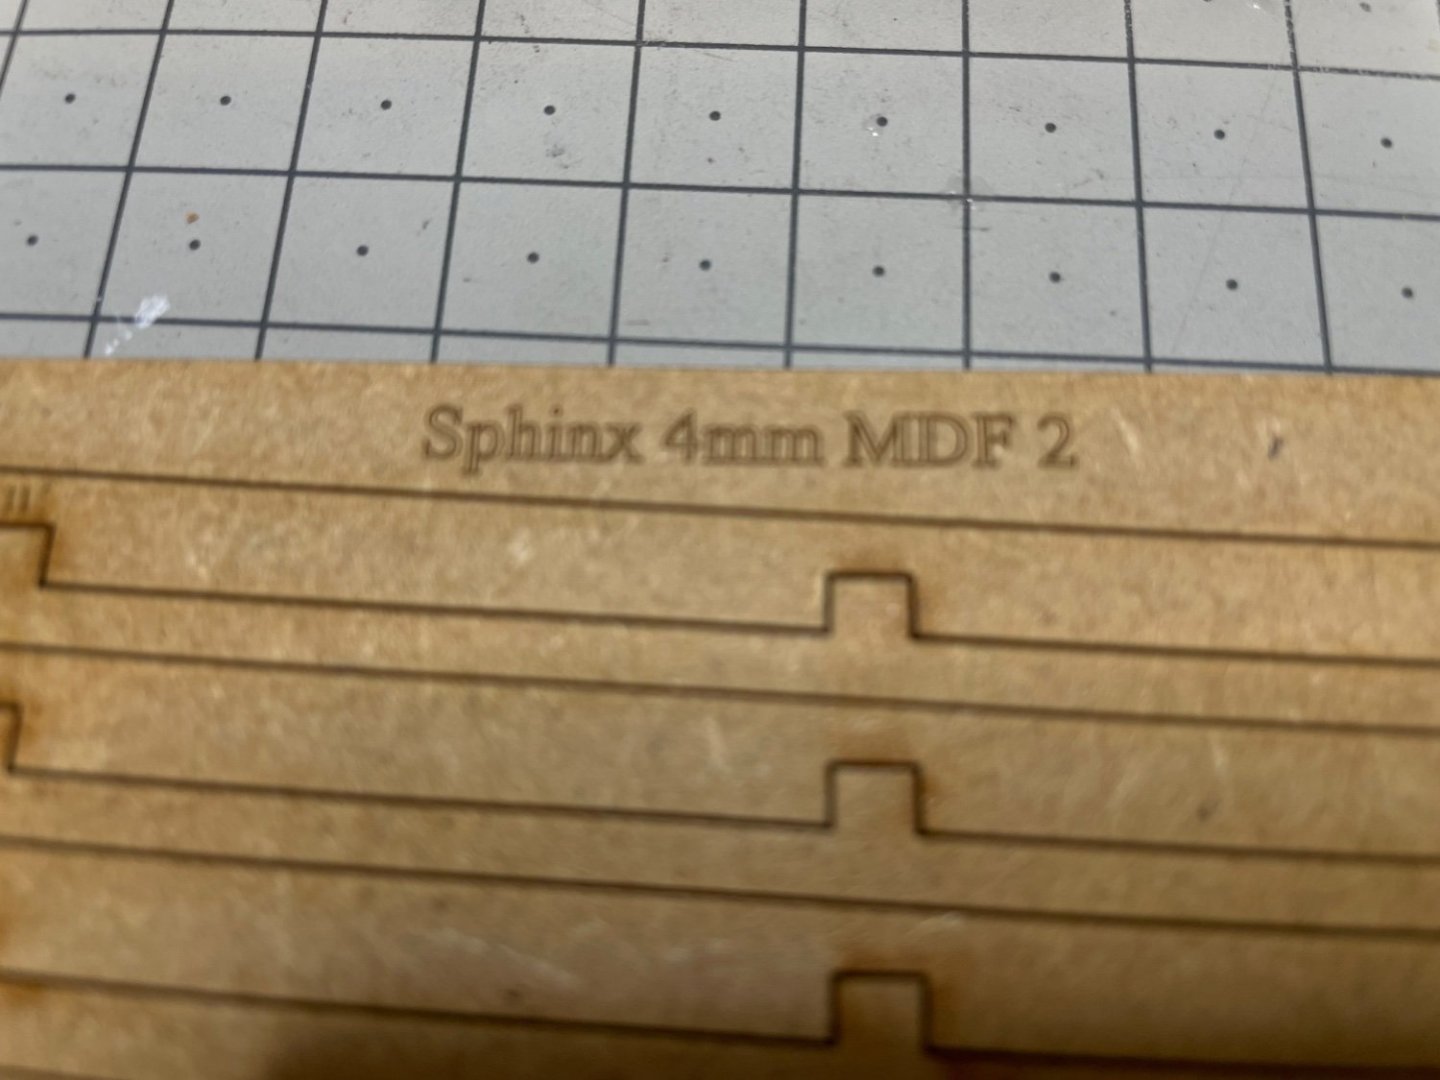
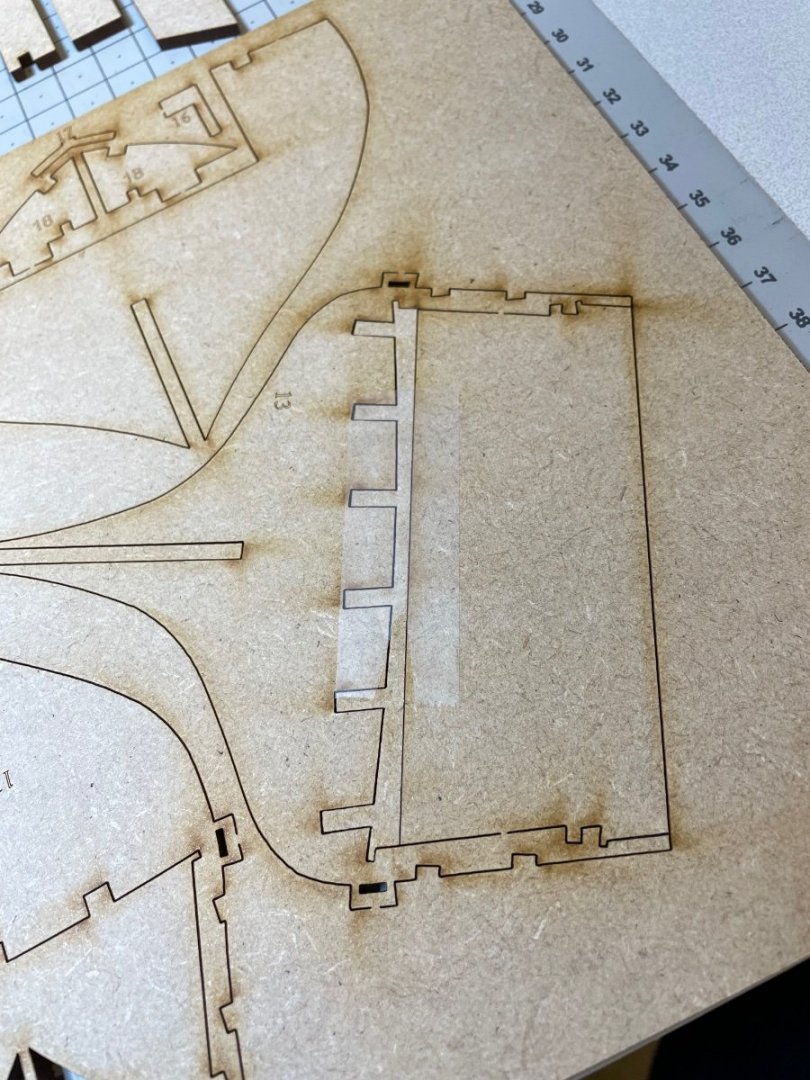
BUILD DAY 4 / 2 hrs / Total: 4 hours Today I spent time preparing the bulkheads, orlop section and the lower deck. Photos 39-40: Removed 13 bulkheads carefully from 4mm MDF and dry fitted as instructed. They are not glued just yet. Photo 41: Lower deck and orlop section. Photos 42-44: I scouted ahead in the instruction manual to check what parts of the lower deck openings will be visible once decorated with gratings. According to the manual leftmost and the rightmost opening edges will be visible. I marked them with tape and sanded off the laser char. I won't spend effort on sanding off the char from invisible edges.


- 426 replies
-
- 2
-
-
- Vanguard Models
- Sphinx
- (and 1 more)
-
Photos 36-38: Bulkhead#1 and Bow Frame Patterns are now ready and waiting to dry for sanding.


- 426 replies
-
- 6
-
-
- Vanguard Models
- Sphinx
- (and 1 more)
-
BUILD DAY 3 / 0.5 hour / Total: 2 hrs Bulkhead#1 and the Bow Frame Patterns. Photo 33: Parts removed and sorted. Photo 34: Patterns 1 below are the closest to the keel and they are not supposed to be glued to the keel at this stage, where you use the keel as a reference for alignment, similar to the steps in stern patterns. First I applied the glue on the contact area to the side further from the keel in order to avoid accidental glue contact with the keel. Photo 35: Then I decided not to take risk at all and instead of using the keel as a reference, I used some other 3mm thick mdf (in this case the build cradle) to align the spacing. It would be a bigger problem to glue the patterns to the keel by mistake at this stage.


- 426 replies
-
- 2
-
-
- Vanguard Models
- Sphinx
- (and 1 more)
-
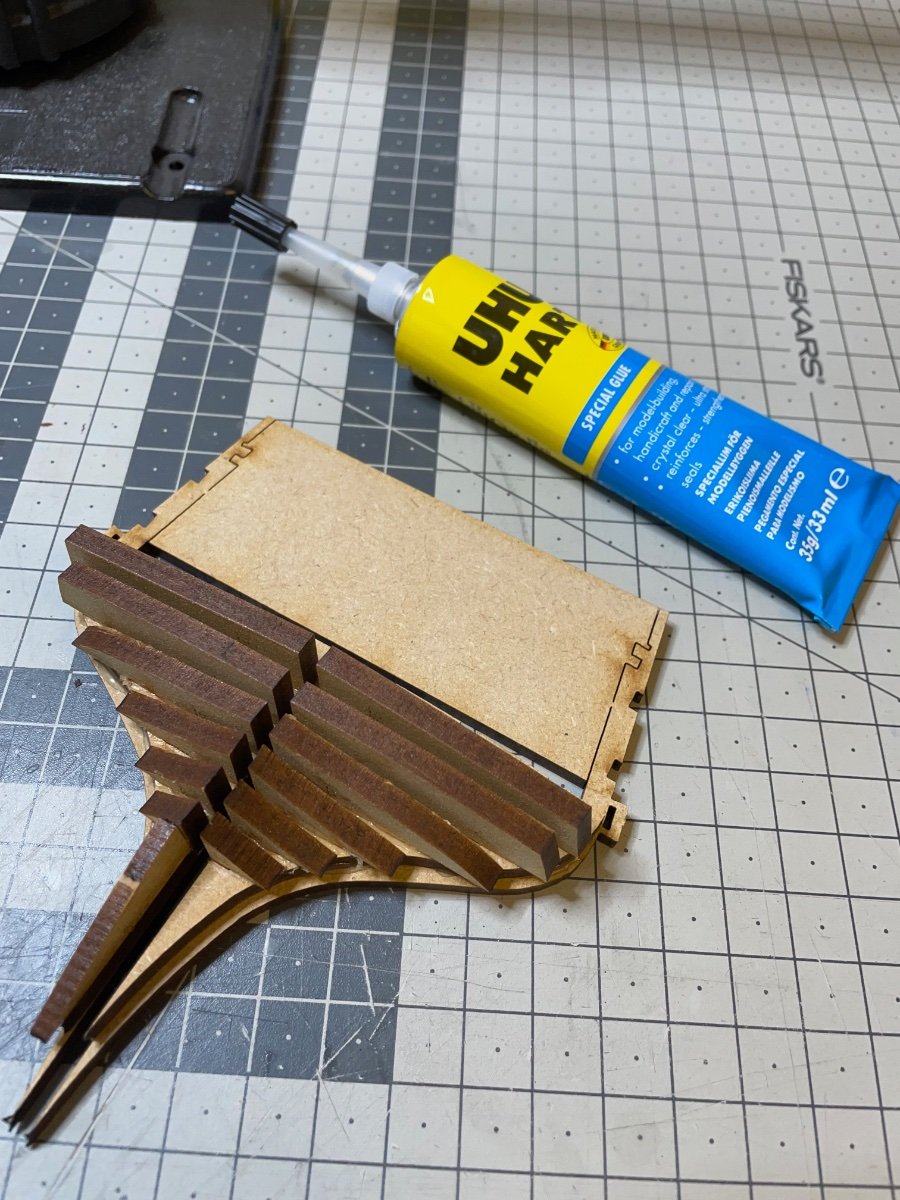
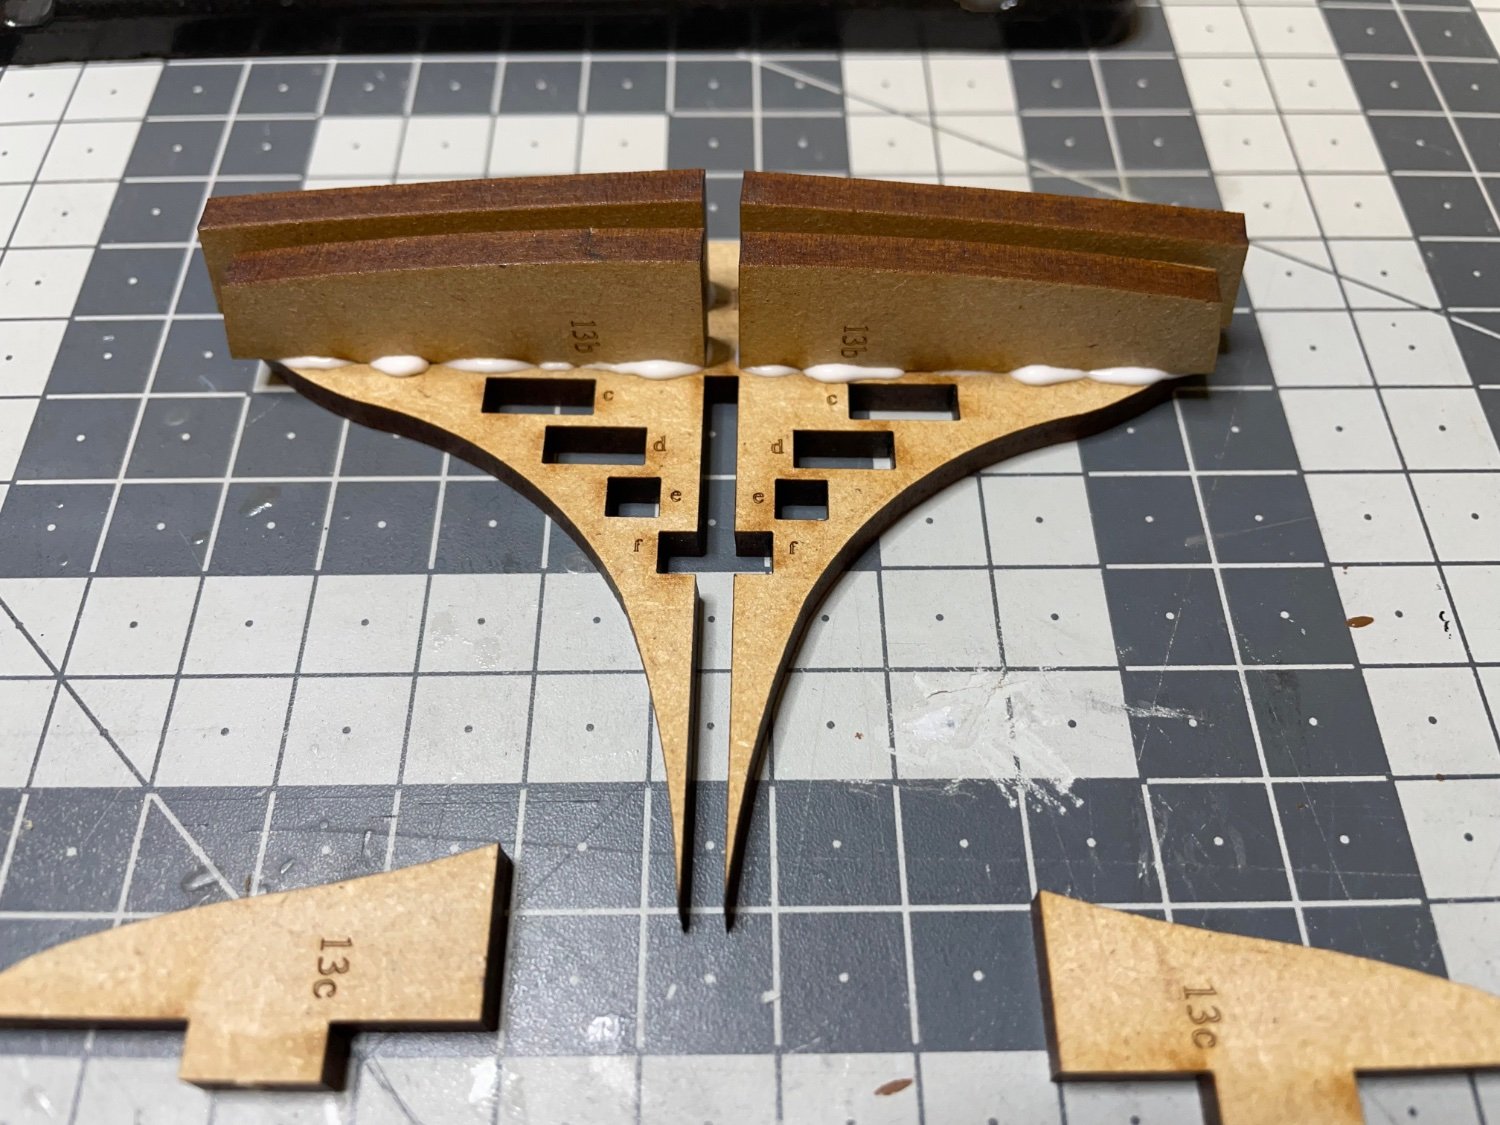
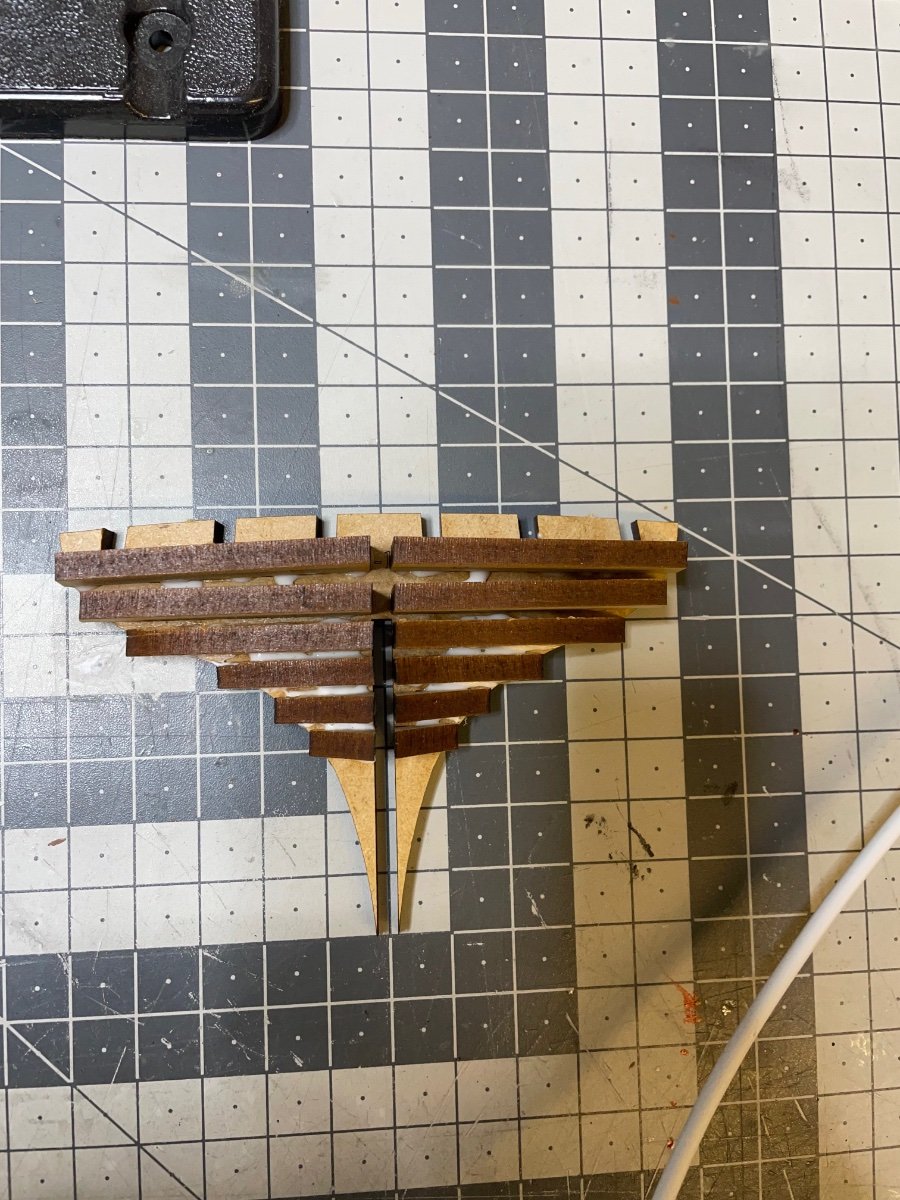
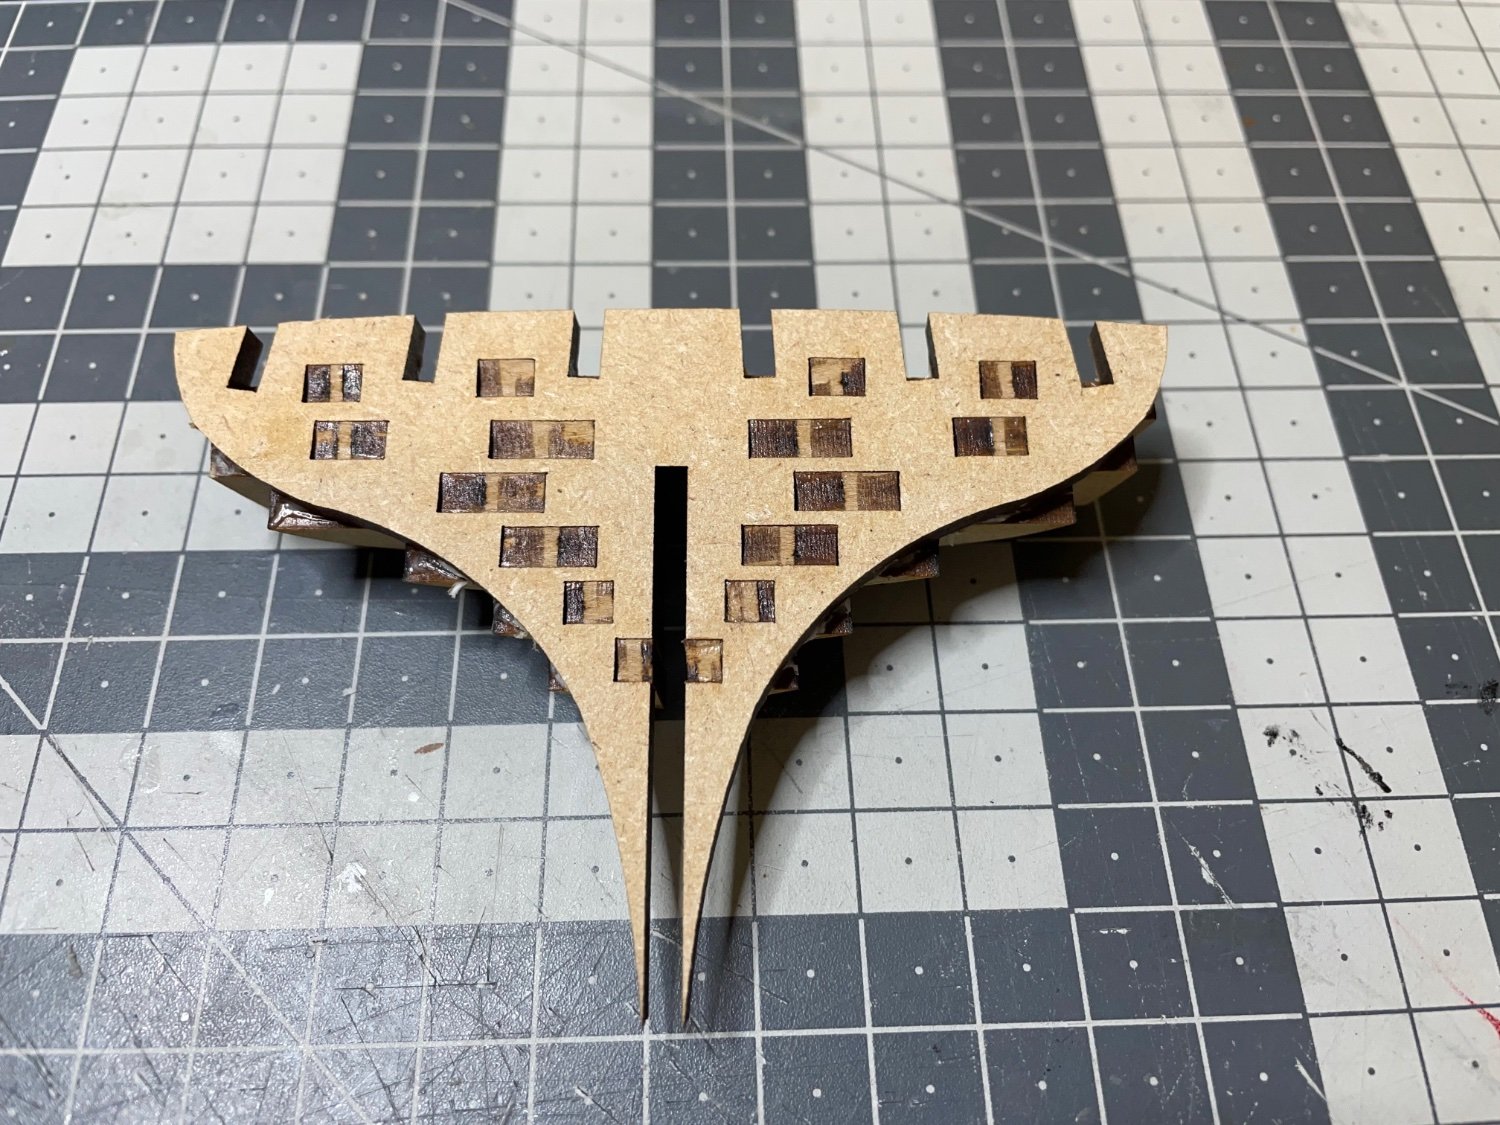
Photos 31-32: I glued the final parts (2 x #24) on Bulkhead #13. I did this on my table after removing the bulkhead structure from the keel. I didn't want to risk them getting assembled to the keel with a glue residue. I used my UHU Hart here.

- 426 replies
-
- 10
-
-
- Vanguard Models
- Sphinx
- (and 1 more)
-
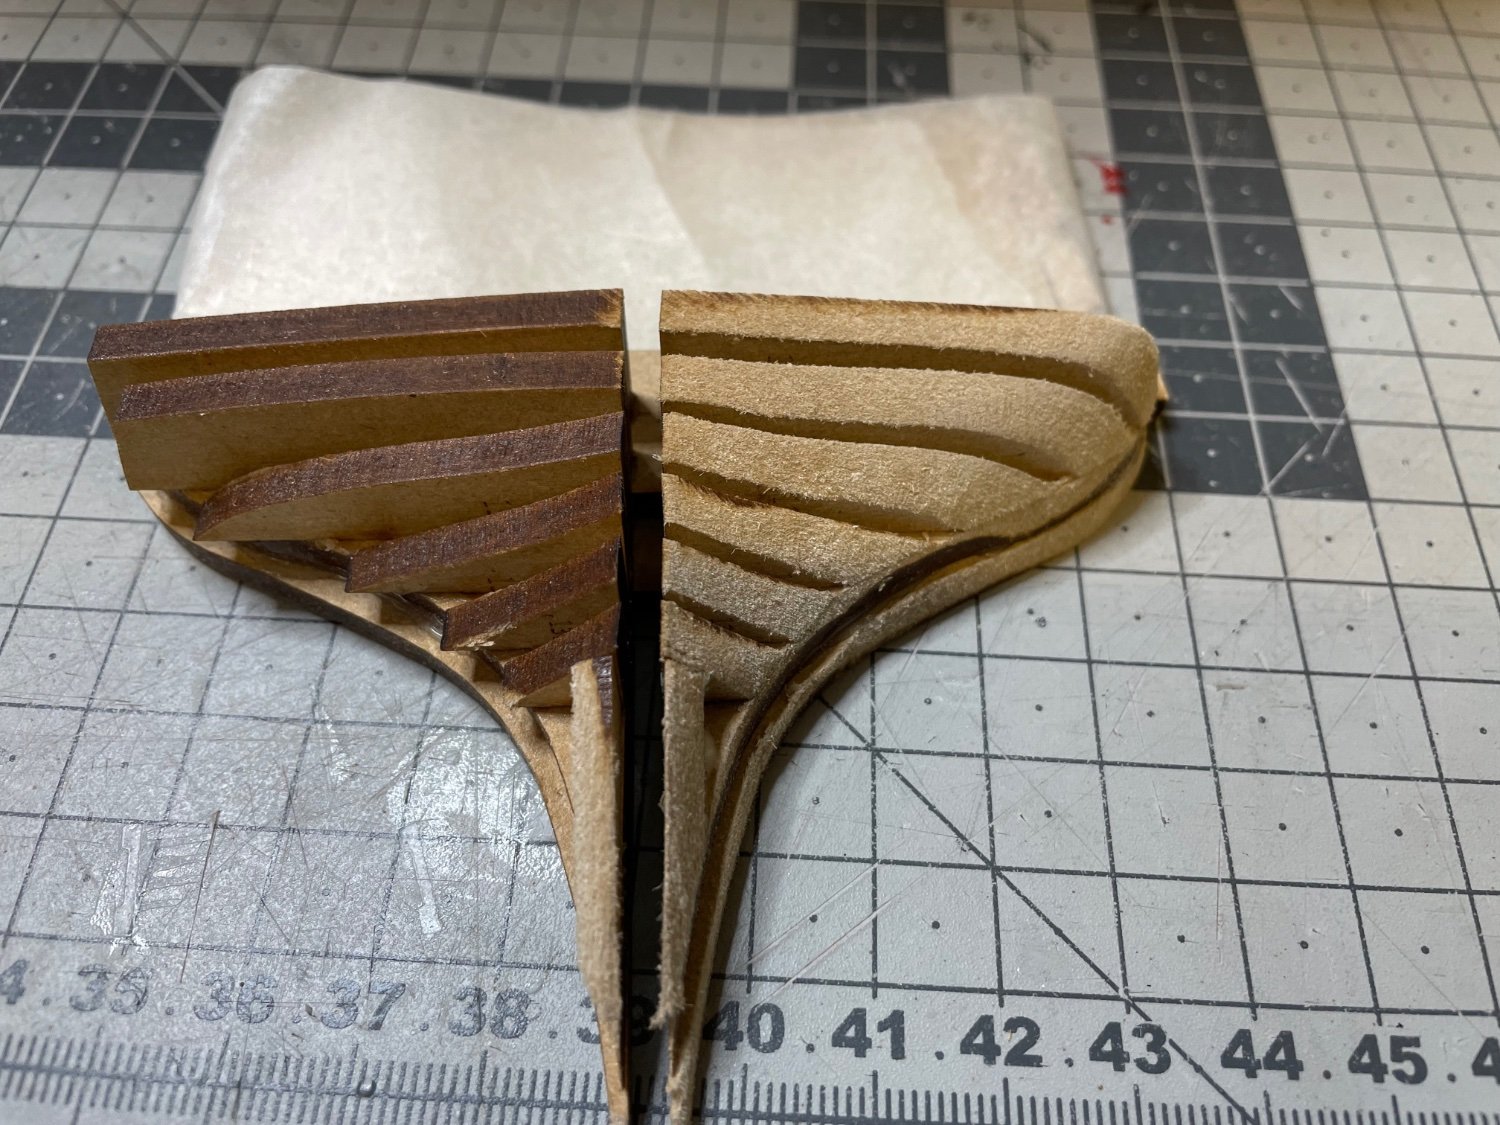
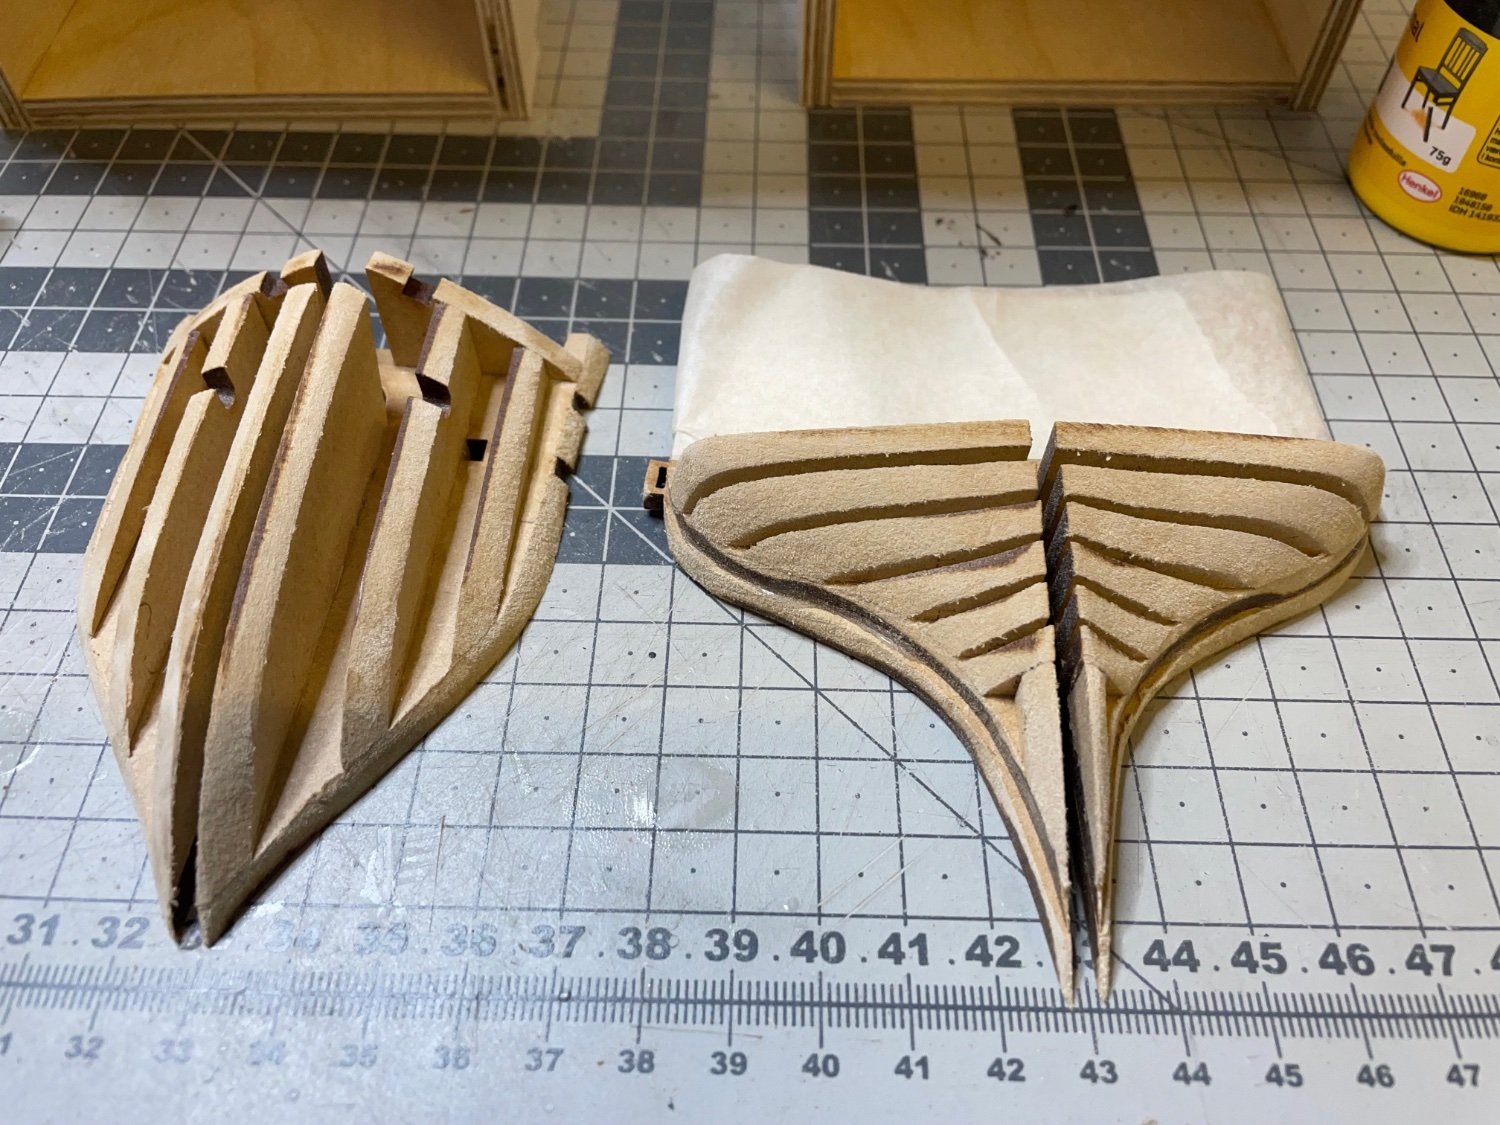
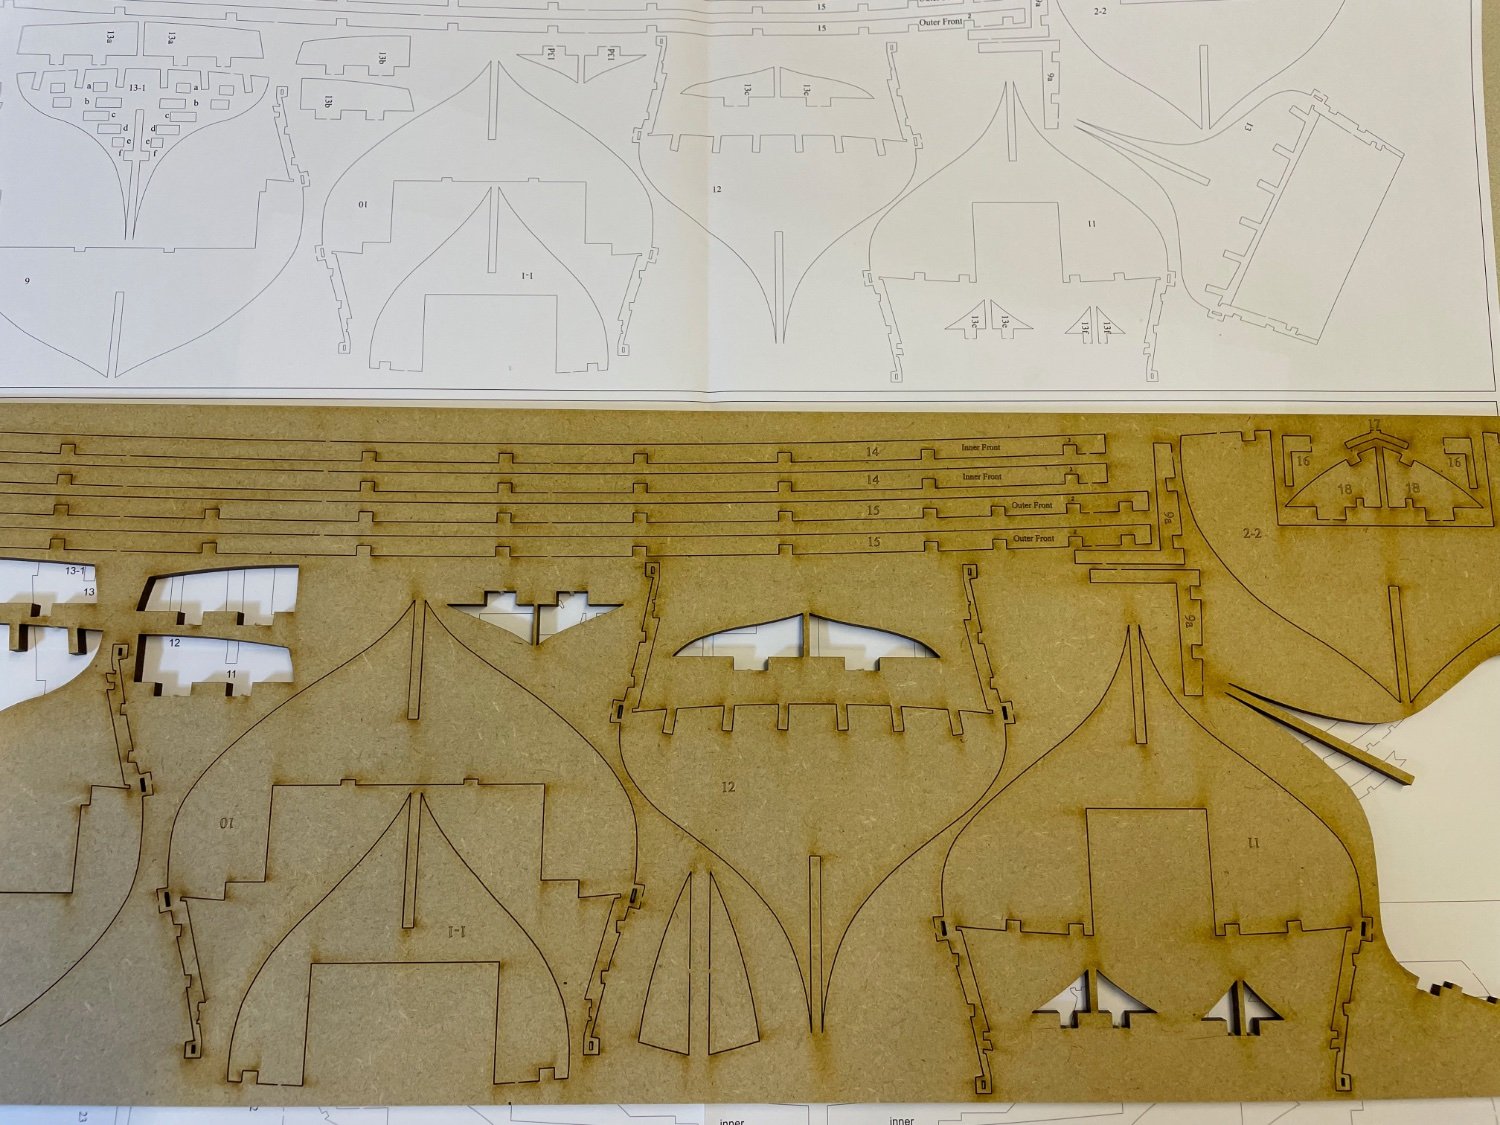
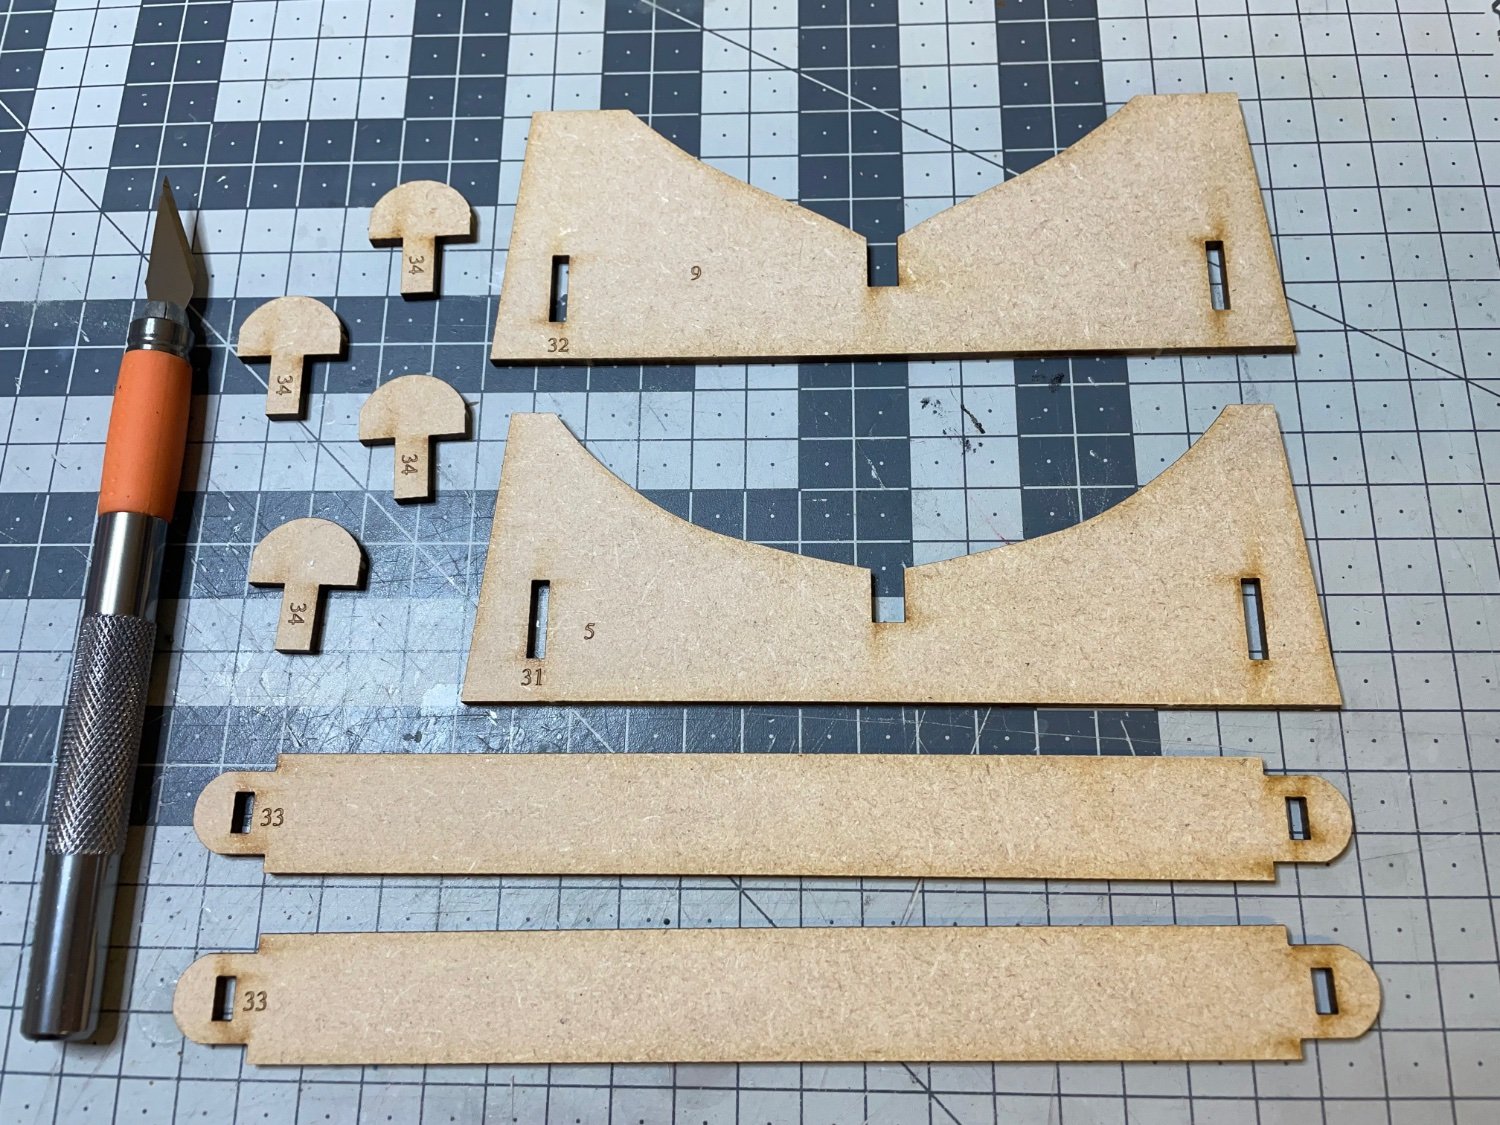
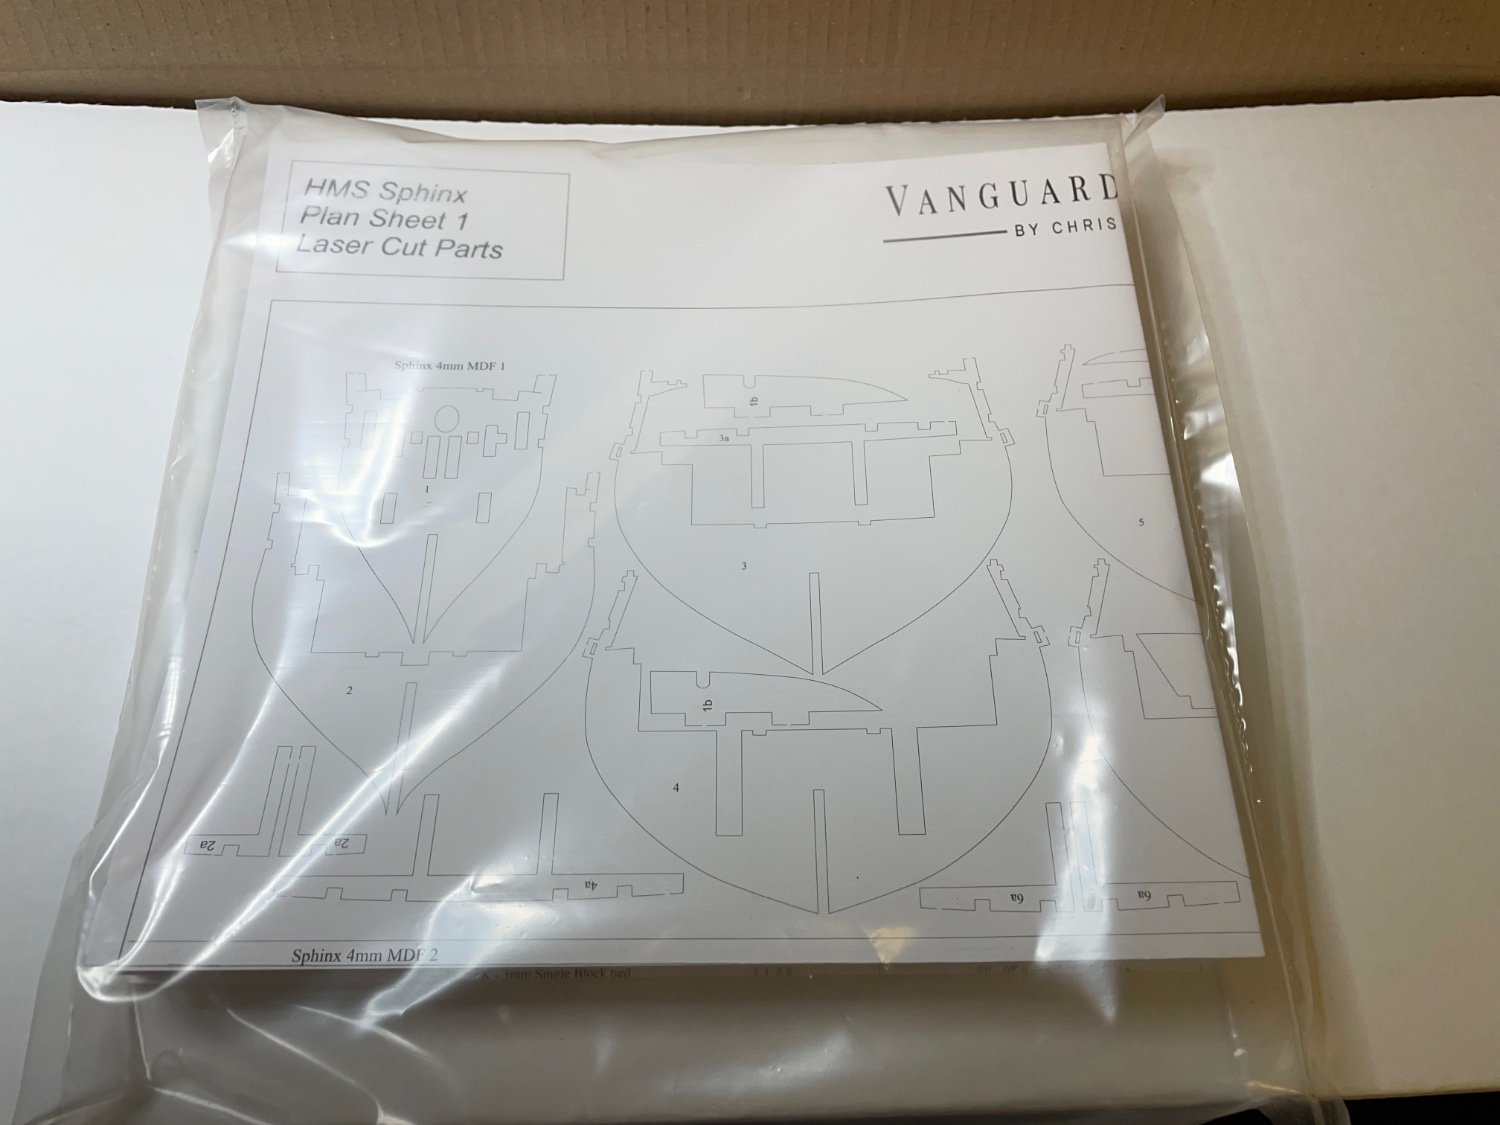
Photo 30: I noticed that the plan sheet of parts are not in 1:1 scale. The print is smaller than the actual size (the scale is not indicated). It is not a big deal since the part numbers are already printed on the parts eliminating any confusion at identifying them. I didn't check all the other plan sheets, but I am sure they'll be 1:1 scale if you need to use them as a reference for example cutting dowels for masts. I also noticed two unidentified shark fin shape laser cut parts, which are not on the plan. Look closely between parts 10 and 12 in the photo. I wonder what they are. We'll see 🤔.

- 426 replies
-
- 7
-
-
- Vanguard Models
- Sphinx
- (and 1 more)
-
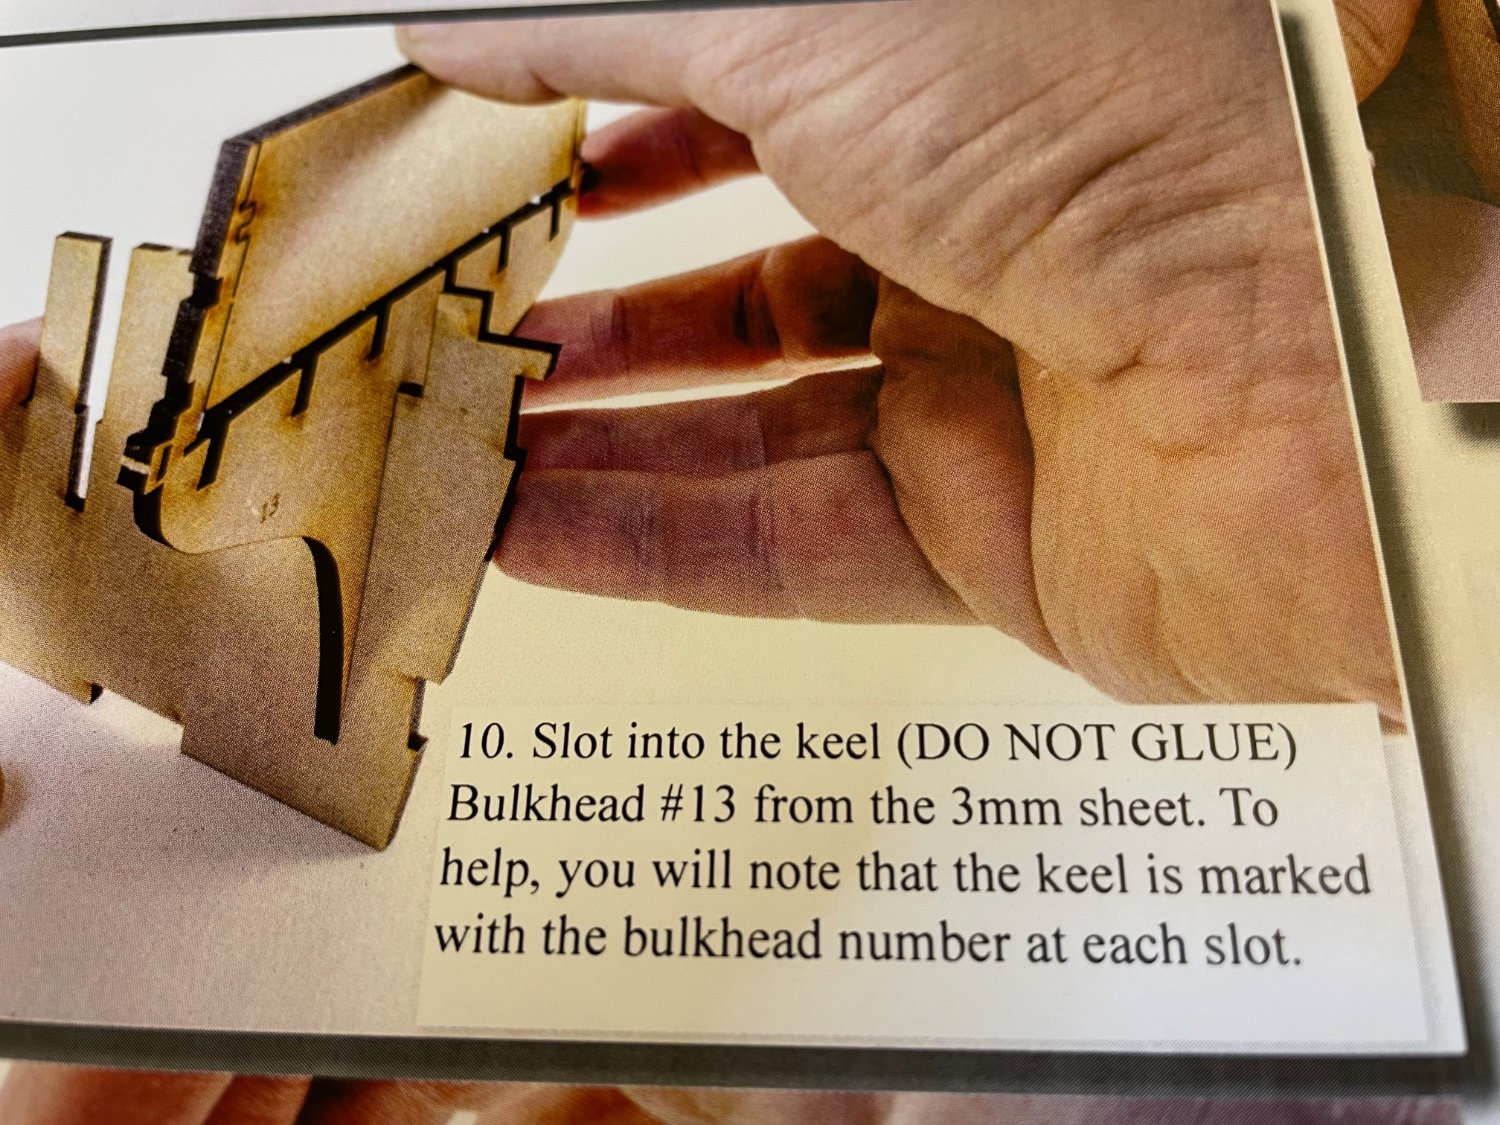
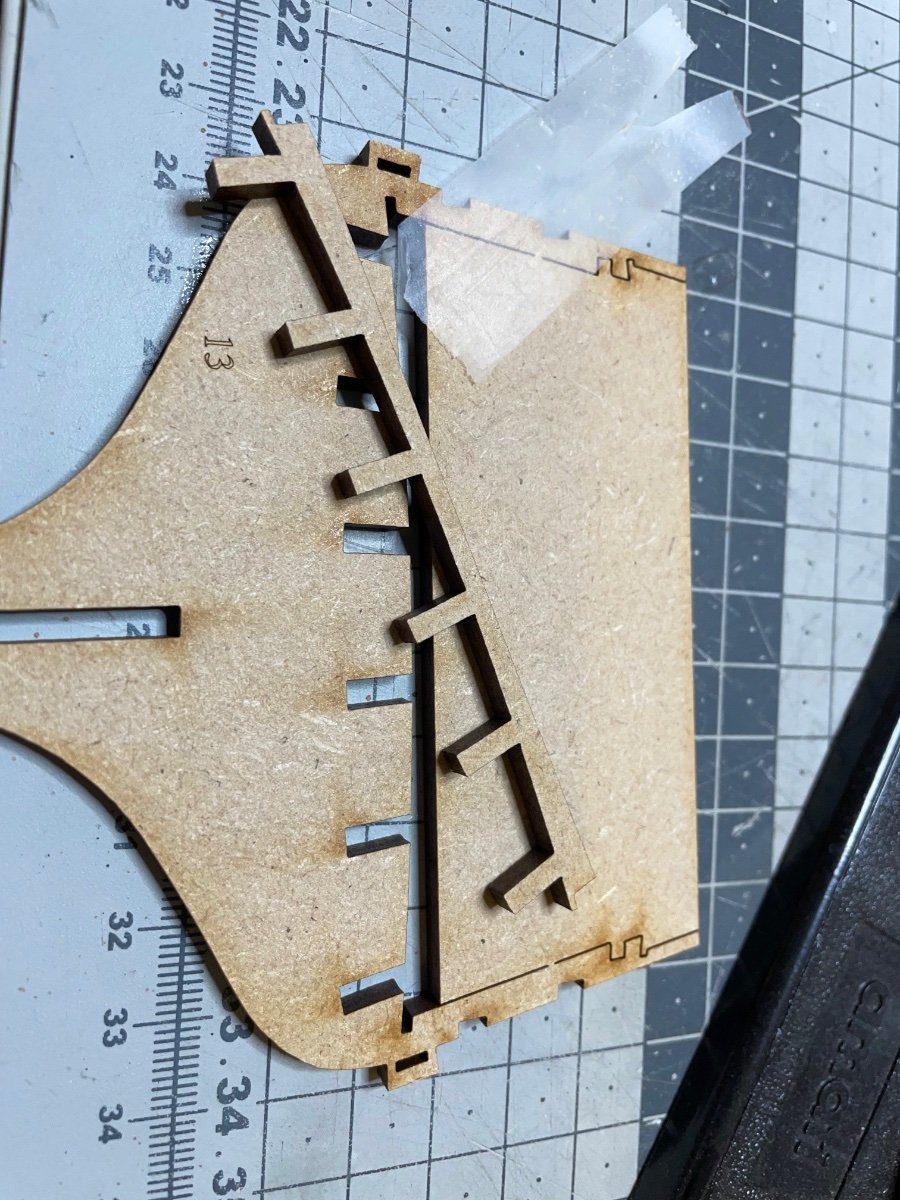
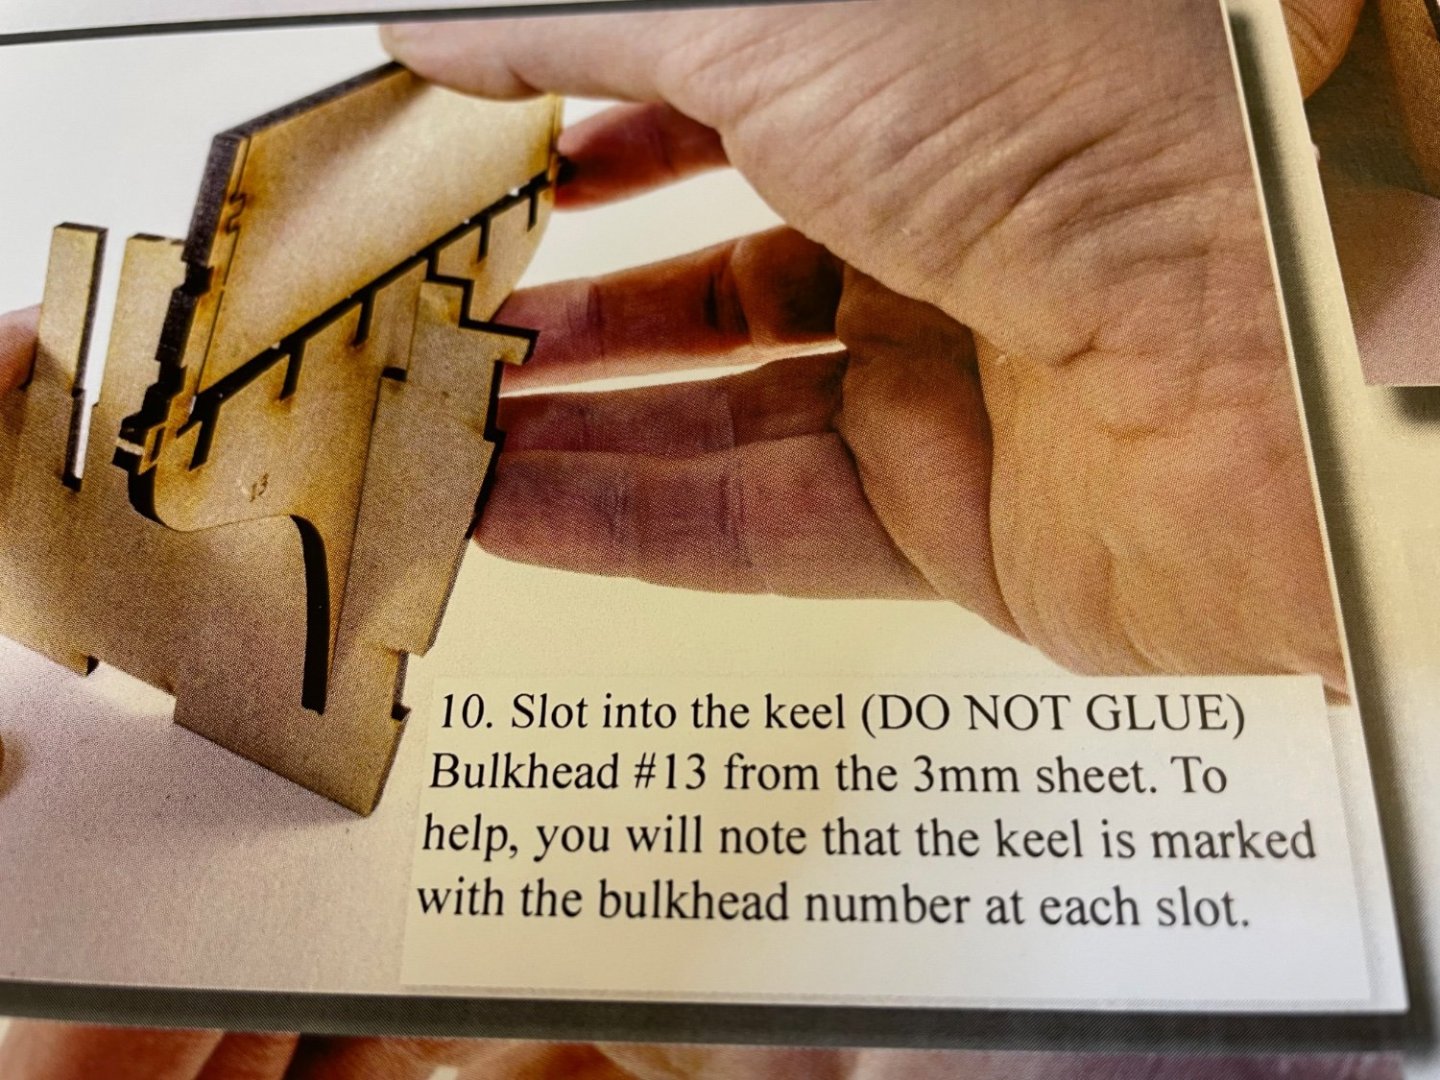
BUILD DAY 2 / 0.5 hour / Total: 1.5 hrs Photo 21: Time to remove the keel from the 3mm MDF. Bulkhead #13 and the Bulkhead 13-1 assembly I just made will be dry fitted first and glued to each other, followed by #24 stern planking patterns. Note that nothing is glued to the keel at the moment. Keel is only used for alignment of the above mentioned parts for now. Photos 22-23: Bulkhead #13. The "comb" like part in the middle was taped to prevent falling apart, though it is apparently just a cut out to be discarded. But I am not sure of it yet, so I keep it aside in case I have assumed wrong. Photos 24-25: A small mistake I noticed in the instructions telling to remove Bulkhead #13 from the 3mm MDF, while in fact it is on a 4mm MDF. Not a big deal, an easy mistake to make and to correct as well, for the online version and the future prints. Photo 26: Smoothening the rear surface of Bulkhead 13-1 assembly ensure a flat contact surface. Photo 27: Bulkhead #13 dry fitted and glue applied as in the photo to fit the #13-1 assembly. Pay attention not to lay glue too close to the keel as we don't want to join them accidentally at the moment. This is also clearly written in the manual. Photo 28: Note how the rectangular extensions on the top of both parts align flush with each other. Photo 29: The clamps help keep the parts in place until the glue is thoroughly dry.

- 426 replies
-
- 8
-
-
- Vanguard Models
- Sphinx
- (and 1 more)
-
Photos 15-20. Six photos showing the process of assembling the Rear Bulkhead and Stern Transom Patterns. Instructions recommend to set it aside to dry thoroughly and that's why I stop here for today. One thing I have noticed so far is both the dimensional and vertical precision of laser cuts. By dimensional precision I mean the parts snap fit to each other perfectly without any slack. By vertical precision I mean they are cut perfectly vertical. I have seen with several other kits (from different manufacturers) where obviously the laser cutter is not calibrated properly, it cuts with a small angle. As a result of that, the two surfaces of the part have different dimensions. Though it is very small, it creates a problem in tiny parts. It also makes it difficult to assemble the parts in right angles. No such issues in this kit! 💯


- 426 replies
-
- 15
-
-
- Vanguard Models
- Sphinx
- (and 1 more)
-
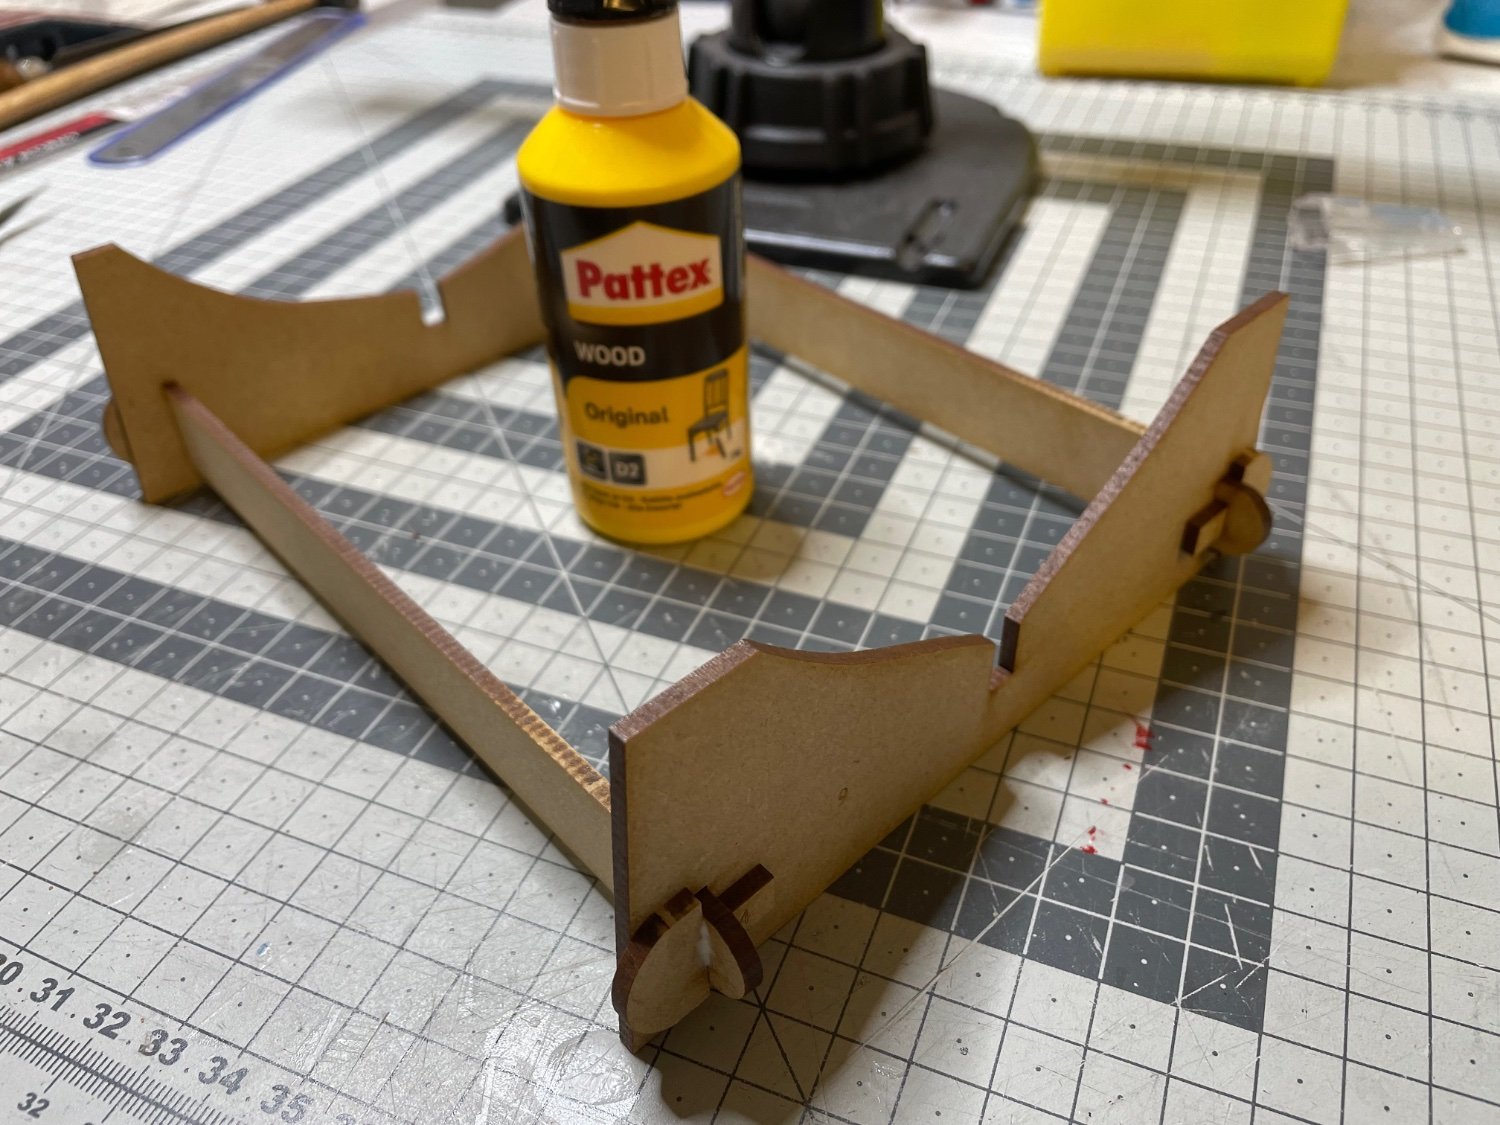
BUILD DAY 1 / 1 hour (Total: 1 hr) Construction starts today. Photos 13-14: Building the cradle. Parts are on 3mm MDF sheet. I removed them with the x-acto knife in the picture using a few strokes on either side of the board and they come off nicely. For not-so-precise gluing I use the wood glue in the photo, just by directly squeezing the tube. This is ready now and it can rest aside until I need it. This is a temporary cradle to help you during the construction and can be discarded afterward. There is also a better looking perspex cradle (to be assembled) supplied for display purposes.


- 426 replies
-
- 8
-
-
- Vanguard Models
- Sphinx
- (and 1 more)
-
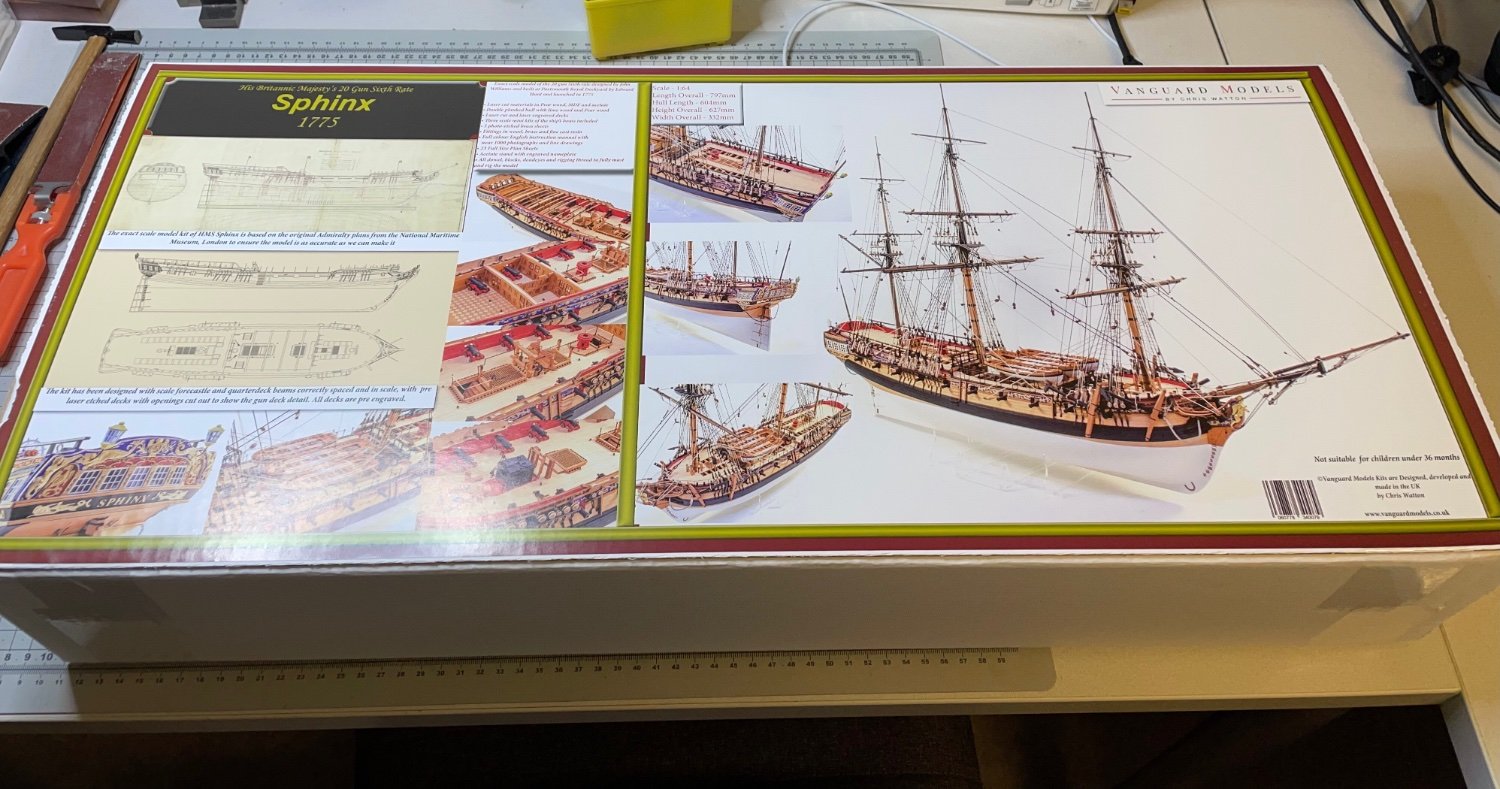
Photo 12: One last confirmation before I start, that I am in the valid age group 🤣. Another way of saying "Age 3 and above" by the way 😄. Well, that's all for now. Overall the unboxing impressions this kit is saying "I am worth for the money" and I can't wait to start, hopefully very soon!
- 426 replies
-
- 12
-
-

-
- Vanguard Models
- Sphinx
- (and 1 more)
-
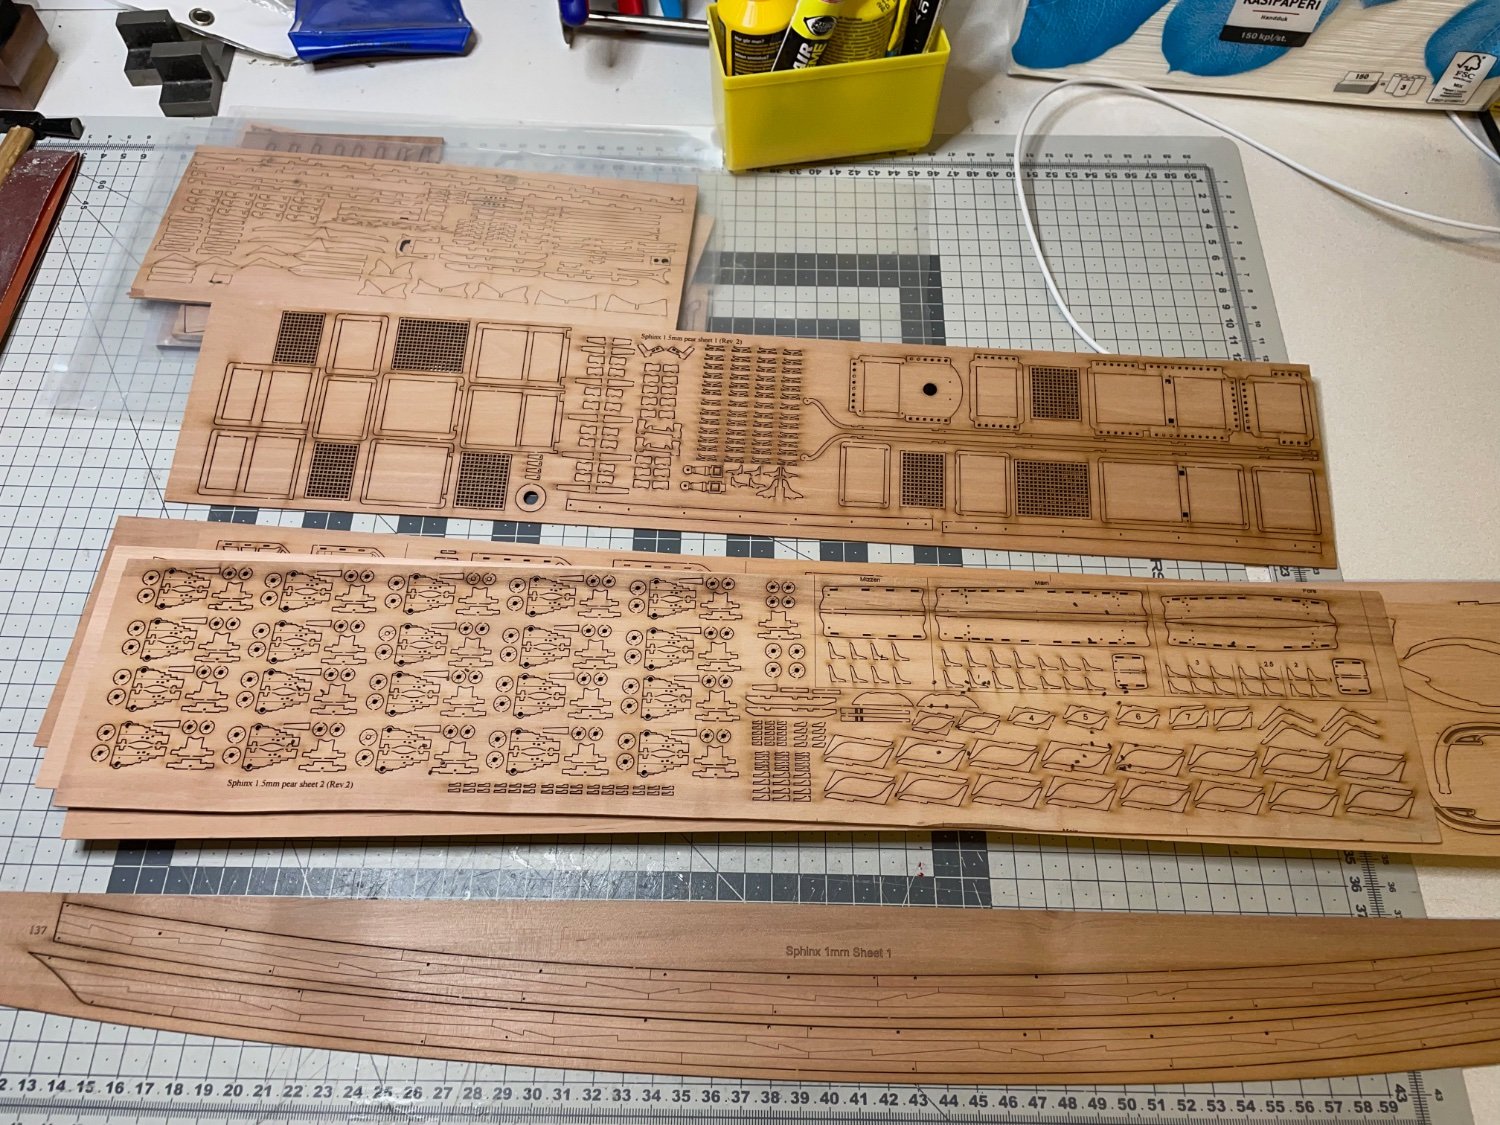
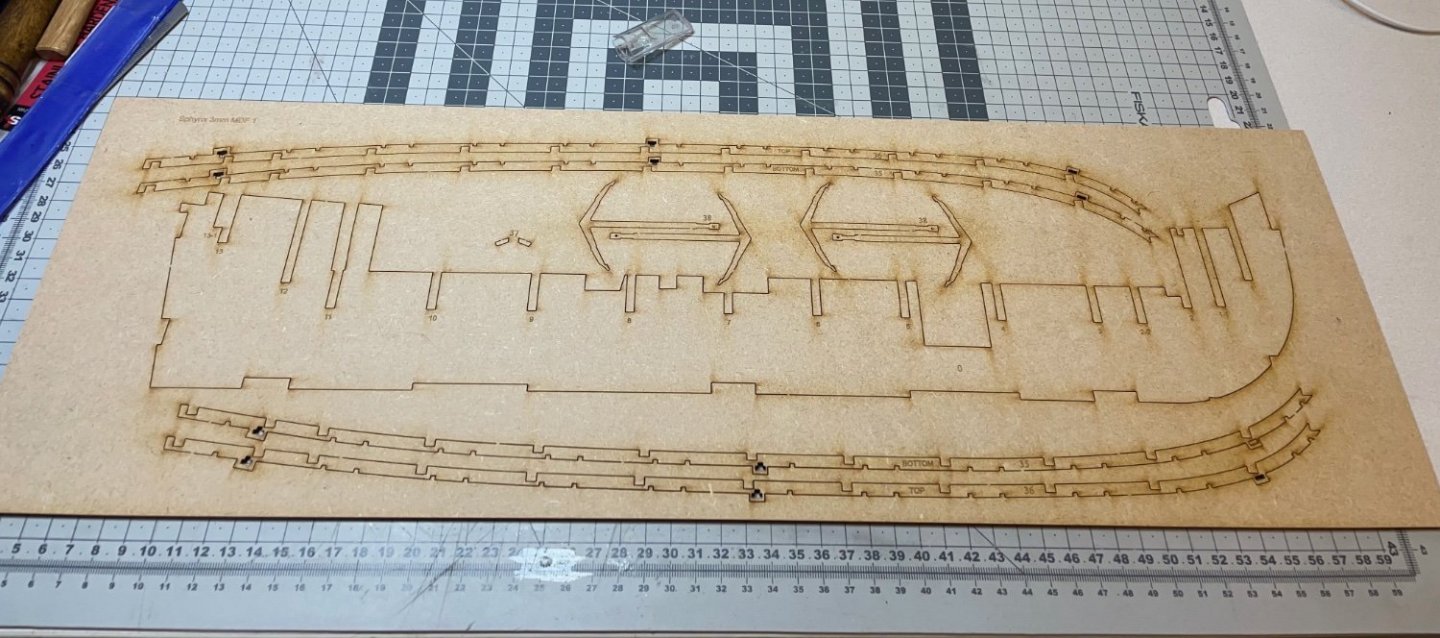
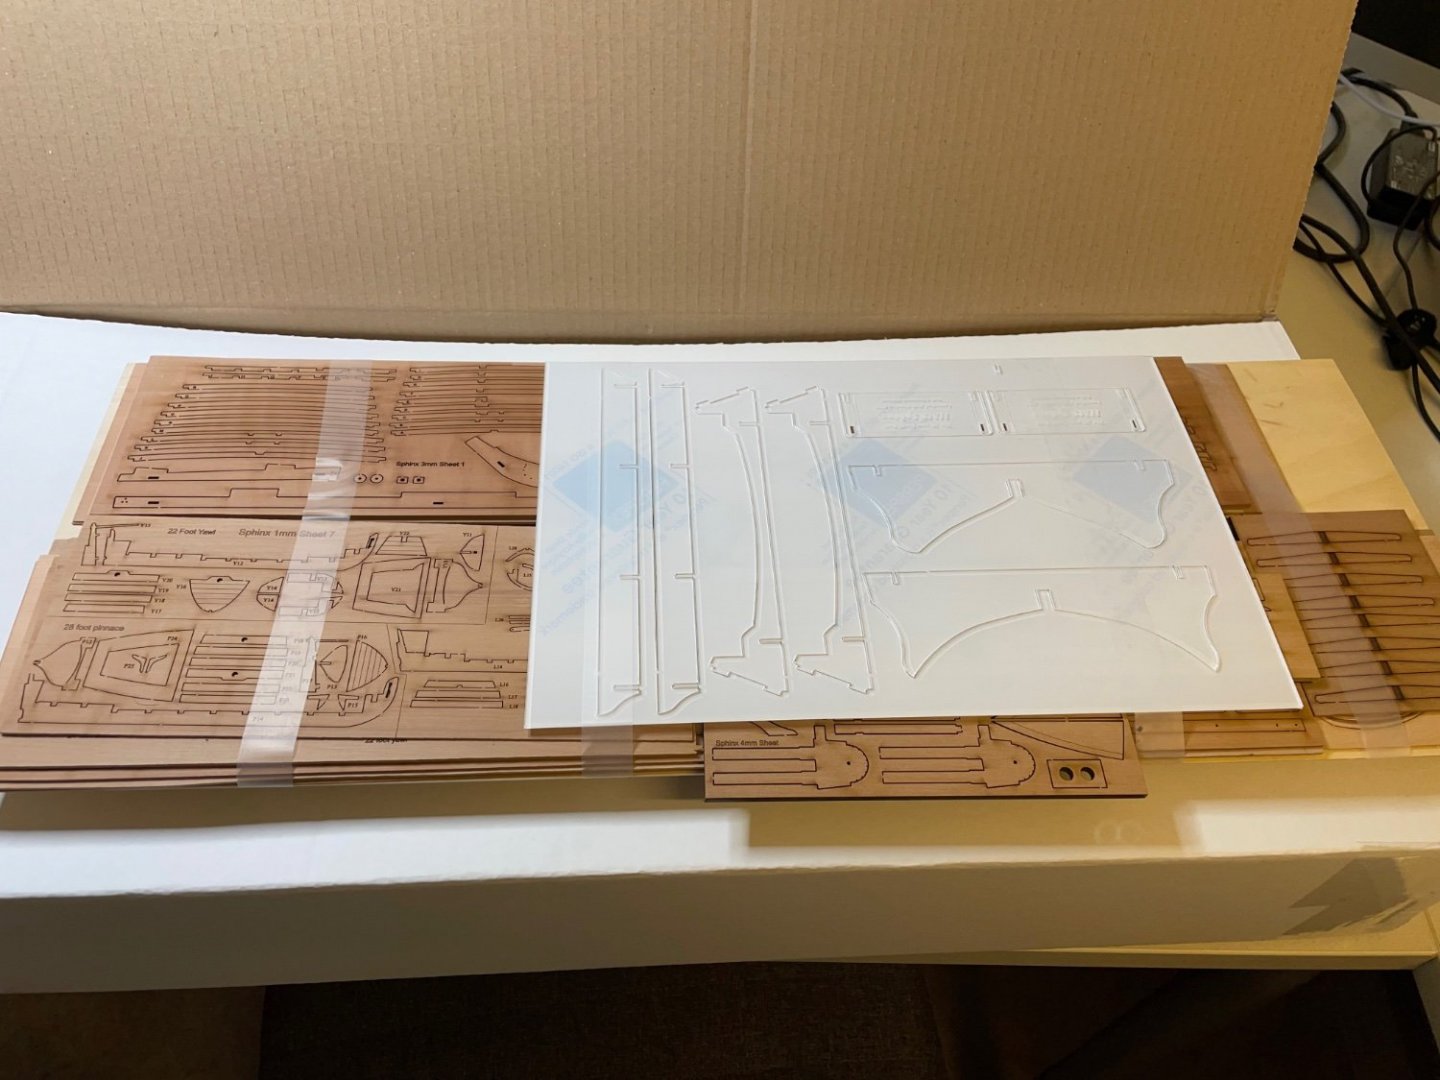
Photos 10-11: Some wooden sheets to give you an idea of the amazing precision.

- 426 replies
-
- 8
-
-
- Vanguard Models
- Sphinx
- (and 1 more)
-
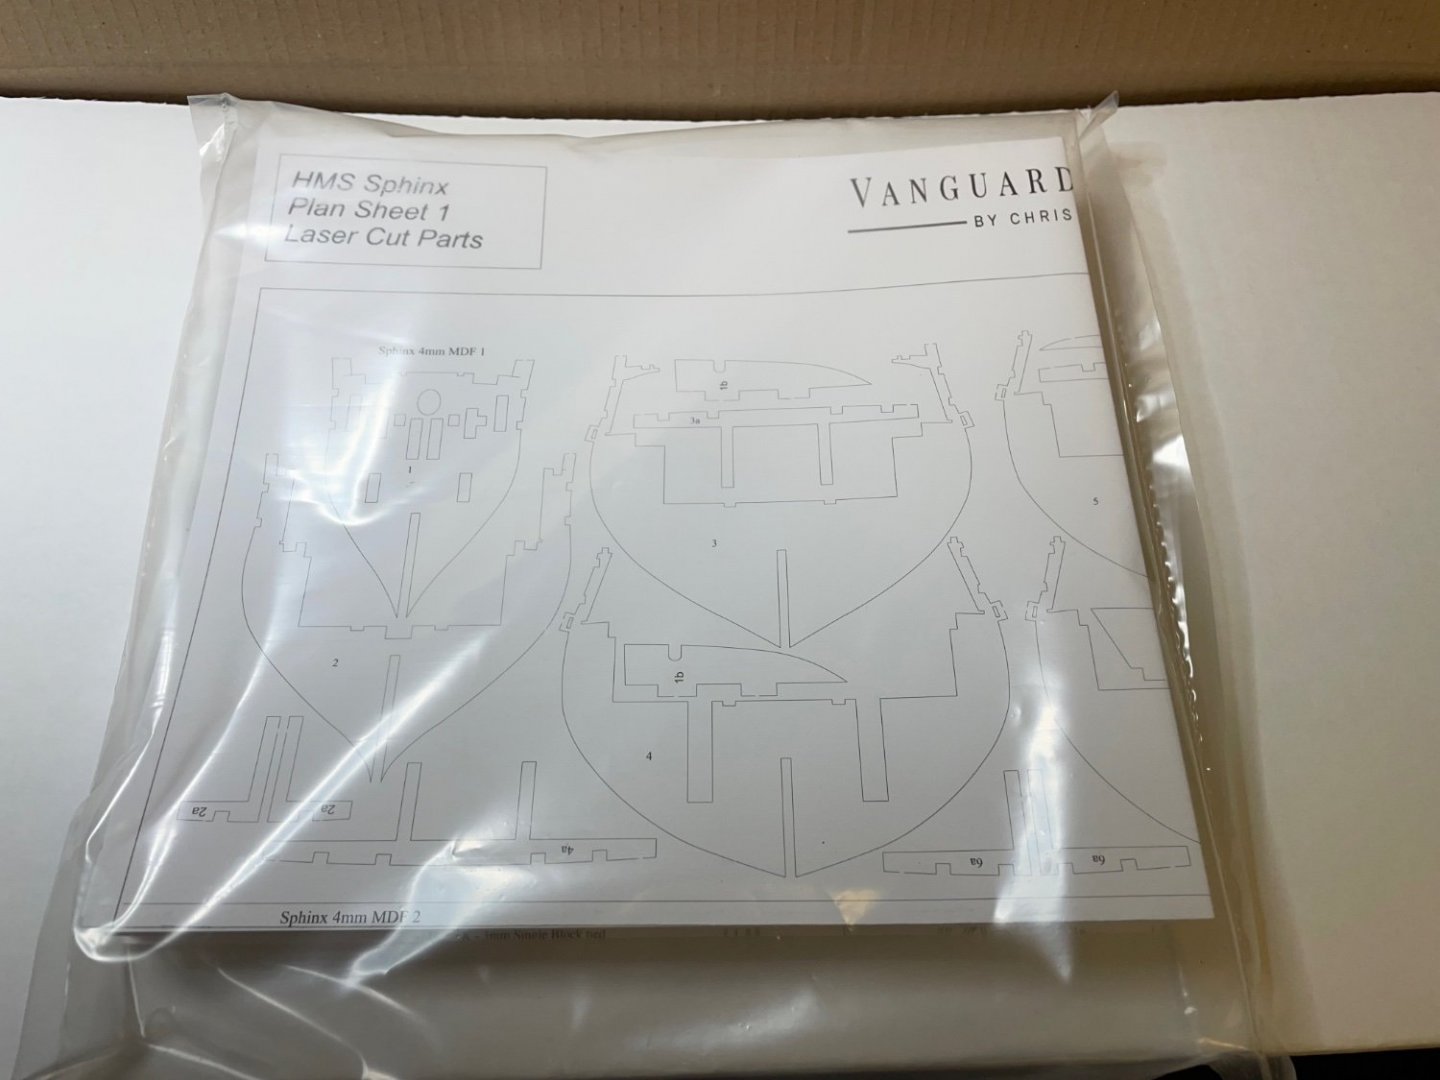
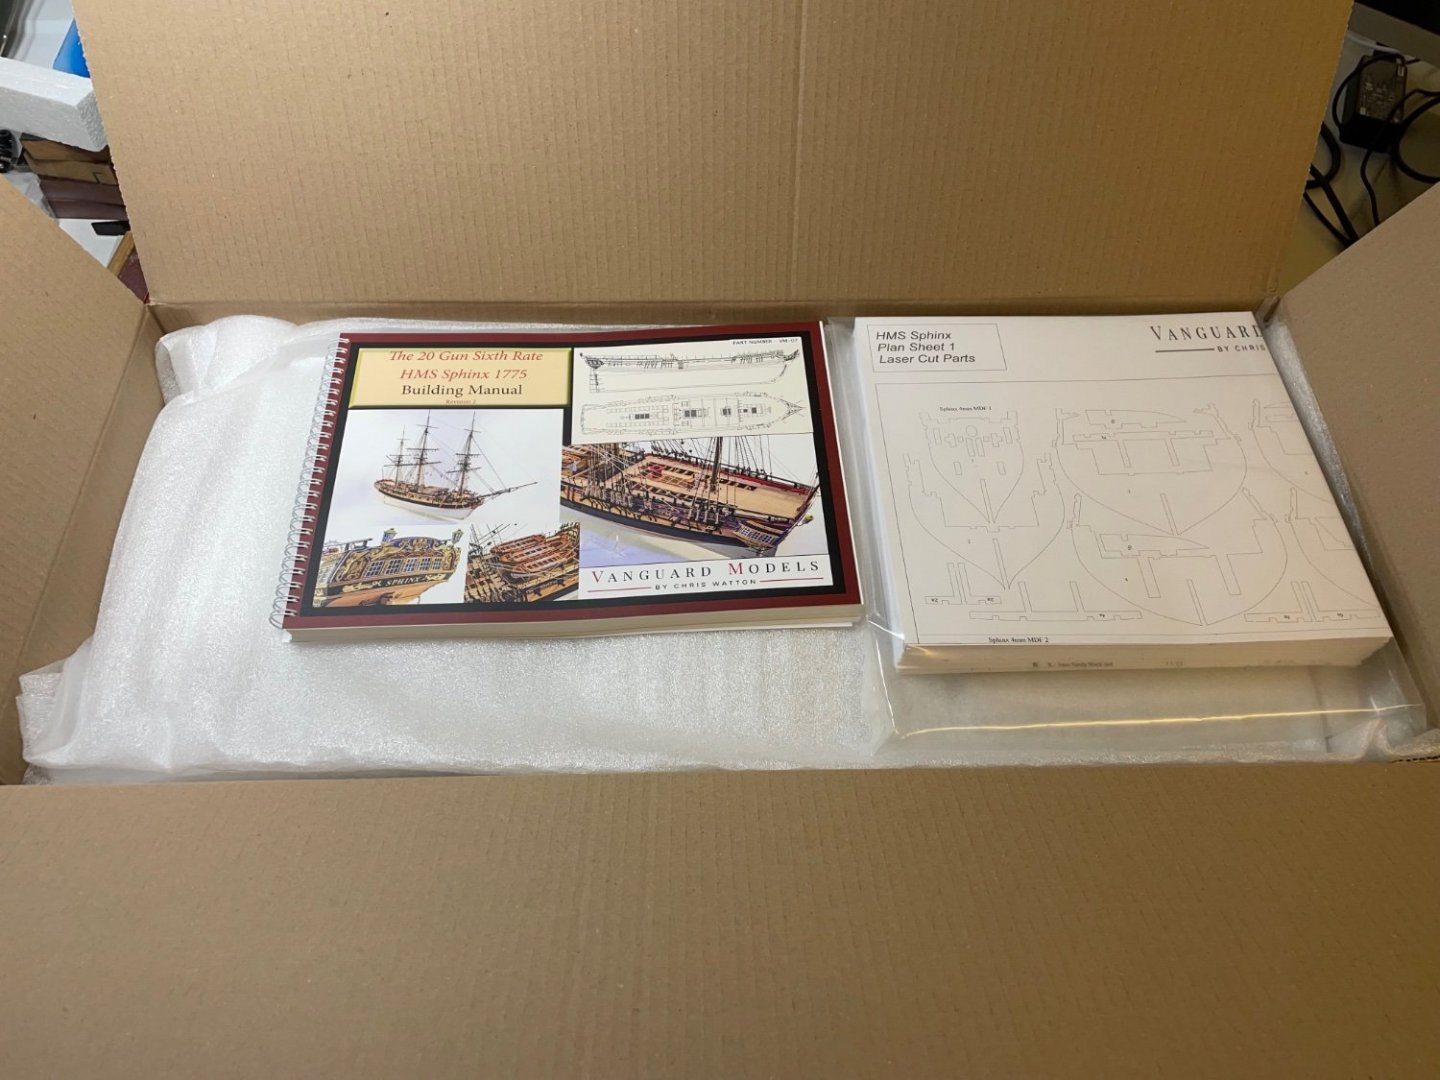
Photo 9: Plan sheets, more than 20 of them. I always like having plans by my side. No matter how detailed the photos are, there is always something you need to refer to the plans to make sure you are doing right.
- 426 replies
-
- 8
-
-
- Vanguard Models
- Sphinx
- (and 1 more)
-
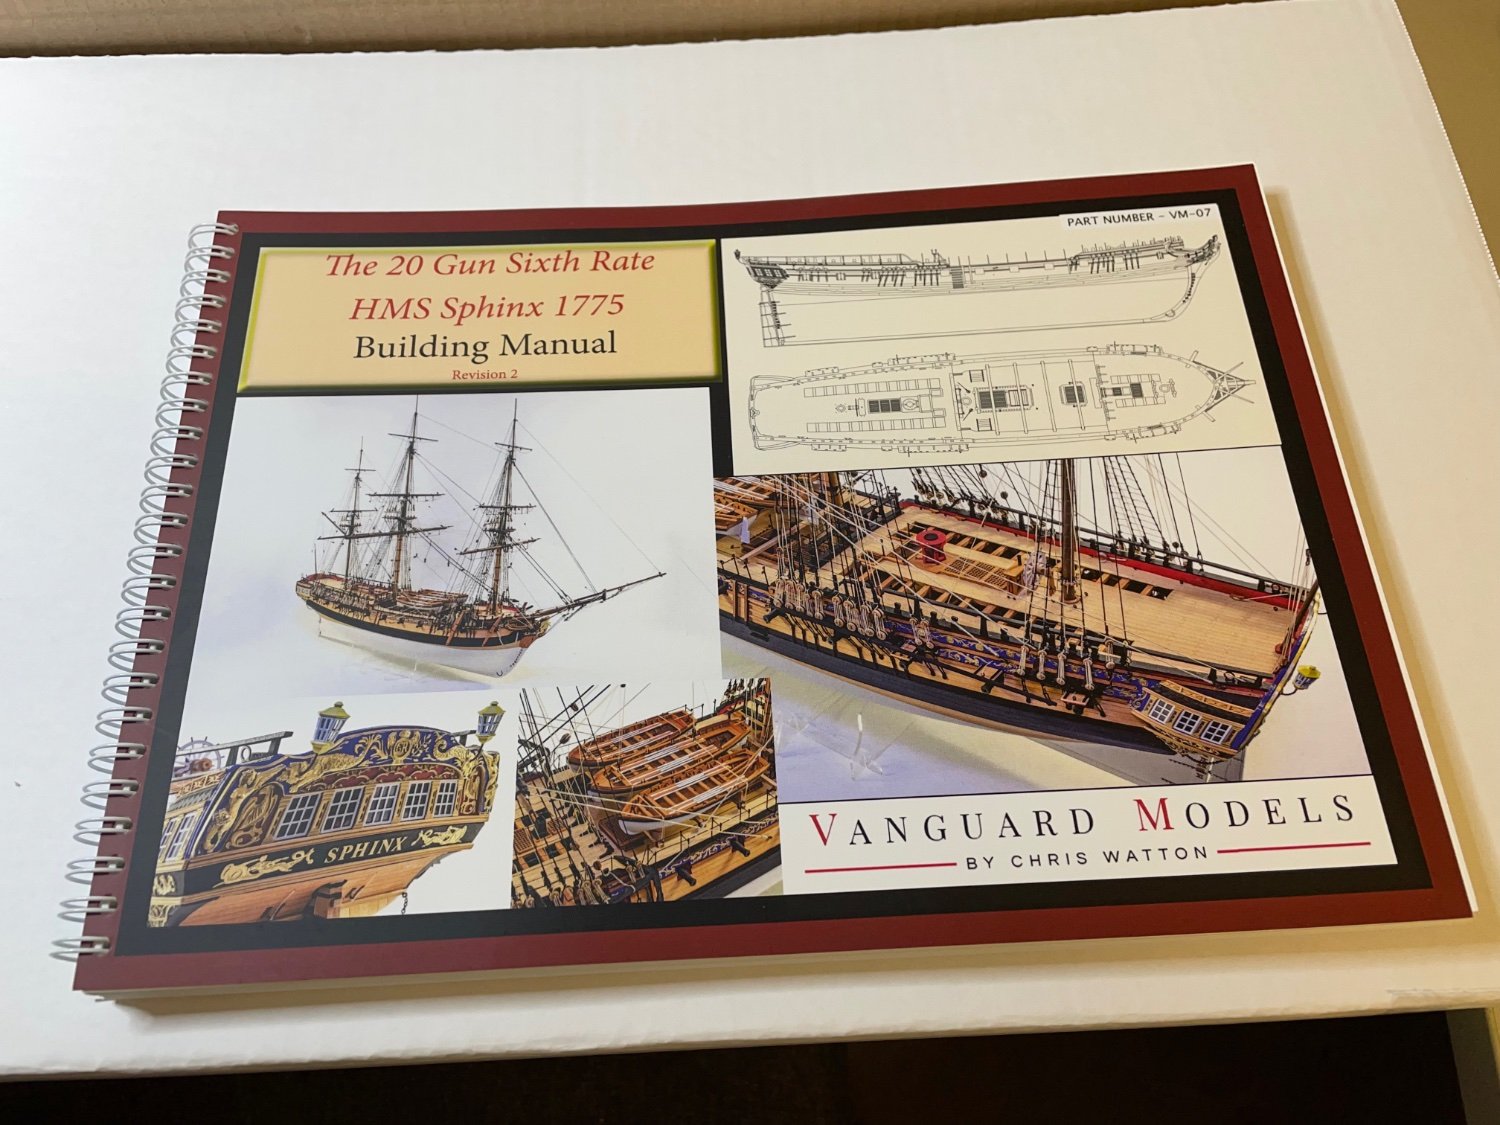
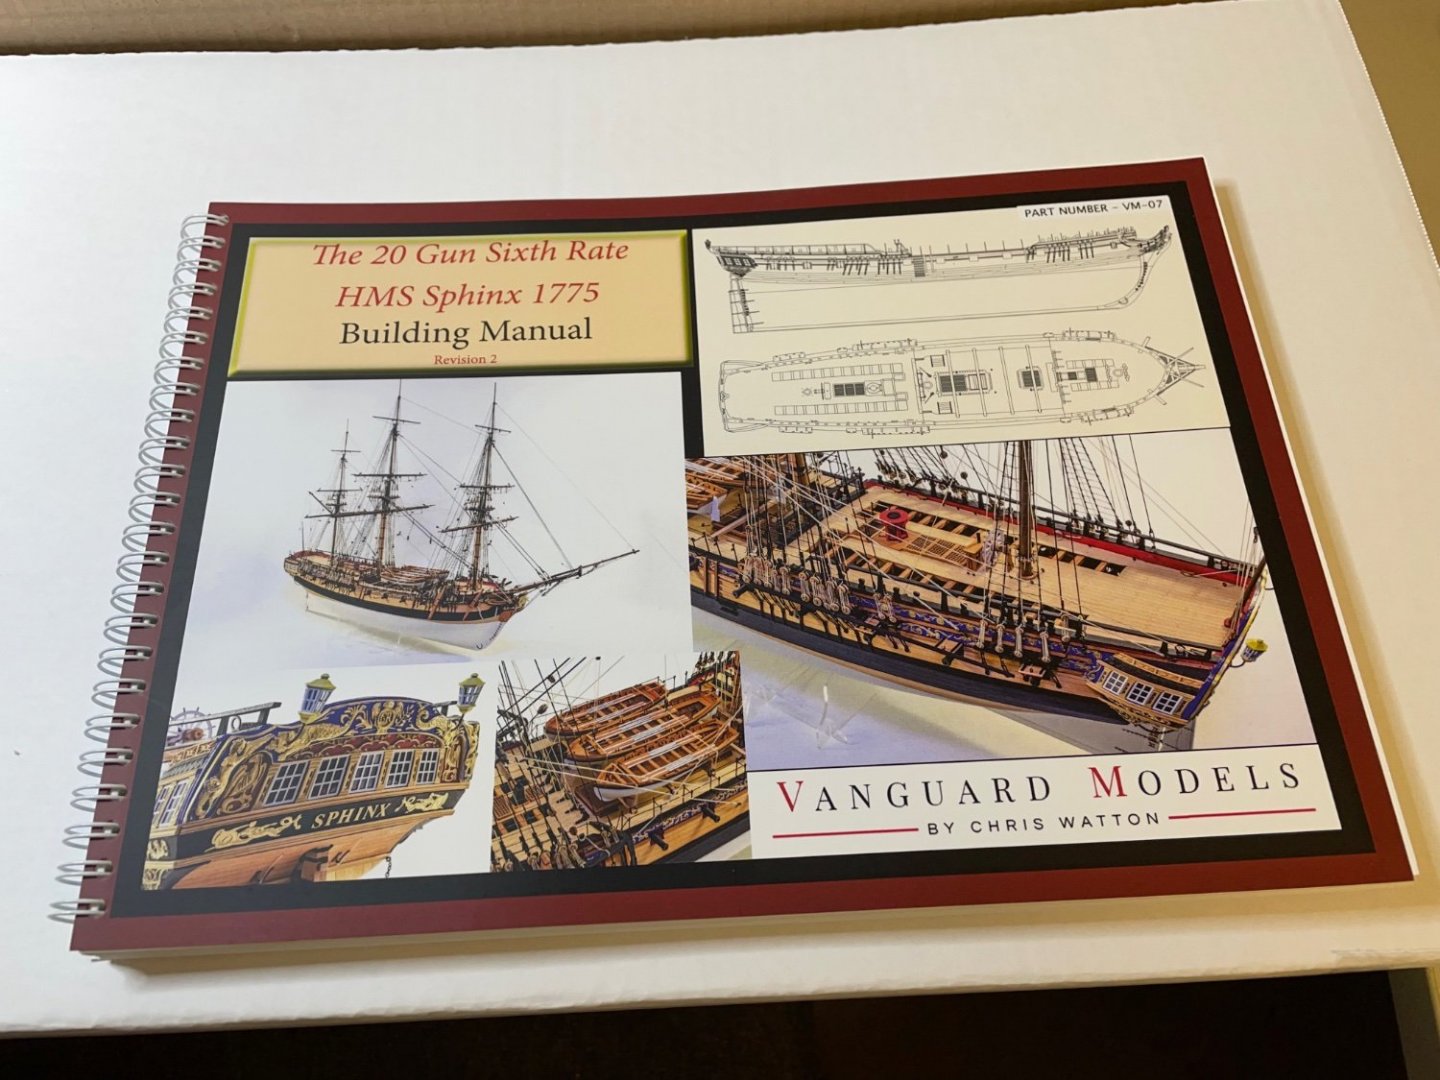
Photo 8: Very good looking thick and heavy instruction manual. It is printed on thick sheets, I guess on 120gr/m2 paper, instead of your regular printer paper of 80gr/m2. The instruction manual of my recent Amati Orient Express was by far the all time best, I can say this one ranks 2nd right after that.
- 426 replies
-
- 8
-
-
- Vanguard Models
- Sphinx
- (and 1 more)
-
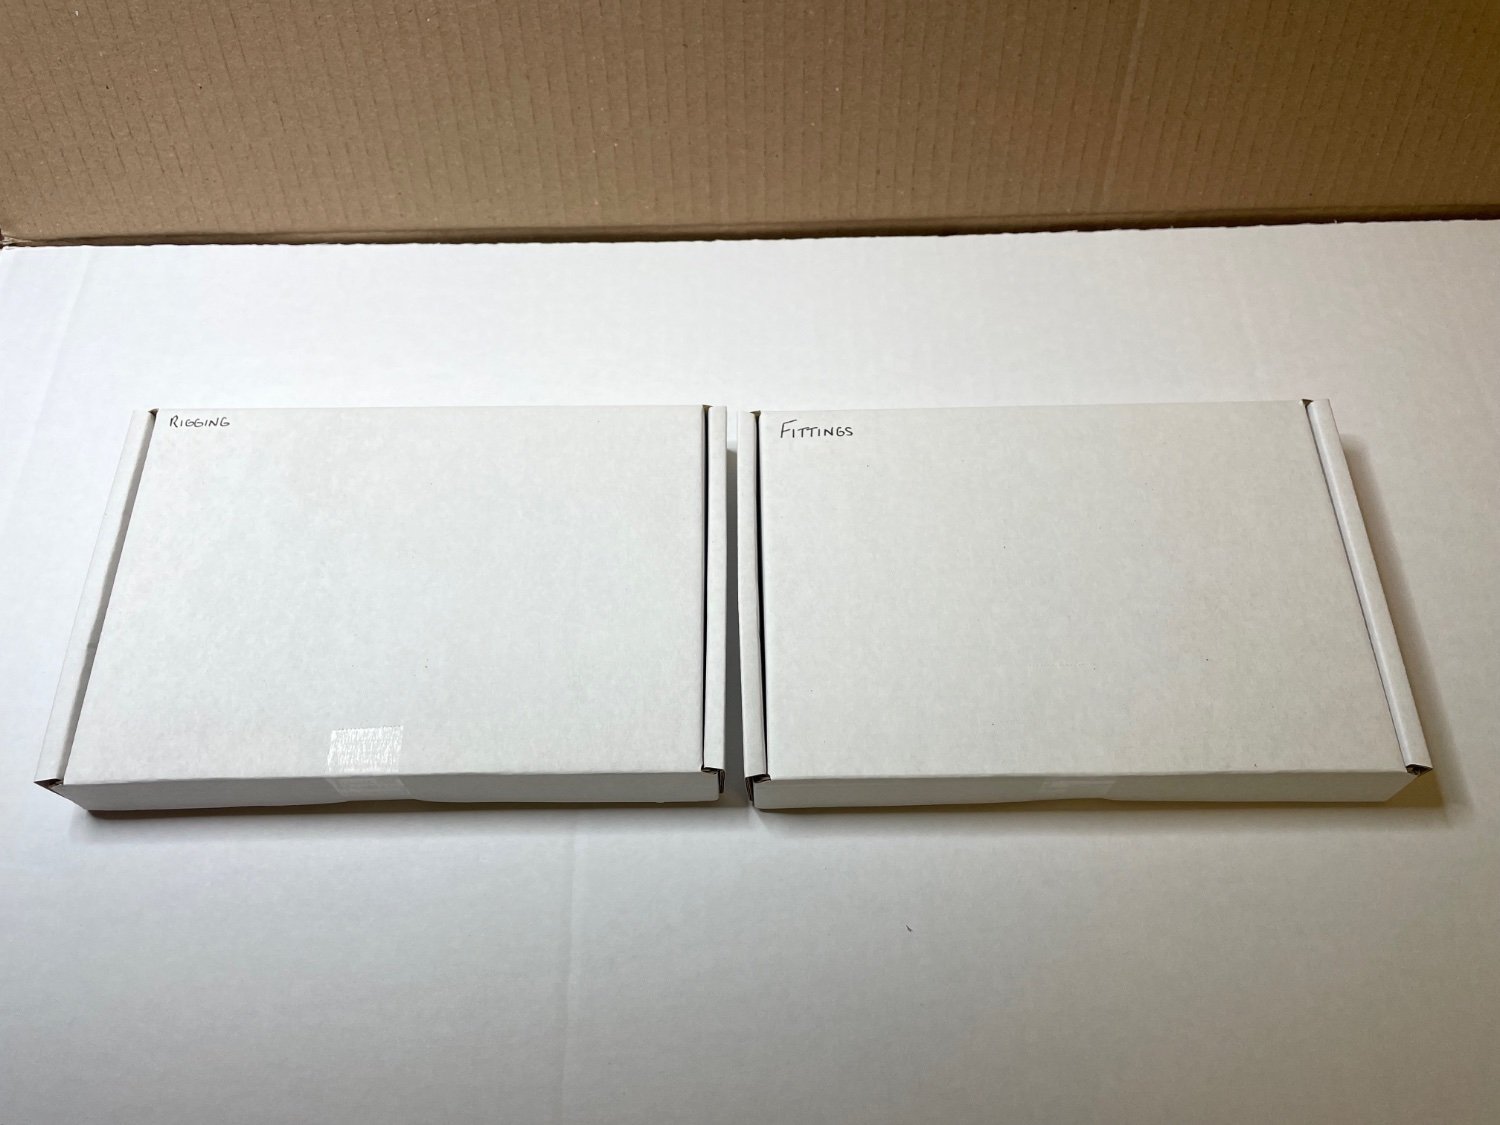
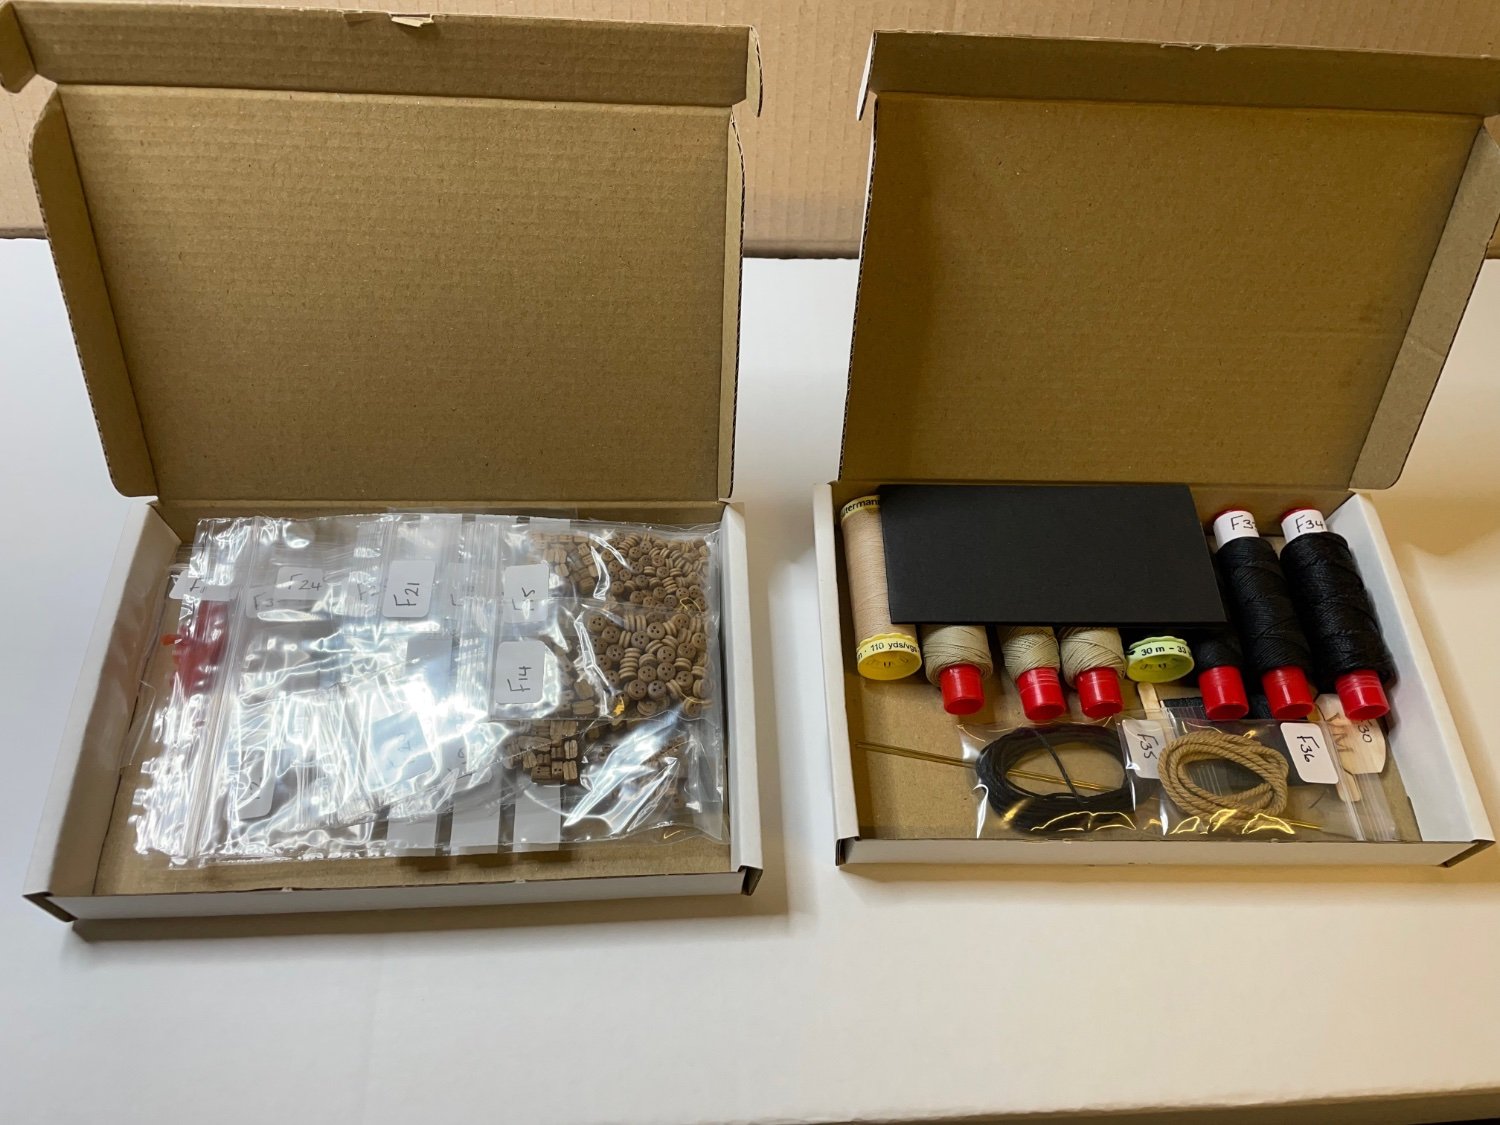
Photos 6-7: Rigging and fittings in their own boxes, marked with what I bet is Chris's own handwriting.


- 426 replies
-
- 9
-
-
- Vanguard Models
- Sphinx
- (and 1 more)
-
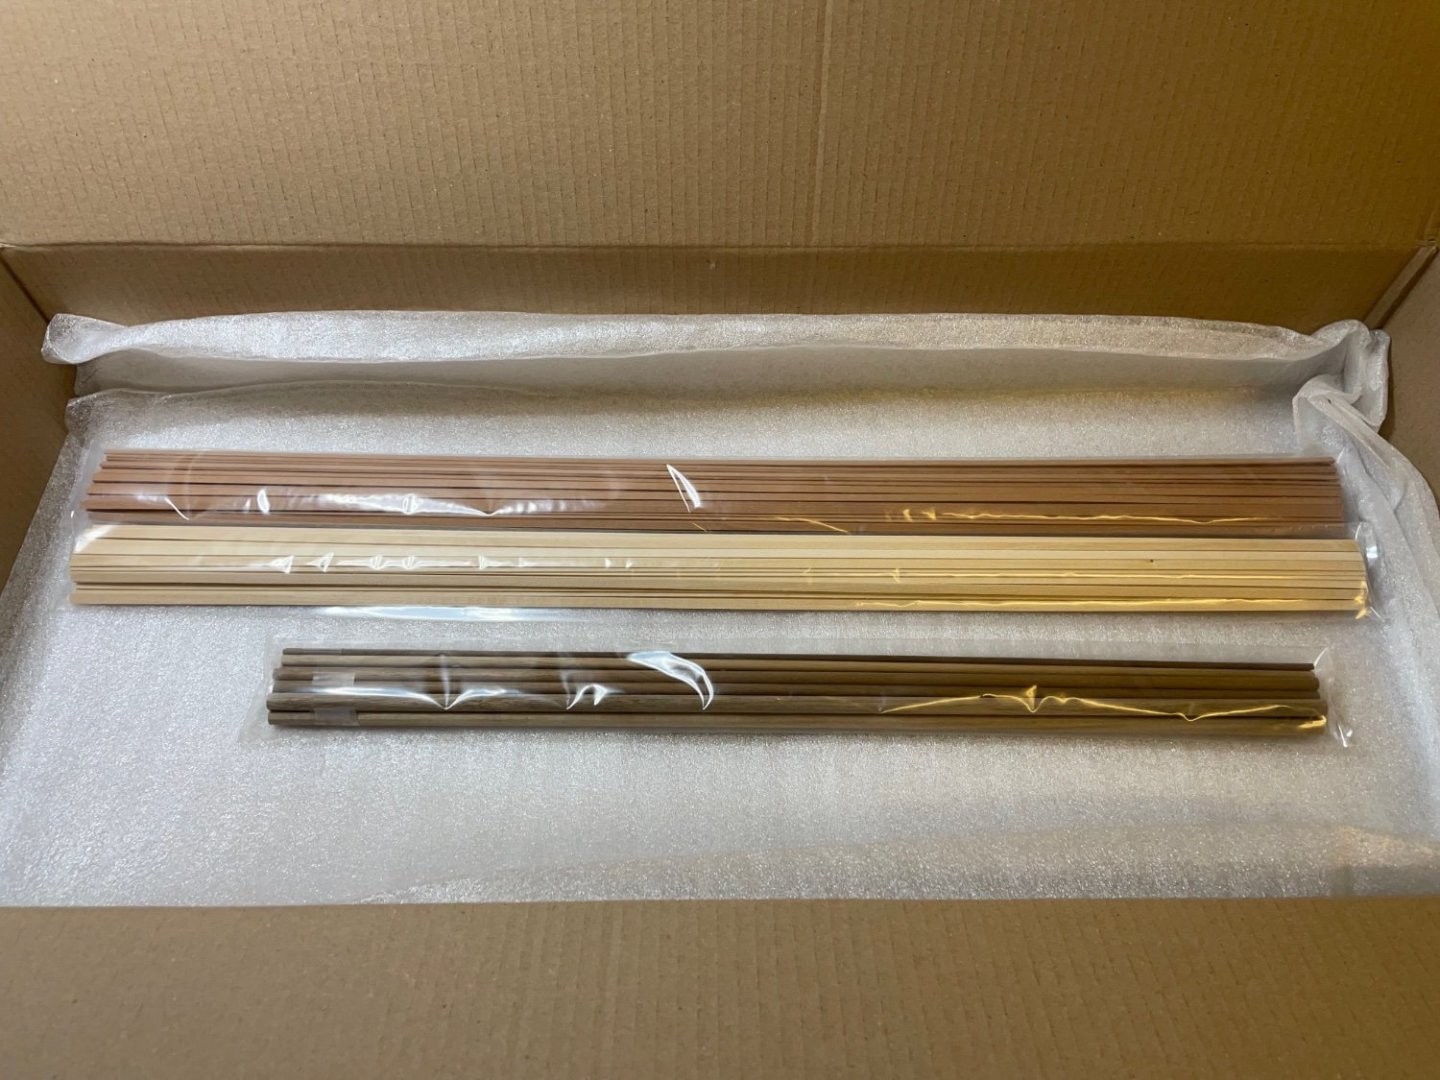
Photo 4: Diving deeper, you find the photo etched sheets and wooden sheets, again each wrapped in soft sheet. Photo 5: The wooden strips are in their own plastic nylon.

- 426 replies
-
- 8
-
-
- Vanguard Models
- Sphinx
- (and 1 more)
-
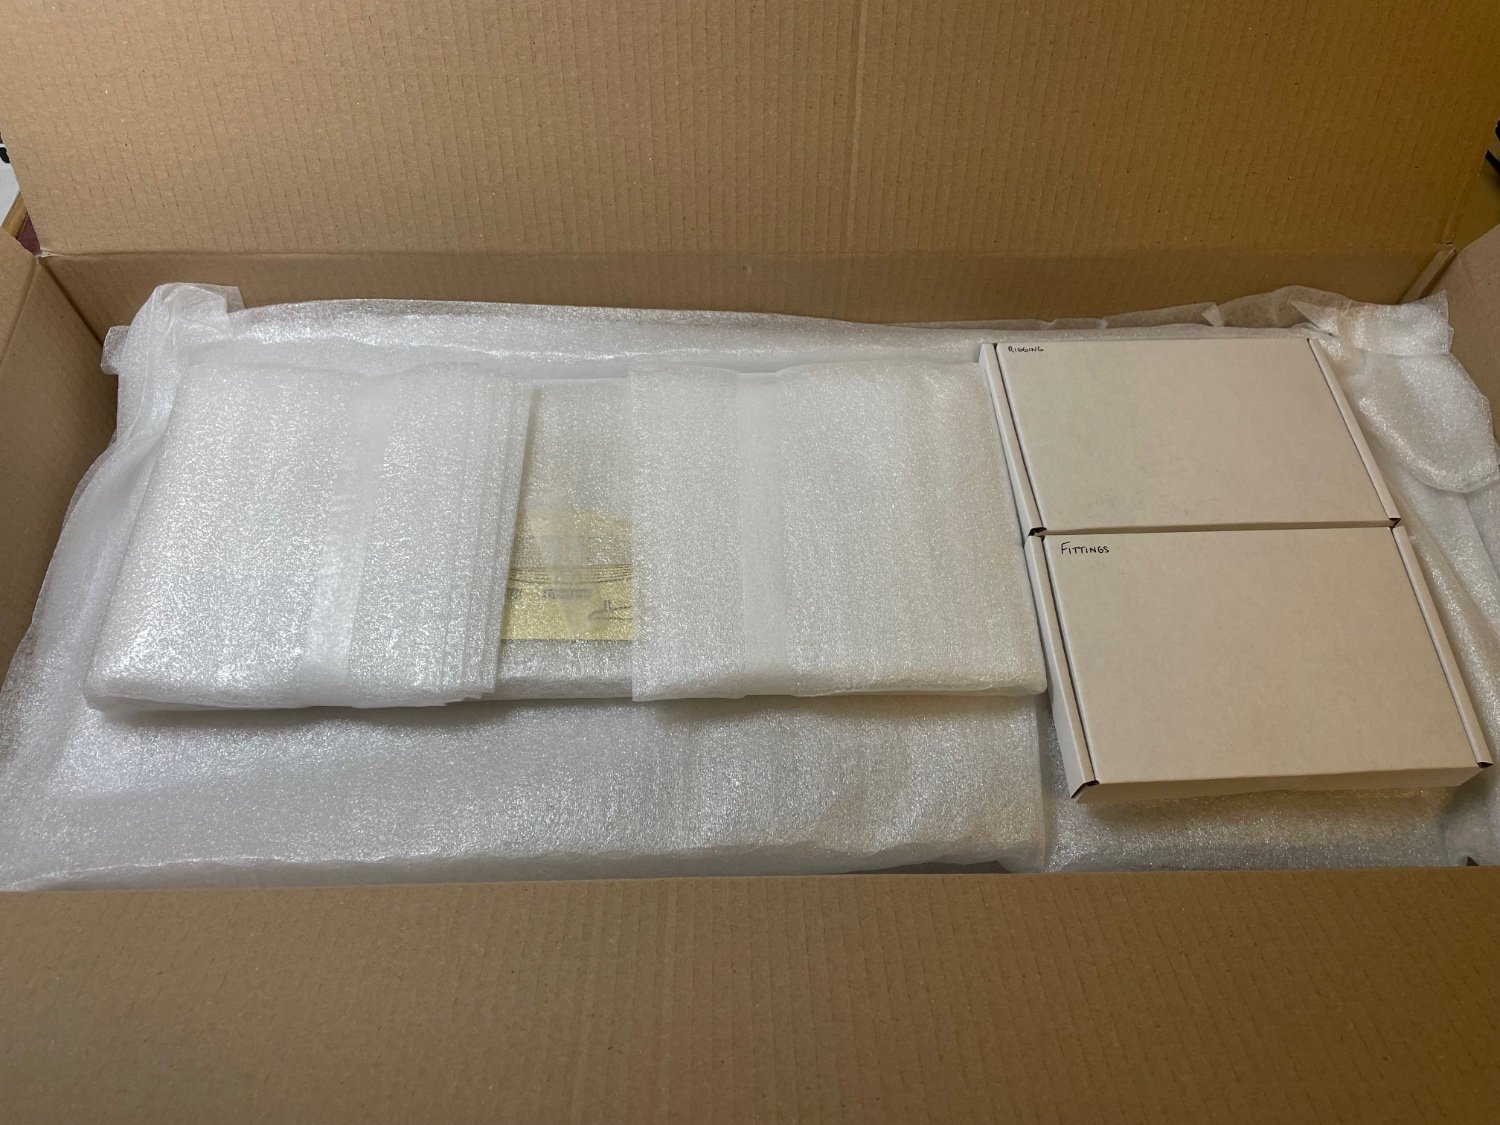
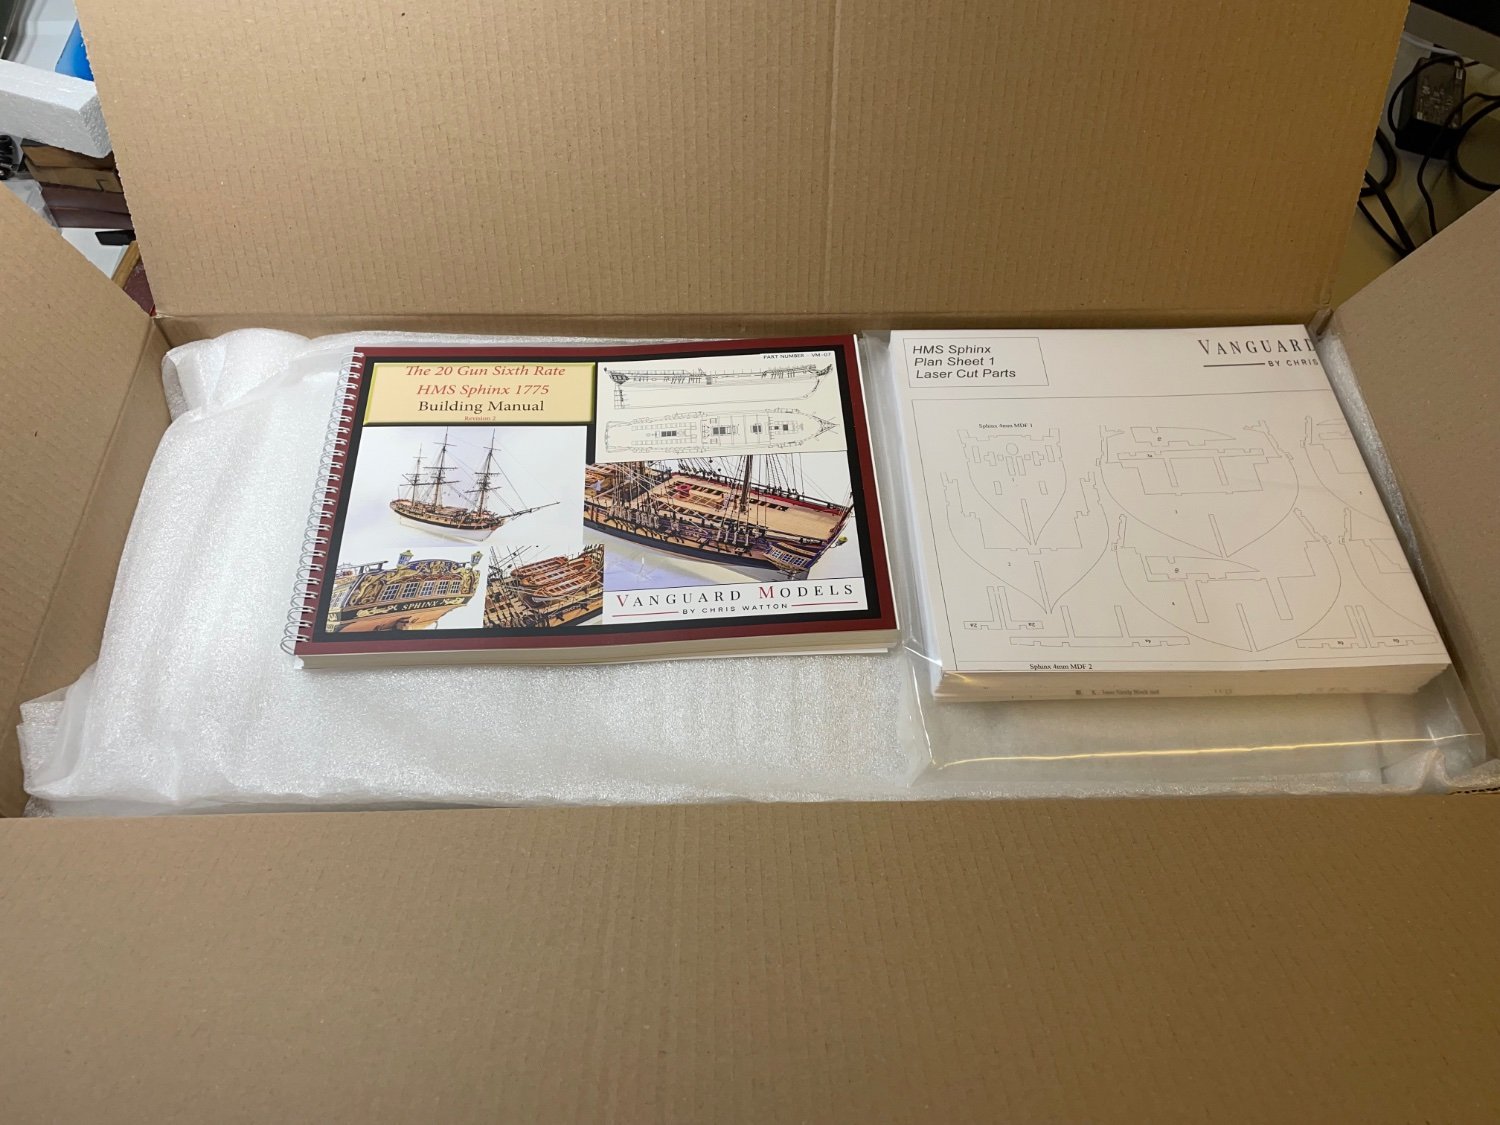
Photo 3: Opening the box you immediately see how much effort Chris has given to packaging. Each group of parts is generously wrapped in soft sheet. On the top of the stack the thick instruction manual and plan sheets welcome you.
- 426 replies
-
- 8
-
-
- Vanguard Models
- Sphinx
- (and 1 more)
-
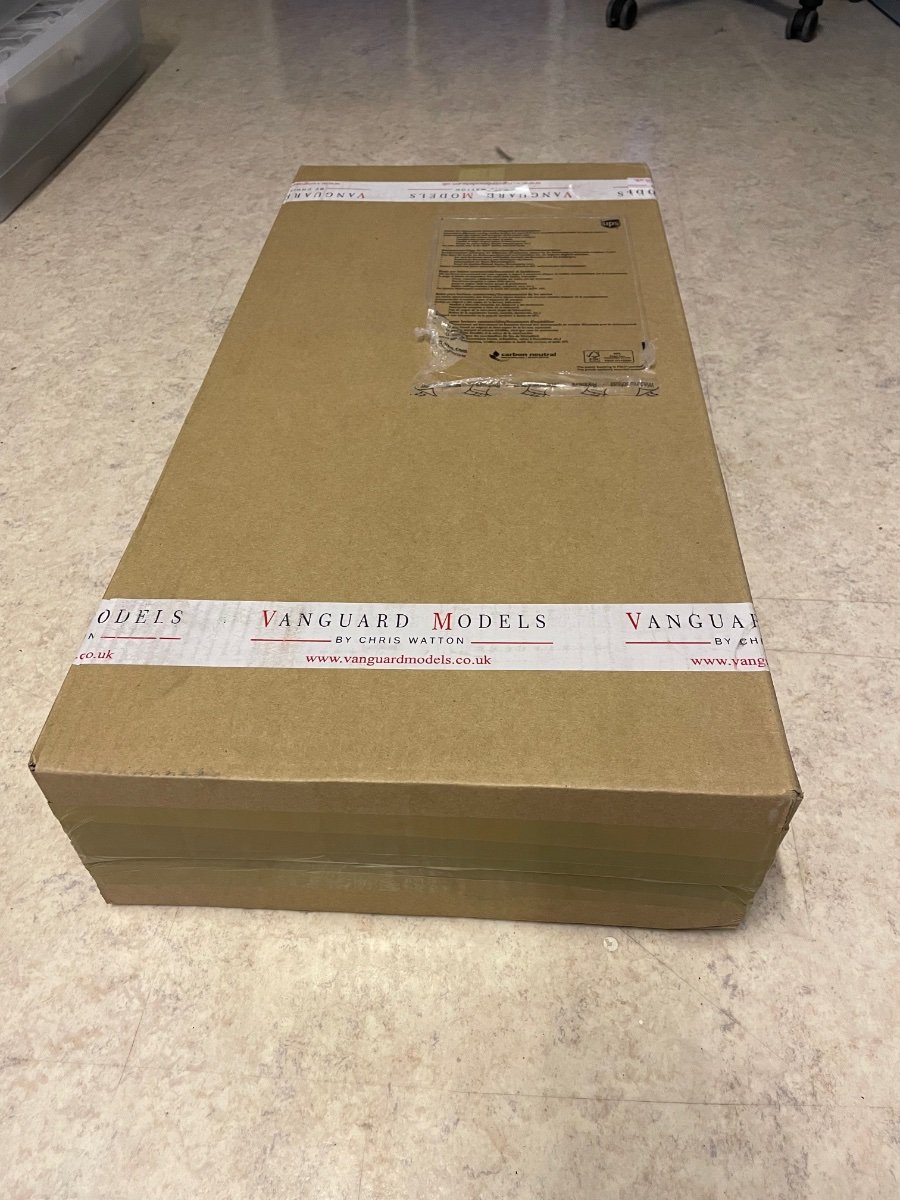
Here it finally arrived yesterday! I want to take all the time I need with this model and make the best I can. I know this means it will sit on my table a looong time therefore I cleaned my table and moved everything else away to dedicate it all the space it needs. Now some unboxing photos. I will not go through all the details, will show just enough to let you admire Chris's exceptionally well packaging. Photo 1 : This is how it arrived via UPS. Box was fully intact, no bumps or dents or any signs of damage. The package measures ca 75x36x14cm and according to the airwaybill it weighs 7.2kgs. Photo 2: The actual kit box is 70x31x13cm. The space in the shipment box was neatly filled with cardboard for cushion.


- 426 replies
-
- 6
-
-
- Vanguard Models
- Sphinx
- (and 1 more)
-
My recent Orient Express Sleeping Car project was a real challenge combining metal, wood, paper and electrics in the same box. Though when I was done, I thought I really missed the smell of wood. So, when I decided to build a wooden period ship as my next project, Sphinx was an easy choice for me. I finally ordered mine in Vanguard webshop yesterday. Chris, ship it already please!! 😁. Needless to say I will share build log in this forum. /Aydin
- 355 replies
-
- 5
-
-
- vanguard models
- Sphinx
- (and 1 more)
-
I have been seriously thinking of this OCCRE actually, I am just undecided between an HMS Sphinx or this one, as next project. I kind of missed the smell of wood :). But OCCRE is in my list!