Chuck
-
Posts
9,701 -
Joined
-
Last visited
Content Type
Profiles
Forums
Gallery
Events
Everything posted by Chuck
-
 I am not saying everyone is cheap or even mean to suggest Ives is. Please dont get the wrong idea. I Just want to point that out right away. His last two suggestions were just a good point to mention that things are getting a bit crazy and overwhelming with the wish lists. I got this covered. The kit will be a very nice project that is affordable and very easily upgraded. Mostly each builder will be able to do so with the tons and tons of info out there on Pegasus. Sure it would be much easier for most if I was able to do the extra work and put it all in the box...but then you will probably be looking at a $350-$375 cross section kit...rather than $225. Which w0uld not be an issue for some of you but most would just say no way....and I would not sell many kits. But let me work on the "base" version first and I can always add other features once it is all done....for an extra price of course. But I can tell you for sure that I wont be plating the kit or doing any masting and rigging. I am sure you guys can cover that aspect and do a fantastic job of it on your own. In fact I learned a lot about the market with the Cheerful and Barge kits. So many people want so many different things its not possible that a kit that comes in a single box will satisfy everyone. So like the Cheerful, I am thinking about oferring this Cross section in installments. - Base starter package with all framing parts and keel with build board - Exterior details package - planking and details -Interior details package - deck framing and fittings -adition one-off extra upgrades - to come much later This way it will be possible for even just a small price that someone could buy the framing and just bash/scratch build everything else. And it would be in everyones budget hopefully. I am also considering breaking down the Barge kit into two or three installments for the same reason. But for now I will keep it as is. I really want to try and make this so you guys have the most options and wont balk at the price tag. I am not calling anyone in particular cheap....but just as an example...I have guys asking me if they can just buy 6 feet of rope or just five 1/4" single blocks so they dont have to spring for an entire package. Its really crazy. Because after cutting them a six feet portion I would be able to somehow sell the remaining 14' in my scratch and dent section. I am surprised every day by the unusual requests and most are aimed at finding a way to save a few bucks. I get it...things are tough for some folks. I am not trying to minimize this. I am trying really hard to think outside the box within reason because you guys would be amazed how much this matters and the large number of requests I get. But I just cant sell you five blocks at .40 cents each and mail them in a regular envelope with a 50 cent stamp so you wont have to pay the regular shipping.
- 130 replies
-
- 24
-

-
Yes it was but, dont relate this to what your traditional kit might look like. There are dozens of people asking for dozens of things....and the kit can not be everything for everyone. Its kind of funny actually. Who wants holly...who wants masts and rigging...who wants copper plates...Pump details...a boxwood option....the list is endless. The beauty of the hobby is that any of you can very easily bash a kit like this to include copper plating. Or buy a few sheets of Holly to plank it with, or whatever else. What you guys dont realize is that with every upgrade it will add $$$ to the cost of a kit. For example, many have balked at the price I am charging for the barge. They dont understand how its different than other kits and what it takes to MFG it. I would like to keep this kit reasonably priced for the majority of builders...and not push this into the realm of where only 15% of the market will be willing to buy it or could afford it. I am shooting for the $225-$250 range....but you guys can bash it easily enough. I really dont mean to sound harsh but I wanted to let you know its a bit overwhelming and if you guys look back on the shear number of requests...thats a lot of upgrades and work for what most wouldnt want to pay more than five bucks extra for. Overwhelmed in New Jersey......
- 130 replies
-
- 19
-
-
longboatfreizes.pdf
-
Pretty much from scratch...but it was really good to have David's drafting on the parts first. That saved lots of time although I basically had to redo them to add the kit features you see. On projects like the Winnie, you basically start with the original drafts...import them into Corel draw and start designing....just like if you put a piece of tracing paper over a paper copy of the draft and used a pencil. I am just using a mouse instead. Makes erasing mistakes a lot easier.
-
Its actually David's drafting and much of the original drafts are also used. But yes that would in my opinion be a very boring topic. But thats just me. Its just a lot of trial and error and computer drafting in Corel Draw. I usually try many iterations of any given feature before going with it. These frames concepts went through dozens of tweaks and redesigns before I arrived at what you see in the photos. The keel parts were about half a dozen different designs. Most of those tries end up in the trash....lots of waste wood. And it feels a lot like this after each and every failure....
-
Consider the flood of Chinese and Russian POF kits on the market right now. They all use stylized framing ala "Hahn" method. Its very stylized and tedious to put together. Most are pirated. Others are just plain bad attempts at POF. This will be my answer to a flooded market of those, by kicking it up a notch and showing some real (almost) framing concepts in a kit form. And hopefully not tedious and annoying to build. Not that the Asian kit obsessed will ever acknowledge anything other than the .....well you know. But the next logical progression would be to take this design concept further and do a full hull. But not likely by me anytime soon.
- 130 replies
-
- 11
-
-
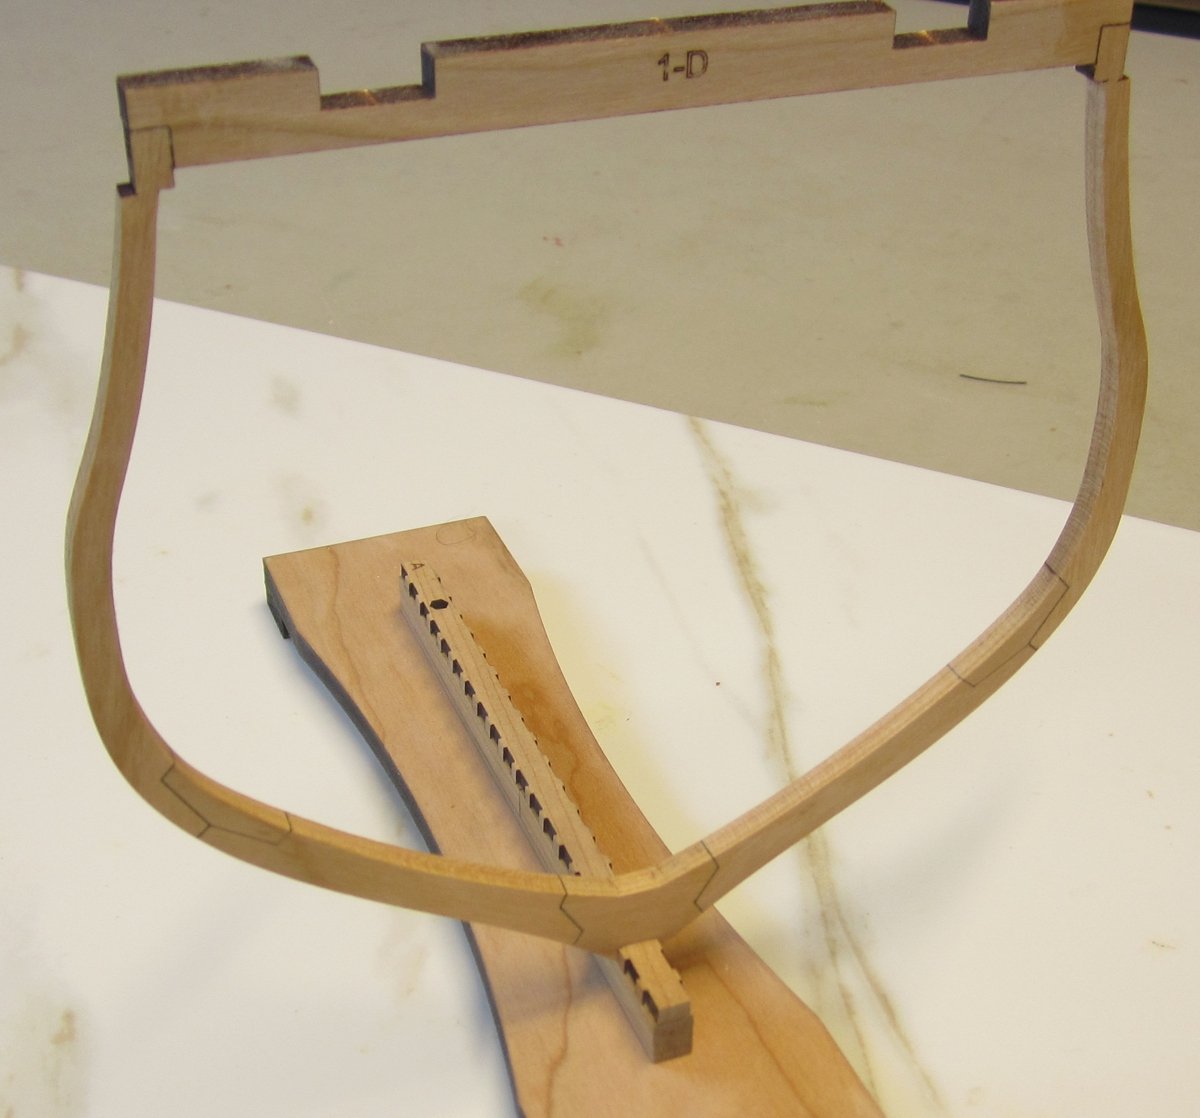
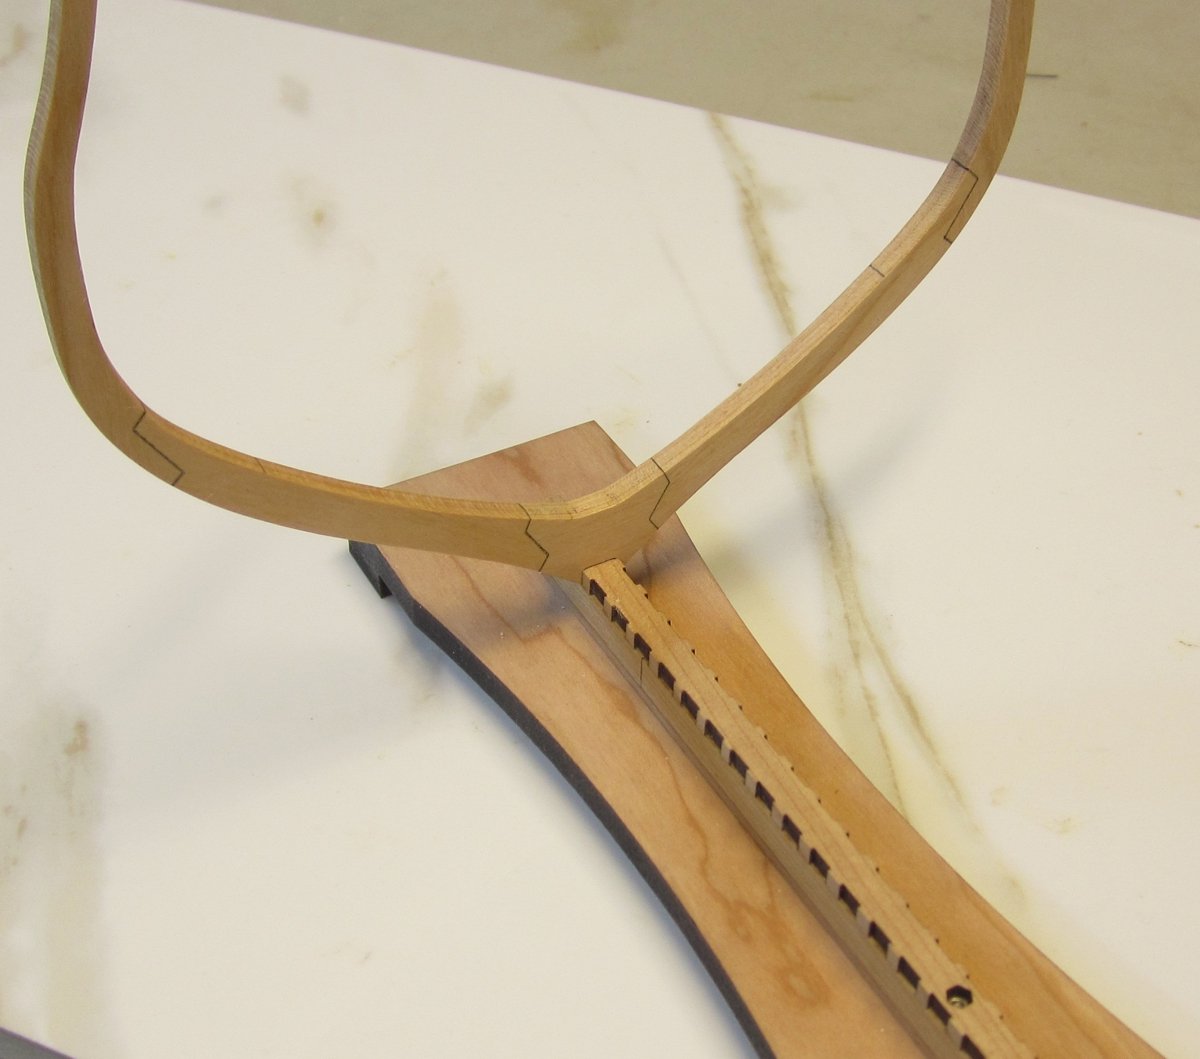
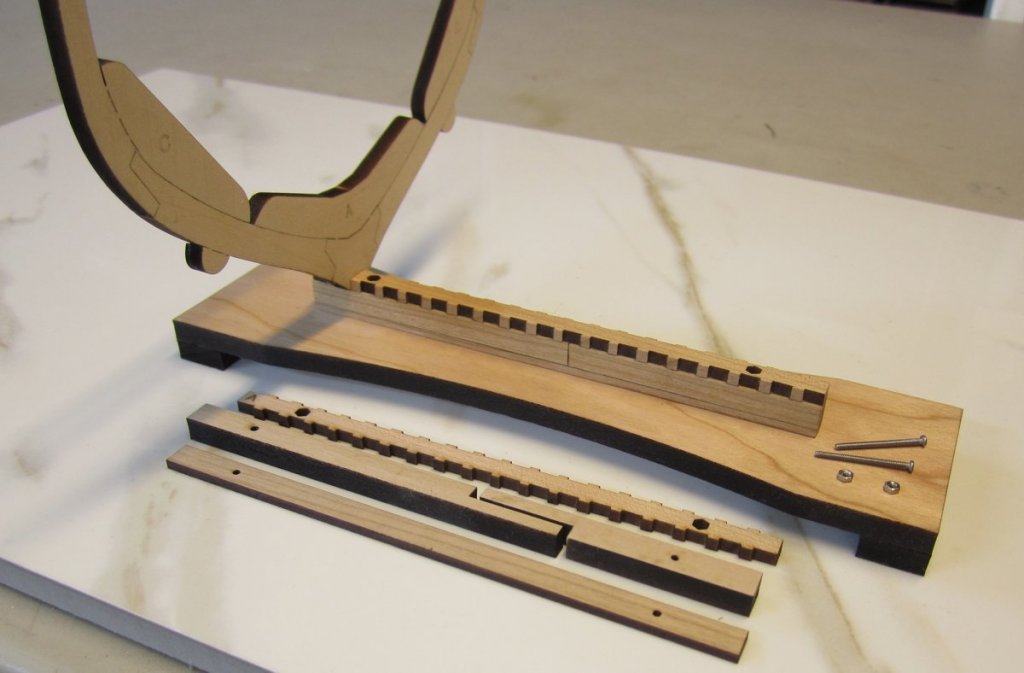
Thank you guys. I wanted to show the test set up with one of the actual cherry frames in position. This will be an actual frame I use on the model as opposed to the other tests I posted. This final version is slightly different in that it is done with chocks. You can see the chock between the futtock and toptimber . Its is not an actual chock but it is impossible to tell the difference. I just used a laser etched line to complete the appearance of a chock and it only shows on one side of the frame. This is important for the outside frames because it completes the look of actual framing practices. But the other side just shows the simple scarf joint. The frames will be so close together that you wont be able to see that. To complete the simulation, I just drew a line with a very sharp pencil along the inboard edge of the frame. This will have to be redone once the inboard frames are faired but you can see how nice it looks. It will make the open framed port side look really authentic. Especially after treenailing is done. If you really wanted to, you could complete the illusion on the other side of each frame with a pencil...but seriously it would be impossible to see.


- 130 replies
-
- 34
-
-
Yes, but that particular frame is but its just for a test fitting. I will be using Cherry for the frames too eventually. I just needed to check the fit and size of the notches on the workbench so I can replicate it across all of the remaining frames as I draft them. So building will slow considerably on this one now. Chuck
-
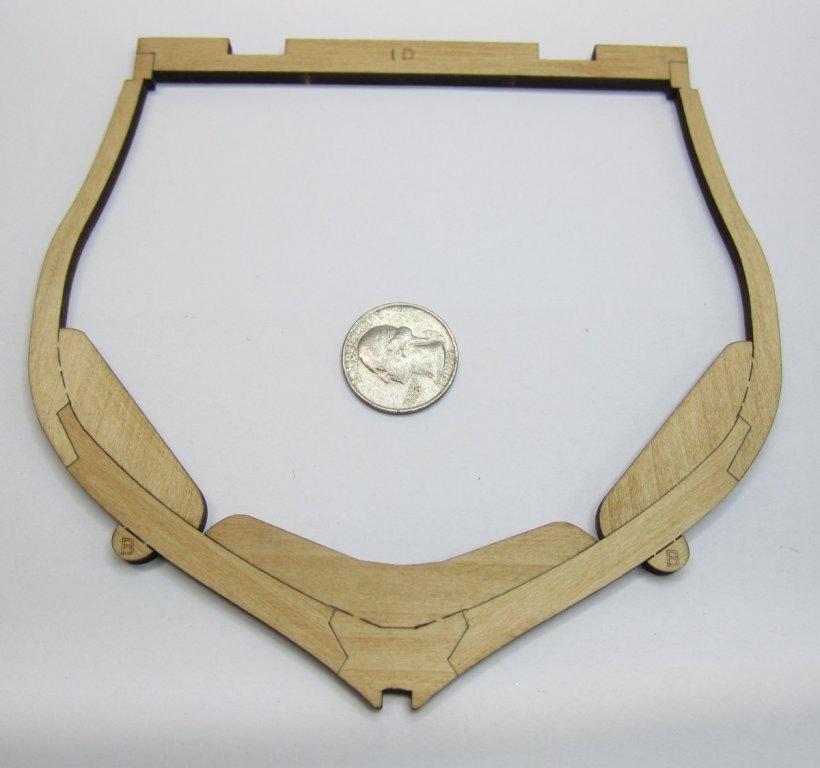
Prototyping the keel parts. These are all in cherry. I have laser cut the false keel, keel, and rising wood. They have holes in them for the screws that will hold it to the baseboard which are also laser cut. Note the hex holes for the captive nuts laser cut into the rising wood. The rising wood is also pre-notched to position the frames. One of my test frames is being tested for its fit and it all seems good. All of the layers for the keel assembly were laser cut somewhat wider than needed so there would be plenty of meat left on the parts. This extra meat will allow someone to vigorously sand the laser char from the edges AFTER assembly without worrying that you will sand too much off which would then cause a problem. You can get these pieces nice and clean as you can see by the keel that I finished. I havent cut the rabbet yet but that is coming next. I am laser cutting a tool that will hopefully help make creating the rabbet a lot easier. I am going to build this one in Cherry. Now that all of the notches and holes have been squared away as far as drafting is concerned...I can move forward with drafting the remaining 18 frames. That will be a slow process. Chuck
- 130 replies
-
- 31
-
-
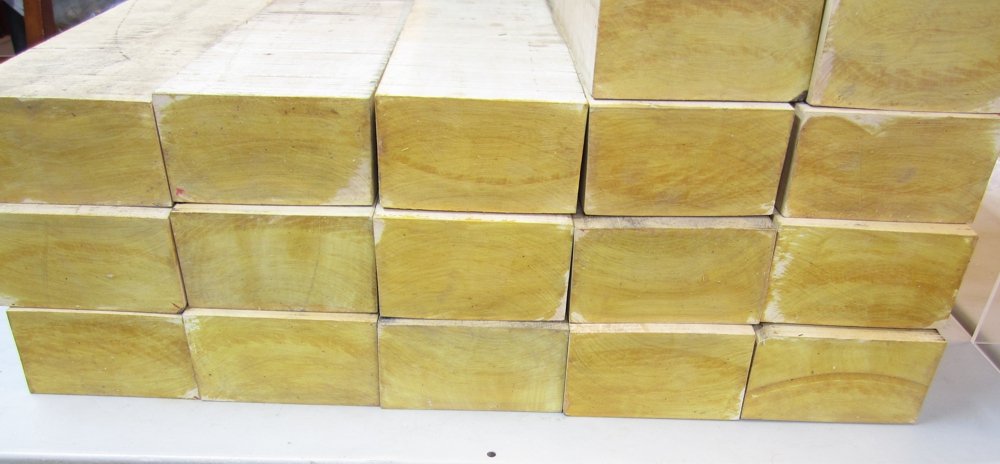
That is about 6 months supply maybe. Maybe 7.
- 1,784 replies
-
- 3
-
-
- winchelsea
- Syren Ship Model Company
- (and 1 more)
-
FYI...The reason for the alternative woods is two-fold. First to make these projects affordable and Boxwood and pear are very expensive. In addition, I am not sure you guys are aware of this yet, but you will be soon. The price for C.Boxwood has increased 75-100% over the last two-three months. There are very few places in the US right now where you can get really nice stuff without grain that is creamy and wonderful. At least not in the large sizes that I need. The current costs for this stuff is now $40 and up per BF. I was getting it for almost half that price six months ago. Just got what is probably my last shipment of awesome looking boxwood this morning at that price before I have to either raise my prices or start thinking about a different wood overall. When your wood guys run out of their pile....they will be very shocked to learn about the increase. And will probably pass that on to you. So my advice....if you use boxwood a lot, buy all you can over the next few months from where ever you can find it. You are looking at really nice boxwood boards that are 3+" thick, 5-5 1/2" wide and 30" long. If you knew how much this stack of wood cost you wouldnt believe it. I am looking to buy another batch within the next few weeks to try and hoard it at the lower prices where ever I can find it. Gilmer now charges the lowest at $40 per BF. Other sources have garbage boxwood or its even more money with boards half the thickness and width. This is also the reason guys why my block inventory has been in bad shape. I was waiting on this nice stack of wood. Once I find time to mill it up I will get right on restocking the sizes of blocks I am out of. Chuck
- 1,784 replies
-
- 16
-
-

-

-
- winchelsea
- Syren Ship Model Company
- (and 1 more)
-
Its going to be just like the Cheerful project. But the plans will NOT be sold separately. The plans will only be included in the starter package which has the bulkheads. There will also be no bulkhead templates on the plans. There is no reason to include them since you get them laser cut. This is being done to make it very difficult to pirate. As of right now there will no longer be a book published. This will just be released the same as I did for Cheerful with a downloadable free monograph and you can buy the starter package in Cherry or in Yellow Cedar if it works out. So far I am liking how the Cedar wood looks and works. But we shall see how you guys respond to it here. In addition to the starter package there will be a large number of mini kits for various other details...like a quarter gallery mini-kit....casting set...ships wheel mini kit, etc. You buy what you want or make them from scratch instead. That is the plan. I am actually cutting a set of parts for Mike as we speak....and one for rusty as soon as my wood order arrives. ETA on starter package being released.....as soon as I get the hull planked up. Chuck
- 1,784 replies
-
- 20
-
-
- winchelsea
- Syren Ship Model Company
- (and 1 more)
-
Indeed he is. This will be a long term project and wont be ready to offer for some time. Chuck
- 1,784 replies
-
- 4
-
-
- winchelsea
- Syren Ship Model Company
- (and 1 more)
-
Not really. No need to test when you find something that works...I cant think of a reason why any similar yellow glue would be different. I would not use CA however. Chuck
- 1,784 replies
-
- 7
-
-
- winchelsea
- Syren Ship Model Company
- (and 1 more)
-
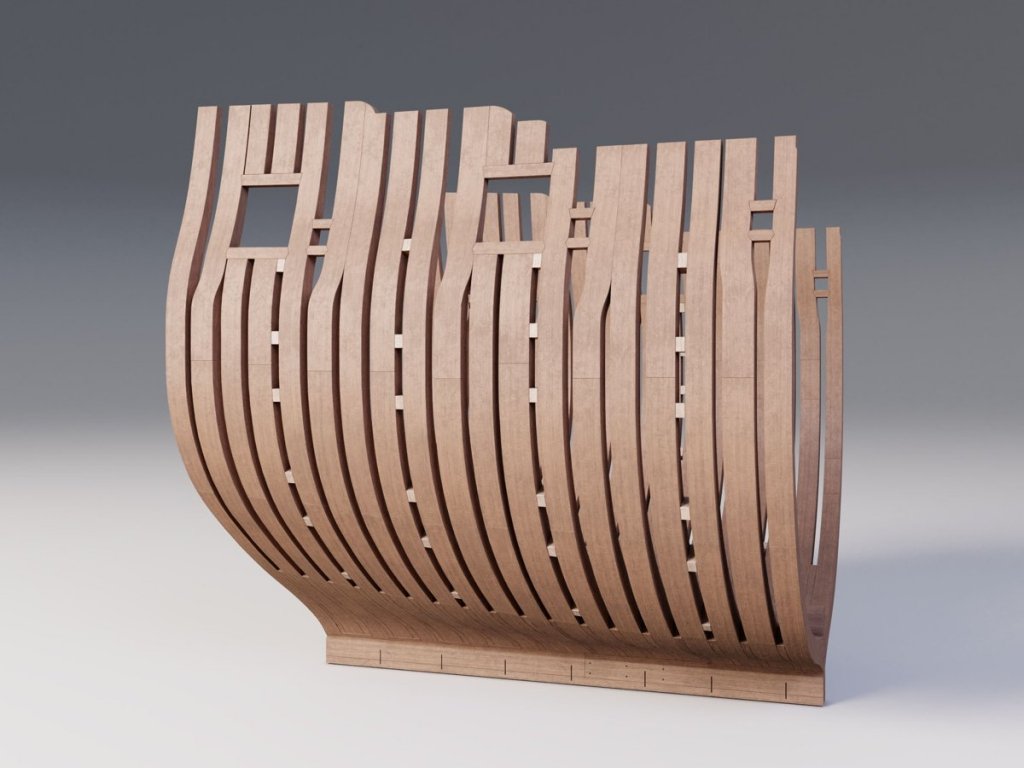
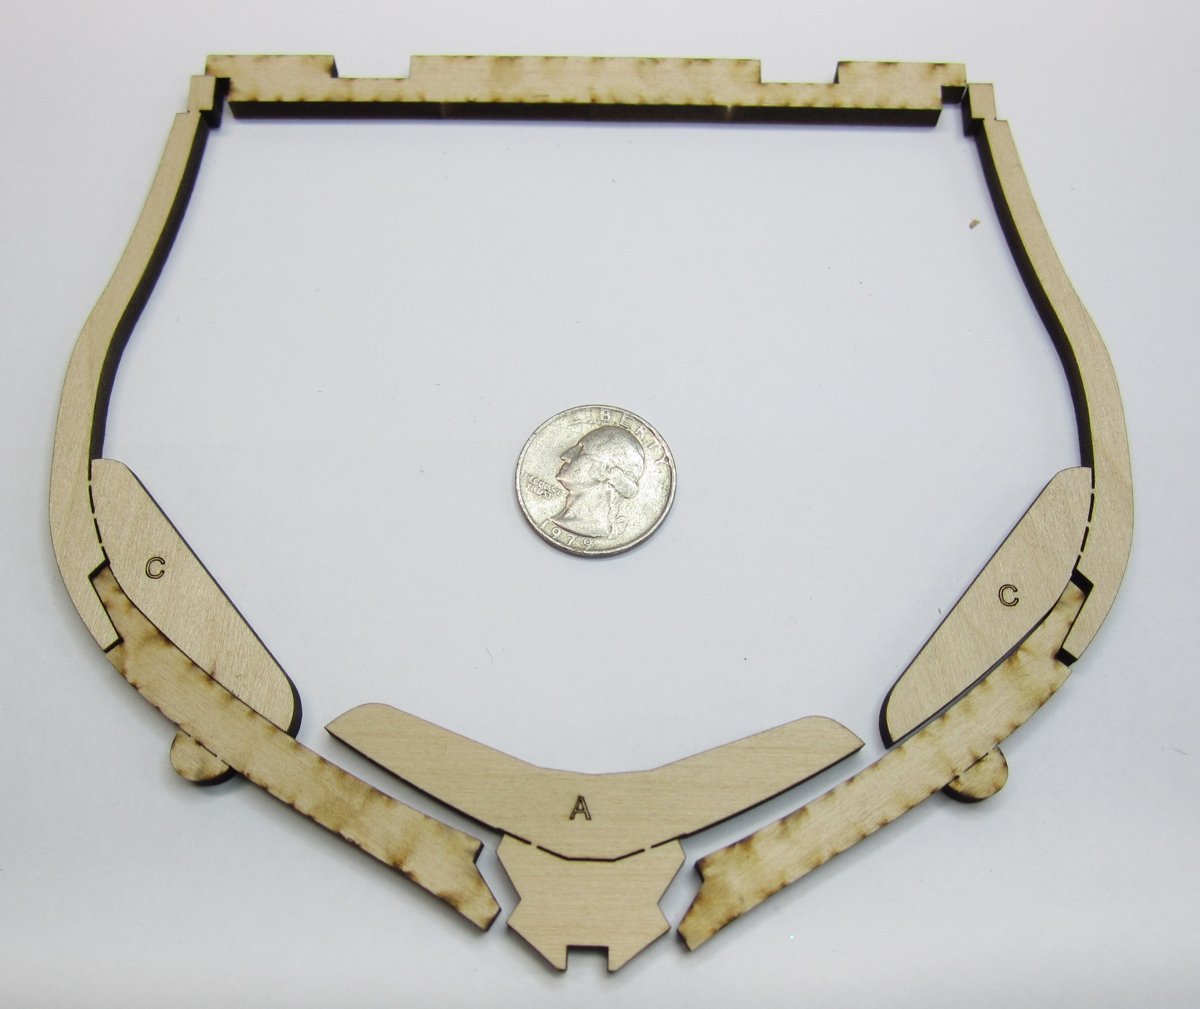
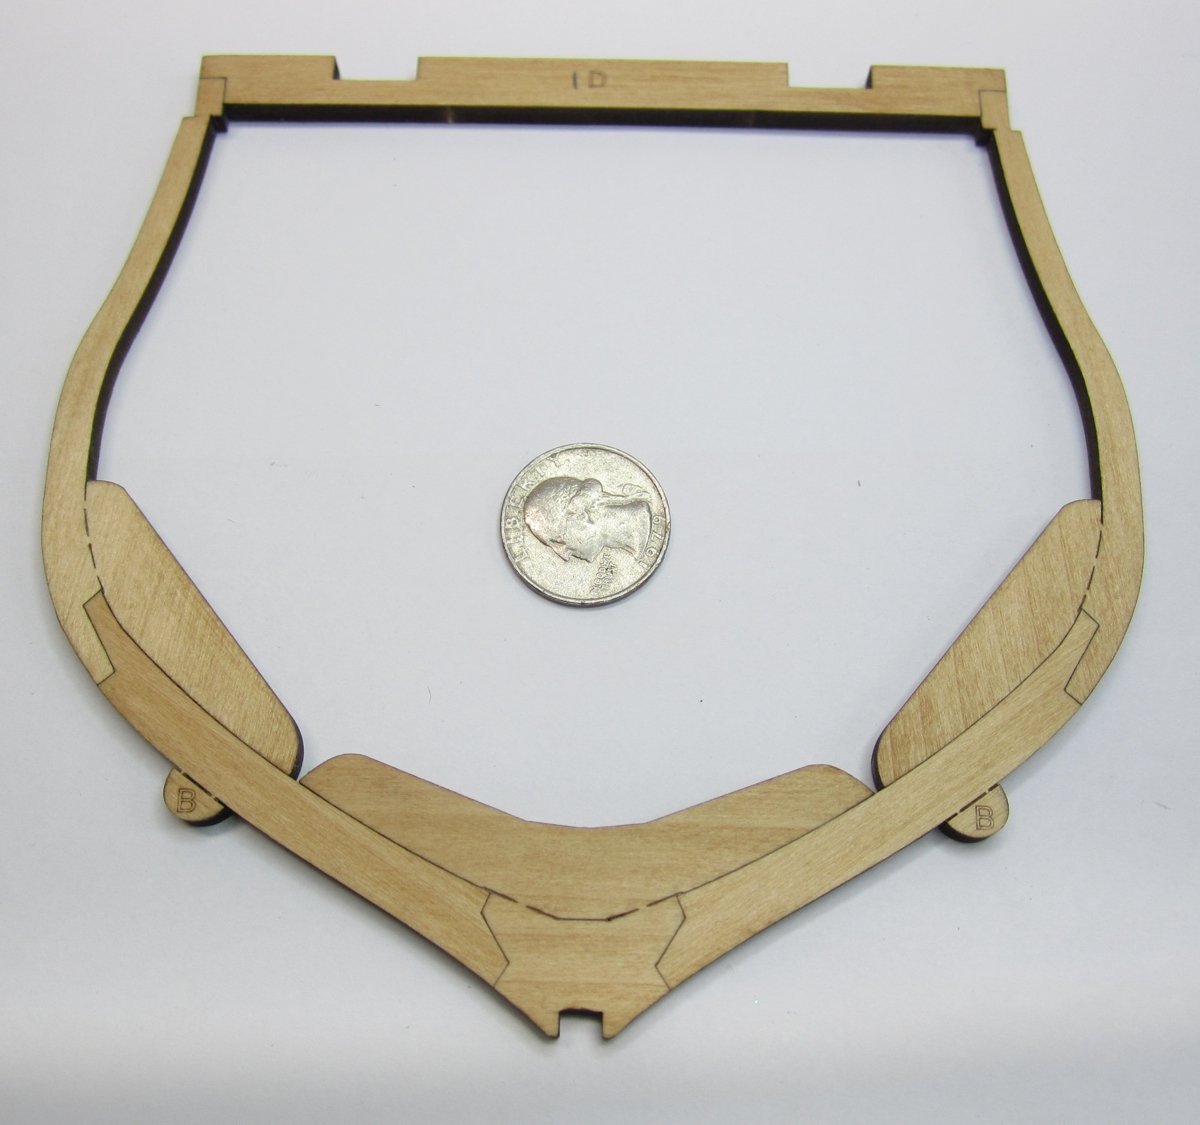
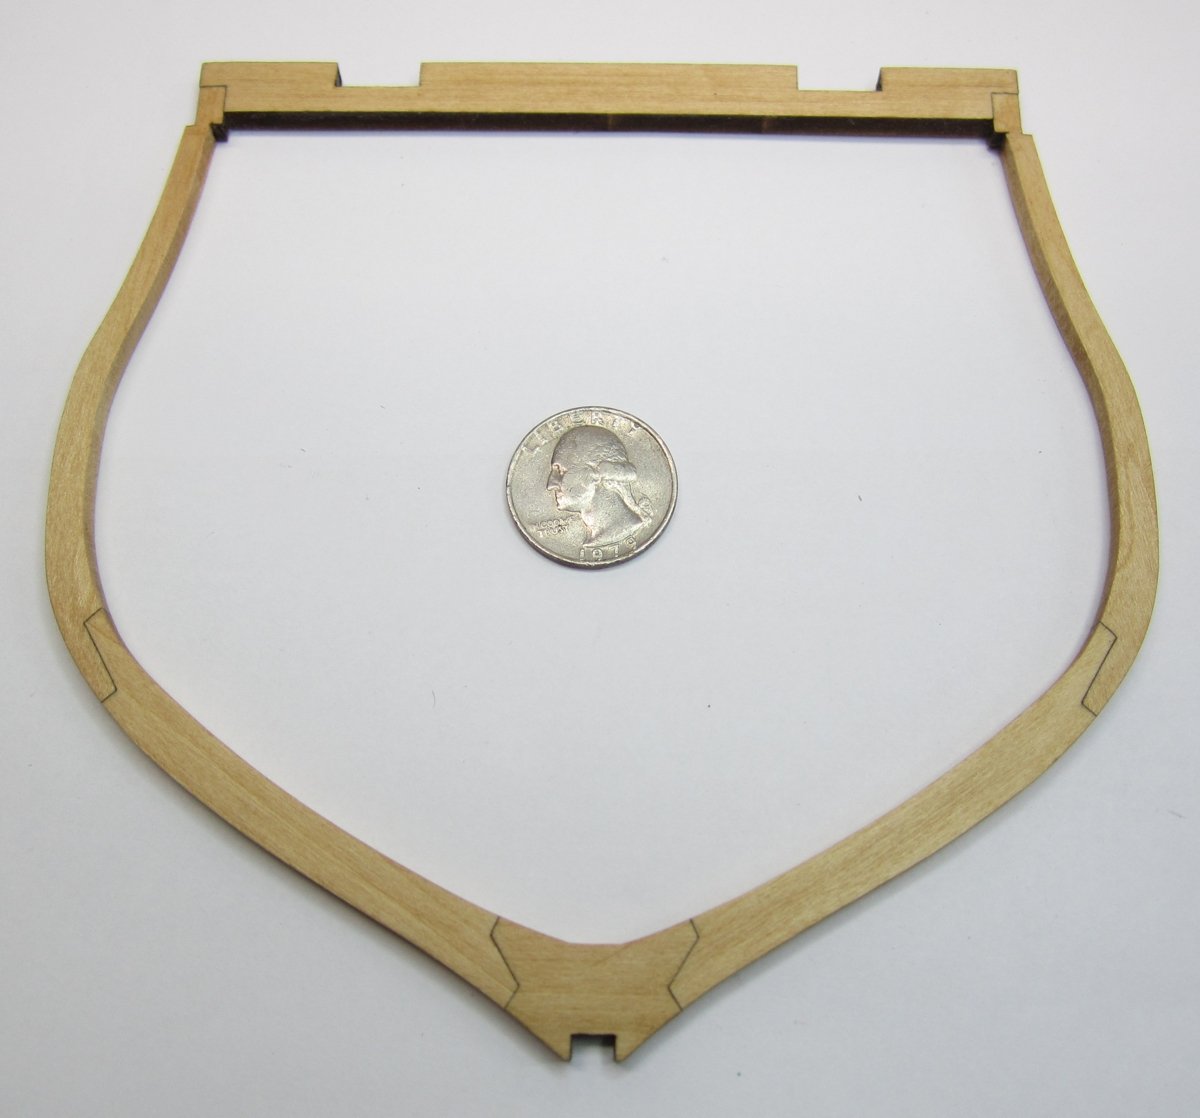
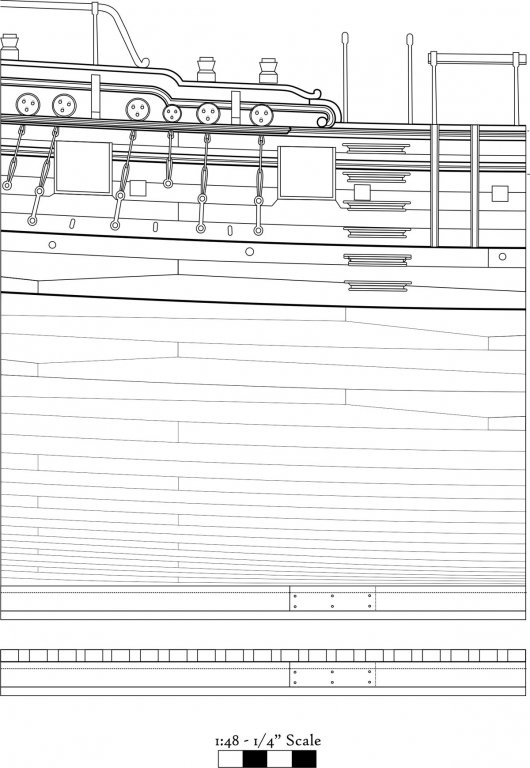
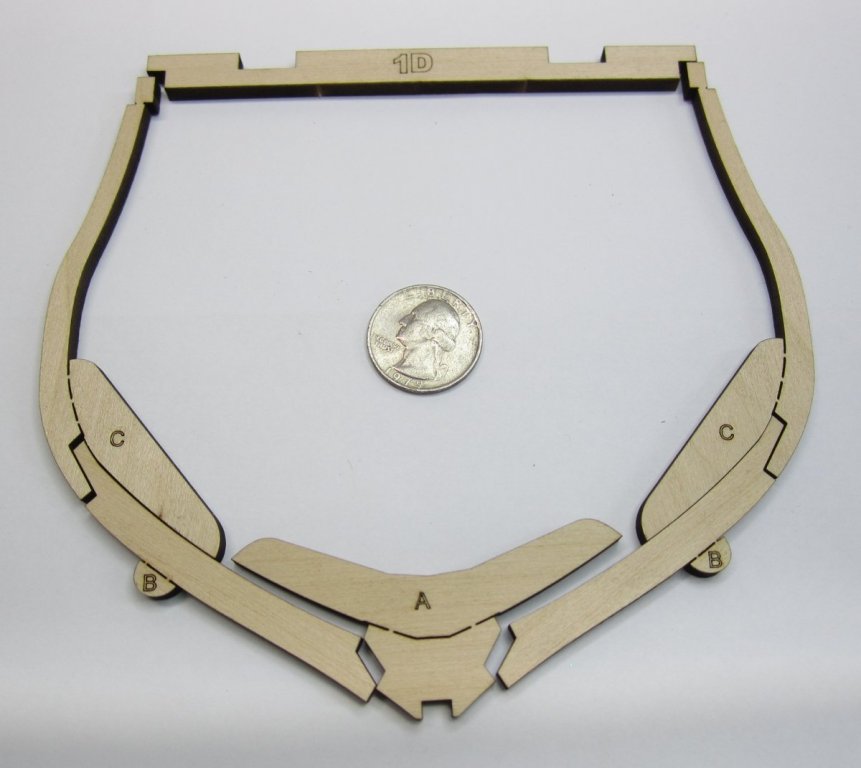
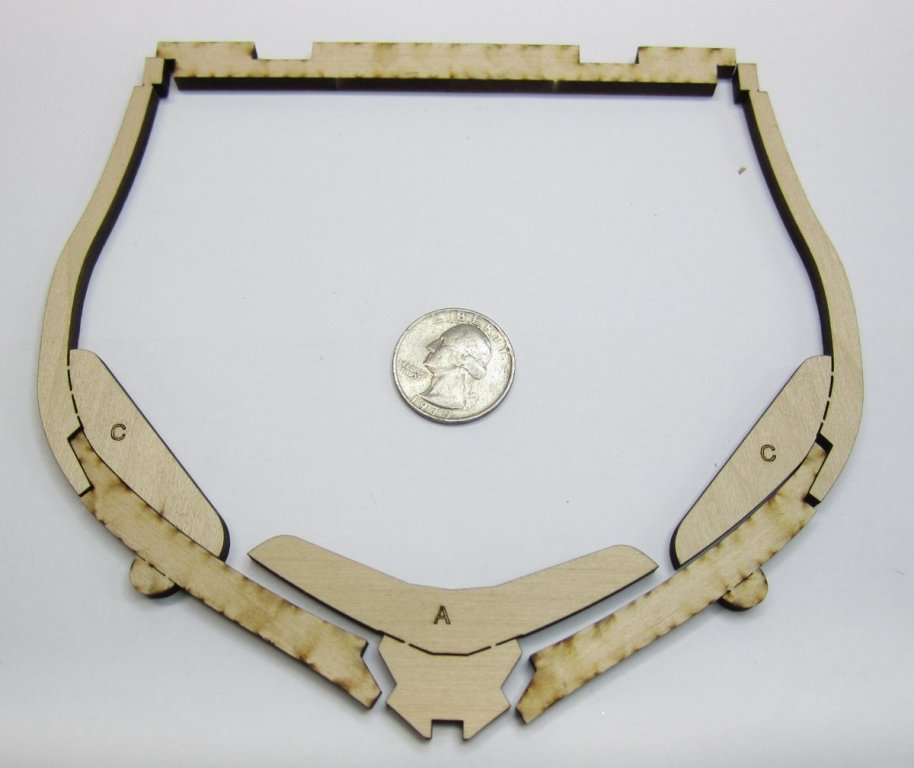
I have started the cross section model...mostly drafting. But I figured I would start a log. I am waiting on arrival of a variety of machine screws and nuts to finish drafting the keel parts. They will be set up in the usual fashion you folks have seen but I will post that once its ready. Here is the overall plan I am working from. Hopefully it will look like this once done...planked on one side and open framed on the other. I have started drafting the frames. There will be some bent frames with curved top timbers but this is just a plain straight one. Here are the laser cut pieces.....but you will not build the frame with the parts laid out like this. Because the laser cuts on an angle, it is best to strategically flip certain parts to get the tightest fit possible. You wont get one side with a large gap which is typical. Therefore no sanding of the char is needed ...nor should you attempt to sand the char from the edges of all joints that fit together. They will fit perfectly as is. The only drawback is that you will see the seam which in some instances was not the case as they werent tarred. But thats OK.... So I flipped them as I show in the photo below....flip parts "C" and "D" for the best fit possible. Note the dirty side on the flipped parts. There is no need to build each frame on top of a plan trying to get the frame to come out the correct shape. I have created some tabbed guides which make it very easy. I built five of these frames and they all came out the same...Each one took just a few minutes. I used titebond on the seams. Just take care not to glue the guides to the frame. See below. All glued up. Then the guide tabs are cut free leaving the frame strong and ready for sanding. I sanded every edge to remove the char except for the notch in the bottom chock which stays unsanded. It needs to be a perfect press fit into notches I created in the rising wood...which I will show later. But the finished frame all sanded up up looks like the one below. The top cross bar is added for strength and also to help register all of the frames once they are glued onto the keel. That is what those two notches on the cross bar are for. After I draft more frames it will make more sense. Chuck

- 130 replies
-
- 48
-
-
Wonderful work Siggi. Another great project and I will be sure to watch your progress. Chuck
-
The Cross section will be an intermediate to advanced kit with some scratch building but not much....you will have to make the octagon from a square stock...its quite easy. Like making the pumps on cheerful. Chuck
-
Syren Rope Rocket
Chuck replied to DelF's topic in Rope Making/Ropewalks's Commercial sources for ropewalk machines
Almost forgot, I am now selling extra shaft hubs for those who wish to have them. Some have found it easier to permanently glue the hubs to the cherry discs on the tail stock. It makes switching from three strand to four strand even quicker. Just as an FYI Chuck- 42 replies
-
- 6
-
-
- ropewalk
- rope rocket
- (and 1 more)
-
Syren Rope Rocket
Chuck replied to DelF's topic in Rope Making/Ropewalks's Commercial sources for ropewalk machines
That rope looks EXCELLENT!!!!!! Very well done. I am so glad you enjoyed making your own rope. I am busy as we speak laser cutting teh parts to restock the ropewalk right now. Chuck- 42 replies
-
- 6
-
-
- ropewalk
- rope rocket
- (and 1 more)
-
I will figure something out.....I havent given up hope yet.
-
Jim actually that is what I am leaning towards....not plastic. I may meet this "wish" half way. I have some some ideas. But will just keep them to myself while I work my way up to that point. But yes...some may be dissapointed. But hopefully most will be very pleased and excited about the compromise.
-
Allow me to explain this a little more and not in terms of cost. Cost is only one of many considerations. Let us examine the proposal of having chain pumps that are open to show that wonderful mechanism everyone loves. Forget the photoetch right now...let us put our kit designer hat on. Its very easy to think about the visual details.....and then what it costs. But let us consider also how to manufacture each piece....not the photoetch. That is easy...just costly. Let us talk about the obvious thing everyone has missed about the pumps. Can anyone guess what it is? From a manufacturing perspective as well as a builder of the kit? OK who guessed correctly? I am talking about the pump tubes. Everyone has overlooked them in this discussion. They are very long at 5" or so before being trimmed to fit. In order to consider including the inner works, I must consider first how I would bore these thin wooden tubes which are octagon. I know how I would do it if I was scratch building them. It requires specialty bits and other tools. But to mass produce six such hollow pump tubes (per kit) that are made from wood and hollowed out would be a nightmare. How could one manufacture these? In addition, should I spend the money to create the photoetch inner mechanism parts and include them in each kit..... but not include these specially designed and bored octagonal pump tubes, how many people who bought the kit would have the tools and experience to create them from scratch. Lets say I spend the money for the photoetch parts and offer it as an add-on. How many people would be upset because they didnt really think it through, and later realize that they must create these tubes but cant for various reasons. They would probably return the item unopened and I would have a lot of them which I cant get rid of. These are questions that go through the mind of a kit designer....for every single part in the kit. I usually start a project considerring all of these details that everyone would want and desire (the wish list) and work my way "backwards" to simplify certain parts based on how they can be mass produced or built by the average model builder. In the case of the pumps.... I have yet to find a solution for making these hollowed out pump tubes quick enough to make it worth my time as a business concern other than to just do it the way anyone else would, which is by hand one at a time. Not gonna happen. So the hang-up is NOT really the photoetch......its the pump tubes. Sorry for the long explanation but I thought some of you might find it interesting....and be surprised that you and probably most of the others overlooked the obvious, unless of course you never had to consider making hundreds of hollowed out octagonal pump tubes from wood every few weeks.
-
Its nice if you have the staff to help you cut the stuff....right now the staff consists of me , myself and I. I am not against it but I would rather do it on a one to one basis depending on time constraints when it comes to a different wood for example. For instance I just cut and finished a barge kit for someone in Boxwood. It was double the regular price. But we worked it out independently. To make those PE sets would mean that I would have to order 50 - 100 of them at a time. I am not sure that there are 100 people willing to spend the "plus" price. There are people who ask me.....can I have it in another wood...... There are people that ask for extra parts.... Two different scenarios and both with their own special sort of problems. It really depends on how much they cost to make guys. I havent got that far along with that yet. So I cant say no at this point.
-
At 1/4" scale its not even 6" x 6" x 6"....just to give you a rough idea. I dont have the exact measurements handy but fore to aft its about 5 1/2". Its probably a little taller and a little wider.
-
The base kit will just contain the hull details. But there is so much information available thanks to the work of David Antscherl and Greg Herbert. It would be very easy to adapt this kit and add whatever details a builder chooses. With the books available this becomes very easy. In addition....if enough demand exists I would have no problems developing additional upgrade add-on mini kits. Many of you have seen the 3D work Denis Rakaric is doing on the Pegasus. I am very thankful for this and it will be yet another way for builders to d an exceptional job building this. The added details will be of enormous value. Here is one such image of the framed section I am working on. The small spacers will be an optional detail but you can see how this project will be like no other cross section kit yet developed. I am even working on a method to develop those shifted toptimbers you see. Denis is doing fantastic work and I thank him for it. This will be a long haul project for me and progress will be slow while I work on building the Winnie but I will do my best to keep you guys posted on the developments and progress. Showing such images is proof that it is so beneficial to collaborate with others to make these projects even better than anyone could possibly do on their own. Its a pleasure to work with these guys.