Chuck
-
Posts
9,701 -
Joined
-
Last visited
Content Type
Profiles
Forums
Gallery
Events
Everything posted by Chuck
-
 I understand, but you need not actually build some of these kits to know about their details. For example, I have never built a Dusek kit before. But I have seen them up close, both here on MSW and in person. The quality of the laser cutting and the materials supplied is excellent. Some of the best I have seen in a kit model. So I would be very comfortable voting for them. Other than that I think folks should just vote their experience....whatever the reason. For example, if you did buy an AL kit because its all that was available to you and you found the plans and instructions terrible, dont vote for them. A "NO" vote is just as important as a "Yes Vote" I have never bought or seen a Soclaine kit up close. I dont know anything about them. So I will not vote for them but instead I will just vote for what I do know about to the best of my knowledge. You dont need personal experience with all of the brands on the list. These results shouldnt correlate with the number of build logs for that exact reason. More of one brand in a lot of build logs could be about availability while this poll is about other aspects for the brands based on the best of your knowledge, whether from online viewing or from personal experience. In addition, the internet allows us to buy other brands that might not be available locally. Hopefully that will help give folks an introduction to these kits. As far as Australia is concerned, that explains a lot about why the Chinese kits are so prevalent there. Right or wrong but availability is a huge consideration and the expense to ship products there. In the states here I have not bought a hobby kit or product in any brick and mortar store for ten years. I have always bought them online and had them shipped. There are zero hobby shops within 100 miles of me that actually carry anything ship model related..... I think it is understood that most people wont have experience with many of the brands listed. Rather than have them list which ones they have had experience with I think maybe a question asking which kit brand you have had a bad experience with would be better. You can select those you thought had poor materials, plans and instructions.
 -
Do you see a button to show vote options.....then just select again. I think. This poll stuff is new in this version. Let me see.
-
You should be able to change your votes.
-
Please select up to three choices for each question. This will help model builders trying to decide which brands are worth looking into. Companies no longer in business or making kits. Let me know if I missed any and I will add them to the list. This is a list of Legitimate ship model companies.
-
I think I will stick with paper on these but just give the file for folks to "bash" a bit and use their own decal paper of choice. Here is the file. dolphinsweeps.pdf
- 269 replies
-
- 8
-

-
- Queen Anne Barge
- Syren Ship Model Company
- (and 1 more)
-
You are referring to this stuff right? I have seen it but have not used it yet. http://www.decalpaper.com/category-s/4.htm Chuck
- 269 replies
-
- 5
-
-
- Queen Anne Barge
- Syren Ship Model Company
- (and 1 more)
-
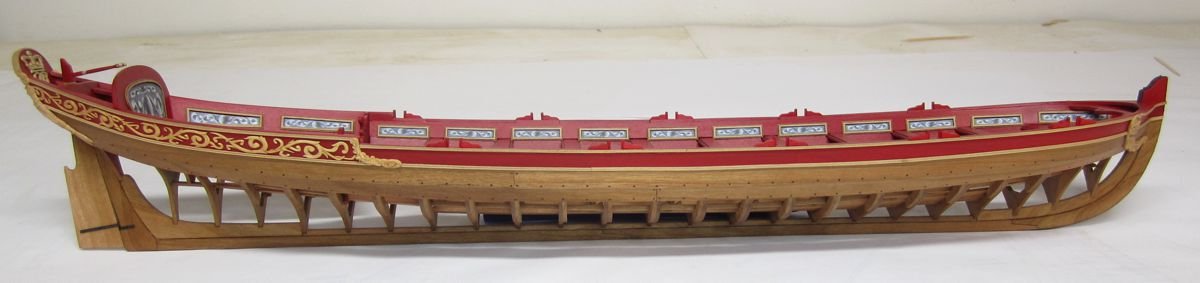
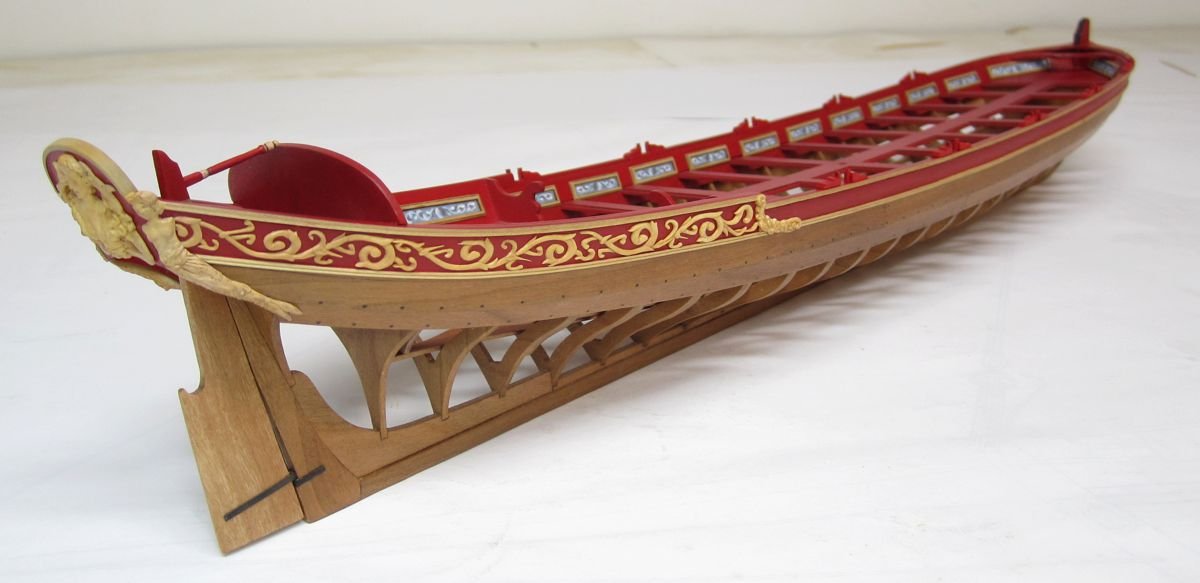
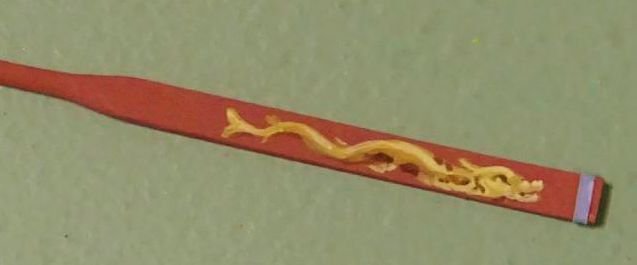
Thanks This isnt the best image but you can see them on these oars for the prince Fredrick Barge. Also note how thin the blades are. They also seem to have a metal protective band on the edge which I did not show. I painted it like it is sometimes shown on other contemporary models. Lots of ways to make your oars/sweeps unique.
- 269 replies
-
- 22
-
-
- Queen Anne Barge
- Syren Ship Model Company
- (and 1 more)
-
Thanks No its just paper. You cut them out carefully with a #11 blade and glue them on. Really simple. They are dolphins/sea creatures based on the typical decorations shown on sweeps of that time period. I basically tried to repeat what Druxey painted on his sweeps for the Hospital Barge. His sweeps as decorated inspired me to do the same. I think it adds a nice touch. Here is one of his painted sweeps. Although he painted all of his directly on each sweep. I cheated and made one and then scanned it, printed it .....cut them out and glued them on.
- 269 replies
-
- 19
-
-
- Queen Anne Barge
- Syren Ship Model Company
- (and 1 more)
-
Just a quick update. Even though I only have to make 5 more sweeps I can tell you that they take a long time to complete. I finished the sweeps for one side of the display so now you guys can better see what the finished presentation will look like. While working on these last few parts I am also finalizing the plans and gearing up to start making kits in just a few weeks. I am also busy writing the instruction manual. I am looking forward to the Winnie soon after !!! Chuck
- 269 replies
-
- 32
-
-
- Queen Anne Barge
- Syren Ship Model Company
- (and 1 more)
-
Indeed it is. Its just another scammer way of selling the brands we already know. They change up names quite readily. There really isnt a Nidale company. Its once again just ZHL scamming under a new name as they do often. See below. They are used interchangeably. I will add this new alias to the list. Think of it like a distributor more than a MFG. Even though they use these alias as a BRAND on many sites they are basically the same company. As far as I can tell there are three actual companies that make kits and they are sold under countless names. Its just a ploy as nobody believes there are 20+ individual ship model manufacturers in China with two or three new ones propping up every month. We currently have 20 Chinese names on the list that all sell the same stuff listed as a Brand Name on EBAY or Aliexpress etc.. https://www.aliexpress.com/item/ZHL-all-scenario-version-of-the-black-pearl-ship-model-kits/32759016135.html?spm=2114.search0104.3.49.6XaTPY&ws_ab_test=searchweb0_0,searchweb201602_4_5570020_10152_10065_10151_10130_10068_10344_10342_10343_10340_10341_5560011_5550020_10307_10137_10060_10155_10154_10056_10055_10054_5470020_10059_100031_10099_5460020_10338_10339_10103_10102_440_10052_10053_10107_10050_10142_10051_10324_10325_5380020_10326_10084_513_10083_10080_10082_10081_10178_10110_10111_10112_10113_10114_143_10312_10313_10314_10078_10079_10073,searchweb201603_30,ppcSwitch_2&btsid=bbd2ef87-74f5-48fe-be13-e0e856049302&algo_expid=f8791d81-32fd-4368-a065-c16307eed895-6&algo_pvid=f8791d81-32fd-4368-a065-c16307eed895 The other prevailing theory is that any shmo in China with a laser cutter and other capabilities will steal the pirated kits of other chinese pirates. This includes photos used on many websites. It is so rampant that although you think you getting a pirated ZHL kit which is usually crappy unto itself, but instead you get an even crappier pirated version of the pirated ZHL kit. You never know what you are getting til you open the box. It is literally a crap - shoot!!! LOL
- 1 reply
-
- 4
-
-
All of the build logs have been moved to the "Build logs for kits" area. The group was shut down long ago. But all of the build logs remain. Click here to see most of them after I did a search in that forum. https://modelshipworld.com/index.php?/search/&q=longboat&type=forums_topic&nodes=10&search_in=titles&sortby=relevancy
-
His email is woodprojectsource@gmail.com
-
Ron I just spoke to Roman. I placed another order from him myself. He said your order that was placed yesterday, went through just fine. He will get back to you soon but is away this weekend. His website and order page is working just fine..my own order went through with no issues at all. Chuck
-
Nicely done Dan.....I know how hard that must have been to hold your interest making two identical models one after the other. It certainly didnt effect the quality at all second time around. Well done. I would have been banging my head against the wall.....like groundhog day.
- 241 replies
-
- 4
-
-
- queen annes revenge
- pirate
- (and 2 more)
-
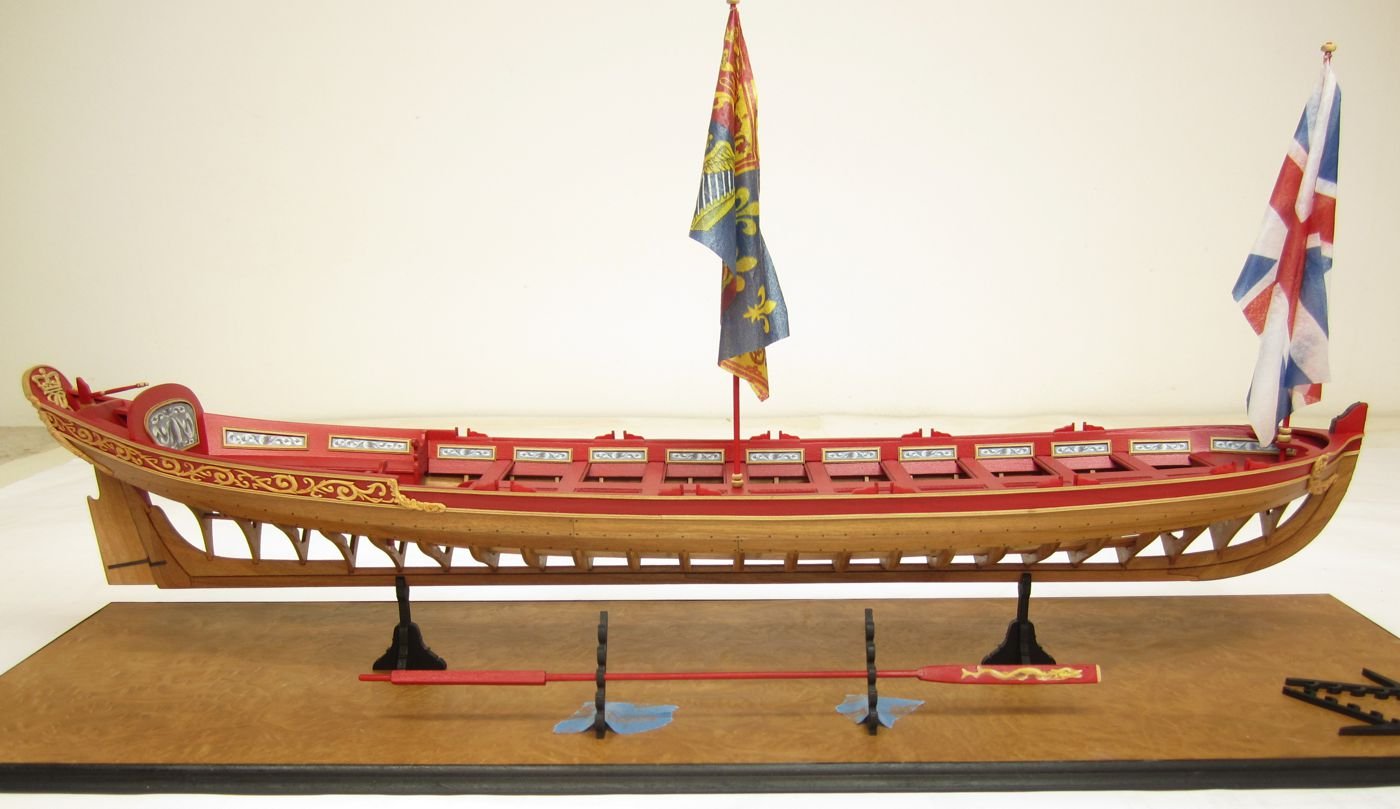
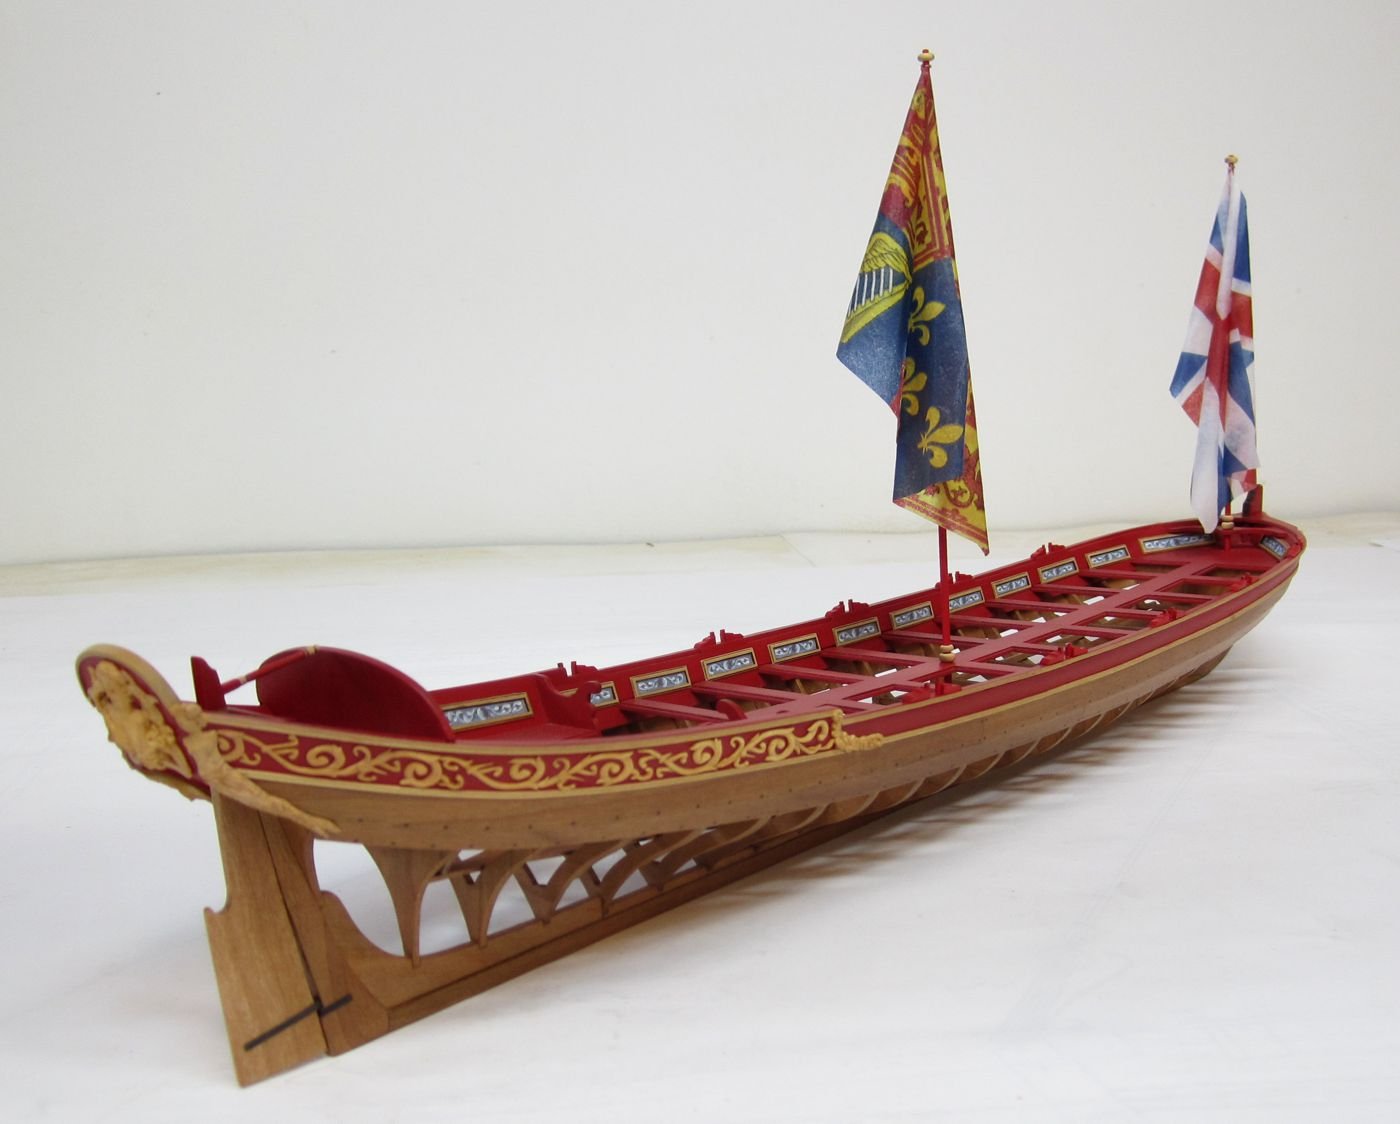
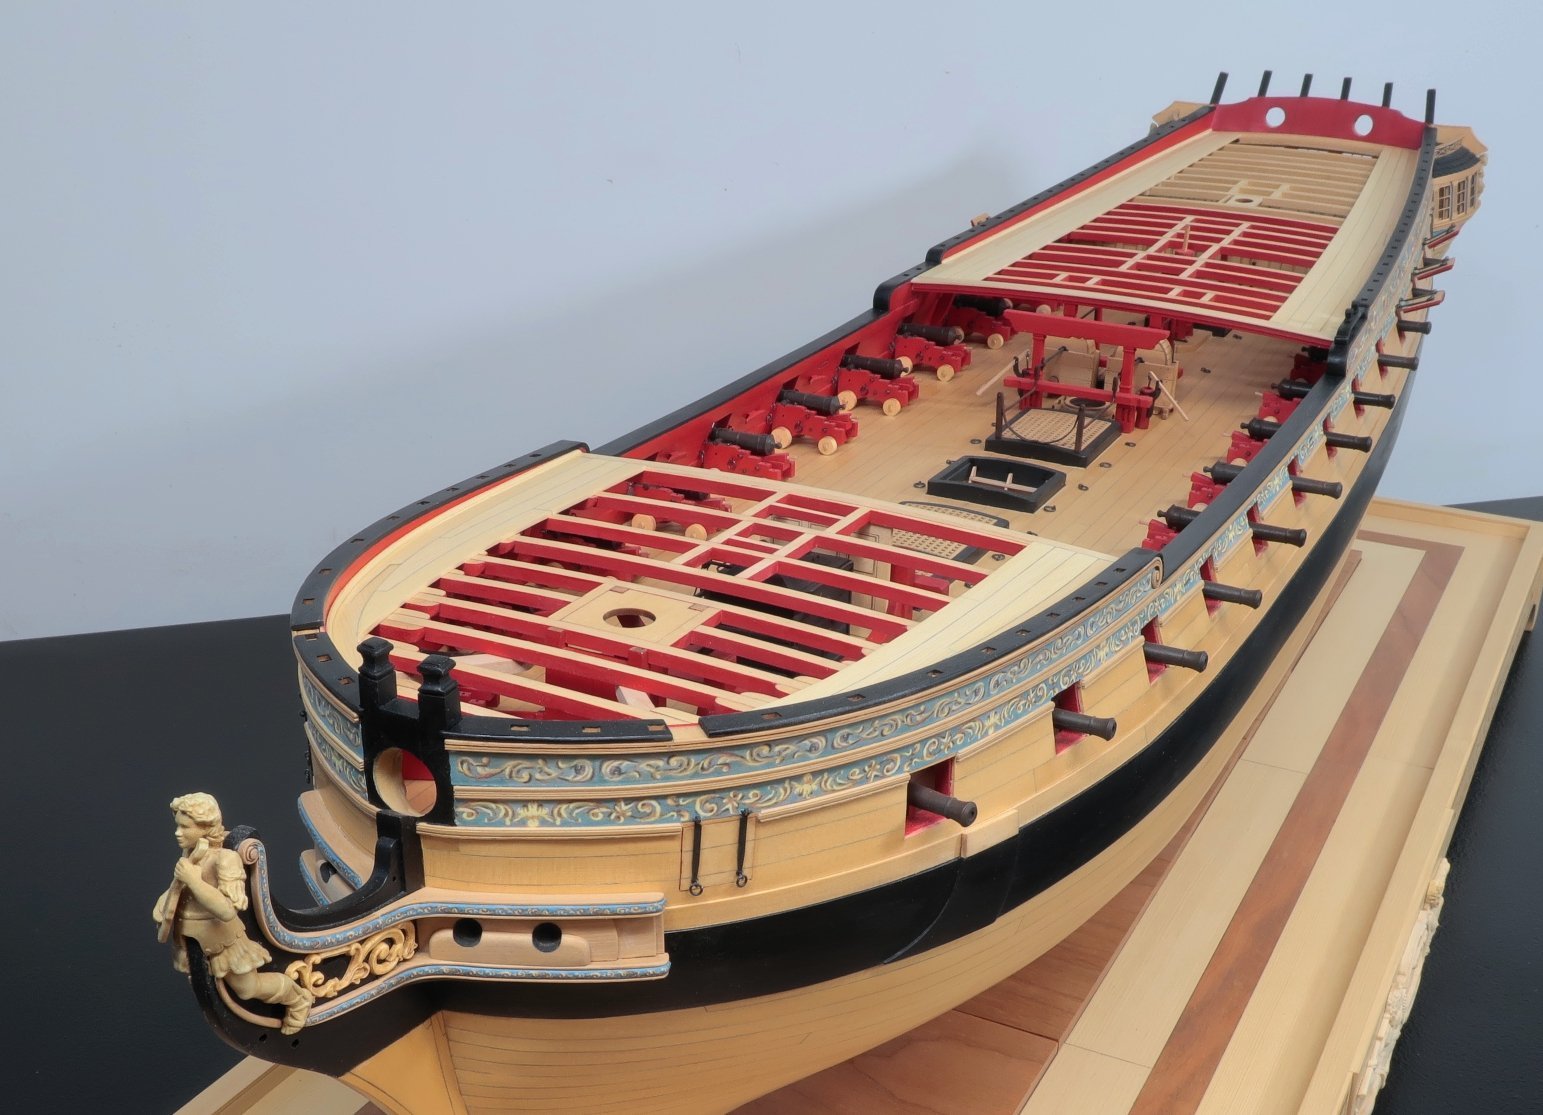
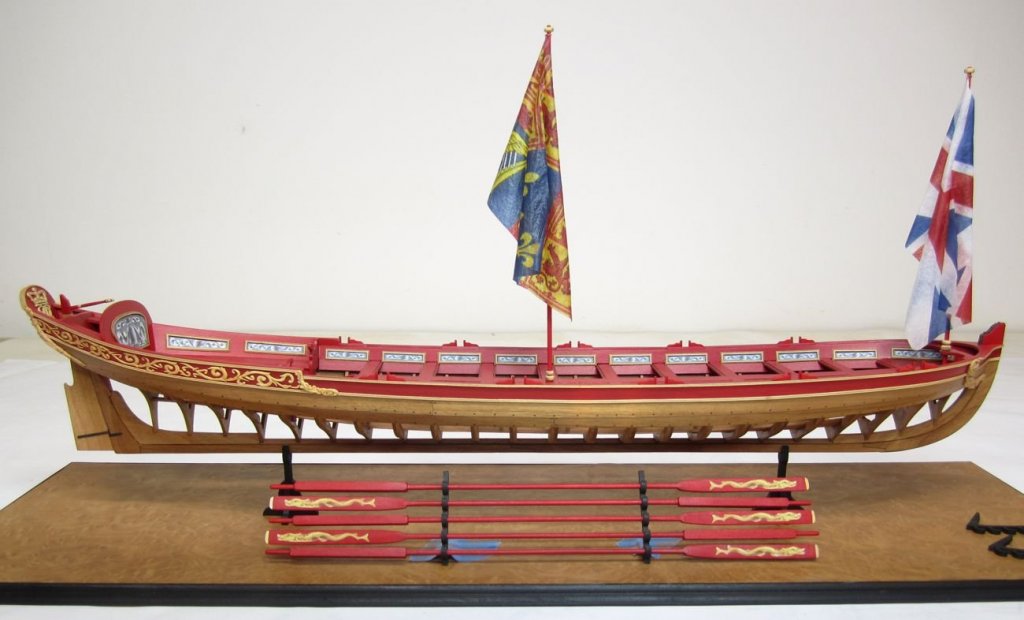
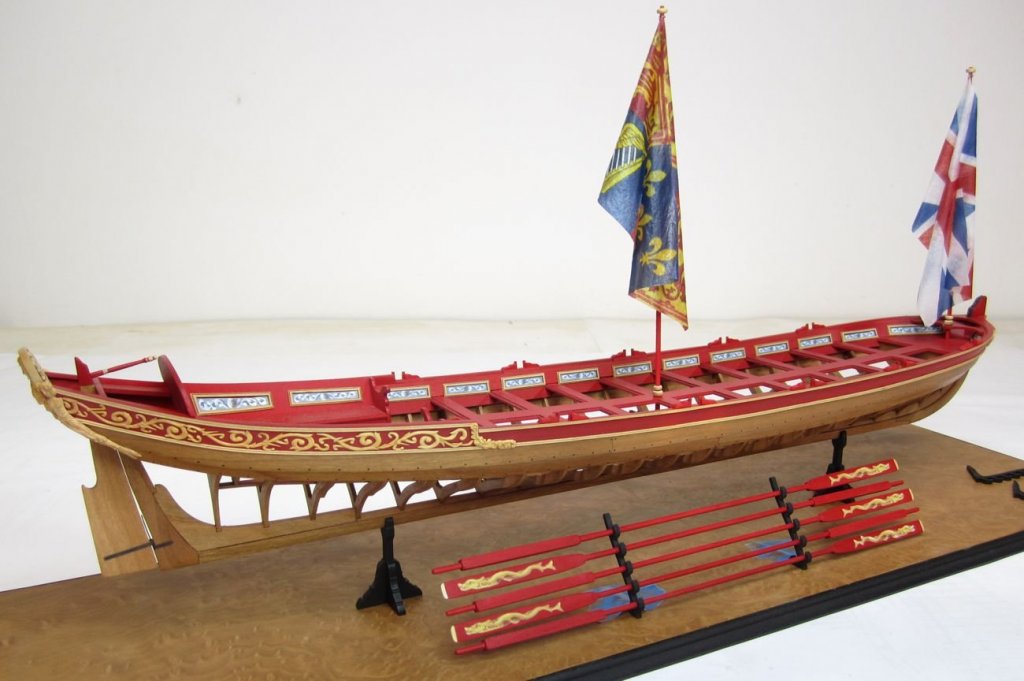
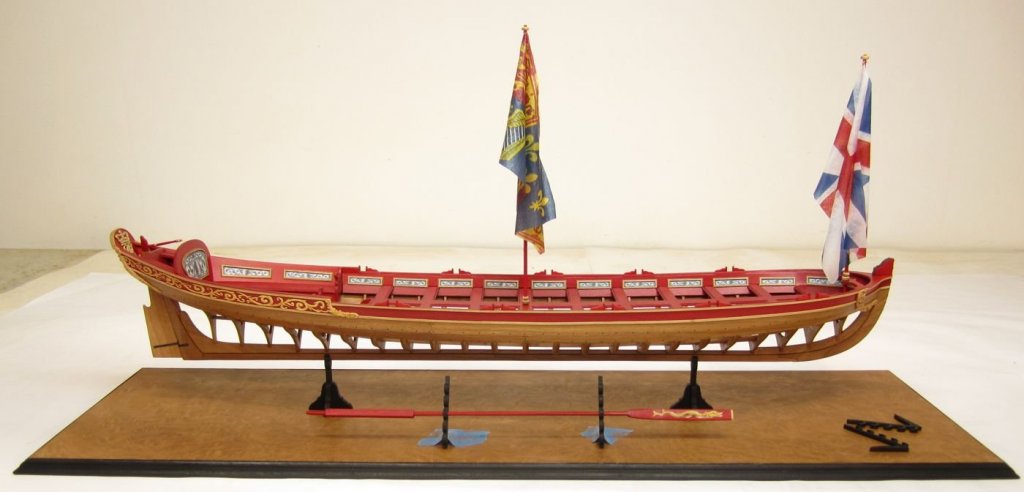
The hull is just a hair longer than 18". Its about 3" wide. Its not a small model. Its a pretty good sized project.
- 269 replies
-
- 7
-
-
- Queen Anne Barge
- Syren Ship Model Company
- (and 1 more)
-
Thanks guys, I hope so too!!! As an aside, I just spent the day revamping my site a bit. I needed to upgrade some parts. So please click around and if you have any trouble placing an order please let me know. I have tested the cart and all seems well. But just in case please let me know if you see some screwy text I may have missed or broken links. This was something I needed to do for a while although it doesnt look too different which I hope is good thing. www.syrenshipmodelcompany.com
- 269 replies
-
- 9
-
-
- Queen Anne Barge
- Syren Ship Model Company
- (and 1 more)
-
Spent some time making a base. Testing how to display the sweeps. Still only one sweep completed. Wont get to the others until next week. Even so, this project is in the home stretch. At least the model is. I still have to carve the decorations for the port side too!! The sweeps will be displayed 5 per side on laser cut racks. I just taped them to the base for this test but I like how it will look. Then I have to finalize the plans, write the instructions, think about packaging and start manufacturing. So still lots to do before these are shelf-ready. But at least now the long to-do list is shorter and more manageable. Chuck
- 269 replies
-
- 42
-
-
- Queen Anne Barge
- Syren Ship Model Company
- (and 1 more)
-
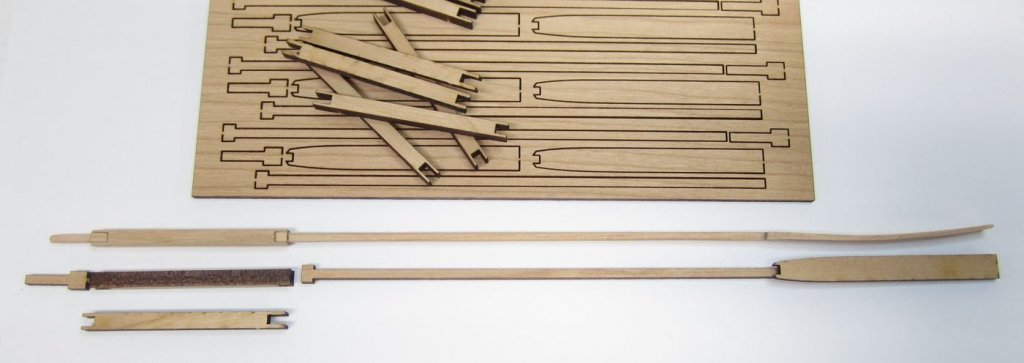
Prototyping the sweeps for the barge..... One down and nine more to go. Each sweep is made from four pieces. Each piece is shaped accordingly. It is either turned and rounded off or tapered and steamed bent. I will of course elaborate more in the instructions. But they seem to go together well enough and are pretty straight forward.
- 269 replies
-
- 34
-
-
- Queen Anne Barge
- Syren Ship Model Company
- (and 1 more)
-
No moving......you can create an album. Just click on the gallery and enter "scratch Built" category. Then set up an album for your images and follow the prompts.
-
Moxis......put it in the gallery. Those forums you mentioned were just links to the gallery. Unfortunately I can not add them to the forum list any longer since the last upgrade.
-
Snowy...please place the appropriate title when starting a topic. Dont just write "Snowy". You must indicate what the topic is in your title. Chuck
-
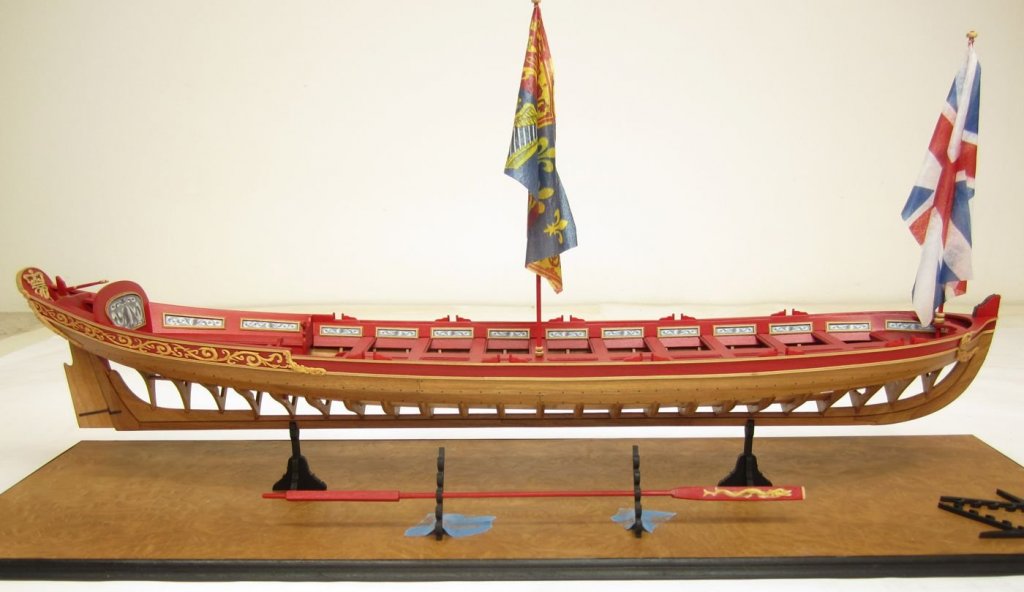
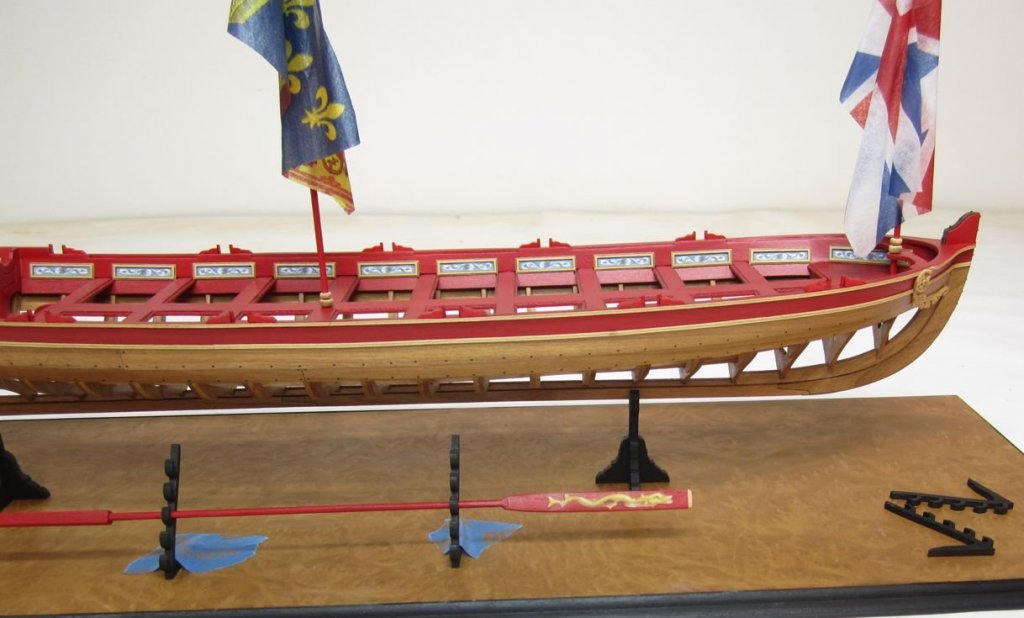
I am glad you found them.... The flags and ensigns are now complete. The dowels were tapered and painted red. Then I added the trucks. The flags are made just like on Cheerful. They are printed on tissue paper and shaped on the staff. The ensigns are the English flag from 1710 and Queen Anne's royal standard from the same time period. Next up will be the oars. Chuck

- 269 replies
-
- 40
-
-
- Queen Anne Barge
- Syren Ship Model Company
- (and 1 more)
-
Thank you guys. I am really getting excited to be back on this project. Hope to have more updates really soon.
- 1,784 replies
-
- 13
-
-
- winchelsea
- Syren Ship Model Company
- (and 1 more)
-
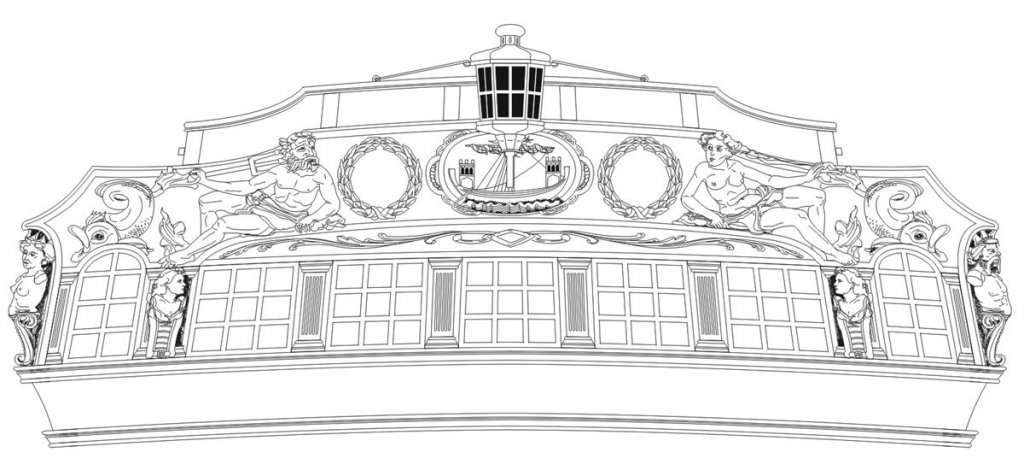
Welcome to the Winnie project. Yes I am starting over again. Many of you might wonder why I would do such a thing. There are several good reasons actually. Let me explain. - About 3 years ago during a flood in my workshop, the 1st Winnie was severely damaged. Although not submerged the humidty and moisture cause the planking at the bow to open up like a banana being peeled back. I did fix it as best I could but I will never be as happy with it now. - It has been a long time since I first designed the project and I have learned a great deal since then. In fact, I have already made numerous adjustments to the design which will make this model easier to build this time around. After watching so many folks build the Confederacy kit, the Syren and yes even watching Rusty build the Winnie alongside me....I was able to identify several key areas as trouble spots. I have since developed new design concepts to make constructing these areas less troublesome and easier all around. - Over the past several years...5 or 6 actually, I have discovered more info and facts about the Winnies appearance appearance. This includes finding the original draft of the Winnie herself. I originally used the drafts of her sisters to make the design. Although very very close, there are differences and I have made all of the required updates. I found this plan in Sweden of all places. I probably could have just continued and nobody would have noticed....but I would have known what the differences were. Better to do it right!!! - Lastly, as all of you know, this will be a commercial project of some sort. Probably like Cheerful with a starter package and many mini-kits. This project is so much larger than Cheerful and a frigate of this size would be very expensive to model. I wanted to ensure that as many folks who want to build her can give it a try. To use Boxwood or Pear for a project of this size would run into the thousands possibly and be very costly to manufacture as laser cut parts. I still do really want to. But some close friends talked me out of it for good reason. Anyway....the new version will NOT be made of Boxwood or Swiss pear. Instead it will be made out of less expensive materials where I could write about the techniques to finish the wood etc. I think it would benefit others to see a scratch model built from something other than costly boxwood and with some care it can look wonderful.

- 1,784 replies
-
- 45
-
-
- winchelsea
- Syren Ship Model Company
- (and 1 more)
-
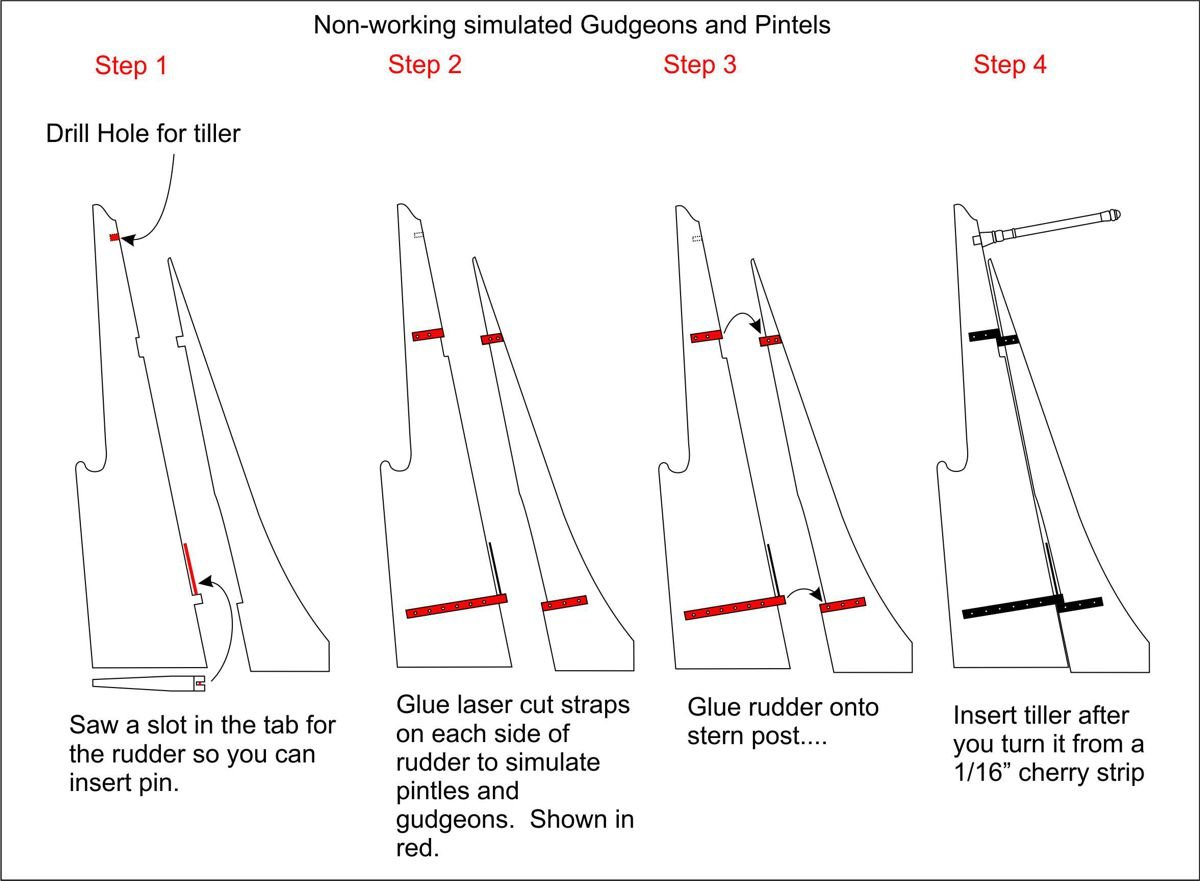
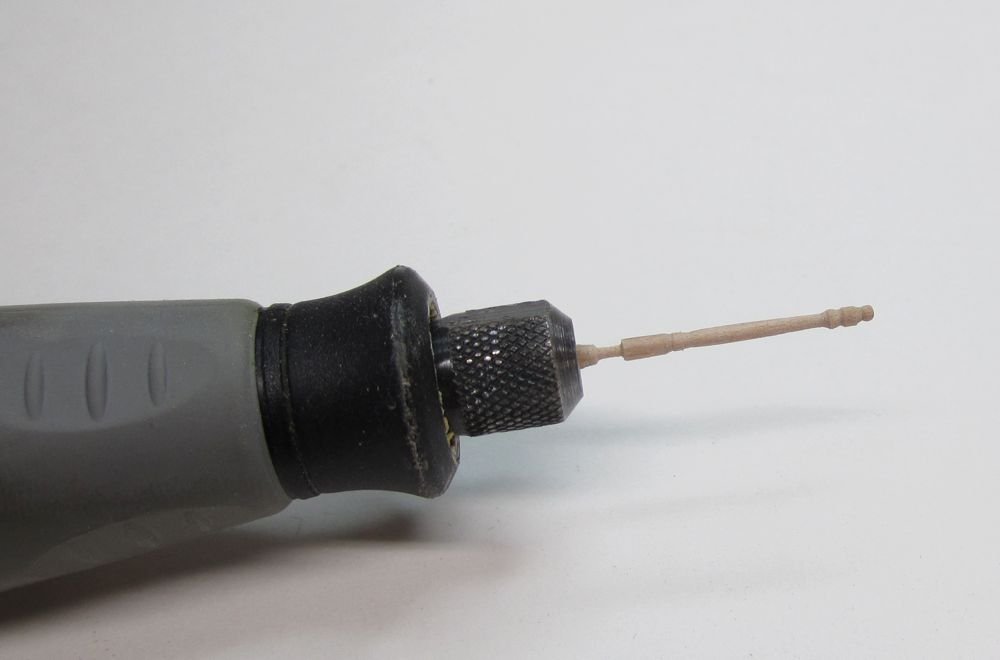
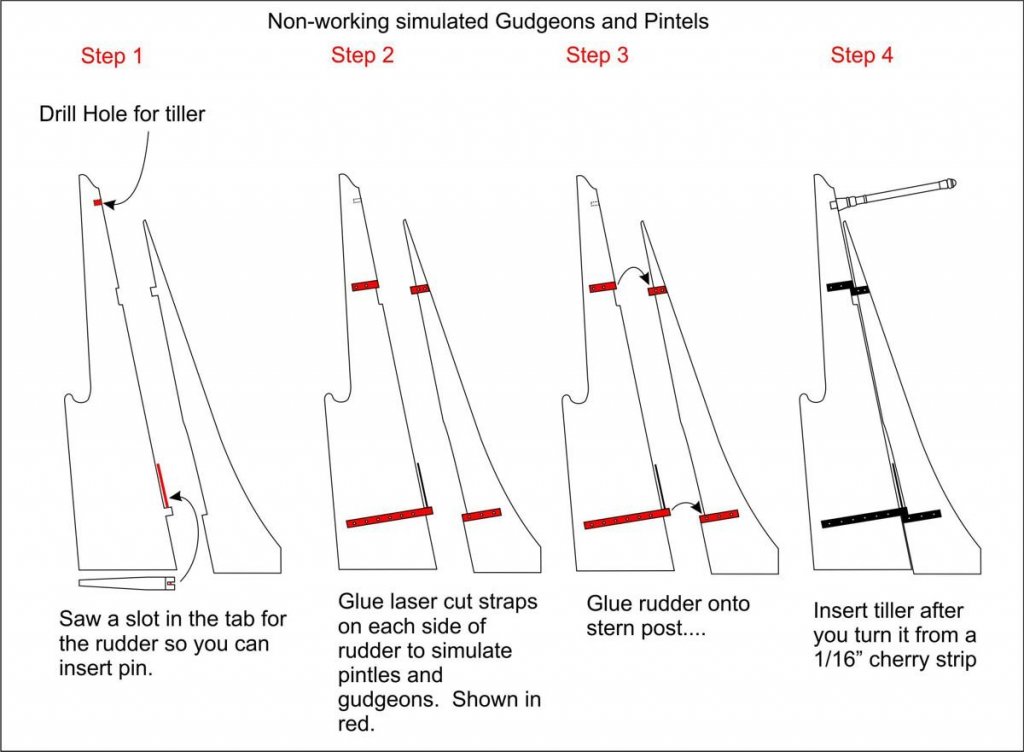
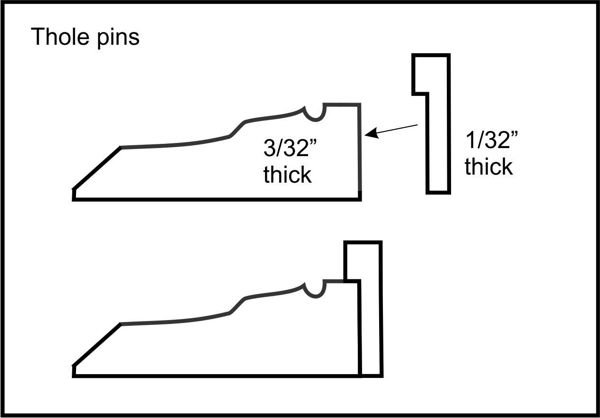
The rudder ...the tiller and the thole pins are now complted. The thole pins are made in two pieces as shown below. This looks simple but these pieces are very small. They were painted red after being glued into position. The rudder is not a working rudder. I mean its not done with working gudgeons/pintels etc. I always find it works its way loose that way and I often pull it off and the parts are damaged. So for simplicity the kit is designed with a non-working hinge that is simulated and the rudder doesnt work. It is glued and fixed in position but you would never know. Before starting on the pintles and gudgeons I cleaned up the rudder and tapered it towards the bottom of the rudder blade. You can see the profile on the bottom of step 1. This was possible because the rudder and stern post was designed with small tabs initially. The simulated laserboard straps are simply glued onto the rudder and each side of the stern post. Then the rudder is glued into position... This drawing may help explain... The tiller was turned from a 1/16" x 1/16" strip in my dremel rotary tool. And finally the images of the model once the work was complete. I am quite happy with how well the set up simulates pintels and gudgeons. It made the process of installing the rudder easier since the flying transom makes it tough to work in such a confined location.


- 269 replies
-
- 42
-
-
- Queen Anne Barge
- Syren Ship Model Company
- (and 1 more)