Chuck
-
Posts
9,701 -
Joined
-
Last visited
Content Type
Profiles
Forums
Gallery
Events
Everything posted by Chuck
-

MS Katy of Norfolk kit issues and parts replacement
Chuck replied to kearnold's topic in Wood ship model kits
That is very typical of those older solid hull kits. You get a hull...a few bits of wood sheet and strips and some string. Then you get a few packs of bad blocks to boot. Folks expect to get more these days but back then ....that Katy kit was what you usually got. With the plans you could make those into a great model but the instructions were about 3 pages long and of no help what-so-ever. Start a build log here and you will get some help as you build her. You can try Syren (link at bottom of my post) for the blocks and rope. Chuck- 14 replies
-
- 4
-

-
- schooner
- katy of norfolk
- (and 4 more)
-
Not yet as that project is a ways off. I wont begin until after the cross section and winnie are released.....
-
I couldnt say....I am hopeful that by the time I am ready to begin one of the two sources I have for info will allow me to use the lines they have taken off of the contemporary model.
-
The molding should have added only 1/32" as it was 1/32" thick so I would suggest another 1/32" less. I know you went with a different molding strip but that makes all the difference in the world when it comes to the thickness of the caprail when it is finished up. Chuck
- 47 replies
-
- 2
-
-
- queen anne barge
- Syren Ship Model Company
- (and 1 more)
-
Nicely done Sam.....try and keep it on the table top from now on though.... You might even want to sand those frames and caprail down even thinner if possible. The thinner it is the more elegant it will look.
- 47 replies
-
- 8
-
-
- queen anne barge
- Syren Ship Model Company
- (and 1 more)
-
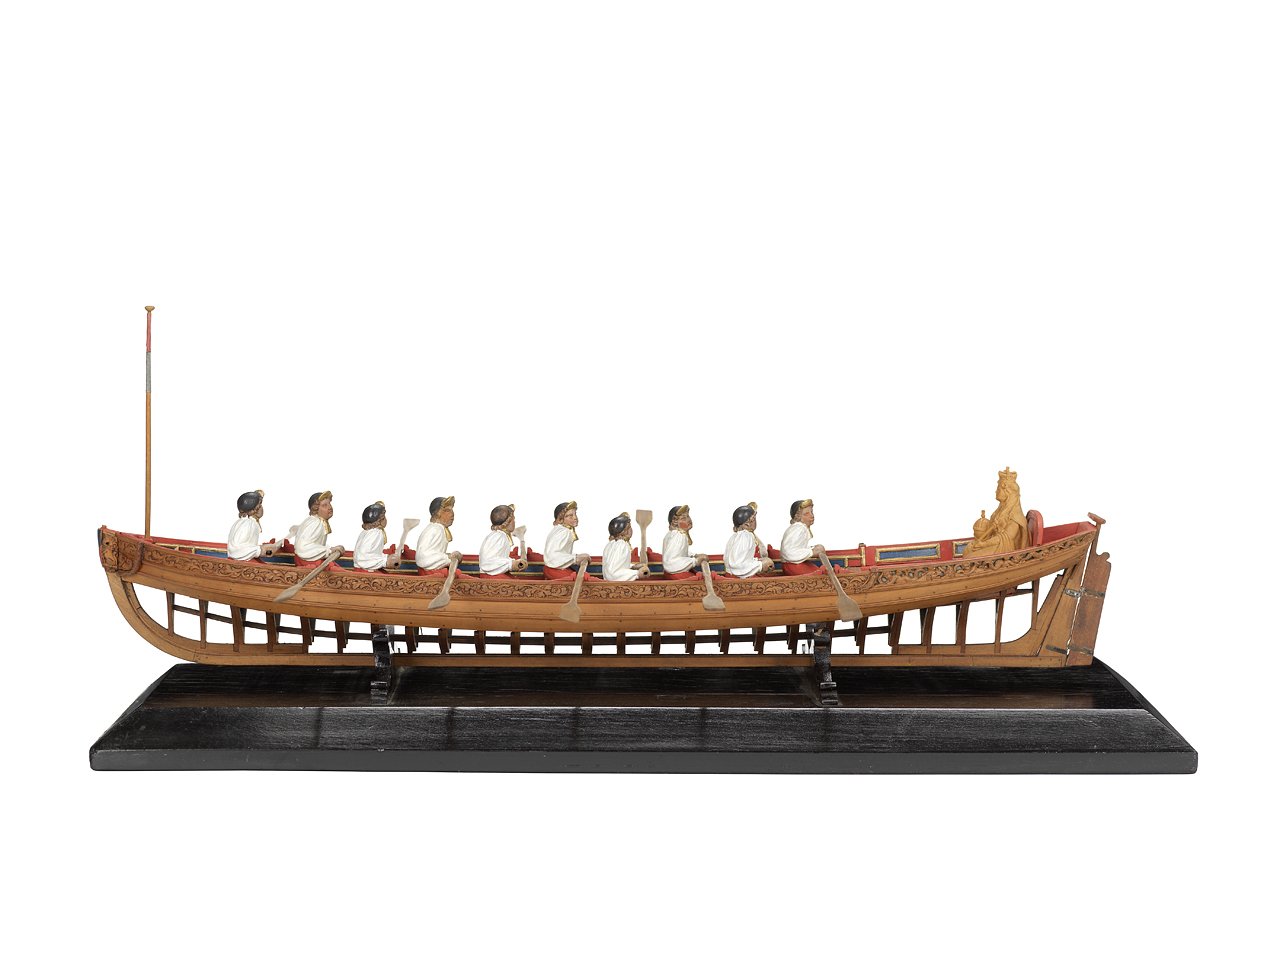
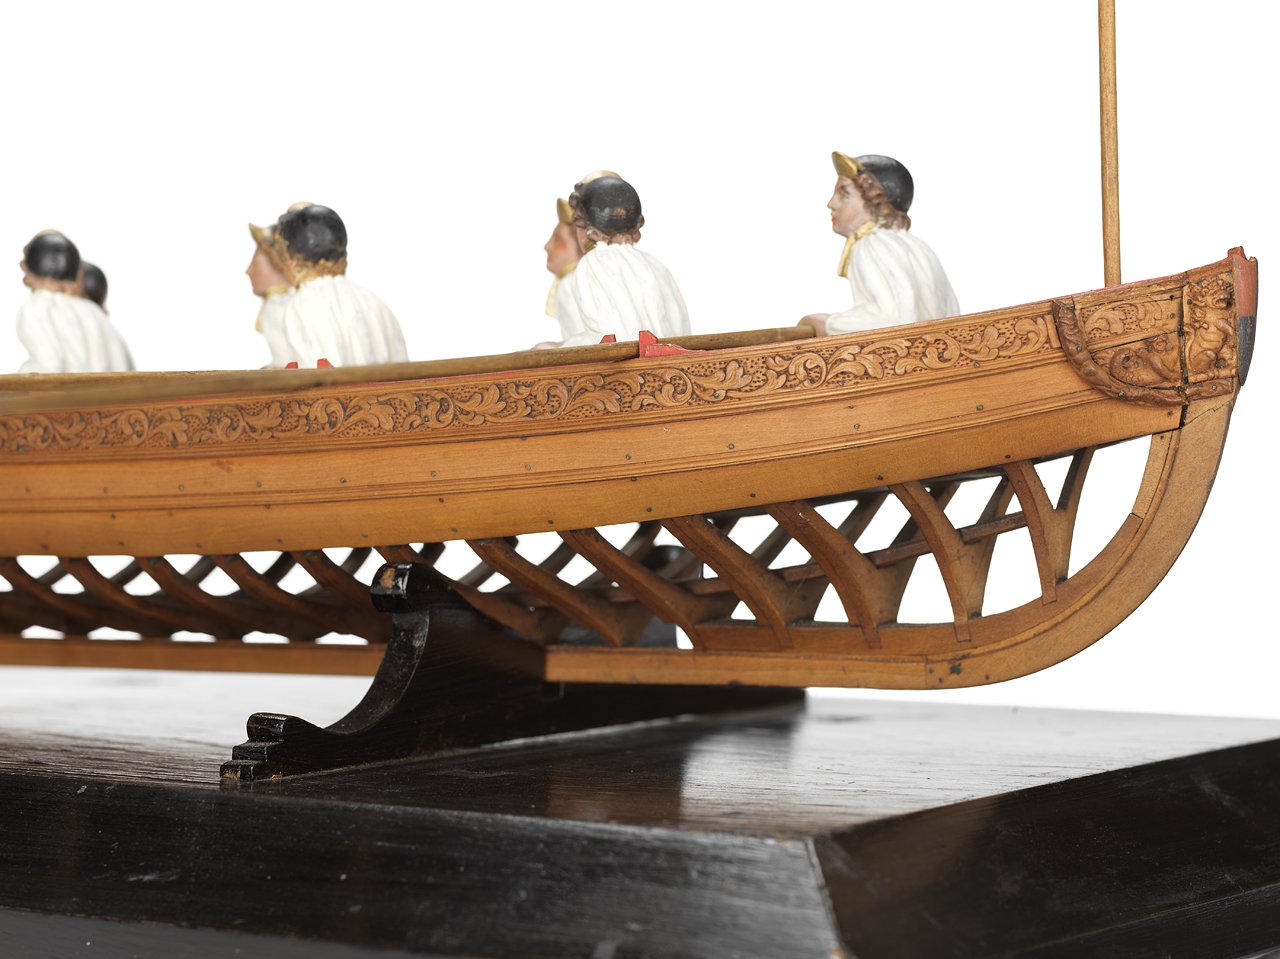
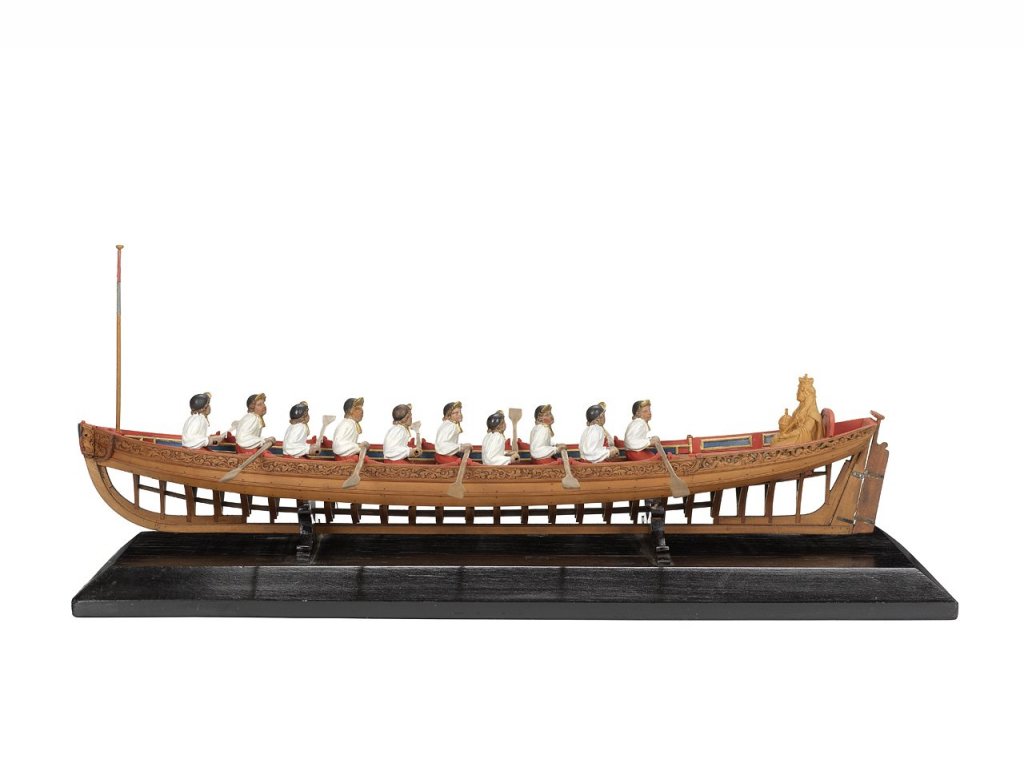
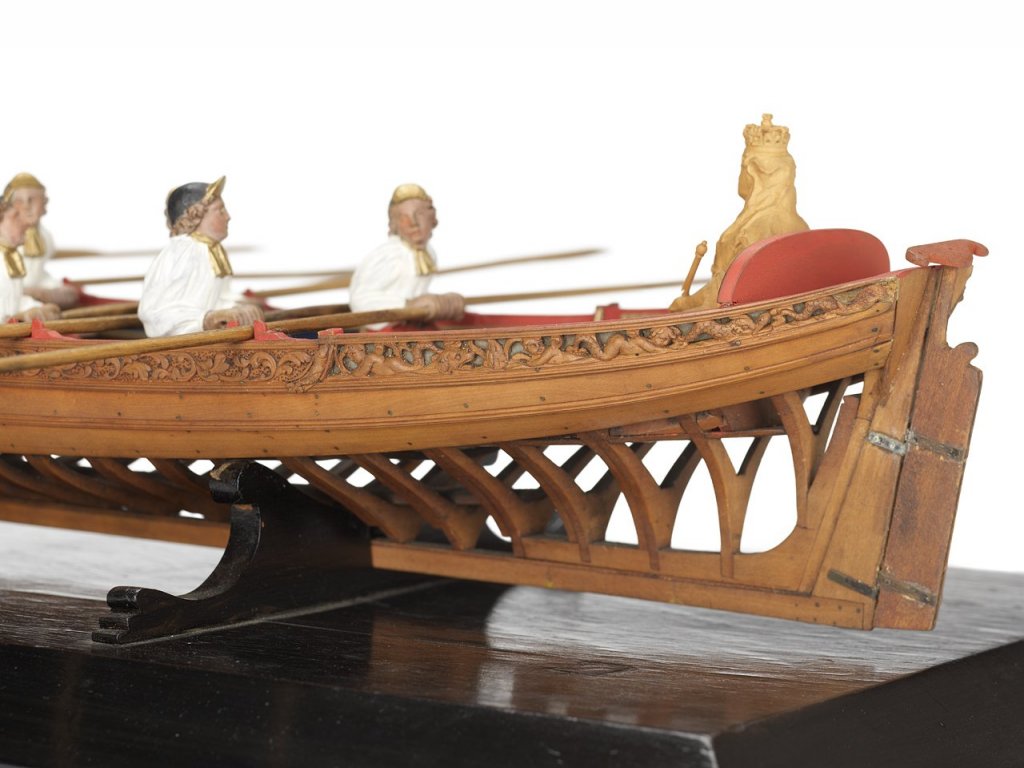
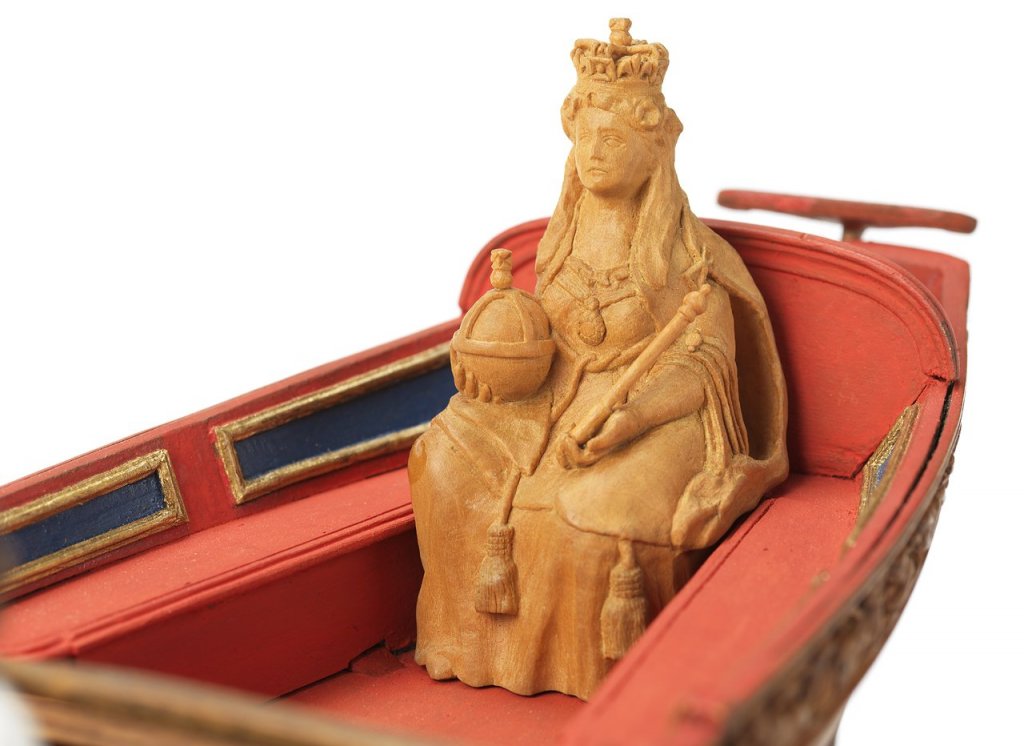
And before you get too far ahead, Here are some pictures of another Contemporary Queen Anne Style Barge with a different color scheme. This also served as inspiration for mine but I noticed I didnt include any images of this one in my instructions. Note the absence of a flying transom. But more interesting is the carved details that are taken all the way up towards the stem. Also note the additional carvings at the stem. Maybe one of you ambitious lads are up to this challenge. A little inspiration as this one really inspired me while building and designing the kit. I almost used that interesting tiller.....check it out!!! The queen anne figure is NOT original to the model and it was a replacement for the lost original. So they left it unpainted. But the other figures are all contemporary and original. I designed a what I hope is a great set of bones for you folks (which is the stage that Ben is at right now) but if you look around.....check out the museums... there are unlimited varieties of looks and decorations that this kit can be turned into....should you desire. I look forward to seeing some interesting and different iterations. But I do like what I went with as well. WAS IT EVIL OF ME TO POST THESE......ENJOY!!!!


- 74 replies
-
- 24
-
-
- queen anne barge
- Syren Ship Model Company
- (and 1 more)
-
That looks really really good Ben. It looks perfect. Careful removing those frame centers.....its the fun part.
- 74 replies
-
- 5
-
-
- queen anne barge
- Syren Ship Model Company
- (and 1 more)
-
They are a wardrobe/fashion company that sells ship models.......nothing fishy there, LOL.
-
Not seeing teh plans it would be impossible to tell. I dont think it will matter much either way in the final model.
-
Elmers....wood filler
-
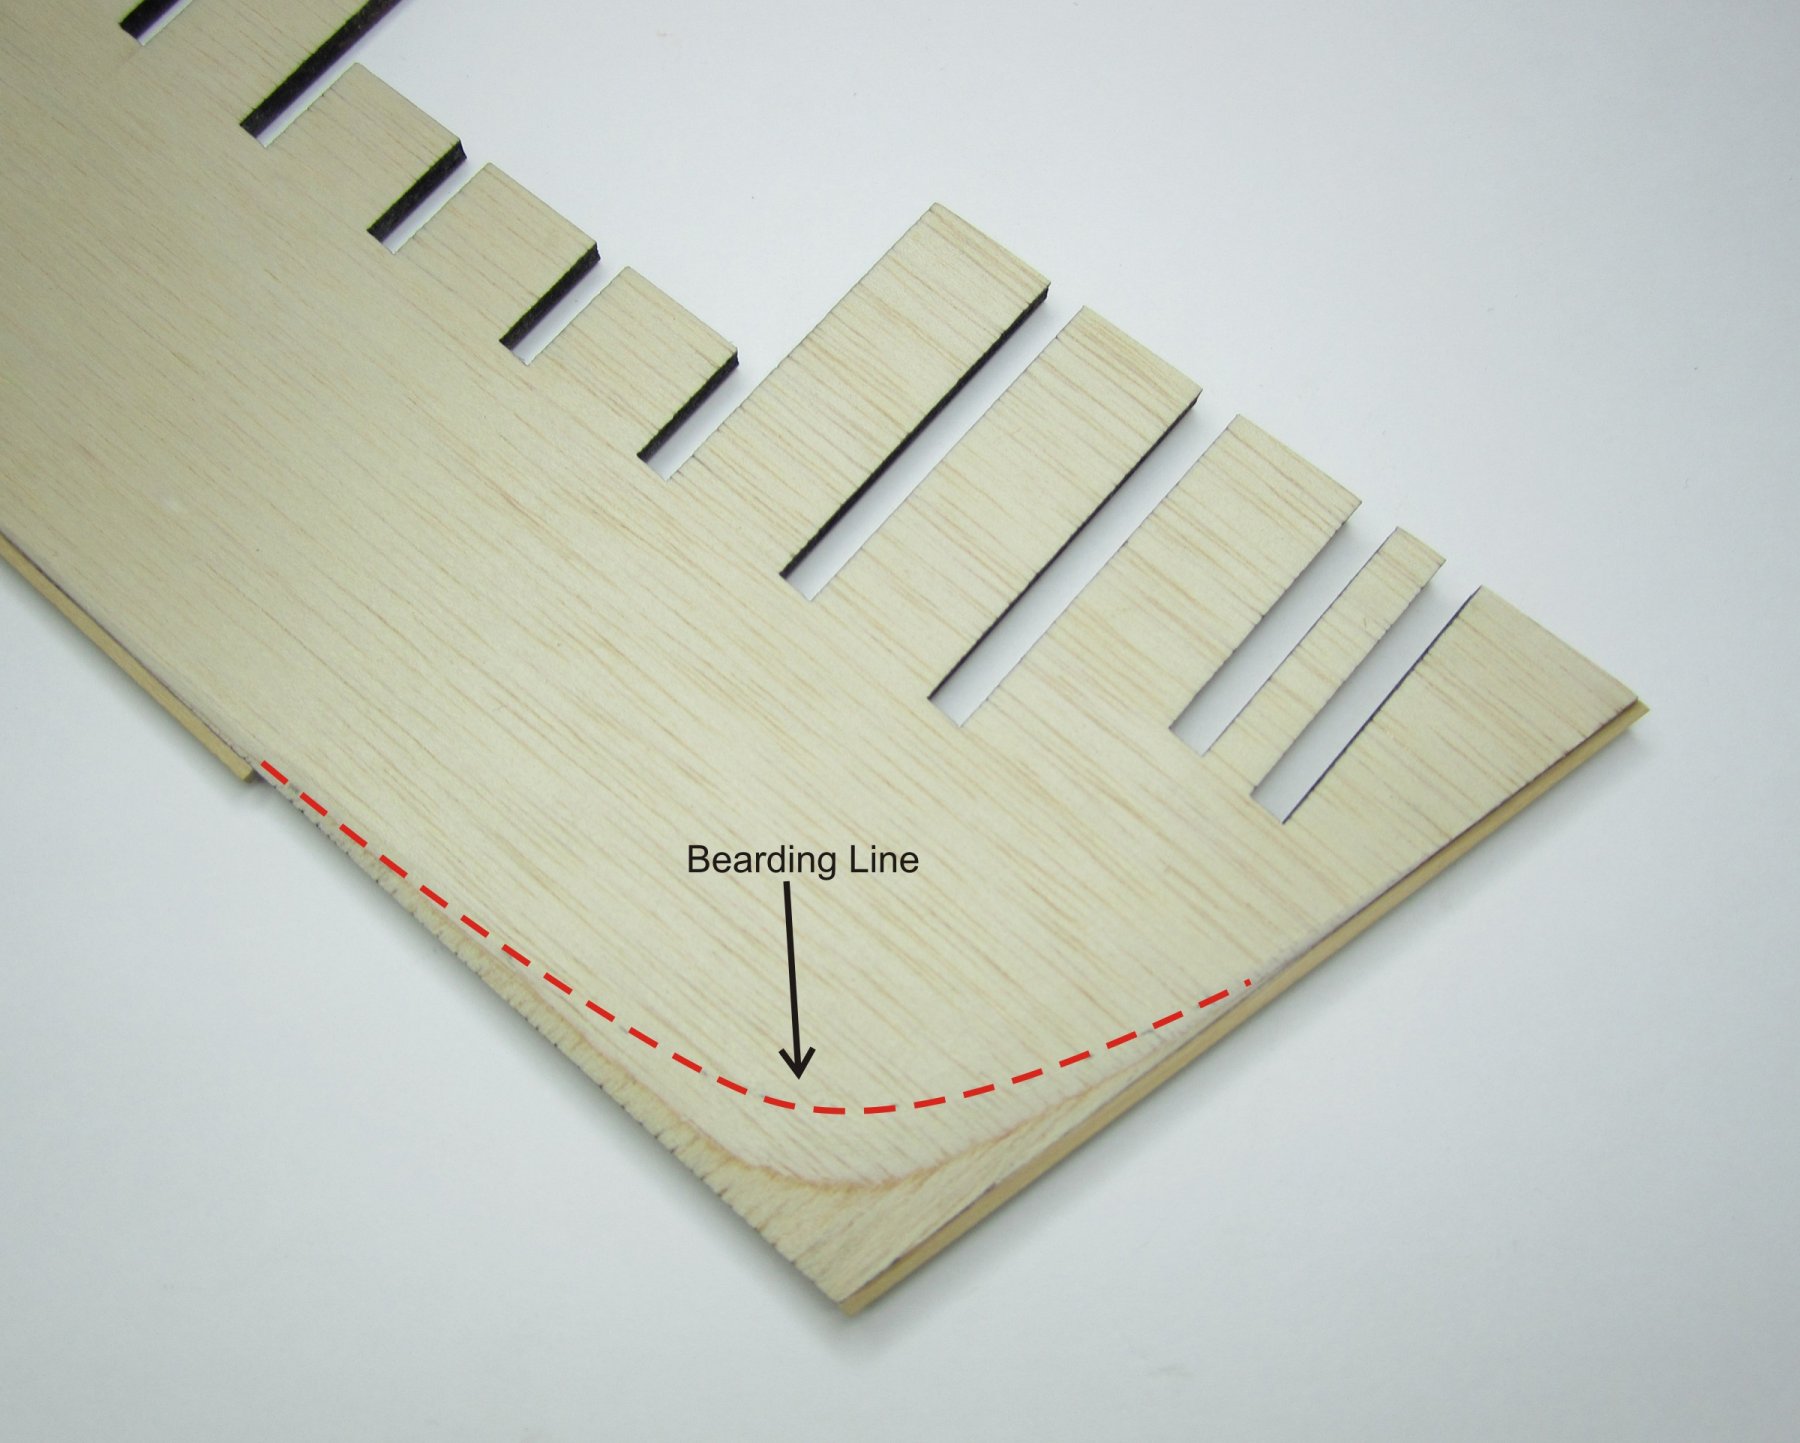
You need to trace them ina vector program like Corel Draw which is what I use. You just cant scan them etc. You need to use a drawing program or Cad program which when finished has vector lines. Those vector drawings are then saved as DFX files and sent to the laser cutter. But when you are tracing them and developing the part templates you must compensate for the kerf of the laser and char after its removed so once sanded the part is the correct size. So in most cases you are drafting slightly oversized. Most laser cutter companies like Boss laser have tutorials on their sites and so does Epilog. They wont teach you corel draw but what they have is quite useful.
-
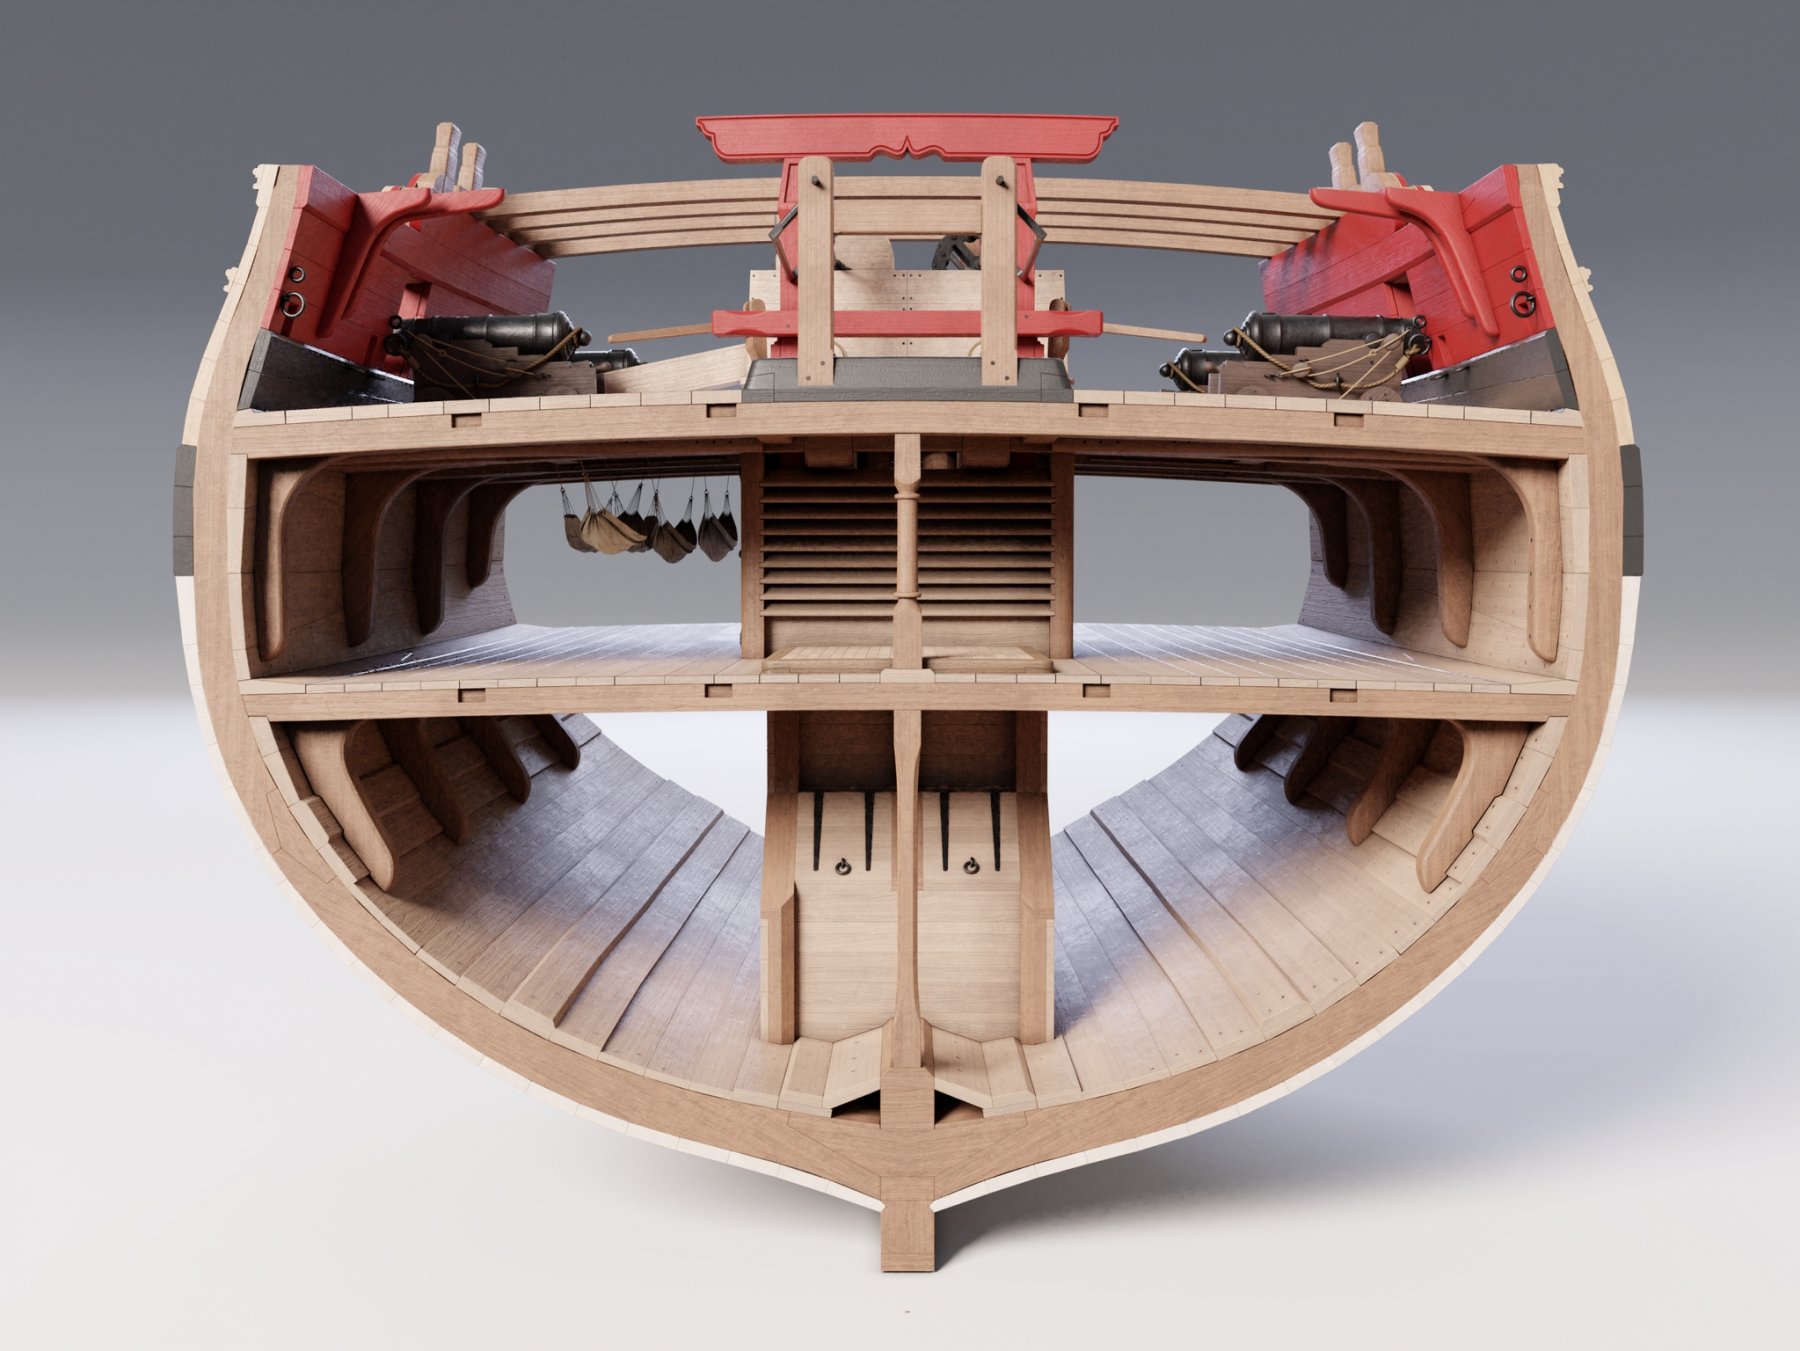
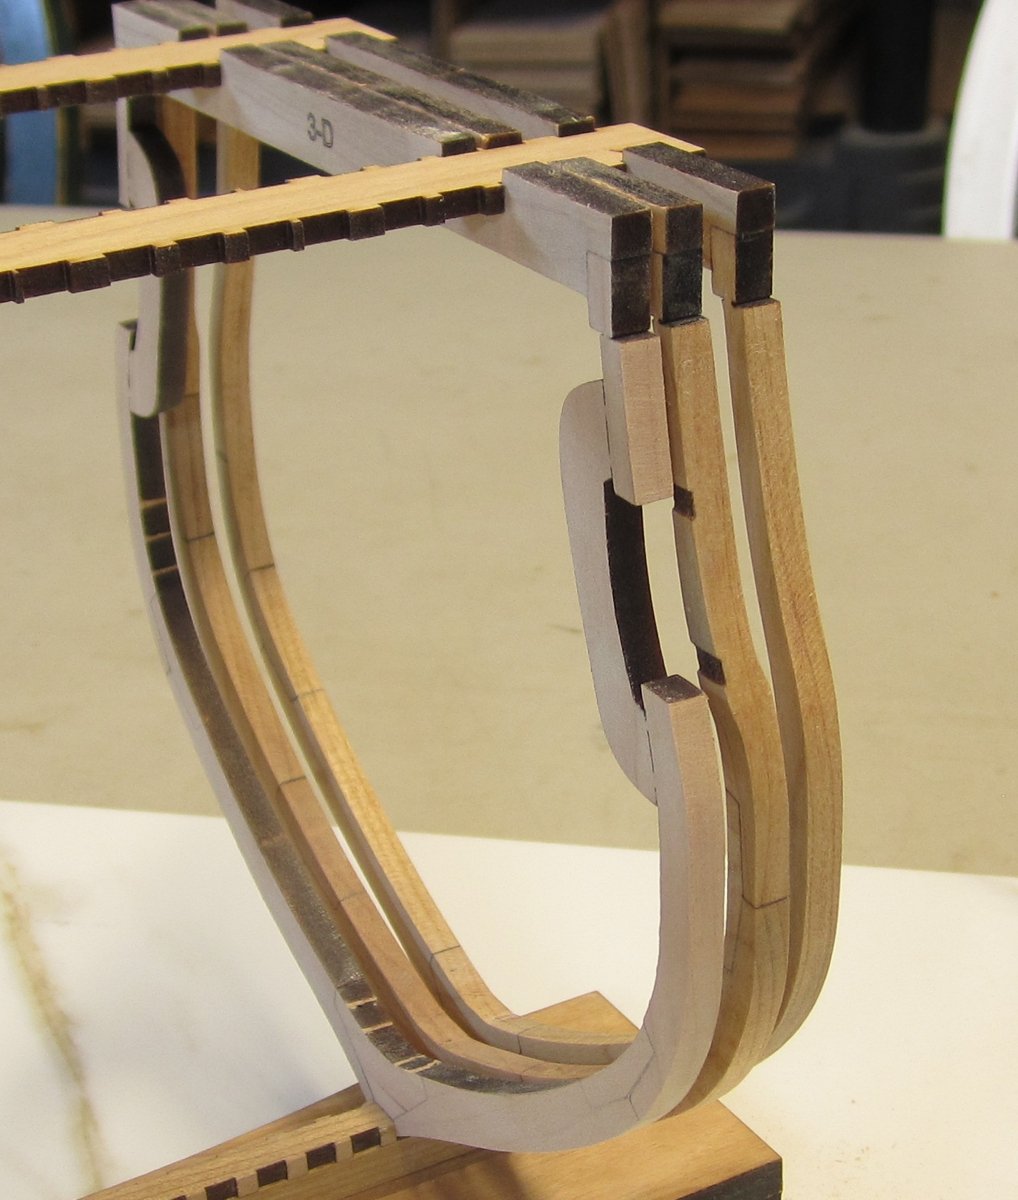
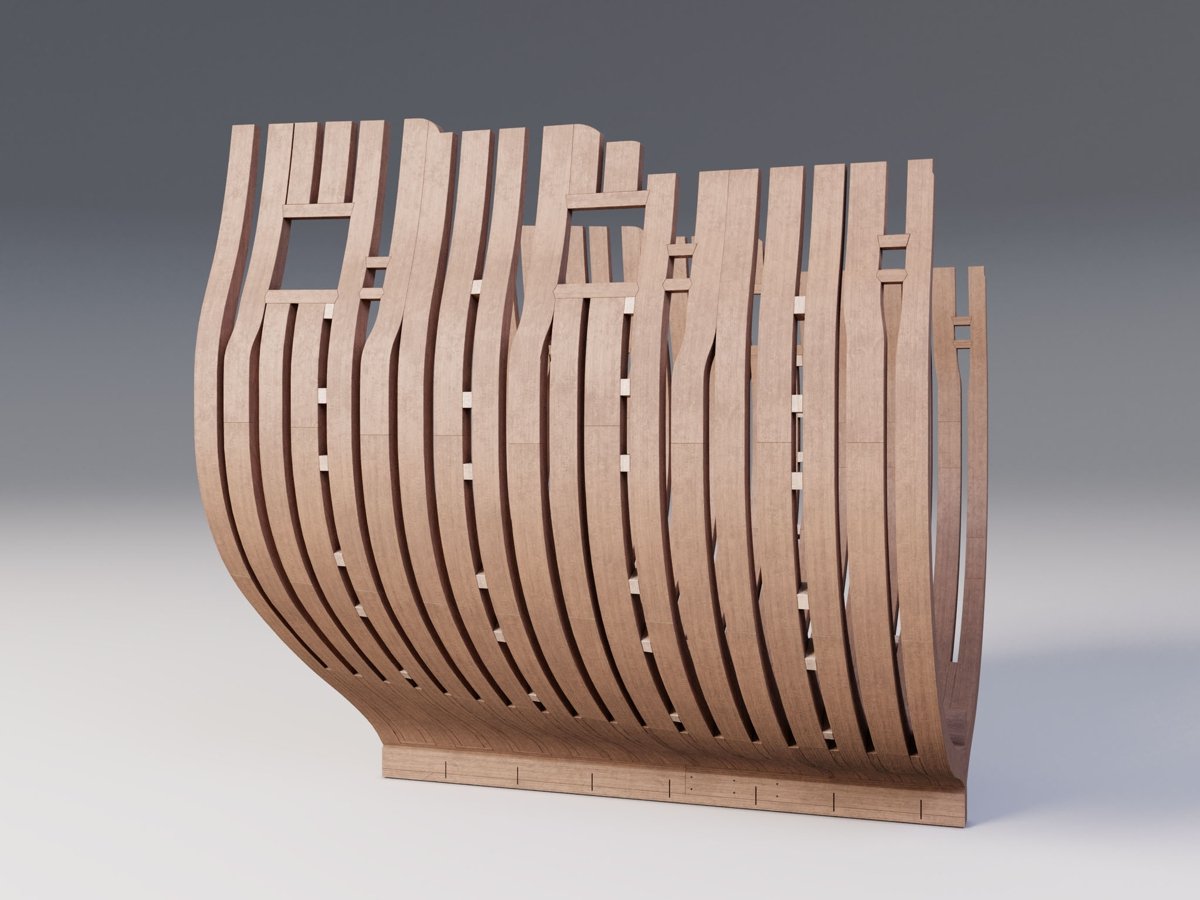
There will be a total of 20 frames in this cross section. It is a pretty robust section of the hull. Eleven of those frames are plain square frames, style one construction. There will be five frames with shifted or bent top timbers...Style 2. And finally four broken frames where the ports will be located.....style three. Style 3 is shown below. The concept seemed to work just fine. You can see I didnt even finish sanding the inside of the frame or apply any finish to it yet. I was just testing the concept. Once the port sill and lintel are added the safety tabs on the inside of the hull can be cut away. I dont think it will be too hard to do but given the tight space maybe but this will be better determined once I get that far. Now that the three styles of frames have been tested and approved....I can slowly move forward with drafting the remaining 17 frames. Its just busy work at this point. Having said that, this initial prototype will now be discarded and I will begin again with a new one after making a few minor tweaks. And this is how I design and bring a new project forward. This next rendition should be the final for all the framing so I will not be making yet a fourth iteration. In the meantime...have a look at one of Dennis' wonderful renderings of this cross section. This time with a lot more trimmings and you can see what the final will look like. Why build one when these renderings look so real???? Makes my actual wood version look kind of boring!!!


- 130 replies
-
- 39
-
-
Its not really the case. The Winnie is already designed and finished. Its all about just building it now with maybe some minor tweaks. No heavy lifting needed. This one on the other hand is such a new concept for me since I never built a fully framed anything. I could have gone the same easy route that most go and just do a hahn style project but that is nothing new at all. So the brain challenge drafting and designing these elements as developed by David Antscherl is just as much fun as building the Winnie. I am very grateful that it isnt the full hull. Once I finalize the three slightly different frame design concepts for these three different styles of frame I will be in good shape. Then its just rinse and repeat......and I only have one more left to tinker with...... Today at my shop the guys all came over and I handed out some laser cut frames to them so they can build them at home. You missed that today but next time you come I will give you a few. Its great having a bunch of testors ready and available so I can watch them assemble my crazy contraptions while I observe any problem areas that might prop up. So far so good. I believe Larry will be building this prototype alongside me and I will be getting him started in a couple of weeks......its a huge help with the entire process and fun for me to watch. Mike brought his Winnie too!!! Which looks great.
- 130 replies
-
- 13
-
-
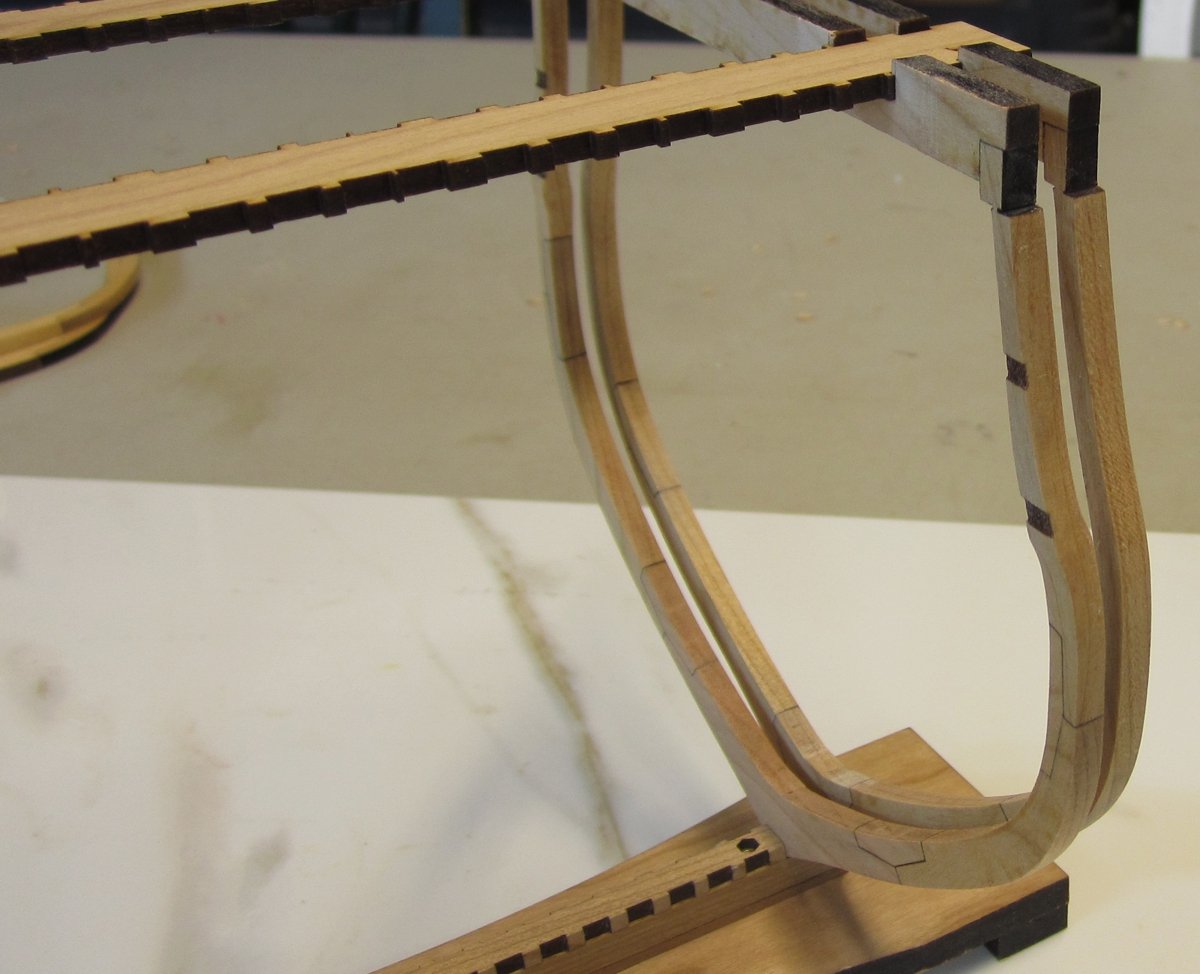
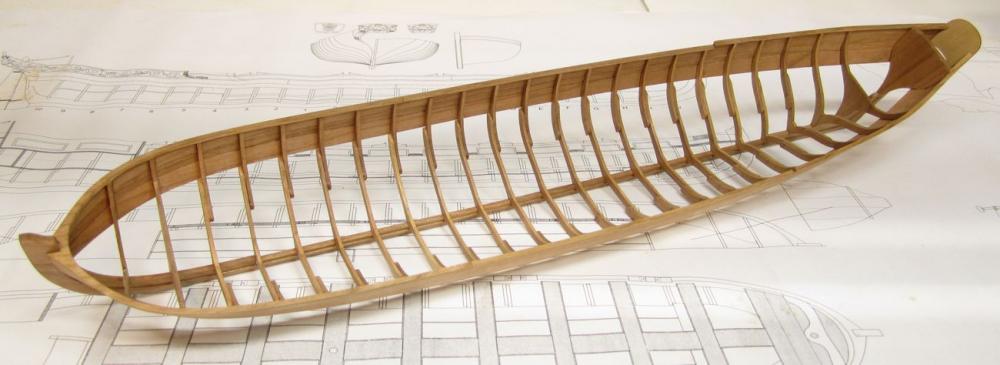
There will be three different types of frames. All with slight variations of my frame design concept. You have seen the first which is the typical square frame. This second type which are are only four or 5 have shifted top timbers....or bent top timbers. It is built very similar to the last frame I described and will be described in full in the instructions. It is shown below with the bent top timber. The other thing you might notice in this photo is the laser etched notches on the frame for the port sill and lintel framing. This should make adding the port sills easier although if you would like to, you can adjust the notch shape so it looks more like the traditional fish tail shape you see and expect. It all depends on how much realism you want to add depending on your experience. The other interesting pieces are the two notched registration strips that will span across the top of all the frames. I didnt see this on other fully framed projects and I thought it would be a nice addition. This is going to be very different than the stylized framing ala Hahn. The third and final frame style will be those that are broken with a space to accommodate the gun ports. I will be designing it so they can remain in one piece until after you insert the port sills and lintels. This will make more sense after I show pictures. This last version of my frame concept will be up next so I want to finalize the testing and get it done soon. You can see the bent frames and "broken or split" frames in this 3 d rendering. I am working from aft towards the bow so the next two frames will be those broken frames to accommodate the gun ports Chuck


- 130 replies
-
- 27
-
-
I forgot to mention that and wasnt about to take another video. But its not for the ends. Its for when you do larger ropes. Like the 2mm stuff. It may have more of a tendency to unwind slightly. So instead of just running some water down the rope after its laid up....I like to make a weak and very thin solution. I mix some white glue or even titebond in the cup of water....its still very watery and then run that over the rope. Once dry....no worries about unraveling.
- 22 replies
-
- 6
-
-
- ropewalk
- rope rocket
- (and 1 more)
-
Ah but that is the half hull.....not one of the other three full models. The crazy thing about these three models is that none of them even match in size or scale or shape. They are all slightly different so its pot luck if they any one particular set of lines will be considered correct. But at least I will be able to say it was from one of them. Either way I will create a kit of a boeier and do have some time to wait as I am still working on the other two projects. But this is my back up boeier pictured below for any such kit should the Czar model info not make its way to me when I am ready to start.
-
I already checked out your log actually.....it is exactly the way I am thinking it will go. But like my mini kit for the cheerful pumps. Folks will still need to form the eight sides from square stock using a 7-10-7 template. But that is something everyone should learn to do at some point anyway.
-
I have already actually built the model pictured above......but I just built it in my head. Every step....by step. I know exactly what the pieces will look like and how all of that trim and molding will be added, etc. Its not very difficult at all. The hardest part of that project is convincing ANY one of the folks who can get the lines off the original contemporary models to do so. Any one of the three contemporary models will do. Or to even share the findings some of them already have. Its the toughest thing I have ever had to try and do. Its like these folks in that part of the world think they are keeping a secret cure for cancer or something. They are just very hesitant to share primary and secondary source information. Its very off-putting. I have never had this experience with any other museum, author or knowledgeable historian or scholar on the subject. I could get state secrets easier than it has been trying to get info on this boeier. It may be the thing that kills this project before it has a chance of getting out of my head and onto the workbench. Its probably why no really good kits or projects exists for these boats. Everything is "need to know" and "I am not sure I want to share" type of stuff. Its very unfortunate. And I am actually willing to pay for the info....if they wait too long I am sure some other not-so-ethical group will try and find a way to steal it though. So hopefully they wont hold out too much longer.
-
Looks good....but check those plans....the rabbet strip doesnt extend that far aft....

- 607 replies
-
- 6
-
-
- winchelsea
- Syren Ship Model Company
- (and 1 more)
-
That Echo Cross section and how it is presented is exactly how I plan on presenting the Pegasus kit. Literally the same. One side planked and one side open framed.....Its beautiful. Chuck
- 130 replies
-
- 23
-
-