HOLIDAY DONATION DRIVE - SUPPORT MSW - DO YOUR PART TO KEEP THIS GREAT FORUM GOING! (Only 36 donations so far out of 49,000 members - C'mon guys!)
×


Chuck
-
Posts
9,660 -
Joined
-
Last visited
Content Type
Profiles
Forums
Gallery
Events
Everything posted by Chuck
-
 Yes..to help with locking them in position and keeping all the frames aligned. It takes the guesswork out of it. But I could have easily gone with every other frame. Less room for error. Since none of that will be seen anyway I figured why not give folks a little more assurance. There is no mistaking where each frame goes this way. The frames will also be locked in position along the tops as well. So its pretty much “build a frame and put in place..”. It all worked out nicely on the test cross section.
-
I would love to see some pictures.
-
The Rising wood.... This is the long notched piece that sits on top of the rabbet strip. This was added next. It has notches cut out of it to accept the floors of each square frame. This is cut in two lengths. Put the shorter forward length in place first. I would not sand anything off as far as laser char. Only sand the small connector that held it into the sheet. This is a thick piece. It is 3/8" thick. The laser may not have cut through in some places like the corners. So before you try and just push this piece out of the sheet, look at both sides to see if you need to use a sharp blade to cut some corners all thru etc. If you want to sand anything you might want to touch up the end that will be the seam between both lengths. Try and squared it up a little. But dont sand too much. You dont want to make it any shorter than it should be. They were left a bit longer at this joint so you can clean it up and get a tight fit. Make sure you dry fit both pieces on top of the actual plan sheet. You want the length overall to match pretty darn close. After you get the forward section on first...dry fit the last aft length while its on top of the plan. This way you can see if you must shorten the forward end a bit at the joint between the two pieces. It should match the plans very closely. As you can see I didnt touch the inside of the notches. But I did sand the char off the top and the sides once it was on the keel assembly. The rising wood, like the aprons are wider than the keel. So make sure you center these on both sides when you glue them in position. You want an equal over-hang of the keel on both sides. Next up is the stern deadwood...still no finish applied to these pieces.


-
Just a heads up folks, There are a limited supply of chapter 12 parts in cedar available. I must reiterate this. For the tenth time. Once again I ask all of you to refrain from buying it unless you are close to needing it. I know I have asked before but that hasnt stopped folks. Its a shame really. I have limited capacity as a one man shop. I really want to make sure that folks who are waiting on these parts get first pick from this batch. If you are not yet at least building chapter 10 or 11, please dont buy from this batch. Wait at least one month to order this last chapter. I have cancelled at least 8 orders for chapter 12 parts so far. All from folks who do this every time I launch a new chapter of parts and I have had this conversation with them before. Please wait a month for the next batch please as a friendly gesture to your fellow builders. Most of you guys havent even started chapter 3 yet! Very selfish of some folks. After countless conversations...ughhh!!!
- 1,784 replies
-
- 11
-

-
- winchelsea
- Syren Ship Model Company
- (and 1 more)
-
Either my phone or my old Canon digital camera.
-
Its hard to say Greg. I often think about that myself. Its similar to another thought I always ponder. Is it that much more difficult to produce say the lower apron traditionally with a vertical mill or by hand with a chisel? The laser cutter is basically just another tool in the workshop. Like a shereline mill. Having none of those, how would that change the difficulty level or possible design concepts. I imagine if you had none of these tools and had to make the lower apron entirely by hand, then either design concept would be a challenge indeed. Now using a 3d 5 axis cnc machine to make the lower apron would certainly change it up even further. With that tool I could make the entire lower apron in one piece with the steps and angles. But then it would be more like a plastic kit and merely an assembly of parts at that point. Not much of a challenge or rewarding. So my hats are off to the folks who do this stuff entirely with a chisel in hand, like the original builders of contemporary models. Chuck
-
Thanks, yes this is something new. This lower apron will be mostly covered up in its entirety so I thought to try something new. It looks like it will work out nicely and make placing those cant frames in position so much easier with out needing a disc sander. There will be a corresponding jig for the top of the cant frames as well. Stay tuned. fingers crossed
-
Sure…I do that all the time. chuck
-
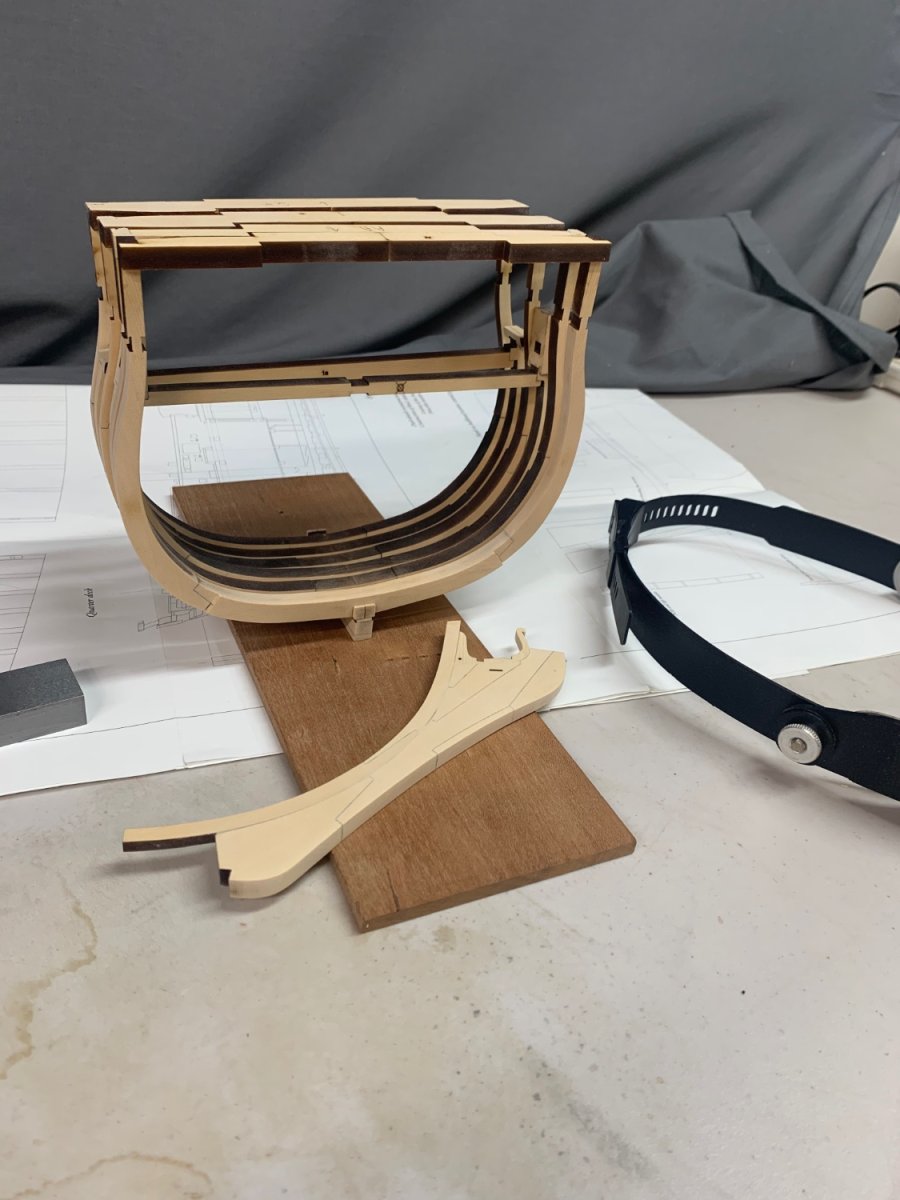
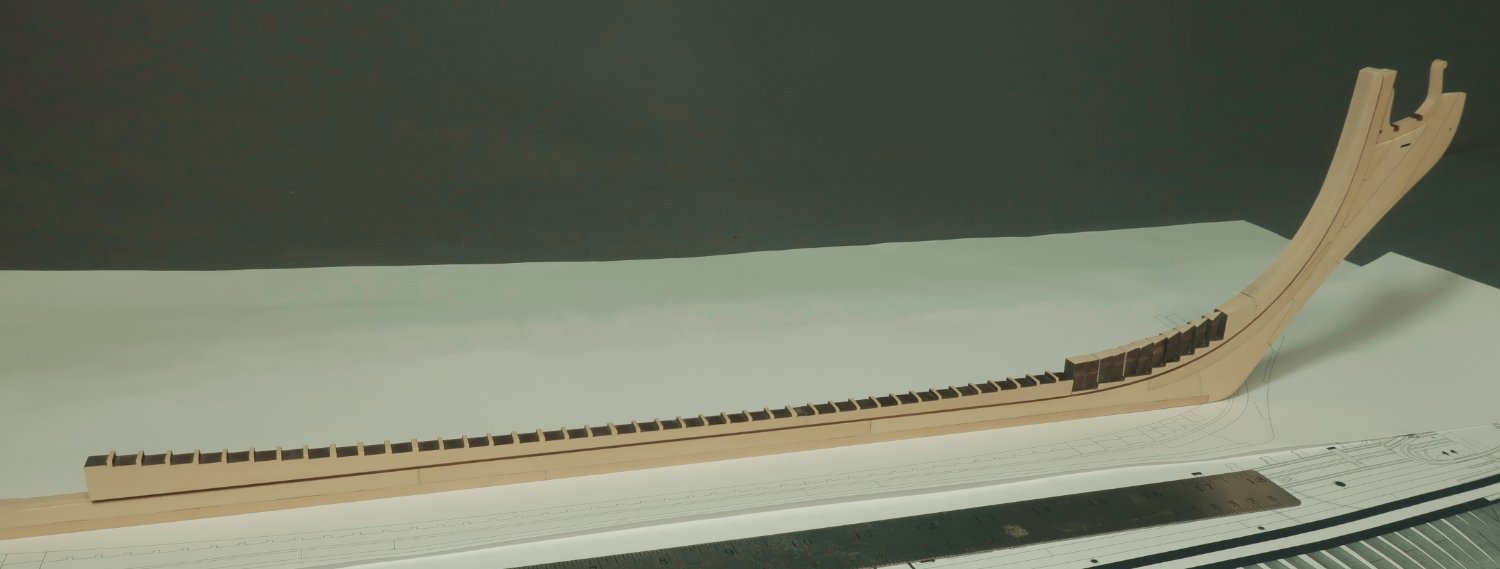
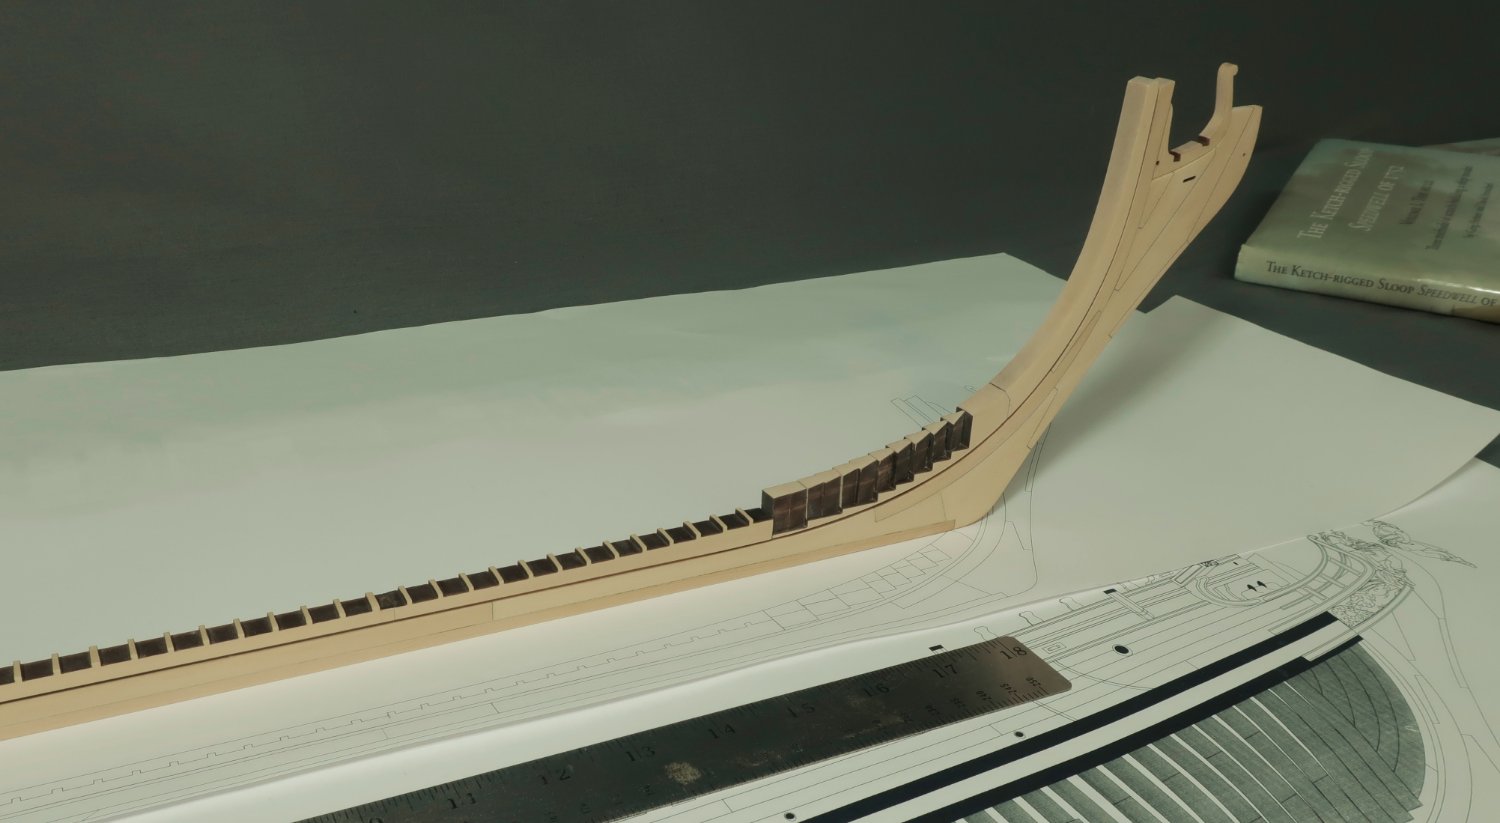
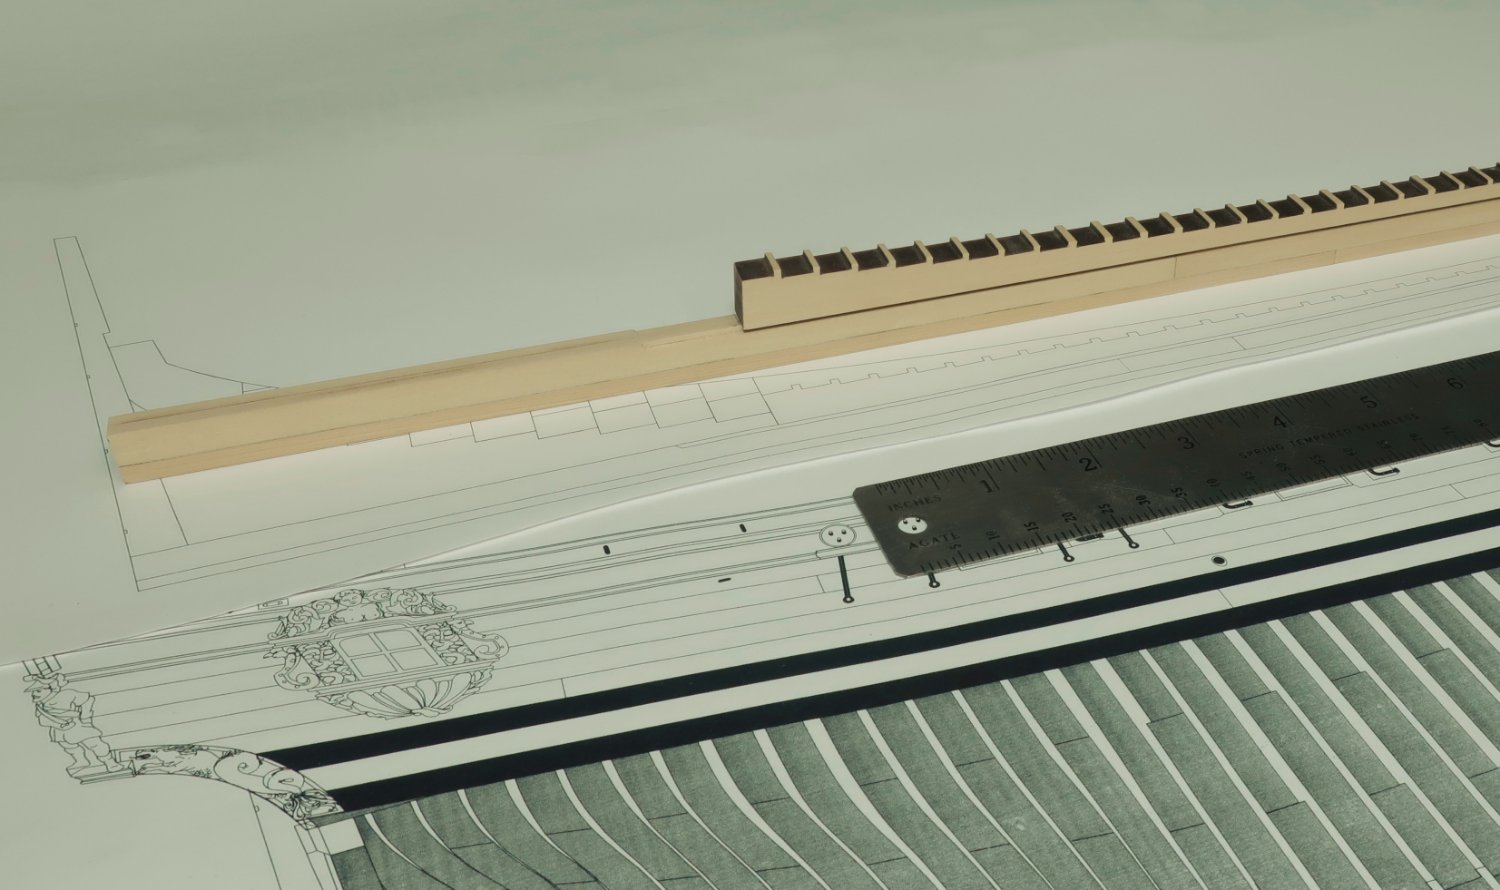
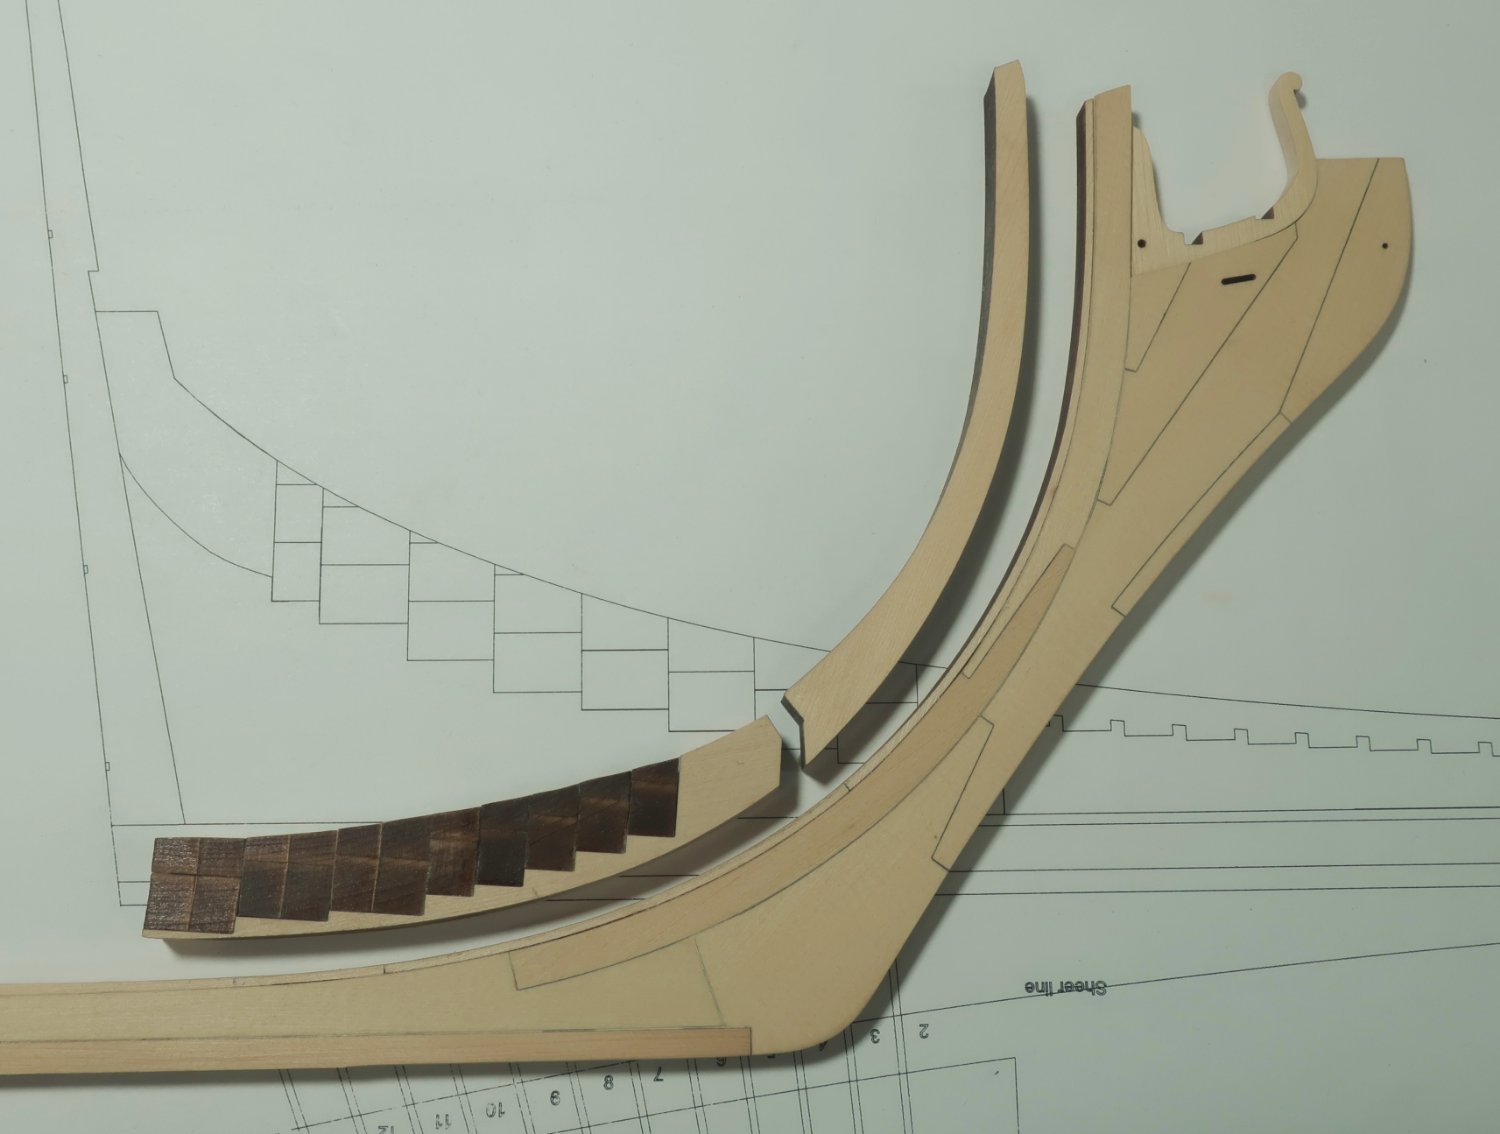
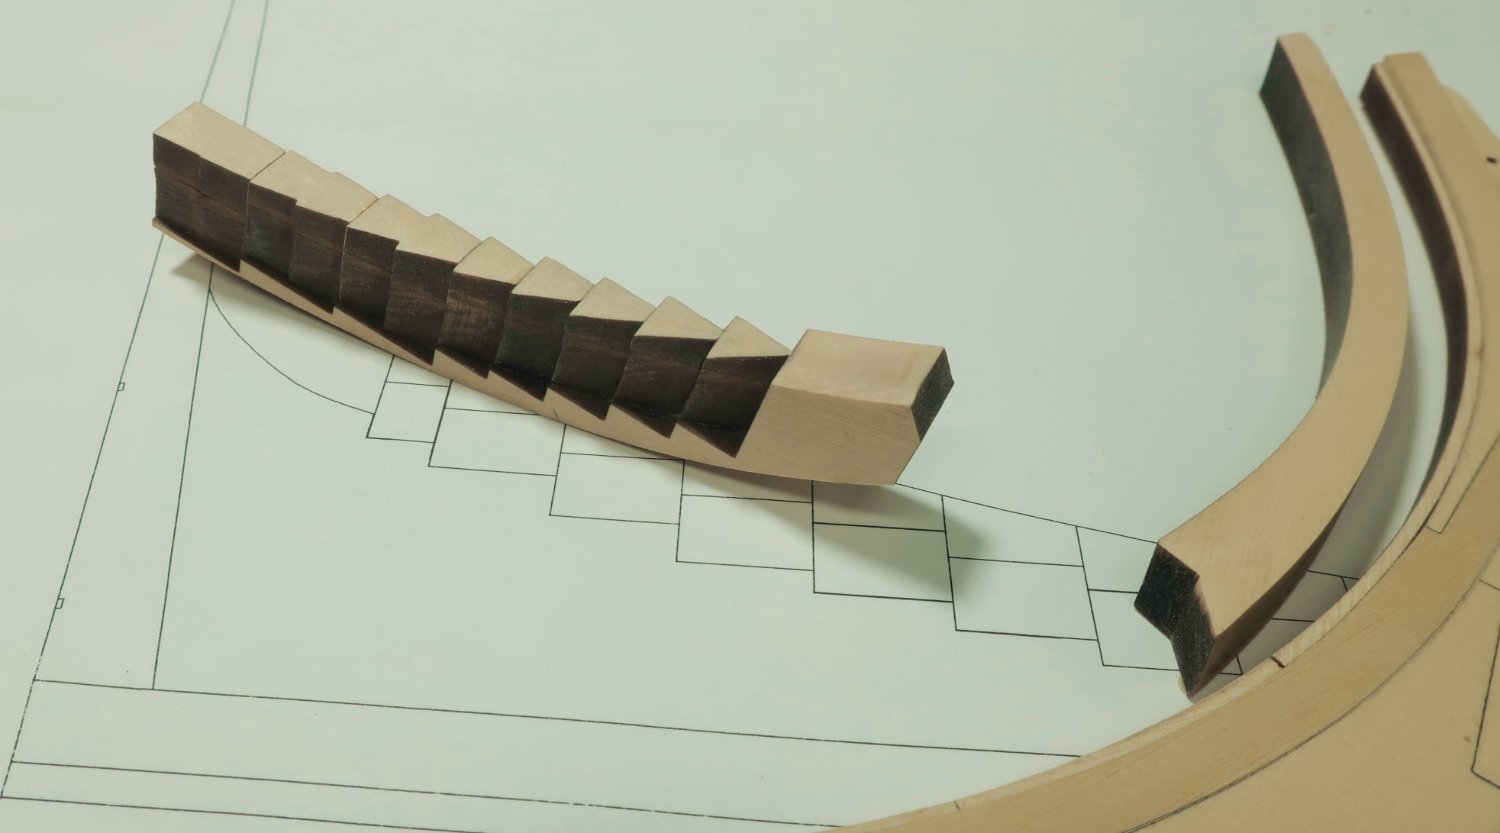
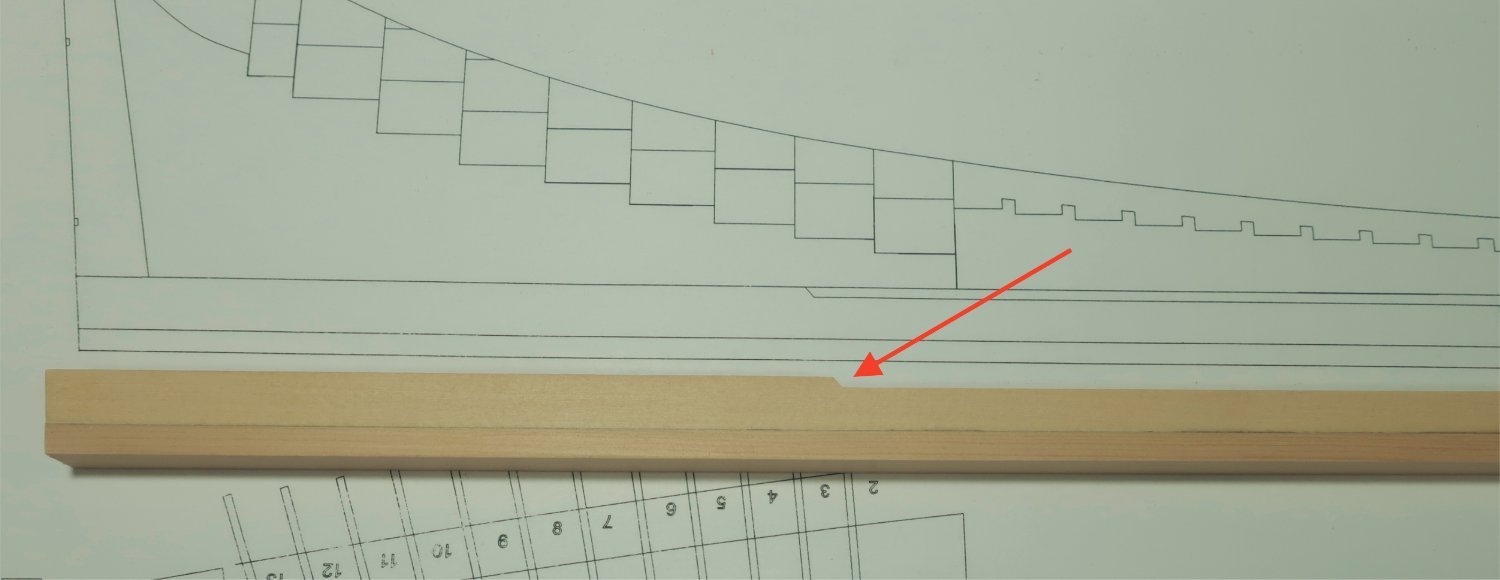
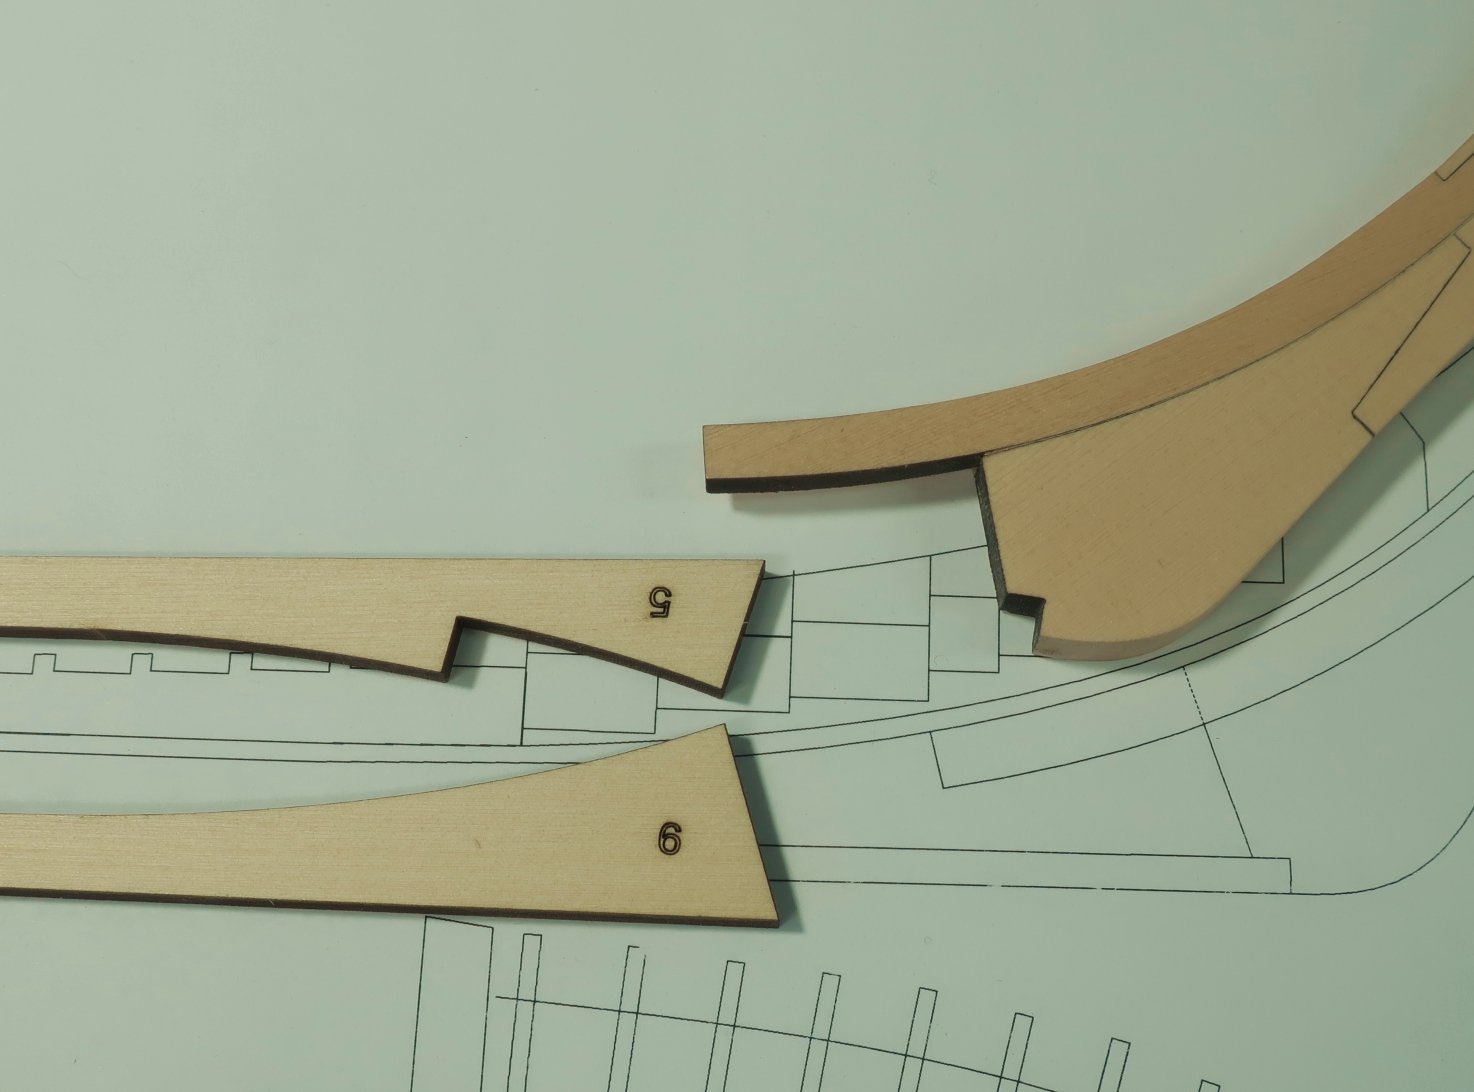
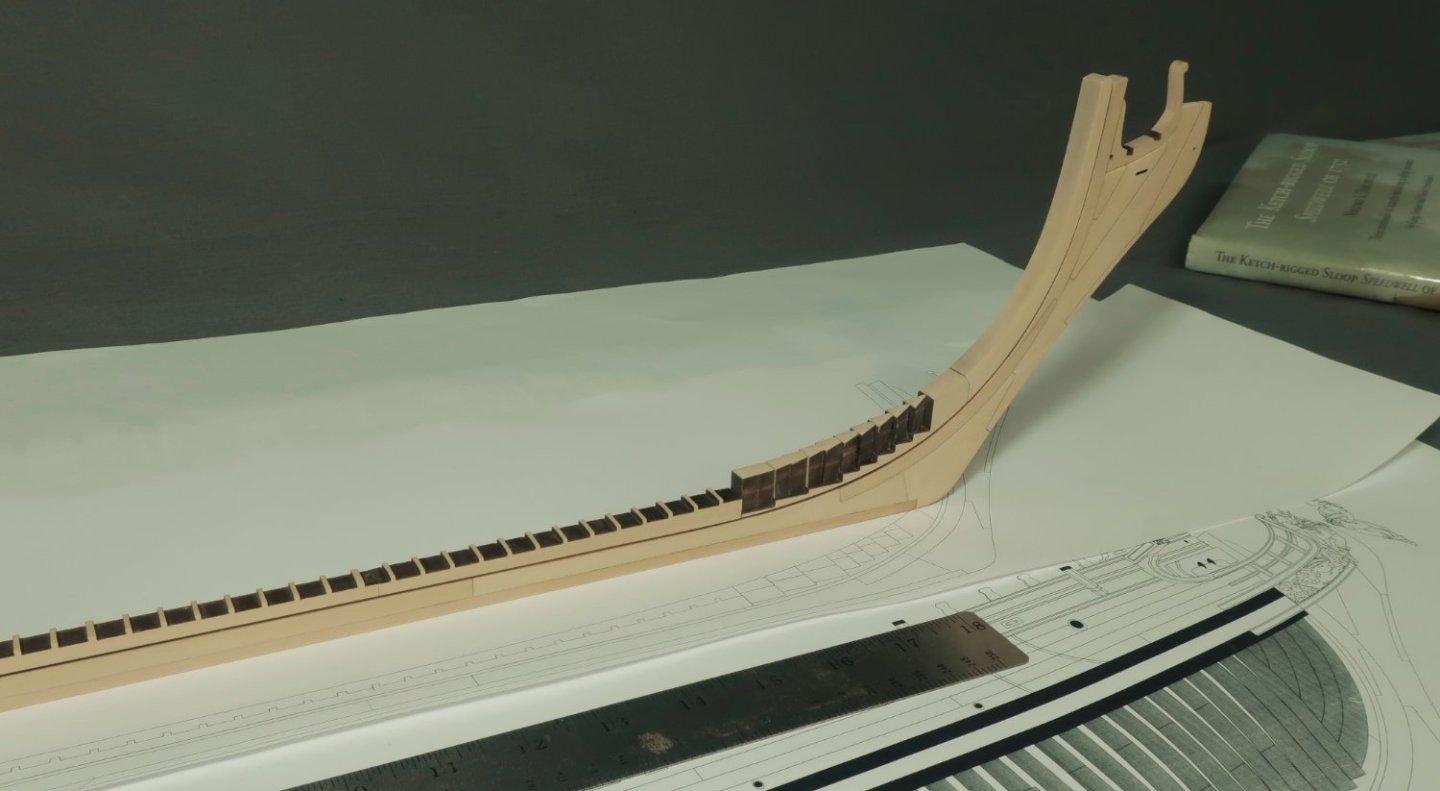
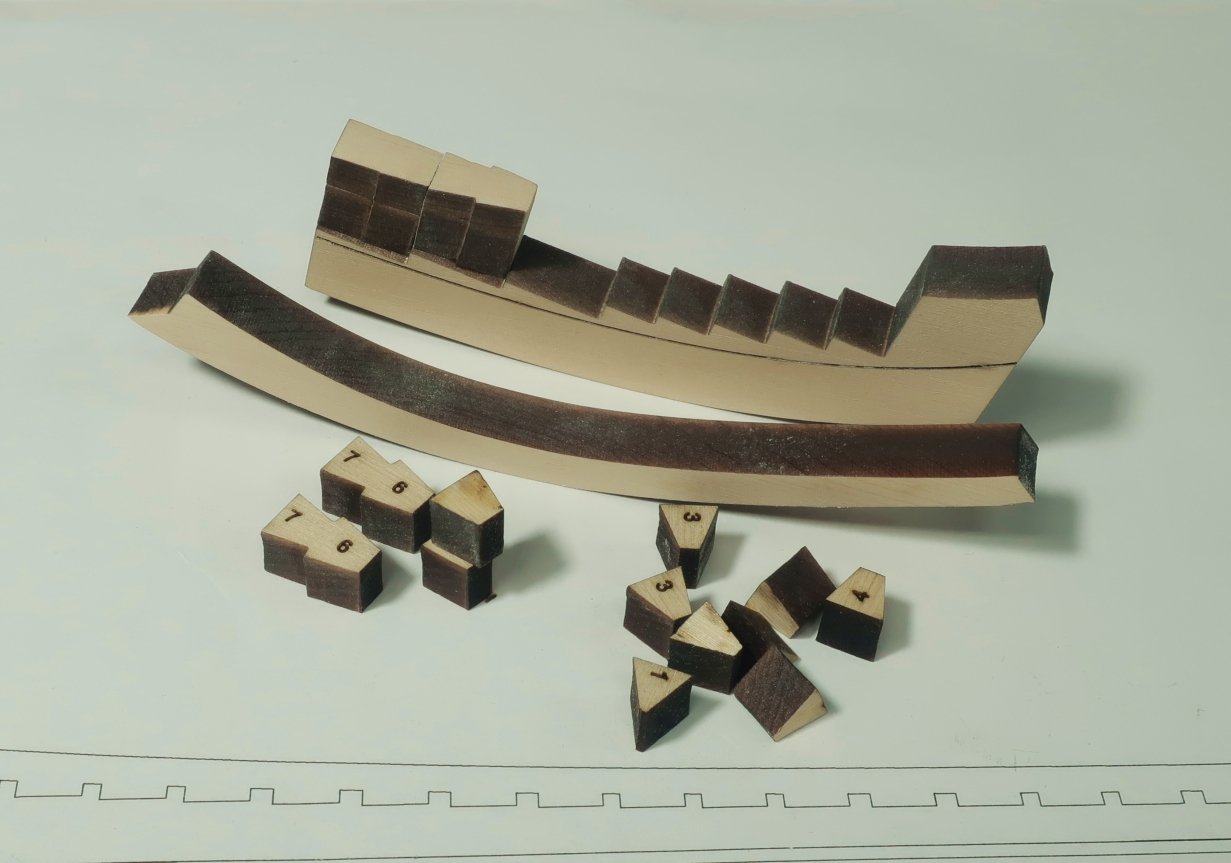
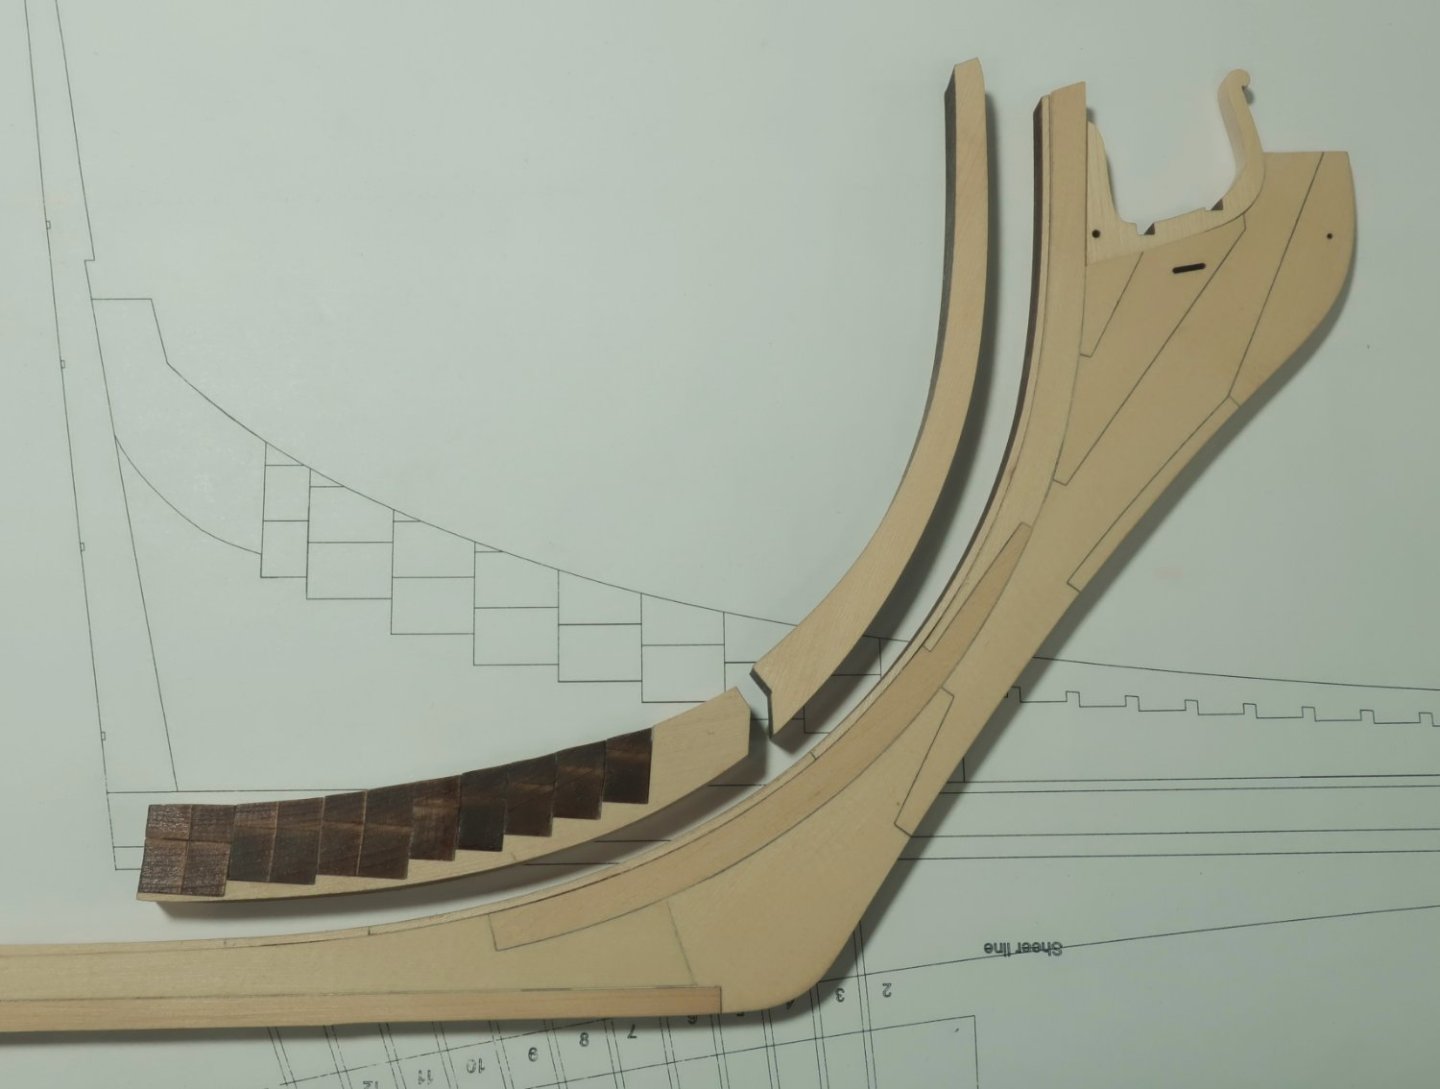
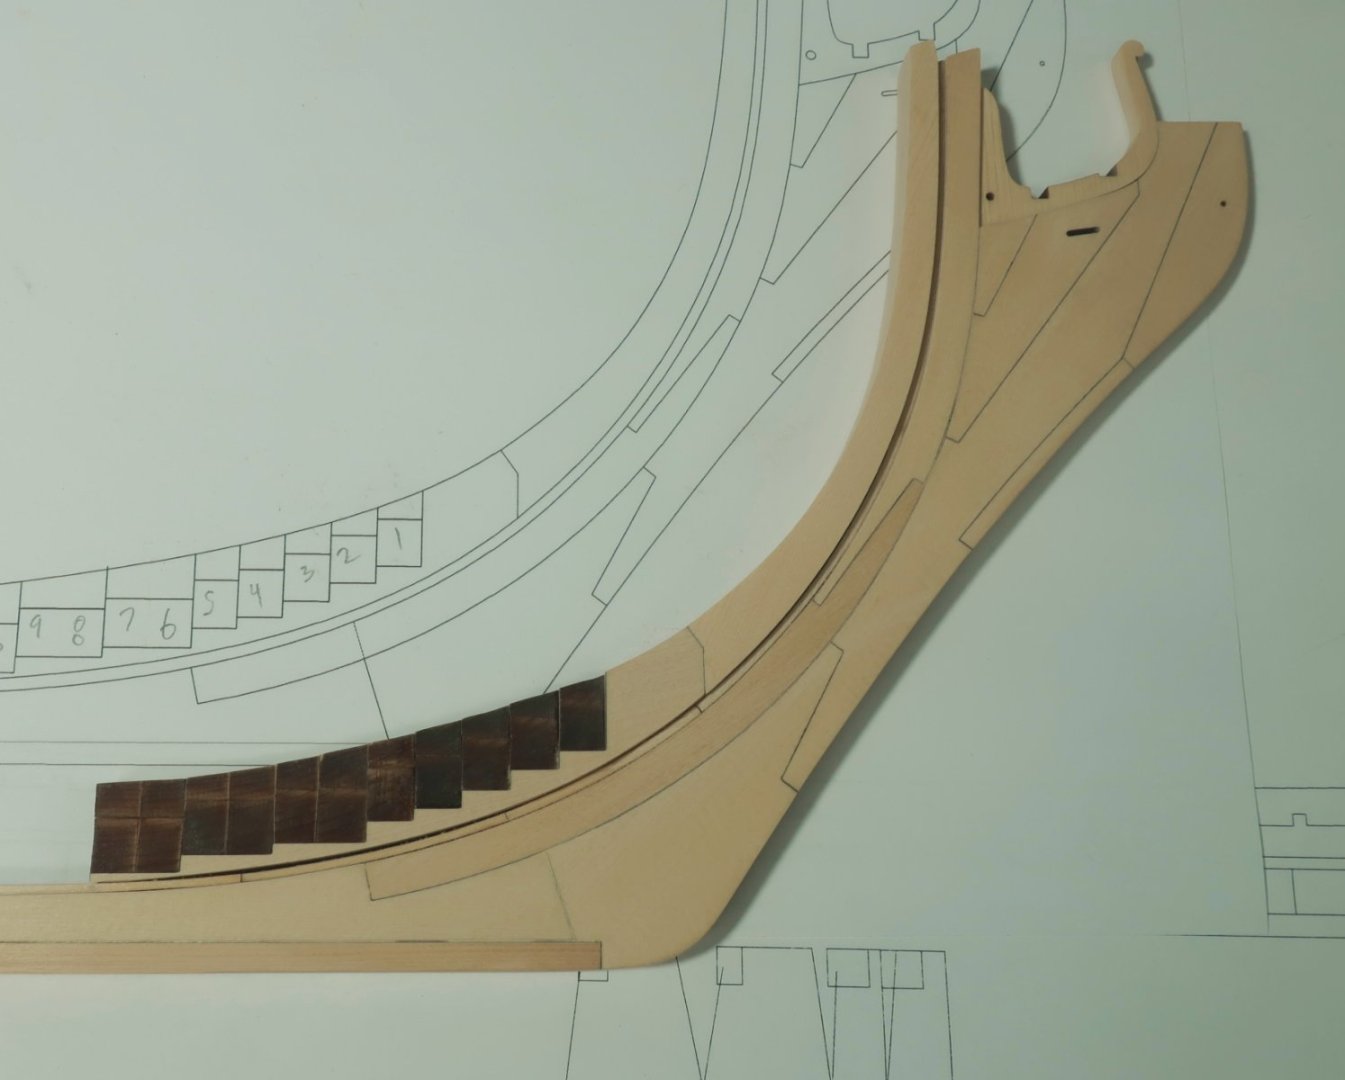
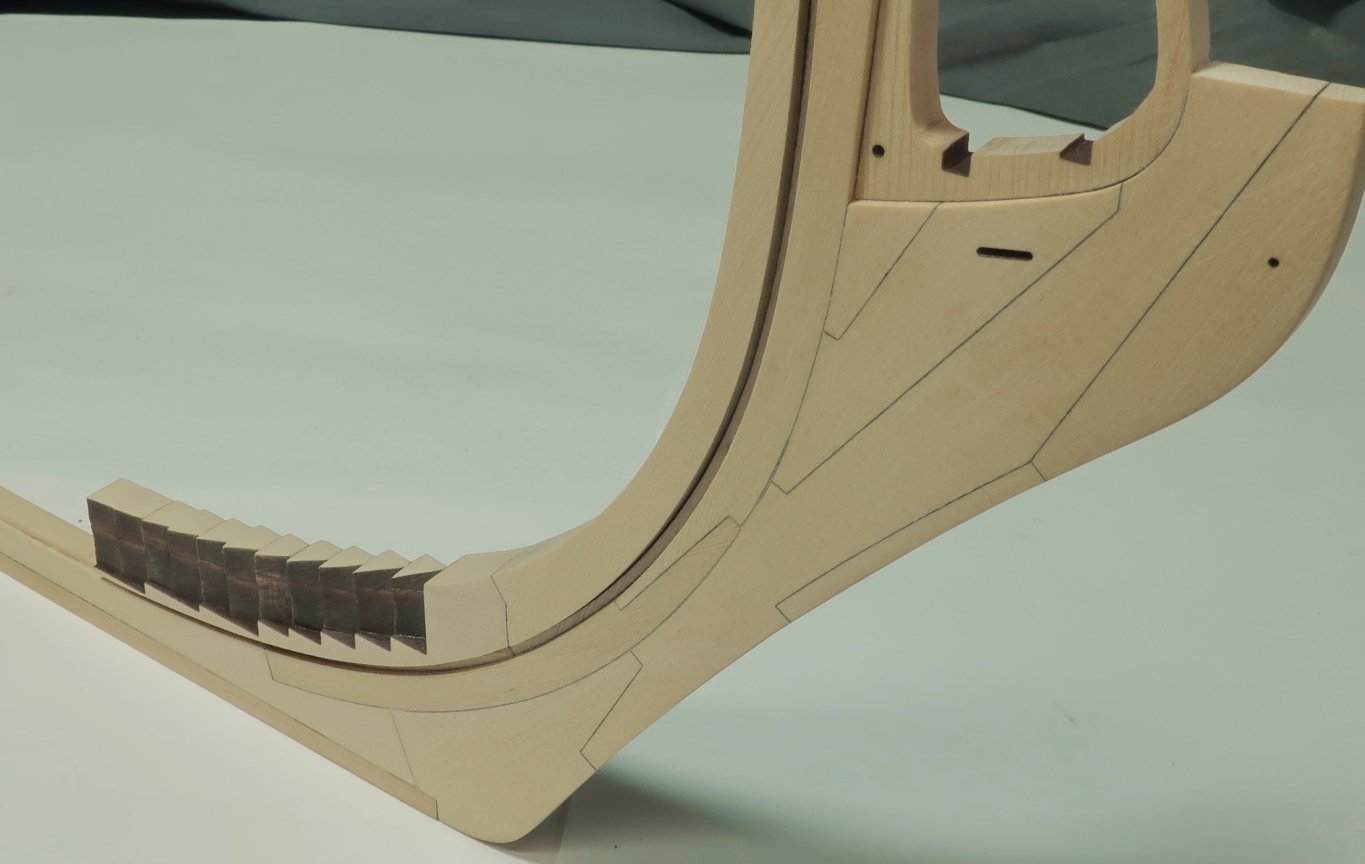
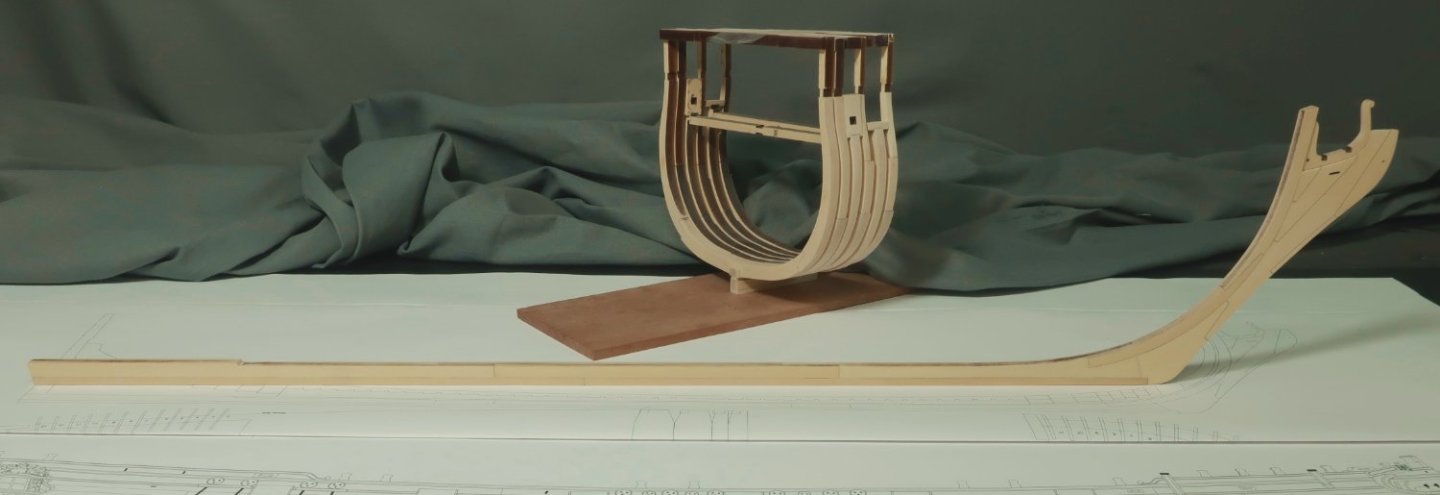
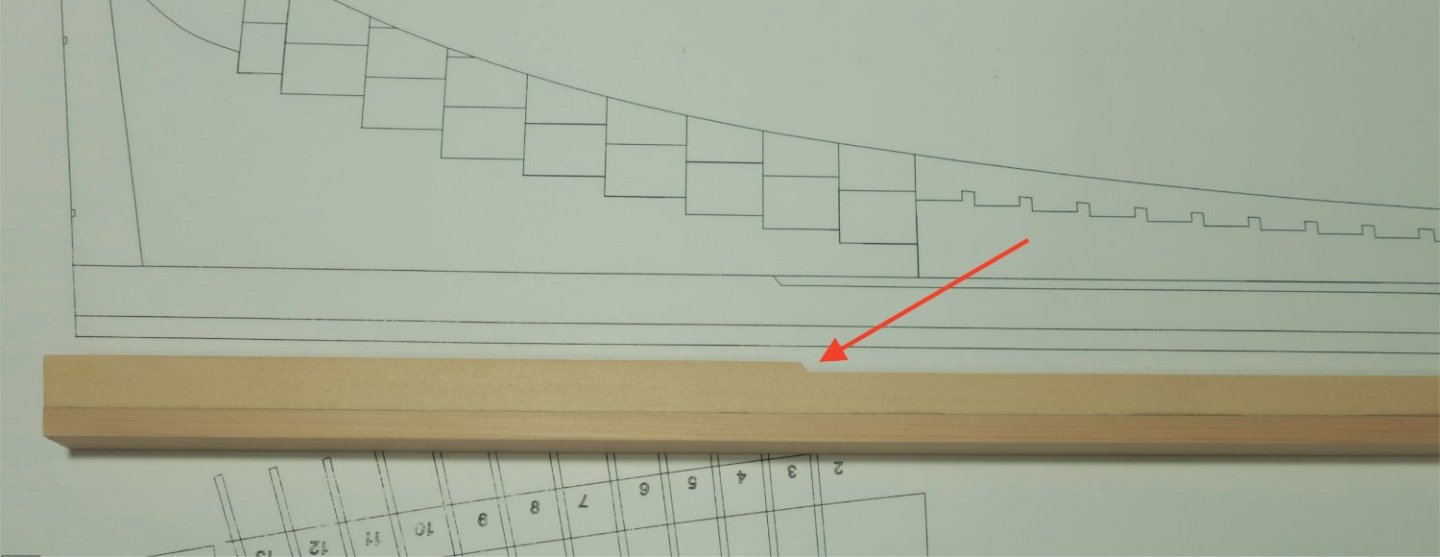
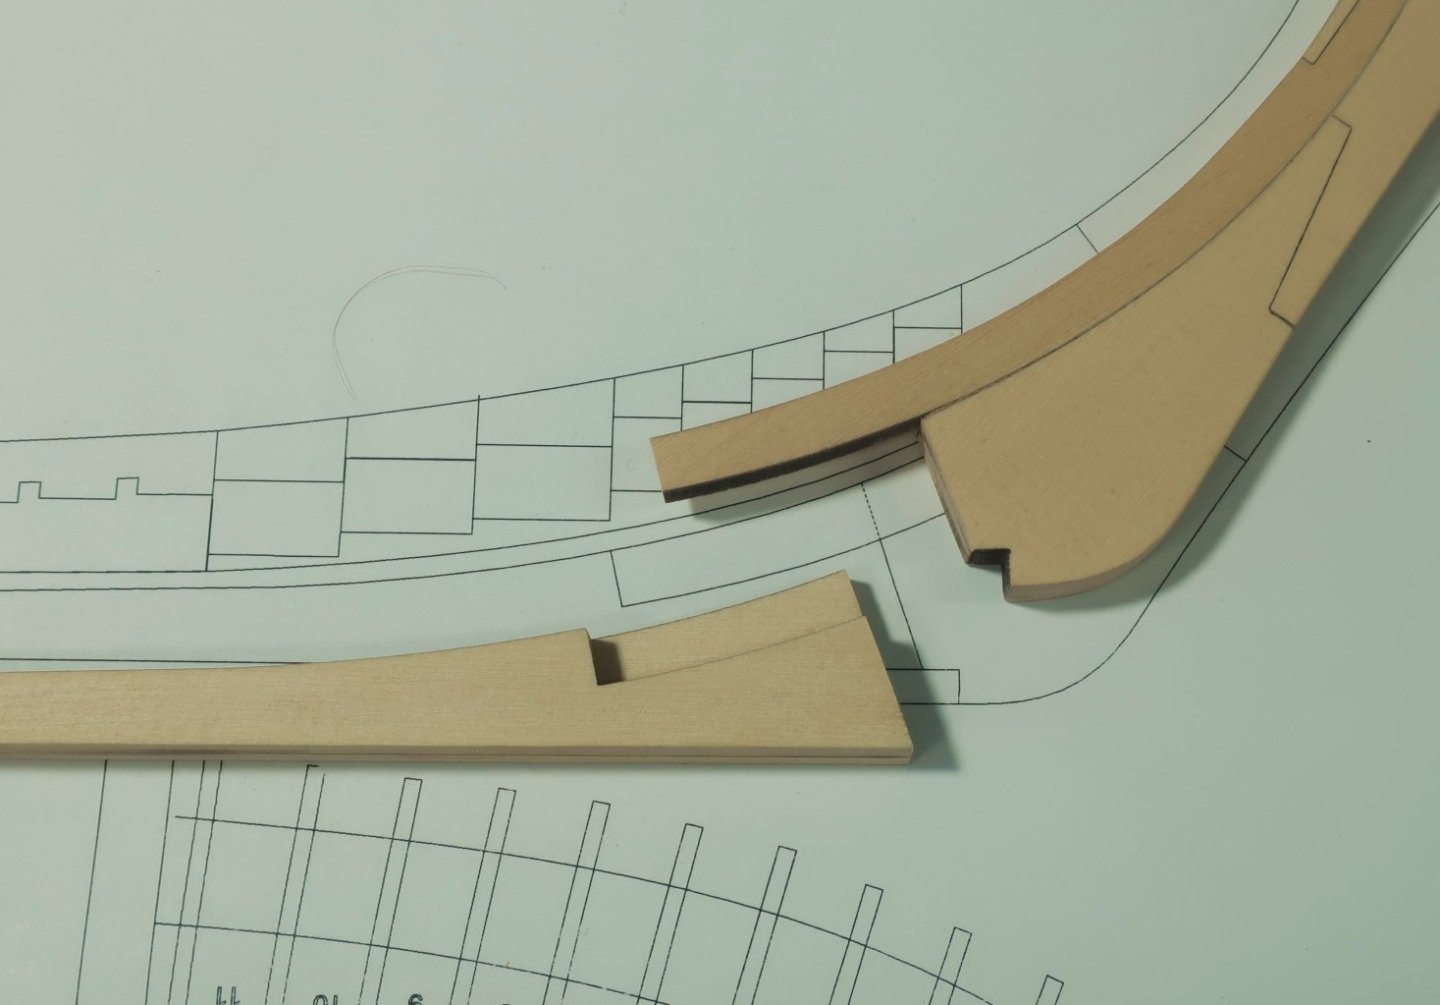
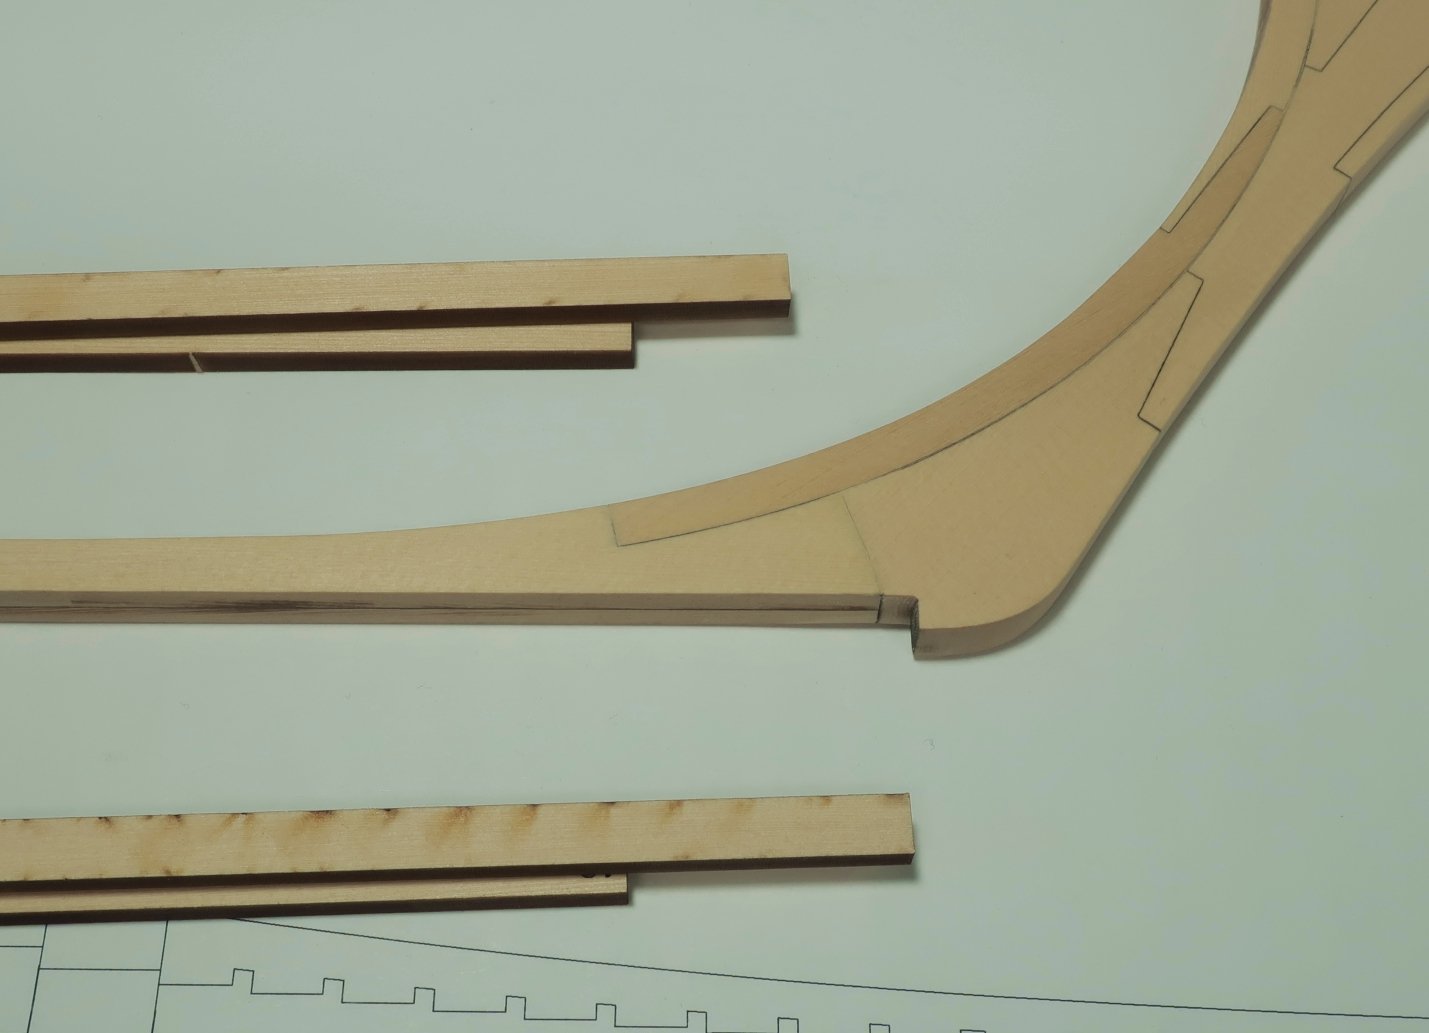
Continuing with the stem/keel assembly.... The remaining sections of keel were added working my way aft. The keel is actually two layers. I added one layer at a time. Each segment is numbered. The numbers face inward so when the two layers are glued up you cant see them. Here is the entire keel all put together. Each segment remember is in two layers and I added them one layer at a time trying to get real nice and tight scarphs. Its not difficult when done in layers. I also added the false keel. This is the thin strip on the bottom. This was done with 1/8" wide strips the same depth as the keel. I simulated the seams with a pencil. There is still no finish on these parts so it will really look great once I add some wipe on poly. On the aft section you will see a small step where the rabbet strip will end. You will probably need to adjust where this is. I made the parts so this was a bit forward of where it should be. Just lay the keel assembly as it stands on top of the plan and mark the exact location for this slanted step. Then use a sharp chisel or #11 blade to cut this step in the exact location. Also note that the false keel may seem a bit wide top to bottom. I have done this intentionally. It is about 1/32" larger than needed. I have found that the false keel when made of cedar will take a beating throughout the project. It will get dented etc. Even if you tape it to protect it. So I made it slightly taller so I can sand the bottom of the keel down smooth much later in the project. Just to smooth out any creases and dents. The Rabbet... The rabbet is done as I typically do on all of my projects. I realize the rabbet is a complex organism of sorts. It should have a "V" shape with and ever changing profile depending on how the hull planking enters it. I usually make a mess of that if carved with a chisel. Those of you who have the Speedwell books from Seawatch can see how Greg did this. He is much more handy with a chisel than I am. So this will be simplified and should you choose to add the garboard hull plank will mostly be covered anyway. Using a simple strip here is neat and clean. The one thing I have done differently this time is I laser cut the curved sections at the bow in two lengths. See the photo below. The two lengths are already glued on the stem assembly but I also show some extras on the table for clarity. They are 1/16" thick. The longer segment goes on first and is centered port to starboard. This will leave a nice lip on both sides. Then the shorter laser cut rabbet strip is added. No need to sand the laser char off these. The remaining rabbet strip that works itself aft is just made using a 7/32" x 1/16" cedar strip. It ends at that slanted step you so carefully chiseled just a moment ago. The Upper and Lower Aprons... Now these pieces you have no doubt seen being made on many POF model. The upper apron is nothing special. Its a plain segment that is 3/8" thick. Simple enough. The LOWER apron is a different story all together. It is much more complex. You have probably seen folks hand chiseling tiny steps into both sides of the lower apron...once again take a look at Volume one of the Speedwell books. I wanted to simplify this however. Not because it could be difficult to do but because I know that most folks dont have vertical mill, or disc sanders or all the gadgets you often see when folks make the lower apron. I have decided to make the lower apron using many separate parts instead. Looking ahead to adding the forward cant frames, each set of cant frames has a different angle sanded into the heel of it. This is so it can be "canted" forward. This is simply not going to work to easily if you dont have a disc sander. So I created small wedges with the angles already pre-set on them to accept straight right angled heels on the cant frames. I hope that makes sense. See below. The upper apron is in front...easy peasy. Set that one aside for now. The lower apron is laser cut with a series of steps. On these steps we will glue the pre-angled wedges. But using this approach leaves the bottom of the lower apron very thin even at this scale. It can easily break or get misshapen. So I have laser cut the "stepped" lower apron attached to a sacrificial piece of wood. You can use it as a handle. DO NOT remove the lower apron from this "handle" until all of the little angled wedges are glued to it. Those will give it enough strength...a remarkable amount of strength actually. In the photo below I have already added two of the laser cut wedges which show the angles for the cant frames. Check your plans as these are prominently shown. Work from the aft side forward. Each angled wedge is made on two layers. They have laser etched numbers on them and correspond to the plan. Gle the two layers together with the numbers facing each other. This is important. Glue the two halves together "number facing number". The next to be done for me are the parts marked "7 & 6" in that photo. I will glue them together now. Once glued together with the numbers facing each other, you could make life easier for yourself later by cutting them down a bit. Once the two pieces are glued together they are too tall. This doesnt matter at all but if you trim them to match the plans it will be so much easier to fair the inside of the hull when the time comes. The Keelson will fit so much nicer on top of this when the time comes. Below you can see me doing just that. With a sharp blade I am trimming the top to match the plans. Make sure you have the piece facing the correct way. Place it on the plan and draw a line where the top portion can be shaved away. Do this for every piece...I know its a pain. But you will thank me when it comes time to add the cant frames later. When all of the segments are glued onto each step of the lower apron base, you can finally cut away the bottom handle. It was held on by just a few connectors which are easily cut with a sharp blade. Hopefully you glued those wedges onto each step securely and didnt skimp on the glue. Glue each onto its step and also to the wedge proceeding it. Nice and secure. Center them down the top of each step. Dont mix up the numbers either. That would be bad because the angles match each individual cant frame. I also sanded the top of all those wedges so it looks nice and neat. It also matched the shape for the lower apron shown on the plans. Note that you should not remove any of the laser char on the angled sides of these wedges. Not only would that screw up the angles laser cut into each of them, but it would also reduce their size. That should be avoided. A dry test fit of the upper and lower aprons on the keel assembly below. trying my best to match the curve. Use the plan to find the exact location for the aft edge of the lower apron along the keel. You dont want it too forward or even too aft. Place the keel assembly on the plan and mark where the exact locations are for the upper and lower aprons. Note how the upper apron extends above the rabbet strip. Note how the aprons are wider than the keel. The aprons should be centered on the rabbet strip leaving a nice over hang on both sides. Still no finish applied to these parts yet. I will do that once the entire keel/stem assembly is completed. Thats it for today!!! Any questions?


-
Im looking forward to seeing more photos of your progress.
-
Just a heads up folks, There are a limited supply of chapter 12 parts in cedar available. Once again I ask all of you to refrain from buying it unless you are close to needing it. I know I have asked before but that hasnt stopped folks. Its a shame really. I have limited capacity as a one man shop. I really want to make sure that folks who are waiting on these parts get first pick from this batch. If you are not yet at least building chapter 10 or 11, please dont buy from this batch. Wait at least one month to order this last chapter. I hate to do it but if past chapter releases are any indication, I may have to cancel all orders that I know the builder is years away from needing this chapter. Its just not fair to the folks who are really in need right at this moment. Thank you so much for understanding. Chuck
-
- 6
-
-
Chapter 12...Chaptertwelve.pdf
-
That looks pretty good. You are doing a fine job. Keep going. Chuck
-
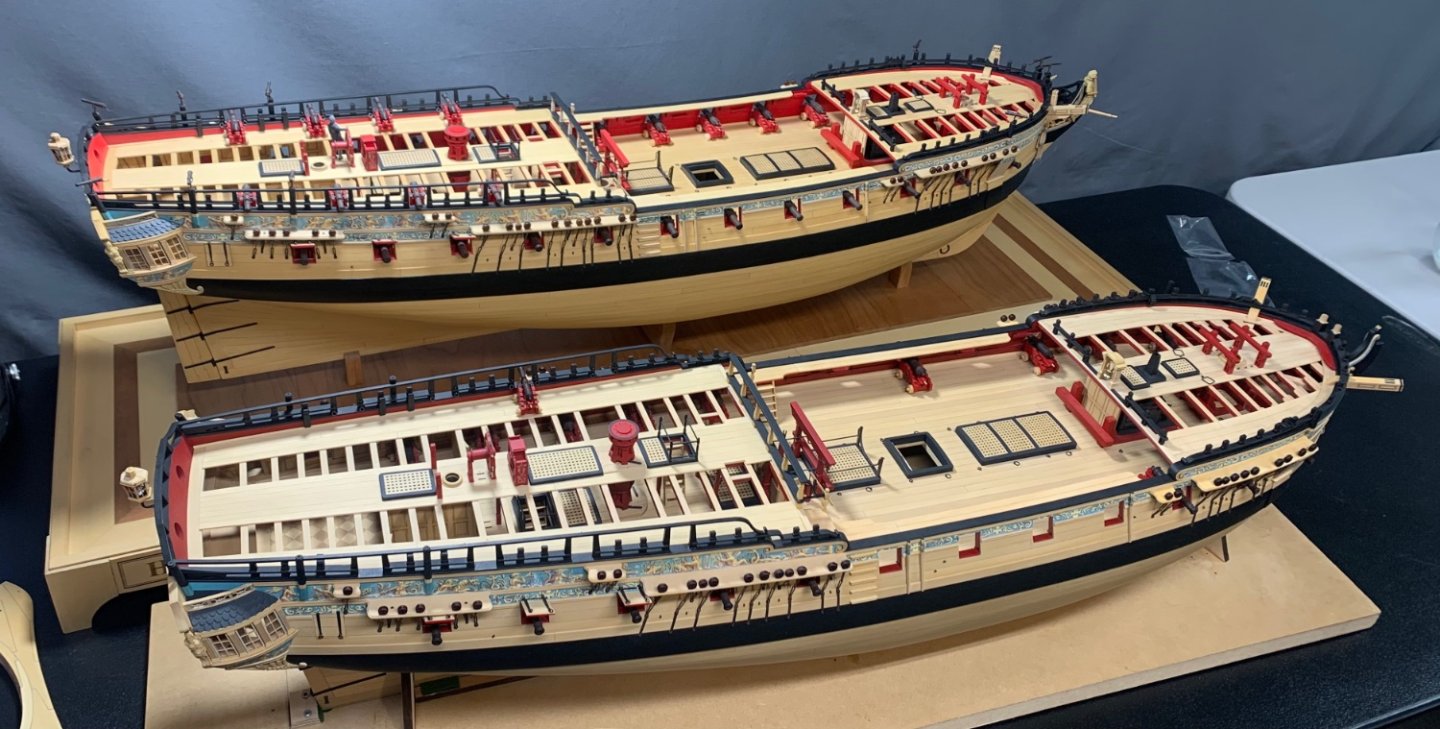
I was just looking at this photo again....Just to hilight the differences or - lack there of, between Yellow cedar and boxwood. These are two Winnie models, One is Mikes and entirely made from Boxwood. The other is mine and made nearly 100% from Yellow Cedar. Aside from a very very slight difference in color they are so similar. This is one of my favorite photos. Just thought I would post as the Speedwell will be done entirely of Cedar with a few boxwood elements just like one of the models you see in this photo. Cedar really does turn into a great looking model in retrospect. Chuck
-
looking great...you are in the planking zone now!!! Gaining momentum.
- 389 replies
-
- 2
-
-
- winchelsea
- Syren Ship Model Company
- (and 1 more)
-
Mike that looks splendid. I have seen your progress from time to time and love what you have done with the project. You really have made it your own and I love added details. Well done Mike. Looking forward to seeing her all finished. I have started cutting the very last chapter of parts today. So it shouldnt be long now. Chuck
-
See this area of the group build... Its all spelled out in the various topics Nick. Chuck https://modelshipworld.com/forum/94-how-to-join-this-group-project/
- 1,784 replies
-
- 2
-
-
- winchelsea
- Syren Ship Model Company
- (and 1 more)
-
Yes it is....try deleting your cookies and history... but the site is up and running. Joe is still cutting wood. https://www.modelerssawmill.com/
-
Materials list chapter Twelve Materials List for Winnie twelve.pdf
-
Stunning work. Such a beautiful model.
-
I am going to quickly finish drafting and building the entire backbone assembly for Speedwell. Yes Mike will be helping me prove the prototype and parts actually fit together for folks other than me. He will be building his version in Boxwood, but I will not be oferring the Speedwell to anyone else using boxwood. The actual kit and project will be primarily Yellow Cedar like the Winnie with occasional details in boxwood where it makes sense to use it. It would just be too expensive otherwise and it would be nearly impossible for me to get so much boxwood aside from using it on those parts that absolutely need it. Mike....dont rush to the finish on Winnie. Take your time and cross the finish line strong!!! These parts for the backbone assembly should however be done for you by New Years. So I look forward to seeing your build log on this too. Dont forget that the Saturday after Thanksgiving the guys are coming by my shop for the usual fun workshop with the gang....lots of Thanksgiving leftovers for sure but you will get to see a sneak peak of what you have in store for you.
-
We shall see when production starts. The biggest issue is getting enough sheets of milled Yellow Cedar and being able to laser cut so many parts with only one machine. I really dont want to buy more machines. Dont have the room. I cant possibly store or even expect Joe to mill the hundreds and thousands of sheets needed to meet demand. Like the Longboat kit and Barge kit, its tough for me to meet demand. I wont discontinue any kits but think of them like the McRib sandwich. It may be months if not a year before I find the time to make more of them and have enough wood to do so. But eventually the McRib sandwich will be back for everyone to enjoy...personally I think the sandwiches are disgusting but you get what I mean. Chuck
-
Moving along to finish the boxing joint. The first segment of the keel is also laser cut in two layers. There are laser etched numbers on them. Glue these two layers together with the numbers facing each other on the INSIDE of the joint. This does a respectable job of simulating the box joint. Then tweak as needed to get a tight fit with the stem assembly. The seams will darken of course when I apply a finish. But it has all been sanded. After tweaking the ends of the box joint just a bit to get really tight seams I went over them in pencil again to make sure they would be visible once I apply some wipe on Poly. You will also note how the remaining two segments of the keel are also done in two layers. It will be impossible to tell that these are done in layers once the rabbet strip and the false keel are added. It was a good solution to making what could have been a very complex and challenging box joint. Bolts will be added later.

-
Oh and I almost forgot. Somebody asked about the length of the model. The hull will be 32” long. Fully rigged the model will be 54 to 55” long. its about identical to the Vanguard Indy model coming out. chuck