HOLIDAY DONATION DRIVE - SUPPORT MSW - DO YOUR PART TO KEEP THIS GREAT FORUM GOING! (Only 36 donations so far out of 49,000 members - C'mon guys!)
×


Chuck
-
Posts
9,660 -
Joined
-
Last visited
Content Type
Profiles
Forums
Gallery
Events
Everything posted by Chuck
-
 Thank you guys. I am excited about the new model project. Mostly about designing the framing. I hope to make it less finicky than you guys have probably seen with the typical POF kits being sold. i absolutely hate all of the scaffolding and boxes you see built up around the hull to align the frames. You cant even see the model through all of that. So I am taking a minimalist approach to frame alignment for square frames and cant frames alike. I will hopefully have the keel assembly completed soon so I can start raising from frames on her. Chuck
 -
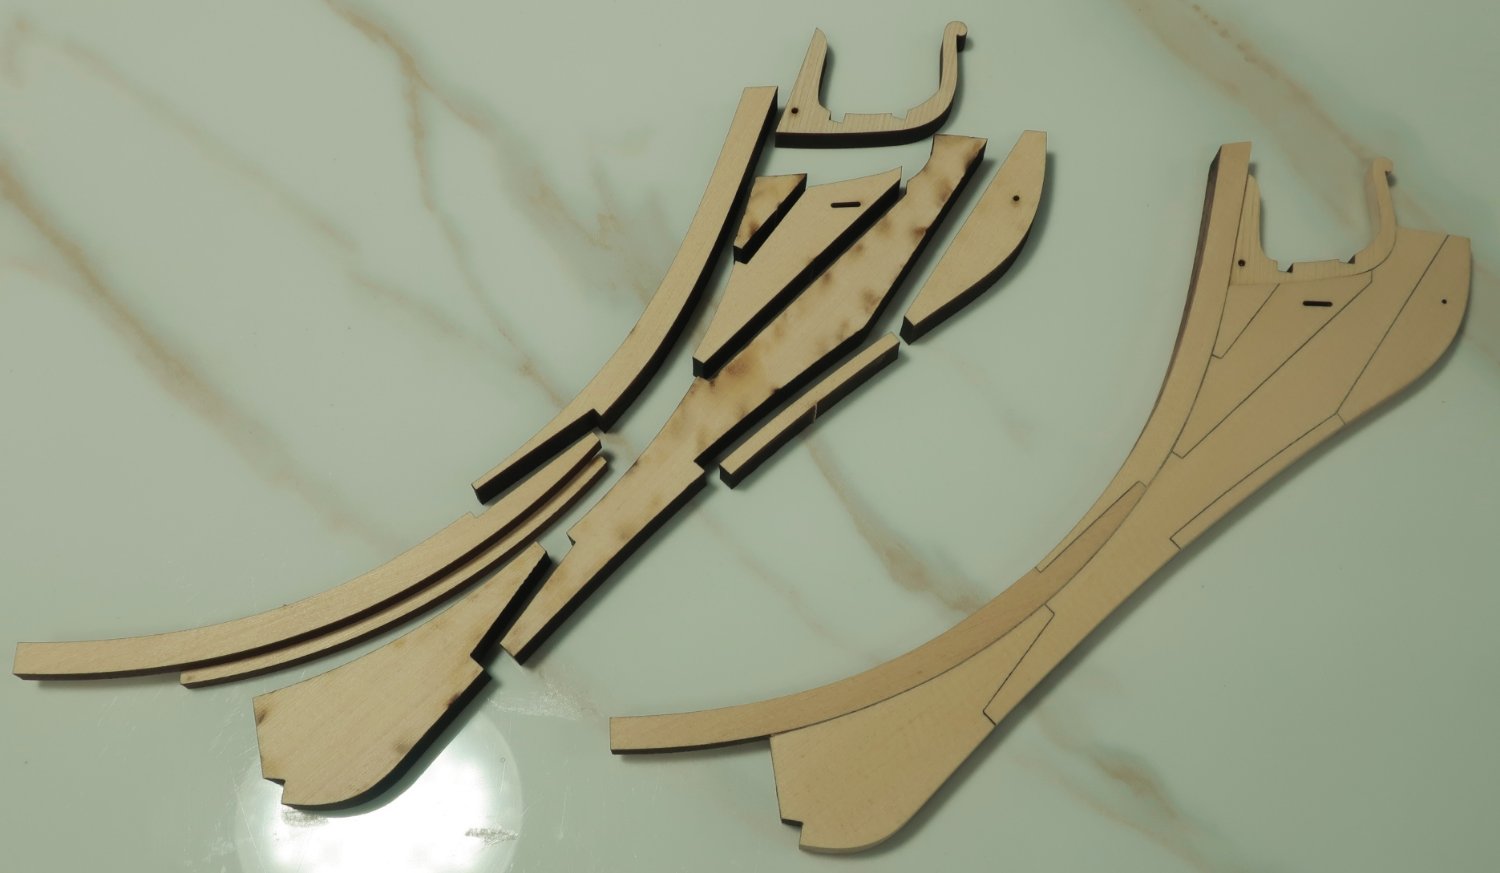
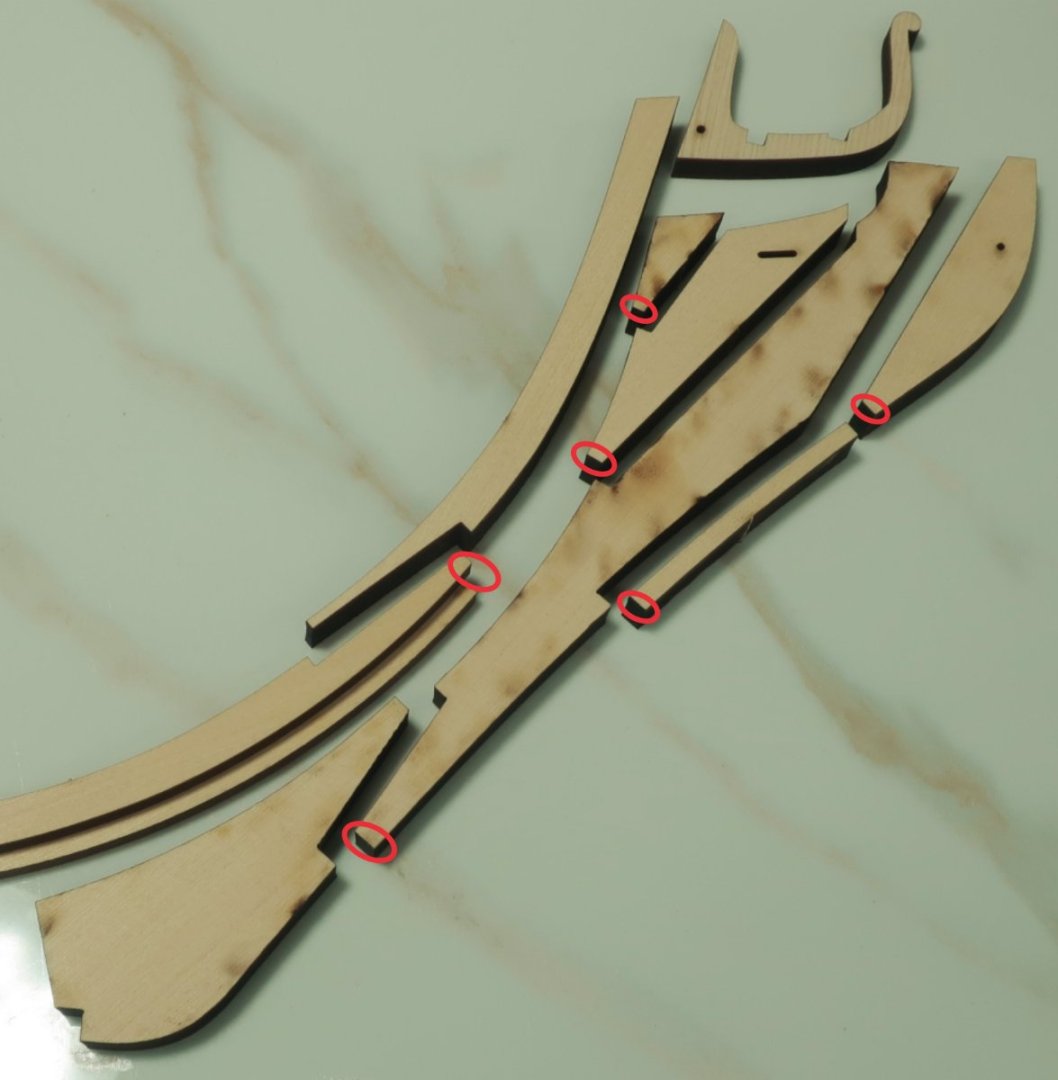
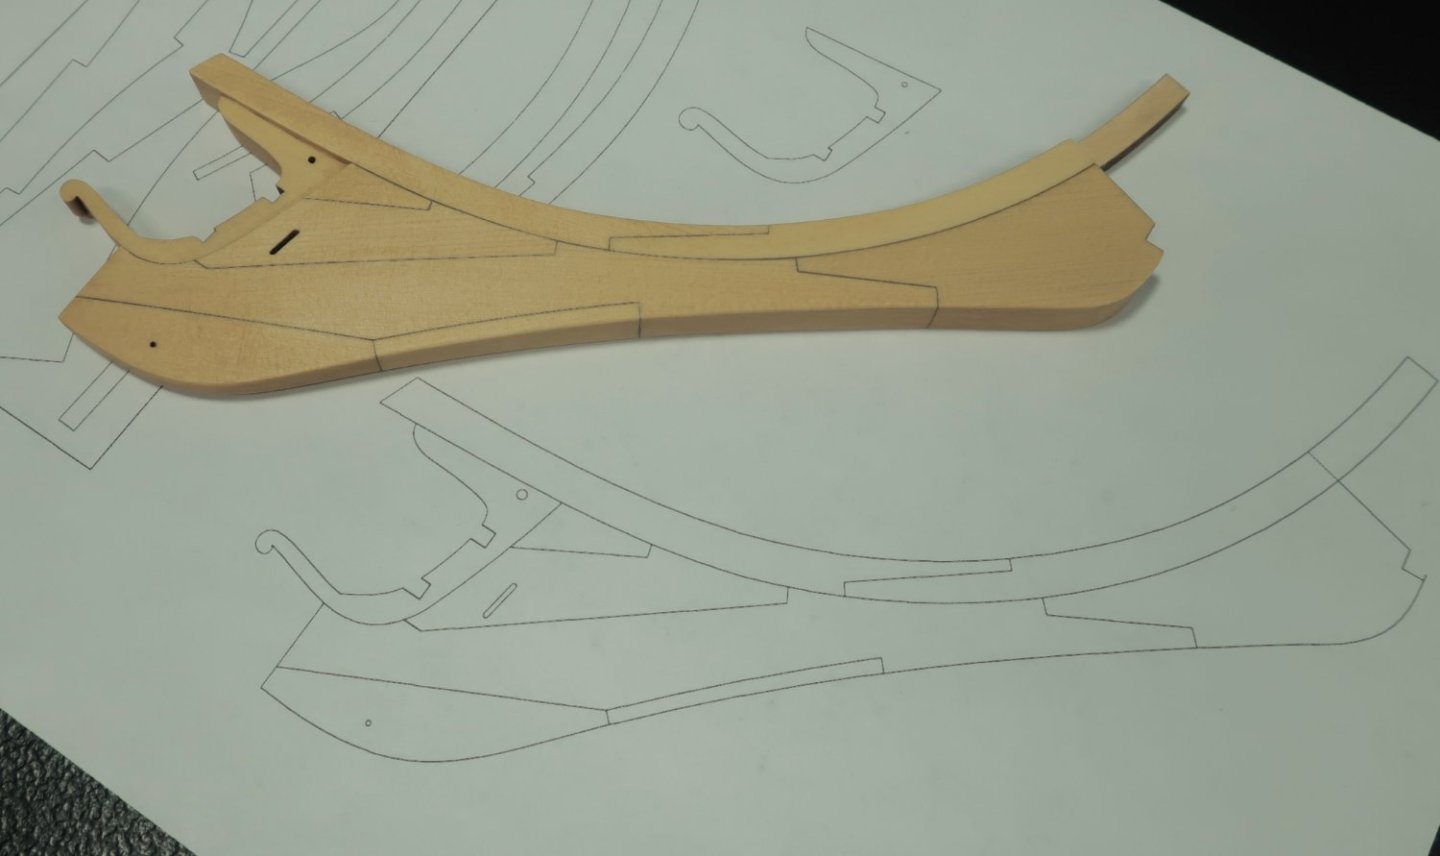
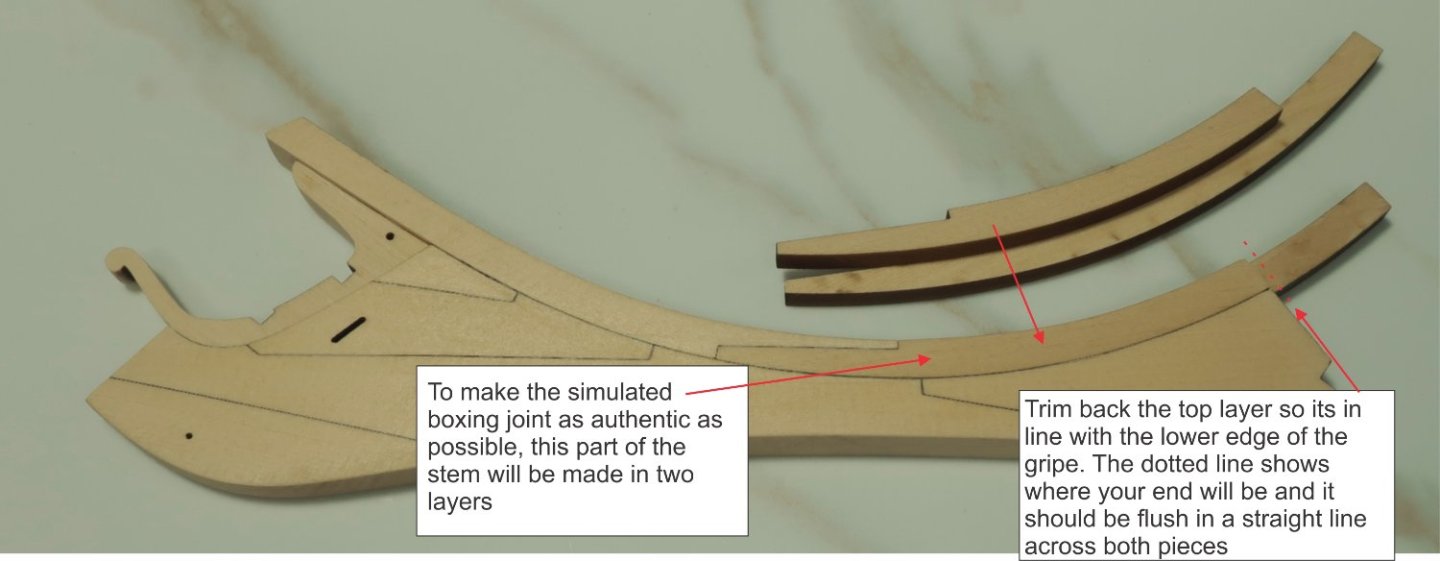
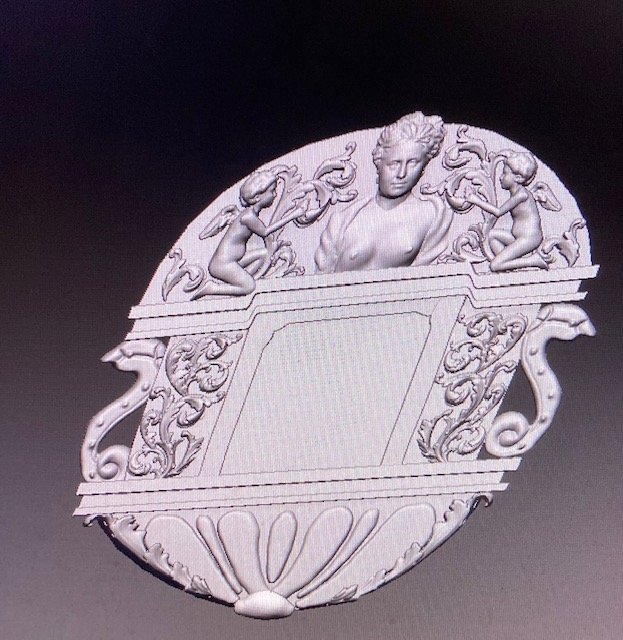
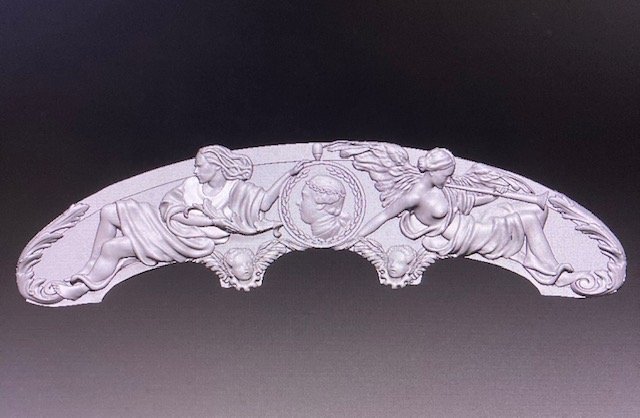
Let me dive right in... Dont forget that if you eventually build this kit, the two volume set from Seawatch will be a must have. Yes you will spot the differences easy enough, but the books along with my instructions absolutely compliment each other and you will want to have them at your side. I always like to begin by building the stem assembly. As was true with Cheerful and the Winnie, All of the parts are laser cut. In this case yellow cedar was used. But there is one major difference. On the Winnie, you could just punch out the pieces and glue them together with little or no tweaking. But this model is being built at 3/8" scale. That means the parts are much thicker than with Winnie. The laser cutter as you know will not cut with the edges at a perfect right angle. Normally I would just flip some parts and that would do the trick so everyone would get a perfect fit with the edges fitting nice and tight. These parts however are so thick that even with the best of laser cutter settings, more than just an exaggerated bevel is produced. When the wood starts to reach 5/16" or 3/8" thick, the laser starts to introduce a slight curve as well. Most of this can be compensated for by doing my usual flipping of parts. But where the edge is narrower, lets say at the end of scarph joint....the flipping isnt enough. So each part has been strategically made a fraction longer on one end only so you can make adjustments for the tightest fit possible. In fact...most edges still dont need to be touched and I recommend that you dont touch almost all of them. I have taken the liberty of circling every edge in the stem knee assembly that should be tweaked. I am talking about knocking off the char and sanding the edge very slightly to get a really nice fit. Just a few swipes with a sanding stick along these narrower edges and you will have a perfect fit. Not too much though. Test the it regularly and flip it over to look at the joint on both sides. Just a quick hitting with the sanding sticks on the edges marked with red circles will make these parts fit nice and tight. Also Note The lower end of the stem will form an actual and true boxing joint. But to simplify the building process this segment of the stem needs to be built in two layers. I will do this a lot on this project which you will soon see. Make sure you assemble the two layers carefully and have the longer piece on the correct side. The two halves were glued together first and then that segment was glued onto the completed head/stem assembly after tweaking the scarph joint for a tight fit. Hope that makes sense. Also note above the dashed red line where the boxing joint will be. The top layer of the stem was left a bit longer than needed to assure it could be trimmed back flush with the end of the gripe. I used a sharp #11 blade to slice it back so it was flush and neat. You can see this was done on my assembly already but once you glue that segment of the stem on your assembly you will see its just a hair too long....that was done intentionally so you could get a great fit on your model and the boxing joint will have nice tight seams. Once completed the thinner knee of the head was also sanded and installed...note how that is pre notched to receive head timbers much later in the project. Just center it port to starboard. Dont sand any laser char off at all until you test it on your assembly. It will fit almost perfect from the get go so only the edges that are visible after gluing it in position should be sanded free of char. This piece can be delicate so more than one laser cut piece is provided just in case. Now it was time to thin down and taper the entire head assembly to receive the figurehead. The fore edge of the stem was sanded so a graceful bevel was introduced. Just like on the Winnie. The forward edge was reduced to 4mm so the space between the legs of the figure will actually fit. Otherwise the figurehead will not fit...I wont go nutty with the instructions here because so much of this is repeated from the Winnie and other projects. But this completes the first part of of the project which means its truly official now.

-
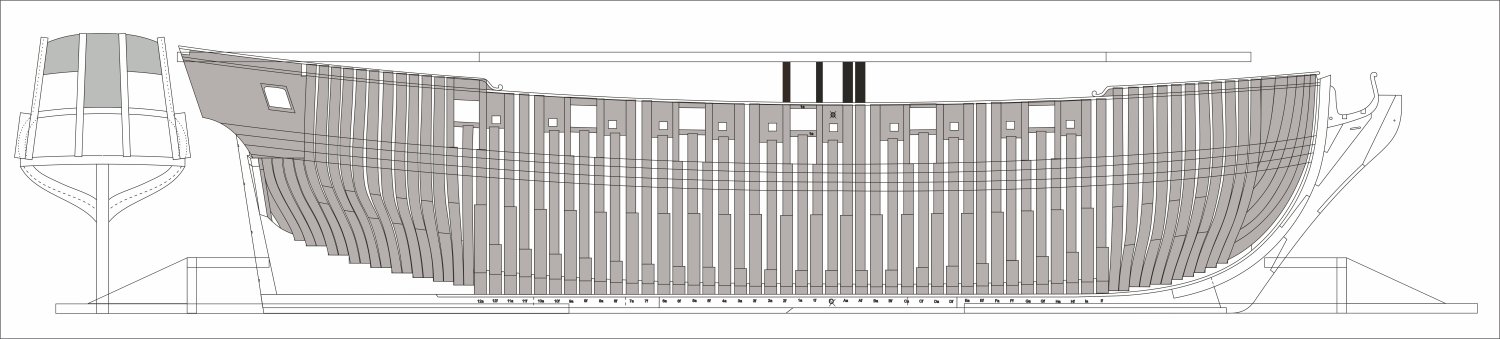
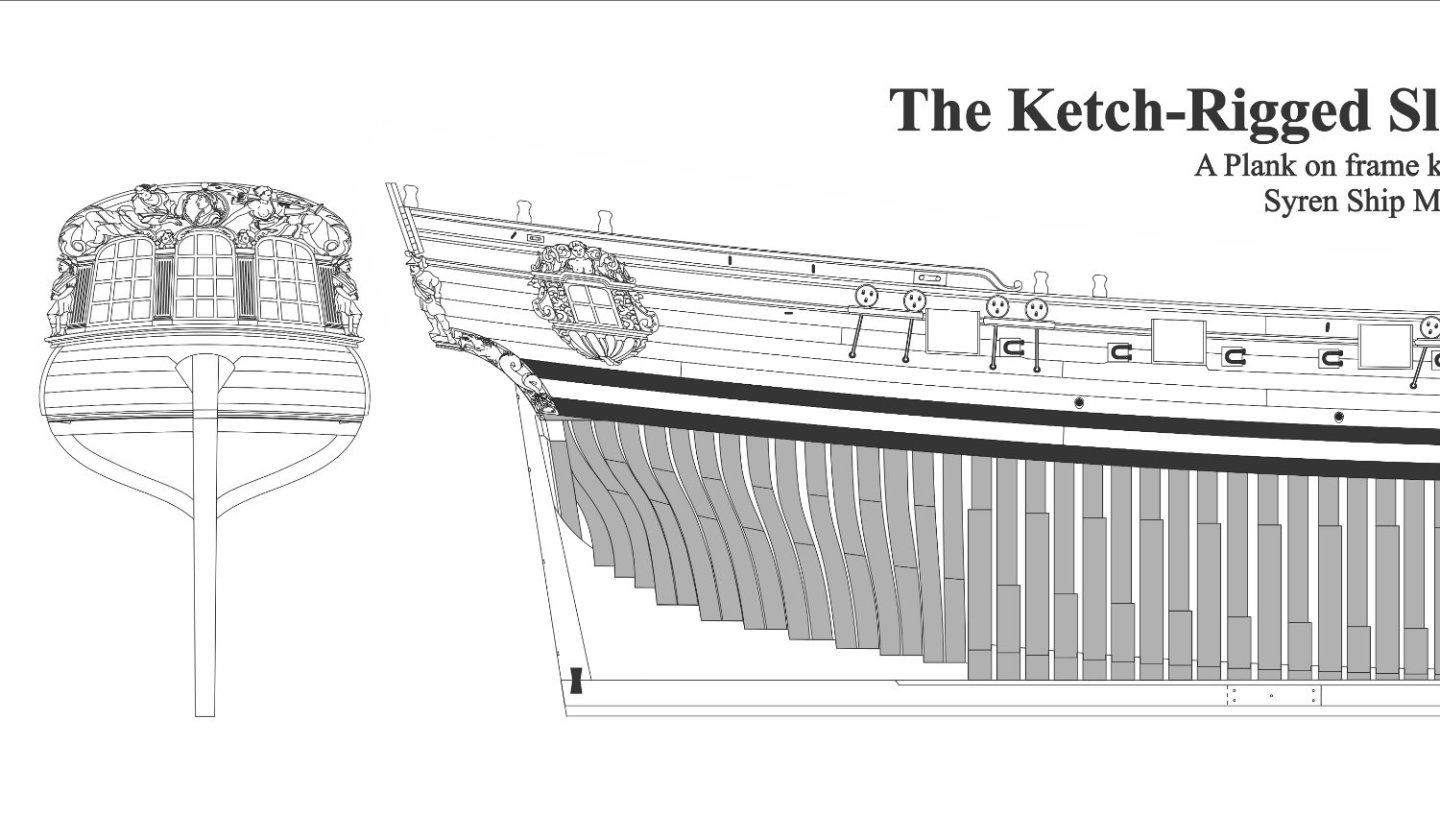
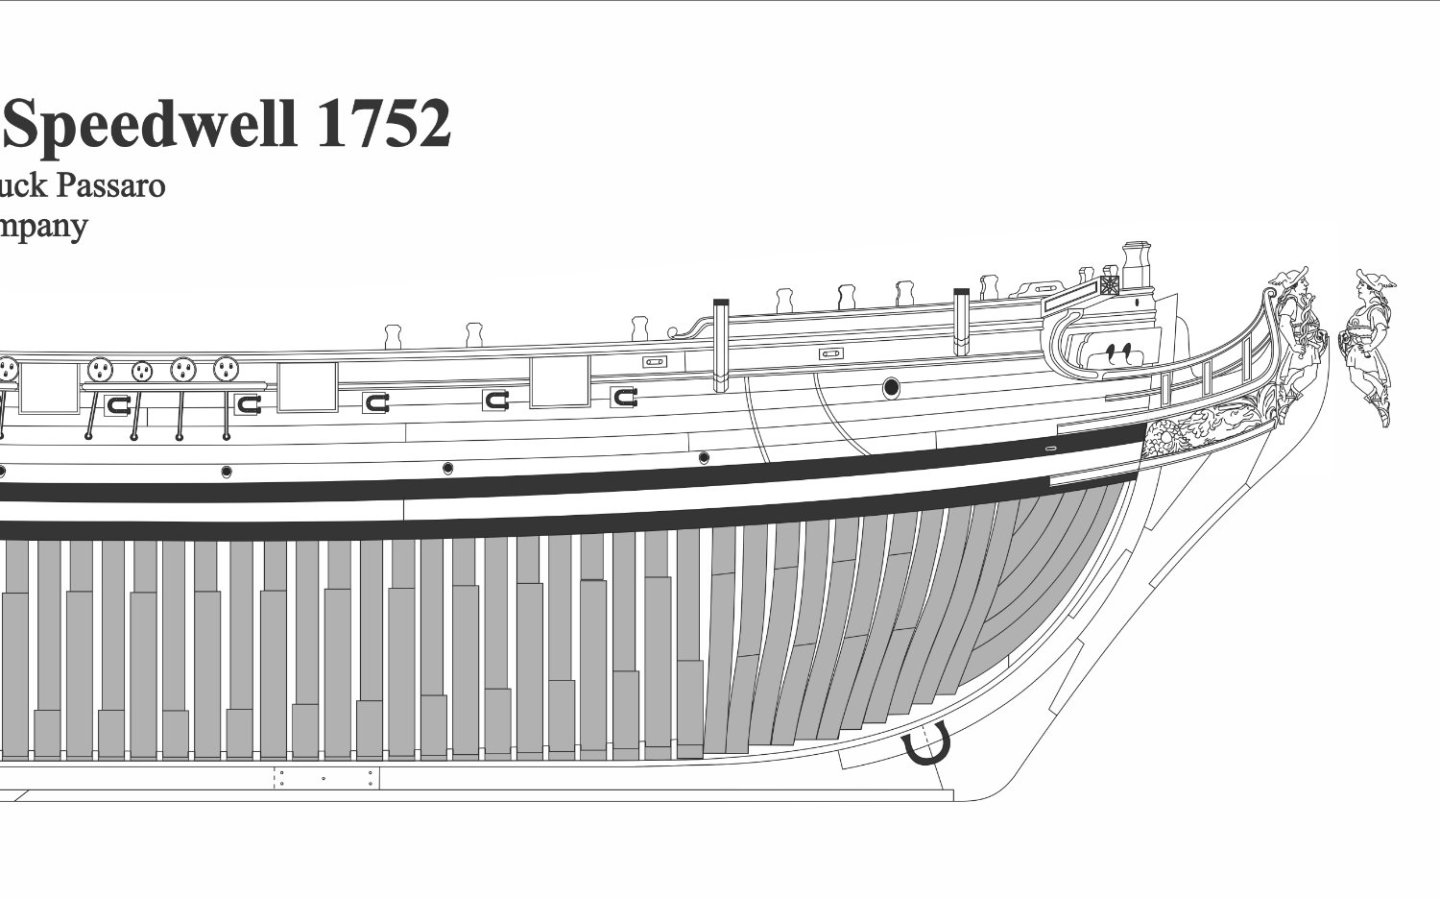
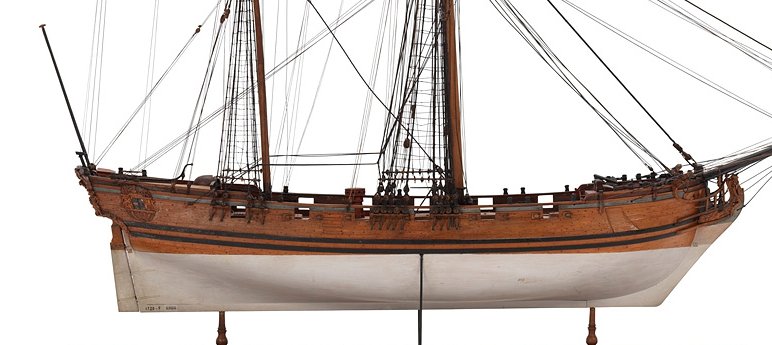
The start of my build log...always a very exciting moment for a model builder!! I am assuming most of you are somewhat familiar with the Ketch Rigged English Sloop Speedwell - 1752. David Antscherl and Greg Herbert have produced a wonderful series of books for model builders on how to build a great model of her. Not only can you build one as a POF model, but as a POB and lift model as well. Why would I choose this as my subject. Those of you that know me, I have always selected a subject that was unique at the time. Never been done!!! The Syren, The Winnie, The Cheerful etc. I chose this subject for several reasons actually, knowing full well that this would become a commercial laser cut kit like my other Syren projects. First- I never really wanted to build a POF model. I prefer the look of a fully planked hull myself. But the craftsman side of me won out as I was looking for a challenge beyond just another POB project. I can build those and sometimes it feels like I am just going through the formulaic motions with each of them. This would certainly be a design and engineering challenge as much as a builder challenge. Second- I am always increasingly frustrated and disappointed to regularly see pirated kits come out almost monthly as of late. Mostly all the rage are those POF kits from China. A coincidence?? That almost all of them released are also subjects of Ancre, Seawatch, or Anatomy of the Ship Books. I think not. You may have noticed the latest pirated kit produced from one of David Antscherl's designs, the Hayling Hoy is now making its rounds. None of the parts fit as is typical and the instructions render this kit almost unbuildable....again very typical. Just check out the build logs of pirated Hayling kit from China on other forums. Its a complete disaster and a waste of money. Literally unbuildable but they are still selling them to unsuspecting builders. So I reached out to David and Greg and asked them if I could develop the Speedwell before a really bad pirated version is released (and one is actually on the way-surprised?) They agreed and are as excited as I am about it. I just dont want to see a crappy unbuildable version of Speedwell being sold to builders. Hopefully they will wait until this one is released. Maybe I should do one of Hayling as well. LOL. My goal...to design a kit based on the books where the parts actually do fit. One that would encourage POF building for folks who want to give it a try. To also write a set of English instructions that are in depth and easy to understand. In short, to make a legitimate kit of from a Seawatch book under license and permission from the author with the authors help and guidance. Will this stop folks from building the knock-off version when it comes out.....probably not. But at least you will now have a choice. The pirated version of Speedwell is currently almost ready and being done by the same company who pirated Hayling. Coincidence again?? I think not. Also and I dont mean to digress....but a pirated version of yet another Seawatch book....Ed Tosti's Naiad Frigate is also set for release very soon as well. Again a coincidence...I think Not. Why dont you ever see a subject from these guys that wasnt first a Seawatch Book or Ancre book? Honest inquiring minds want to know. Anyway There will be differences between my Speedwell of course. I will be modifying it for simplicity so you dont have to be a master builder with every expensive tool in shop. The design concept for this POF model will be unique and allow a novice and intermediate builder to tackle it. It will also be at 3/8" scale which should also make it much easier to build. Here is the preliminary framing plan which will show just how different it will be. It will be planked from the wales upward so there is no reason to over complicate the project with bent frames....If you compared this to David's plan it is completely different. BUT make no mistake. Yes the folks who pirate these POF projects will claim its different and therefore original. BUT make no mistake. This is a 100% copy of Davids work. All of this is directly lifted from his plans and only modified to make production and building a bit easier. But it is a copy...literally traced. But the difference here is I give full credit to David and will be paying for the privilege to use his knowledge and expertise and hard work and years of research on this subject. I do hope you will swing over a chair and watch this new Speedwell project come to life. A huge thank you to David and to Greg who will no doubt think I am pain in biscuit by the time this is completed. speedwellsheetone.pdf speedwellsheettwo.pdf speedwellsheetthree.pdf SpeedChapOneMono.pdf SpeedChapTwoMono.pdf


-
Beautiful as always! Wonderful photos as well
-
Looking great Glenn…things will start to move quicker now visually that chapter 3 is done. chuck
- 840 replies
-
- 2
-

-
- winchelsea
- Syren Ship Model Company
- (and 1 more)
-
The sills run parallel to the deck actually. This is what the laser etched marks are lined up for. Follow them and also keep them flat on top port to starboard. But they will angle fore and aft to match the run of the gun deck. Chuck
-
Hello Steve...welcome to the forum. I am sure you get a lot of inspiration and help here on MSW. There are also a lot of great folks who I can say from personal experience will become life long friends. Please also check out the Ship Model Society of New Jersey. I am a member there and we meet once a month. Google our club website and feel free to drop by and visit during one of our meetings. We meet at the Roseland Public Library on one Tuesday evening per month. Chuck
-
Really excellent work. Yes that center belt is a challenge for sure. You did a masterful job with it.
-
Looking great Ben....glad to see some fun stuff getting done.
- 399 replies
-
- 3
-
-
- winchelsea
- Syren Ship Model Company
- (and 1 more)
-
Actually no in progress photos are allowed in the gallery at all. Just those of the finished model. But yes you can also create a build log that contains all of those in progress images. Just not in the gallery. Only photos of the completed model. Otherwise we usually get members who spam us to death in the gallery with a double whammy of hundreds of in progress build photos. Usually to bump their albums to the front page every other day. So just photos of the completed model in the gallery please.
-
Frank...you can gradually reduce the thickness to 1/8" thick. Not the full length down to the deck. I would say anything around 5/32" thick at deck level and even slightly more is fine. But not much more. Its along the sheer that is most important. A wide caprail is so clunky and out of scale and is typically what you see on most kit models and scratch alike. Its a huge common rookie mistake. Chuck
-
Thank you!!! i should be caught up with making blocks and rope by next week and will start making chapter 12 parts. its going to be busy these next few weeks.
- 1,784 replies
-
- 2
-
-
- winchelsea
- Syren Ship Model Company
- (and 1 more)
-
Ialmost forgot a unique and important feature of this little gem. I got so used to it I thought it was a standard feature on all disc sanders but its not. It is such a timesaver. This sander has a removable disc. If you examine the picture below, you can see the disc is in two halves. This makes switching grits so much easier. In fact with the spare disc you can have one ready alongside the machine with a different grit. It has 3/32 hex driver with it so you can remove it. The front disc is removed from the back of the disc through the slot on top of the motor mount, there are 3 screws that mount the front disc to the back. So removing the sandpaper is easier. You remove the entire disc and swap out the sandpaper and then place the disc back in the machine. You could literally buy several of these discs and have them all ready with sandpaper and you are ready for the quick change.

-
I forgot to mention that these should be available towards the end of the month. Check The Model Machines website frequently for its availability.
-
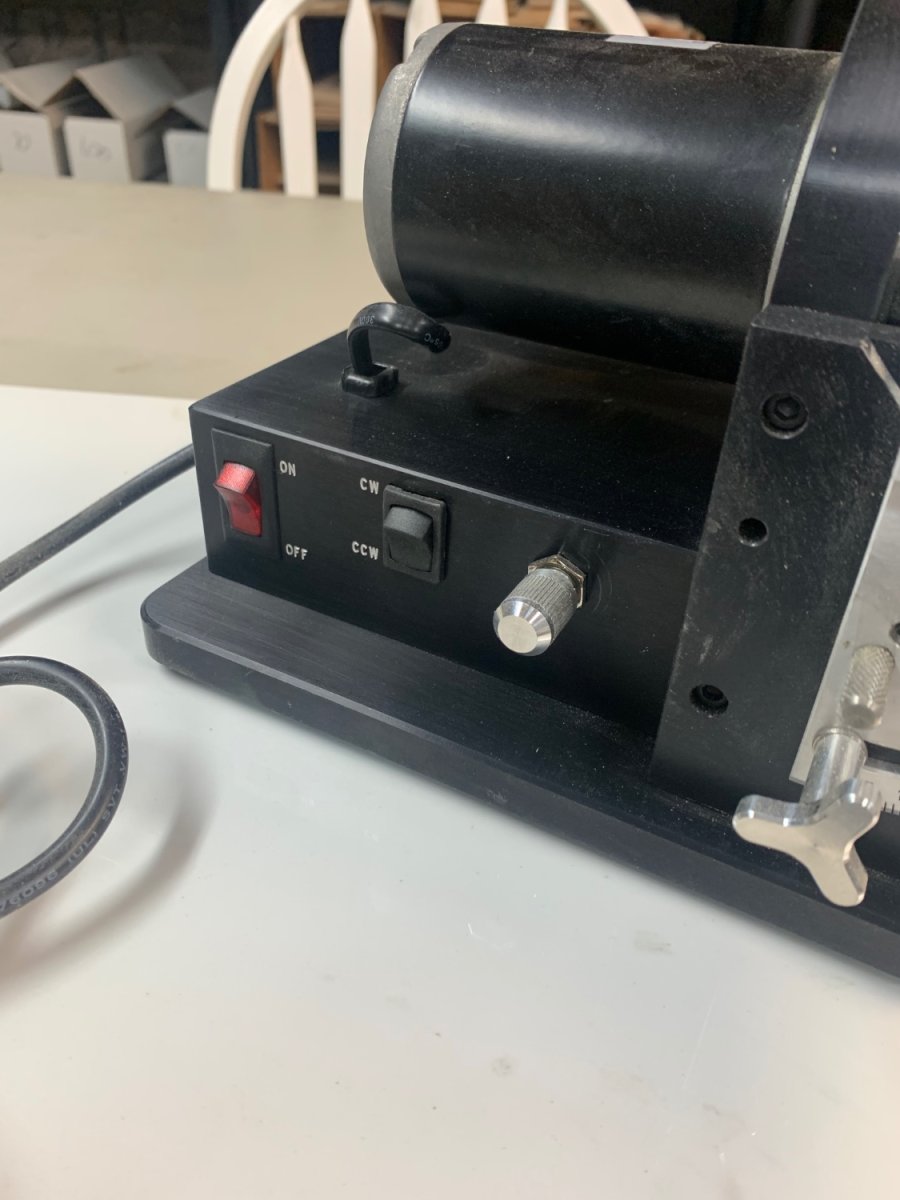
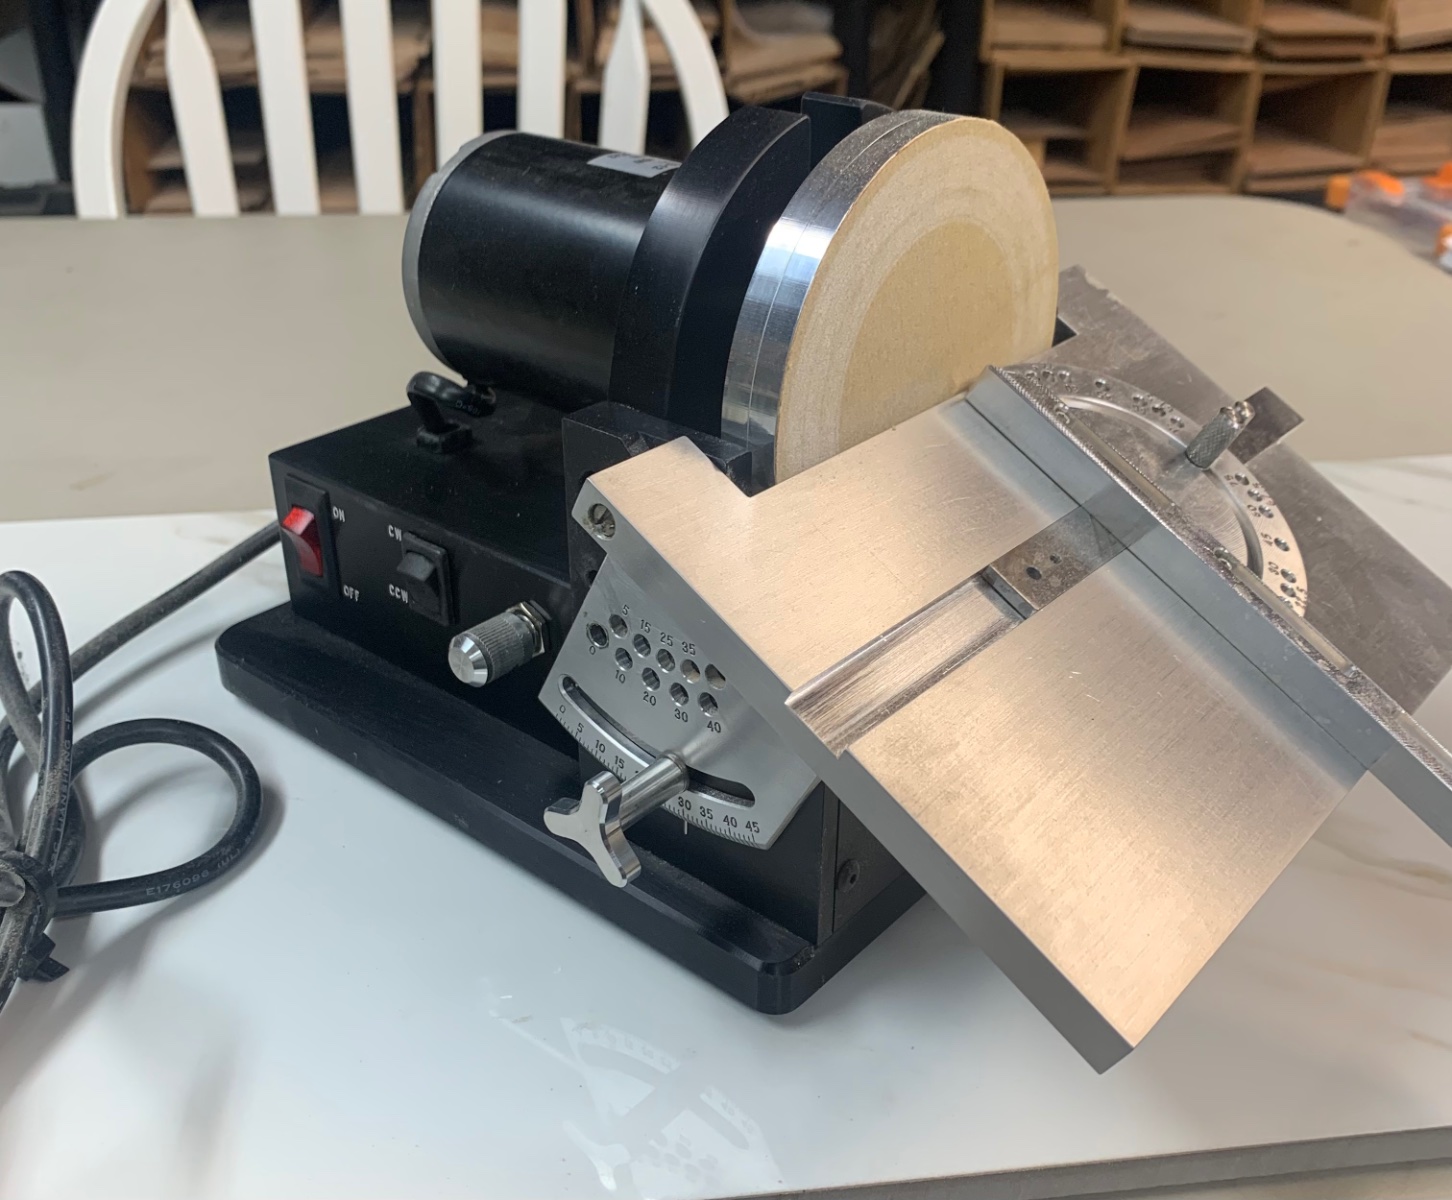
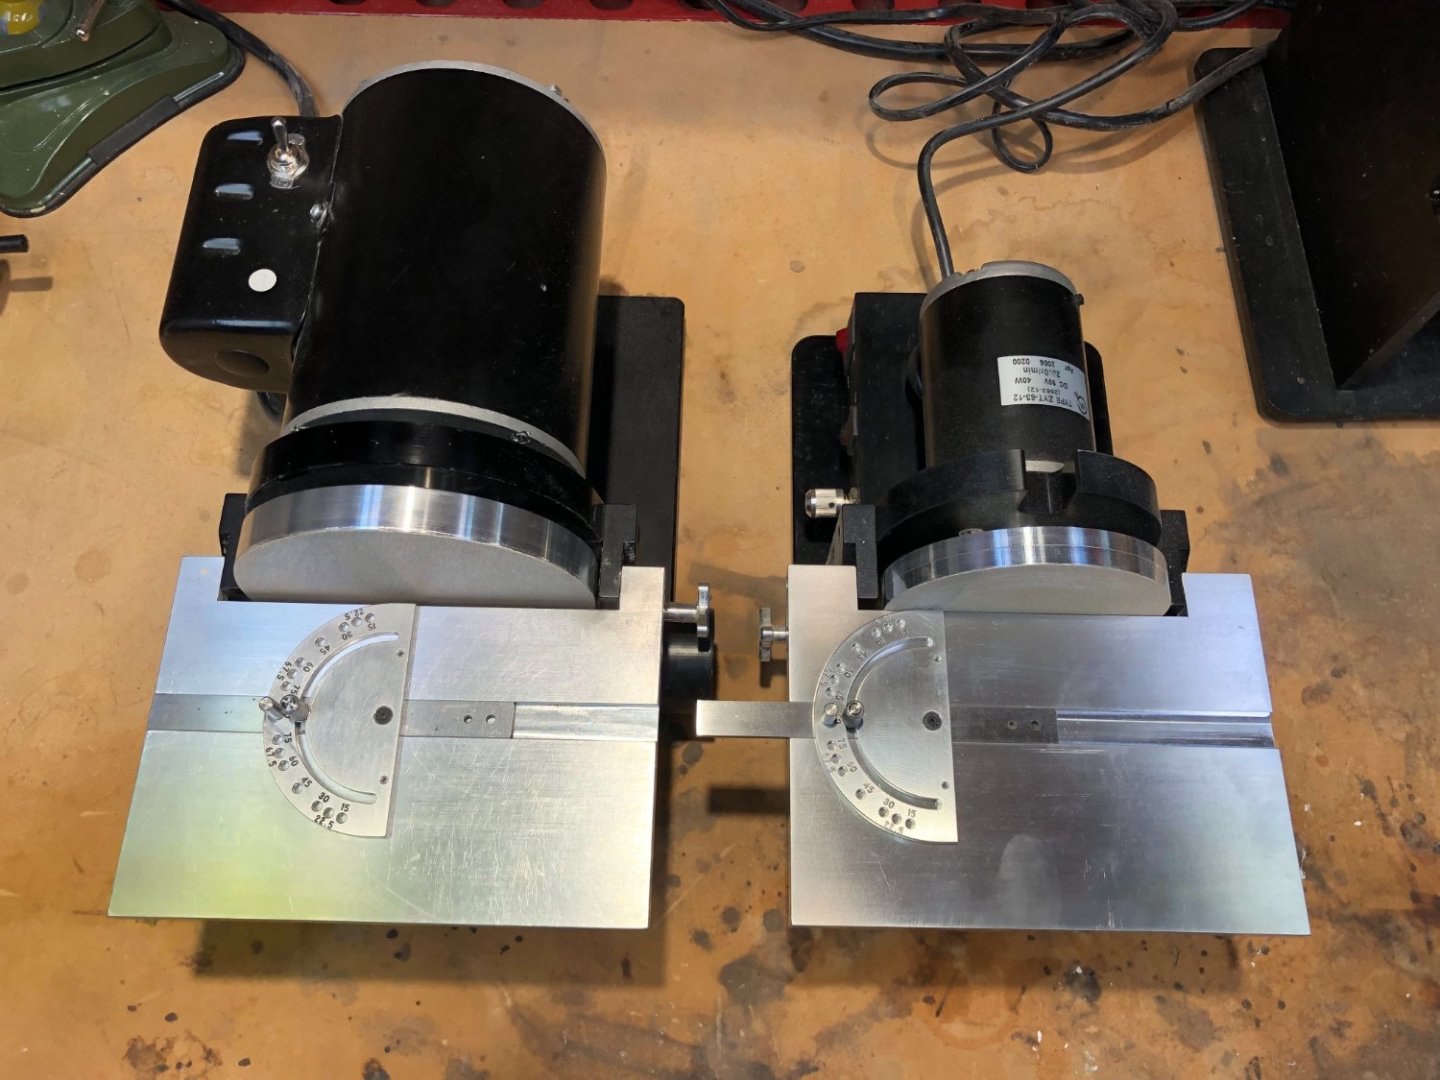
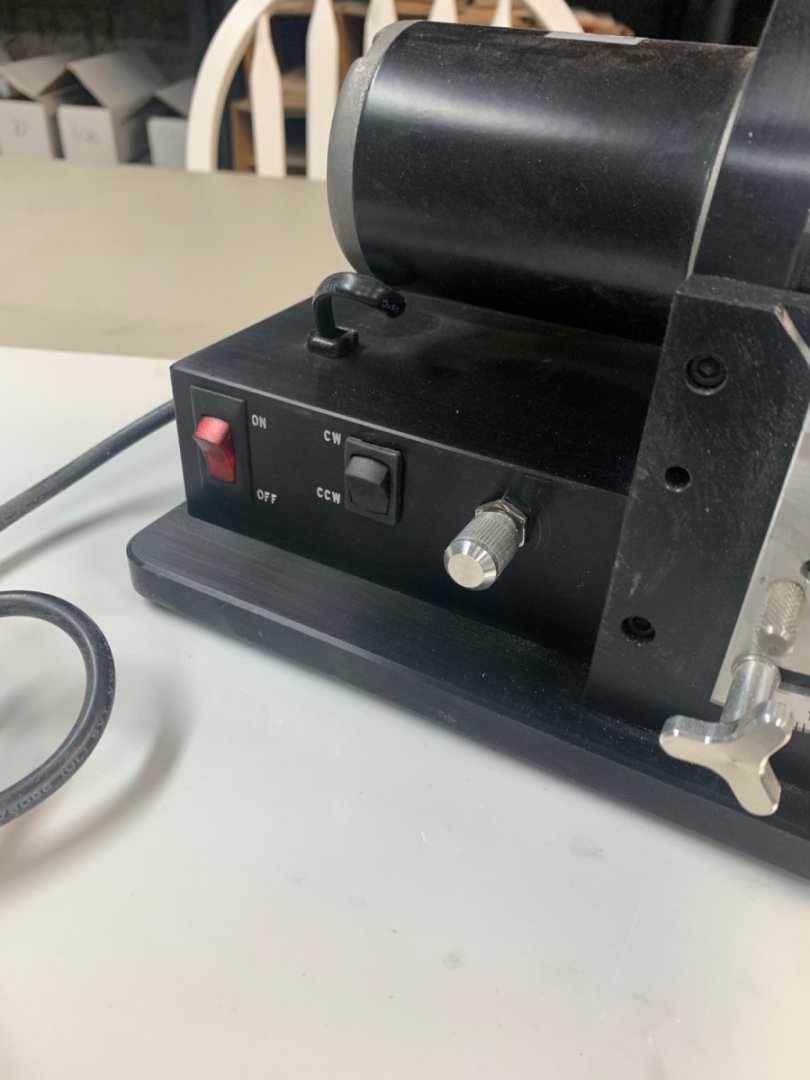
I would like to introduce you guys to the latest tool that will soon be offered by Model Machines. Jim Byrnes has done it again. You might ask how he could possibly make the disc sander he offers better. I asked the same thing. But as expected, he managed to do just that. The first thing you will notice is the size difference between the new disc sander and the old one. This new Variable Speed Disc Sander is the perfect size, at least for me. It has a 4" disc. You can see the side by side comparison below. I have put it through its paces over the last few months. You might expect a less powerful machine. It is not. This smaller disc sander packs some power. It is also quiet as a mouse. It runs super smooth as expected and you barely hear a whisper from the sander. Another great function of this sander is the ability to change speeds. The variable speed control is super smooth as well. I prefer slower speeds on softer material like Yellow Cedar. But maybe thats just me. You can tailor the speed for your own comfort zone. In addition the other neat feature is the direction is reversible. I am right handed so I usually keep it going counter clock wise. But on some occasions it was a real pleasure to be able to reverse direction. The shape of some parts just makes this a great option to have. BUT remember....DO NOT REVERSE DIRECTIONS UNLESS THE DISC IS FULLY STOPPED. I havent done that by accident yet but I imagine it wouldnt be pretty. The table top is 6 3/4" long and 4 1/4" deep. Its a really nice size. I used this on some test frames for my upcoming speedwell kit. The parts sat comfortably on the table, even the small parts. As you would expect, the table tilts with a variety of "lockable" preset angles. Just push in the pin and tighten it up on both sides of the table. Its sturdy aluminum construction like all of the Byrnes machines is also present here. This machine has some tight and precision tolerances and is of course well made. Superior to anything else you might have used in the past. You can also see the precision miter slide that is typical of Jim's machines. There is no play with this slide. It is very accurate and slides comfortably. I thought the smaller size would make it more difficult or awkward to use. But to my surprise it did not. In fact after using the new 4" disc sander the larger older sander seemed a bit awkward by comparison. The new smaller size makes sense and I didnt find myself wandering to the old one at all. This new sander will now be my go to sander and it is lightweight by comparison. It fits nicely on your work bench and doesnt take up much room. It slides nicely into the corner and even fits on a nearby shelf when I need to store it for longer periods. That is a huge plus. Jim will be launching these very soon. It will make a great tool if you are in the market for a disc sander or want another one to compliment the older larger disc sander. From what I understand this machine will indeed replace the old disc sander once Jim's inventory of the old larger sanders is depleted. I am unsure what the price point will be on this but I can tell you it will be more than worth the money. Its not something I would be able to do without now that I have one in my shop.

-
Wonderful news.... Chuck
-
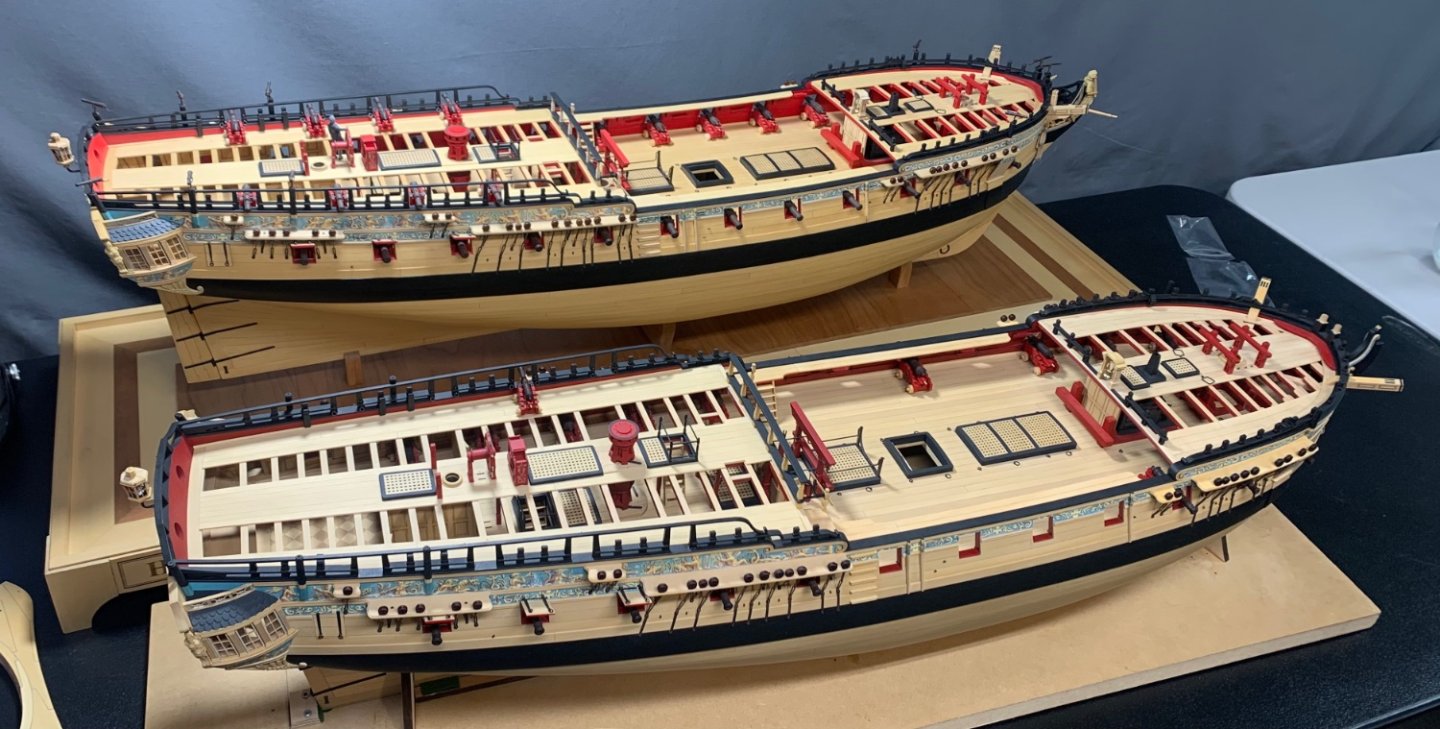
Had the guys over to the shop. Tale of two Winnies. One is mine and the other is Mikes (stuntflyer).

- 1,784 replies
-
- 41
-
-

-
- winchelsea
- Syren Ship Model Company
- (and 1 more)
-
Thanks guys. There will be a barge but I am taking a break from Winnie for a bit. I am going to catch with with making inventory of blocks and rope once I get back and maybe start work on Speedwell. I also have to write the last chapter and cut parts for folks.
- 1,784 replies
-
- 13
-
-
- winchelsea
- Syren Ship Model Company
- (and 1 more)
-
Just a wee bit high on the angle. Make the bottom of the cathead flush with the bottom edge of the molding. That should adjust the angle a bit.
- 642 replies
-
- 3
-
-
- winchelsea
- Syren Ship Model Company
- (and 1 more)
-
You have done a masterful job on her. I think I had as much fun watching you build her as you had building her. Beautiful work.
- 857 replies
-
- 5
-

-
-
- Sphinx
- Vanguard Models
- (and 1 more)
-
You are welcome. I will be the first to admit that I take forever to design and produce these projects. I cant rush through them. So many kit mfgs seem to announce the availability of new kits every few months. That is something I can never do. This next project will be a bit of wait. Hopefully worth it. POF projects have triple the parts and more complexity. I prefer quality over quantity any day. I am also trying out some new design features to make it easier to build. Chuck
- 1,784 replies
-
- 15
-
-
- winchelsea
- Syren Ship Model Company
- (and 1 more)
-
Thank you so much guys. Its always a bit weird when you finish project that took years. I cant believe its done actually. writing the last chapter today.
- 1,784 replies
-
- 20
-
-
-
-
- winchelsea
- Syren Ship Model Company
- (and 1 more)
-
Thank you all for the kind comments. I wasnt planning on it. I dont think I have enough room in my shop for all the wood that I will need for those. They would also be ridiculously expensive. I will make the plans available however in short order. It would be best to have some uniqueness to everyones presentation as well. It will nice to see how everyone displays theirs.
- 1,784 replies
-
- 7
-
-
- winchelsea
- Syren Ship Model Company
- (and 1 more)