
HOLIDAY DONATION DRIVE - SUPPORT MSW - DO YOUR PART TO KEEP THIS GREAT FORUM GOING! (Only 36 donations so far out of 49,000 members - C'mon guys!)
×


Chuck
-
Posts
9,660 -
Joined
-
Last visited
Content Type
Profiles
Forums
Gallery
Events
Everything posted by Chuck
-
 https://modelshipworld.com/forum/93-general-project-discussions-on-planking-fittings-and-monograph-chapters/ That link above takes you to a tab that can be found above the build logs.......see it highlighted in white below in this screenshot. There seem to be a lot of folks who have forgotten about this areafor the group or recently joined and didnt see it mentioned on the "how to join this group" topic. So browse anything you might have missed and feel free to join any of these IMPORTANT discussions. Also start new ones if you need to because its easier to find a discussion on a particular Winnie topic here than hunting through all of those build logs. This area is being way under utilized as a source. Chuck
-
Looking good....dont forget to simulate the caulking between deck planks. You are well on your way.
- 113 replies
-
- 1
-

-
- Cheerful
- Syren Ship Model Company
- (and 1 more)
-
Nope I dont actually know. But its not anything you will need. But I am sure you can figure it out from the original draft if you find a reason to need it. They are NOT level across that bulkhead and are purposely at different heights and angles.
-
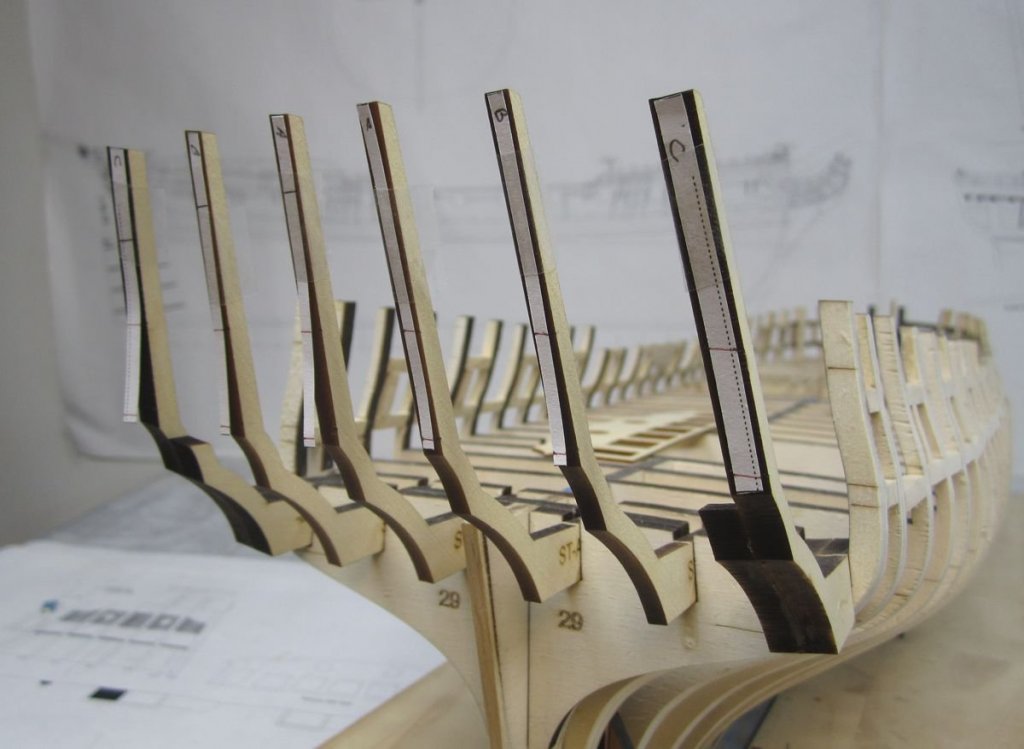
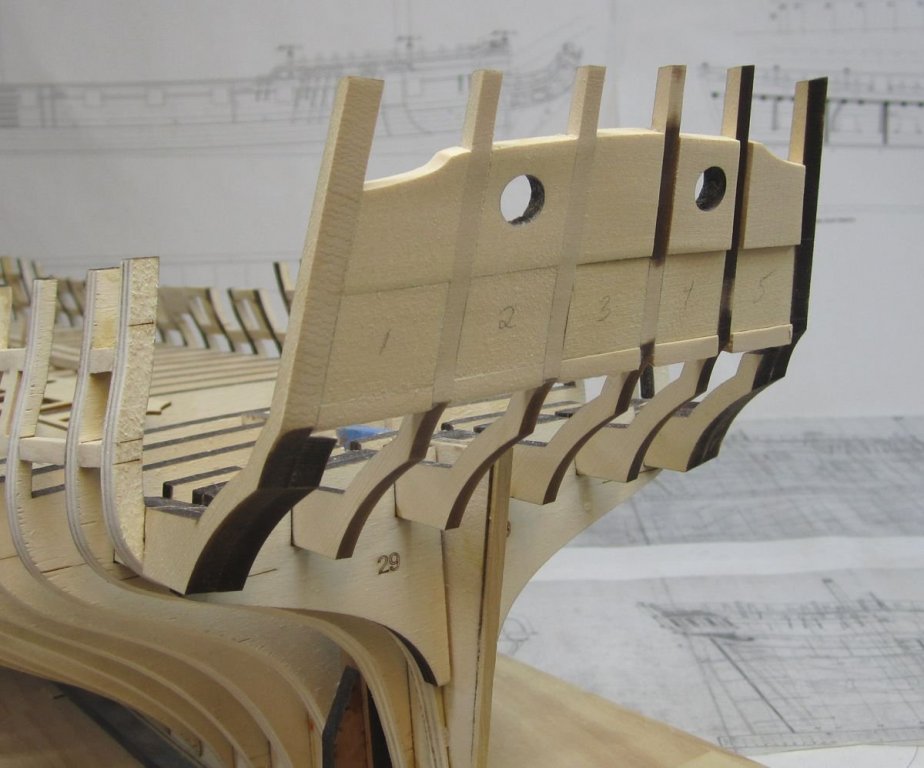
Some of you guys are way overthinking these stern set ups. The best way to line things up and get things level is to work from the other side. View the stern frames and fillers from the outboard side. One step at a time working from the inside two stern frames placing the fillers and frames in position. Use the template to mark the heights ahead of time. I see so many errors in your placement you will certainly have issues with the way you are proceeding. Just attach each template to each stern frame to establish the heights for the sills and fillers. Then proceed to place each filler and sill between them working from the inside out.... Place the number 3 filler first and then the sills above and below it... Then proceed to #2 and #4 And lastly 1 and 5. Getting a visual from the outboard side at each step. Chuck
- 389 replies
-
- 6
-
-
- winchelsea
- Syren Ship Model Company
- (and 1 more)
-
Looks great Fred.
-
Yes they do...they will be able to mill to the sizes you need.
-
That looks exceptional…really nice work
- 99 replies
-
- 1
-
-
- winchelsea
- Syren Ship Model Company
- (and 1 more)
-
That will happen sOmetimes. But you recovered nicely. Onward and upward as they say.
- 389 replies
-
- 3
-
-
- winchelsea
- Syren Ship Model Company
- (and 1 more)
-
It looks OK. Its hard to tell in photos if everything is lined up where its supposed to be but it looks just fine. Chuck
-
Looks nice...one thing I do recommend is that the blue paint on the stern transom shouldnt be used at full brilliance or saturation. Its too bright and blue....Before you add anything else I do recommend that the blue paint there be toned down with just the smallest amount of white mixed in to it to lighten it up. Iamof course suggesting some white mixed with the blue on your pallet before you paint. Just a smidgeon....it helps a lot. Chuck
- 840 replies
-
- 2
-
-
- winchelsea
- Syren Ship Model Company
- (and 1 more)
-
I am a big proponent for not mixing wood types. My preference is always to use the same wood for hull and deck. But I am old school and tend to look at and admire the contemporary models which mostly did the same.
-
Beautiful work. A very nice planking job indeed.
-
That looks great Ben....how did I miss this post. Wonderful progress. Chuck
- 399 replies
-
- 2
-
-
- winchelsea
- Syren Ship Model Company
- (and 1 more)
-
Absolutely yes… Chuck
-
A nice fresh start!!!
-
Nicely done!!!
-
Burn it off. Run it through a candle flame quickly! it will be nice and crisp.
-
I am having trouble following your question without pictures. Try just following the monograph. No need to switch it up. Just read ahead if you need to. it is all covered. Finish up the stern as indicated. I believe you are being too cautious and may be overthinking things a bit. No need to develop a new method as you can see by the many build logs....it all worked out wonderfully. Remember the first time you tried to develop a new approach with the stern? Dont be afraid to finish thing up when its stated to do so. As you may be screwing the pooch down the road. There is usually a reason why I created the order and approach back at the stern and it was to hopefully avoid issues later on. But show some pictures and lets see what you are referring too. Just use the template showing the stern frames and if yours line up you are good to go. Then fair them to the dotted line or even a bit further as shown on the plans... Chuck
-
Should ship out on Monday …Tuesday at the latest.
- 389 replies
-
- 2
-
-
- winchelsea
- Syren Ship Model Company
- (and 1 more)
-
I think I got mine from staples. A small can.
- 1,784 replies
-
- 1
-
-
- winchelsea
- Syren Ship Model Company
- (and 1 more)
-
You dont have to start over at all... Many folks have found similar issues. Just remove the sill and fillers between the stern frames carefully. Then reshape slightly narrower and glue them in position again. Work from the inside ...out. Closing the gap so-to-speak to reduce that 3mm issue. If you can get it down to 1mm it will be tolerable and not at all noticeable. It wont effect the outcome in the slightest. You will easily be able to shift those stern timbers and clamp them against the top fillers to make up the space. do one at a time until you are done working towards to outside on the offending side. Easy-peasy. If you need new fillers you can cut them yourself or I can provide them foe you. Its a much easier solution and much cheaper solution. Chuck
- 389 replies
-
- 2
-
-
- winchelsea
- Syren Ship Model Company
- (and 1 more)
-
Make sure you fair the outside of the hull back at the stern sufficiently. I am referring to the outside stern frames. You want to have enough space after you put on the transom for the stern window fillers back there. So they leave a nice lip for your window inserts for the false lights on the stern. Hope that makes sense. Most folks under fair and they dont have enough space for it. Chuck
- 389 replies
-
- 2
-
-
- winchelsea
- Syren Ship Model Company
- (and 1 more)
-
That looks lovely. Its starting to come together.
- 43 replies
-
- 4
-

-
-
- Mayflower
- Model Shipways
- (and 1 more)

