HOLIDAY DONATION DRIVE - SUPPORT MSW - DO YOUR PART TO KEEP THIS GREAT FORUM GOING! (Only 20 donations so far - C'mon guys!)
×


gak1965
-
Posts
720 -
Joined
-
Last visited
Content Type
Profiles
Forums
Gallery
Events
Everything posted by gak1965
-
 The Flying Fish plans were drawn by Ben Lankford, who also did the Niagara and Pride of Baltimore II. All three sets of plans are magnificent. The Fish plans in particular are less model plans and more like simplified builders plans. They don't show the model bulkheads, but rather the frames, and the detail views show the actual ship timbers, etc. The MSW kits (which I really like) feel "semi-scratch" to me, having you scratch build a variety of the things that go onto the decks and aloft. Having to fabricate all of those things yourself gives you more feeling of accomplishment, at least in my mind. I agree with you that they feel like they give you the skills needed to build something from scratch. We will see if that is true - I just received plans from the NMM Greenwich for the RRS Discovery, so as I'm building the Fish, I'm going to be turning those into plans for a POB model. The one area that the MSW kits are deficient (in agreement with @mbp521 , aka Brian) is the Brittania fittings that they supply. The Fish has a lot more of them than either of the other two I've done, and that they are the worst I've seen in an MSW kit. I've replaced the Brittania anchor stocks with wood and brass versions before, so no problem there. The windlass wasn't too bad except for the flash, but the capstans are a mess, the cleats require a lot of cleanup, etc., etc. I thought about scratch building a windlass like @Keithbrad80 but the only model appropriate power tools I have available are a dremel and drill. Nevertheless, it may be possible to build a better capstan (or get the Brittania 1:96 ones from BlueJacket. The Niagara (at 1:64) had a capstan kit, which I may be able to shrink down to 1:96. We'll see.
- 602 replies
-
- 2
-

-
- Flying Fish
- Model Shipways
- (and 2 more)
-
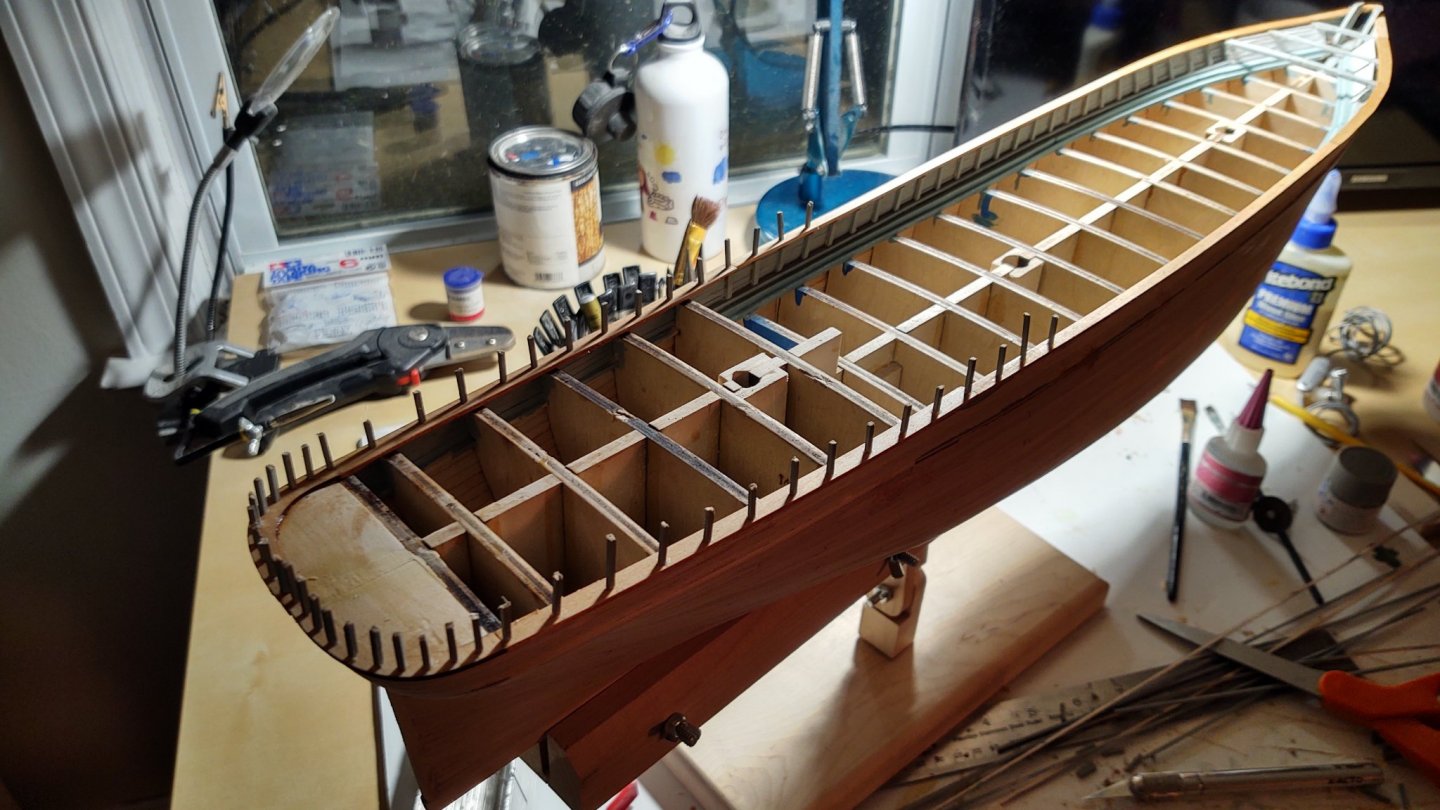
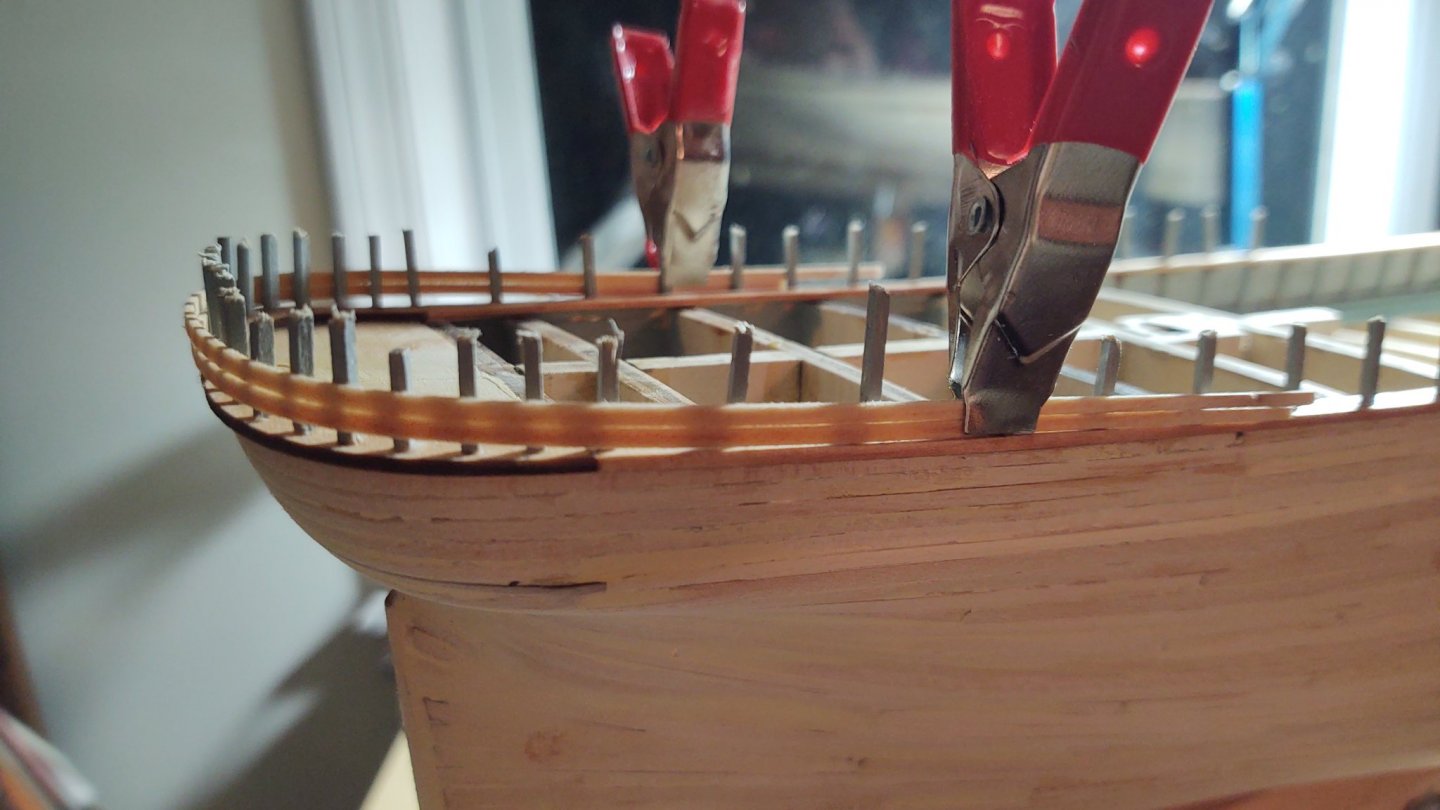
So - making things for the forecastle. I drilled the hawse pipes, made outer rings for the hull where the pipes exit, fabricated the chain stoppers, cleaned up the windlass and painted it, and made the bitts (pictures later). As I install them, I am going to install the anchor chain as well, as I suspect pushing them through the hawse pipes, and the chain stoppers is going to be a real pain once the forecastle is decked over. Which brings me to a question. the plans show a 5/16 chain link (short axis) at 1/2" = 1 ft. which is a 7.5 inch chain. A 7.5 inch chain at 1:96 would be 0.08 inches, which is, I think 13 links inch given that the supplied chain is round, not oval like real chain. The supplied chain measures about 1/32" and based on the part numbers from model shipways, suggests that it's actually 42 links per inch. This seems wrong to me (and the chain seems awfully wimpy compared to the size of the ship. Am I missing something, or (as I suspect) do I need to order some additional chain? It looks like the BlueJacket chain is orderable in more reasonable lengths. Has anyone used their chain? Do you like it? George
-
Looking great so far. Pretty big hull at 1:72. If I'm calculating correctly, it's about 900 mm, right? Going to be an awesome model when you are done!
-
Yep. Niagara has 4 blocks plus the breeching rope. I didn't bother with the hooks - I just lashed the blocks to the relevant eyebolt, reeved the lines into the blocks and then put the eyebolts into pre-drilled holes in the bulwarks and the carronades.
- 370 replies
-
- 1
-
-
- Model Shipways
- Confederacy
- (and 1 more)
-
Thanks Brad! I was worried that I was reading the plans wrong. It will be a nuisance if I have to cut and then replace the joists for the forecastle in order to successfully drill the hawse pipes. We'll see if I can find the the right combination of bits to do so without cutting them out.
- 602 replies
-
- 1
-
-
- Flying Fish
- Model Shipways
- (and 2 more)
-
Just to show you my lack of knowledge, I've never even heard of pre-stain. Do you have a recommended brand(s)? Getting the dowels to take stain has always been a problem. If that would help it would be great.
-
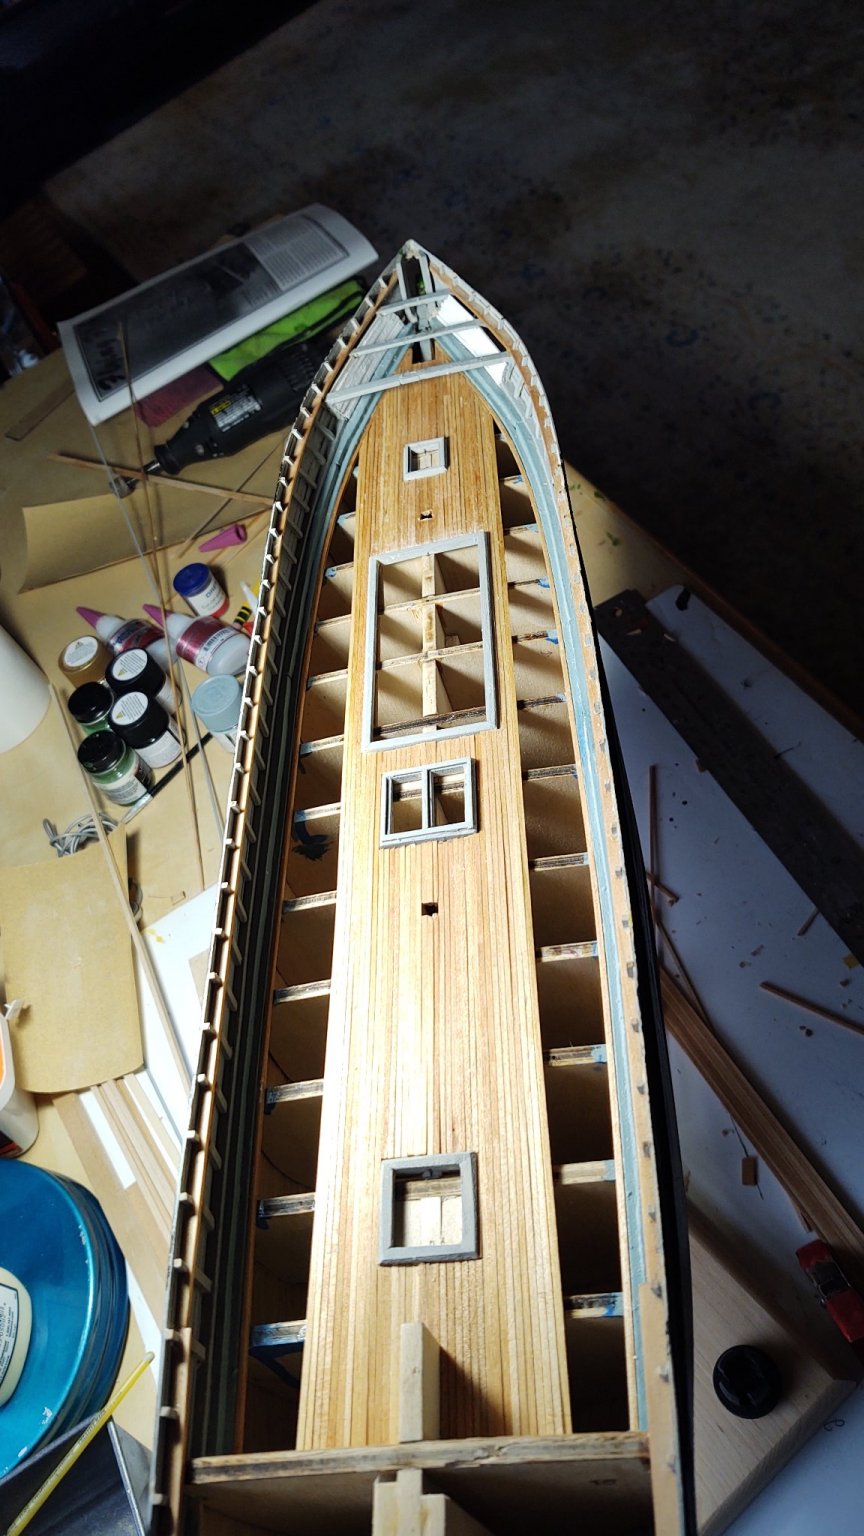
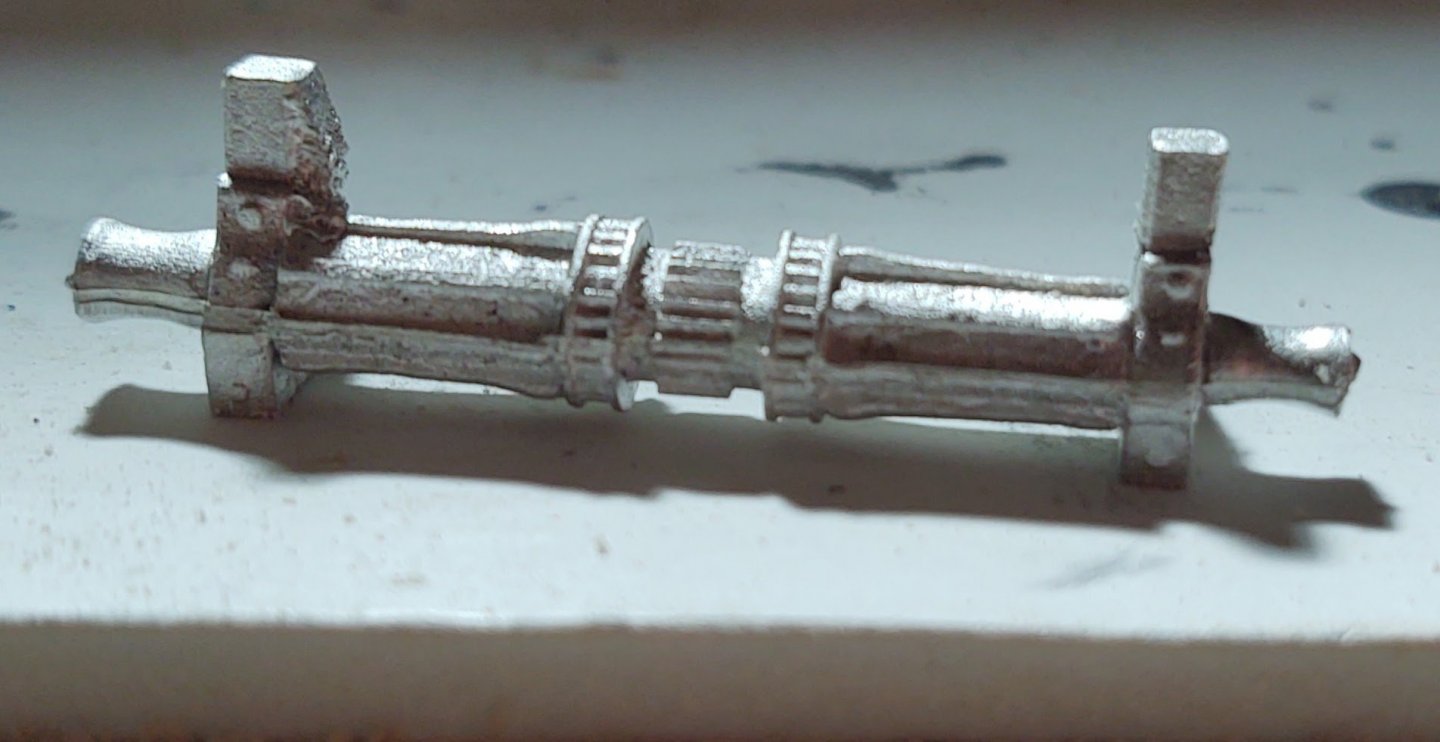
Well, the main deck planking is complete. I did not use a nibbing strake - it would have probably looked better, but it is beyond my capability at the moment and [warning, rationalization following] won't make much difference at 1:96 scale. I pre-stained the 1/16 by 1/16 planks, but needed to smooth it out in a couple of places, and so did a bit of restaining in those areas. It didn't seem to have a negative effect. On the whole I'm moderately pleased. Before moving to the stern, I'm going to build and install everything that belongs under the forecastle, and I'm going to try to place the 5 bitts and then plank around them so that there is some interest in that space. The first step is going to be to clean up the windlass, which as can be seen has a lot of, well, I'll call it 'flash' in homage to the term of art in plastic. It also appears to have a slight casting defect on the windlass bitts that is going to require some filler. A question to the clipper aficionados out there. Was it standard to paint the bitts some color other than black? My inclination is to paint them the same gray or blue that I've been using on the waterway or the inner bulwarks, or alternatively the white that I used on the ceiling planks, but I just don't know. One additional question to anyone who has built the fish (or has knowledge of standard clipper design). If you look at the section of the plans I've snapped below, you will see that the anchor chain goes through the chain stopper (which I will fabricate "approximately" just to help guide the chain itself, through what I tend to think of as a wear pad (although supposedly it also removes gunk) and then out through the hawse pipe. The pipe slopes downward and exits just below the waterway. Both of the previous ships I've built that required drilling them had the pipes aimed 45 to 60 degrees from the orientation of the ship's centerline. But when I run a straight line from the pipe, it looks like it exits the hull pretty much lined up with the location of the hawse (follow the ruler down). So - am I reading this right? Do the hawse pipes more or less run parallel to the centerline? Thanks for looking in! George K
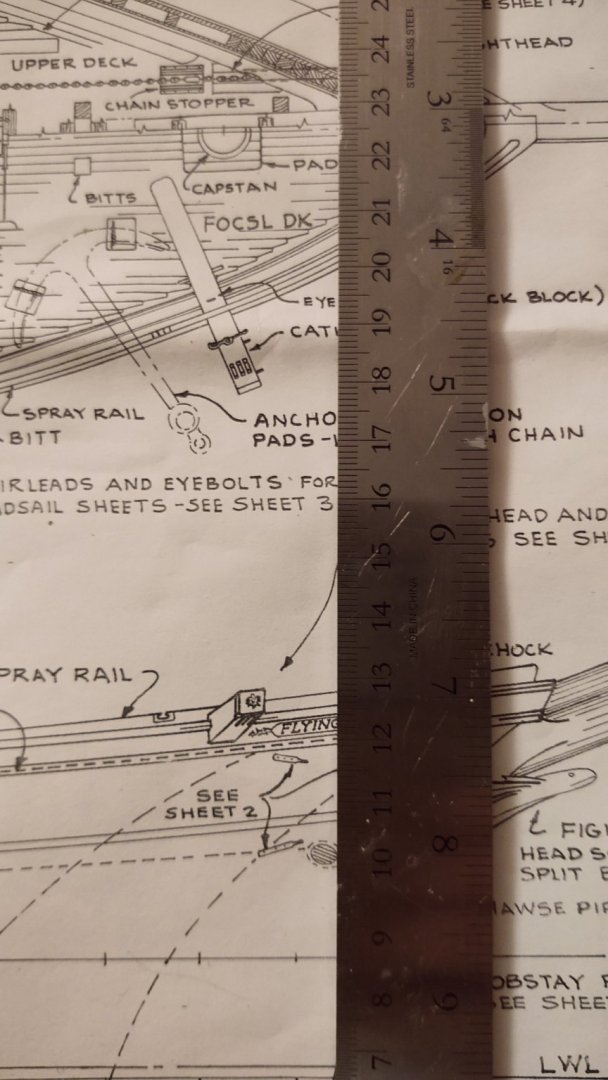
.thumb.jpg.c8f6b0d86d222b7516dc267100c1c318.jpg)

- 602 replies
-
- 3
-
-
- Flying Fish
- Model Shipways
- (and 2 more)
-
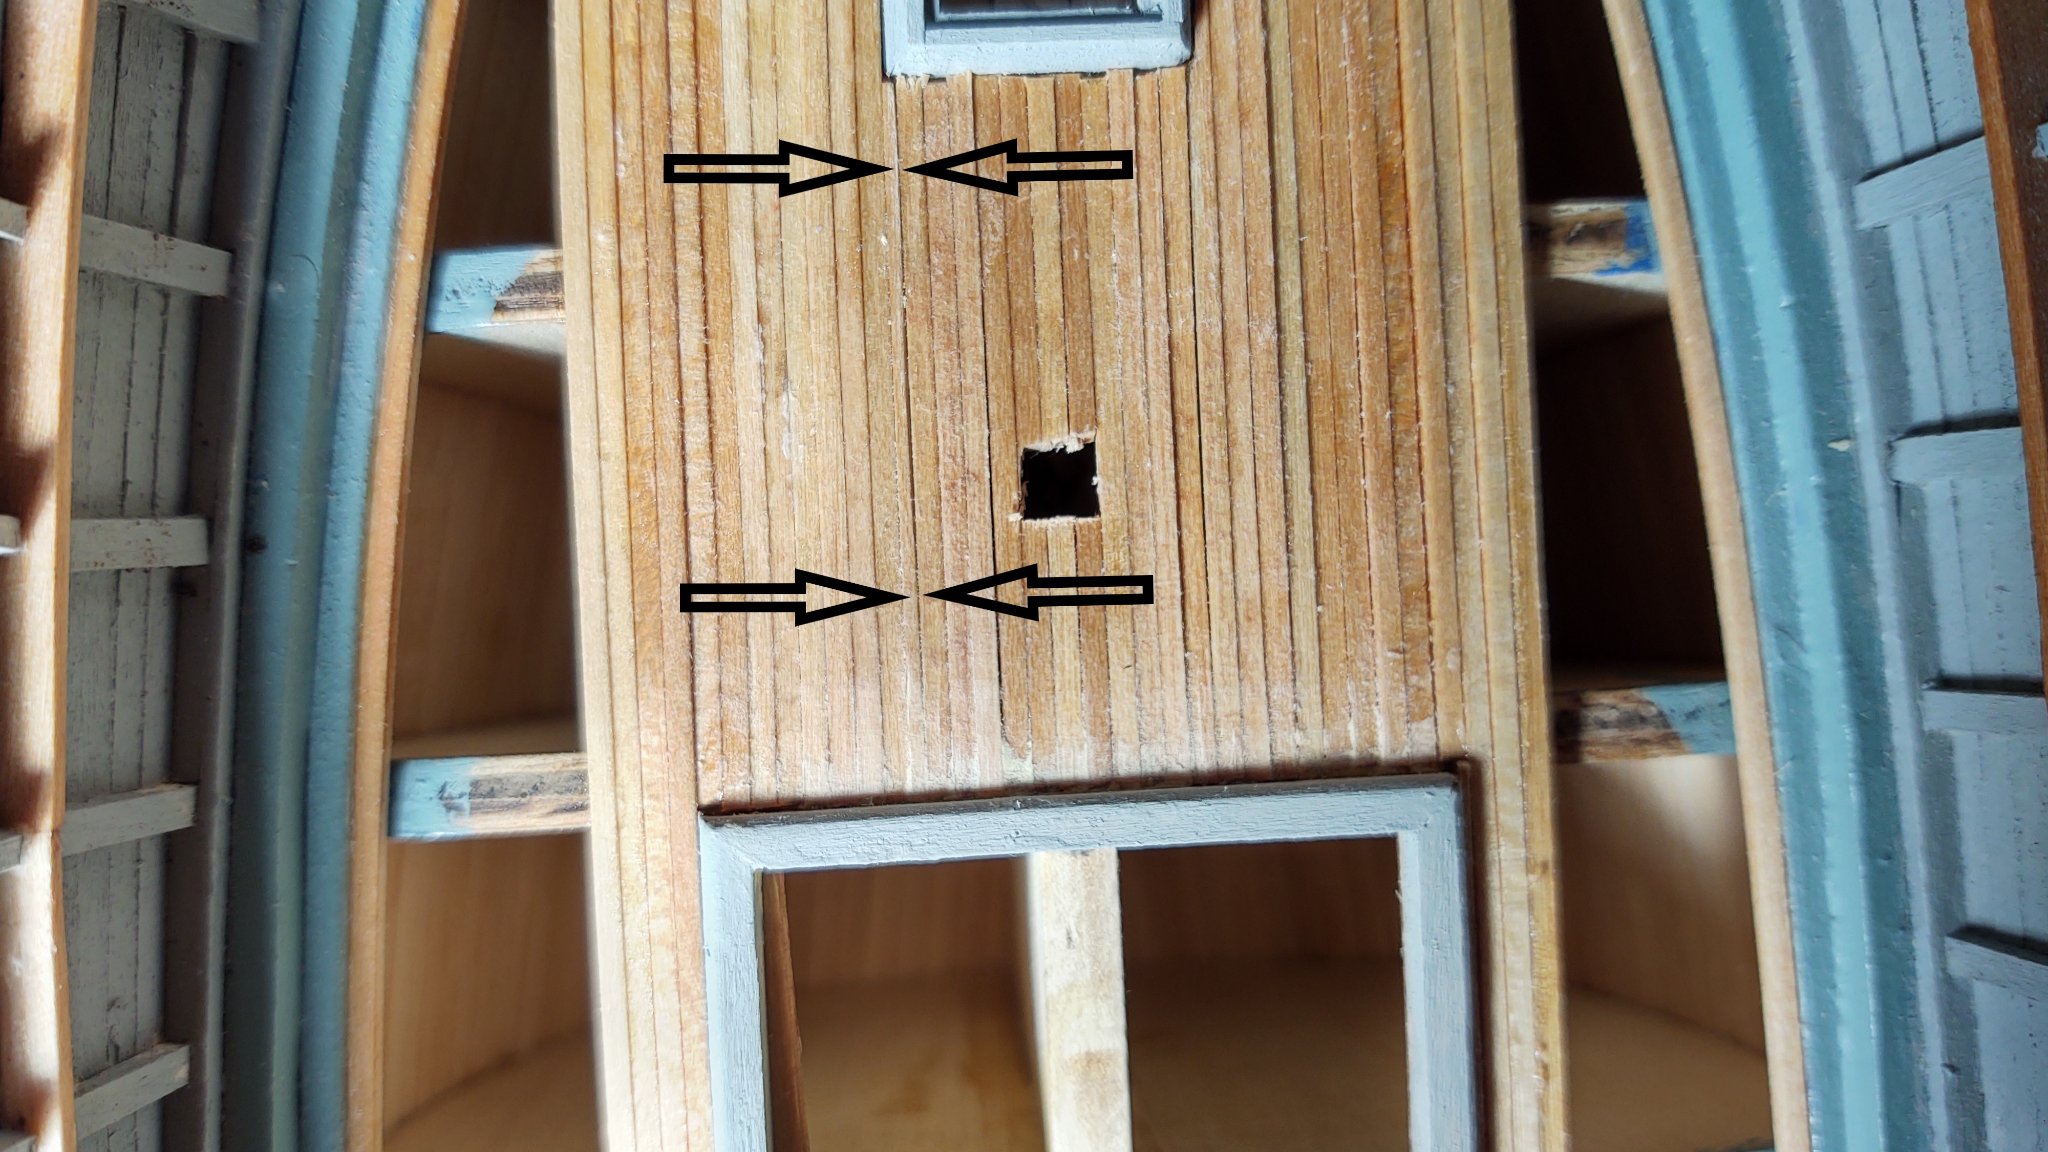
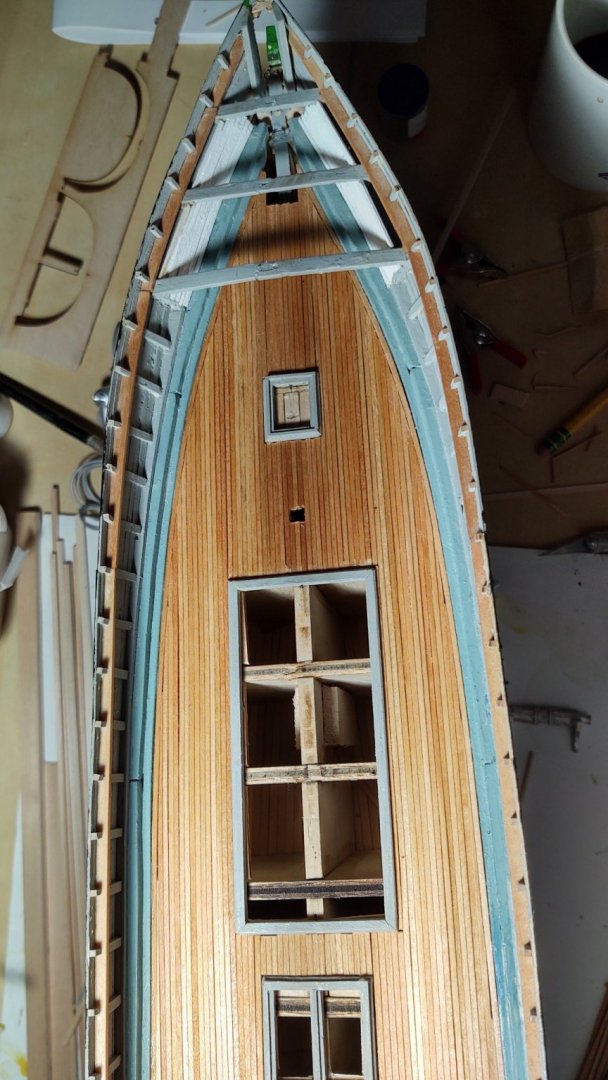
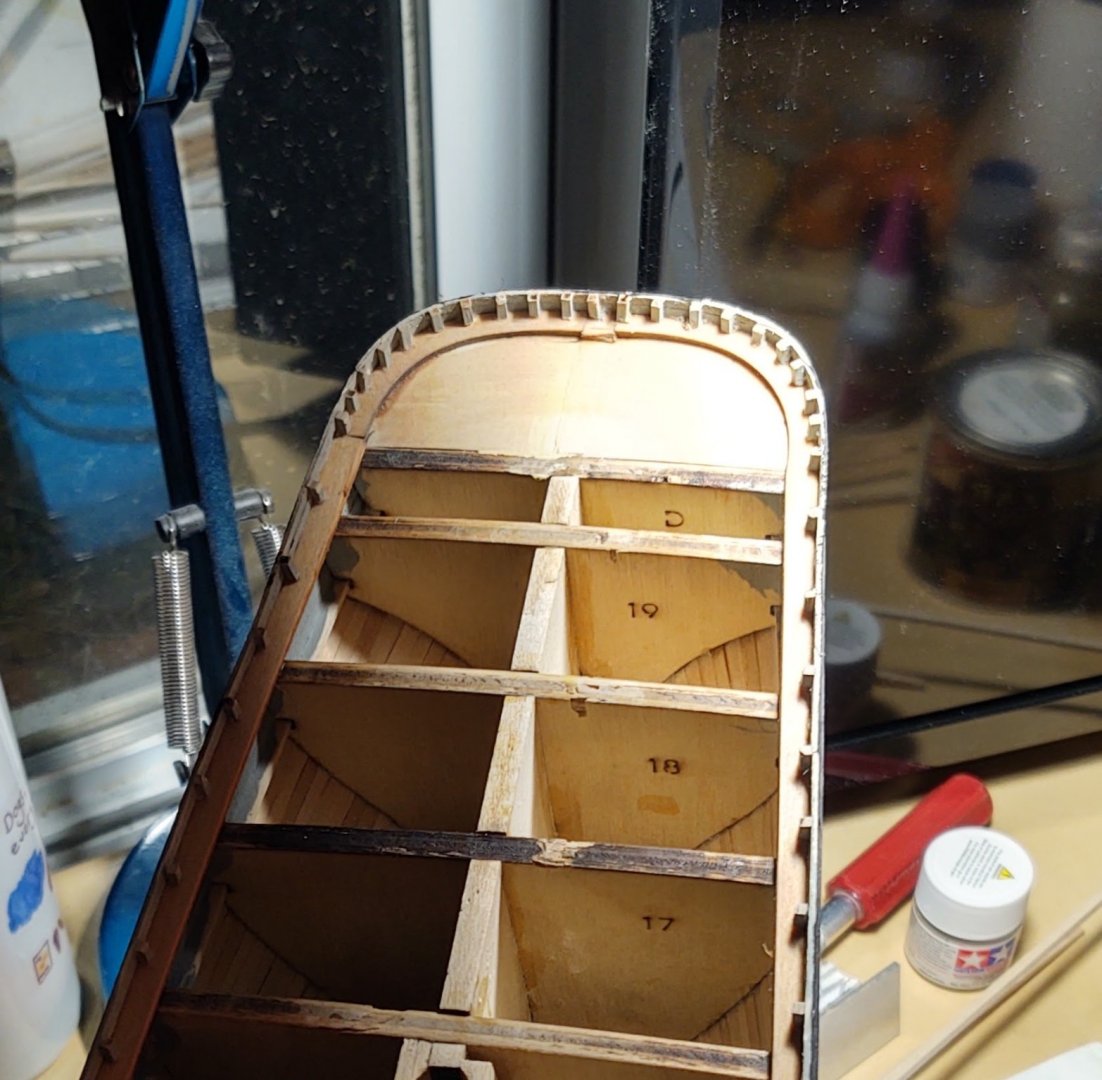
Well, my last post was almost a month ago, during which time I've moved my younger daughter home from college in Boston, and moved the older daughter from her job at a paper in a small town in Nebraska to a new paper in Boise, ID. As a result, I haven't made quite as much progress as one might hope in that time. However, the main deck is starting to come along. As Brian pointed out, when you work around the various coamings, you are likely to occasionally have an alignment issue. Fortunately, they weren't major problems. Where the coaming edges did not line up exactly with the end of a deck plank, I put the planks in place fore and aft, then put the next plank outboard in place. This typically left a gap on the outboard edge of the coaming itself that I filled in with a sanded down plank. I find this to yield a more even result than trying to cut out segment of a single plank and have it fit both to the previous plank and the coaming edge. I also had a couple of places where I had to put in the equivalent of a stealer on the deck. In the image below, you can see that in order to have the planks fit properly when they were adjacent to planks started further aft, I needed to fill a small gap. The arrows indicate the about 1/32 inch plank I used to fill the gap. It won't be noticeable once the deck furniture is in place. I don't know if it was an asymmetry in the hull or just the result of variations in the thicknesses of the 1/16 deck planks, but either way it's not a big deal. Hopefully more in less than a month. George


- 602 replies
-
- 3
-
-
- Flying Fish
- Model Shipways
- (and 2 more)
-
My condolences on your loss. Your progress is amazing, and an inspiration to us all. George
-
HMS Discovery 1789 by Don Case - 1:48
gak1965 replied to Don Case's topic in - Build logs for subjects built 1751 - 1800
Looking great! -
The coamings and bulwarks are Tamiya XF-80 "Royal Light Gray", also labelled 'Navy Gray' (https://www.tamiyausa.com/shop/acrylic-paint-flat-mini-10ml/acrylic-mini-xf-80-navy-gray/). One presumes therefore a standard Royal Navy color although you couldn't prove it by me. The waterway is Tamiya XF-23 "Light blue" George
- 602 replies
-
- 1
-

-
- Flying Fish
- Model Shipways
- (and 2 more)
-
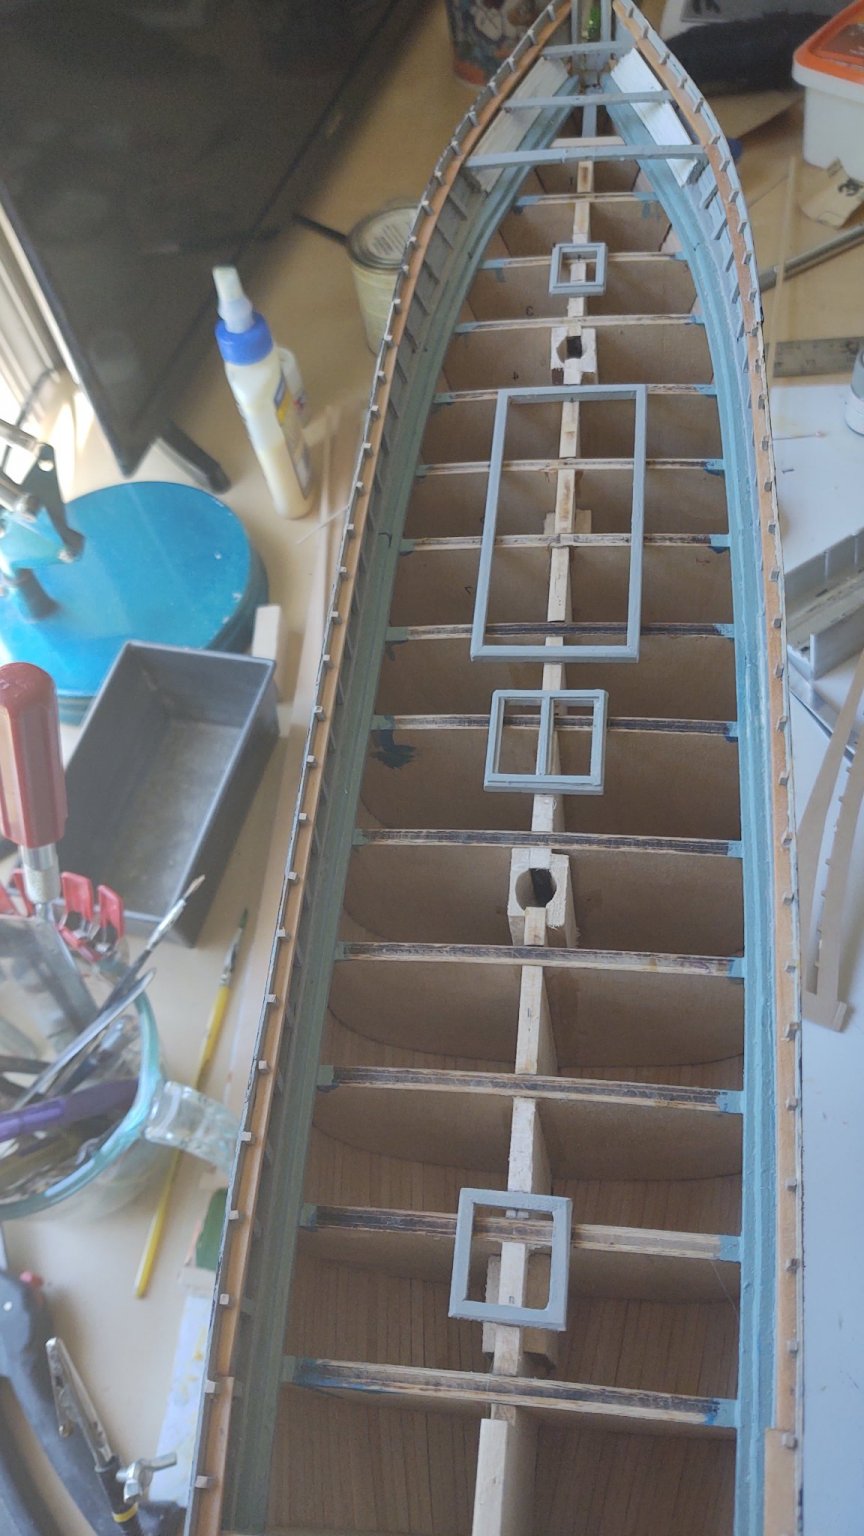
Thanks for all the encouragement. An update. I fortunately re-checked the sizes. The largest coaming was too wide, so I adjusted, painted and mounted them in the hull. Scrap wood was placed around the coamings to give the deck planks something to anchor to: The deck planking stained with 'maple' stain: and the first three deck planks installed. Much more planking to go, but it's a start. Regards, GAK

- 602 replies
-
- 5
-
-
- Flying Fish
- Model Shipways
- (and 2 more)
-
Absolutely amazing job! Calling it the 'Revell Cutty Sark' seems to be a misnomer at this point. As much scratch building as you've done, I'd put it in the scratch section. I can understand why you wouldn't necessarily want to put the figures in place, 1:96 is a kind of awkward scale for them. At 1:350, no one expects figures to be detailed, they kind of add some surface interest, and I've seen ships (particularly aircraft carriers) where they gave a proper sense of the bustle. That said, I included some of the 1:96 figures on my (out of the box) Revell Constitution. But, they were figures painted by my then 7 and 9 year old daughters and the model was a present for their grandparents. The 'toy look' wasn't as much of an issue.
- 399 replies
-
- 4
-
-
- cutty sark
- revell
- (and 2 more)
-
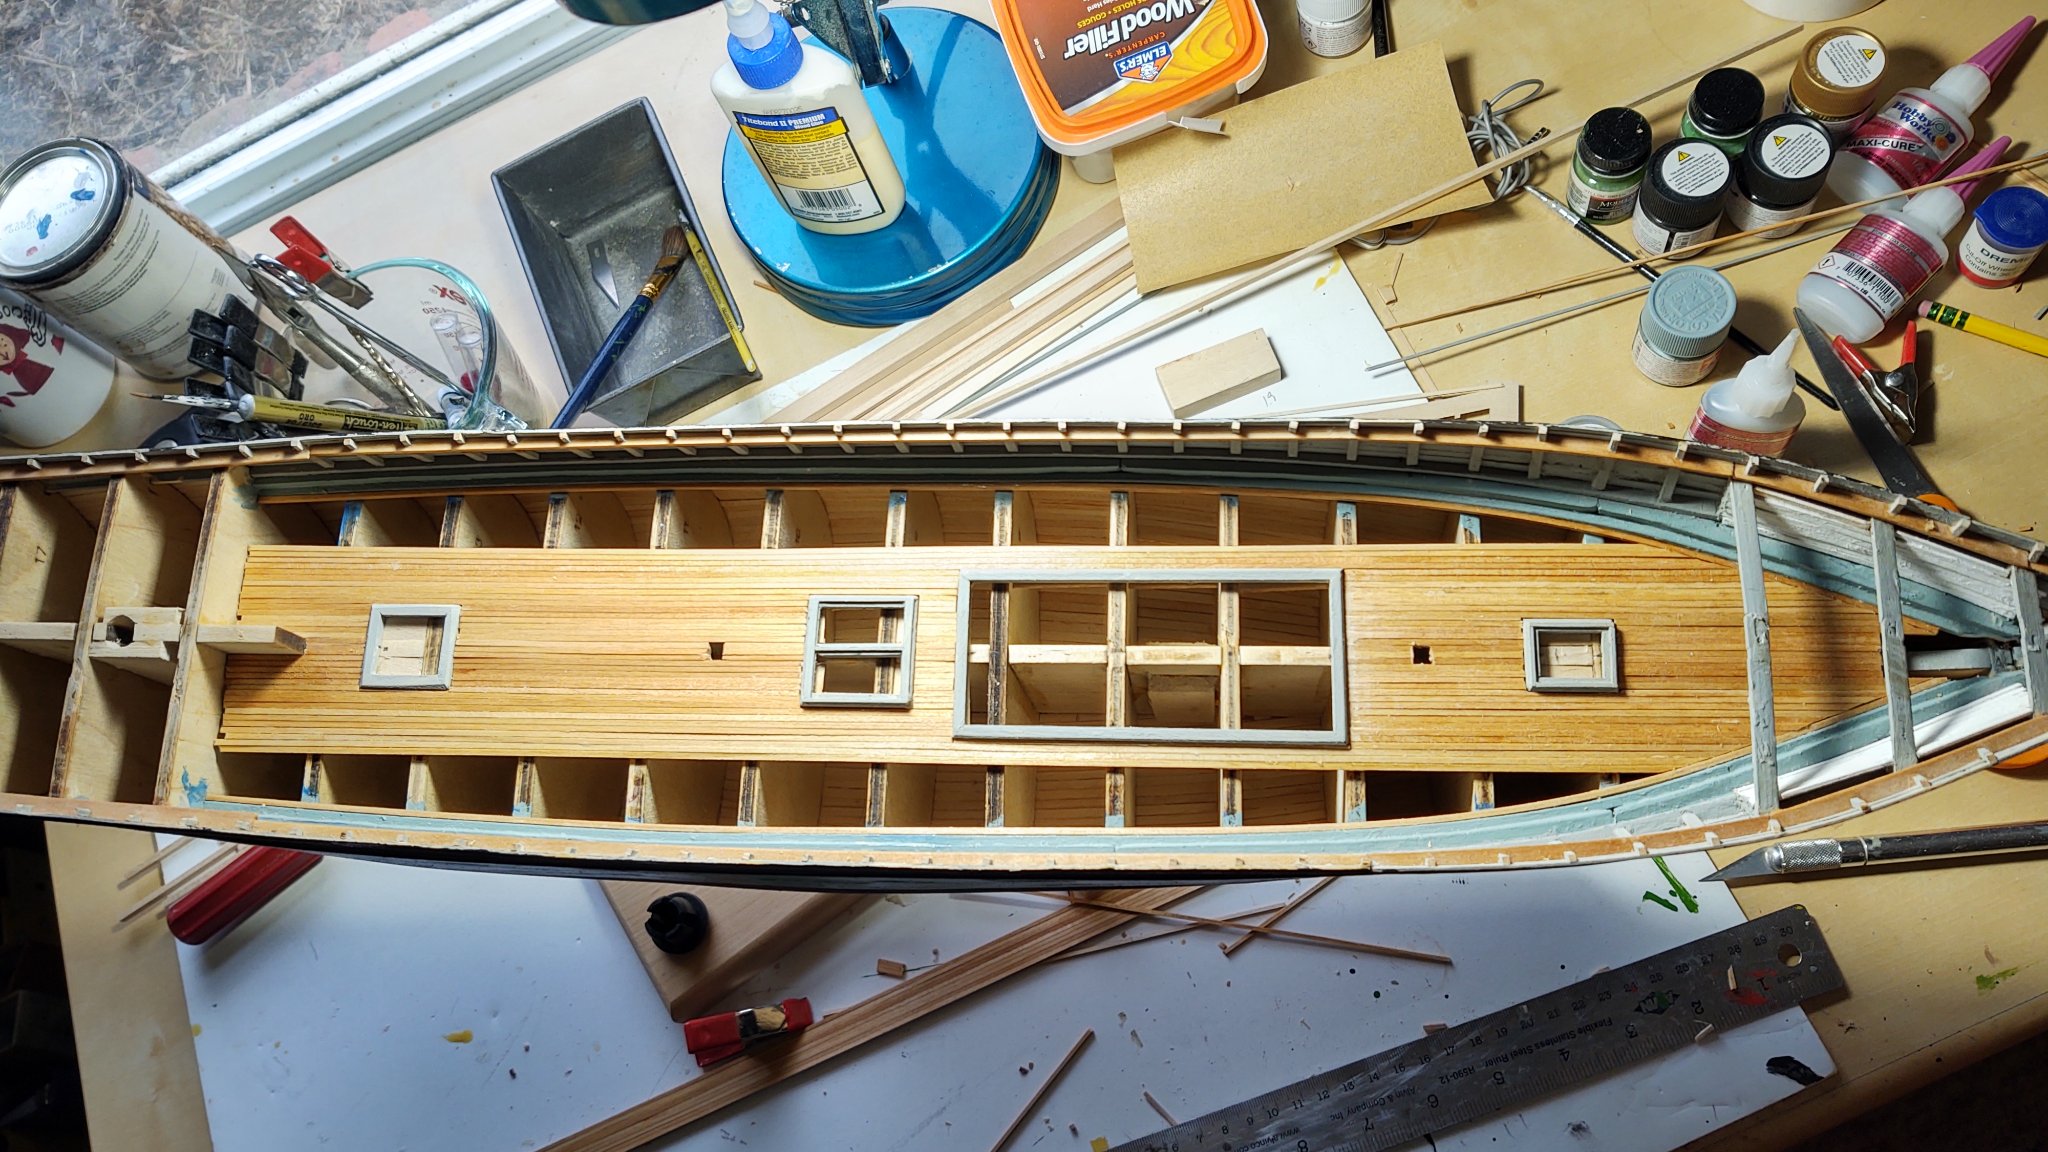
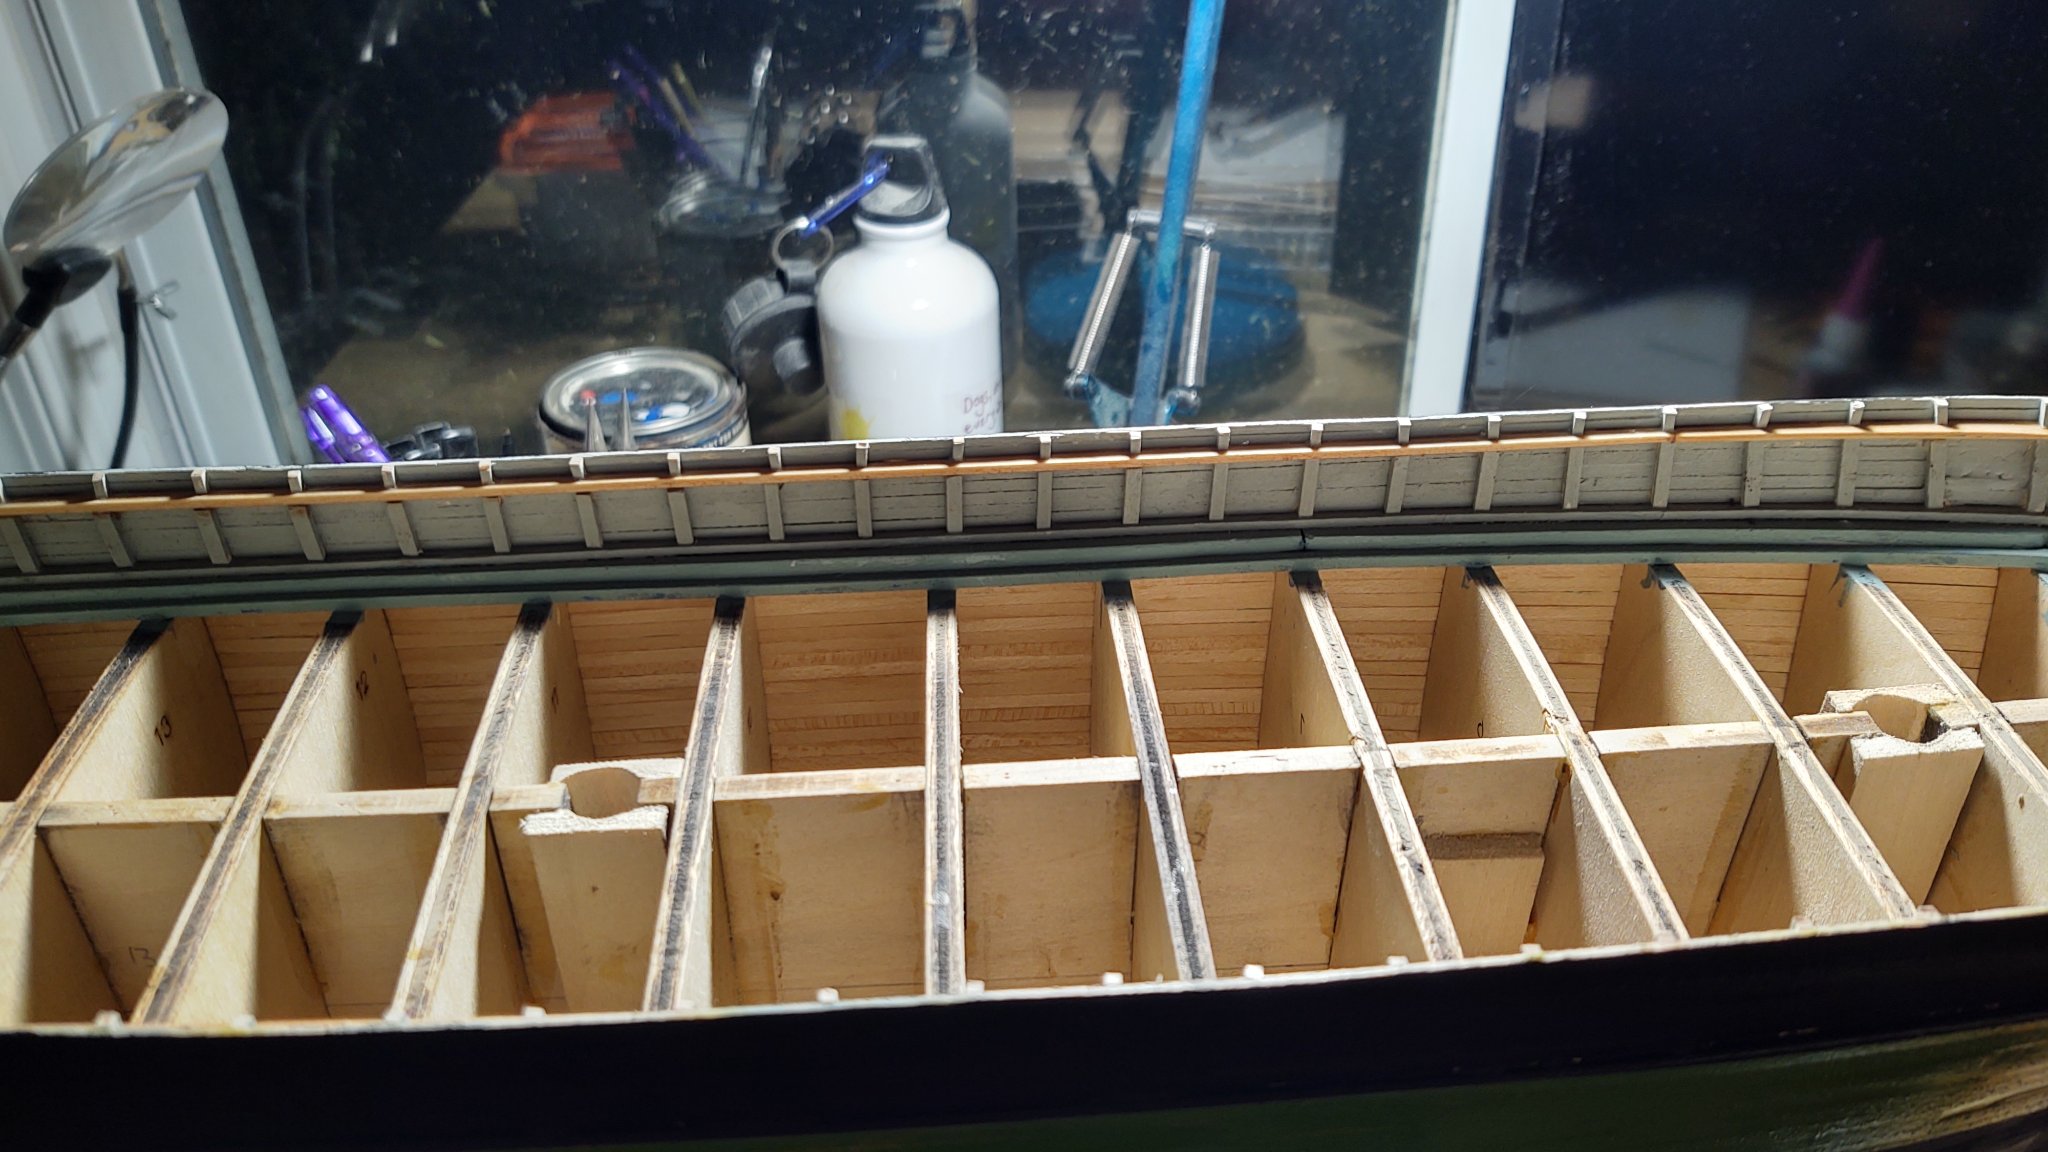
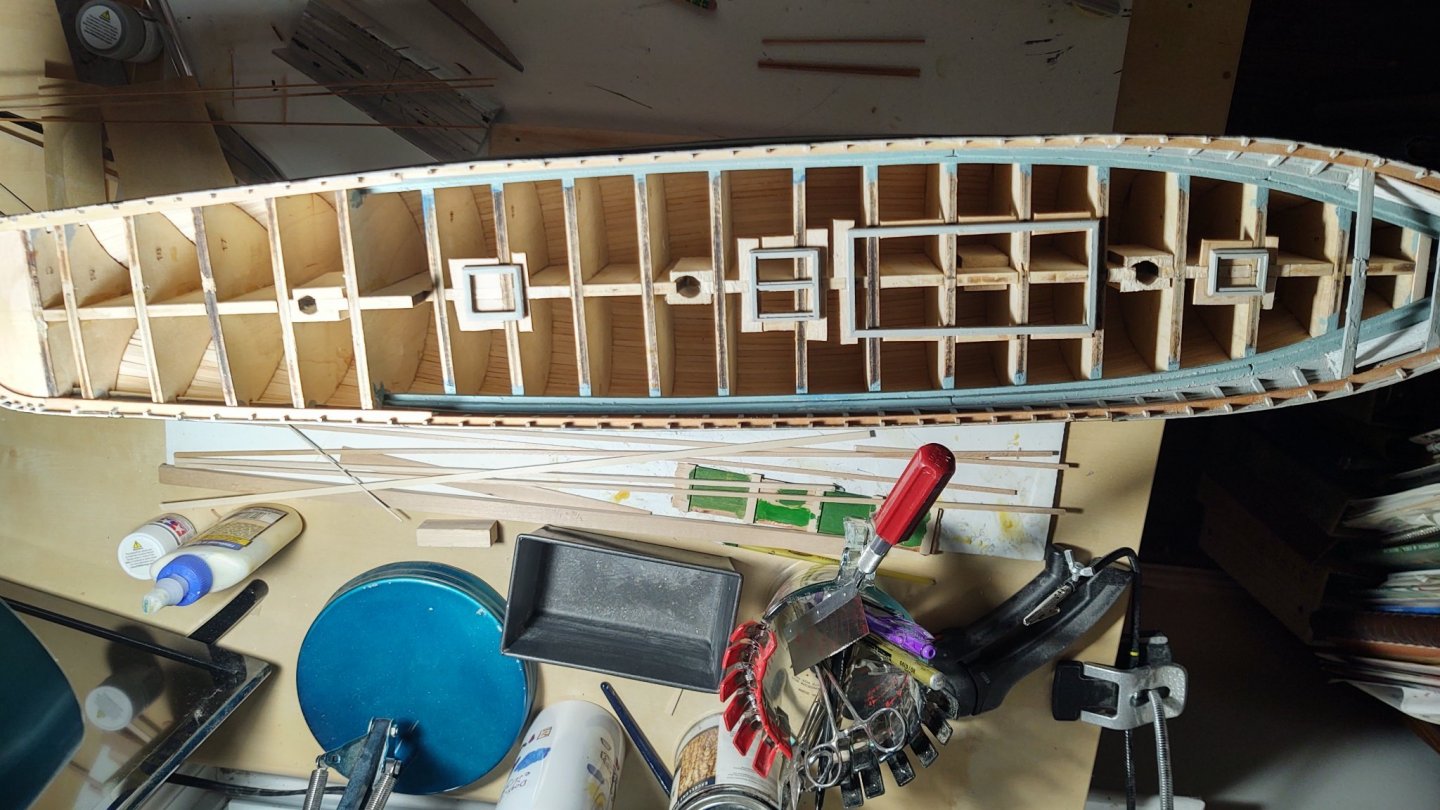
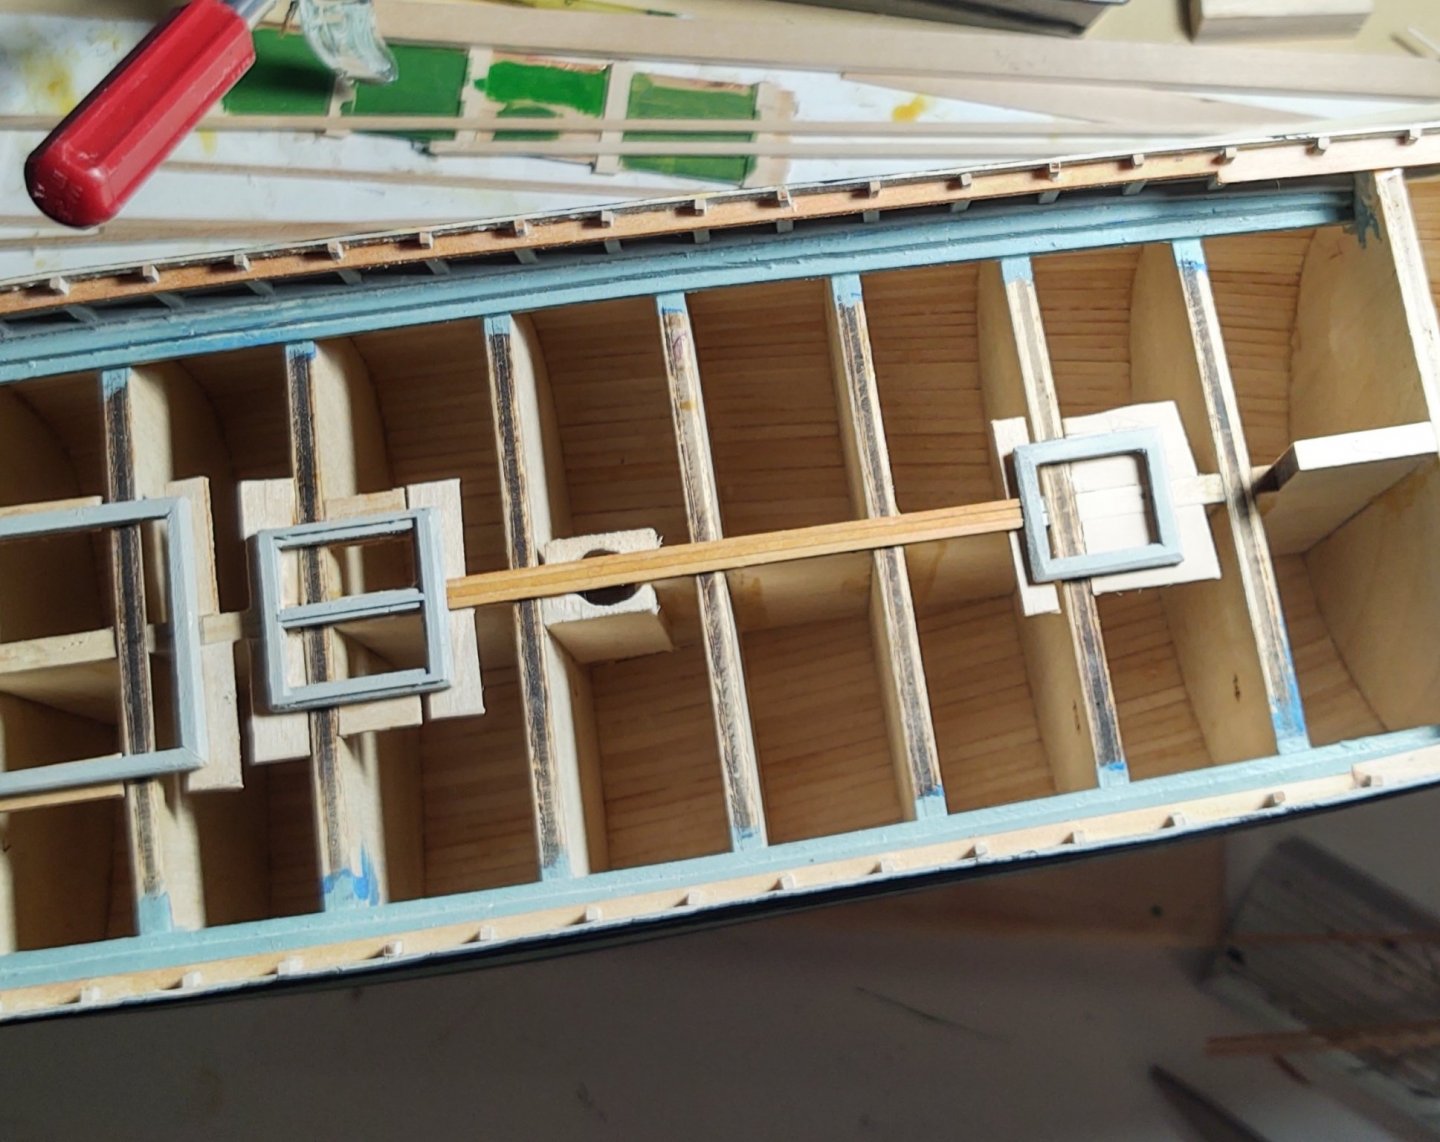
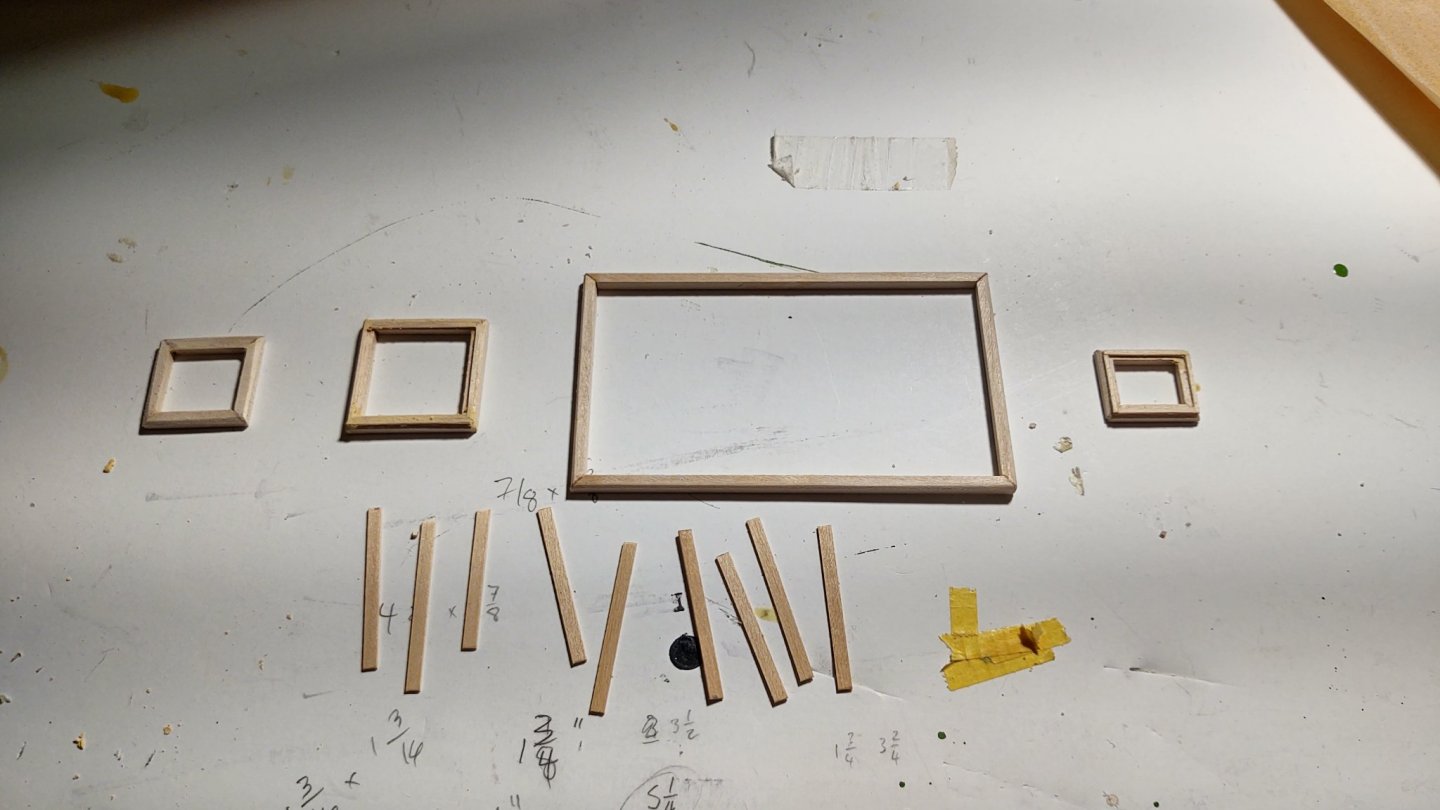
Very, very brief update. I've been busy with work work, home work, and what might be called vaccination logistics and it's kept me away from the building table. As a first step back, I've built the four coamings for the main deck. I like to put them in first and fit the deck planking against them rather than putting the planking down first. It is a bit of a pain, particularly when the coamings and the deck planking don't match exactly (i.e. always), but, it's how I've done all the others and I don't intend to change now. This took way longer than I originally intended, as the smaller coamings are very fiddly - if they are even vaguely off they look really bad - I wound up making multiple pieces for the small ones until they finally looked right. The 1/8 by 1/32 segments are eventually going to be the hatch covers. I cut them so that I could place the 1/32 by 1/32 segments I used to define the edges of the hatch covers in a way that everything would fit properly. Anyway, they are built, sanded and the bottoms are sanded to match the camber of the hull. They aren't painted because I realized I was out of the particular gray I'm using for the bulwarks and coamings. Once they are painted and installed, time for the main deck.
- 602 replies
-
- 3
-
-
- Flying Fish
- Model Shipways
- (and 2 more)
-
I will follow with interest. A quick question. Do you have access to a laser cutter or use a commercial service? If the latter, which one and what did they need to do the cutting? George K
-
Good luck Brad, I wish you all the best in your new efforts!
-
Ships vs Boats
gak1965 replied to Mike from Aus's topic in Using the MSW forum - **NO MODELING CONTENT IN THIS SUB-FORUM**
Heck, that's a DDG, twice the displacement of our most recent class of frigates. -
Now that is looking ahead. I'm obviously well past that point, but if the Discovery has them, I'm definitely going to drill them while the waterway and planksheer are in place but no stanchions or bulwarks.
-
My only expectation of a call from the Smithsonian is to tell me no in advance...
-
Hi Brian, I was planning on installing the vents and I expect you are right on that, and it will require a bit of rethinking the order of installation. Based on that, logic says to install the decks and coamings first, and probably cut the bulwark sheaves before installing the vents and then the topgallant rail. That way, it's still open, but I'm not mashing the vents with drills, or knives, or bits of deck. Just out of curiosity, did you use a drill or a pin vise to make the holes? I need to see if I have a large enough bit, but after I broke off a mostly rigged jibboom on the Niagara it needs to be a very big hole for me to pull out my drill. I usually install the coamings first, and then the deck. Even though it is a bit of a pain, I think it looks a little more 'real', but not sure about doing so on the Fish. At a minimum, I think I will install a (shortened) coaming on pre-laid deck where the aft cabin facade sits on the main deck. Otherwise, I think I'll need to run the planks to an under-coaming support that runs the full beam of the ship, and the longer such extensions are the harder it is to maintain the camber properly. Elsewhere (including on the poop) I should be able to install the coamings first without much problem. Thanks again for the tip! George
- 602 replies
-
- 2
-
-
- Flying Fish
- Model Shipways
- (and 2 more)
-
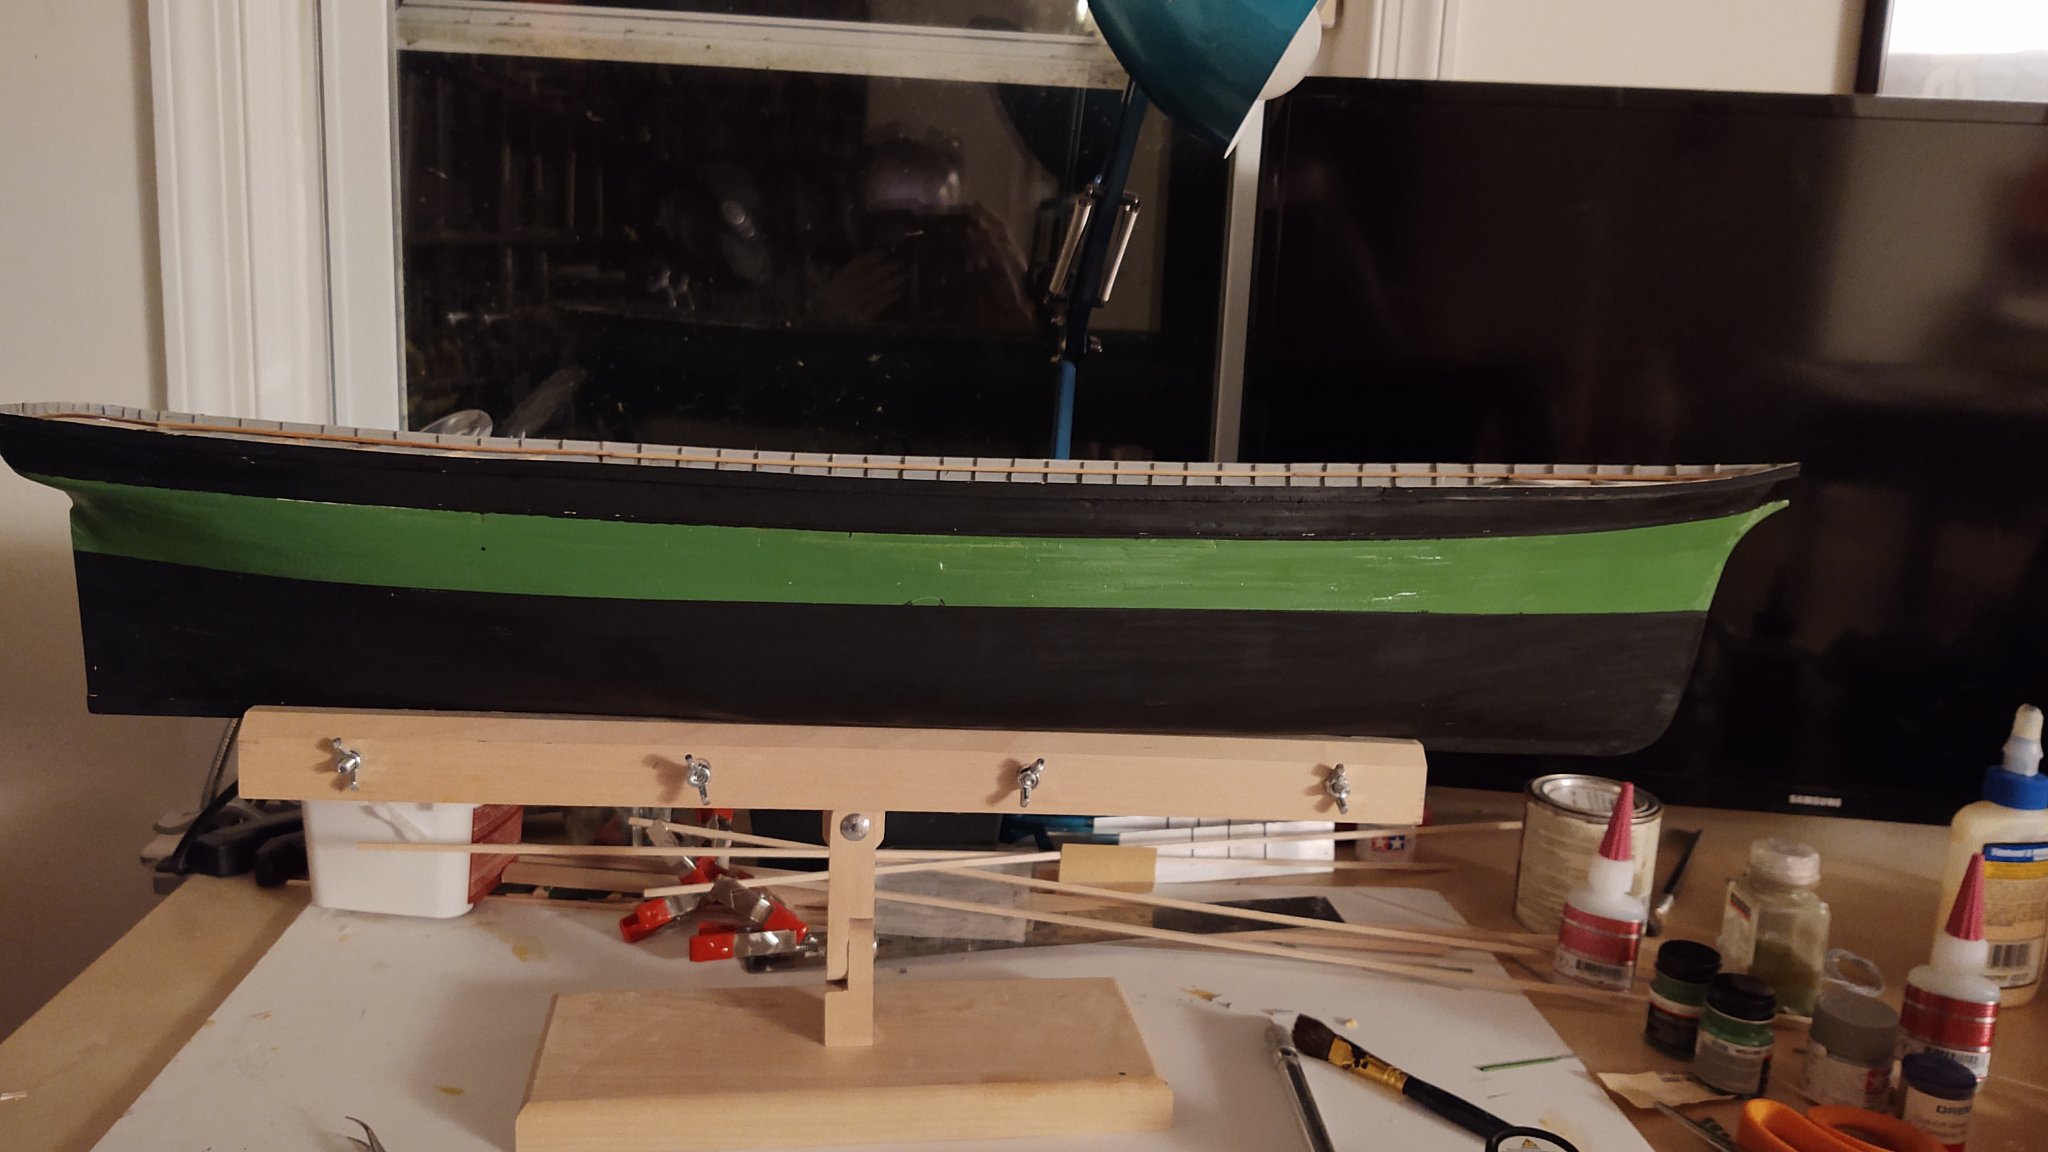
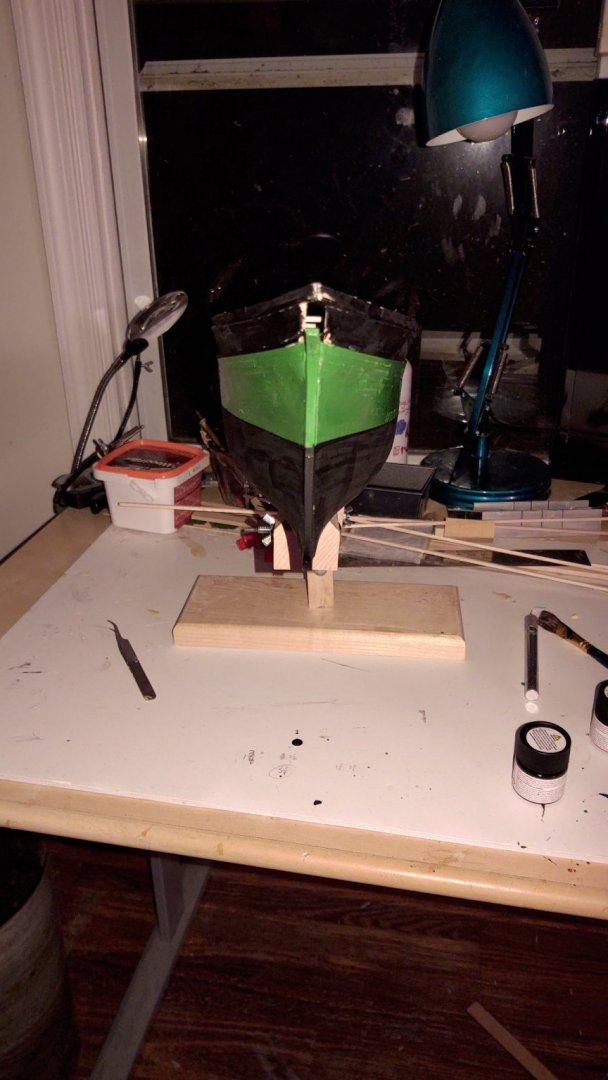
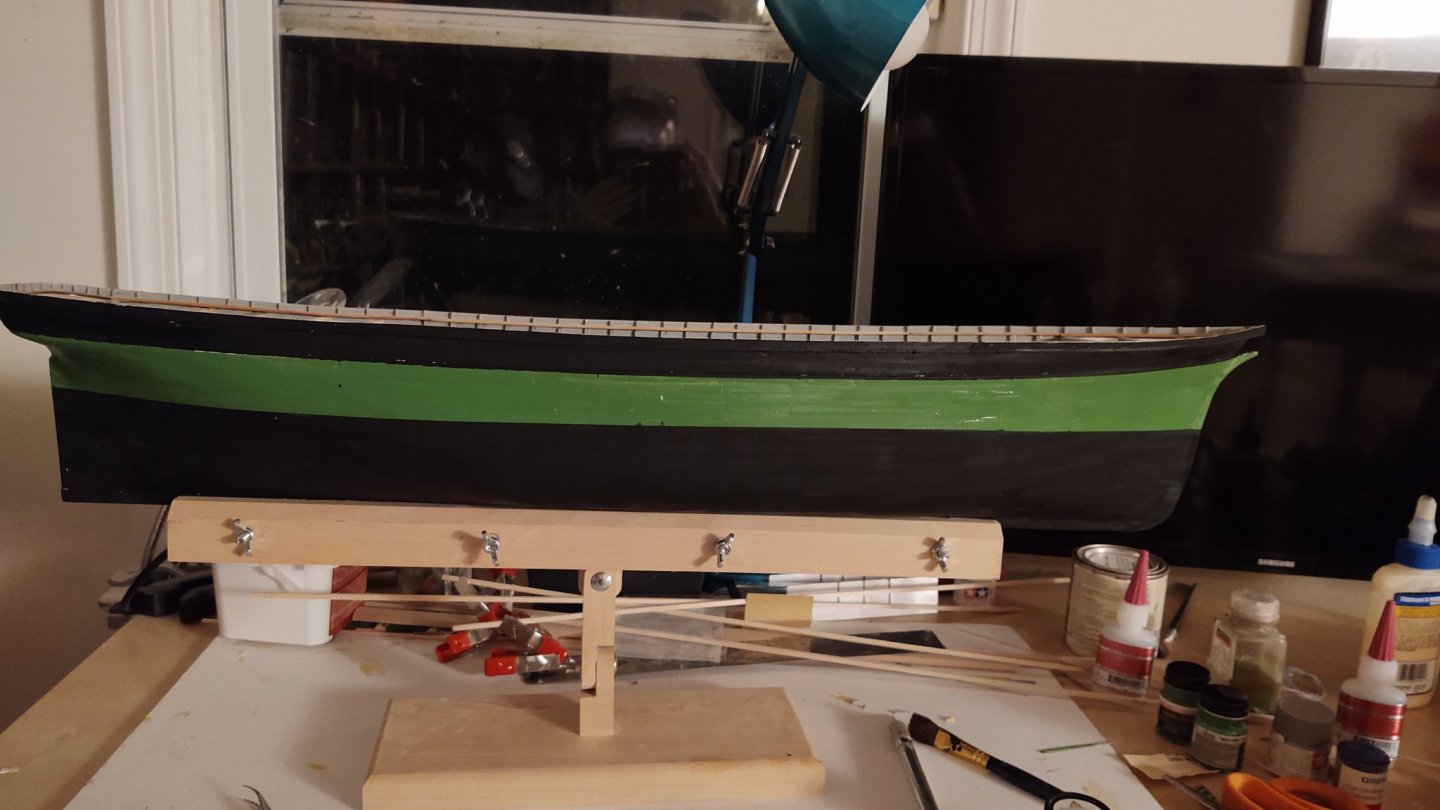
Brad, Vladimir, Brian, and Cathead, thank you for the answers and the encouragement. I've made some progress since the last post. Step 1 was to install the stanchion extensions between the main rail and the topgallant rail. Before I did that, I spent some time restaining sections of the rail so that the stain variability was reduced to something I considered acceptable. At each stanchion between the poop and the forecastle, I measured in 3/32 from the outboard edge of the main rail and marked the location. For the poop and the forecastle where there were no stanchions, I kept the same spacing, with the exception of the stern, where I increased the number of stanchions by three fold to properly define the stern (as is shown on the plans). I then glued pre-painted 1/16 square segments in place, using the marks I had just made, and aligning the angle of the extension to the angle of the stanchion beneath. I made no effort to get the length exactly right, as I was just going to cut the excess off later. I used the same strategy for the stern bulwarks as before. Put the segment into boiling water, strap it in pace around the stanchion extensions and then clamp in place until dry. The only difference is that I pre-painted the inside of the bulwarks before gluing them in place so that I wouldn't have to put any paint on the main rail. Once in place I used a cutting blade on my Dremel to trim them down to size. I had to reseat a number of them. Unlike the primary stanchions which sit in holes in the planksheer, these were CA glued directly to the rail and the bond was not as strong. No matter, cut another section, glue it in, trim the tops; by that point the bulwark was shaped and not going anywhere. The ship now has its primary coat of paint. I mentioned earlier that McKay wanted to paint her green, and so I have done so. This means I have kind of slipped away from the historical now, but I'm trying to be rational about it. The green I'm using seems fairly similar to a number of modern versions of green where the name at least appears to have been in circulation at the relevant time (it is pretty close to the Great Western Railroad colors). I only painted the green from the planksheer to the load waterline, which will be the edge of the sheathing. Below that I painted it black since I think that will provide the best color for the underside of the plates. Similarly, I painted from the planksheer to the bulwarks flat black. It needs a bit of touch up, but letting the paint fully dry before I do so. I don't know why McKay ultimately painted her black, but when people make changes like that I assume that the answer is money. Maybe green paint cost more. I may take one more non-historical step on the build, and that is to pick out the planksheer with a very thin line of gold paint, to kind of highlight the green to black transition. My logic is I think it would look nice, and if McKay had the money, he would have done so. We'll see - step 1 is to do the touch up. One final thing - this is a big model. I went through an entire bottle of black paint doing the hull. George K

- 602 replies
-
- 4
-
-
- Flying Fish
- Model Shipways
- (and 2 more)
-
Really looking amazing. When you are done, is it for your home, or are you thinking of offering it to Vicksburg NMP?
-
If you don’t mind me asking, what is the problem? I haven’t done the Dory but I have done several other Model Shipways kits. The other thing to do is search on the forums for a log of the same ship and put your question there. I know my co-builder of the Flying Fish @Keithbrad80 has built the MSW Dory.
-
Reading Ed T's log on the Young America is an almost surreal experience. The man is an artist in mixed media that also has solid engineering behind it. I don't know if you've ever seen any of the ship models in the Rijksmuseum in Amsterdam (this is the one I remember most https://www.rijksmuseum.nl/en/rijksstudio/works-of-art/ship-models/objects#/NG-MC-651,0, which is 4.5 meters long and 4.1 meters tall), but Ed's work could take pride of place there or the NMM in Greenwich, or anywhere else for that matter. Just amazing.
- 602 replies
-
- 2
-
-
- Flying Fish
- Model Shipways
- (and 2 more)
-
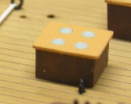
Very nice. I love the new storm gangways and the ladders look great as well. I'm embarrassed to ask, but what are the little huts around the capstans? Passat had them as well, but I never gave them much thought. Skylights for a cabin below?


.jpg.526528e02c331df604e88b5b392259bb.jpg)