HOLIDAY DONATION DRIVE - SUPPORT MSW - DO YOUR PART TO KEEP THIS GREAT FORUM GOING! (Only 75 donations so far out of 49,000 members - C'mon guys!)
×


gak1965
-
Posts
722 -
Joined
-
Last visited
Content Type
Profiles
Forums
Gallery
Events
Everything posted by gak1965
-
 I had the same problem in the beginning with the MSW kit. The problem (I think) was that I misread the MSW plans. I concluded that the core of the main and fore masts were 24 inches (1/4" at scale), which was also the size of the square top of the lower masts. However, more careful reading of the plans suggested that the square top of the main (at 1:96) should have been 1/4", the square top of the fore 3/16", and the core on both the masts should be 3/16". Once I built the masts up on a 3/16 core, the tapering didn't remove the chapeling and the masts looked right. I had to then build up the square top on the main by sheathing it with some 1/32" wood, but it was a minor issue relatively speaking to resolve. This may not be what is happening in your case but it's something to maybe think about. Looking awesome, BTW. I loved how you put the bars on the carriage house windows. I put some on my Fish, but they were nowhere near as clean as the ones you made. Regards, George K.
 -
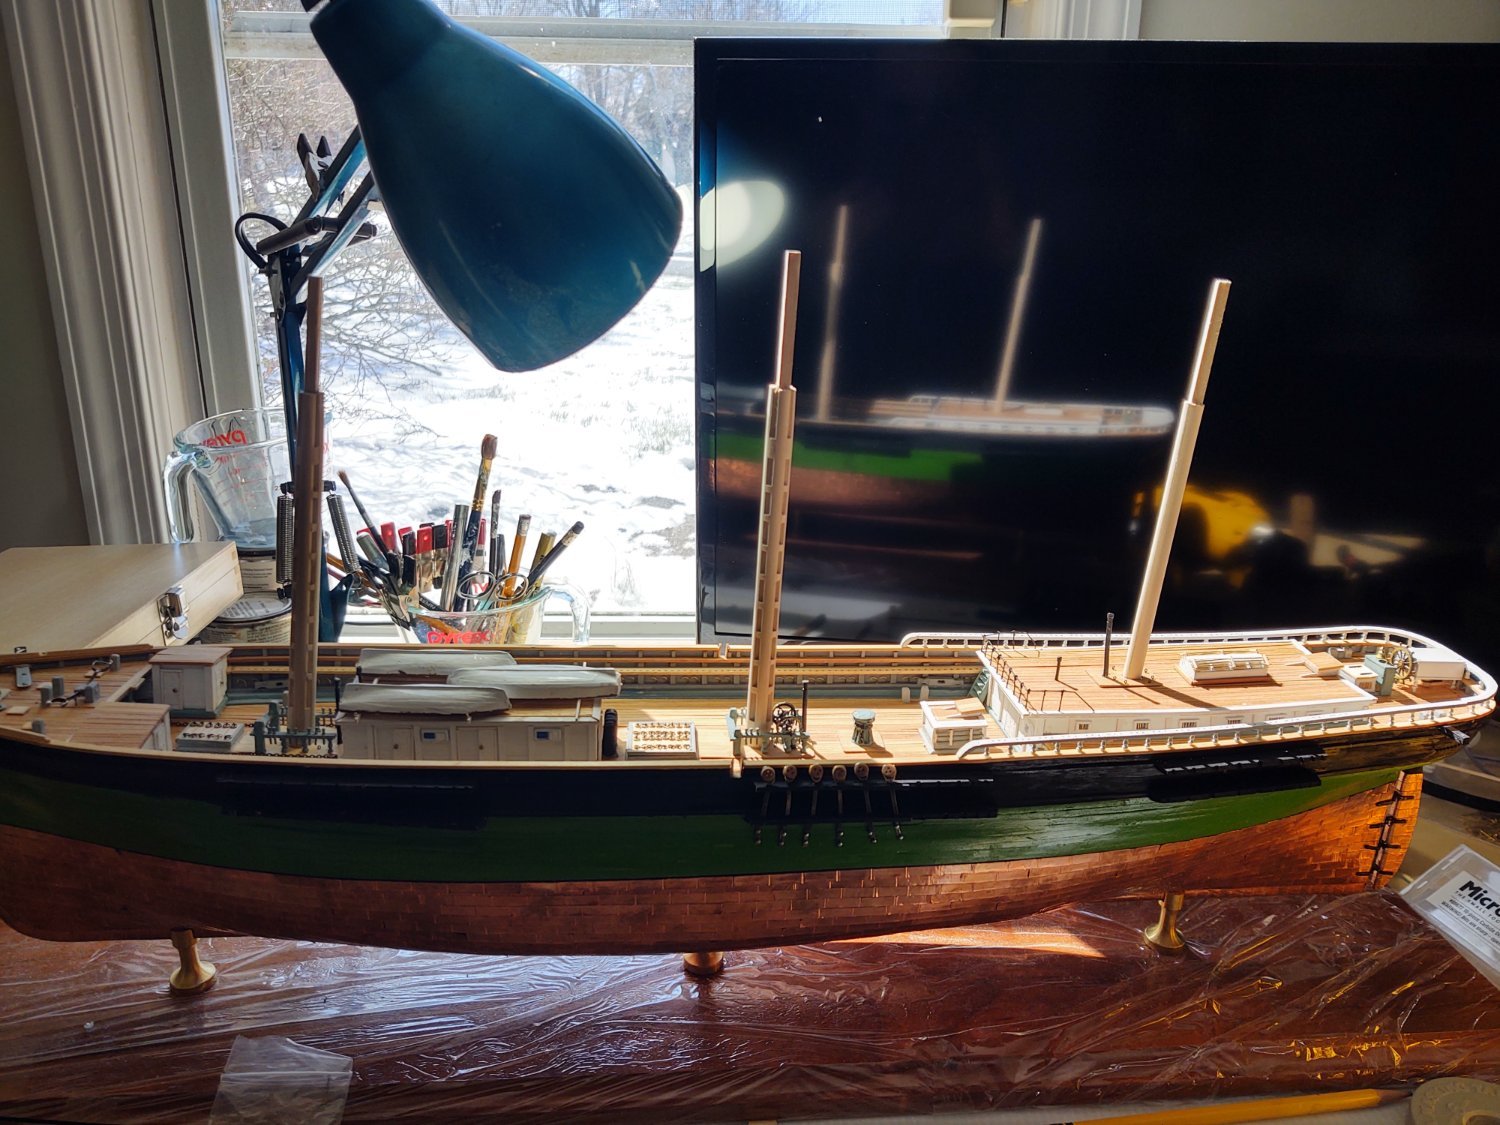
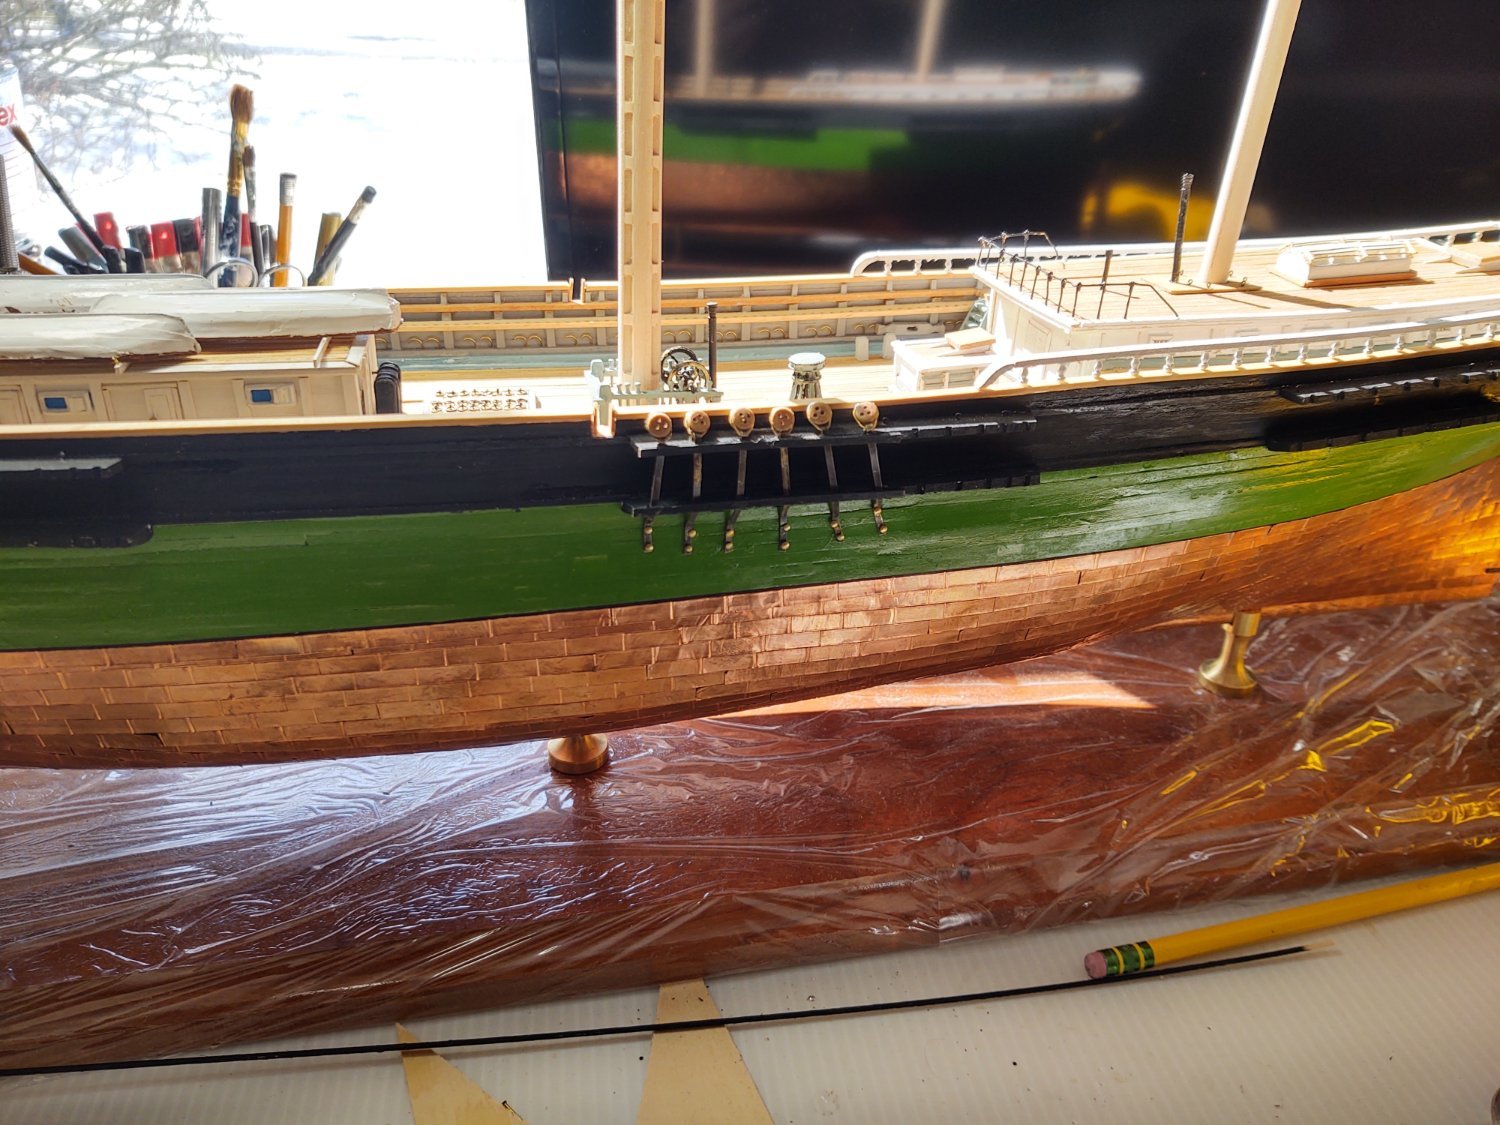
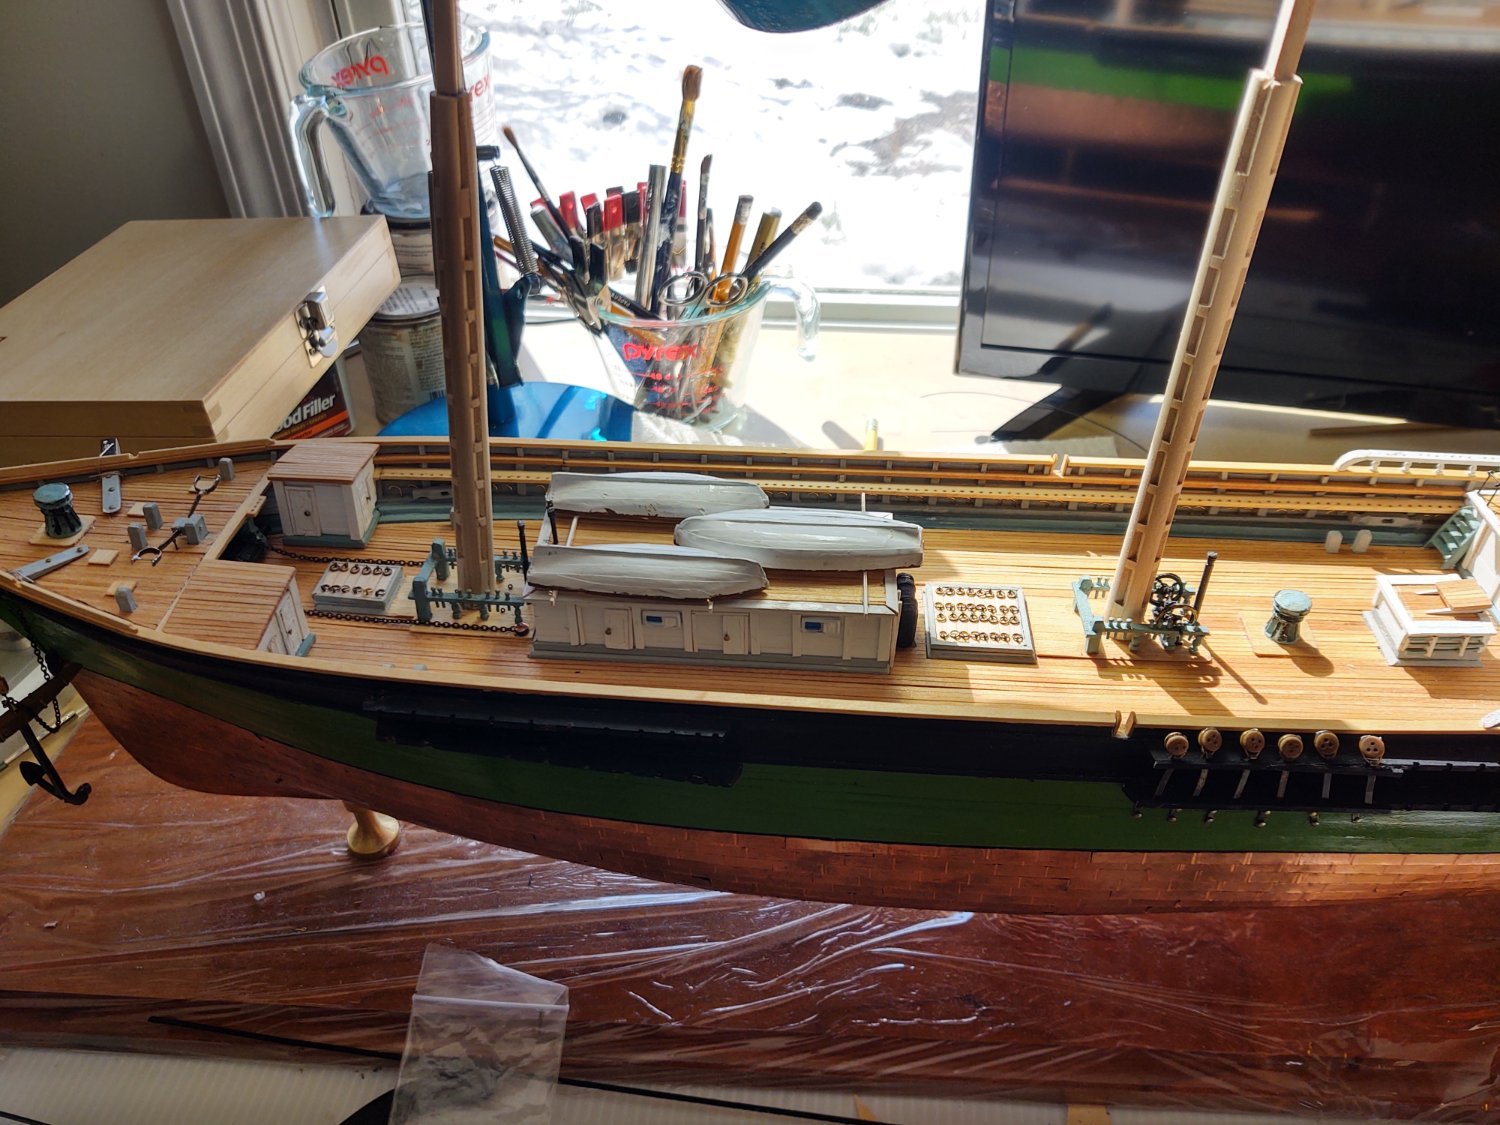
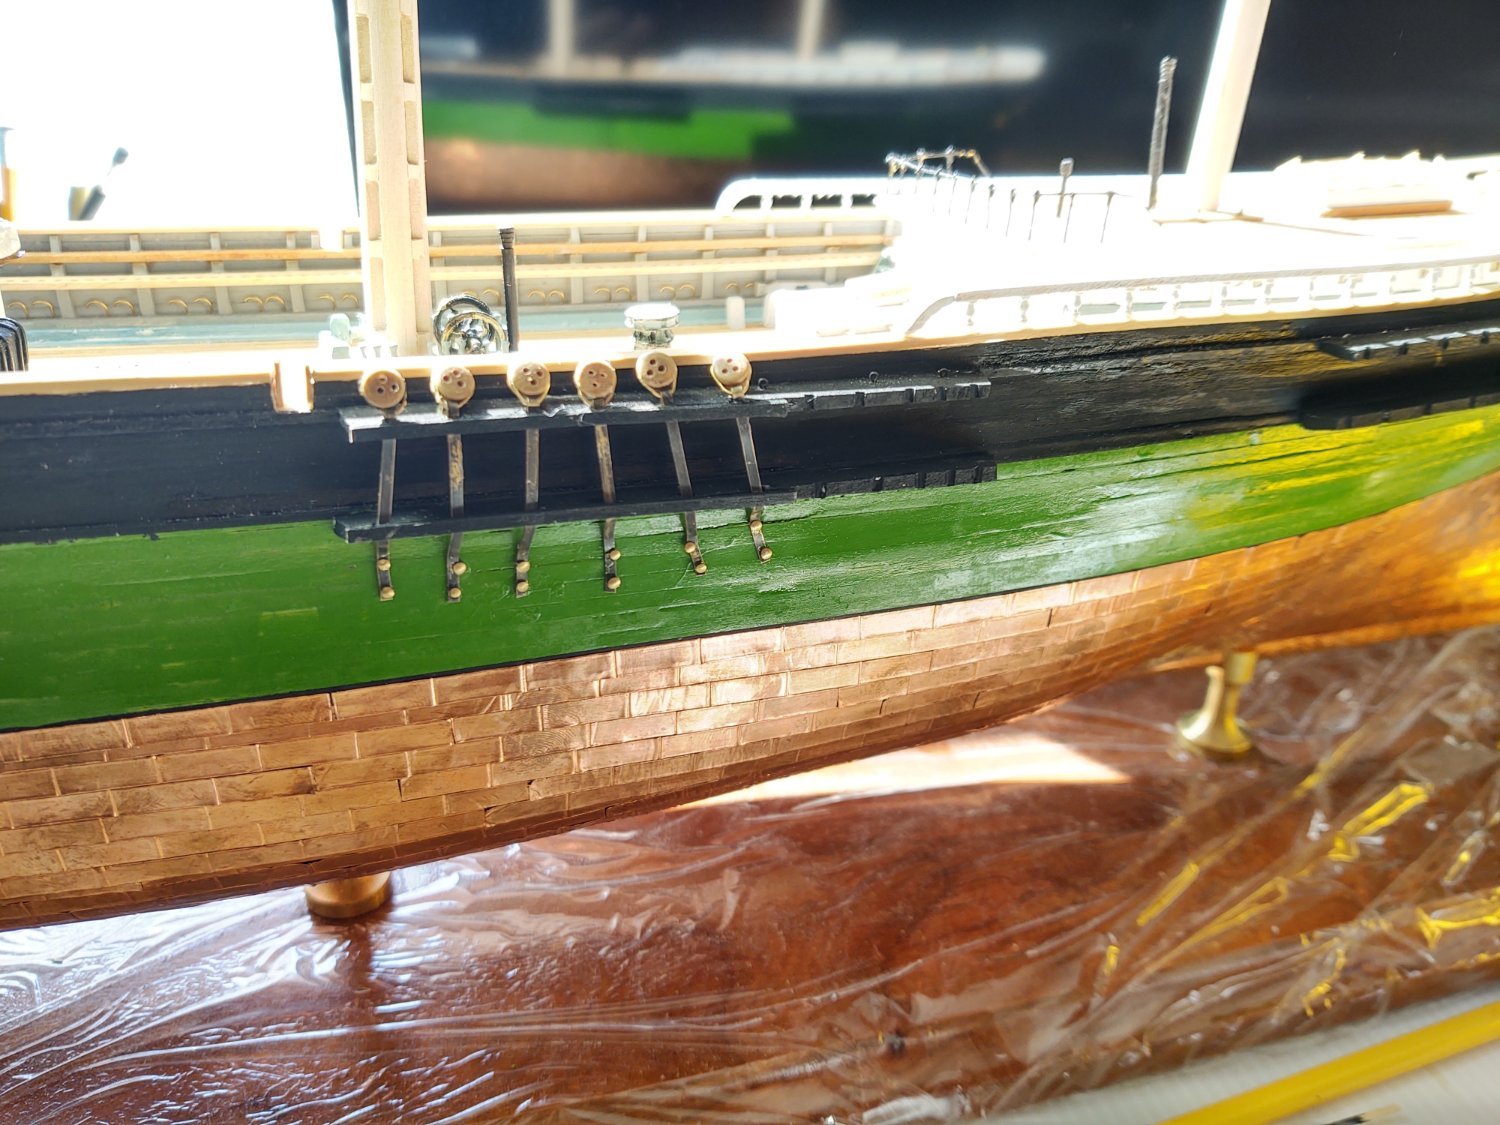
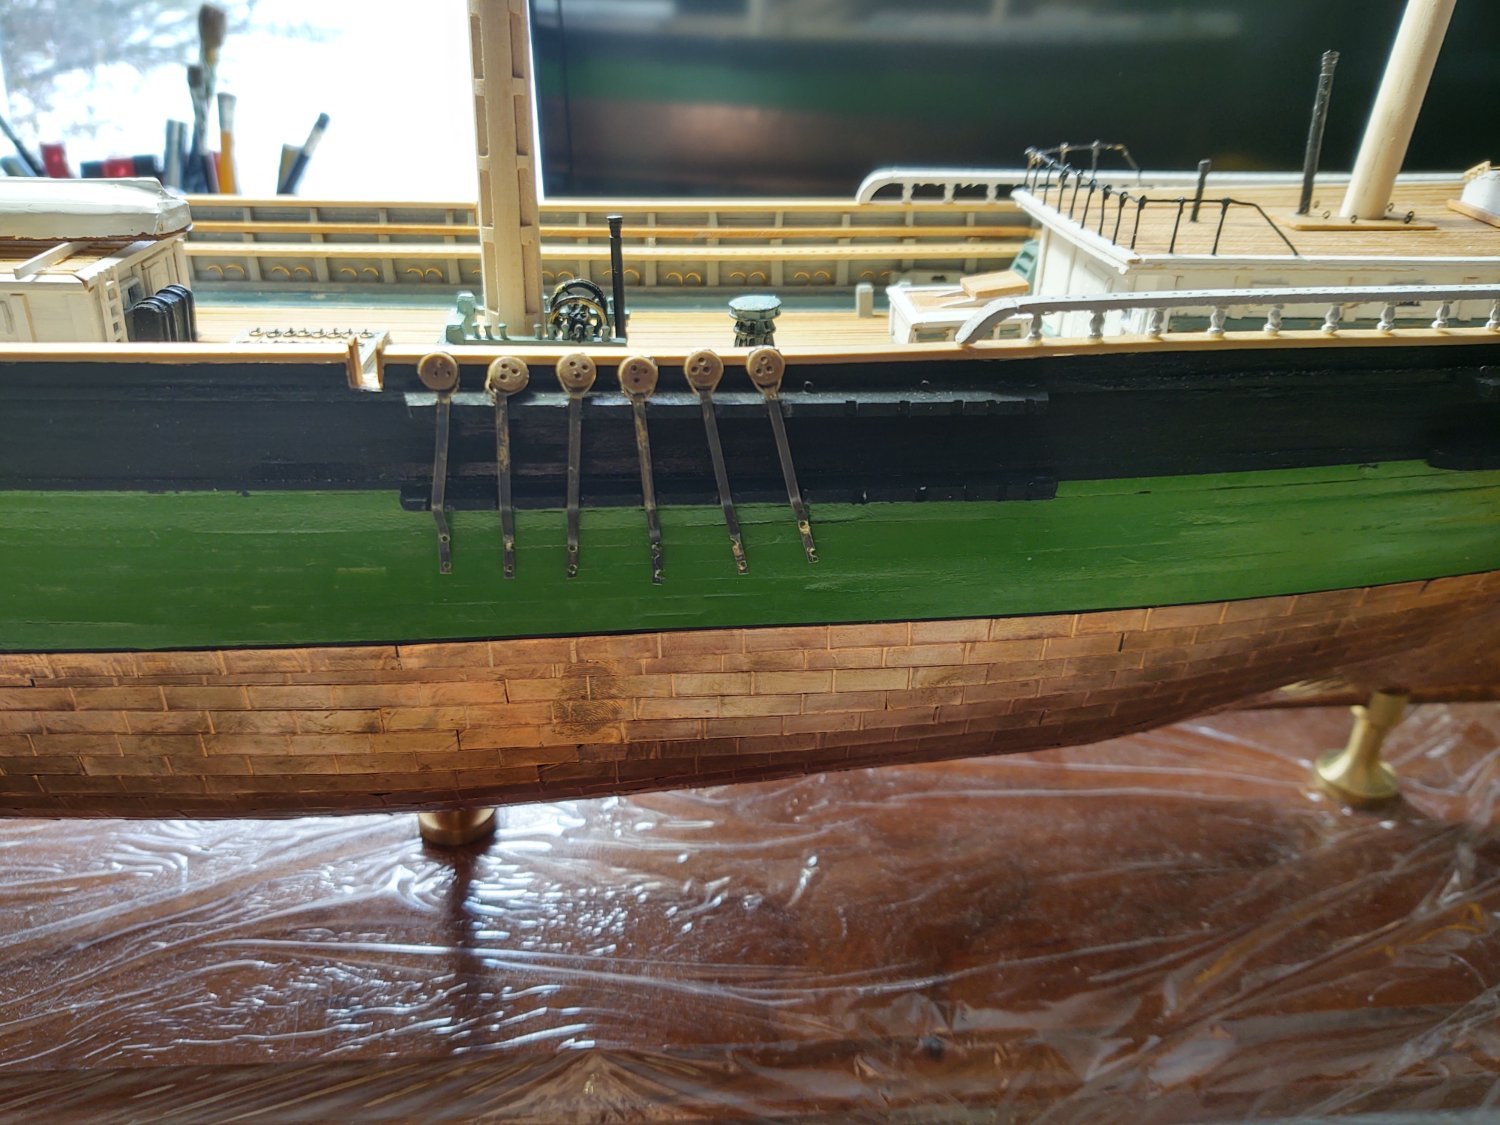
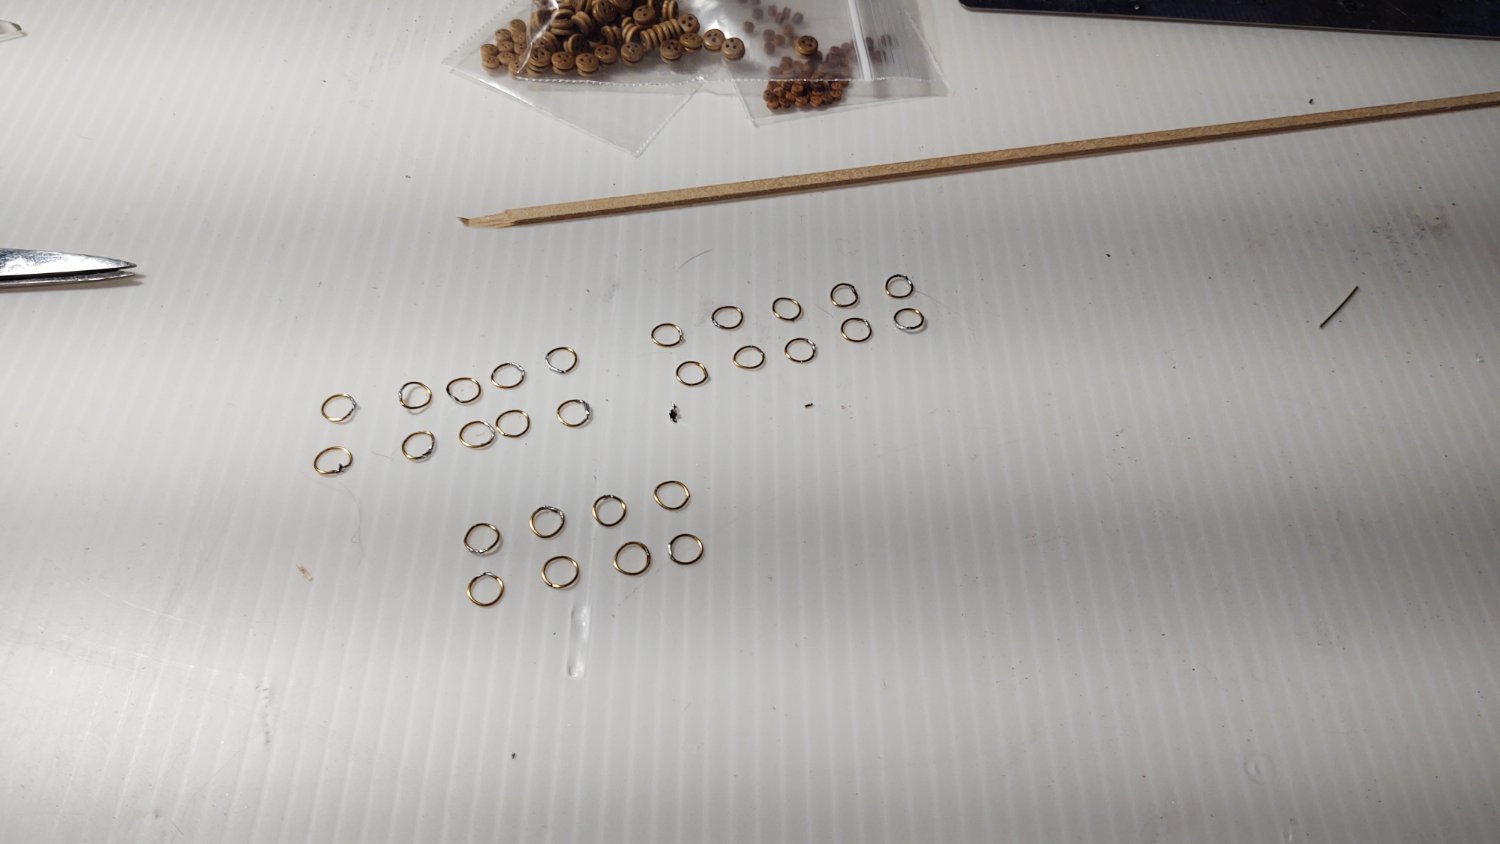
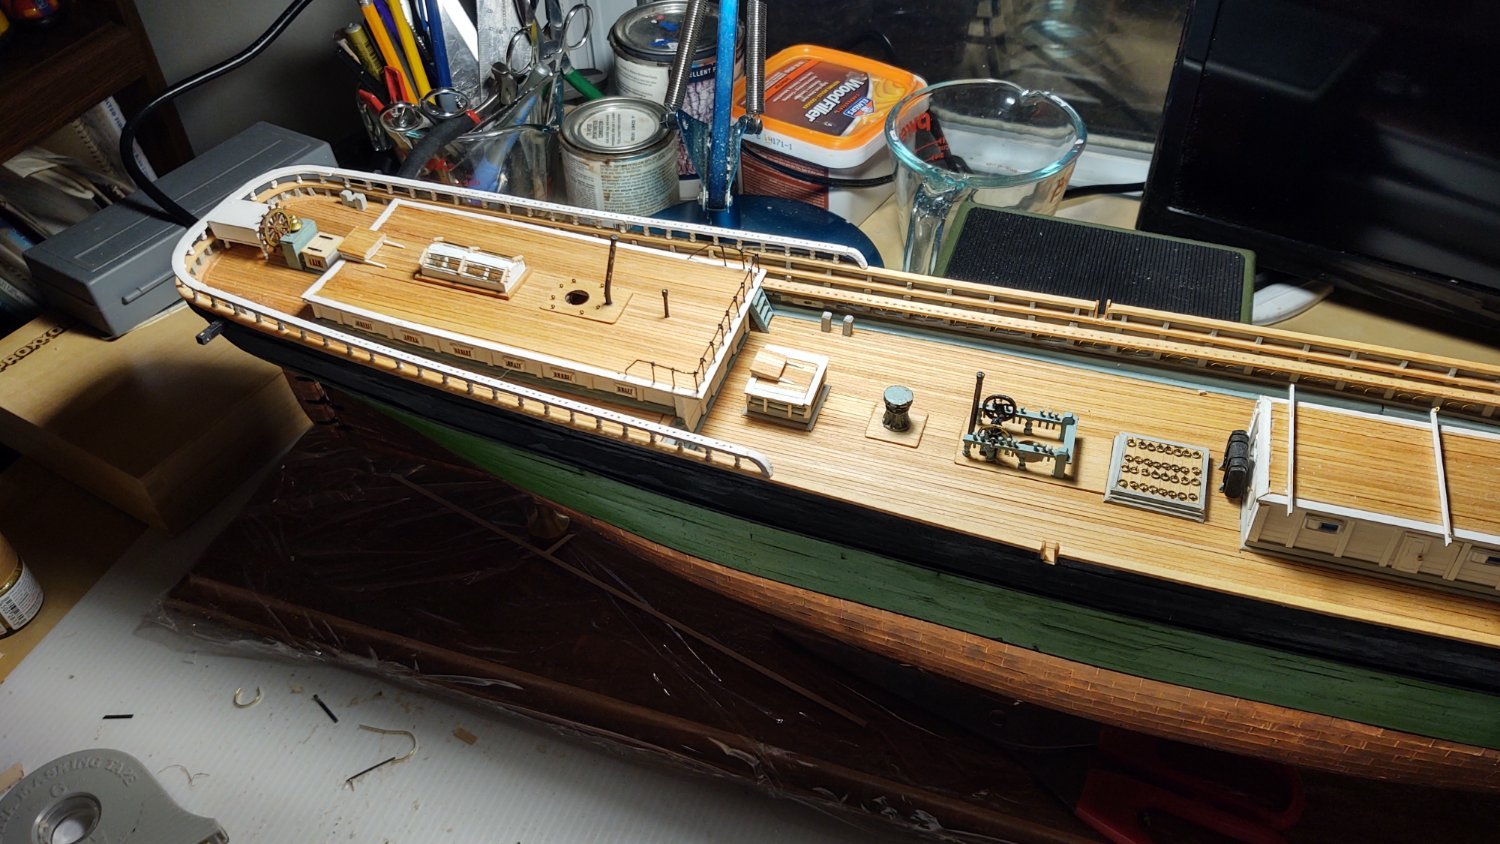
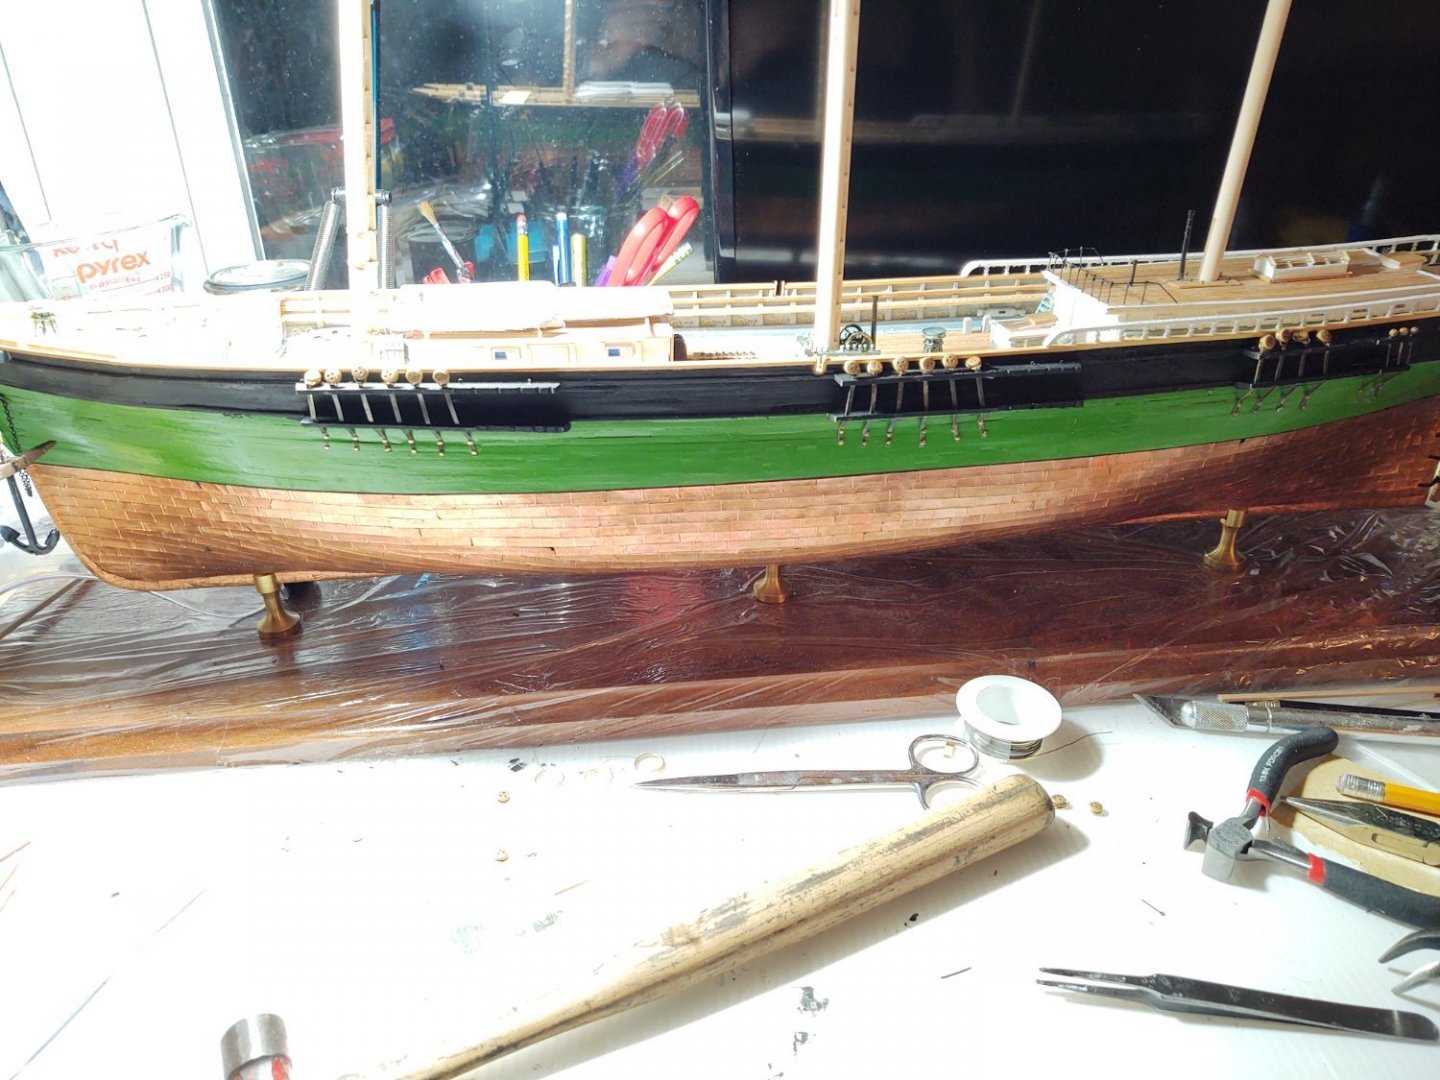
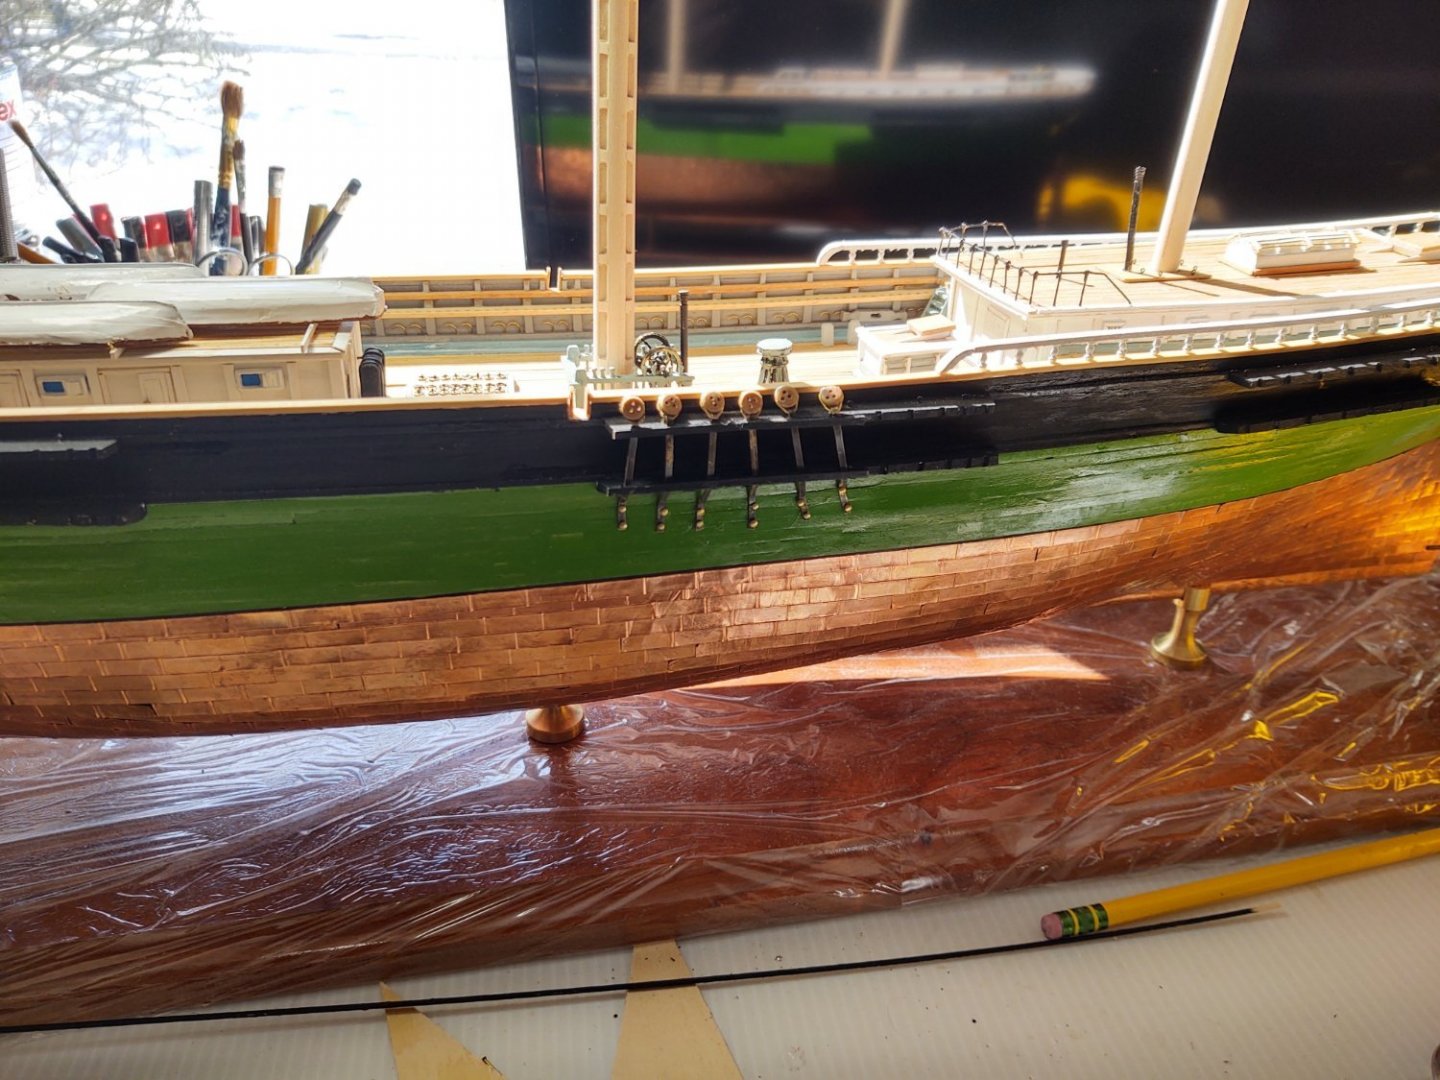
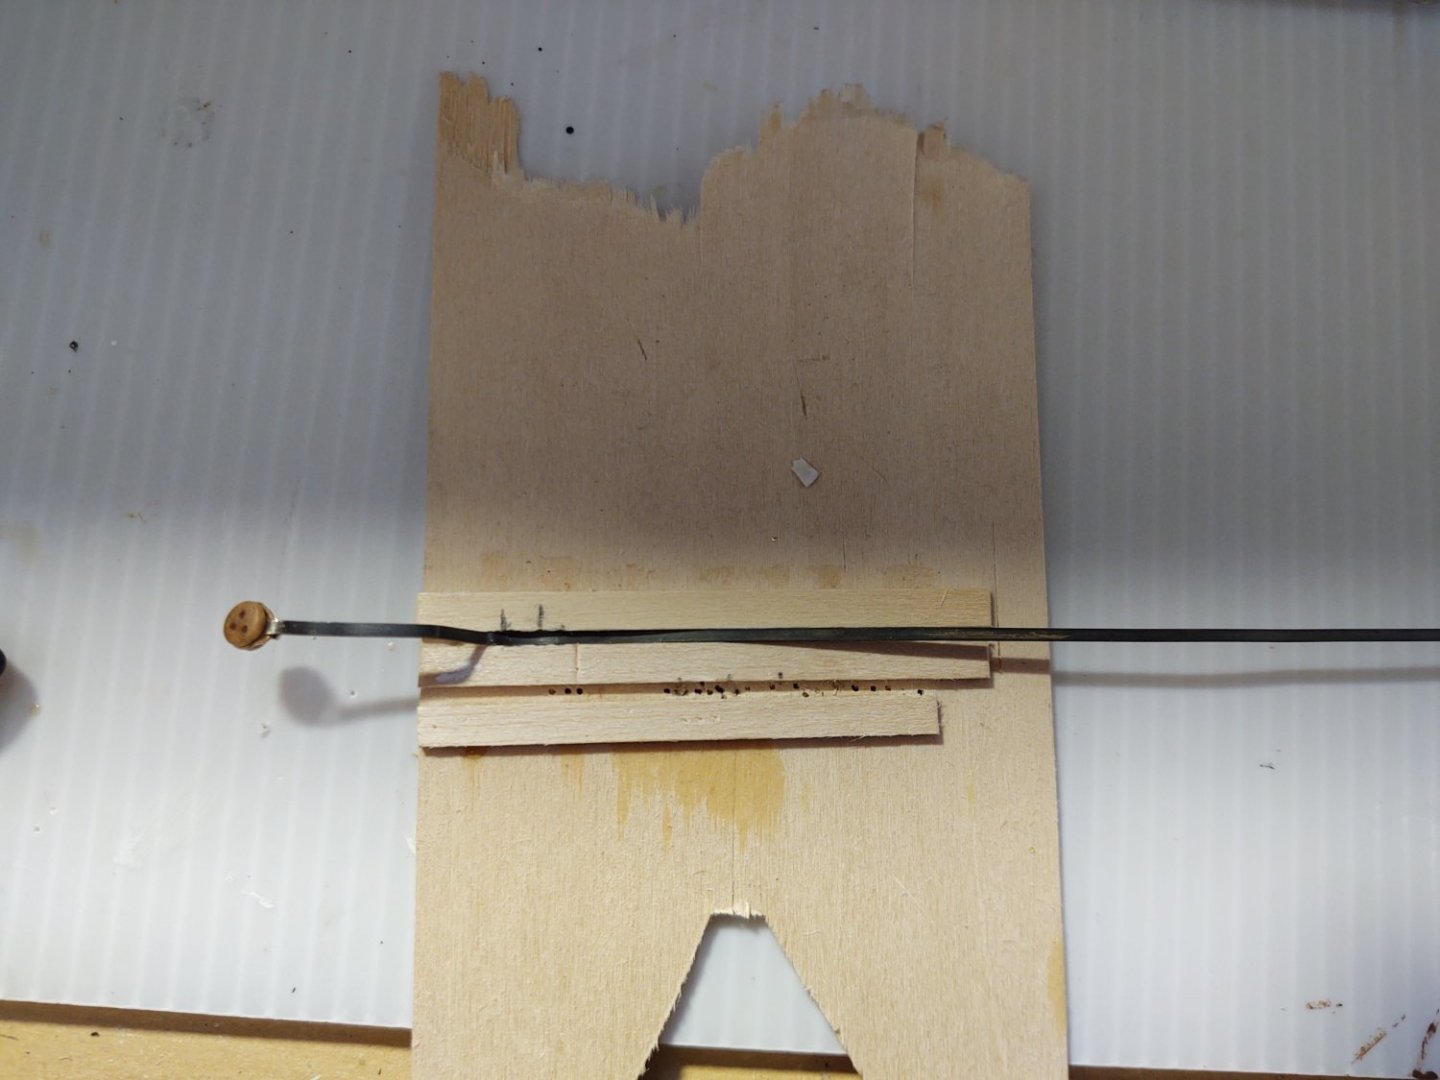
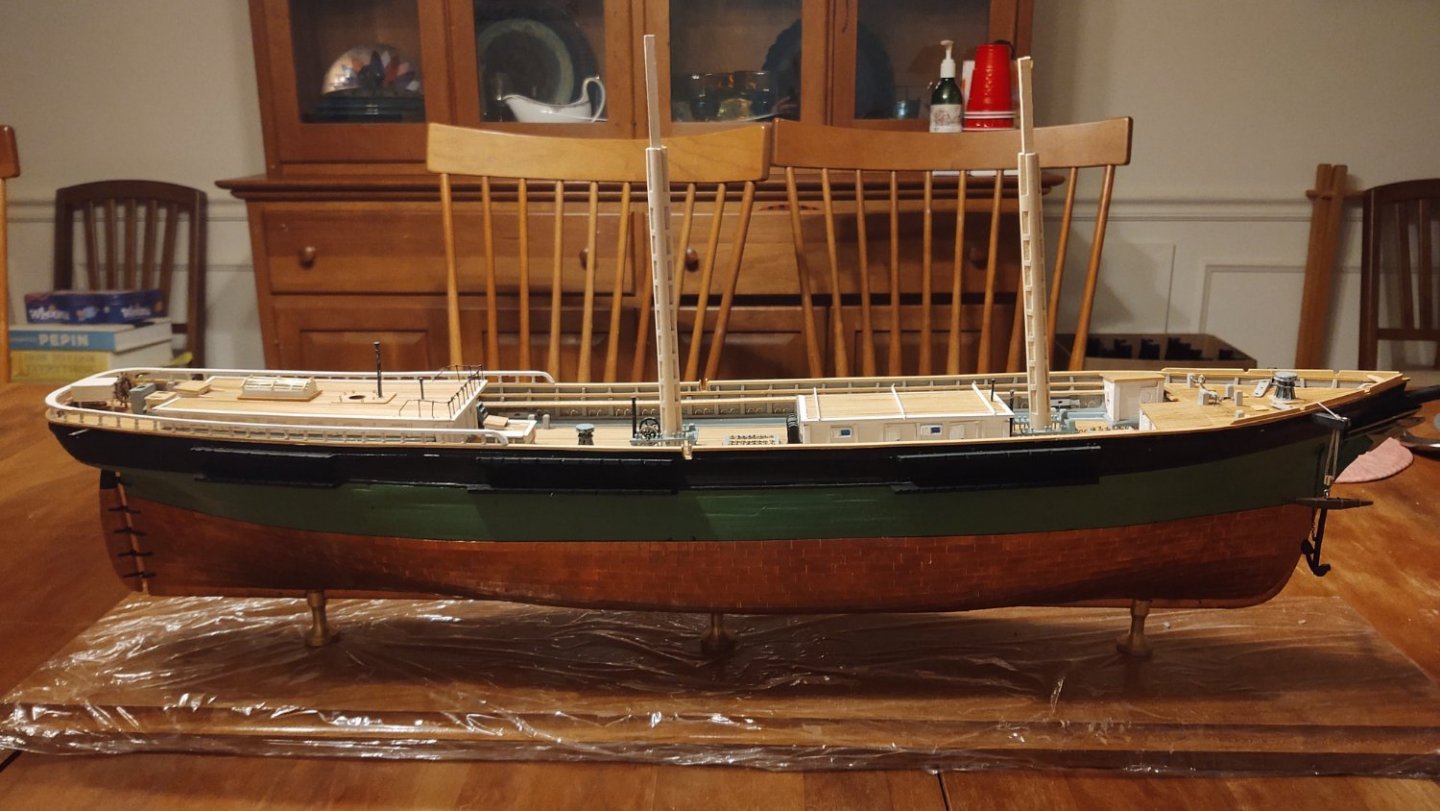
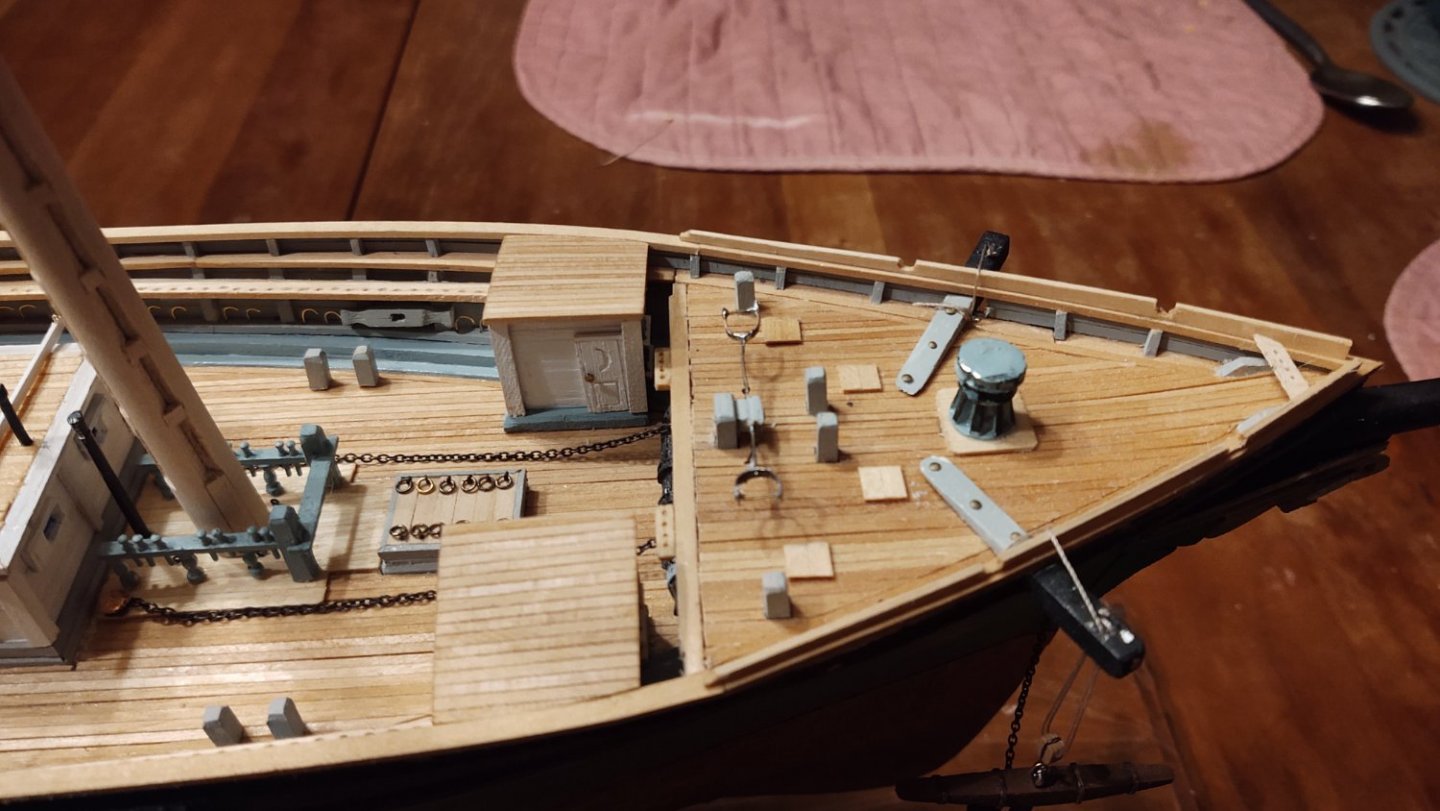
It's been about 3 weeks since I've done an update. A combination of things has slowed everything down, ranging from some extra efforts needed with work to training for the Cherry Blossom 10 mile race that was last weekend. As I age, the miles take longer and cost more. Plus, for some reason making the chain plates has been something of a blocker for me. As I mentioned in previous posts, there are three sizes of deadeyes attached to the chain plates for all three masts. The largest deadeyes use 1/16" wide brass strip which is wide enough to drill for the nails that are representing the bolts. They are 6 inches at scale and that seems about right for the size of the deadeyes. I'm using 1/32" wide brass (so 3" at scale) for the smallest of the deadeyes (these are for the backstays in the upper works). They seem right but I don't have either a drill press or other obvious means of cutting holes in the strip to push the nails through. I've worked out a method for dealing with those (more anon). There seemed to be no intermediate size of brass strip available for the lower backstays. However, @MrBlueJacket from sent me a small test strip of 1/16 by 1/64 Britannia strip. Even though it's the same width as the brass, it just looks different and somehow right for the intermediate size chain plates. Once my order arrives I'll start on those. The pic above shows the chainplates on the port mizzen. The four large ones are in place, and the three smallest. What I wound up doing was stropping the deadeyes with some 34 gauge steel wire and then bending the 1/32 brass strip through the strop, covering the area where I wound the strop with the bend of the brass (if that makes sense). Then I put bent the brass, installed it in the channels, and cut it off where I wanted the top "bolt" (i.e. the nail) to sit. I used a bit of CA glue to attach the bottom of the plate to the hull. I then took a 5 mm strip of blackened 1/32" brass that represented the preventer and glued it to the hull about 1 mm from the bottom of the plate, and in line with the direction that the plate was facing. I could then drill two small holes, one between the plate and one below the "preventer", and glue nails into the holes. It's not perfect, but I think it works. Where I am now with the plates is that I've done all of the shroud plates on the port side of the ship and the first three of the upper backstays. There are 6 lower backstay plates and another 6 of the upper backstay plates, but having worked out how to make them all, I feel more confident about moving forward. I expect to display the starboard side, so this was the "practice" side, and I've learned some good lessons for when I move to the other side of the ship. Below is a (terrible) photo of where she stands now. I couldn't get the light right, the point is that the chainplates are coming along, if slowly. I've been doing some other steps as well. I've been adding the mast hoops to the fore mast, and will move to the main once that is done. I've also started fabricating the mast tops, that will be coming soon. I added the ladder from the main to forecastle, which I am oddly, and perhaps strangely proud. The ladder is a bit chunky (that's what happens when you don't use the fittings, I suppose), but what I'm proud of you can see in the photo below. I made the railing out of chain and 4 jackstay eyebolts. I don't know if the real ship had chain railings, but somehow I thought that they might, so I took some of the rigging chain and attached it to blackened eyebolts. As an aside, you can see the lowest of the mast hoops in the photo as well (all the paintings show the masts as painted white (including the hoops) so they are going on prior to painting. As always, thanks for looking in! Regards, George K
- 602 replies
-
- 6
-

-
- Flying Fish
- Model Shipways
- (and 2 more)
-
Wait, what? You mean the rail on the roof of the carriage house, or the taffrail? The Fish was wrecked in China, the Captain brought home parts of a rail to put into his house? Where were they incorporated?
-
The plates on my Fish are 0.03 x 1/16. I will see about some 3/64 strip for the smaller ones.
- 602 replies
-
- 1
-
-
- Flying Fish
- Model Shipways
- (and 2 more)
-
As you say, they are on the plans for the lower channel. I'm going to put them in once the rest of the plates are on. Am I seeing correctly that you switched to smaller brass strip for the last three stays? I may need to buy some intermediate size strip for those as I don't think I can readily drill a holes a hole in the narrow strip from the kit
- 602 replies
-
- 1
-
-
- Flying Fish
- Model Shipways
- (and 2 more)
-
Concur with @rwiederrich that is nice looking.
- 602 replies
-
- 1
-
-
- Flying Fish
- Model Shipways
- (and 2 more)
-
I've used thin, black wire from BlueJacket for the vertical footrope components. I found it was impossible to make thread hang right. Not that this is the consideration, but it is way easier to make the loop with wire than with any kind of thread.
-
How are you making those blocks, if you don't mind my asking - they really are nice. Sorry if I missed this somewhere, if so, please point me to the correct post. Regards, George K
-
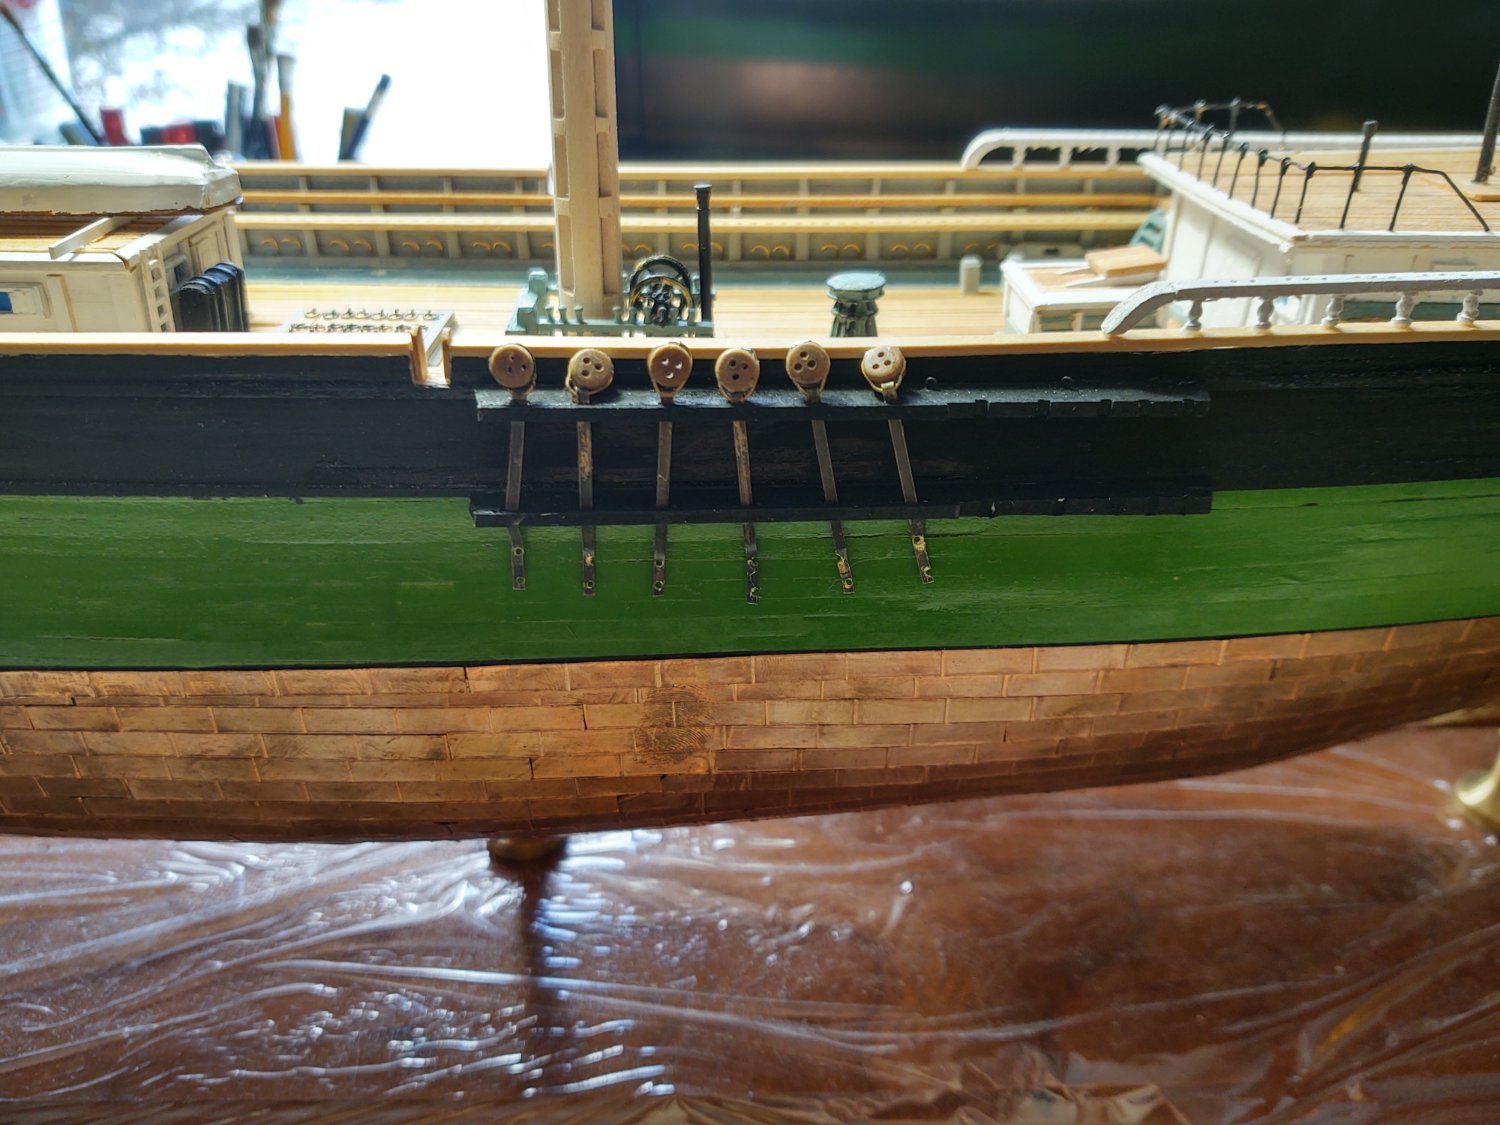
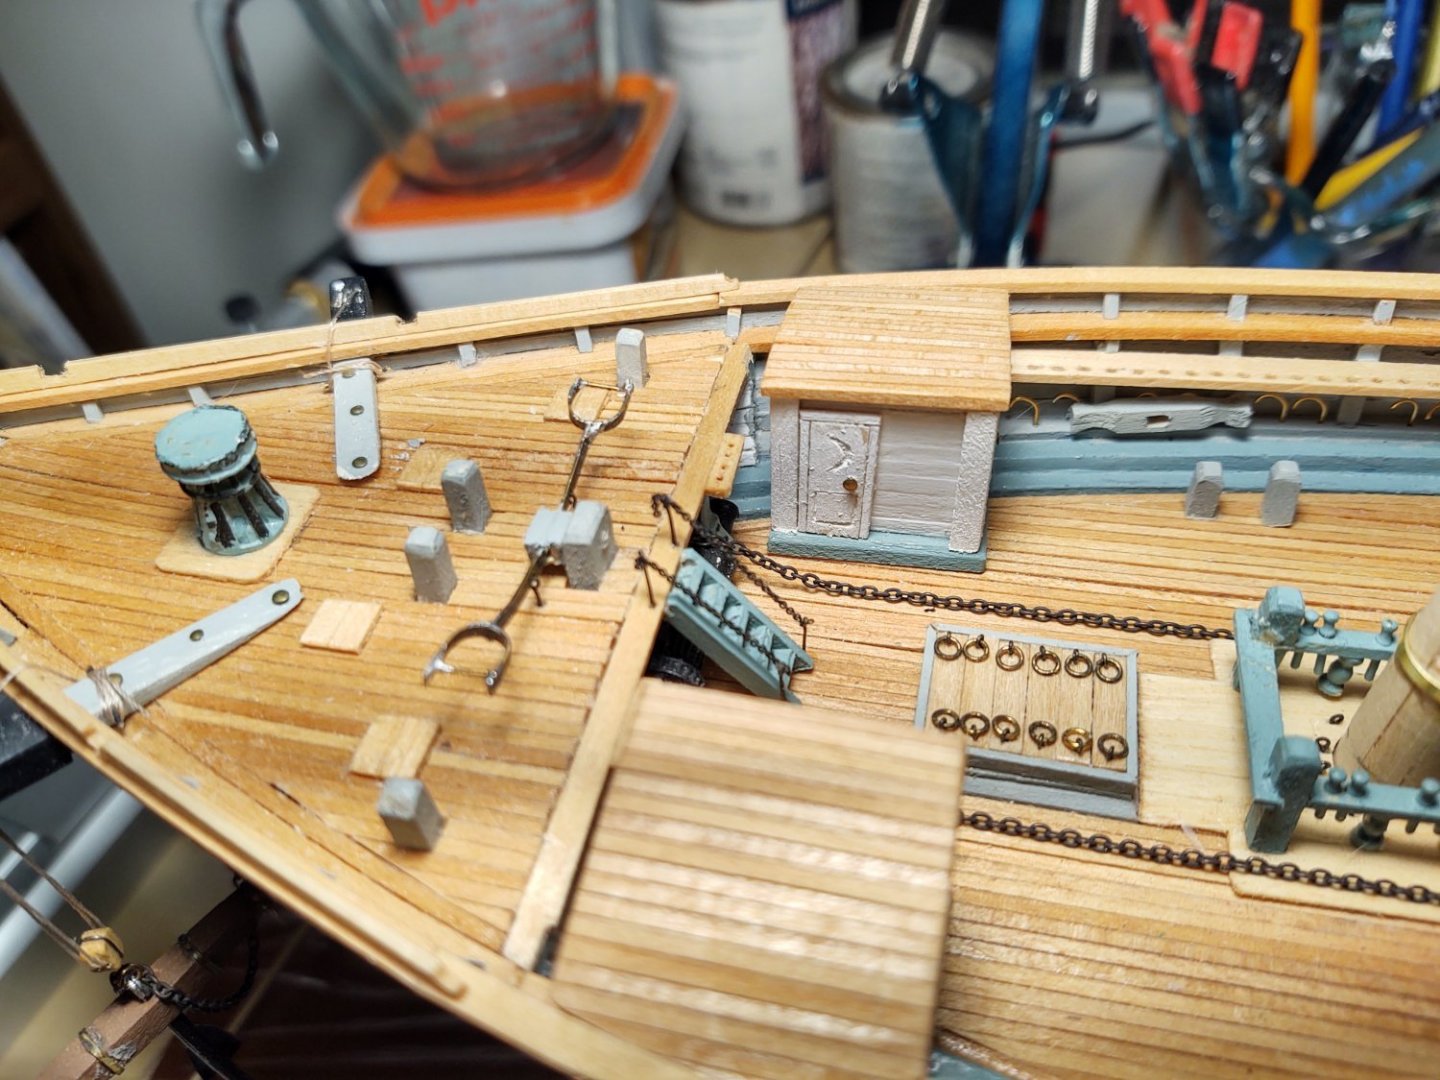
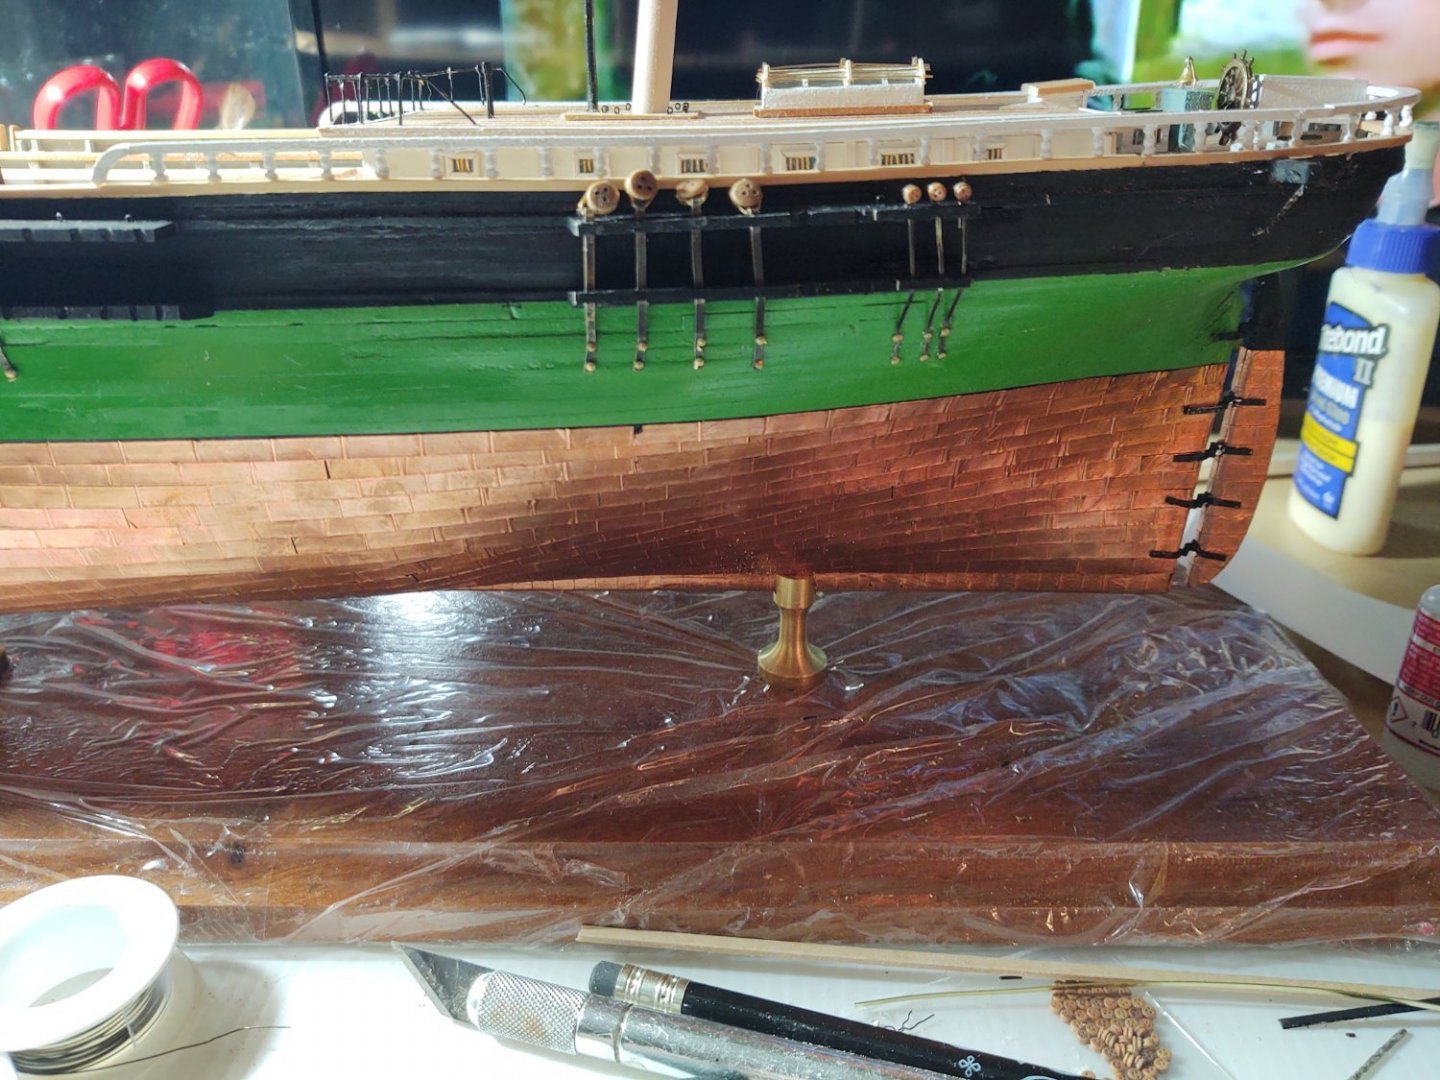
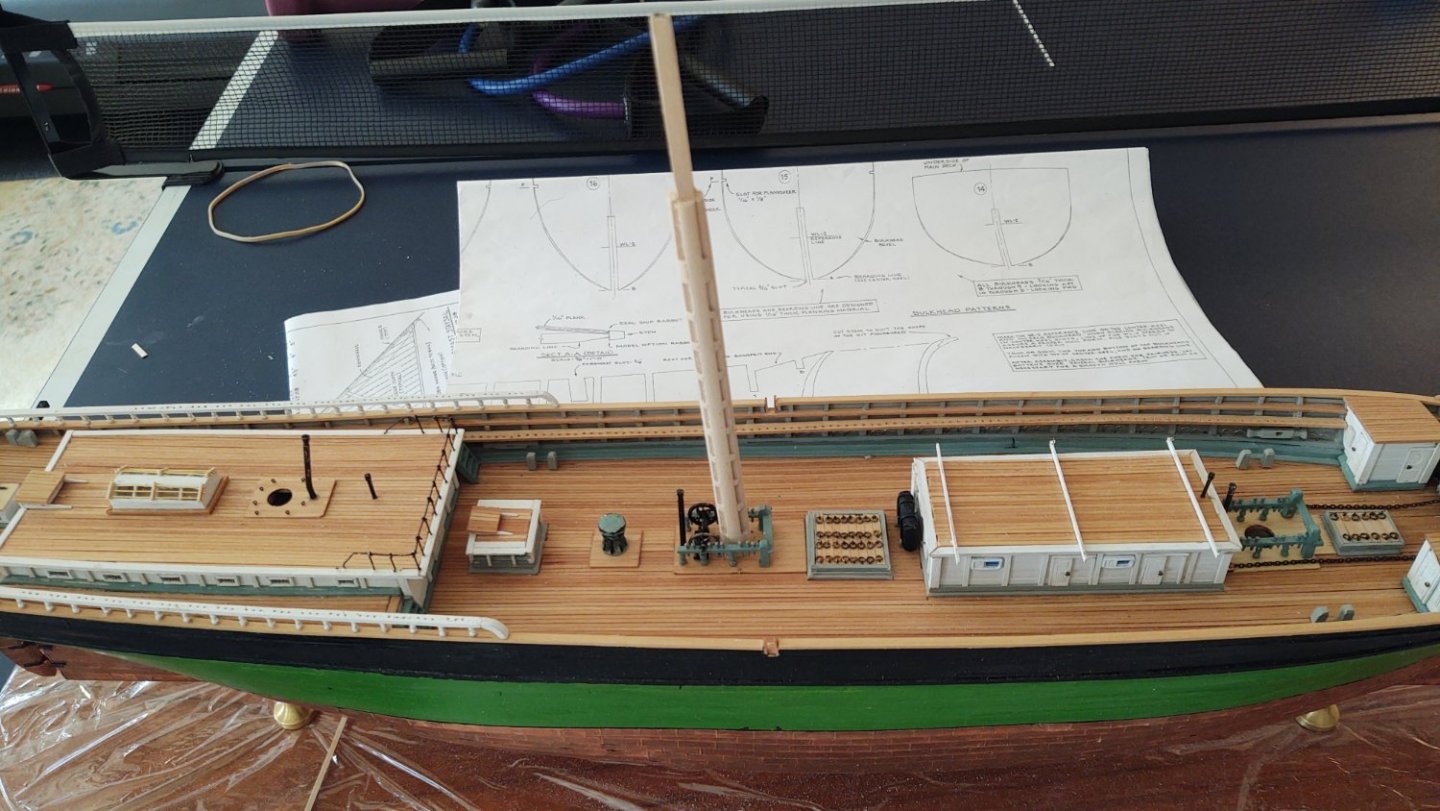
Some interesting progress on the Fish. After my error described in the last post, I made 32, 18 mm circumference wire loops and fitted them to 32 of the largest deadeyes, pushing the wire into the channel in the deadeyes and leaving a rectangular section at one end to insert blackened brass strip that will become the chain plate. Actually, I probably made more like 60 of the loops, as, in the process of fitting the loops around the deadeyes and forming the attachment point, I think I snapped one for every one that was successfully manufactured. Nevertheless, they are made and ready to start installation. I had cut the chains according to the patterns on the plans so that the chainplates will align with the shrouds. This meant that each plate would have to be of a different length in order to ensure that the bottoms of the preventers would run (more or less) along the same line. So, I measured the distance between the lower chains and the top of the preventer off the plans and put a piece of Tamiya tape on the hull so that the top of the tape is where I wanted to upper bolt on the preventer to end. (it's about 6 mm). I then took a deadeye with the brass strip attached, fitted it to the correct pair of cutouts on the chains, and carefully bent the brass strip so that the it would hit the hull at the top of the tape. I then put the bent deadeye/chainplate into a jig to hold it in place, and carefully drilled two holes 4 mm apart. (the lines are 4 mm). I did this for the 6 chainplates the hold the shrouds (in this case for the port side main mast) and marked them with tape so I'd know which is which. Next I removed the tape and used CA glue to attach the 6 chainplates to the chains, but didn't glue where they attach to the hull. From there, I glued a pre-painted black strip over the two chains, since the plates are not on the outer edge of the chains, but rather pass through. I only covered the shroud plates at this time, as I will need to do something similar for the backstays. Finally, I used a pin vise to drill holes in the hull for the bolts, and used small nails dipped in CA to secure them in place. It's not perfect, but this is the 'non-display' side and I suspect I will get better as I go. It is definitely better than I did with the Niagara, and I think that the concept is generally sound. Here is another view: I also built up the core of the lower mizzen mast. It is solid, not built, but I turned it more or less the same way I did the other masts because it struck me as easier to wind up with a nice square core where the top will live rather than trying to cut out a square from round stock. Anyway, I think it looks nice. One question. I've been detailing and painting the ship's boats, and I was wondering about how standardized the loadings of them would have been. The plans say to set all three boats on the deckhouse with the boat bows facing forward. They would seem to 'pack' better, with more room on the the roof of the deckhouse if the cutter and the Captain's gig had their bows facing aft and the longboat had its bow facing forward. One of the boats needs a bit of touch up before I mount it, but I would be curious if anyone has any thoughts here. As always, thanks for looking in and the encouragement! Regards, George K


- 602 replies
-
- 5
-
-
- Flying Fish
- Model Shipways
- (and 2 more)
-
I don't know that I would call these boats "lifeboats". While they certainly would behave as such in an emergency, they are more properly "Ship's boats", used for all sorts of workaday functions. According to the plans, the three boats on the deckhouse are a longboat, the captain's gig, and a cutter. I imagine that for many tasks the crew would go to the long boats on the davits first, but, these were working boats, they must have been pulled off periodically or (to quote Long Jack from Captains Courageous) "they would be overboard". Given the small crews and passenger loads on vessels of these types, I'm guessing that you could get everyone into the two 24' longboats on the davits in an emergency in any case, without worrying about difficult launches of the other boats. As to the rig design in the plans, I'm going to speculate that it was considered too difficult to replicate the rig, and a simplified 'line over the boat was substituted so that something was there. Regards, George
-
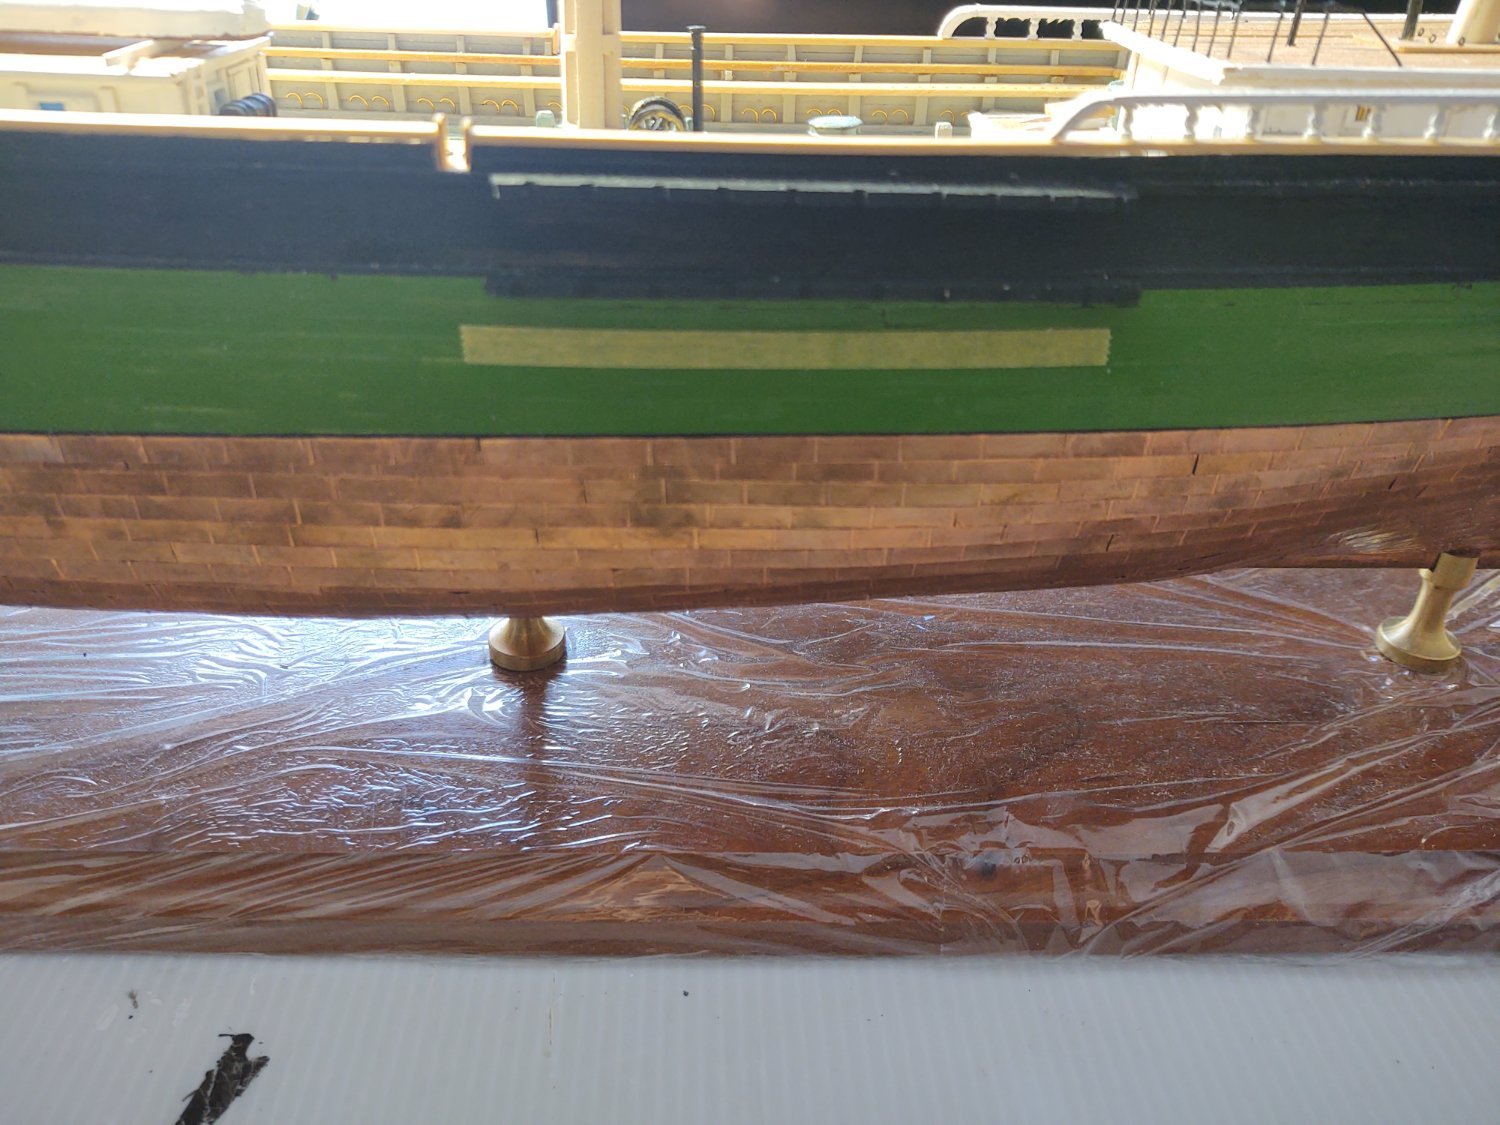
Looking good! I painted the hull before I completed it, partially so that any small errors wouldn't show through as much. It used utterly conventional Tamiya flat black XF-1 acrylic on the area that was going to be coppered and things have adhered just fine. What I would do is throw out the kit copper tape and replace it with 3/16" Venture Tape (you can get it from places that supply stained glass artists). I used black backed tape so any slight peeling wouldn't show. It adheres better than the kit tape, looks better, and is more in scale than the 1/4" stuff from the kit. Regards, George K
-
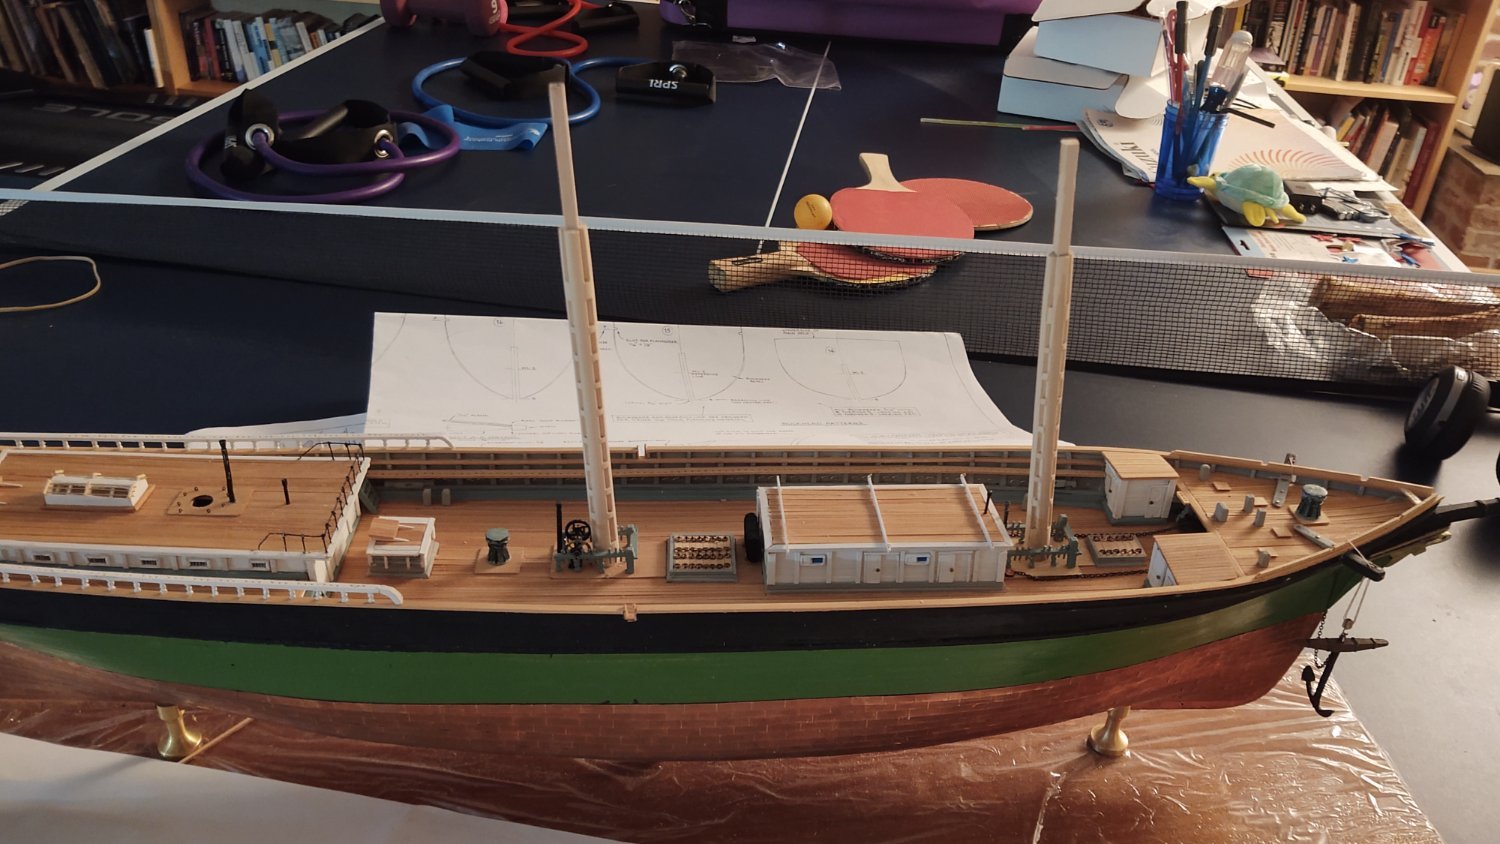
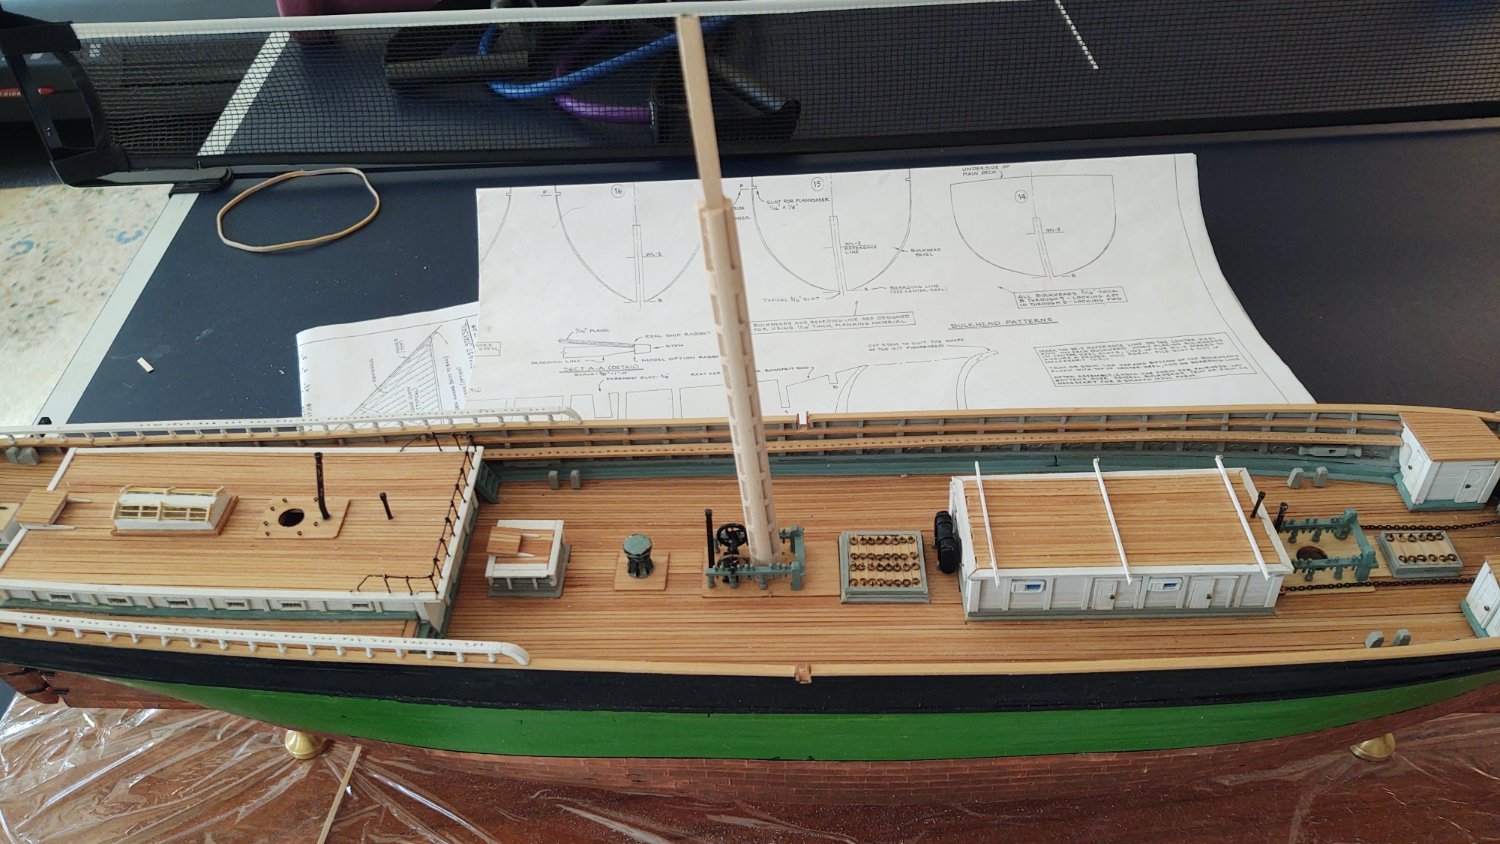
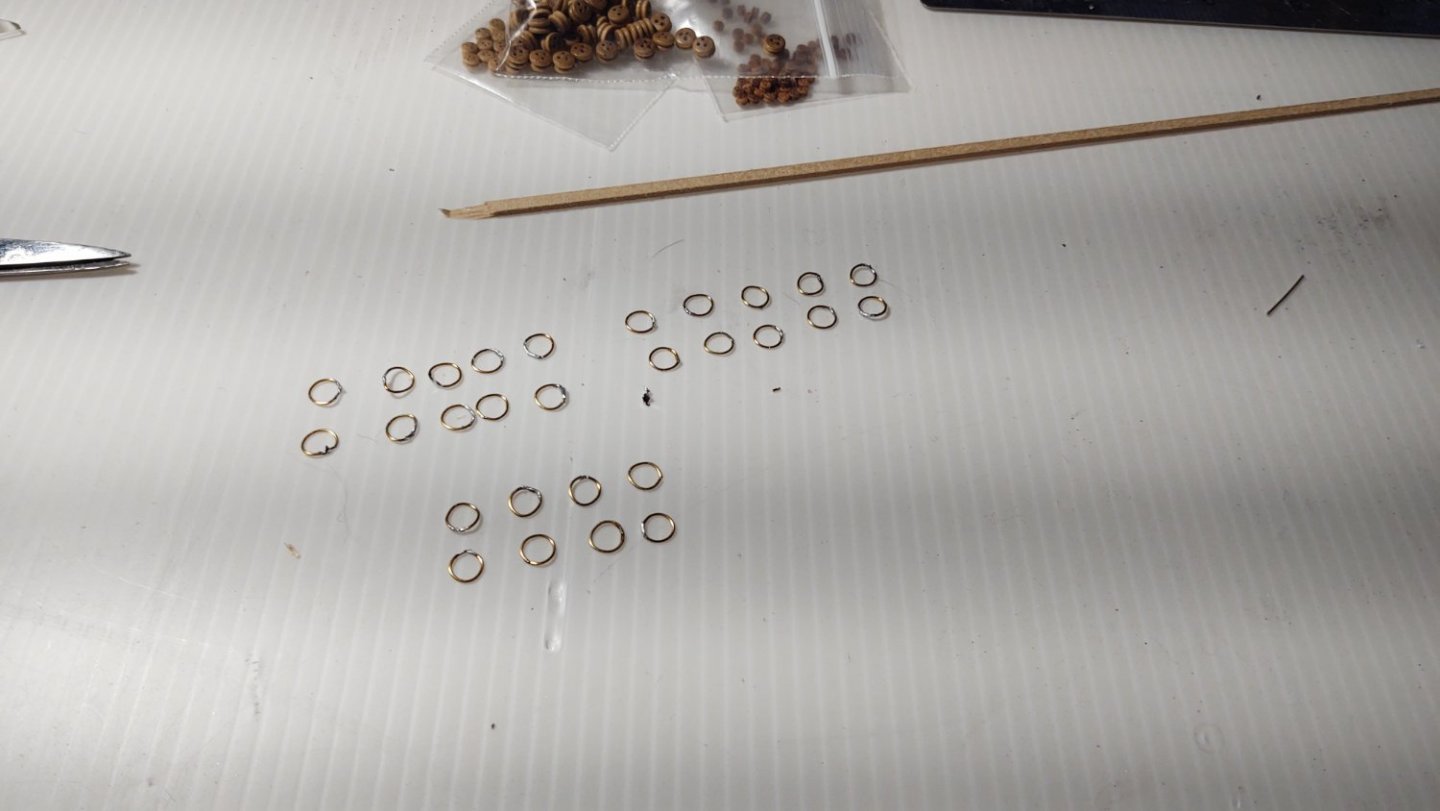
Well, it's been almost a month since the last update. Partially because the work I was doing was repetitive and not changing the appearance of the ship all that much, partially because I spent some time visiting my older daughter in Boise, and partially because I've had a long list of backed up house maintenance items that needed completion. However, an update on some progress that has been made. First, I turned the lower foremast the same as the lower main. The result (unpainted, but in situ) are shown below. It isn't much different, the dimensions of the built portions are about 3/8 inch shorter, the square element only 1/8 inch shorter, reflecting the relatively similar sizes of the two built spars. Next, I built the windlass handles on the poop deck. I used a slightly different design than shown in the diagrams which struck me as being sturdier. In any case it is installed: Most of the rest of the work has been to build out the chains and the chain plates. First the chains, the upper chains flat, the lower chains wider at the root and narrower at the plate end. Notches were made for the various chain plates and then they were painted, the necessary eyebolts added, and installed on the port and starboard sides of the ship. I set the notches up according to the plans so that when the plates are added, they should align with the direction of the relevant shroud or stay. Once the plates are made, I will add a thin, black painted strip to the outer ends to retain the plates and deadeyes. Finally, I've begun making the deadeyes. I started by making 32 wire loops from 17 mm pieces of 24 gauge wire as below: Unfortunately, they all needed to be about 1 mm longer to readily fit around the deadeyes and leave enough room for the blackened brass strip that is the plate itself to fit in, so I've been making new ones from 18 mm of 24 gauge brass wire. I've also ordered a set of better drill bits, as the ones I have are really terrible for cutting the nail holes in the brass strip. By the time that they arrive I hope to have all of the shroud deadeyes stropped and ready for fitting on the ship and the plates ready to be cut to length and have the necessary holes drilled for the nails that are representing the bolts. Until then, more soldering. As always, thanks for looking in, and for the likes and encouragement. Regards, George K


- 602 replies
-
- 7
-
-

-
- Flying Fish
- Model Shipways
- (and 2 more)
-
Looks great. Is the aftermarket flight deck warping forward, or were you just waiting for some other detail.work before laying it down? Really awesome build!
- 126 replies
-
- 5
-
-
- Thetis Bay
- Finished
- (and 4 more)
-
I tend to use the water approach as well, although the key there is to make sure it is dry before you mount the plank, otherwise you will get shrinkage and a gap as the water leaves. That said, I've made stern bulwark planks that have a 180 degree bend in them with no tool more complicated than a tea kettle and a small pan. Regards, George K
-
I seem to recall the bust turned out more or less okay...
- 602 replies
-
- 1
-
-
- Flying Fish
- Model Shipways
- (and 2 more)
-
Thanks! But machining it is - I have zero talent for sculpture!
- 602 replies
-
- 1
-
-
- Flying Fish
- Model Shipways
- (and 2 more)
-
I'm certain it will look awesome when completed from what you've shown of the build so far, and the amazing skill in your USS Cairo.
- 602 replies
-
- 1
-
-
- Flying Fish
- Model Shipways
- (and 2 more)
-
Vlad, looking forward to seeing this other option.
- 602 replies
-
- 1
-
-
- Flying Fish
- Model Shipways
- (and 2 more)
-
Thank you both for the compliments. The instructions suggest cutting the grooves in the round stock but that seemed really hard to me. Proof again that there are many ways to solve a problem, and it's easier if someone else (i.e. Rob) had already demonstrated the method on his builds.
- 602 replies
-
- 1
-
-
- Flying Fish
- Model Shipways
- (and 2 more)
-
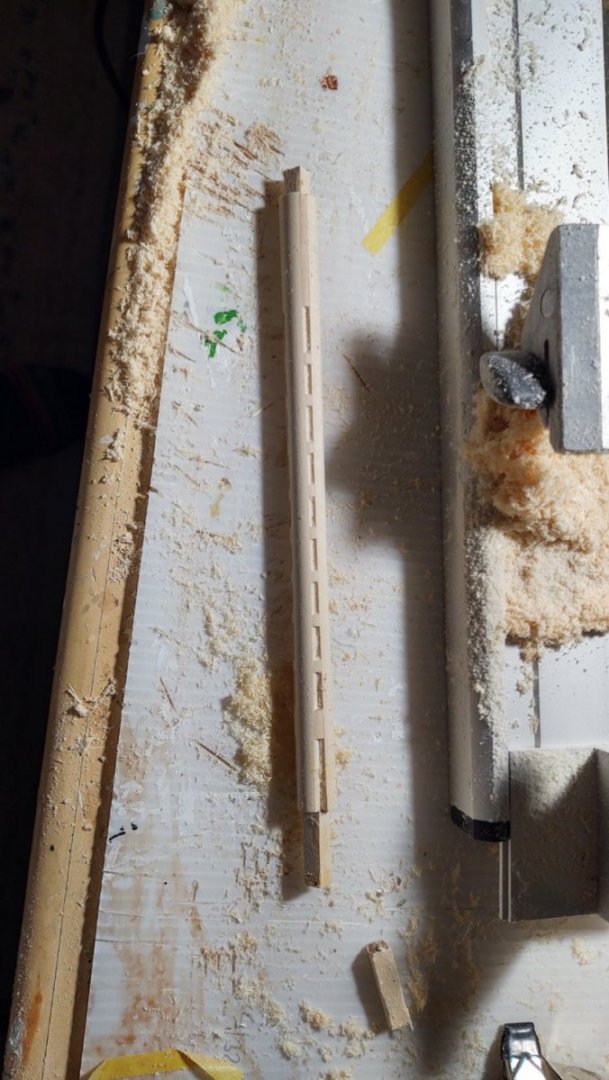
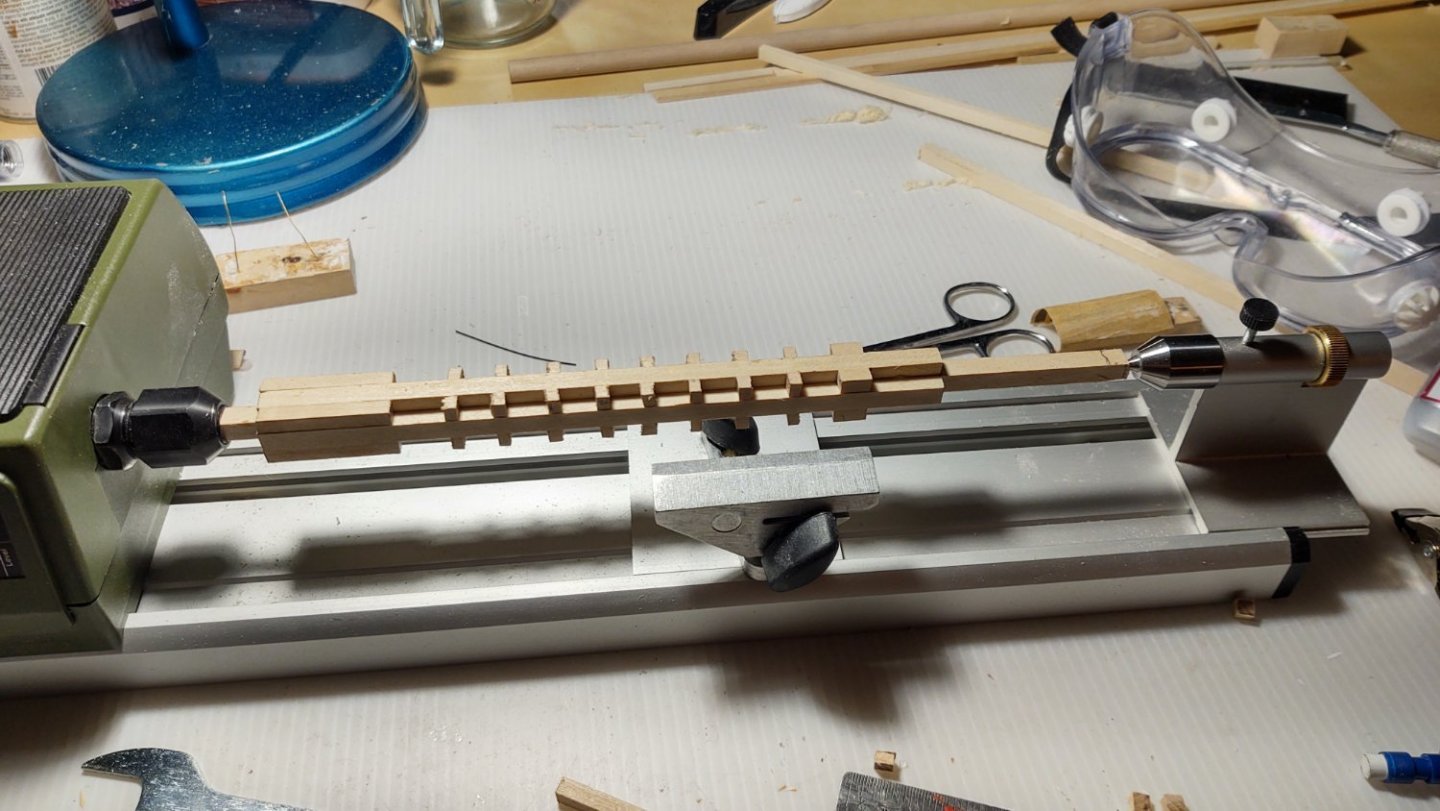
Brief masting update. As you will recall, I made a first pass at the main mast using a 1/4 by 1/4 inch core, and 1/4 by 3/16 inch "wings" using 3/16 by 3/16 inch inserts to mimic the wedges where the mast hoops went, and that the mast was unusable because it was poorly centered. I made another pass at this as below: The center piece on the right side has the top of the spar marked, where I will need to trim some to fit the mast cap, and continues into the chuck on the left side (which will be the end that is inserted into the deck. This yielded the following mast: It wasn't perfect, but it seemed usable until I stupidly cut off the mast top rather than the base so that it would fit properly into the ship. In any case, even though it felt usable, I wasn't happy with it. It looked a lot like the picture of the model, but not like the plans. Looking at them more carefully, I noticed that although mast should be 1/4" square at the cap end, the core of the mast was 3/16" at scale, not 1/4". So, I took the same strategy as before, except that the core piece was 3/16" square, the "wings" were 3/16" square, and the wedges made of 3/16" square material. After lathing, I got something that I was much happier with, as shown here sitting in its location on the ship: It's even and more obviously a built mast. I'm happy with this one, and will make the second one the same way. The mast isn't complete, I will need to sheath the core with 1/32" wood on all of flat surfaces in order to obtain the 1/4" diameter up to the mast cap. but on the whole I'm satisfied. Incidentally, I went to the store the other day to get some more 3/16 square basswood stock and they had none. The guy at the store seemed to indicate that they aren't getting much. Big chunks of this mast were made from 3/16" square stock that I built from spare 1/16 by 3/16" stock. It turned just fine, so I will probably get rid of a bunch of such stock making the foremast. As always, thanks for looking in. George K
- 602 replies
-
- 5
-
-
-
- Flying Fish
- Model Shipways
- (and 2 more)
-
Having worked for the government, I can tell you if it has a serial number it has to be accounted for😀. In any case, if I read Wikipedia right, the ship was headed in for a yard period anyway, and those planes were at worst enough aluminum for another 18 Hellcats and 8 Catalina.
- 126 replies
-
- 6
-
-
- Thetis Bay
- Finished
- (and 4 more)
-
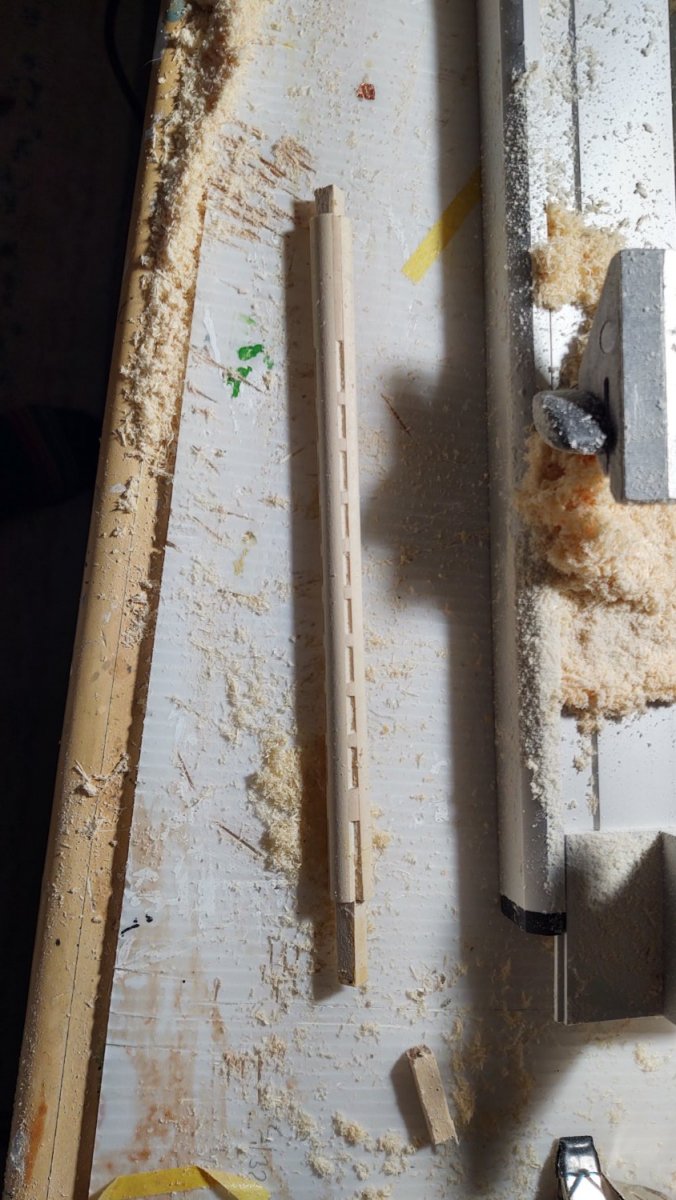
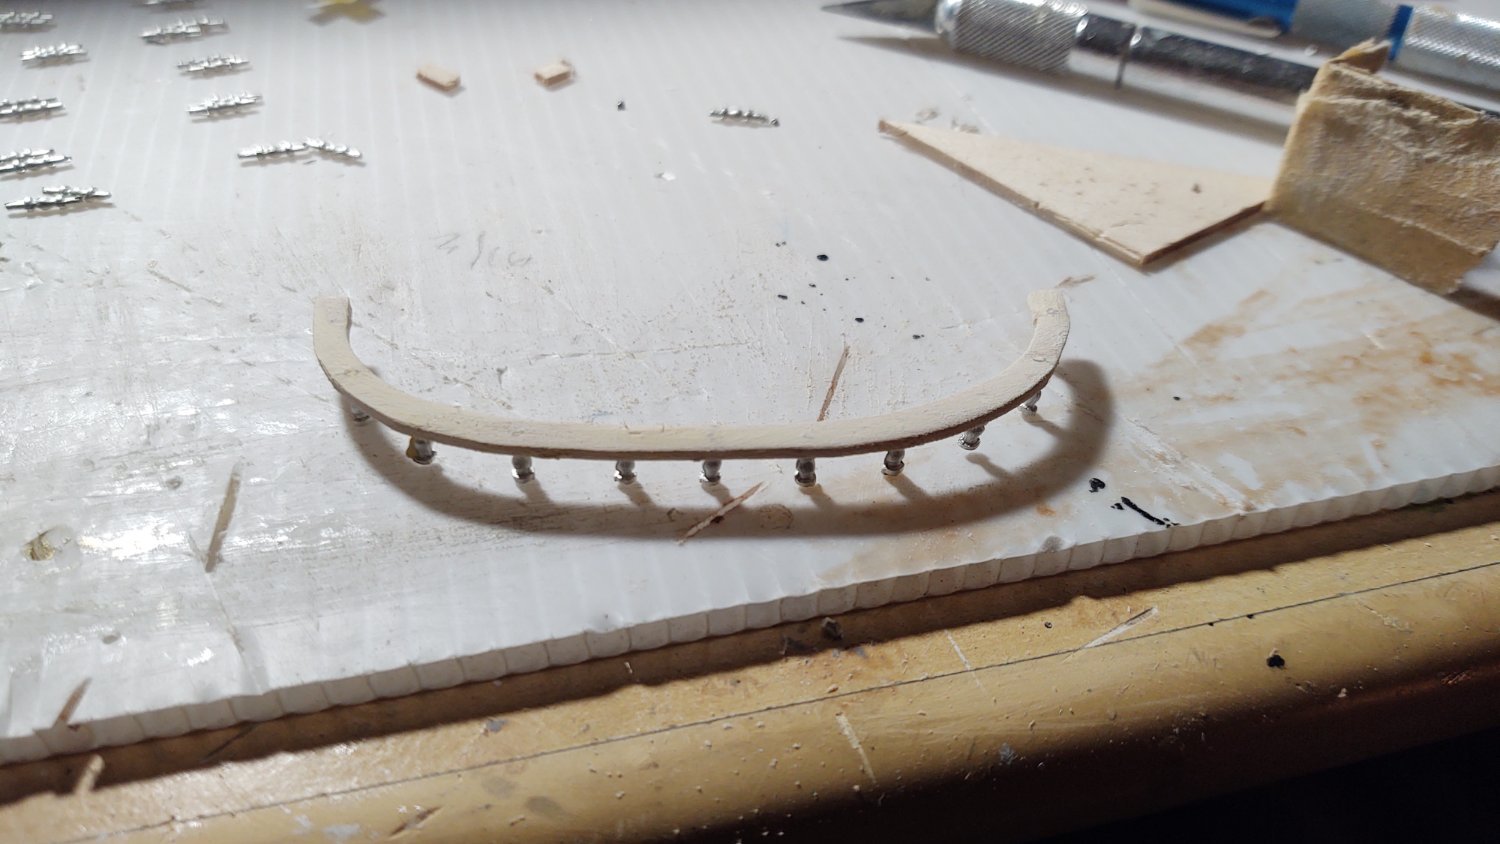
A brief update. Over the last several days, I completed the taffrail, although it required making each piece something like three times. For ease of construction, I split the taffrail into 5 sections, a (roughly) semicircular stern, two straight segments that I was able to dry bend to follow the curve of the hull without problem, and two quadrant shaped sections that were the forward terminus. The stanchions are Britannia castings that had small centering knobs on both ends. I carved the after segment out of a piece of 1/16 thick basswood, and then drilled holes approximately 9 mm apart that were used to center the glued stanchions. I then filled in any gaps with putty and sanded the top of the rail as below: You will note that the centering pin on the bottom of the stanchions have been removed. Based on my experience making the taffrail, I wanted nothing to do with drilling the topgallant rail, and anyway, trying to locate the holes struck me as virtually impossible, so I cut off the centering pins and ground the bottoms of the stanchions flat. They were then painted white and made ready to install. In the meantime I had to make the part of the taffrail that would have the belaying pins. My original thought was to drill holes 9 mm apart for the stanchions. After those holes had been drilled, in the sections with the belaying pins, I would move 1.5 mm forward of the stanchion hole and drill a belaying pin hole, shift 3 mm drill a belaying pin whole, and then shift 3 mm and drill another belaying pin whole, at that point 1.5 mm from the next stanchion. Locate the stanchion, rinse, repeat. That would yield a uniform row of 3 mm spaced (center to center) belaying pin holes that straddled the stanchions. Unfortunately, 1.5 mm was too close for holes that were about 1 mm, and inevitably I would get split wood. So, I made a slight change, spacing the stanchions 10 mm, and then putting the belaying pin holes 2, 5, and 8 mm from the preceding stanchion. What that means is that the belaying pins are in groups of 3, spaced 3 mm, followed by a 4 mm gap, followed by 3 pins spaced 3 mm, followed by a 4 mm gap, etc. I used the same technique (more or less that I did with the pinrails, except drilling 4 holes each time (3 pin holes and the next stanchion hole), and aligning on the new stanchion hole: As can be seen in the upper part of the image, I installed the stanchions as on the stern, and clipped/ground off the bottom locating pin. The two quadrant shaped ends were carved out of 1/8 x 1/4 inch boxwood. Everything was painted and then installed. You can see the result below: The groups of three are definitely present, but there are plenty of holes in the mizzen mast area. Looking at the photo, it also appears that I bent the patent vent - will need to fix that. As always, thanks for looking in and for the likes. Regards, George K


- 602 replies
-
- 4
-
-
- Flying Fish
- Model Shipways
- (and 2 more)
-
To anyone that has built the Fish, it would seem like you can get maybe three holes for belaying pins on the taffrail between stanchions. That would cover like 8 stanchions, or 7.2 cm. Does that seem right to you all?
-
No opinion on the question of usage, but it appears gold paint called Shell Gold existed as early as the 12th Century (https://www.materializedidentities.com/single-post/2017/02/03/shell-gold-production-usage-and-handling-of-a-historical-artisanal-technique-including). Basically finely ground gold leaf in a binder. Regards, George K