


Gyber
-
Posts
34 -
Joined
-
Last visited
About Gyber

Recent Profile Visitors
968 profile views


.thumb.jpg.62d1d69fed1f32364417cb1f9cdeb009.jpg)


-
 Duanelaker reacted to a post in a topic:
Niagara by Gyber - Model Shipways
Duanelaker reacted to a post in a topic:
Niagara by Gyber - Model Shipways
-
Roger Pellett reacted to a post in a topic:
chisels
-
I'm late to this discussion, so it might not be helpful anymore, but.... I would recommend an inexpensive set of good chisels. These can be easy to find actually. No need to spend a lot of money of chisels. A selection of MHG Bench Chisels would work (about $14 each size,) or a set of Stanley Sweetheart Chisels would also work. I assume you have a way to sharpen them. If not you do need sharpening stones and a bit of practice. All the more reason to get an inexpensive set. I would spend a bit more on a good rasp, and look out for one that has hand cut teeth. A good chair maker's rasp will probably cost you about $75-100, but it will be worth it in the long run. And a set of needle files will be necessary in my opinion. I use a small bandsaw to re-saw lumber, and then hand plane the board, then sand to final thickness. A thickness planner will also work well. There are a million ways to get the job done. I hope my few comments were helpful.
-
Gyber reacted to a post in a topic:
Seawatch Books
-
Gyber reacted to a post in a topic:
Free hand lumber harvesting
-
 Looks good! One problem with the upside down construction method is, like an Easter egg, you don't know what is inside until you cut into it. Your cover should be fine. I assume there will be a seat at the stern as well, which will cover most all of the in-board stern exposure. Robert
 -
Gyber reacted to a post in a topic:
Bohuseka by bolin - FINISHED - scale 1:12 - Swedish west coast rowboat
-
Just joining in and now following along with your build. I'm looking forward to seeing your progress. I love the look of the Latham! Robert
-
Gyber reacted to a post in a topic:
Jointer question/recommendation
-
Thanks Jaager for your reply! Perhaps given your comments on apple wood fungus, I should consider fungus'd apple for the poop deck planking. I've removed the "waxed apple", and painted the ends with an acrylic paint to seal the end grain. I understand apple to be a slow-drying wood, so I will leave the blank, keeping an eye on it, and trying to weight it from time to time to see how it is doing. There is no rush at the moment, as I'm finishing up an old model project at the moment. The 2" blanks are really an experiment, and a way to evaluate woods that I've not tried before. I'm glad to read about your high recommendation for apple. As I'm in a new town, and recently retired, the overlap of "people I know" and "people with 14" bandsaws" is currently zero, but I can ask around. I unfortunately don't have room for a reasonably sized bandsaw right now, but perhaps in future a 10" saw like the Rikon 10" Deluxe with a good quality 1/2" blade might do OK on smaller stock: I don't know. Anyway, that would be for the future, and I will look out for a community woodshop with a bandsaw for now. It is amazing the degree that I don't know much of anything, so I'm learning that wood-turners often use green wood to pre-carve larger sized works. They then dry the thinner intermediary carving before finishing it off. These pieces naturally dry quicker. I think one problem of using blanks is that the level of moisture in the wood is likely to be variable from one order to the next. Kiln drying is mentioned in some of the catalogs, but mainly for stock under 2" -- a general observation which might be overridden by more experience. Thanks again for your comments. They are appreciated. Robert
-
I've been experimenting with various wood sources, including 2x2x12" turning blanks. These are relatively easy to resaw with a miniature table saw. One problem is the moisture level of the blanks can vary. I recently received an apple blank that is sealed in wax on all sides, and is rather wet (about 34% moisture content.) I've not had many problems with wet wood in this format before, so I was wondering about the best method for drying it. I plan on removing the wax on all sides, and resealing the ends, and then air drying it for a half year. Are there quicker alternatives that anyone knows about? Robert
-
Yes, this is a common problem, and shrouds can be pushed in as well as out of alignment if you are not diligent. I would redo the ratlines, but maybe the shrouds are fine. Even super-taunt shrouds can be pushed in/out. One approach is to use a card to mark the shroud positions and the expected ratline positions. Then you can verify after each ratline that things are shipshape. Also, if you do every other ratline, then fill in the gaps, it can be easier to maintain alignment. Robert
-
Question on false seizing / zip seizing
Gyber replied to slagoon's topic in Masting, rigging and sails
I got a big package of needles, and I use these for making the seizings. I drill a small hole in a hard wood, then force the needle through the hole. This gets a tight fit. Put the needle in the wood, wrap the line around, and add thin CA. I use pliers to move the needle after the glue is applied, then let the glue firm up a bit more, and then remove the needle. The seizing comes off cleanly for me. The only thing is to keep the needle clean. I don't use any wax or other lubricant. I don't see it is needed. Robert -
Niagara by Gyber - Model Shipways
Gyber replied to Gyber's topic in - Kit build logs for subjects built from 1801 - 1850
Thanks Patrick for looking in (at my reruns.) And hi to Rshaw as well. I hope to be able to get the reposting up-to-date soon. Regards, Robert -
Niagara by Gyber - Model Shipways
Gyber replied to Gyber's topic in - Kit build logs for subjects built from 1801 - 1850
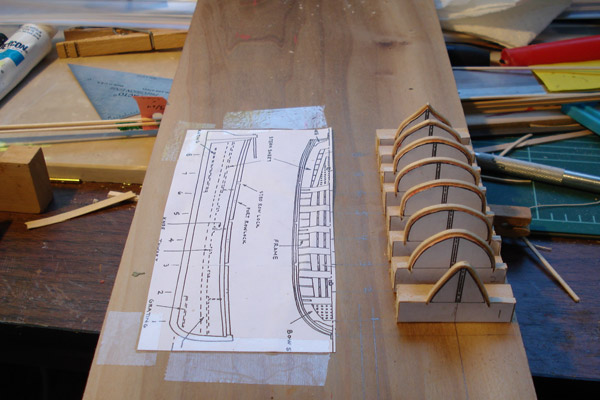
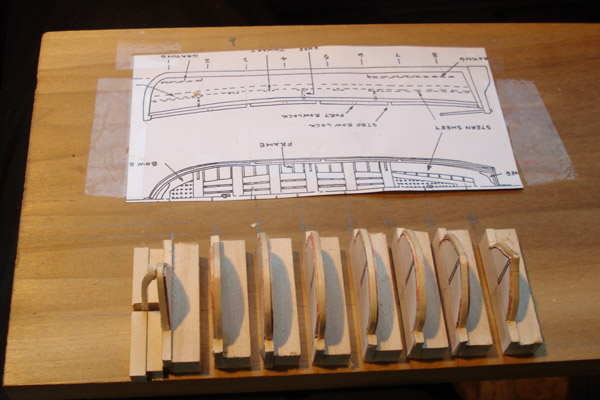
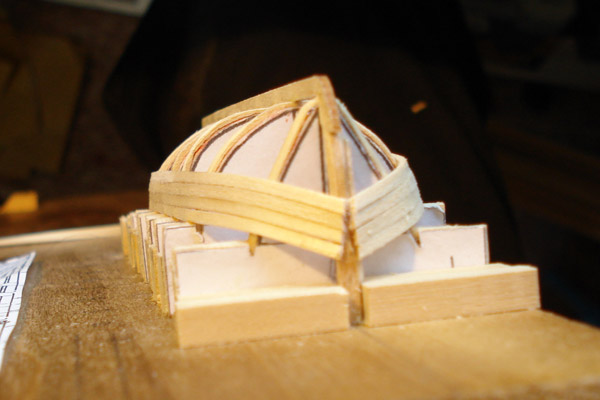
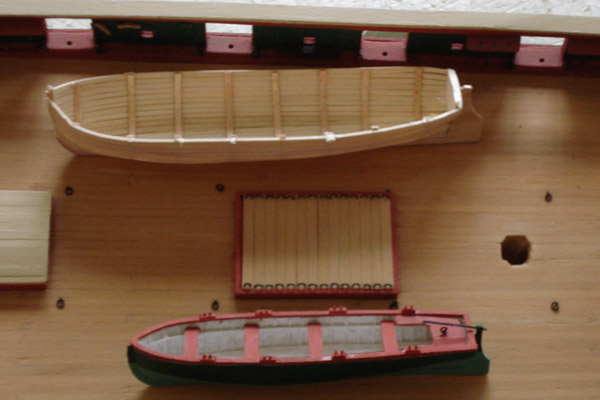
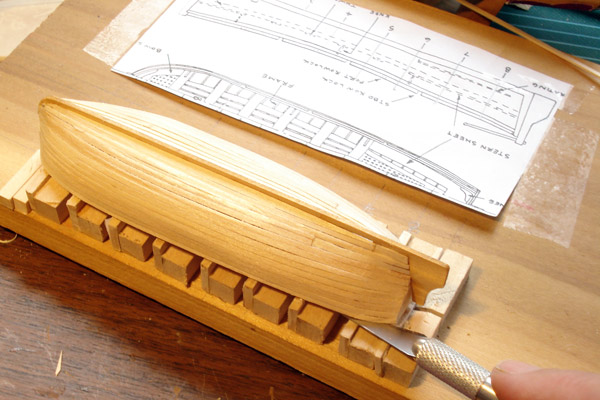
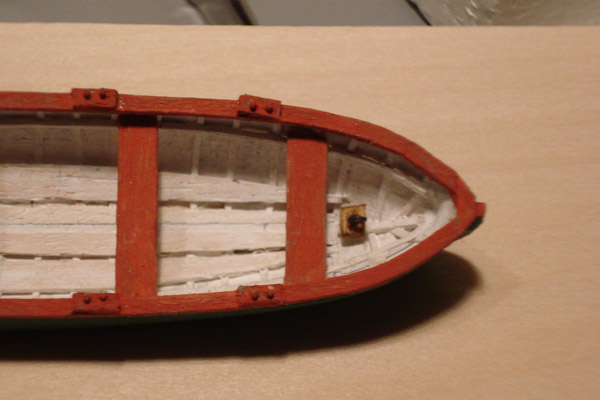
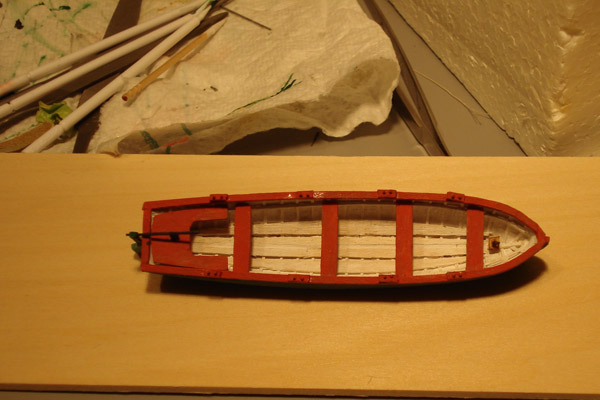
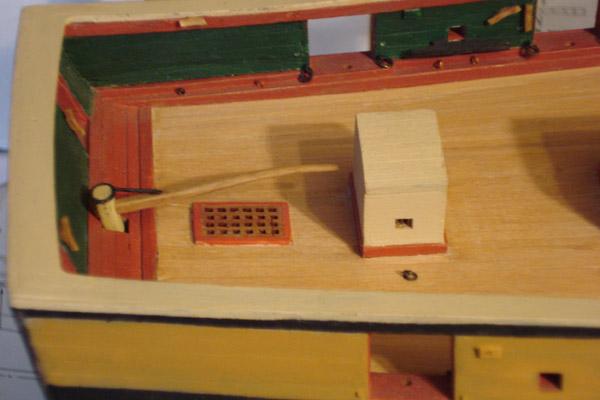
#78: Author: Gyber, Location: Los Angeles Posted: Wed Nov 25, 2009 12:04 am — Today I got a bit further on the jig for making the cutters plank on bulkhead style. As I'm in new territory (for me) I'm taking things slow, so that I don't mess up too much. The bulkheads have now been fitted with boat frames. These are glued only at the ends (tabs), where l cut into the bulkhead base. In theory after the planking, the tabs are cut, and the boat should lift off of the jig (I remain skeptical.) I waxed the edges of the bulkheads to prevent glue from penetrating, as a fail safe (we shall see!). After the bulkheads are added, I fashioned a bow piece to terminate the planking at the front. The transom is glued to a square dowel at the angle needed (the transom for this cutter is not perpendicular, but angled aft.) I'm still fiddling with the transom a bit, to figure out how to deal with planking the stern. So far so good. I will need to fair the first and last two bulkheads to make the planking run smoothly. I'm a little worried that the boat frames are not thick enough for the fairing needed at the stern. I may have to redo these with a bit thicker frames. Now I'm off to buy the turkey for Thanksgiving, and will be busy for the next few days. I should have time to work on the model on Friday, as it is a day off for me. Happy holls for those celebrating Thanksgiving! Regards, Robert Description: Frames are bent around bulkheads using heat/water. I used alcohol for the ones with sharp angles. #79: Cutter continued... Author: Gyber, Location: Los Angeles Posted: Sat Nov 28, 2009 2:29 am — Ok, I made a bit of progress on the first of the two cutters. I added the keel and rudder, using the laser cut piece that came with the kit. The rudder and keel are currently one piece, but I will cut the rudder off from the keel as a last step. I accidentally broke the bow off (the piece was on a 1/32 basswood sheet, not ply! -- very fragile). Oh well. So far the planking is going smoothly. The garboard strake is installed, and I just need to figure out how to finish the planking off without causing undue disgrace to this author. And, I also hope the danged thing will come off the jig. My first few planks, the super glue seemed to seep through the frames (as the glue is want to do.) I learned to age the glue, which is a gel type super glue, by leaving a drop of it on a piece of waxed paper. When it thickens, but still is liquid, it is easier to apply a precise drop to the frame, and it does not penetrate into the wood as much. I will be reinforcing the whole hull with a dilute wood glue when the planking is done, so I'm not so worried about the strength of the super glue bond. Robert #80: Static brig niagara model shipways kit Author: kenr, Location: melbourne Posted: Sat Nov 28, 2009 5:33 am — Robert. I assume you are going to cut out the insides of the bulwarks.? If so, how are you going to do it Regards ken #81: Author: phrygian, Location: Kentucky Posted: Sat Nov 28, 2009 2:05 pm — He's planking onto frames bent over the bulkheads. bob h #82: Author: Gyber, Location: Los Angeles Posted: Sat Nov 28, 2009 8:48 pm — Sorry for all the posts. I could not resist posting about the cutting out of the cutter, which went very smoothly. I'm not sure I did the best planking job: it is tougher that it looks to get all the small planks bent and fitted. After the planking was done, I cut out the transom, and then cut the tabs off at the bulkhead. It lifted right off! I've included a few pictures to show the rough shape. As the cutter will be painted, I will do a bit of sanding and smoothing, then reinforce the wood with a dilute wood glue wash. It is a bit of a relief to have gotten this far with it. Now I only need to do it all one more time for the second cutter! At least the jig should hold together for the second boat. I probably will not post again for awhile, as I have lots of "uninteresting" tasks to do on the model. I will show the detailing work on the boat, however, when I get to that stage. Ken, Bob was correct in pointing out that the boat frames were not directly connected to the bulkheads, only bent over them, and glued at the jig base. Regards, Robert Description: The transom required some steady cutting out, but it went smoothly. Oops, there went the top of the rudder! The frames were relatively easy to cut. #83: static brig niagara,model shipways kit Author: kenr, Location: melbourne Posted: Sat Nov 28, 2009 9:38 pm — Robert I understand now. Congratulations,very neat work Regards ken #84: Author: Rockit, Location: Ohio Posted: Sat Nov 28, 2009 11:00 pm — Looks good Robert - I'm going to come back and refresh when I get that far along; maybe steal a couple of your ideas #85: Author: vanburen, Posted: Sun Nov 29, 2009 5:53 am — Perfect timing! I just started on my boats. Looking great. #86: Author: bernie, Location: Geelong Posted: Sun Nov 29, 2009 7:33 pm — Nice work on the boats. Both techniques seem to have let you produce good results. I like this kind of work very much (though a bit too clumsy to replicate it ). cheers, Bernie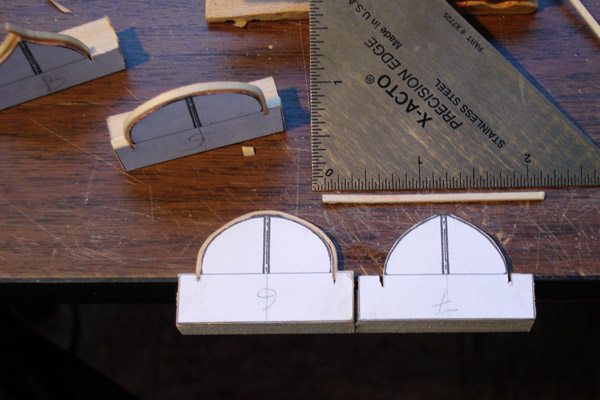


-
Niagara by Gyber - Model Shipways
Gyber replied to Gyber's topic in - Kit build logs for subjects built from 1801 - 1850
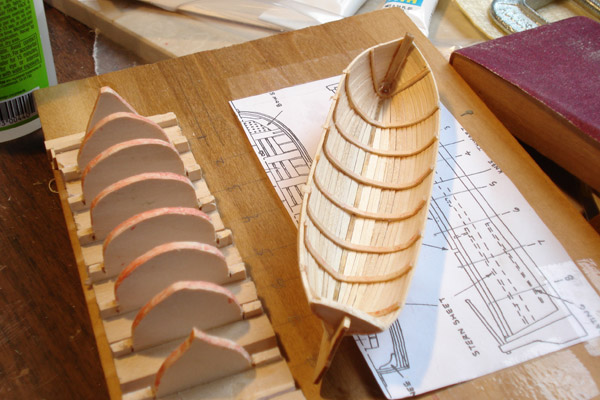
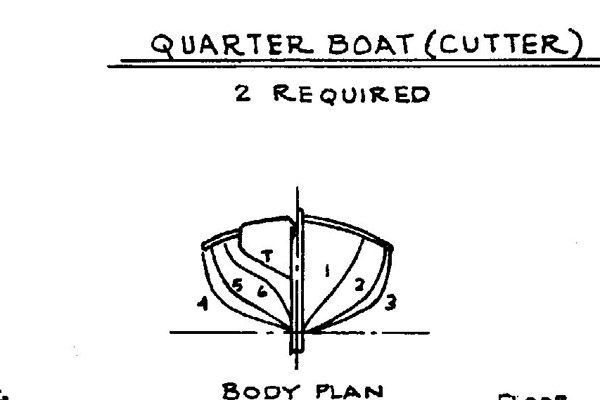
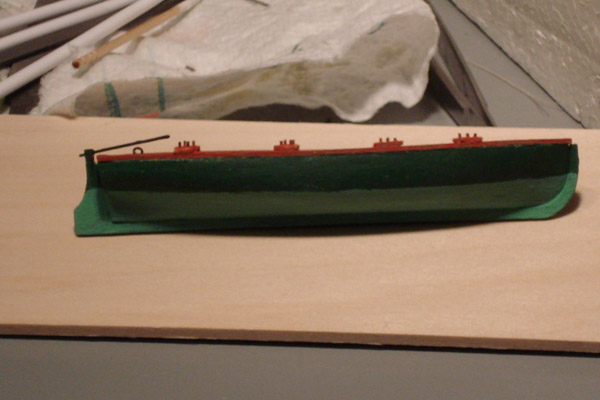
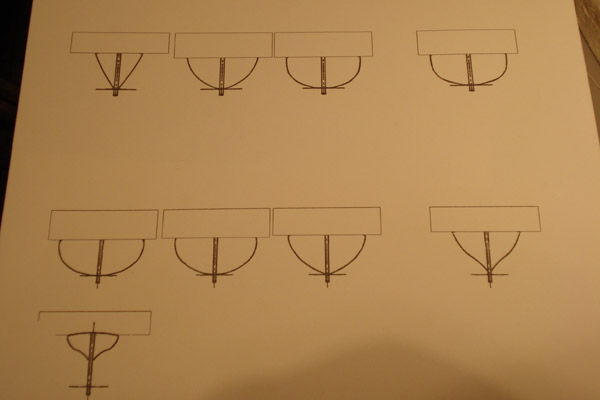
#76: Ship Boats Author: Gyber, Location: Los Angeles Posted: Sun Nov 22, 2009 3:17 am — Next I'm going to resume working on the ship boats for Niagara. There are three: a yawl, and two larger cutters. I've already completed the yawl, using the model kit's bread and butter construction, with no planks on the exterior. The hull is finished off by sanding the constructed hall paper thin, then priming and painting it. I like the results, but have a nagging feeling that I can do it better. So for the cutters, I want to attempt a plank on bulkhead construction using scale planks. I've included a few pictures of the yawl. Worst case would be if the cutter does not turn out well, I can redo them using the kit's materials. I will mention that the construction method was gleaned from Hubert Sicard's "Wooden Ship Modeling for Dummies." I will modify the techniques if need be, but since this is my first attempt to scratch build a boat, I will stick to his methods as much as possible. I'm not a sales person for Hubert's site, but I have found he has a lot of neat ideas. Just looking at his methods opens one up for adventure in modeling. I'm a slow worker (as I've mentioned before) but I will keep you posted on my progress... Robert Description: Here is the yawl... Description: I used Photoshop to scan in the body plan, and separated them out to create a template for each bulkhead #77: Author: Gyber, Location: Los Angeles Posted: Mon Nov 23, 2009 3:06 am — I didn't get too much done today, as I'm coming down with a cold. However, I cut out the bulkhead profiles for the cutter using an exacto knife, and pasted them to a 3/32" board. If I had been smart, I would have glued them all along the edge. This would have avoided having to square the bases. Next, I rough cut out the profiles using a jewelers saw, and then fine tuned them using a number 11 exacto blade, then sanded them The bulkheads are now in the right ballpark for shape. I will fair the bulkheads to their final shape when I've glued them to a base board. Robert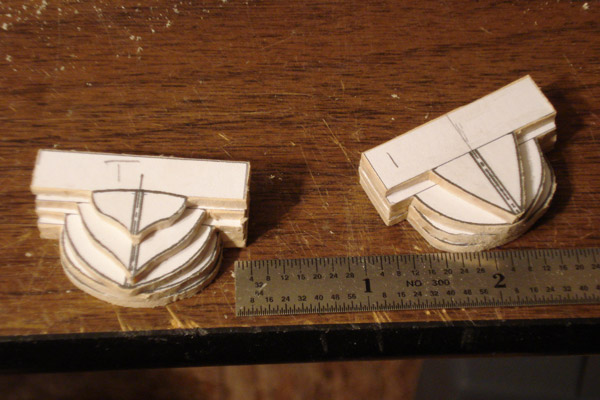

-
Third time is the charm. Your build is looking great. I like seeming the working ship models, and I will look forward to your log. Robert
-
Ouch! This is one of my fears working on ratlines. I don't know the exact construction of your shrouds (single or paired), and where the cut occurred. I would be surprised if you can do a splice however. Probably best to replace it and redo the ratlines. Others may have more optimistic advice however! I feel your pain. Robert
-
Niagara by Gyber - Model Shipways
Gyber replied to Gyber's topic in - Kit build logs for subjects built from 1801 - 1850
#59: Author: Gyber, Location: Los Angeles Posted: Sun Nov 08, 2009 10:55 pm — I've made a bit more progress on the rudder attachment. I must confess that though I started out work with a good mood, I found by the end of the battle, I was glad to be done attaching the "darn" thing. If I had a dollar for every time I dropped a gudgeon I would be able to retire by now. Not to mention the multiple attempts it took to glue the "danged" things onto the stern. Oh well. Here are a few pictures of the battle scene (cleaned up with a bit of paint to hide a few rounds of action. Description: Drilling out the pintles and gudgeons was another fun task. Description: I decided to fashion the gudgeons out of a U shaped piece, with a small diameter tube sized to fit the pintle pin, and filed down on one edge to make it "D" shaped. The flat part of the D is attached to the U shape, and it is done. Easier said Description: Pintles are U shaped on the plan, with a pin attached - in this case by soldering Description: I pre-painted the rudder (maybe this is a mistake!), but the ship stern also needed to be prepped for attachment. Description: The end result. It still needs a bit of clean-up, but it is now roughly complete. #60: Author: Gyber, Location: Los Angeles Posted: Sun Nov 08, 2009 10:57 pm — Hi Bernie: yes indeed I filed a set of jewelers screwdrivers down to use as chisels. I keep them nice and sharp, and they seem to work well. Regards, Robert #61: Author: Loeffelholz, Location: Springfield, Illinois Posted: Mon Nov 09, 2009 2:59 am — Lovely brig you've got going there, Robert... I'm building the AVS now as my rookie effort...but I'm more and more leaning toward the Niagara for my 2nd project---I figure one mast, then two...then three #62: Author: Gyber, Location: Los Angeles Posted: Mon Nov 09, 2009 6:04 am — Hum, here is a possible sixth build ... javascript:emoticon('') http://www.ahrtp.com/TallshipsOnLine/pages/CROWL1-1.htm Robert[/url] #63: Author: Rockit, Location: Ohio Posted: Mon Nov 09, 2009 11:16 pm — Tiller rigging stuff... [Note: the following three photos have been lost] Tiller03.jpg Description: Starboard side line to tiller Tiller02.jpg Description: Looking towards Starboard Tiller01.jpg Description: Notice how excess line is coiled and left to dangle #64: Author: Gyber, Location: Los Angeles Posted: Tue Nov 10, 2009 5:49 am — Rockit: Those are great pictures -- it is nice to see the Niagara as a working ship. Thanks for sharing them! I must admit I'm anxious to start rigging the model, but I keep seeing things that need to be added (and things that I missed on the plan.) I've not put eye bolts or cleats on the stern ports yet (for example.) There is also the cap on the rudder post with the reinforcing rod going to the tiller. My top rudder post is oval shaped at the moment, and it will probably stay that way. A perfect circle shape would have been easier to cap. Oh well. I think it is the Captain's prerogative to make these little adjustments. An oval it will be: get the blacksmith at once! Make it so Lieutenant (Aye-aye Captain!) In general I enjoy scratch building the many parts that this kit requires the modeler to make. But today I would give anything for a little plastic bag full of twenty or so consistently made cleats! Regards, Robert #65: Static: brig niagara, Model shipways kit Author: kenr, Location: melbourne Posted: Tue Nov 10, 2009 7:08 am — Robert. I did just that . bought 20 or so consistently made cleats. Going back and looking at the Niagara you just dont notice the cleats unless you look very closely and most of them are wrapped with rigging. Regards Ken #66: Author: Gyber, Location: Los Angeles Posted: Sun Nov 15, 2009 9:25 pm — Thanks Ken for your comments. I tested the cleats today to make sure that they would not come off at the first tug of rigging. I only had one failure, which has been put right. I will not fiddle too much more with them, as I'm sure you are right: they will be hidden by rope etc. Today I finished up the tiller, with the addition of a cap, and a reinforcing rod from the cap to the tiller. Next I started to model the breach bolts that appear on most pictures I've seen of the exterior of the Niagara hull. They don't appear on the plans (at least I don't remember seeing them) and they were probably considered too small for the scale of the model. I used a flat brass rod cut square (I did have trouble getting the bolt plates to be "exactly square".) I've included a few pictures of what the plates look like. I will do the bolts as a simple dollup of acrylic paint (dot) in the center of each plate. I'm not sure if it is worth the trouble (any thoughts?) If anyone has thought on how to do it better, I would appreciate the comment. Regards, Robert T #67: Author: bernie, Location: Geelong Posted: Sun Nov 15, 2009 10:30 pm — Fat lot I know about it, but the plates look rather thick from where I sit. Perhaps brass shim or even paper? Nice work on the tiller cap and reinforcing rod, BTW. cheers, Bernie #68: Author: Loeffelholz, Location: Springfield, Illinois Posted: Sun Nov 15, 2009 10:40 pm — Looks fantastic! I love the paint scheme. Definitely leaning toward Niagara for a 2nd build... Cheers, Mark #69: Author: Rockit, Location: Ohio Posted: Tue Nov 17, 2009 1:47 am — Coming along nicely, ra. For those interrested in the little glass skylights, I posted some photos for sixman in this thread: http://modelshipworld.com/phpBB2/viewtopic.php?p=126213#126213 #70: Author: Bahamas_Diver, Location: Cleveland, Ohio Posted: Tue Nov 17, 2009 3:28 am — Robert your model looks great. I have a question about the kit. The actual Niagara has a captains walk that covers a portion on the tiller area. Does the kit have the captains walk too? #71: static: brig niagara, model shipways kit Author: kenr, Location: melbourne Posted: Tue Nov 17, 2009 7:23 am — David. In answer to your ? re a captains walk, I dont think so but are you able to give us a sketch or photo so that we can be sure. Regards Ken #72: Author: Bahamas_Diver, Location: Cleveland, Ohio Posted: Tue Nov 17, 2009 12:45 pm — Would be happy to do so. here is one picture of the top of the walk. It is a simple bridge that covers a portion of the aft end and where the tiller meets the rudder stem and allows the captain to stand high enough to see past the bow. #73: Author: Bahamas_Diver, Location: Cleveland, Ohio Posted: Tue Nov 17, 2009 1:54 pm — Hmmmmm sorry...That link didn't work as I had hoped. Here are 3 pictures of the captain's walk. [Note: the following three pictures have been lost.] capt walk2.jpg Description: Notice captains walk at aft end with tiller under it capt walk3.jpg Description: Notice tiller on left side of picture under the walk capt walk4.jpg Description: Captain on walk overseeing "shove off" #74: Author: Gyber, Location: Los Angeles Posted: Tue Nov 17, 2009 4:47 pm — David: The Captain's walk is not on the plans. I would say that adding the Captain's walk would be a relatively easy thing to do. I saw the walk in your photos of the Niagara, but decided to not add it in. Currently the stern ports are used for docking lines. I don't know if originally there would have been two long guns there? It seems unlikely due to the slope of the counter: the guns would be more of a danger to distant birds than to any opponent ship. Bernie: regarding the thickness of the bolt plates. I think you are right. I did try using card, but I did not have the right thickness. It was too thin and you could not see them at all once painted. I may search about the house and see if I can find card with the right (not to thick, not to thinness.) Paper would be much easier to work with. Thanks for your comments. Regards, Robert #75: static brig niagara, model shipways kit Author: kenr, Location: melbourne Posted: Wed Nov 18, 2009 7:47 am — David Robert is correct, but it should be relatively simple to add to the model and would be a very attractive addition. In my case I would have to move the rigging for the boom!! Regards ken


-
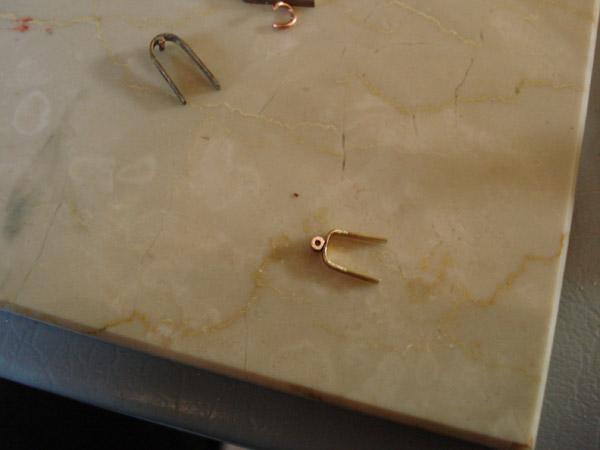
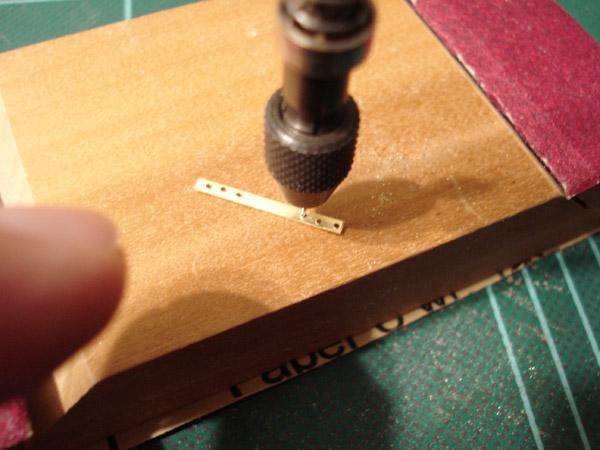
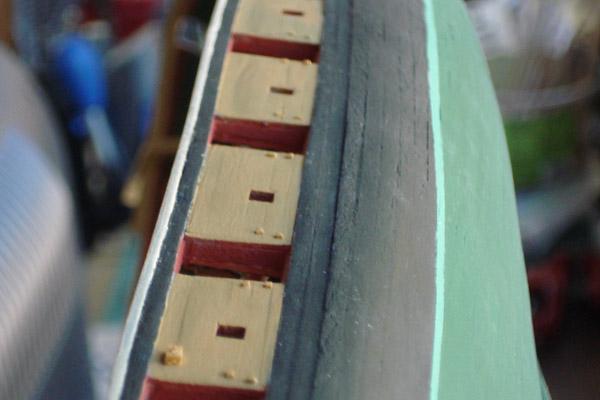
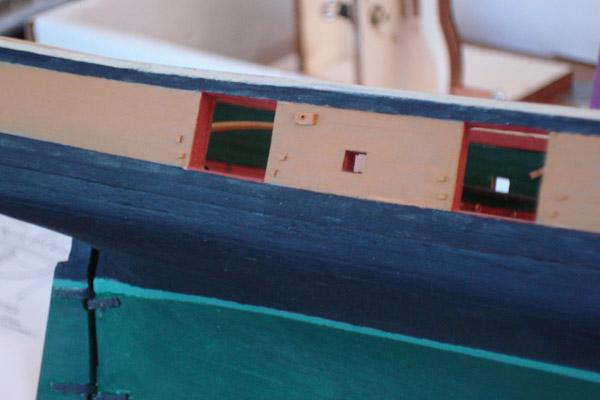
Sorry about that! We have all been in this situation. What type of glue did you use? R