
HOLIDAY DONATION DRIVE - SUPPORT MSW - DO YOUR PART TO KEEP THIS GREAT FORUM GOING! (Only 27 donations so far out of 49,000 members - C'mon guys!)
×

PeteB
-
Posts
183 -
Joined
-
Last visited
Content Type
Profiles
Forums
Gallery
Events
Everything posted by PeteB
-

AIRBRUSH OPINIONS PLEASE...
PeteB replied to MadDogMcQ's topic in Painting, finishing and weathering products and techniques
Hi Mike - Addendum to my previous comments plus Tamiya recovery: The Addendum: Just had to decant a can this morning to touch up some gravel rash on my wifes car bumper (use my airbrush for this) and this time tried out what I think you guys call a box cutter. Forget using side cutters - the box cutter with a new blade makes things soooo much easier. Use the point to create the initial escape hole as described and once the propellant has dispersed use it to cut an inch or so horizontally to form the spout and decant - makes it a very easy and clean 2 to 3 minute operation. In regard to what you would get out of a Tamiya spray can I have attached a photo of the amount of paint I got out of the 400ml car touch up can. The jar is a medium jam jar about 21/4" Ø x 5" inches in the old money or about 55 x 125mm whichever you use. As you can see I got about 2 3/8" of paint so proportioning it to a 100ml Tamiya can you could expect a bit over 5/8ths to 3/4"in a similar sized jar which would be enough to keep you air-brushing to Xmas and beyond. Looking at the amount of paint in the jar it's easy to believe the claim that 75% of rattle can paint is wasted. An add on for me is that I don't have to thin this in any way as its just waiting to be poured into the airbrush cup and it doesn't seem to skin over at all in the jar at least not that I have observed months after decanting. Anyway mate have a go it won’t blow you and the house up and once you've done it no sweat next time. Cheers Pete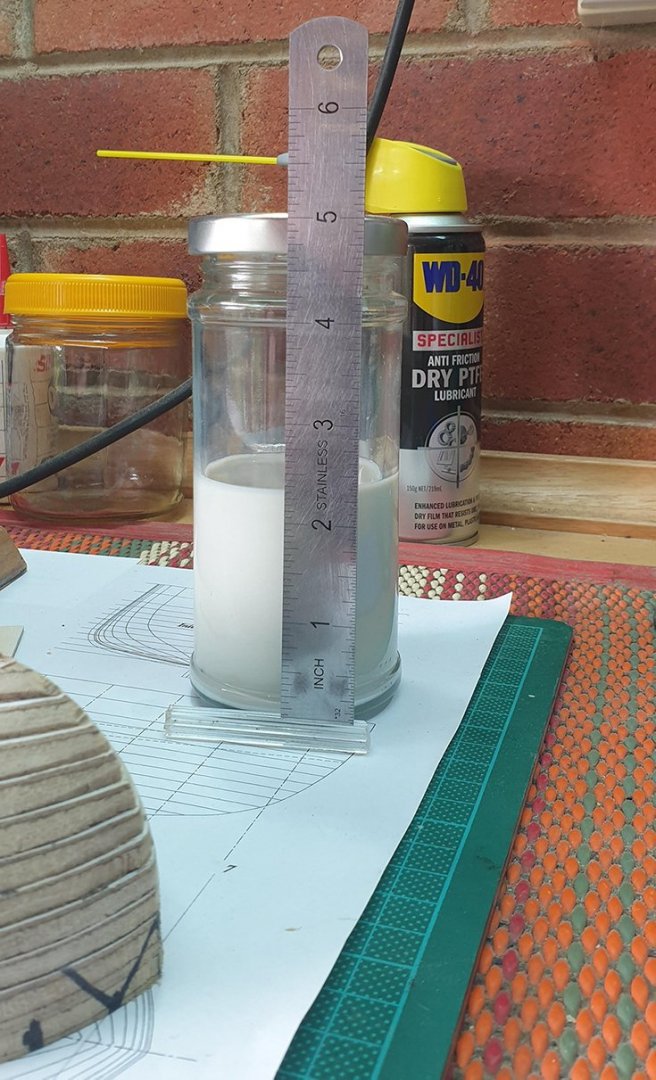
- 40 replies
-
- 7
-

-
- best airbrush
- compressor
- (and 1 more)
-
AIRBRUSH OPINIONS PLEASE...
PeteB replied to MadDogMcQ's topic in Painting, finishing and weathering products and techniques
Hi Mike I was a bit hesitant at first but after seeing it on youtube (where else!) gave it a go. Firstly don't shake the can and hold Vertical - I did it outside my garage as I wasn't sure what to expect and just used a small pair of wire snips and slowly nipped into the can near the top where it goes from vertical back towards the centre up to the nozzle - the metal is really very thin and it doesn't take much to breach it . You are well above the paint level and by slowly biting down until you hear the gas start hissing - then just leave it for about a minute or two till it stops. Then all I did then was enlarge the original hole and cut a horizontal line across the can for about 1.5 inches and then pull it out in the centre to form a spout and pour the paint along with the ball bearing into a glass jar with a metal lid no mess done and dusted. I'd seen the straw trick before but it was just too messy for me, this way no problem just take it easy making the first hole. Cheers Pete- 40 replies
-
- 5
-
-
- best airbrush
- compressor
- (and 1 more)
-
AIRBRUSH OPINIONS PLEASE...
PeteB replied to MadDogMcQ's topic in Painting, finishing and weathering products and techniques
Just a quick one in regard to ready thinned paints. If you find you can only get a specific colour in a spray can you can decant it by carefully putting a small hole in the can to let the propellant out - its not as bad as it sounds takes 30 secs - then cut the top off with a pair of snips, its very thin, and pour into a screw lid glass jar. For best results let it sit overnight with the lid only sitting loose on top to let paint degass. If you're new to airbrushing this takes some of the guesswork out of thinning until you get some experience as Its then ready to use with no further thinning. Cheers- 40 replies
-
- 3
-
-
- best airbrush
- compressor
- (and 1 more)
-
Thanks Jan - amazing resource you linked me to. Didn't spot anything at first glance but I'll go through the sheets individually tomorrow. Once again thanks for the info - stay safe - Cheers Pete
-
AIRBRUSH OPINIONS PLEASE...
PeteB replied to MadDogMcQ's topic in Painting, finishing and weathering products and techniques
Hi Tom - I use two both gravity feed - Iwata for fine and a no-name for area work - both in use for the last 15 years or so. I put Enamels and acrylics through them both on and off during a days spraying. As others before have mentioned get a compressor with a tank so the compressor is not running all the time. Another important point for any compressor is for it to have a water trap and drain. I found some of the cheaper models I tried before my current setup are quite noisy so depending on where you will be painting do a bit of research into the noise level. Be extremely careful when handling the needle as this and the seat are essential ingredients along with the correct thinning to effective airbrushing. link to a very good short tute from a guy who knows how to airbrush which I found very useful - hope its helps you as well. Cheers Pete- 40 replies
-
- 4
-
-
- best airbrush
- compressor
- (and 1 more)
-
Hi Guys I’ve made up my mind to finish off the old clunker at the request of my daughter. Apart from scraping the accumulated detritus of nearly 40 years off I will replace some more in scale blocks etc and re-rig with a varying selection of ropes from chuck to offset the kits two sizes. The head rails need replacing along with various other rails and bobs and bits which shouldn’t take too long as I’m keen to get on with the 42ft Armed Longboat using Gerard Delacroix monogram and plans now that I have rounded up some pear and boxwood. One issue with the Billings Norske Love that has always seemed a bit odd to me is the height of the poop deck port and starboard rails which can be seen by the scale figure in the photos are just below knee height which I would have thought would almost guarantee a quick trip overboard on a dark night? The other item is that Billings either by design or omission don’t show any sort of fittings such as a coach house to get some light into the great room below nor any seating or flag lockers et al on what is a very large expanse of empty deck. I have trolled the net and logs here but there are remarkably few finished models for such a well know kit. All the ones I’ve found are the same apart from one with a gaff rig on the rear mast in place of the Billings Lateen rig, all show the same large expanse of bare deck. At this stage of the build I’m not trying for any historically accuracy but I would like to finish what appears to me to be a vacant lot looking for something to occupy it (realise its missing the knees and large flag staff). Has anyone got any thoughts on whether something should or might be expected to be there for a ship of this vintage and Navy? I assume Billings must have had access to some original plans and I wonder if anyone would any idea where to start looking or can tell me that this is likely the way she was constructed so I can stop wasting my time. Appreciate you looking and any advice you may have. Cheers Pete.

-
Hi Guys are there any Aussie members with a Proxxon or Sherline/MicroMark or Taig Lathe that they aren’t using that much and would be prepared to sell. The $au exchange rate and zero freight service to Australia at the moment make a new purchase unviable. Drop me a PM if you have one please - Thanks for looking - Cheers Pete
-
Mill Speed to Avoid Chipping
PeteB replied to ChrisLBren's topic in Modeling tools and Workshop Equipment
Know this is an old thread but for those that follow - I've noticed marslv and others use a backing/sacrificial piece of wood behind the cut which seems to help stop tear out. Cheers Pete -
I learnt in school about a guy that used to spend a lot of his time working on ceilings - he did great work too. Called michelangelo or something like that... 🙂
- 589 replies
-
- 5
-
-
- le gros ventre
- cargo
- (and 1 more)
-
Hi Ed I want to say for me its been a "tour de force" of technique, master craftmanship and sharing that has kept me awed during your build - For me your build log is an unbelievable treasure trove of learning and I would like to thank you for the journey. Cheers Pete
- 3,618 replies
-
- 2
-
-
- young america
- clipper
- (and 1 more)
-
Hi Marsalv - All today I have had all sorts of high tech options from double ball races to modified live centers fitted with a mill bit flying around what grey matter is left - I should have known to first apply the old standby - KISS. - Thanks mate for putting me out of my misery - cheers Pete
- 589 replies
-
- 2
-
-
- le gros ventre
- cargo
- (and 1 more)
-
Hi Marsalv - Can't help but keep going back and admiring your work from start to date - just beautiful clean joinery especially the way you have cut the limbers - I was wondering if you could let us in on the secret ? It looks like some sort of collar around a mill bit which is guided by the batten and limits the depth ? I can't work out if its stationary or rotating with the mill bit - Could you enlighten me please. Cheers Pete
- 589 replies
-
- 3
-
-
- le gros ventre
- cargo
- (and 1 more)
-
Hi Dave - thanks for posting - reading the letter you could almost feel the pain he was feeling as he wrote - a man out of his time - the world is getting poorer every day - wont be sad when my times up just feel sorry for my kids. Cheers Pete
-
Certainly looks the business - lovely work. Pete
-
Swan class 3D model in progress
PeteB replied to dvm27's topic in CAD and 3D Modelling/Drafting Plans with Software
Hi Denis - been looking forward to another episode of this extraordinary build - beautiful work as always. Cheers Pete- 141 replies
-
- 2
-
-
- pof swan series
- swan
- (and 1 more)
-
Get in on the start this time - great subject - Cheers Pete
-
Hi Michael I missed the start of your beautiful Cutter but have spent the past couple of days just taking in the craftsmanship of both the joinery and metal work. I got about a third the way through the build when I realized I wasn't going to remember the myriad of techniques you have so generously shared so I went back to the start with a pen and paper for a aide memoire. Thank you for sharing a beautiful build. Cheers Pete
-
Pandora by marsalv - FINISHED - 1:52
PeteB replied to marsalv's topic in - Build logs for subjects built 1751 - 1800
Hi Marsalv Can I add my congratulations to the list - even without seeing the competition it was a given that your superb work should have been rewarded as it was and I suspect Pandora will generate even more Gold wherever you choose to show it in the future. I was late to your build but have just gone through it in one sitting and intend going back through it again post by post with a pen and paper to record all the tips and techniques you have so generously shared with all of us here. I was particularly struck with your extensive use of milling to achieve the beautiful clean square edges on all of your work with no round off apparent to me at least from sanding. Look forward to your "Le Gros Ventre POF" with eager anticipation and hope to get in on the front row this time. Thank you for the hours of pleasure you have given me looking through your build and the skills you have generously shared. Regards Pete -
Hi Johann - been a silent admirer of your superb work through the build to date - Your rope with the weathered shade you have achieved in this last post is to my eye a superb representation of the real article - well done - Cheers Pete
-
Thank you Johann I had imagined such a narrow width would have been distorted by the contact with blade but not so - Thank you for posting the photos by way of explanation -cheers Pete
-
Hi archjofo - In awe of your beautiful precision wood and metal work - I've been sitting here looking at the Buoy rings and your description of how you made them - and trying to think how one cuts 1/4 mm brass sheet with a table saw?? would you be able to let a mere mortal know how you do that please - Cheers Pete
-
At first I couldn't believe the scale of the tragedy - then to find the litany of safety defects that caused the death and injury toll to be so high arose from simple greed. Appears to be everywhere you turn now- I had difficulty reading the text messages but particularly the one from the little girl trapped in the Cinema to her Parents outside. Rest little children.
-
Certainly looks the business like all Jims products. I had the Tilt table on my shopping list but not sure now as Id probably get more use out of the sled. Shame it doesn't incorporate a tilt into the sled but might have a look at that myself when I can afford the freight. Thanks for the Heads Up. Cheers Pete
-
Hi Aviaamator - As always your "Locksmith work" is terrific and mate your carronade carriage really looks the business. Never disappointed every time I look in. Cheers Pete
-
Hi Chuck - just watched your videos good stuff thanks - one question, in your video you said you can make virtually unlimited lengths - I assume that the length is limited by the distance between head and tail stocks or can a completed length be joined to a fresh lay up? Cheers Pete
- 22 replies
-
- 3
-
-
- ropewalk
- rope rocket
- (and 1 more)

