HOLIDAY DONATION DRIVE - SUPPORT MSW - DO YOUR PART TO KEEP THIS GREAT FORUM GOING! (Only 24 donations so far out of 49,000 members - C'mon guys!)
×


mikiek
-
Posts
2,276 -
Joined
-
Last visited
Content Type
Profiles
Forums
Gallery
Events
Everything posted by mikiek
-
 Can be mind numbing at times...
 -
That makes sense Joel. Between the catheads, hatches and bowsprit it would have been difficulty to get a gun into that forwardmost port. Perhaps the new Niagara didn't have an 11th port because it doesn't need it. I imagine the anchors are wenched in with something motorized. Again, who knows? This does make me wonder about something. We have next to no documentation on the original builds of Niagara/Lawrence. The Brits were always pretty anal about record keeping. Is there any better documentation on the building of Detroit?
-
Steve - the ships boats configuration appears to be different. Not sure where the idea came from on the Lawrence model. The Niagara kit (and current replica) have all on davits. None sitting on deck. Again, who's right who's wrong ????? I also see 11 gunports on the Lawrence build vs 10 on Niagara.
-
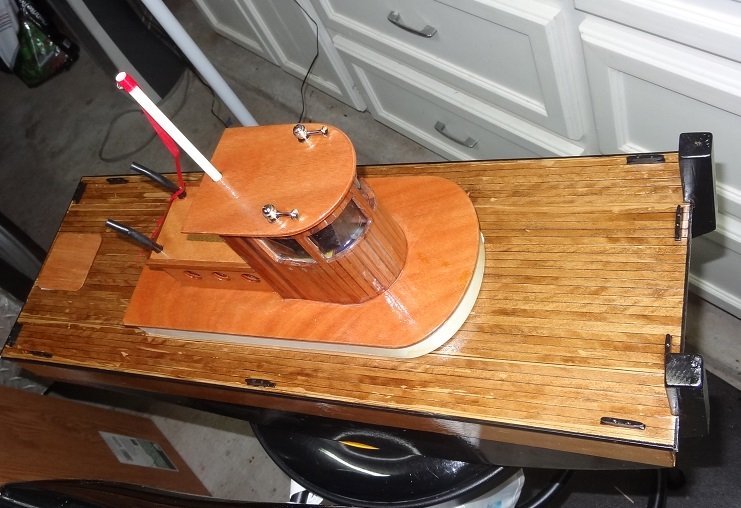
Thank you Per. It was a good build. Regarding name - I was going with something more traditional (tug boat wise) - Maggie Mae. Will can make laser printer vinyl decals with various fonts. I used them on the T37 and I will get him to make some for the tug. Name on the transom, hull number on each side at the bow. I'm going to work on my other static builds for a little while and then start on the trimaran. I'm running out of room for all the RC toys. I've had to start storing the boats using wall mounts.
- 96 replies
-
- 5
-

-
- tugboat
- Tippecanoe Boats
- (and 2 more)
-
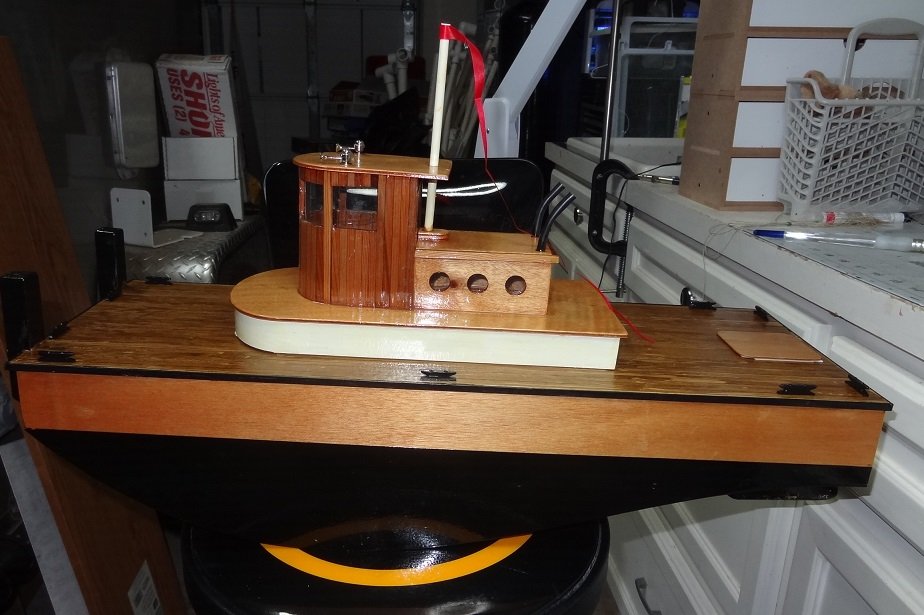
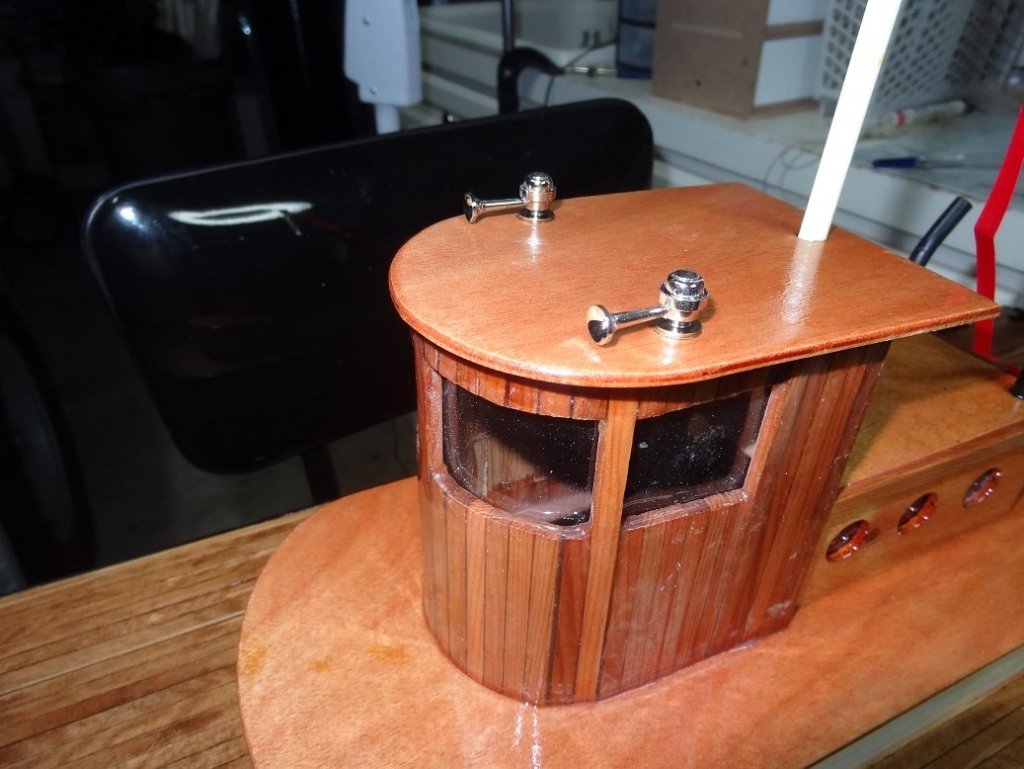
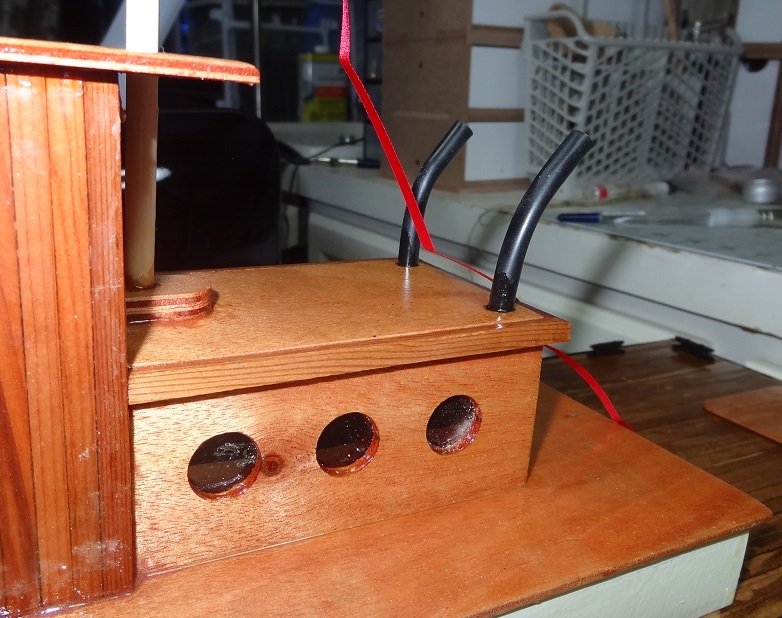
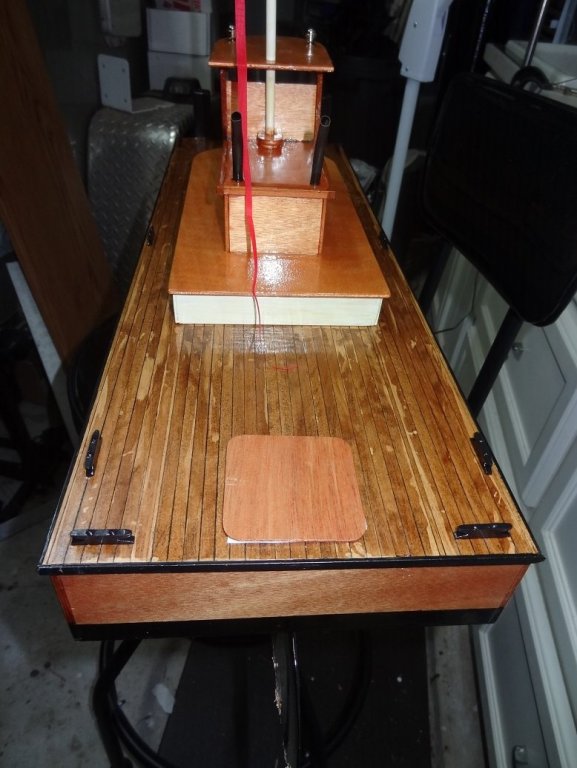
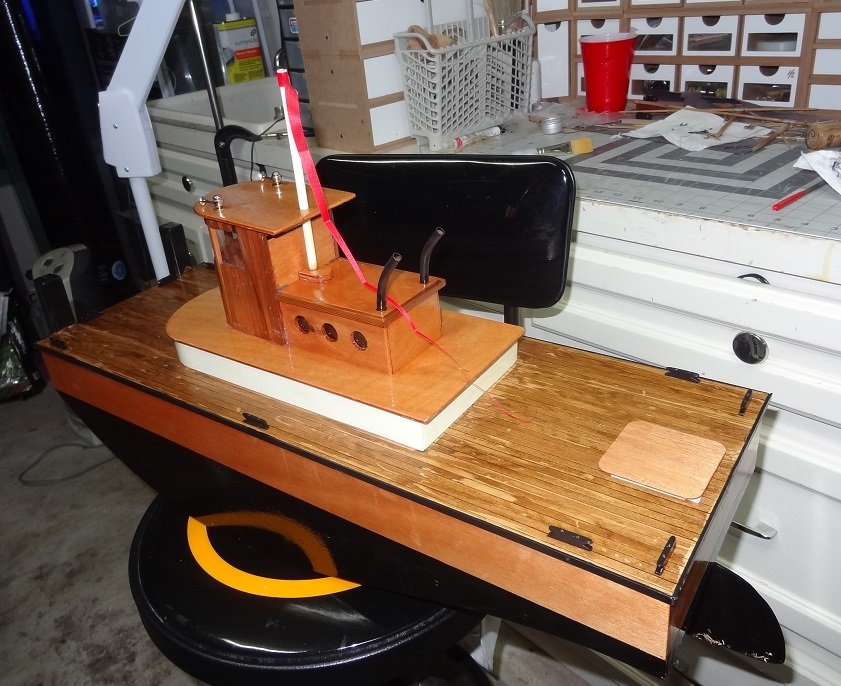
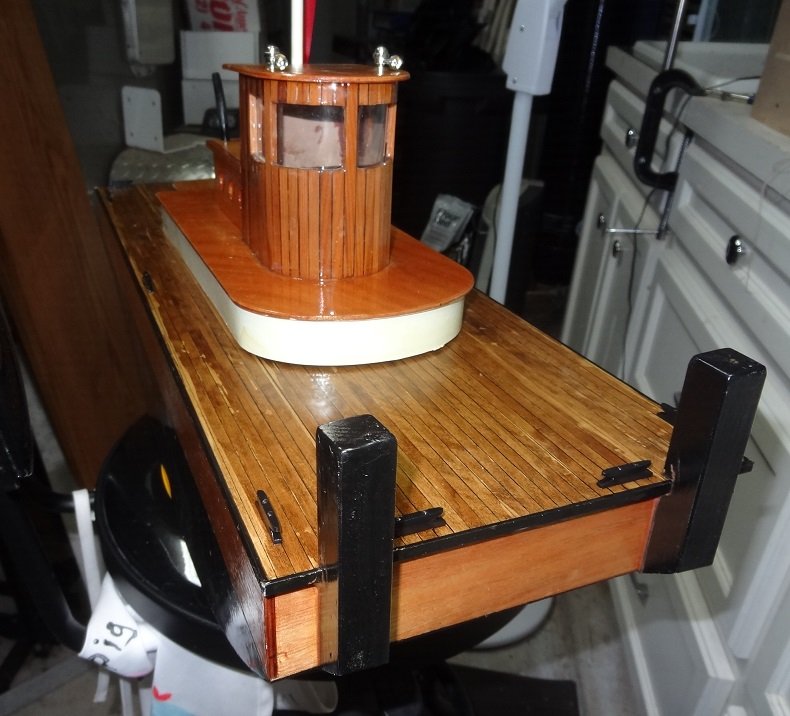
I'm going to call this one done. I've added a few details but still don't have any tires to hang on it. The back ordered tires order was cancelled yesterday if that tells you anything. I feel sorry for model car builders. No one seems to have regular old scale tires. So I've added some horns (non-functional), some exhaust pipes and what tug would be complete without some cleats? Here's some final shots. Thanks to everyone for following along. Oh yeah, the tug did it's first rescue the other day. We were sailing the rc boats and the comm link broke for some reason and a boat just drifted off into a fountain and got hung up on the sprayers. So I sent the tug in, gave the sailboat a nudge, freed it up and let it drift to the other side of the pond. Exactly what I got the tug for
- 96 replies
-
- 5
-
-
- tugboat
- Tippecanoe Boats
- (and 2 more)
-
Great ideas fellas and pretty easy as well. I wasn't necessarily expecting to add a real grommet to the sails. I just didn't want to poke a hole and leave it at that. I think it would have looked funny. I love the idea of hardening the holes with some colored glue. Solves 2 problems - a stronger hole that stays open and it'll look like something is there as reinforcement. Win, win.
-
Thank you Joe. I think it adds something to the display. Kinda makes it look a little like something in a museum, plus the build is still clean after 3-4 months on display. That's saying something given that the cats sleep on a sofa back right next to it. Oh yes, I found a local shop that makes all sorts of things with plastics. This one was a little pricey as I had them build a base stand as well as the case.
-
I've started the lateen rigging for Arrow. Sails are included in the kit and I plan to install them. In the lateen rig, the triangular sail is almost laced to the yard. This means a bunch of holes running the length of one edge of the sail. The instructions say to just poke holes. I think that would end up looking pretty bad. I'd like to reinforce the holes with something. Tiny grommets would be the ultimate - not sure if something like that is even available. Any other ideas would be appreciated.
-
Glad you got a new start. I was afraid all that good mojo from Phantom might slip away
- 228 replies
-
- 4
-
-
- gunboat
- model shipways
- (and 1 more)
-
One was full of holes But seriously, there is a painting of the battle that shows possibly the hull colors might have been different. It's hard to tell. And we'll never know if that was actual or just the artist's rendering. Joel, I think you posted that at one time or another.
-
Mike - if it was one panel I think the gold would look nice. If it's panels all the way to the bow, it might be too much. But that's just my taste (or lack of it) Of course that begs the question, if not gold then what? I agree with Steve, white would be kinda ordinary. You might try painting some card stock gold and position them. At least you wouldn't have to redo the wood panels. I would only want to have to make them once.
- 129 replies
-
- 3
-
-
- finished
- model shipways
- (and 1 more)
-
Matt - the dark wood, walnut? It has great color all by itself. Try Minwax Natural stain. It really doesn't have any color, it just gives the wood a wet look. Finish with a matte varnish. That is of course unless you like shiney
- 50 replies
-
- 1
-
-
- artesania latina
- Virginia
- (and 2 more)
-
Looks wonderful Per. Nothing like finished mahogany. You might try some stain sealer first if you have some.
-
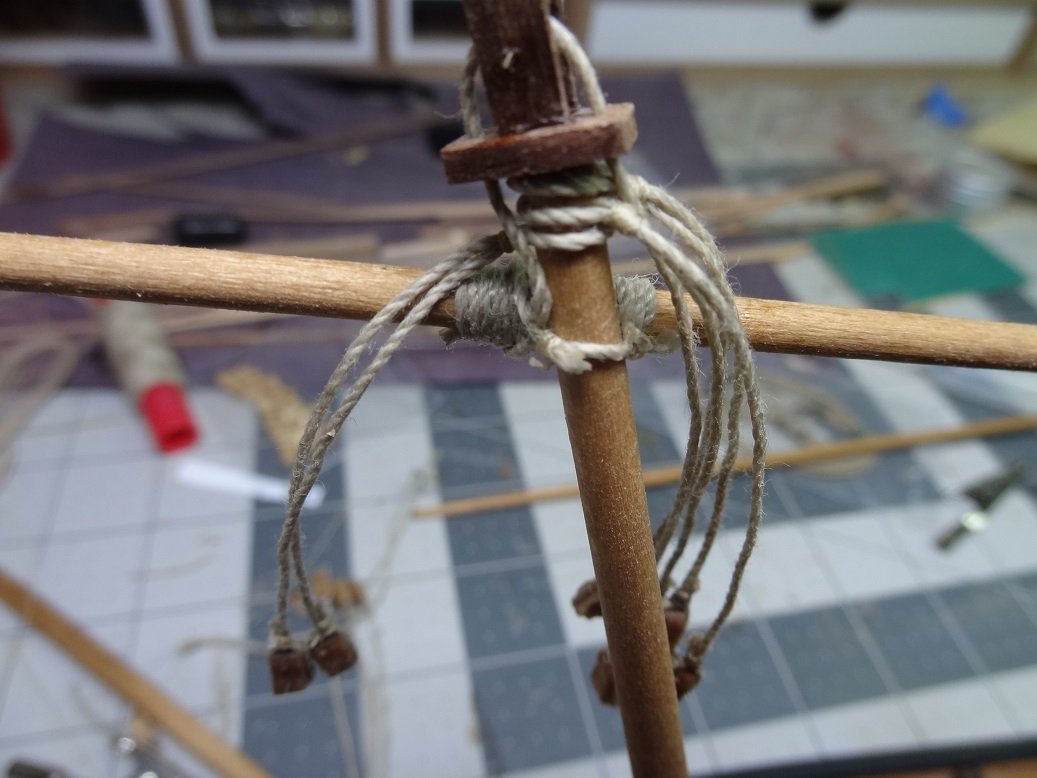
Rigged up a tackle with the next smaller size rope. Now it looks like a bowl of angel hair. I'm going to move the two ringbolts on the deck outwards. I'm hoping it will spread out that X a little. Of course the other option - wait, wait, don't say it! Frapped - which is probably how it was kept most of the time anyway.
-
Good point Steve. I can try the next smaller size. Problem is it's not much thicker than the rope I am using for seizing.
-
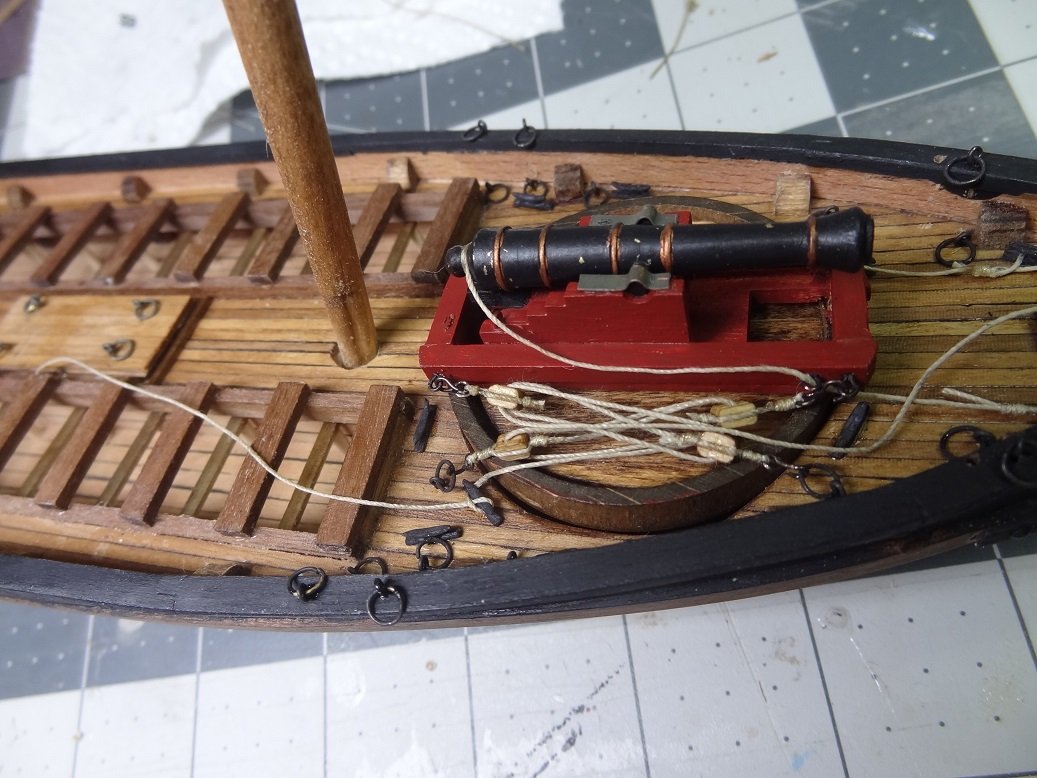
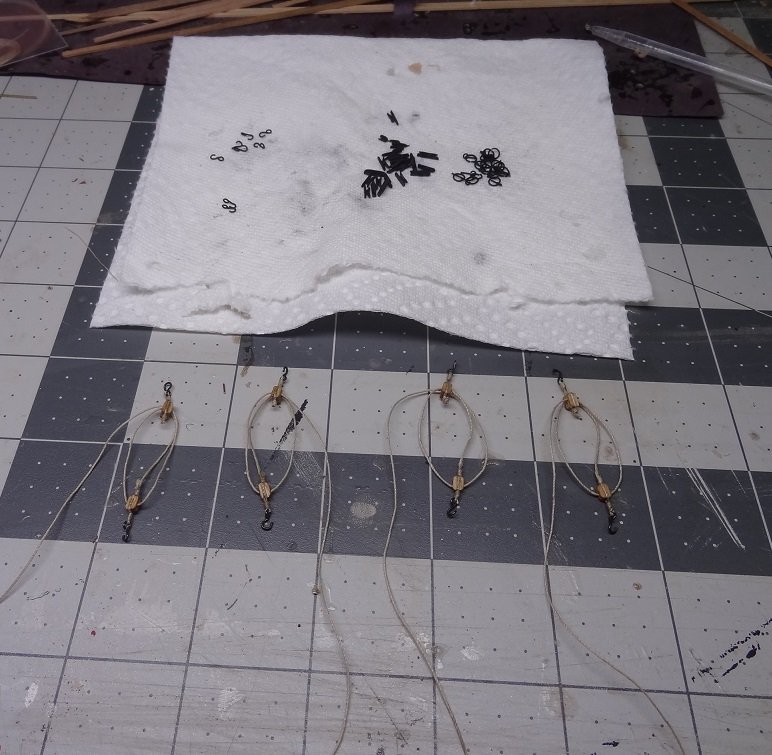
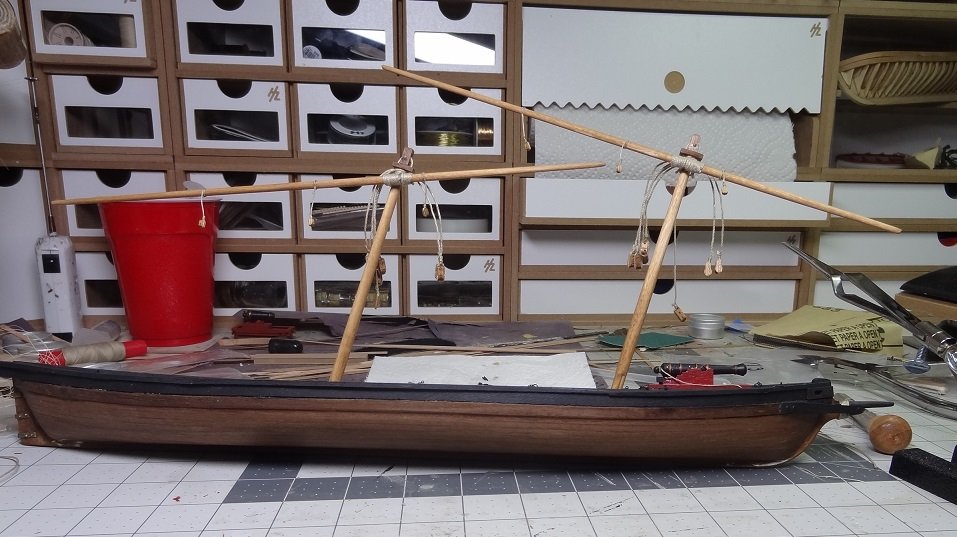
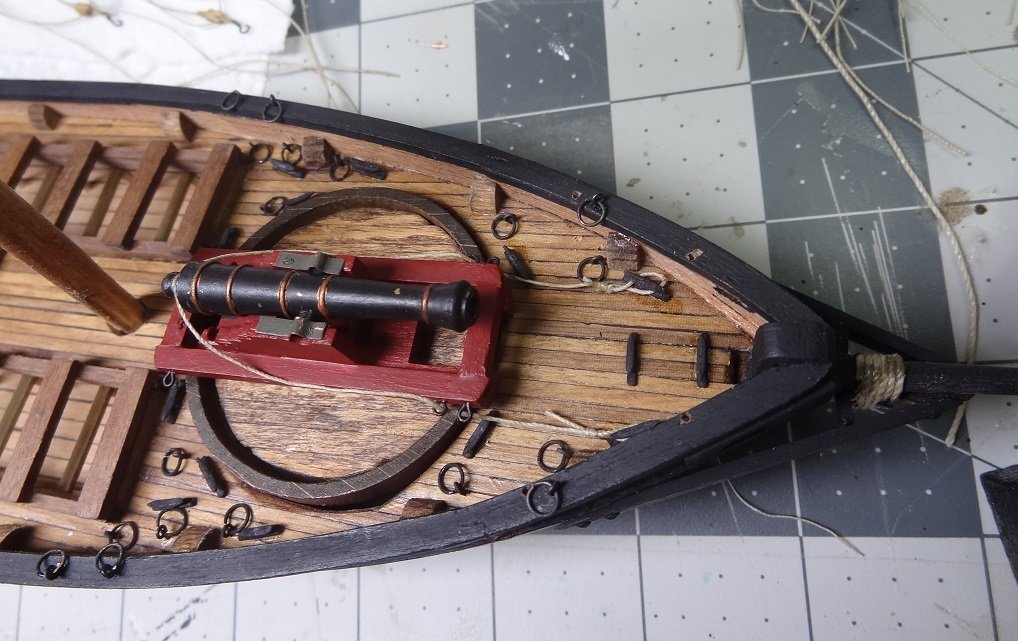
Steady progress is continuing on Arrow. Mostly rigging - some I've done before, some not. I had hoped that lateen rigging would be less involved than square rigging. I'm beginning to think differently While rigging the spars has not been terribly difficult, the sails will be another story. They have to be almost laced up to the yards and the full detail even has a lot of telltales running from the foot to the luff. So I am adding hardware to the deck - cleats, eyebolts with rings. I decided I would blacken these vs the painting that I have gotten used to. They came out nice. My biggest gripe with blackening is that most of it ends up coming off on your fingers or tweezers. I found that letting them sit for almost 24 hours after rinsing them off seems to help keep the color. Typically I would dry them with a paper towel and start using them right away. Maybe letting them dry out helps keep the black on. The color is holding up better this time whatever the reason. I've completed gun tackle for the bow - the long gun. After installing them on one side of the gun, I am disappointed. It looks like a bowl of spaghetti. All the fasteners seem to be too close together. I will definately have to rethink this. The result so far is not acceptable. So far with the rigging, I have gone with whatever was supplied in the kit. The Amati rope doesn't look too bad - oddly there is no black rope, all tan. Not overly impressed with the blocks. Cleats are pewter and do not have the small post on the underside (for added strength when gluing) like the Model Shipways kit.

- 138 replies
-
- 10
-
-
My order from the model shop came in today. Minus the tires - backordered. Pretty poor turn around - they were in stock 15 days ago when I ordered. It took them 12 days to ship and apparently in the mean time they ran out. I did get my order from Tippiecanoe Boats today. T50 trimaran is in hand - hull number 22. It's going to be a screamer. I'll definately do a build log when I start that. I'm glad I have the experience of 2 of their other kits before starting this. It looks like a challenge.
- 96 replies
-
- 4
-
-
- tugboat
- Tippecanoe Boats
- (and 2 more)
-
Thanks guys - the gammoning came out nice.
-
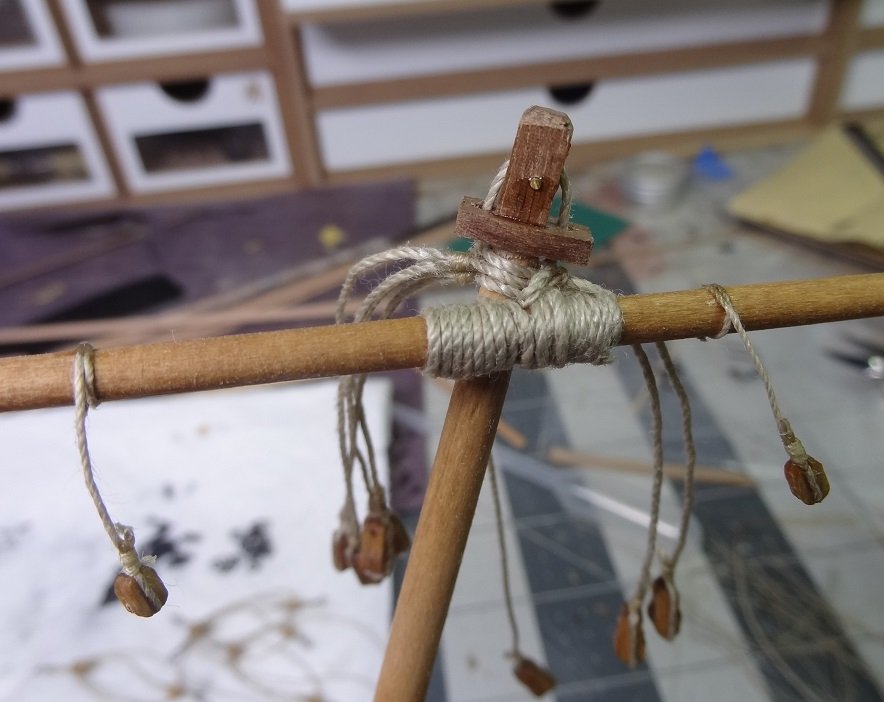
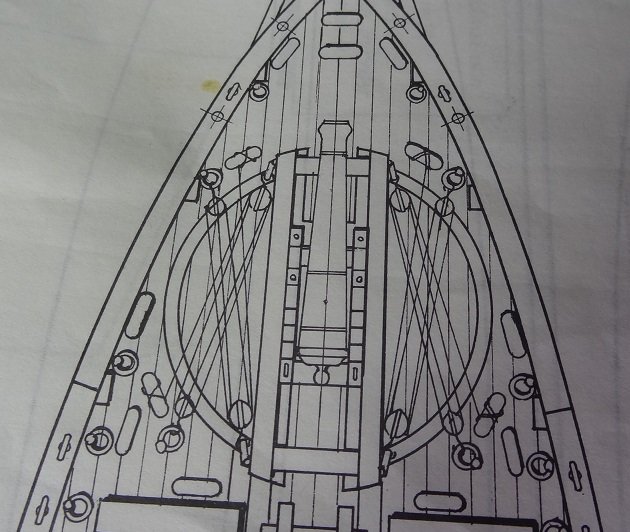
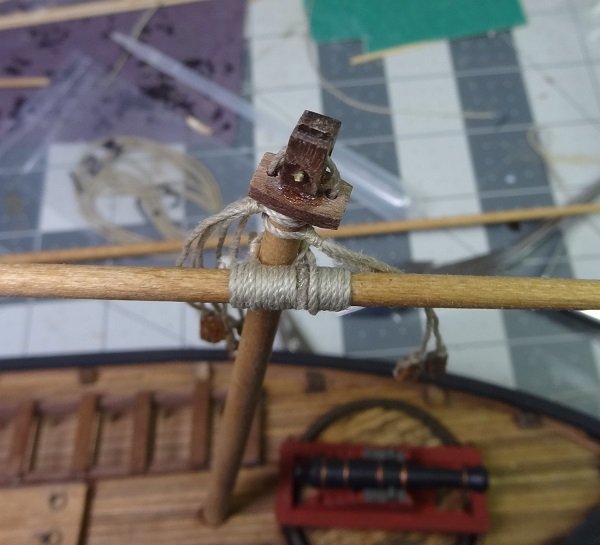
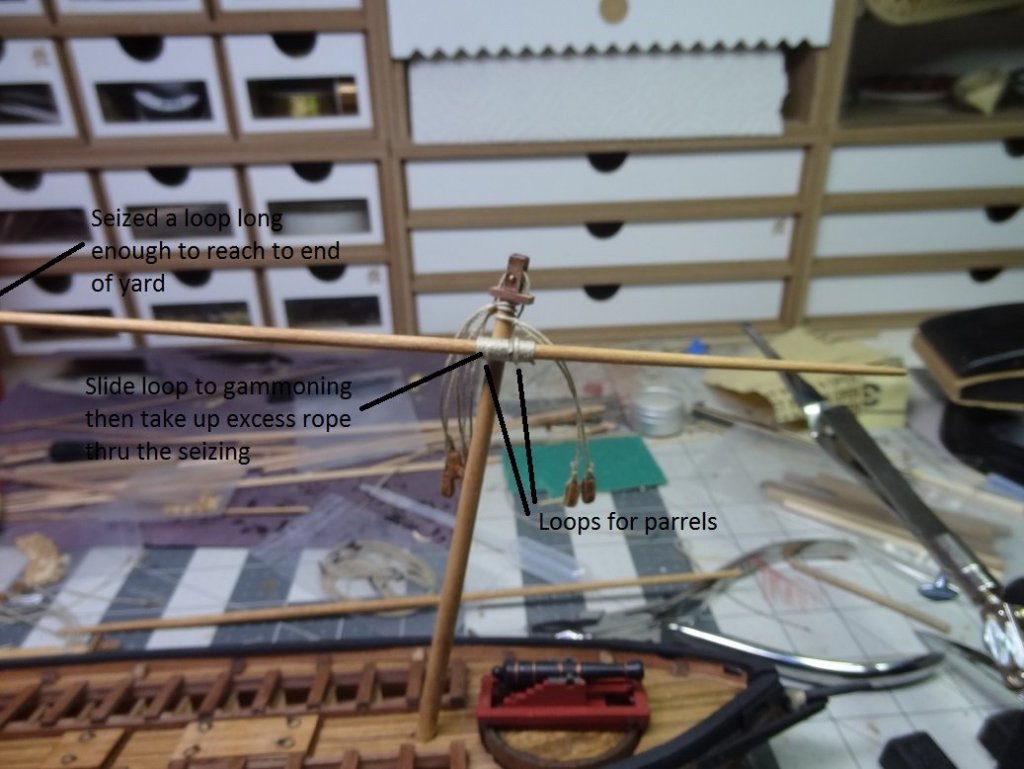
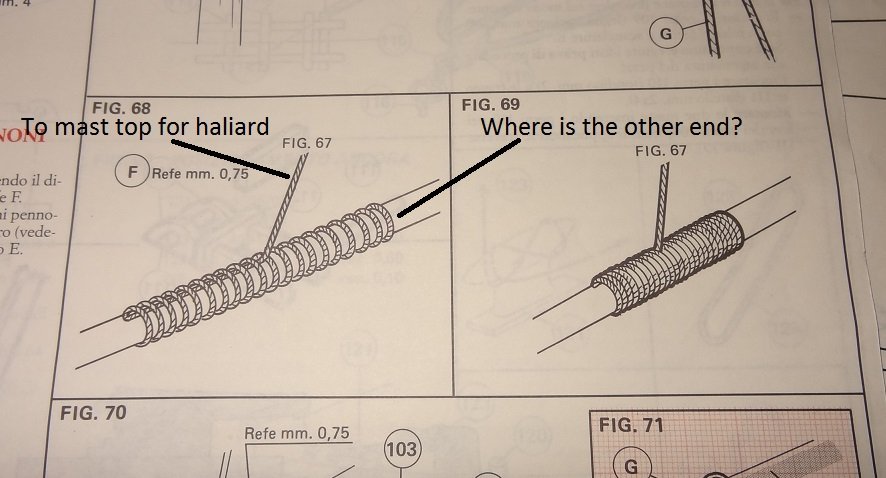
As Joel would put it - the Lauck Street DVDs have led me to an epiphany. Working the seizings has become childsplay. It's not the whipping part - nothing revolutionary there. I just didn't realize that after you are done with the whipping, you can slide it around on the rope or pull the rope thru it. Maybe everyone knew that but me At any rate, I am progressing with the rigging of the spars. Remembering this is a lateen rig, a yard will be bound to each mast. First a gammoning on the yard. One end of this is supposed to be the haliard and run up thru the mast top. The instructions were terrible on how to do this, so I used a suggestion from this post. Over the gammoning a parrel is made to hold the yard to the mast. This showed me the value of sliding the seizing around. According to the instructions you seize a loop on the yard, run the other end around the mast and seize another loop on the yard. You end up with something like this. Well for me, trying to seize that in place would have been a bear. The rope around the mast has to be tight (no room for fingers) and all sorts of other ropes in the way. Instead I seized a loop in a third hand, then slid the loop over one end of the yard and down to the gammoning. Then slid the seizing down to tighten. Easy enough but how do you seize a loop to the yard on the other side of the mast? Rather than doing all this with a cut piece of rope I used the whole spool. Seized the first loop at the end of that. Then I seized another loop about 10" down the rope from the first one, again with the third hand. This loop is run around the mast and slid over the other end of the yard and down to the gammoning. At this point both loops are in place on the yard but there is a lot of excess rope between them. Given that the rope can still be pulled thru the seizings that's exactly what I did - pulled all the excess thru the seizing. Worked like a charm! And since the rope is still on the spool I don't have to cut and throw away the excess rope. Like I said, a new world has opened. Now tell me I'm not the only one that didn't know about this.


-
Excellent idea Frankie. That does make more sense. What the instructions have pictured seems almost like a chicken & egg scenario. You can't do A before you do B, but you can't do B until A is finished.
-
Haven't found any Googles for this and the instruction pix are not making much sense. My next build step is to add a yard to the mast of a lateen rig. One end of the rope used for the gammoning goes up to the mast top as a haliard. Where is the other end of the rope? How is it fastened?
-
Go for a wood wheel! Wood belaying pins for the spokes
-
Elijah - my hope is that it won't take too long to rig. Although to do it justice I will have to make sails. Besides that, I just think it is an interesting and very different boat.
-
Ron - I bought the entire DVD set - about 14 discs. It's on the Lady Nelson discs and several of the others. If you are familiar with them most of the practicums are written up. Those discs also have some 1-2 minute videos that show the seizing. It's not real different than other YouTube videos but I never realized that you could slide a seizing around after completing it. That one point has made all the difference for me. I would take some pix and show it but I suspect that might be copyright infringement.