
Supplies of the Ship Modeler's Handbook are running out. Get your copy NOW before they are gone! Click on photo to order.
×

dgbot
-
Posts
3,993 -
Joined
-
Last visited
Reputation Activity
-

 dgbot got a reaction from HIPEXEC in USS Constitution by Hipexec - FINISHED - Constructo - 1:82
Your steps came out great. I knew you could do it.
David B
-
 dgbot reacted to HIPEXEC in USS Constitution by Hipexec - FINISHED - Constructo - 1:82
No...it's not Jacob's ladder....it's my mass produced stairs! All I have to do is clean up some extra glue and then cut them to size. So far so good!
-
 dgbot got a reaction from pete48 in Herreshoff 12 1/2 prototype by pete48 - FINISHED - 3/4" = 1' - SMALL
Lovely job on the hull. Your planks are nice and tight and even.
David B
-
 dgbot got a reaction from cpt. Tom in Le Gros Ventre - Gabare du Roi 1776 by cpt. Tom - 1/48 Scale
My only problem with this print is actually doing the narrowing. My sense of depth has never been good so on an average I take off a little too much and have to start over. The person who can figure out how to do this easly and market it would probably be called a hero.
David B
-
 dgbot got a reaction from Auvergne in Xebec by Auvergne - Amati - 1:60 - C. 1753
Your Xebec is coing along fine. I have always liked unique models.
David B
-
-
dgbot reacted to pete48 in Herreshoff 12 1/2 prototype by pete48 - FINISHED - 3/4" = 1' - SMALL
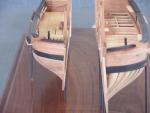
Today, I started planking the Hull . First I soaked my planking material in Rubbing Alcohol . I soaked them for about an hour and a half. This way, I can achieve maximum flexability with the ability to attach them more quikly ( as alcohol evaporates faster than water ) I was able to get the first 5 rows on, She is looking alot like Capt' Nates 12 1/2 . Everything is right on the numbers ( I am pleased ) Here are the results
-
dgbot reacted to Omega1234 in Ingomar by Omega1234 - FINISHED - 1/278 - Hereshoff designed schooner
Hi everyone. Well, progress continues; albeit slowly!
I've started on the internal floors of the cabins/accommodation. The floors are individually planked and once sanded, they should look a treat! I then started marking the locations of the bulkheads, furniture, etc on the hull and the floors.
I also started to build the deck using a jig with the correct deck camber. The deck's fully planked on one side, whilst partially unplanked on the other side. This is done deliberately to allow the internal accommodation to be viewed. Both the deck and the floors are individually planked using strips of birch and wattyl respectively.
Admittedly, there's still a lot of finishing to get a good fit between the hull and deck, etc, but, that's all part of the fun of building, isn't it?
The hull has also been puttied and sanded, but I won't paint it until all the rough stuff is done. There's no point doing it now, only to find that I've accidentally damaged the paint during the building phase.
Hope you enjoy the photos.
-
dgbot reacted to woodrat in Le Gros Ventre - Gabare du Roi 1776 by cpt. Tom - 1/48 Scale
Tom, the drawing shows the sternpost knee and filler from aft. On top is a plan view. This shows the progressive narrowing of the knee as you go from fore to aft towards the rabbet in order to accommodate the run of planking. I hope this helps,.
Dick
-
dgbot reacted to NenadM in Cutty Sark by NenadM
Some more windows shopping looking for my stuff (soldering wire, etc etc) and I think I found a solution for to much shinny "coppering"
Thank you for advices, Gentleman !!!
And here are results of testing :
Just exactly I wanted ! Keep original color and shine, but kill it a little !
It seems that only a few (?) testings and experiments has to be done, and that I am ready for "coopering" with couple of thousand hand made pieces ....
-
 dgbot got a reaction from druxey in Airbrush results in "fuzz"
The problem is acrylics are water based as a result they tend to raise the grain on certain woods. Basswood will always fuzz when using acrylics. You have to use a sanding sealer before you can airbrush.
David B
-
dgbot reacted to HIPEXEC in USS Constitution by Hipexec - FINISHED - Constructo - 1:82
Here's my experimental stair factory. Time will tell.
-
dgbot reacted to Gaetan Bordeleau in Le Fleuron by Gaetan Bordeleau - FINISHED - 1:24
These last days I am making some adaptors. Here is one of these intended to hold a camera inside the model.
-
dgbot reacted to flying_dutchman2 in The First Royal Dutch Yacht Mary by flying_dutchman2 - FINISHED - Mamoli - 1646
These are the last shots with the flags in place. Taken on a light table.
I painted the VOC emblem on the flags as this was the era that the VOC had yachts. I omitted the one sided British flags that came with the kit.
In a couple of months I will add the display case pictures.
Thanks for viewing.
Marc
-
dgbot reacted to flying_dutchman2 in The First Royal Dutch Yacht Mary by flying_dutchman2 - FINISHED - Mamoli - 1646
More details.
-
dgbot reacted to flying_dutchman2 in The First Royal Dutch Yacht Mary by flying_dutchman2 - FINISHED - Mamoli - 1646
Different angles and close ups.
-
dgbot reacted to Stuntflyer in 18th Century Longboat by Stuntflyer (Mike) - FINISHED - Model Shipways - 1/48
Finally got most of the inner hull details completed. I used Blacken-it on all the metal parts. 15 minute baths in acetone and vinegar in that order and then 50% reduced Blacken-it with distilled water. The windlass and handle where made next. I could not get each end super close to the riser because the riser is at a slight angle. Though everything looks good, if I did the model again, I would sand the frames slightly more vertical so the risers would be more perpendicular. Handle is not glued yet. I was hoping to get wooden belaying pins of the right scale but they are not available according to Chuck. I painted the brass ones from the kit after applying a gray primer coat first. I used yellow ochre Acrylic paint with a touch of orange, white and burnt orange. After I place the oarlocks using 24 guage wire I will clean up the red paint on the cap rail and paint them red as well.
Transom frieze
Augie told me about this product which he uses to flatten glossy acrylic paint. It's very easy to use and works great. Just a light spray is all that's needed. I will use it on the red paint later.
-
dgbot reacted to alangr4 in Young America 1853 by EdT - FINISHED - extreme clipper
Now Ed you really are killing me.
You might want to check out The Really Right Stuff web site. They have a brace of camera brackets, rails etc etc which are really right up your alley.
Indeed you might want to talk to them as there really is a niche for what you have come up with.
Very clever Ed well done.
Alan
-
dgbot reacted to EdT in Young America 1853 by EdT - FINISHED - extreme clipper
Young America - extreme clipper 1853
Part 67 – Lower deck framing continued
I had my small camera in the shop so I took this first picture with it. It shows one of my more important tools. No one would design this contraption this way from scratch. It was first just a simple fixture to allow me to take overhead sequential shots during Naiad’s magazine construction. It has since evolved into the adjustable mount shown below. You can get seasick looking at some of the pictures taken with this but they can easily be rotated in post processing. I take very many pictures including lots of in-hull close-ups and could not do without this thing.
I take all the photos in available light using aperture priority so the camera is stopped down to increase depth of field. Thus, the shutter speeds are quite slow requiring a mount. Most of the pictures are still taken using an almost-normal tripod.
Pardon the digression, but I thought it might be of interest, since we cannot build ships any more without photography.
Back to the work. In the next picture the beams are progressing forward.
The large opening is for the larger of the two rectangular, vertical fresh water tanks. The half-beams and headers are pinned in place at this point. The next picture shows a hanging knee glued to one of the half-beams.
This knee was fit before the knee on the beam forward was in the way, but it will be glued in after that beam is installed. The difficulty in holding these knees under the beams for fitting dictates some preplanning.
In the next picture all is installed on the starboard side and a pillar assembly is being marked for sizing under the beam.
In the next picture both pillars with their knees have been installed on the starboard side.
Next is a picture of the same area from further back.
In the next picture the beam forward of the smaller water tank has been glued in and the headers on either side are being installed with the help of a clamp..
The pillars on the port side have also been installed in this picture. These last three beams all require lodging knees and ledges. The last picture shows the current status of the framing.
Two full beams and two pair of half-beams remain to be installed to fill the void.
Ed
-
 dgbot got a reaction from IWHARPER in Le Fleuron by Gaetan Bordeleau - FINISHED - 1:24
The gentleman and I along with several others brought this model and case into the contest in Manitowoc and we had to go through the service and supply exit.
David B
-
dgbot got a reaction from pete48 in Herreshoff Buzzards Bay 14' by pete48 - FINISHED - 3/4" = 1' - SMALL
If I thought I would not get shot, I would drop by and take her out on the lake.
David B
-
dgbot reacted to shipmodel in Queen Anne's Revenge 1710 by shipmodel - FINISHED - 1/36 scale
Log 24 - Head Structures
Hi again. It has been a bit longer since the last segment than I hoped, in part because our daughter gave birth to her second child and our eighth grandchild. Everyone is doing fine and it reminds me that there is more to life than ship modeling. Sacrilege, I know, but it’s hard to deny.
Time to concentrate on the head structures, the rails, supports, and small deck that fit around and under the base of the bowsprit. Here is how they look in the plans.
I started with the bare stem piece cut off at the approximate height to mount the figurehead. It had been left somewhat rough to this point before the rails were fitted.
The stem was trimmed flat and the inside curve was sanded smooth. A strip of hardwood was cut and fitted to the inside curve which extended up to the height of the lion figurehead’s mane. It will support the forward ends of the two upper rails. The edge of the mane was penciled in on the wood for reference so the rails don’t interfere with the figurehead.
The top rail was roughly shaped to fit from the cathead to the stem in a pleasing curve that matches the plans, but it was not finished at this point. In the photo you can see a piece of translucent tape which has been laid on the stem so the ‘S’ shape of the lower rail could be drawn on it. I call this rail the ‘hawse rail’ because the hawse piece mounts just above it and I don’t know its proper name.
The hawse rail is made up of two pieces. Here a paper pattern is being developed to establish the mating faces of the lower section against the wale and the stem.
The lower piece was cut using that paper pattern while the upper section was cut using the tape pattern with the shape drawn on. They were both left a bit oversize to allow for a good deal of shaping and fitting. Here they are roughly set in place.
The lower piece was ground and sanded till the mating face was flush with the wale and the piece sat at the proper upwards angle to meet the descending angle of the upper piece. The outer face of the lower piece was left large till the upper piece was fitted.
Here you can see the hawse rail fitted, sanded and given its first coat of finish. The upper rail has now been shaped to fit. Simple carved decorations give the upper rail some interest. A better photo is coming later.
With these two rails in place the middle rail was fitted, shaped and installed. The figurehead was repeatedly put on to test the fit of the rails then removed for safety and to provide clearance to work on the rails.
The bottom rail was built up in two pieces like the hawse rail. It is just a lot shorter as it extends only to the foot of the lion. Here are all the rails as fitted and finished.
Now the hawse piece was cut and fitted to the top of the hawse rail. Two holes were drilled for the anchor cables to be installed into when the time comes. Here they are with the figurehead in place. The carvings on the top rail can be seen clearly in the photo. They were done with a sharp-cornered bit in the Dremel, then smoothed and refined with a curved file called a riffler. The varying shine on some of the parts will be toned down and corrected in the final finishing coats.
As I was roughly cutting out the rail pieces, I made a second set for the port side. All of the techniques were the same. Here are the port side rails, except the bottom one. I was fortunate that prior planning made it relatively easy to get the two sides symmetrical.
And here is a detail photo of the rails and the carvings on the port side.
Three support brackets were fashioned and installed between the upper rails. Only the middle one had to have a bent shape to lie against the rails and sit next to the hawse pieces. Here they are installed but not finished.
And here they are finished in two views. The end points of all the rails and the intersections with the support brackets were all subsequently reinforced with metal pins and glue.
Next the deck and grating under the bowsprit were built. A paper pattern was used to define the total size and shape of the piece so it sat level and firmly on the rail support brackets. It was built up from two triangular pieces of grating, with solid pieces fit around it and against the curve of the hull.
You can see in this view how a hole was left along the centerline for the gammoning which will hold down the bowsprit.
Two seats of ease were fashioned from solid birch pieces with cherry tops. The bowsprit has been temporarily installed to check the fit. A wooden ring, like a mast coat, will dress up the entry into the hull when it is permanently installed. You can see a small mark on top to locate the central gammon cleat later.
So here is the completed head structure. There will be a wire railing installed for the safety of the crew while using the heads, but that will wait until the gammoning is installed so it does not interfere with my stubby fingers as I work.
Next on the schedule – the captain’s cabin, the open gunport lids, and the channels and deadeyes.
Hopefully it will not be so long till the next report.
Be well
Dan
-
dgbot reacted to pete48 in Herreshoff Buzzards Bay 14' by pete48 - FINISHED - 3/4" = 1' - SMALL
Thank you Rick , Here is what she looks like after the Final coat, for a total of 4 coats of Epiphanes Varnish
Best Regards,
Pete
-
dgbot reacted to olliechristo in HM Colonial Cutter Mermaid by olliechristo - FINISHED - Modellers ShipYard -
ther has also been small touches going on at the moment, like the ropes to open and close canon port lids.. A very small cleat was added inside bulwark..
-
dgbot reacted to olliechristo in HM Colonial Cutter Mermaid by olliechristo - FINISHED - Modellers ShipYard -
Looking at the plans for main yard backstays and i see a clash... It appears the stays interfere with culverins.. Surely this is not right..? Warm regards and thanks again all.. Ollie