Supplies of the Ship Modeler's Handbook are running out. Get your copy NOW before they are gone! Click on photo to order.
×


tkay11
-
Posts
1,822 -
Joined
-
Last visited
Content Type
Profiles
Forums
Gallery
Events
Everything posted by tkay11
-
 Aaaah! So it was a Pint Rail after all. These spelling errors in plans cause no amount of confusion. Must have been written in Scouse, as in "Pin' rail, lad, get te i'." Now, a pint pewter pot at 1/64 scale is about 2.3mm. Maybe I'll fashion a few for the crew out of aluminium tube and leave them hanging on the rail as something that future generations will have to figure out. As for the deadeye strops, I've already put the kit ones in on the starboard channel, so that's an area of the dark side I won't be visiting. At least, not for the moment ... or once I've the topsail sheet belaying points and hot horses out of my mind. Tony
 -
OK, here's another question. One of the reasons for the crowding before the mast is the fact that we have a rail, a flue and a hatch to go between the mast and the bowsprit bitt assembly. In the Alert plans there is no rail in front of the mast, and now that we have all these belaying points along the sides and in front of the windlass (which replaced the smaller belaying racks) I'd like to ask if there is a strong reason to keep that rail in place. If there is no strong reason, the flue could then fit fine between the hatch and the mast. I'm looking forward to the lesson about the importance of that rail as this is another demonstration of ignorance! Tony
-
Kester, I really love your build -- it's not only beautiful but full of interesting insights and discussion, so provides a very useful education for me. I'm glad to see the horses rearing their heads again (I'm remembering the discussion in Gregor's build at http://modelshipworld.com/index.php/topic/2288-hmc-sherbourne-by-gregor-–-caldercraft-–-scale-164-1763/?p=187068) and that you've finally placed your bet on your favourite. I don't have anything to say about that, but very interesting for me is the placement of the chimney, or galley flue. I've been puzzling over that as in most builds of other cutters that I've seen, and in the Alert drawings, the flue comes well away from the hatch and is placed centrally. This would be logical as the galley and stove are also well away from the hatch and the central location leaves room for the galley. However, as you point out, the area fore of the mast is very crowded, so makes this difficult. So I'd be interested in your thoughts as to your decision on the placement of the stove and its flue. I can see that there's a separation as a result of the shot rack, but would the galley have fitted into the space remaining? As usual, not an opinion, but a question out of ignorance! Tony
-
I bought mine at Warco. There are a few types. I bought one with a base, but the one with LED lights and a clamp is at http://www.warco.co.uk/lights/302938-led-lighting-work-lights-magnifying.html You can do a search for the other types by typing in 'magnifier' to their search function. It's the cheapest place to buy these lights and their delivery and service was excellent. Warco's based in the UK, but you may find an Irish supplier. I hope that helps Tony
- 1,039 replies
-
- 1
-

-
- ballahoo
- caldercraft
- (and 2 more)
-
Thanks, Chuck. So I guess it's up to me as to whether I fit one or not. At least it sounds as though there won't be too many complaints if I don't fit one. Tony
-
Actually I'm glad you disagree. I was half suspecting I mistook it as a jib outhaul so it's good you can put me to rights. Anyway, it looks like your theory as to the dates may well be correct. Thanks for the input, and, as usual, it's great that we can ask these silly questions on this forum without being torn apart for ignorance! Tony
- 17 replies
-
- 1
-
-
- Sherbourne
- bobstay
- (and 2 more)
-
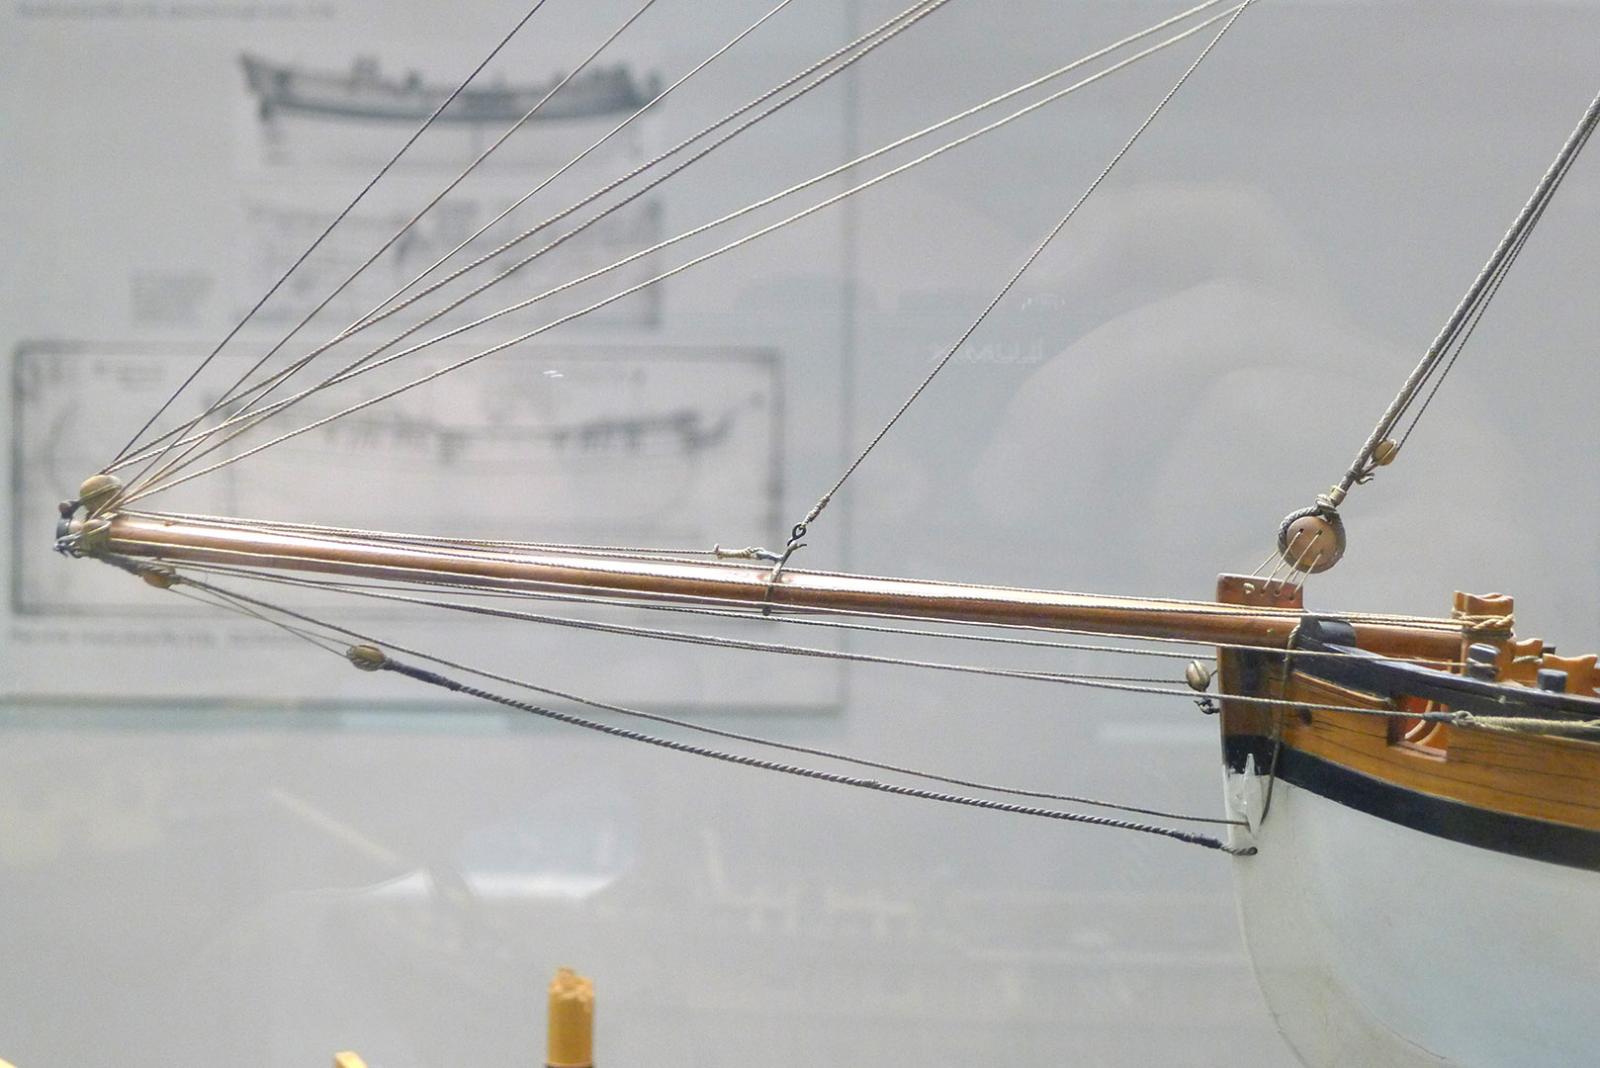
Thanks Michael and Kester. It seems clear that a counter-force is required, and I really like Kester's suggestion that this might be provided by the combination of the martingales and the traveller outhaul when the earlier cutters had less sail. I note from Jim Lad's build of the Stag that he didn't put a bobstay in either -- at least that is what I presume from the level of detail in the pictures at http://modelshipworld.com/index.php/topic/137-stag-by-jim-lad-scale-196-english-revenue-cutter-of-1827/?p=112117. As to the busyness at the bowsprit, I was beginning to get very worried about the amount going on there already, so the lack of a bobstay would please me greatly! Tony
- 17 replies
-
- 1
-
-
- Sherbourne
- bobstay
- (and 2 more)
-
Thanks, Michael. So do you think leaving it out of plans is just because it is expected to be there, or might some small ships such as cutters have been without a bobstay? Tony
-
Sorry, everyone, but now that we've had the discussion about backstays, I've traced my puzzlement about the rigging of the bowsprit on the Sherbourne and would like to check that I have it right. My conclusion so far is that there was no need for a bobstay (or that it would hamper things) for the bowsprit on the Sherbourne because of the need to move the bowsprit in or out. Petersson shows no bobstay on his cutter, and Goodwin neither shows nor discusses a bobstay in the AOTS book of the Alert. The kit plans for the Sherbourne show no bobstay. The only reason I ask is because my pictures from NMM of the cutter Trial of 1790, seem to show a bobstay as well as the jib outhaul. But then it doesn't show any holes on the bowsprit to suggest that it could be moved. Could it be that a running bowsprit doesn't have/need a bobstay as that would have hampered its being moved? Thanks for your patience with my ignorance! Tony

-
That's a really informative reply, Kester (as usual!). I was just about to go to the AOTS Alert book to see what it said there, but you have saved me the trouble -- although now I will go and look and read up more about the rigging now that I am learning the terms and in a very few cases actually remembering and understanding them. Anyway, I am pleased in that it seems there is one less job to do! I look forward to any comments you might have on the oddity of the method of hoisting, as I am sure that other Sherbourne builders as much as myself would benefit from your wisdom. I have also been trying to square the kit plans for the bowsprit rigging with Petersson's outlines, and still find it rather confusing -- but I know that with perseverance I shall get there in the end. I wrote to the Science Museum in May and they sent me a list of all the cutters in their collection and where they were stored. It looks as though the model Petersson drew from is in Blythe House in West Kensington (where I used to live), so I might pop over there and see if I can check that out as well as the other contemporary cutter models they have there. Thanks again for the trouble you take in general to lay straight the record. Tony
-
Aah! Thanks, Chuck! I now understand. Very clear and very logical! Tony
-
I am working on the belaying plan for the Caldercraft model of HMS Sherbourne, cutter, and can't figure out how the ropes holding the topmast shrouds are fixed. There is no indication of those particular shrouds in the kit's plans for the standing rigging. Petersson's book on Rigging Period Fore and Aft Craft shows them being fixed via pulleys hooked to the channels, but the pulleys are shown with the pulling rope merely wound round the top of the upper block of the two that are hooked to the channel. Would the loose end of that rope have been fixed to the main shrouds with a cleat, or would it have been placed on a belaying pin on the rack by the channels? I hope this makes sense -- having had no sailing experience I am doing this all from a theoretical viewpoint! Tony
-
How to sew sails on your wifes sewing machine
tkay11 replied to Mirabell61's topic in Masting, rigging and sails
Thanks for the repost -- I was wondering what had happened. Tony -
Nice to see you back on the case, Gregor. Fabulous work! Tony
-
Lovely to see the progress, Gregor. I've had a very intensive three months, and just this week can think of picking up where I left off. I too was working at the seizings, trying smaller and smaller lines, and I agree about the tube-like effect which I am unhappy with. I was thinking that was down to the method I'm using of making the seizings first by wrapping them round small drill bits and then fitting them to the line. I'm now down to fly-fishing thread and will start experimenting with that, and maybe trying to make the seizings as they are in reality. Tony
-
Great to see another build in our cutters' shipyard on this forum. I'll be following this with much interest. Tony
-
There are furniture creams made up of beeswax and turpentine -- a recipe for furniture polish that goes back centuries. The mix seems to be exactly the same as Chuck's recipe. I have a couple of bottles of Stephenson's Olde English Furniture Cream made of this, but that brand is no longer made. However there are plenty of others such as Lochinvar at http://www.johngrahamhardware.co.uk/stephensons_old_english.html) and also Stone's furniture cream made up in the same way. There are probably lots of others if you do a search on furniture creams. Tony
-
Nice one, John, and perfect examples. I'm still looking at the Sherbourne plan, though, which shows the crutch well forward of the stern, but so much in the line of the rudder that it makes some sense to think that it would lie either side of the rudder. Tony
-
And am I right in thinking, Doreltomin, that the boom is firmly lashed to someting just in front of the rest, or is that parallax error? Tony
-
Thanks, everyone, for the ideas. I've been out all evening, so missed the discussion and glad to get back to it. I like the idea of the boom support to one side. If it is something on the side, and since in such a position it would be rather in the way of the aft swivel gunners, could it be that it was something that slipped in and out of a sheath on the out side of the boat? If so, that would mean: 1. that there would only need to be one, which could be transferred from one side to another according to need. 2. that it could be stowed very easily indeed, being relatively small, when not needed at all -- and hence would not be something that would be a normal feature of models as only used for particular occasions when the boom, after a hard day's work, needed a little lie down and a rest from all that rolling around. Just ideas, guys, until we hear something definitive. Tony
-
Thanks, Gregor. Very nice workmanship, and I'd not seen the Science Museum photos. I had seen the one in Peterssen, but I was intrigued by the different position on the Sherbourne plan. Tony
-
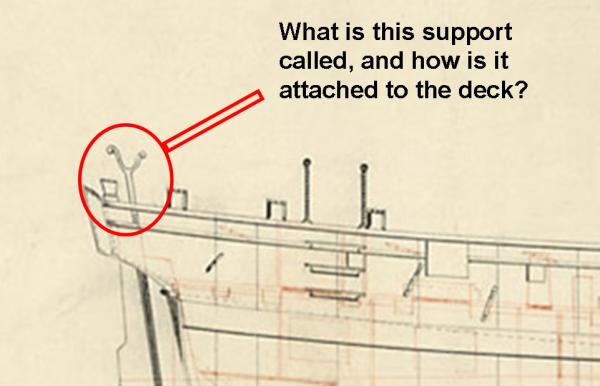
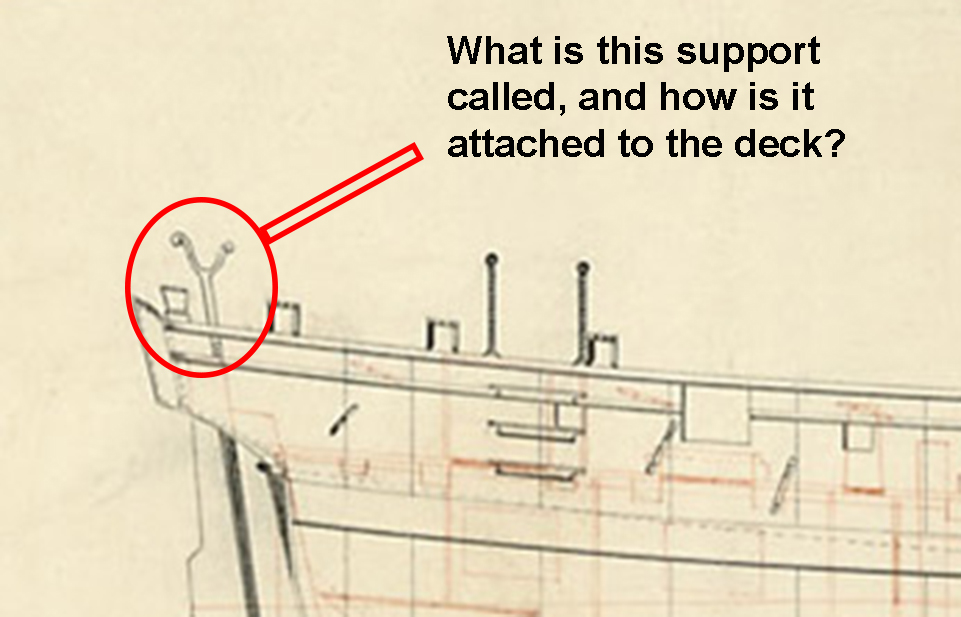
Now this is really getting interesting, Jay. Great insight! Maybe it really is a catapult. No, ok, I won't press for that. How about something that linked to stern davits for that elusive method of carrying the ship's boat? I wouldn't really buy that either, since it or they are in the wrong kind of position. But I'm looking forward to more ideas as you and others get into this. The curly nature of the prongs at their ends seem to be redundant if they were to be a support, and wouldn't be much in keeping with the rest of the ship -- which surely is far from ornate and is instead very functional. Tony
-
As I'm very lazy when it comes to working things out, I'll wait a while to hear whether any other ideas come up. Perhaps a battery-operated support that rises through a hole in the deck and unfolds the arms as it rises? The truth is at the moment your idea, Kester, is the most pragmatic and based on something that really worked. Tony
-
Darn it! I'm cursing myself for not noticing Kester's photo in his own build, and very disappointed that it's not really a catapult. It would have been fun making a working model of a catapult with the ammo -- it certainly would appeal to the grandchildren. But thanks, Kester, for helping out, as usual. It's a nice idea to make it in the form of a cross -- which makes it easy to set up and perfect for taking weight. However, the drawing shows a single pole with a U-shaped hook, so it looks as though there's another way of doing it. Tony
-
I am thinking about whether I build my model of the cutter Sherbourne with sails or not, and in the process have been considering how the boom might be supported. The following is a section of the plans showing what I reckon to be a support for the boom, and presume in my ignorance that it might only be used when no sails are on. Could someone advise me of the name and function of this piece and how it is attached to the deck, if at all? If, of course, it turns out to be an old TV aerial or washing line support or even the support for a rather large catapult used in the event of the swivel guns failing, or perhaps a perch for the man at the tiller when he wanted to have a better look ahead, then I would be equally happy of the advice. Thanks Tony