HOLIDAY DONATION DRIVE - SUPPORT MSW - DO YOUR PART TO KEEP THIS GREAT FORUM GOING! (83 donations so far out of 49,000 members - C'mon guys!)
×


tkay11
-
Posts
1,829 -
Joined
-
Last visited
Content Type
Profiles
Forums
Gallery
Events
Everything posted by tkay11
-
 I had thought CMB announces availability for each article -- there are many times when I have looked for something on their site and it says 'not currently available' or words to that effect. When I bought the Sherbourne, it was because their site said the Lady Nelson was out of stock, so I rang and asked if there would be anything similar that they had in stock. I was very pleased with their advice to buy the Sherbourne. It may be that with wood they don't advertise stock levels, though. Tony
 -
Looking for old article from MSW 1
tkay11 replied to acdblujns's topic in CAD and 3D Modelling/Drafting Plans with Software
I don't know if you're referring to Rex Boocock's articles which are posted in the downloads section. The first of the series details Photoshop and AutoCAD importing. It's called "CREATING NEW SHIP DRAWINGS FROM EXISTING IMAGE FILES - PART 1". Re-sizing in both is very easy. Tony -
The holes are for the swivel gun posts (part 33 on the 3mm walnut strip) and the timberheads (part 36 on the 2mm walnut strip). Page 4 of the manual (Deck fittings) tells you to look at Plan Sheet 2 for reference. You'll find that the timberheads and gun posts have slightly different bases which helps you identify which piece goes into which hole. In terms of fixing the rail, it probably helps to pin as well as glue. I think I pinned mine, but can't remember. Tony
-
Looks very neat. Well done, Jan Tony
-
casting metal parts including cannon
tkay11 replied to rtropp's topic in Metal Work, Soldering and Metal Fittings
I'll add my voice to the chorus of requests, Joe. Tony -
Just a notice to you all: I'm off travelling for a week. I've been following the log with interest, so if there are no comments from my end, ye'll know why. I look forward to catching up when I get back. Tony
- 1,039 replies
-
- 1
-

-
- ballahoo
- caldercraft
- (and 2 more)
-
Drilling Sheave Holes For Masts
tkay11 replied to Stuntflyer's topic in Modeling tools and Workshop Equipment
That's much better! Thanks, QA! Tony -
Drilling Sheave Holes For Masts
tkay11 replied to Stuntflyer's topic in Modeling tools and Workshop Equipment
Aaaah! Centre drills are just the thing I needed to think about as I have been having some trouble with a 1.5mm drill that refuses to go down the centre. Thank you so much, QA! Oh, and I like the blocks as well -- I might well order one! [Edit: Oops, $96 for one. Maybe I'll make my own] Tony -
Drilling Sheave Holes For Masts
tkay11 replied to Stuntflyer's topic in Modeling tools and Workshop Equipment
Yes, with a little thought, QA, I could do a wooden jig. I've been using angle iron (well, aluminium, actually) for this kind of thing. But your's is a really beautiful piece of work. Tony -
Drilling Sheave Holes For Masts
tkay11 replied to Stuntflyer's topic in Modeling tools and Workshop Equipment
Now something as beautiful as that fingerplate can't go un-noticed in the internet world. You don't happen to call yourself Arbalest as well do you? I'd love to be able to make something like that. Tony -
There's a small guide to joggling at https://sites.google.com/site/shipwrightsfaq/smf-q072. The nibbing that I ended up doing I showed in my log at http://modelshipworld.com/index.php?/topic/335-hmc-sherbourne-by-tkay11-–-caldercraft-–-scale-164-1763-a-novice’s-caldercraft-sherbourne/?p=3203. Tony
-
I agree with Kester. Almost every day (when I have a day to spare, that is) that I spend on ship modelling I have a moment when I say to myself "this is terrible, I'll never get the hang of this" and I put my tools down in disgust. Unfortunately for the ship which then has a nice little respite from the various attacks I make on it, it isn't long before I'm going over it all in my mind and saying "Hmm. Suppose I tackle it that way. Maybe that'll make it all work". So I go back to the desk and have another bash at it. Sometimes I get it right, sometimes I don't. I have learned not to spend too long at the desk staring under a glaring lamp at tiny little pieces. It is highly important to take a rest, just as you would from normal work. It may well be in the nature of this new job that first attempts don't work out. Look what happened to Mark who's just given up his first attempt at the Licorne after getting a long way into the framing. Now that's BIG TIME giving up to start again. I've just spent a couple of days figuring out how to make the axle trees for the cannon. I thought I really had it solved until, into my 8th axle, I found they all were 1mm too short, and, in addition, several of the axle stubs were not quite at right angles to the axle. My filing skills obviously need improvement. So I'll have to go back and have a very good re-think about how to do them. In other words, Jan, I can bet you'll be back on the job in very little time if you are interested in the hobby with its endless problems to solve and overcome, and it sounds like you are. Tony
-
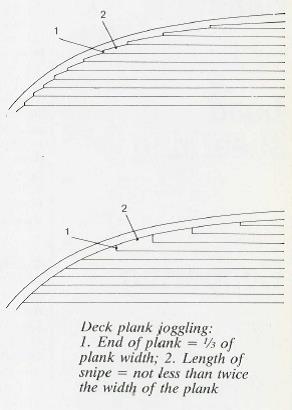
Jan, I don't know if you have already done so, but if not, have a look at the deck planking tutorials on this site. You'll see them at http://modelshipworldforum.com/ship-model-framing-and-planking-articles.php. There's an excellent one by Ulises Victoria, and also a calculator in an Excel spreadsheet by AEW. You can see the two different types (joggling and nibbing) in the following picture from zu Mondfeld's book Historic Ship Models: Tony
-
Yes, QA, it does look flimsy, but it seems quite solid to me -- given that I don't expect the forces on it to be too great (and I'm not going to test it by clouting it with a 2lb hammer). I'm really pleased with the DB250. I had dithered for a while about getting a metal-turning lathe, but reasoned: (a) that I was just working with wood. ( that the level of accuracy with wood would be quite sufficient -- especially given that a lot of modellers on this site use the DB250 and have very good results (in addition to being pleased with it themselves). I have seen lovely small pieces made with the DB250, and in addition many say it is very handy for working with masts -- even more so should I bother to buy an extra bed to extend it. c) that a metal-turning lathe would be overkill for me. I can't see myself working with metal for quite a while. Furthermore, that although I could turn wood in the metal-working lathe, it would only be for work with small pieces, and work with masts would require me to return to my household drill. I am happy with shaping masts using my household drill setup, but have found the DB250 so much more convenient to set up and easier to use. (d) A metal-turning lathe and all its accessories would be expensive. I only have a small budget for such things. £500 would be way above anything I could afford. I read that the affordable micro-lathes would have to have a lot of setting up. And the slightly larger afordable mini-lathes that also require care in setting up but are less prone to issues with alignment would be out of my budget. Then I had a look at the cost of all the accessories and that really put me off. I can foresee that one day I'll be interested in a metal-working lathe, but that will depend a little on the outcome of the lottery. In the meantime I'll have a lovely time learning wood turning skills with the DB250. I've already learned to appreciate the 4-jaw independent chuck and learned how to turn 4mm wheels from square stock. Great fun! Tony
-
The runner is solid, so conceptually one could do the modification. However, I'm going to stick with the current setup for the while since it is doing the job and I still have a long way to go in learning the basic skills in using the lathe. It took me months before I was happy in using my table saw, so I expect the same learning curve for even such a simple lathe! Thanks, though, for all the ideas, Wefalck. Keep them coming -- they certainly spark the imagination! Tony
-
That looks like a very nice project, Wefalck, but I think I'd need to come over to Paris to see your workshop and learn a bit more from you before taking such a job on! I suppose the file would be needed to make the sliding mechanism with runner and grooves. What would defeat me, I think, is filing with that precision. Or maybe it's like ship modelling -- just start and learn by doing. Tony
-
Excellent suggestions, Wefalck, and highly doable! I like the idea of the spring washer, as well, as I was thinking about the play round the nut. Thanks very much Tony
-
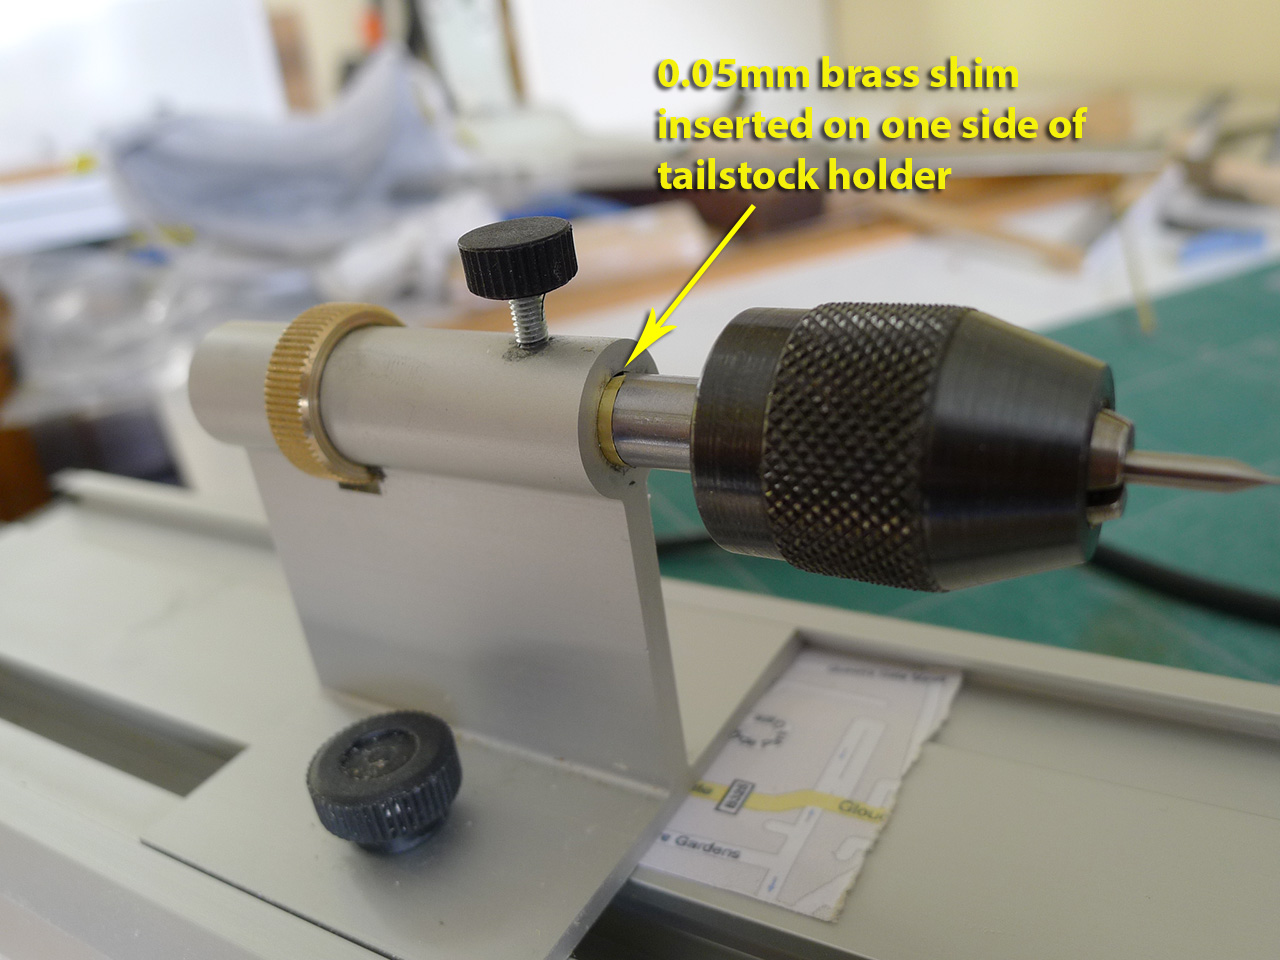
Well, I have fiddled with adding brass shims, and I am totally surprised that a 0.05mm shim has fixed the problem. I managed to squeeze it in on one side of the tailstock holder as shown in the photo, and this has not only reduced the play to almost nothing, but I am now hitting dead centre. I might now exchange the paper shim underneath the holder for a brass shim of the same size (0.1mm) but possibly I'll wait a bit before doing this as I try to hold to the motto 'If it ain't broke, don't fix it'. My estimate of 0.2 must have resulted from the distance of the holder from the end of the drill point -- thus increasing any angle of deviance. Tony

-
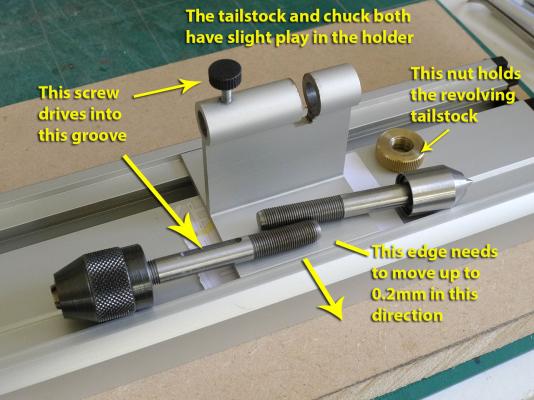
Thanks, Welfalck. You are quite right about the construction. I attach a photo as requested. When I say that there is slight play of tailstock and chuck, this is even after the holding screw is tightened. I don't have a pillar drill, but I have an ordinary drill stand for the standard electric drill. The stand is not of the highest accuracy, but once I have a drill bit positioned on a piece it at least drills vertically. Other than the paper I have been using as a shim, I have brass shim sheets of .001", .002", .003" and .005". I could see if one would fit on one side of the tailstock holder. Thanks for the link about the scraper! Tony
-
That's as I expected, Wefalck -- and thanks for the usual thoughtful reply that you give to such questions. I was saying to myself that I shouldn't expect that sort of accurate work on the wood lathe. All the same, I like challenges, and so I was trying to think of various tricks around the problem. I have at least got the accuracy down to about 0.1mm of dead centre (by pressing on the chuck with my hand and only allowing the drill bit to go in about 6mm at a time), but it remains possible to notice that the hole is not quite centred if it is looked at carefully. By the way, what is meant by 'scraping-in'? I figure 'filing' means filing down the edge of the tailstock base. I had thought of that, but then thought I might well make the problem worse if I didn't have an accurate enough set-up to file it down accurately and totally parallel with the holding groove in the bed. Tony
-
Thanks, QA. I'll look into it. Tony
-
They're 2, 3, 4, 6, 8 and 10mm with my Proxxon DB250 wood lathe. The only problem I've had with it so far, is that the tailstock is about 0.2mm away from dead centre. I'm trying to fix it with some shims. So far a paper shim has worked to fix the vertical discrepancy, but there's still a lateral discrepancy I'm trying to fix. Unfortunately it would mean shaving a bit off the tailstock sliding base and I can't think of another way round it yet. Part of the problem is that the way the tailstock is made means that there is some freedom of movement either of the tailstock or of the drill chuck, so the combination means that drilling an accurate 0.5mm or 1mm hole in a rod with diameter of 3.7mm is next to impossible for me at the moment. Tony
-
Gun port lids and sweeps, on small vessels
tkay11 replied to Stockholm tar's topic in Wood ship model kits
Here's another thought. If the Sherbourne did have gun port lids, then they would have to be side-opening, wouldn't they? My reasoning is based on the drawings showing the gunports right up to the rail, which might mean there was no way of fitting them unless the rail was considered strong enough. Ignore at will if this is not logical! Tony -
Gun port lids and sweeps, on small vessels
tkay11 replied to Stockholm tar's topic in Wood ship model kits
I had no idea I was touching on actuality! Don't worry -- I realise the terrible potential of blast. At a much smaller scale, I remember the kick-back and the deafening noise just of a .303 rifle when I was in the army cadet force as a teenager at school. It put me off going near guns for the rest of my life -- let alone tamper with one of these 3 pounder beasties. Tony -
I can't answer your question about the colour of the margin planks, I might suggest that if that is all the wood you have, then, as long as the difference is consistent, it might even look quite nice. As to whether they should be there, it is probably more accurate to have them. It looks as though you are on the path to shaping the margins nicely so it would be a shame to do away with the idea altogether. You then have to decide whether you joggle (indent) the planks into the margin, or nib the planks so that they do not indent the margin. There are rules to follow for both nibbing and joggling so that the ends of the planks do not come to a point. It looks as though you have not yet glued the planks to the deck, so you have plenty of flexibility left. Tony