
HOLIDAY DONATION DRIVE - SUPPORT MSW - DO YOUR PART TO KEEP THIS GREAT FORUM GOING! (Only 13 donations so far - C'mon guys!)
×


Overworked724
-
Posts
1,258 -
Joined
-
Last visited
Content Type
Profiles
Forums
Gallery
Events
Everything posted by Overworked724
-
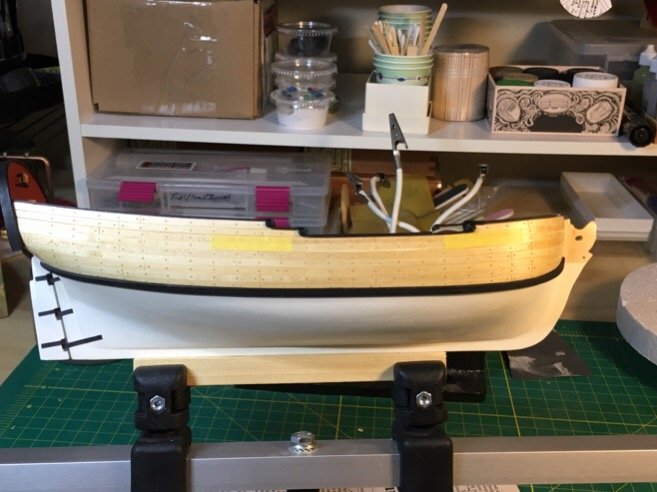
 Thanks Ron/John! Not certain that I would classify myself as an artist...more like a 'stubborn hacker'. Funny....after I mounted the current rudder, I my mind started racing on what other materials I could have used...since my head got stuck on 'wood' (i.e. paper) and metal (i.e. copper sheeting) for the P&G's. Sitting at my desk, I realized I could have used plastic and paper clips as well. We have some clear plastic file folders from Japan which are just the right thickness. And the small, plastic wrapped paper clips (I like those...they have a good 'grip' on paper when you use them) would be perfect for the pins. If you straighten out the paper clips, you can glue the hinges to the 'pin' with the plastic on...and strip away the plastic just above the hinge! It would work - and you would not have to worry about gluing metal to metal. The stripped paper clip is just about the same gauge as the 22g wire I was using earlier. Going to try that a bit later and post the pics. The reason I am fussing so much is because the hinge is non-functional (locked in place). Since the hinges are paper, they are fragile, and I am a bit leary of it not lasting until completion. This was also the reason why I made a couple of additional rudders and hinges. I used wood glue to mount the current rudder...so if the current one gets damaged, I can simply clean it up, and mount a new rudder/hinge assembly I will have sitting in the wings. On a positive note, I looked at the Sultana this morning, and she did look like she passed a milestone! =-)
- 449 replies
-
- 3
-

-
- sultana
- model shipways
- (and 2 more)
-
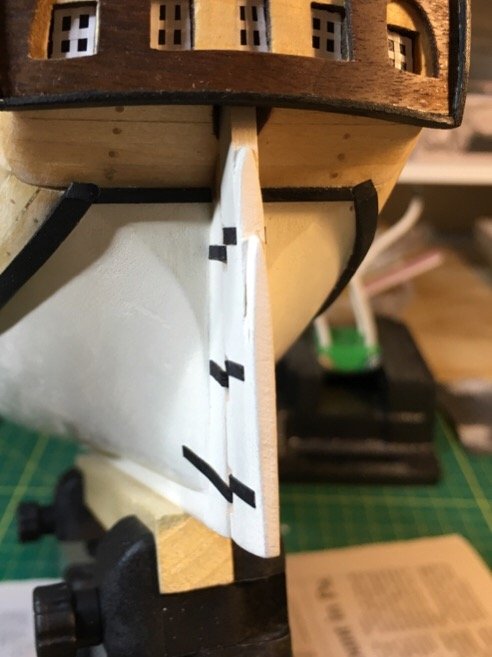
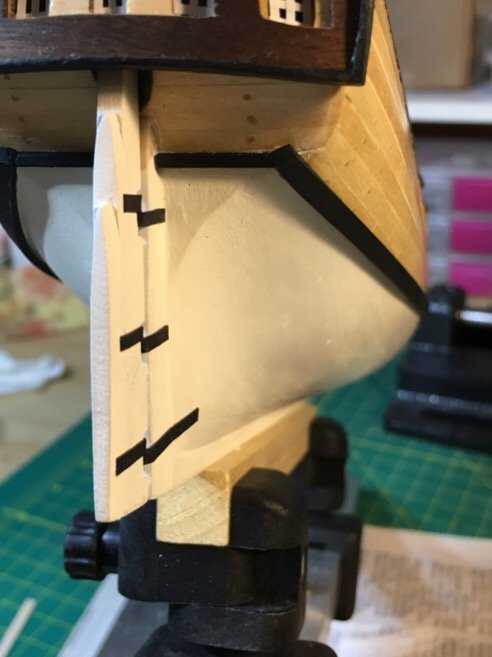
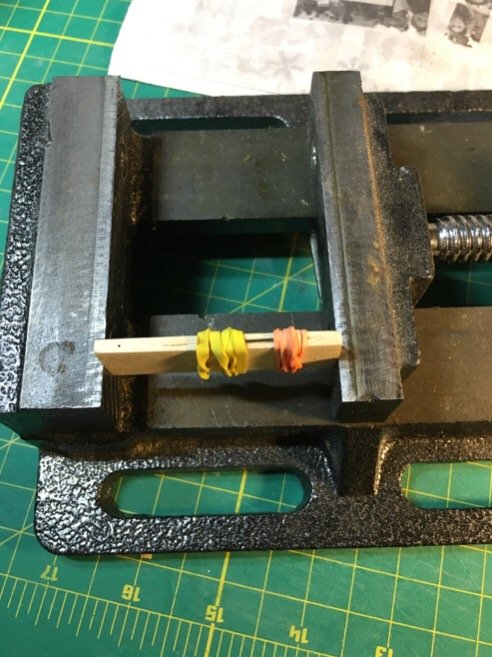
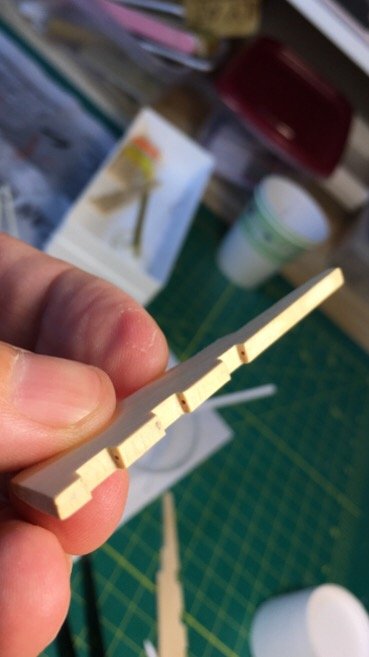
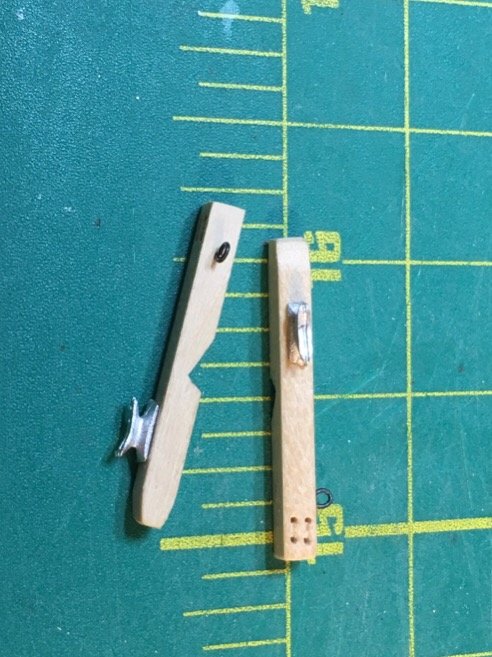
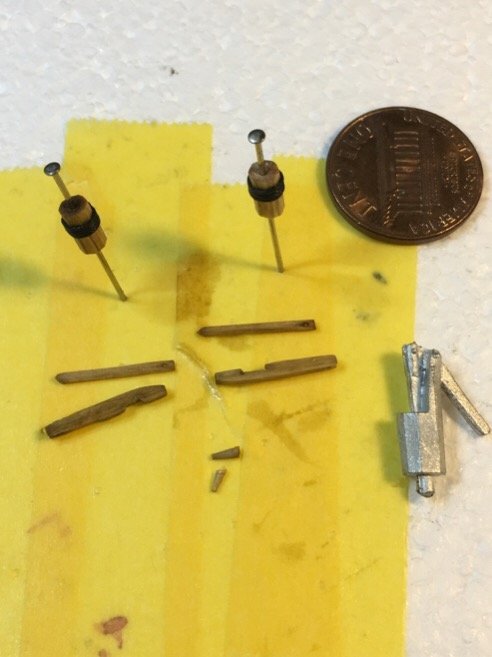
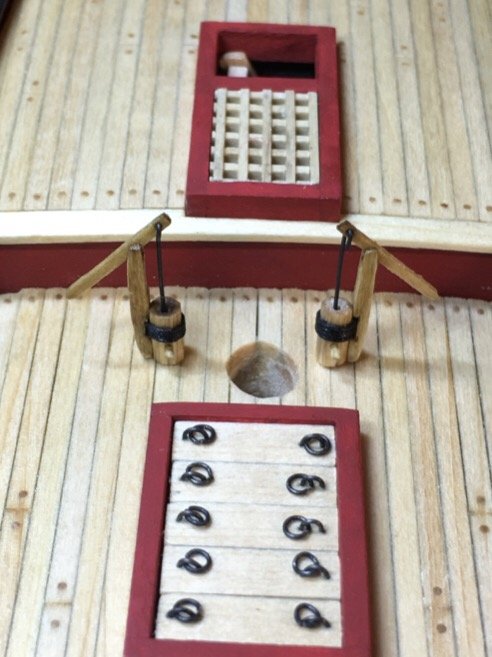
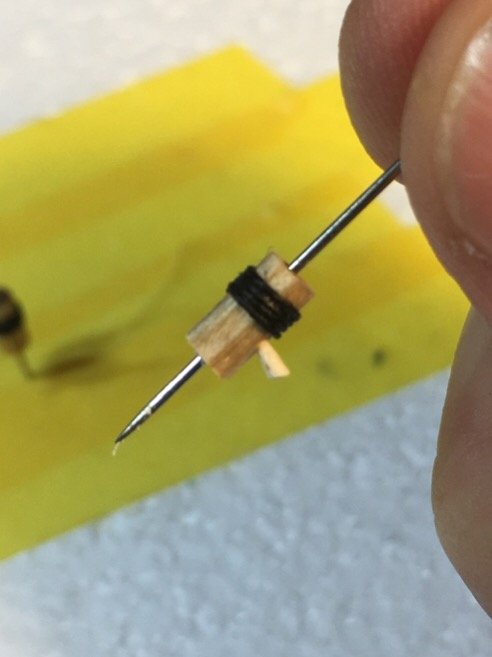
Ok. After spending 2 solid days trying to get metal to stick to metal (which is impossible without welding apparently), I finally made an executive decision. Paper pintles/gudgeons (P&G's) it is. But I've learned a few things. Paper is is easier to deal with, but it is fragile. You can see how they deform and lose their integrity after painting with acrylics. (Solved using a black magic marker). Don't have acid free paper, so maybe next time. Photos below. To put this in perspective...I have built and painted three rudders, and made multiple sets of P&G's of both paper and copper stripping. I have sliced my fingers repeatedly, and my hands are literally caked with glue (wood and CA), white and black paint, and blood. I am quite serious when I say that the rudder is by far the most ridiculous chore yet. I did not enjoy it. 😏 The end result is OK...but frankly would like to say that the next time I do this part of a ship it will be with pins and premade parts...I mean really...what kind friggin manufacturer is too bloody CHEAP to put them in a 'beginner' kit!!!!??? This was way more difficult than it should have been. And doubly more so for a beginner like me. Ok. Sorry ... my Vent is over. I used a yellow manila folder for the P@G's, 22g wire of the pins, carpenters glue for prep and mounting. No paint...just a black Sharpie to avoid damaging/deforming my paper P&G's. Moving on...to get a beer and ignore this model for the rest of the evening.


- 449 replies
-
- 10
-
-
- sultana
- model shipways
- (and 2 more)
-
Acid free paper....I am going to have to look that one up! Thanks!
- 449 replies
-
- 2
-
-
- sultana
- model shipways
- (and 2 more)
-
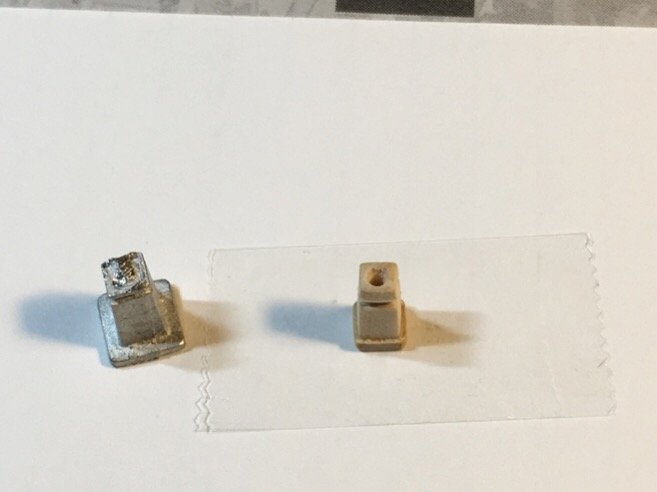
I hate Pintles and Gudgeons. Model Shipways was too cheap to include them...sigh. Paper P&Gs are difficult. The water in the paint (acrylic) breaks down the fibers and it loses its shape, and starts to disintegrate upon too much manipulation. Metal does have some advantages. Hey...great idea...how about some folks give me some ideas!? I dont have metal cutting/soldering tools. So how do I make these things? going to bed...
- 449 replies
-
- 2
-
-
- sultana
- model shipways
- (and 2 more)
-
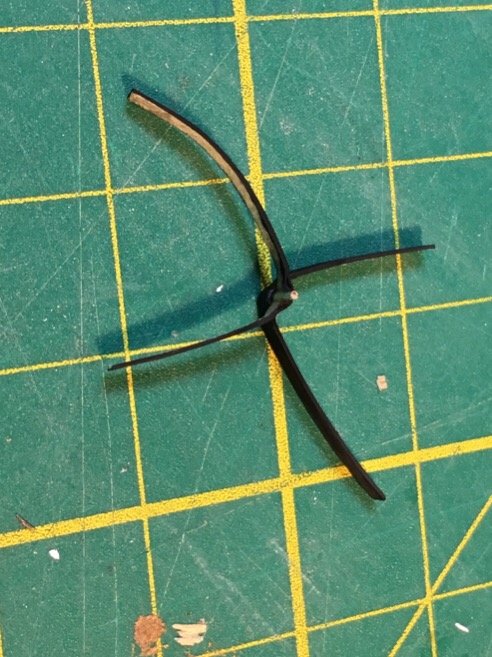
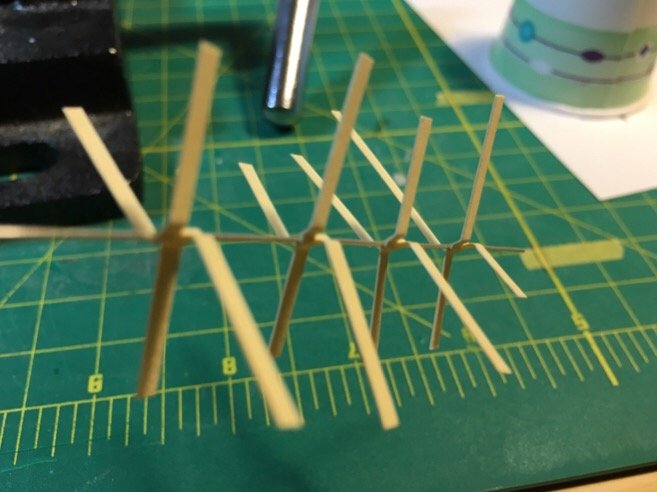
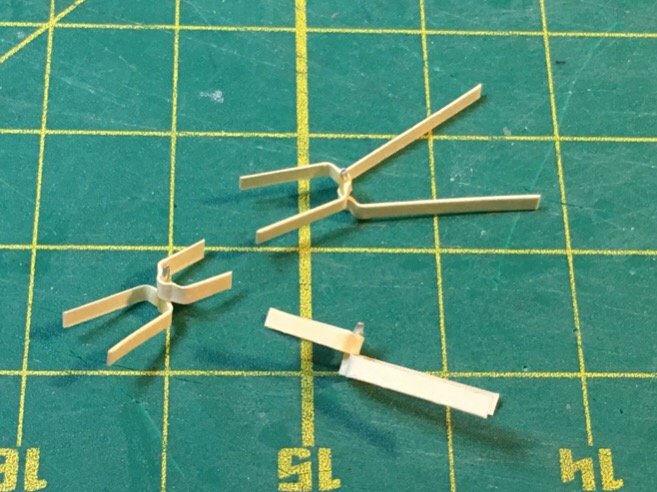
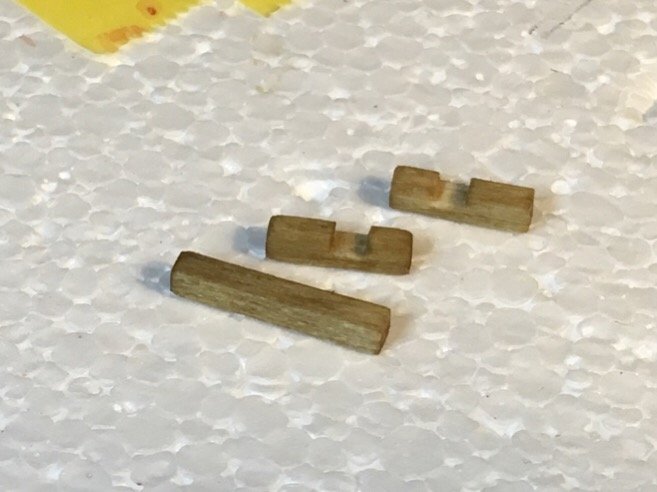
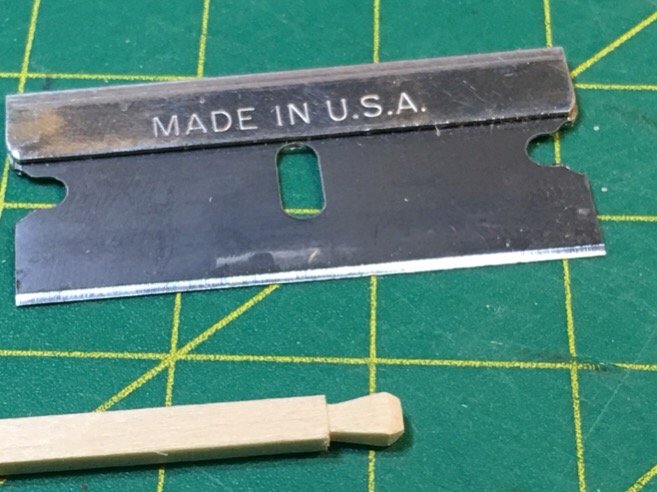
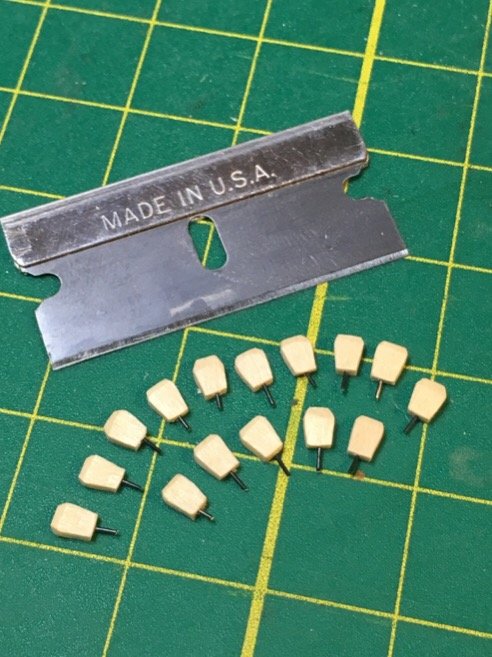
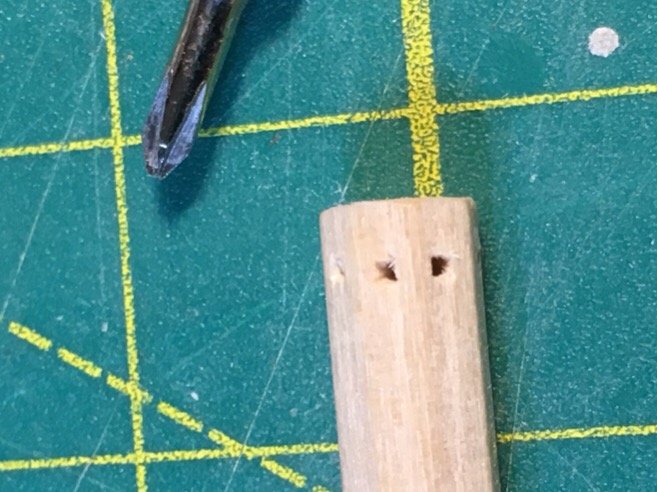
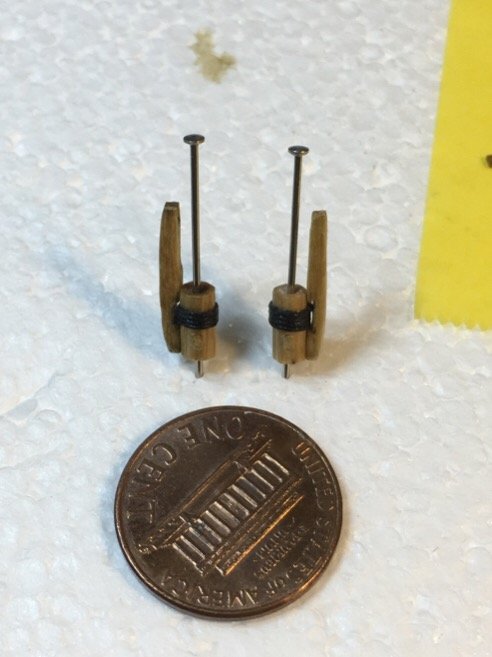
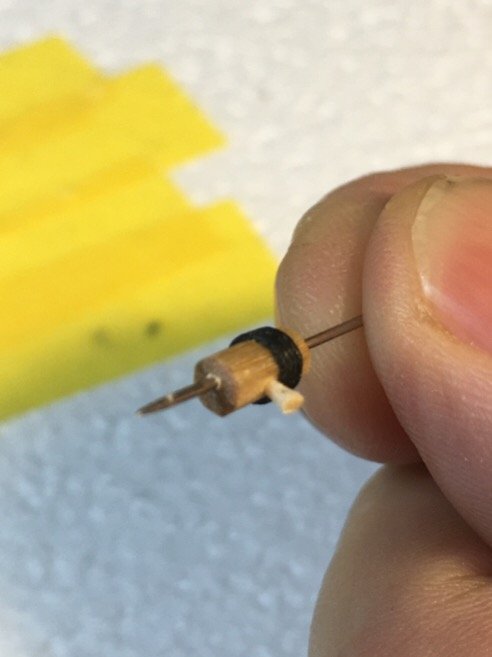
Well...can say I have been making many attempts at the pintles and gudgeons (P&G's). None in the 'kit' so have to make them. As I said, I gave up trying to make them out of copper. So made a few attempts with paper. The right paper and technique eludes me, but if I can hack it through with a decent result, I'll call it a win and move on!! Following Chuck's guide, made a simple jig with wood and a 22g piece of wire to prebend the paper P&G's. Then used the same gauge wire to make a string of them (used Wood glue...seemed to be easier to manage than CA glue). Drilled a small guide hole into the upper edge of each gap in the rudder for the pin to fit into The 'pin' in this case is simply the small excess of the 22g wire left after trimming. They turned out ok...but the proof will be in the painting/mounting. We shall see! Moving on...


- 449 replies
-
- 7
-
-
- sultana
- model shipways
- (and 2 more)
-
Dear Bob Beautiful work! I am hacking my way through my own build on this site, and one aspect I have been dreading is the pintles/gudgeons. I have the rudder (3 actually....just in case I need spares!) ready, but try as I might, using copper stripping seems to be a lost cause - but then again, I have no good experience as this is my first wood ship build. I am very interested in how you prepared and mounted your pintles/gudgeons using paper. If you would, any response would be helpful since I would like to follow a 'paper' path to mounting my rudder as well - since it seems to be the path of least resistance. Best Patrick
- 682 replies
-
- 5
-
-
- halifax
- lumberyard
- (and 1 more)
-
Note to newbies like me...ship plans are useful for visual guides. I copy and cut out various portions of the deck i am working on to ensure my ruler/divider is not lying to me. I find that the more you progress, the easier it is to get some type of assymetry in the look/shape. I have quite a few areas on my model where this has occurred. The plans help my visual brain recover from the gaps in the measurements. As Gunny Highway would say..."Adapt!!! Overcome!!!"
- 449 replies
-
- 4
-
-
- sultana
- model shipways
- (and 2 more)
-
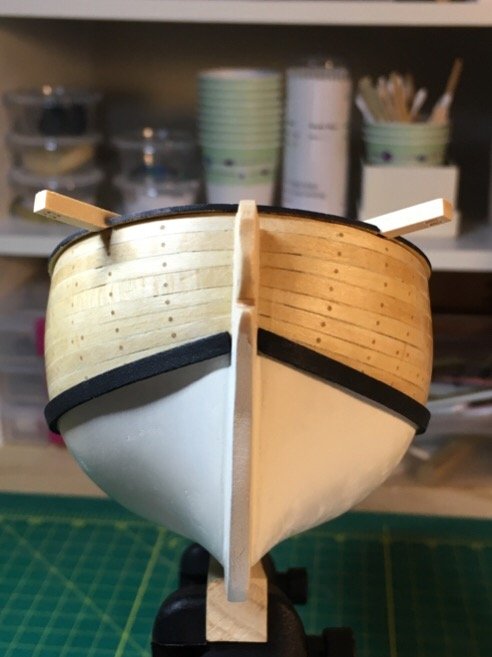
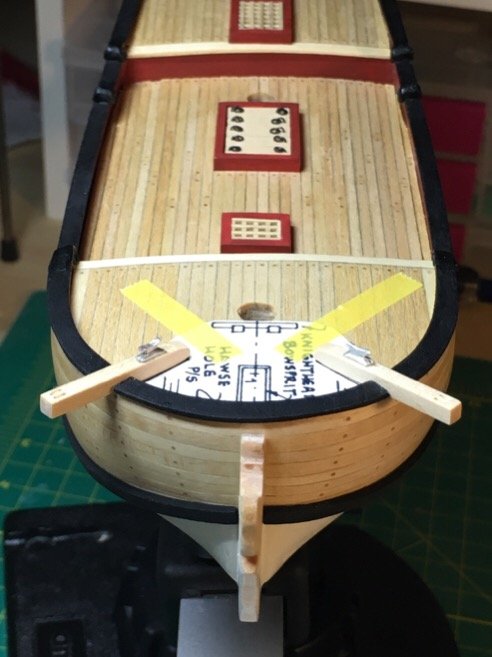
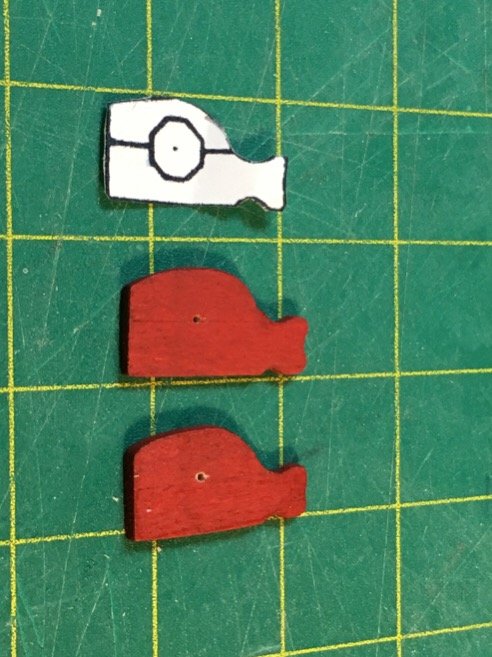
After considering my next steps, decided to suck it up and make the cat heads. Overall was a good attempt. Nothing quite as terrifying as cutting off chunks of your ship. Was extremely careful not to overtrim the gaps in the cap rail to fit the catheads. Will paint tomorrow. Moving on....to bed.
- 449 replies
-
- 6
-
-
- sultana
- model shipways
- (and 2 more)
-
John - Thanks for your note!!! Can't tell you how much I appreciate the kind thoughts and support! The furniture has been fun to build...and frankly, I was surprised at how well it turned out considering it was my first attempt at such an endeavor! I actually read (and have reread) your log on the Sultana and you accomplished that which I could not have done - make the ship look realistic using the included metal parts. My skill in painting is pretty poor - and I simply had no idea how to prepare/trim/sand down the parts without completely destroying them. (My shameful secret - I am scratch building the furniture and whatnot because I don't know how to prepare the supplied cast metal parts. ) I have a long way to go - but my brain is already trying to get past the rudder, paint touch ups, catheads, stanchions/rails, knight heads, cheeks, chain plates, deadeyes, trim, masts, spars, booms, and sprit...it is the rigging that scares me most! Never done it before...rigging looks so complicated. But, onwards and upwards. I am simply trying to log as much as I can of this build for myself and for future newcomers to the hobby to follow - and avoid my many impatient mistakes (e.g. Drilling the gammoning hole in the wrong place on the stem!! Over sanding the foredeck!! Using CA glue to support my planking!!....etc. )! This is my first wooden ship model...and I am sincerely hoping I can finish it...! (The admiral already has plans on where to put it.)
- 449 replies
-
- 3
-
-
- sultana
- model shipways
- (and 2 more)
-
Okay. Not much progress this past weekend. Scratched my eye...recovering. But I did manage to make the galley stack. Once again, pretty much eyeballed it based upon measurements from the plans. Looks much better than the kit supplied one. Also got the pawl made. Need to paint and trim down the copper tongue.... but looks ok.


- 449 replies
-
- 8
-
-
- sultana
- model shipways
- (and 2 more)
-
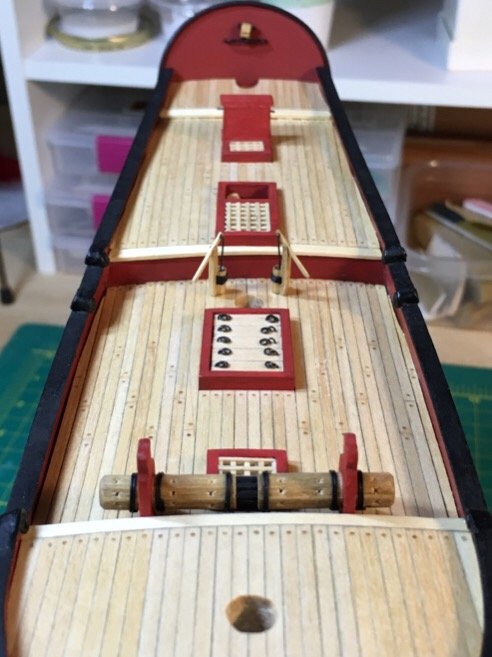
Got the bitts done. Used 2.4mm square dowel. Cut and gently sanded the pieces, cut the notches and ensured good fit. Stained and glued. Celebrated with a beer and toasted my mad genius and awesome skill as a novice ship kit builder. 👍🏽 🍻 Moving on...to the galley stack.


- 449 replies
-
- 5
-
-
- sultana
- model shipways
- (and 2 more)
-
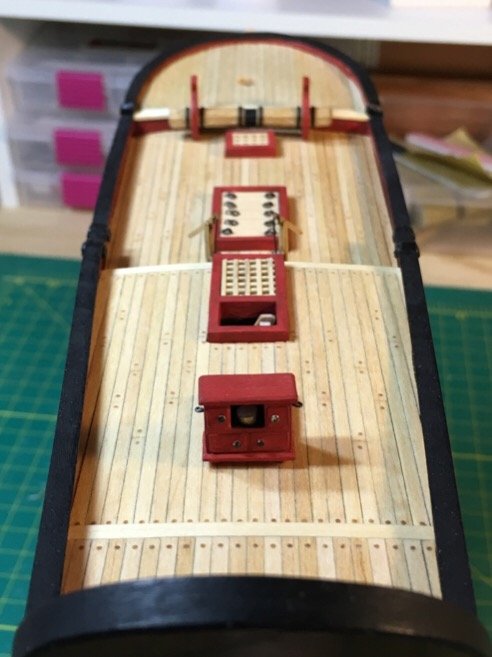
Just posting some pics with the furniture I made in lieu of the cast metal pieces. The difference is stunning. I have some newfound respect for handmade fittings and furniture. Honestly, without Chuck's practicum, I would have been very uneasy about making these initial attempts. Although I have not followed Chuck's guide in all cases, it does give you a great crutch. No fear!!! 😁
- 449 replies
-
- 8
-
-
- sultana
- model shipways
- (and 2 more)
-
Well...timber heads are prepared. Chuck's technique for preparing them worked well. I plan to put them on after I don't have to mess with the rudder, chain plates, etc. (why make life difficult?) I think the next is the pawl, bitts, and cat heads....Moving on.
- 449 replies
-
- 5
-
-
- sultana
- model shipways
- (and 2 more)
-
Someone asked me where my profile name came from! In fact, the admiral wants to get a dog...she told me unexpectedly while she was cooking dinner. I said it would be fine provided I could name it...she asked me what I would name it...and I said, "Capt'n Fluffy McDoogles". She did not like it. Don't laugh....I'm serious. Side note: The ice cold stare of a tiny, slightly pissed off, Japanese woman holding a razor sharp carving knife can give you nightmares. Moving on...to the timber heads. 😜
- 449 replies
-
- 3
-
-
- sultana
- model shipways
- (and 2 more)
-
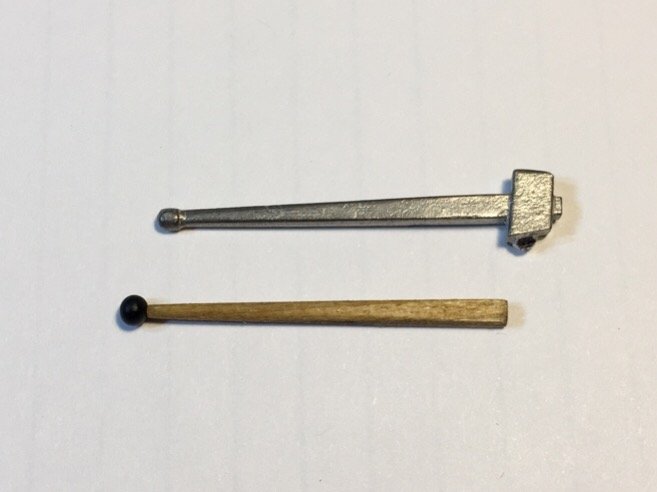
Tiller arm is completed. Again. Not trying for perfect...arm was simple. Trimmed a section off a 2.1mm thick basswood strip. Sanded it down and rounded off the end. Drilled in a hole with a #78 drill bit into both the tiller arm end (tiny tiny hole!) and into the little black ball I made out of black sculpy. (Yes...sculpy comes in black). Stuff is awesome...made a few little BB's of black sculpy then baked them up (175F for 20 min). Drilled a small hole in the BB of sculpy then trimmed a small piece of 28G wire and connected the BB on the end of the tiller. (Stained the tiller after sanding) End result looks pretty decent. Also measured with rudder and binnacle in place...so no interference there. Running out of deck furniture...need to mount the rudder soon. Side note: just discovered the embedded dancing emoticons. Posting just became more exciting. Moving on...
- 449 replies
-
- 3
-
-
- sultana
- model shipways
- (and 2 more)
-
It's worth stating that I feel like I am in kindergarten. You won't see high tech ship building techniques or nitpicky research questions to ensure historic accuracy. What this build is is quite simple...fun. I'm having fun! The small joys of overcoming minor challenges during the hard but rewarding act of creating something I can take some pride in. My ship building skill set might be small...but it's growing! (Baby steps)
- 449 replies
-
- 2
-
-
- sultana
- model shipways
- (and 2 more)
-
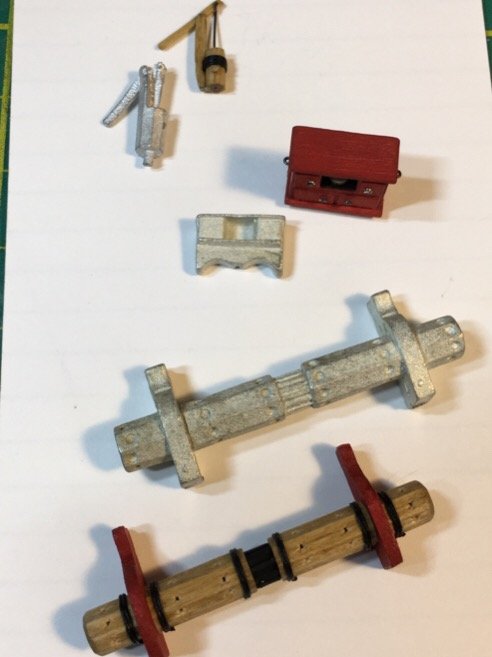
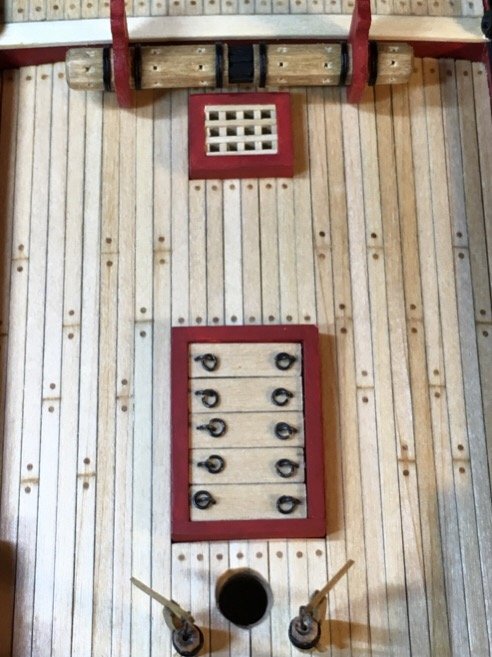
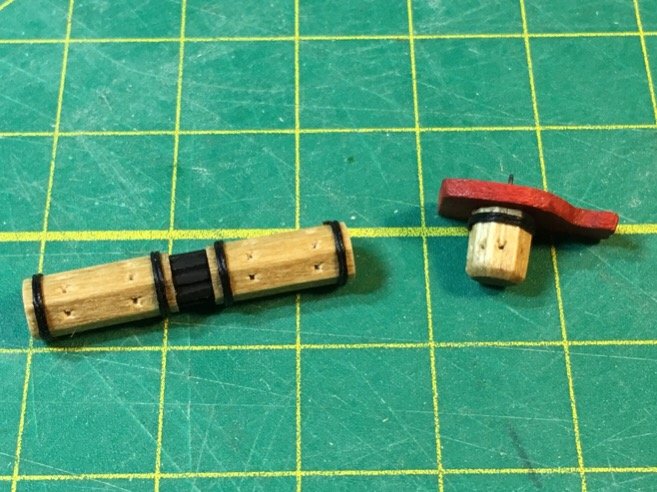
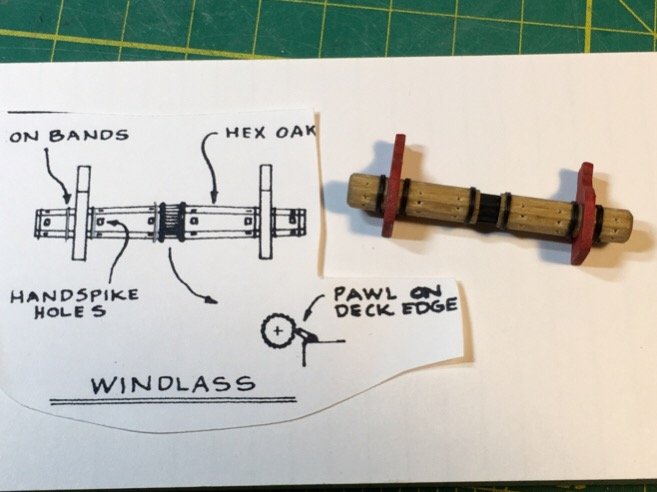
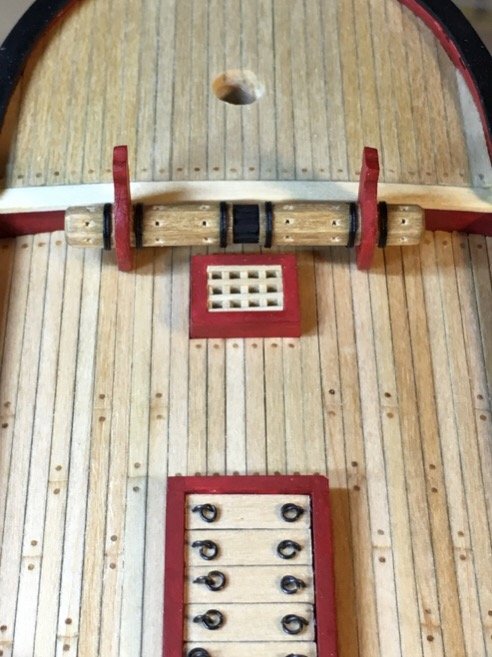
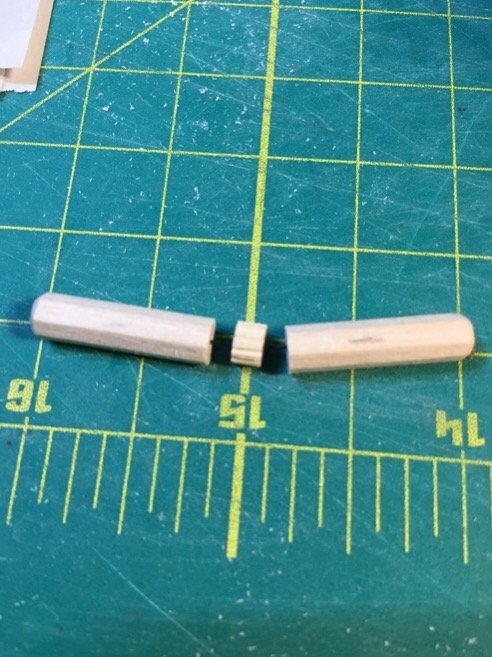
Windlass is done! The black thread (2 wraps) with a touch of CA glue for shine gives a good impression of metal bands. The wood was prestained prior prior to any glueing. The guide holes and the wire did a decent job of keeping me honest during glueing. Used carpenters wood glue so I could take my time while the glue setup to make minor adjustments in alignment. Good tip: I marked the bottom of the dowel to keep the consistency of when I cut my thread and to ensure when I put the entire thing together (7 pieces in all) that the windlass had a seamless look. Not a bad job for my first try! Pretty happy with the result. Compare it to the piece included in the kit...I just shake my head. Time well spent. 🍻 CHEERS! Moving on.... (Note: When making the separate parts and planning to fit them back together, I marked each of them along one face of the hexagonal barrel (before cutting it into separate pieces) so I could align them back when glueing the final piece...the marks are on the bottom, where a viewer cannot see the thread overlap or the pencil marks used for alignment!)


- 449 replies
-
- 10
-
-
- sultana
- model shipways
- (and 2 more)
-
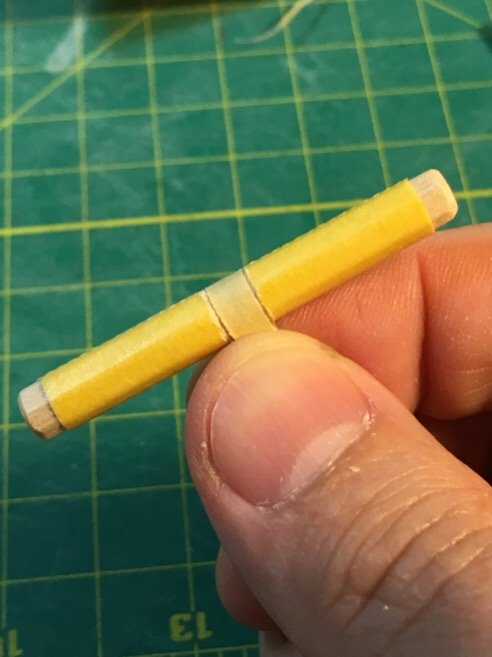
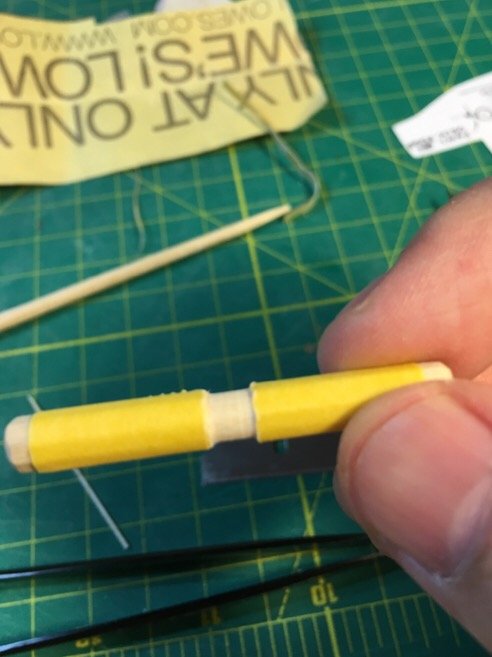
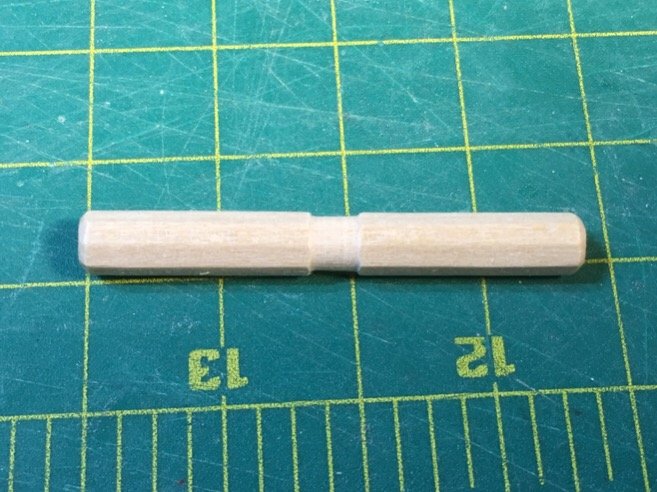
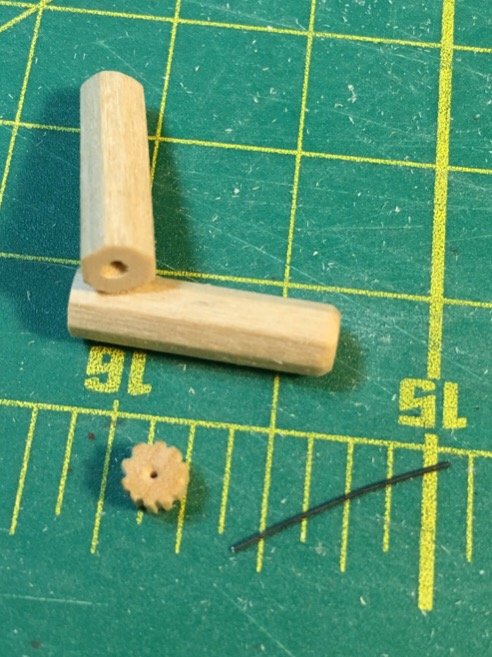
Windlass 101: Measured dowel and decided to use painter's tape to allow me to sand down the center. Walaaa...instant cog. Then cut out center, filed in the teeth, and drilled in some guide holes into the barrels and cog to allow greater control and stability both during and after glueing. The parts are small, so this once again took some time. Will plan to use black thread instead of tape for simulation of iron bands. Square holes are easier...predrill the holes and use a jeweler's Phillips head screwdriver to square it out. Looks pretty good so far, but still have some ways to go before I can have a Windlass Party!!


- 449 replies
-
- 7
-
-
- sultana
- model shipways
- (and 2 more)
-
Ok. Decided to try to get a bit of progress on the windlass. As before, following Chuck's practicum. However, I am crap at trying to shape a dowel. Truth be told. So I was liberal in experimenting with other doewls. Rather than try to get a perfect 1.8mm diameter taper from the middle to end of barrel, I decided to keep it a homogeneous diameter. (Just trying to give the ship a warm look, not win a beauty pageant!) Happily, I did finally manage to arrive at a roughly hexaganol shaped barrel. Also made 2 separate sets of windlass cradles in case I screw up. 😁 Moving on....

- 449 replies
-
- 3
-
-
- sultana
- model shipways
- (and 2 more)
-
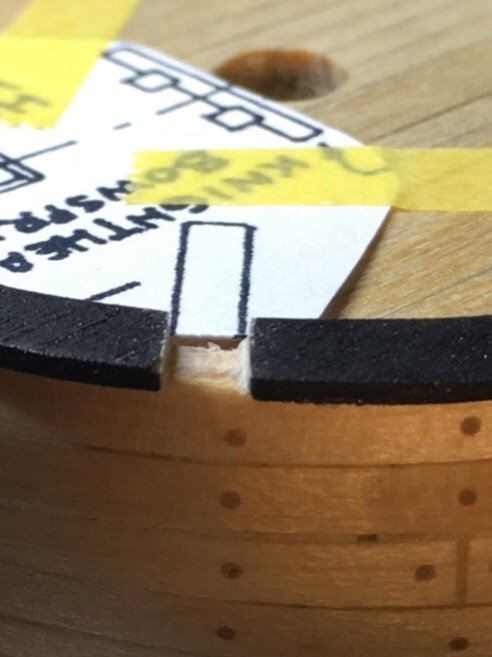
I think option 2...with the added clarification that I design and test fit the cheeks first. Then I can fill in the current hole and then drill the new one before putting in the cheeks. Should be less stressful and give a cleaner look. We shall see. 🙄
- 449 replies
-
- 2
-
-
- sultana
- model shipways
- (and 2 more)
-
Yes...I am now looking at the stem/stern more critically as I prepare for future activities. I am loathe to say this...since my wales curve up a bit higher towards the bow, I mistakenly drilled out the gammoning hole higher on the stem than it should have been. Crap. What to do....two options. 1. Live it and adjust 2. Fill the current hole with some colored wood filler (try to match the wood) and redrill the gammoning hole AFTER the cheeks are in.... hmmmmm. What to do.....
- 449 replies
-
- 2
-
-
- sultana
- model shipways
- (and 2 more)
-
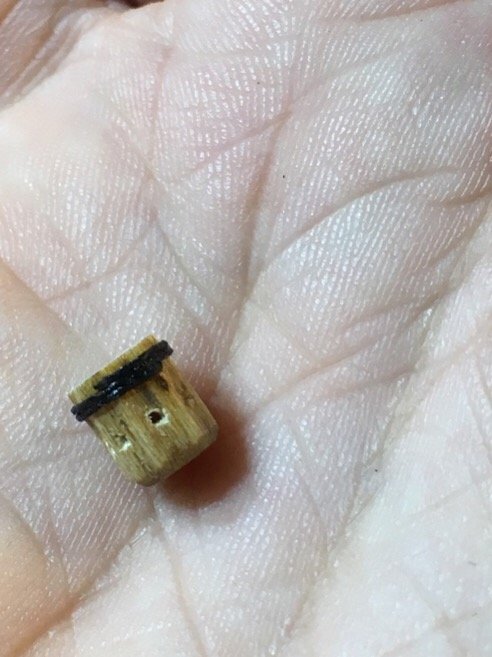
The ship pumps are done! Not too bad for my first scratch built pumps. Once again, totally agree with Chuck P. On his assessment of the pumps provided in the kit. They are awful. The molding is also pretty shoddy, so if you plan to use them, be prepared for a lot of filing! I will say that the furniture provided in the kit is 'useable' but would not impart much warmth. It really is a great feeling to see something which looks more natural. It also makes the appearance of the deck much more authentic!! I consider my pumps and my binnacle to be my two best accomplishments so far. Considering using the kit supplied windlass...need to think about this a bit more...🤔 Moving on! note: the pumps are small! I really took my time and also took the cowards way out by reinforcing the tiny joints with slow CA to keep the wood for splitting.

- 449 replies
-
- 6
-
-
- sultana
- model shipways
- (and 2 more)
-
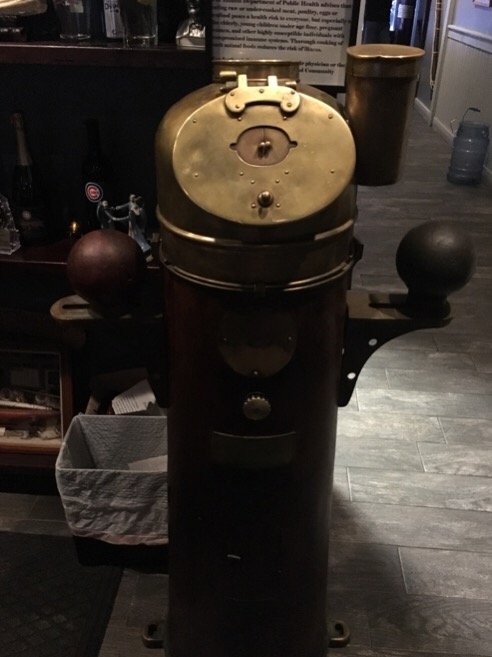
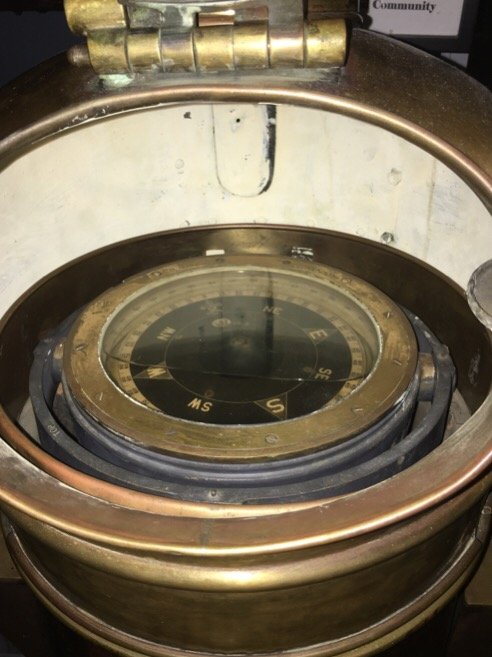
So...my nautical knowledge being in its infancy, had to look up what a binnacle was. Still, without seeing firsthand what it was, I was following Chuck's practicum to get the gyst for my own binnacle construction. Funny enough, had dinner last night at Dover Straights (seafood restaurant) and the reception desk had an old binnacle. Had to snap a shot...😊 On to pumps. The kit pumps are abysmal so Chuck is bang on the point ... trying to make them is difficult. Quite small but my binnacle construction is giving me newfound hope I might not totally botch the job. Problem I encountered was using tape to simulate the iron banding around the pumps. Simply could not do it...so used thread instead with CA to give it some shine. These pumps are so small I don't think a casual observer should see too much of a difference. Also, the spouts were simply too small for me to manage as a rectangular shape. Simply snipped off the tip of a toothpick and inserted into hole made with a pin vise. Thinking ahead, decided to drill straight through barrel to allow for insertion of a pin once they are ready to be glued to the deck. May not need it, but will have the option once they are ready. A pin will help keep them centered and aligned if I need to adjust them before the glue sets. Moving on... to watch the Bears game...😁

- 449 replies
-
- 5
-
-
- sultana
- model shipways
- (and 2 more)
