


bartley
-
Posts
424 -
Joined
-
Last visited
Content Type
Profiles
Forums
Gallery
Events
Everything posted by bartley
-
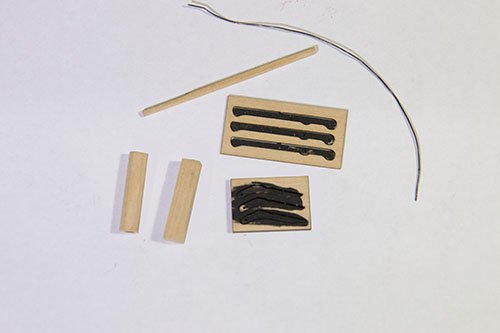
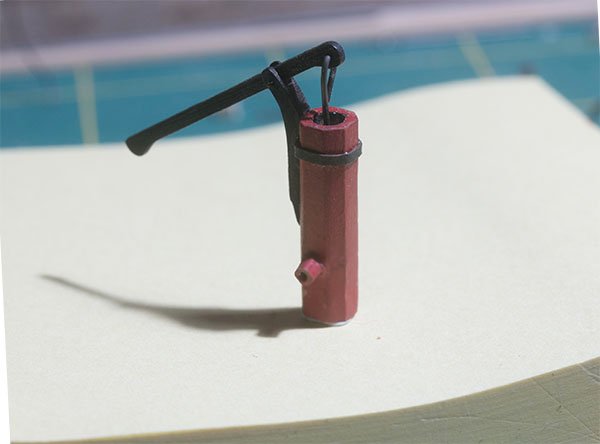
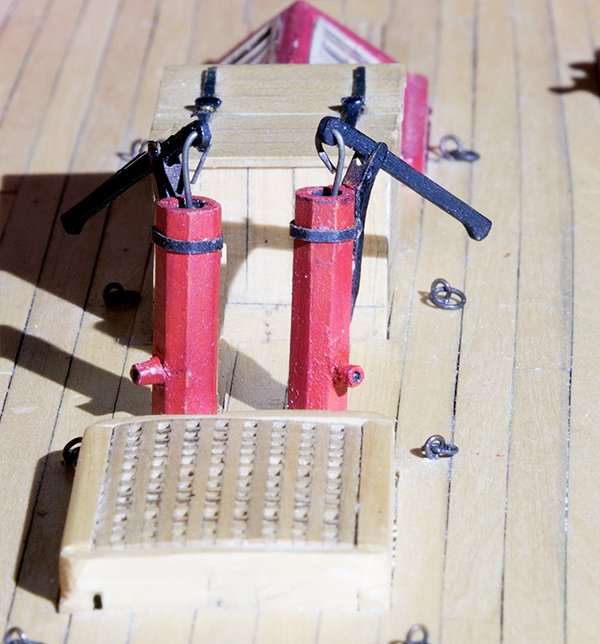
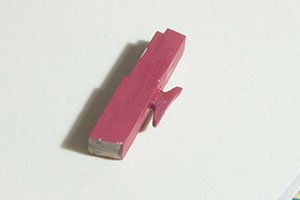
Post 44: Elm Tree Pumps. Once again a nice little mini kit from Chuck: The first task was to make an octagonal profile from the square stock provided. Chuck provides a 7:10:7 template. I made several copies of this and then glued them to each side. I then used my Veritas mini plane to plane down to the lines. After painting assembly was achieved as per Chuck's instructions. The bracket for the handle has to be modified by filing a slot into it to take the handle. This was quite easily done with a micro file. Then assembly as per the instructions was straight forward. I found that the most difficult part was inserting 28 gauge wire through the bracket and the handle. Initially one side of my carefully made slot broke off!. Fortunately Chuck provides three sets of parts for two pumps and the second time I was more careful. And here they are installed on the deck John

- 160 replies
-
- 8
-

-
- cheerful
- Syren Ship Model Company
- (and 1 more)
-
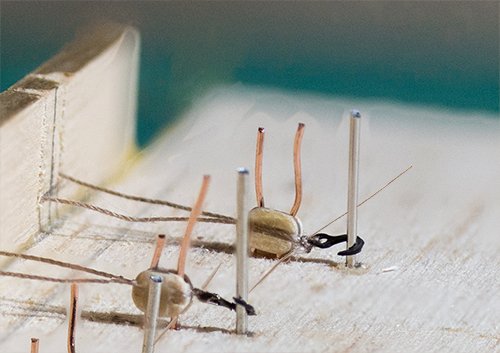
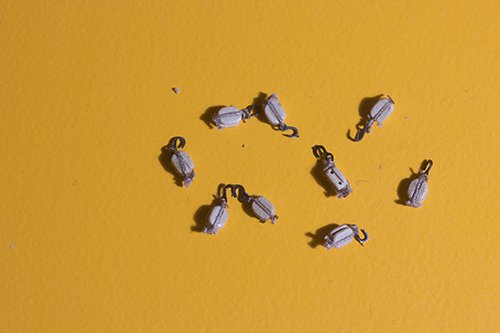
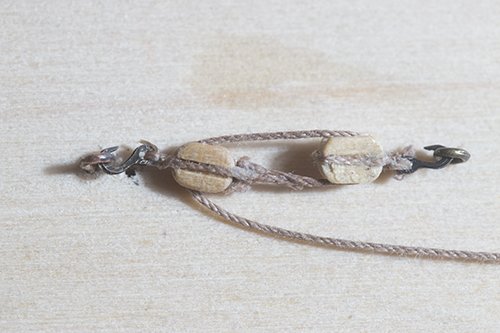
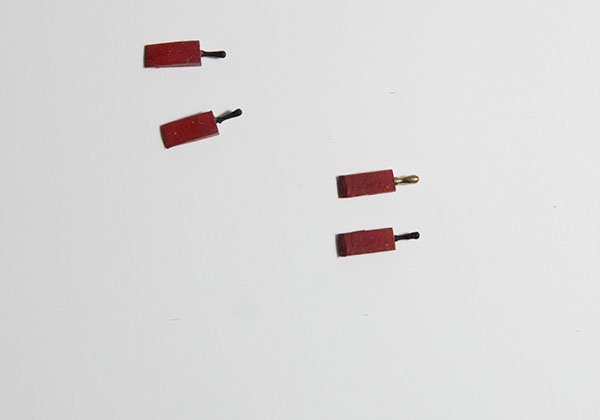
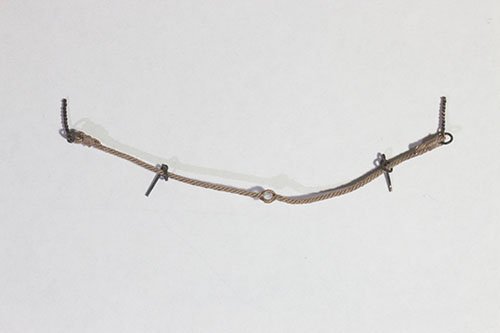
Post 43: Cannon tackle These were made up from Syren 3mm blocks and 3mm hooks from Dafi. There are all sorts of jigs described on this site for siezing these. I found it pretty difficult to achieve a neat appearance on these small blocks. Here's the jig I used The blocks were held by two copper pins epoxied into the board. Syren 0.3mm rope was threaded through the hook then around the block and held in place by slots cut into the vertical board. short length of fly tying thread was wrapped a couple of times between the block and the hook just to keep the hook from binding on the block. The rope was glued to the block with 50:50 PVA and when this was dry it was tied off to the back of the block with a square knot. After sealing this with hypo cement and trimmed off with a sharp scalpel blade. Hereare some examples The tacles were rigged on a jig with two eyebolts and jecked on a mock up gun before rigging to the guns on the deck. Finally, rope cols were made by wrapping rgw rope around a 3.6 mm dowel and sealing with 50;50 PVA I am not entirely satisfied with the look. They are pretty untidy and the blocks are very close together (as I suppose they would be). I could have used smaller diameter ringbolts but this would only have separated the blocks about by another 0.5 mm. The only advantage would have been that it would probably have kept the hooks in place. I found that they slipped out of these ringbolts very easly and so it was tricky to get both rings secured. John
- 160 replies
-
- 6
-
-
- cheerful
- Syren Ship Model Company
- (and 1 more)
-
Syren Servo-Matic mouse making attachment
bartley replied to WalrusGuy's topic in Masting, rigging and sails
A method which I found somewhere on this site is to make a wooden "mouse shaped" former with a hole in the center for the rope and then cover this with fine gauze like surgical type. Paint it black and it gives a woven look and to me looks pretty authentic. John -
Lego works well as well. John
-
Reducing mast circumference without a lathe
bartley replied to Charlie pal's topic in Masting, rigging and sails
I don't think so. At least not the way I do it. When I make the octagonal shape using a V jig there is no taper. I establish the taper during the sanding. I calculate the diameter about 5 or six times over the length and then keep checking with a micrometer as I go. John -
Reducing mast circumference without a lathe
bartley replied to Charlie pal's topic in Masting, rigging and sails
This my home made wood lathe. The plate contains a roller blade bearing and there is a ledge on the back so I can clamp it to the table. The id of this is about 10 mm . for narrower spars I insert a wooden "washer". I have two of these boards and for long masts I place one in the center to add more support.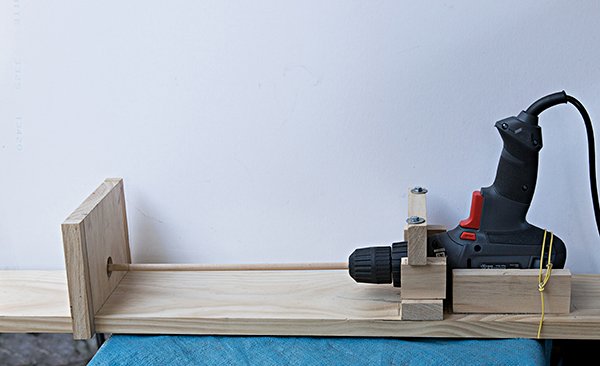
-
Reducing mast circumference without a lathe
bartley replied to Charlie pal's topic in Masting, rigging and sails
It also helps to reduce the spar to an octagon first and then apply any of the methods described above. There are several reports on this forum about how to produce a regular octagon. John -
No, I haven't tried any of these products on synthetic rope. The rope I show is Syren rope. I am sure the effect will be different on polyester rope. The fly tying cements hold quite well but they are an expensive option and as Bob says, shellac is pretty cheap. John
-
Yes indeed, Bob. I should have mentioned that one as well. John
-
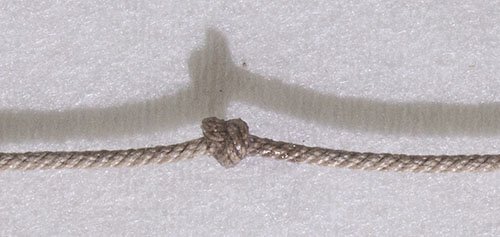
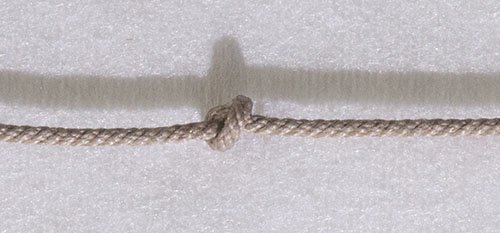
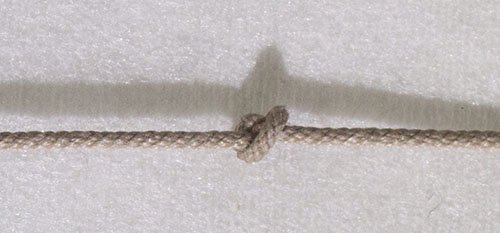
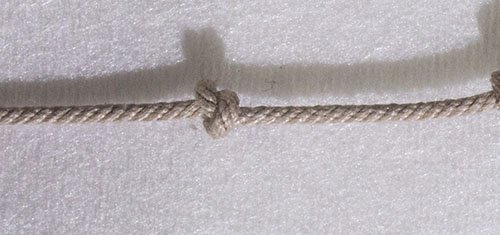
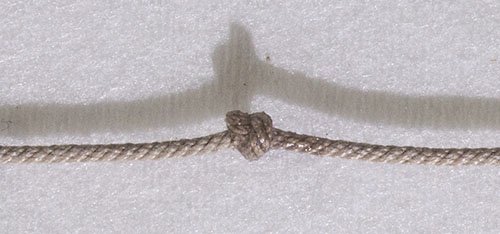
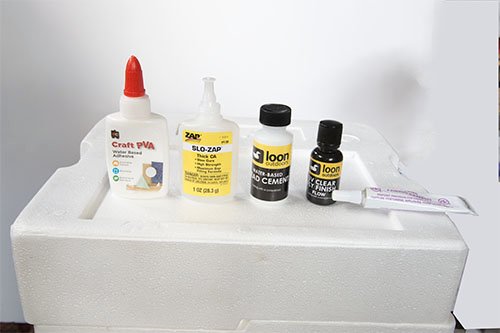
When rigging our ships we all have a need to secure knots to stop them loosening. There is a range of products available for this purpose so I thought that I might express my opinions on the subject. Here are some of the products available: As with most on this forum, diluted PVA is my “go to” for stiffening rope, attaching rope to blocks etc. The only comment I would make is that I think on rigging one should use a non-acidic product (pH7). The pH of Titebond for example is about 2.5 (very acidic) and I would be concerned about the long-term effects of this on natural fibre rope. However for securing knots (on ratlines for example) I am not sure that it has enough " holding power". Many use CA for this purpose. I am not a big fan of CA. I don't like its toxicity (although we are only using small quantities rather compared to industrial use). However, my main objection is that it forms a rigid, sometimes brittle, bond. It often discolours the rope and is glossy. My “go to” for this purpose is Hypo Cement. For those who do not know this product, it is a fabric cement used primarily by costume designers and appliqué artists and so it forms a flexible almost transparent bond. There is also a range of fly tying cements – some solvent based and some water based. Below I show some knots treated with various products. I know that only a small drop is needed to seal a knot but here I have covered the whole knot in order to try to demonstrate the differences. Unfortunately the differences are not so obvious in the photographs PVA. CA Hypo Cement. Fly tying Cement Water based Fly tying. UV activated Fly tying Amongst the fly tying cements the water-based version seems to be the best and while the UV version is attractive, it seems to darken the rope and is rather glossy. John


-
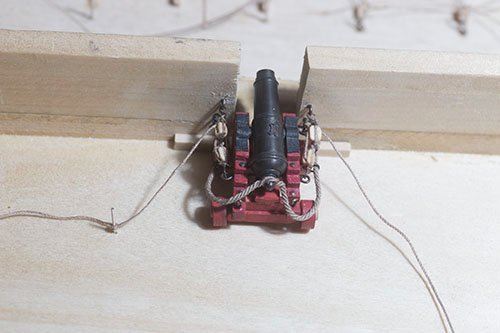
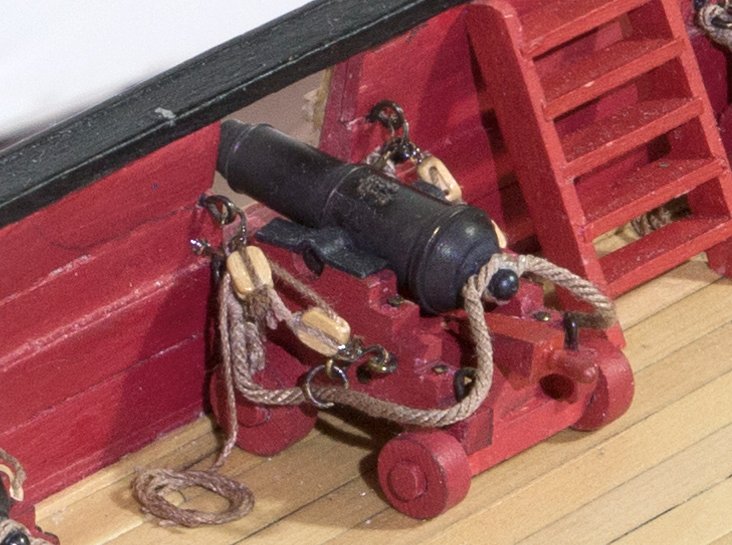
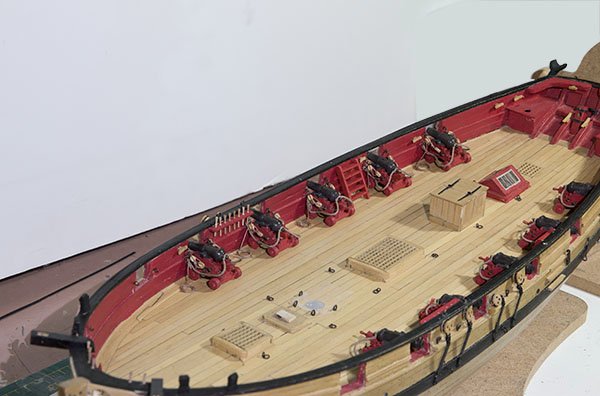
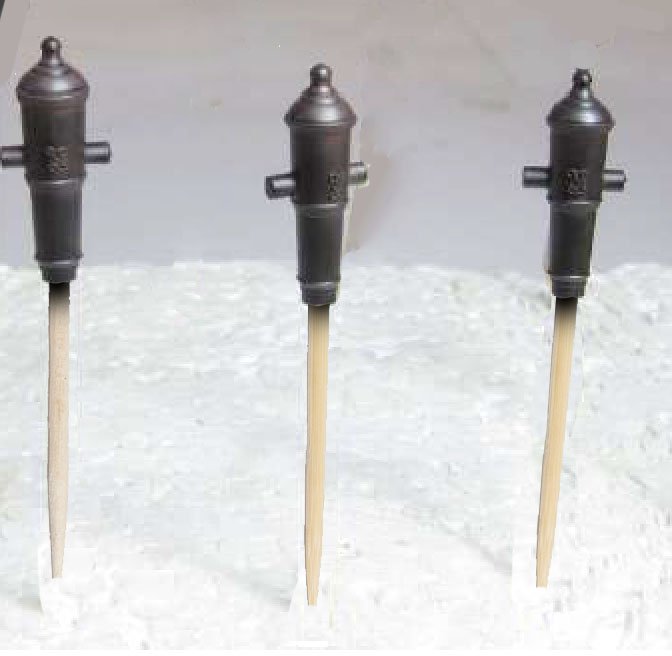
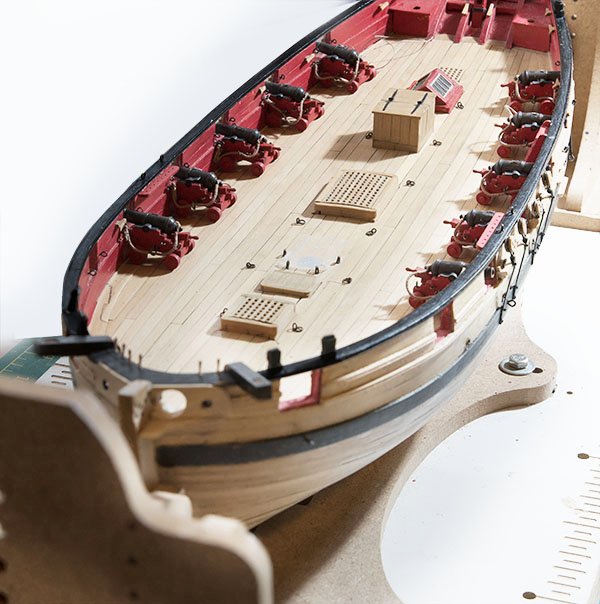
Post 42: Mounting the Carronades Time to mount the carronades on the deck. But first a couple of points I failed to mention earlier. Blackening, the guns The guns were blackened by the method suggested by chuck involving spraying with black paint (Vallejo warm black in my case) and then brushing with Rusty Brown weathering powder. I have some etch primer for brass but I find that it is quite viscous and destroys the detail a bit. So I spayed the black directly on the brass cannons after washing them in soap and water and then a dip in acetone. Because the coating is therefore a bit delicate, I gave them a final coating with matt lacquer. The final effect can be seen in earlier posts (38 and 41a) Quoins I avoided adding these until I had established the correct elevation of the guns. I initially made the handles from wood which I thought were nicely to scale. However they proved too fragile and broke at the slightest provocation. They were a real pain to drill out and replace, especially if they were already glued to the carriage. So in the end I replaced them with some slightly larger brass ones which I had obtained from Master Korabel. They may be slightly over scale but at least they are more robust. Mounting the Cannons In post 41 you will see that the ring bolts for the bulwark are of the twisted pair type. I am a bit paranoid about these pulling out. They were shortened of course so as not to penetrate the hull planking. They fit tightly into a 0.6 mm hole which had been pre-drilled before the deck was planked. A few that were a bit loose for some reason were glued with a spot of epoxy. The cannons were attached to the deck with a spot of PVA on the wheels. This proved slightly problematic because although the seemed quite firm, a slight bump with my clumsy hands broke the bond. The deck had a couple of coats of Poly so it was not really a wood to wood bond. I notice that Stuntflyer pinned his rear wheels to the deck and I can see why he did that. I decided that this was a lot of effort and just elected to reglue any that were dislodged. Here are the mounted cannons: The next challenge is to make and fit the out-haul tackle. I will need to think about this for a while. I will be using Syren 3 mm blocks and 3mm hooks from Dafi. These are pretty small for old hands! John
- 160 replies
-
- 10
-
-
- cheerful
- Syren Ship Model Company
- (and 1 more)
-
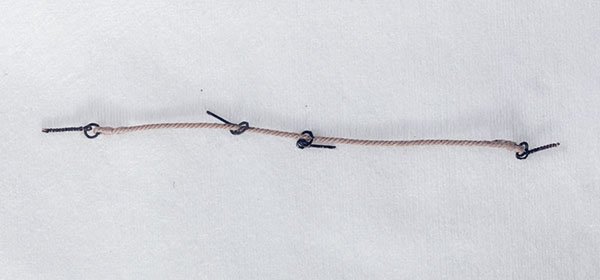
Post 41a: Breech Ropes / Carronades Here are the breech ropes fitted to the carronades ready for installation on the deck.
- 160 replies
-
- 5
-
-
- cheerful
- Syren Ship Model Company
- (and 1 more)
-
Post 41: Breech Ropes These were made as described by Chuck using .035 Syren rope 3" long. In my case the connection to the ring bolt in the bulwark was made using a whipping close to the eyebolt. Bulwark eyebolts: 26 ga wire and 2.8mm rings (silver soldered closed). Carriage eyebolts: 24 Ga wire and 3.8mm rings. and then the center eyesplice made using an awl and coating with diluted PVA While on the subject of securing knots I thought that I might express my opinions on this. As with most on this forum, diluted PVA is my go to for stiffening rope, attaching rope to blocks etc. However for securing knots (on ratlines for example) I am not sure that it has enough " holding power". Many use CA for this purpose. I am not a big fan of CA. I don't like its toxicity (although we are only using small quantities rather than an industrial scale). However my main objection is that it forms a rigid, sometimes brittle, bond and is glossy. My go to for this purpose is Hypo cement. For those who do not know this product, it is a fabric cement used by primarily costume designers and applique artists and so it forms a flexible almost transparent bond. Below I show some knots treated with various products including fly tying cement. I know only a small drop is needed to seal a knot but I have covered the whole knot here in order to try and show the differences. PVA CA Hypo Cement Fly tying cement Water based fly tying UV activated fly tying You will notice that there a number of versions of fly tying cement. The UV version is attractive but it seems to darken the rope and is rather glossy. Here are some of the products mentioned: John


- 160 replies
-
- 4
-
-
- cheerful
- Syren Ship Model Company
- (and 1 more)
-
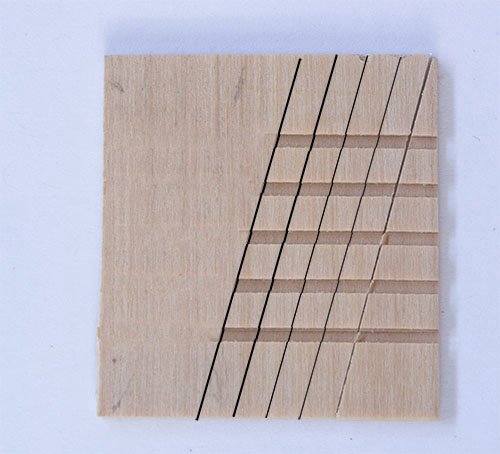
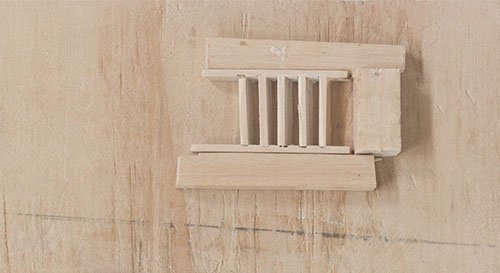
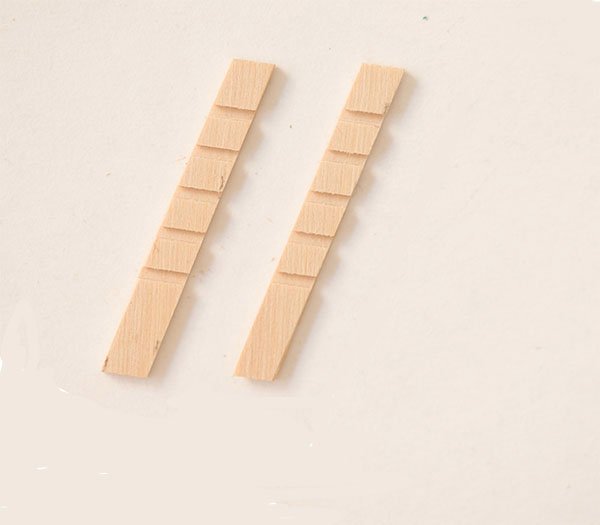
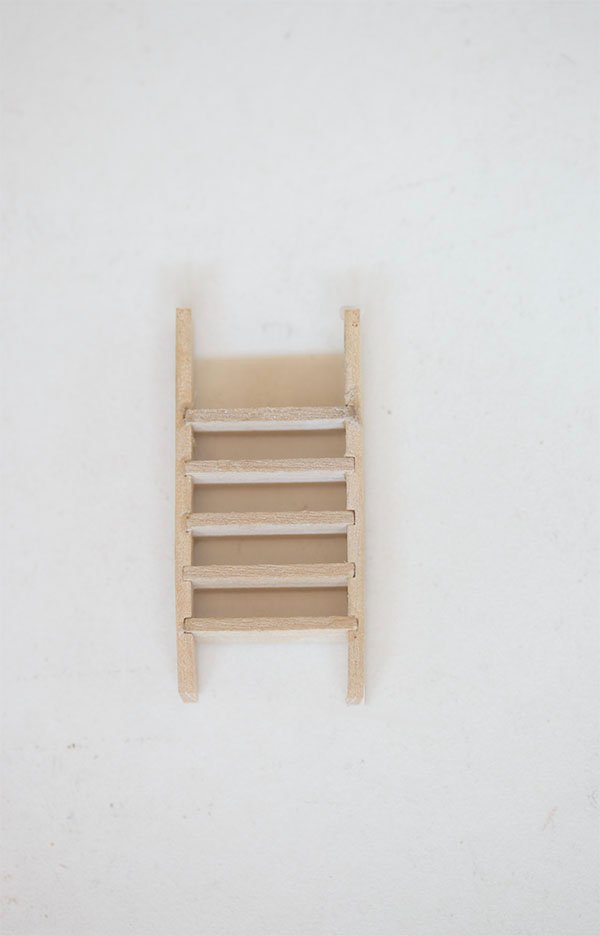
Topic 40a: Internal Ladders I have been asked to provide a bit more detail on ladder construction. So for what its worth here's what I did: First I made a jig with the correct angle from the plans Then I glued 4mm strips to this with a glue stick With my friend's mill I then cut slots at equidistant intervals. Flipping the jig gave ne left an right sides. For assembly I used this second jig to ensure the sides were parallel and the steps at right angles.
- 160 replies
-
- 6
-
-
- cheerful
- Syren Ship Model Company
- (and 1 more)
-
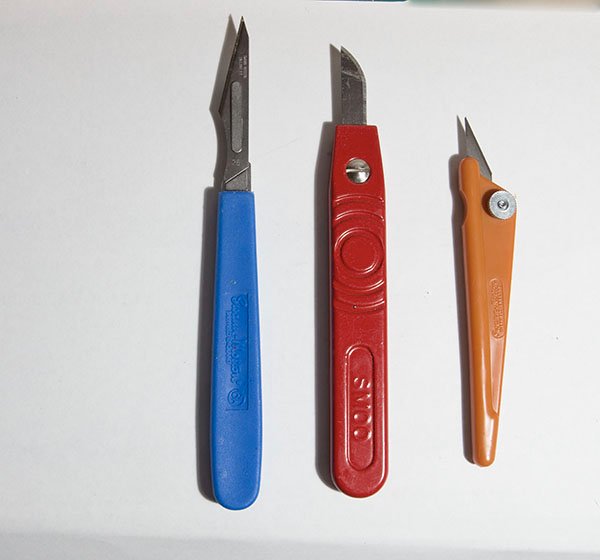
Glenn, If you decide to have a look at Swann-Morton blades make sure you match the handle to the blade type. The handles are sold separately. So the blue is the conventional scalpel blade holder. This is the one I use mostly and the blades are about 2/3 the price of Excel blades (at least out here), The red is I think called a SM00 Handle and takes a different style of blade. You will see that I have a different shaped blade in this one. The orange Craft Knife has a different style blade again and I only obtained it by accident because I bought the wrong blades and had to buy a handle to fit them so I could use them up. John
- 778 replies
-
- 3
-
-
- cheerful
- Syren Ship Model Company
- (and 1 more)
-
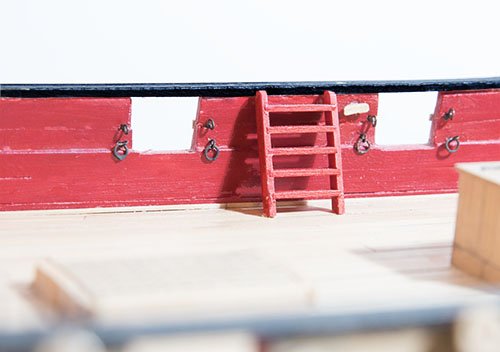
Post 40 : Internal Ladders I love these little scratch building projects in this build. They look easy but, on reflection, are more difficult than they seem at first (at least for me). Chuck’s excellent instructions are a great help – better than the kit, which I built previously. However, I notice that he often stops short of providing the intimate details on how to build a particular component. Far be it for me to read his mind but I believe he wants us to problem solve. In this case, for instance, there are photos of the shapes of each of the parts. However, we must get the dimensions and angles from the plans. How do we ensure that the angles of the steps are all the same, that the sides are parallel, that the port and starboard ladders are the same but mirror images? I solved these problems in my own way but I always face something of a dilemma in providing a “how to” in my log. Firstly, though I have learnt a huge amount from "how to" descriptions provided by others on this site, this is only my second build so I am very inexperienced and the way I stumble along and solve these little challenges is probably of little interest because experienced builders have probably solve the same problems long ago. Perhaps more importantly, the problem solving is exactly what I enjoy so much about this build. So, by providing intimate details on how to build a component, do we actually spoil the experience for others? Those who built this ship earlier like Rustyj, Rafine and Stuntflier perhaps had a better experience because they had no “how to” and had to solve the problems themselves. Anyway here is how they look:
- 160 replies
-
- 6
-
-
- cheerful
- Syren Ship Model Company
- (and 1 more)
-
Good work Glenn. I found this almost the trickiest part of the whole build and much of my precious supply of boxwood ended up in the bin! Incidentally, I notice that you use No. 11 blades. For what its worth, coming from a beginner, I have given up on these in favour of Swann-Morton scalpel blades. I found the No 11's lost their edge pretty quickly. The scalpel blades seem to last longer and are cheap. I also find their hobby handles very comfortable. You are catching up to me fast. I am enjoying the build but am a bit slow and bumbly. John
- 778 replies
-
- 4
-
-
- cheerful
- Syren Ship Model Company
- (and 1 more)
-
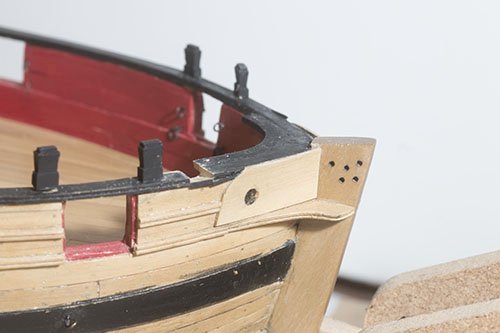
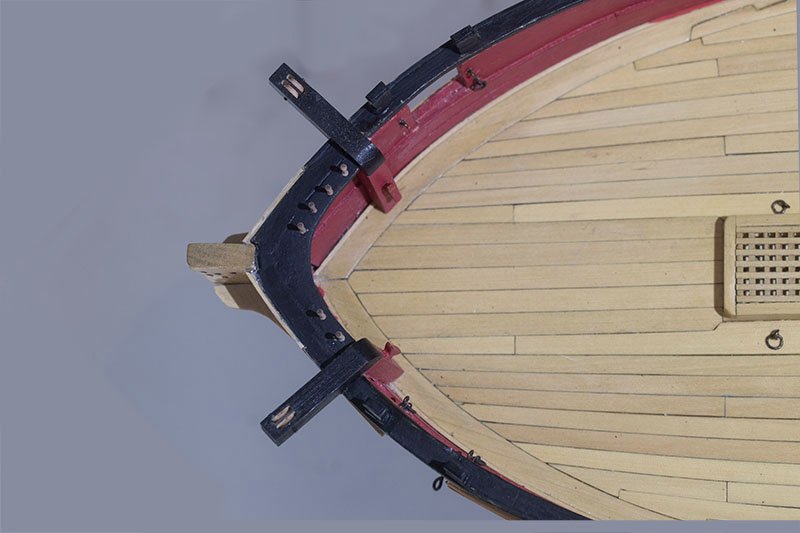
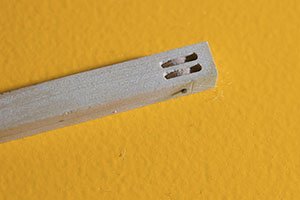
Post 39: The Catheads As suggested by Chuck these are made in two parts from 3/16 square stock which was cut on my Byrnes. The first step was to cut slots into the caprail - always a scary business, cutting holes in nicely fabricated parts. The inboard part was made first and notched to fit the spirketing and the waterway: Slots were cut for the sheaves using a micro mill. I do not own one of these but i have access to one via a colleague whom i cut planks for. However, as always with this kind of arrangement, I am not very competent because I never learn by experimenting. Finally the inboard end was round to fit. The idea is that it should look like one piece - which as it presumably was. Cut from the elbow of a tree I presume. So finally the two parts were glued in position: John

- 160 replies
-
- 11
-
-
- cheerful
- Syren Ship Model Company
- (and 1 more)
-
Yes Glenn, After all they are our models so we can do what we want. I think that the main issue was that someone wanted to use black rims to simulate metal bands so it was pointed out it that would not be done on a ship as it would damage the deck. Then that morphed into avoiding black altogether because it looked like metal. But our gunwales are black and no one says the look like metal! John
- 160 replies
-
- 3
-
-
- cheerful
- Syren Ship Model Company
- (and 1 more)
-
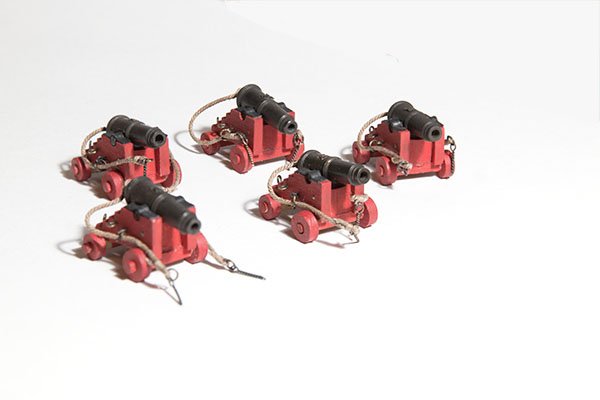
Post 38: The Carronades This is a first for me (my previous build had no guns) so I am enjoying the process but it is quite a slow business for me . I quite like the look of black trucks but being mindful of the discussion on this point from Druxey and others it seems that the consensus is "any colour but black" so I have gone with red. I placed a few on deck to see how they would look. Just as on the chain plate straps, I used chuck's method for the blackening of the cannons (painting followed by weathing powder). The rigging of the guns is next. The breech rope is quite straight forward using the method described by Chuck but I am finding fabricating the in-haul tackle much more of a problem. I am exploring a few methods at the moment n order to find one that is quick enough to make the 40 or so blocks with hooks yet produces an acceptable appearance. John

- 160 replies
-
- 9
-
-
- cheerful
- Syren Ship Model Company
- (and 1 more)
-
Great build Glenn! I am interested in your brass support pedestals. Cheerful is only my second build and my first one came with wooden pedestals. Did you make them yourself or are they available commercially? John
- 778 replies
-
- 2
-
-
- cheerful
- Syren Ship Model Company
- (and 1 more)
-
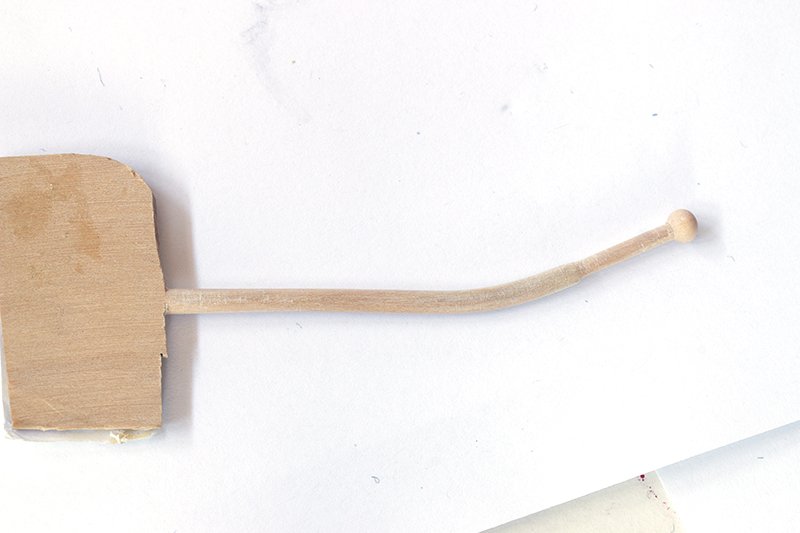
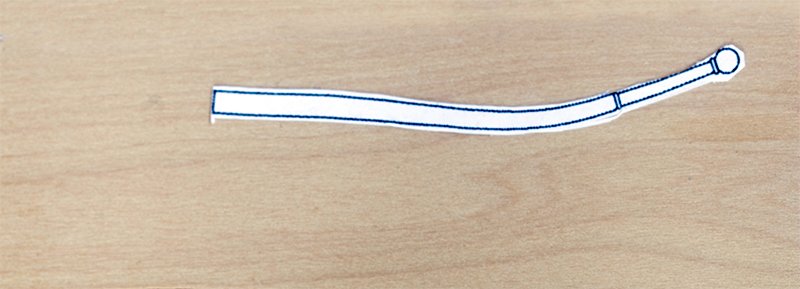
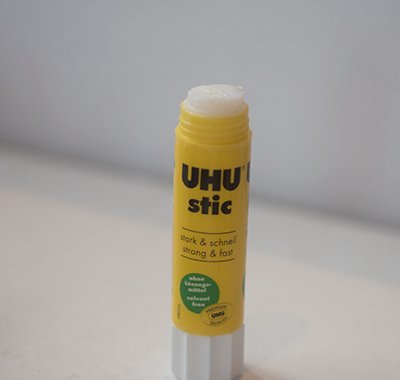
Post 37: The Tiller The fabrication of the tiller was straight forward. I glued the profile from the plan to 2 mm boxwood sheet with a glue stick. I prefer this method of attaching paper rather than PVA as it us easily removed with alcohol leaving no residue. Then, after cutting out the shape with my Knew jeweler's saw, I used files and sanding sticks to make a round profile. I found that leaving a chunky handle made the sanding process easier I will not install it yet as it is quite fragile and I am concerned that it might snap while I am adding other deck fixtures John
- 160 replies
-
- 5
-
-
- cheerful
- Syren Ship Model Company
- (and 1 more)
-
I totally agree Patrick. I solder most of my rings closed and when using true silver solder the annealing makes them so sloppy I may as well use a rubber band! There is little force on these rings so Stay-Brite provides adequate strength. John
-
Byrnes Table Saw making a 1mm by 1mm strip
bartley replied to CharlieZardoz's topic in Modeling tools and Workshop Equipment
Excellent advice, Bob. I would add Rule 4: Rehearse the cut. i.e. without the saw running push the work through exactly as you plan to do. This enables you to answer questions like - where will my hands be? Is there any obstruction on the exit side? etc. John -
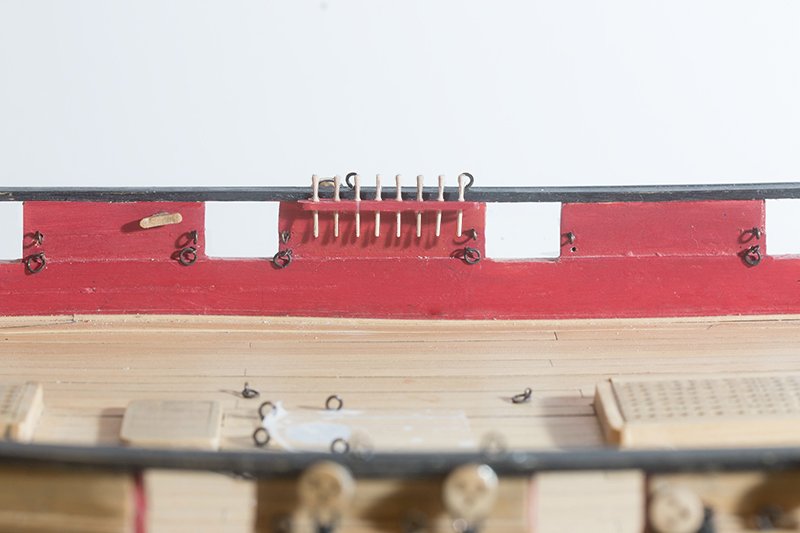
Post 36: Pin Rails The port pin rail is now installed. Rails are made from 3/64 strip and 4 mm deep. O.9 mm holes keep the pins reasonably tight: Starboard still to do and the bow rail will need to be replaced as I drilled the holes too large, John
- 160 replies
-
- 8
-
-
- cheerful
- Syren Ship Model Company
- (and 1 more)