


bartley
-
Posts
424 -
Joined
-
Last visited
Content Type
Profiles
Forums
Gallery
Events
Everything posted by bartley
-
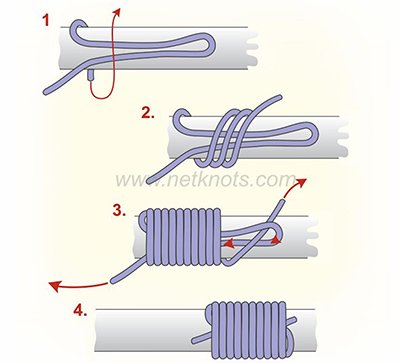
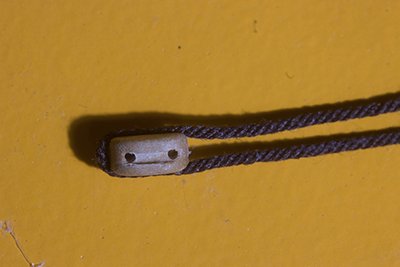
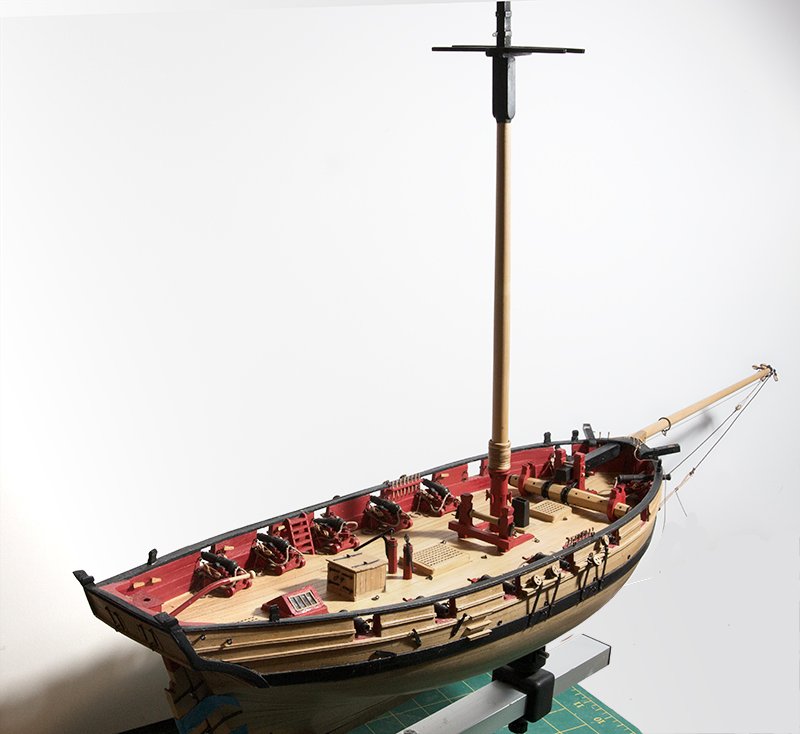
Post 53: Burton Pendants I decided to install these before installing the topmast so that they can be slipped over the mast head. The seizing of the blocks is nothing new but I show my procedure here for completeness. Normally I use a standard whipping of about 10 turns. If a shorter length of seizing is required as in seizing hooks, I use the simpler West Country whipping. And now the pendants in place - tied off temporally:

.thumb.jpg.37f5d76809b26324b6060cab329b4b23.jpg)
- 160 replies
-
- 10
-

-
- cheerful
- Syren Ship Model Company
- (and 1 more)
-
Modelers certainly do not need to know much chemistry but for the record I have covered it here. I have not used the Caswell product but its composition seems similar to Birchwood Casey in that it contains both selenious acid and molybdate and the acid is phosphoric. The concentration of these products varies but I would recommend diluting then to slow down the reaction. This seems to delay the build up of the "flakey" material which rubs off. John
-
OK John, pickling solution is chemically sodium metabisulphite. It is used by jewellery people to clean metal and is sold in The US under the trade name Sparex, See here for some discussion of its use in blackening. It is a really good way of cleaning contaminants from brass but if you use it take care not to overdo it as it actually etches the surface of the brass and prolonged use will destroy minute detail. I use 10 min at 60 degrees Celsius. John
-
Glenn, If you look at posts 30 and 41 in my Cheerful log you can see what I did. I make no claims that these are correct of course. John
- 1,784 replies
-
- 4
-
-
- winchelsea
- Syren Ship Model Company
- (and 1 more)
-
John, What is your cleaning method? If you think there is a lacquer coating you need a good acetone wash. I then use a pickling solution but if you do this you must neutralise the pickling solution with bicarbonate and then wash this off before blackening. John
-
Further to my comments above cleanliness is vital as well. The surface of brass is often treated with lacquer and even if not there is an oxide layer on the surface. These areas will not blacken so the surface must be cleaned to remove these layers. Often what happens is the surface is only partially cleaned. What happens then is that only the clean areas blacken so the article does not seem black enough and we leave it longer. Then multiple "flakey" layers build up in the clean areas and eventually rub off. In neat blackening agent full blackening should occur in about 10 sec. In a 1:1 dilution - about 30 sec max. If it takes longer than this your surface is still contaminated. John
-
Chuck does deliver to the UK. Just click the "Syren" link amongst the sponsors on the right hand side and that will take you to his site where you will see a description of his "Servomatic" which i use for serving. There are other models but his is simple and inexpensive. John
-
Dave On my Cheerful build log here I have just posted some information about how various threads influence the final diameter of the line. John
-
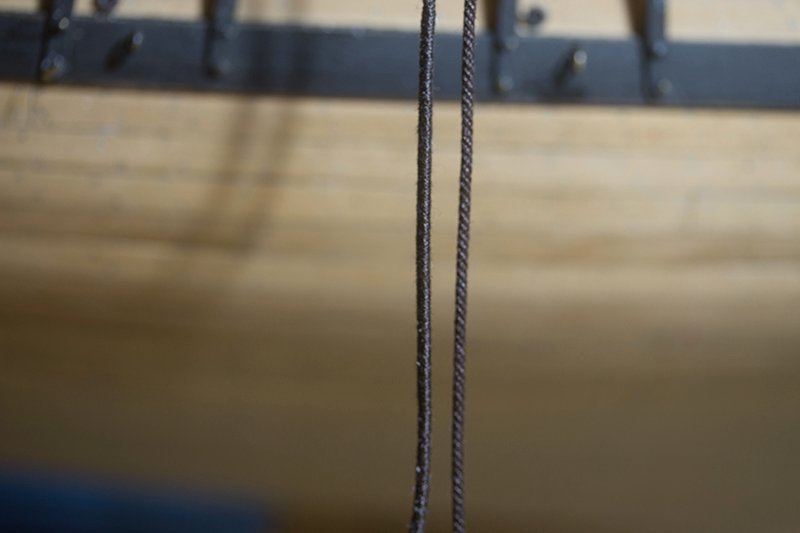
Post 52: Serving the Ropes I am using Chuck’s serving machine and his rope (a historical item now) To my eye many examples, which I see here and elsewhere are too heavy. I like a lighter look. My preference is to choose a different thread thickness depending on the original size of the rope. So, I use three different threads: Veevus 16/0 fly tying thread diameter -. 0.04 mm Veevus 8/0 fly tying thread diameter -. 0.06 mm Gutterman 50 wt cotton thread diameter 0.128 mm Mara 120 diameter 0.15 It is pretty difficult to measure these small diameters but they can be calculated from the Denier measurement and there are also some literature measurements which agree fairly well with the calculation. Of course, the main thing is what the result looks like when served on the rope and if it appear s correct to you but, for comparison, I have made some measurements on the final served lineI also made some measurement on the final thickness of the rope The first thing I should say is that Chuck’s rope is pretty close in diameter to what he says it is. 0.88 mm rope served withwith16.0 fly tyiing thread diameter 0.936 0.88 mm rope served with 50 wt Gutterman Cotton diameter 1.11 1.12 mm rope served with 16/0 fly tyiing thread diameter 1.26 1.12 mm rope served with 50 wt Gutterman Cotton diameter 1.47 1.37 mm rope served with 50 wt Gutterman Cotton diameter 1.60 (with the lay) 1.37 mm rope served with 50 wt Gutterman Cotton diameter 1.71 (against the lay) I prefer the appearance of the final line when it is served with the lay (as recommended by Druxey incidentally). It gives a slightly "bumpy” look as the thread partly fills the gap between the strands. However, this is a personal preference and others may prefer the more regular look obtained by serving against the lay. I generally find that this method produces a slightly lager diameter. I hope these data are of interest John
- 160 replies
-
- 8
-
-
- cheerful
- Syren Ship Model Company
- (and 1 more)
-
Proxxon DB-250 lathe extension bed
bartley replied to glbarlow's topic in Modeling tools and Workshop Equipment
I am not in a position to purchase a Proxxon lathe so I made my own using a hand drill The boards are drilled to accept a roller blade bearing. The far board is clamped according to the length of the mast. The central board is movable and acts as the "steady" to which you refer. If the mast is not the same diameter as the bearing I have a series of wooden "washers" which I insert into the bearing. In fact now I have several bearings with different sized inserts.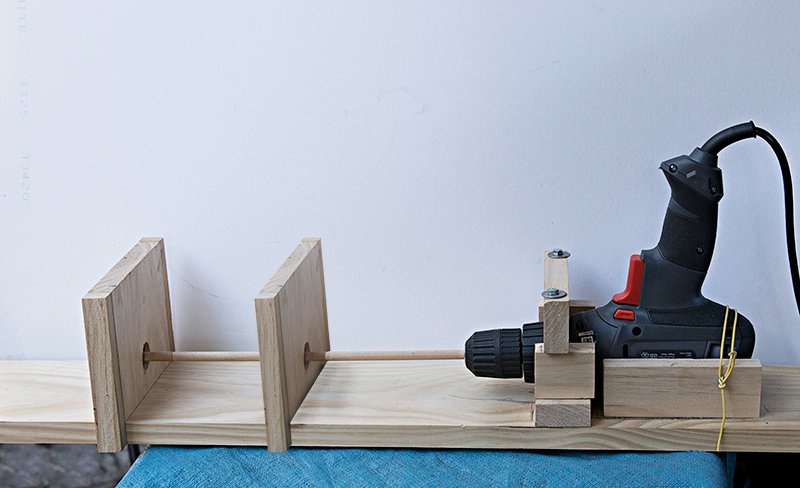
-
There are 10 carronades and two 6 lb chase guns. . The inscription on the NMM plan reads: "Draft for building in the merchants yards by contract two cutters or his Majesty’s Service to carry ten 18 pounder carronades and two 6 pounders for chase guns" See my version here John
-
Yes, I enjoy Marsalv's work as well. I wondered what you thought of Doris' work? I think my point was that it is amazing what she can achieve with simple tools. I certainly couldn't come close. Doris is Czech and I think Marsalv is Romanian. They probably don't have access to the parts as we do and are forced to make there own. John
-
Dave, Fly tying threads are indeed confusing. They have a different purpose of course. However, I can give you some information. Nominally the higher the number the thinner the thread so 16/0 is thinner than 8/0. I use Veevus 16/0. This is made of polyester and the diameter is 0.038 mm. Their 8/0 thread which should be twice the diameter but is given as 0.059. The strength (which is what matters to fishermen) is about double that of 16/0. Most threads are polyester but there are also nylon, kevlar and polyethylene threads. John
-
Good work again, Glenn. Interesting about the use of mills and lathes and things. I don't know if you know the work of Doris Obrucova. Her Royal Katherine is in my opinion an outstanding work of art. She has said many times that she works with simple tools (knives, sandpaper) and owns no power tools. A lesson to us all perhaps. John
- 778 replies
-
- 1
-
-
- cheerful
- Syren Ship Model Company
- (and 1 more)
-
JohnU If you read my posts on the chemistry if the process you will see that the selenium in the blackening agent does not "bond" to the brass but is physically trapped in little etched pits. If the process is too fast or prolonged for too long then several layers build up and these rub off easily. You will probably get better results if you dilute the reagent at least 1:1 to slow the process down. John
-
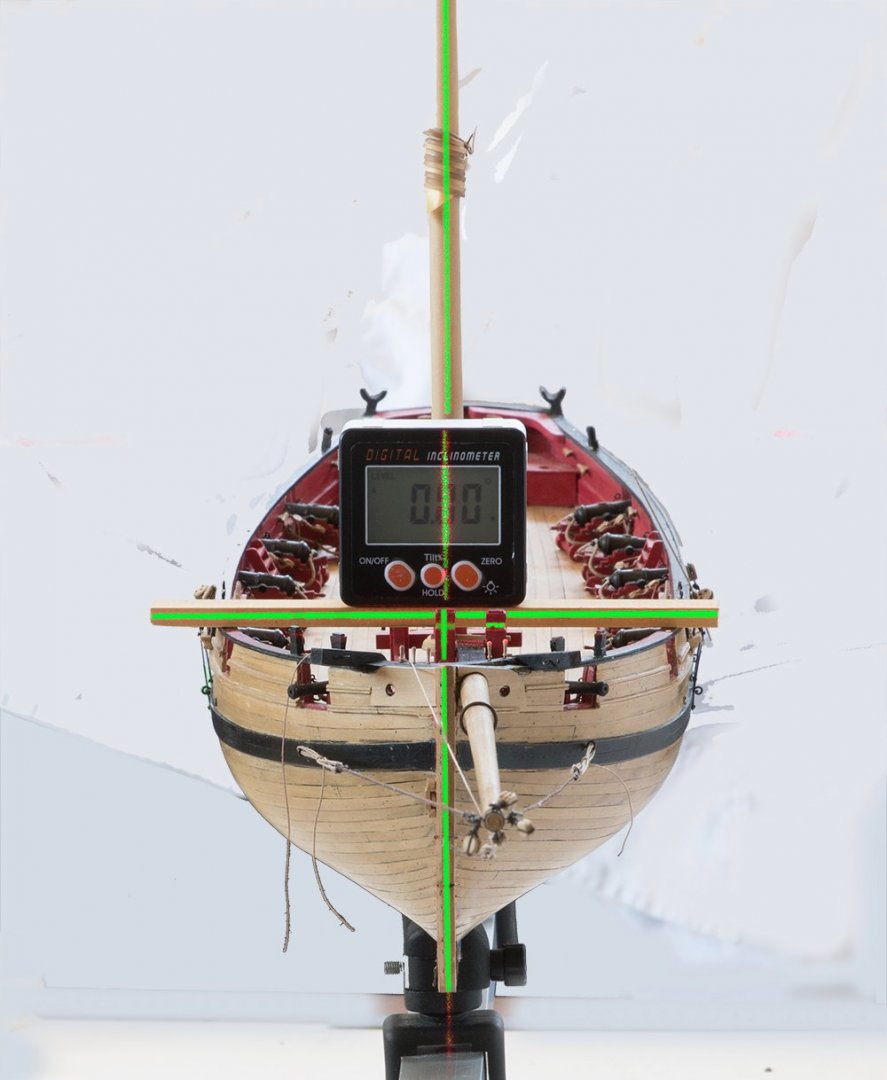
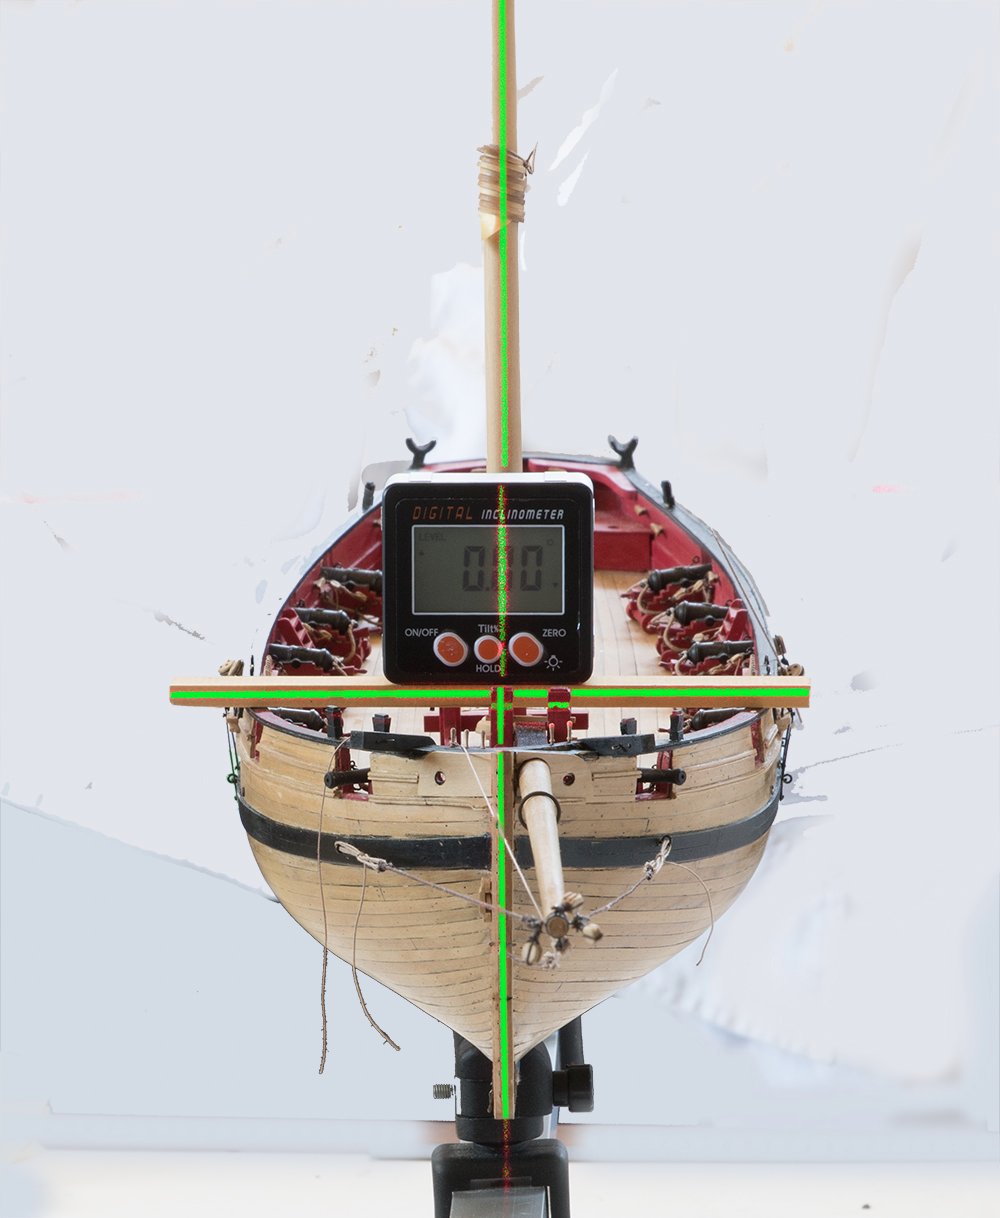
Post 51: Stepping the mast The mast was a fairly tight fit and so after leveling the ship with a digital inclinometer, a digital level in the cross- hair mode was to check the vertical alignment: Other distractions such as the Australian Open Tennis Championship and the Americas Cup have kept me out of the workshop lately and now it is the start of the rugby union season. I am also waiting for the delivery of some rope from Chuck so there might not be much progress for a while. This will give me time reflect on my rigging strategy. Chuck suggests rigging from the inside to the outside and I can see the logic in this. However does prevent preparing the shroud gangs off the ship slipping and other standing rigging off the ship and slipping the over the mast. They would need to be seized on the ship and, although my Quad Hands would help, I am not convinced I can do it uniformly and without damage to other fittings. I can always slip the shrouds over but not rig them until later. Its kind of messy so I need to think a bit more about it, John
- 160 replies
-
- 8
-
-
- cheerful
- Syren Ship Model Company
- (and 1 more)
-
Shipman, Oxygen is the culprit in the decomposition. This may sound like a cop out but oxidation is one of the most difficult processes to understand so it is difficult to predict what the products are. Firstly liver of sulfur is not a single chemical substance . It is a complex mixture. amongst the products of decomposition are sulfates which colourless but also sulfur itself which will be insoluble. In its pure state it is yellow but it tends to pick up impurities and and is often green or brown. If the product has been used there will be copper and other metal present so they may attach to the sulfur. One of my chemistry professors used to say " a little bit of colour goes a long way". Meaning you don't need much of an impurity attached to a pure substance for our eyes to observe the color as close to black. So its difficult to say what the black flecks are but my guess is that its supfur eit some impurites attached. John
-
Yes indeed, shipman, this is true. Liver of sulfur is a complex mixture of sulfides and polysulfides. Over time in air these decompose to in active sulfates. Shelf life may be less than a year, Strangely it works well on copper but not very well on brass which is 60% copper. John
-
Yes, Kurt this "sharp rap" is somehow different. Many years ago my son was sailing in a small boat constructed as a "klegicell sandwich" . This is foam core with kevlar fiber on each side. It was like rigid like a sheet of steel with respect to movement against the water but once coming around a mark, the boom of an another out of control sailor hit the side of his boat. Punched a neat hole straight through. So, very strong in one sense but very poor impact strength. John
-
Dave, My experience is that if it is bare wood there is usually some staining (depending on the timber and how long you leave it in contact). However, if the timber is painted there is no problem. These bolt heads were blackened after installation. John
.thumb.jpg.50a9d609754803d9f108b9765040aa96.jpg)
-
Shipman, A couple of extra tips: A clean surface is the key. You obviously know about pickling but don't overdo this step. Pickling is etching the surface of your brass so 10 min at 60 C is usually enough. Don't handle with your fingers now. So, into your soda bath to neutralise the acid, rinse under the tap, drain and into the blackening reagent. Don't immerse your items into the bottle of reagent. Put a small amount into another vessel which you can seal so you keep the original solution uncontaminated. Neat Birchwood Casey reacts pretty fast (10 sec) so to give a bit more control I dilute this decanted solution 1:1 with water. Then you can probably immerse your items for about 30 sec, into the soda bath, wash and allow to dry. You will need to experiment with the time a bit - too short and blackening will be incomplete, too long and you will get "flakey" layers on top of the original. These flakey layers rub off easily. By the way the black stuff which rubs off is selenium which is toxic so wear gloves when you are cleaning up the surface. John
-
OK shipman, Shelf life of the blackening agent should be indefinite if you keep the lid on. Pickling solution: make it up about 8:1 of the water to solid. Note: add the solid (sodium hydrogen sulfate) to the water not the other way round. The soda water: it doesn't really matter; I add the bicarbonate to the water until there is a little left undissolved. This is called a "saturated solution". John
-
Dave, I have dealt with this disposal issue here. If you search my thread you should find it more on this. As I have mentioned also here the Birchwood Casey product is a little different from the other brands in that it contains both Selenous acid and Molybdate so it reacts with both copper and zinc- both of which are in brass. So it reacts a bit more quickly and probably forms a deeper black. Also it will react with any alloy containing either of these metals John
-
Question regarding the base of the mast
bartley replied to DaveBaxt's topic in Masting, rigging and sails
Although I did not end up using this, I did I believe produce a good simulation of the canvas covering by using tissue paper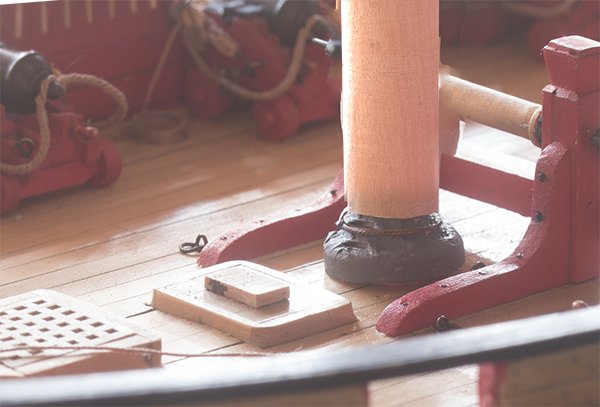
-
All credit to Glenn. His Cheerful build is magnificent. Great workmanship! but we must credit Chuck Passarro for the invention of this weathering method. From chapter nine of his cheerful monograph:- "I also weathered the black backstay plates ever so slightly. This was just a matter of brushing on some weathering powder and buffing it off. I prefer to make all of the metal elements have a different texture and look than the black painted areas of the hull such as the wales. Its very subtle and can be overdone very easily. So if you want to give this a try it’s a lot of fun and you might just like how it looks too. My weathering powders come from Micro-Mark and there are several colors to choose from. I decided to use Rusty Brown. I will use this for all of the metal work on the Cheerful. The photo on the next page shows the powder being added to a carronade later in the project. Grimy black is another color I sometimes use but in this case I decided to go with just the rusty brown. After the parts have been painted black, just apply a generous amount to the piece with a soft brush….apply it all over. Then buff it off with another soft clean brush. Repeat this process to suit your preferred level of color and appearance." John
.jpg.4fc6431aebc4349b9b1aec35d6876e8d.jpg)

.jpg.2c38353e4c67fd550b98d45afb394cf0.jpg)