


Modeler12
-
Posts
1,716 -
Joined
-
Last visited
Reputation Activity
-

 Modeler12 got a reaction from mischief in What is your favorite hand tool(s)??
How to sharpen tools is a bit of a controversial subject, but Ron you might be interested in the following video.
http://www.finewoodworking.com/how-to/video/how-to-hone-a-chisel.aspx
Don't worry about all those stones the fellow talks about. Two of them will be plenty. I do use a couple of stones in a wooden box that have been around for many years. But what I really like for small cutters is an Eze-lap, a small diamond coated 'file' that gives me an instant edge (even on #11 Exacto blades and other carving tools). I have a couple in the drawer right in front of me at the work bench and I can sharpen an Exacto blade faster than replacing it. Plus I will have a sharper edge than a new blade offers.
Check out the following: http://eze-lap.com/woodworking_shop_machine_use/hone-stone/
Now if you really want to get involved with the refining process check out http://www.owdman.co.uk/howto/howto.htm
But that should be enough.
PS Your avatar reminds me of an early Rembrandt. You could have been one of his models.
-
 Modeler12 got a reaction from zozo in HMS Pelican by Modeler12 - per Harold Hahn’s plans
Making wheels got better after I took the approach I should have used to start with.
1. Use a center drill to locate and start a hole!!!
2. Use the dial indicator setup, I had previously installed on my lathe, to cut the wheels to the right width.
When I drilled holes without using the center drill, the result was a small wobble as the drill entered the wood. Obviously it got worse as the drill went deeper and the hole became eccentric.
Hence, a good start means everything, even here. The final holes were a lot more to my liking.
I used a 'cut-off' bit to part the wheels from the turned wood. I added up the thicknesses of the bit and wheel and spaced the next turnoff accordingly. Both methods gave me much better wheels (although I still had some cleaning up to do).
-
 Modeler12 got a reaction from BobG in Making rope coils
There are a couple more ways to do the coil around a belaying pin. One is to use the line that you have hitched around the pin. You make another flat coil with some more line and hang the coil around the hitched line. The picture below should tell you the story.
What I like to do is to make the coils ahead of time and store them until I need them. I use several different sizes. Below is one variation of what I showed earlier. It ends up looking a bit more like the photographs. I make a series of small loops on a board with brats and hook those through the coil.
This shows a couple just looped around a pin.
Keep in mind that the sailors had to be able to grab the line and know exactly how it is looped around the pin. They would have to do this blindly in the dark and heavy seas. Hence all lines were belayed the same way.
-
Modeler12 got a reaction from BobG in Making rope coils
Belaying a line around a pin is the first step.
I cheat a bit and do this first when belaying around a pin or cleat. I make the first couple turns and put a dab of CA on the line to hold it in place. Then I cut the line!!!
Next I take the same line I just cut (or another section of the same material) and make the coil. The fixture is simply two nails, a pin and some thinned PVA glue. Wrap as shown, let dry a bit and remove.
Again they are not perfect but that is life. The last picture shows the two truss tackles with a double and single block that are 2.5 mm. Pretty small. A cleat was mounted on the mast just above the top.
-
 Modeler12 got a reaction from ibozev in Making rope coils
MSW 1 had a couple topics about making rope coils. I would like to review some of that and perhaps others can add to this.
There are at least two types of rope coils. The first is the spirally wrapped one that might lie on deck. The second is the coil that is part of belaying a line on a cleat or belaying pin. I'll cover them one at a time.
There is a fellow (help??) who made a fixture to make the flat coils. I took a similar approach with some materials on hand. I took a piece of plastic that is not kind to PVA glue, made a wooden block with a hole in it and a nail. I coated the line with a thinned bit of glue. Then using the nail I pushed the line through the hole of the plastic and into the hole of the wood. Now I have a sandwich with the line being the lunch meat.
Instead of wrapping the line around, I turned the block while holding the sandwich loosely together so the meat does not fall out.
When I think I have about enough, I let the whole thing sit a while (but not too long!) You can see that some are not perfect, but good enough.
I'll cover the second type of coil in the next thread.
-
.thumb.jpeg.fc5d633a7b34428fcf19419a73d56d55.jpeg) Modeler12 got a reaction from EricWilliamMarshall in Landlubber Mike's technique for furled sails
Modeler12 got a reaction from EricWilliamMarshall in Landlubber Mike's technique for furled sails
Now that is scary!
-
 Modeler12 got a reaction from mtaylor in Preferred support when planking?
I use the Panavise a lot for almost all the rigging operations, holding small parts such as blocks and a multitude of other tasks, but not to hold the frame during planking. While planking, the hull of the model has to be in the up-side-down position and clamping the keel is not practical. After all. the planks have to go around the keel as well.
I rested mine on several layers of old towels. The rail along the sides, the rail on the stern and part of the bow supported the hull with the tip of the bow hanging over the edge of my workbench.
-
 Modeler12 got a reaction from Bob Cleek in Where to buy wood
Having said the above about Hobby Mill, let me add another source for rough lumber to the list that was started.
http://macbeath.com/information/contact/contact.html
MacBeath is a large retailer in all sorts of wood and has locations in a few spots in the US. Check out the heading 'products/exotics'.
I have been to the store in Berkeley a couple times to buy wood for my furniture projects. But what I like is that they have a 'scrap bin' with all sorts of leftovers that is sold by the pound. I have some bloodwood, ebony and others. I don't know if other stores have the same thing. But you might contact the above if you want to find out more.
-
 Modeler12 got a reaction from GrandpaPhil in USS Constitution by Modeler12 - FINISHED - Model Shipways
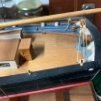
Here are a couple pictures of work in progress. The display case will have a door (with more glass) to the left and the top will also have a pane of glass. The grey background is a piece of fabric glued to a 1/4 inch piece of plywood.
I still need to mount the boats, rig the braces, make a new base and generally clean things up before I can call it done.
-
 Modeler12 got a reaction from Patrick B in Modeler12 carving attempt - Me too; I am willing to try almost anything.
Happy New Year
-
 Modeler12 got a reaction from clogger in The Kit-Basher's Guide To The Galaxy
A word about needle threaders.
They are fine if the hole you want the line to go through is big enough. However, if you are using the tiny blocks for rigging the hole is just about the diameter of the line. That means it is impossible to pull the doubled line plus wire through. Rigging the blocks for a cannon is one example.
I have given up on needle threaders a long time ago. Instead I put a tiny drop of CA glue on the end of the line and smear it along for about 1/2 inch. It only takes ten seconds or so and you can clip the stiff end of the line at an angle to give it some body and a point. It should slip right through.
-
 Modeler12 got a reaction from thibaultron in Miniature Russian carving tools
Looks like great carving tools.
I also would like the email address and was wondering how payments and shipping are handled.
In particular, I like to see more details of the shape of each tool and if I could order some individually rather than a whole set.
For 23 of those at $360 total I assume a price of $18 each would not be unreasonable.
-
 Modeler12 got a reaction from Glomar in Is a waterline marker useful?
In my opinion the type of marker is not as important as setting up your model such that the waterline is parallel with the table on which it sits. In other words the waterline at the bow and stern should be at an even height. Likewise the line should be the same on both sides. This requires propping up those points until they are at the level as defined in the plans.
Below are two pictures showing how I did this with my Connie. The table top was level, hence the sides could be leveled as shown. The fore and aft points were located and you can see the small wooden shim towards the bow.
I put small pieces of masking tape on the hull, made a wooden block to the correct height and used that to make my marks.
-
 Modeler12 got a reaction from BETAQDAVE in US Brig Oneida 1809 by rlb - The Lumberyard - 1:48 scale - POF - Lake Ontario Warship
Hi Rembrandt, I mean Ron.
Being a bit new to this forum, i just came across your build log, and I must say you are doing a fantastic job with this brig. At first I thought this was a 'scratch build' but now I will have to look at all of your pictures and check out these model kits for future projects.
I just clicked on the 'follow this topic'.
I also noticed your favorite tool, the 1/4 inch chisel. Did you sharpen it?
-
 Modeler12 got a reaction from Django in Seizing or whipping a line. Here is how I have done it.
I have made numerous seizings on the strop or line that goes around a block. The cannon riggings on my USS Constitution is one example. There are twenty-two guns with four blocks each. Lots of time to practice.
I put a short video clip together for those interested in my approach.
Of course, there are many other places where this seizing is used. The top of shrouds as they go around the mast is another one. There are also variations to the 'common whipping', but in all cases the idea is the same.
-
 Modeler12 got a reaction from Fright in Making rope coils
Belaying a line around a pin is the first step.
I cheat a bit and do this first when belaying around a pin or cleat. I make the first couple turns and put a dab of CA on the line to hold it in place. Then I cut the line!!!
Next I take the same line I just cut (or another section of the same material) and make the coil. The fixture is simply two nails, a pin and some thinned PVA glue. Wrap as shown, let dry a bit and remove.
Again they are not perfect but that is life. The last picture shows the two truss tackles with a double and single block that are 2.5 mm. Pretty small. A cleat was mounted on the mast just above the top.
-
 Modeler12 got a reaction from aviaamator in How to: Ratlines
Jim, I tried your method quickly to see if it had any merits. I have some wire that is .009 inch diameter. That translates to about 0.7 inches on my scale. I made a template (which I need to do any way) and made a few attempts to use the thin wire.
I finally gave up because I cannot see how I can crimp the ends uniformly as I go along.
I know I am not following your suggestion to the point, but I also cannot constantly rotate my model to get to the other side.
Thanks for this idea.
-
Modeler12 got a reaction from aviaamator in What is correct tension on rigging lines
I agree with Norman about not being hasty in tying off the lines as you go along. I just finished doing the stays and top shrouds on my Conny and found that I had to redo a couple of those lines because as I went higher up those lines tended to distort what I had done before. It was not serious, but enough to see the difference. And believe me, your eyes are better than any gismo to determine tension.
One problem, of course, is that the untied lines end up get in the way of what you want to do next. I did as much as I could, made a judgement call and tied off those lines I thought would be unaffected by what came next. Here is part of the result.
I like to add one more comment about the effect on the masts alignment. When I started to do the rigging of the three masts seen above, I noticed that the main had a slight tilt to port (compared with the other two). As I went along with the topmast, topgallant and royal shrouds I kept that in mind but did not do anything really 'tight' about it. Sure enough, it did not take much because they now line up very nicely. However, to reiterate, the fore and aft alignment can be changed drastically with tension in the stays.
-
Modeler12 got a reaction from aviaamator in Making gun carriages
For my next project I need 16 guns (6 pounders). I am using the drawing published by the late Harold Hahn who came up with the formulas and dimensions for a variety of guns used by the British. The first drawing shows how he arrived at the various dimensions. It involves the scale you are working to and the caliber of the gun.
The sides of the carriage are obviously the most complicated. Using my new mini mill and a piece of pear wood, I proceeded as shown in the pictures that follow. I used four different bits, including the diamond coated V. I do not have a rounded bit with this small a diameter and will have to file the round groove by hand after the 'log' is slices. I need at least 32 of those pieces at a thickness of 0.051 inches.
To cut the last step I decided I was too close to the vise and turned the part around. All cuts were made at about 5000 rpm.
I think I would not have been able to do this without the mini mill. For me this has been a good investment thus far.
-
Modeler12 got a reaction from aviaamator in Simple carving techniques for first-timers using a chisel and knives
The picture you showed, Ray, is indeed impressive but I don't think it represents a carved piece of wood. It is a drawing and to 'shade' carved wood would be redundant. The following is probably more in line with what we are trying to accomplish here. The 'stop cuts' and deep relief carving are very nicely done, in my opinion.
-
Modeler12 got a reaction from Fright in Sources for Boxwood Blocks
Hi Jeff. I have shown the two pictures below before, but maybe they help.
I had to hold off continuing my deck detailing until I got the new blocks from Utah and I am not sorry I waited. I also show what the ship's blocks really look like by comparison.
as received in the kit
versus Warner West's
versus real
PS I am not too proud of my hooks but ignore that, please
-
 Modeler12 got a reaction from JerseyCity Frankie in USS Constitution by Modeler12 - FINISHED - Model Shipways
The result was not perfect, but better. It is hard to show the shape of the jibs, but here goes.
Next comes the netting on the rails, attaching the boats and finally to raise the flags.
-
 Modeler12 got a reaction from Charlie in Rigging Blocks- How to
I am not sure this will help, but there is a video I made about seizing or whipping. As part of that I show how I strop a line to blocks and then apply the seizing.
Of course, there is also the use of wire for stropping. It all depends on the application.
-
 Modeler12 got a reaction from Anthony Burnside in Byrnes Table Saw
Here is my second addition. It is essentially a hold down fixture but uses a ball bearing mounted as shown.
The design came from seeing what another modeler had done to cut thin veneer.
Jim Byrnes also uses this idea for his clear blade guard.
I have cut several pieces this way and it really works very well.
-
 Modeler12 got a reaction from mitbok in Byrnes Table Saw
Here is my second addition. It is essentially a hold down fixture but uses a ball bearing mounted as shown.
The design came from seeing what another modeler had done to cut thin veneer.
Jim Byrnes also uses this idea for his clear blade guard.
I have cut several pieces this way and it really works very well.