HOLIDAY DONATION DRIVE - SUPPORT MSW - DO YOUR PART TO KEEP THIS GREAT FORUM GOING! (Only 72 donations so far out of 49,000 members - Can we at least get 100? C'mon guys!)
×


lb0190
-
Posts
686 -
Joined
-
Last visited
Content Type
Profiles
Forums
Gallery
Events
Everything posted by lb0190
-
 Thank you everyone for your condolences . We're heading home today....
 -
Sorry-getting on a plane in a few minutes and will be on the road for a while. If no one answers your questions, I will try but it will have to wait until after I return. My brother in law passed away and we need to help his mother adjust. Take care.
-
Hi Popeye, It's good to hear from you and other MSW friends. Thanks for looking in and for advice as well as compliments. I'll probably do a light sanding after the deck is completed, followed by restraining.
-
Hi Bob, I just read your CS log. It looks like a great build with excellent results.
-
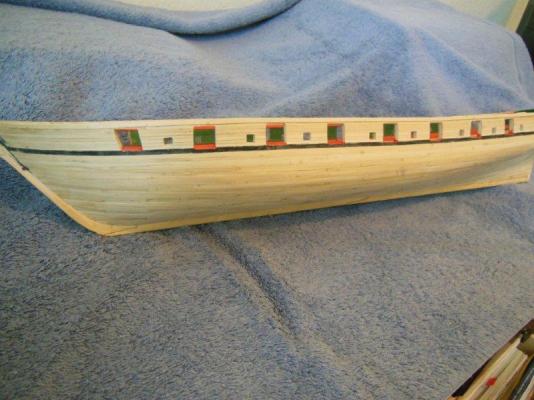
Your welcome Scott. Hi Russ, I always appreciate advice - thanks. I have two short boards I simply missed when gluing them down and did not have the heart to rip them out. If I cannot fix it with filler I suspect there will be a few coiled ropes in that area. I intentionally opted for full length planks on this build. I thought the .095" wide planks would turn out nicer going single strips even though it's not historically correct. I also prefer this look over the tapered planks at this scale. Hi Bob, thanks for looking in. I bet the Cutty is a nice change of pace. I came close several times to starting my Longboat, but I'm trying to wait until the Niagara is complete.
-
Hi Scott, Thanks for sharing. I may give that a try on another build. I think I may have been using too heavy a line. I backed off a bit and so far it's been an improvement. I need to do some trial runs on whichever method I choose for my next build. BTY, your caulk lines look very good!
-
Hi Augie I think I'm using too soft a pencil. There's no number (golf course pencil) but I suspect its a number two. I will try to clean up the smuding (I like your word... lol) with some light sanding. Your Confederacy looks amazing!!
-
I beveled the lower corner that mates against the last installed plank, not the side, only the corner. I pencil color the side that mates against the last installed plank. I use minwax golden oak, but I dilute it 50% so it's not too dark. If the above does not make sense to you, let me know and I'll post some photos with close ups.
-
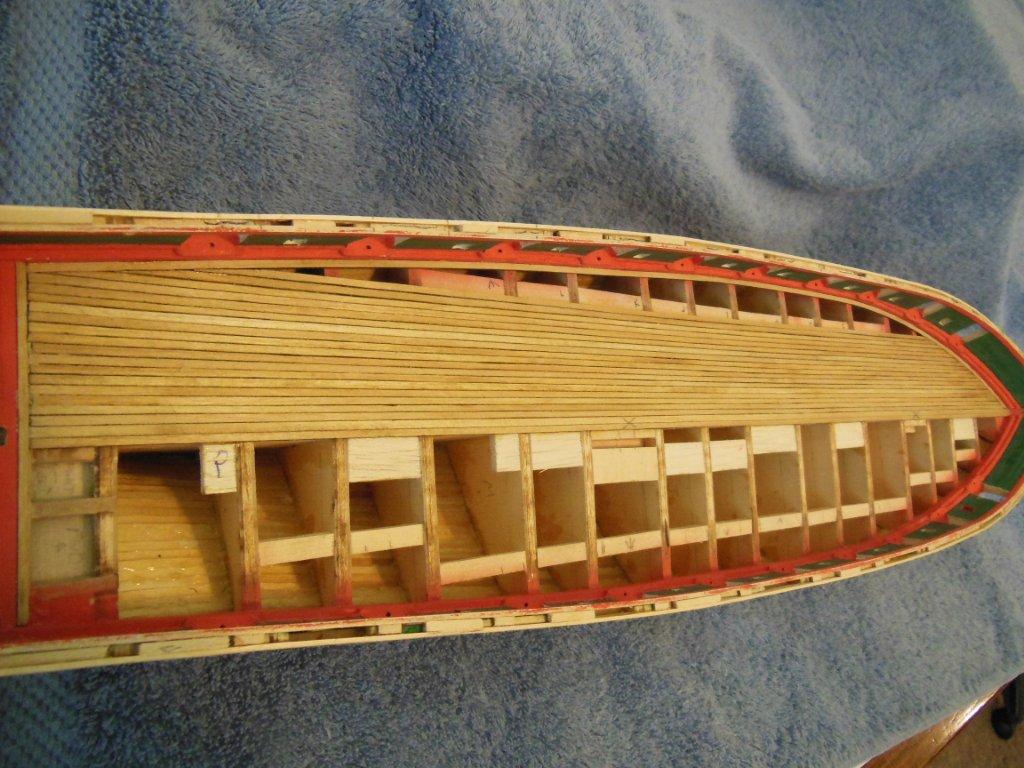
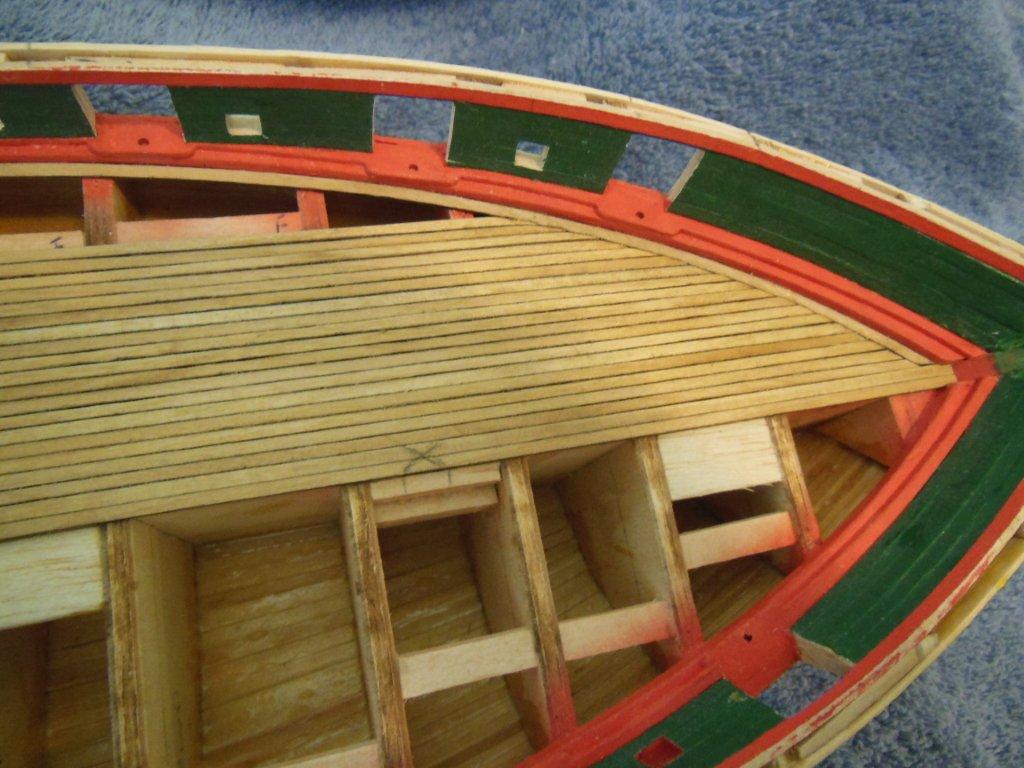
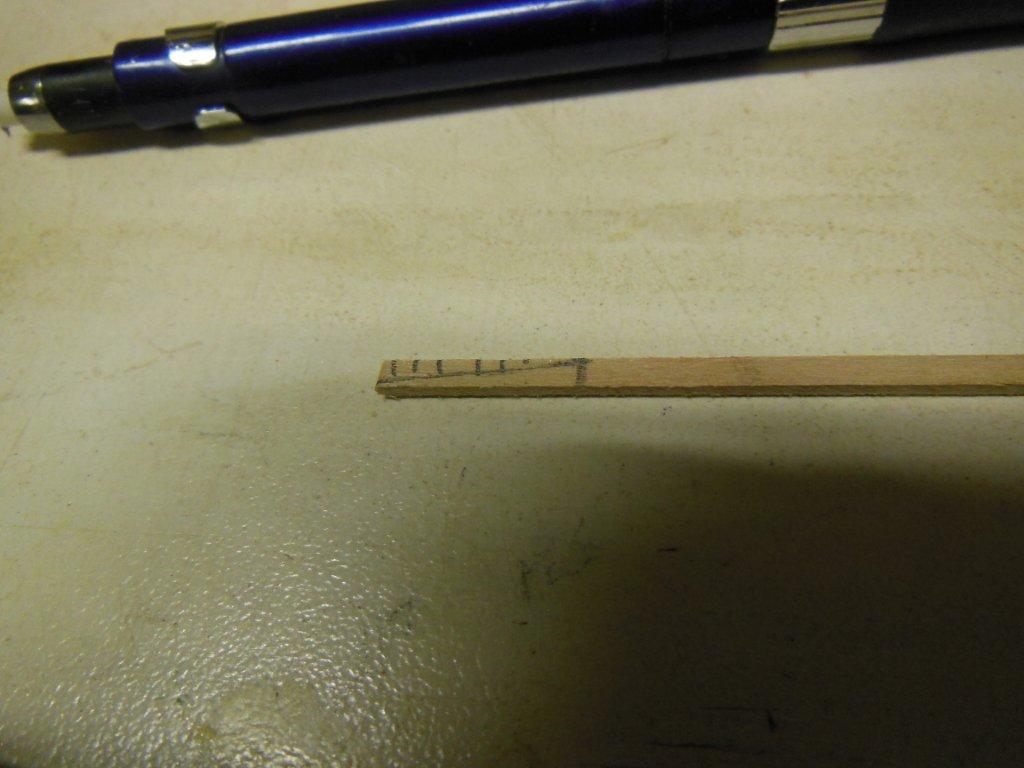
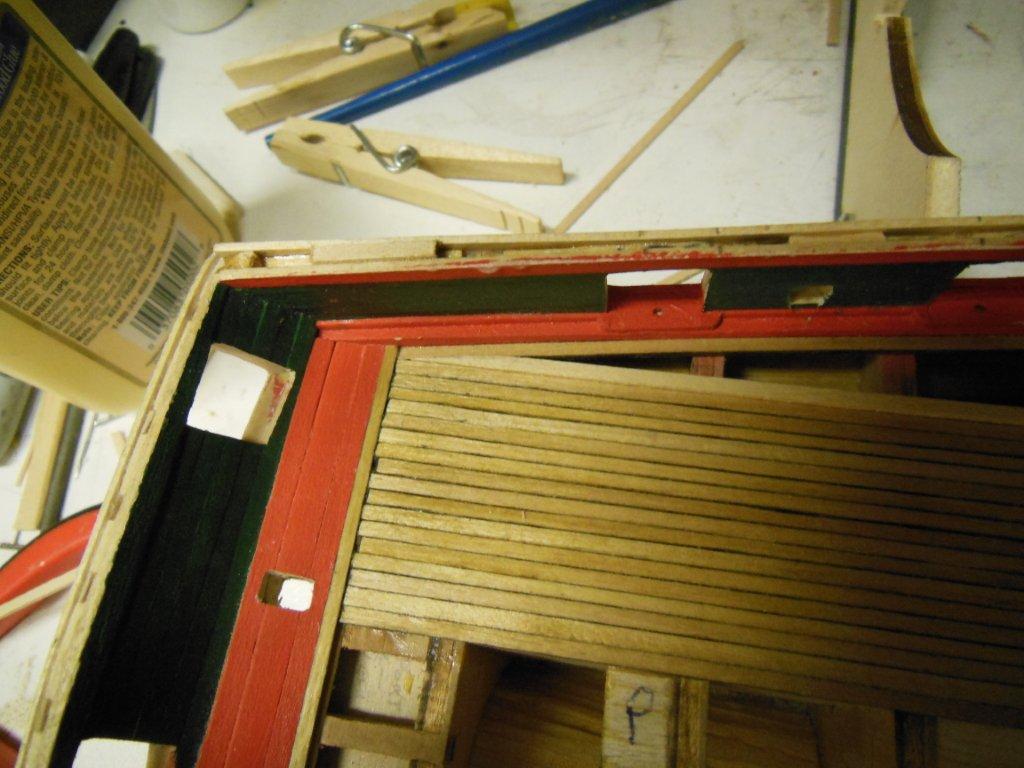
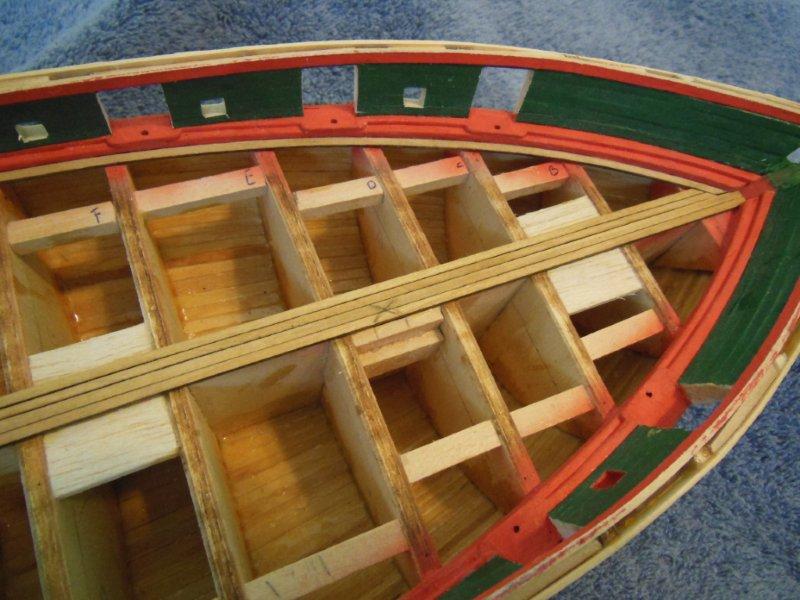
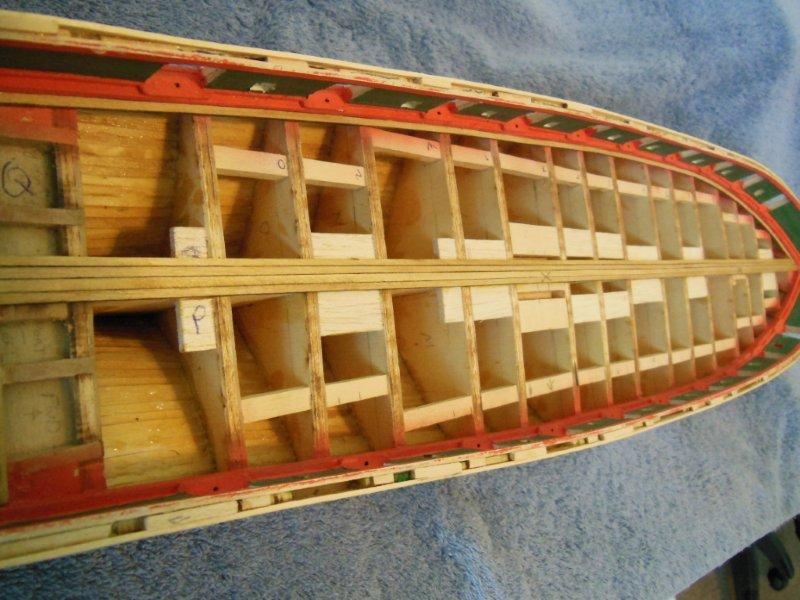
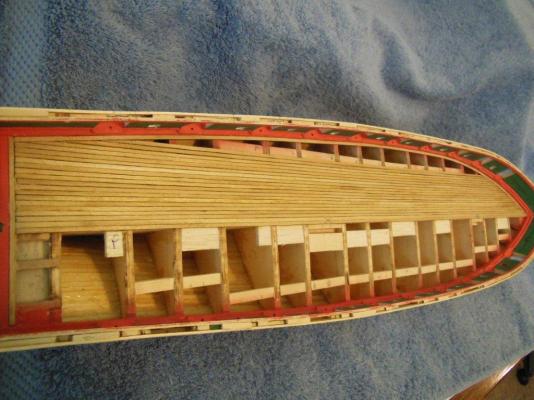
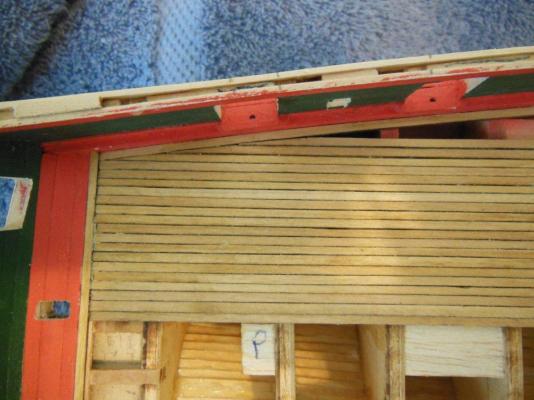
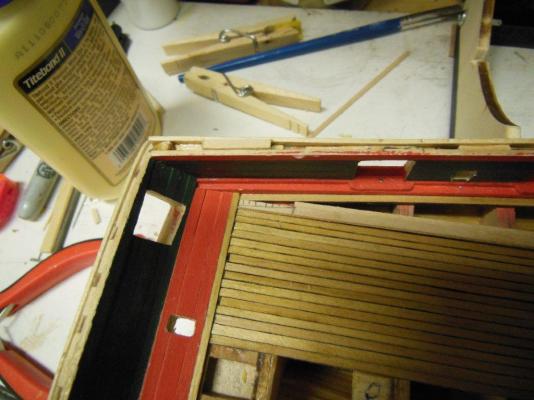
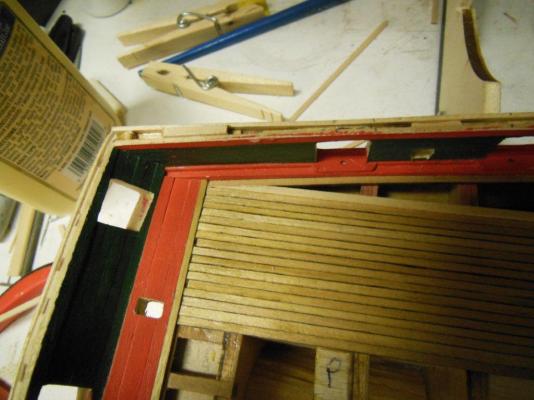
I thought maybe there's some benefit in sharing how I'm preparing the deck planks and gluing them in place, so here goes... Keep in mind I'm very much a novice at this (2nd build) and I'm sure there are many other ways to accomplish this task. This may be a better "don't do it this way" Once I have a piece of wood selected, I (try) to do the following: I inspect both sides of the wood to pick which side looks best. Some wood has blemishes that I like to place on the down side. Lightly sand all four sides of the planks Next, I make pencil hash marks on the down side and sometimes when I think it's needed also mark each end with an “F” for fwd and “A” for aft. Now it's time to trim the plank to fit and shape. First I shape the end that is the most complex in shape and make sure it fits snug and tight (more on this below). I start with this end first in case I need to make it several times. Next, I trim the length to fit and then shape the remaining end. Next, I bevel the inside lower edge that mates up to the already installed plank/edge. The bevel helps the plank fit up snug against the installed plank, especially if there is a little dried glue that seeped out and dried when the previous plank was installed. I then insect the surface where the plank will be installed. I look for uneven surfaces, globs of dried glue etc. and correct any noted issues as best I can. A trial fit is next, confirming the plank fits well or at least as well as I can get it. Now it's time to apply the pre-stain followed by the stain. Once the stain is dry, I use a pencil to color the fwd, aft ends and one side of the plank to simulate a caulk line. This has not turned out as well as I hoped for, but for the first time, I can live with it. It may clean up later if I decide to sand the deck. Gluing the plank in place without a false deck is a bit of a challenge for me. I first had to decide where to lay the first plank, which will then determine how all remaining planks will mount, kinda like laying floor tile. I used the center keep as a starting place due to it being (supposedly) centered from left to right and due to two planks being the same width as the keel which was a great reference in keeping the first two planks very straight. I'll cut in the mast holes later. For the time being (always subject to change), I'm installing the deck features on top of the deck planks. I used both Titebond and CA when mounting the planks. I used a dental probe to apply small amounts of white glue on the edge of the installed plank, other than at the bulkhead locations. Once the Titebond was in place I place CA glue on each bulkhead and the fwd/aft edges of the plank. The CA glue dries quickly and helps hold the plank in place white the Titbond dries. I use wedges when possible to hold the plank in place. Time to move on to the next plank. The planking became more difficult for me once the aft end shape went from being squared off to a more complex shape the the fwd end. The last four pictures show how I determine where to mark and cut the wood to get the correct edge angle and a reasonably decent fit. I just noticed the dirt and dust in the photos, next time a cleaning is in order before pictures.


-
Scott, Scott, I found the paint colors for the Niagara on the Model Expo site: http://www.modelexpo-online.com/product.asp?ITEMNO=MS2240MS Set of eleven 1 oz. bottles of Model Shipways paint: 2 each/MS4839 Primer, MS4830 Hull/Spar Black, MS4801 Bulwarks Dark Green; 1 each/MS4831 White, MS4821 Deck House Light Buff, MS4802 Bulwarks/Gun Carriage Red, MS4829 Hull Yellow Ochre, MS4828 Iron/Cannon Black. The regular cost is $54 but a sale price may cut that to almost half buy ordering them individual instead of the kit order.
-
Hi Gerty, thanks for looking in and for the compliment. Hi Scott, the paints I used are from Model Expo, which they have made to their specifications http://www.modelexpo-online.com/ I used the colors they suggested for the Niagara which are identified on their web site. Model Expo says their paints are a replica of the paint colors used on the ship, I believe from the first build but I'm pulling that from memory which is getting shorter every day If you decide to buy their paints and are not in a hurry, they can be purchased at 1/2 off from time to time. The main thing to remember about Model Expo is they have huge sale discounts on practically everything - jst sign up for the e-mail notices.
-
I use z-poxy finishing resin primarily due to having some left over from another build. It is two part, brushes on very well and is sold at many places including Amazon. I've also used diluted Titebond (white wood glue). I diluted it enough to where it will brush on easily. Both work fine but IMO the epoxy is stronger,
-
Hi Brian, I decided to take care of the hull first so I still had access to the inside allowing me to coat the interior with epoxy which increased the strength a great deal. At this point, I'm thinking of gluing structures to the deck surface and pin where it makes sense. I may change my mind once I get to that point but for now it's pin and glue. I'm glad the photos helped.... Larry
-
Hi Augie & Sjors, Thanks for the warm welcome back!
-
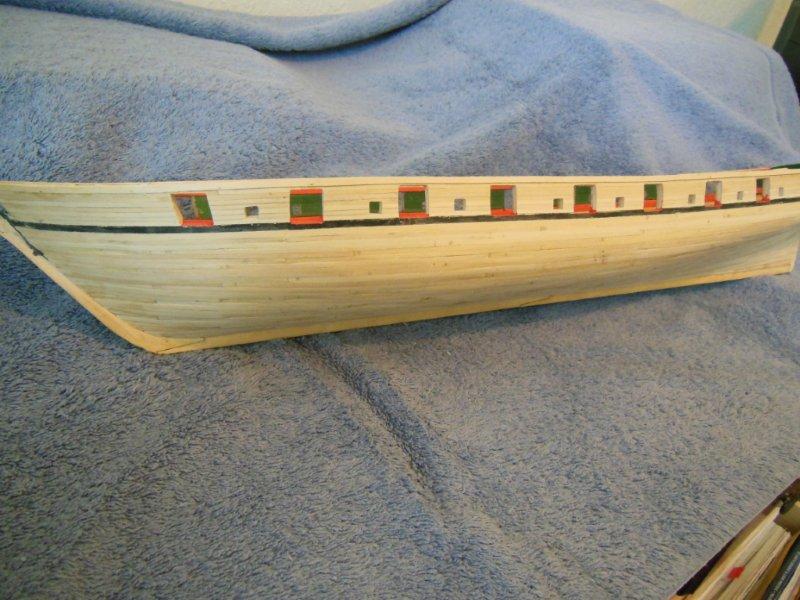
I'mmmmmm Baaaack! It's been a while since I've posted anything or worked on my Niagara. Lots of family issues and health problems just kept getting in the way so I simply put my ship on hold. I've started once again... Since my last post I've completed the following items. Added topmost plank on both port and starboard sides. Finished shaping and squaring up gun ports and sweep ports Touched up a lot of interior paint damage Started working on the deck planking In regard to the deck planking I decided to use a 50% diluted golden oak stain with pencil shading on one side to simulate deck caulking. I have the port nib strake (plank?) installed and decided not to notch it due to the small size, thinking it will look better unnotched as compared to what could easily be a sloppy looking outcome. Likewise, I also decided to run full length deck planks and not taper them. I kinda like this look better due to the deck being so busy and also due to the lack of a false deck which could have resulted in resulted in a rough looking deck. I hope everyone is healthy and doing well. With a little luck I'll pick up some steam get some model ship building accomplished on a more regular timeframe. Edit: I forgot to mention, the two "X" spots on the deck is where I need to cut out the mast location holes.


-
Welcome to the Niagara club! Thanks for the heads up regarding the missing pictures. I've been away for a while and was not aware there was a problem. I have no idea what caused the issue but I re-posted them today. Good luck with your build, I'm sure your ship will look amazing.
-
Congratulation's Patrick! She looks great. If my build turns out half as well I'll be satisfied.
-
Augie, She looks very impressive, something to be very proud of.
- 2,191 replies
-
- 1
-

-
- confederacy
- Model Shipways
- (and 1 more)
-
Patrick, Welcome back! The anchors look great!
-
Hi Alistair, Thanks for the compliment and for looking in. Yes, it's much warmer here than many places (including home), but after getting used to the warmth it dos not take much of a temperature drop to get me shivering... Anything under 65F feels cold to my old bones. I'm glad the hull planking is complete. It cleaned up decent with some sanding and now if can only get the gun and sweep ports to their final size, I can start painting.
-
Thanks Scott. I'm taking a short break but occasionally sand on her when it's not too cold in the garage. Hopefully the weather will turner warmer soon and I can resume the build.
-
Augie, She looks great and is certainly something to be very proud of!
- 2,191 replies
-
- 1
-
-
- confederacy
- Model Shipways
- (and 1 more)
-
She looks really nice Augie, something to be proud of!
- 2,191 replies
-
- 1
-
-
- confederacy
- Model Shipways
- (and 1 more)
-
Good moring Augie! I hope your having a good weekend. Your check is in the mail... I have a few sanding areas on my Niagara that are very tight and I've been holding off on working them until the tool shows up.