HOLIDAY DONATION DRIVE - SUPPORT MSW - DO YOUR PART TO KEEP THIS GREAT FORUM GOING! (Only 24 donations so far out of 49,000 members - C'mon guys!)
×


RichieG
-
Posts
114 -
Joined
-
Last visited
Content Type
Profiles
Forums
Gallery
Events
Everything posted by RichieG
-
Al, I'm just looking at this for the first time, and it looks great! Hard to believe that it's your first model! (and glad to hear that you're thinking of starting on the Mayflower; I'll be looking forward to that, as we can 'work together on it')
- 265 replies
-
- 3
-

-
- finished
- artesania latina
- (and 1 more)
-
Captain Al, thanks for looking in on this build. I think it's great that you're starting the same kit; let's try to help each other as we go. (Just know that I'm exceedingly slow, so you'll probably get well ahead of me right out of the gate.) As far as your questions: I emailed mmosko@aol.com about the replacement parts, and he got back to me within the hour. Actually, he sent me a copy of an email that he sent to someone else, telling that person to send out the parts. That email address was jimenez.s.carlos@gmail.com. So I never communicated with John directly. But, if you end up needing anything, I'm sure there are several ways to get help. You could call John on the phone, or email Marc or Carlos for starters. Tigersteve suggested jgarcia@modelexpo-online.com and I'd guess that that would work too. And yes, I think the modelexpo website is the same company as Model Shipways (not modelshipworld, which is this forum that we're on right now.) But you're definitely getting the same kit as I have, as MS2020 is the same model number as mine. So, that being said, you'll get the 51 page instruction book written by Chuck Passaro, which really is excellent. The exact same instructions are available on line from the website, so we'll have backup copies if we need them. And, yes, of course, I'm already following those instructions, and plan to continue to use them as the main source of information on how to proceed. But even those detailed instruction may occasionally leave some questions unanswered, which is why I'm asking things of the more experienced modelers on the forum. In addition to the instruction book, there are 4 large pages of plans that you don't get online. They have, among many other things, full size plans for the false keel and all of the bulkheads. So, if you had some good 3/16" plywood, you could definitely cut your own parts with a scroll saw. I guess it depends how far you want to go. Since customer service is so good, I felt like it was far easier just to get replacement parts. As far as the shape of the bottom of the ship's boat, I think that, at least for the mayflower, it's pretty clear how to shape it. If you look at the plans that I photographed earlier in this build log, you can see cross sections of the hull, and the bottom is pretty flat. You definitely will have to sand off the edges of the bottom lift to get them to blend into the second lift, but the center of the bottom lift stays pretty flat. And you can see the keel added to the center of the bottom in those cross sections. Also, there are two cradle pieces that are meant to hold the boat, (also shown on those plans) and they are pretty close to flat at the center (leaving a notch for the keel), and begin to curve upward as you go laterally. Anyway, that's my take on it.
-
Tiger, I hadn't even considered that option! But, I think I'd rather thin the piece out before gluing for two reasons: 1) it's going to be glued onto a curved surface (as you can see in the plans in the fourth picture in my last post that had pictures) and it'll be tough to get a nice even thickness after it's gotten that curved contour on it (easier to just put it on a flat surface and sand it with a flat block) and 2) because it needs to be bent to conform to the curved surface, it might be easier to bend when it's thinner. I did glue in the keel and frames. These were 1/32" x 1/32" strips, which are the smallest that the kit comes with. I glued the keel and the first 3 frames at the bow with titebond, but I was getting frustrated with the fact that I'd put glue on the strip and hold it in place with my finger, wait a few minutes, and invariably the strip would end up stuck to my finger instead of the inside of the boat. So I changed to CA glue for the rest of the frames. This worked much better at getting the strip to stick to the boat instead of me, and I tried to use as little as I could, and used a wet followed by dry cotton swab to clean up extra glue, but by the next day, I saw a nice white residue over pretty much the whole bottom of the boat. I wonder if I can remove some of that with acetone if I'm careful to apply only a tiny amount at a time. PS. I also learned this (which I'm sure everybody already knows, but maybe a true novice might find this helpful): when trying to bend those thin strips to the contour of the inside of the hull, it's better to prebend them around something like a dowel of appropriate size (I used the cap of my CA glue bottle) in order to get a nice smooth curve, rather than just push them into the hull, where they will tend to crease in one or two spots.

-
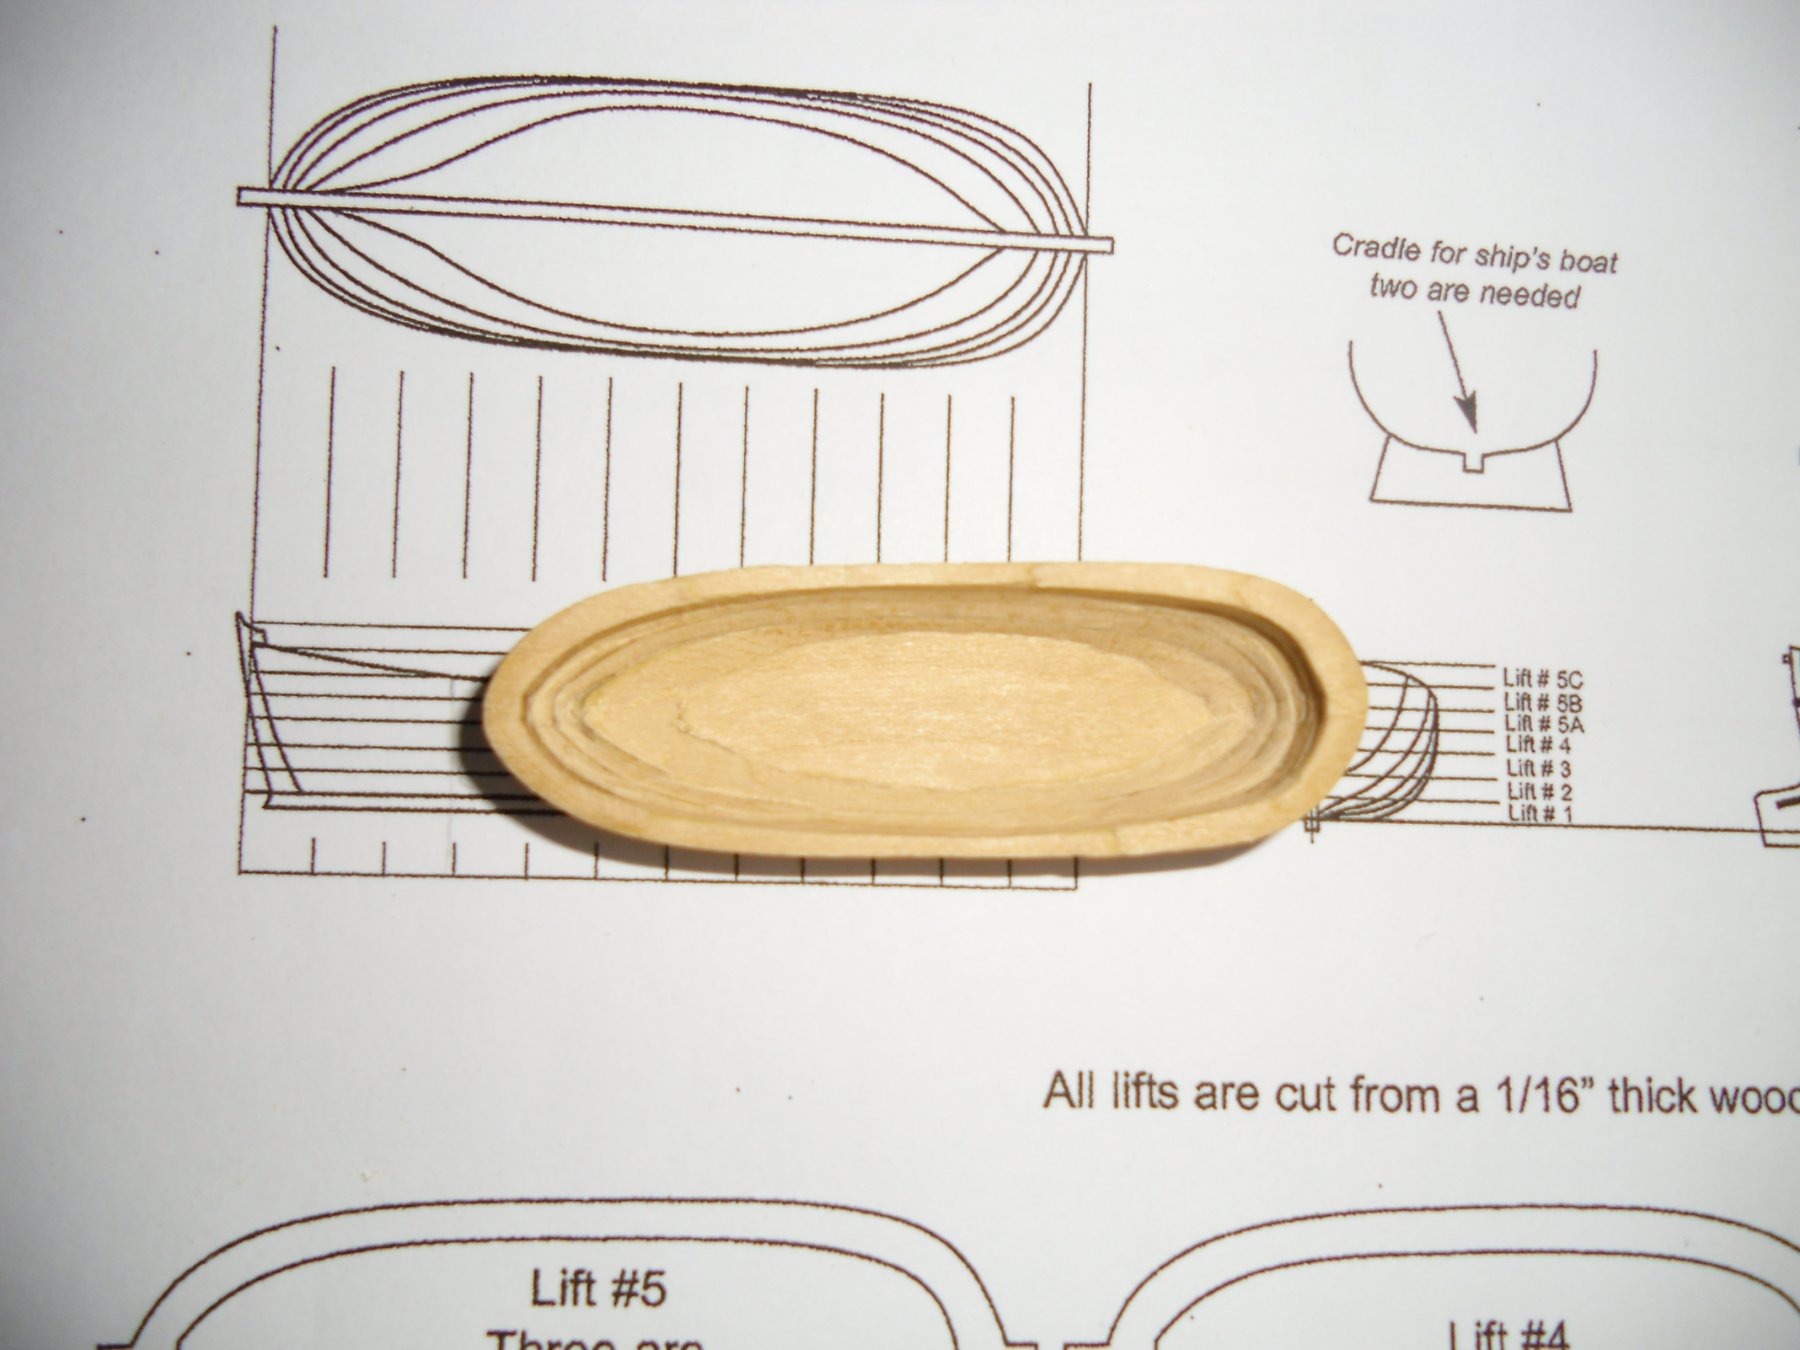
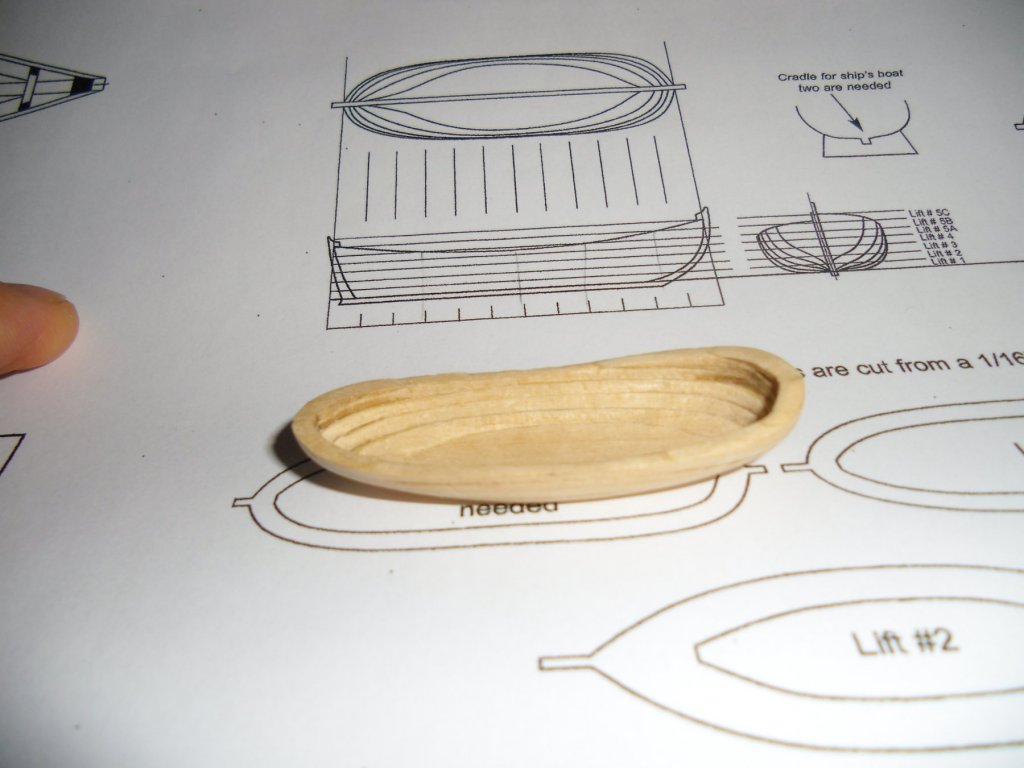
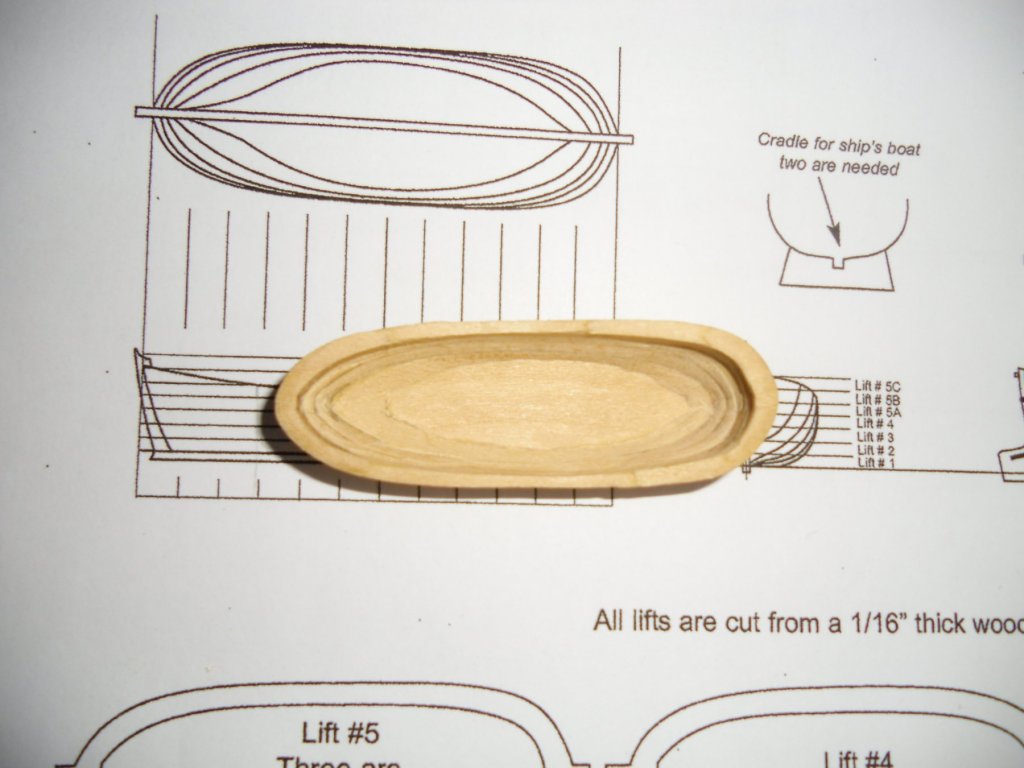
Thanks Steve. I think I'll try some golden oak and natural, or mix them, and try it on some scrap to see what looks good. I guess I don't want to go too dark. The ship's boat is probably a good place to try some of this stuff, because it's probably ok if it doesn't match exactly the rest of the colors on the ship. I have a question about this model in particular: after these seven lifts are glued up, there is a piece called a caprail that is glued onto the top edge. It is laser cut on the same piece of 1/16" wood as the rest of the lifts, although in the instructions, it says that the caprail is 1/32" thick. I guess this means that I should sand the piece to half of its thickness before gluing it on? (I've looked at most or all of the mayflower build logs, and I haven't actually seen anyone describe building the ship's boat) Thanks for the advice and encouragement so far. It's giving me the courage to proceed...
-
actually, upon further reflection, I think what I meant by 'sanding sealer' was 'pre-stain conditioner'.
-
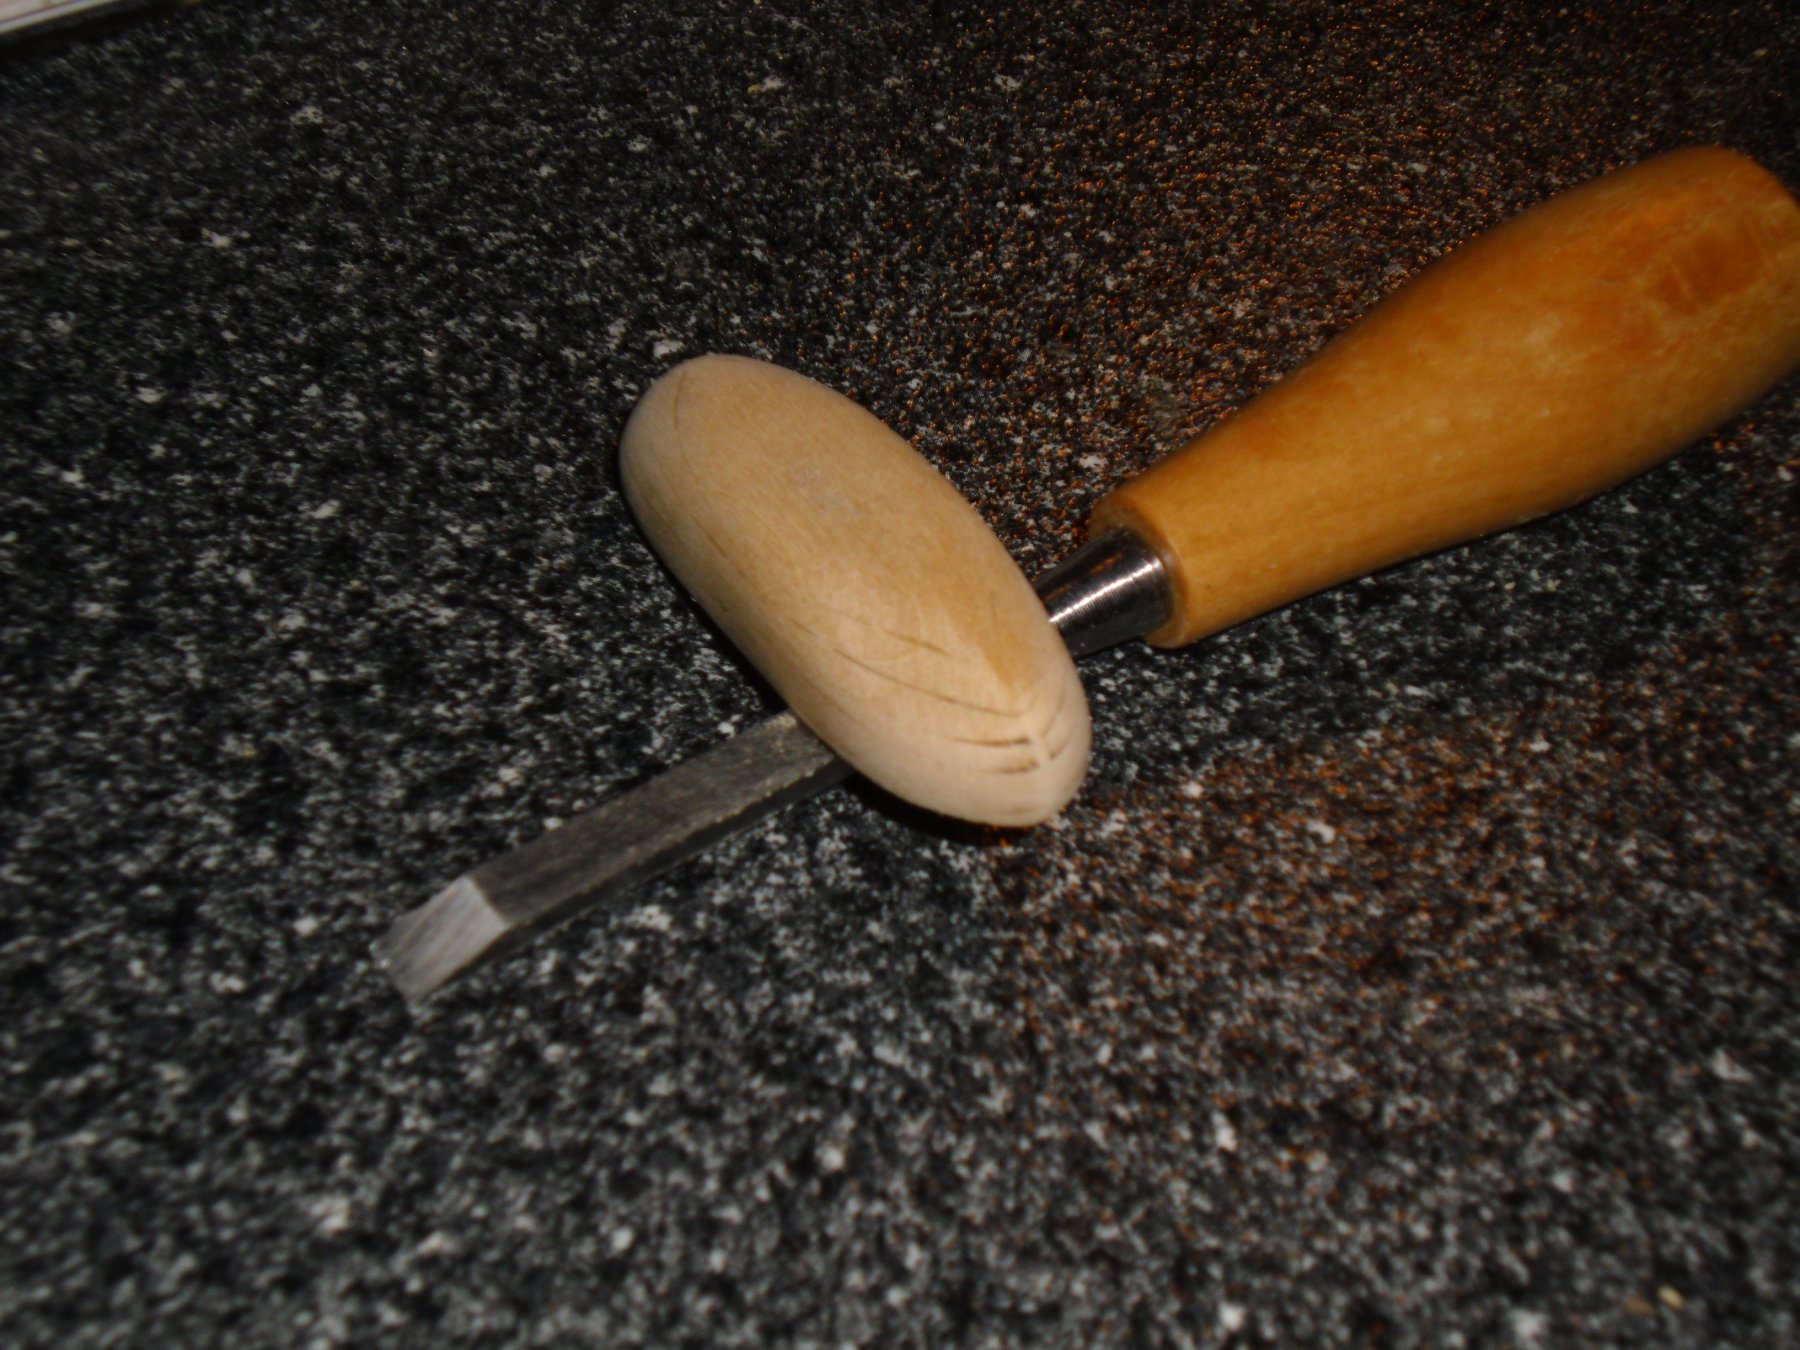
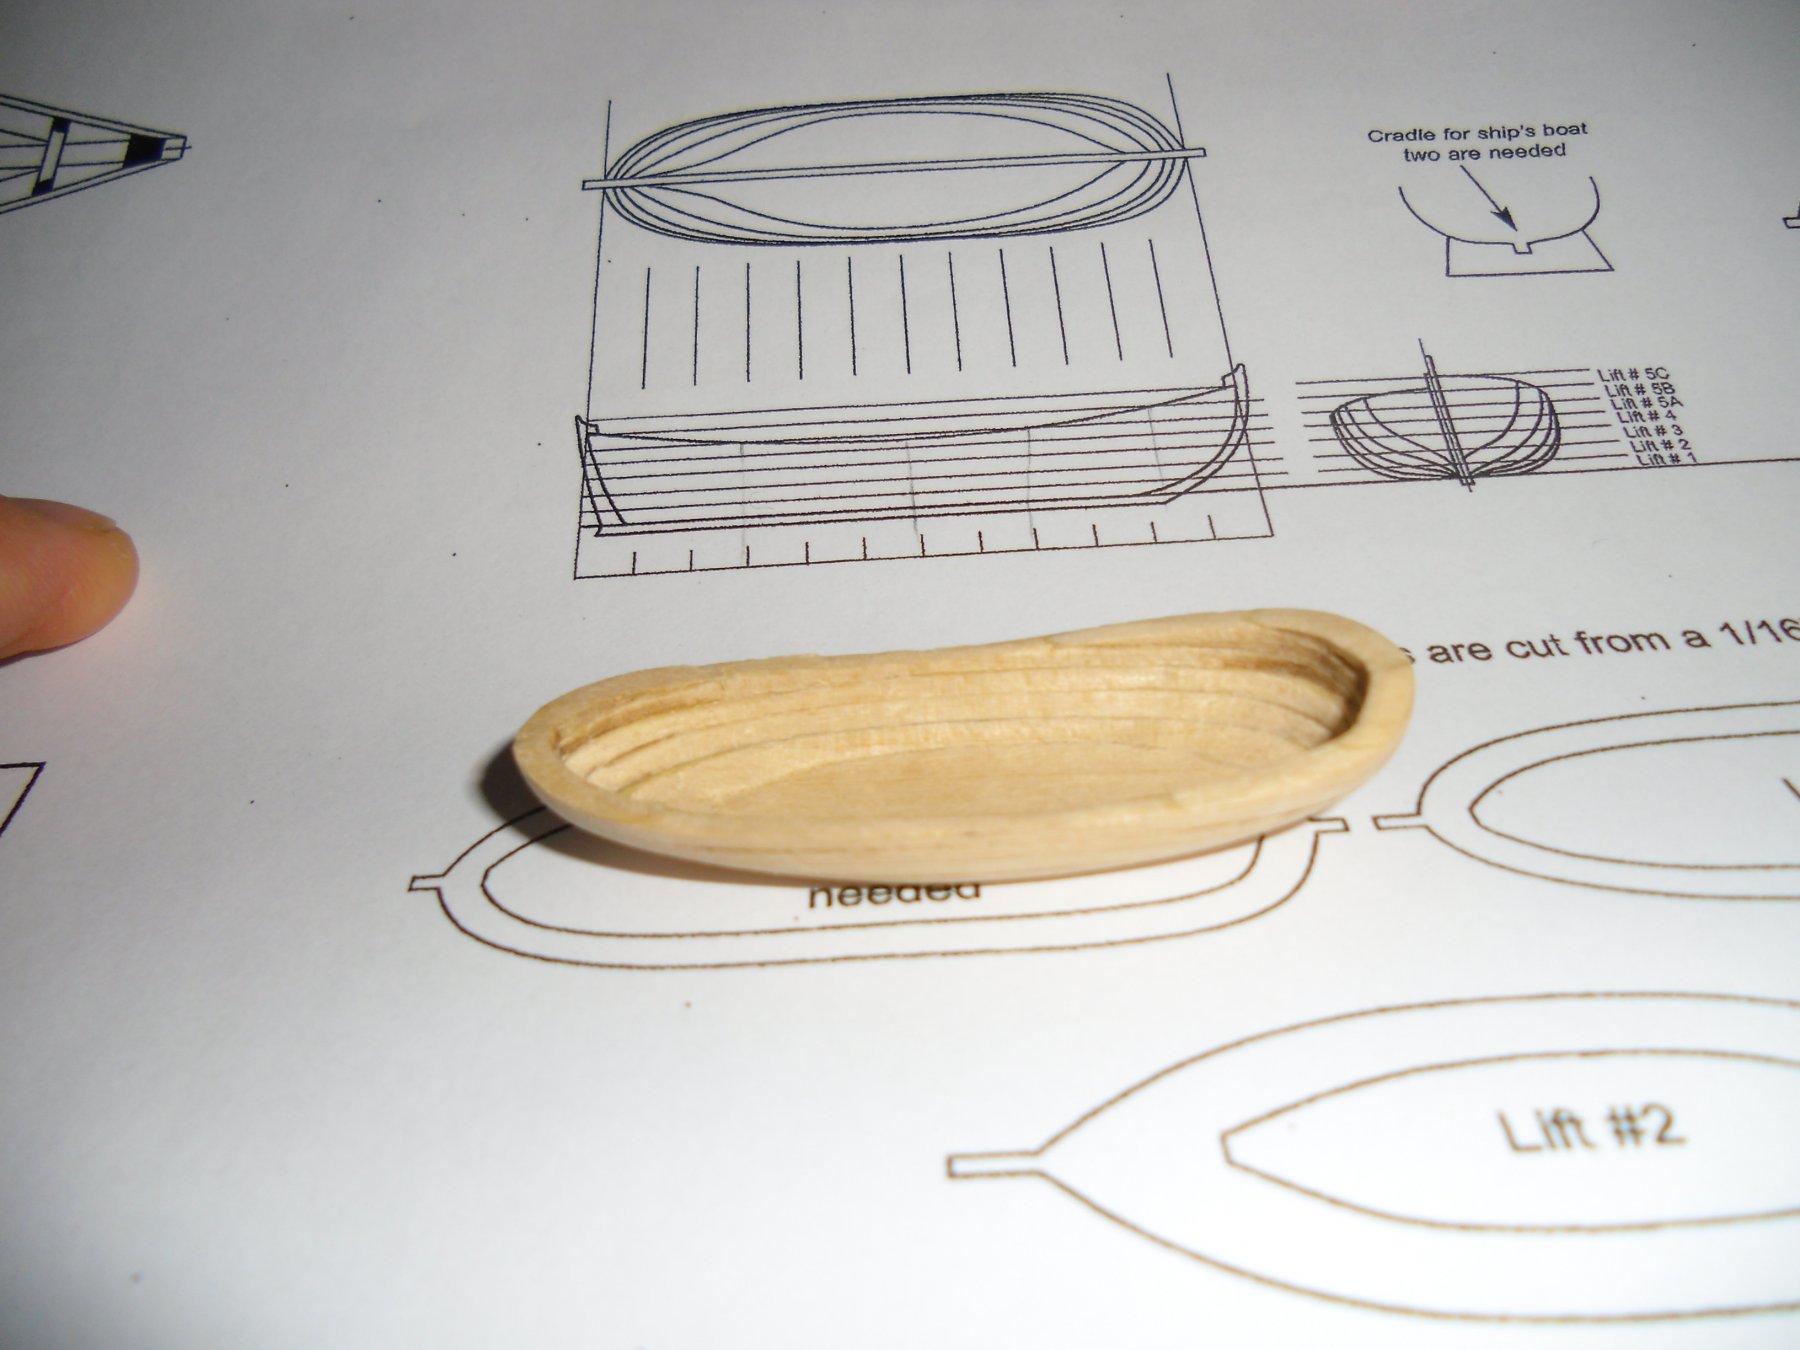
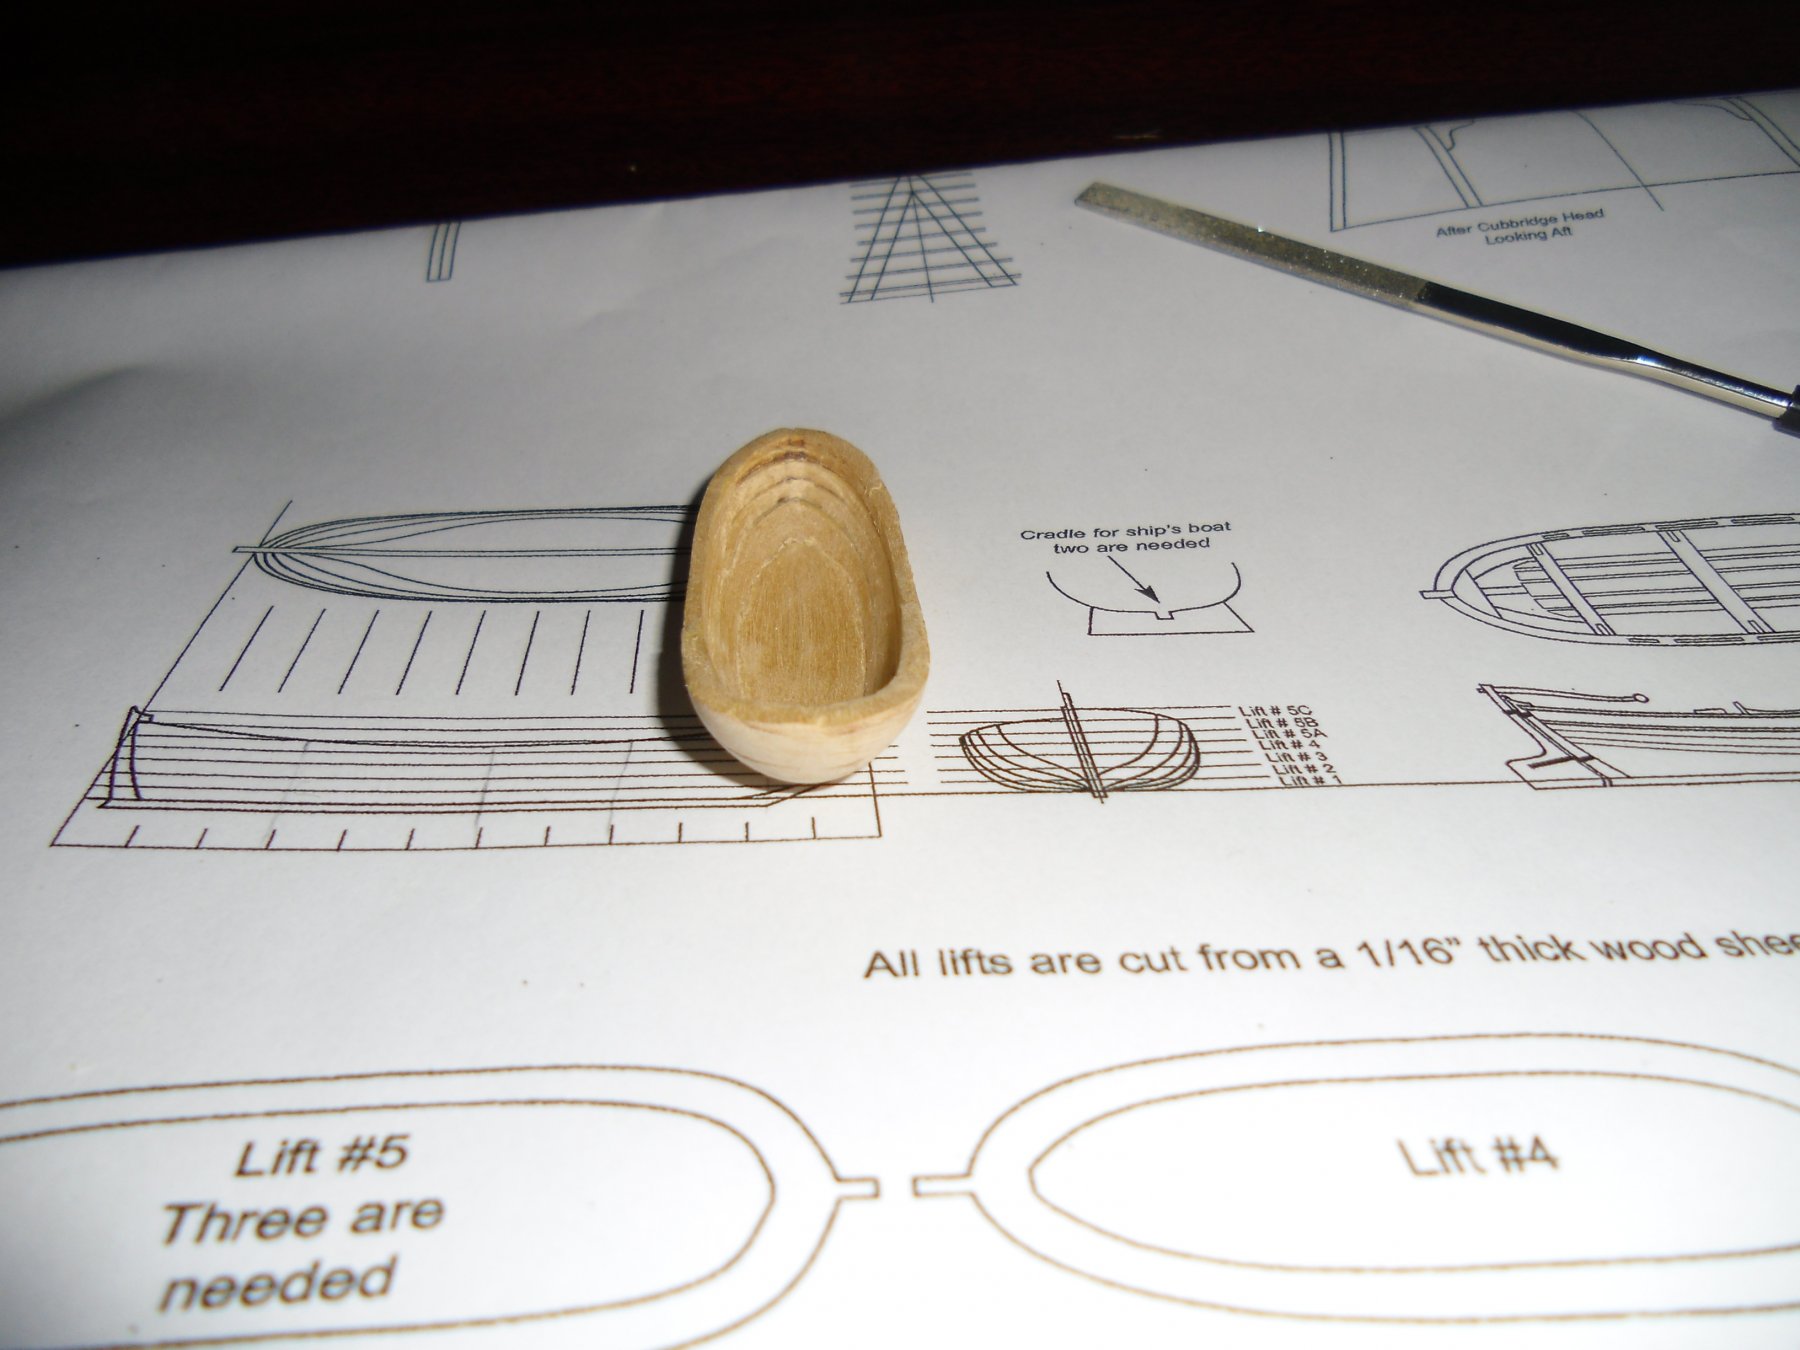
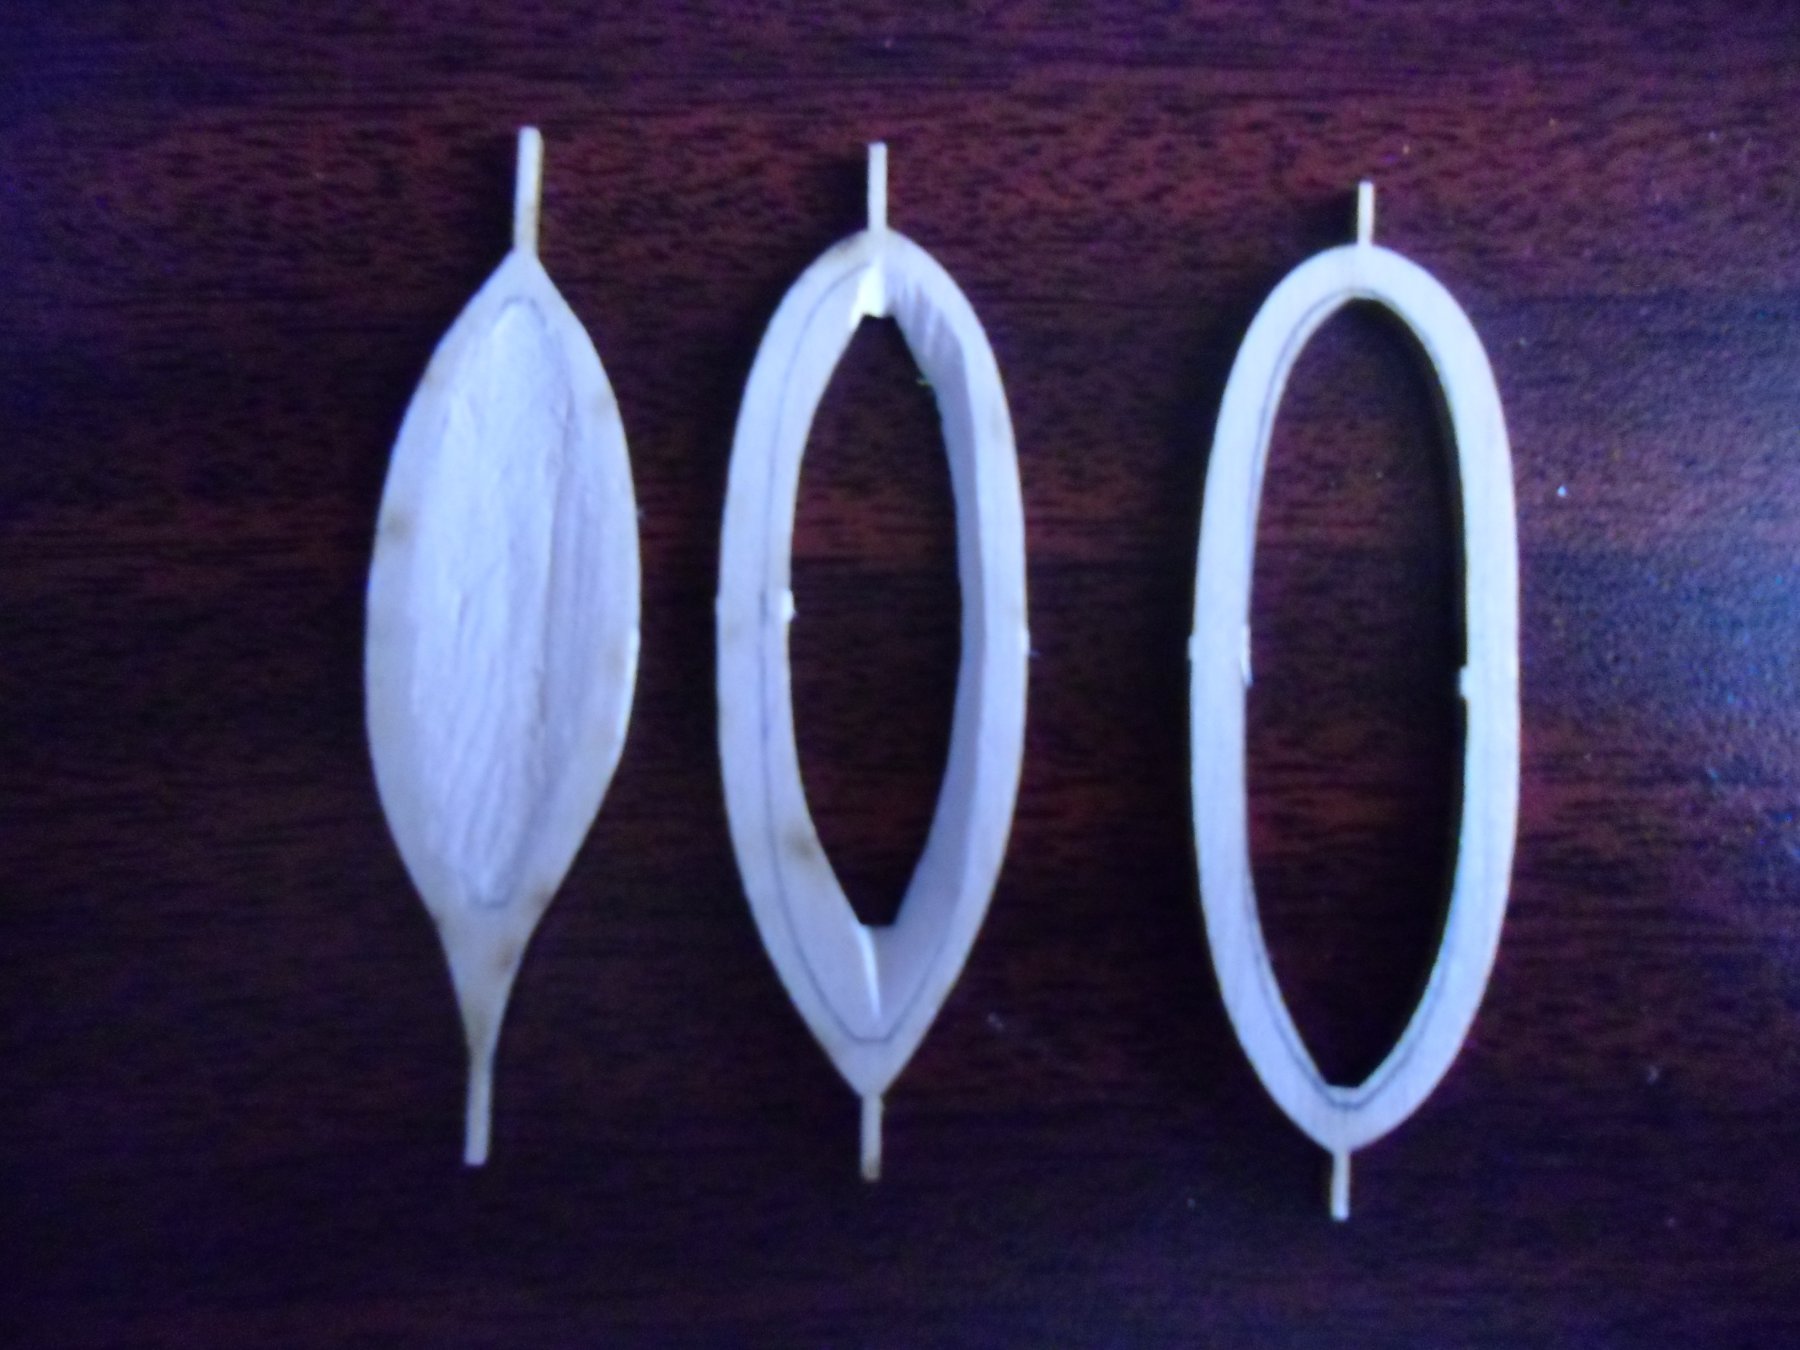
I must say that I think it was a wise decision to pre-bevel the bottom 3 lifts before gluing all of the lifts together. I glued them together sequentially, starting with lifts 2 and 3, and was able to fine-tune the internal beveling without the bottom of the boat in the way. Then, I added lift 4, and filed/sanded the whole thing a bit more. (The instructions say to glue them all together and sand the outside first, but I think this approach made it much easier to get into the inside bottom, particularly at the front and back.) After I added all six upper lifts, I glued on the bottom one (lift 1), and gave the inside another pass with the file and sandpaper. After this, it was easy to sand/file the outside contour and remove the little registration pieces on the front and back. There is a contour to the top of the boat, which is described on the plans, where the front is higher than the back, and the middle dips down. I copied the heights from the plans onto the model, and carved away the upper part, and file it down smooth. Looking down at it from the top, I can see that the front and back walls are thicker than the sides, and, as the instructions say "try to establish a consistent thickness for the hull", I think I will use a dremel with a diamond burr to thin out the insides of the front and the back. (I think the outside contour is pretty much done once all the ridges between the lifts are filed away, so I'm only going to remove material from the inside now. (the first three pictures are before contouring the top, and the next three are after. I tried to show the model nest to the full size plans from the side, front, and then a top down view which shows how there's some thinning to do on the inside of the bow and stern.) After that, there are instructions to add internal keel and frames, floor boards, risers, thwarts, and a cap rail. But it does say to try to stain or paint the interior before doing most of that, as it will be tough to do after. So I need to decide whether to stain or paint, and what color to use. I think I want to stain it and let as much natural wood show through; I think I've seen Chuck Passaro use golden oak stain from minwax on some of his ships (this model was designed by him), so I may get some of that from the Home Depot. I'm not really sure what sanding sealer is for, but I might put some of that on before the stain, and then the wipe-on-poly seems to be popular to top it off. I'm certainly open to advice on prestain, stain, and finishing, though (hint, hint...)


-
I think it looks great! But, when you say the model was 'prepared by your friend', do you mean that he designed it? And what kind of wood is that on the hull planking? It's very pretty.
-
I've looked at some of these kits online. They look like a nice change of pace, and can be pretty intricate. I'm interested to follow along and see how it goes.
-
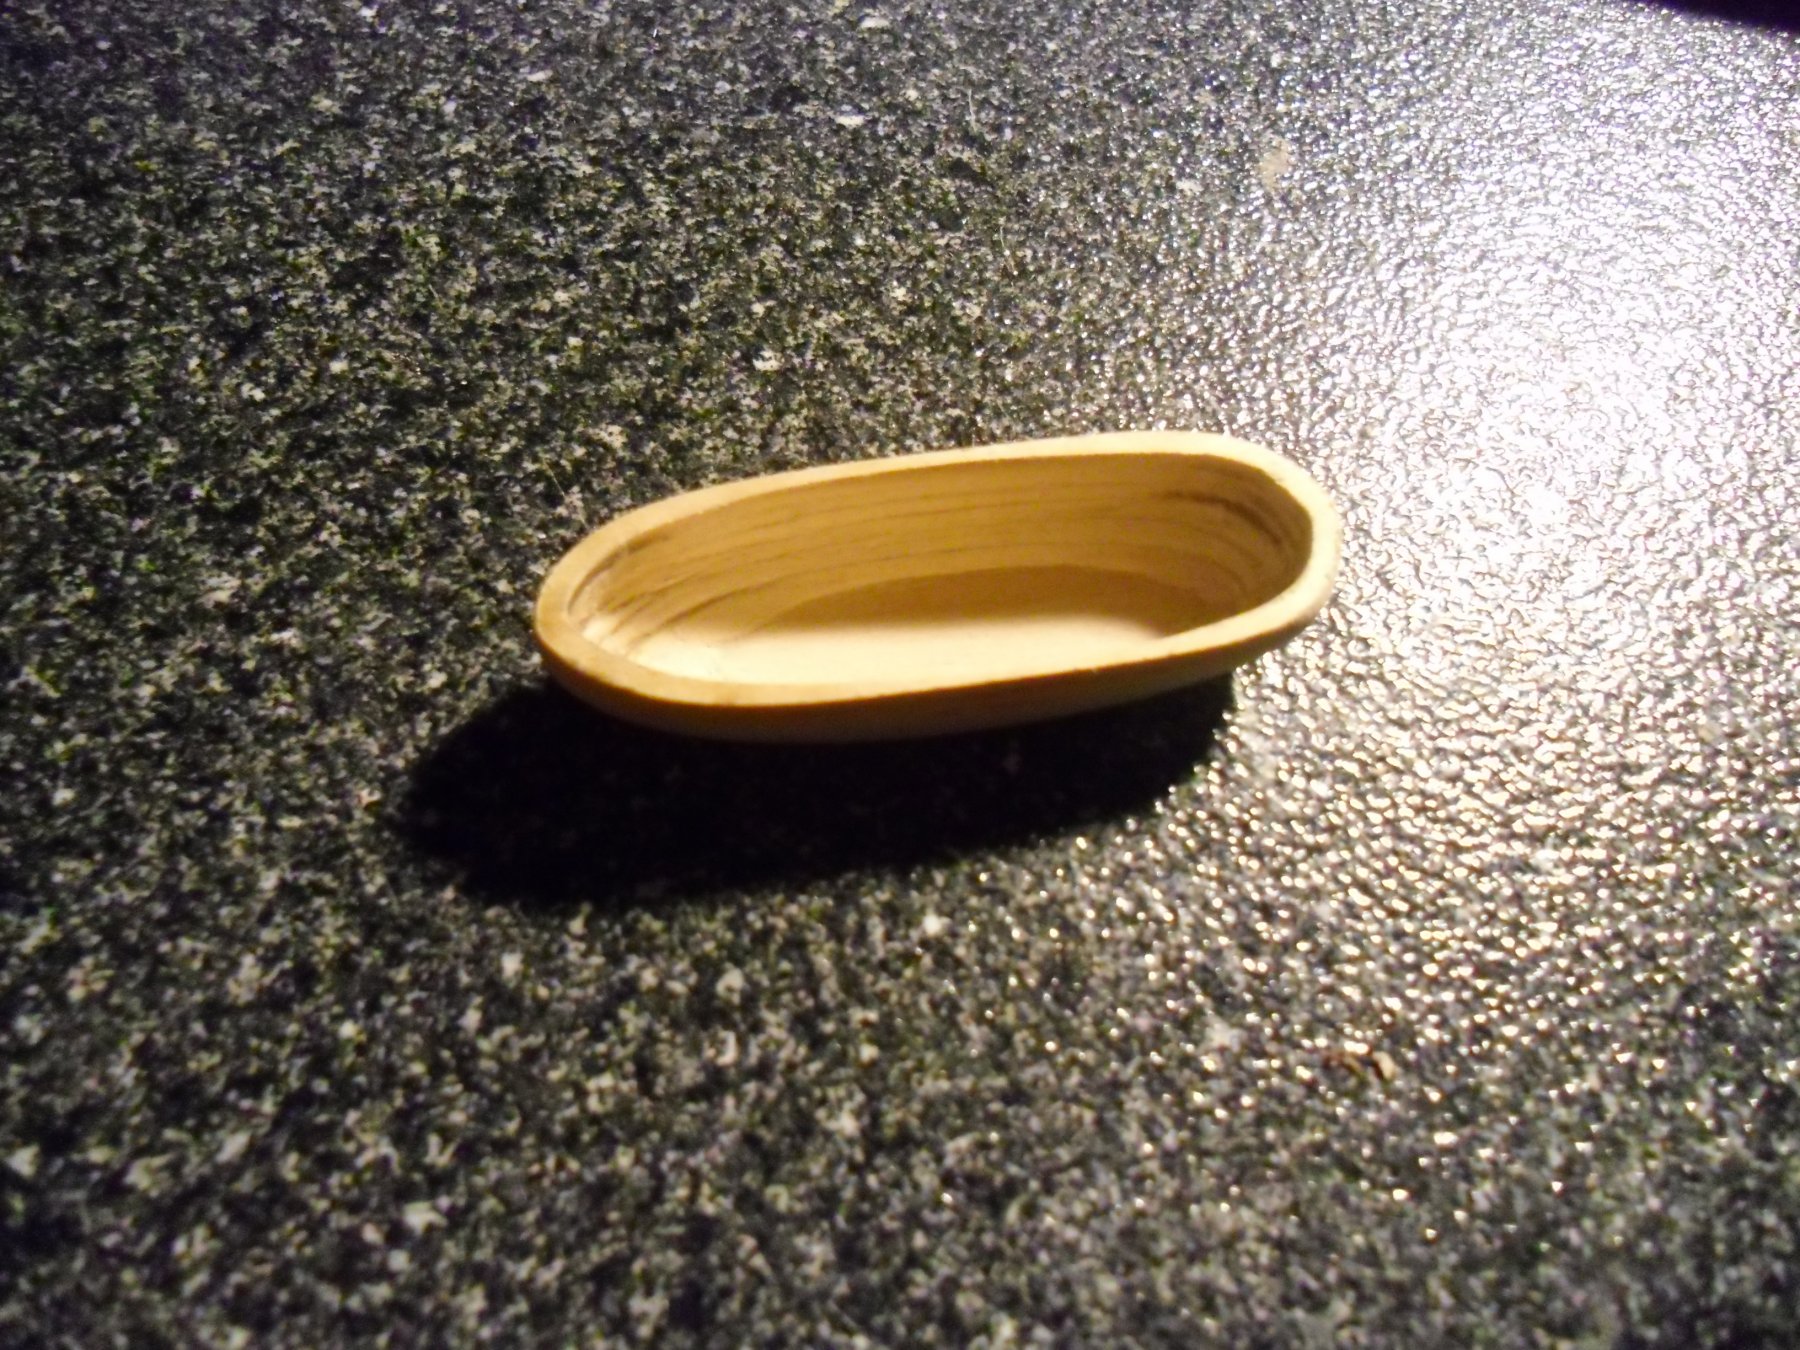
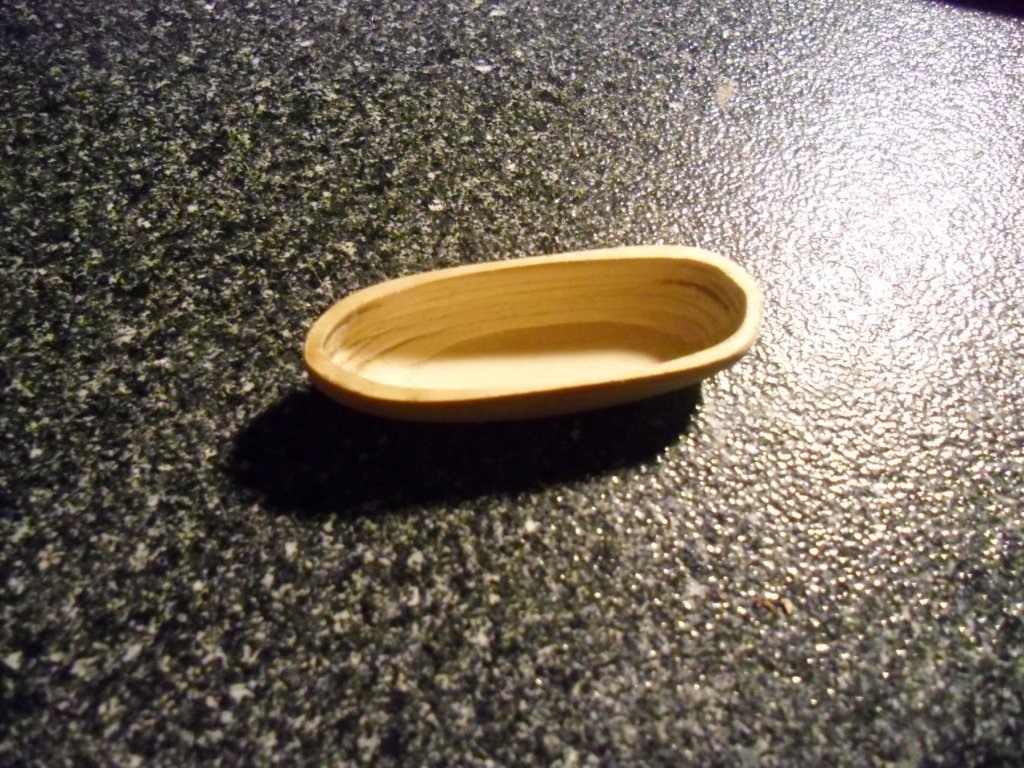
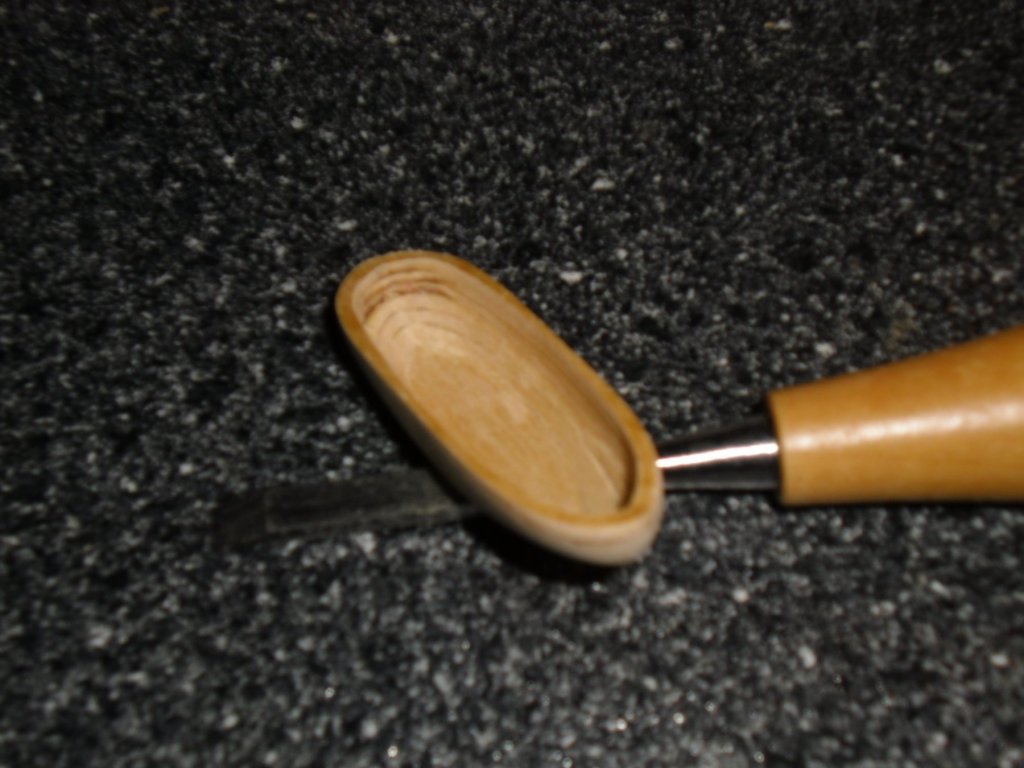
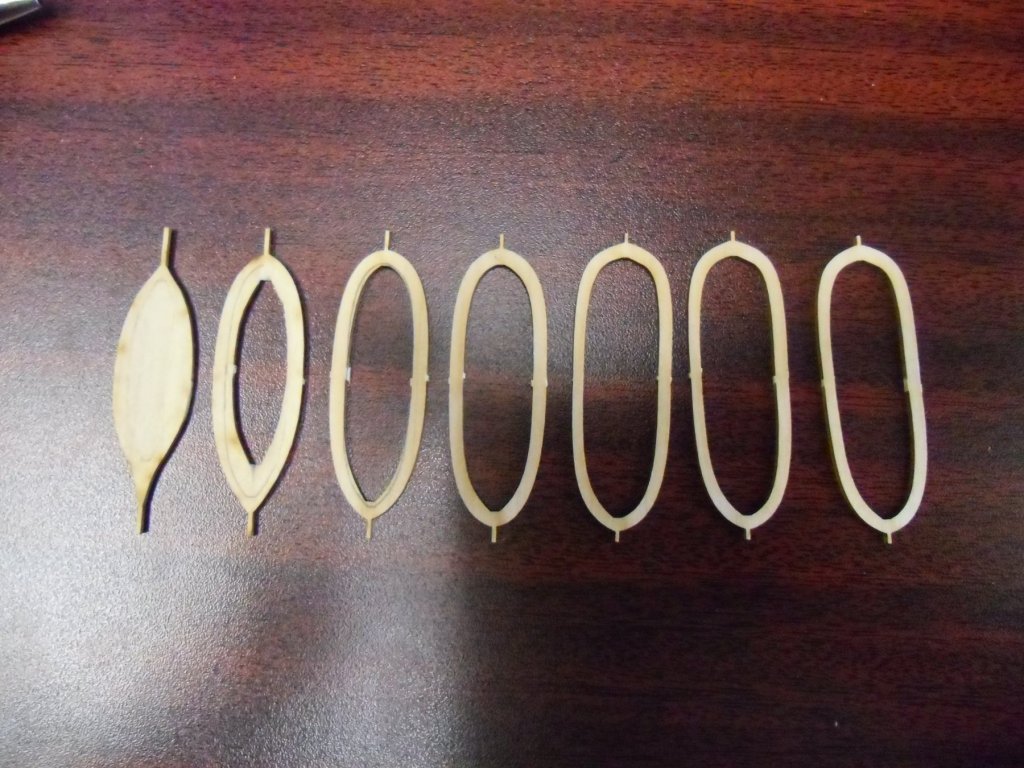
While I'm waiting for the replacement keel and bulkheads, I've decided to try to forge ahead with the ship's boat, which I guess is something like what I would have called a 'life boat'. (This one is about 2.5 inches long, and at the 5/32" to 1' scale, I think it would be about 16 feet long. I imagine they could save about a dozen people if the ship went down, and the rest would have to just do their best?) In any case, this boat is made of seven 'lifts' (laser-cut flat pieces) which are meant to be stacked up from the bottom to the top, and then chiseled or sanded to shape on the both the inside and outside surface. (This is apparently called a 'bread and butter hull' for some reason; maybe the lifts are the bread, and the glue is the butter?) The instructions say to glue them together first, and then shape the outside followed by the inside. However, it does say that you might want to leave off the bottom lift at first, as it will allow better access to the bottom of the inside of the boat for whatever instruments you choose to use to shape it. I've decided to take this advice to the extreme, and try to (at least roughly) shape the inside of the pieces before I've glued any of them together. So, I stacked the bottom two pieces, marked on the bottom one the inside contour of the upper one, and then filed the center of the floor down to about half thickness (from 1/16" to 1/32"). I repeated the process for the second and third lifts, marking the inner contour of the third lift on the top of the second lift. This allowed me to file a bevel along the second lift's inner edge using the pencil line on the top and the bottom of the laser char on the bottom. It certainly is easier to shape the lifts individually, as I can stick the file right through the center hole without having it hit the bottom of the boat. I've done this for the third lift as well, and stacked them to see if it's starting to look like the bottom of a boat, and actually, I think it kind of is... I know that I'll have to do the fine tuning after it's glued together, but at least this way, I've gotten the bulk of the roughing out taken care of while the access is good.


-
update: within 45 minutes of sending the email to Marc (and this is on a Saturday), he already responded to me and to Carlos, instructing Carlos to send the parts out. I have to agree; they do seem to have excellent customer service!
-
Thanks, Tiger. I just sent an email to Marc Mosko at mmosko@aol.com, which is the address they suggested on the modelexpo website for part replacements. But I'll keep jgarcia in mind if that doesn't work. I'm glad that everyone gave me the good advice to replace the parts, because my inclination was going to be to put the keel into a jig, put on the bulkheads, and forge ahead paying attention to the alignment as I went. But now I suspect I was in for problems compounding on top of problems if I tried that.
-
OK, I'm kind of surprised, but it seems that the consensus is to call customer service and get replacement parts. It looks like all of the 3/16" plywood pieces are pretty well warped. I'd guess they were all cut out of the same larger piece of plywood. I'll give them a call and see what they have to say. Thanks to Tiger, russ, and don, for helping me avoid some frustration down the road.
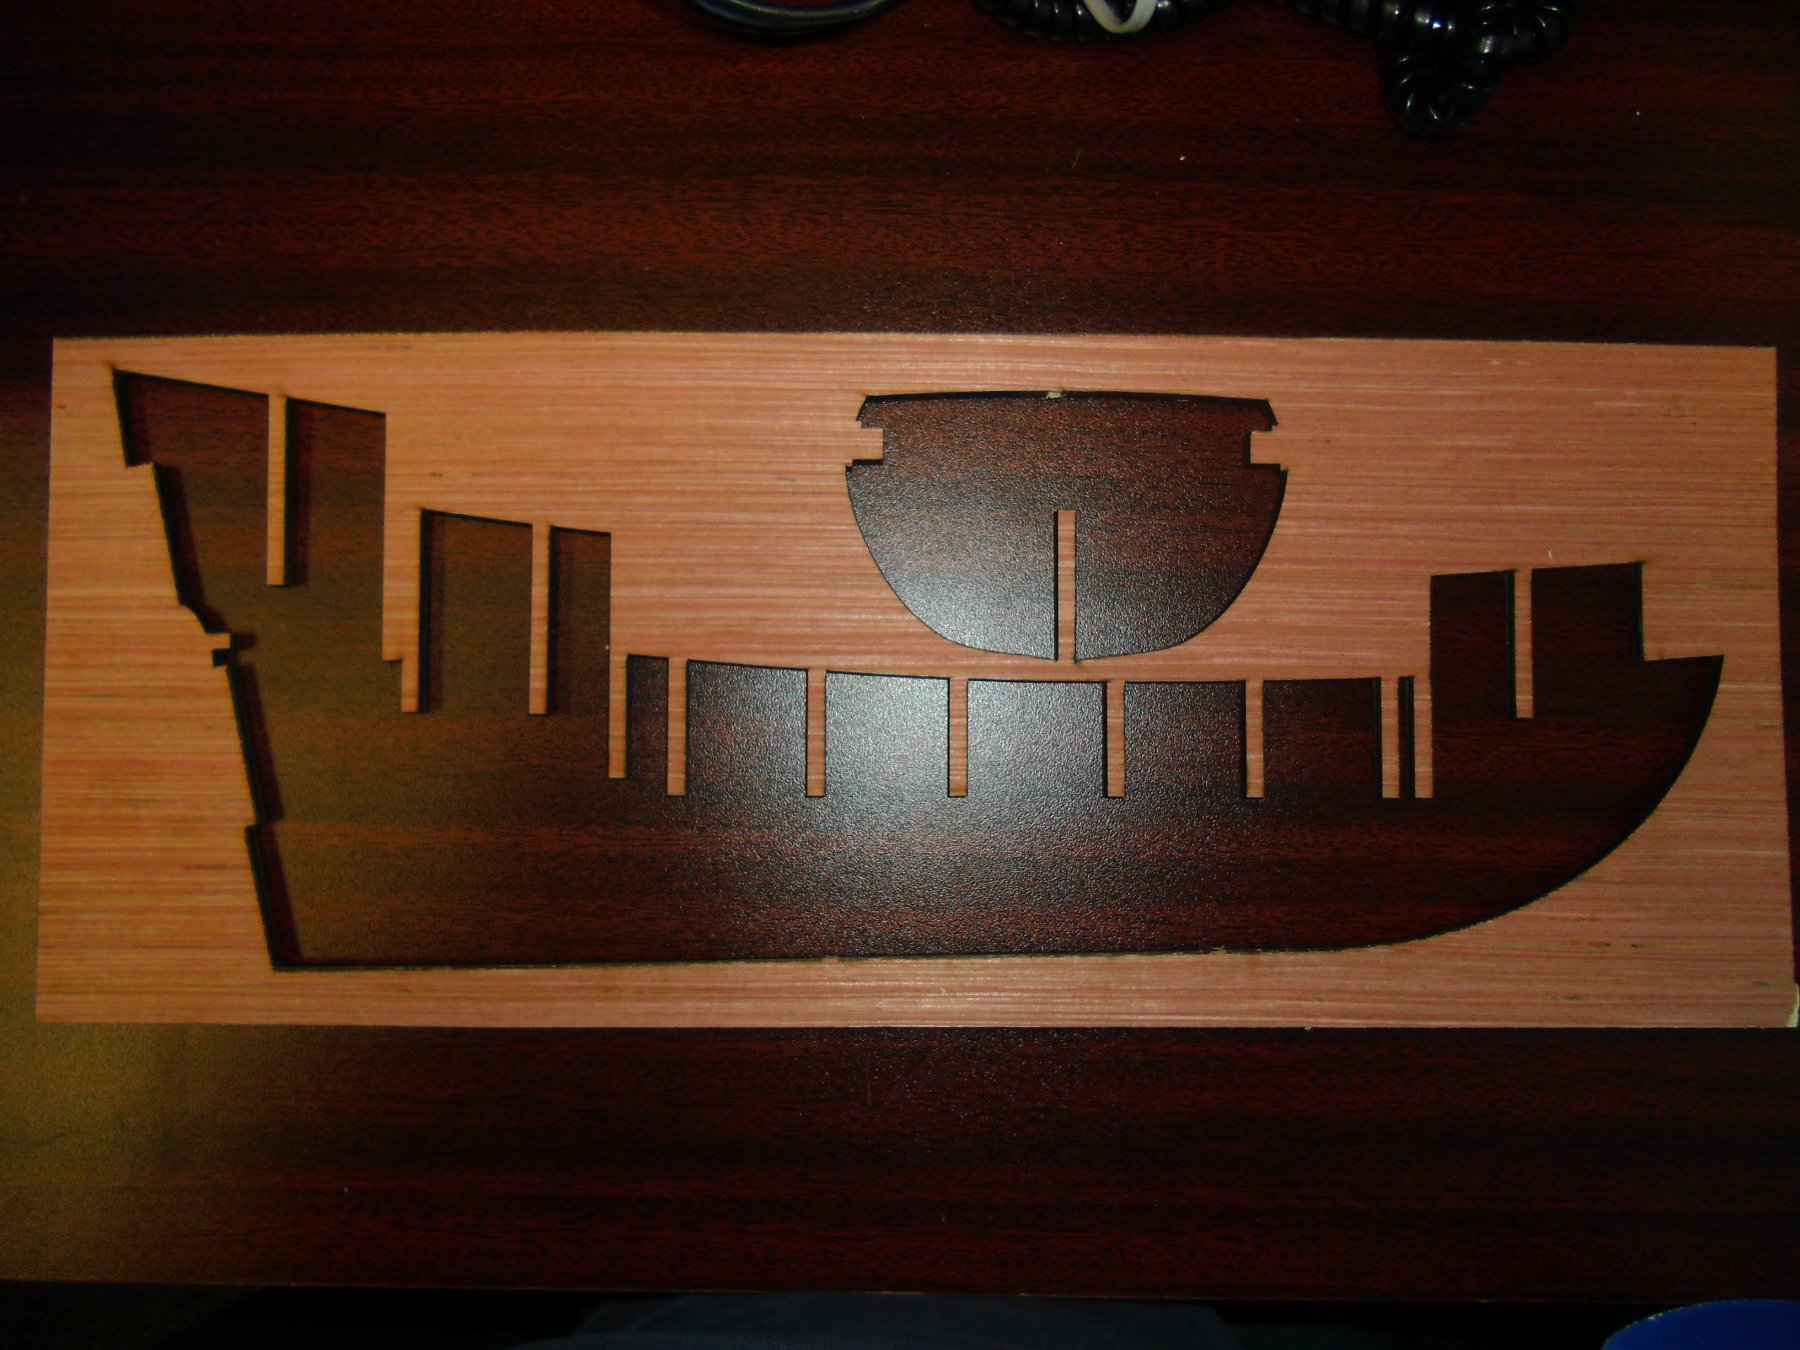
-
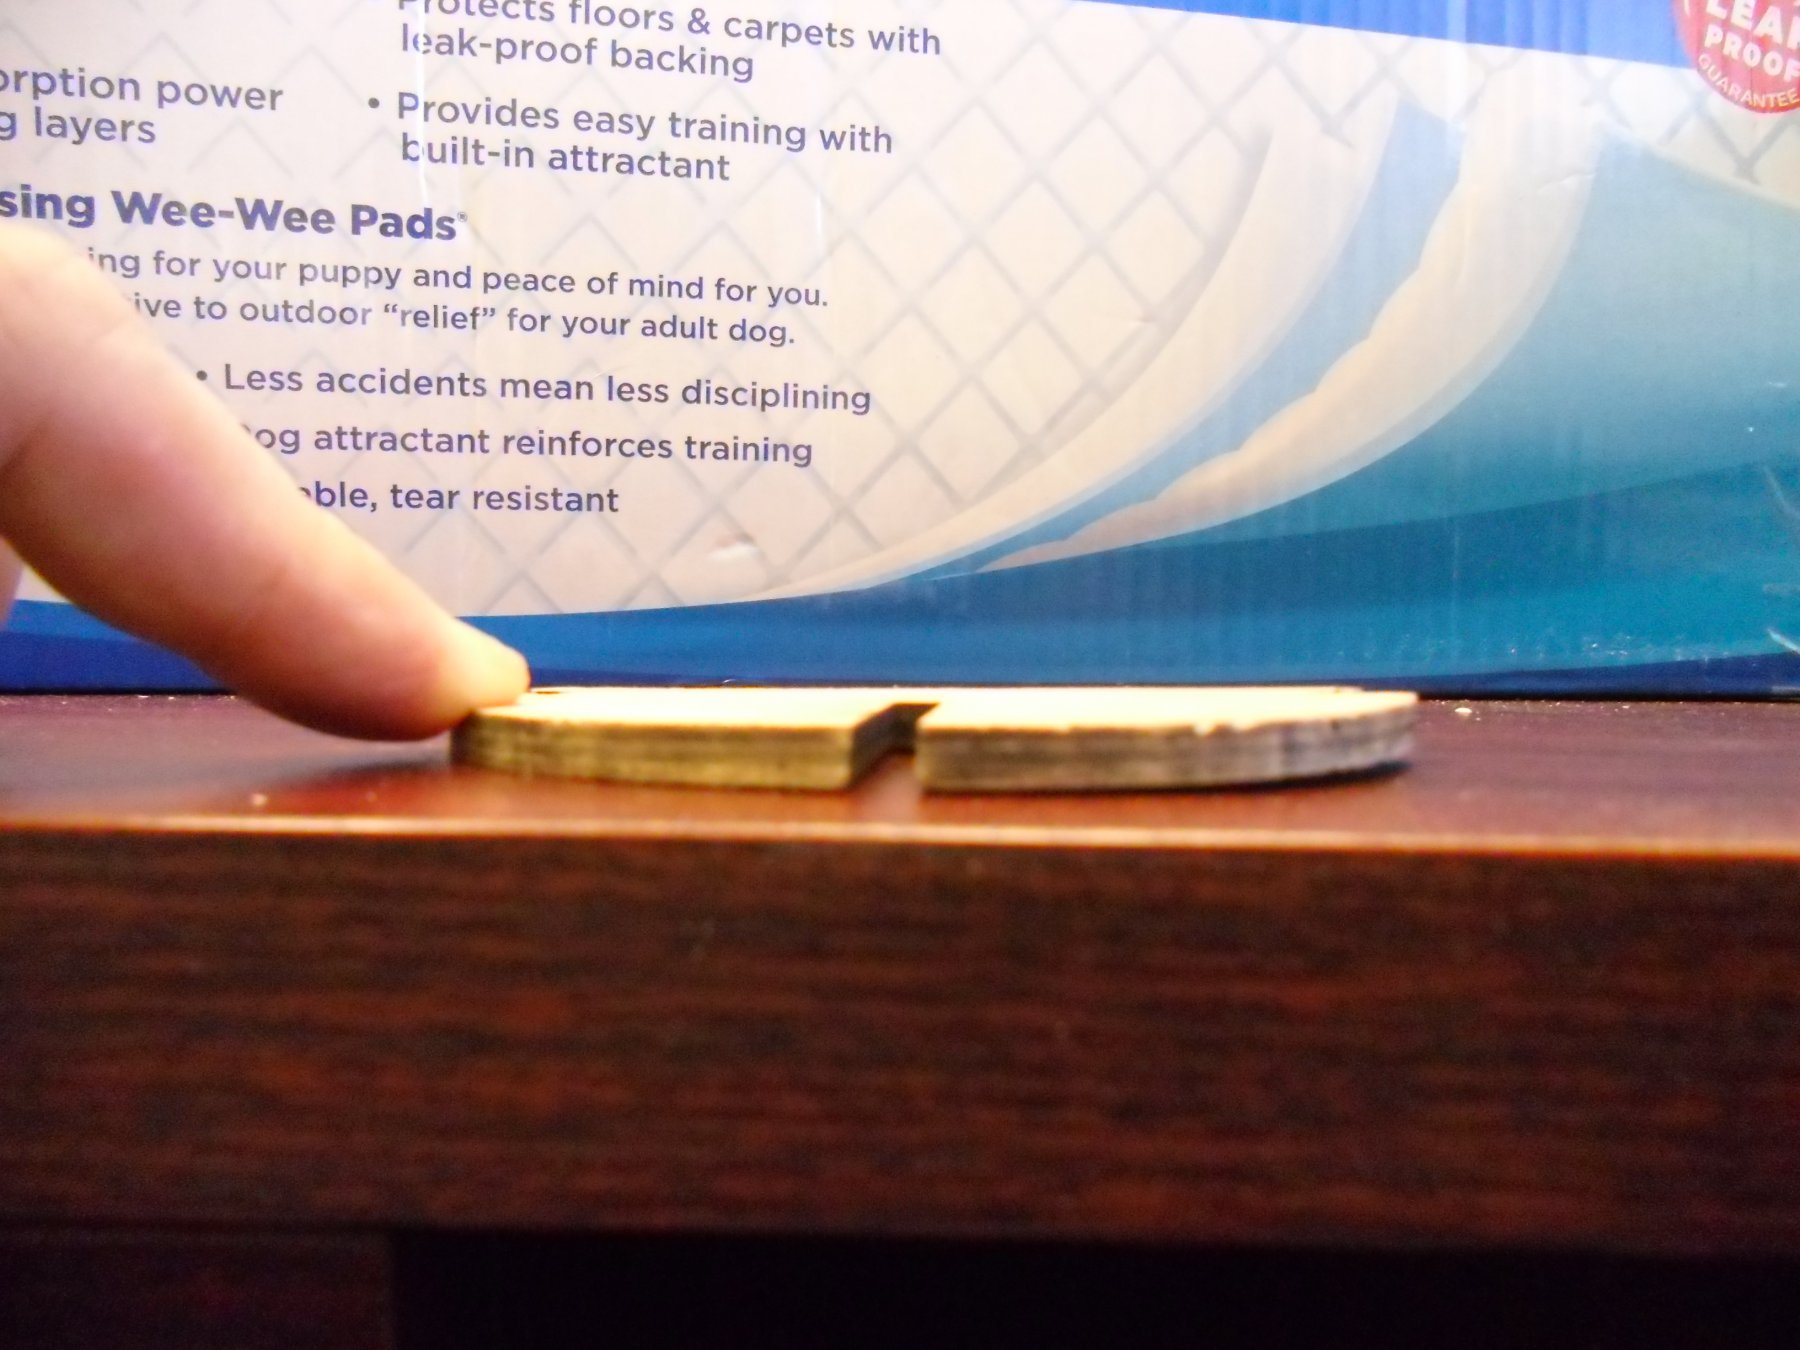
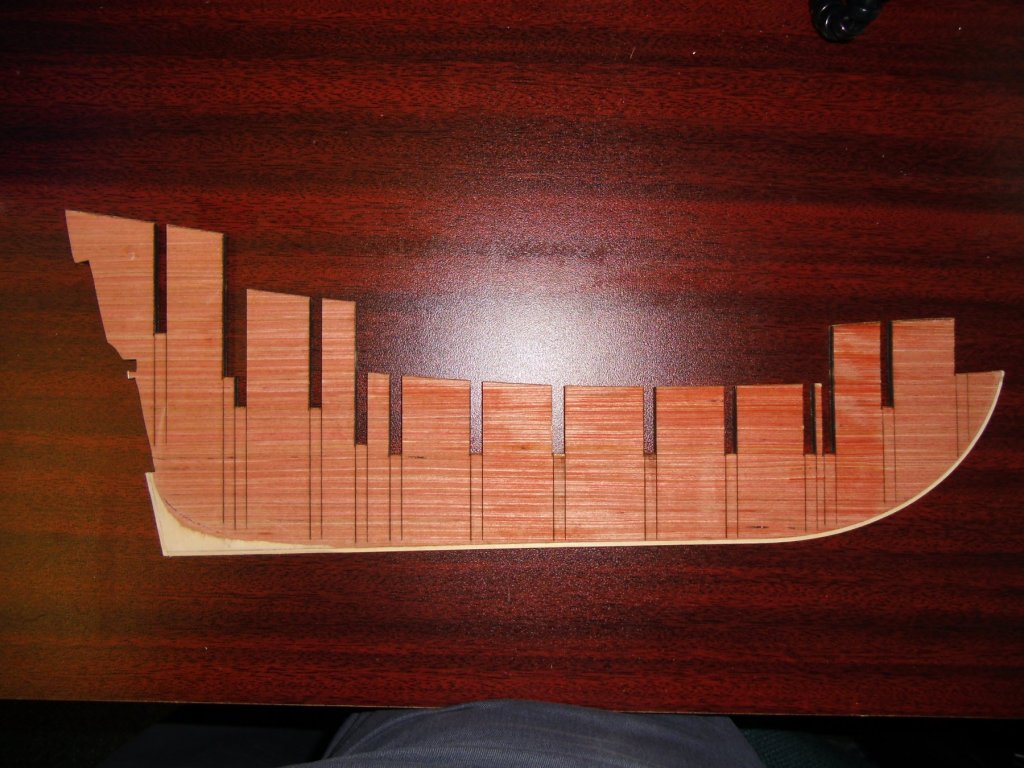
I'm starting this build log on the Mayflower from Model Shipways. I'm pretty new to this kind of modelling, so I'm hoping for as much advice and constructive criticism as I can get. The first thing that they want you to do is cut out the false keel and gently sand off the laser char. Then, you glue a piece of basswood called a 'rabbet strip' along the bottom edge and along the stern. This allows you sand or chisel the bottom rearmost part of the keel from its original 3/16" thickness to 3/32" below a predetermined mark called the 'bearding line', which is laser drawn on one side of the keel. (As the rabbet strip is 1/8" wide, it needs to be reduced to 3/32", which means that 1/64" is removed from each side. I first cut the rabbet strip down to about 3/32" in the area that need it, and then used a diamond dusted file to thin the keel as necessary. You can see this in the second picture, where the lighter colored rabbet strip is along the bottom of the keel, and the plywood has been thinned in the bottom left corner, thereby changing its color as the top layer was filed away.) I think that part went fine. But, I do have this question. I've taken a picture of the piece of plywood that the false keel was taken from, and then I've included a picture of both its long and short edges. Both of them have pretty noticeable warpage; and when I put the false keel onto a flat surface as it is in the second picture, there's about 2-3 mm of vault in the center. I've soaked it and left it to dry under some weights a couple of times, and it initially looks pretty flat, but after a few hours, it's back to the same warp. My understanding is that it's pretty important that the keel be straight in order to proceed effectively. I believe that I have a few choices: 1) keep soaking the keel, and drying it under weight on a flat surface, and hopefully it eventually will flatten out. 2) proceed with gluing on the bulkheads, and then put wood spacers between some of the bulkheads in order to force the keel straighter. 3) I read somewhere on this forum that you can multiply score one side of the keel, and then brush glue deep into the score marks, and clamp it between glass until it dries. Sounds complicated... 4) get a replacement part from Model Shipways. (I've heard that they have pretty good customer service.) I don't think that this is necessary, but I'll defer to the wisdom of the forum. Also, the plywood that contains the bulkheads is similarly warped. These are much smaller pieces, so the warping isn't as obvious as it is on the keel, but it is definitely there. (I've included a picture of one of the bulkheads with my finger holding down one side, showing that the other side lifts off the table.) Should I be worried about those too? Any suggestions?


-
Derek, I've just finished reading your Mare Nostrum log, and then this one. I really appreciate the 'warts and all' approach you have; you don't try to hide anything, and I'm learning a lot from your travails. Sorry that I don't have any brilliant advice to offer, but I just thought you'd like to know that your logs are really helping some people.