


king derelict
-
Posts
3,296 -
Joined
-
Last visited
Content Type
Profiles
Forums
Gallery
Events
Everything posted by king derelict
-
Great work on a favourite aircraft Jav Alan
-
Looking forward to another masterpiece Dan Alan
-
Bugatti Type 35B by CDW - FINISHED - Italeri - 1:12 Scale
king derelict replied to CDW's topic in Non-ship/categorised builds
Looks very nice Craig Alan -
Really stunning work. Those black and gold Lotus were great looking and your model captures it all Alan
-
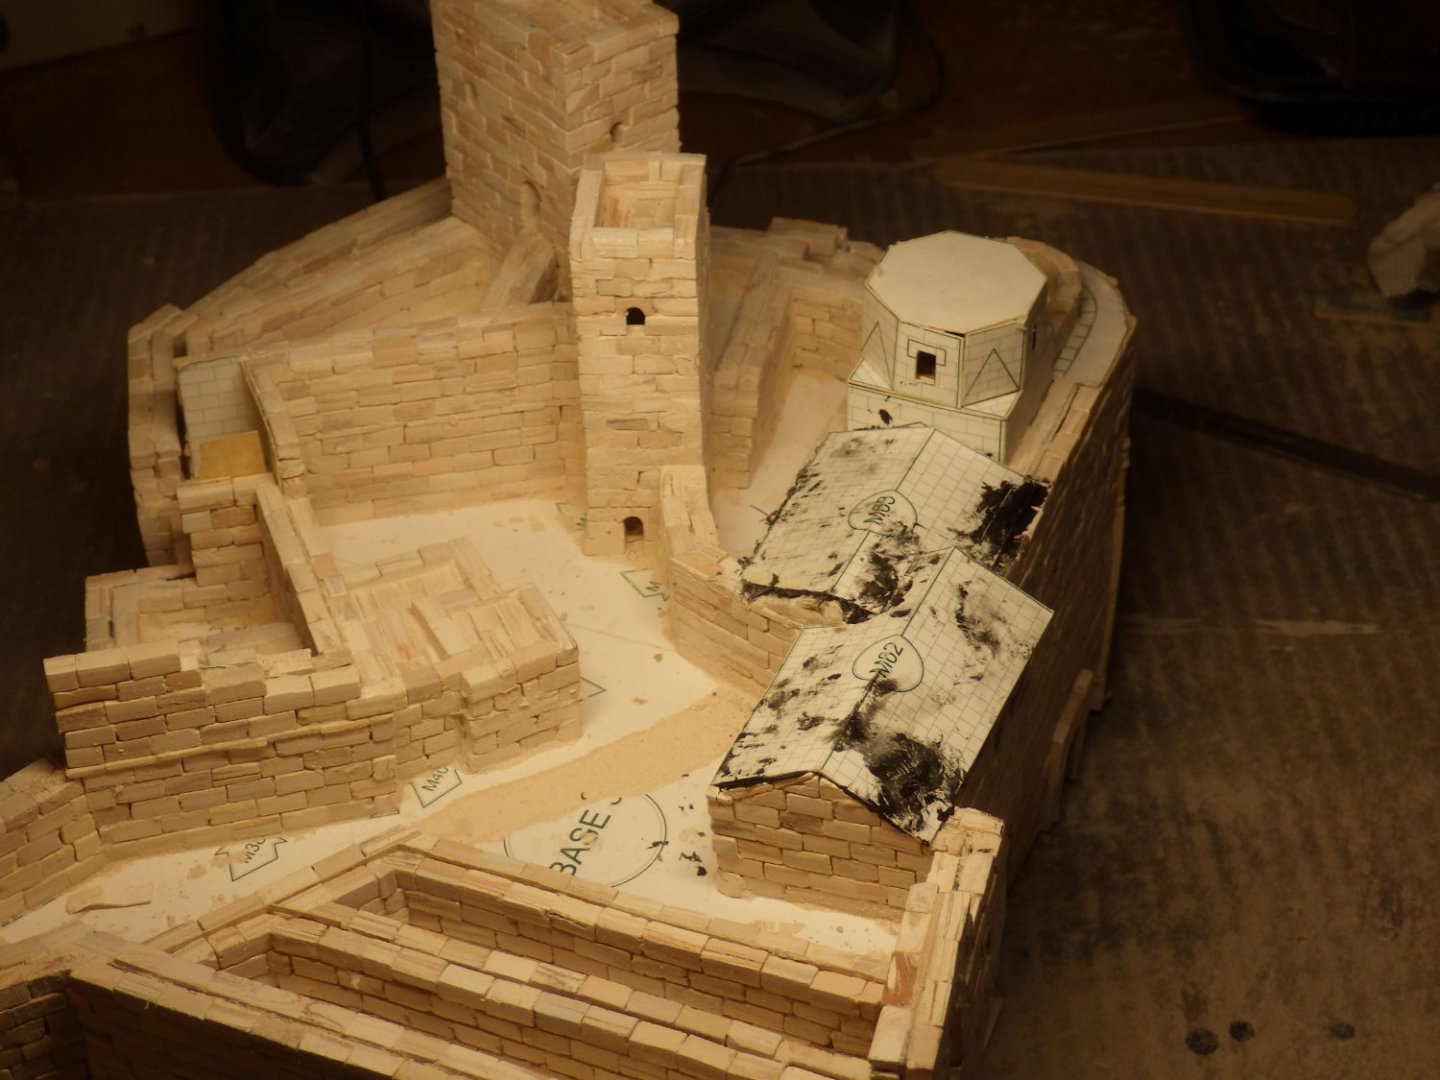
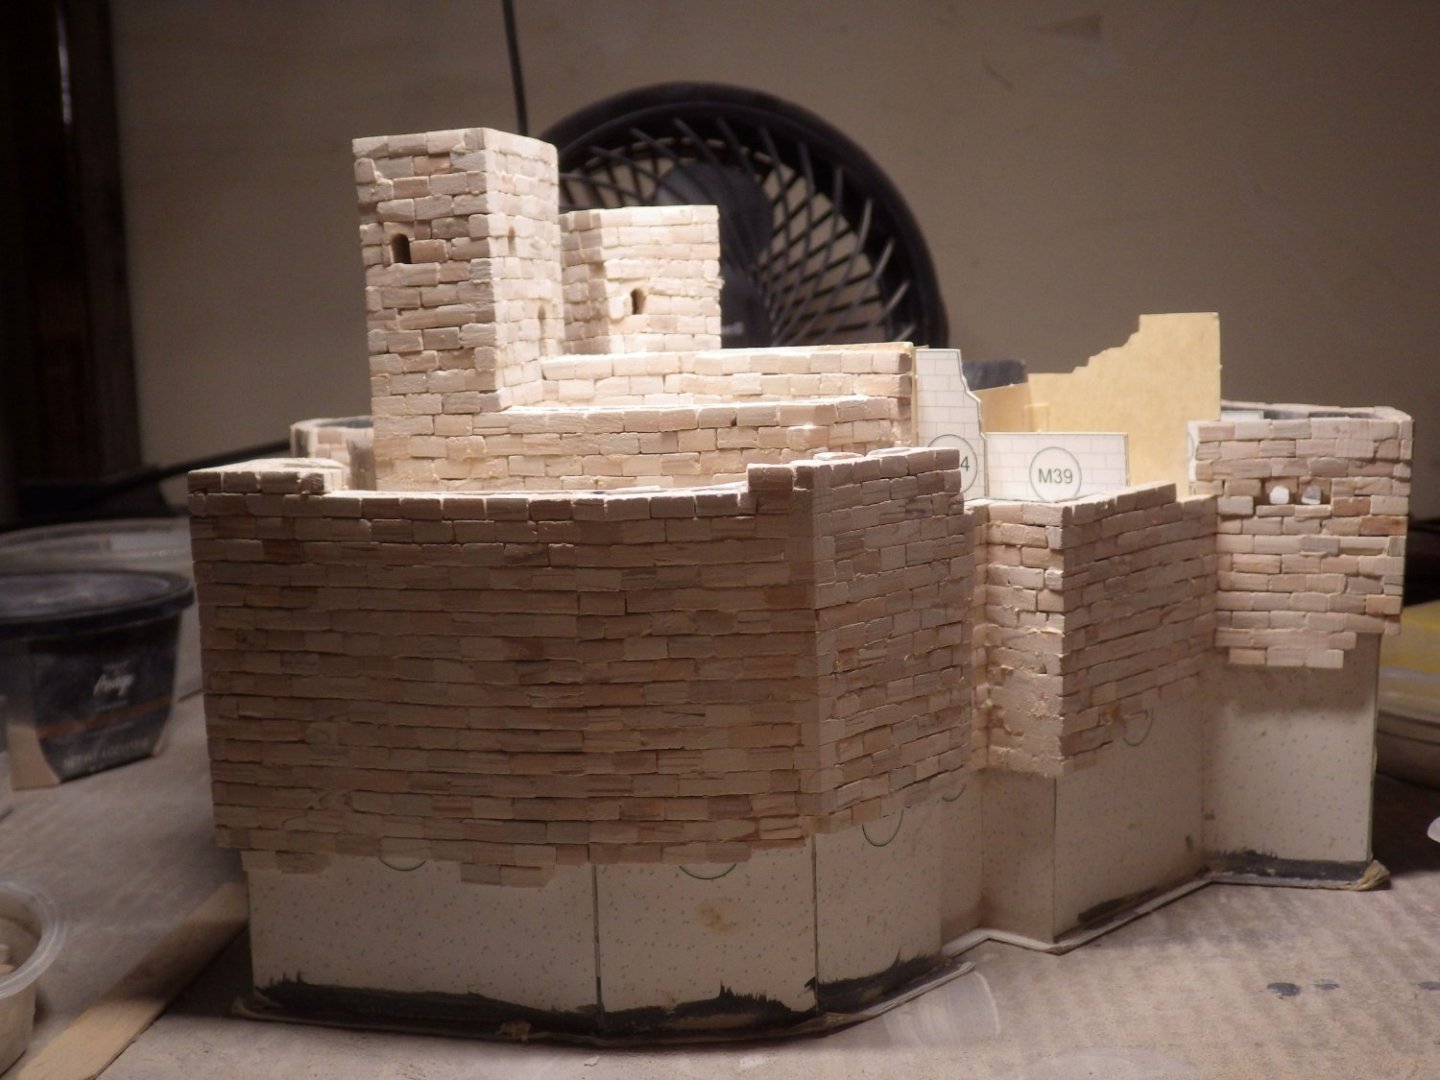
I'm adding blocks in the last sections of open structure. Just the last section with the arch and windows to complete. Then its onto the octagon tower and the roofs. the octagon tower is going to be challenging to build up. Lots of shapes to sand. I added the templates for the roofs sitting them on black caulk to try to eliminate any light bleed. That looks fairly successful although I got in the usual filthy mess when I use caulk. Doesn't matter whether its the kitchen sink or something more delicate; I manage to get it smeared everywhere. Luckily it doesn't seem to have got anywhere that will be visible once the roof tiles are in place. The stock of blocks is almost gone. I think I will make the open structure but I don't think there is enough to build the tower. I found my stash of spare blocks from previous Aedes Ars kits and I think I'm in good shape if I use them. There may be a bit of a pause in the build now. Tomorrow I am off to New Bern NC for eye surgery. I'm hoping to be home on Sunday night but I don't know how long the recovery is going to take and the quality of eyesight while that's happening. If all goes to plan it could be a couple of weeks. Hopefully there are some long-term gains to be had. Thanks for all the support, comments and likes Alan
- 462 replies
-
- 14
-

-

-
I would love to try a Lightning. That was my first test aircraft at Boscombe Down. Watching the rate of climb following an AB take off was unforgettable. It would be a great bare metal challenge too. I've browsed kits but haven't formed an option on which is the superior offering. I need to try to find my Lightning reference book which is somewhere in my fathers attic in the UK. That may be a project for my December visit Alan
-
It will be great to see you back on this spectacular project. So many great figures already done. Your brush painting skills make the air brush redundant for this one. Enjoy and have fun. Alan
-
Thank you Andrew. I'm going to need to review the helpful suggestions for the landscaping in the very near futue. Alan
-
Thank you Craig. It will look better with some more sanding and some mortar in places. Alan
-
Thank you very much OC , these kits are tough proposition with so much repetitive work with the stone work. The result is a unique model and there is enough vagueness in the guide to provide plenty of challenges. It's going to be a while before I pick up another one though Alan
-
Really beautiful Dan and I always learn from your builds Alan
-
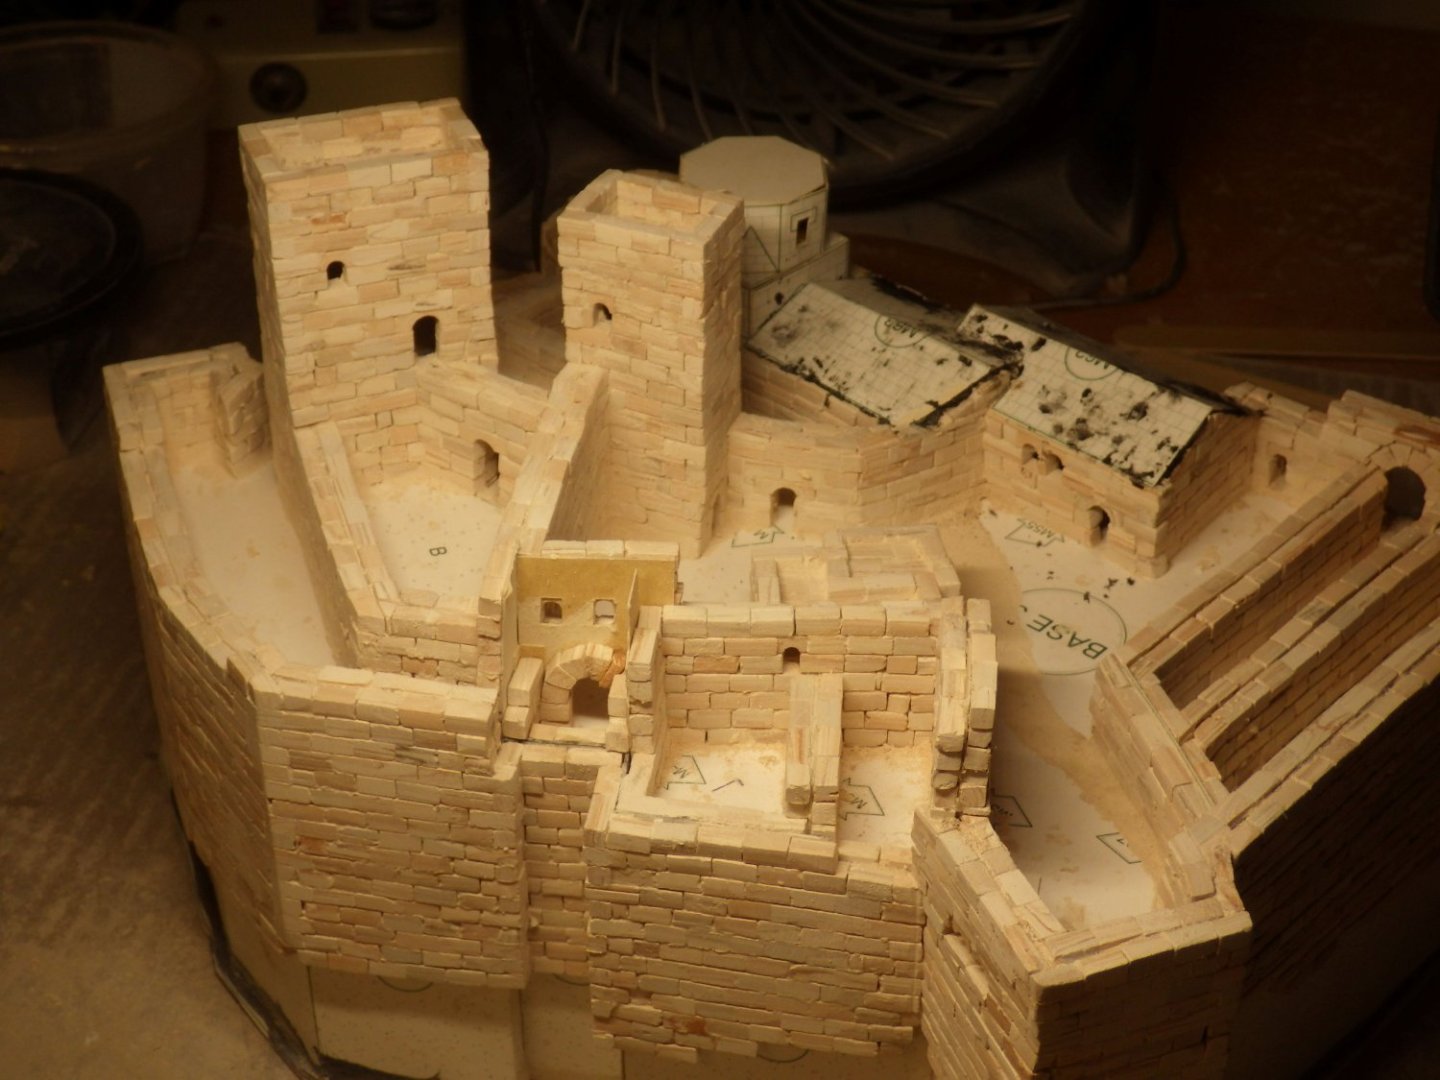
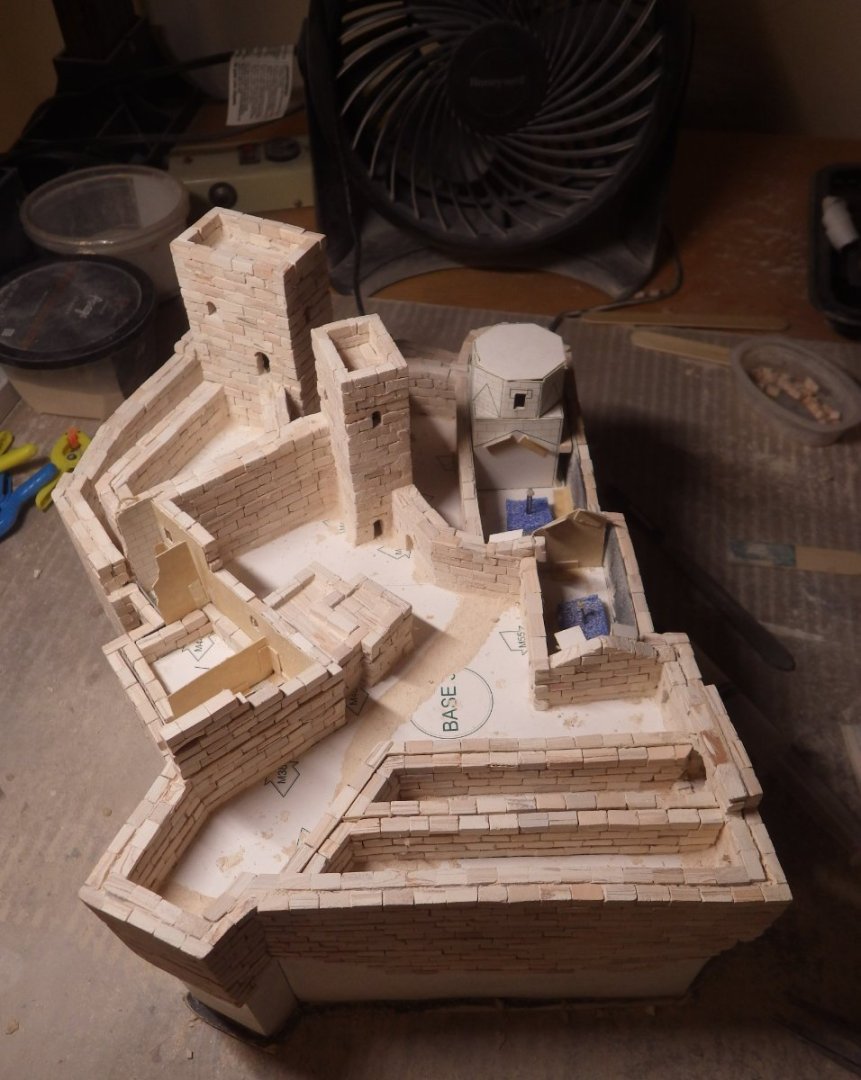
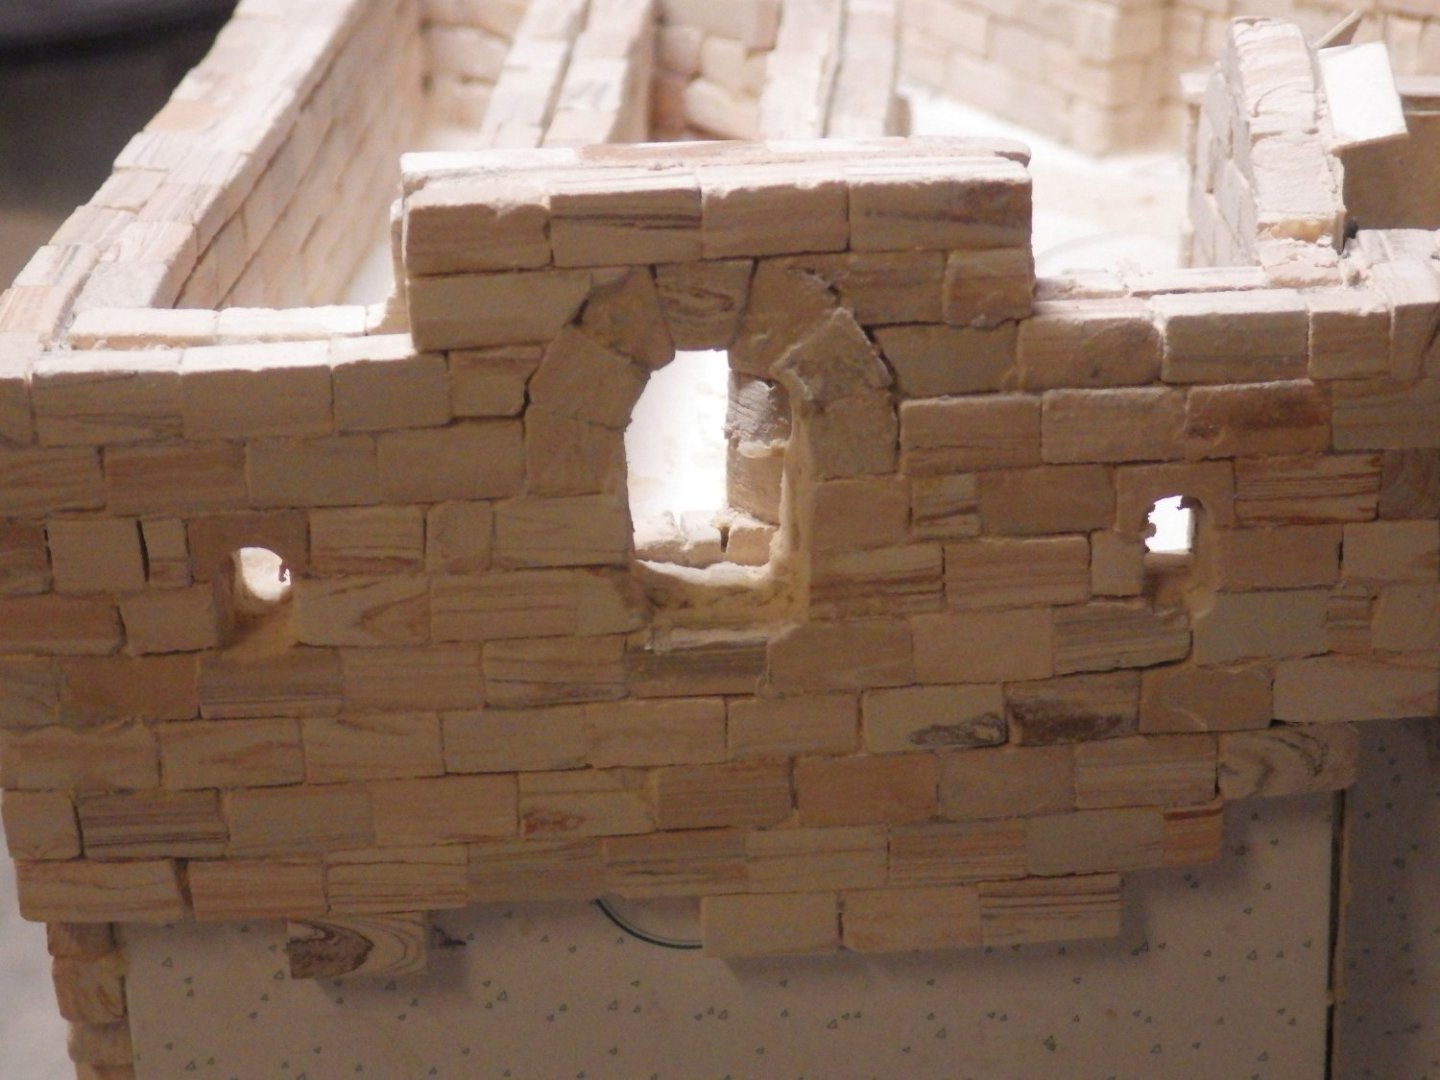
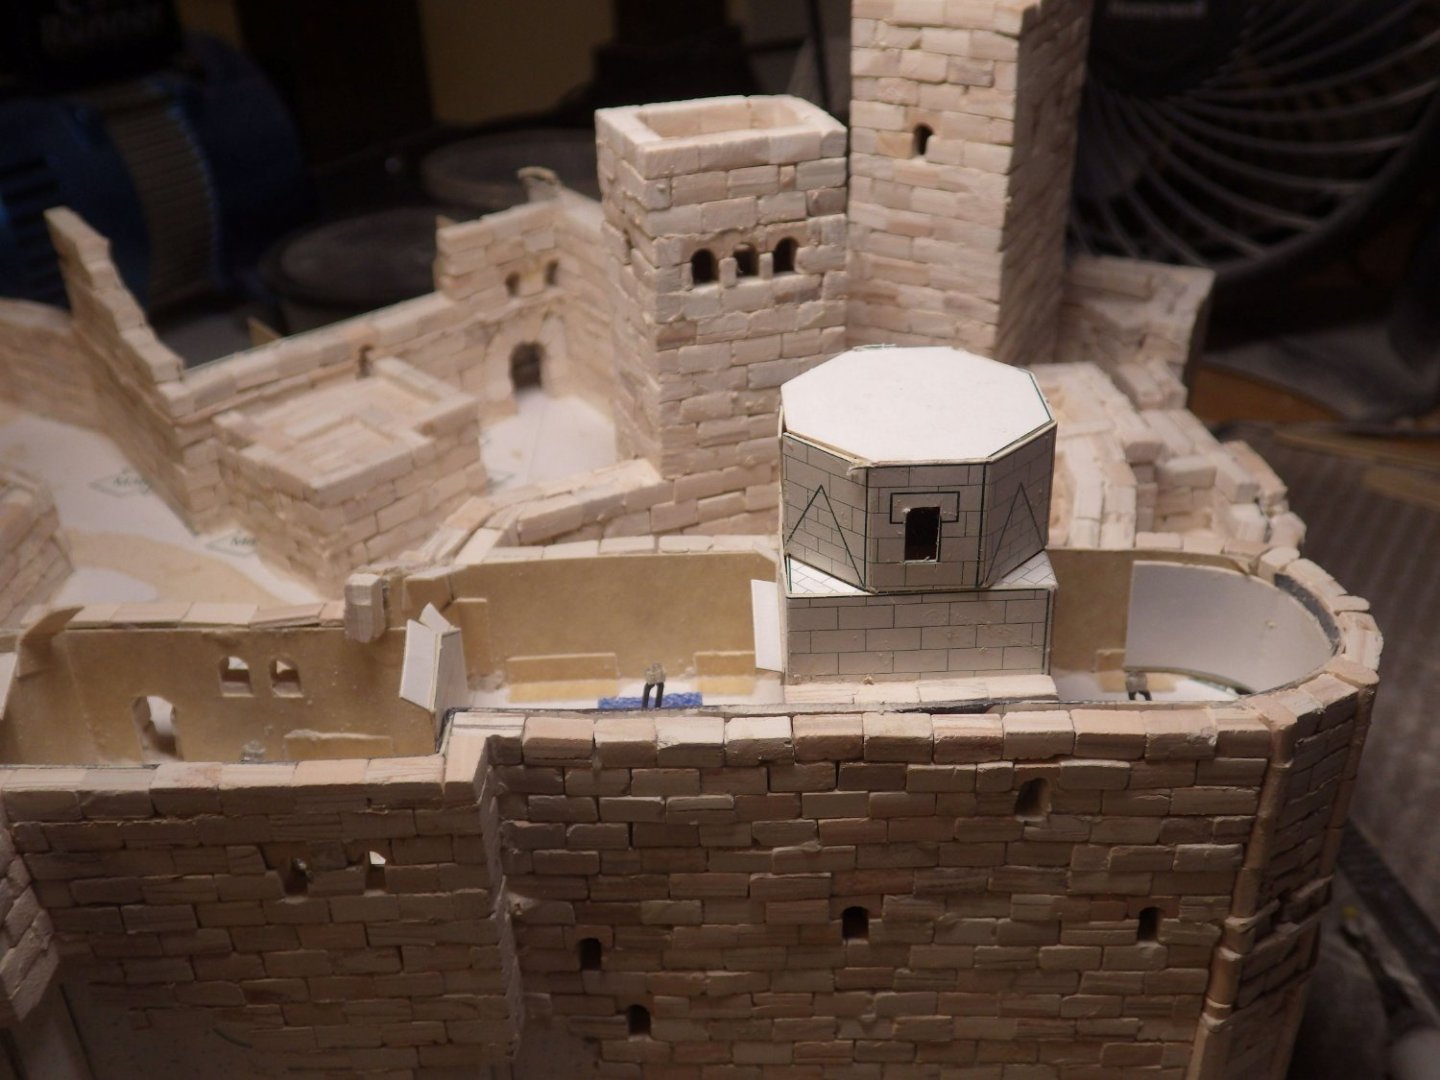
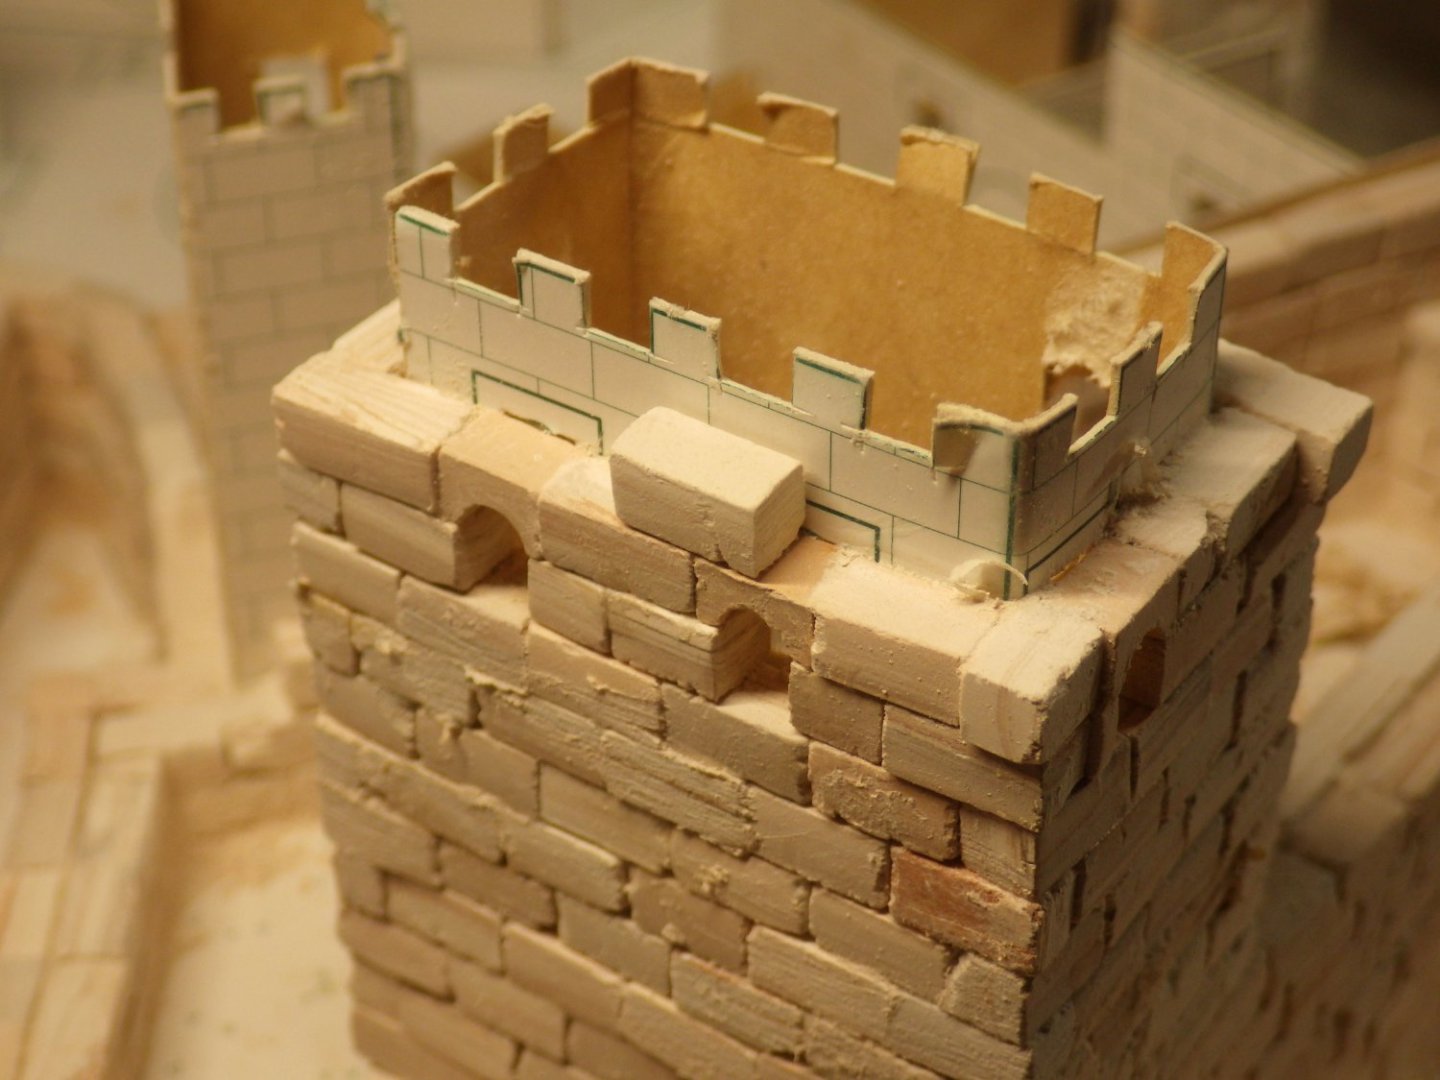
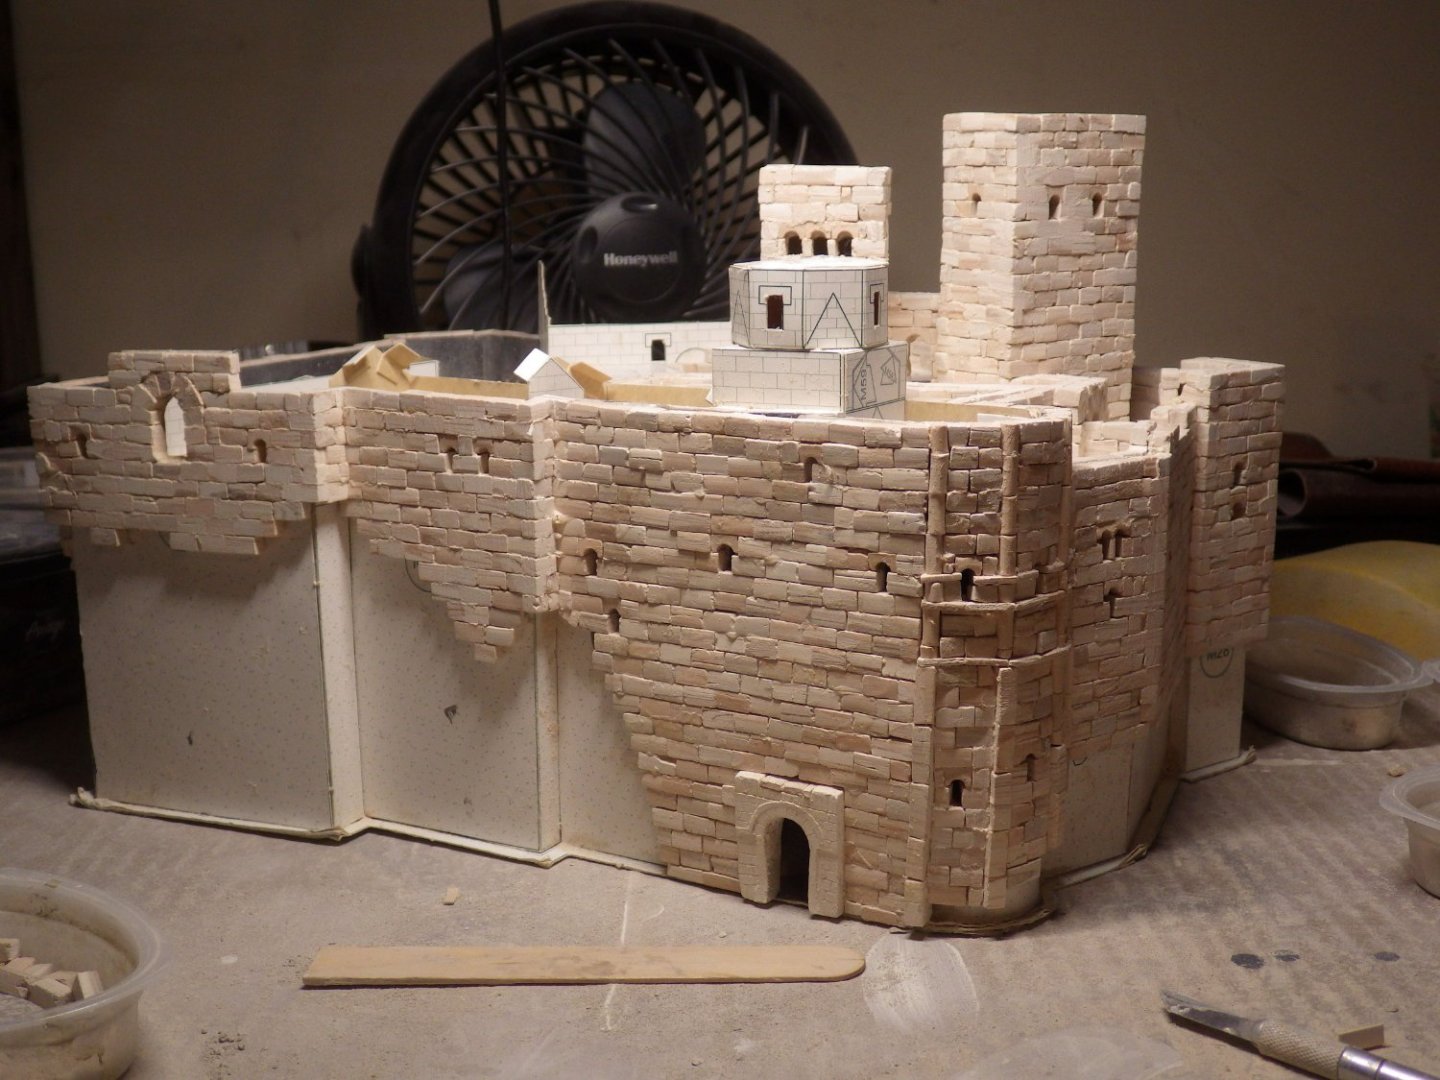
Progress has continued through the week with most of the upper structures completed. Its beginning to feel like the last lap. I came across another Aedes Ars discontinuity. The arched gateway in the lower right is too close to the wall of the structure and is partially blocked by the wall. The guide is of no help. I checked the templates and everything is where its supposed to be. My solution is to chamfer the wall as it meets the arch and fair it into the archway. I'll round it off a little and I think it will look acceptable. The windows still need to be opened out too and cleaned up a little I'm working on the last bits of structure now The remaining blocks are diminishing but I'm hopeful I might just make it The last challenge will be the last tower and the roofs on the adjacent buildings There is going to be some very intricate block and tile work here and I think there is going to be some potential for light leakage. I ordered some black caulk to sit the roof templates on and I may add some cardboard to the templates to ensure there are no gaps. Thanks for looking in and all the likes and helpful comments Alan

- 462 replies
-
- 12
-
-
I think its going to be tight
-
Thanks Andrew. I have seen some packs of extra blocks on Amazon at a pretty fierce price. I will try a begging email to Aedes Ars first and see how good their customer service is. I'm hoping I might squeak though. Alan
-
Thank you OC for the encouragement. Its starting to feel like I'm in the last days of block work. That little engraving tool is great. It can get into some places I was really struggling with. Its not very powerful but that's a good thing for this application. I don't want to grind excessive amounts off the stonework Alan
-
Bugatti Type 35B by CDW - FINISHED - Italeri - 1:12 Scale
king derelict replied to CDW's topic in Non-ship/categorised builds
Lovely project Craig. The weathered finish is going to make it exceptional Alan -
The snow looks very convincing Craig. I'm looking forward to seeing the icicles Alan
-
Stunning, the finish is spectacular Alan
-
Thanks Craig. That is very helpful. I always have a fight with the tracks Alan
-
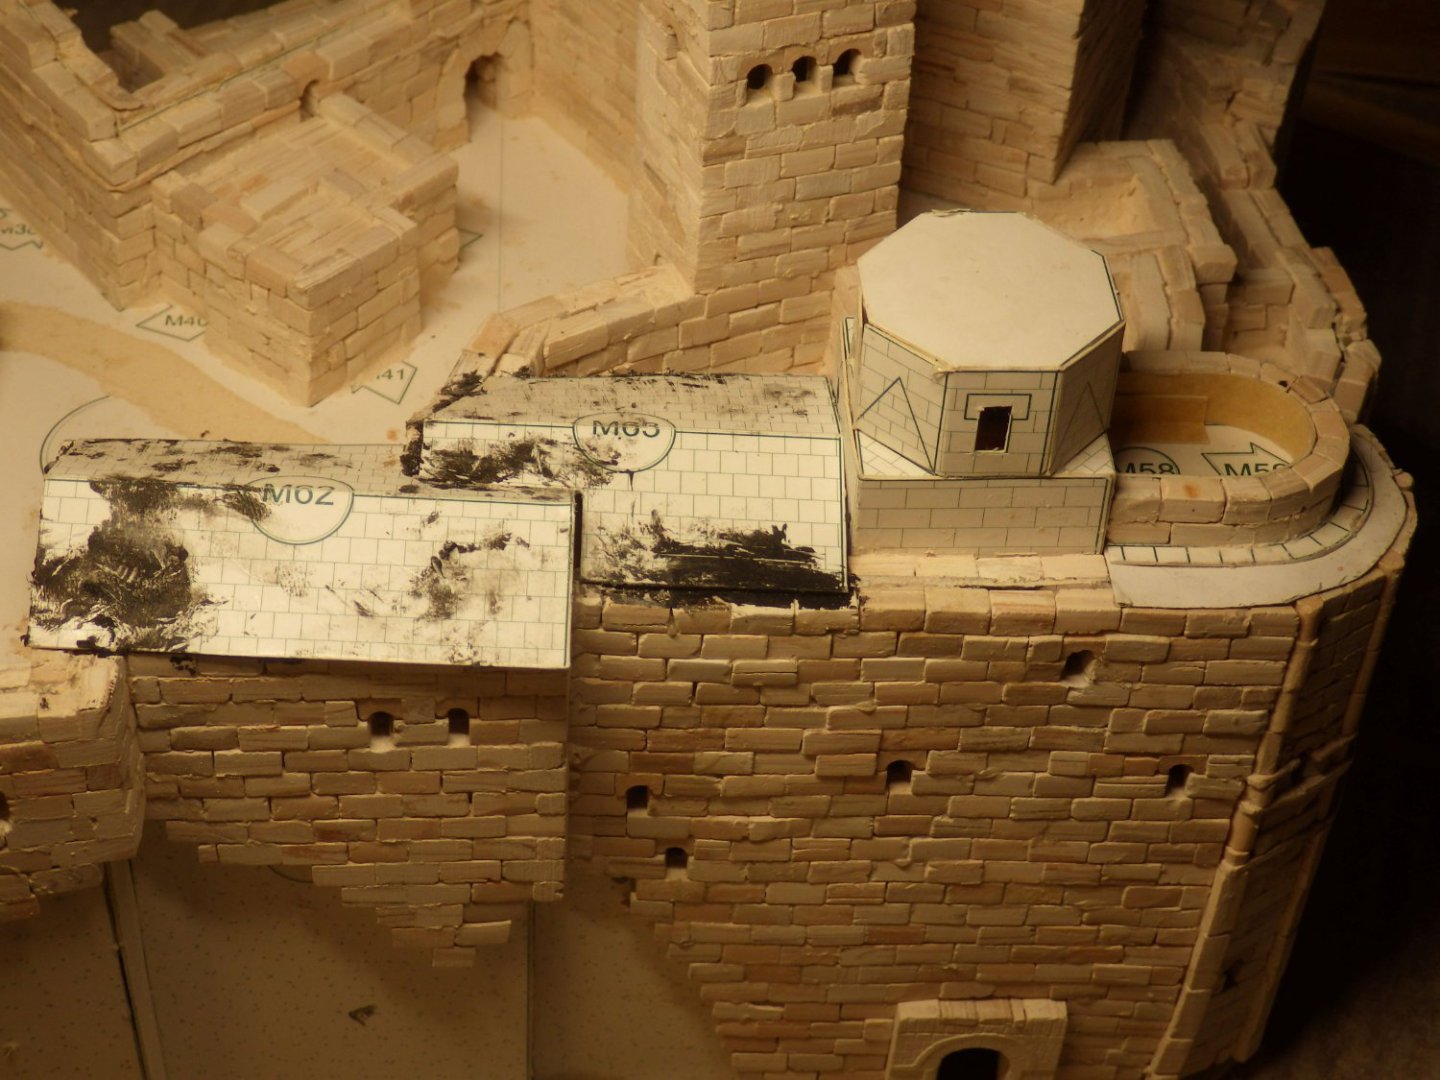
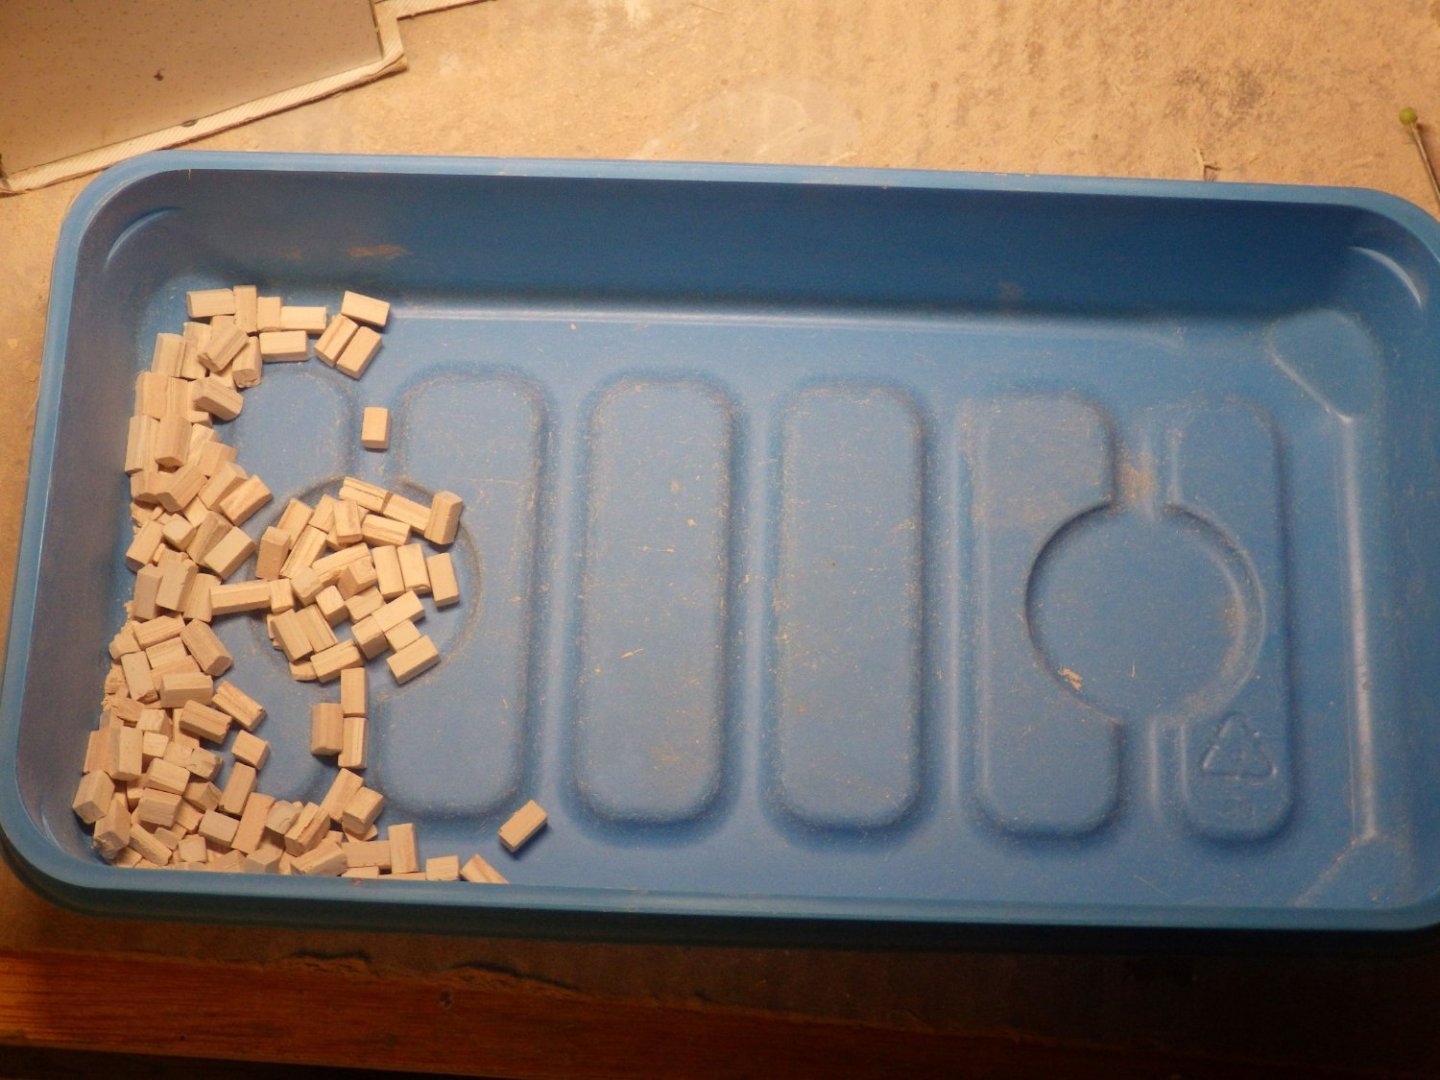
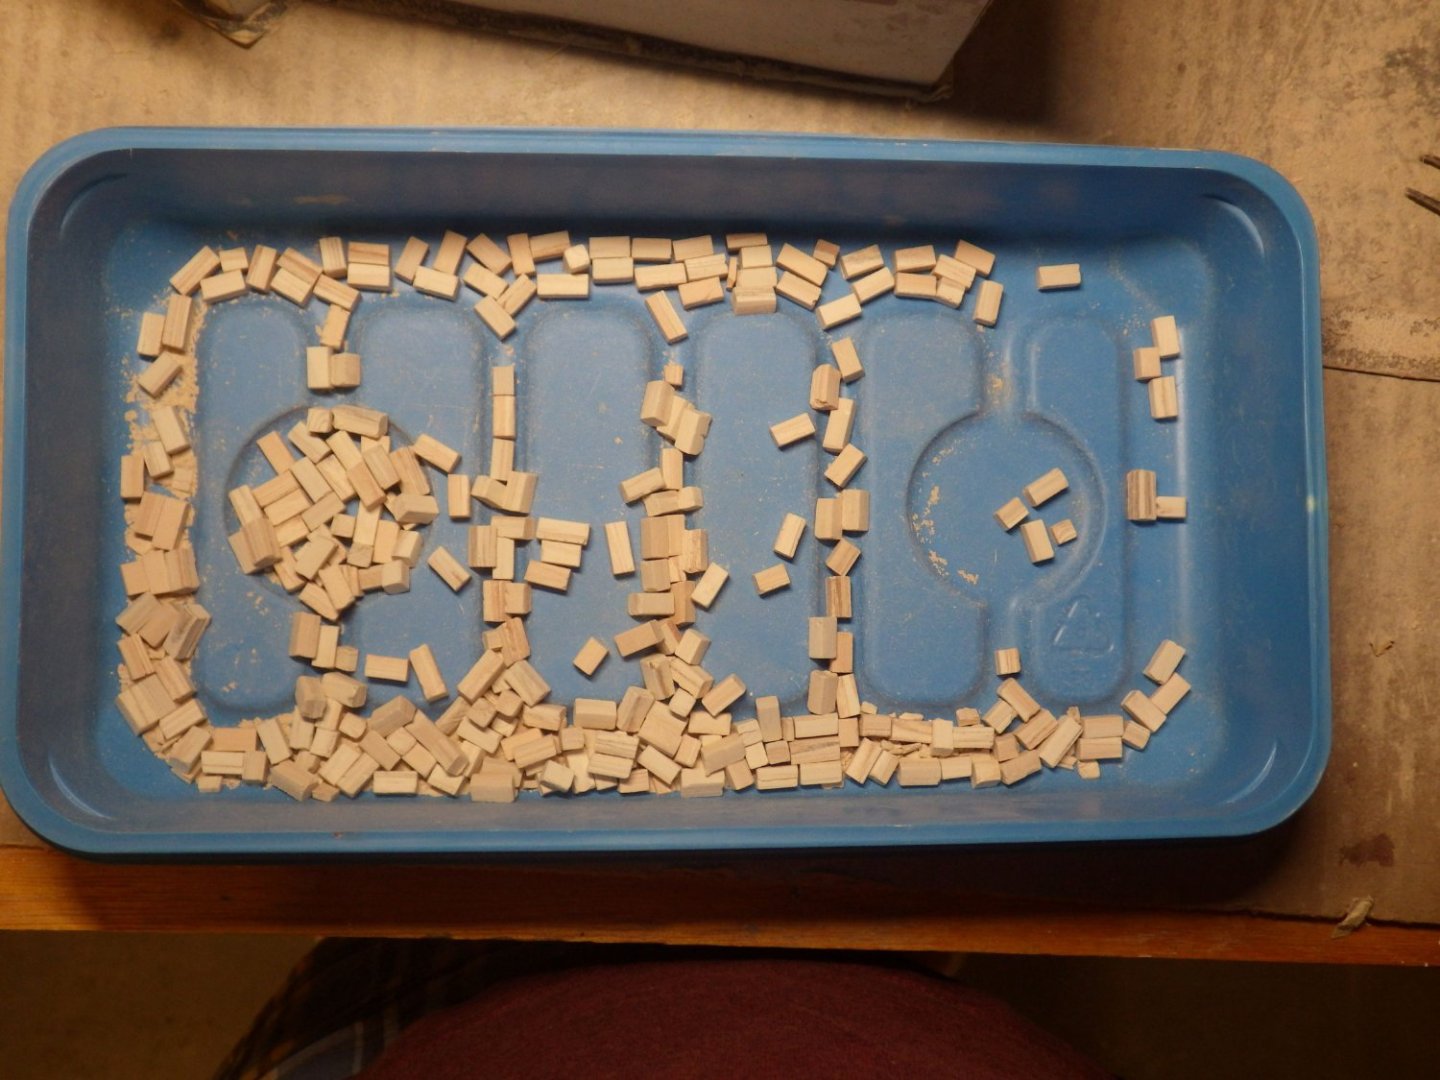
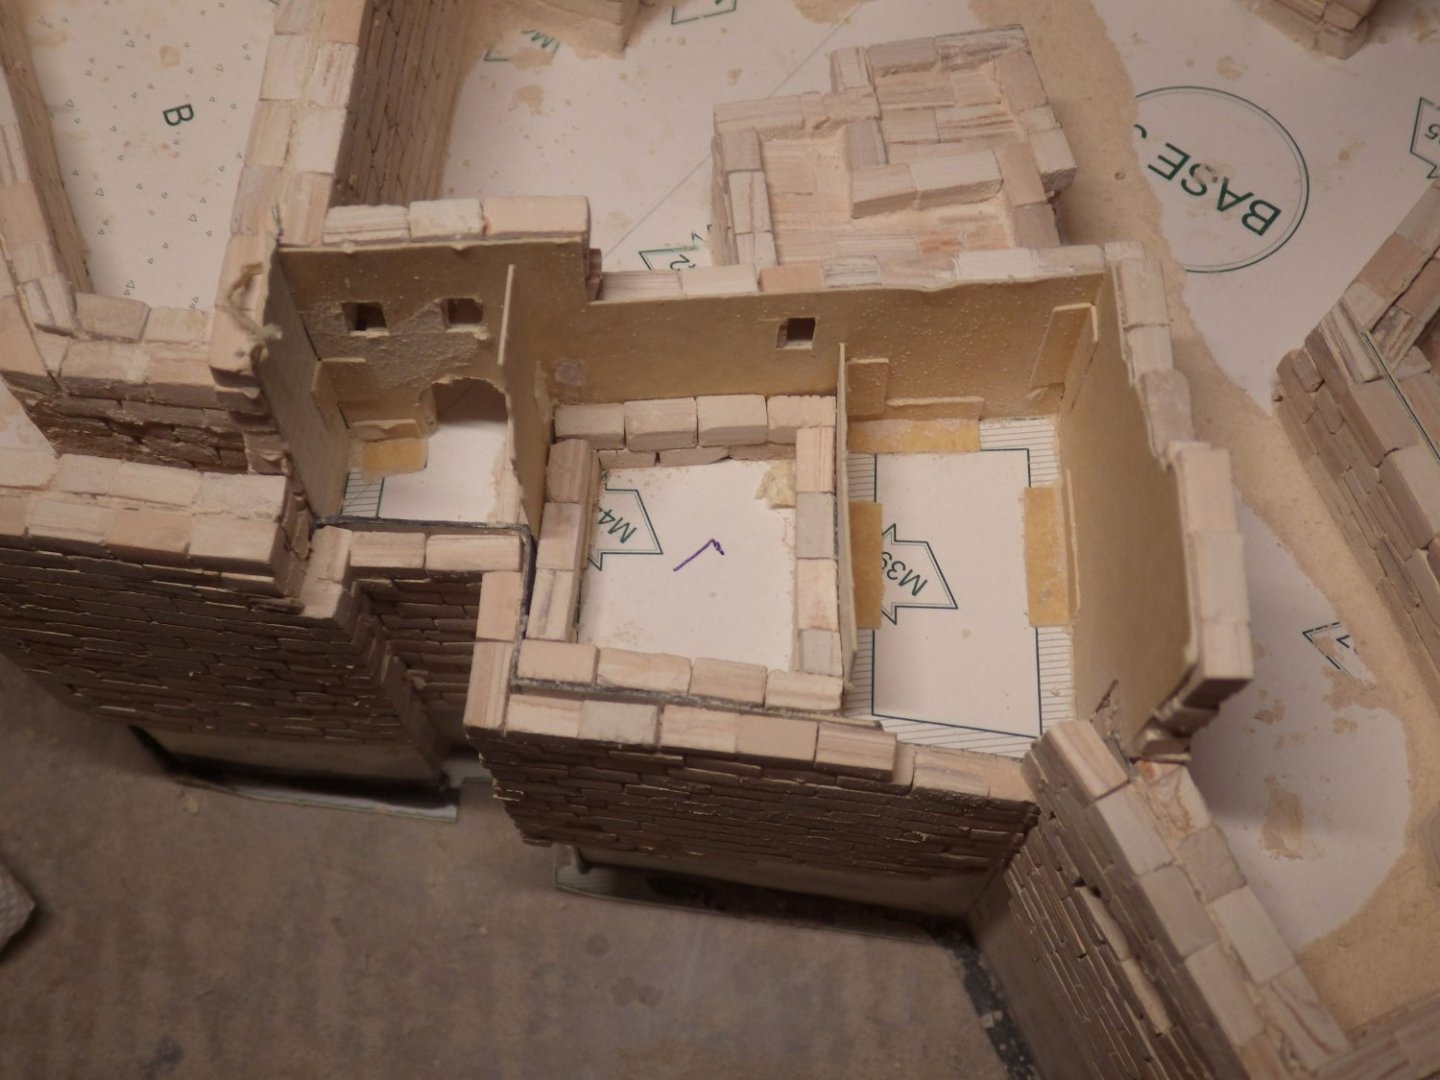
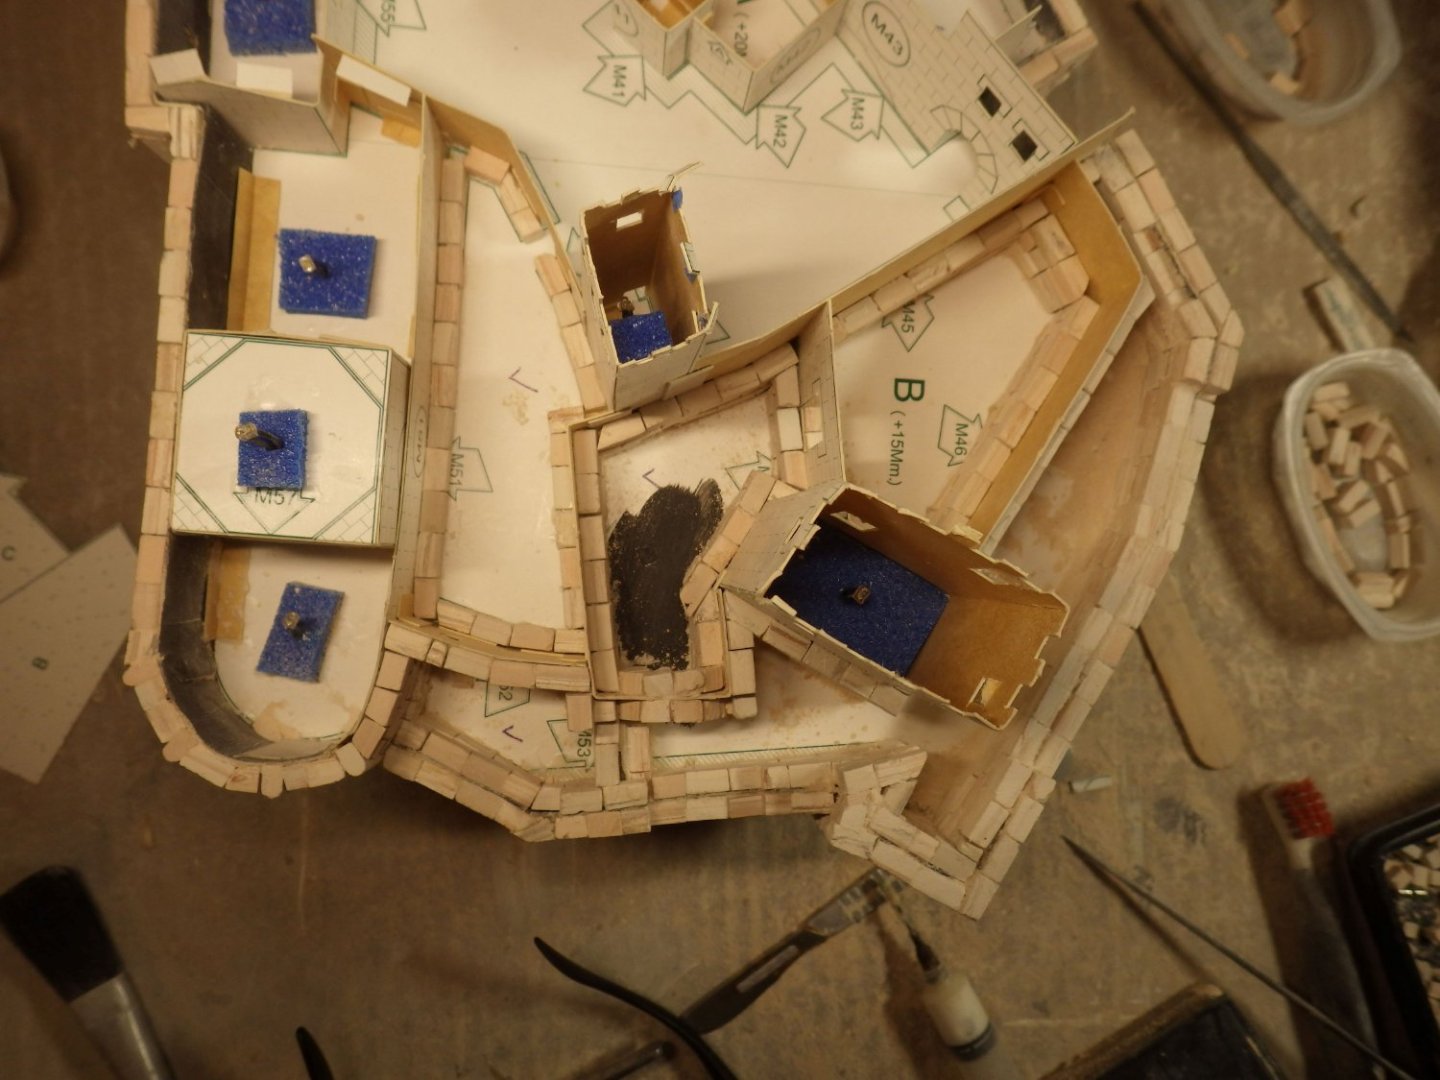
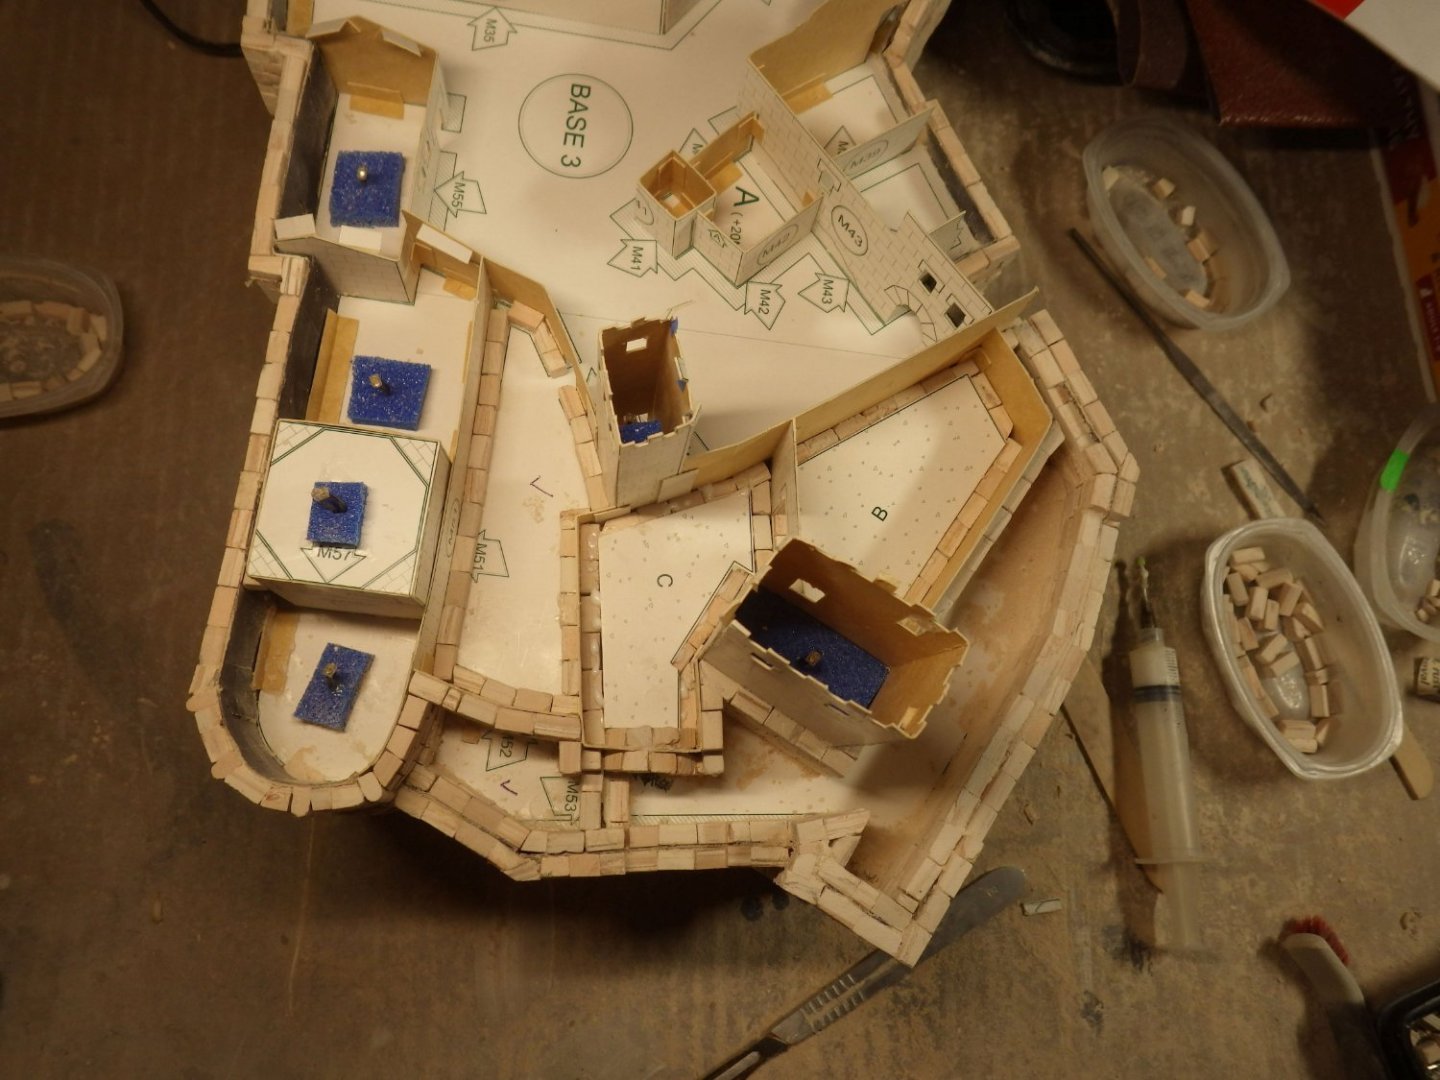
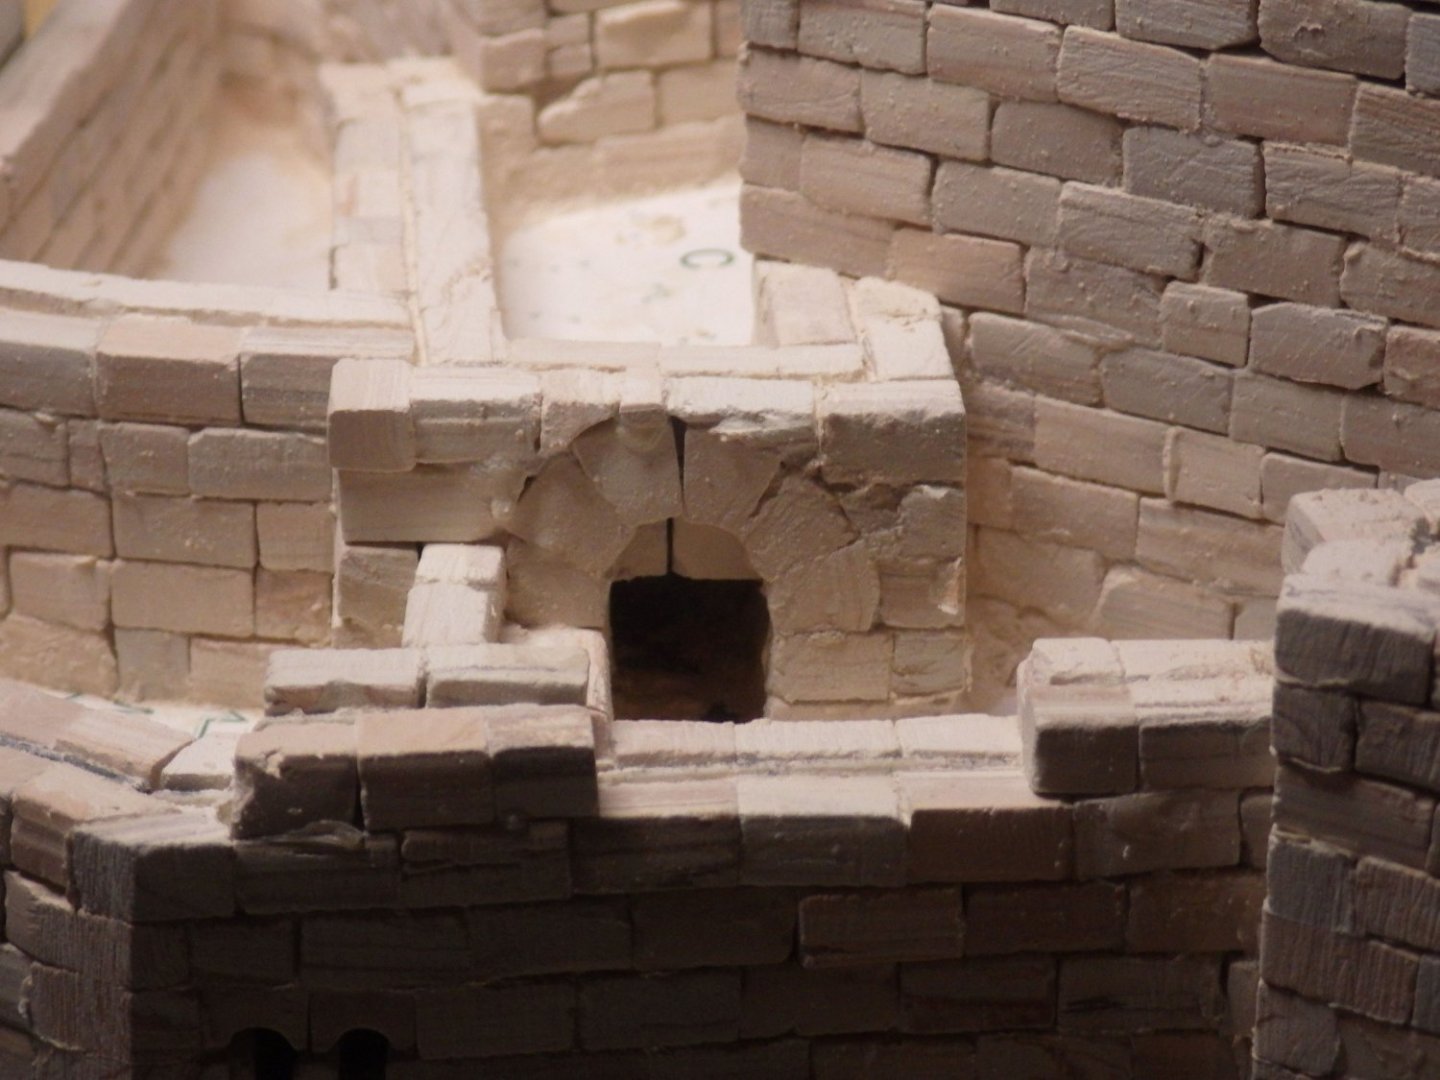
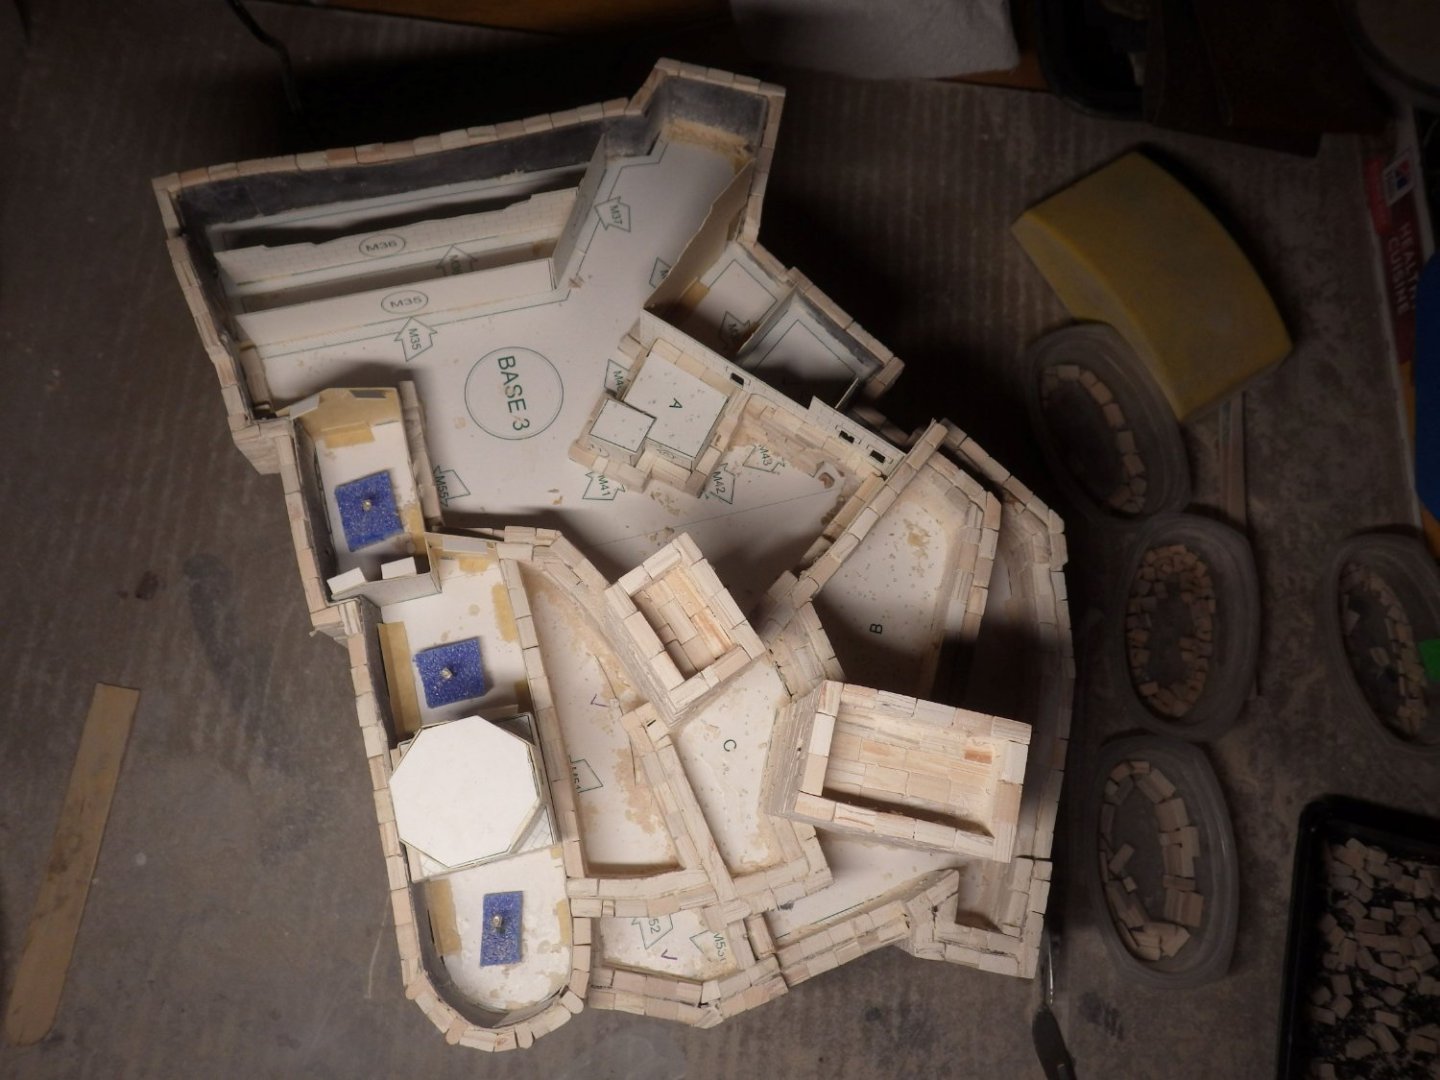
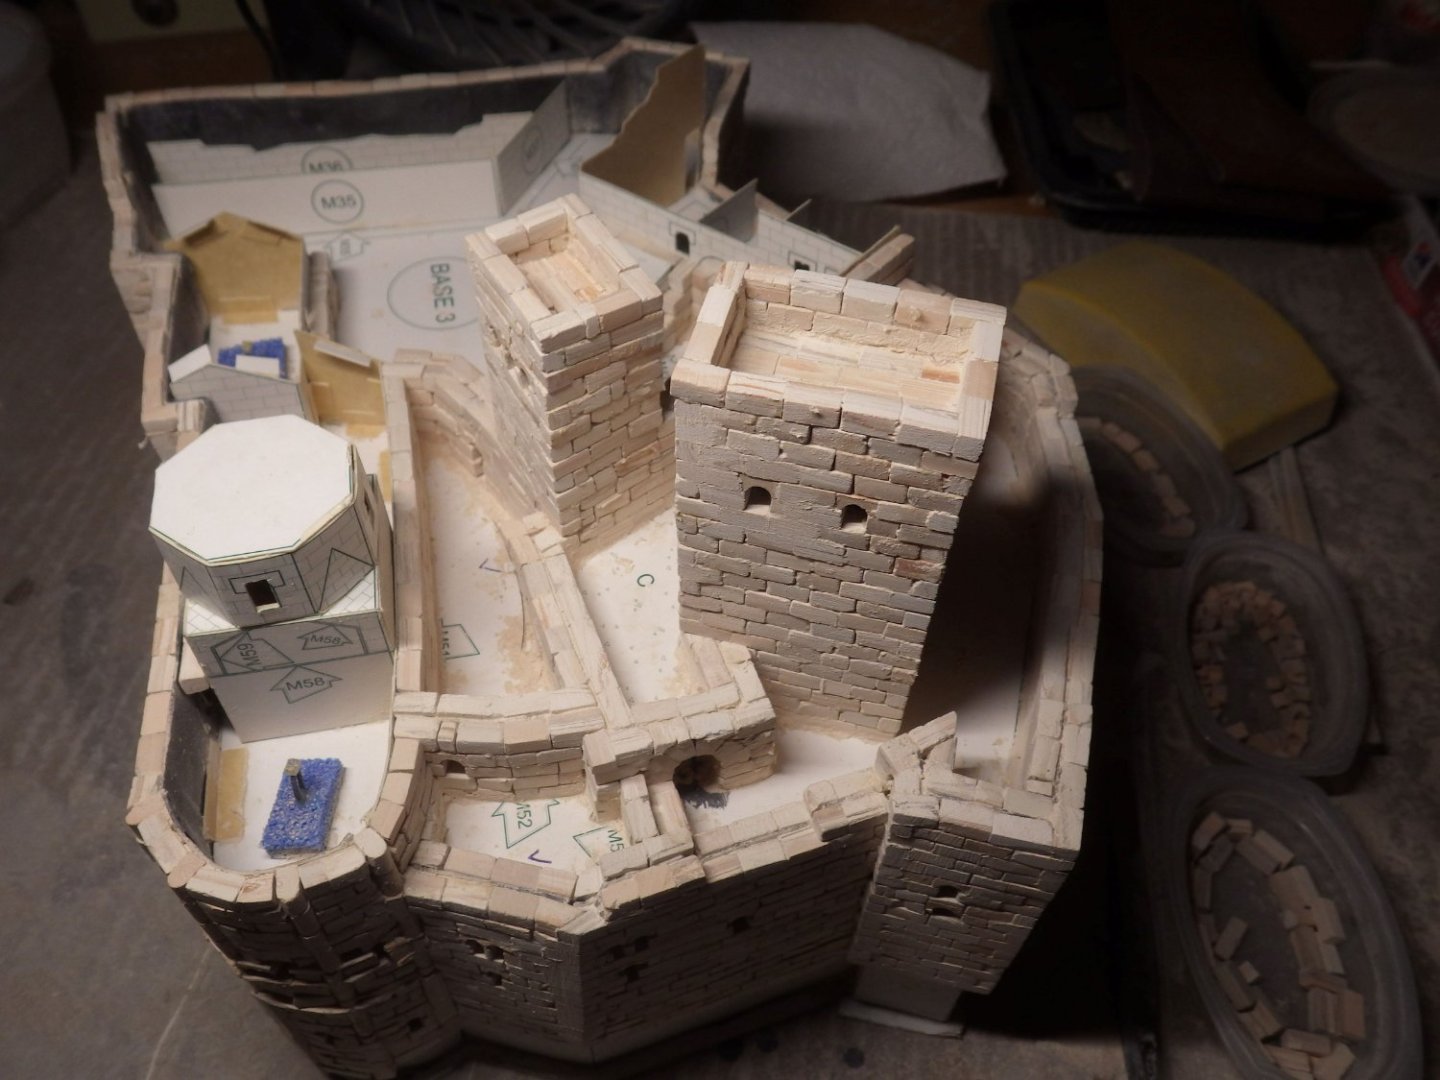
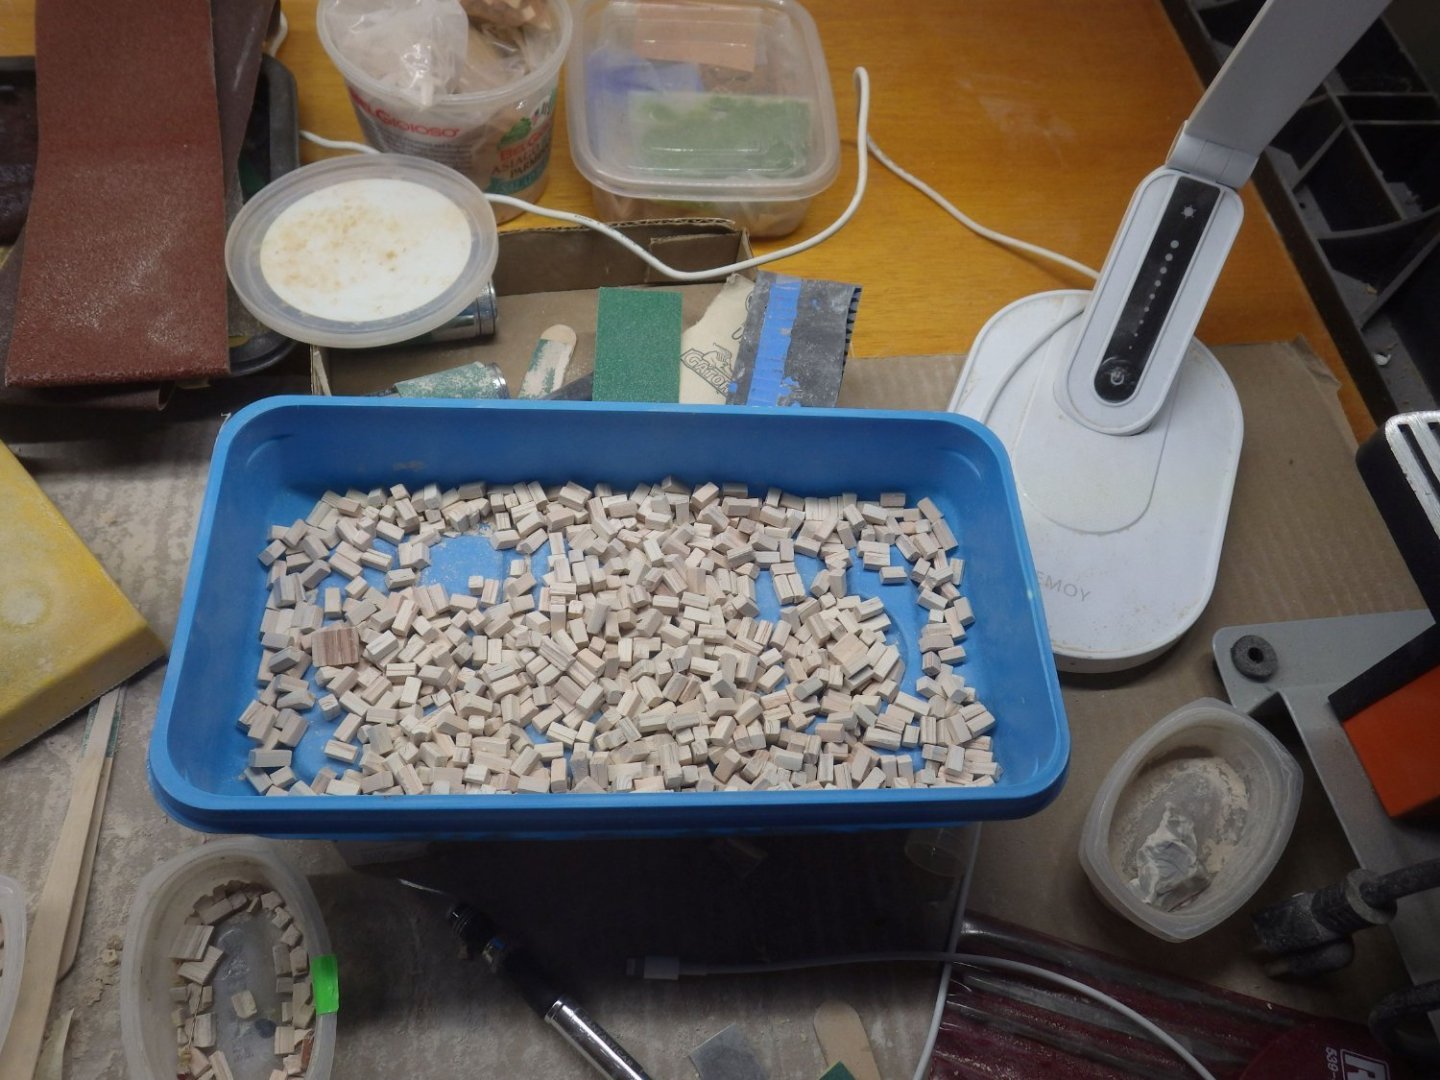
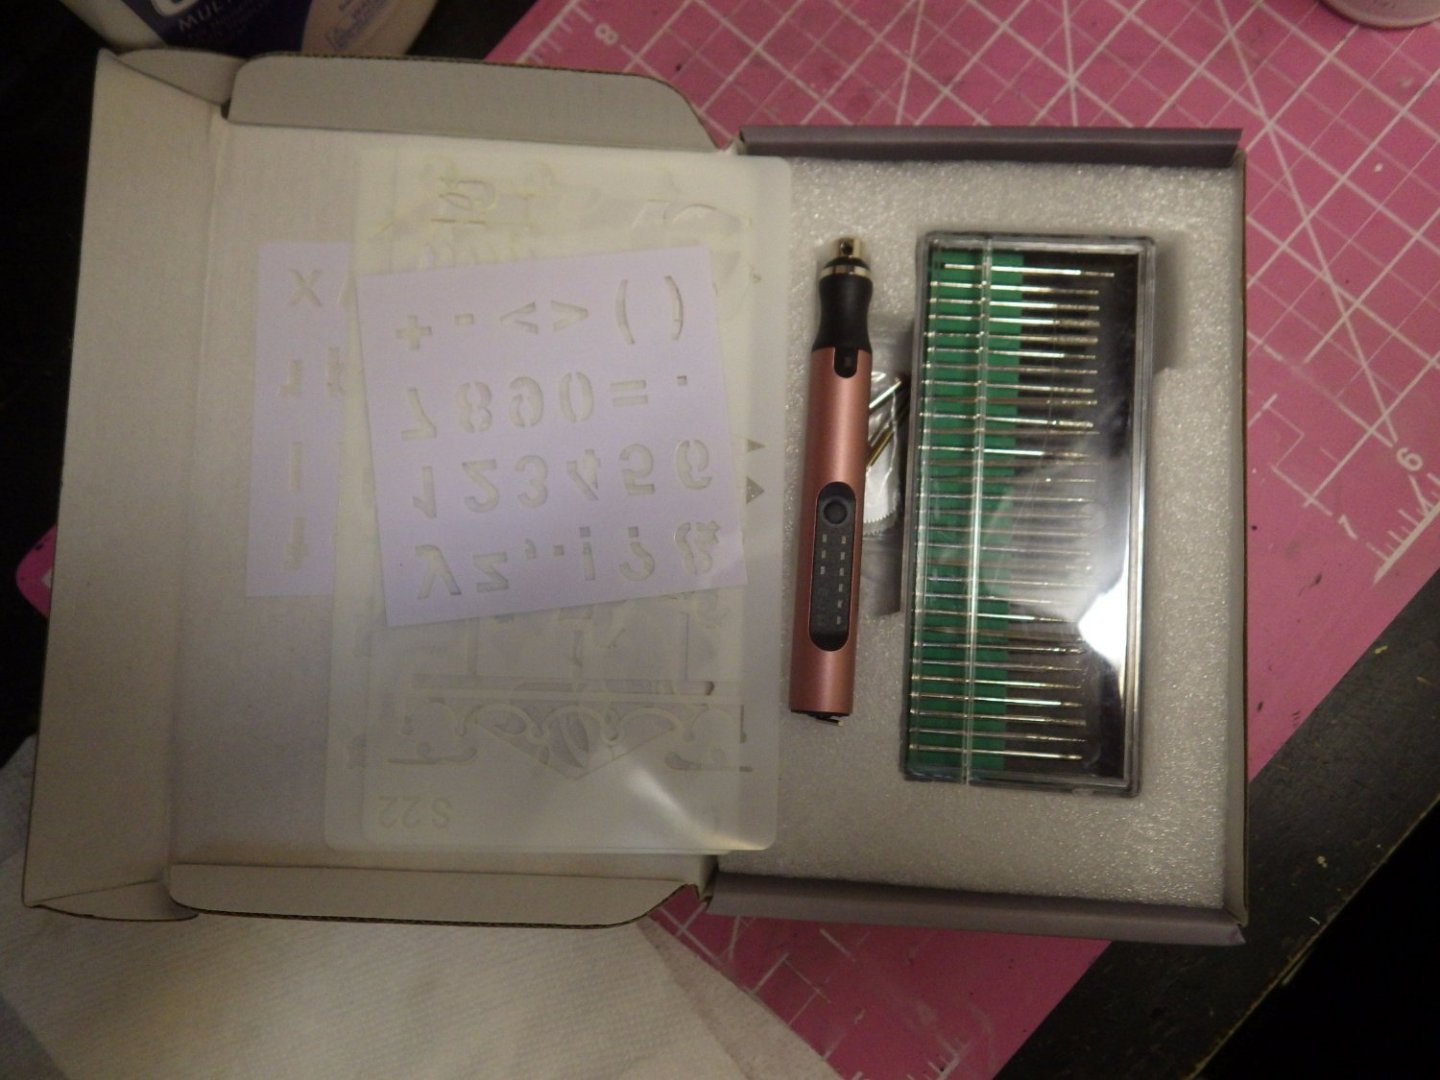
Time to rescue this from the bottom of the page. Actually I've been getting a fair bit of work done during the week but I'm conscious that progress isn't too apparent if I update at frequent intervals The problem with the elevated courtyard and the arch sort of resolved itself. I put some matte black paint immediately inside the enclosed area to make it harder to see what is in there and added the floors to the areas B and C The floor rests on the lip of the inside walls. I decided that I didn't like the arch on the inner wall of courtyard B so I ripped it out and then continued building the walls up from the new floor level. This created a step down beyond the arch. I quite like it. With the black floor it has a sense of descending into a passage leading down into the castle. After that I continued building up the walls and came up to the next area that requires a bit of thought. The towers and their embrasures. The templates have very small crenellations which don't look at all sensible with the figures - they are barely waist high. This is an area where the scale is a bit of an issue - the blocks are really too big to make decent crenellations. I'm still pondering on the final answer to this but in the meantime the tower walls were finish and I paved the roof Then added two additional tiers of blocks (another concern if the Loarre Castle wardens ever come to Hobe Sound for their holidays) The same was done with the smaller (Queens) tower. I'm working on the adjacent structures now with a couple more roofs added. The several walls that start in various places and join to other structures is an area of the build that needs attention because the uneven sizes of the blocks and the sanding along with my inexactitudes can result in the inner and outer walls being unequal heights or the tiers on one side of the tower being a different height to the other side. Generally it has come out alright so far with a judicious bit of sanding here and there. So progress to date This is the total reserve of blocks - I am not sure whether I am going to make it - its going to be close. There are still several double walls to complete and those long structures at the top of the last photo are going to use a lot of blocks I risked $25 on Amazon for this micro engraving tool with a bunch of bits thinking it might be good for getting into all the areas difficult to reach to clean them up. Opening out the windows might also be easy with it. I think a delicate touch will be needed. It looks nice little tool. USB chargeable so very handy. Its even got stencils of teddy bears It comes with a micro saw blade; I'm wondering if that could be used to saw up blocks cleanly enough to solve the crenellation issue. Regardless there are hours of serious clean up needed once the structures are completed. Many thanks for looking in and all the likes and comments Alan


- 462 replies
-
- 14
-
-
-
Most of the floors or courtyards seem to be a gravel surface and Aedes Ars gives you a tiny bag of white ground material which is nowhere near enough to do anything useful with. I could mix it with some ground block material but it would have to be mostly block dust to cover the ground so I think its off to see what Woodland Scenic and others have to offer. Thanks for the help Alan
-
Thanks OC. The templates and the guide are contradictory in places and I agree with you the wall needs to be doubled and that's the direction I have gone in. Alan
-
Very nice work on the details. The photography is excellent too Alan
-
Lovely work. As an old DH apprentice it's nice to see another De Havilland build Alan
-
Lovely subtle weathering Alan


