king derelict
-
Posts
3,286 -
Joined
-
Last visited
Content Type
Profiles
Forums
Gallery
Events
Everything posted by king derelict
-
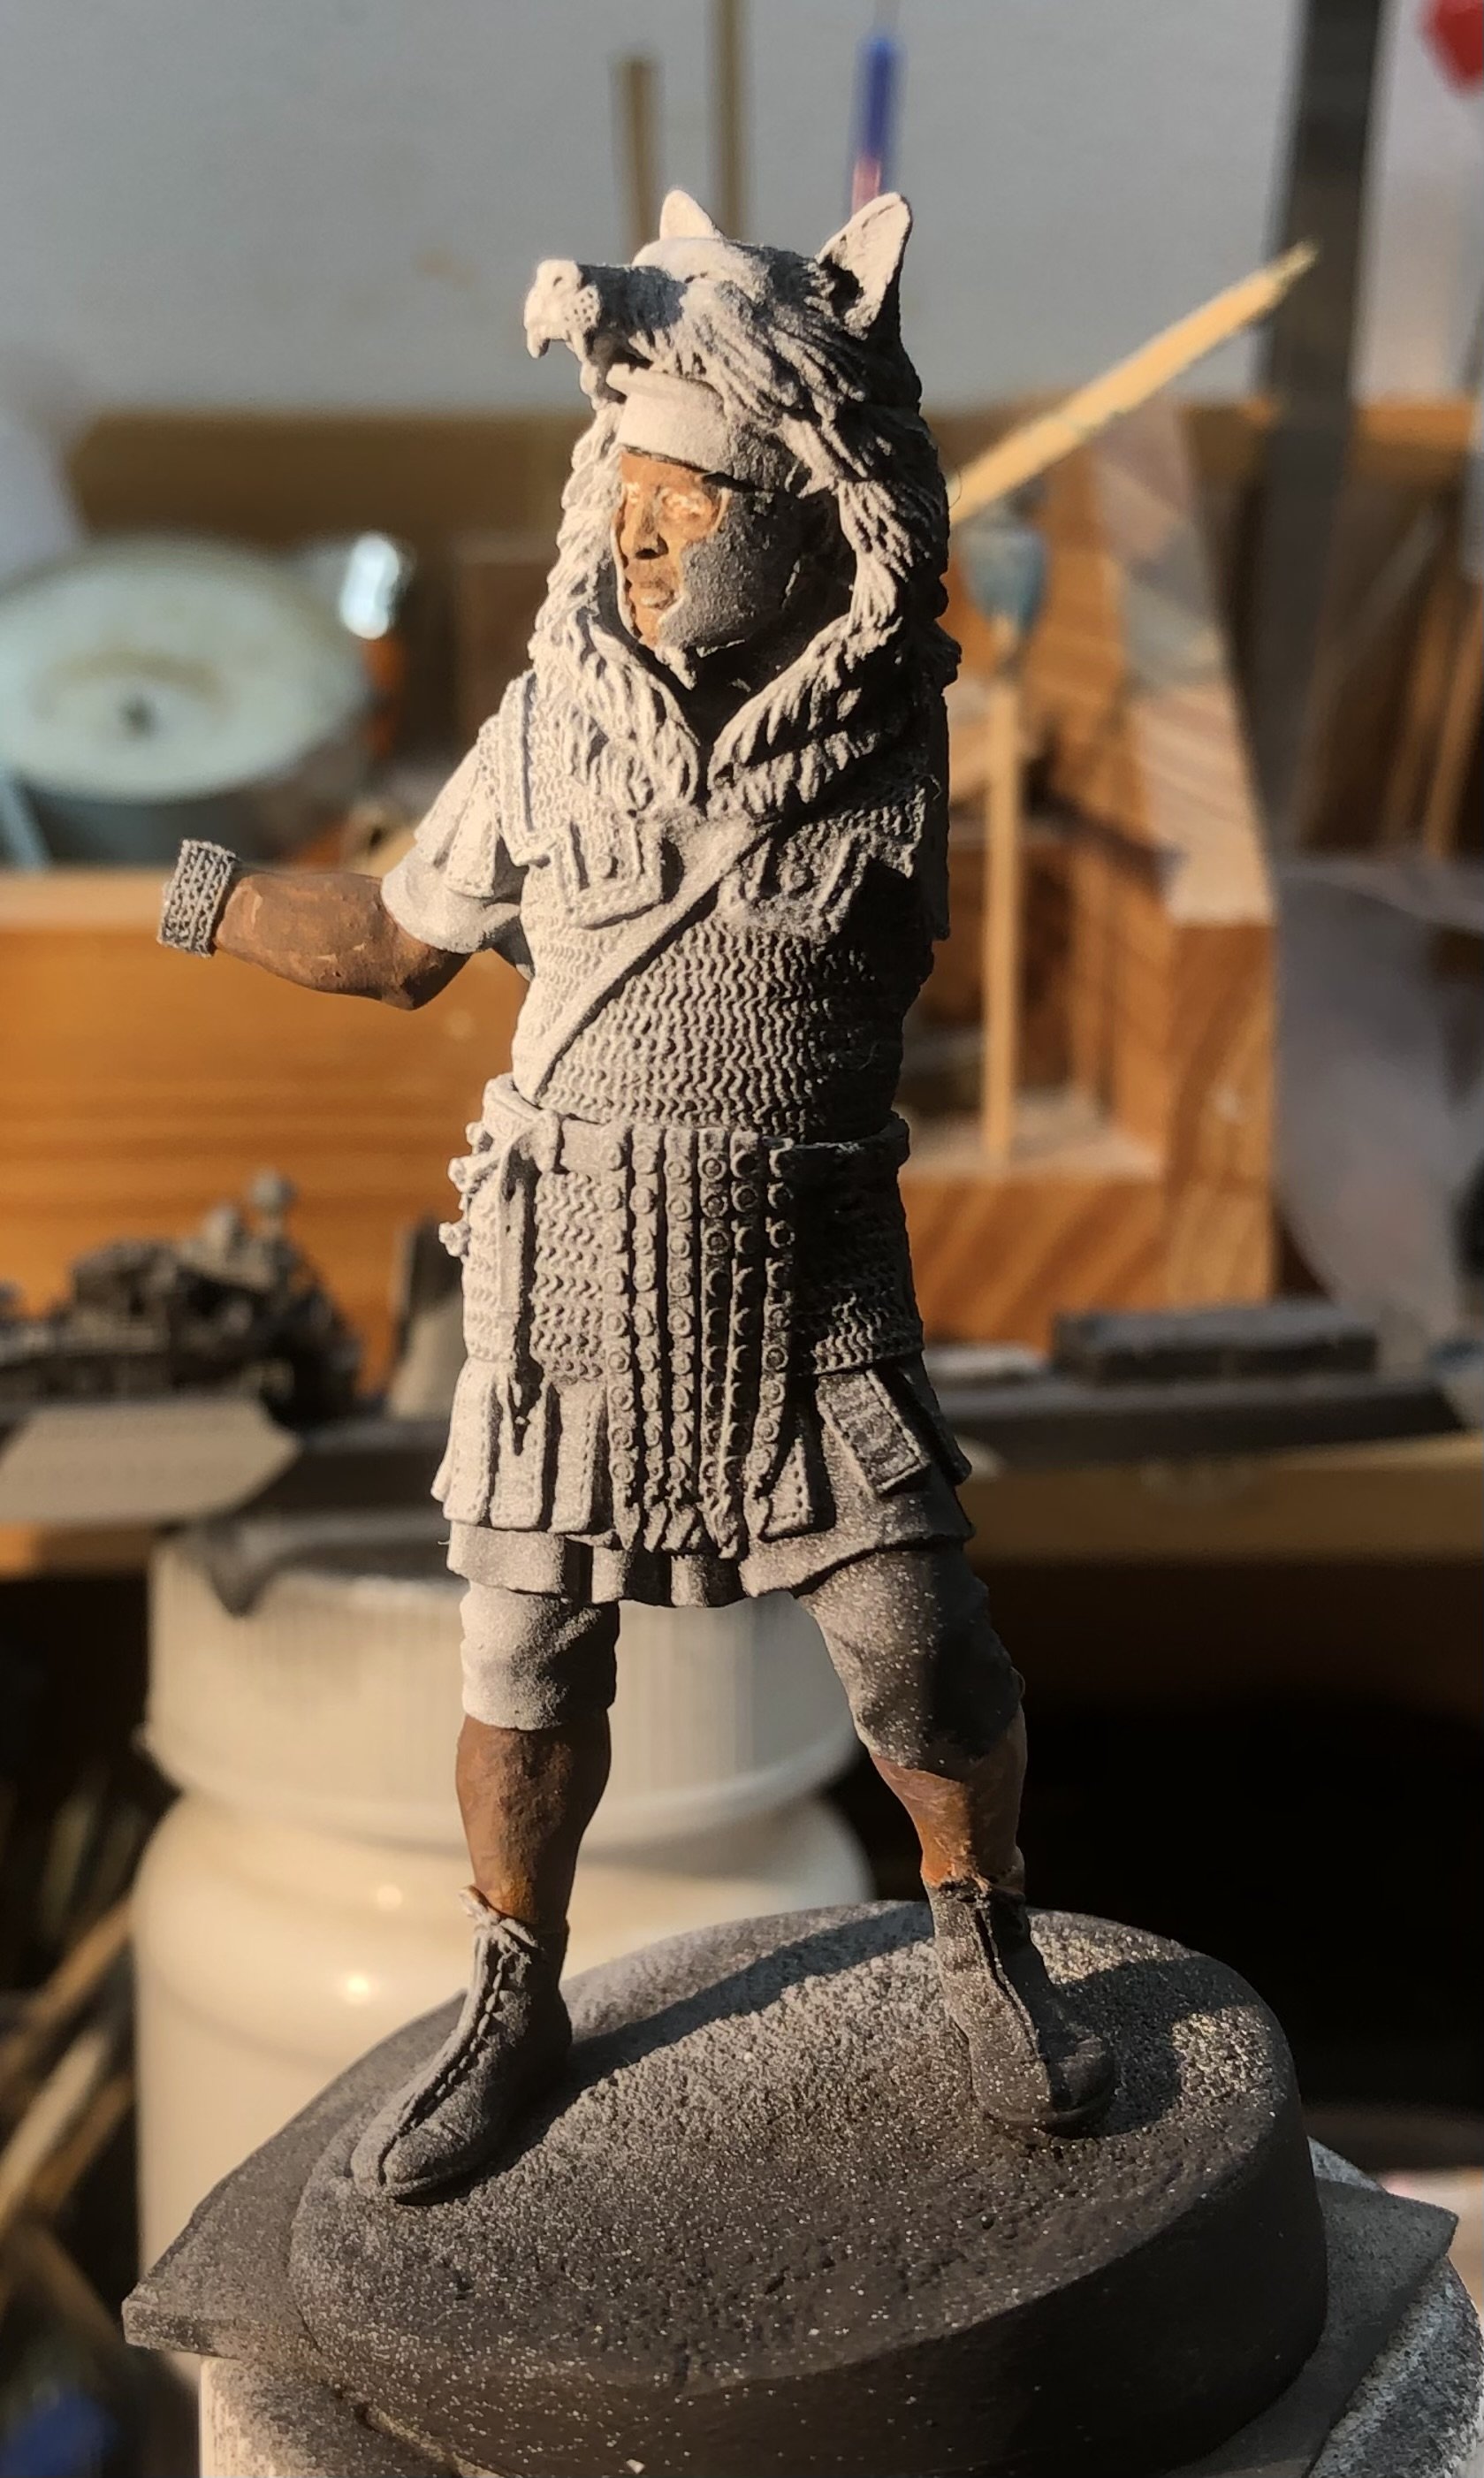
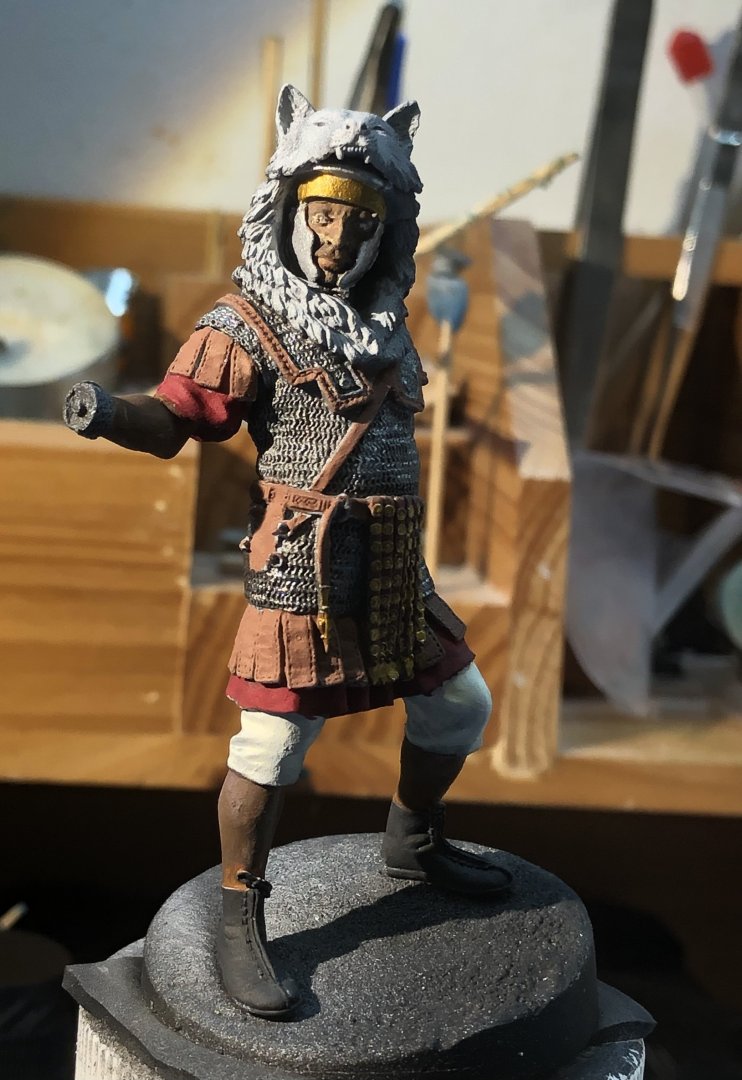
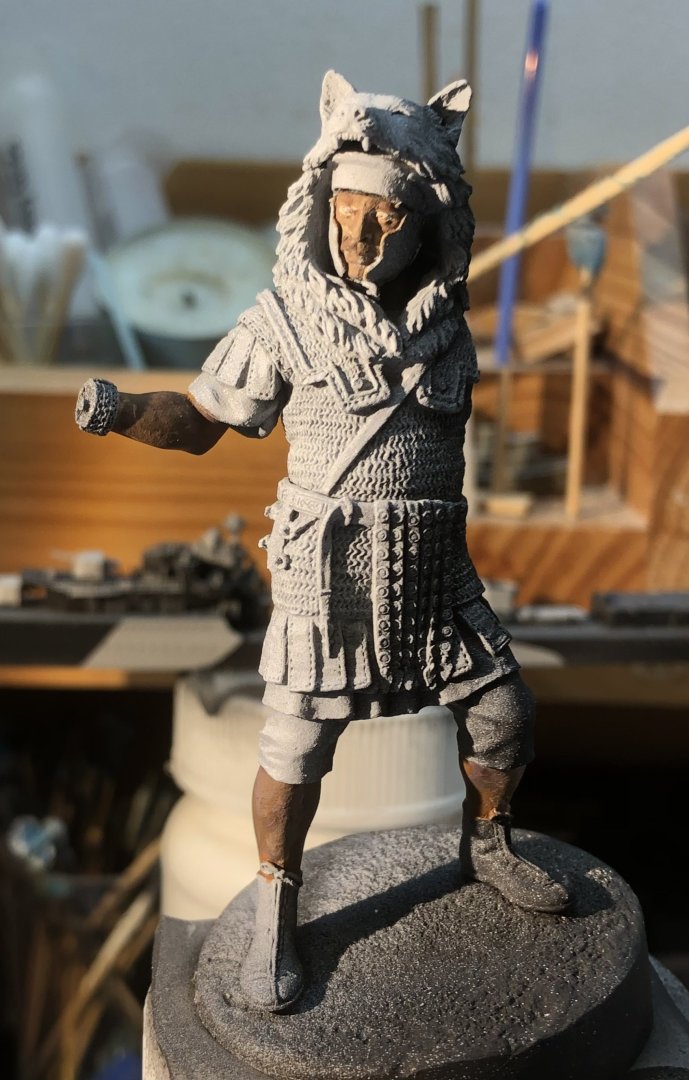
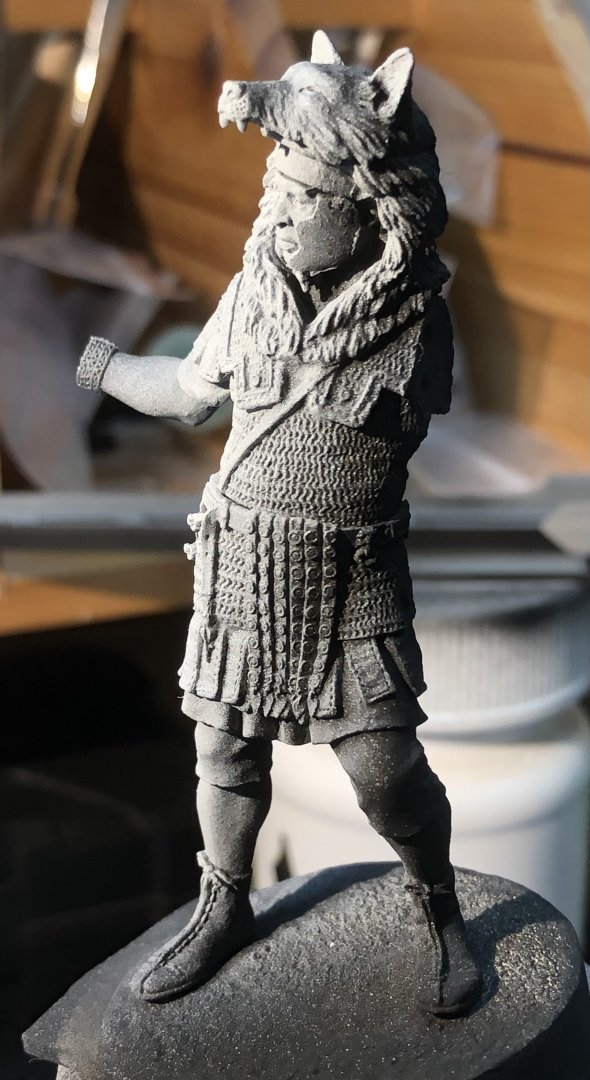
I looked at last night’s efforts and decided that the skin tones were reasonable for my first Nubian figure and I would press on and see how things developed. I painted the mail tunic with Vallejo Metal Color Steel which I think is an airbrush paint but it brushed on very nicely and was suitably dark. I added a dry brushed coat of Model Color Steel which is a bit shinier and used it for the helmet cheek guards. I added lips and worked around the eyes and I think it works, but the pupils may need a bit of attention. He’s a bit starey at present. The red for the tunic may be a bit dark but I don’t think there is any historical evidence beyond convention. In fact, my reading suggests that the tunics may have been natural wool or linen. Time to think about the wolf skin and I need to pick my legion and experiment with the decal paper. Thanks for looking in, the likes and comments. alan


-
Looks great Rob. The graffiti makes it a very different tank. Lovely. I need to go and read Homage to Catalonia again. alan
-
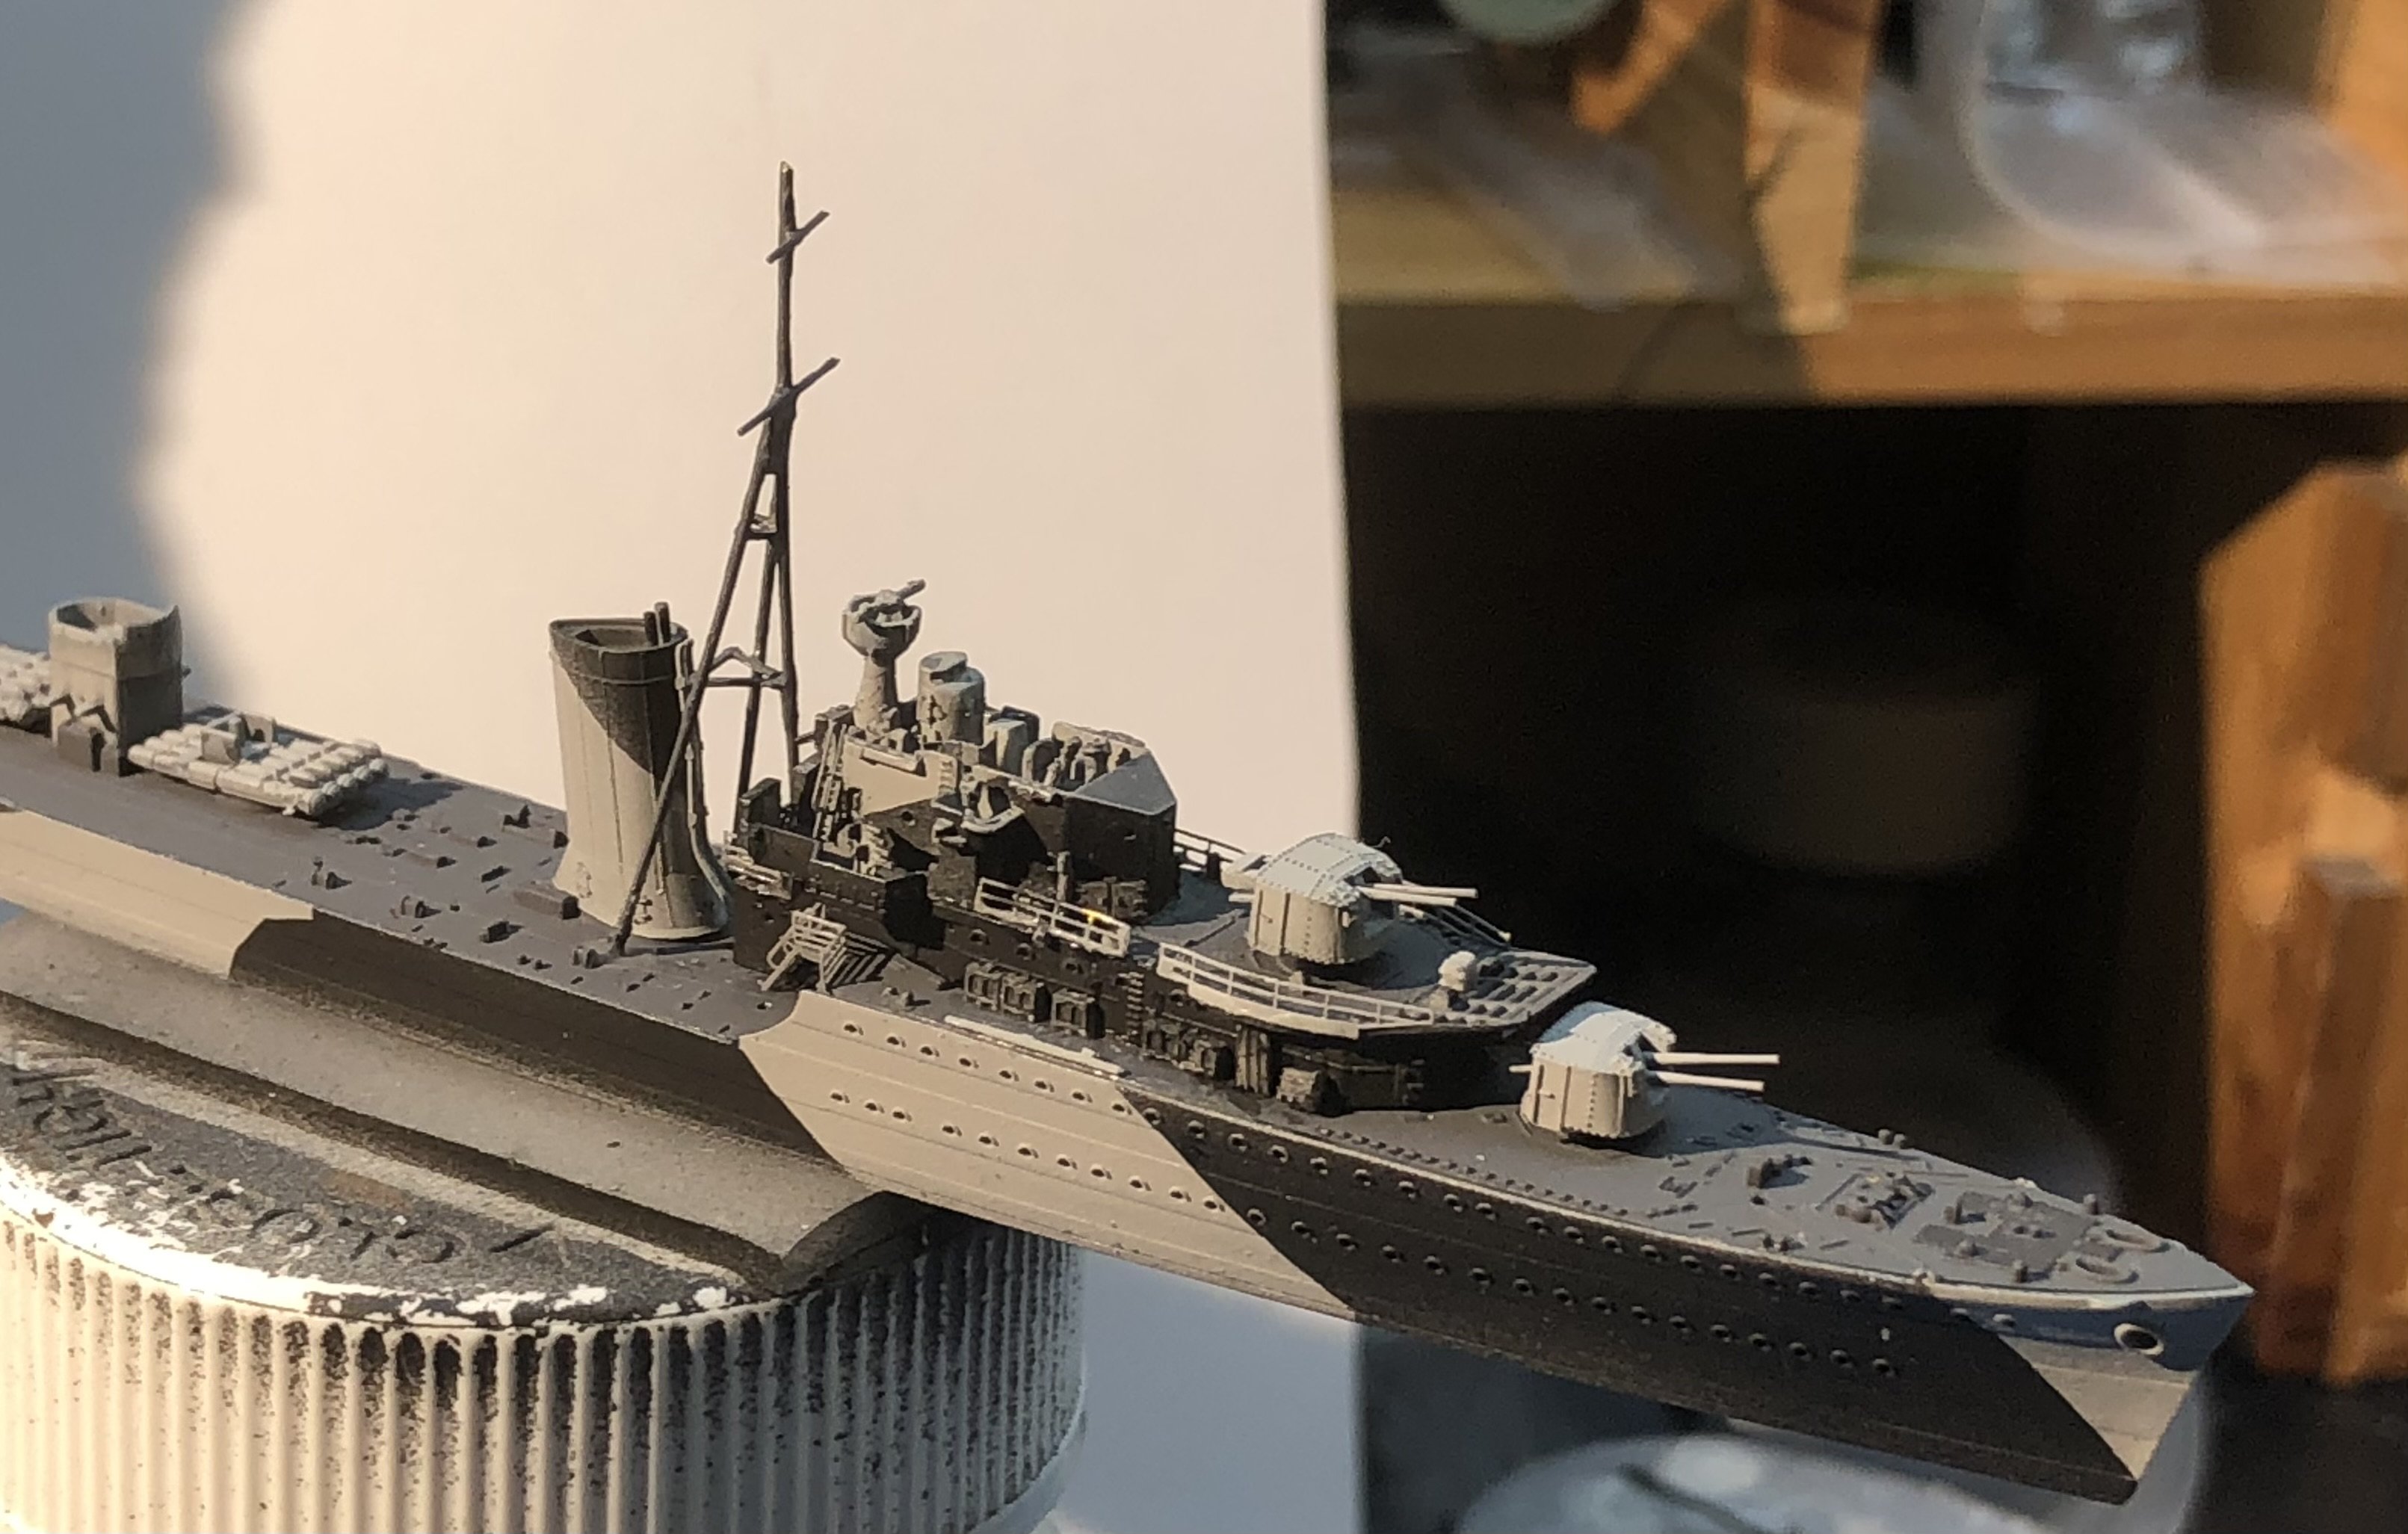
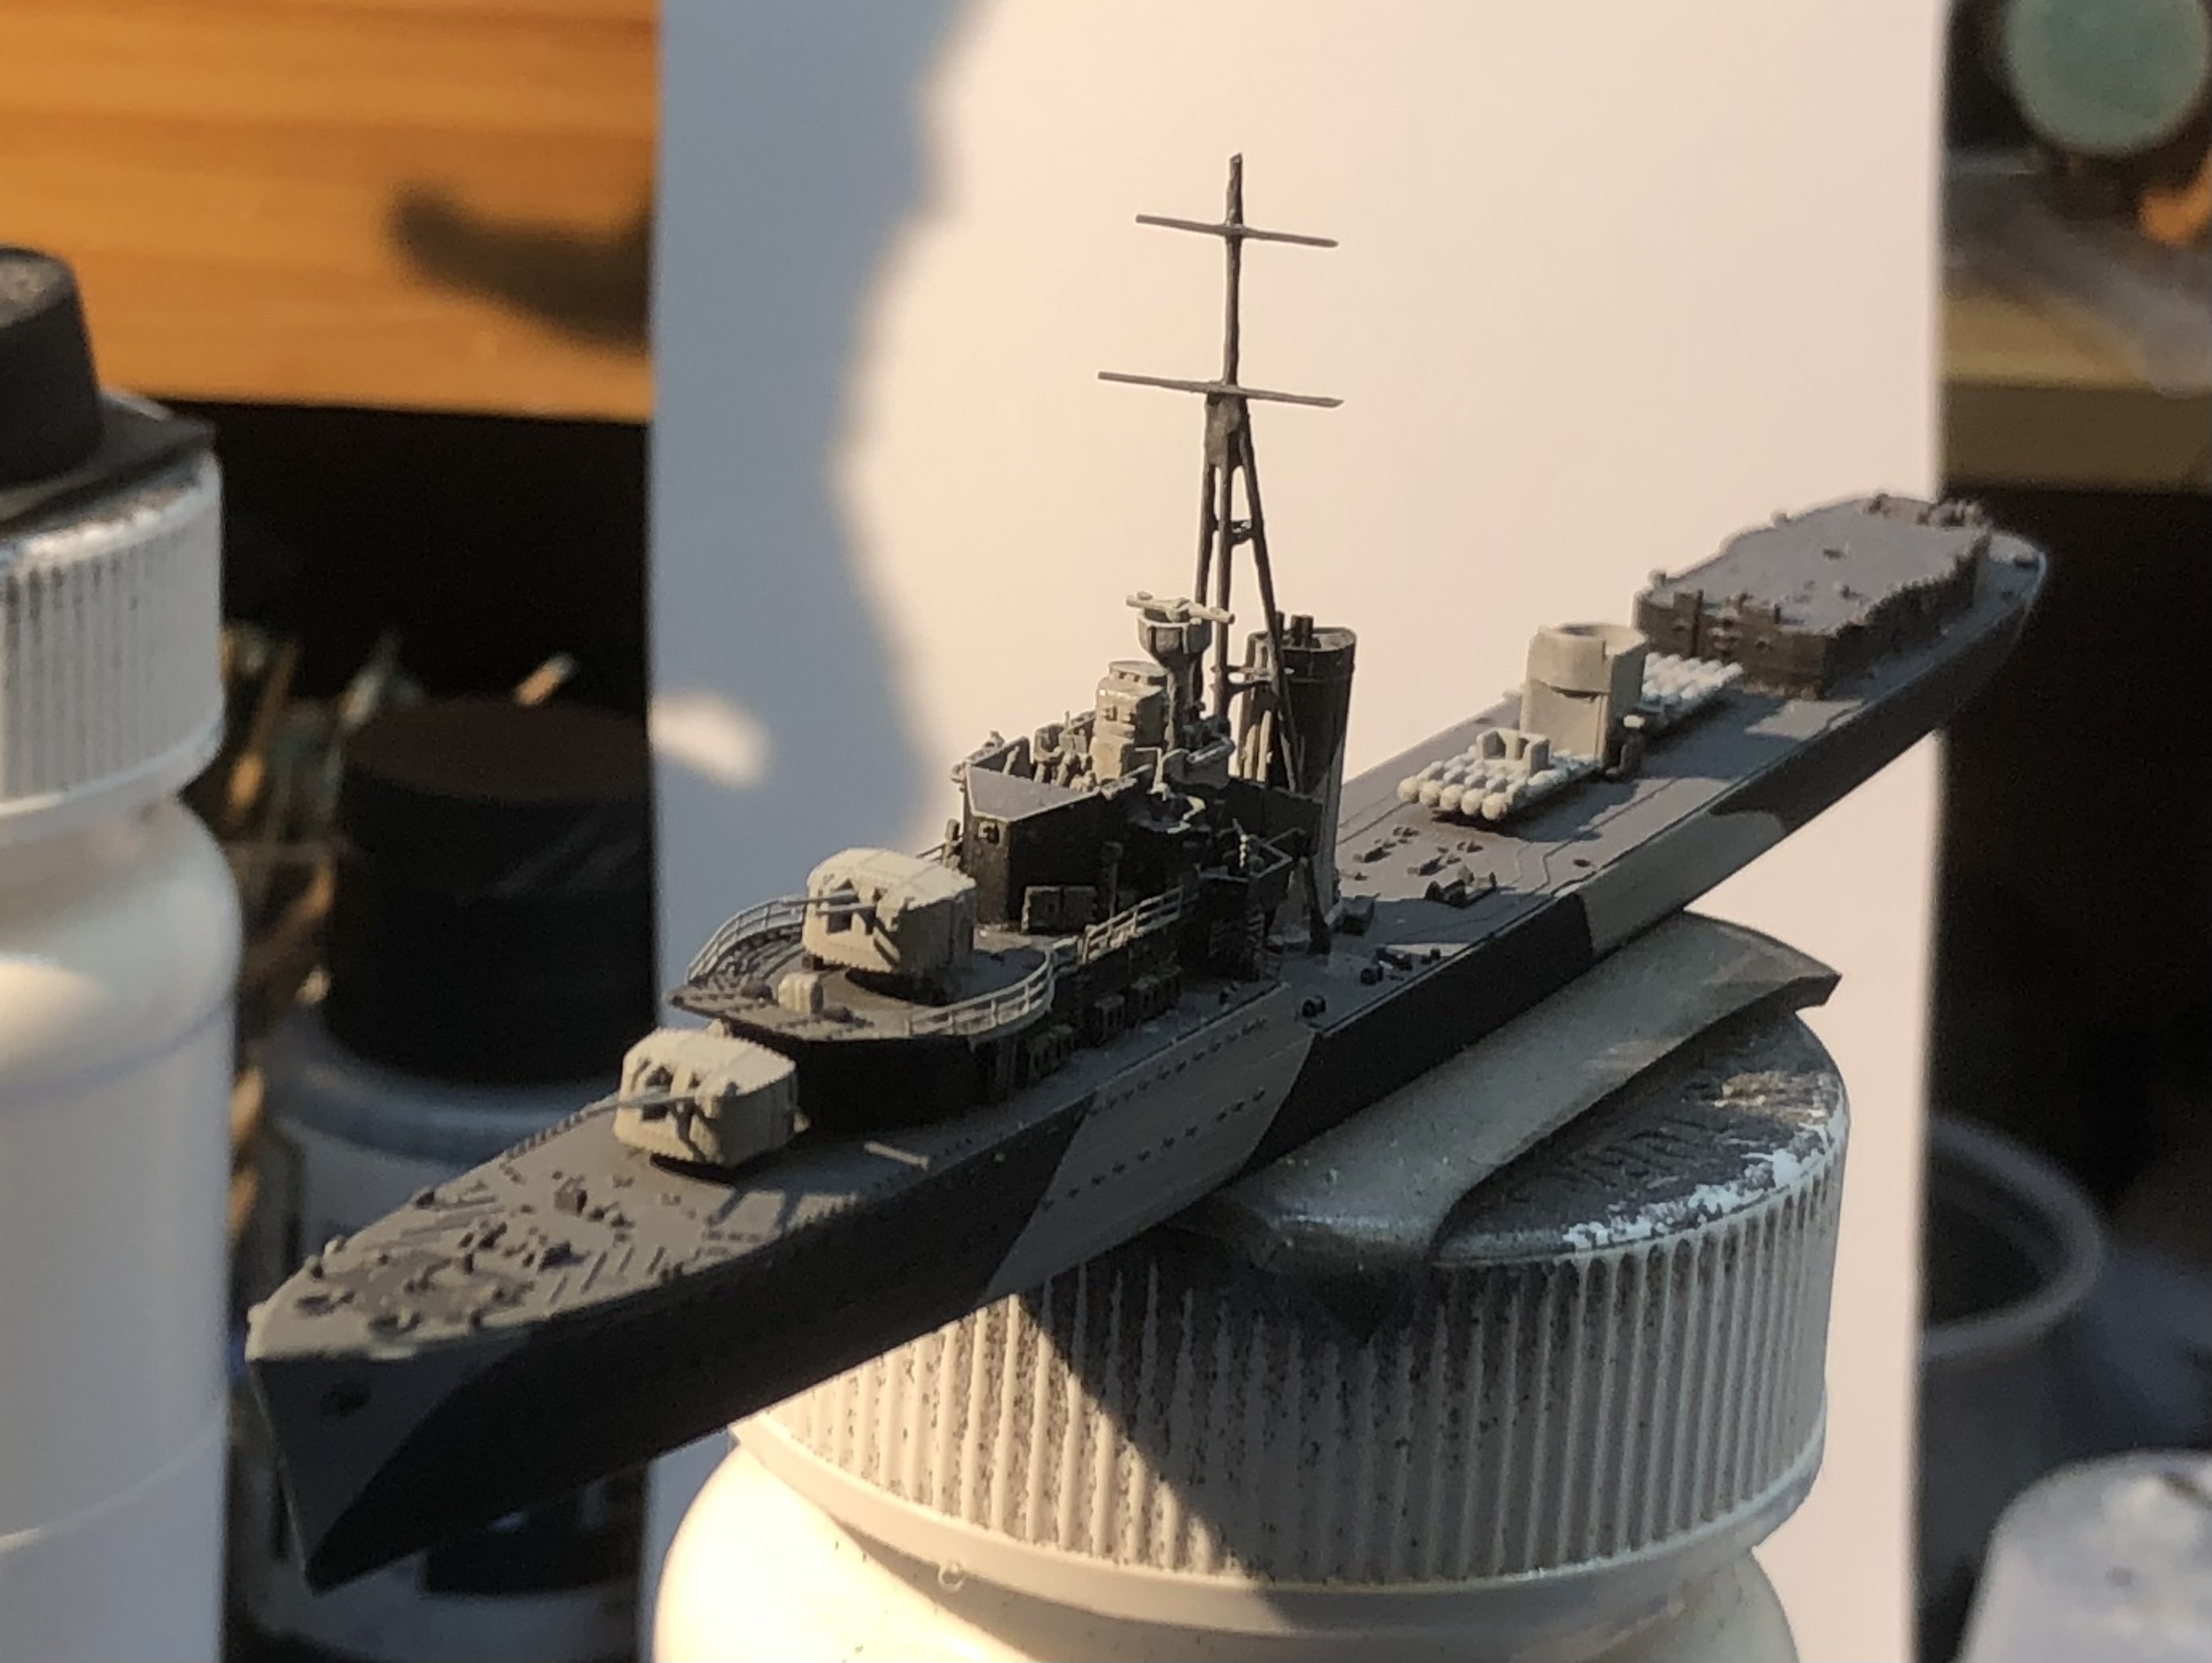
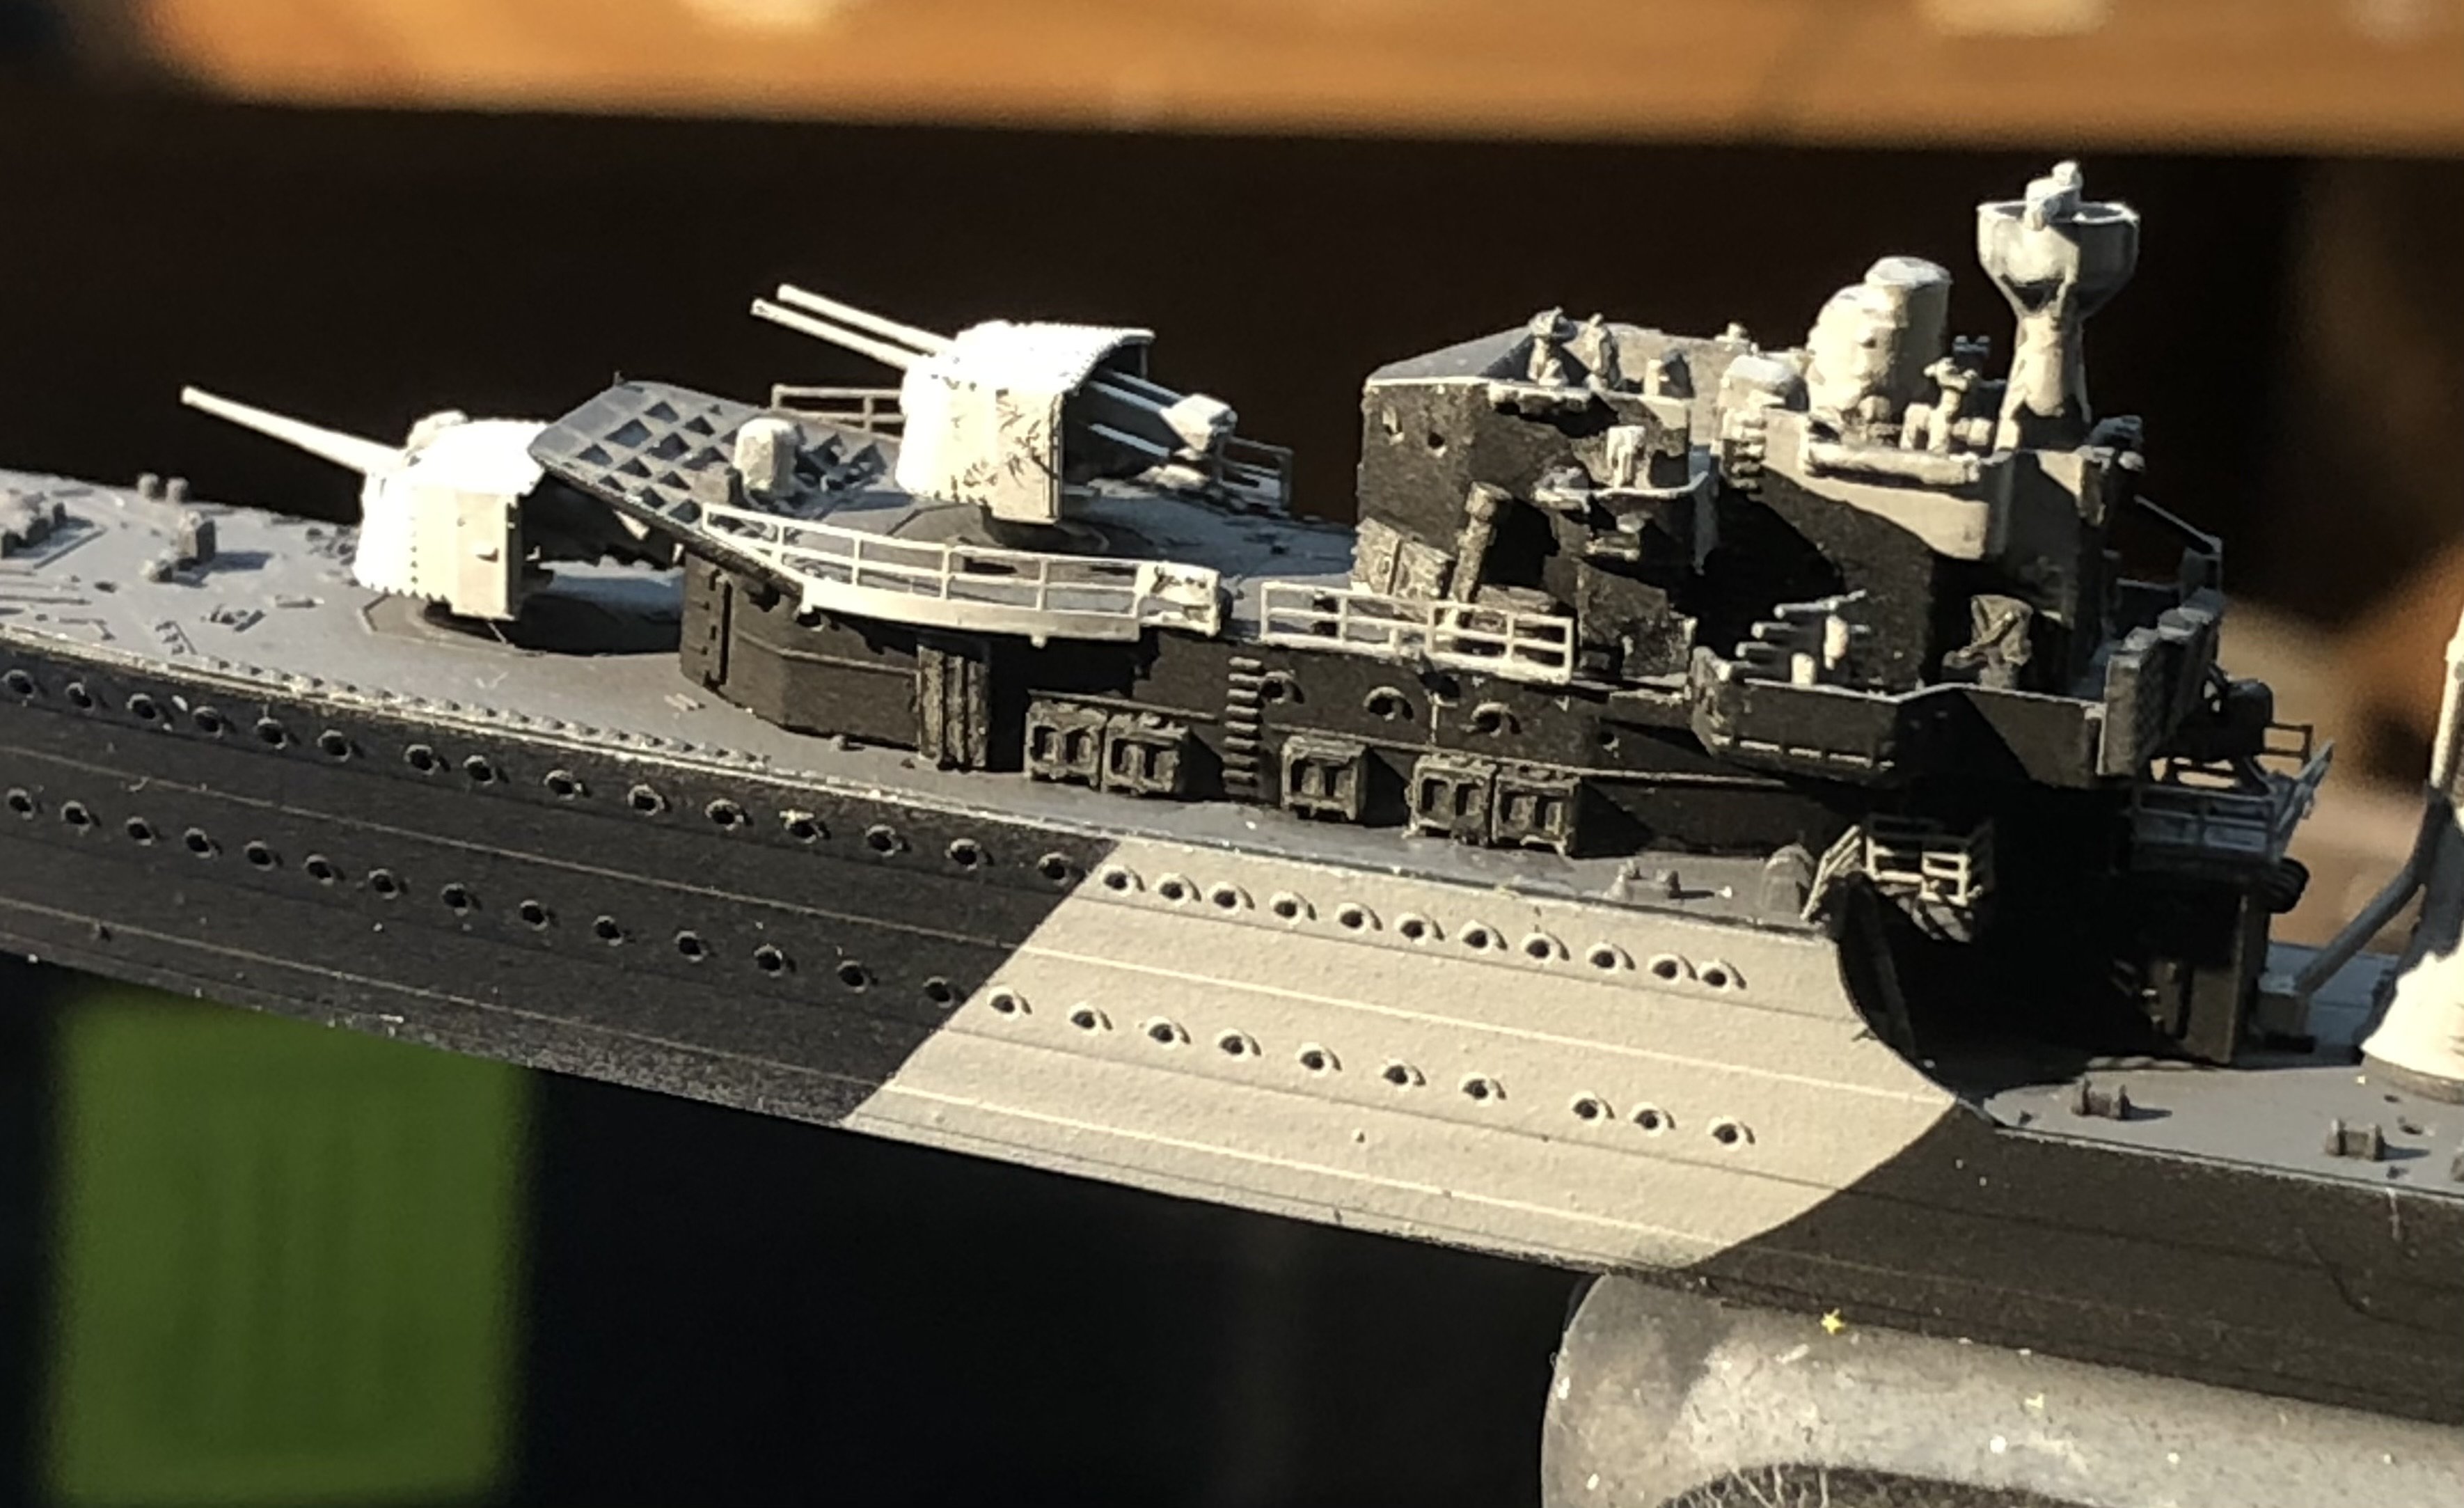
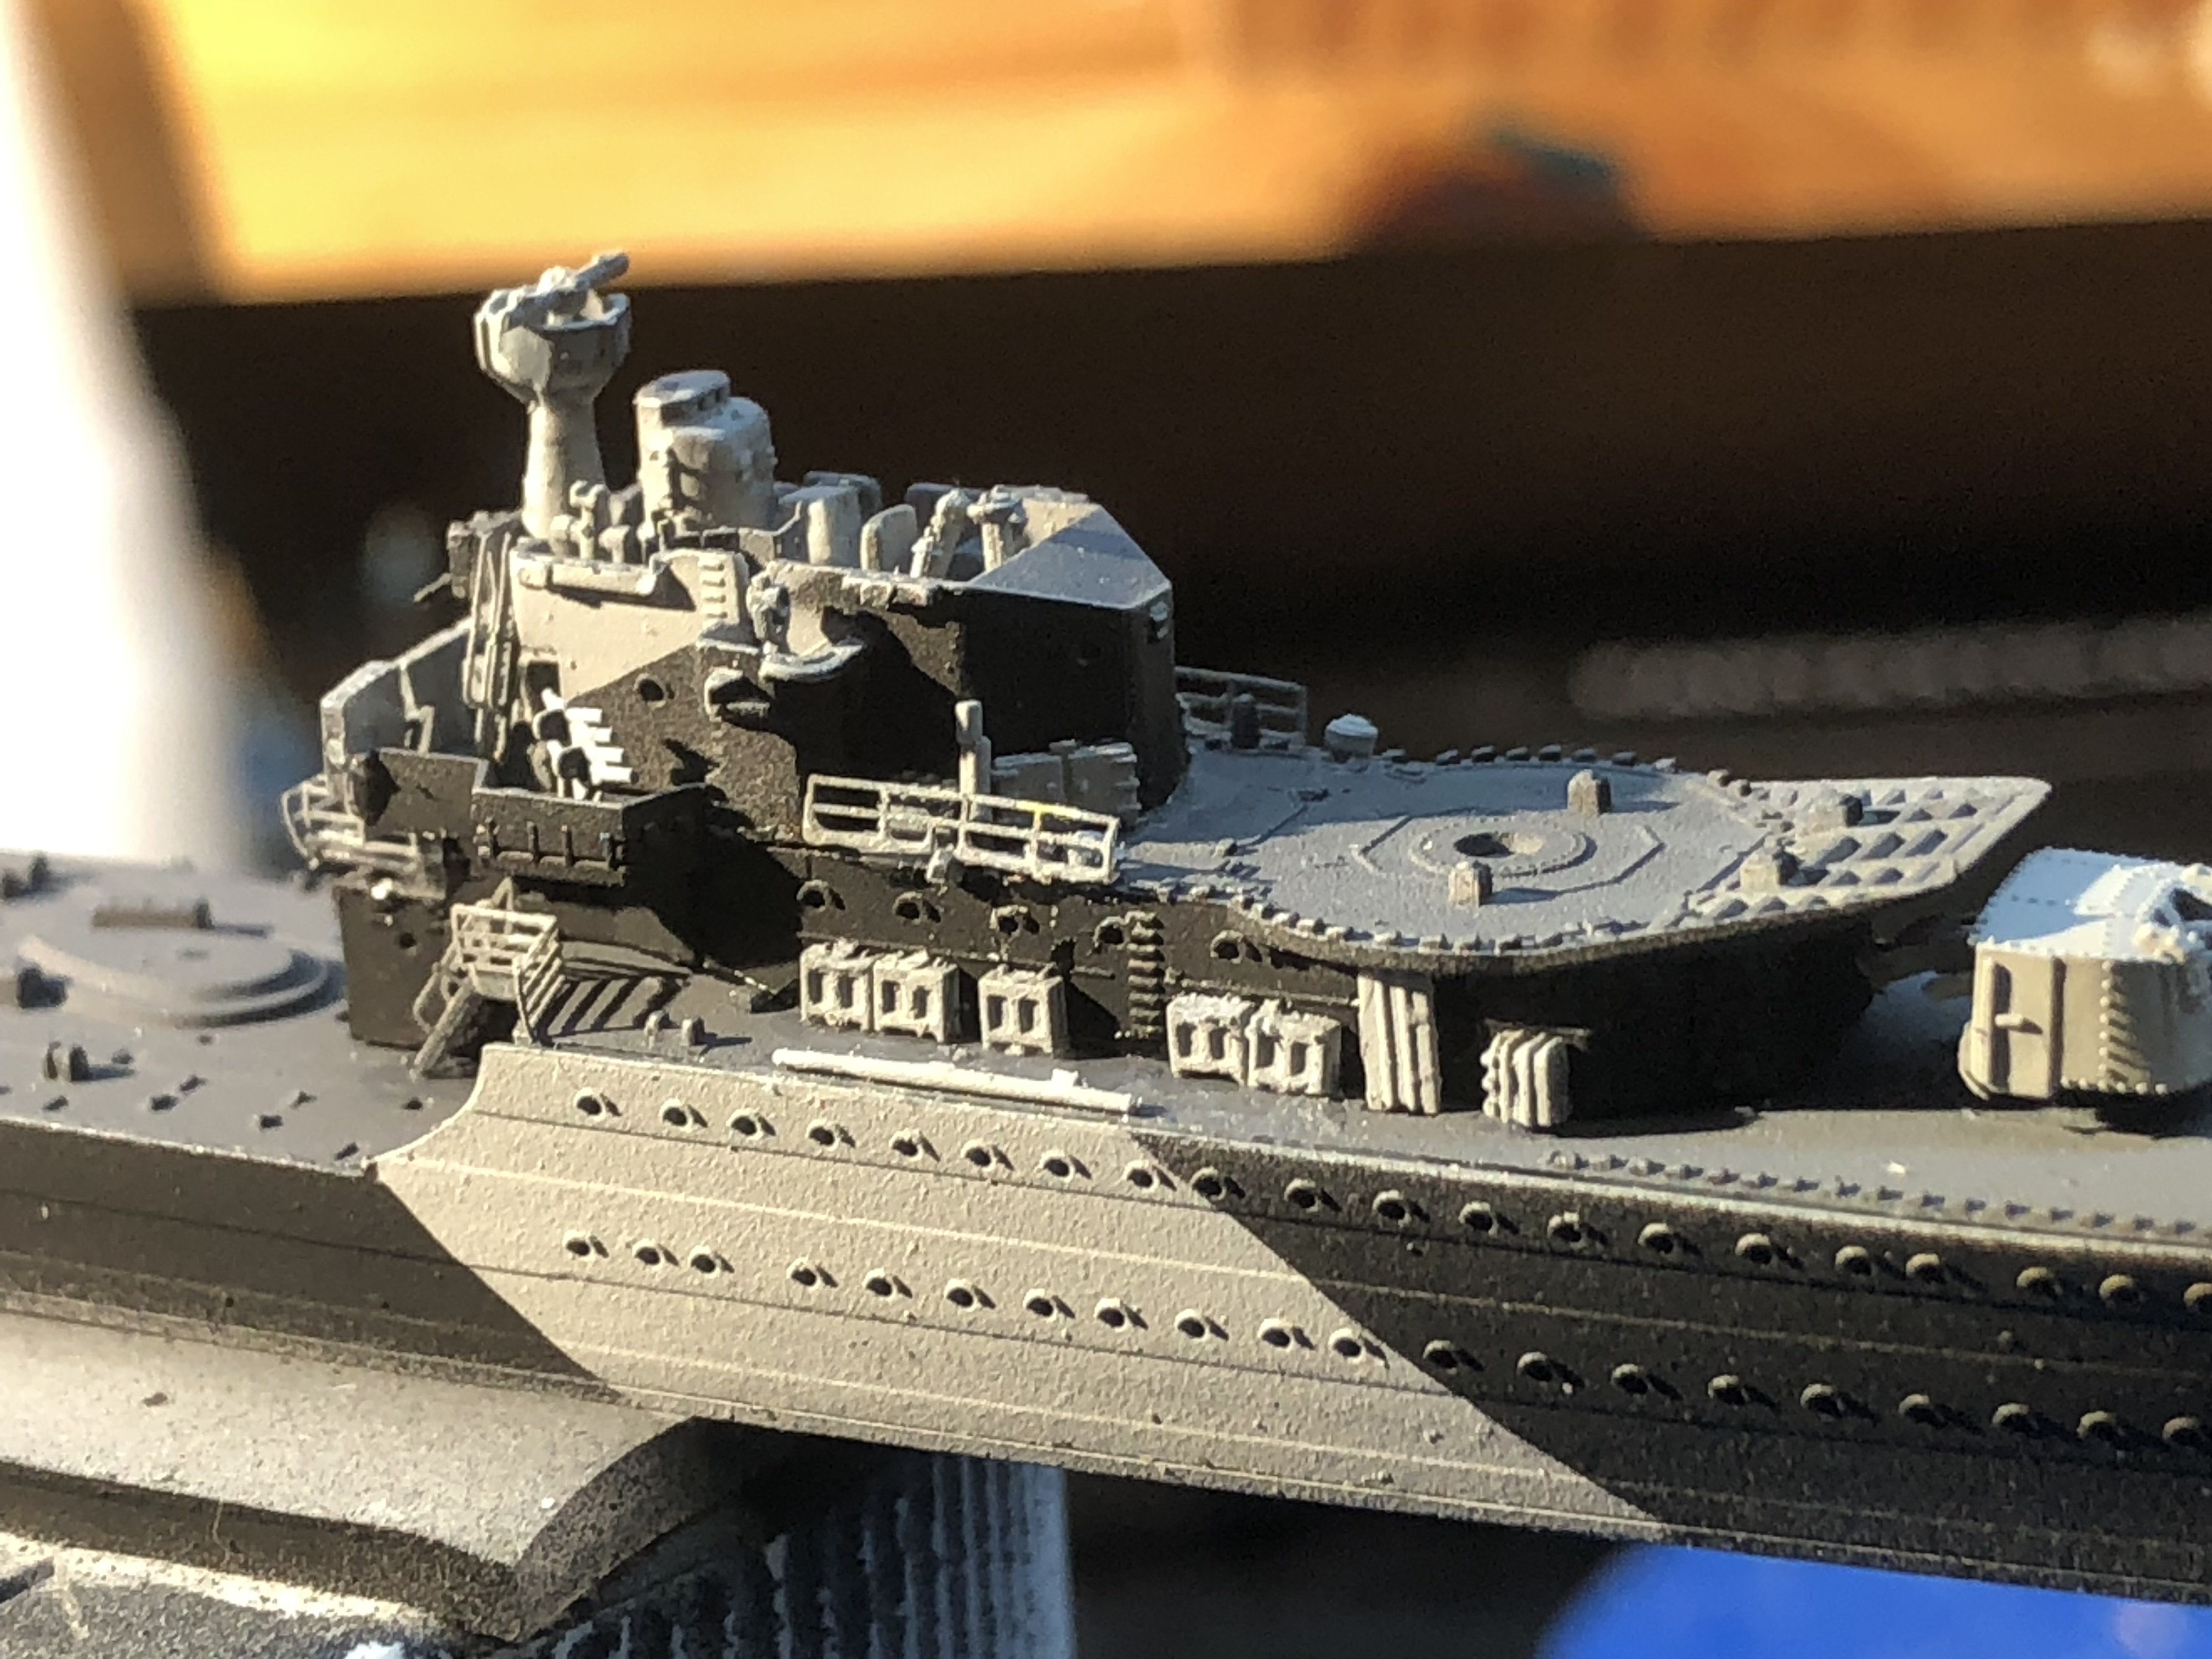
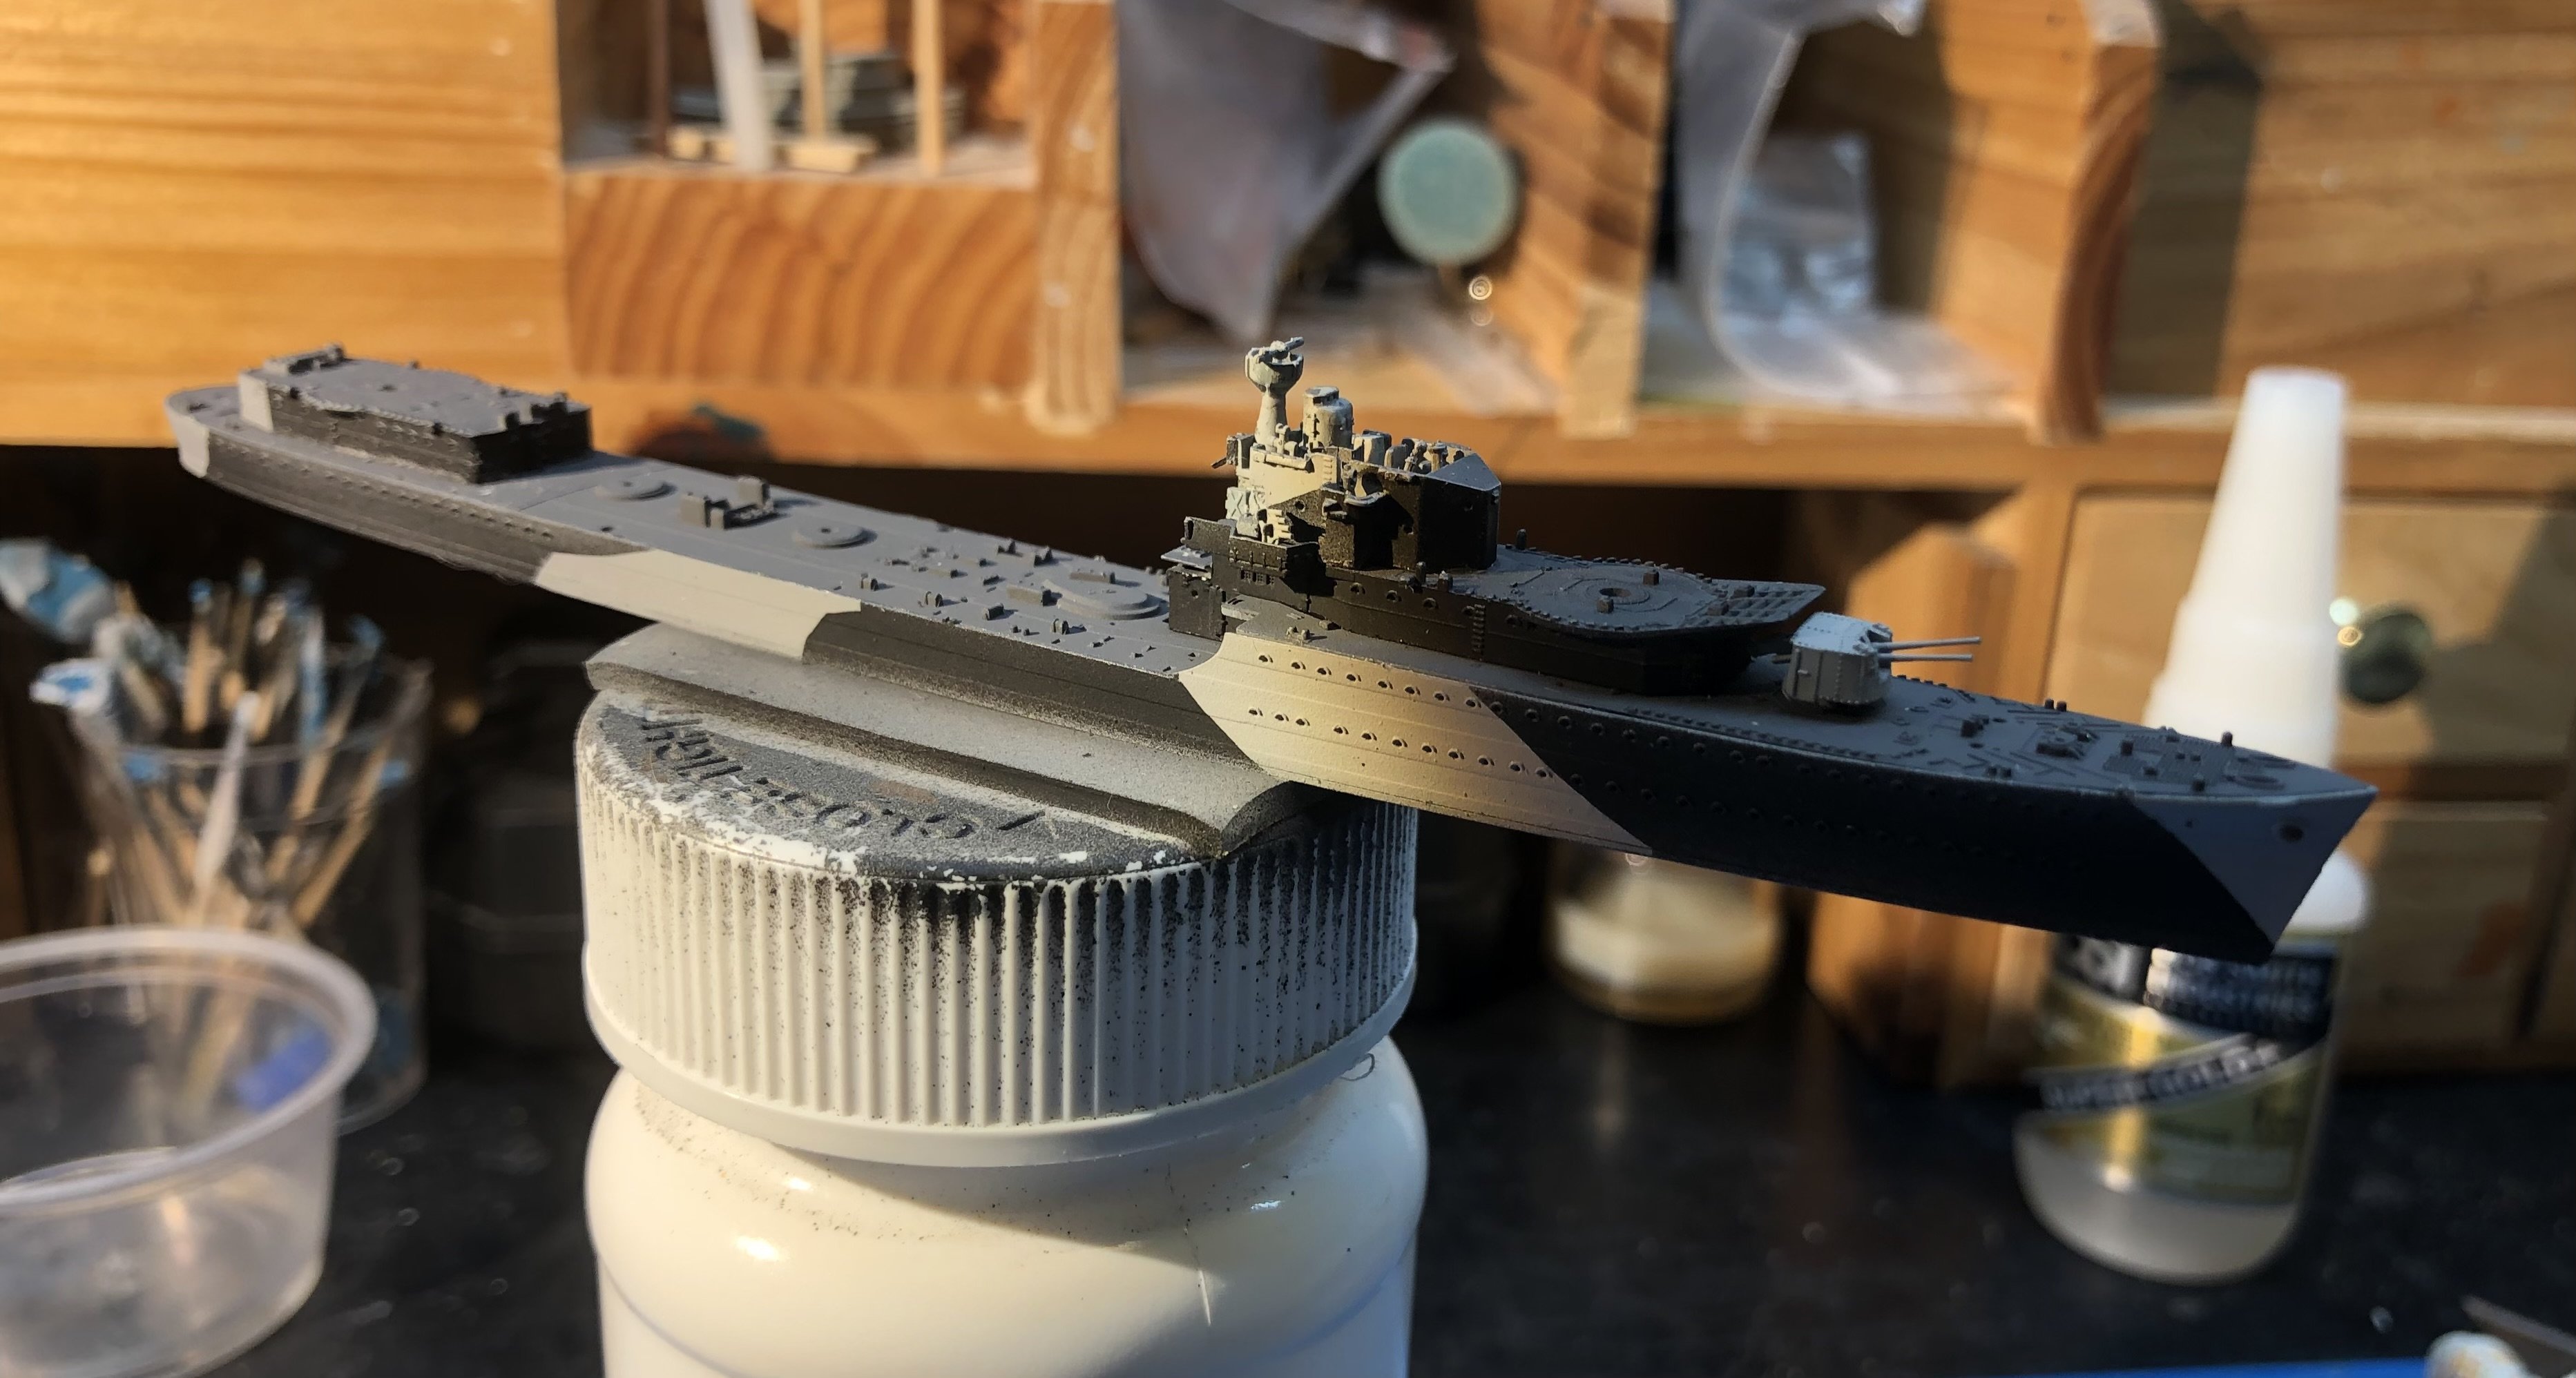
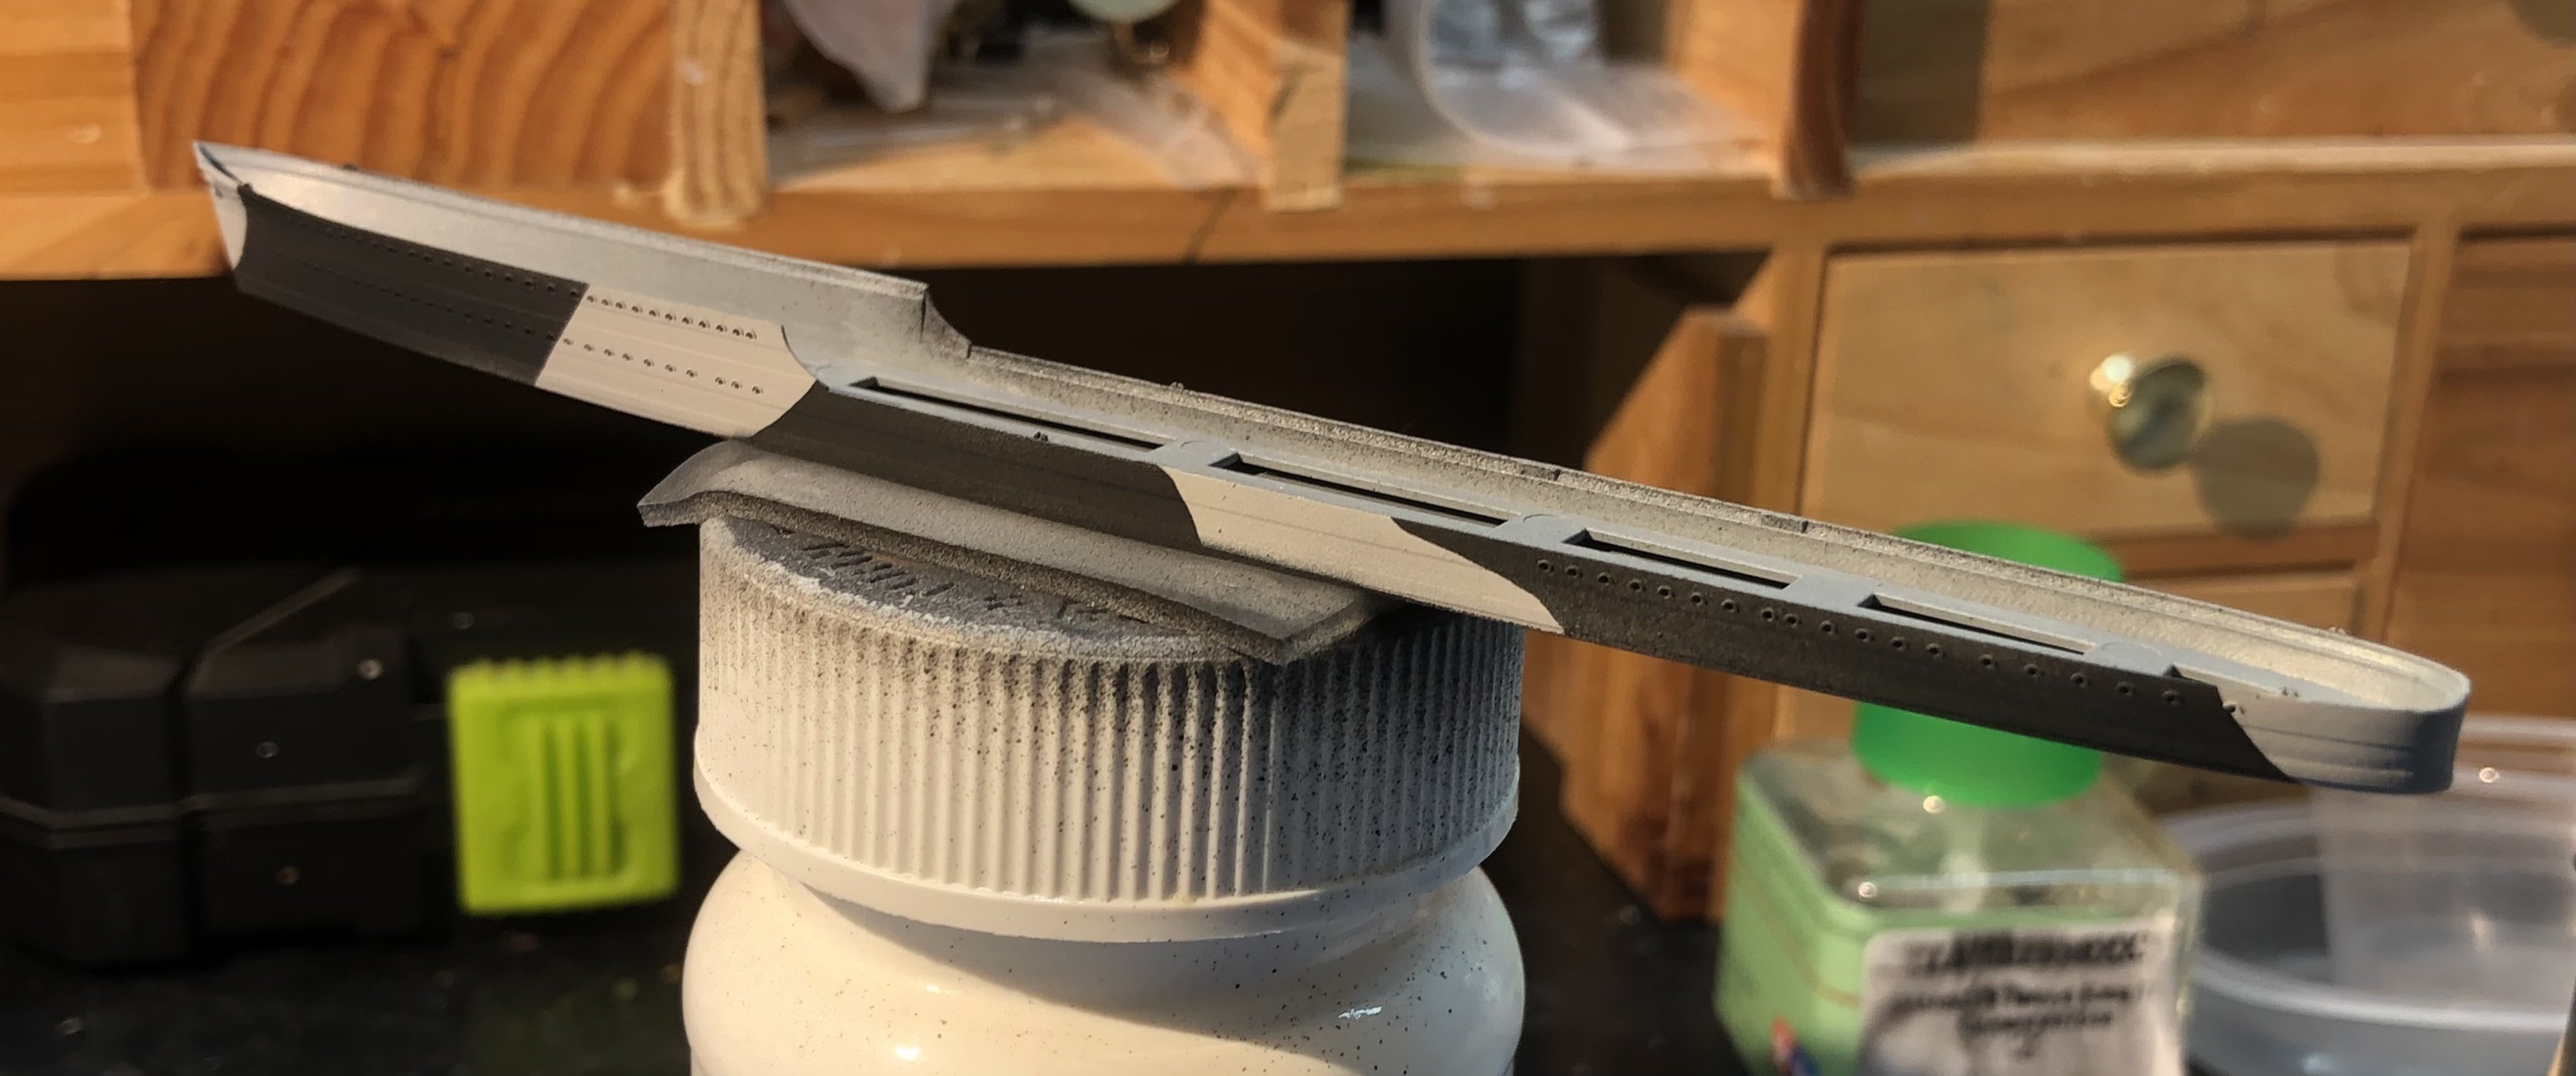
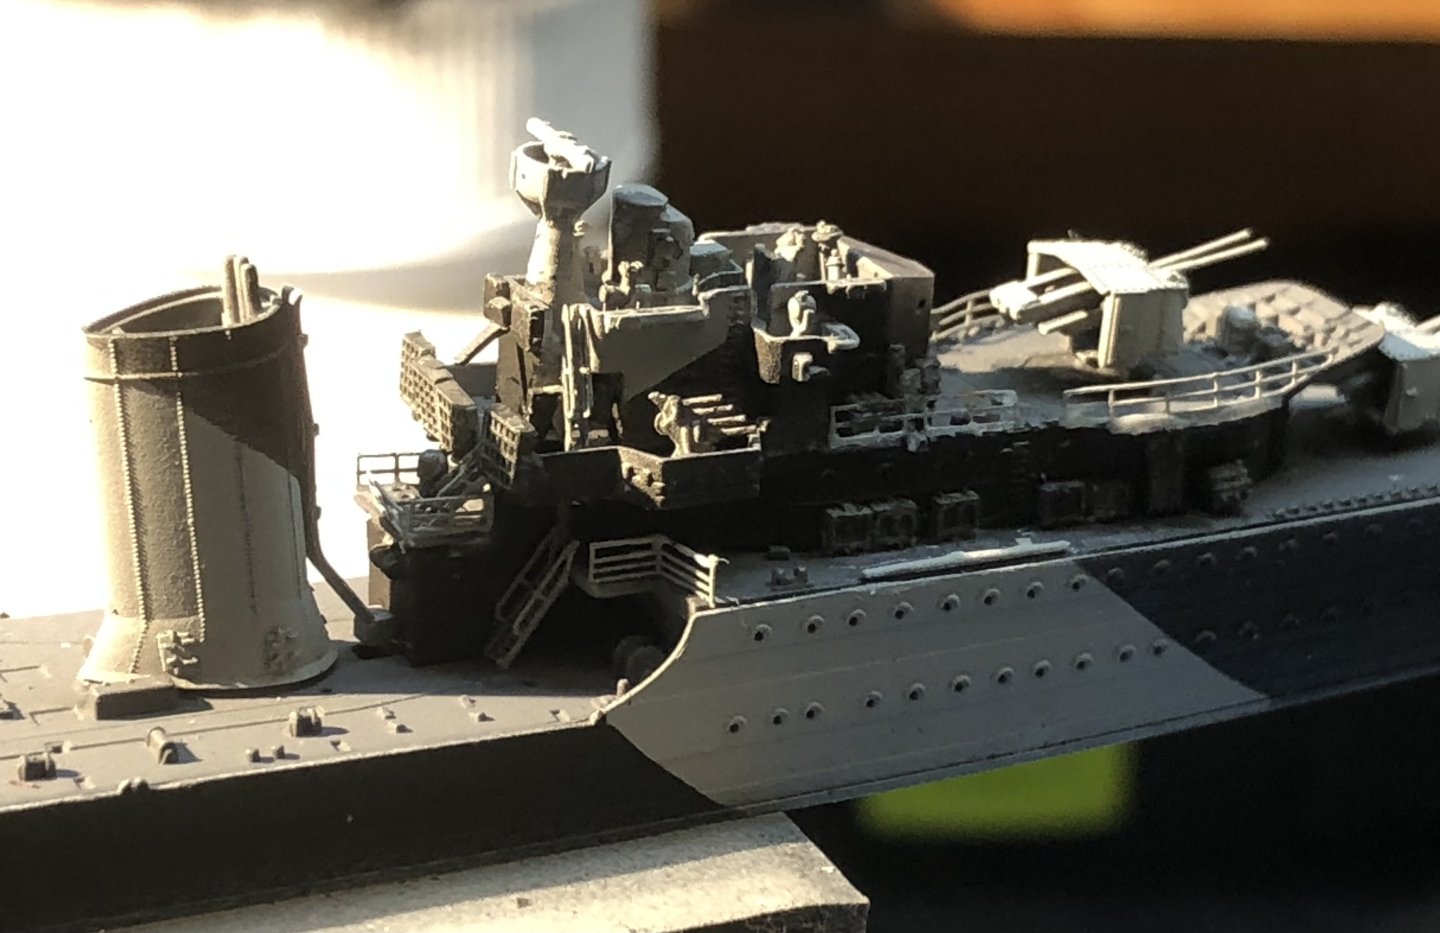
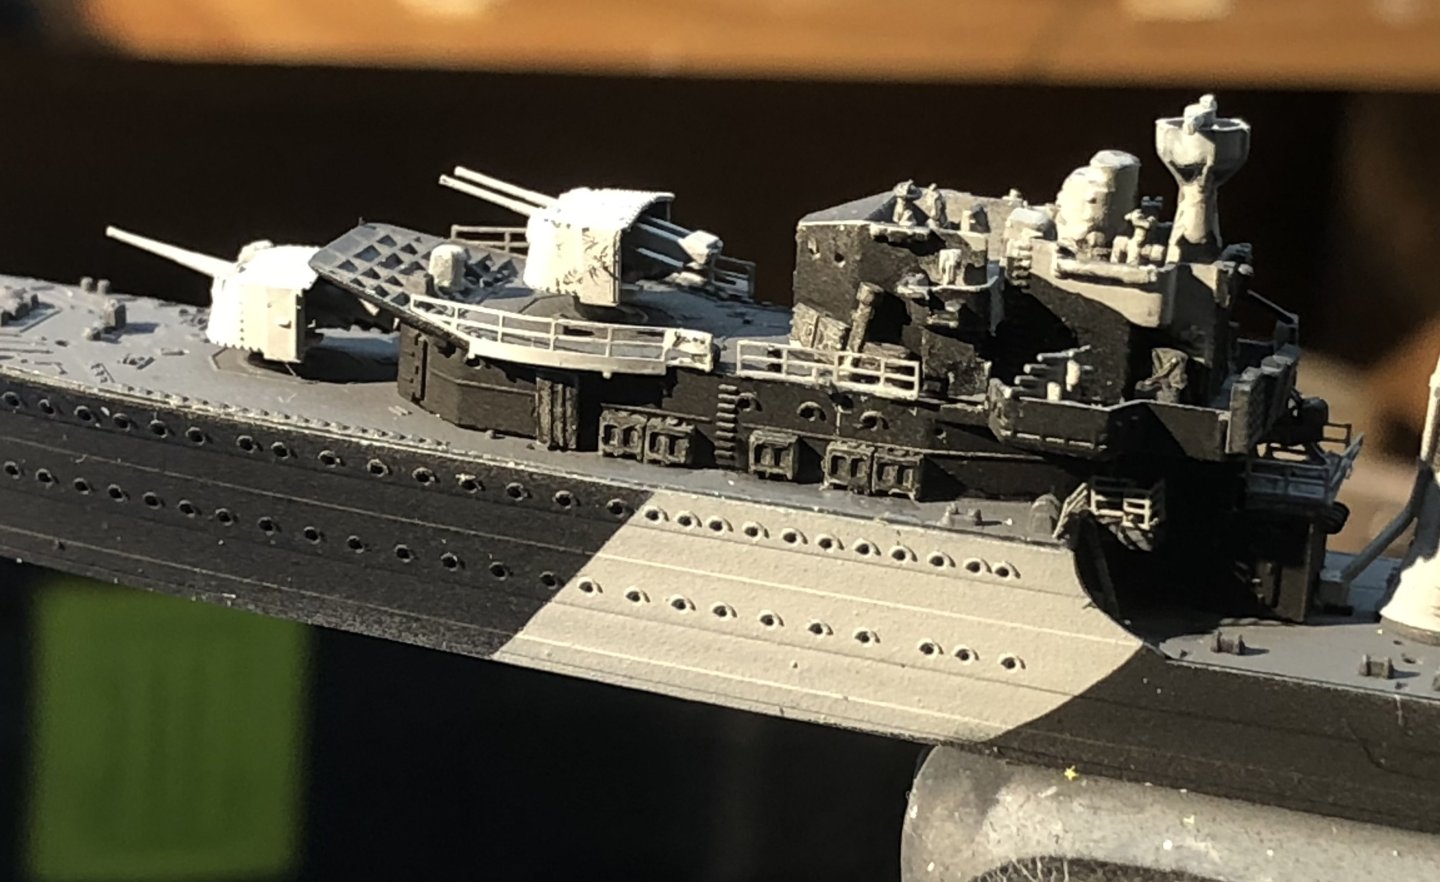
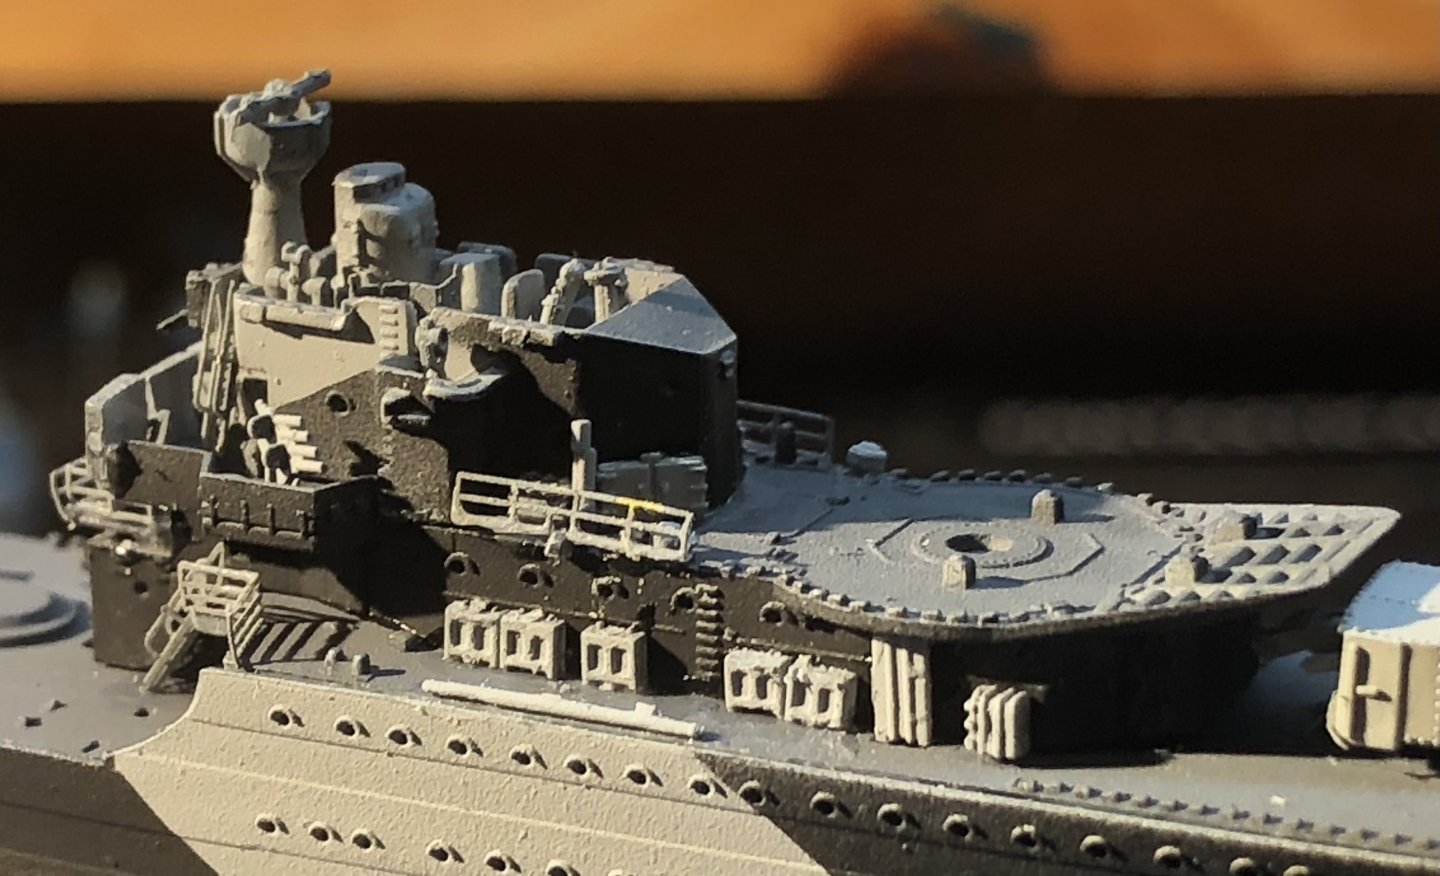
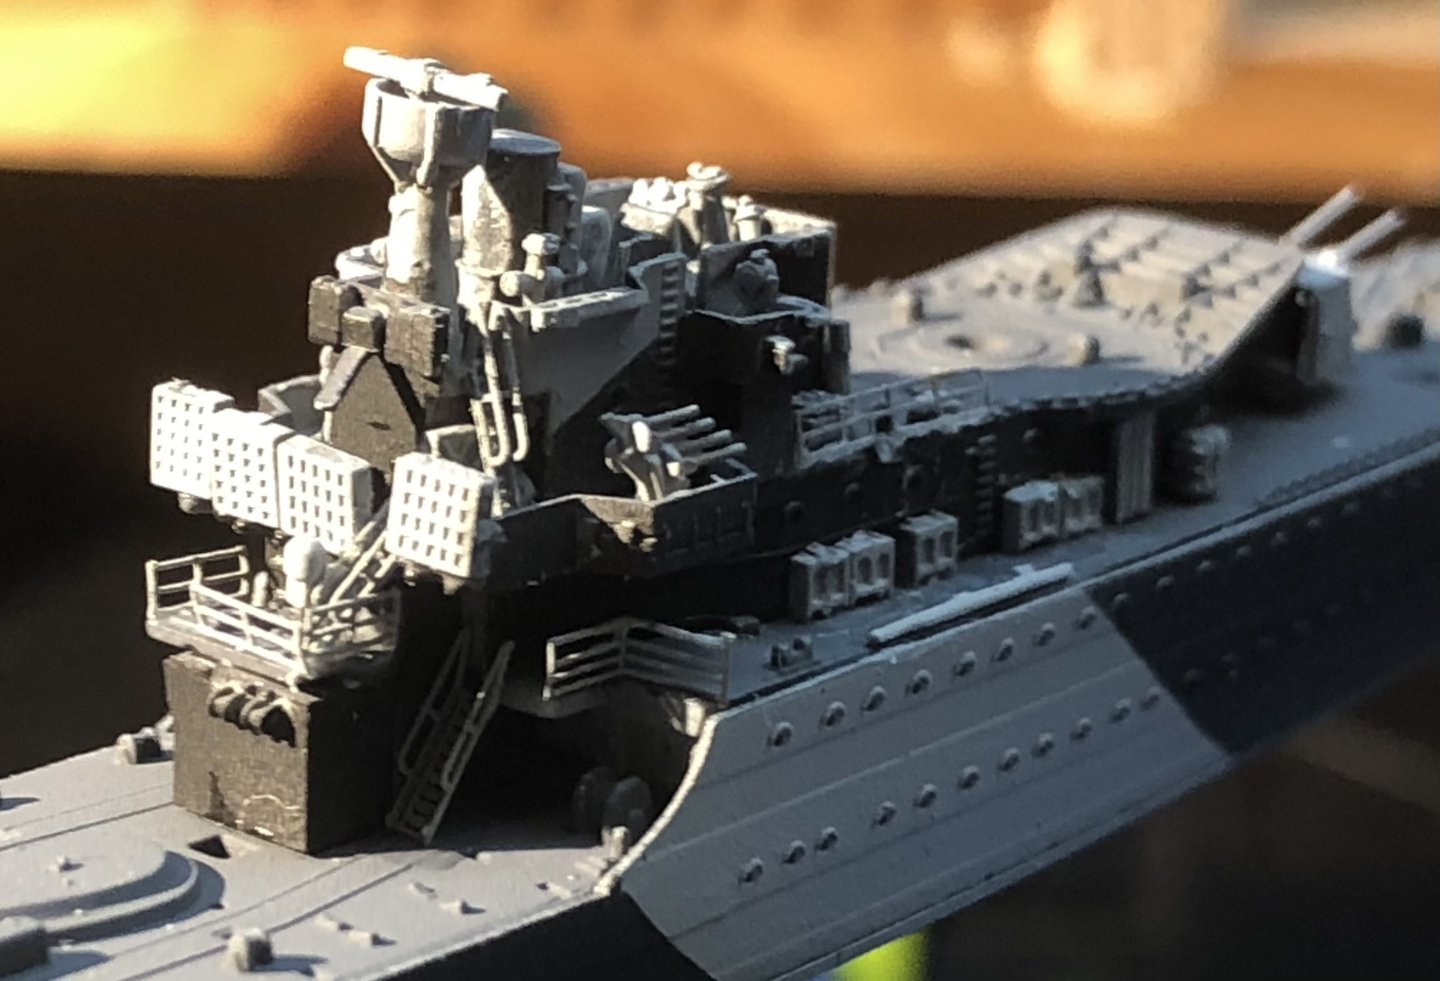
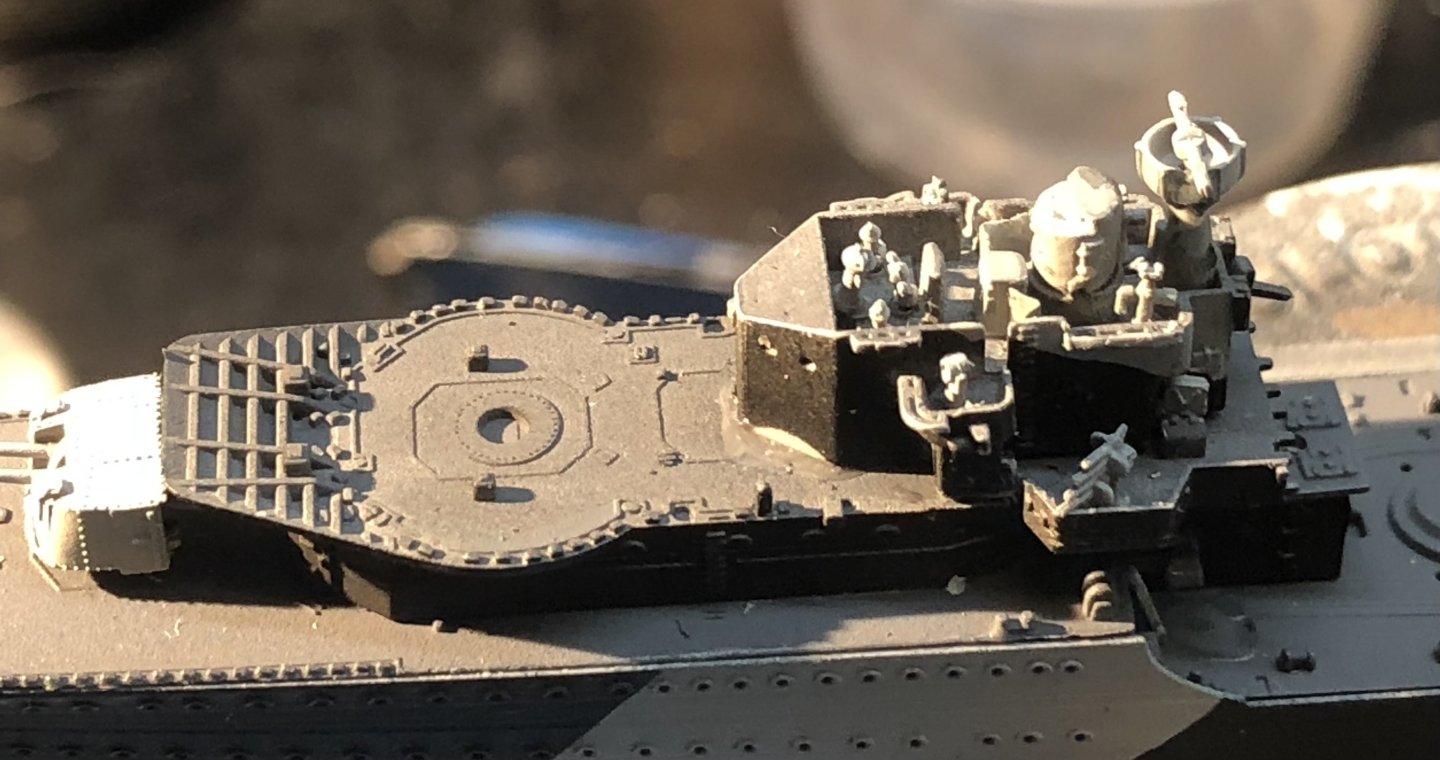
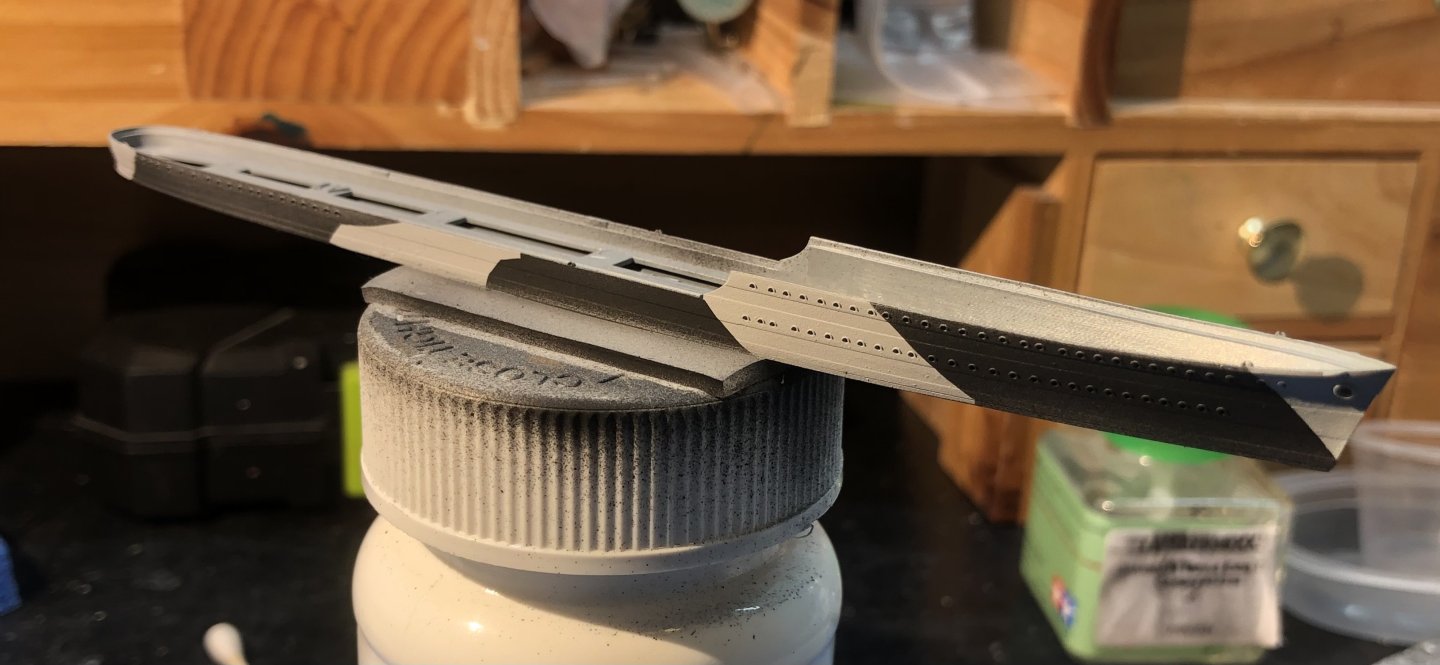
I finally mustered up the courage to tackle the tripod mast. It is nicer than the kit mast and considerably more robust. The plastic Flyhawk mast is beautifully thin but very delicate. Primed and painted then today installed after multiple attempts to line it up, avoid damaging the rear of the bridge etc. I did knock two of the splinter mats off the back of the bridge and had to go and have a cup of tea before resuming. It’s in place and I can move onto the Bofors platform and (sigh) lots of lockers. Thanks for looking in, the likes a great comments. alan

-
Thanks OC. I think that’s the way forward for the pile of lockers still to be fitted. alan
-
For some reason building the brass tripod mast on HMS Kelly felt too daunting so I worked a little on this mainly playing around with the skin tones. I’m using my usual Vallejo acrylic paints. I started with Burnt Umber and then used clear orange to redden it, Royal Purple to darken it and Sunny skin tone to lighten it. Ive made a first pass at the bare skin areas and face and it looks reasonable with a few details needed on the face. I’ll see how it looks in the morning and maybe try something different. It may need painting of the adjacent areas to view it properly. Thanks for looking in, the likes and comments. alan

-
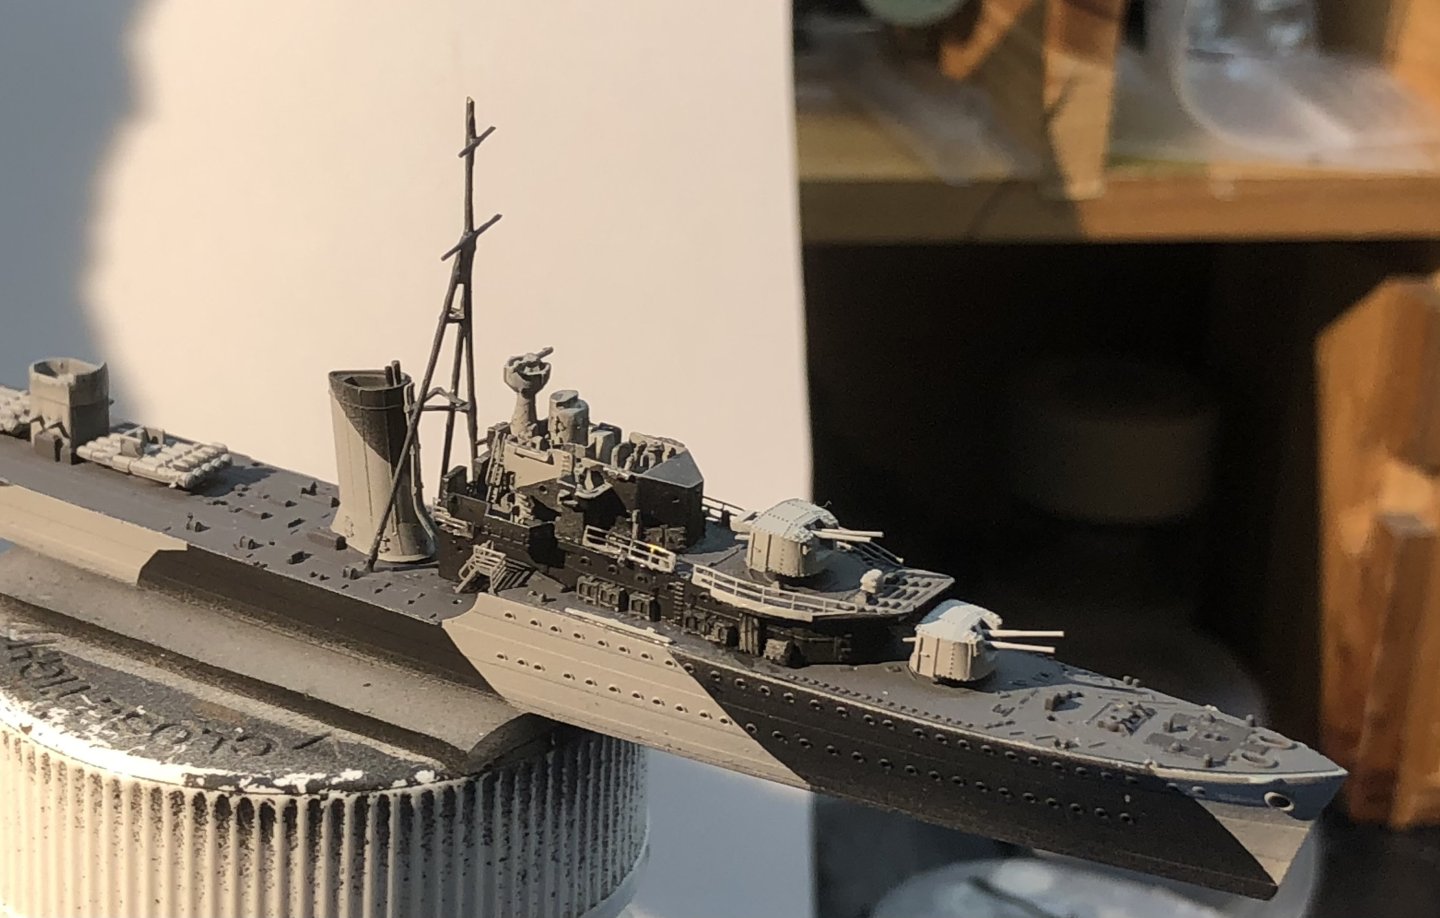
The bridge area is finished apart from some paint touch up. I decided to try using diluted black on the lockers instead of grey tones. I made it a bit thicker than a wash and I think I’m fairly happy with the results. As the photos show you can discriminate the lockers but they are not too obvious. And I have one to straighten up tomorrow. I added the funnel and the next task is the tripod mast. The kit one is very nice Flyhawk moulding but very delicate. I need to make a jig to hold the brass parts in place while gluing or soldering but the enthusiasm wasn’t there today so I attacked a slow running shower drain instead. Tyanks for looking in, the likes and comments. alan

-
Thank you very much OC. I think Flyhawk makes some demanding kits but the detail is impressive. alan
-
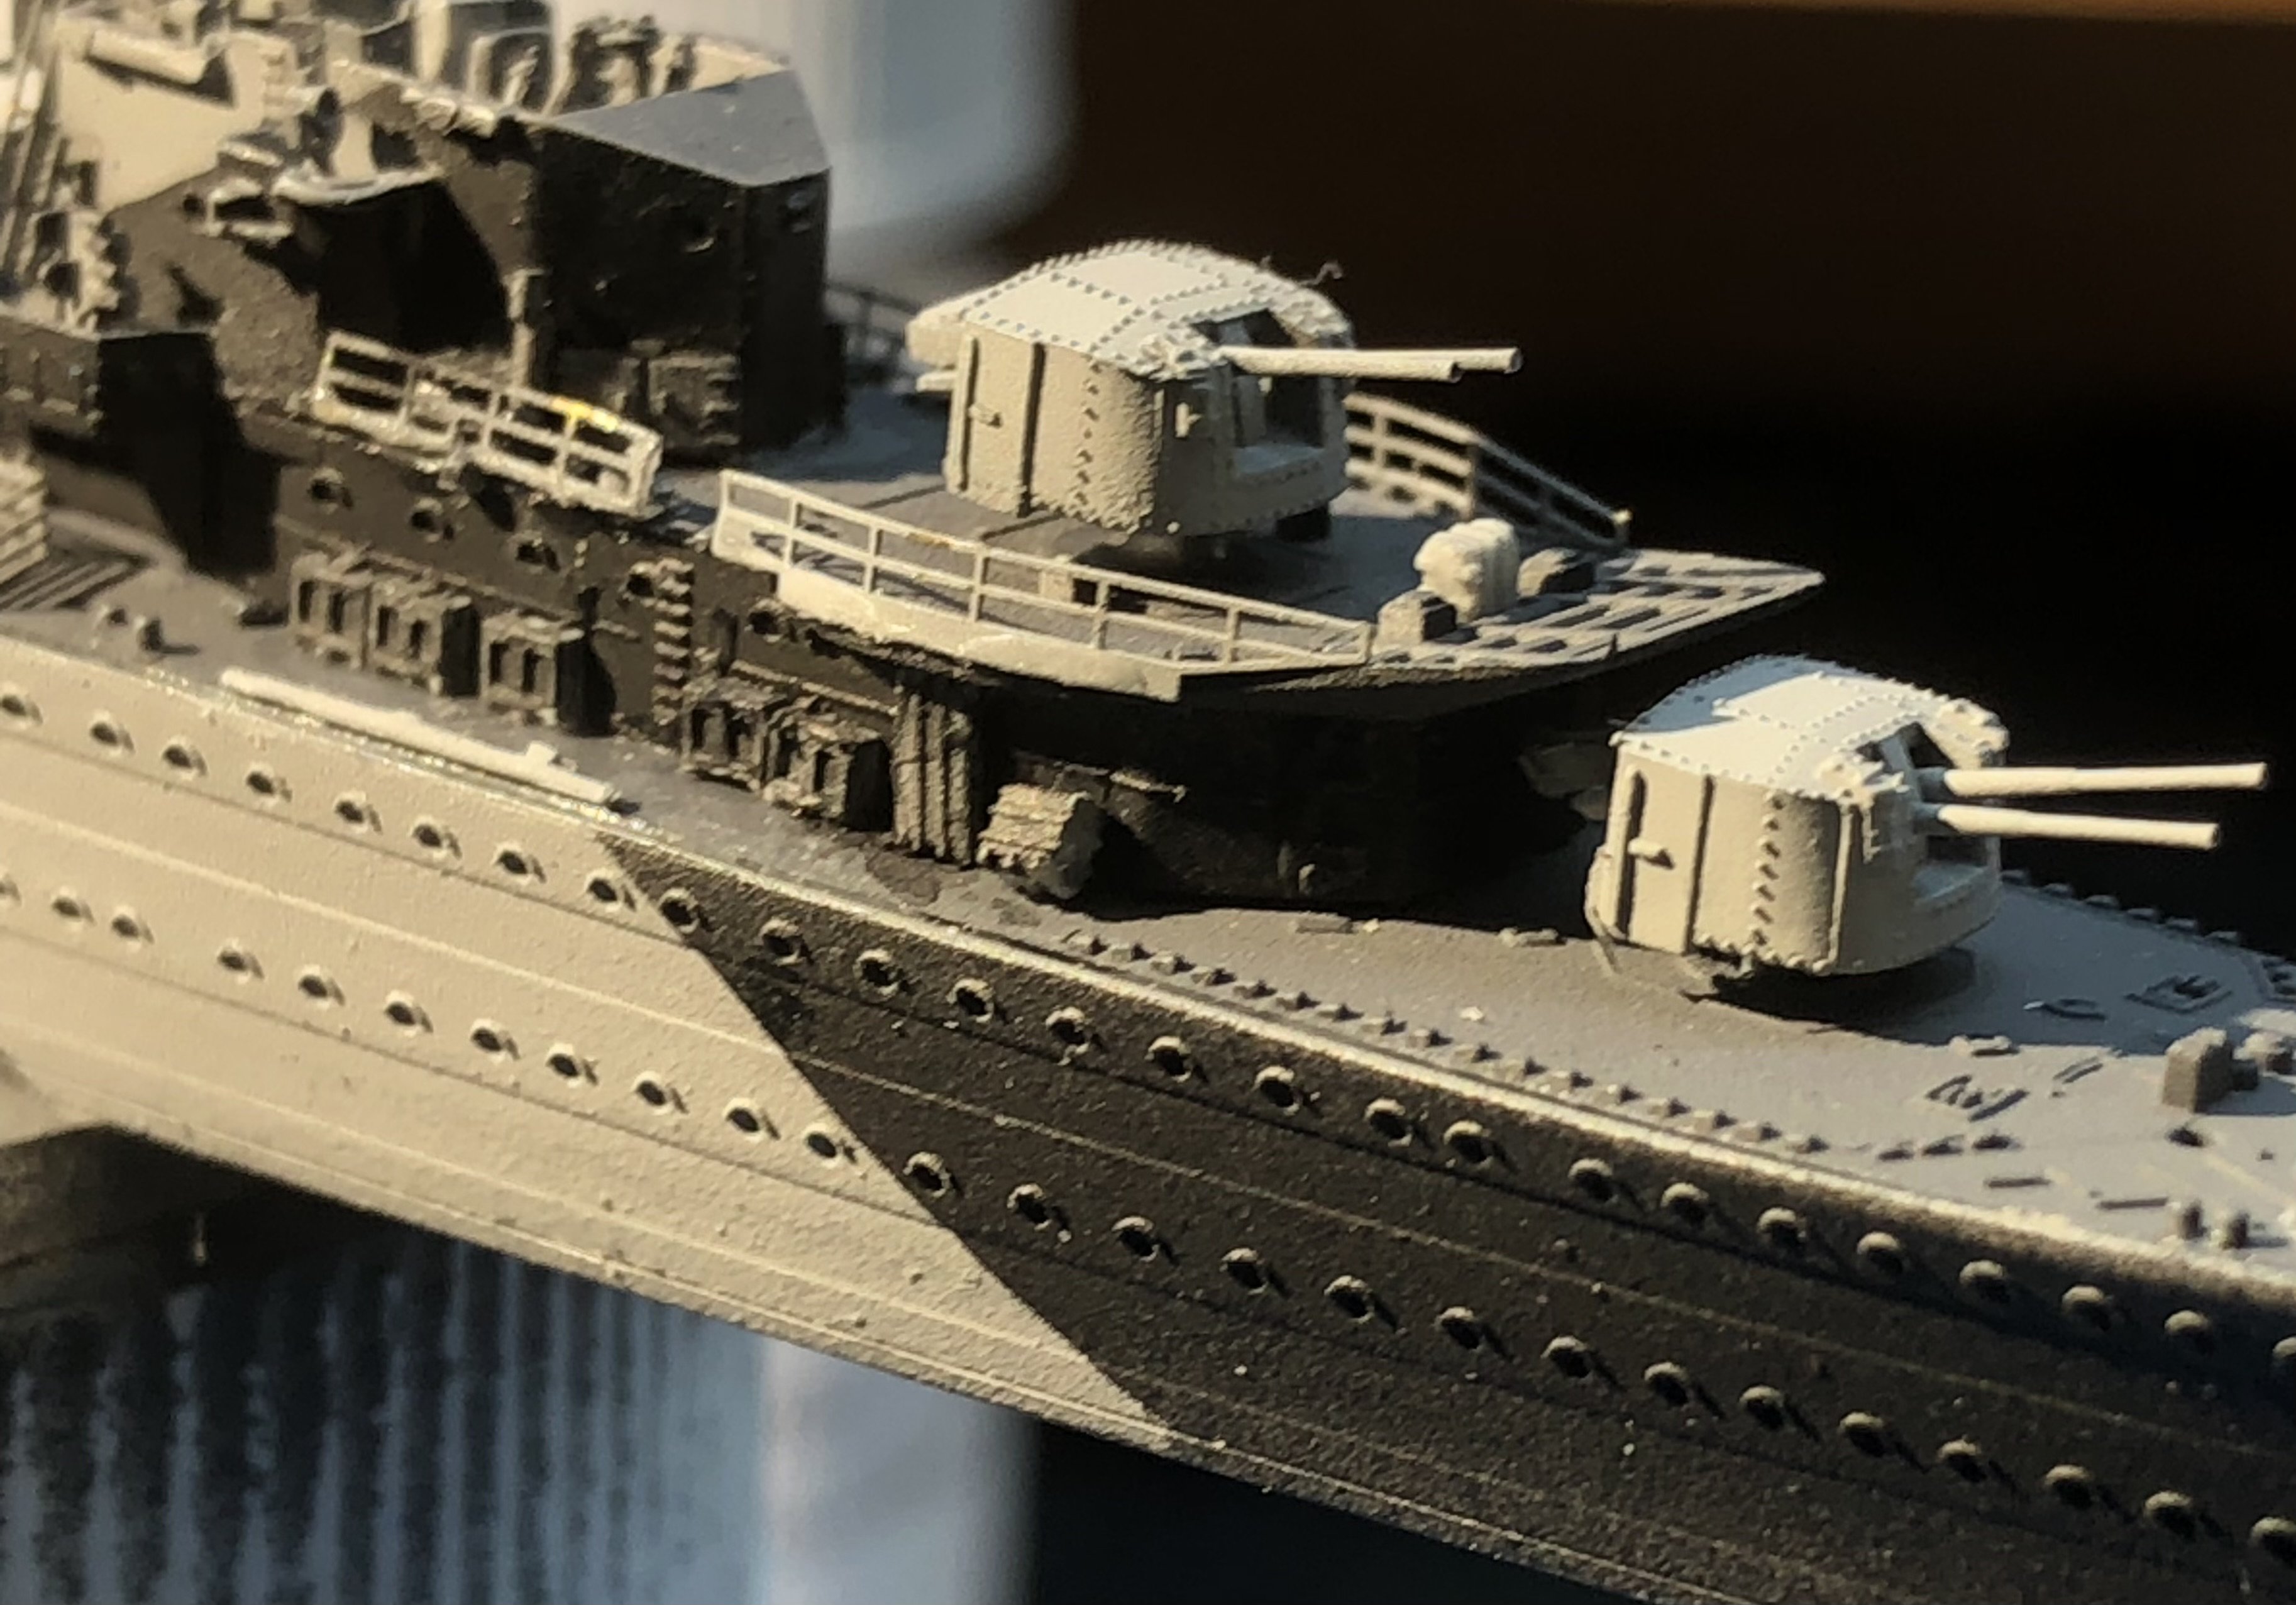
I can’t believe I spent all the modeling portion of the day still working on the forward superstructure. Over twenty lockers of various shapes and sizes, stairs, railings, ventilators. I think the lockers are going to have to be painted to match the camouflage but if I use straight black they are going to disappear which will be a shame. I think I’m going to try painting them with dark grey and see if they blend in but still be visible. I think I also have NATO black which is sort of grey and rubber black which is a dark grey. Gun and more lockers, railings and then I can move on. Thanks for looking in, the likes and comments. alan

-
Thanks Mike. Yes I haven’t modified the portholes at all. Flyhawk does a really nice job of defining them. Even the ringols are present. With the black primer and subsequent paint lightly applied they look really nice and much more consistent than if I tried to drill them out. alan
-
I’m sure it’s good for our souls. There are an incredible number of tiny parts just for this little destroyer. All the lockers are individual pieces. I dread to think what the Hood kit is like. alan
-
A lot of great work being done, really looks amazing alan
-
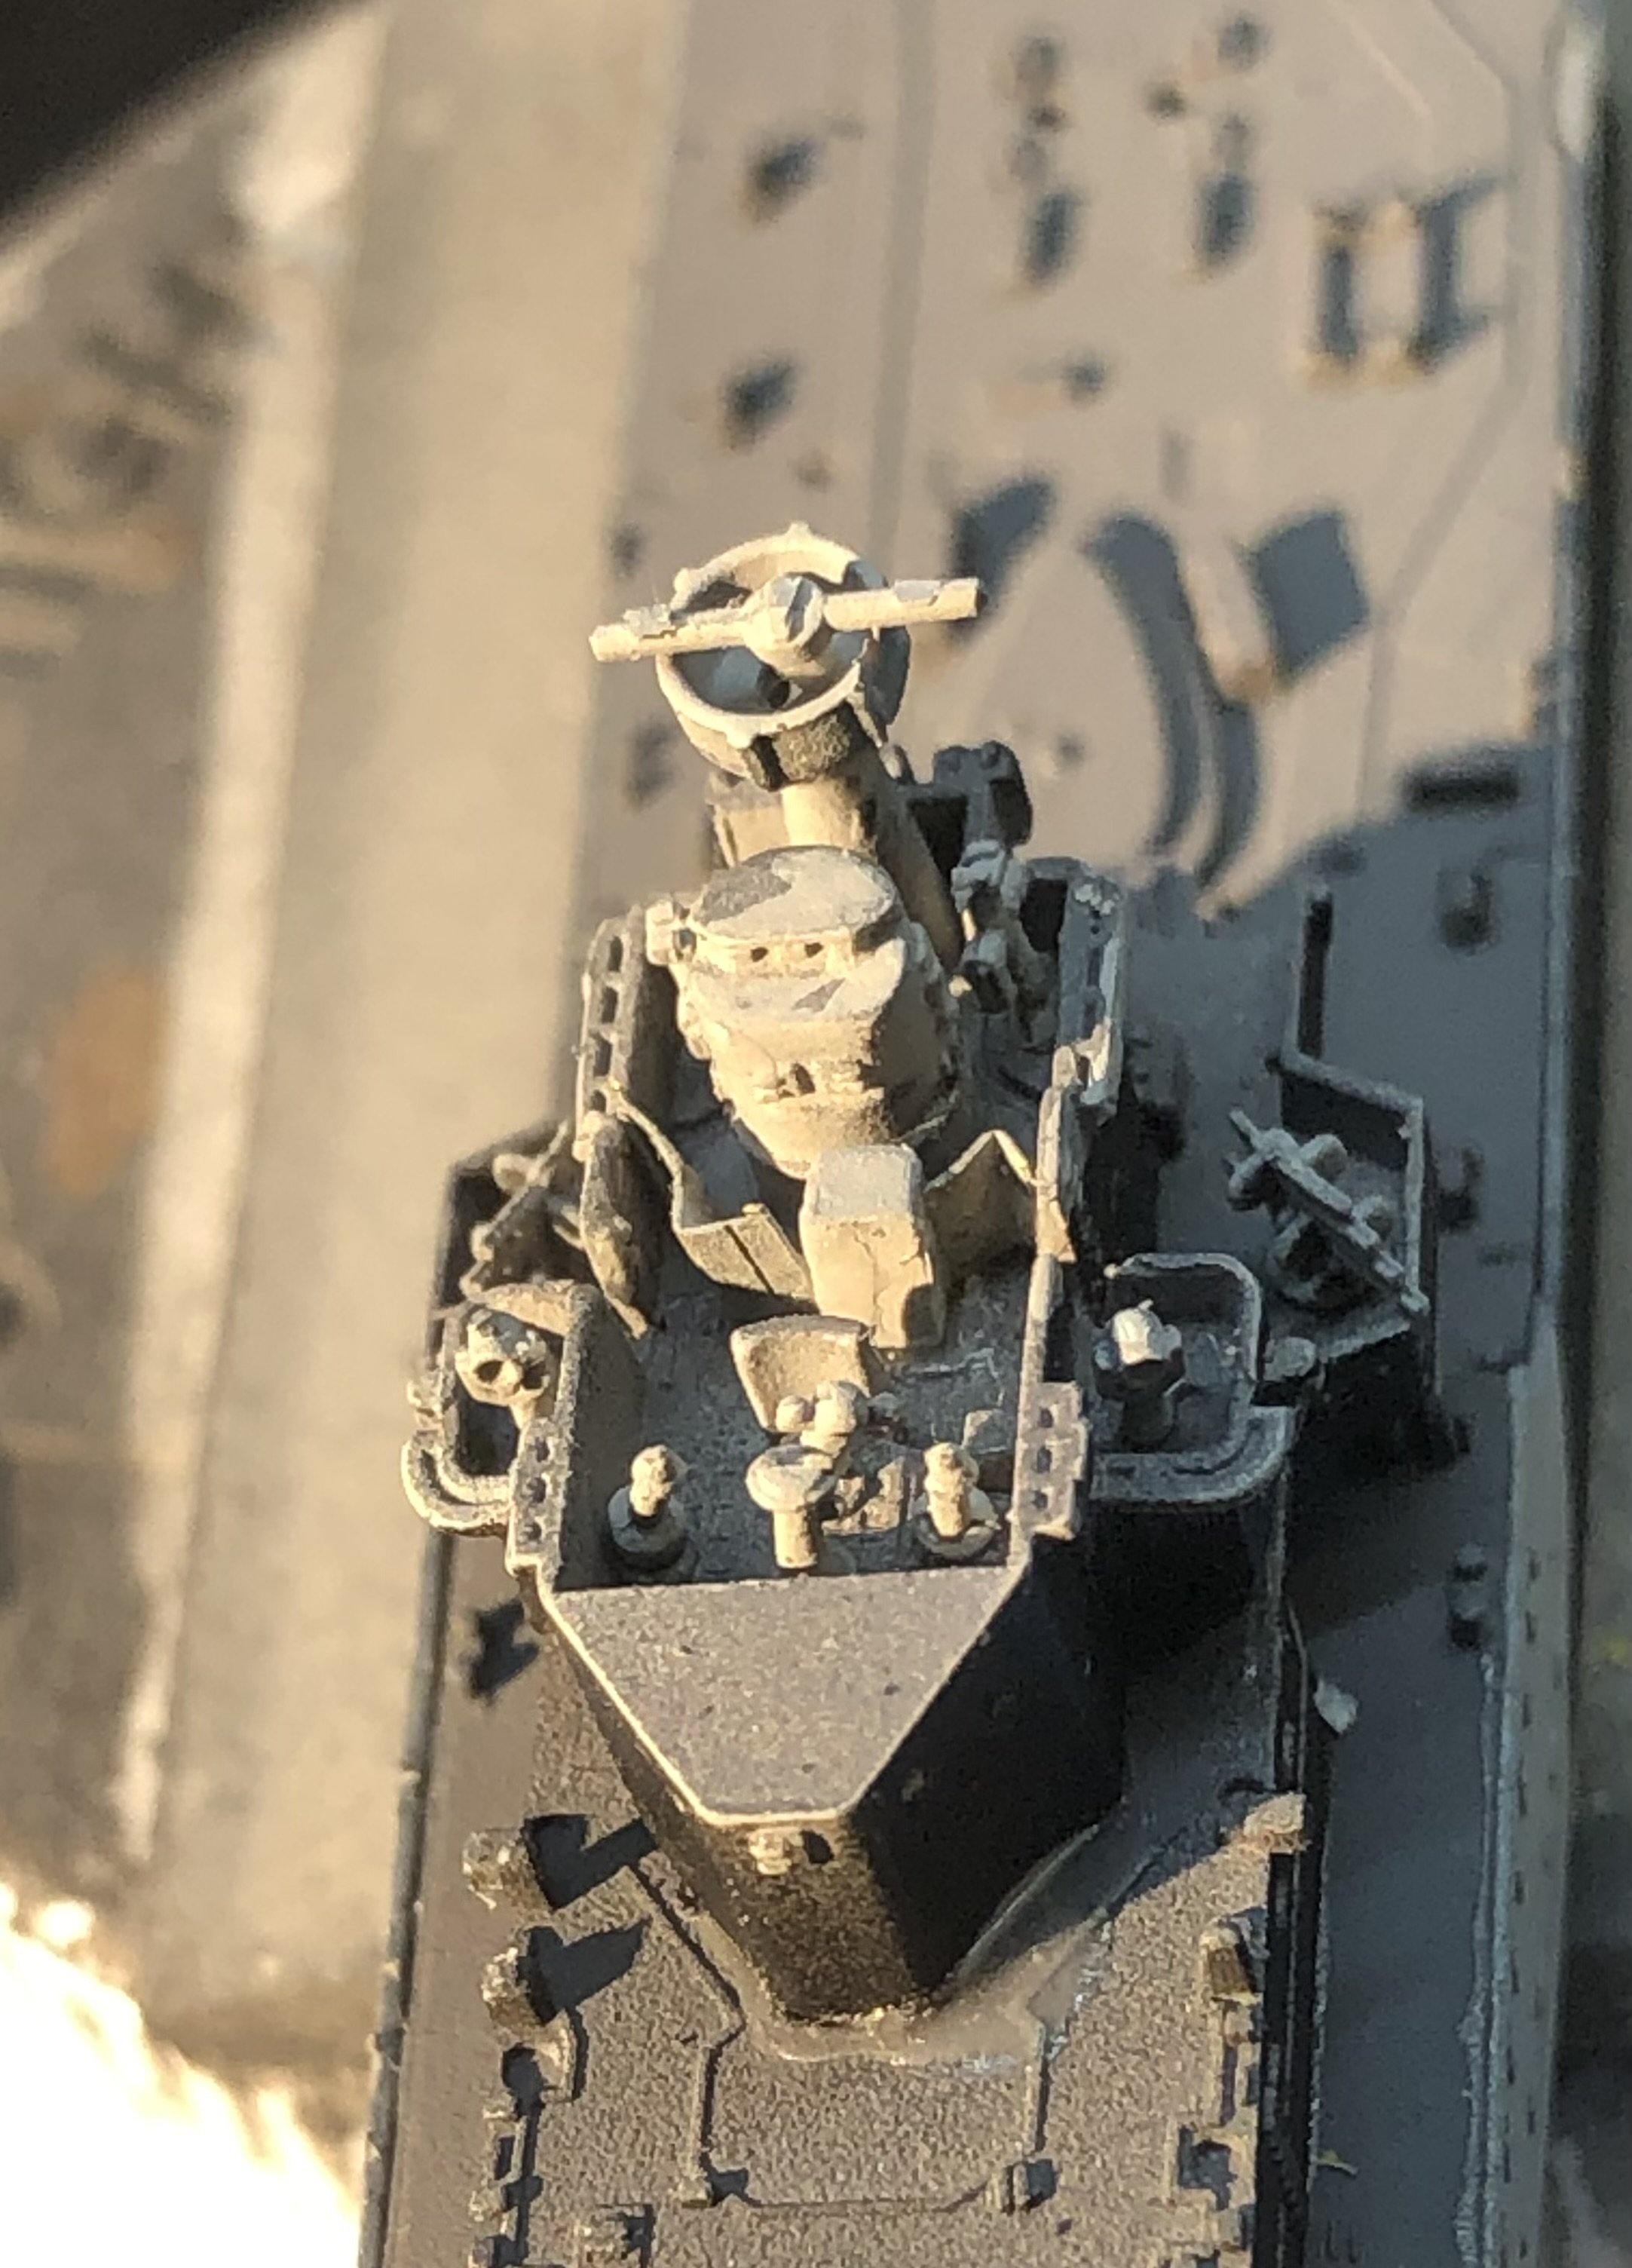
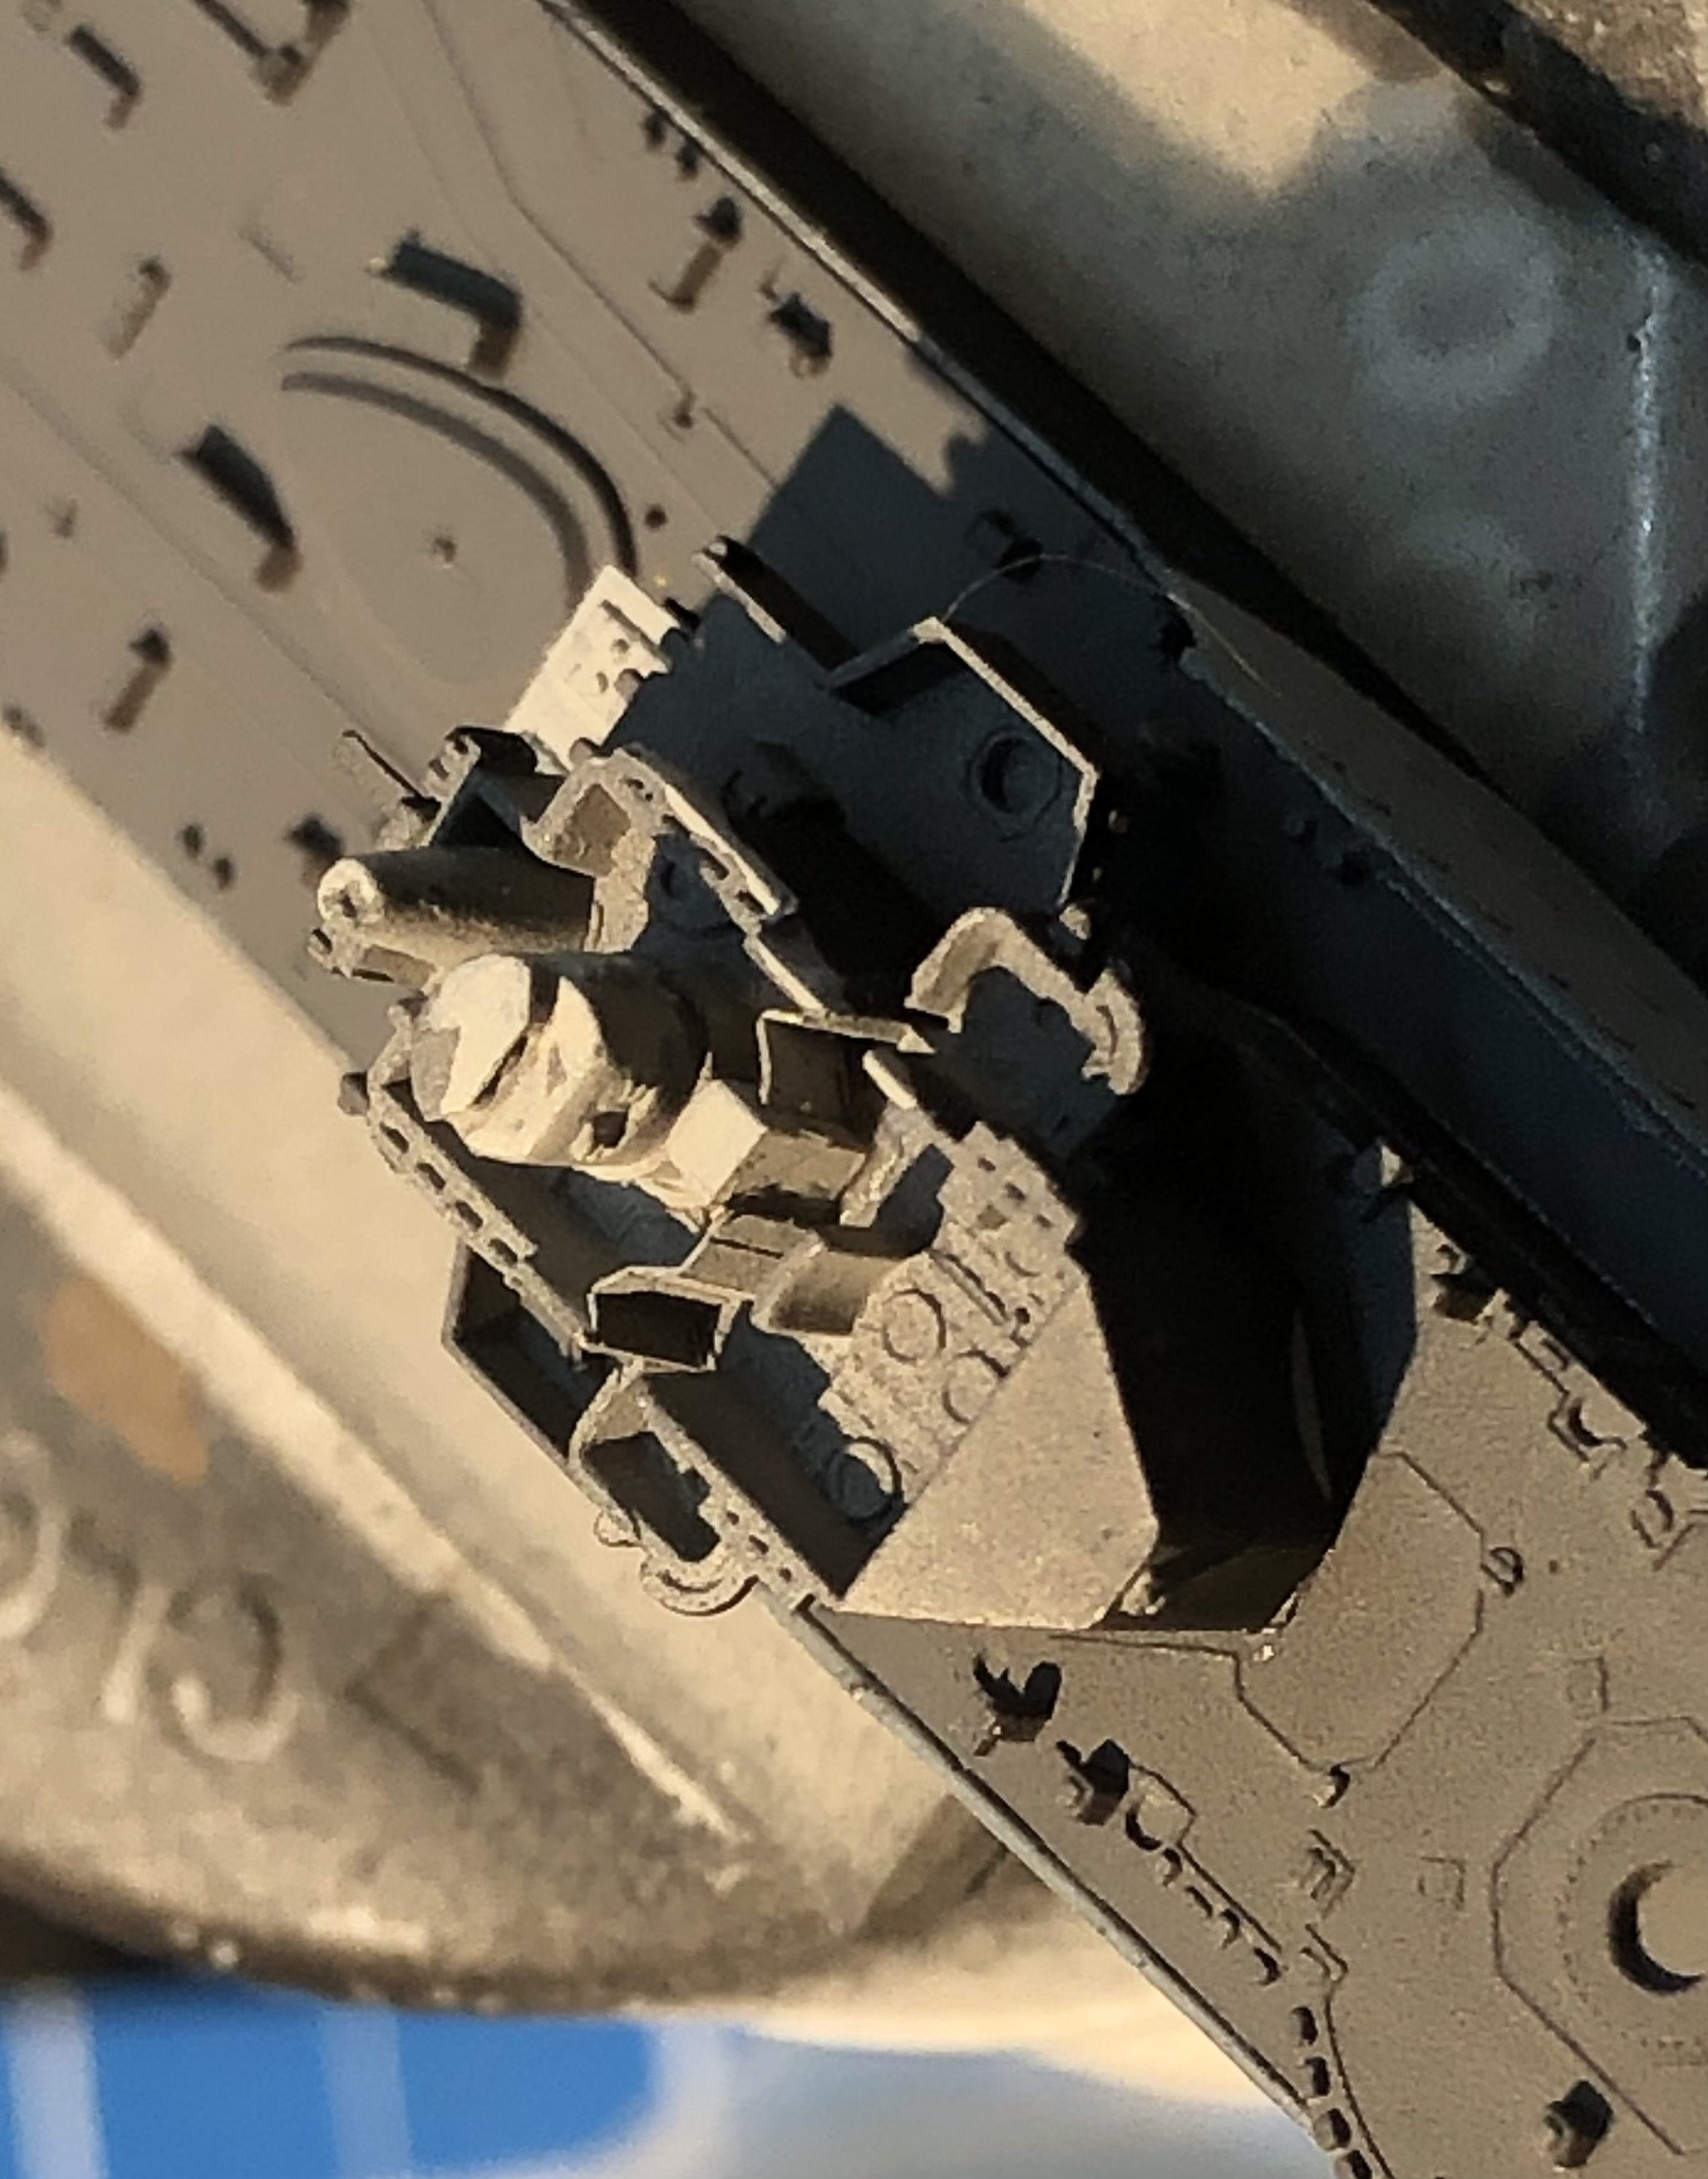
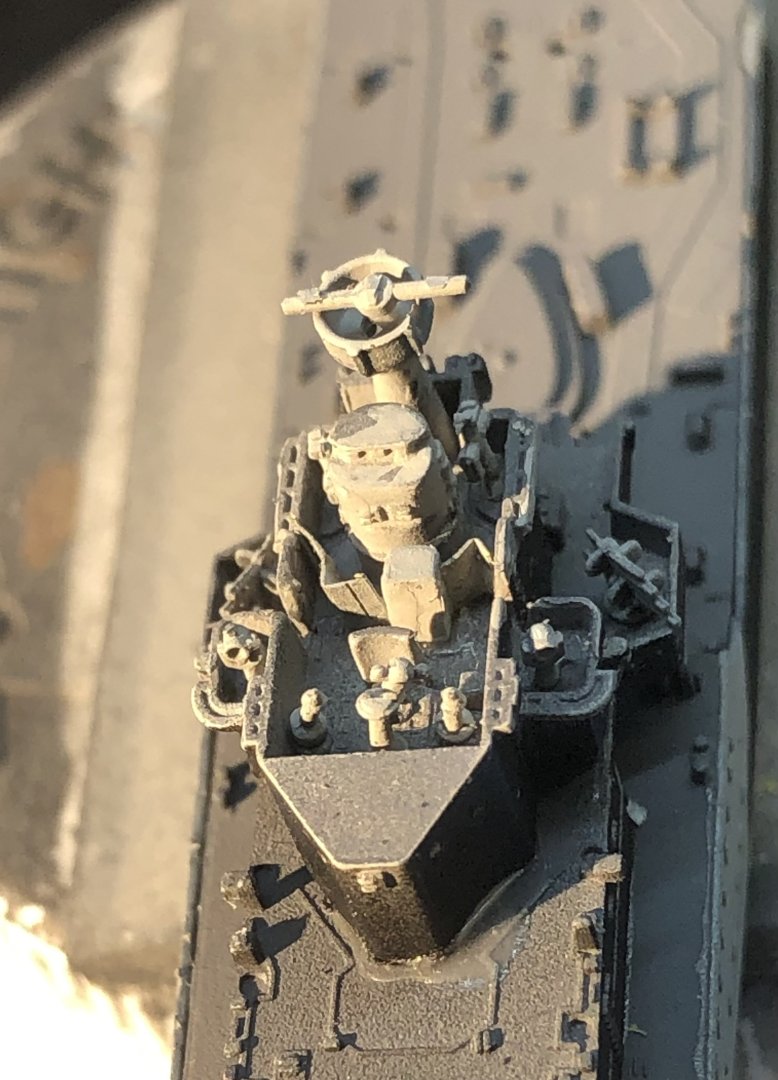
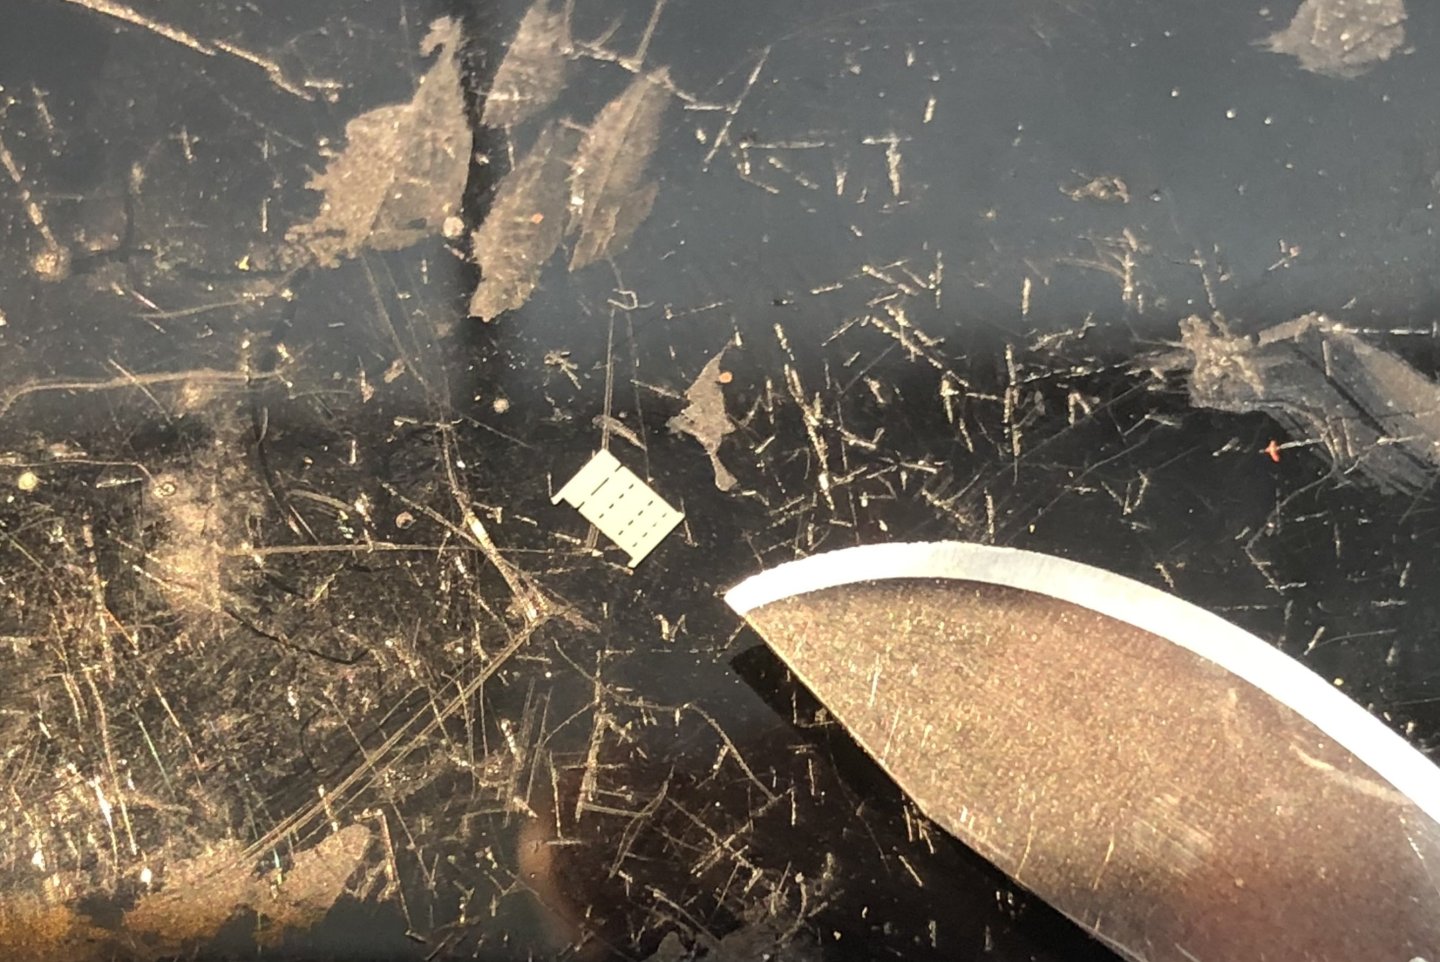
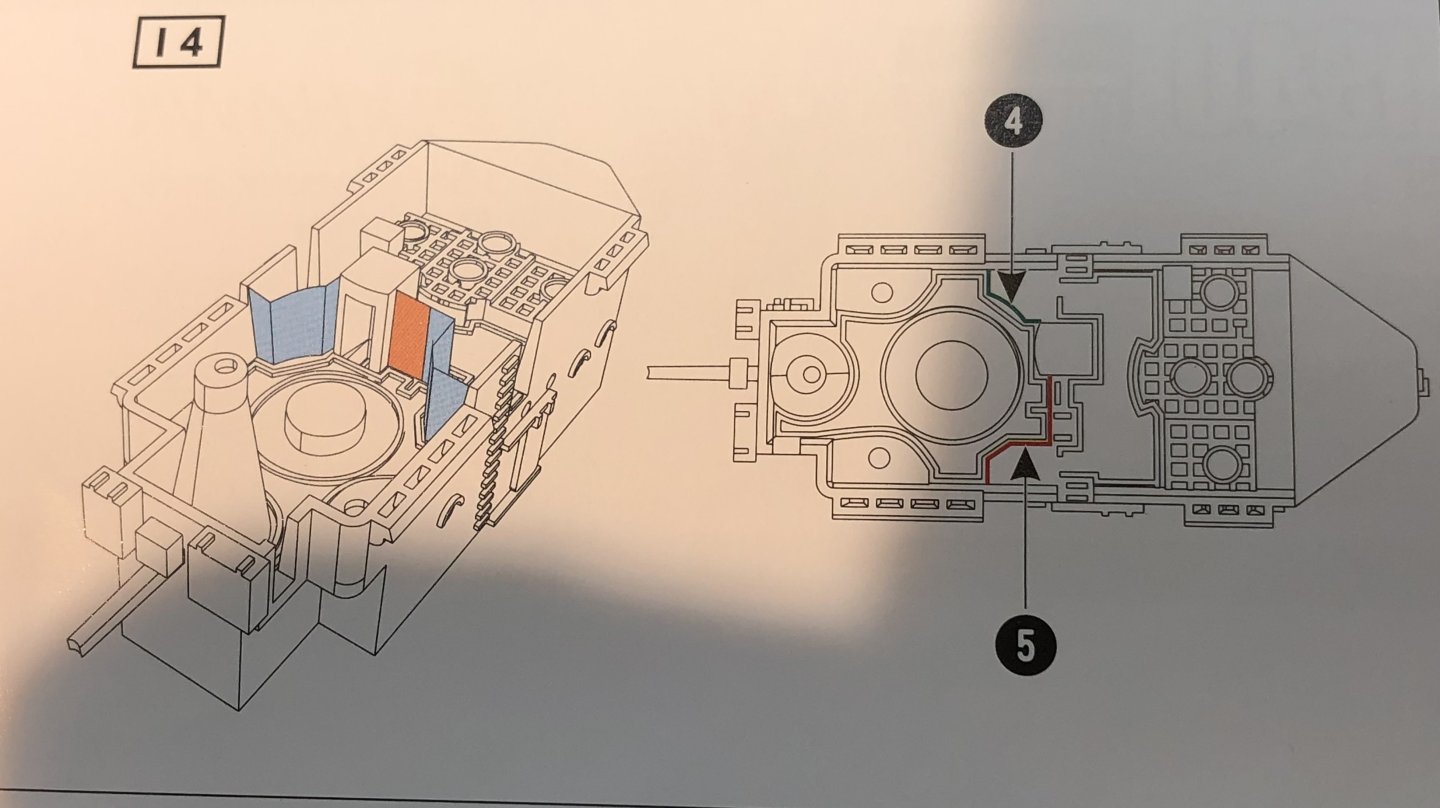
It’s been a mixed day for modeling today. I started well adding the decks and most of the superstructure to the hull. Everything fitted very nicely. I added the bridge and started on the details. The PE includes screens dividing areas of the bridge, something I haven’t seen before. It looks straightforward in the instructions but the pieces are tiny. Here’s the bigger part #5. Folding part #4 was a bit of a nightmare, trying to put a curve into such a small piece. I ended up with this. And then onto the plastic details, searchlights, binoculars, binnacle etc. It was then that I realized that the bridge wasn't sitting flush on the deck. I was able to remove it but during the subsequent efforts to find out what was stopping it sitting down I gradually knocked off everything, the PE screens, both binoculars, the binnacle, pelorus, and the searchlights. Amazingly I found them all with the help of the hand held vacuum. So everything is back in place and I will continue tomorrow. The black camouflage and the dark gray deck makes it hard to see how good the fit is at times. So this is where I am now. It impresses me how much detail Flyhawk cram onto the bridge and how detailed the parts are. The binnacle and pelorus are really nice. I decided to use the kit quad 0.50 cal guns, they are quite well detailed and the printed ones are not significantly better. I’ll keep them for a Trumpeter or IBG kit Thanks for looking in, the likes and comments. alan


-
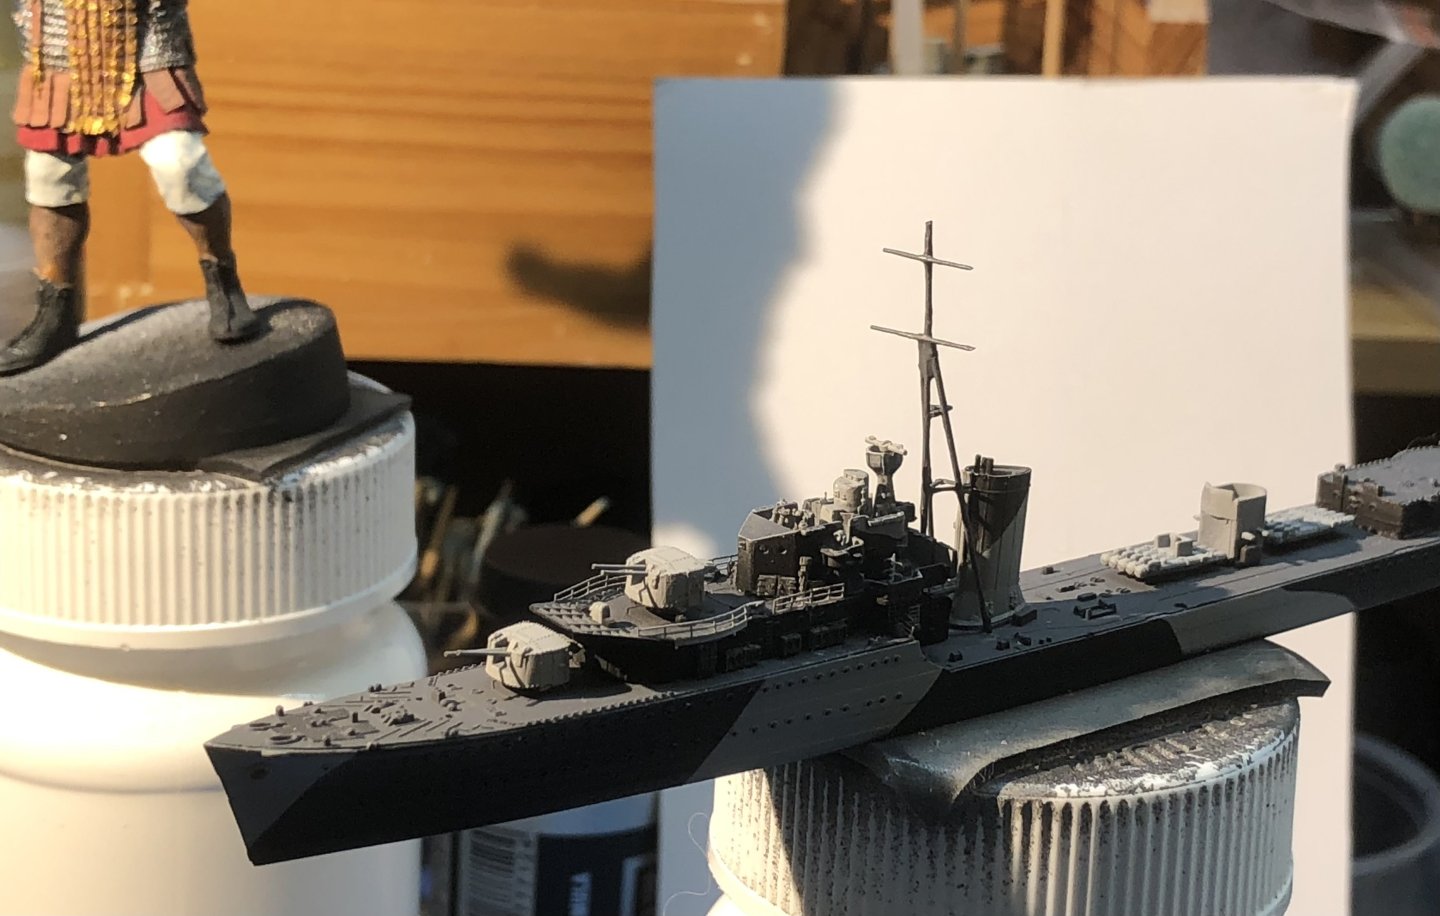
I was busy with the black primer over the weekend on both the vexillarius and the Kelly. Then a coat of light grey and this morning I masked the hull and sprayed the black parts of the camouflage. I’m either getting better at masking or the Tamiya paint is easier to work with, no seepage under the masks. It probably helps that it’s 86F in the garage and the paint is drying on contact. This gets me to the point where I can start sticking some bits together. Thanks for looking in, the likes and comments. alan

-
Ive got some decal paper for inkjet printers and I have found a website that shows the standards of the legions so something might be worked out with a bit of practice. Over the weekend I managed to add the usual black primer coat and then the zenithal white paint. It shows off some nice details so I’m keen to pick up a paint brush Thanks for looking in, the likes and comments. alan
-
Absolutely beautiful work Mike. Your PE work is very neat and really makes a difference. It’s a great subject and the aircraft really make it stand out. Definitely calls out for a diorama. alan
- 24 replies
-
- 4
-

-

-
- Akitsushima
- Pit Road
- (and 1 more)
-
Thank you Mike, I like these ancient figures, plus there’s a bit more wiggle room with the colours of the dress. alan
-
Thank you very much Rob. His face is nicely sculpted and I think I got the shading the way I wanted. Not a shy Middle Eastern potentate. Alan
-
Hi Rob, yes the FT-17 is 1/72. I opened the box and the hull is above 1/4 the length of the 1/700 destroyers about the size of a matchbox. I’m tempted to start gluing bits together. alan
-
Lovely work on the torpedo boats, they look great. alan
- 288 replies
-
- 4
-
-
-
- Card
- Pre-Dreadnought
- (and 3 more)
-
Looks very nice Mike. The cranes are really neat alan