twintrow
-
Posts
496 -
Joined
-
Last visited
Content Type
Profiles
Forums
Gallery
Events
Everything posted by twintrow
-
Vince it looks as if the bulkheads have not been "faired" so you need to do that before planking.Go to the site below and read over the instructions for planking. Should help you understand what it needed. There are other planking tutorials in the Resources" section, jut click on The Nautical Research Guild Home Page at the top of this page. Keep the photos coming (set up a build log) then we can always talk you through most problems, some of us have already had them, we all had to learn. http://modelshipworldforum.com/resources/Framing_and_Planking/plankingprojectbeginners.pdf Tom
-
Look carefully at the piece you are cutting or bending. Check the direction of the gran. Try a trial cut with scrap. One side will almost always cut better than the other. Also make the cut with several light cuts. Yes it will take longer, but better than throwing out splits. Tom
-
Is there a better #11 blade handle
twintrow replied to roach101761's topic in Modeling tools and Workshop Equipment
# 11 Scalpel blades $20/100 free shipping eBay http://www.ebay.com/itm/BOX-of-100-x-SWANN-MORTON-No-11-SCALPEL-BLADES-/311043246365?pt=LH_DefaultDomain_0&hash=item486b9f491d You can also get some cheaper from China but I wouldn't recommend it. Tom -
Thanks DiKri for the response. It was thorough and informative. The kind I like to see. Tom
-
Michael OK we are ready to see the sharpening photos ;o) I learned how to handle sharp cutting instruments in Hospital Corps School; U.S. Navy. It included the #11 blade. Most important lesson, keep the blade at a 90 degree angle, handle straight up. Never try to use the blade laying it diagonally because it snaps rather easily. And always remember it was a deep cutting tool, if you want to cut thinner or less deep use a #15 blade. Tom
-
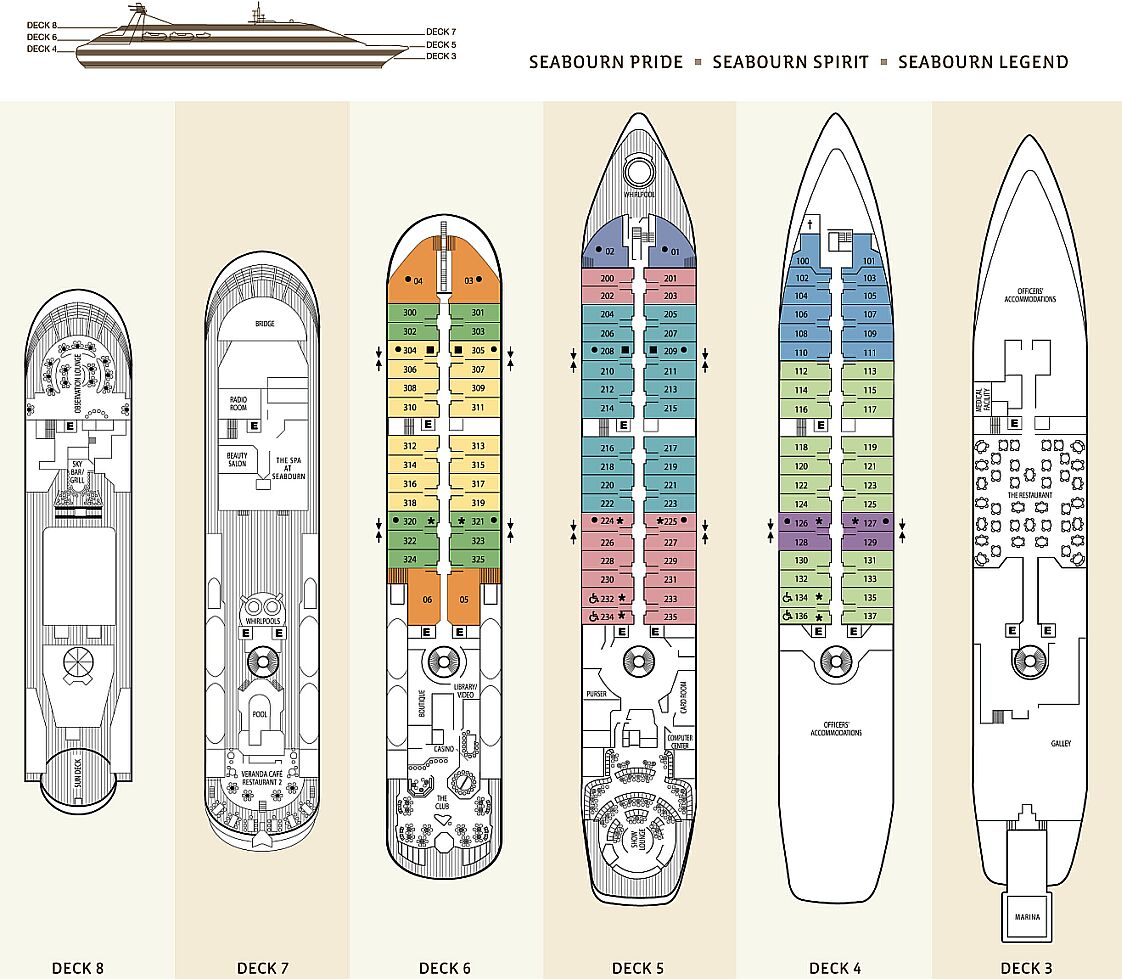
Philippe I did a quick Google search on the two ships you named and a massive amount of information came up. It included a site about both the Spirit and Pride showing deck layouts(see attached photo), etc. from which you can determine the shape of the hull quick easily. The site also shows many photos of the ships exterior. http://www.cruise-australia.net/Seabourn-Yachts-5.htm Tom
-
Marc don't forget to salvage the wires as well (didn't see any in your remains pic), good for making eyelets, stropping, and some hull decorations, etc. Tom
- 396 replies
-
- 3
-

-
- Idea
- Bright Idea
- (and 1 more)
-
Is there a better #11 blade handle
twintrow replied to roach101761's topic in Modeling tools and Workshop Equipment
I frequently see someone say "I just swipe it across my whetstone and it is as good as new"....And I have looked for a good demonstration on how to sharpen a blade (knife, chisel, whatever) and have tried all the techniques and still have dull blades. I'd love to see a simple foolproof method of sharpening #11 blades, sprue cutters, chisels and scissors. Any one want to try...or suggest one they swear by??? O suggest a mechanical sharpener that works,,,,Please and thank you. Tom Guess I need to edit this....I understand that the technique for sharpening a chisel is different than the technique to sharpen a blade which is different than sharpening sprue cutters. But there must be ways than can done with simple straight instructions probably with pictures [0) -
The wood that chuck has already turned into 3/32 blocks Seriously, it is doubtful that you could find blocks better than the blocks Chuck makes, especially at 3/32 way too small. Tom
-
JPett Thanks for starting this thread JPett, I'm hopeful it will get a lot of tips and tricks. I've tried air brushing a couple times with less than satisfactory results. I don't know anyone around me that knows anything about it and would really like to learn. Looking forward to some good tutorials. Tom
-
Model Shipway's Pride of Baltimore II kit question
twintrow replied to Clausewitz The Younger's topic in Wood ship model kits
Doug contact Model Expo and ask them directly the same question. Let us know how that went. They have had great customer relations for many years (with a few bumps along the way granted) but there have been several personnel changes there over the past 18 months or so and we should test them out. Tom -
Casting epoxies from Smooth-on
twintrow replied to src's topic in Modeling tools and Workshop Equipment
Try just spraying with a clear matte spray. First try one side then if not enough spray both sides. Small cans of clear matte can be found at any hobby shop, Hobby Bench, or at Lowe's or Home Depot ( not sure of an equivalent store in Australia) in larger cans. Tom -
Casting epoxies from Smooth-on
twintrow replied to src's topic in Modeling tools and Workshop Equipment
Hornet You can pretty much eliminate the warped glass look by stretching some Thule across the panes. Thule is a micro mini netting available anywhere they sell material for wedding dresses. Some of us also use it for simulating hammock netting. The effect when laid diagonally is of cut glass windows. And is also period correct for much of the 17 and 18th C. Tom -
Design and Build a Custom Work Station
twintrow replied to pompey2's topic in Modeling tools and Workshop Equipment
Nick, looks like there will be no leg room?????? Tom -
Casting epoxies from Smooth-on
twintrow replied to src's topic in Modeling tools and Workshop Equipment
Gene Bodnar over at Model Ship Builder swears by Puzzle glue. The glue you spread over the back of a puzzle to hold it together He has shown some pictures and the glazing looks a lot like old glass with a little waviness in it. I've used the Micro Mark glazing and it works well so long as the space it has to cover isn't too large. Tom -
You may also look for "iris scissors" on ebay. And you might ask your Dentist or Family Doc (or Vet for that matter) what they do with old instruments. Most use disposable stuff today, but a few still use instruments. If they get a little rusty or dull or bent they get thrown away. Beg for them to be saved for you instead! Tom
-
He is doing the research GaryM, and he started at the appropriate place by asking a question at MSW. Tom
-
Thought I'd add the link to see this 3D printer. Makes up 7 5/8 parts. Plenty large enough for our needs. Strange that the details says takes 30 hrs to assemble....hope that includes a couple lunch breaks. http://www.micromark.com/3D-Printer-Kit,11656.html?ns_md=Email&ns_sc=Marketing&ns_cn=14WS051&ns_pc=14WS051&utm_source=Marketing&utm_medium=Email&utm_campaign=14WS051 Gotta go start practicing my sales pitch for the Admiral.... Tom

-
Just looked at ebay and found quite a few ranging in price from $33 with free shipping on up. http://www.ebay.com/sch/i.html?_trksid=p2050601.m570.l1313.TR3.TRC2.A0.H1.Xmagnify+lamps&_nkw=magnify+lamps&_sacat=0&_from=R40 Worth a look. I have three of these lamps mounted on my workbench, very useful. tom
-
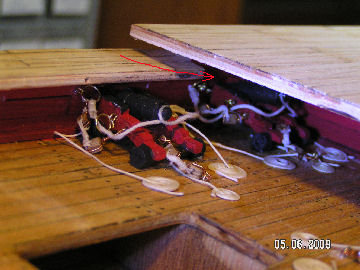
Mat the biggest problem I remember about this kit was to be sure and rig all the guns on the gun deck before putting on the fore and aft decks. Otherwise there is no way to rig them, noo room. Take a look at the photo to see what I mean Tom
-
Scott if you search "fair a frame" here on MSW you will find mostly negative comments about it. When I'm thinking of buying a new tool, I'll search for the tool and read the comments first....saved some hard earned cash that way. Tom
-
Pete Your welcome...the info is on page "G". It doesn't say how many oars, i just counted the oarlocks. It also shows the sail plan for all the boats on that page. Tom
-
Pete According to the AOS Constitution there were the following ships boats: On Deck 34' Launch 7 sets of oars 32' Commodore's barge 6 sets of oars 32' Cutter 6 sets of oars 28' Cutter 5 sets of oars In Quarter davits whaleboat 5 sets of oars In stern davits 26' Cutter All could be rigged with sails. Each would have a removable rudder stored in the boat when not in water. Not sure about the color. Hoe this helps Tom
-
French polishing is a wood finishing technique that results in a very high gloss surface, with a deep colour and chatoyancy. French polishing consists of applying many thin coats of shellac dissolved in alcohol using a rubbing pad lubricated with oil. The rubbing pad is made of absorbent cotton or wool cloth wadding inside a square piece of fabric (usually soft cotton cloth) and is commonly referred to as a fad,[1] also called a rubber,[2] tampon,[2] or muñeca, Spanish for "rag doll".[3] "French polish" is a process, not a material. The main material is shellac, although there are several other shellac-based finishes, not all of which class as French polishing. The finish is considered by many to be a beautiful way to finish highly figured wood, but it is also recognised to be fragile. It is softer than modern varnishes and lacquers and is particularly sensitive to spills of water or alcohol, which often produce white cloudy marks. However, it is also simpler to repair than a damaged varnish finish, as patch repairs to French polish may be easily blended into an existing finish. Tom
-
I haven't yet read the entire book but the index references about 25 pages dedicated to these two including the ramming of the Cumberland. Tom