HOLIDAY DONATION DRIVE - SUPPORT MSW - DO YOUR PART TO KEEP THIS GREAT FORUM GOING!
×


hamilton
-
Posts
1,931 -
Joined
-
Last visited
Content Type
Profiles
Forums
Gallery
Events
Everything posted by hamilton
-
 I can imagine that resourcing the materials to produce a kit of this size, details and complexity is an extremely tough undertaking! But too bad about the scale issue with the plates. The coppering looks really nice so far with the tape - are you anchoring the tiles in any way beyond the adhesive backing on the tape? I've found that with the tape I have occasionally to pat the tiles down where they start to peel up from the surface.... hamilton
 -
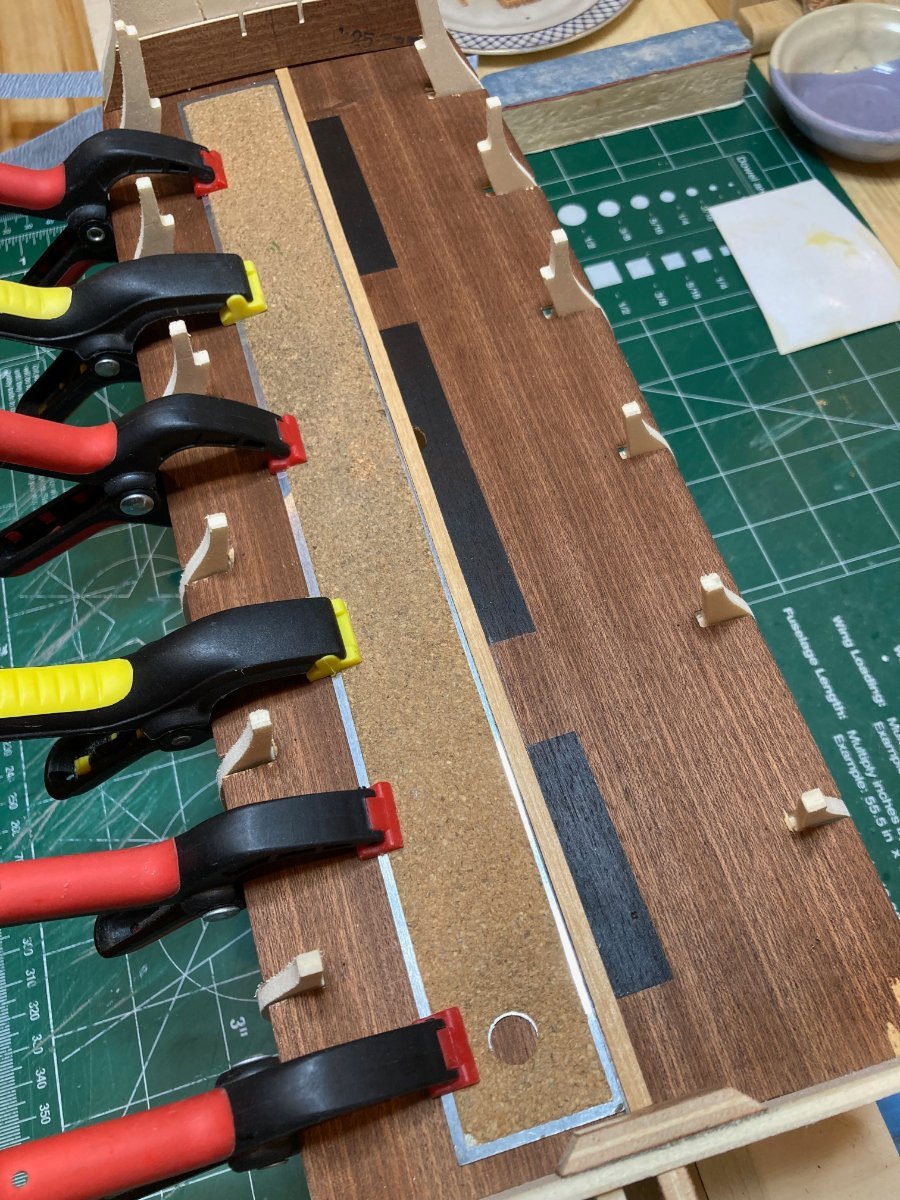
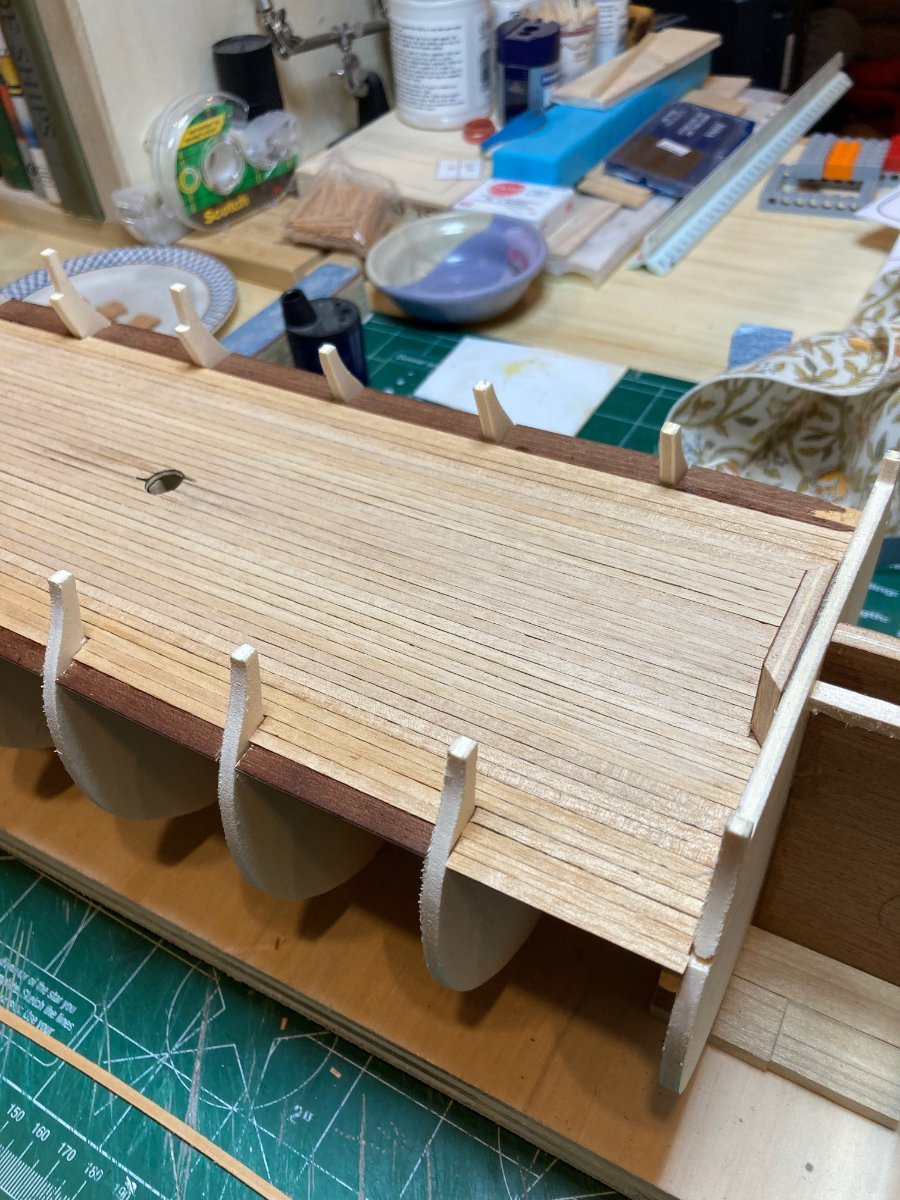
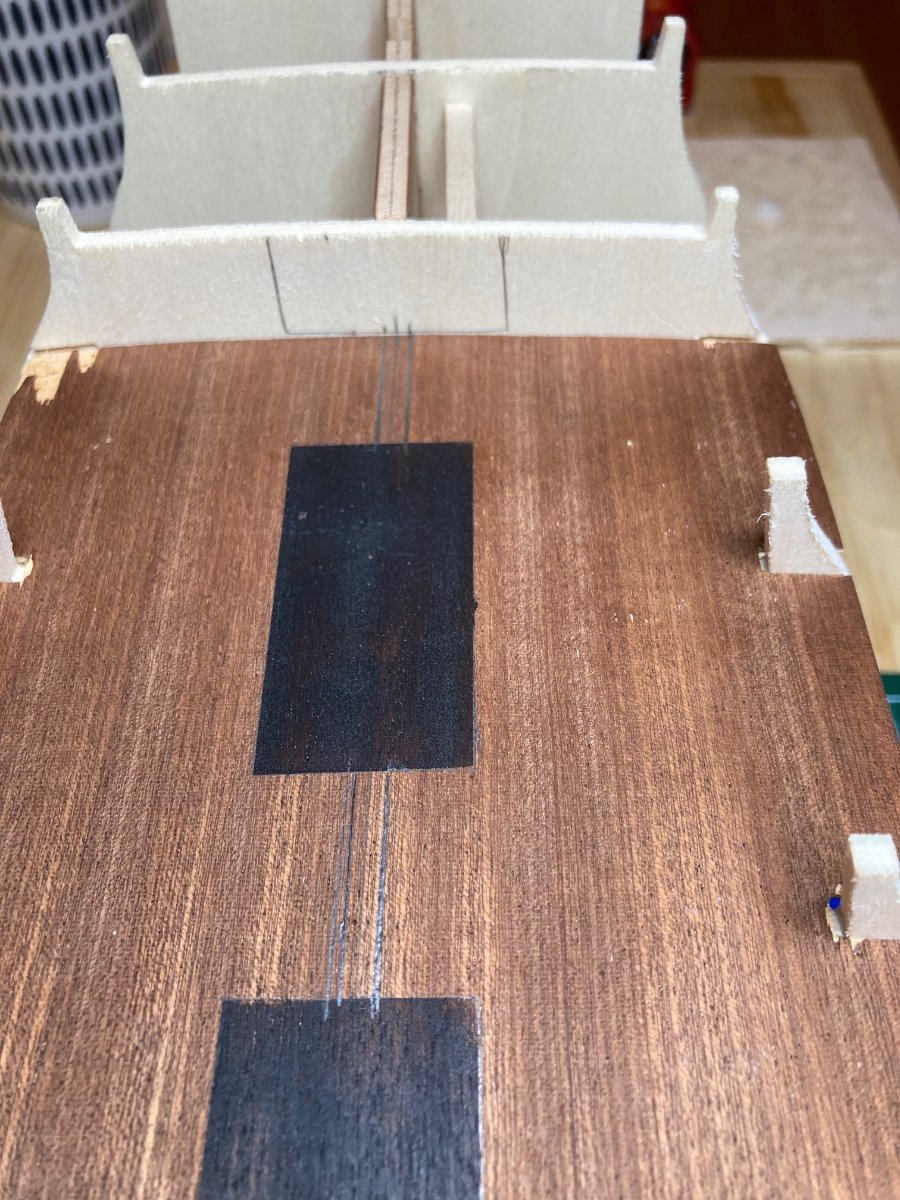
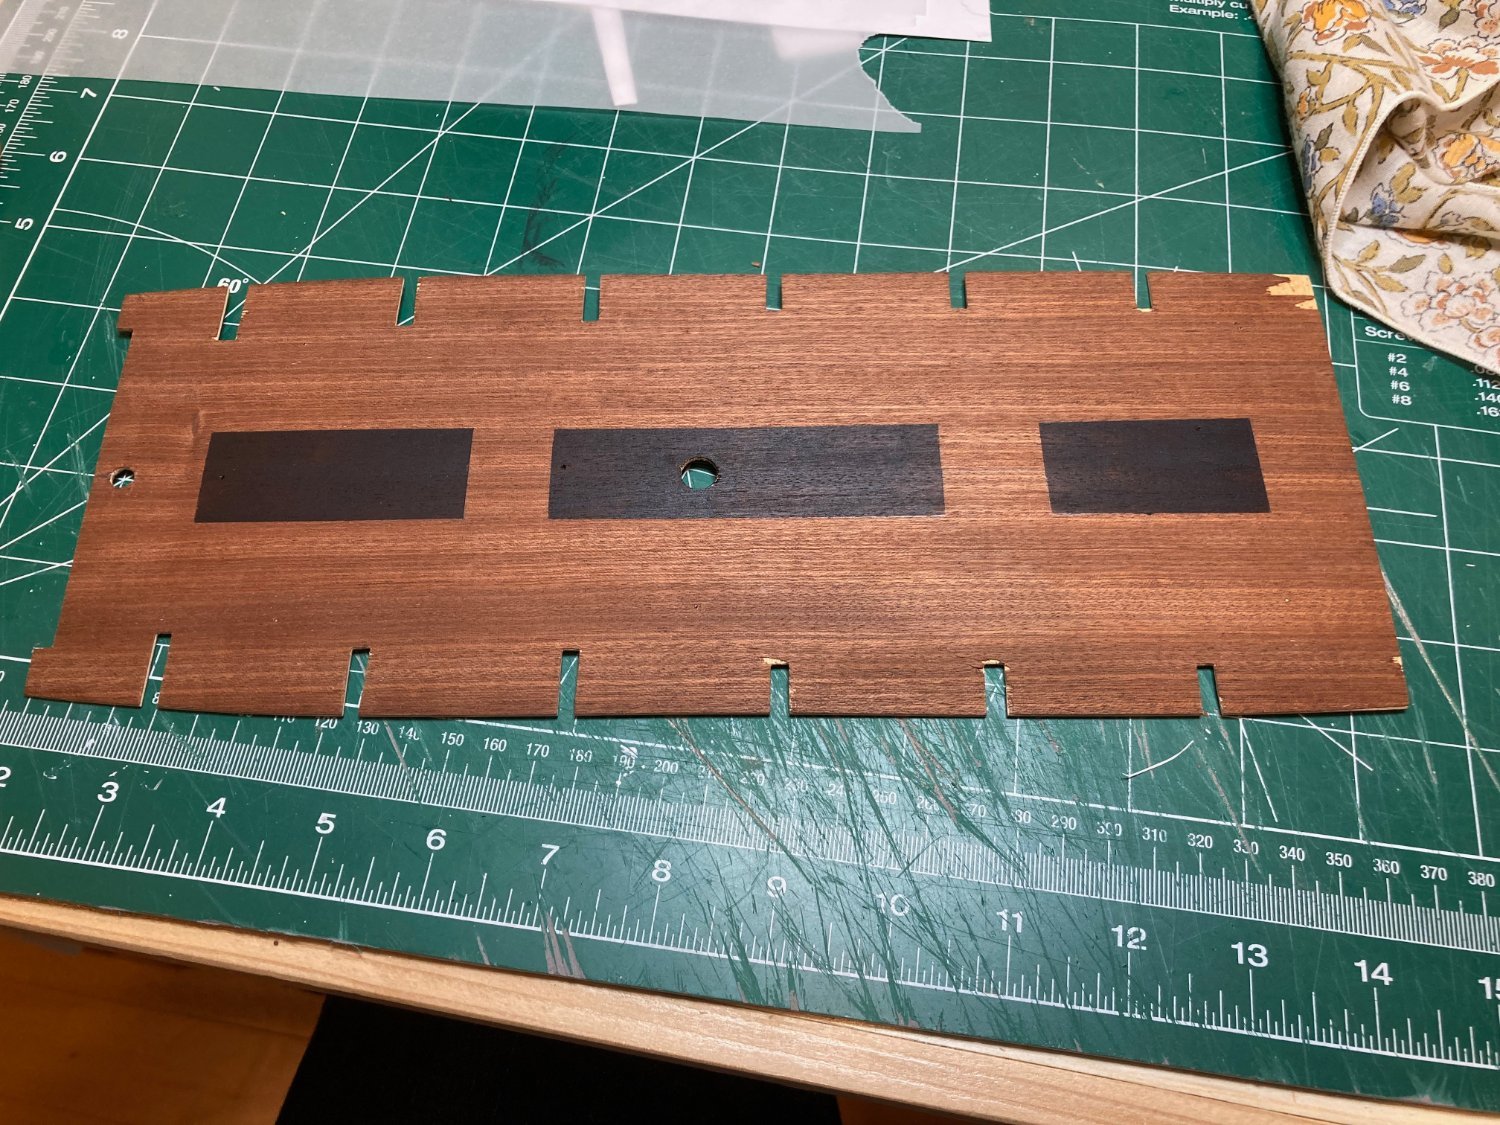
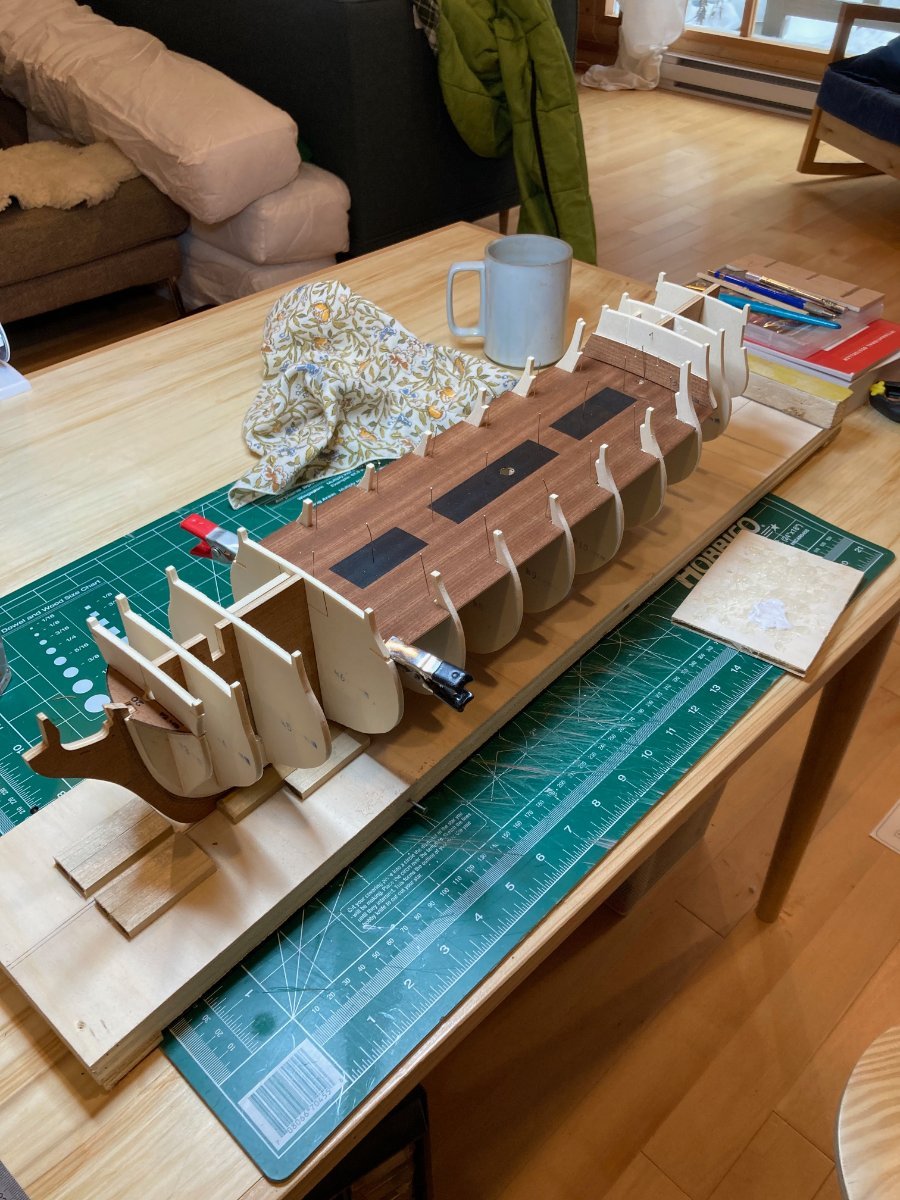
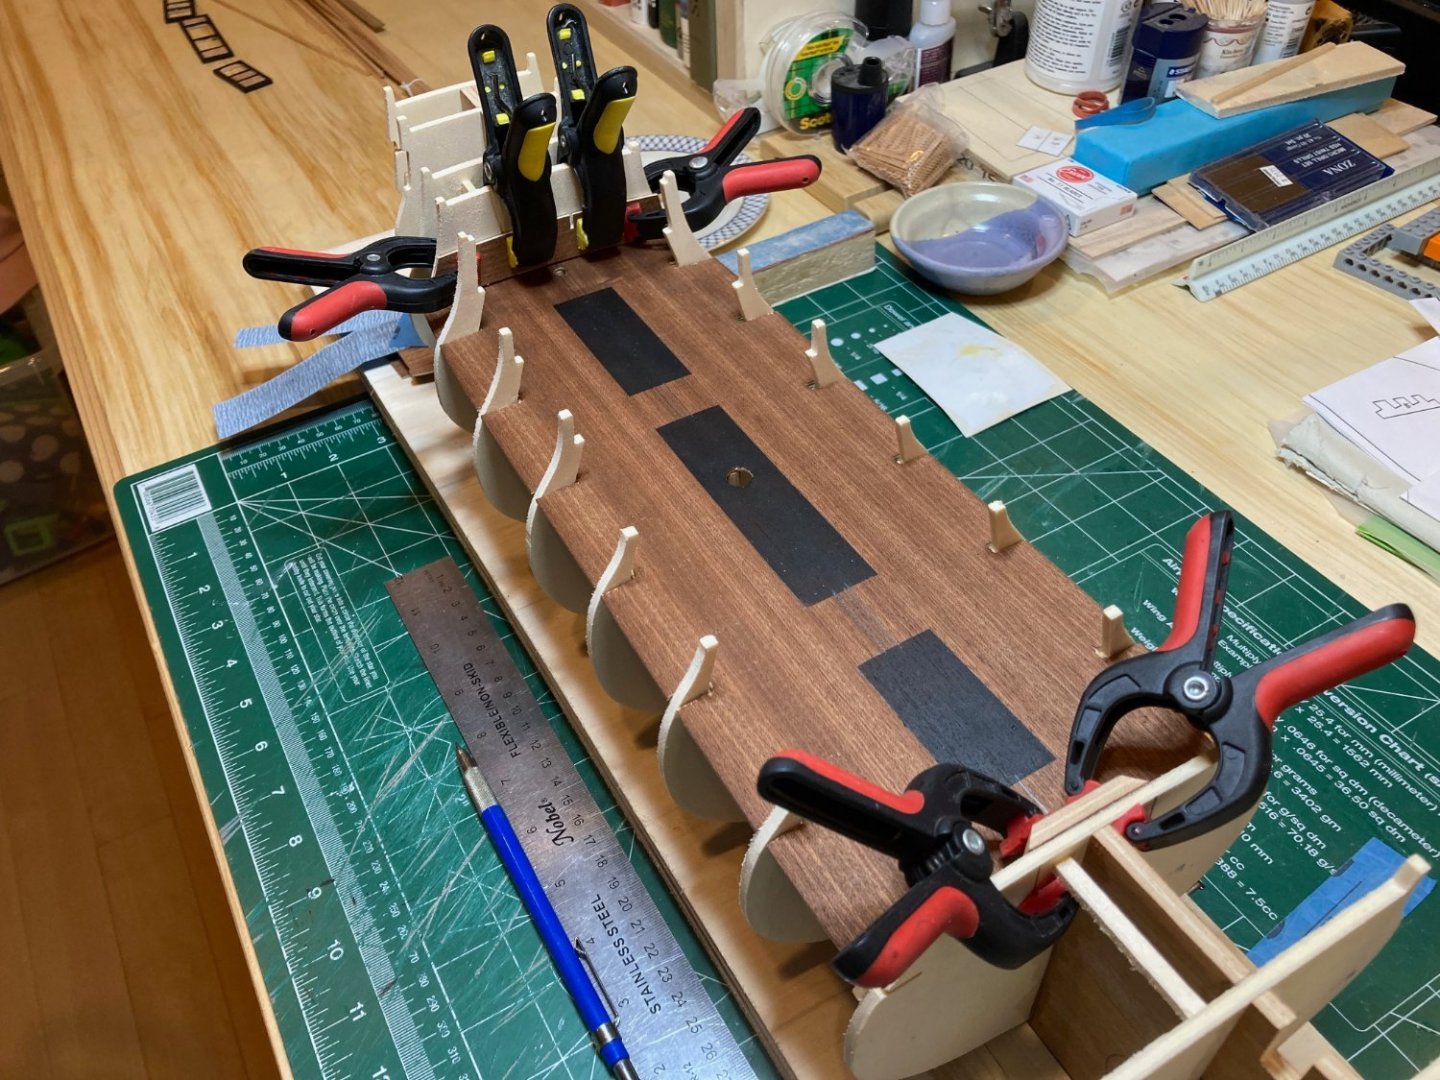
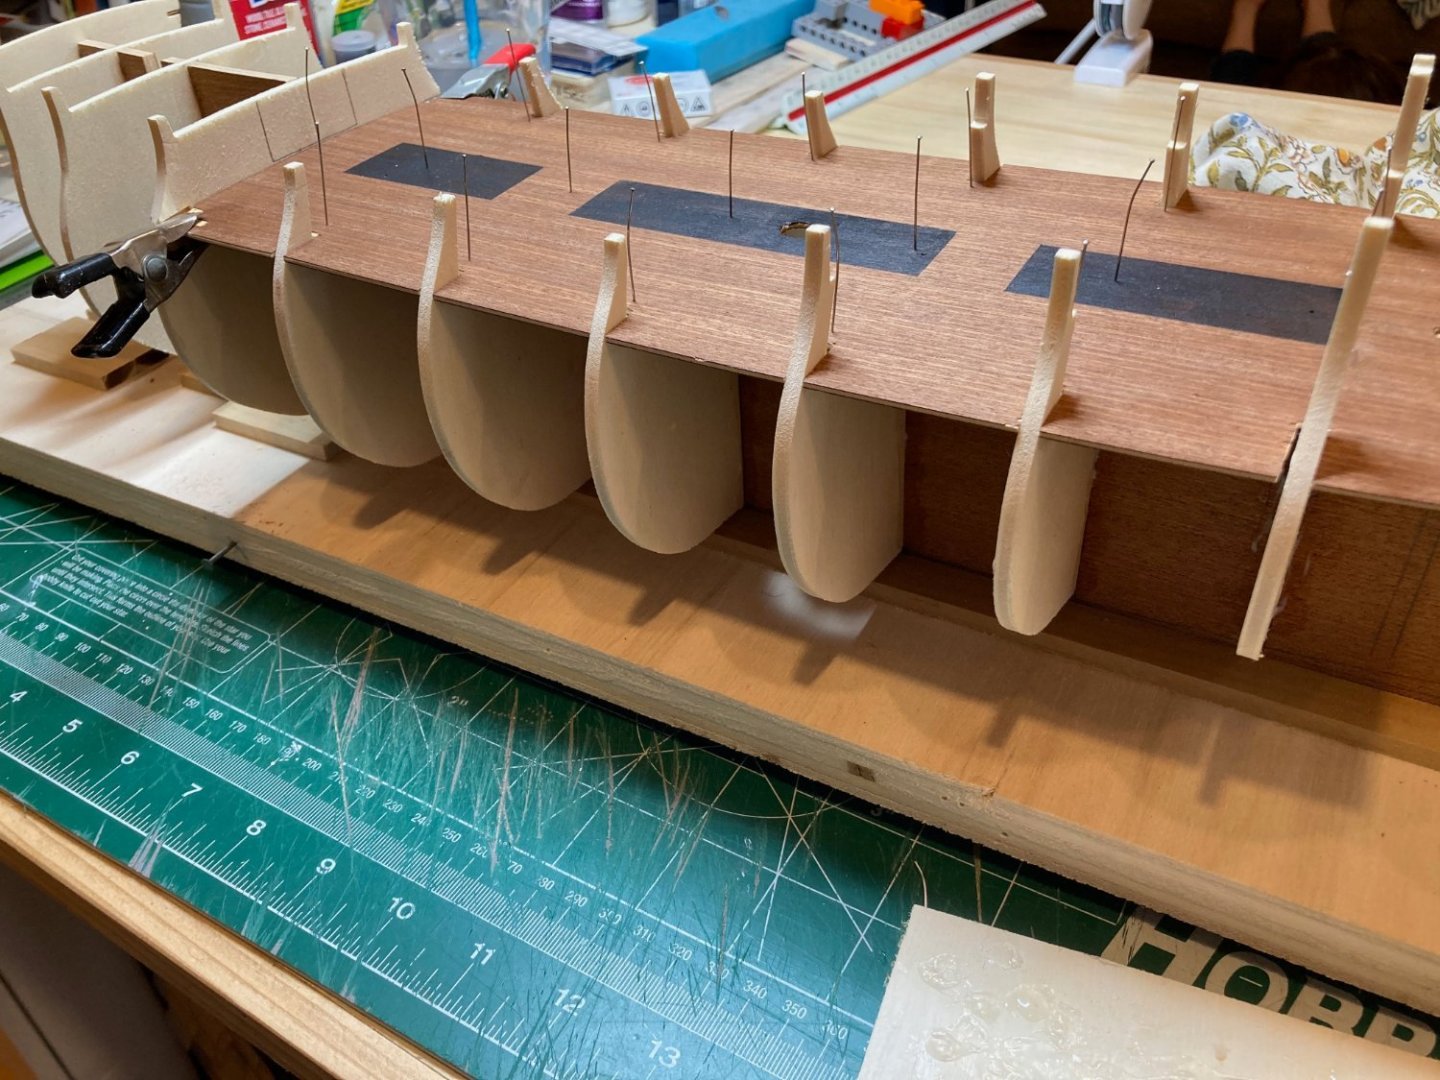
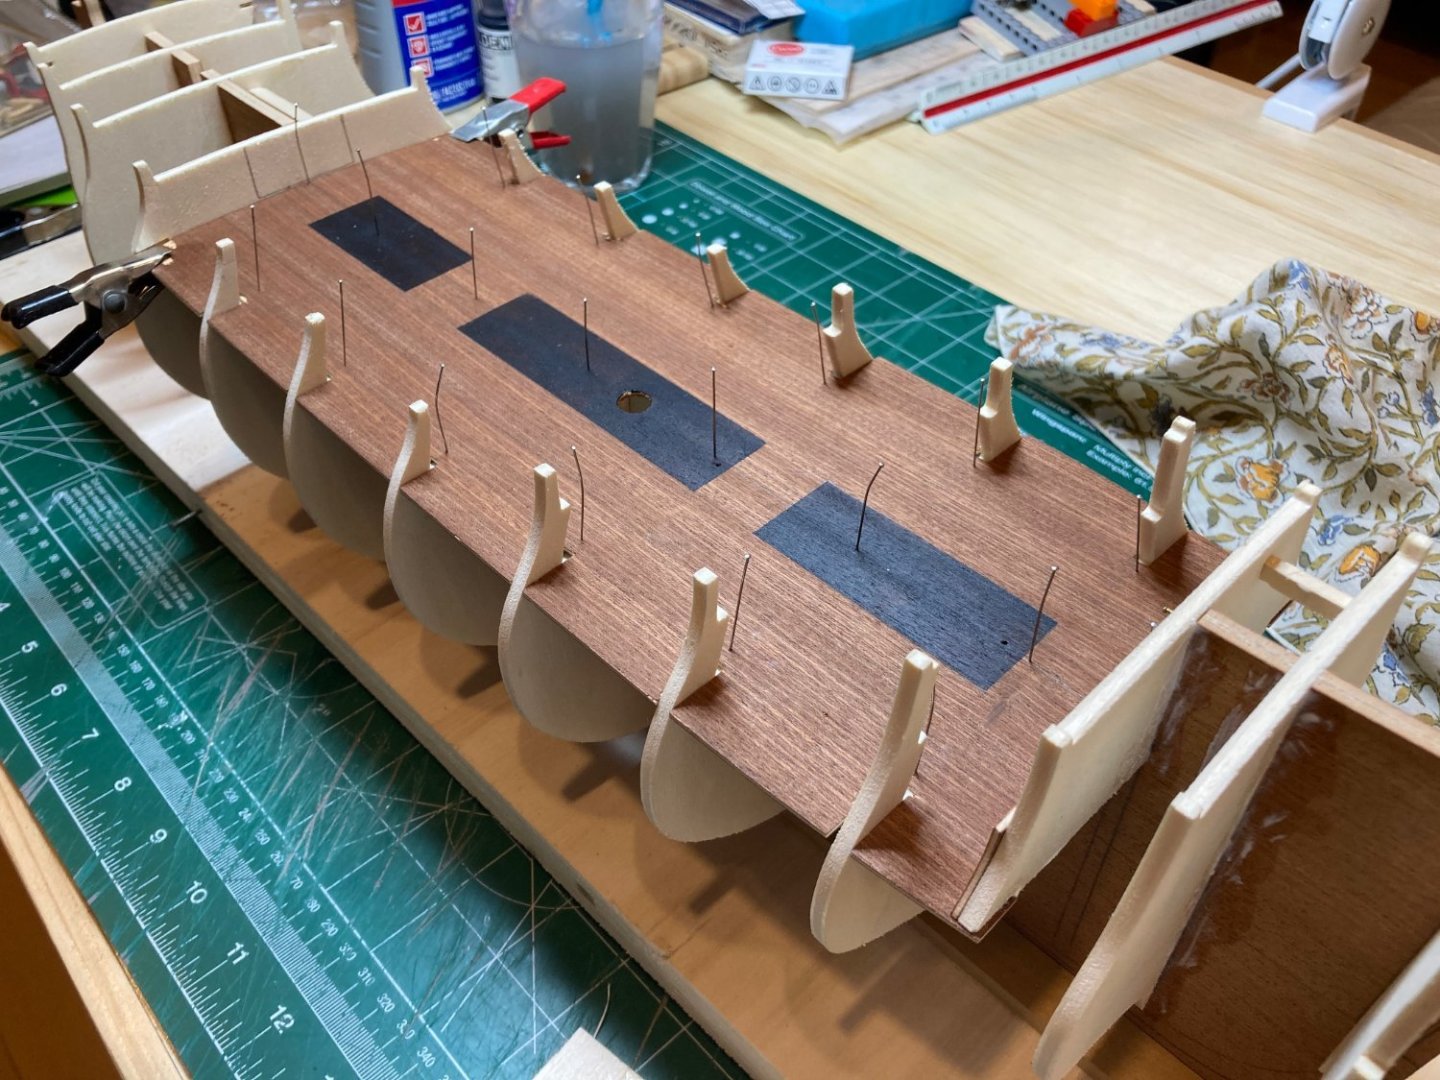
Hello there I have not managed to carve out as much time for Bellona this past week as I had hoped, but this log is still catching up on past progress, so....this post documents the main deck planking. I originally thought of nesting the hatch coamings into the deck planking, but two things changed my mind on this. First, most of the main deck will be covered by the quarterdeck and gangways, plus the ships boats in the waist, so the subtle effect provided by nesting the coamings would be entirely lost. Second, I did not plan ahead and build the hatches to the actual width of the planking strips that run in line with the coamings, so it would have involved a lot of tricky cutting out of plank sections to accommodate the hatches. In addition, the deck camber is so slight that I figured I could achieve the effect (for what visibility there will ultimately be down to that level) just by laying a strip of sand paper down the centre of the deck that was slightly wider than the hatches and lightly sand the camber into the hatches so it didn't look like they're popping up from the deck to port and starboard. But this is for later. In any case, the black painted sections marking the hatches were initially done to provide depth through the hatch gratings. But once I decided to lay the hatches over the planking, they served the purpose of allowing me to locate the hatches with small tick marks on the planking. I also decided to lay the strips the entire length of the deck rather than cut out individual planks (as I will for the planking on the exposed decking). To get the centre-line "king" planking, I had already marked out its width on the subdeck, so I clamped a straight edge to the deck to act as a jig for positioning the plank and glued the plank in place. Like many, I use CA for gluing deck planking, though I've learned my lesson about using pen or ink to simulate caulking, since the capillary action of the CA tends to carry the ink to places you don't want it to go! I ran a 4H pencil along the outboard edges of the king plank and then continued this on the outboard edges of the planks port and starboard. After the king plank was laid the rest was pretty straightforward, with some small section laid at the extreme edges of the deck to work around the bulkhead extensions. The last photo shows the deck completed, sanded and with a few coats of wipe-on poly. The next post will document hatch construction, which will pretty much bring this log up to date with the actual progress on the model. I'll have to move onto finishing the stern framing, installing the forward cabin bulkhead and then the poop deck and f'csl - then on to hull planking!! Enjoy and happy modelling hamilton


-
Did I hear that right - 500$ just for the copper tiles? Wow..... In any case hope you've got some good music/audiobooks/podcasts to listen to while doing this work....the planking and coppering so far look really nice hamilton
-
A good repair though Harlequin! I've been puzzling a bit over the finishing of the brass as well. When I built Mamoli's America I finished the skylight in white and blue using a straight pin as an applicator, since the areas to cover were very tiny. This allowed much more precise application, though you need good free-standing maginification to get it done - at least with the poor eyes I have....There was a time when I was convinced that my modelling practice actually improved my vision!! Now I'm not so sure..... hamilton
-
Looking good Chief! I think it's wise to hold off on any brass parts that might not be insulated from damage through the mechanical action of working on the model. I think that, unless things shift as I go along, I will put off doing more with the stern area after framing it out until the outboard planking is done and the model doesn't have to be so much "in hand". Finishing the brass is a quandary for me too. I know that in the metal-working section of MSW there are some good tips on brass finishing - mostly blackening, but some tips for painting as well. I'll have to spend some time identifying the useful ones again, taking some notes and doing some planning. Many seem to advocate washing the brass in acetone and rinsing with water as a preparation for blackening - not sure if this also produces positive results for painting, but I may try a few experiments with some bits of old brass I have lying around from other models. When painting on wood, there is a definite advantage to diluting the paint slightly - the thicker the paint, the more streaky it will tend to appear. The quality of the brush is also an issue - the softer the better to avoid streaking. Watered down paint will require many more coats for a good finish, but the outcomes will be nicer - though I do not know whether these principles apply to brass - the runniness of a watered down paint reduces its grip regardless of the "toothiness" of the surface.... Anyway, I'll share whatever I find in my searches and hopefully we can help each other get to a nice even finish on these fiddly brass bits.... Bye for now hamilton
-
I think that as long as the part is decently aligned outboard to provide a good foundation for the planking you'll be ok - some minor adjustments might be needed depending on how the piece you re-fixed aligns with the faces of the bulkhead extensions forward and aft of it. It's quite amazing how sometimes what seem like debilitating errors aren't as significant as they appear when they first occur. hamilton
-
Nice progress Chief! Is the f'csl installed now, or just dry fit? Even though I know we've talked about installing the q-deck first, I'm now questioning this idea - primarily because it requires installing some main deck features that might get damaged and/or dislodged in the planking process (considering how the model needs to be manipulated during planking) - namely, the canons, the aft capstan and the main sheet and jeer bitts)....working out the build sequence at this stage is very tricky. I think that once I've completed the stern framing, I'll move onto the planking, as seems to be suggested in Corel's documentation. Once the first planking is complete, it will be safer, I think, to return to the main deck features and to the q-deck. As for the broken bulkhead extension - that's a touch one. This has happened to me in the past and I've just secured the broken-off part to the main part, and reinforced in on either side with thin strip wood. If you still have the broken-off part, this approach might work for you. Another idea would be to make a tracing of the extension on the starboard side and then cut out a new extension from scrap wood. Then saw off the remaining extension on the port side flush with the deck. You can then fix the worked-up extension onto the main part - might be good to drill some small holes for pegs to reinforce the connection between the two parts. It would have to be treated very gingerly during the planking....other more experienced builders may have other suggestions - you might start a topic in one of the other forums here to see what solutions you can drum up from other members. Take care down there and bye for now hamilton
-
Thanks for stopping by Harlequin - and for the words of encouragement. I'm starting to feel a bit of confusion setting in - not around specific processes, but around the sequencing of the build overall. I was thinking it would be easier to install the q-deck prior to the poop, but this would require me to install main deck features first (aft capstan, main jeer and sheet bits, canons), since these would be beneath the q--deck. But installing these prior to planking seems foolish as I imagine that with the manipulation of the model through the planking process, these other features will easily become dislodged/damaged....so I may stick with what appears to be Corel's suggests regarding the sequencing and move onto planking once I've finished the stern framing...... Anyway, I have to study the plans a give some more thought to this..... hamilton
-
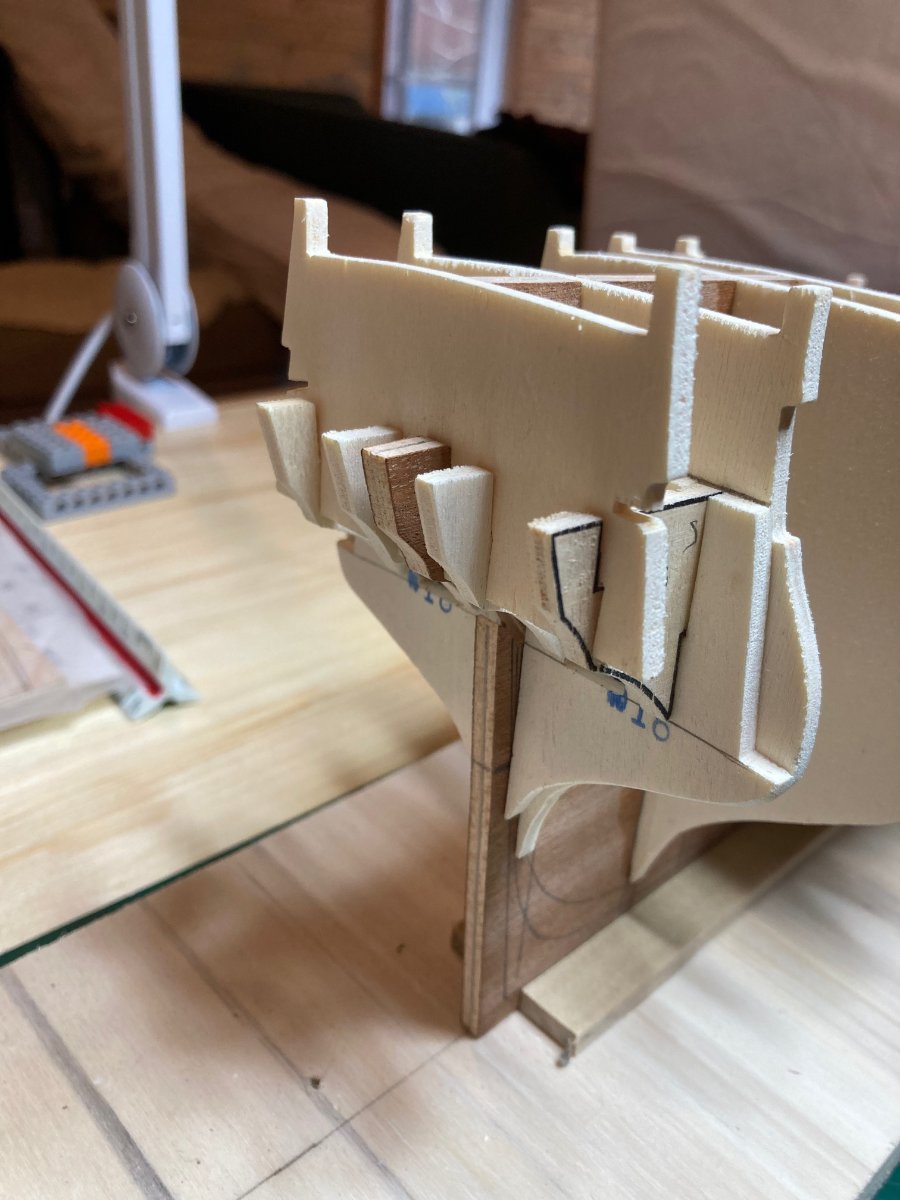
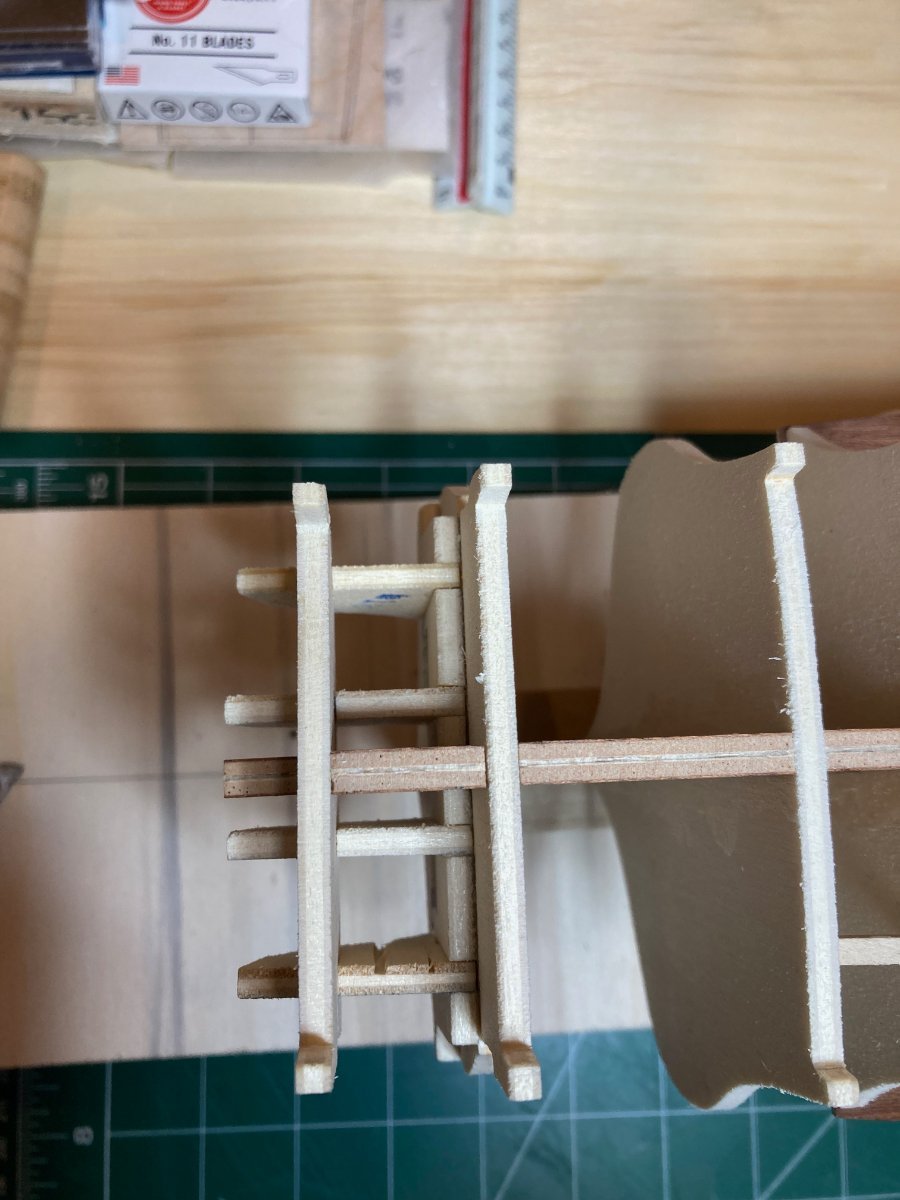
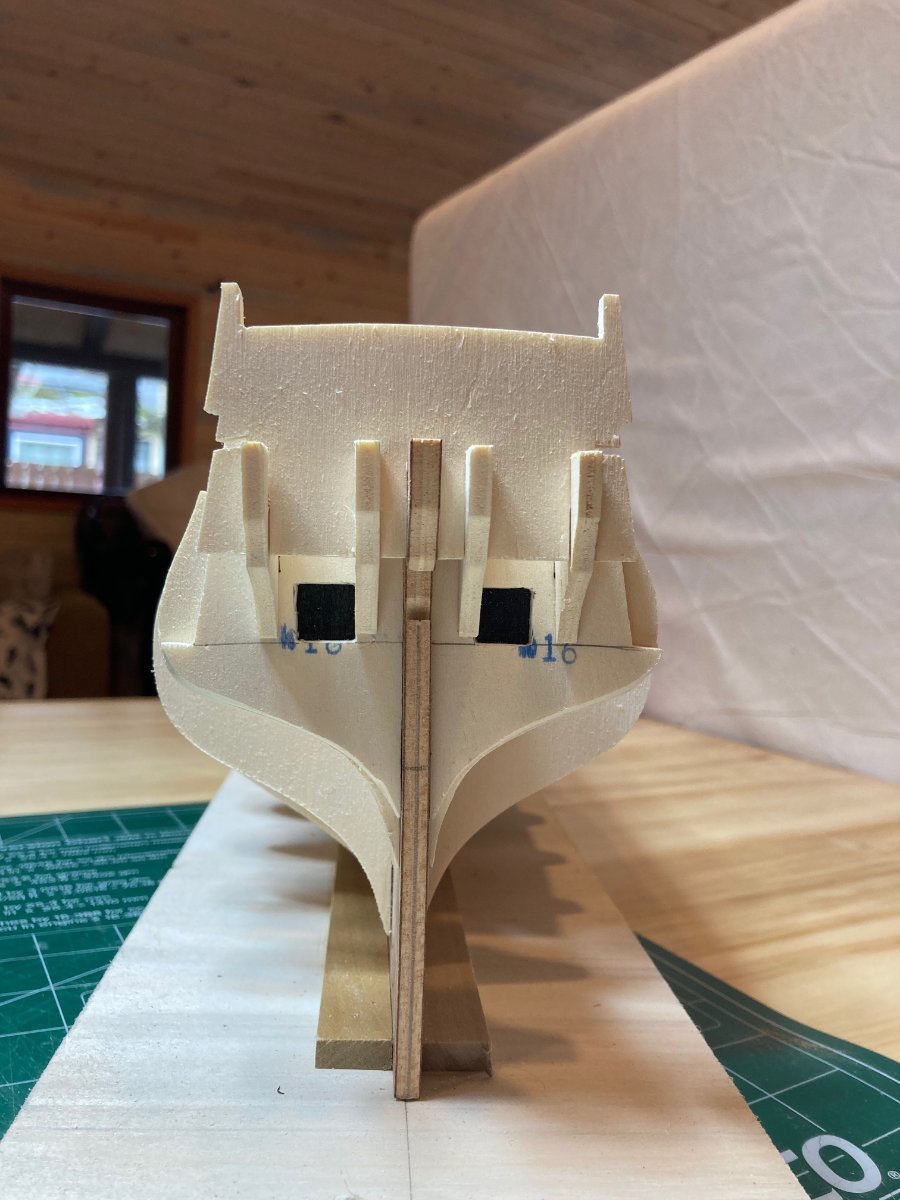
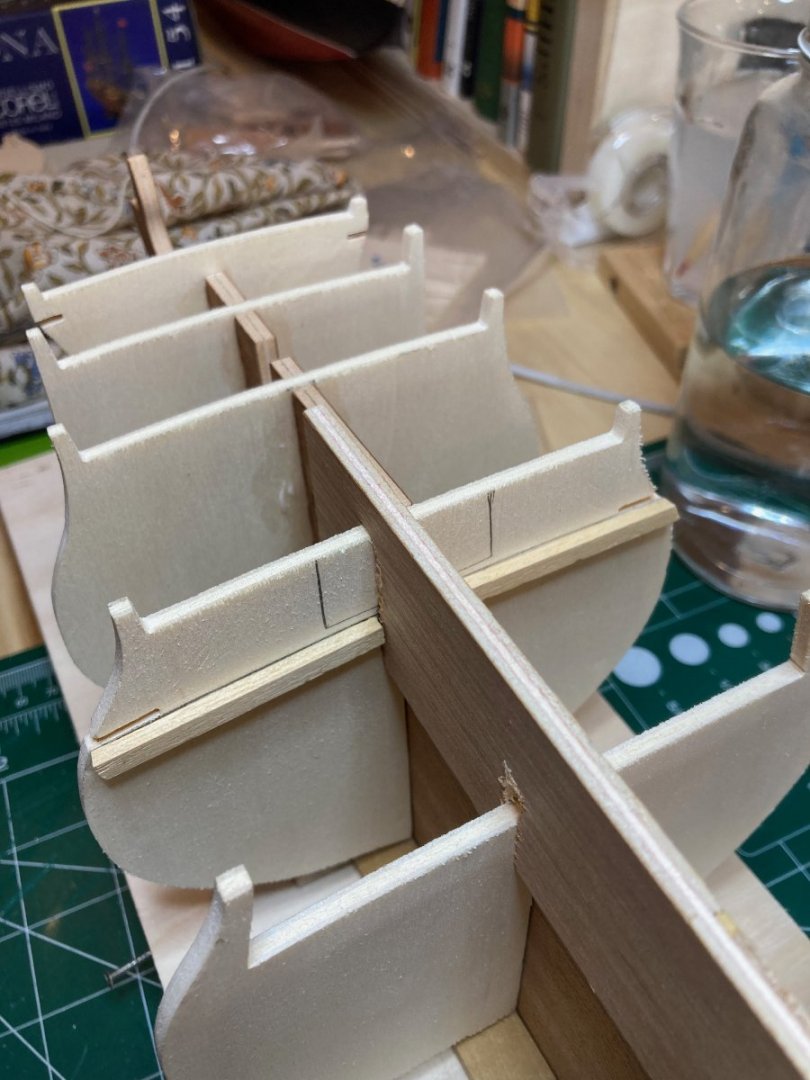
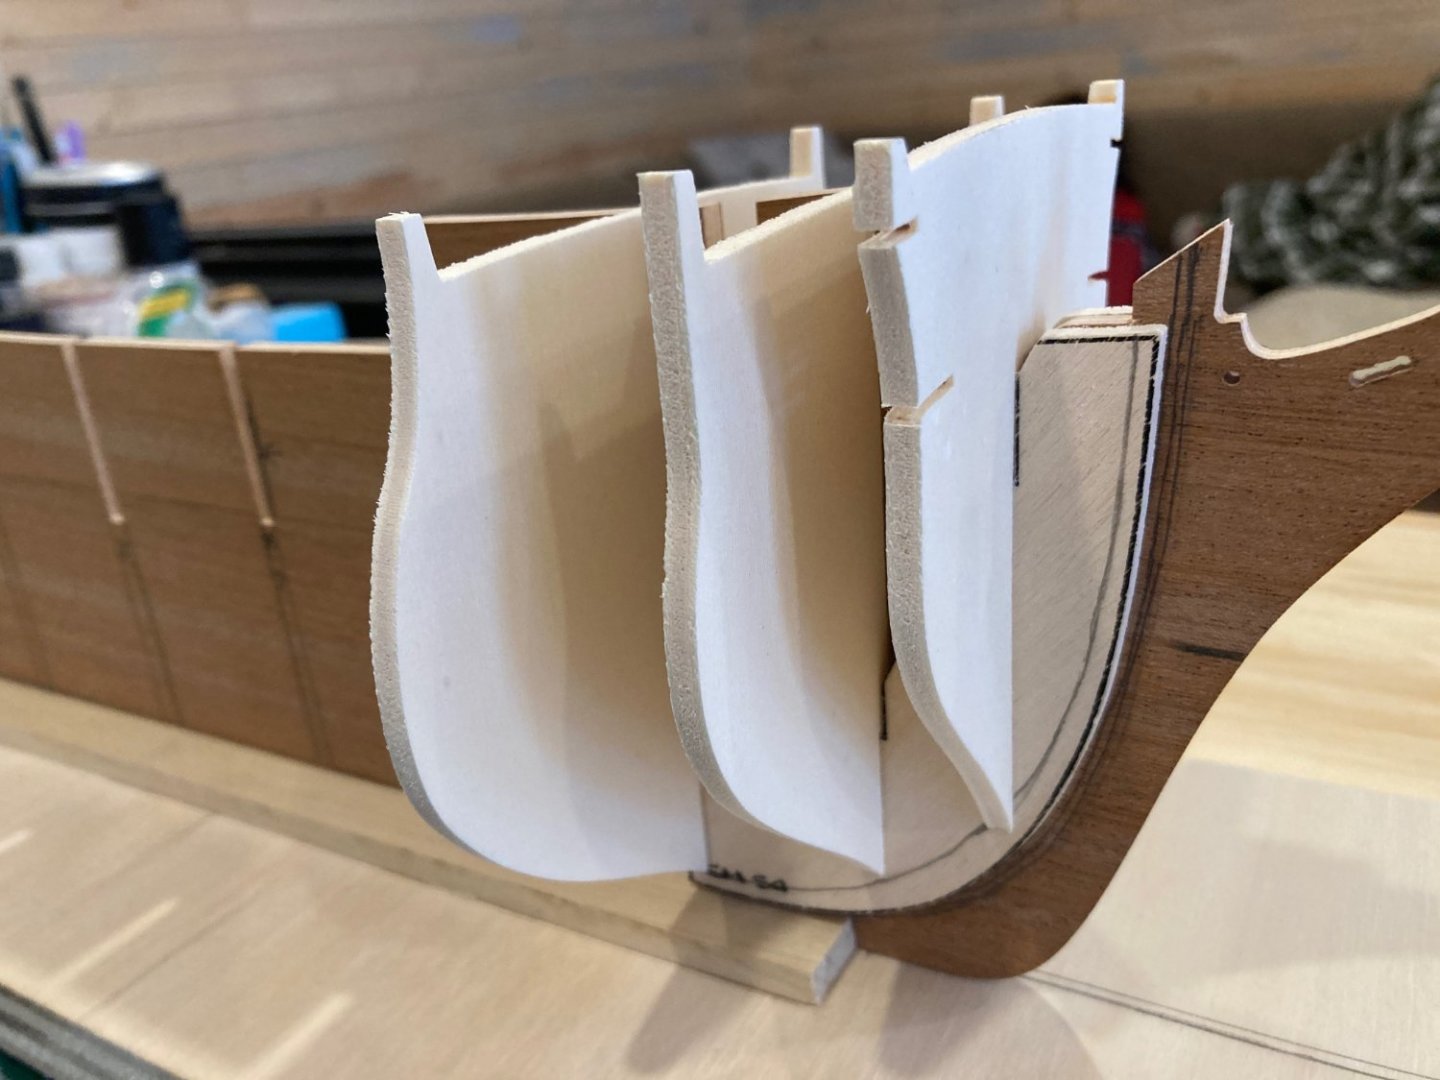
Time for another quick Sunday update. I have a "week off" work this coming week (not really off fully, but without as many calls to my attention as usual) so I hope to make some forward progress on Bellona. For now, this post will document the first part of the stern framing. Several transom frames are installed on the aft side of the stern bulkhead assembly and another bulkhead piece is slotted down onto these to lock them in place. There were a few minor adjustments needed to get everything to fit nicely and snugly, but this was not too tricky an operation. One photo you see below makes it seem as if there is some real asymmetry here - but I promise you this is an illusion produced by my iPhone based sub-amateur photography. You'll see in the photos how I drilled and filed out square sections on bulkhead 16 to mark the position of the stern chasers. The other work documented here is the marking out and installation of the filler piece for the f'csl cabin bulkhead and for the aft quarterdeck support. In one photo you can see where I've marked out the position of the king plank on the main deck for later installation. The balcony is fit atop the transom frame pieces, which (as you'll see) need to be adjusted for a slight camber prior to installing the balcony. The last part of the stern framing (which is the next stage of the build to be completed this week I hope) will be to add framing and filler pieces for the quartergalleries and to install the stern balcony. Then it's onto the other decks, which are a bit of a puzzle - particularly the two-part quarterdeck, which the plans seem to indicate is installed after the poop deck, but which I think will be easier to install beforehand. I have to consider the sequence of the coming stages carefully as I feel like it might be easy at this point to build myself into a corner....This is, after all, the first multi-deck model I've built (apart from Blandford, which was smaller and much simpler than this)..... Enjoy the photos and happy modelling hamilton


-
What an incredible build! The coppering will be a challenge, but she's really going to look great once that's done! hamilton
-
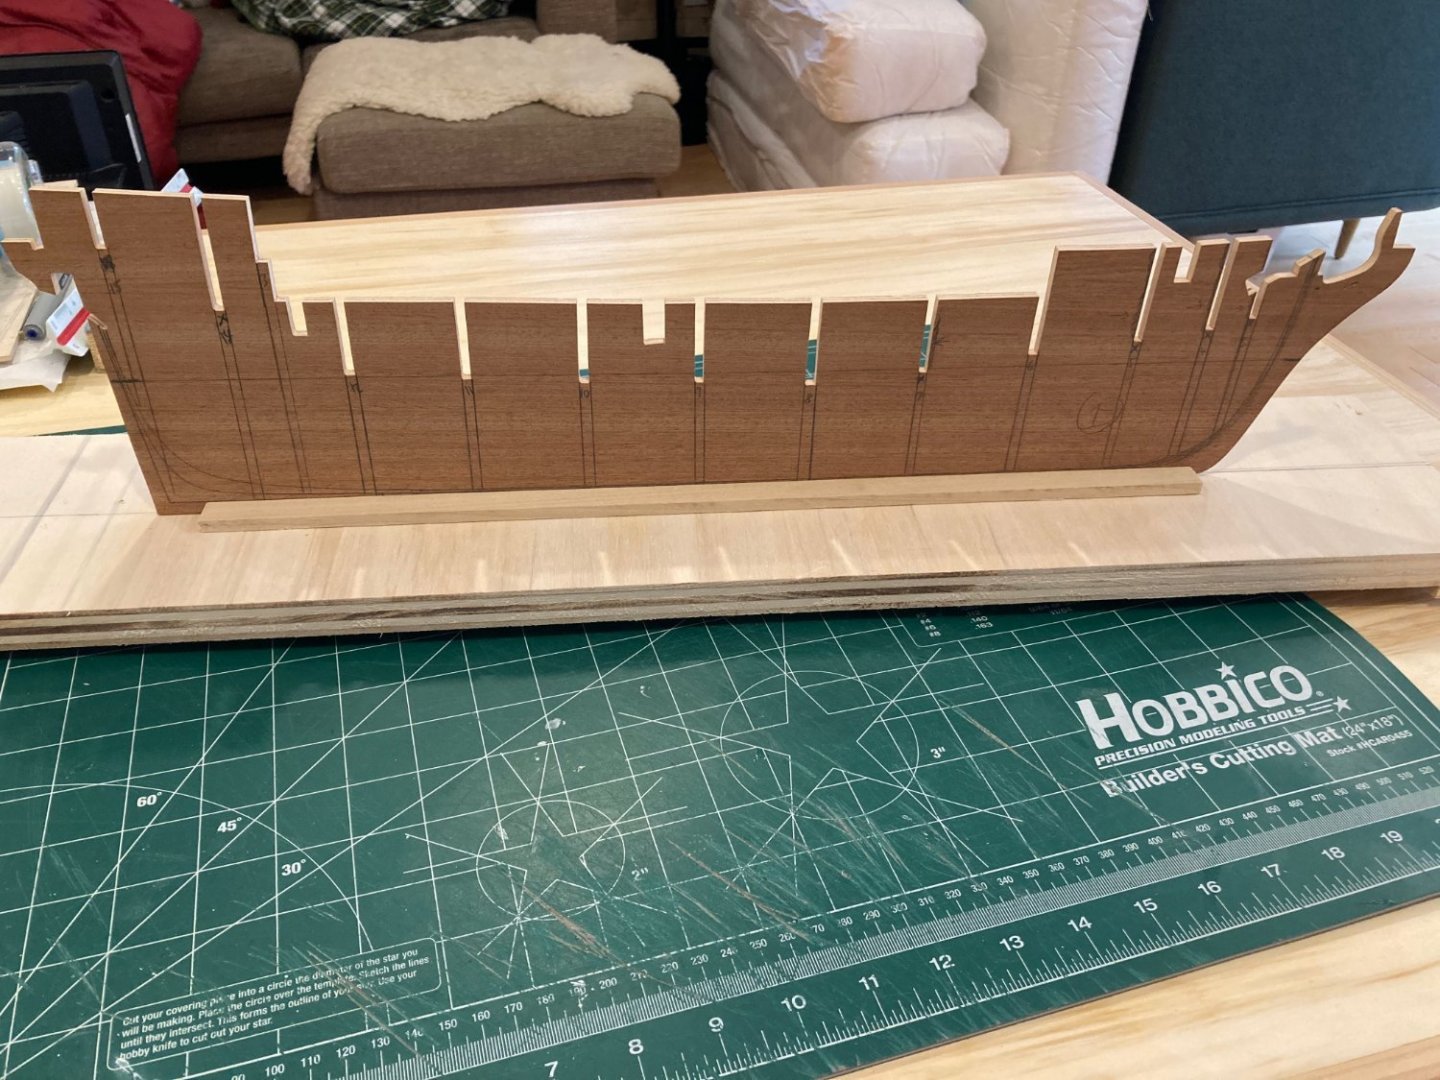
Thanks for dropping in Harlequin - hopefully it will take me forward!! Another update. I'm now heading into a small break from work - still lots to do but more flexible schedule until the beginning of March, so hopefully I'll be able to make further progress on Bellona. For now, this documents more past progress - the preparation and fitting of the false main deck. This was a pretty straightforward operation. One difference here from other kits I've built is that the plywood false decks Corel supplies have little tabs on them that fit into slots in the bulkheads - this is true of the bow platform, the main deck and the stern balcony. The tabs on the main deck slot into little cut outs on bulkhead 6 (fwd), while at the stern end, bulkhead 13 (which is only a partial bulkhead) sits atop the false deck to provide stability there. Of course the first thing I did when test fitting the main deck was break the fwd tabs off. To make sure the deck sat properly at that end, I glued two strips of wood on the aft face of bulkhead 6 to act as a landing spot for the decking. I also traced the outline (visible in one of the photos below) of a filler piece that defines part of the fwd cabin bulkhead. The deck itself was prepared by filing out some of the slots for the bulkhead extensions, marking the centre line (and then the full width of the central "king" plank that runs along the centre line - as a reference for later), and tracing out the position of the hatches/capstans/main mast partners. Initially I had planned on nesting the hatches into the decking on the main deck - but since I will be adding ships boats to the build, the effect produced by this would be more or less invisible, and since the deck camber on the model is quite slight, I decided to plank the entire deck and fix the hatches atop the planking after sanding the camber in using a piece of sandpaper laid along the centre line (for a later post). I painted the hatch areas black for depth - though in the end, since I planked over these, this was kind of unnecessary.... Anyway, enjoy the photos and happy modelling hamilton


-
Hi Chief Williams Looking really good - once its oiled up the deck will really look good. I used a pencil as I was planking, run along the edges of the planks and like you it seemed to have a more than subtle effect until I applied some wipe-on polyurethane and then things looked much better. So I imagine the same will be for you. Happy modelling hamilton
-
Hi Chief Williams: I realised that I forgot to "follow" your log and have clearly missed a tonne of updates!! She's looking great so far. I think that the main deck hatches only need light sanding for the deck camber - and if the plan is to embed the hatches in the deck planking then this may be more minimal still. I laid a strip of sand paper slightly wider than the hatches along the centre line of the main deck and secured it with a bit of rubber cement. I then very lightly sanded down the hatches to match the deck camber in this way - it did not take long, but I'm not convinced it was necessary for these hatches. Anyways - enjoy the nice weather and bye for now hamilton
-
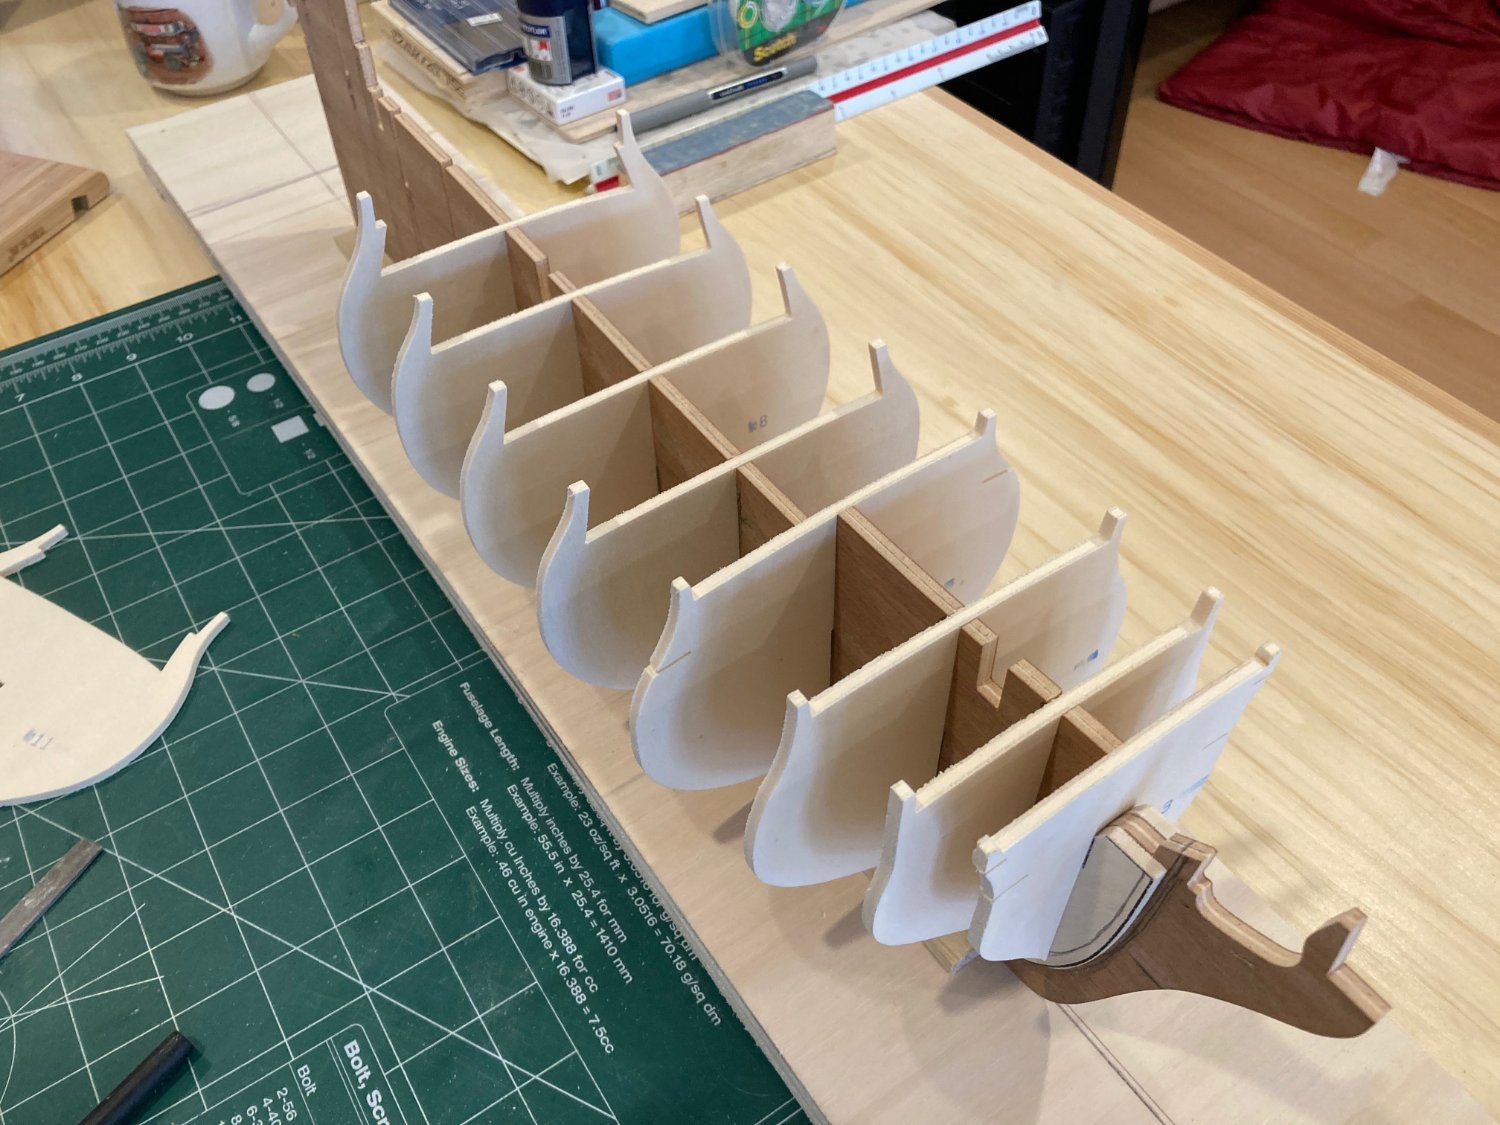
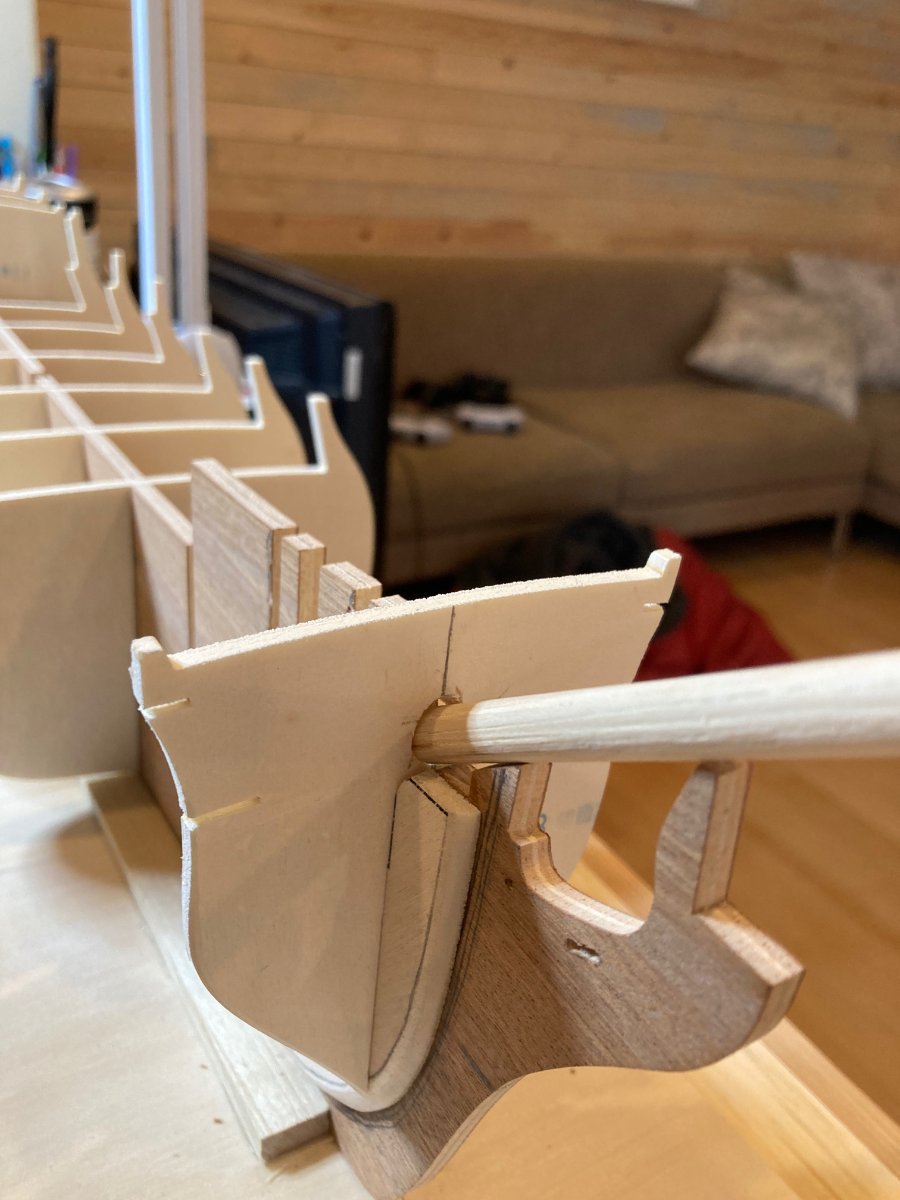
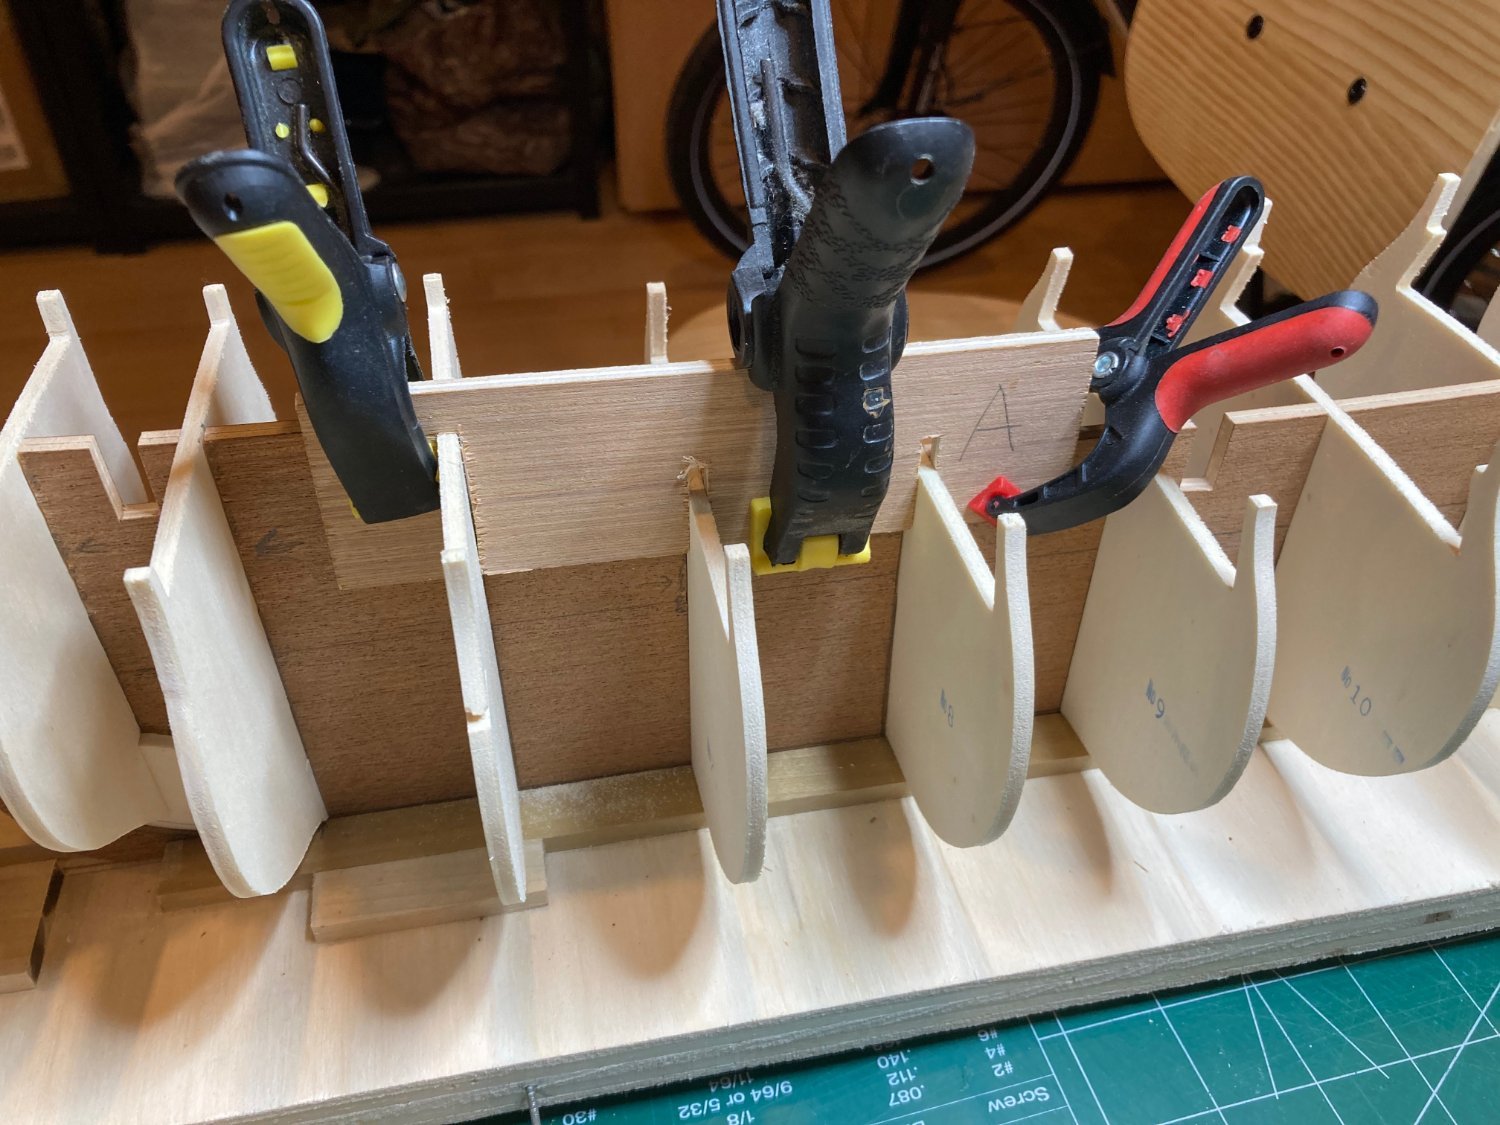
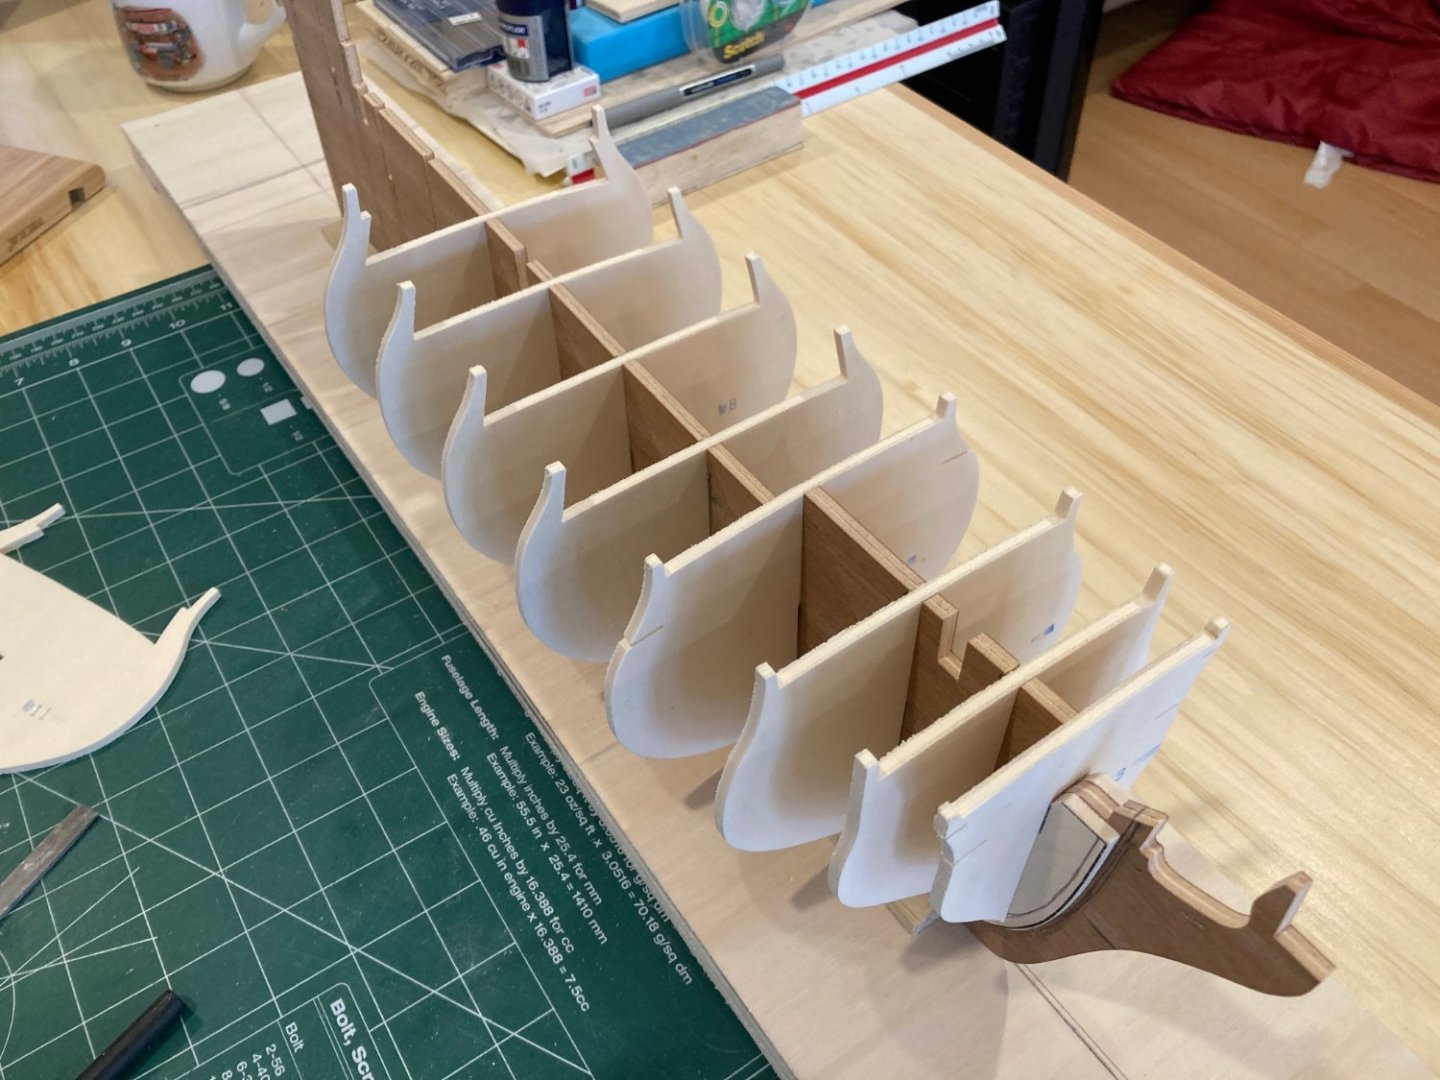
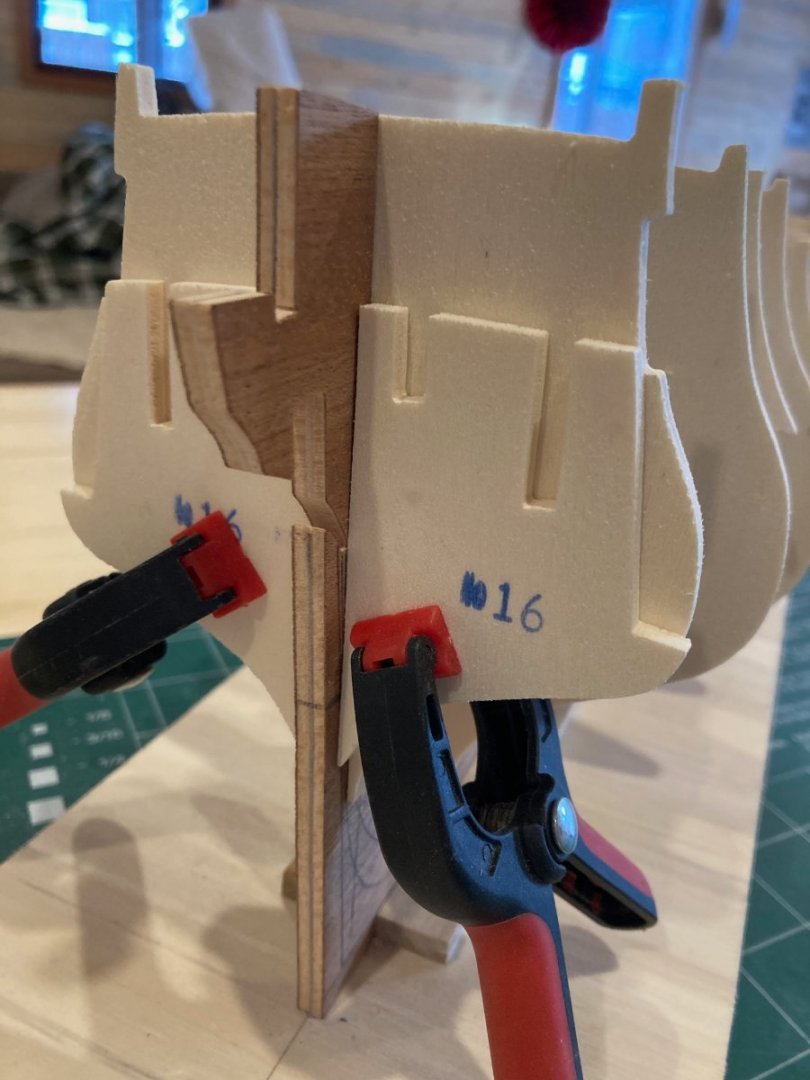
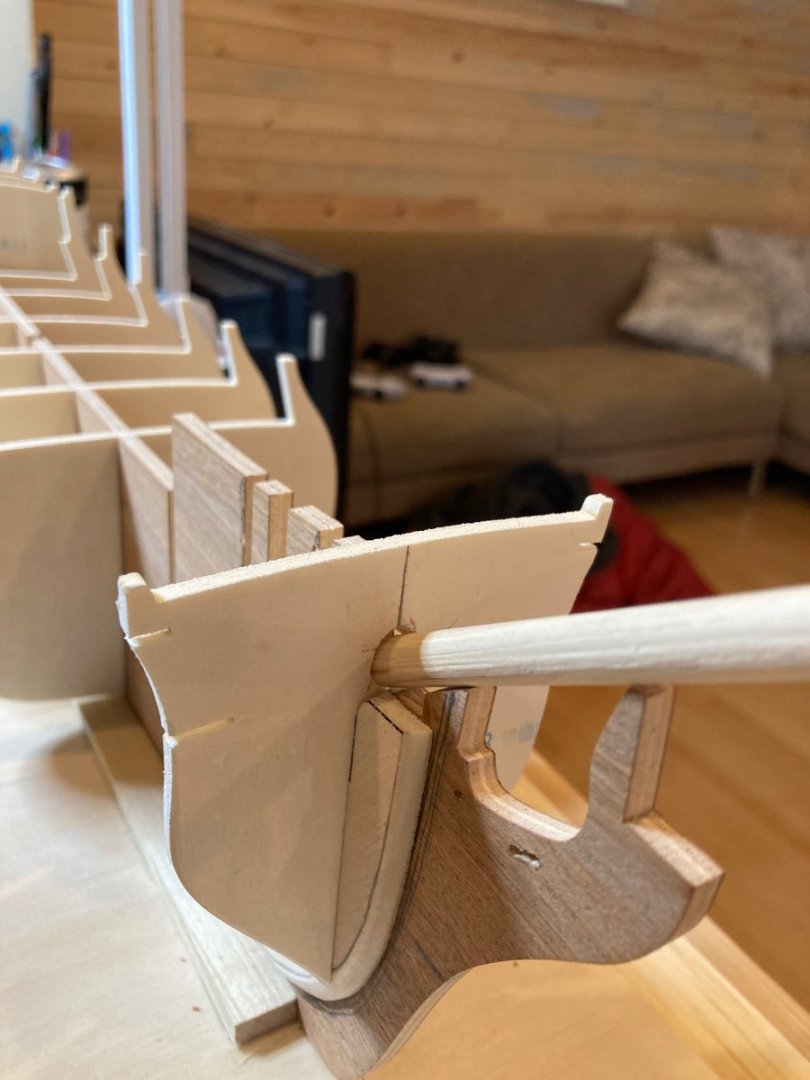
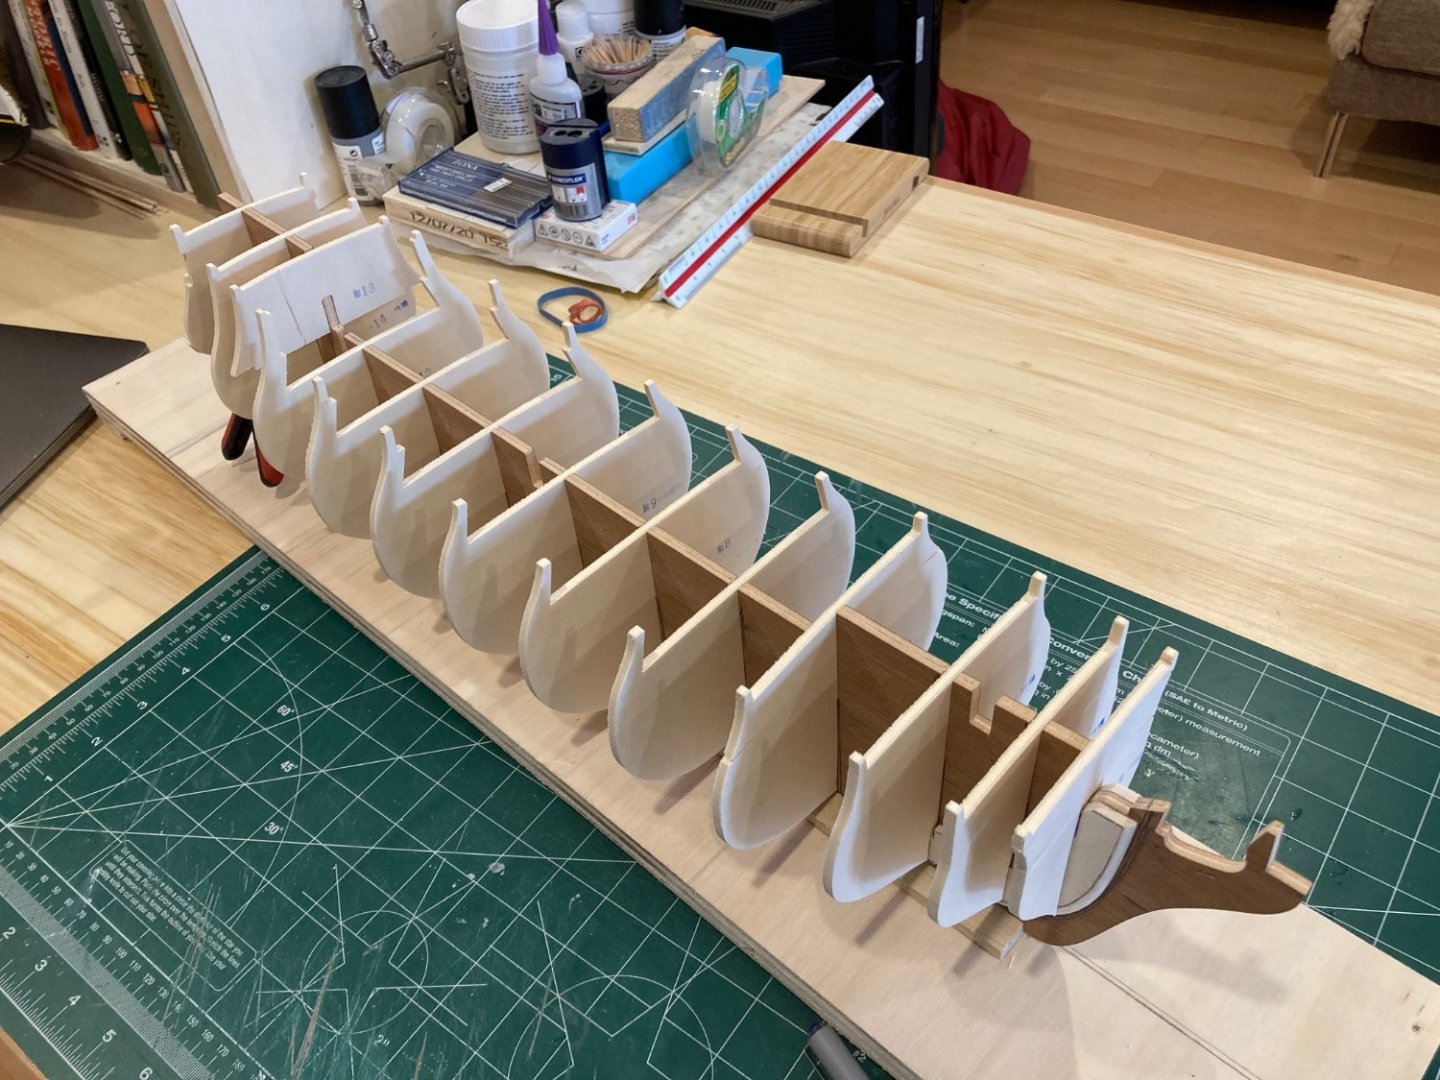
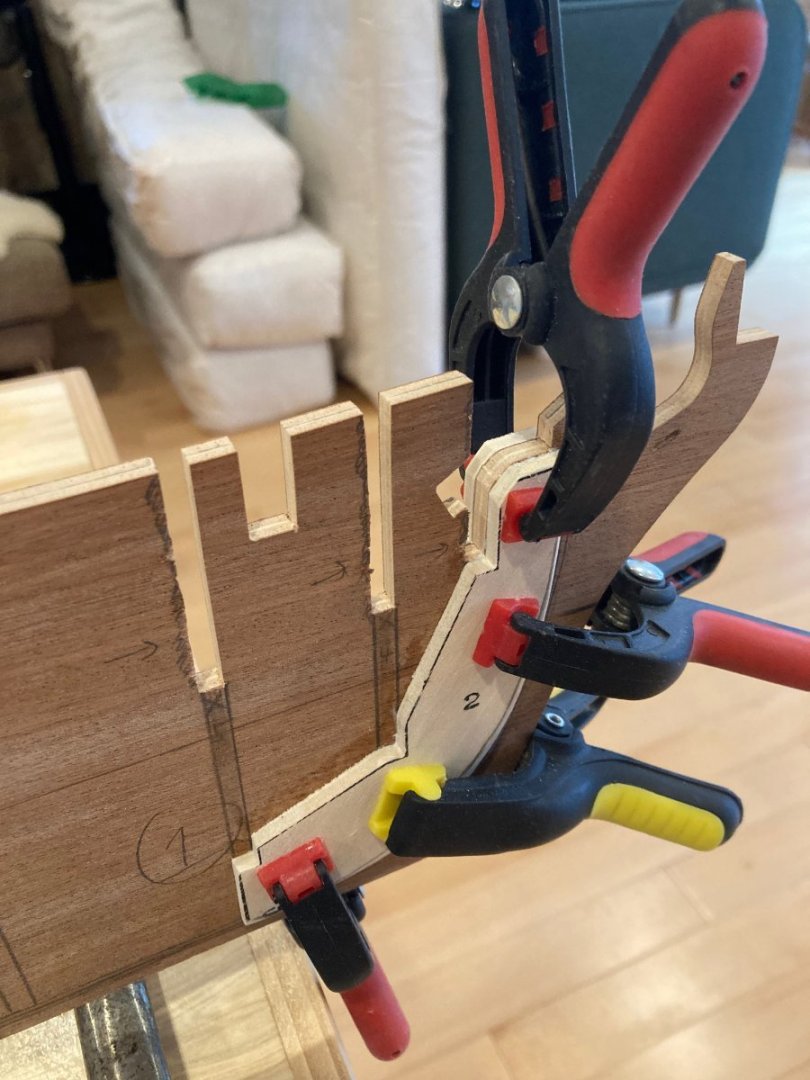
Thanks for the likes Yves and Chief Williams So I have not done any actual work on Bellona since the last update, but since this log is still "catching up", I guess that'll be ok for now. This post focuses on the installation of the bulkhead frames. The fit of the bulkheads was pretty good. Some filing of the bulkhead slots on the centre keel was necessary at bulkheads, 3, 4, 5 and 7, while the keel slots on some bulkheads also needed some light filing. I marked a centre line along the outside edge of the centre keel, and used that in combination with templates taken from the drawings and made some adjustments to get a nice square fit. The frames sat pretty fair on the keel, though a bit of bracing to square them properly was necessary in a couple of places. Bulkhead 15 has two filler pieces attached to the aft face - this is the first element of the stern framing, which I'll document in next week's update. The photo below shows them clamped (but not yet glued) to bulkhead 15. A hole needs to be drilled along the centreline of bulkhead 3 to allow passage of the bowsprit. I marked this off using 8mm dowelling and then used a jig to drill out the hole at the proper rake for the bowsprit - cleaned up with a half-round needle file. The final photo below shows the plywood clamp I made to correct for the bowing at the upper edge of the centre keel at the aft end of the f'csl section. I used some 1/4" ply left over from the renovation of our garage. Layign it along the centre keel in line with (and extending fore and aft beyond) the bowed section, I marked out the position of the bulkhead slots and then cut the slots out of the jig on the scroll saw. A few minor adjustment were needed before it slid nicely over the bulkheads and I could clamp it against the centre keel. I then clamped it in place and glued on the bulkheads, being careful not to glue the jig to the framework! Once the glue had cured, I removed the jig, glued the remaining seams that I couldn't access when the clamp was on, and that was that - it corrected the bowing quite nicely. Thats all for now - enjoy your modelling and bye for now hamilton

-
the story goes that Caligula made a bet that he could ride a horse across the Bay of Naples. He then lashed together a bridge of ships that ran across the bay and made good on his boast - I'm not sure if this was the same horse that he made a member of the Roman Senate, but.....whatever else you can say of Caligula, he was a man of his word hamilton
-
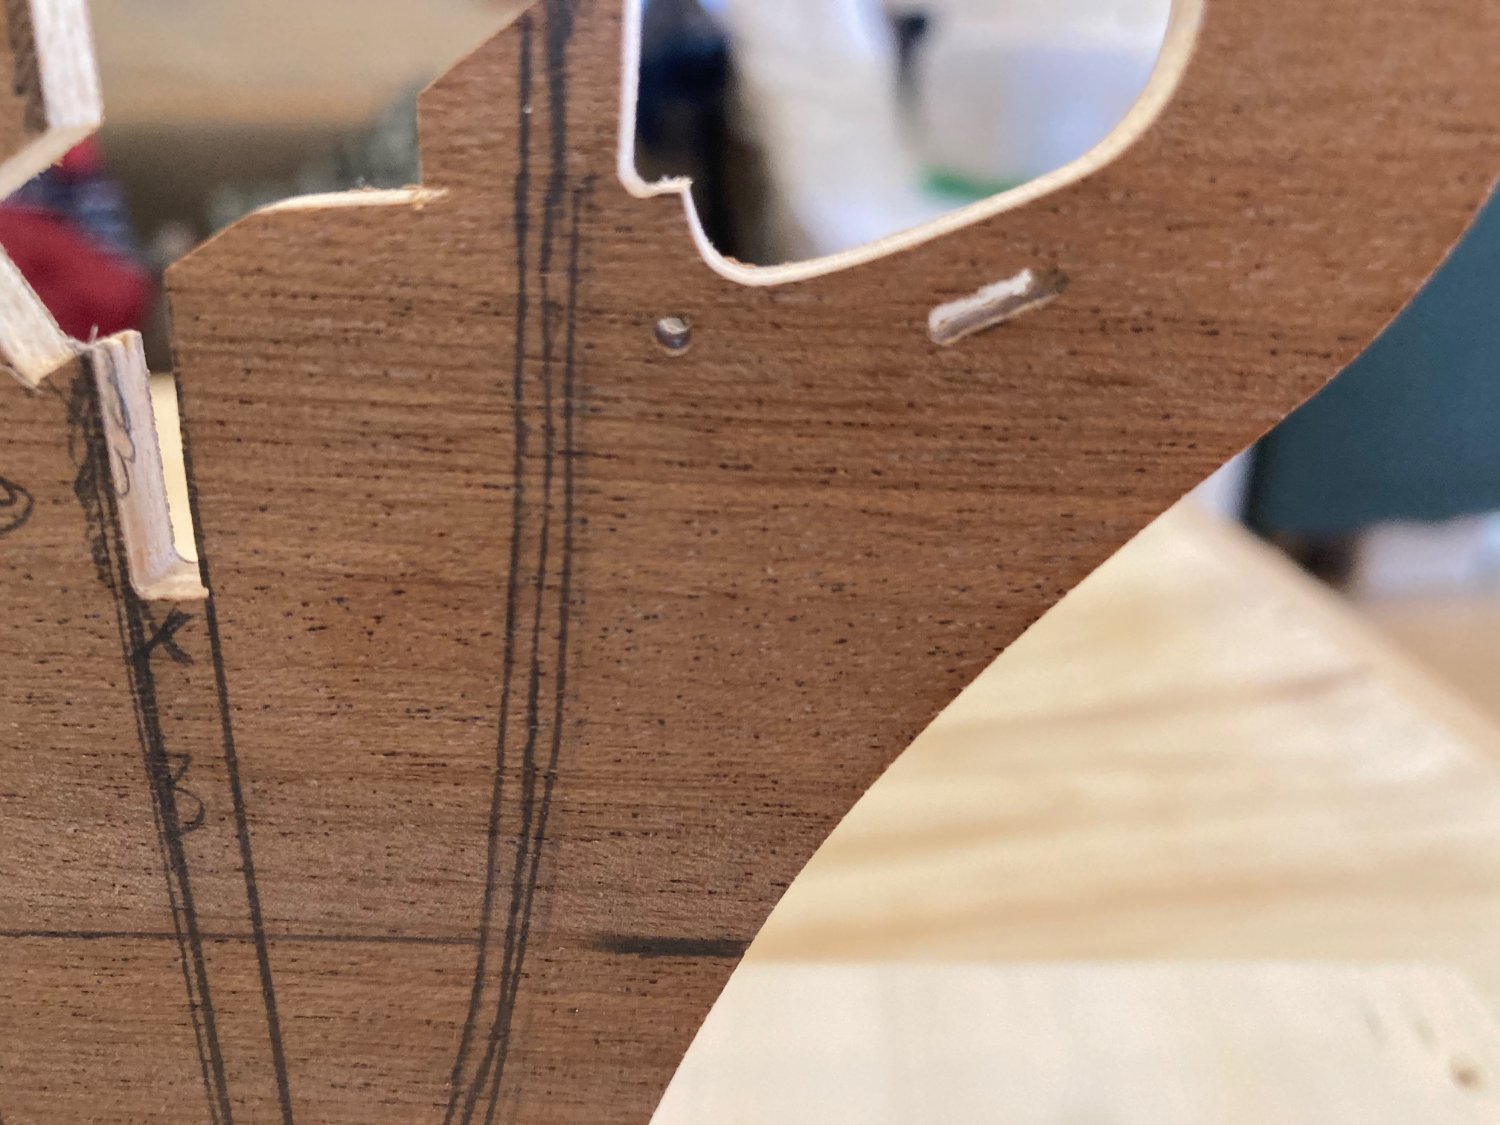
Hello all: As noted above, I've almost completed the framework to this point, but I'm going to tease the build log out slowly so I can get through a very busy patch at work. I won't be able to return to regular activity on Bellona until later in February. I thought I would begin with a quick overview/review of the kit and some notes on preparation of the centre keel I've built several Corel kits in the past - Toulonnaise, the Flattie and Brittany Sloop, and the Greyhound. I really enjoyed all of them and though Greyhound had serious deficiencies as a kit, it worked up into a pretty decent model. The materials Corel supplies are ok, and this kit - which is at the higher end of their stable - is good quality both in terms of the wood supplied and the other materials and fittings. One needs to set very low expectations for instructions, of course, and the plans sometimes raise more questions than they give answers. But I don't think these are real impediments for people with experience building plank-on-bulkhead kits. The difficulties come when trying to bend a kit into a form designated by the modeller's search for historical accuracy - here it is always a compromise between the structural features of the kit, the information available and the skills (or in my case quirks) of the modeller. The centre keel comes as a single part, including the knee of the head. The part came out with some warping - not severe. A bit of bowing along the length of the keel which was easily corrected by making a building board out of old 3/4" plywood with some 1/4" x 3/4" hemlock strips left over from a cabinetry project (see photo above). The other issue was a bit trickier to resolve - the upper edge of the forecastle section of the centre keel bowed to port by about 1/16". As I'll show later I made a jig out of old 1/4" plywood to correct this during the installation of the bulkheads. I don't have a lot of images of the centre keel preparations, but here is a list: I made templates for the bearding and rabbet lines and marked them out - you'll see in the images that these are quite rough - I did clean them up! The bow filler pieces helped with this I extended lines for the bulkhead slots down to the bearding line as reference for setting the bulkheads and checking for any corrections that needed to be made on the slots I drilled out the gammoning slot and a hole for the main stay collar I dry fitted the bulkheads and noted where slots on the keel piece/bulkheads needed adjustment (shimming/filing out Here are a few shots to show some of the work - not intrinsically interesting, but..... hamilton

-
Yes Yves! I've looked in on your CAF build - it is intense!! I got myself the CAF Granado (part 1) as a Christmas present - inspired by your Bellona. But since that kit seemed well out of my reach (and I already had Corel's kit on the shelf)....I'm sticking with this "little cousin". Thanks for stopping by! hamilton
-
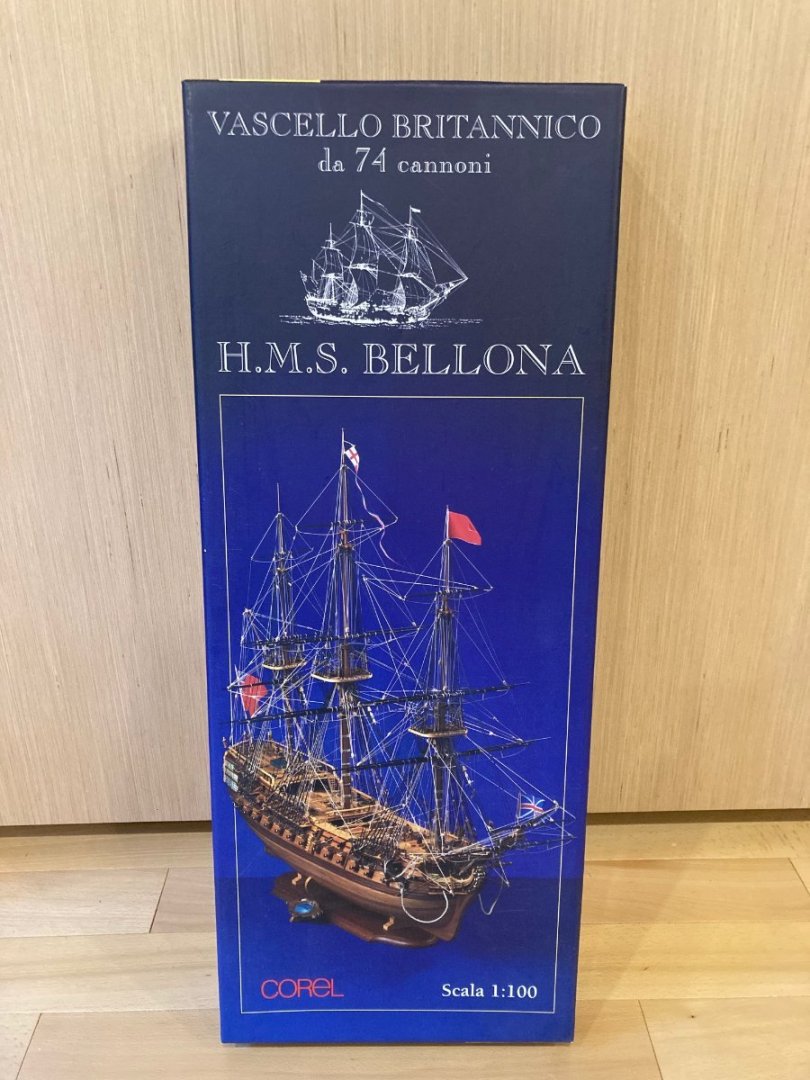
Hello all This is becoming a terrible habit, but I've decided to take another break from Bluenose and venture onto another build - one that has been sitting on the shelf for a very long time and that I've been thinking about since I got this kit (I think back in 2012) - Corel's Bellona. I have to give fellow MSW members Chief Williams and Harlequin acknowledgement as inspirations and for providing impulse to begin this build - and this log! I've always thought it strange that there weren't more builds of this kit on MSW, and I hope that this log can serve some purpose for the community. The history of Bellona is well known, and I'm not going to rehash it here. But my plan for the build is to represent the model (as per the kit) at her 1780 refit. As reference I'm using Brian Lavery's Anatomy of the Ship HMS Bellona - though his drawings cover both the pre- and post-refit and are sometimes confusing in terms of what is being depicted. This is most obvious with the rigging, which I've used James Lees' Masting and Rigging of English Ships of War to determine. A few years ago I started plotting out the build by making a detailed (some might say insane) parts list and rigging and belaying tables to supplement the information supplied on the Corel plans and to plan out approaches to the various elements. This is my usual way of working through a complex build and allows me to think through the construction of each element and to engage in intensive study of the plans and source material. Hope it pays off! In any case, in terms of build progress at the moment, I've nearly finished putting the framework together. But because I have a young family and a demanding day job (at least one that's very demanding for ten months of the year), I am only able to work on the model for a few hours each week, which makes for slow progress. So I'll be posting weekly updates here to cover stages of the build up to where I am now. In the meantime - here's the box and the centre keel. Build updates will start next week. In the meantime - enjoy your modelling! hamilton
-
Of course! Water! Never a doubt! Looks like we're at about the same stage in the build - I've glued up the frames and main deck on the keel (except the stern frames, which I've assembled but which need some tweaking). One thing I've been considering is adding main deck coamings and planking prior to installing the poop deck and f'csl - though the kit plans show the full assembly of the hull framework complete prior to planking the main deck, but I feel like the poop deck and quarterdeck would make this more tricky than. it needs to be...just a thought! In preparation for this option, I marked out the areas of the hatches/capstan platform/ mast partners, and painted them black to add depth beneath the hatch gratings. I'll probably build up the coamings and plank around them if I can find time on the weekend.... In any case, looking forward to more updates - at the risk of annoying the admins (since I have already one languishing build log here already) I may end up starting one here for Bellona too! Take care - hope the heat doesn't get too bad down there hamilton
-
Looks like a neat fix. I actually just started working on this kit, too - at the stage where I've installed most of the bulkheads (barring 15 and the stern framing). And I also made a gigantic spreadsheet - a parts list, rigging tables, belaying info, etc. I find this an incredibly useful exercise in complex builds like this, as time consuming as it is - a great way to prepare and map out the build in a more intentional way. I decided against carving a rabbet joint into the centre keel after doing a test on a small section in mid-ships - the material is too cheap! The veneer just crumbles and flakes and the interior material is so soft and spongey that it seems impossible to get a clean line. I'm not going to be keeping a log - my full time work limits my modelling time, and I have a semi-active log for another build on the go here, but I'll follow you here and hopefully be of some help if you hit any snags along the way! hamilton
-
I received this book as a gift from my wife's business partner several years ago - it's coverage is very broad and the illustrations are clear (and often very beautiful), though I'm not sure it could be used as more than secondary reference for model building - admittedly this may be a result of my own limitations as a modeller! hamilton
- 4 replies
-
- 3
-

-
- Review
- Book Review
- (and 2 more)
-
Some very fine joinery on a standard-setting build! Love following your work Mike hamilton
- 607 replies
-
- 2
-
-
- winchelsea
- Syren Ship Model Company
- (and 1 more)
-
An exciting start - I just ordered this kit, but probably won't be starting it for a while. Will be nice to watch your work here in the meanwhile! hamilton
-
HMS Granado 1742 Kit - CAF Model - 1:48 Scale
hamilton replied to cafmodel's topic in Wood ship model kits
Just ordered session 1 of this kit.....lots on the shelf, but happy to add this to the pile! hamilton