hamilton
-
Posts
1,933 -
Joined
-
Last visited
Content Type
Profiles
Forums
Gallery
Events
Everything posted by hamilton
-
 Well it seems I'll have to give it some thought. I added treenails to my 1:25 scale Glad Tidings pinky schooner, but at that scale they looked appropriate. At 1:53 (a little smaller than 1/4) it might not be doable. I certainly want to avoid a pock marked deck....at the same time, if I can fashion a small enough treenail and if, once the deck is finished, they blend in well, I may go for it....I'll probably do a series of tests before finalising the decision anyway. Thanks all for the input and for the nice photos! hamilton
 -
Hi Russ: Thanks for the response, but this doesn't really solve my issue - are you saying there are no trunnels (or treenails) visible anywhere on deck or that the scarfs should be trunnelled the same way as the joints between the deck planks? Sorry if I'm being thick - I've just seen many modellers adding treenails to their decks.... hamilton
-
The coppering looks great! A lot of painstaking work but it really pays off in the finished look. Well done hamilton
-
Hi there: I'm installing a margin plank in several sections, scarfed together. My question is whether there would have been visible trunnels at the scarf joints on the margin plank and if so, how they would be arranged. This is for the Fair Rosamund, 1831... Thanks in advance! hamilton
-
OcCre planking system
hamilton replied to hamilton's topic in Building, Framing, Planking and plating a ships hull and deck
Alright thanks all!! Since I've already done that with the support strips, I think I'll just fill the notches in and plank as usual....thanks again! hamilton -
OcCre planking system
hamilton replied to hamilton's topic in Building, Framing, Planking and plating a ships hull and deck
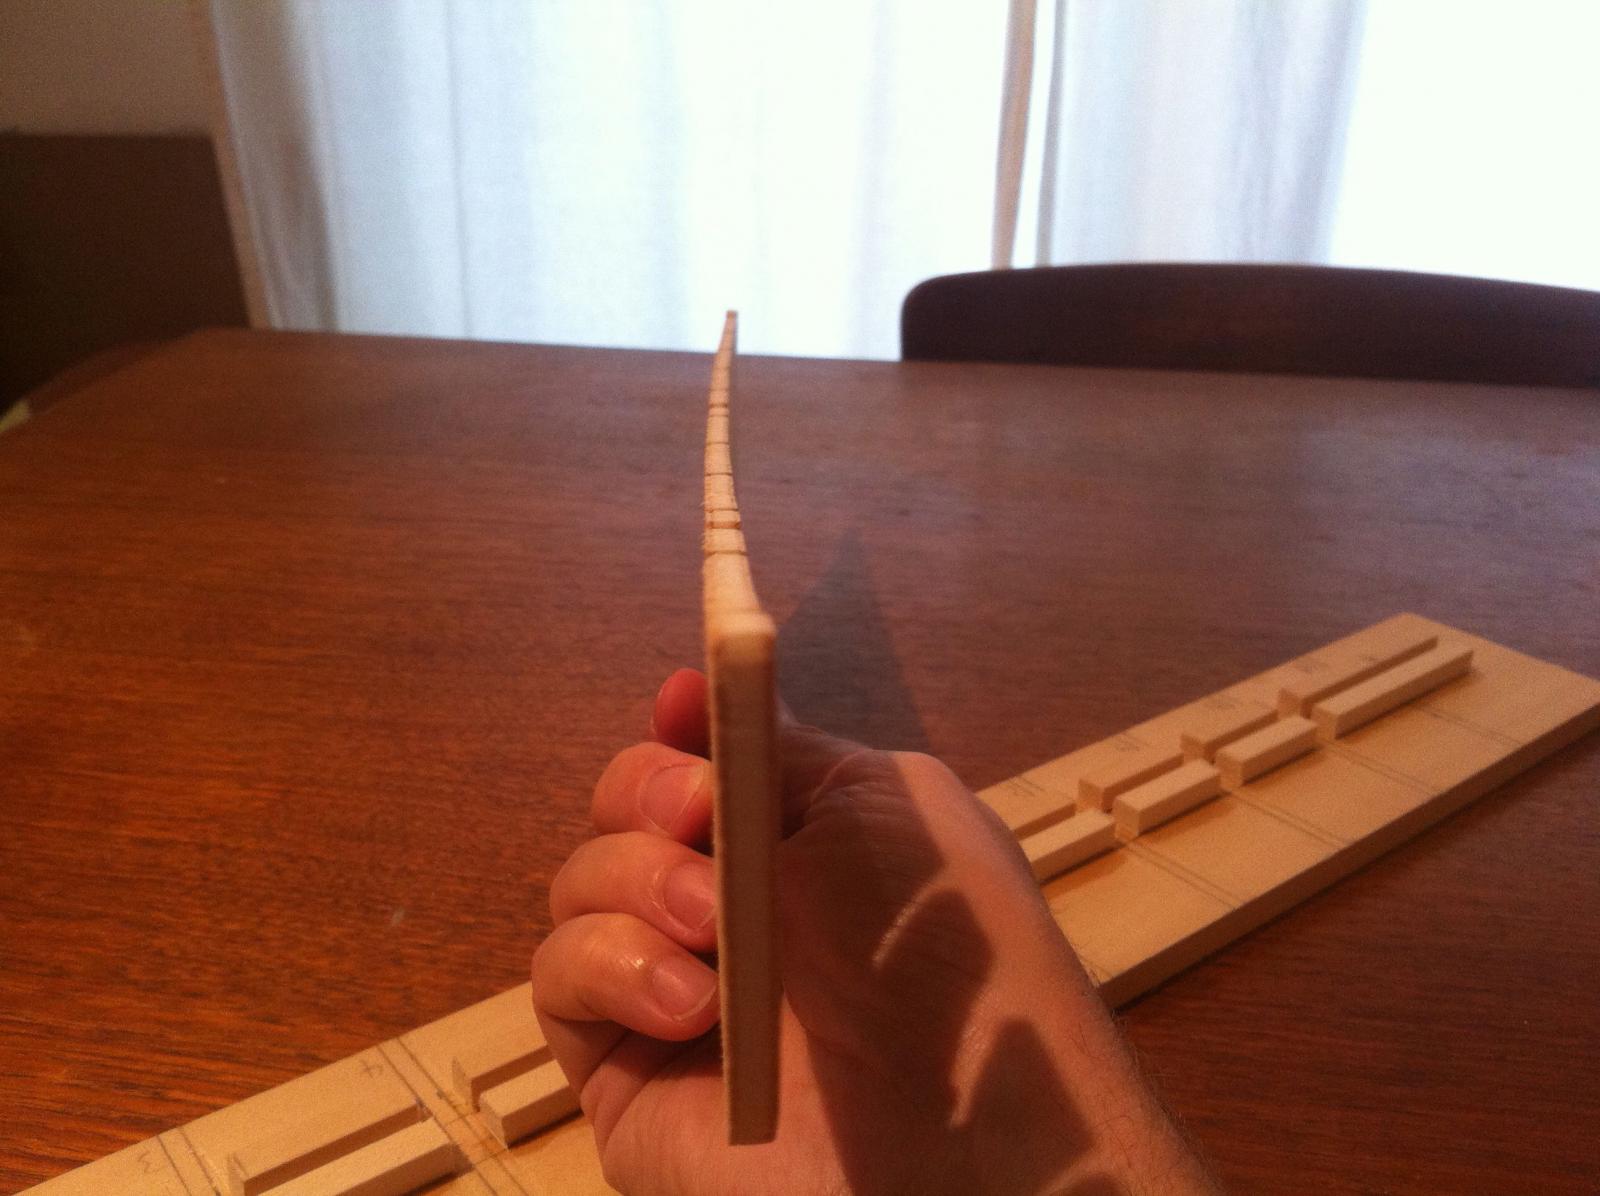
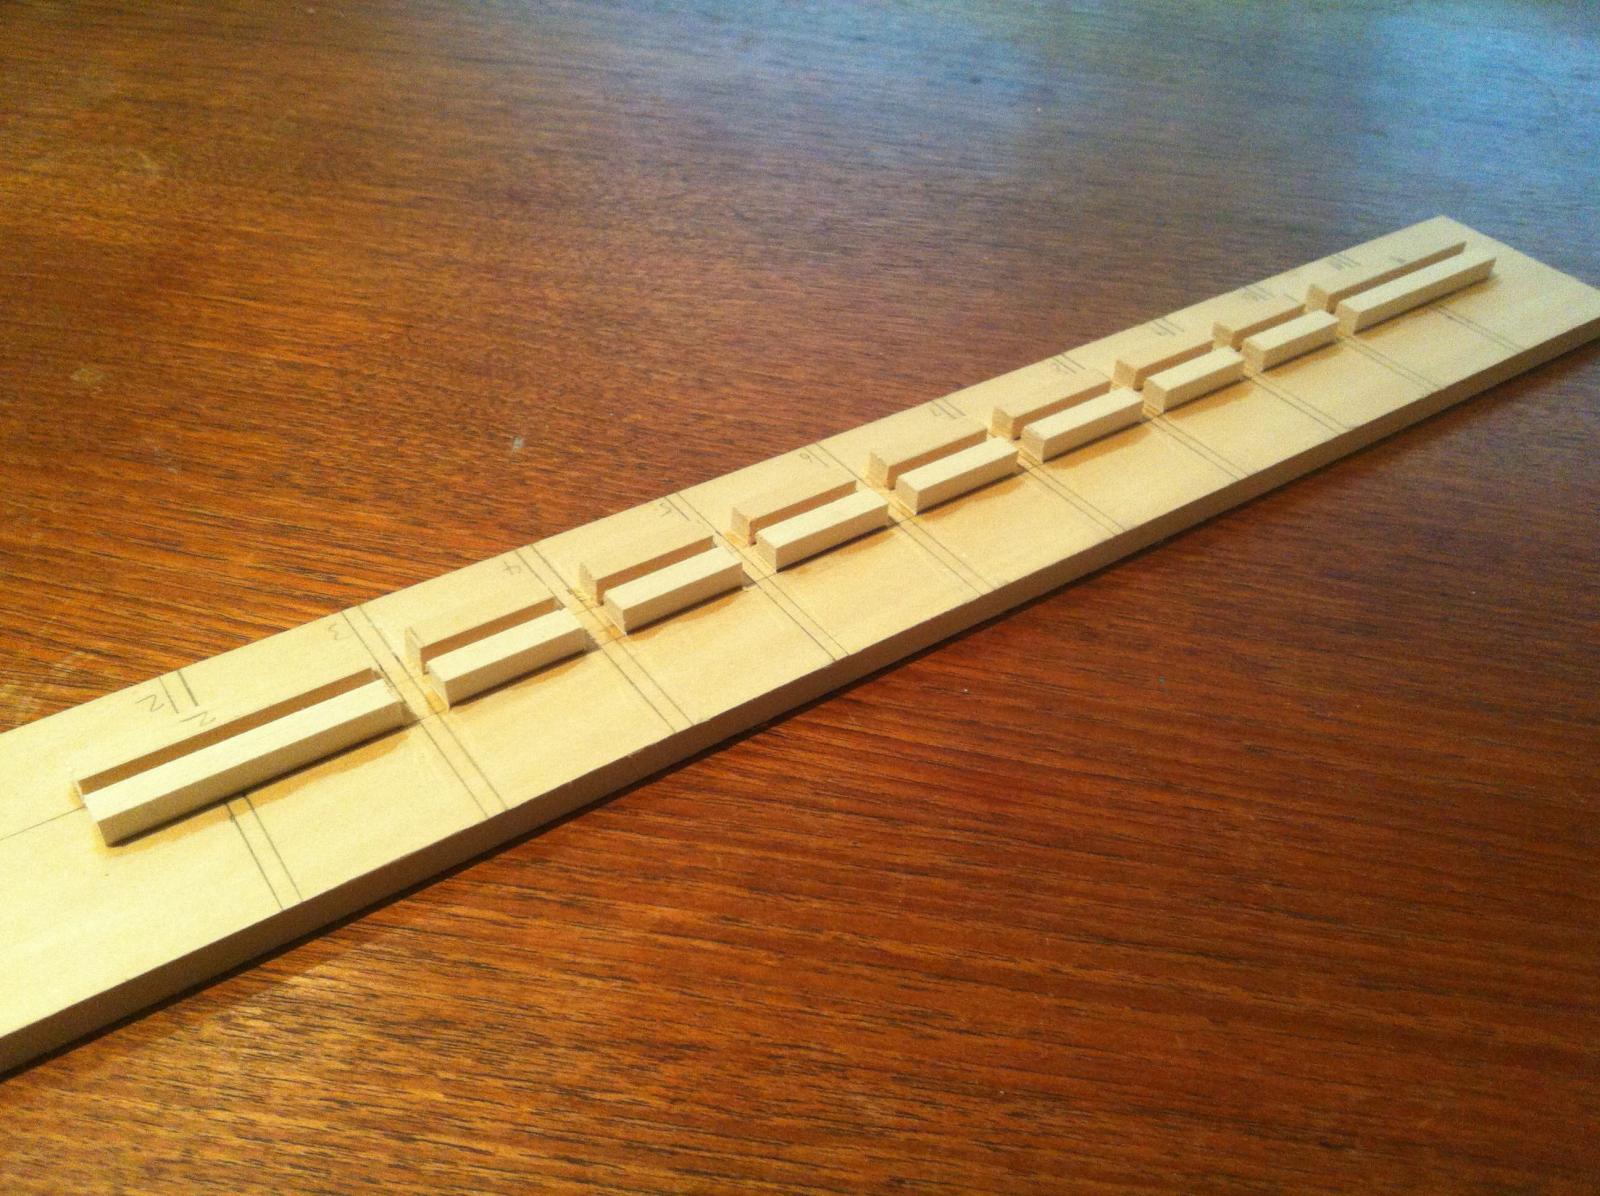
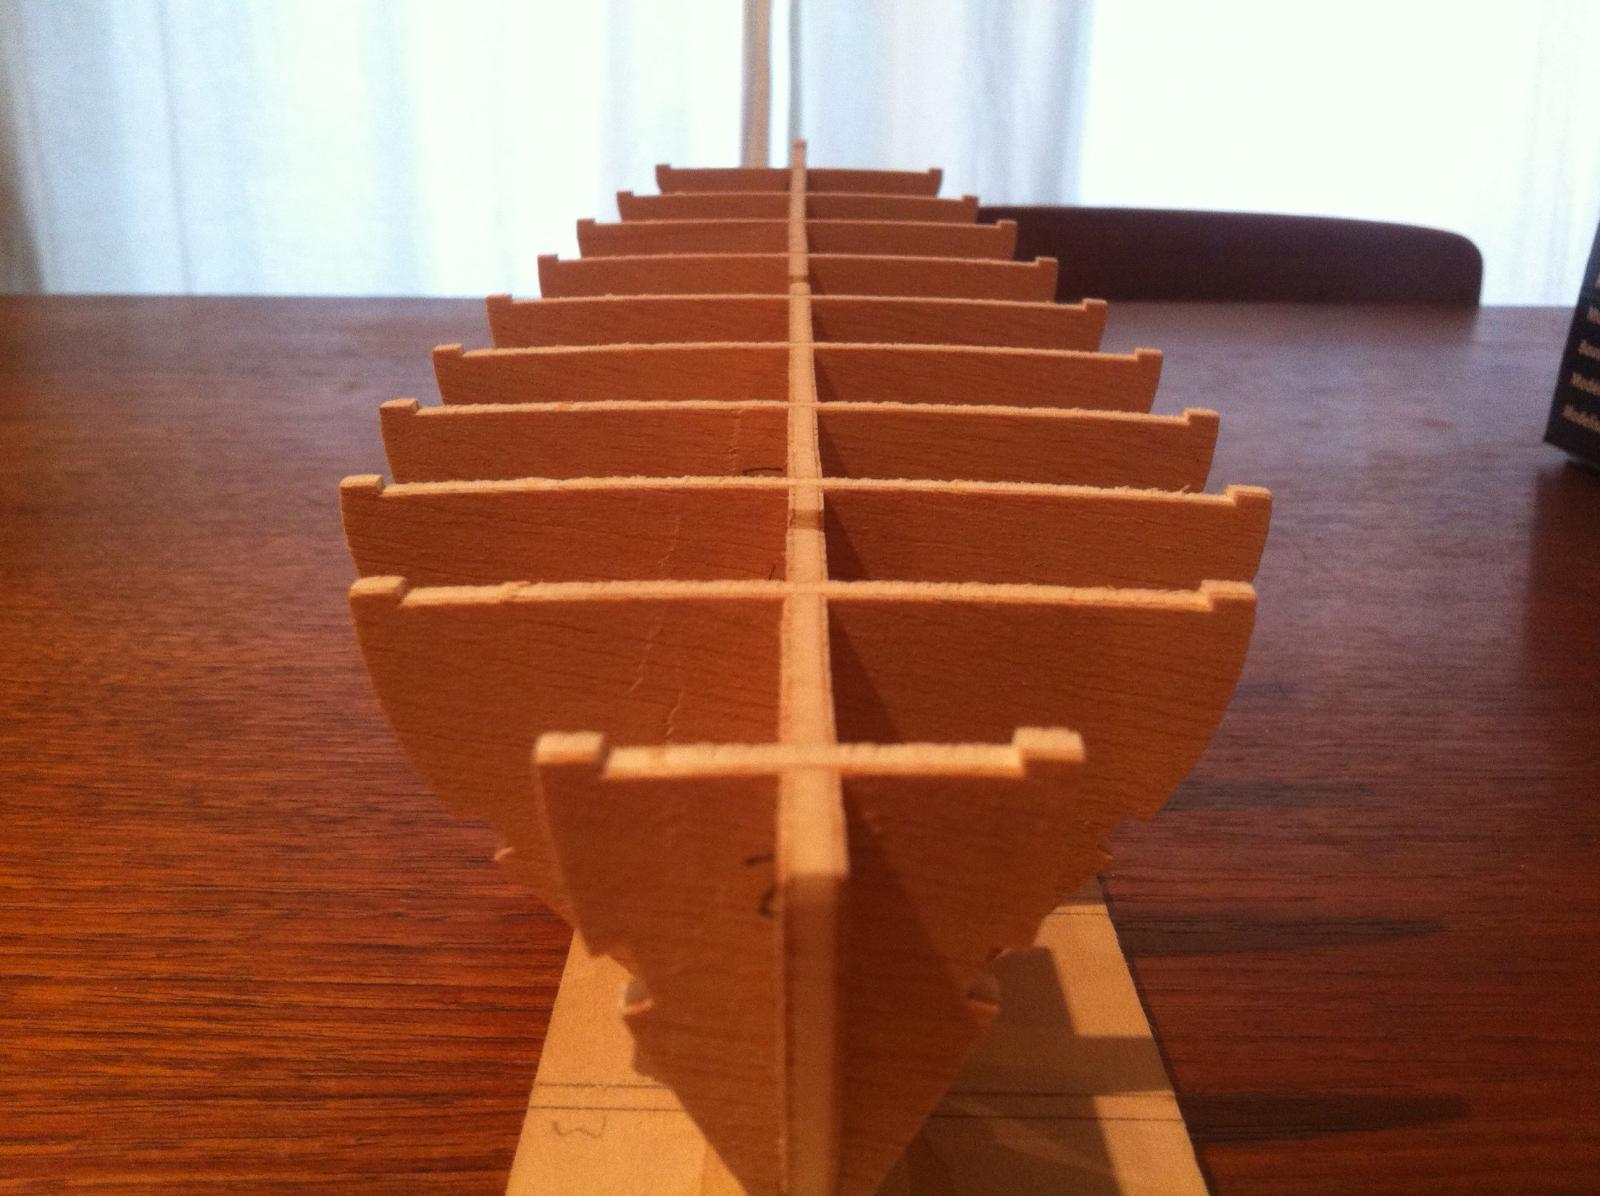
Hi Pompey: This is the best shot I have - you can see the notches at the turn of the bilge..... hamilton
-
Thanks Casey and Meredith: Casey -- you may be right -- I used small strips between the bulkheads so the long strip in the notches might be redundant.... Meredith -- I hope all is well with you. I really admire your build and will likely imitate some of its features (the margin plank on the deck, for example). The ply IS awful, yes! Probably the poorest quality I've worked with so far. On the up side, this came in handy when I was attaching the deck last night - the ply was so soft, that small straight pins went into it with very little effort! Now that the deck is installed, the bowing in the centre keel has been completely corrected. Bye for now hamilton
-
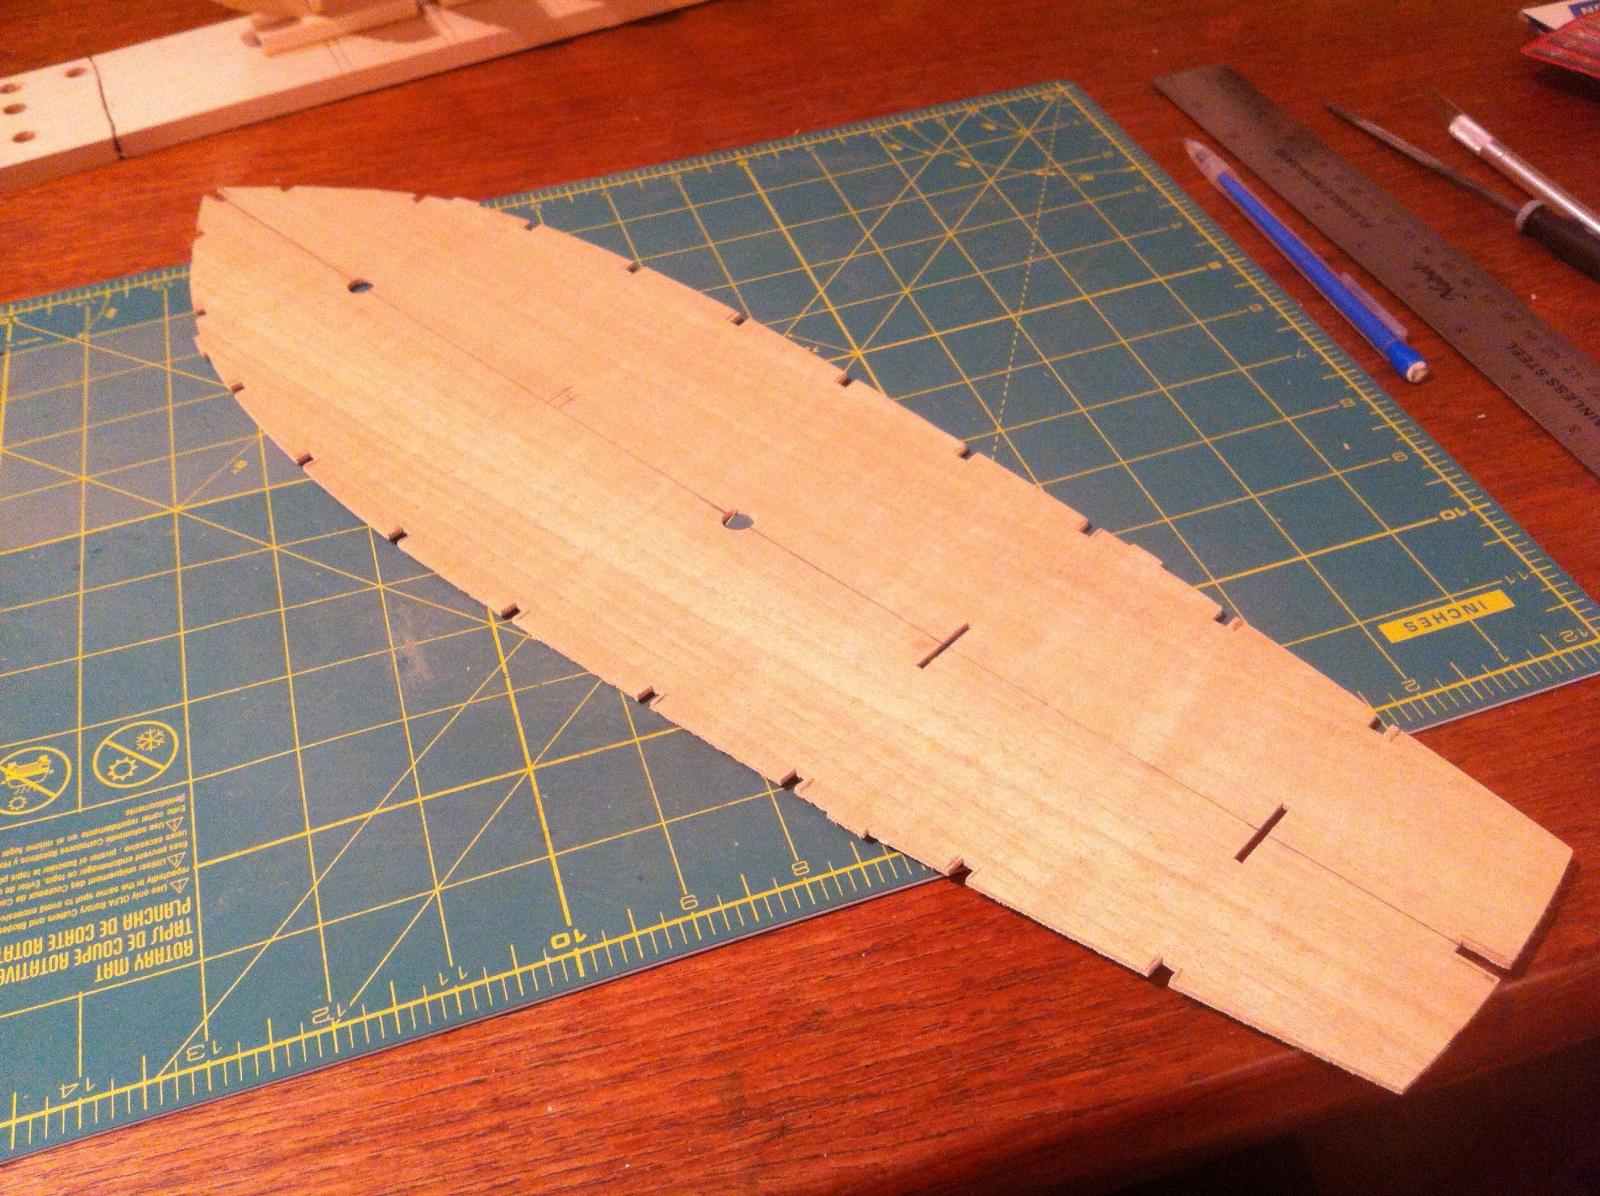
Hi there: Not sure if I've titled this thread correctly, but...... I'm building the OcCre Dos Amigos and am curious about others' experience of a peculiar feature of the planking of this model - perhaps other OcCre kits have a similar feature. A series of notches is cut into the bulkhead edges. A 4mm x 2mm strip is laid into these notches that acts (presumably) to section off the hull for planking.... I'm tempted to fill in the notches and just plank as usual, since this "baseline" plank would, I believe, lay beneath the first row of planking and serve as little more than a visual & measuring aid. But if there are advantages to this system that I'm unaware of I'd love to hear about them. Thanks in advance! hamilton
-
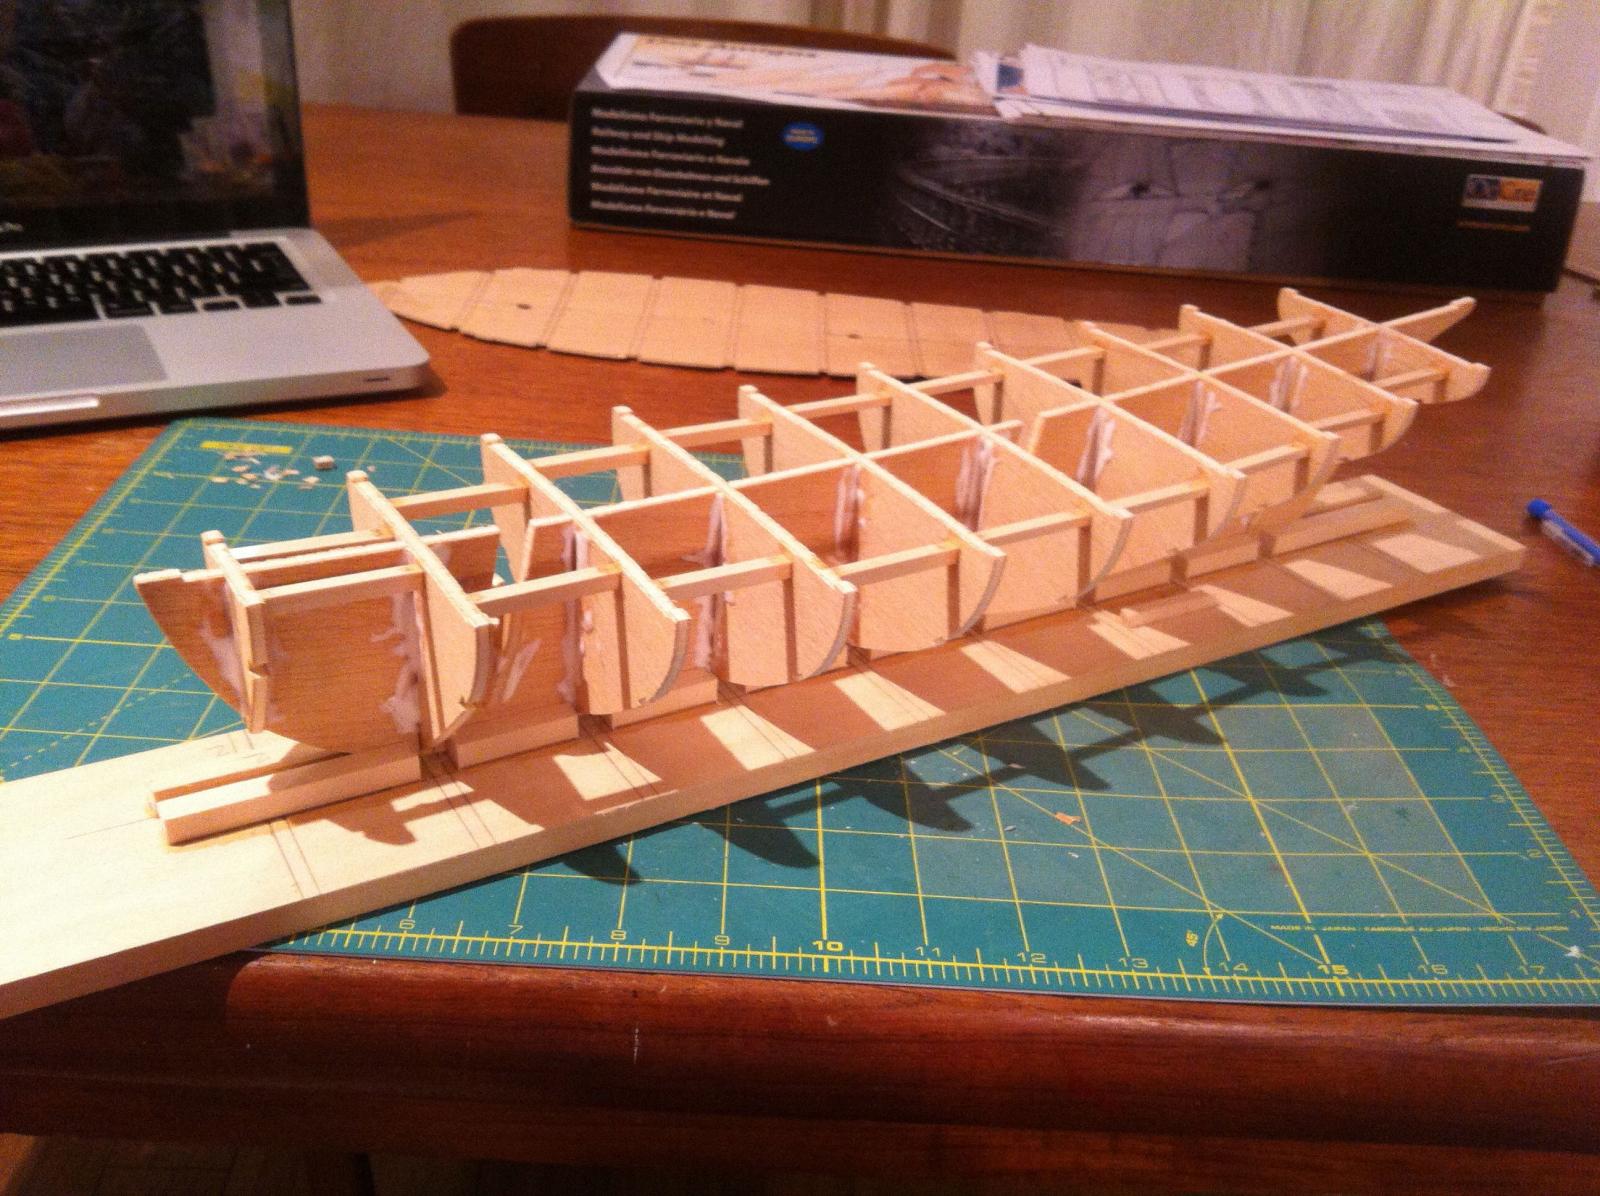
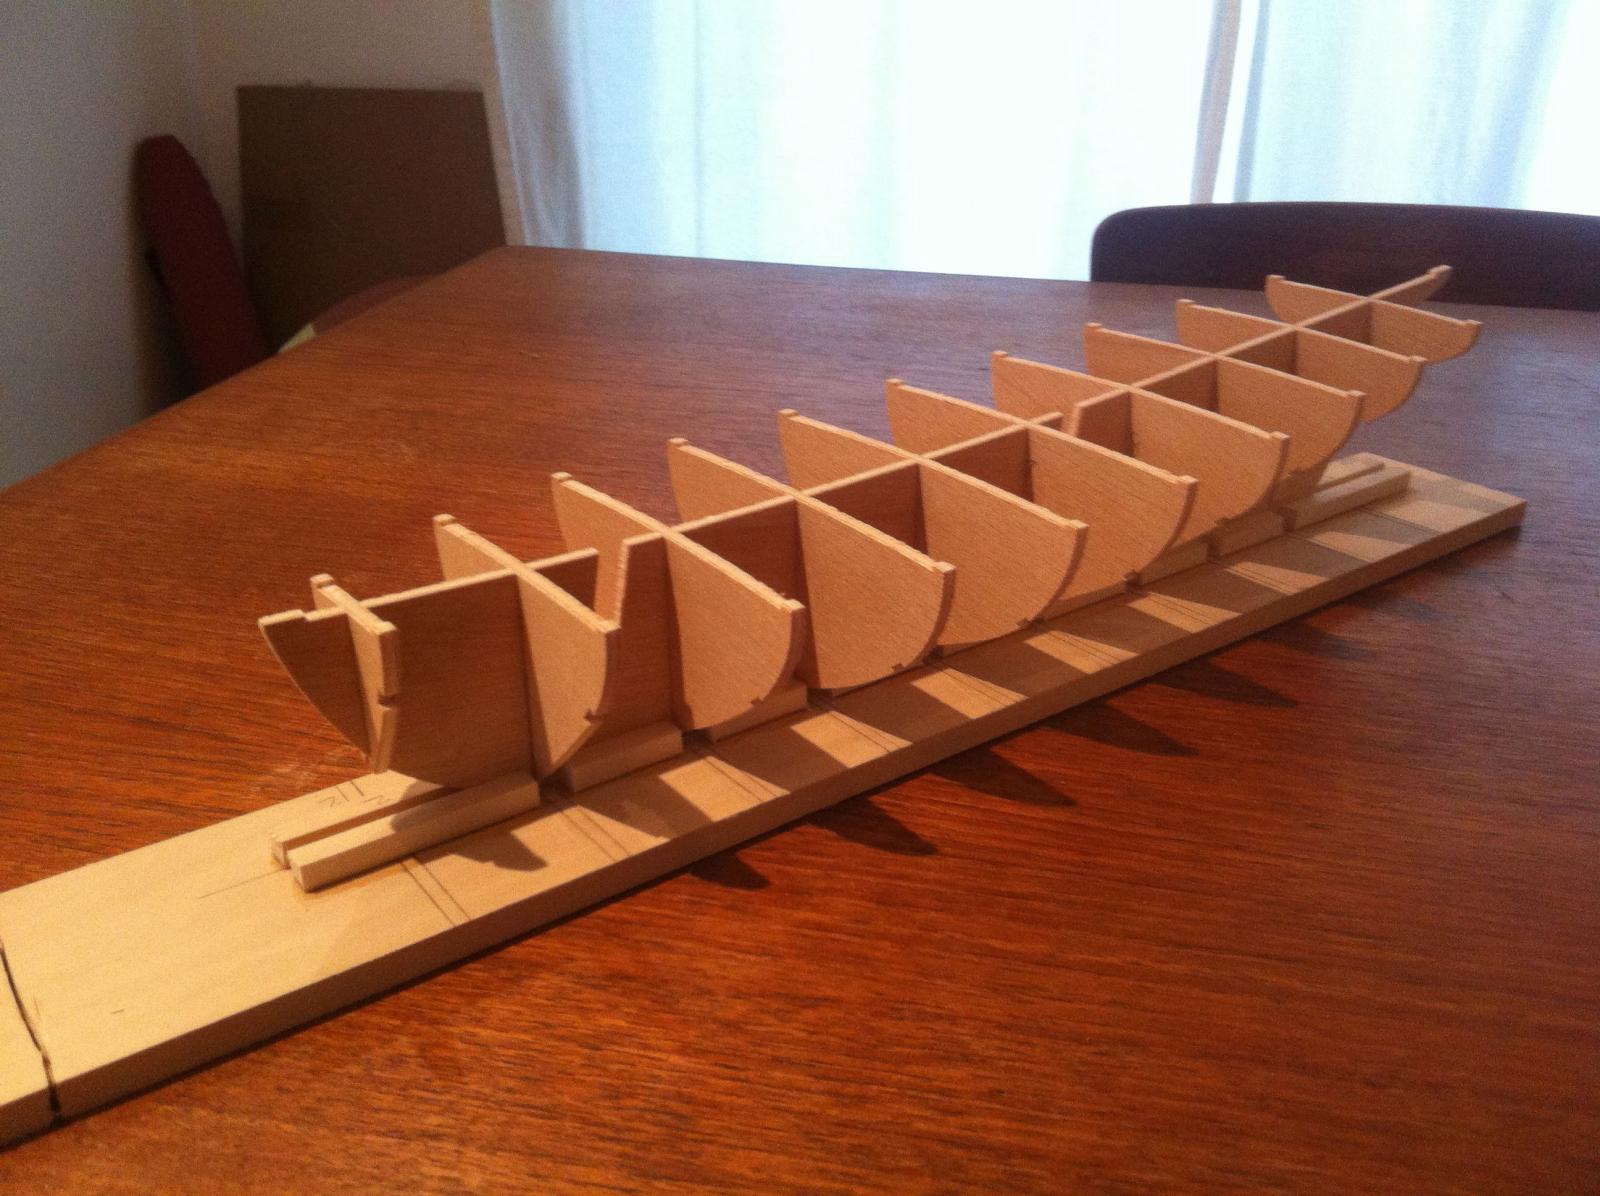
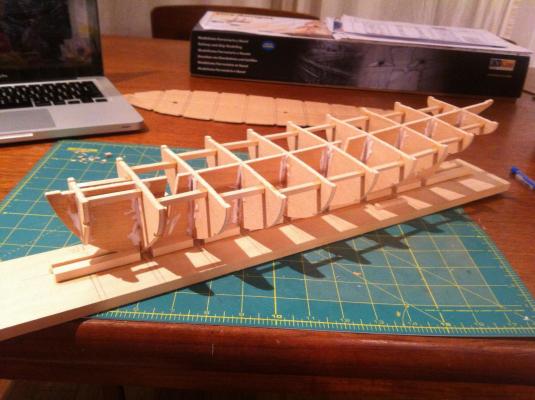
Well I'm now back from my trip and back to the bench. Tonight I installed the bulkheads along with some reinforcing strips, cut to measure between each bulkhead. In conjunction with the building board, this has served to straighten (mostly) the warped keep. There is still a very minor bend towards the stern, but this will be corrected when I install the deck. So far so good.... If any of you have built an OcCre kit, have you come across this strange feature - a set of notches cut into the edges of the bulwarks into which is placed a rather thick (2mm) plank that runs the full length of the hull and acts to bifurcate the hull for planking? It seems a little redundant and I'm considering filling in the notches and just planking as usual....of course part of me is curious as to whether this feature has any benefits, so I might try it - thought I'd canvas you all for comments....I may post the question elsewhere in the forum..... In the meantime, here are some pictures hamilton


- 69 replies
-
- 6
-

-
- fair rosamund
- occre
- (and 1 more)
-
Thanks Crackers once again for even more interesting historical information! This is very illuminating. hamilton
-
I've only build 1 mamoli kit so far - the Gretel - though I have another (Yacht America) on the shelf. I recall having to make a lot of adjustments to the bulkheads on the gretel to get a fair run of planks on the hull - their CNC parts were made of decent ply, but as I say they were not entirely accurate. I replaced almost all of the cast metal parts with scratch-built wooden ones, but this is a matter of taste, really. The wood supplied with the Gretel (and from what I can see the America, too) is very high quality - and I imagine that this is consistent with a higher end kit like the Surprise. I see from your signature that you've got the MS Syren on the shelf - this is a very fine kit (I've got it too), though not much variety in the wood. Mamoli supplies more exotic woods, but suffers in the instructions/plans department. The Syren plans are far and away better than anything I've seen from Mamoli (as is generally the case with Model Shipways), and obviously Chuck's practicum is a much better user-guide than what is supplied with most kits from any manufacturer. The Gretel and America are both rather simple rigs, so the plans were adequate as far as that goes, and most of the rest you can kind of feel out. There are a lot of isomorphic drawings with measurements included rather than scale plans. Others could say more I'm sure. Good luck hamilton
-
Thanks Crackers! I knew about the lady in the painting and about the ship, but didn't put the two together! And the Portsmouth connection is nice to have, too - at least it explains why OcCre included an American flag with the model! Though I don't think she would have flown an American flag in her slaving days (since the other sources I've seen say either Brazil or Cuba)...... hamilton
-
Thanks Bob - just popped by your Essex log - she's looking great! Haven't done much on FR these last days - just working the sub-deck a little to get it to fit on the bulkheads and planning ahead for deck planking...hopefully I'll have a chance to install the bulkheads and deck this week. I'm heading to Italy on Friday - a bit of work, a bit of pleasure. And then I'll have much to make up for with the Admiral when I return.....back soon hamilton
- 69 replies
-
- 1
-
-
- fair rosamund
- occre
- (and 1 more)
-
Your work is great - I built the 1:100 Amati Bluenose a while back and have often been tempted to try this larger one - such a beautiful hull! You're doing her great justice here hamilton
-
She's looking amazing, Bob! Very impressive work - I just read your comment on Alistair's Pegasus log and now I can see where you were coming from! hamilton
-
Hi John: I built the Kate Cory a few years ago and had a lot of fun doing it. She builds up into a really nice model - that was before I joined MSW but I took some photos of the process - if you need some references for particular parts of the build just let me know and I'll gladly share if I've got what you need. Good luck hamilton
-
Thanks BE - some magic will certainly be required - though maybe not as much as with the Blandford! hamilton
-
Thanks Ed - I suppose this means that there is ample room for interpretation! hamilton
-
Looks great Mike - nice to see you got through the planking tribulations with such a good result....I've never used PVA for planking - always CA for a fast hold....but I use slow acting, gap filling CA in small quantities...... hamilton
-
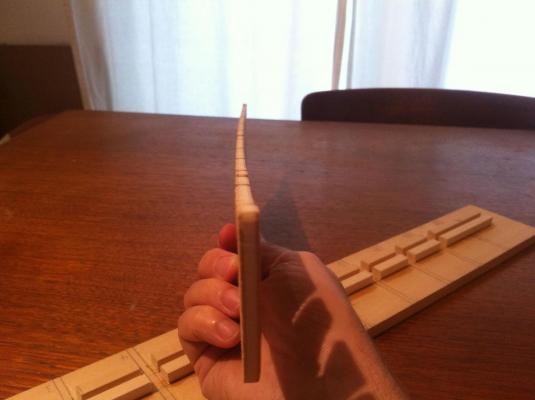
Hello there: I think I've corrected the keel warp. Clamping the keel in a building board mostly straightened it - there is a tiny bit of bowing still at stern, but this I can correct in the installation of the subdeck. As I've said, the ply supplied with the kit is very poor - the stuff represented in the photo-illustrated instructions seems of higher quality, and looking at the photos is making me jealous of whoever got to work with the better wood. Anyway....the bulkheads needed only very minor adjustments to get them to fit and on first blush there are no glaring issues (which is a relief after the challenges with Corel's Greyhound!!) The bulkhead slots in the subdeck need to be corrected, but this is a minor issue - though the sound of me filing out the slots turned out to be a major issue for the Admiral who was sitting close by trying to work....so that task has been postponed. Here are some photos.... hamilton


- 69 replies
-
- 4
-
-
- fair rosamund
- occre
- (and 1 more)
-
Hello there: I read Ulises Victoria's article on deck planking - very clearly written and informative - and I've planked a few decks in the past. But one thing I've wondered is whether any particular conventions governed whether a 2, 3, 4 or 5 butt shift was used....Was it: 1. Builder's/designer's preference 2. A matter of time-period? 3. A matter of vessel type/size/rate? 4. A matter of national convention? I've almost exclusively used a 4-butt shift in all the models I've built - with the exception of a couple where none was used or where a 2-butt shift was used... I'm currently building the Fair Rosamund from the OcCre Dos Amigos - a Baltimore clipper of the early 19th century - any hints on the deck planking arrangement? hamilton
-
Hi Jason: I've been a bit of a lurker on MSW lately, but coming back and visiting your log I continue to be impressed by your work! The rigging is great - amazing detail and a beautiful look - I'm becoming more and more tempted to pick up this kit! hamilton
-
Hello Mike and Richard! Thanks for stopping by - still waiting for some updates on the Endeavour and Mercury, Richard!! Mike - unfortunately I can't pursue the strategy you suggest. I'm a kitchen table modeller and have no power tools except a dremmel that I pull out on rare occasions. Everything else by hand. Cutting a new keel is simply not possible, attractive as that option may be, so I'm reduced to clamping and squaring the old fashioned way. The problem with the warp is that it seems to be more pronounced along the top edge then it is along the base. With my Toulonnaise keel, clamping along the bottom edge solved the warping issue. With this one I'm not sure....I will likely have to try to fair the keel as I attach the bulkheads. I'm spending this evening making my building board, so once that's complete I'll have a better sense of how deep the problem goes.... Anyway, I've come to expect these things in ship kits and not get too frustrated or upset by them - simply another problem to solve is all.....(of course, talk to me when I'm half way through the planking and I might be singing a different tune!) hamilton
- 69 replies
-
- 1
-
-
- fair rosamund
- occre
- (and 1 more)
-
Thanks Mark and Andy! Started the build this evening by cutting out the bulkheads & centre keel from the billet. I have to say the quality of the ply supplied with this kit is quite poor - VERY soft. And of course the keel is bowed, and so I'll need to devise a decent clamp for it - not only along the base, but to correct a warp that runs along the top of the keel part....could be tricky. My Toulonnaise keel had a decent warp in it and between clamping the base of the keel and working hard to square & strengthen the bulkheads it ended up getting worked out. Hopefully the same will apply here...... Tomorrow I'll make the clamp/building board, put on the mast mortices, make some bulkhead support beams & begin installing the bulkheads. This one's going to be much bigger than the Blandford.....good thing it's a gift - I've nowhere to put it!! hamilton