HOLIDAY DONATION DRIVE - SUPPORT MSW - DO YOUR PART TO KEEP THIS GREAT FORUM GOING! (89 donations so far out of 49,000 members - C'mon guys!)
×


niwotwill
-
Posts
596 -
Joined
-
Last visited
Content Type
Profiles
Forums
Gallery
Events
Everything posted by niwotwill
-
 Hey Robin I just read Patricks log about using Sculpy to make carronade wheels and thought I'd try to make stern carvings with Sculpy. Wife said I could use oven. Don't make a mess. Lets give it a go and see how we do, Hey! She's coming along wonderfully Merry Christmas and Happy New Year Stay well and stay safe Will
 -
Love the look of the longboat on the gallows bits and as Gahm said it really make the scene. Wonderful work. Can't wait to follow along to see what other amazing feats you have to show. Happy Holidays Stay well and stay safe Will
- 950 replies
-
- 2
-

-
- syren
- model shipways
- (and 1 more)
-
Patrick Simply amazing the ingenuity of your solution. Truly a moment of glory they look wonderful. I now need to start learning how to use sculpy. A friend suggested I try it but I've never had the nerve to use the wires oven. Again WELL DONE 👏 Stay well and stay safe Will
-
Finished the belaying pins 125 total more than enough but I'm sure some will break during rigging. Started making the roller slides for beneath the carronade slides. I used a brass square tube cut to length then drilled holes for roller axels. Cut slices of brass tube at correct width for the rollers and after cutting off one side of the square tube leaving a channel. Used brass rod for the axels and pushed it all together. A small drop of silver solder on the ends of the axels keeps it all together. Just need to blacken and they'll be ready to use. I've been working on the longboat and am now touching up the paint after the cap rail, rubbing strip, stem, keel and stern post I'll post results when the project is finished. Okay I'm putting off the carronades since I don't like the look of the breech ring and the mounting pieces so I'd better get back to it. The mounting pieces I'd made were to unfinished looking so I took a couple and filed the sides and the overall shape. I like them better now with a smoother look. So I did 2 and now only 30 to go. hahaha I'm going to change the breech rings to look more as they were part of the casting rather than added on. I saw one post where the rings were made from wire/rod and inserted into holes drilled in the carronade body. When soldered the fillet should give the appearance of being one piece. Well that it for now I'll let you know how it all turns out Stay well and Stay safe Will
-
Just stumbled onto your log and thought I'd follow along. Many great ideas and techniques that i'll put to good use. Many thanks. Your Syren is looking very nice can't wait to see more. Will
-
Patrick she's looking very good I like you margin planks and the scarf looks nice equal on both sides Port & Starboard. I notice you went with a darker red paint I like the darkness not a over bearing red color that's why I went with vermillion red with a little brown. Now the belaying pins per Thomas he dropped me the not and the photo is in his log posting #600. It really helped to have a sketch with dimensions in front of you so you could eyeball the distances. Hope this helps Stay well and stay safe Wii
-
Thomas Just a note of thanks. Today I finished making 125 belaying pins per your method and I'm quite proud of how they turned out. Again many thanks and I keep looking for longboat progress. Stay well and stay safe Will
-
You are very correct on bending the ribs but the finished job looks great. Very nice spacings and the floorboards look extremely nice. Great job. Just a note I started to work on the longboat as a break and hadn't dry fit the furnished stem, keel and sternpost only to discover that i'd not shaped the bow in the radius of the furnished stem. So to fix the problem I used Sculpey to copy the bottom and used it as a pattern to make my own stem, keel and sternpost. I'll post the results when finished. Beautiful job. Stay well and stay safe Will
- 950 replies
-
- 1
-
-
- syren
- model shipways
- (and 1 more)
-
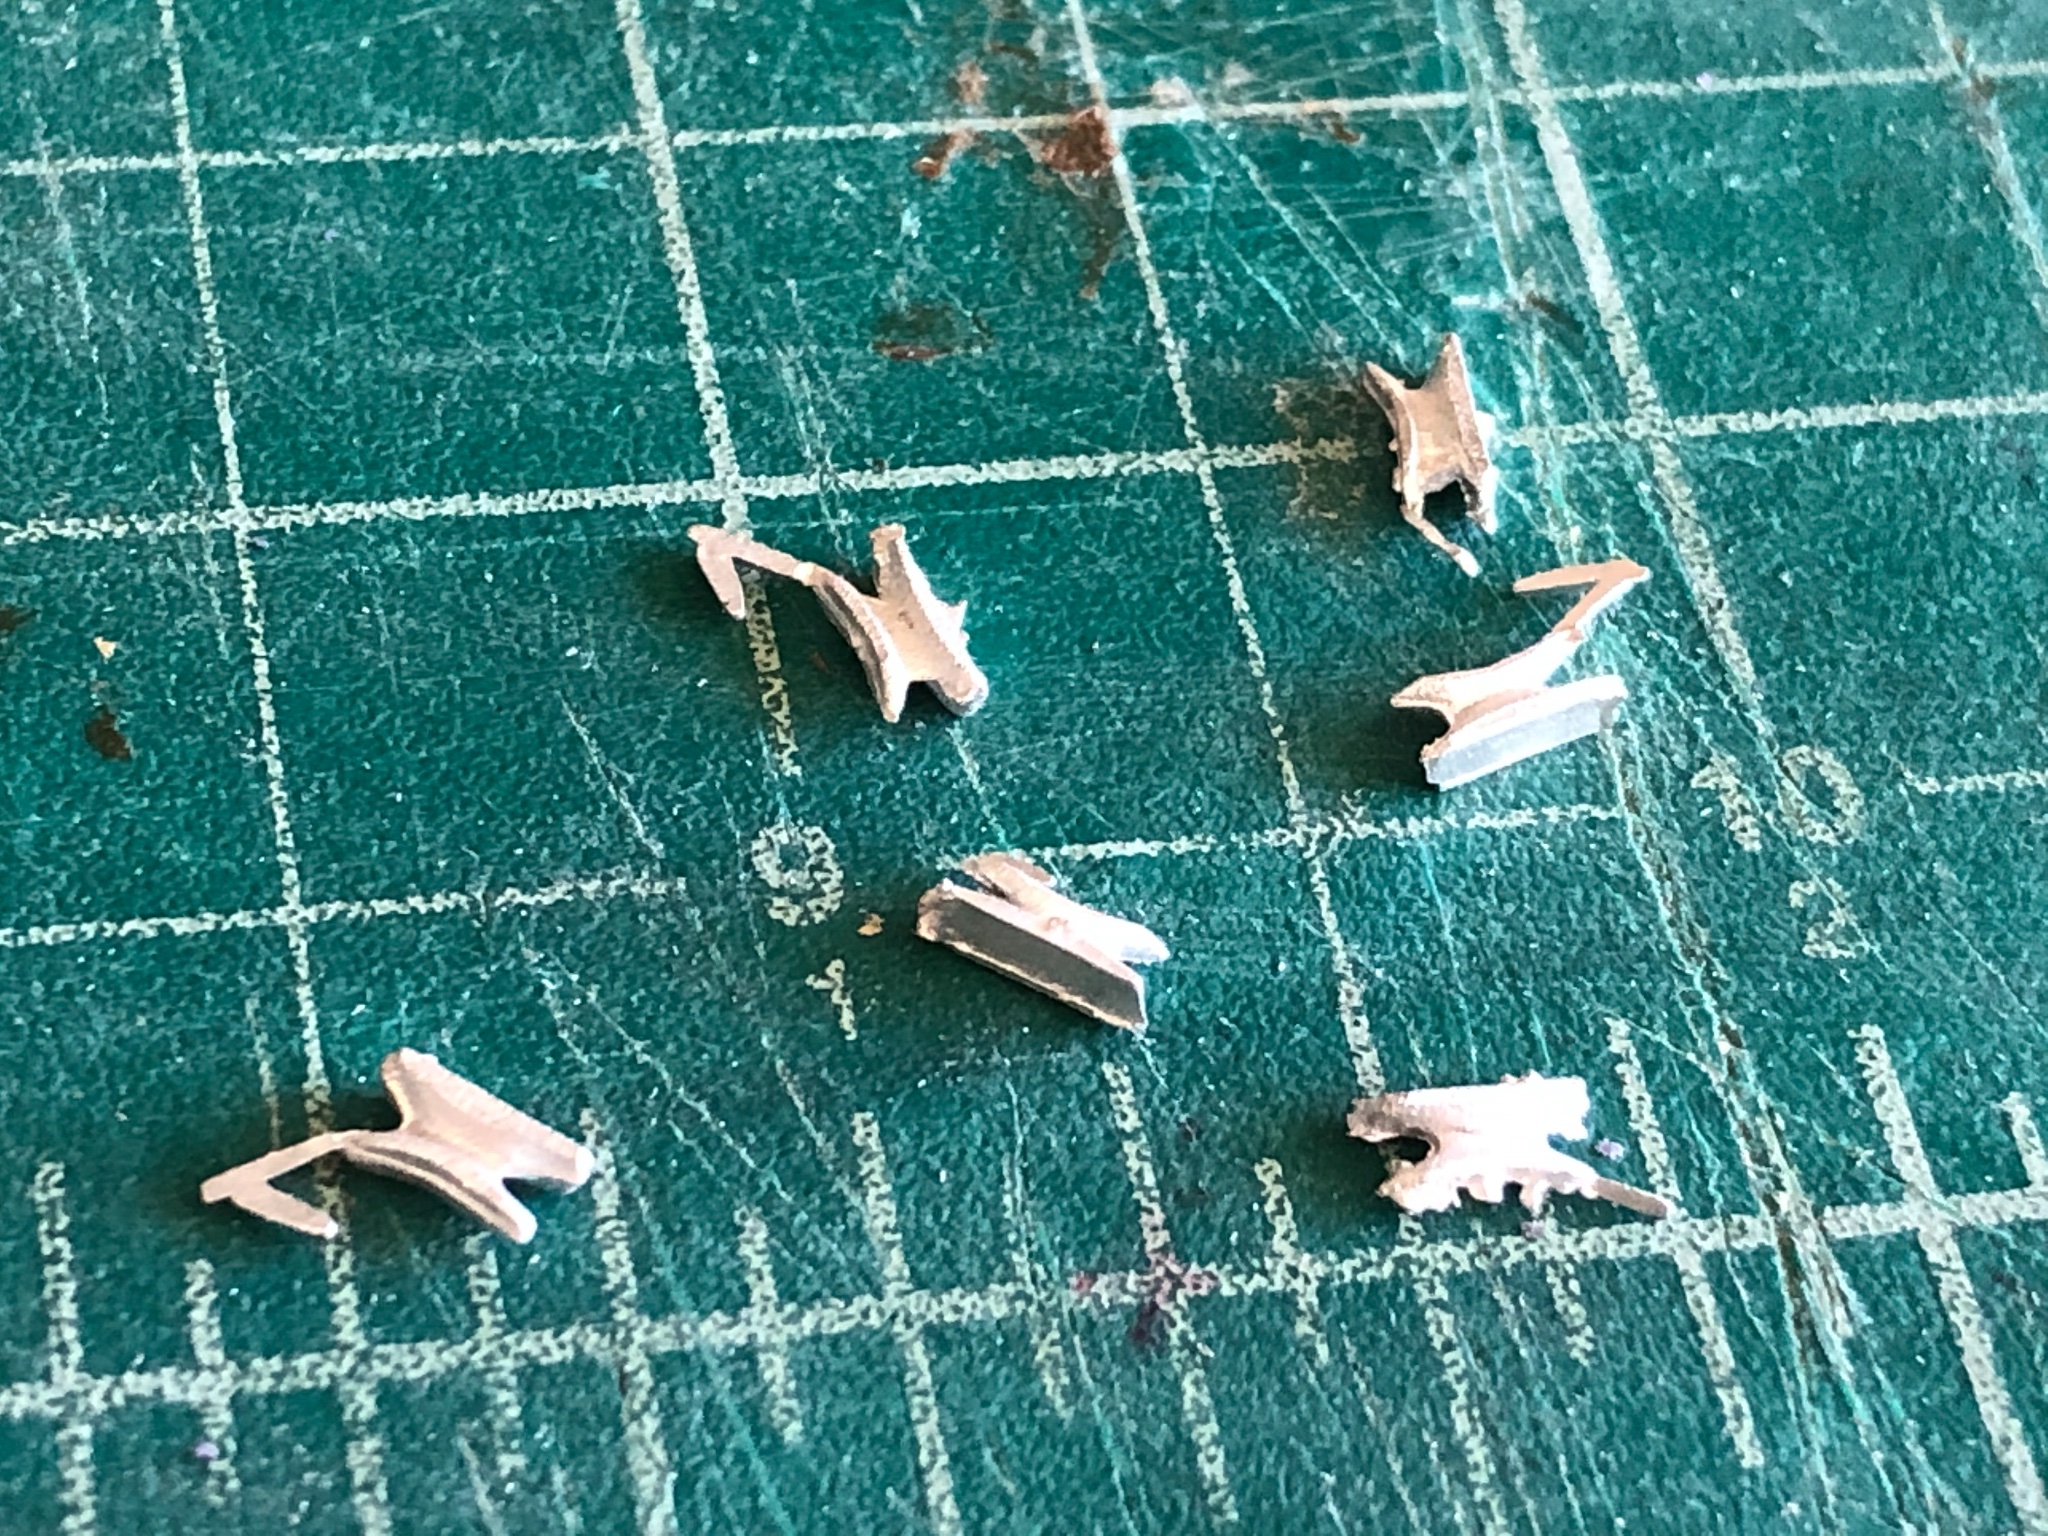
Progress is slowly being made on the carronades. I worked on centering the barrels in the gun port openings and decided to not use the ring on the bottom of the barrel but instead use a rod. The rod will act as an axel for the mounts. A slot was cut across the barrel and then a 1/32" rod was soldered into the slot. Instead of the wooden mounts I made mine from copper and soldered the pieces together. Using an idea I found in another post I took a 1/32" by 3/32" brass strip and cut a groove the length an then laid a brass tube in the groove. Tacked them together with silver solder and soft soldered the entire length creating fillets. Sliced of the 1/16" mounts like a loaf of bread. When the mounts are glued to the sled the axle will be held fast. Cutting the groove for the tube Completed mounts and carronade Well now its on to the sleds Stay well and stay safe Will

-
Thanks for the kind words PaavoOso, grab a seat and lets go for a build. I've been working on another model and have just finished the after frame patterns (#1 through #17). Frame 1 & 2 are built and ready to be set. I try to get a group of frames built so that I won't waste a batch of 'liver of sulfur' when I blacken the copper nails. Again thanks for following along Stay well and stay safe Will
-
Nice job of the deck to smooth the surface for planking. Its coming along fantastic I love to see you ideas of how to overcome obstacles. Great Job Pat Stay well and stay safe Will
-
Looking great does not convey the level of admiration your deck furnishing bring when I study the photos. The fife rails as something to behold the level of detail down to the radius edges. Amazing work. Longboat looks very nice I like the even thickness of the sides. Can't wait to see how it progresses. Great Work Will
- 950 replies
-
- 1
-
-
- syren
- model shipways
- (and 1 more)
-
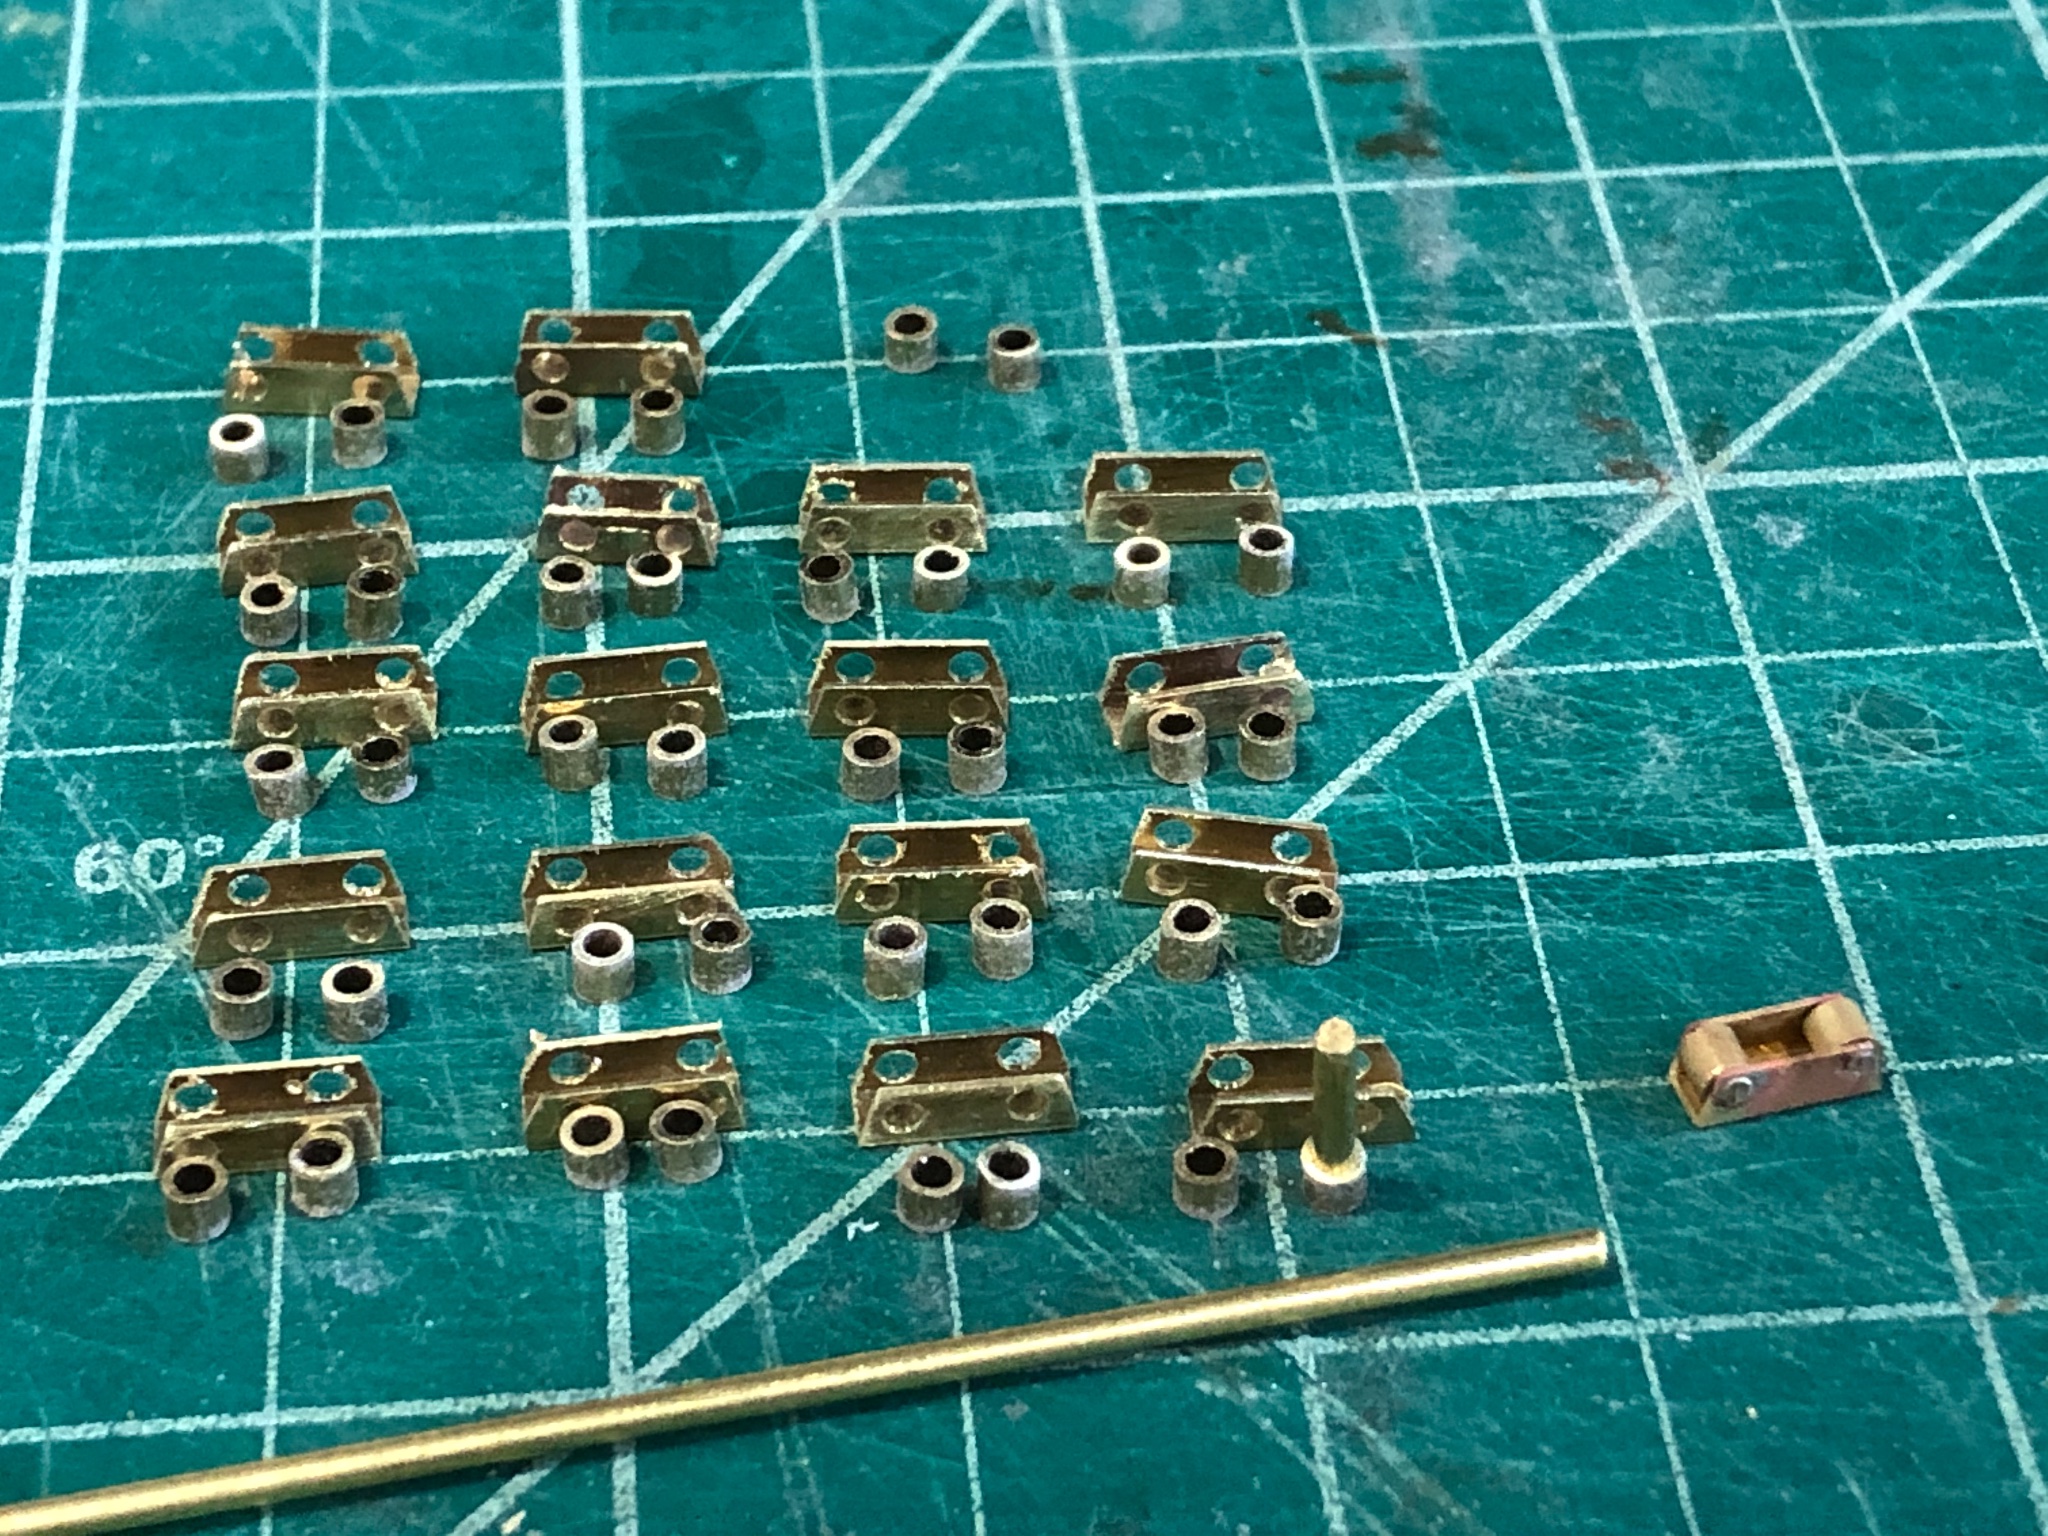
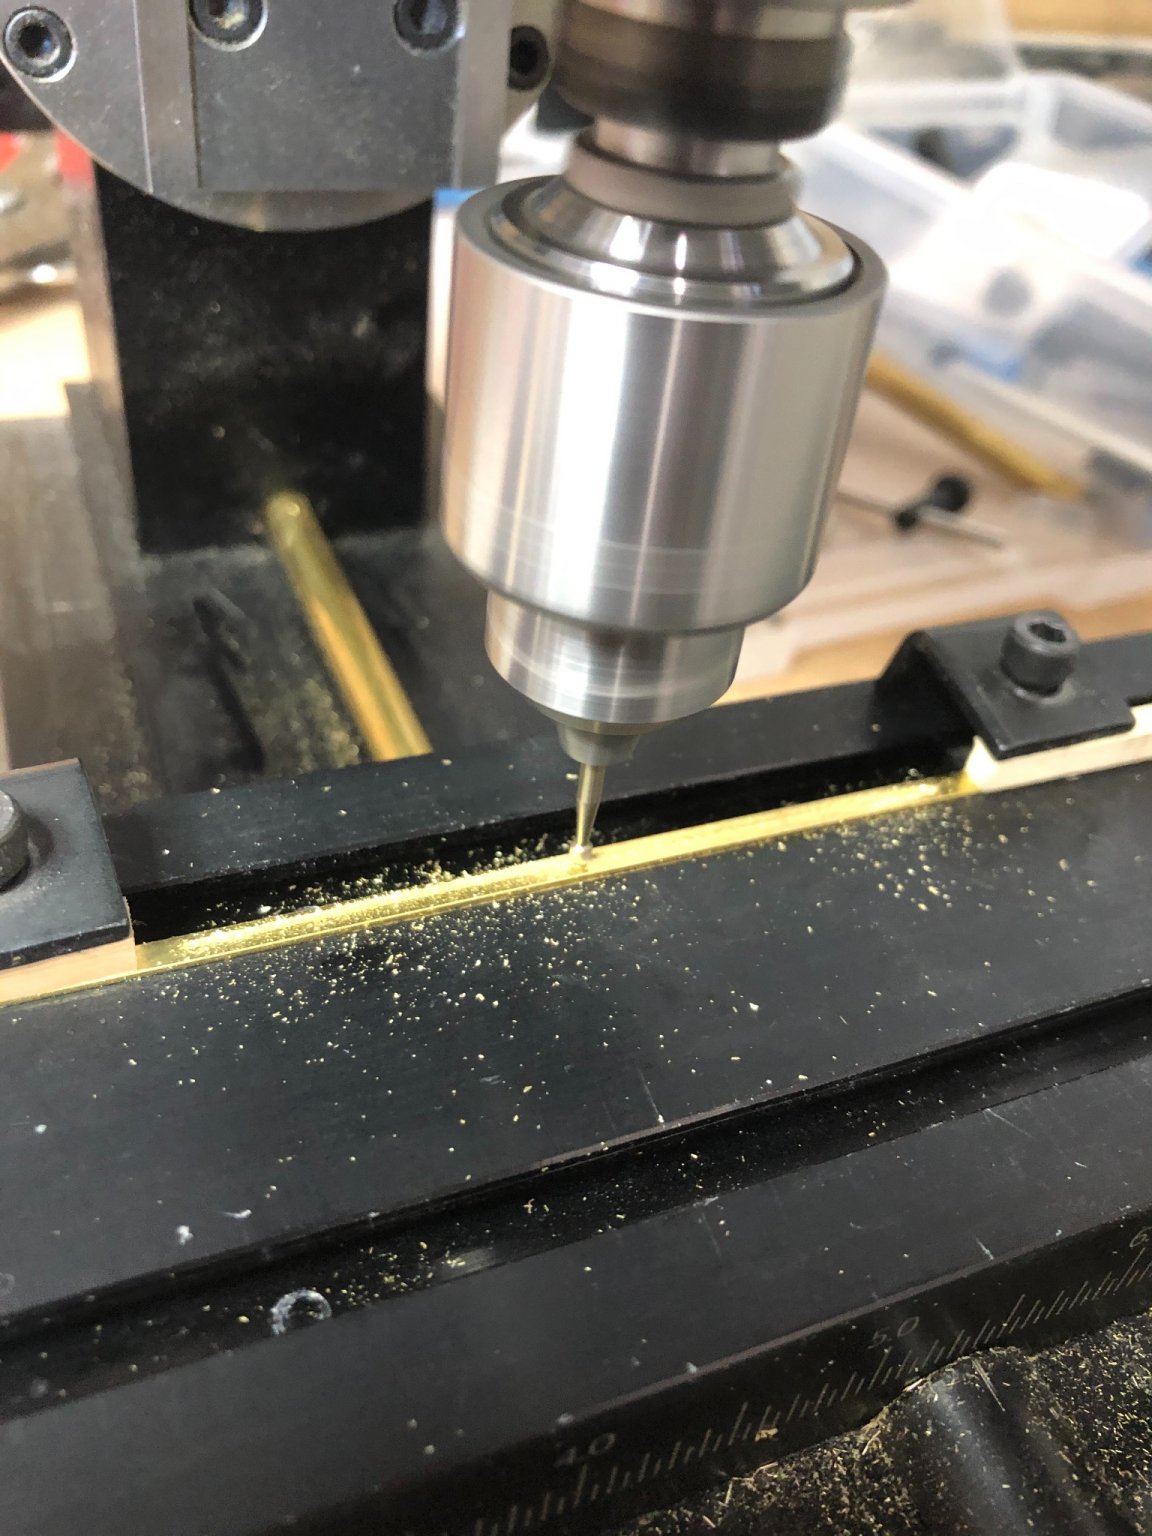
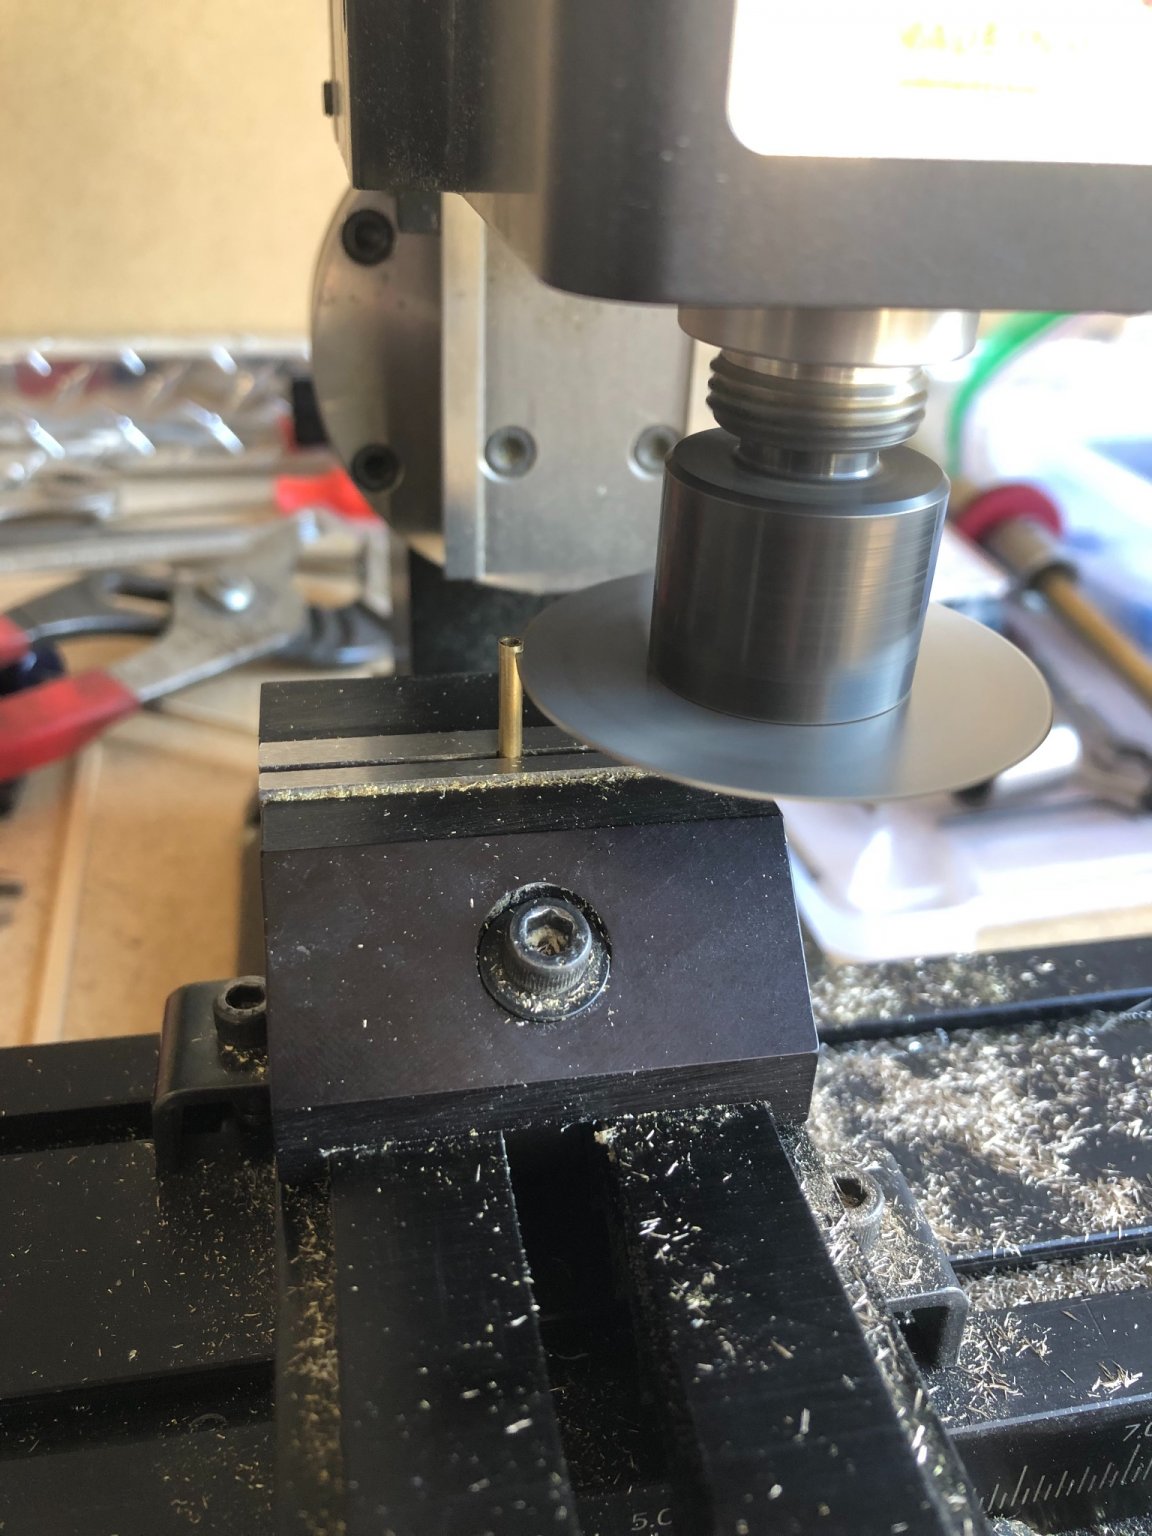
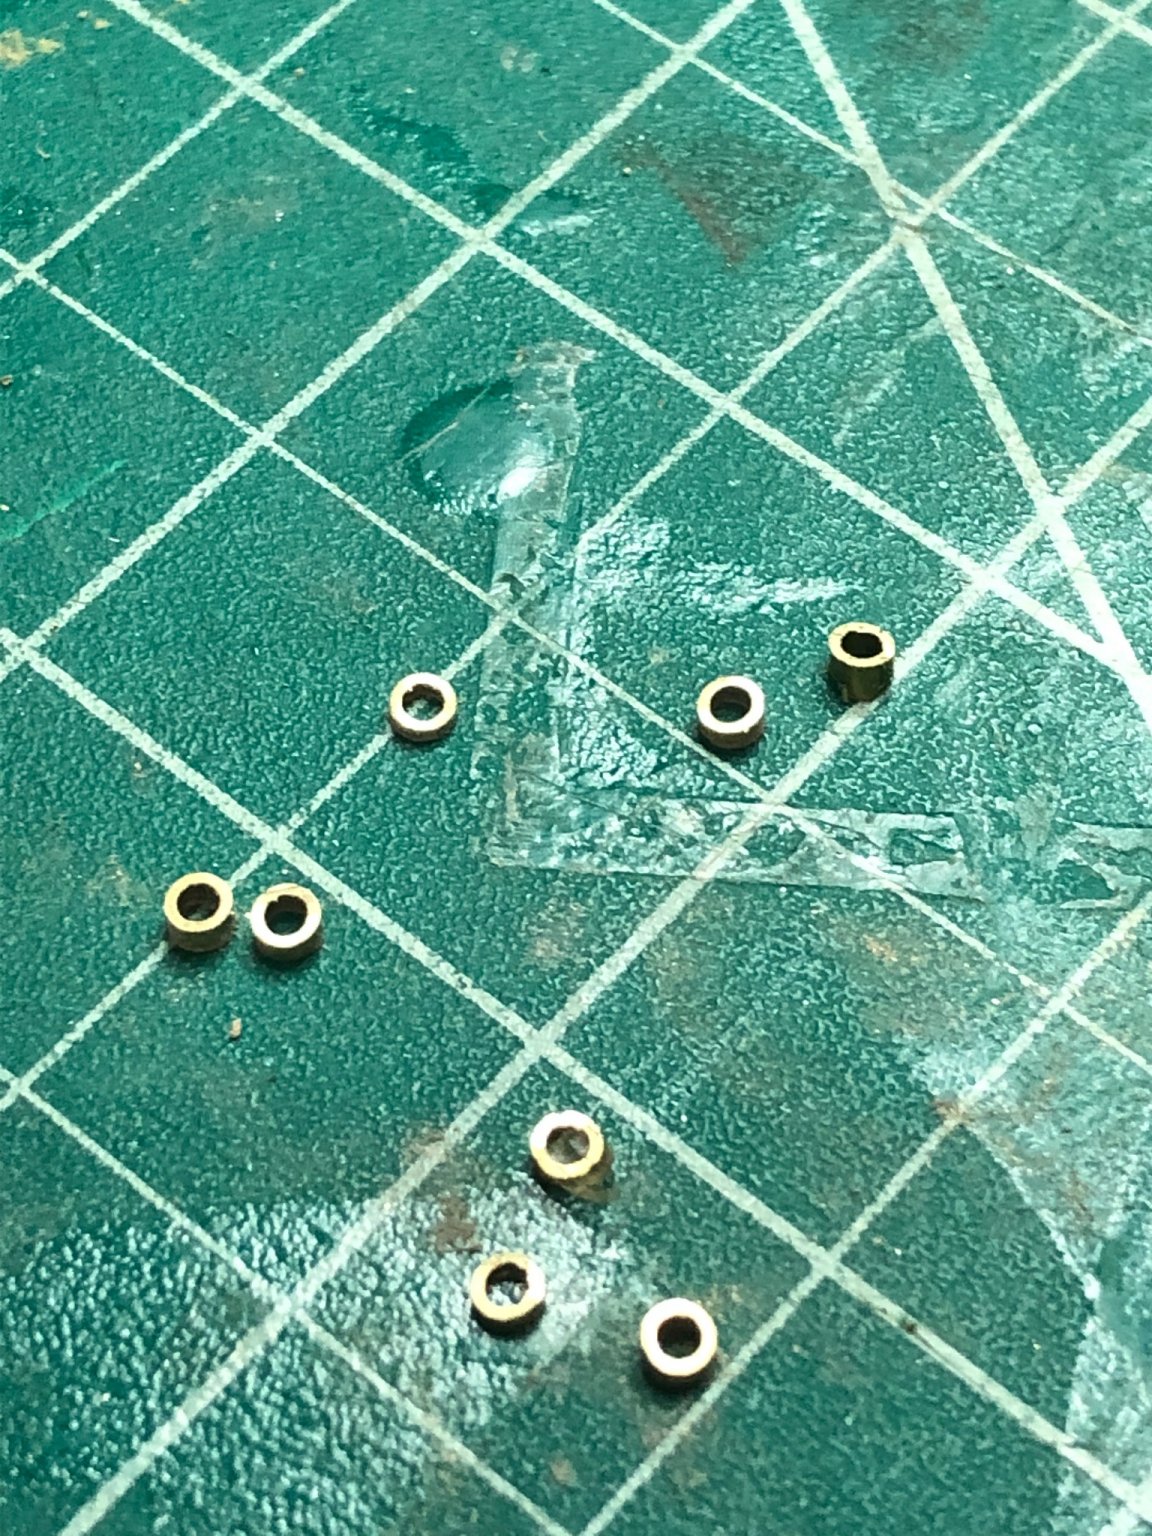
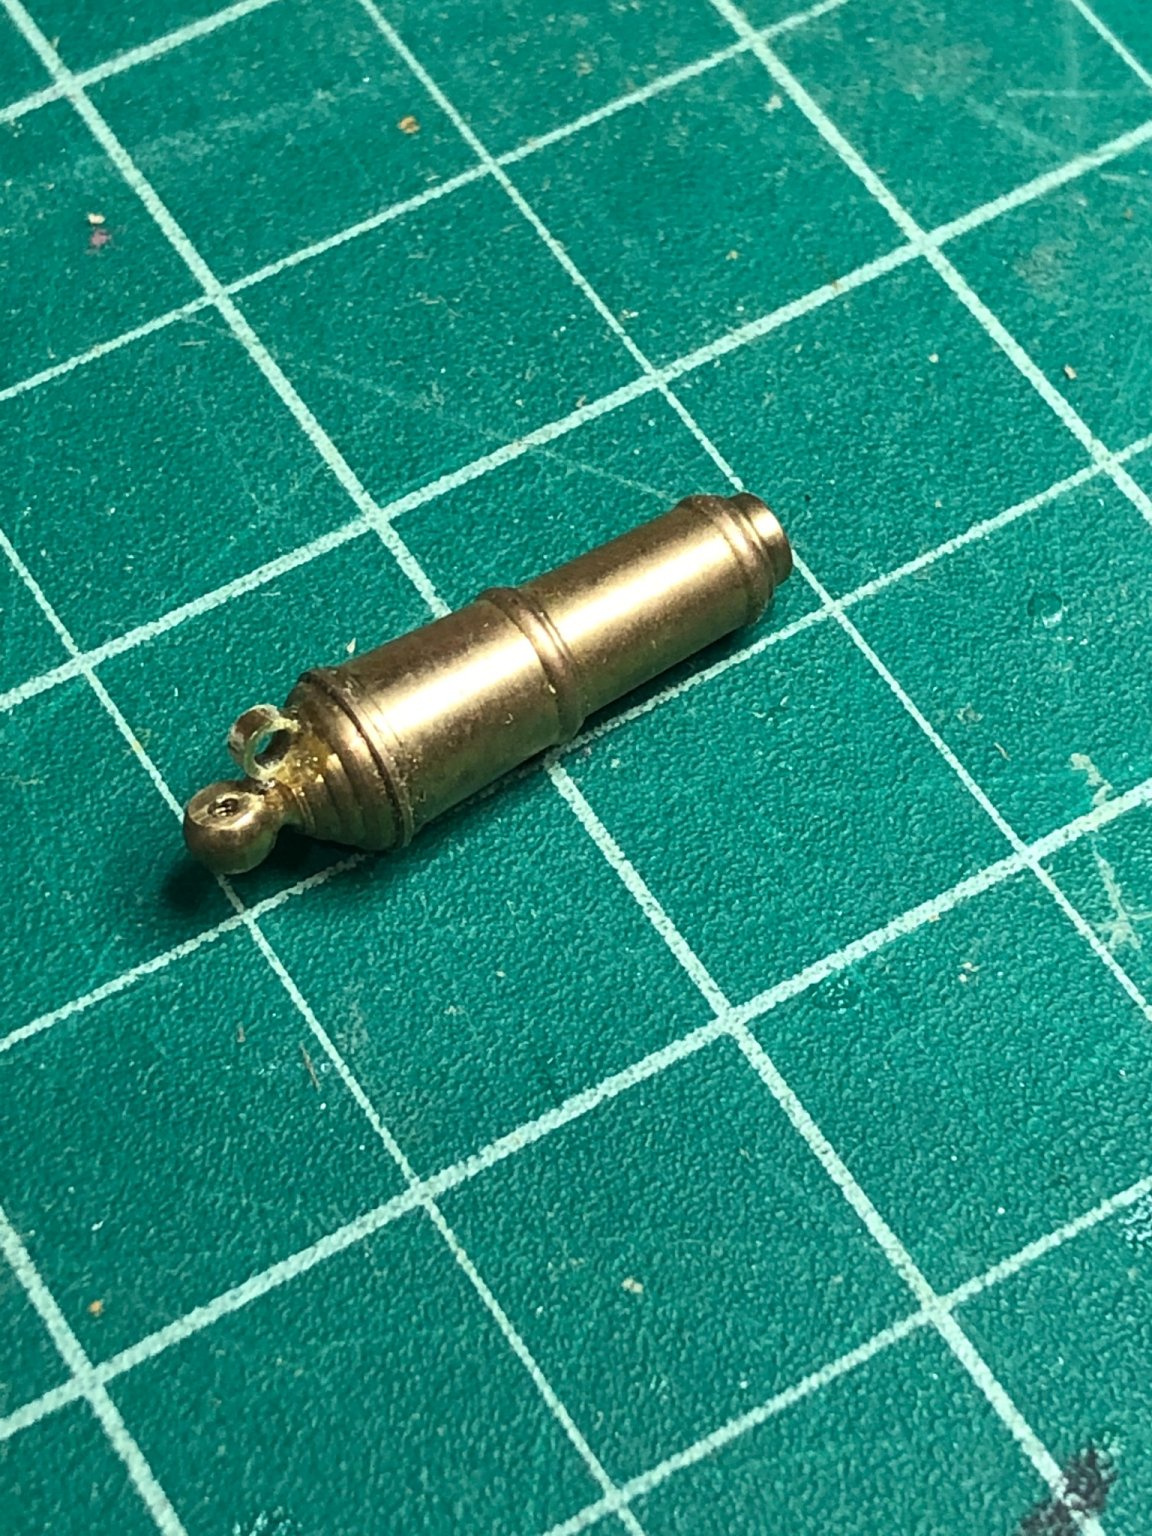
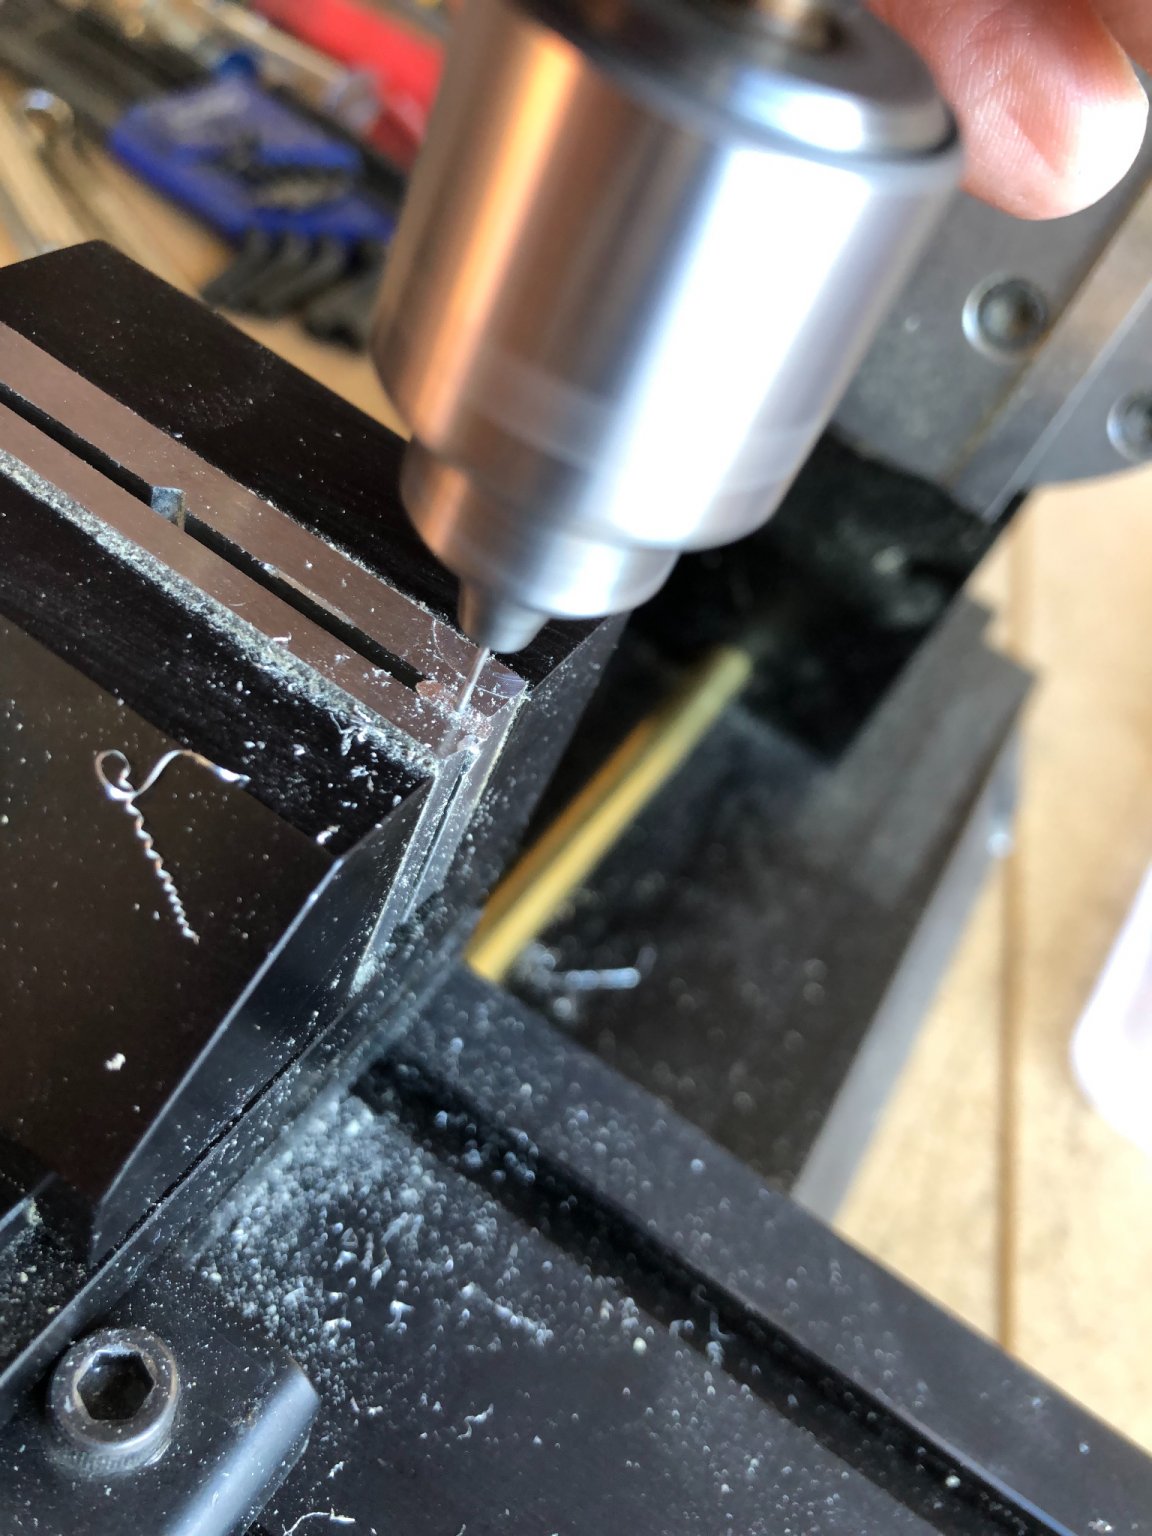
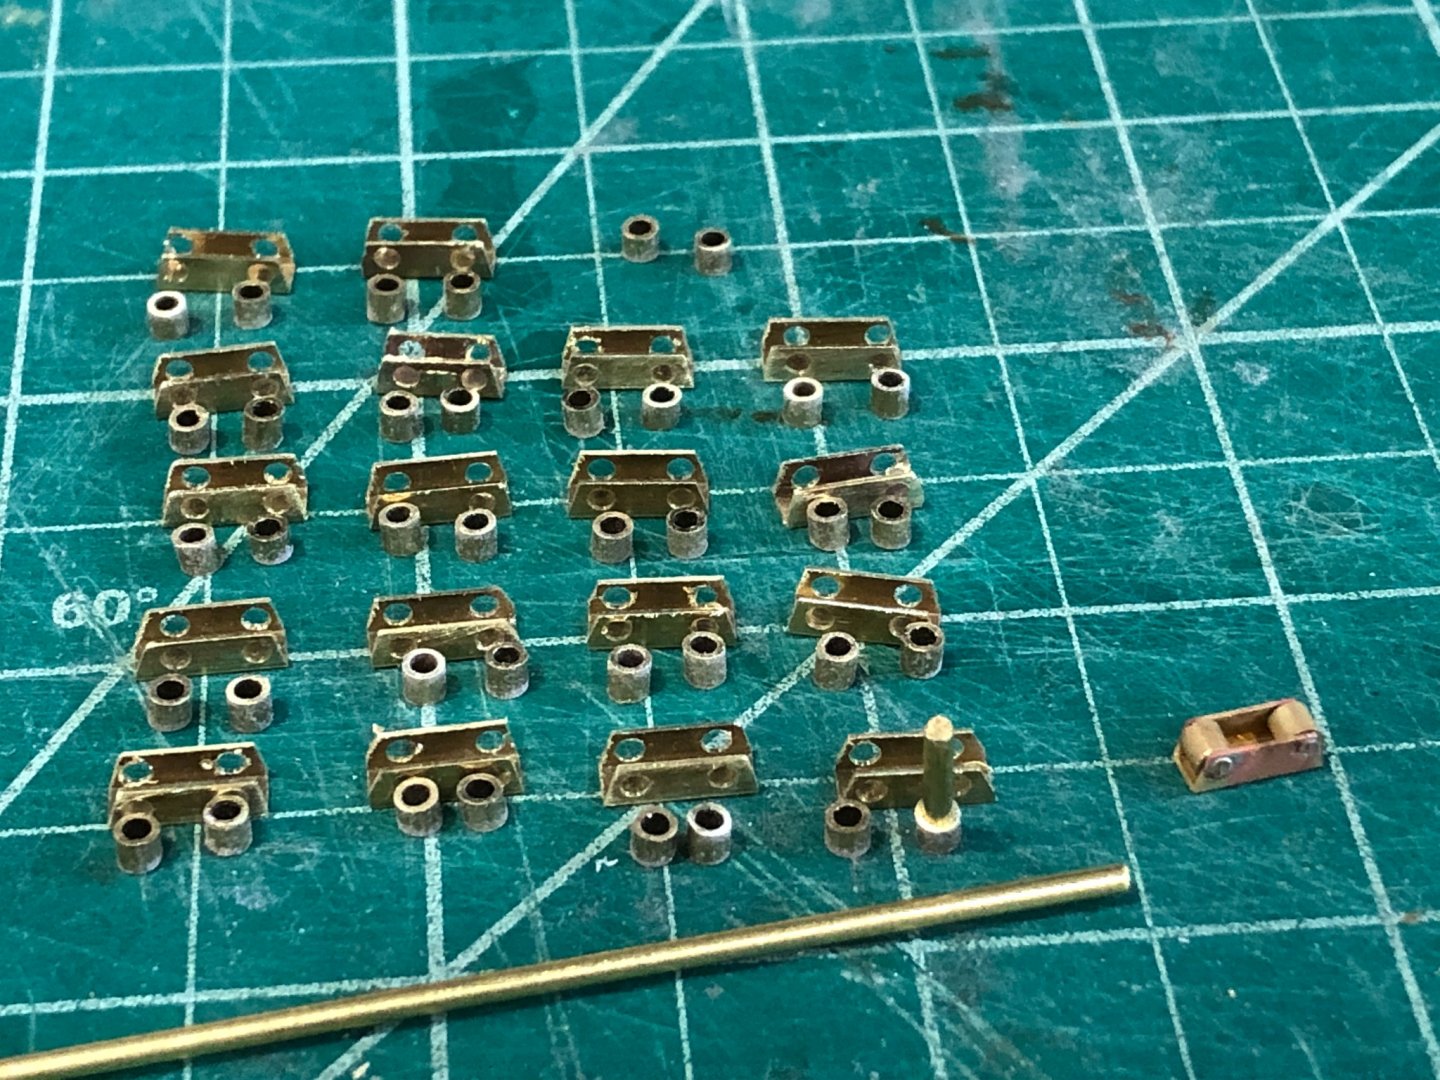
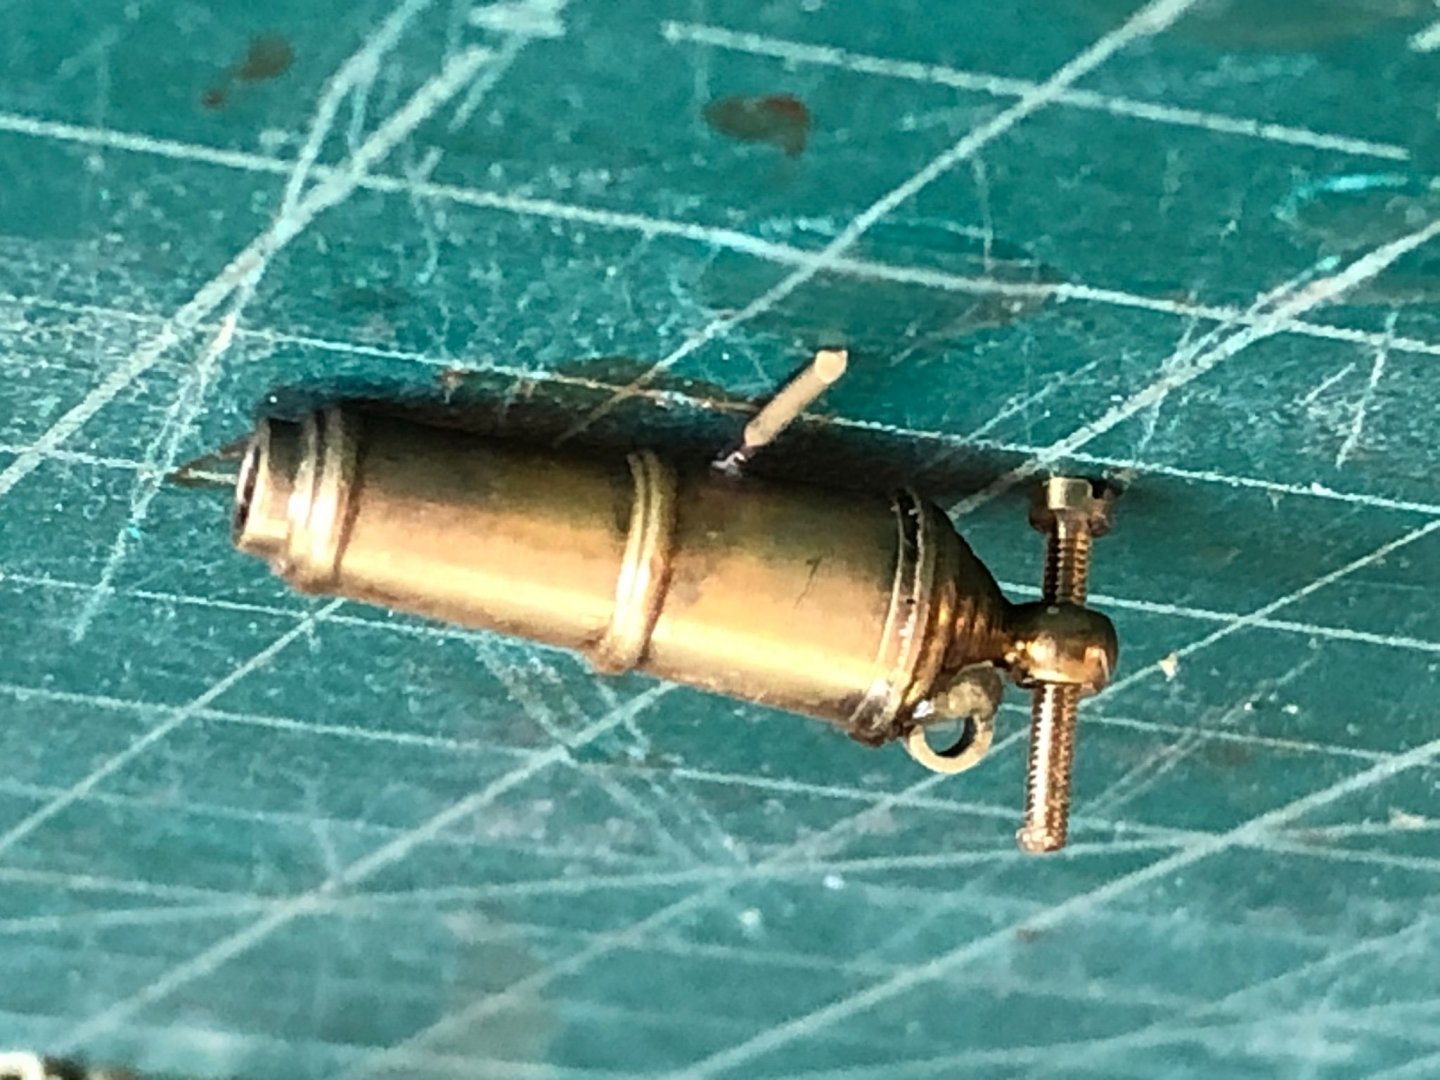
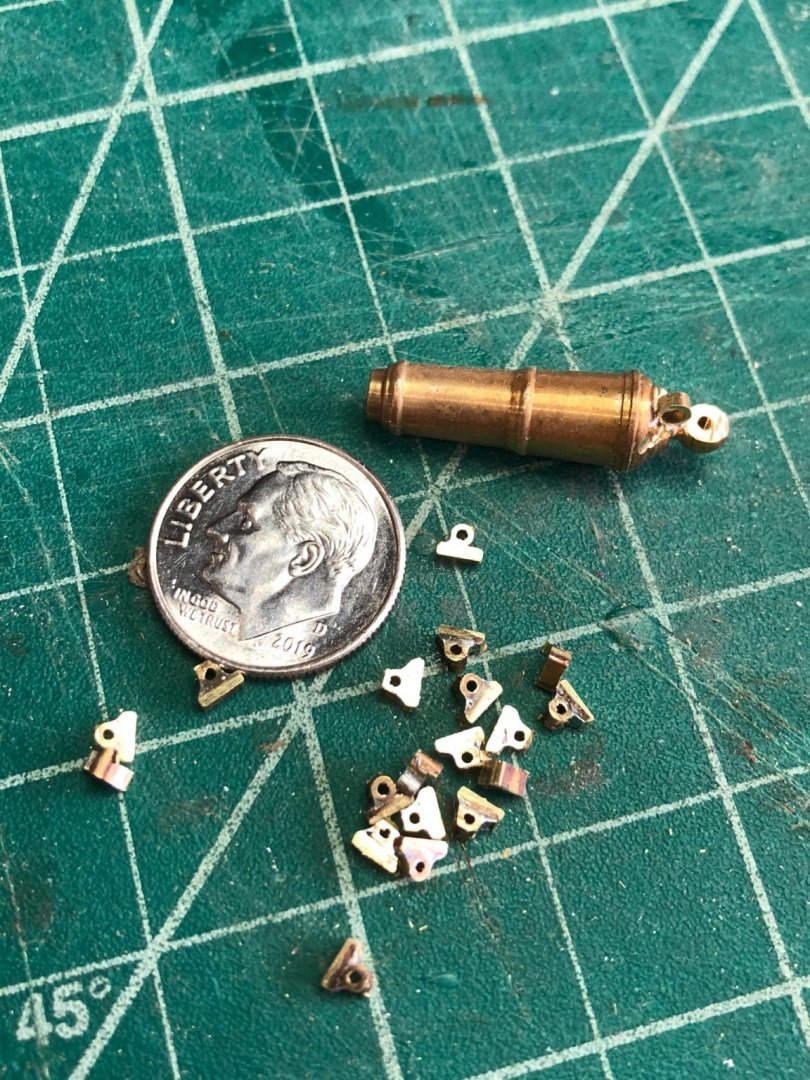
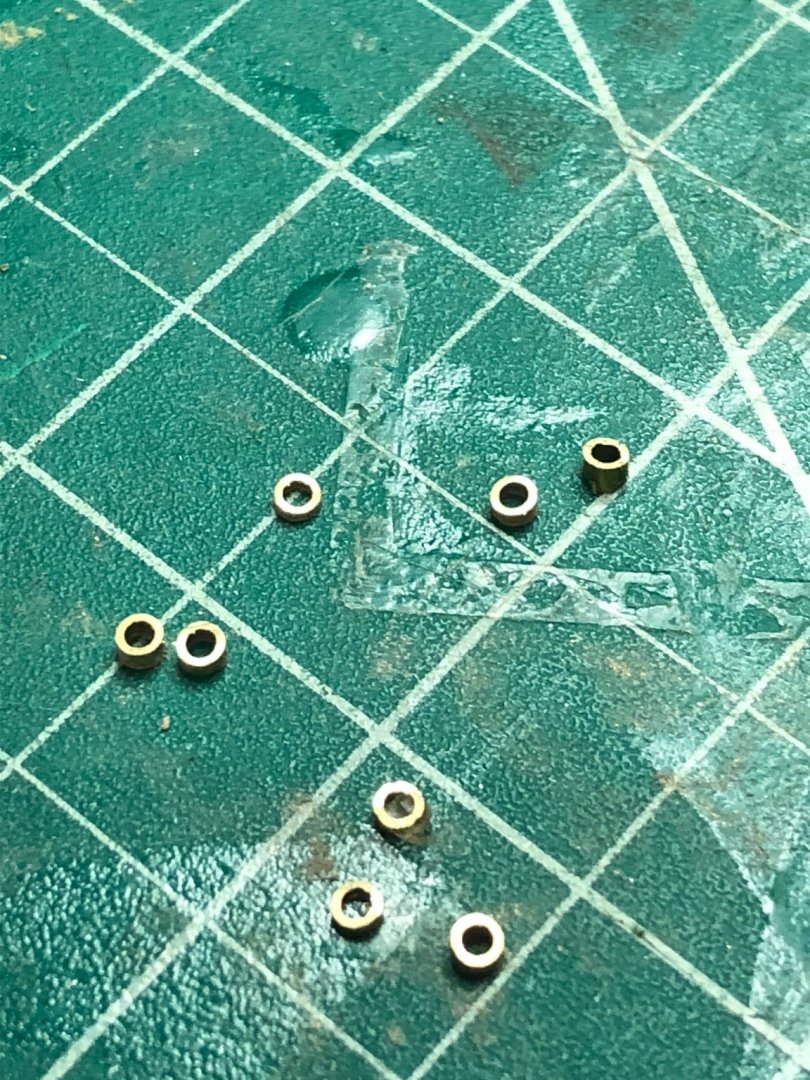
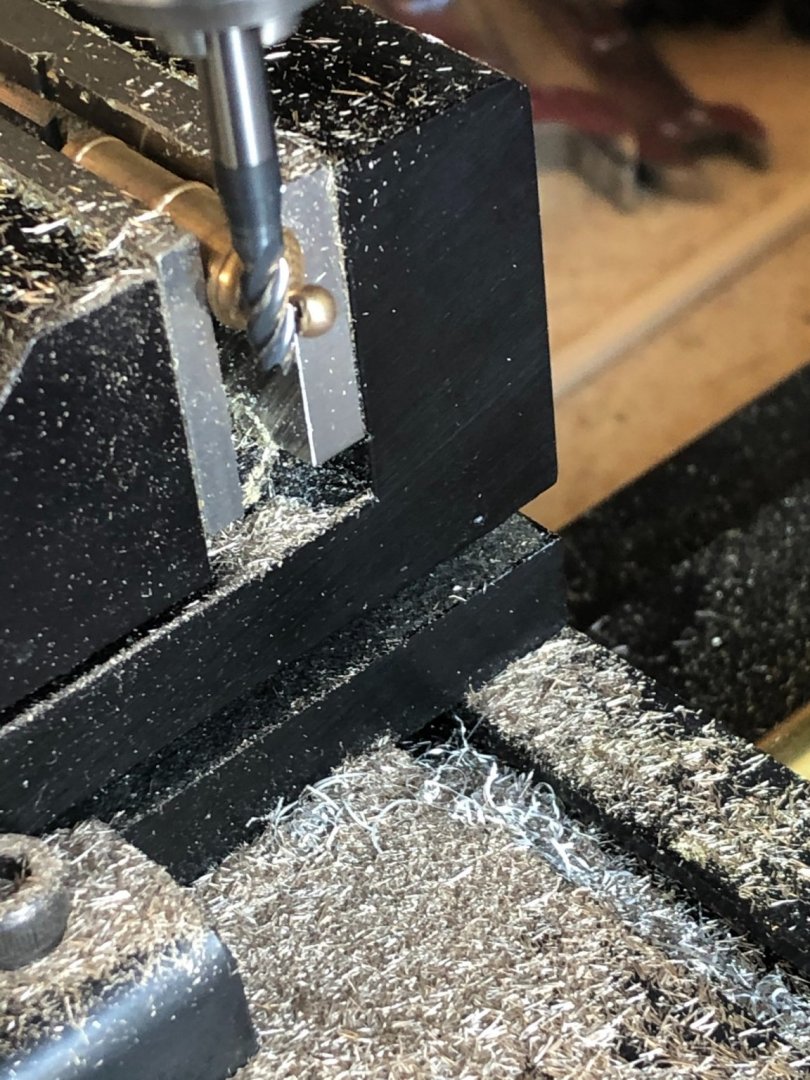
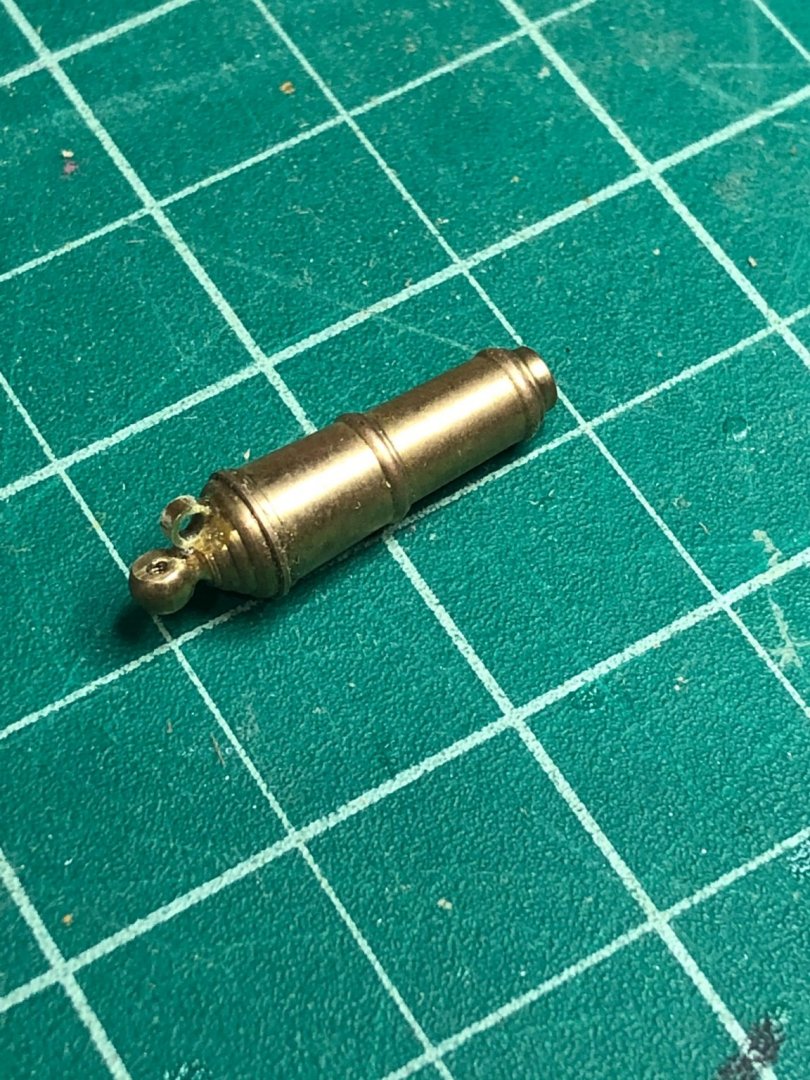
Well back to work on the sleds as said before I was using the Caldercraft kits that come with the carronades. When I did a dry fit of the sleds and mount it put the carronade barrel above center of the gun port by between 1.5mm and 2mm. After measuring all the pieces of both the Shipways and Caldercraft it was the thickness of the Caldercraft sleds causing the problem. Syren sleds are 1/16" thick, or even a little less, and Caldercraft sleds are 2.0mm thick. I've decided to use the Syren parts with the Caldercraft carronades. The Caldercraft carronades do not have a ring for the breech line so I had to modify them for a breech line ring. Started out making the rings using a brass tube with an .093 od and .058 id that looks very much in scale. I mounted the the tube in a vice on the mill bed and used a .020 kerf blade to slice of rings that were .045 thick. With the rings sliced off it was just a matter of some fine sanding to clean up the cut surfaces I placed the carronades in a vice and used a 3mm cutter to create a surface for the rings to be set without moving. I didn't think I could solder the rings to the guns with such a large difference in the material size. I could not heat the solid brass gun sufficiently to flow the solder without evaporating the light rings so its JB weld to the rescue. Using the epoxy was actually a better solution since when I put a drop of epoxy on the previously prepared surface and set the ring in place it flowed around causing a nice fillet. I'm thinking the rings may be a little to thick maybe 5 to 10 thou but for now they look ok. I can change them without to much effort if in time they still look a little out of scale. Now on the Syren sleds. Stay well and stay safe Will

-
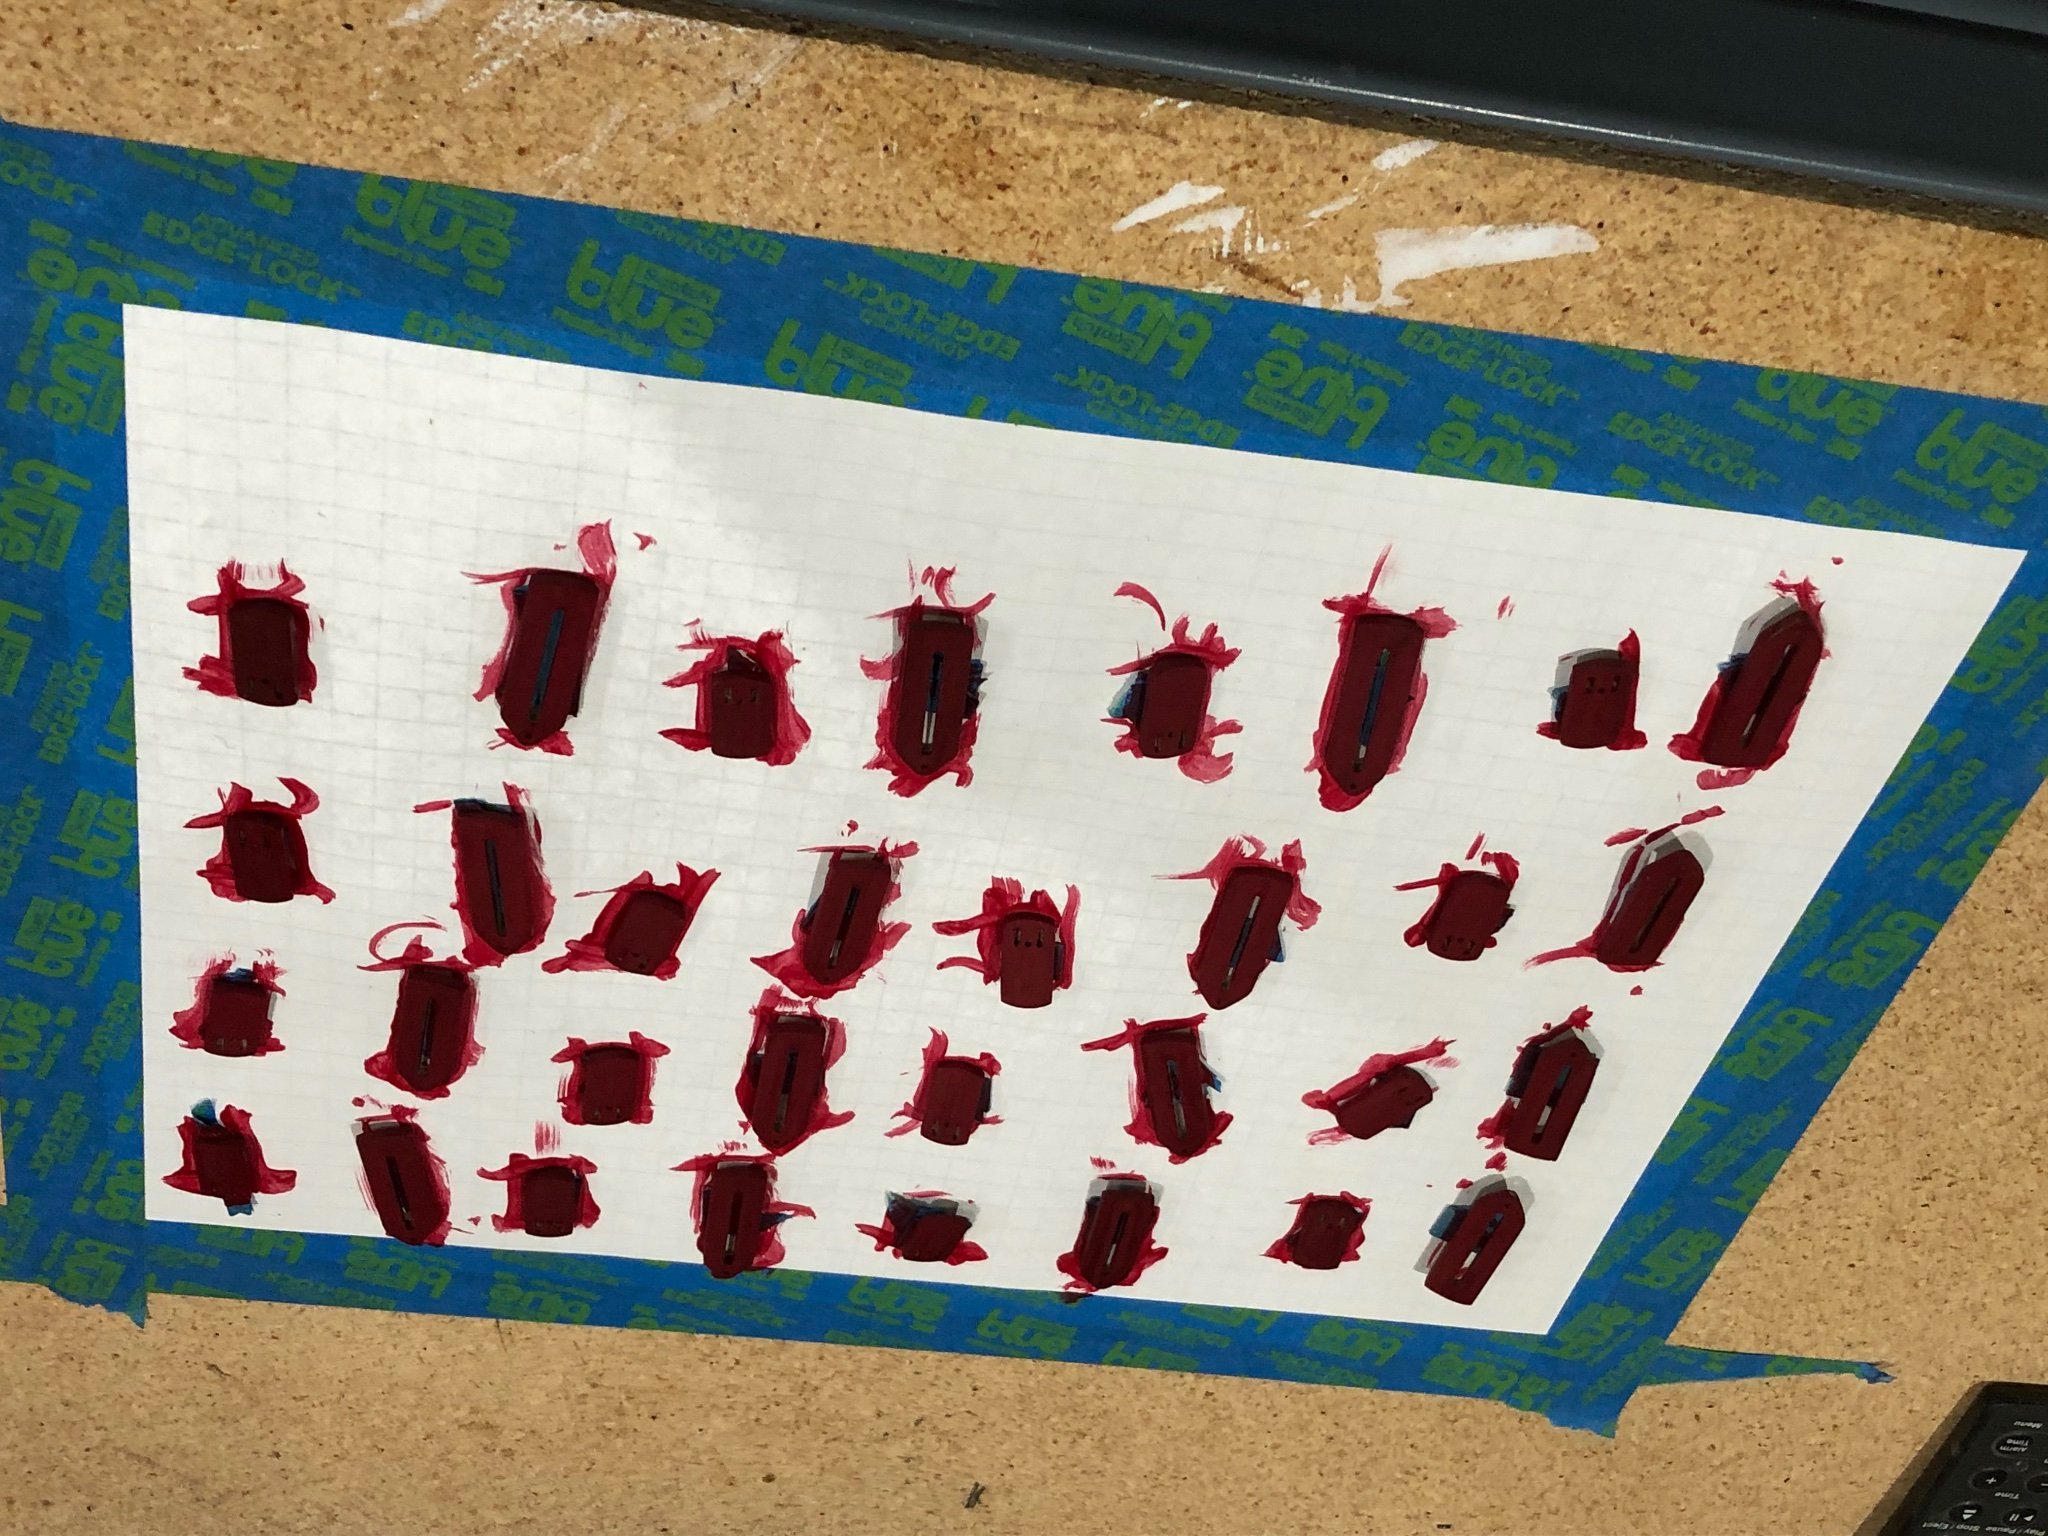
Hello everyone hope all are well after Thanksgiving. Finished the inner bulwarks by adding the cleats, ring bolts and rings as shown on the drawings and log photos. Started the carronades with beginning with the sleds that came with the Caldercraft carronade kits. Nice to clean up the parts as they are made of walnut and routed not laser cut. No char to sand off and straighten the cuts to keep them perpendicular to the surfaces. Placed all the brass pieces in a dish of white vinegar to clean them and put a slight etch for the paint to adhere. Set the sleds up to be painted and did the first coat of paint today. They already look good. The walnut sanded to a very smooth surface and it shows with just the first coat of paint. Taped parts to backing paper Painted parts first coat More to come as I assembly the sleds Stay well and stay safe Will

-
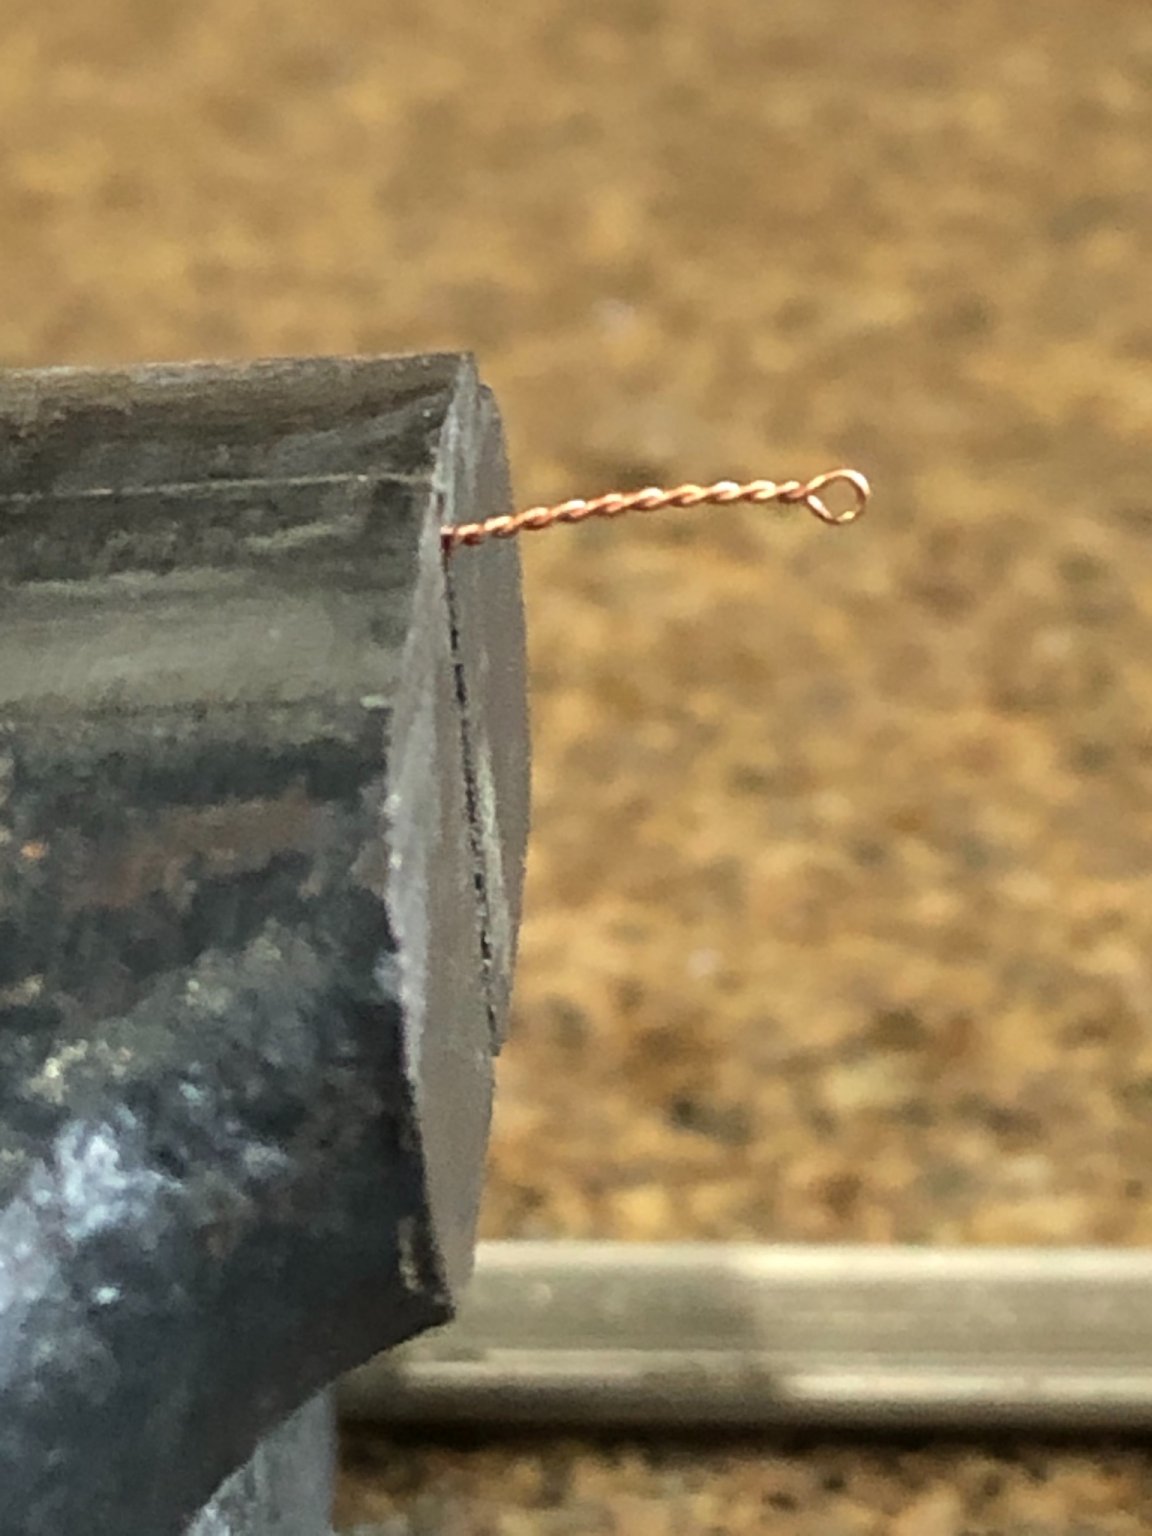
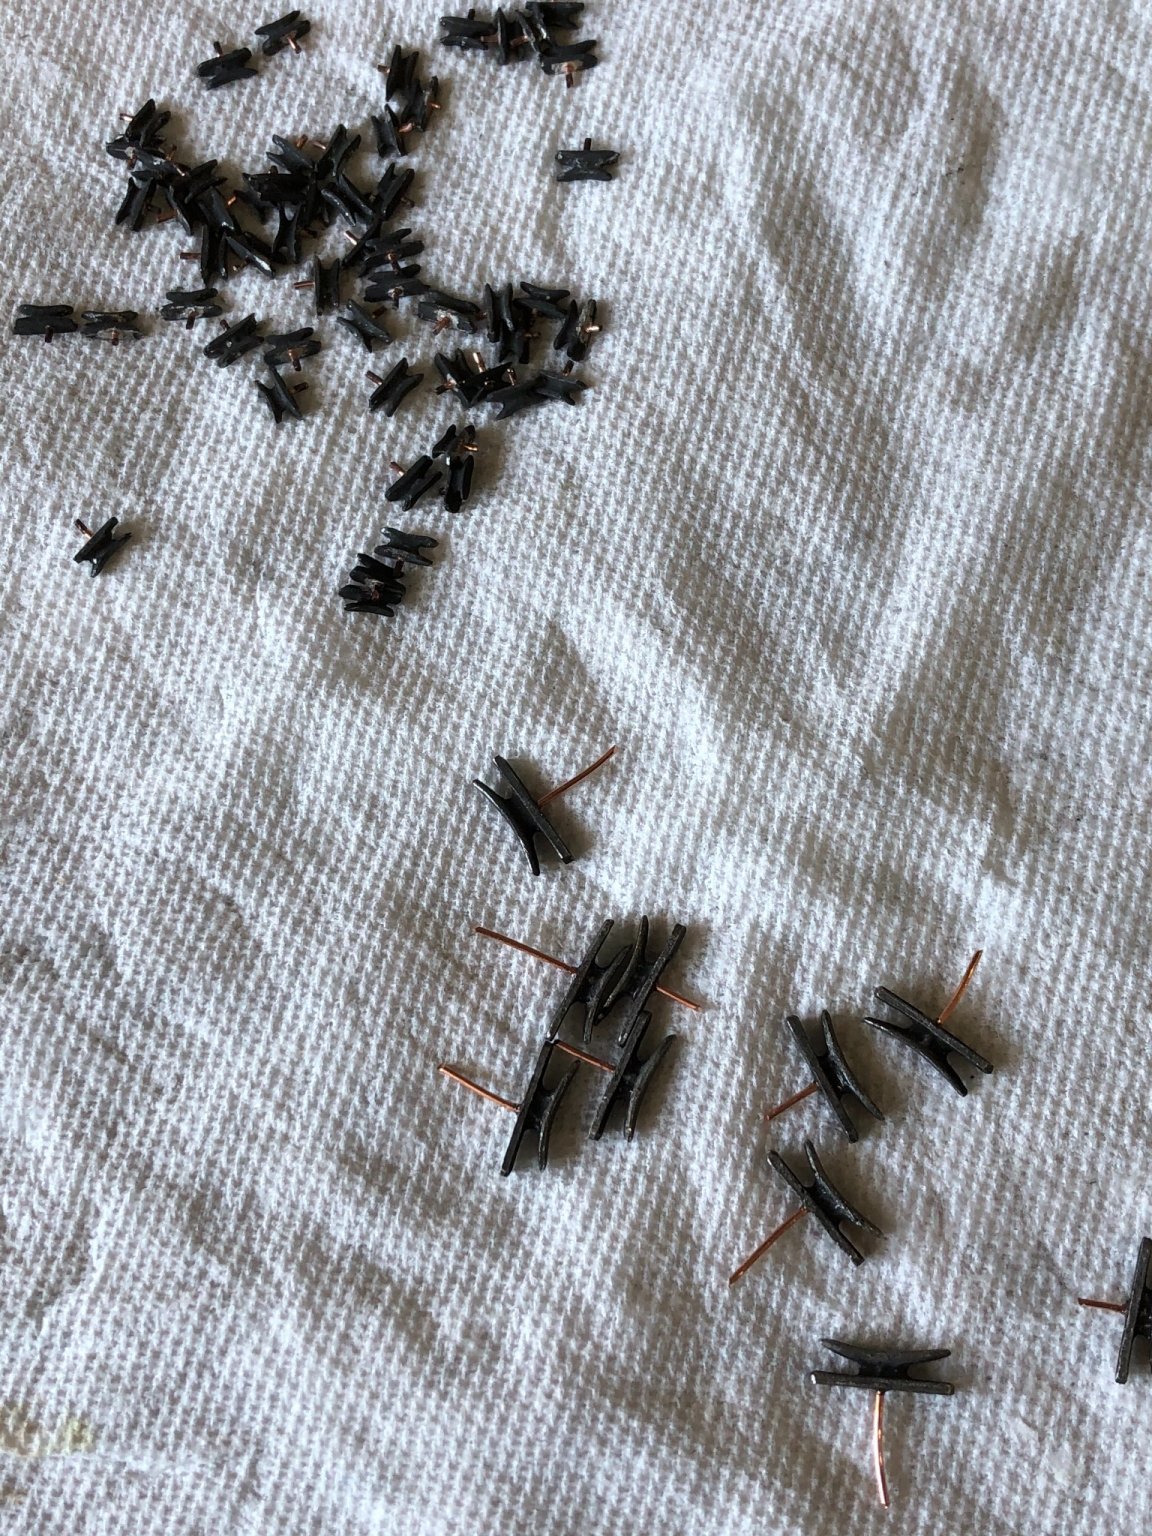
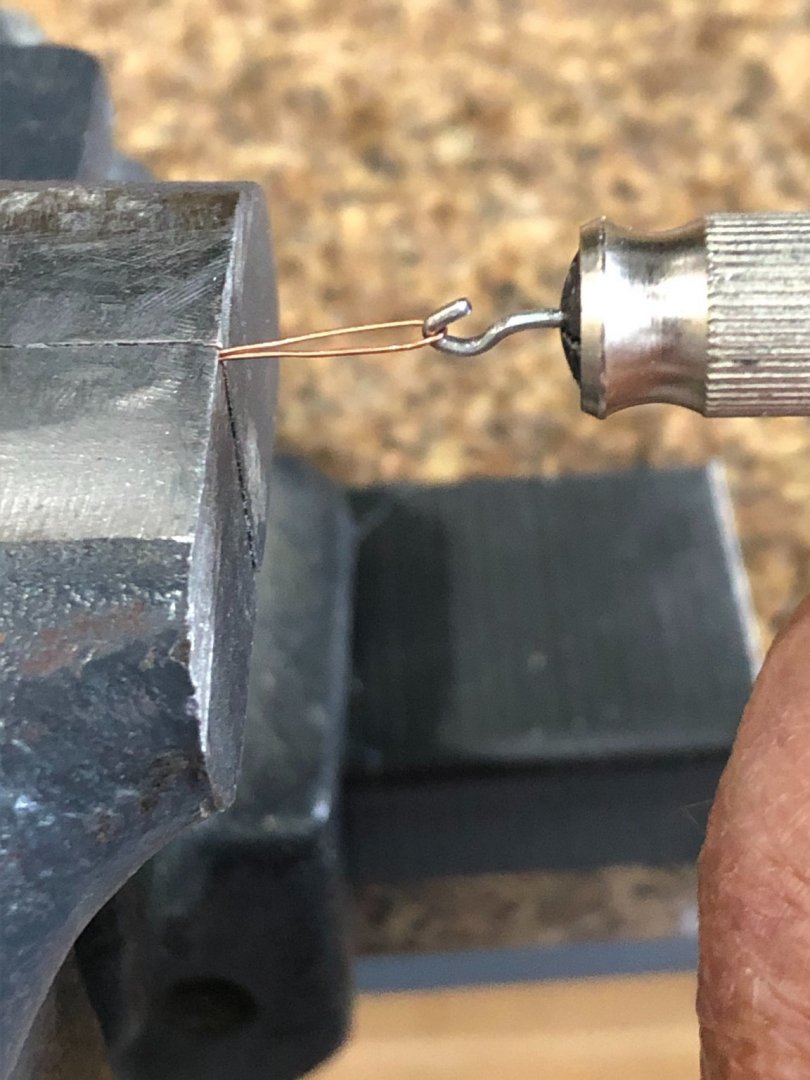
Spent the day putting cleats, ring bolts and rings on the starboard bulwark and aft bulwark until I ran out of ring bolts. Had to make more so for 3 hours I made 100 more ring bolts for the port side. Just a photo of how I make the ring bolts Using 26AWG copper wire and a .045 dia mandrel. Stay well and stay safe Will

-
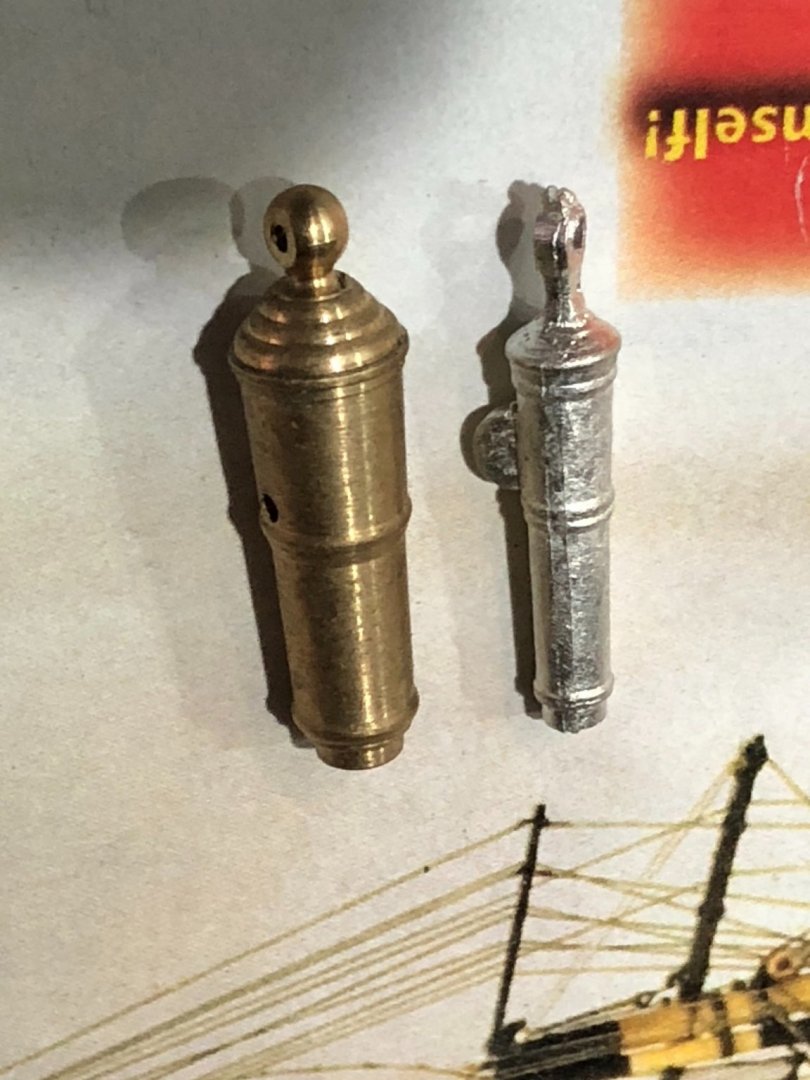
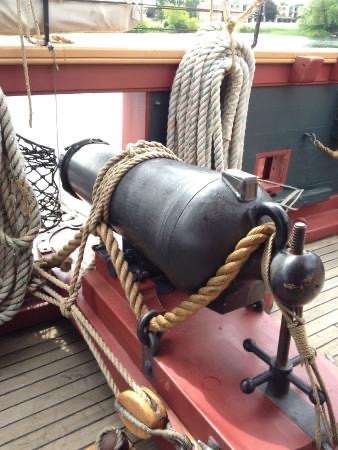
Just thought I'd show a couple of photos displaying the difference between the kits carronade and the Caldercraft carronade. Looking a photos of the carronades on the brig Niagara shows me that I've got some work to do but they'll look great. Stay well and Stay safe Will
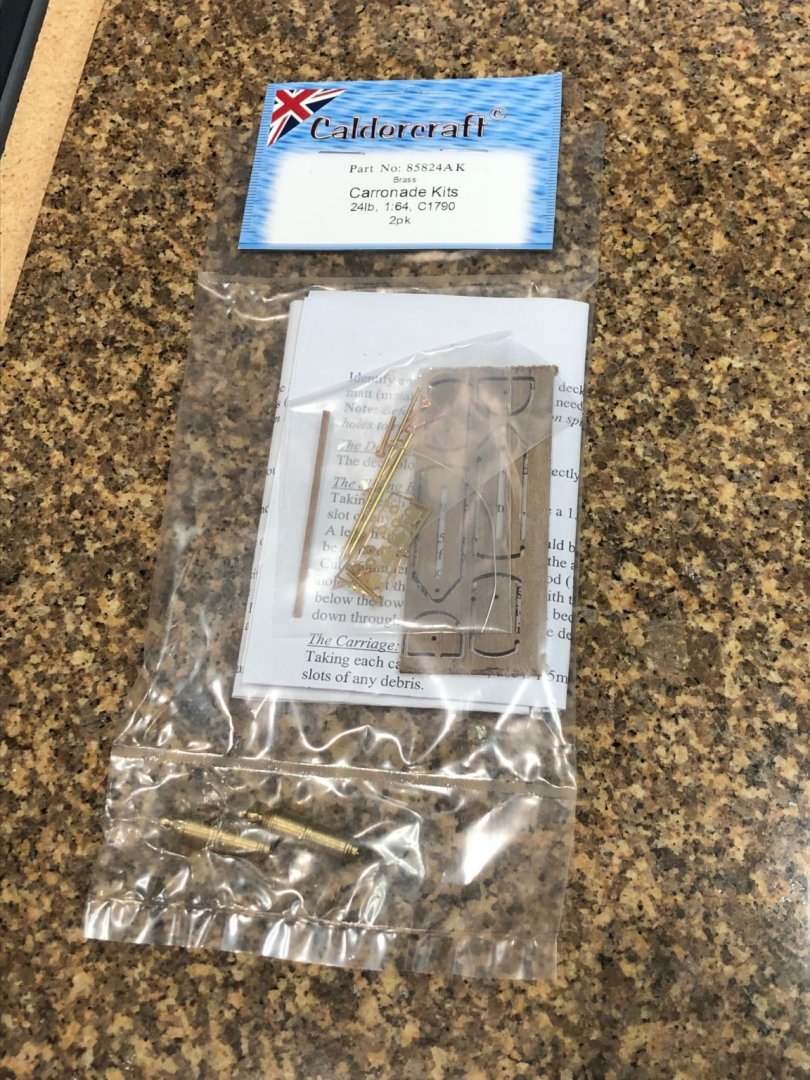
-
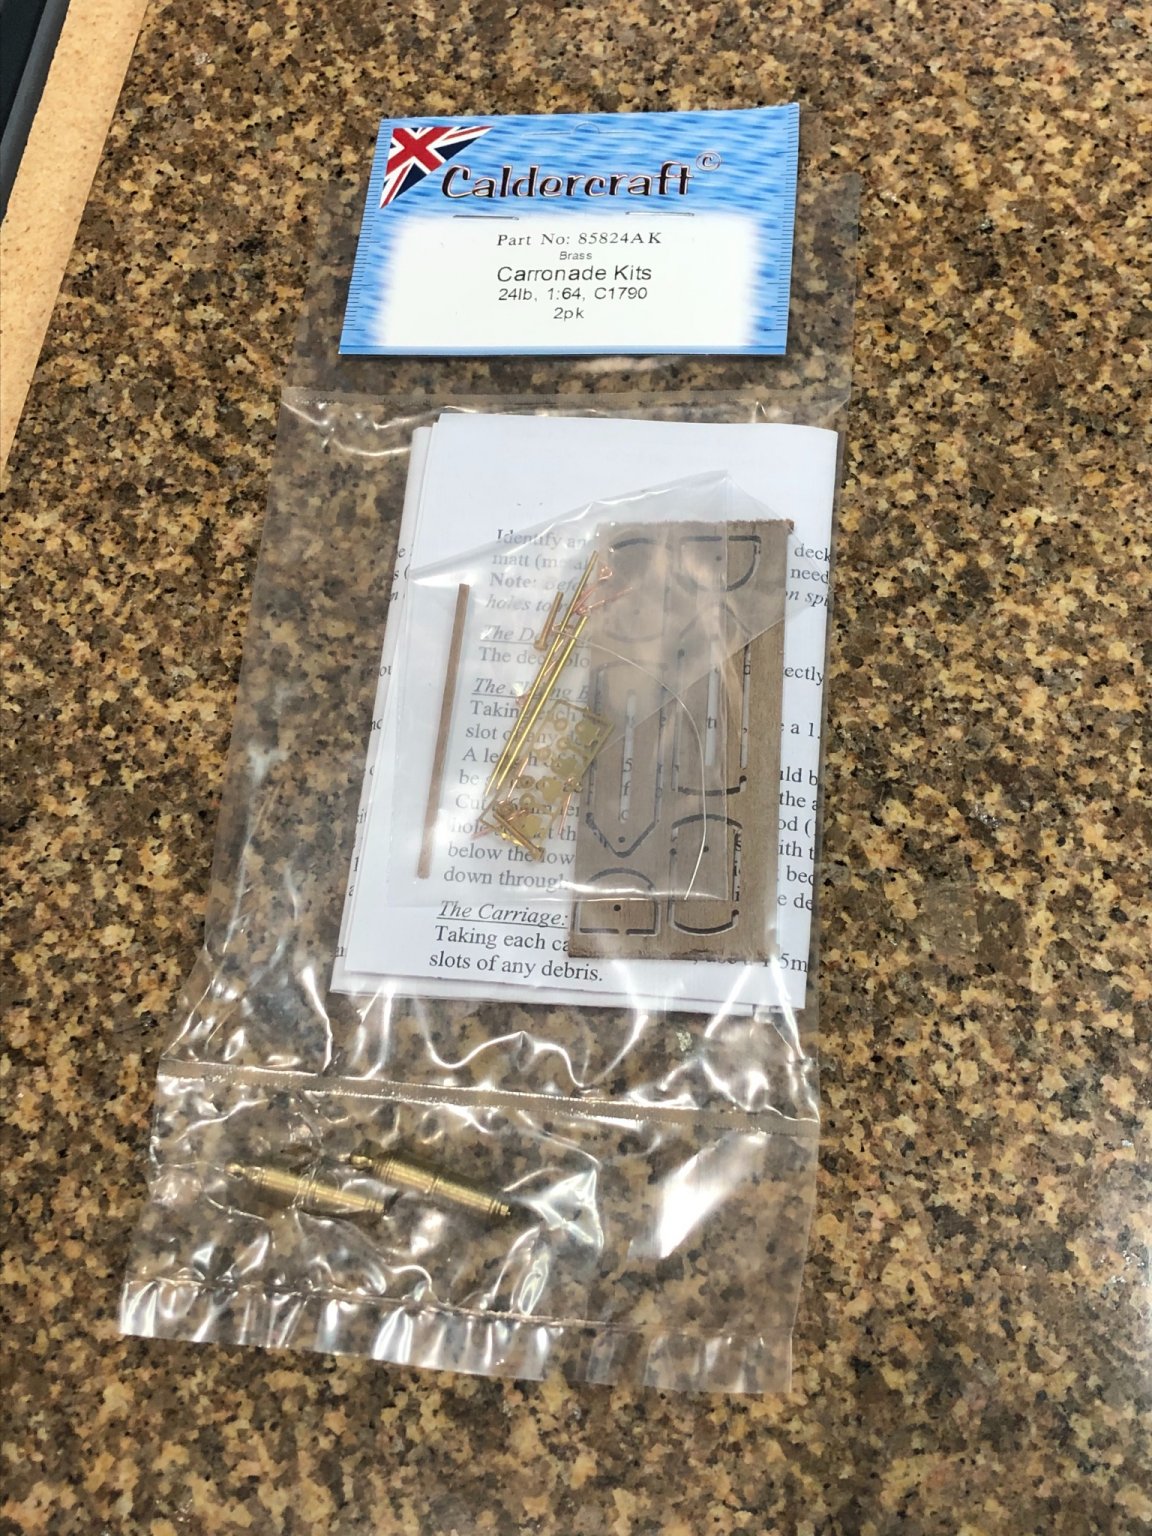
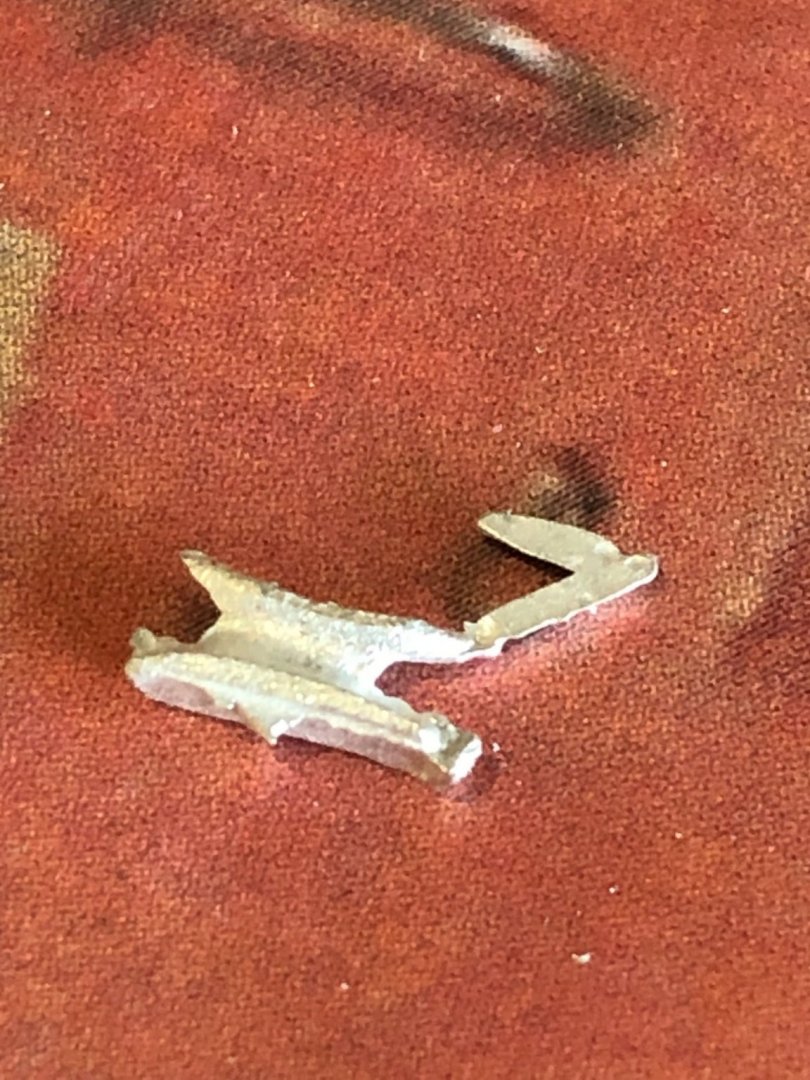
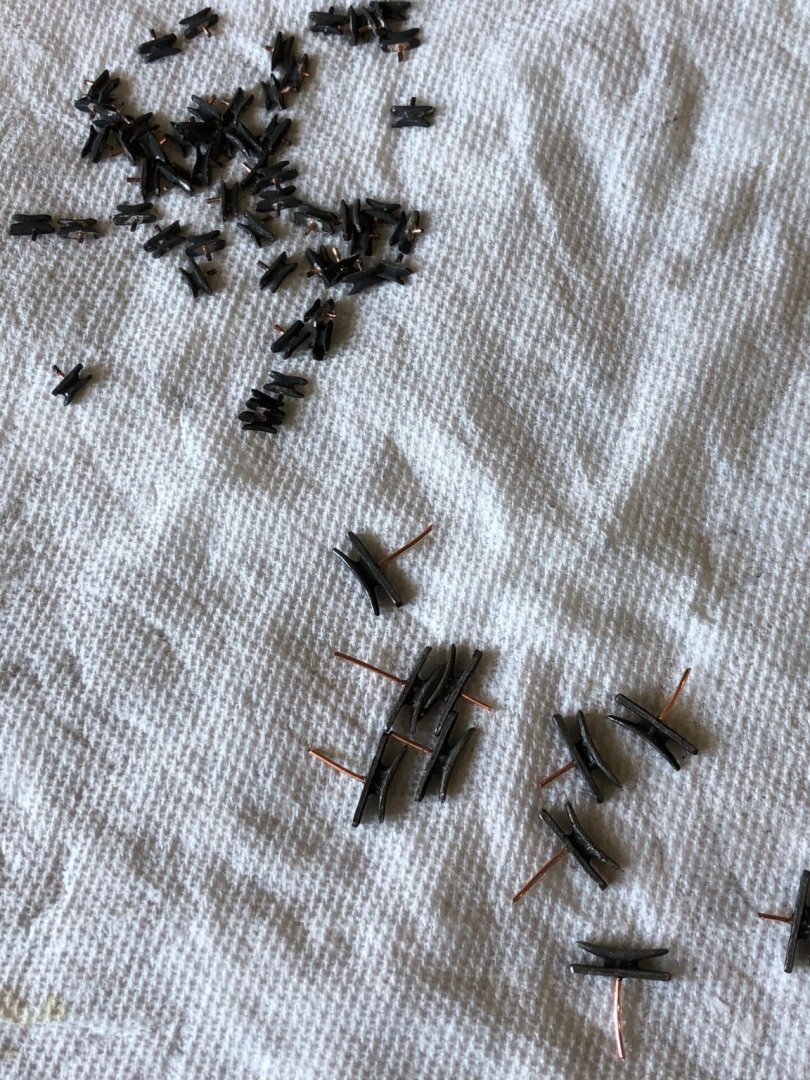
Cleaned up the pin rails and started preparing the cleats for the inside bulwarks. Worked on and off for 3 days on the white metal castings to remove the flash and smooth the finish. Almost all the 5mm cleats were like these in the photo. UGH!!! Closeup of a typical cleat After filing and sanding I chucked them into a machine vice and bored holes that I could then glue copper wire to support the cleats from rigging stress. 57 5mm cleats and 10 10mm after using "JAX" to darken them. Ready to start using them. I trim the wire to length as I fit them. Almost finished with the cleats and rings and then on to the carronades. Reading back through Syren logs, specifically about carronades, I noted that some had purchased their carronades from Caldercraft so I started to read up on 24 pound carronades. The kit carronades are way to thin in diameter for a 24 pounder so I bought the Caldercraft kits. Delivery was suprisedly fast from the UK Stay well and stay safe Will


-
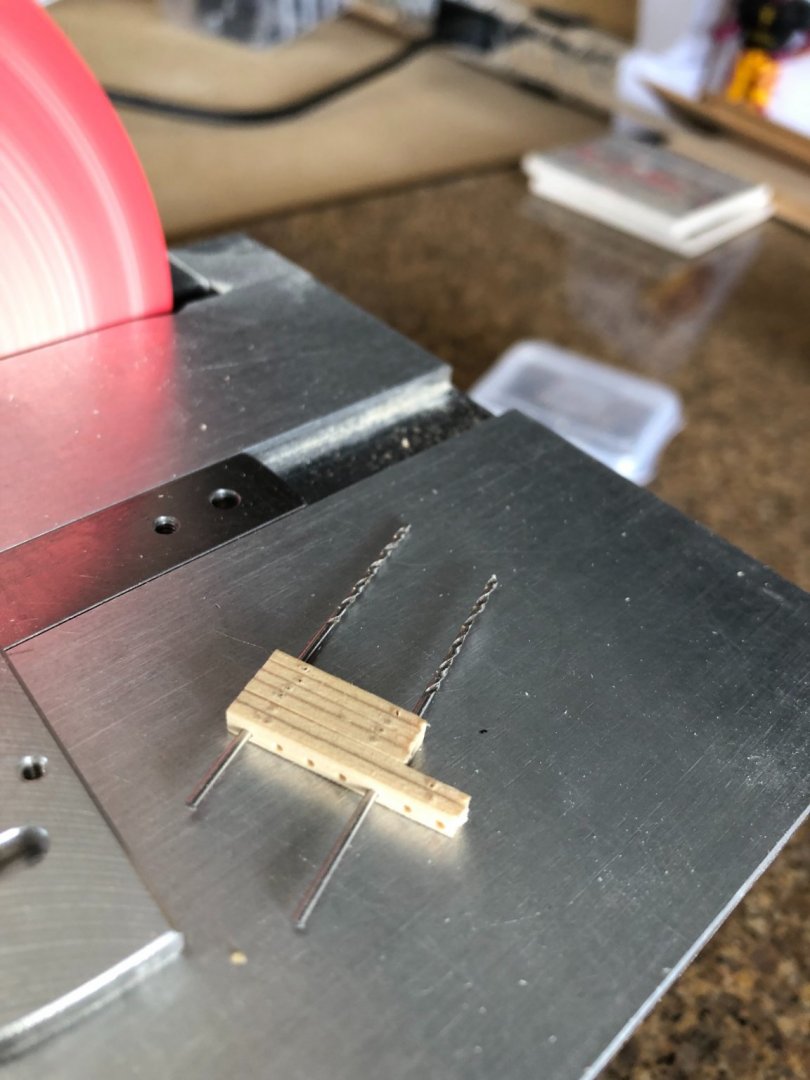
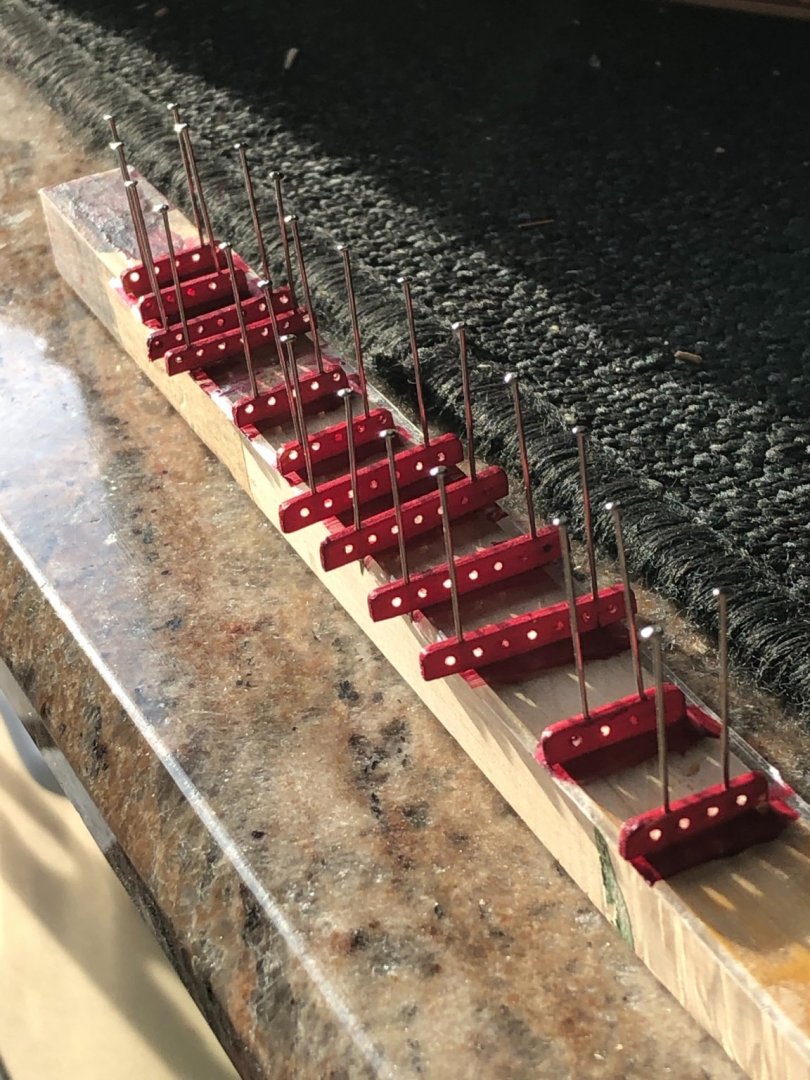
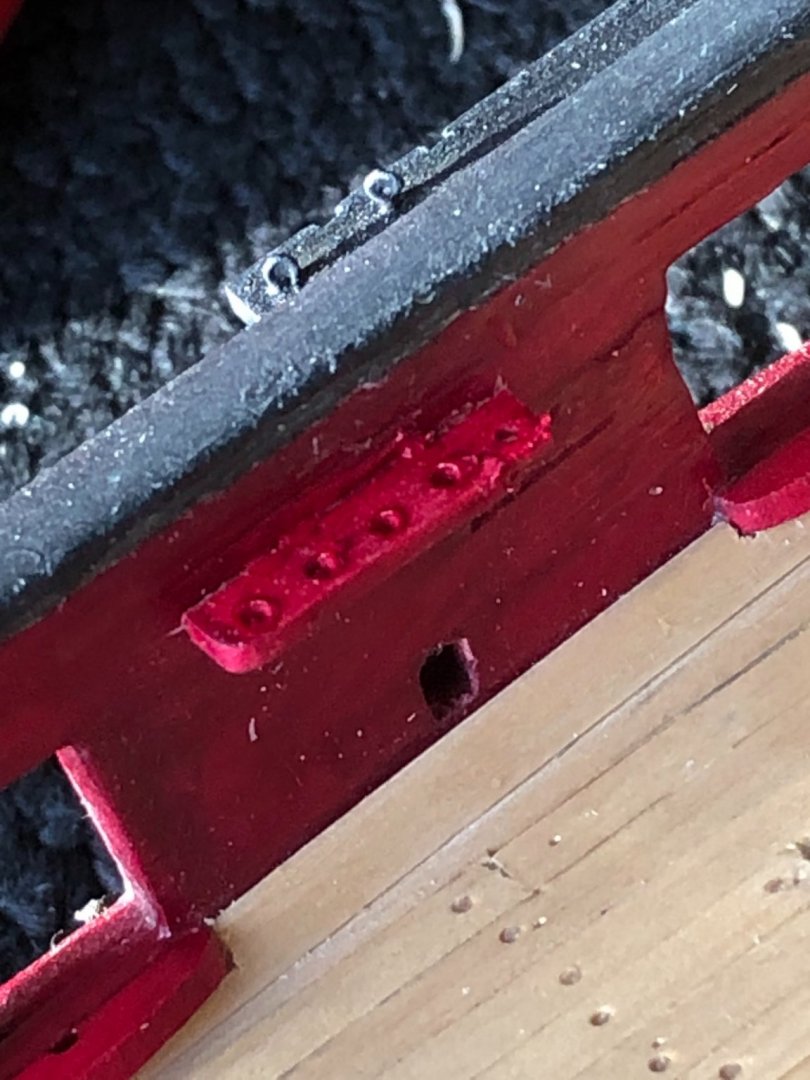
Again, I can't say it enough, thanks for the likes and comments. 👍 Spent the day making pin rails. Started out cutting strips out of cedar 1/8" and 5/32" wide then milling them done to .05 thickness. The wider strip will be reduced to the 1/8" as it curves at the bow. I decided to drill the the holes in the to be curved pieces in a straight line as the curve is so slight on the short lengths. I used a 1mm drill for the holes, as suggested in the manual, on the mill to keep the spacing even and straight. My freehand drilling is suspect a best. I can't believe how you are able to make such perfect patterns by had. After drill the hole patterns I cut the strips to the correct individual lengths. Using the drill bits as registration the pieces were stacked with the drill bit keeping them aligned. The disk sander made sure the lengths were equal and the end angles were equal. I've had problems with pin rails coming loose on other builds so I'm going to pin these rails as suggested. Trying to align blind pins sounds like a difficult process so I decided to use #9 silk sewing pins through the rail into the bulwark. Drill .029 dia holes through the rails between the belaying pin holes. Painted the rails red to match the bulwarks. Pushed the sewing pins into their holes ready to set rail on bulwark. Put glue on the pin rail and set it against the bulwark. Push the pins in about 3/32" with pliers and when set snip off the pin protruding even with the pin rail. Touch up red paint and can't see the pins. Tomorrow I'll clean up the pin rails by lightly sanding and then another top coat of paint. Boy the zoomed photo shows everything but it does look much better to the naked eye. Thats it for today Stay well and stay safe Will

-
Thanks Patrick and Wally (hope you don't mind) I used a Proxxon lathe and swiss files and 600 grit wet-n-dry sandpaper to do minor cleanup. I must confess I got the idea and help from Thomas Gahm. I saw them on his log and asked how he did such a nice job and he was kind enough to post the method on his Syren log. One thing he pointed out was he kept a drawing next to the work area to reference spacing and such. On his log is a photo of his lathe with a piece in progress so I keep it next to my work space. After a few it becomes much easier and faster. You could use almost anything a drill or dremel as long as they were secure to the work surface. Using the lathe has the advantage of the tool rest post but anything will do. Thanks again for the nice comments and likes. Stay well and stay safe Will
-
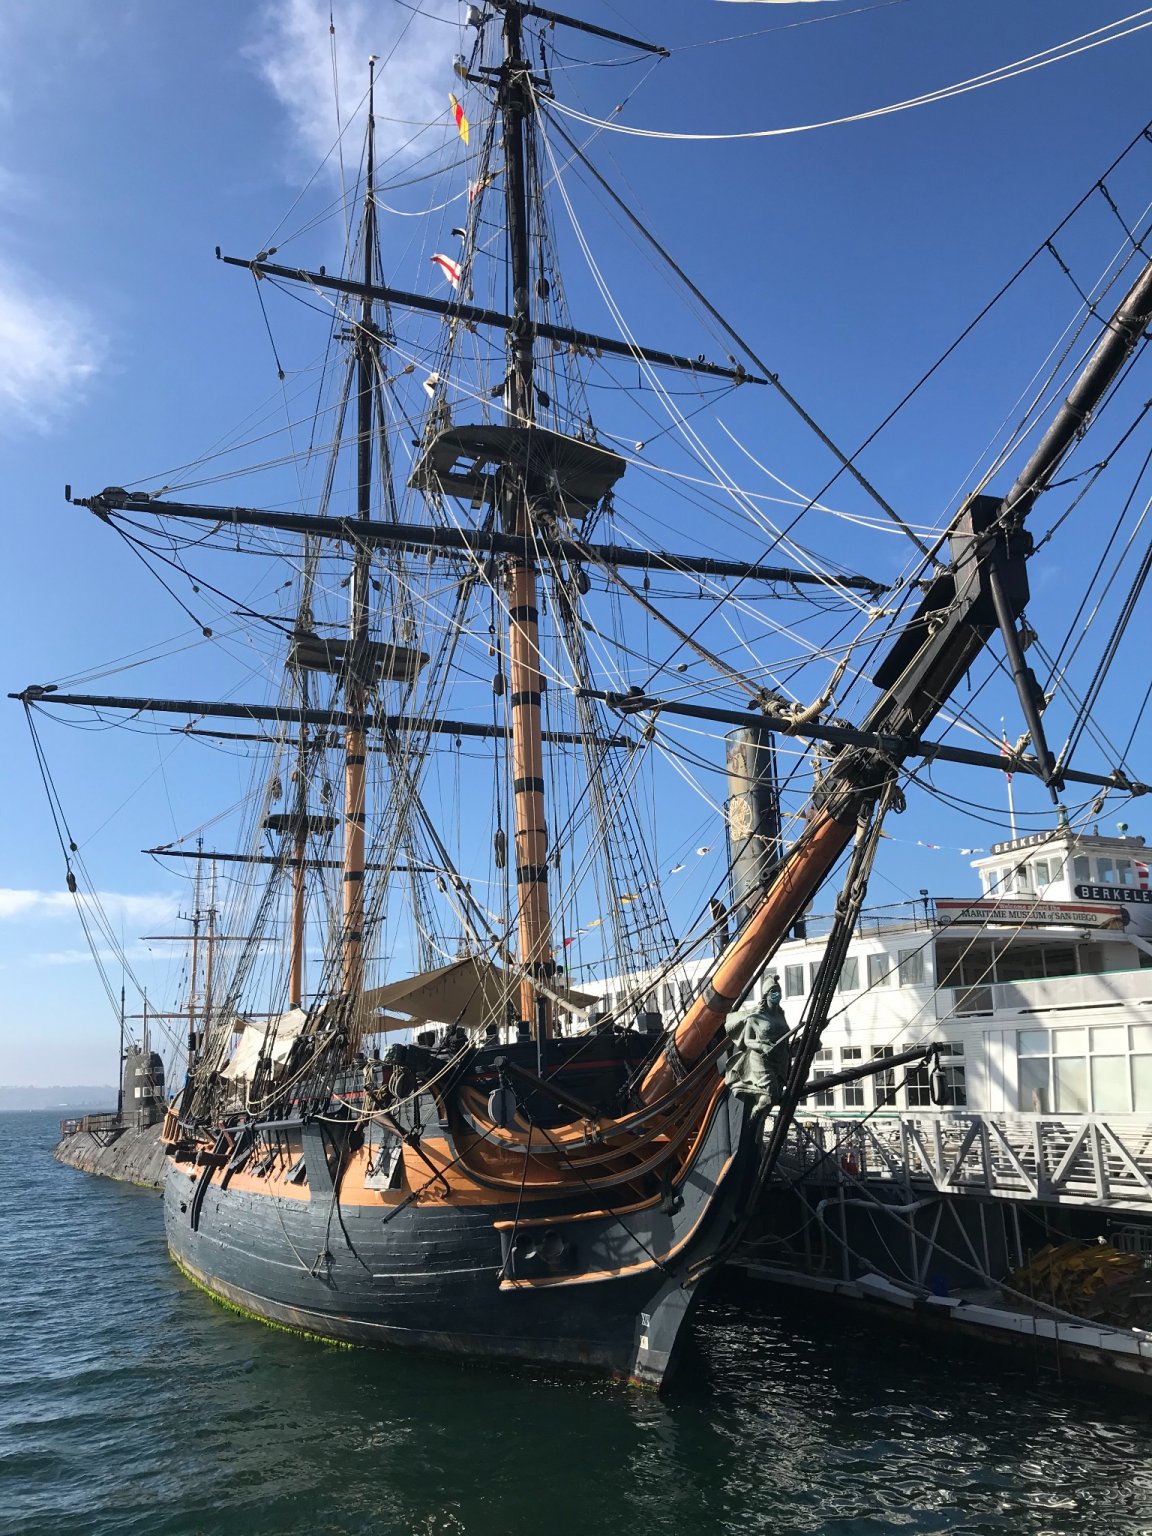
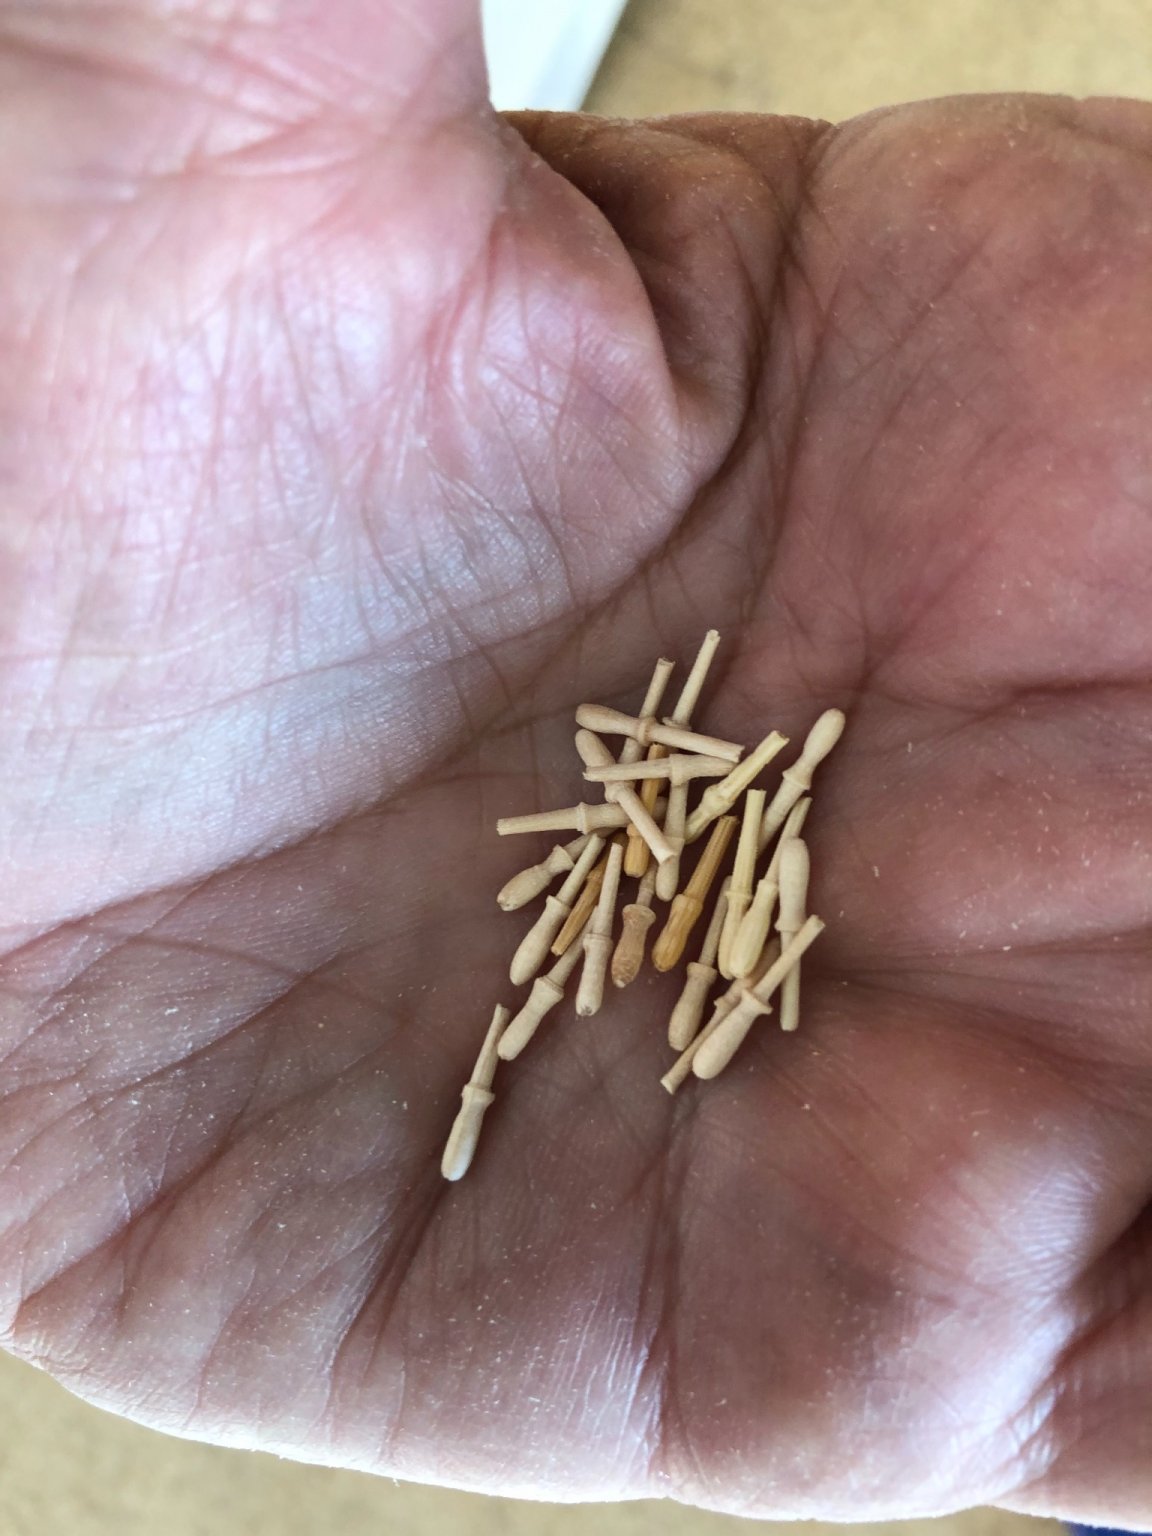
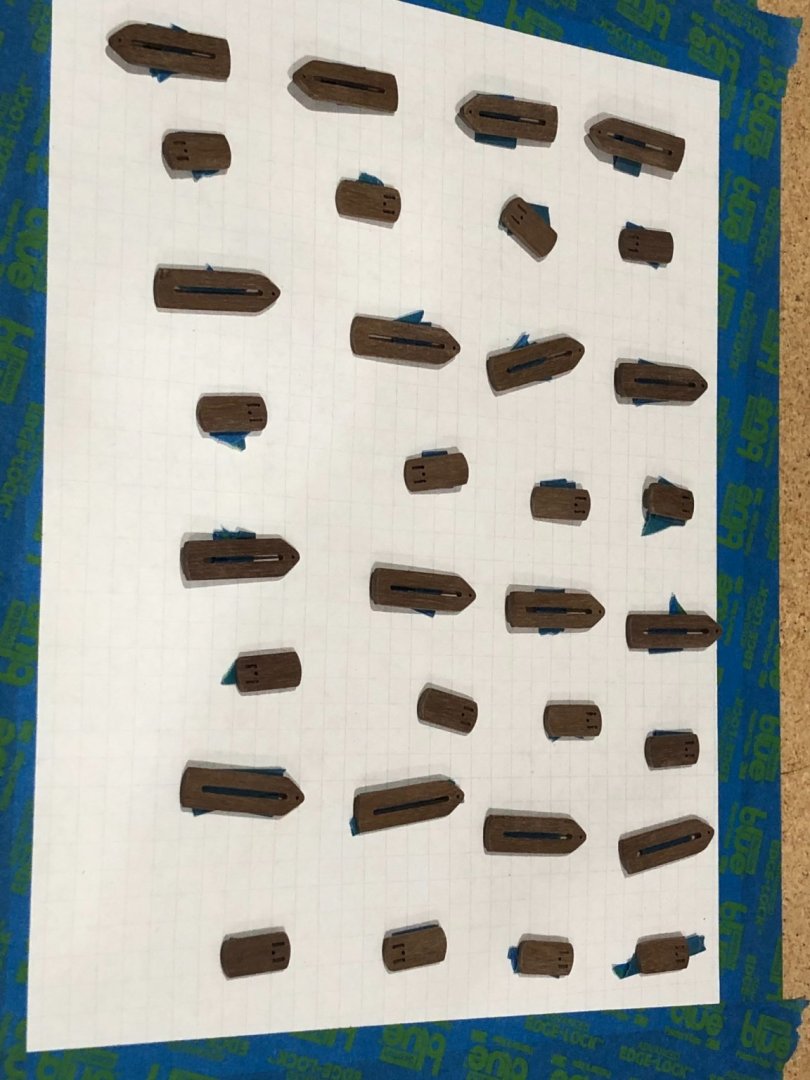
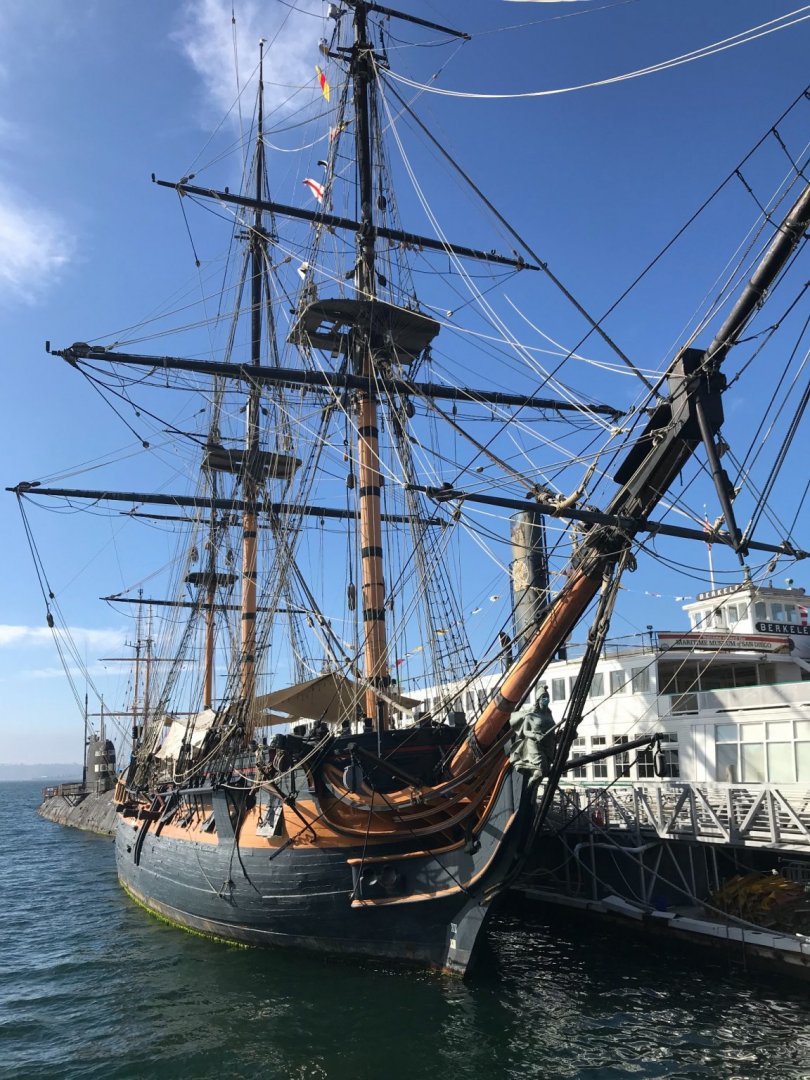
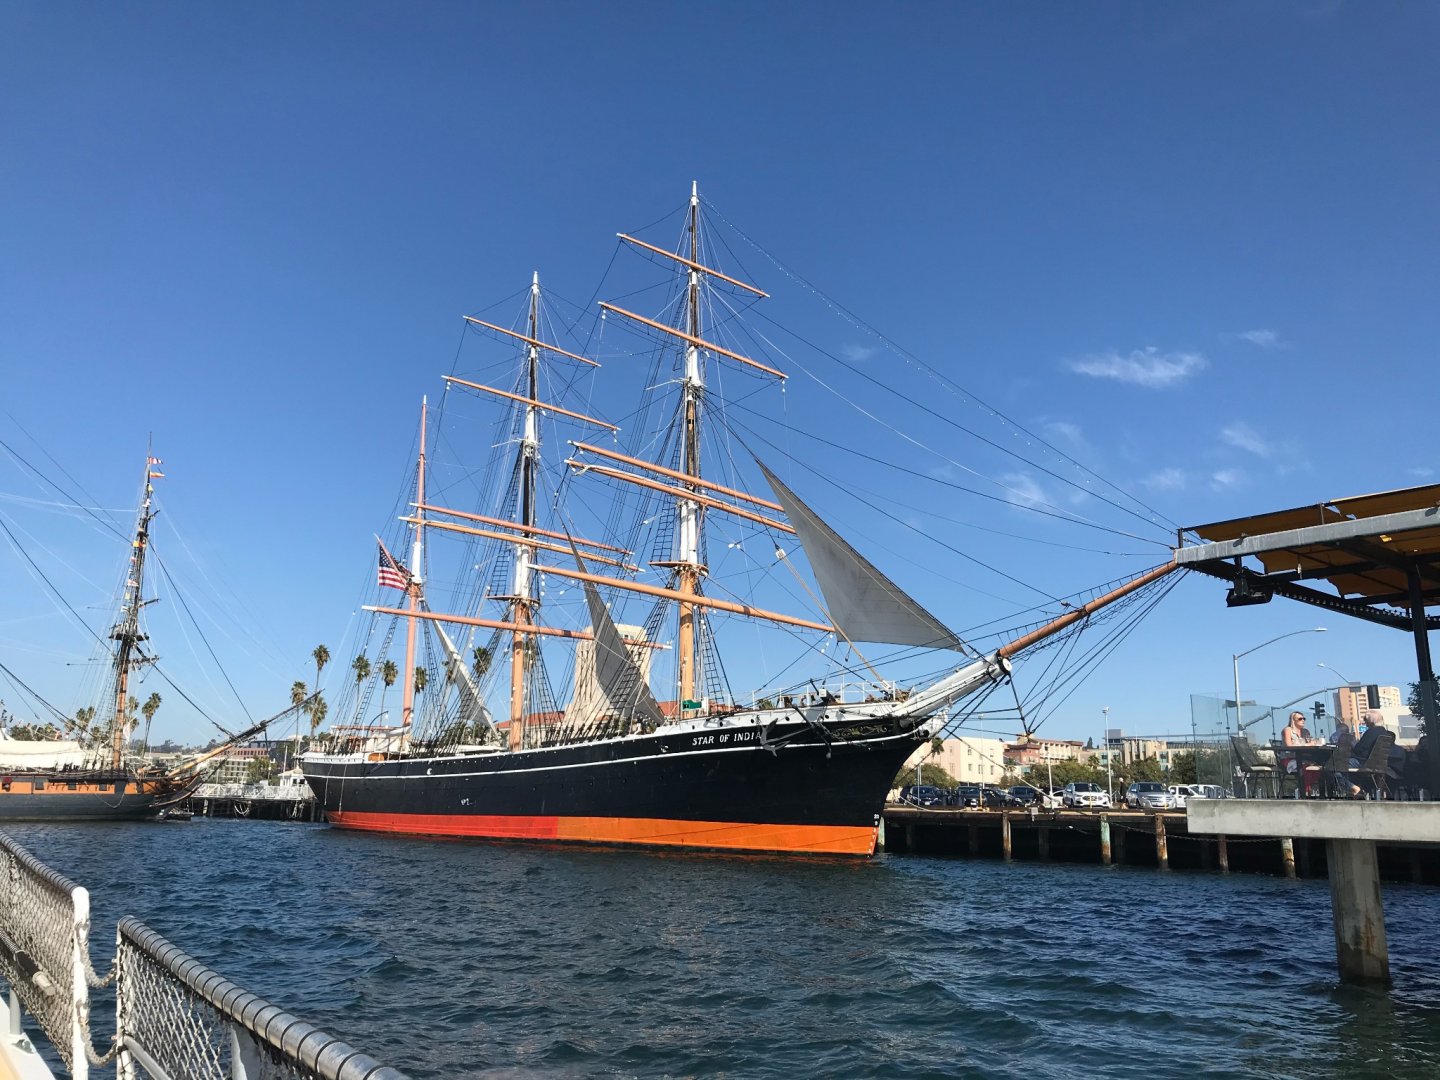
Back from holiday. Had a great time in San Diego. HMS Surprise Replica used in the movie "Master and Commander" Star of India a iron hulled clipper ship made in 1863 and rerigged as a barque OK travel show over I digressed. finished starboard sled brackets and then onto pintails. More on pintails tomorrow but spent time on belaying pins. Using Thomas's method with toothpicks. I bought some birch wood toothpicks which turn nicely and hold stain well. I've made 25 today and 75 to go (oh yeh having some fun now} I'll probably make 20 to 25 extras for spares. Darker ones are after a quick light stain. Well touch red pain tomorrow and more belaying pins. Stay well and stay safe Will

-
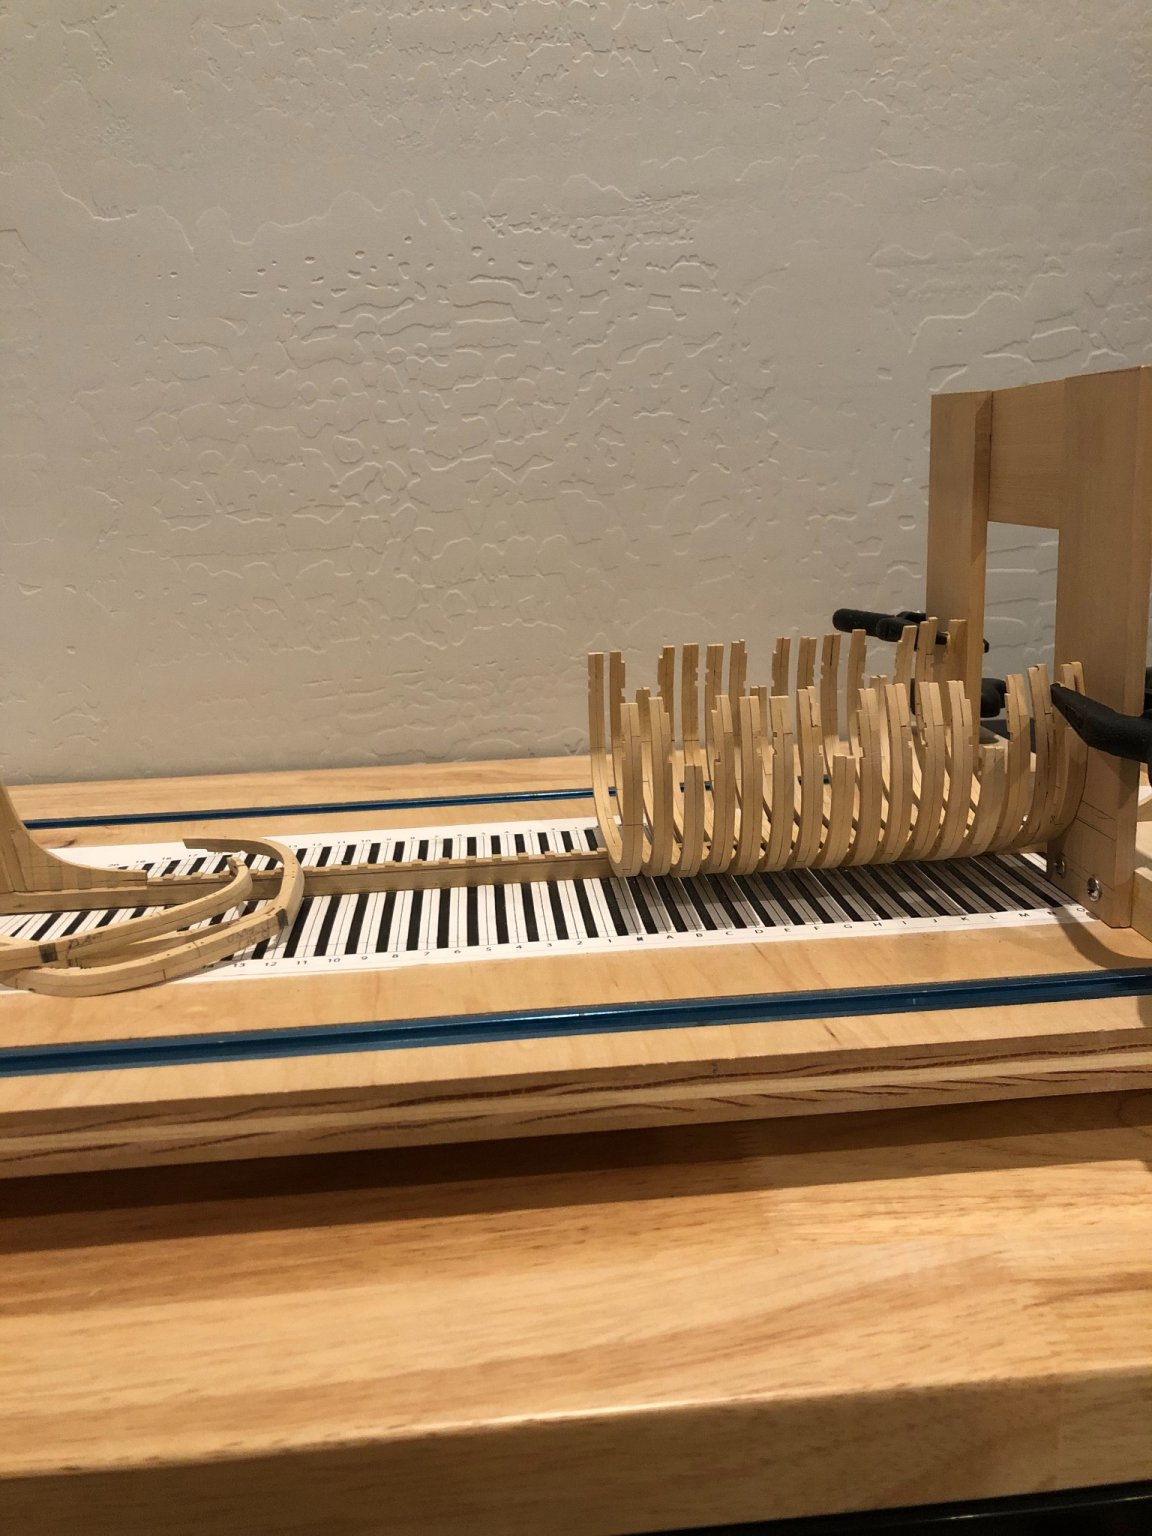
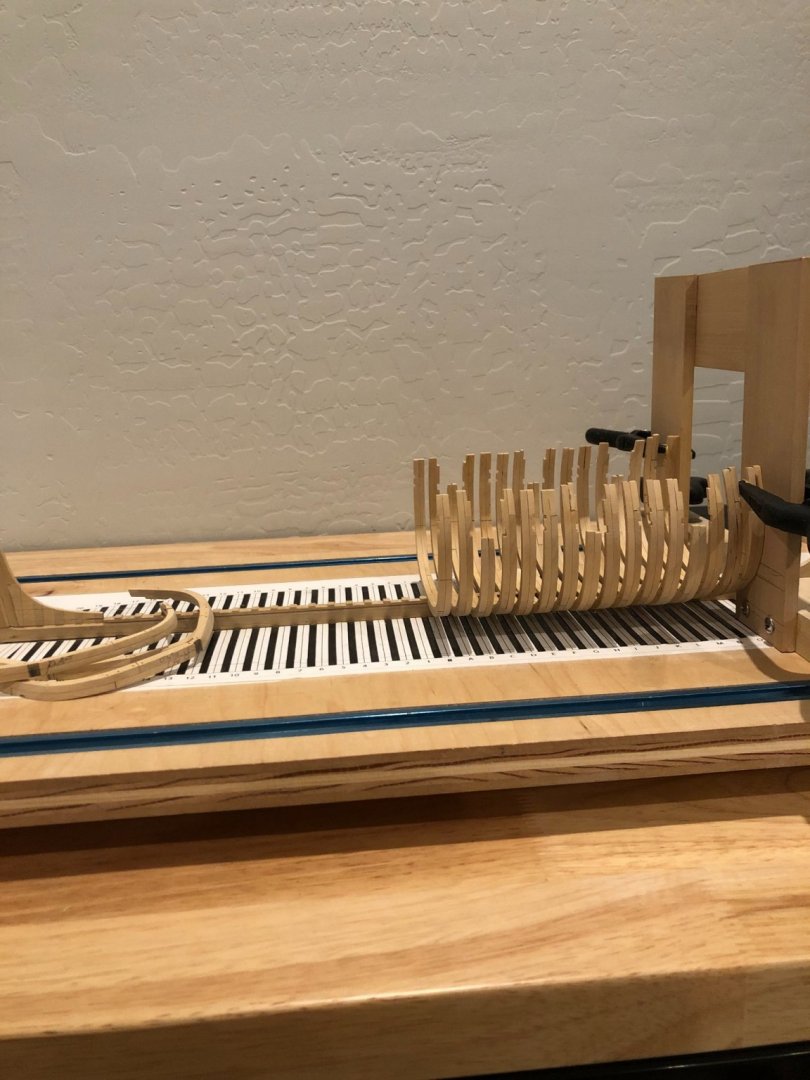
Still working on installing frames. Frame O just set tomorrow I'll set frame P leaving frames Q and R to go. This is my first scratch build and truly a learning experience so I'm following the book from NRG. The order of frames is the forward full frames and then the rear frames followed by the rear half frames and the transom and stern. Next is setting the forward half frames and cant frames. I'm making the drawings for the aft frames having completed 1 through 4 and I've built 1 & 2 where I start setting aft frames as I go along. That's a quick update more to come soon Frame "O" being set Stay well and Stay safe Will
-
Patrick the interior bulkheads around the gunport and sweep port is very amazing, great work. It looks as if there is sufficient distance between the deck and sill for the margin plank and waterway, so as not to have the same problem I had on mine. Very nice Will still on holiday Stay well and stay safe
-
Amazing progress and looking very nice especially the bits and pieces you've scratched built. Awhile back you were worried that school would slow your progress, but it appears that has not been the case. How is school doing? Stay well and stay safe from Will on holiday.
- 950 replies
-
- 1
-
-
- syren
- model shipways
- (and 1 more)
-
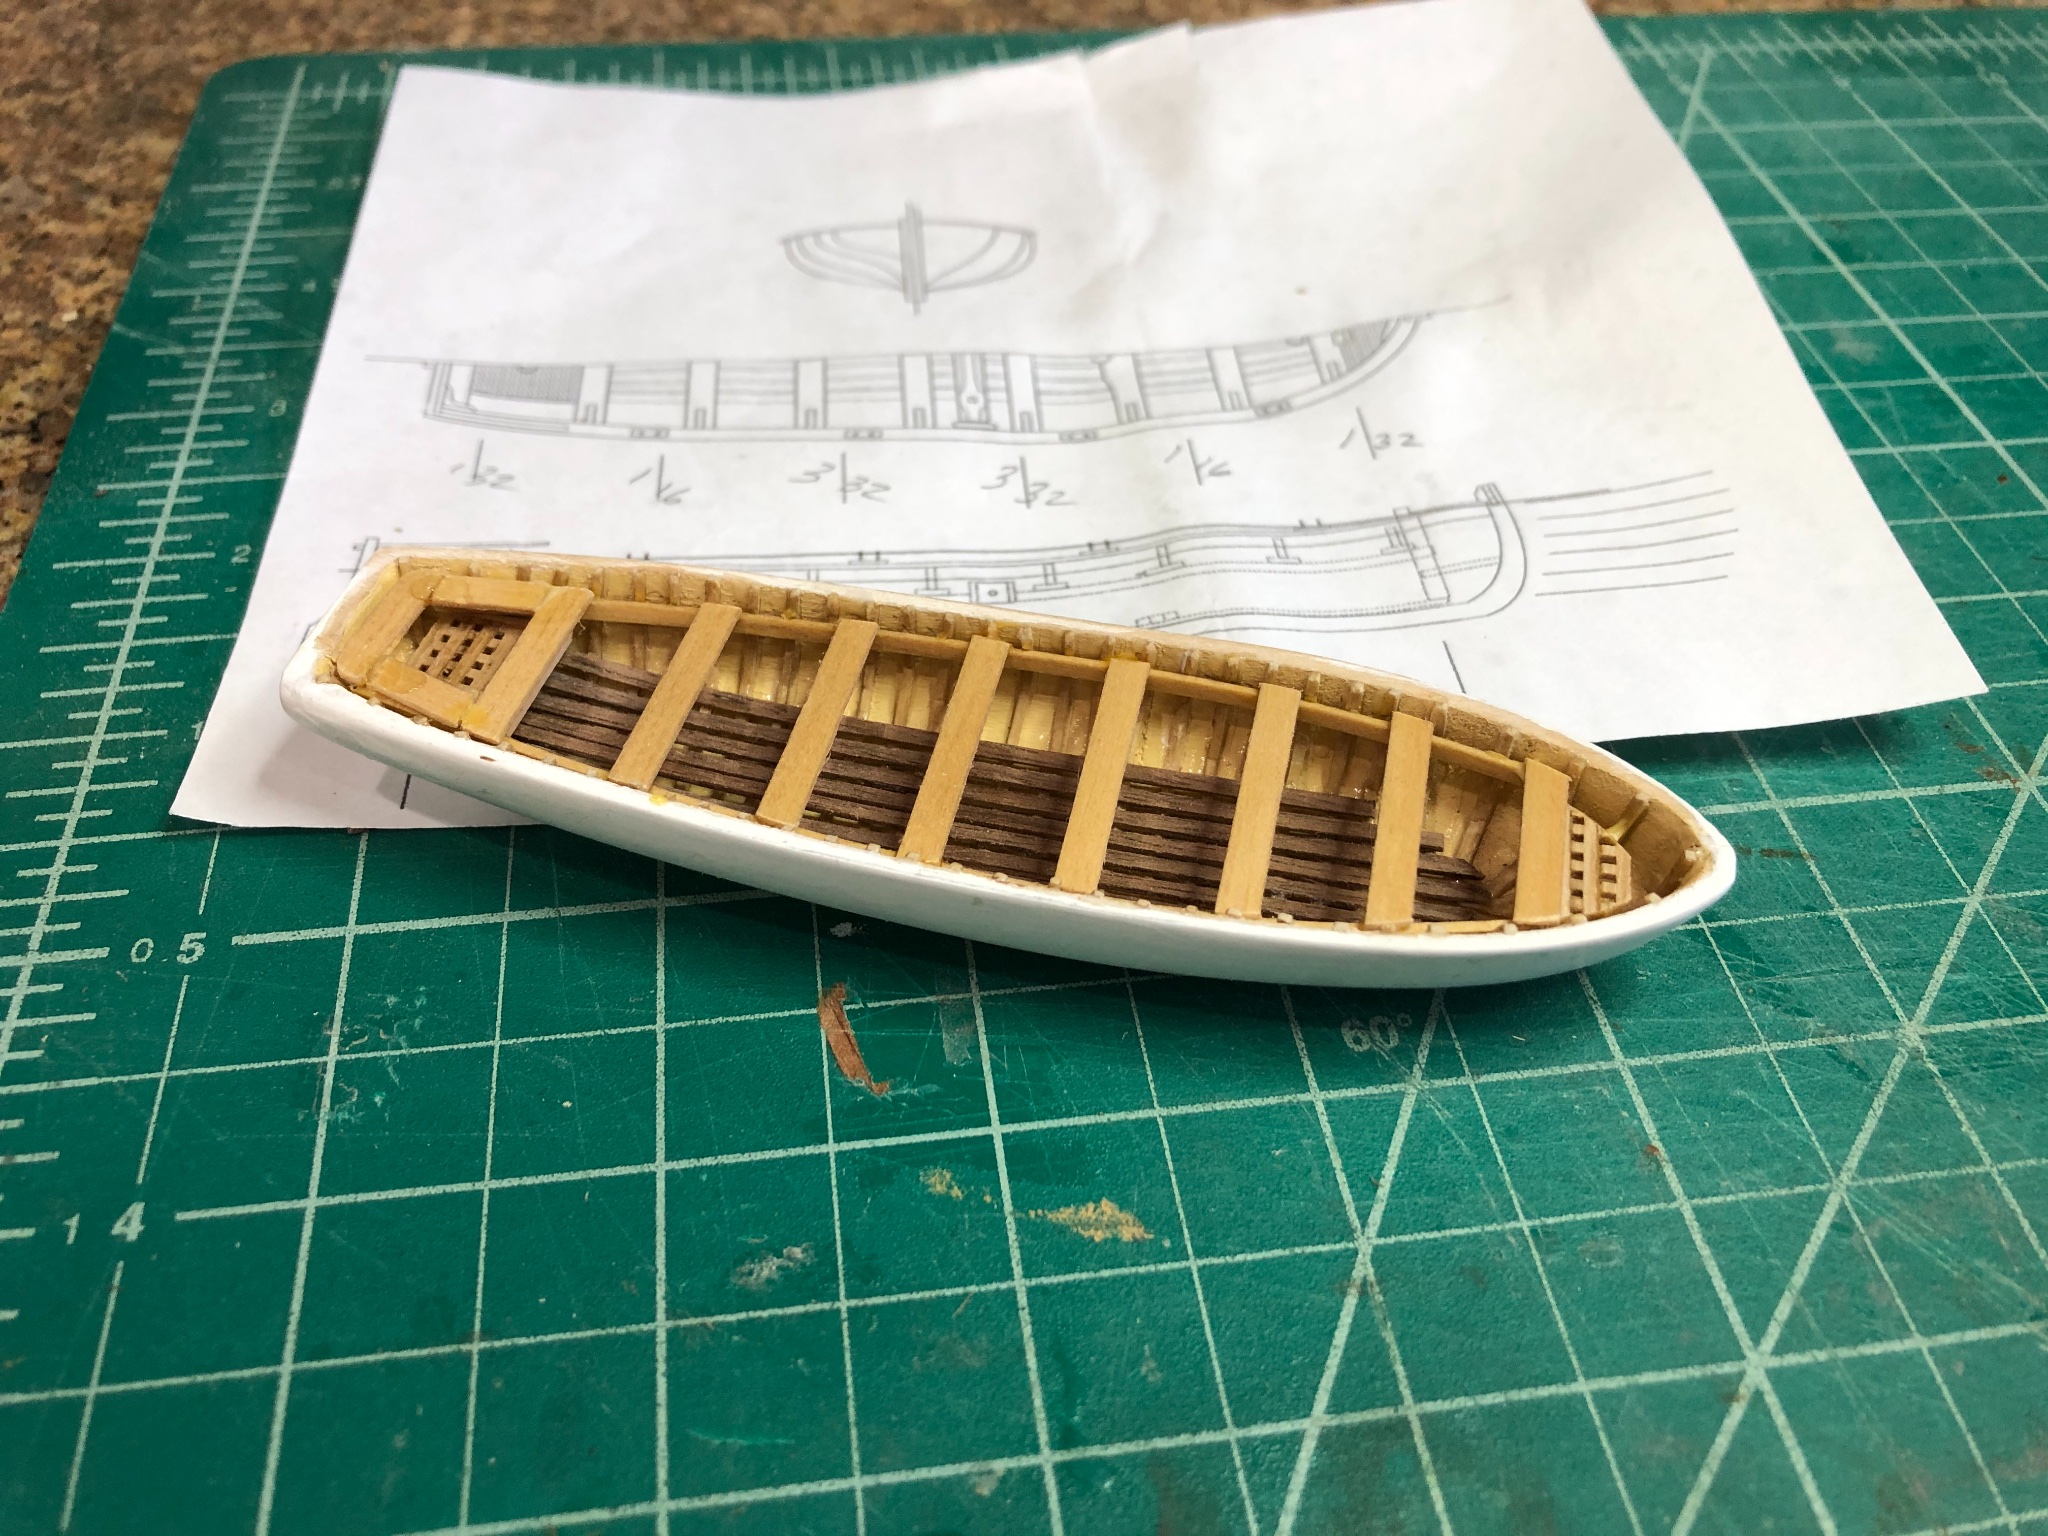
Thanks all for the kind words and likes it means a lot to me and keeps me motivated. Finished the port side sled brackets. Turns out its not as simple as I had thought it seemed that the margin plank and waterway rose too high not leaving enough room under the port sills. I had to carefully trim each port about 1/64th" to 1/32nd" for the top of the sled bracket to be level with the port sill instead of standing proud. I'm hoping that the carronades, sleds, and associated rigging will obscure the trimming. Were going on a little holiday trip to San Diego to see and feel the ocean (I love the desert but I grew up on the ocean) celebrating my wife birthday. When I get back I'll touchup the red paint where I cut away the waterway. Spent time on the longboat getting the thwarts set in place next on the windlass and few bit on the thwarts then I'll put it away and concentrate on the Syren. More when we return next week in the mean time Stay well and stay safe. Will


-
Your progress amazes me and the quality of the results is amazing. Will
- 950 replies
-
- 1
-
-
- syren
- model shipways
- (and 1 more)