HOLIDAY DONATION DRIVE - SUPPORT MSW - DO YOUR PART TO KEEP THIS GREAT FORUM GOING! (Only 13 donations so far - C'mon guys!)
×


src
-
Posts
2,300 -
Joined
-
Last visited
Content Type
Profiles
Forums
Gallery
Events
Everything posted by src
-
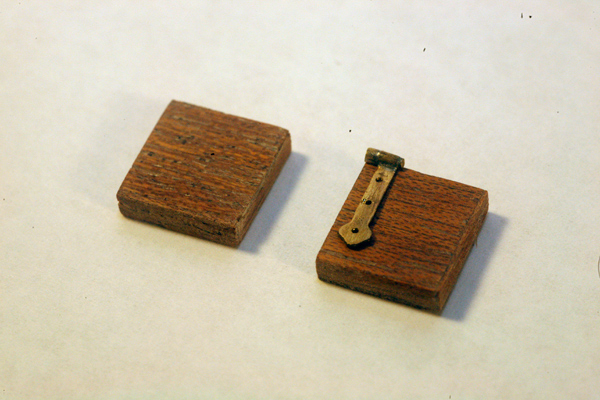
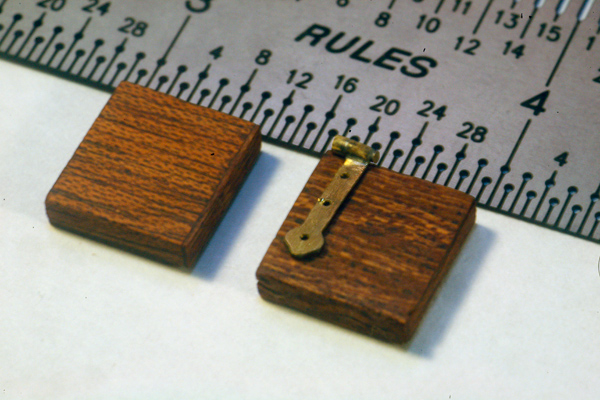
Sarah, thank you!! I dont think I could have done the hinges with out photo etching them. They still need a lot of clean up and I need to decide pretty soon if I will blacken them or leave them bright. Decisions decisions!!! Sam
-
Ahhh JP... gotta love Rockler! I have a love-hate relationship with them. Love 'em cause you can usually find what you are looking for in a better quality than the big box stores and the employees are usually knowledgeable. Hate 'em cause I have spent WAY too much of my hard earned dollars there! I was going to second Augies comment but I promises Carl (Cog) I would learn patience. So.... I will patiently await that last plank.
-
That rotten four lettered word work really gets in the way of life doesnt it? Sounds like you have some jump time coming though. Sam
-
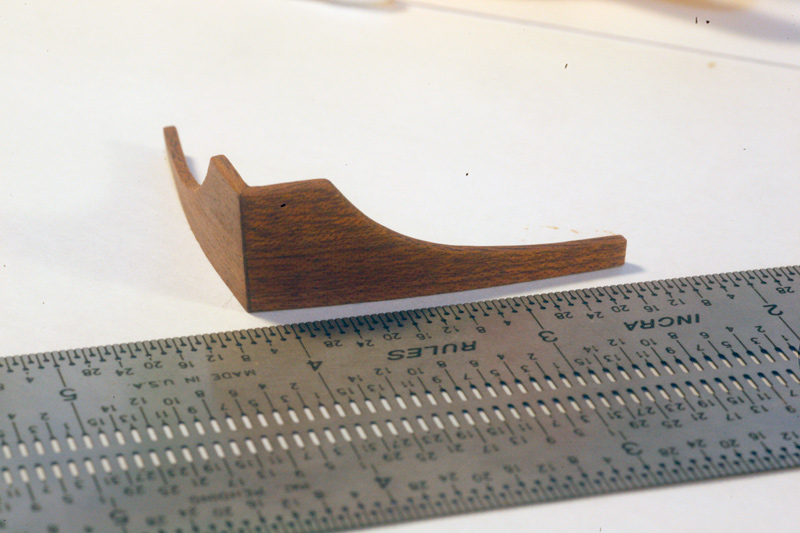
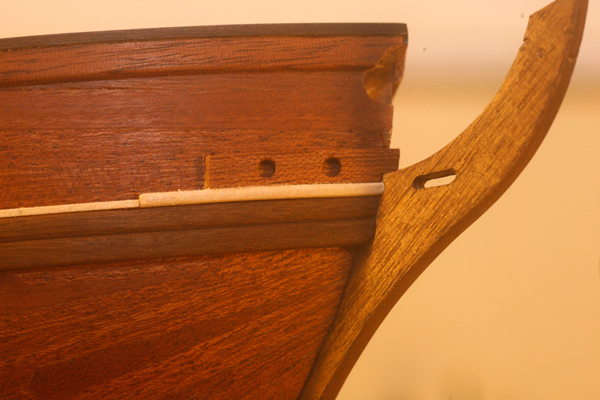
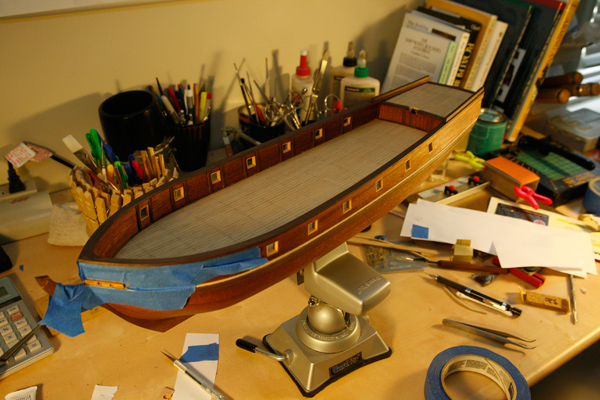
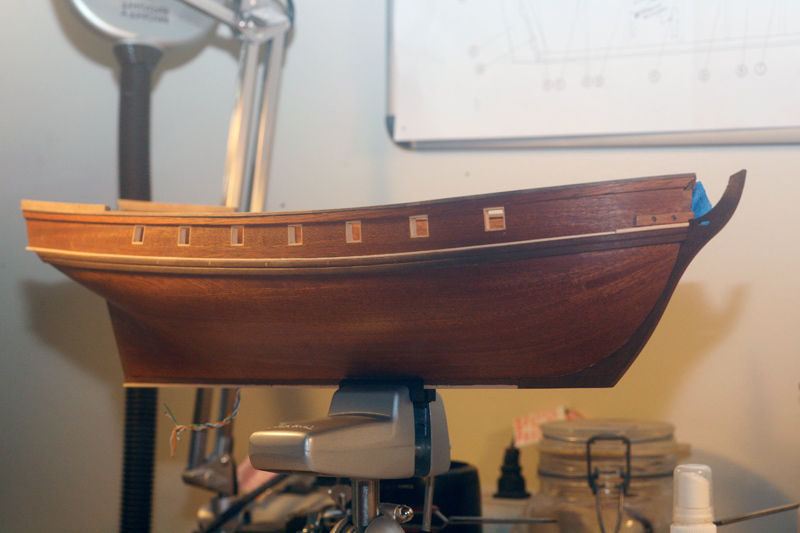
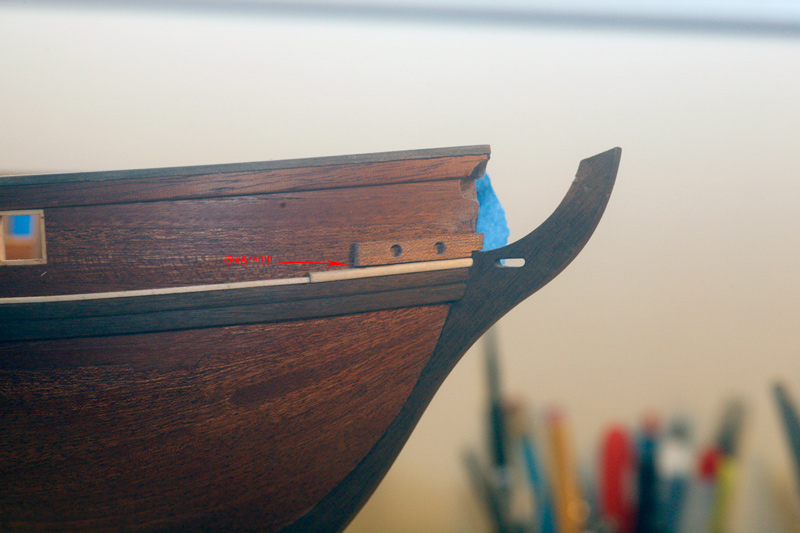
Thanks everybody! Russ, I wasnt sure about the color at first and its a much more labor intensive staining process than I really wanted to do, but its really grown on me. The contrast of the light box wood against the mahogany is even working for me. I was very close to gong with a slightly darker wood, I am glad now you talked me out of it months ago, thanks. Rich, thanks. Its good to be building again. I still cant sit for very long before things start locking up on me, but I can work on little things. Perhaps some gun carriages are in my near future. So your gonna be jumping out of a perfectly good airplane again? Nice! That is something I would like to do again one day. I dont know what I enjoyed more, the rush of freefall or the absolute silence once the chute opened. Carl, thank you. Yours will get there too. Take your time, I will learn to be patient one day and not bug you. ( I dont want you to demonstrate you technique on me) Yesterday I got the second stain on the mahogany parts and then dug out the tripod and macro lens. This morening I glued the stern ring on the transom, dont have pictures yet. The top picture is grain filler only, the bottom is final stain. The hinges need some additional clean up, havent decided weather to polish and lacquer or to blacken them. Thats all for now. Sam


-
Robbyn, I would egree with the advise your getting on spraying, all those nooks and crannies on a ship just get overspray in them and its very hard to clean up, not to mention the reasons others have mentioned. Brushing isnt a big deal, especially if you plan it out in advance and try to do your finish as you go. For your clear coat invest in two or three good brushes, they are not cheap but will last forever if you take care of them.It never hurts to practice on some srap wood to get a feel for how the clear flows and dries. Look at me, I am still on my first build and telling you how to do your finish!! I am basing all this on years building cabinets and furniture, I have sprayed more than a few Stickley style reproductions and spraying around all those spindles is for me a challenge, I much prefer a rubbed oil or brushed clear for that. What ever you choose you have a very large following here that will keep you out of trouble. Thanks for the well wishes, you wanna trade injuries, my back for your hand??? Sam
- 773 replies
-
- 1
-

-
- san francisco ii
- artesania latina
- (and 1 more)
-
Archie, How is the build coming? Sam
-
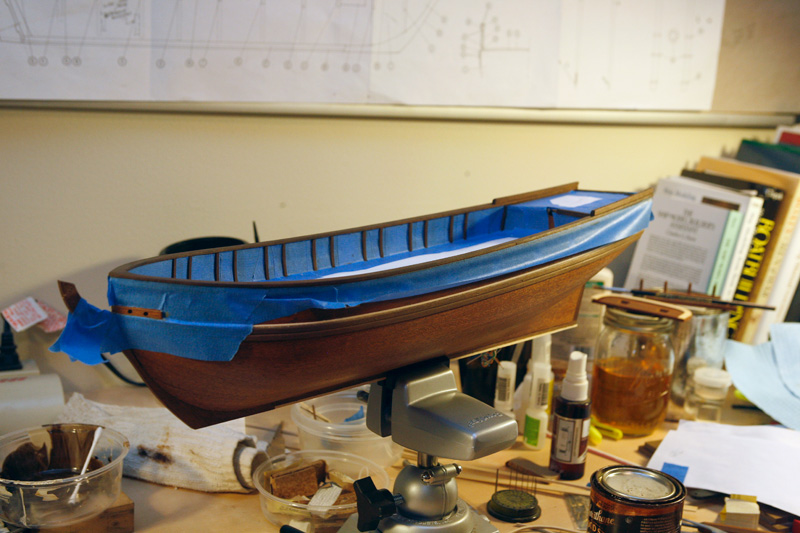
Just a quick update. I can finally sit long enough to build a bit. I got the hull masked off and stained the cap rails and the inner bulwarks(?) The instructions call them rough tree timbers. I used Varathane Dark Walnut. I like the Varathane for working around masked off areas, it is a bit thicker than Minwax stains and doesn't bleed under the tape as easy as the more watery Minwax does. The Varathane is more like a cream consistency. I also put some grain filler on several sub assemblies; stern gun port lids, the hawse hole reinforcements and the fore rails. I need to dig out the macro lens and tripod for those so pictures will have to wait till tomorrow. As for now I have a date with the cast iron elbows of my masseuse. Sam

-
JP, Been away for a while and just reacquainted myself with your build. Planking looks really good. I am jealous!. Sam
-
Russ, been away for a bit and just now was able to catch up on your build. Looking good. Sam
-
Robbyn, Yikes I go away for a couple of days (weeks?) and you have a half completed ship, have started soldering(!) AND your a moderator!!! Were you on the over achievers list in collage as well as the deans list?? Everything looks great. As far as soldering, it appears the more experienced here are using irons, perhaps I am missing something but I use a small butane pencil torch, my parts dont move around on me. It is an almost instantaneous joint, A little dab-0-flux, a tinier snippet of solder, light the torch touch the flame to the part and your done. Regardless which way you go, each time you solder something you will get better and better, what you have done looks good. Sam
- 773 replies
-
- 1
-
-
- san francisco ii
- artesania latina
- (and 1 more)
-
Rich, Shawn, Thanks. Starting to feel better, I can at least drive to work and dont have to lay down in the back of the GF's to go to the chiropractor. I do have to wait for traffic to ease up before I leave for work and leave work before it starts so I am only working 4-5 hours a day. Was actually able to work on the ship for a few minutes yesterday and today. Nothing to show here but it felt good to start getting back in the saddle again. Cog, I wonder if acupuncture could be a kind of voodoo, pins and needles..... This has been my first experience with it, mixed thoughts on effectiveness. Shawn, new jobs are always fun. One if the reasons I tend to stay at a place for a while. Anyway, hopefully by Friday I can have something worth a picture. Till then..... Sam
-
Sarah, Looking really, really good! Enjoyed catching up, sorry about your little mishap. I imagine I have a few in my future if I ever get the point of rigging. Sam
-
Russ, Was able to take a minute and catch up with your build, as always ice clean work. Curious about your scarfs. On your "MKIII" piece you ran your scarf from outboard to inboard, ie, the shorter end of the plank is outboard. When I did mine I went exactly opposite, mainly because that gave me the longest usable planks at the bow and just went with it for continuity. Do you know if there is a preferred direction or does it matter? Sam
-
Thanks everybody for the wishes. Carl, I have been thinking the same thing. Hey, you didnt give my "friend" my address for pestering you did you???? Or is that Aikido technique related to voodoo? Rich, no work, just an annoying visit from a long lost "friend," Sciatica. I am leaning against my office chair, draped over the back so I dont have to sit to write this. I went to a acupuncturist yesterday and was looking at the pins and tubes he was using and thinking, how can I modify these into a modeling tool/part? I have done a small bit of work this last few days nothing worth a picture though. Removed the offensive haws reinforcement, sanded the rudder and drilled out the hole for the rudder. As things slowly loosen up I should get a chance to do a bit more. Sam
-
Robbyn, Are you making sure you have raw wood when you glue your assemblies up? That is most likely why your tracks fell apart. When I prestain anything I always make sure to mask off areas to be glued or figure out a way to scrap/sand off the stain where I need too. I am finding on something small like a model ship that can be a challenge. there are several places I have opted to glue the pieces on and mask around them on my build. just an FYI for your next build/step. How is the hand coming along, looks like your back up to speed. Sam
-
Carl, you're so right there. Captain Lorcan is turning into a Chunky Monkey, gonna have to put her on a diet, else she will sink her next command!! Just a quick update. Have not been able to build this week, an old "friend" dropped in for a visit and wont leave. He is a real pain in the a$$, his name is Sciatica. I thought I had banished him to the cornfield forever 6 years ago, but he escaped and stopped by to say "Hey! Remember me?? We dont talk any more, dont you love me?" Needless to say, not much has been done build wise this week. I did get the hawse hole reinforcements and the guard rails a the instructions call them on. One of my reinforcements needs to be replaced though, it slipped when i glued it up. Thats it for now, hopefully i can start buil;ding again in a couple of days when I can sit again. Sam
-
Nice Jig Russ, Are you turning your deadeyes or cutting them out of dowel rod? Sam
-
Robbyn, Nice work. Its very satisfying pull off something you have never done before. As for the spousal grumbling, I ran into the same situation here. To keep the peace I committed to one weeknight reading with her rather than building. Worked for us. Of course that does not include "Datenight Friday" Maybe a kit for his birthday? Sam
-
Robbyn, I am wondering how stain is going to work on the transparencies. Most stains are designed to work with a porous surface. You might need to stain a full sheet and let it start to set up then use a 1.5-2"dry brush and a rag to wipe it off to the level you want. It would be process similar to glazing a stain. You seal your wood, then stain on top using the the brush to pick up stain and wipe it off the brush with the rag. brush the whole page up and down wiping the brush off regularly and then left and right. As the stain starts to dry you should start to get a even tone. It might work for this, it may also just pool up on the acetate. A better option may be to try some paint or tint and an air brush if you have one. A mixture of raw sienna and burnt sienna might be a starting point. Maybe 3 parts burnt to 1 part raw sienna. There is a company called TintsAll that sells 1 oz tubes of UTC tints for a buck or two at paint stores and the big box home improvement stores. Mix it in to some naptha or mineral spirits. I have used oil based stains to do this on cabinets once or twice. It worked OK, not great, just ok. The stain takes so long ot dry on a smooth non-porous surface that it usually collects dust in the air and any on the brush. With the size of your window glass that may not matter. Have fun! I am very curious as to how it will turn out. What size gun ports do you need? I have two that look to be identical to the ones adriake posted, they are 11.8x13.4mm. They are yours if you want them. Sam
-
Robbyn, Just getting caught up with your build. I agree with the others, your hinges look really good. Your almost making me wish I never bothered with the expense of photo etching. For your yellow film, have you tried a photography store? Most of them still carry gel filters in all sorts of colors. Or, you mentioned you work at a collage, maybe try the auditorium/theater dept? Kitty Kitchen Hockey. HA! have to remember that term. Sam
-
Chuck, I would contact Constructo directly. I messed up on my planking and ran out. It took a couple of weeks but they sent me some more 2nd plank material, no charge. My best guess is they would do the same for and instruction booklet. sam
-
Robbyn, Nice start on the doors. There is something very satisfying about looking at a kit part and saying "I think I can do better" And yes, it seems to be contagious and addicting, watch out. If once you start down the dark path, forever will it dominate your destiny, consume you it will. Sorry, the Star Wars geek in me just came out, I'll put him away now. I would agree with Russ, $15.00 is way too much for brass sheet. If the hobby and craft stores dont have it you can try the hardware stores they frequently have a K and S rack somewhere in the hardware section. Sam
-
Russ, like always, great work. Did you use your toothpick trick to fit up the transom margin plank? What is the "steeve of the bowsprit" mean? DId I miss out on the completion of your restoration project? I was really tied up with work for most of Jan and Feb and lost track of a lot of builds. The unfortunate demise of MSW BC (Before Crash) didnt help either. Would be a shame if I missed out on that. Sam
-
Sarah, Nice jig. Mark better hurry up, I have my cat burglar outfit on and am coming over, if he isnt quick I may steel it first. Sam
-
Robbyn, I have used the red mahogany stain on other mahogany projects in the past, found it was hit or miss depending. Like you I found it nat at all to my liking for ship building. What are your plans for a top coat if any? Sam