HOLIDAY DONATION DRIVE - SUPPORT MSW - DO YOUR PART TO KEEP THIS GREAT FORUM GOING! (Only 13 donations so far - C'mon guys!)
×


src
-
Posts
2,300 -
Joined
-
Last visited
Content Type
Profiles
Forums
Gallery
Events
Everything posted by src
-
Robbyn, your hull looks great. Am I seeing Minwax red mahogany there? sam
-
I understand completely JP. My work room is also the spare bedroom and gets converted 3-4 times a year. I keep telling my GF she needs to get a better job so I can retire and she can buy me a bigger house where I have my own workroom. Last time I said that she picked up the chef knife I had just sharpened and said she was going to show me a better job. Being "from Mars" I dont translate Venetian well, do you think that means I will be getting me my room soon? I hope so...... Take your time, finish your gift and enjoy your guests, I wont even check in on you ten seconds from now this time. I will wait at least 15. sam
-
Admiral, Thanks for stopping by and the kind words. Rich, Russ, I agree "work around" is probably the solution. The potential for making things worse is very real. It will be a reminder in the future to check, check, and RECHECK everything. Carl, yes Muy Tie would be one solution, but a bit more drastic than even I am willing to try. Explosives.... now there is a thought... "There isnt a problem in the world that cant be solved with the proper application of high explosives!" As far as Commander Lorcan, that little beast eats WAY more than she needs. She helps the dog eat his dinner, eats her own meals and now in the last couple of months she expects a treat at night when Gunnar gets his! She even sits right next to him for it. I have found the best solution is to limit her diet of modeling stuff by only letting her in my work room when I am there. Opening the window for her to sit in has helped tremendously also. No building for me tonight, my day started at 2am. I will work around the situation and get some pictures tomorrow. Sam
-
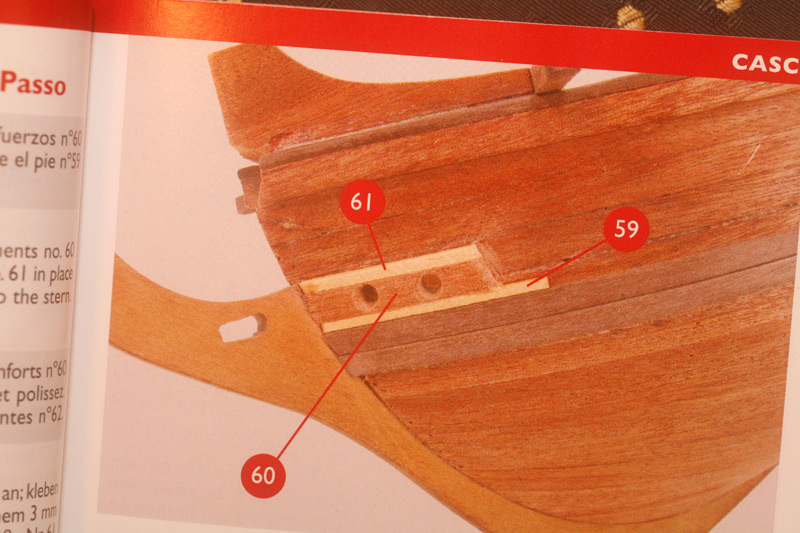
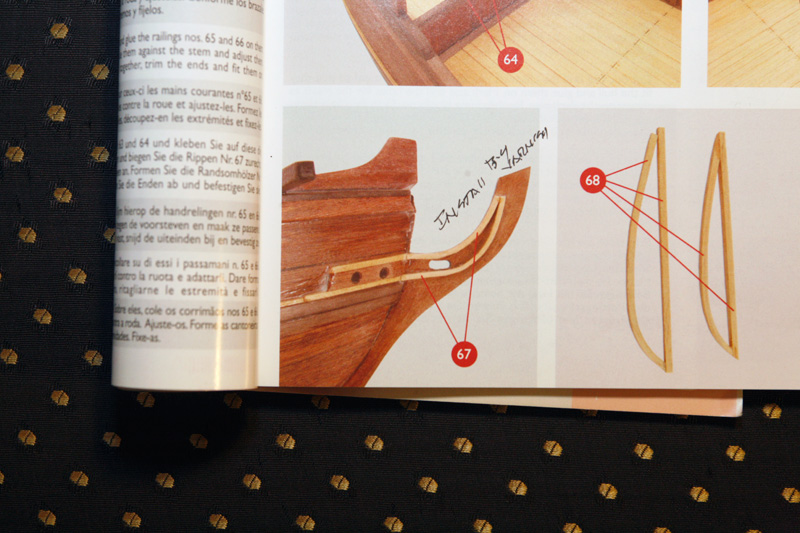
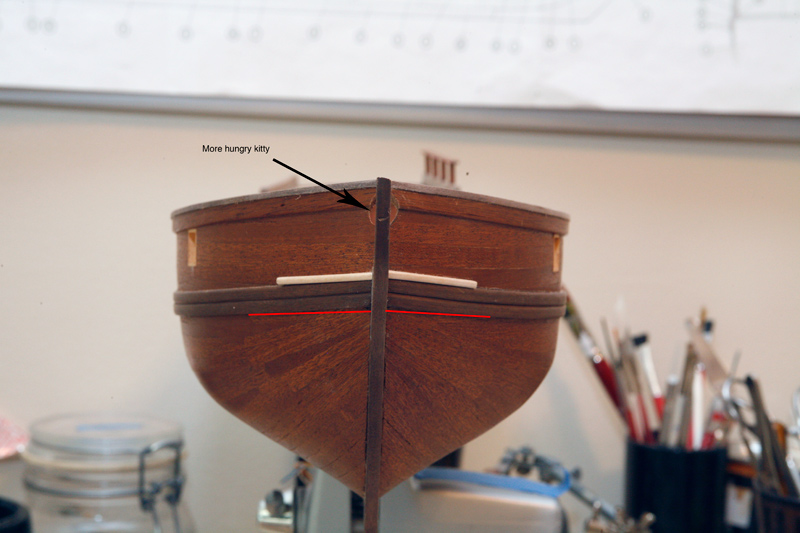
Oh I see... Out of town were you?? hahaha Ok so here is something that is entirely my fault all alone, I cant blame this on anybody but myself no matter how much I would like to blame it on the manufacturer. This first photo shows how the instructions say the stem should be trimmed out. This shows what I have built Here is how the instructions call for the stem to be finished. I installed the stem so it is inline with the keel. One nice straight line from the stern to where the stem starts to curve up. Its been so long since I installed the stem that I dont recall if it matched the drawings on the plans or not. Part of the problem is I put too much upsweep on the wales i think. The red lines show where I believe the wales should have landed. Whatever mistake(s) I made I now have a dilemma, tear it out and redo it or find a work around. At this stage I am leaning towards a work around, tearing out the stem will potentially damage the hull and moving the wales down will definitely damage the hull, re-staining will be beyond difficult. I am leaning towards the picture below, just forming the parts correctly. I also notice a couple of spots where commander Lorcan was trying to inform me of my error a few weeks ago. Commander Lorcan, 9 pounds of frolicking feline fury:


-
Rich, Still trying to figure out where I went wrong. I will get some pictures up later today or Saturday (have to go to THAT Park tomorrow morning, early) Basically I have the stem too low for the Whales and feet as the are called n the instructions. Take a look on page 41, See how everything lines up with the lower curve of the stem? Mine does not. So far my measurements are all within a bout .5mm so I dont know where I have gone wrong. If I was the only one building this now or in the past I would assume the part was cut wrong. But you, Auger, and I think desert sailor as well as others whos names I cant remember and dont appear to be "Active After Crash" have all done it wright. Stands to reason I have done something wrong. Correcting it will require some serious surgery on a multi-step-stained hull. Not to mention the glue that will have to be cleaned off. I am working on a fix, but I have to bend up some strips and see what it looks like. As far as the deviations from the kit, I am not really sure how all this "bashing" as Robbyn calls it happened. I started out with the intent to just build the kit with minimal investment, somewhere along the line I started making "improvements." I am going to blame it all on Russ's advice to do my scuppers in brass tube instead of cutting them out like the instructions called for. Yep Russ, Its All YOUR Fault! I had nothing to do with it. hahaha BTW, Russ, am I missing a build of yours? Havent seen anything from you in a while. Teaching taking up all your time? Sam
-
Ok, I waited ten seconds and there are still no pictures. what gives.....?
-
Jp, Thanks for the painting schedule it is making more sense now, for some reason I was confusing that technique with your deck staining pictures in the painting and finishing forum. Was wondering what you were using blue for! Silly me. regardless I am (im)patiently standing by for your pictures. no rush Sam
-
Wow Robbyn, thank you. Welcome back to building. I am enjoying watching your progress. That is the great part of this hobby, you can make it as easy or as complicated as you wish and you dont have to make anybody happy but yourself. The etching was actually easier than I expected, other than finding the chemicals here in California; it seems like any time Darwin rears his head in this state, our congress critters feel the need to protect the rest of us from ourselves. Otherwise it was pretty straight forward. Now the cleanup on the other hand...All those little inconstancies are mine alone. And as far as the "skill" part, when I get over my latest boo boo I will post a picture, it seems I have mounted my stem too low on the bow. I think I have a work around that wont entail ripping a bunch of work out..... I hope. Stay tuned. Sam
-
Russ, Shawn, Thank you both. Its nice to be building again. the hand rail were fun, I did end up making the posts twice, just couldnt make the tenons correctly by hand, next time. Russ, I am not sure if 8 parts will be enough, we shall see. The camera REALLY exaggerates little inconsistencies. Shawn, lurk away! I guess the streams are calling? I know the feeling, I used to fish every weekend I could; ocean, lake, stream, the fish store.... I am lucky to get two trips a year in now. My brothers, nephews and I try to go up to Bishop creek near Mamoth every year for a long weekend. Caught a 5.5lb German Brown last time, I didnt think they got that big in a stream. Sam
-
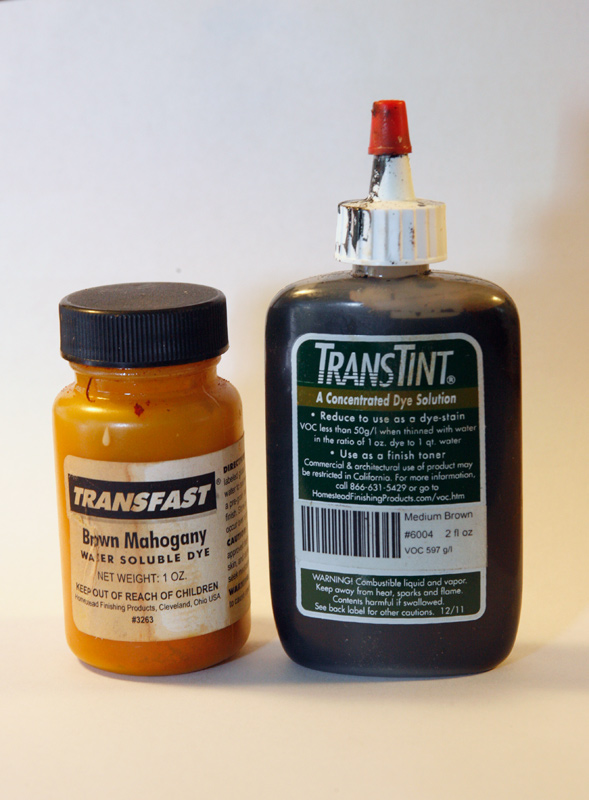
Rich, The build looks good! As far as your stain, what color are you shooting for? Before you try a paint to tint with see if you cant find some Universal Tinting Colors or some dyes designed for the same carrier as your stain. Years ago I tried adding paint to a stain and ended up with a mess. Depending on your stain and paint compositions you could end up with a ball-O-goo instead of stain. If you have a Rockler store near by, they carry the TransTint Dyes I mentioned in the Painting and Finishing post. That will tint your stain no matter what the carrier is, ie water, oil, etc. Also, sometimes I have found it pays to buy several stain sample packets in the general color range you are looking for. Dont expect the picture on the can to be what your final stain will look like, that depends as much on wood species as it does prep. You can usually find sample packets for about a buck or less each. If you just want to lighten the color, you can add some of the same brand clear to it or even some conditioner as long as its the same brand and carrier; water or oil base. If you need to shift the color; ie too red, find a color wheel online and use that to determine what color you need to add to get what you want. For instance if it is too red add some green tint, that will neutralize the red. There should be instructions when you find a color wheel. Another resource is a place called homesteadfinishing.com, there is a forum there and people are just as friendly and willing to help a newcomer as they are here. This tool might also help you. http://woodworking.rockler.com/hardware/Stain-Color-Wheel This is a inexpensive tint I have used for making glazes in the past. It should work for color correcting your stain as well, just test first. I have bought it at all of the big box home improvement stores here in Los Angeles. The Do-It Center (if you have them in Texas) has carried it most consistently I have found. http://www.amazon.com/Sheffield-Bronze-1524-Tints-All-Colorant/dp/B003TGW9B0 Have fun and good luck!! Sam
-
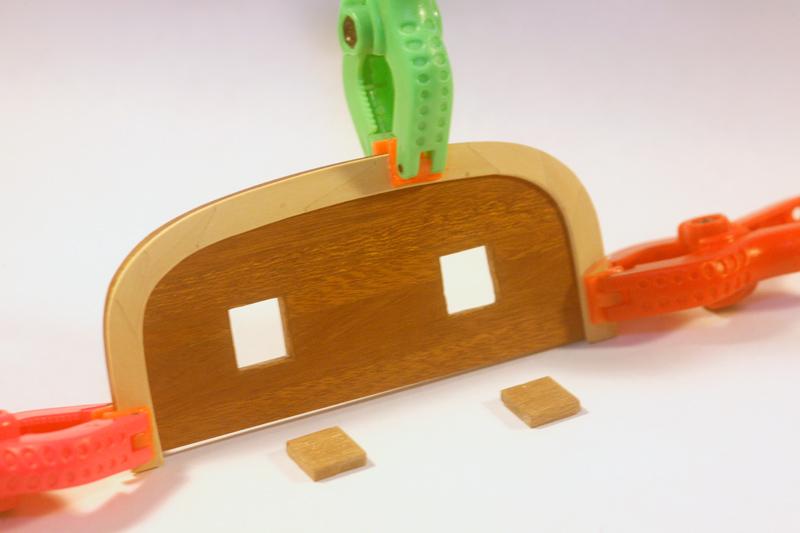
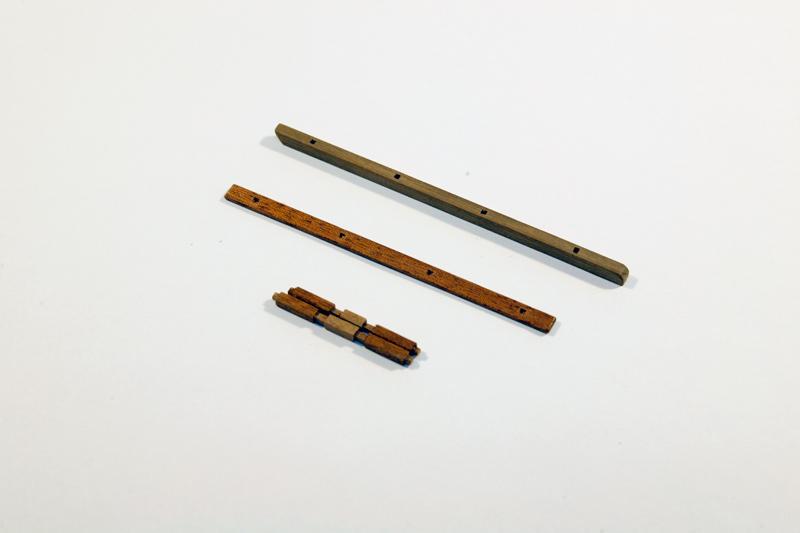
Rich, Thanks The kit part is in the lower left corner of the photo. Back during the dark days of MSW B.C. I was waiting for some new lumber to come in and started playing with photo etching. I want to make my own gallery windows since what was in the kit was rather sad looking. another user, Auger, had built his own and I felt they looked much better than the kit so I thought I would give it it try. As I was drawing up the window frames to be etched I figured I would etch some port hinges as well. The new parts look ok, I need to do some clean up and may have to make a couple more to get two more or less matching pairs. I have made a couple more parts. Pictures to follow. domestic duties first. Sam
-
Jp, I think I understand what you are doing with the paint, any possibilities of some step by step pictures? Sam
-
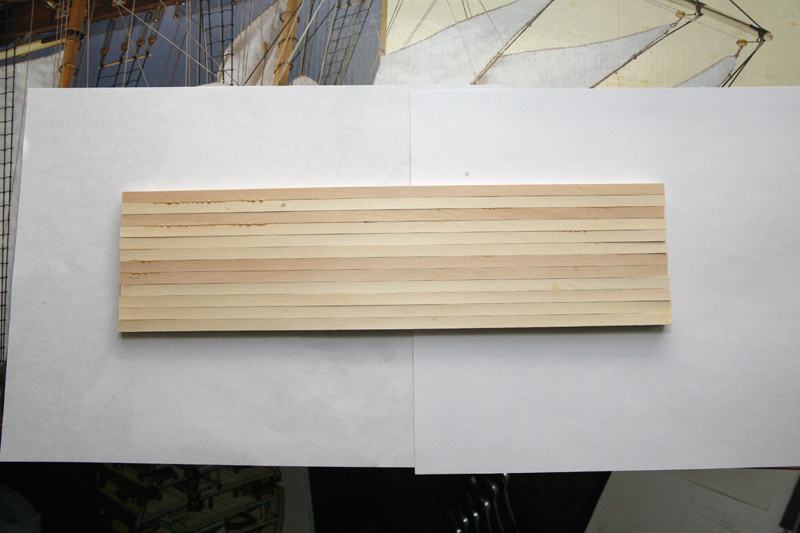
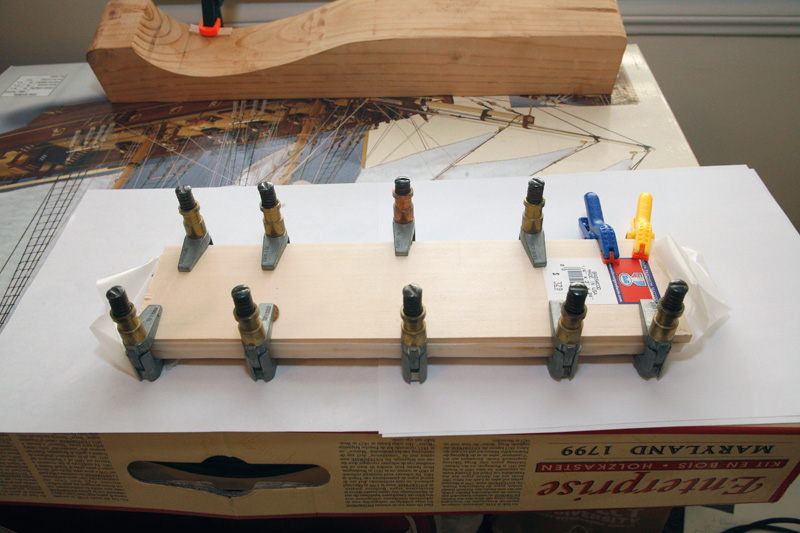
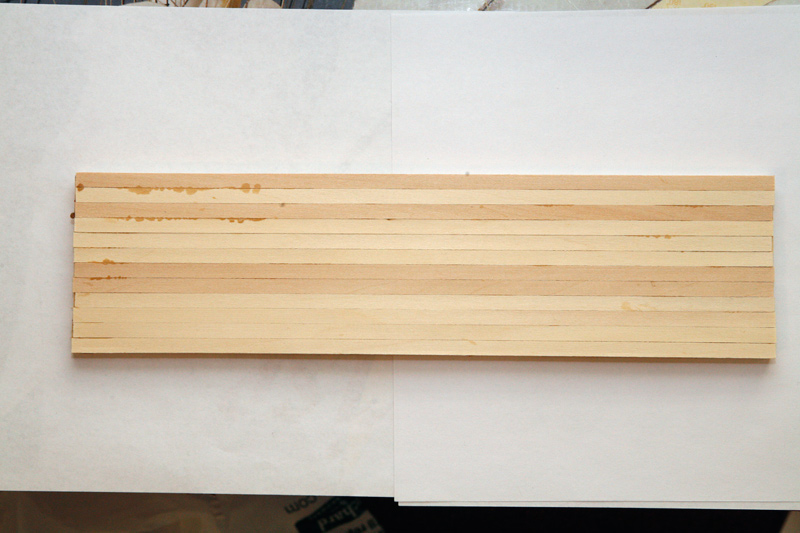
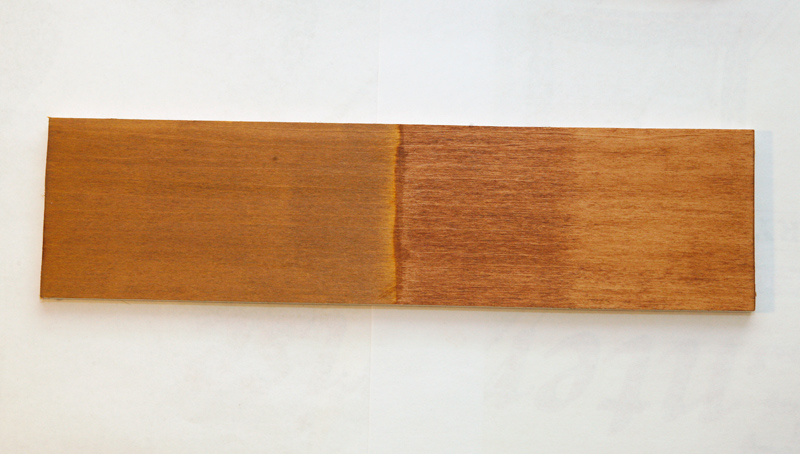
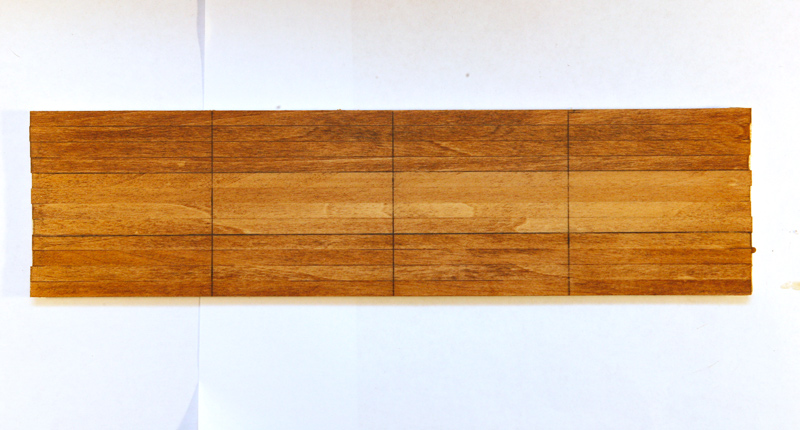
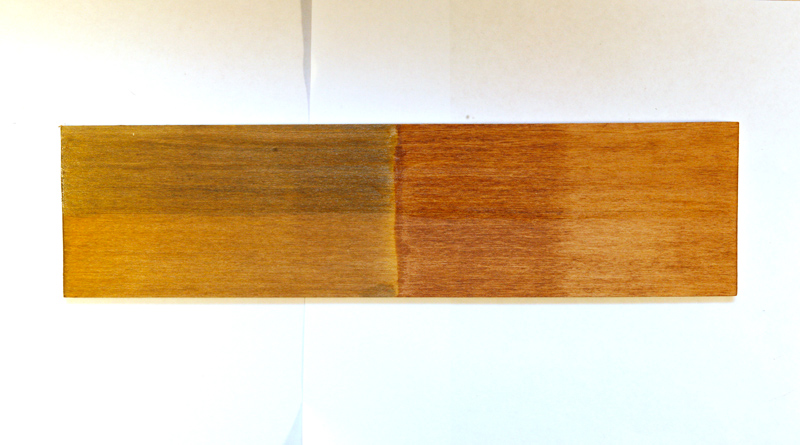
I have seen several topics about this, mostly on the old MSW, but also a couple here about the difficulties of staining basswood without splotching. It got me wondering just how tough basswood was to stain. So this weekend I went out and purchased some basswood strips and set about to staining them. One of the things I learned building and finishing cabinets and furniture over the years is that sanding plays a huge role in how your stain comes out. The stains available at most hardware and building stores are a pigment based product in an oil or water based carrier. The pigments lodge in the pores of the wood and in the scratches left by the sandpaper. The finer you sand the less nooks and crannies there are available for the pigments to lodge in. A lot of woods, Cherry, Maple and evidently basswood have inconsistencies in their structures and evidently some woods have variations in their sap content. This causes them to take stain unevenly or "splotch". One of the most common methods of combating this is to use a pre-stain conditioner. Its really nothing more than linseed oil thinned way down in mineral spirits. You can make your own by taking one part boiled linseed oil to 9 or 10 parts mineral spirits. Saturate the wood with it, let it set for 5-10 minutes and wipe up the excess. Apply you stain in the next hour, before it dries and you get a more even stain. Another method and my preferred method is a washcoat of thinned down finish. I usually use 1 pound cut of shellac. A one pound cut is simply 1 pound of shellac flake to one gallon of denatured alcohol. depending on the size of a project I may only make a quart at a time. 4oz of flakes to one quart of alcohol. brush it on, let it dry 30 minutes and scuff sand with 320, wipe off the residue with a tack rag and stain. You get a very even stain, although quite a bit lighter than if you stained on unsealed wood. Another method I have used is to glaze. Seal your wood make your glaze and work it in. I have my doubts as to its applications in model ship building, its messy and all the details in a build make me think glazing is a recipe for disaster. I started by simulating a deck or hull. I didnt bother cleaning off the glue since I wanted to see if it was possable to sand out a glue smudge. I clamped them down overnight then removed the clamps Next I started sanding, I sanded the entire board to 150, then 3/4 of the board to 220, half of the board to 320 and finally the last quarter to 400. Normally on a piece of furniture I would only go to 220, but with all the directional changes on a hull I felt 400 would be better. At that point you are getting to where the scratches are becoming close to the same size as the stain particles. I applied my washcoat to the center horizontal 1/3 of the board and minwax stain conditioner to the bottom 1/3. I left the upper 1/3 untreated. My stain was Varathane Golden Mahogany, just something I had in the garage. On the untreated portion the stain splotched pretty severely. On the conditioned side you can see an improvement, especially in the 320 and 400 bands. The wash coat is the most even, but considerably lighter. Next I applied a couple of coats of Varathane Poly clear satin. After looking at my results I got curious. Dye stains can also be a great tool for splotch prone woods. Dyes color the wood on a molecular level so you get a very even color. You wont find dyes at your local home depot or hardware store. You need to go to a specialty wood working store like Rockler, Woodcraft, or my favorite, Homestead finishing. An internet search will turn all of these places up here in the USA. I am sure there are places in Europe and Australia, but I dont know the names. One of my favorite brands is the transtint dyes. They will break down in any carrier; water, alcohol, lacquer, alkyd, oil, whatever. Thy are a bit pricey. $20 if I recall for 2 oz but the last a long time depending on how you use them. I had some brown mahogany water based dye here so I mixed up a very small batch; 1/8 tsp in 4 oz of water. I sanded the entire board to 400, then applied the dye to the left side of another board and the same golden mahogany to the right side with both conditioner and washcoat. The dyed side came out very even. although I dont know if this is a good color for basswood. Then I applied 4 coats of blond shelac to the top half and 4 coats of linseed oil to the bottom half. Something really unexpected happened when I applied the shellac, the brown dye turned greenish brown. Also if you look closely at the bottom of the board you will see a small green blob that is a small spot of the clear poly I used on the other sample. Prompting my use of the linseed oil. This is a great example of why you should always do a test board when staining and finishing. I think a garnet shellac would offset the green but I would need to get some flakes and see. Also a light red dye would shift the green to a brown. [ After all of this I am starting to think that maybe the best solution is to either wash coat or not stain at all. One of the furniture makers I worked with years ago swore if you wanted a dark finish go with a dark wood. If you want a light finish go with a light wood and clear coat. I hope all this helps somebody, it seems like this question comes up frequently Sam


-
]Didnt get a whole lot of time to work this weekend. I did manage to start on the gunport hinges. Forming them around the hinge pin to create the barrel was a bit of a challenge. soldering the parts together was far easier than i imagined it would be. I barely touched the flame to the parts and the solder was flowing. I have done a very small amount of brazing in the past and it always took a few seconds to heat the metal. This brass is so small its instantaneous. I only need 2 pairs, I am going to make several and choose the best. As you can see they vary a bit. Some of the barrels are out of alignment and some of my drilling is off. All in all though I am pleased with how they are coming along. On the upper left are raw parts off the tree from the photo etching. on the right are "completed" parts. Below is teh kit part I am basing my hinges on and a gunport. I havent decided if I will blacken them or leave them bright and coat with lacquer. Most likely I will blacken them, it will hide the inconsistencies think. Sam

-
sarah, I think your doing a great job. I was poking fun at myself too for the instructions. I am also on my first build and find the instructions to be....... vague at times. Especially when the translation to english doesnt quite work. Masts and rigging as magical creatures? With a sadistic mind of there own! And besides, who would want a fat free hamburger?!?!?!?! For me at least, I would rather have one hamburger a every six months with with bacon and blue cheese and caramelized onions than a fat free one every week. Keep up the great work. Sam
-
Sarah, Just getting caught up with your log. Looking good! I know what you mean about working with splinters of wood, sometimes I feel like the splinters I dig out of my hands from work are bigger than what goes into my build! AS for instructions, who needs instructions?? Dont tell me your one of those people who stop at the gas station and ask for directions are you?!?!?! Sam
- 160 replies
-
- 1
-

-
- harriet lane
- model shipways
- (and 1 more)
-
Rich, I am right behind you. Looks like you got it worked out. Looks good. sam
-
Dafi, Great job!! I think you need a bigger challenge next time! You can buy micro drill bits here, very pricey but they have 'em. http://www.kyoceramicrotools.com/?gclid=COCqsLrqiZoCFSMSagodpRhJFg There is also Otto Frei in Oakland, CA. Its Micro Mark for watch and jewelry makers. http://www.ofrei.com/ Sam
-
Robbyn, Rich Thank you! I have really enjoyed the last couple of days off. Other than my "Nine Pounds of Frolicking Feline Fury" (aka Lorcan) knocking over my kit box....twice, its been a very enjoyable and productive break from work. Port hinges will have to wait till the weekend, I discovered my "crack" torch is out of butane. No time to get more as the Future Admiral will be home soon and expects dinner on the table promptly at six. Sheeesh! Women! Now a question concerning my handrails if somebody knows. On a real ship, would the tenon have been a through tenon or a stop tenon like I did? Thought anybody? Sam
-
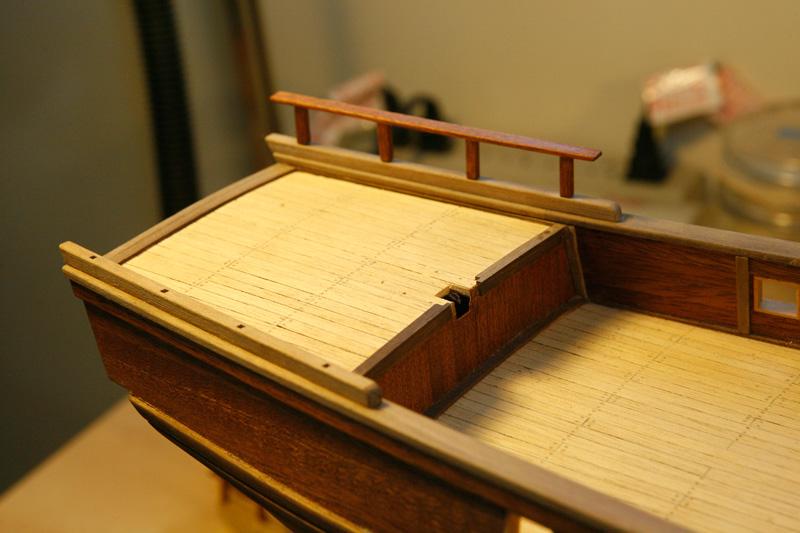
Quick update on todays progress. I got the Transom stained and fit up the stern ring. That will get glued up tonight. Gun ports are next, making the hinges may be a bit of a challenge. Last night I glued up the upper parts of the waist deck hand rails and this morning I finished staining them. I glued the poop rails on. The hand rail is set in place, I want to stain the cap rail and poop rail before I glue these down. Easier than masking. I didnt stain the tenon on the hand rail and I will cut a small square of masking around the mortice so I get a good glue joint. Thats it for now. Sam comments, criticisms and questions always welcome.

-
Wow! Its been since mid January since I have been able to sit down and really work on my build. I have a couple of days off so now I get to "play" a bit. My firts attempt at a mortice and tenon joint was disappointing. The mortices were fairly easy to chop out but cutting scale tenon in mahogany was just not working for me. The wood is just to splintery at this size in my opinion. I went out several weeks ago an bought a router table for my dremmel tool. While not perfect it was hands down better. I was able to get the tenons real close and then use a file to clean them up. Then I dry fit them. most of them fit well enough that I could turn the rail upside down and they would not fall out. I have done a wash coat of shellac and filled the grain with grain filler. they are outside drying right now. I might even get tehm glued up tonight. While they dry I am going to see what I can do about making some gun port hinges. Thats it for now. Sam

-
Rich, What are the drill bits for?? As for my build, stagnating.... work has been keeping me pretty busy since mid January. 10-12 hour days 7 days a week. We are supposed to finish tonight, then I can start building again. Sam
-
Coloring Basswood
src replied to JPett's topic in Painting, finishing and weathering products and techniques
JP That sample does not look bad at all. There are a lot of things that can cause your stain to be uneven. Sanding technique is one. Make sure you follow the same sanding schedule for everything. Virtually all of the stains you get in the local paint/hardware store are a combination of pigments and dye in a carrier. The pigments lodge in the pores and tiny scratches left behind when you sand. If you sand part of your hull to 220 and another part to 320 for instance the area you sanded to 320 will be lighter. How MUCH you sand with a particular grit affects it also. If you REALLY sand one area you run the risk of burnishing the wood and the stain wont penetrate. Also, as I am sure you are aware, sanding cross grain is not recommended, those scratches pick up the stain and leap right out at you. Its posable to break that rule if youre carefull. I sanded my hull to 400 because there were several places where it was very difficult to sand with the grain, at 400 you really have to look to see the scratches. Keep in mind though on dense fine grained woods sanding to that grit can make it so you get very little color. Some woods just have a structure that makes them difficult to stain. Birch and cherry are two of the biggest offenders. In the ship modeling world it is starting to become apparent to me that many of the preferred woods for modeling are difficult to stain. I would agree with the others about the prestain conditioner. As others mentioned it very easy to use and you get very nice results. If for some reason you (or others) cant find it or are too far away from a paint store, you can make your own with nothing more than 1 part linseed oil and 10 parts turpentine or paint thinner. You can also use a technique called washcoating. It is very similar to stain conditioner. I use a 1lb cut of blond shellac. That is 1 pound of shellac flakes to 1 gallon of denatured alcohol, more than you will use in your life probably. You can scale it down to whatever amount seems appropriate to you. I make a pint at a time, so you scale down to 1/8. (8 pints in a US gallon) and 2 oz of flakes. Easier is to buy your shellac and thin it down. Buy the smallest can you can find and pour out about 2 oz in a sealable container then add about 4-6 oz of alcohol to that and you will be good to go. Brush on a coat, let it dry, scuff sand to 320 and stain on top of that. You can do the same thing with water based clears but I dont know how much to thin them since I dont use water based finishes as a rule. As a guess three or four to one should be about right. Always make a test board first. I would strongly recomend you make a board at least 4x6" or larger with your planking material and experiment. You really wnat to try to use the same material you're in your project. That way you can find out in advance if your going to have any problems with staining. This is the test board for my build. I used the display base that came with the kit since I will be building another display board. Ideally you want to use some of your planking to make your board, I was practically out. Left to right is Varathane Chestnut, Brown Mahogany, Traditional Pecan, no stain and then Gold Mahogany. From top to bottom is a washcoat, grain filler and stain. Second row is grain filler and stain, no wash coat. Third row is washcoat and stain, no grain filler. Bottom row is stain on raw sanded wood. It is kind of hard to see in the picture, but the biggest color change was with the wash coat, it blocked a lot of the pigments from settling in the pores. There are a lot of other ways to combat splotch prone woods, gel stains, dyes, glazing, chemical staining (hazardous if your dont take the required precautions) but require many more steps to get a finish. Looks like you are well on your way. I have most likely given you more information than you needed. I am generous like that! Have fun! Sam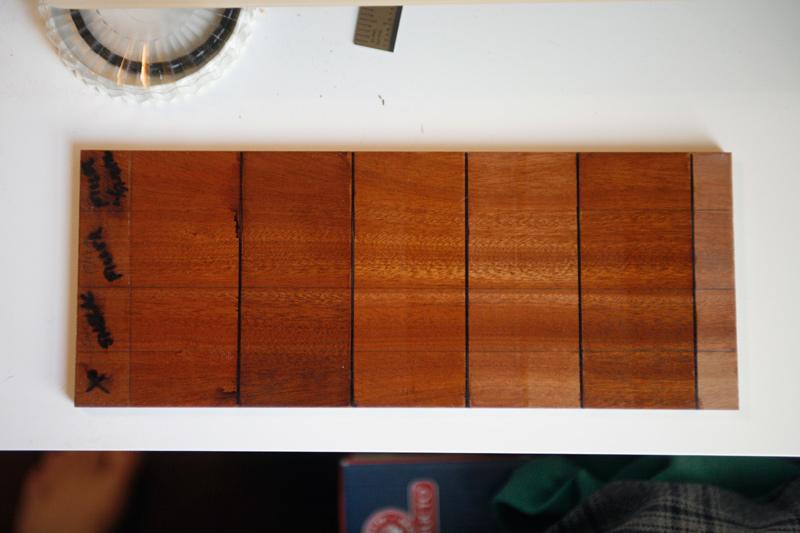
-
Nice progress Rich. Those pins look like they are a challenge. I wish I could sit in front of the TV and work like that. We have a nine month old kitten who gets into everything and a 55 pound German Pointer who thinks he is a lap dog. Working away from my desk is right out. Sam
-
Anytime Robbyn, copy away!!! I didnt actually miter the corners of the port linings. If you look closely at the picture you will see the horizontal pieces, what I called the rails are full width and the vertical pieces, what I call stiles butt into the stiles. I am not sure, but I doubt this type of construction, if it was even used on a real ship, would have been mitered. Unreinforced a miter is one of the weakest joints you can choose. Too much end grain to end grain. My best guess is these would have been a rabbeted joint or even dovetailed. Dovetails would have held up better to the stresses of sailing before failing. Like you I questioned my ability to do that small a joint by hand. Regardless how you go, I am sure you will do a great job. Sam