HOLIDAY DONATION DRIVE - SUPPORT MSW - DO YOUR PART TO KEEP THIS GREAT FORUM GOING! (Only 13 donations so far - C'mon guys!)
×


src
-
Posts
2,300 -
Joined
-
Last visited
Content Type
Profiles
Forums
Gallery
Events
Everything posted by src
-
Rich, Carriages and chainplates look good. Hang in there on the job search, something will hit. seems like its tough in all the professional markets right now, my GF has ben looking to change jobs for three years, same thing your running into. Fingers crossed for both of you. Sam
-
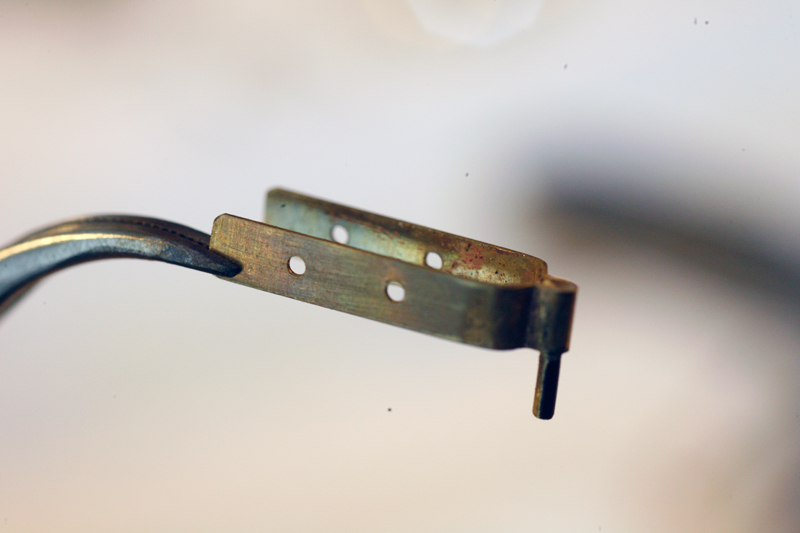
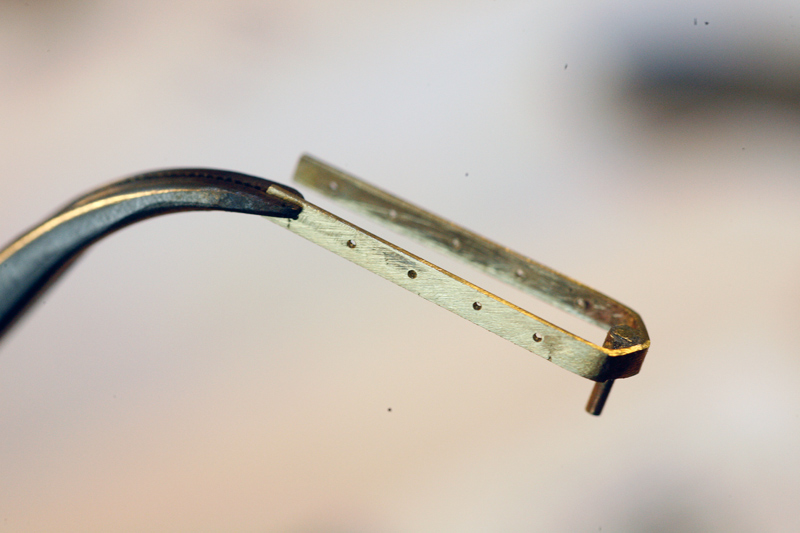
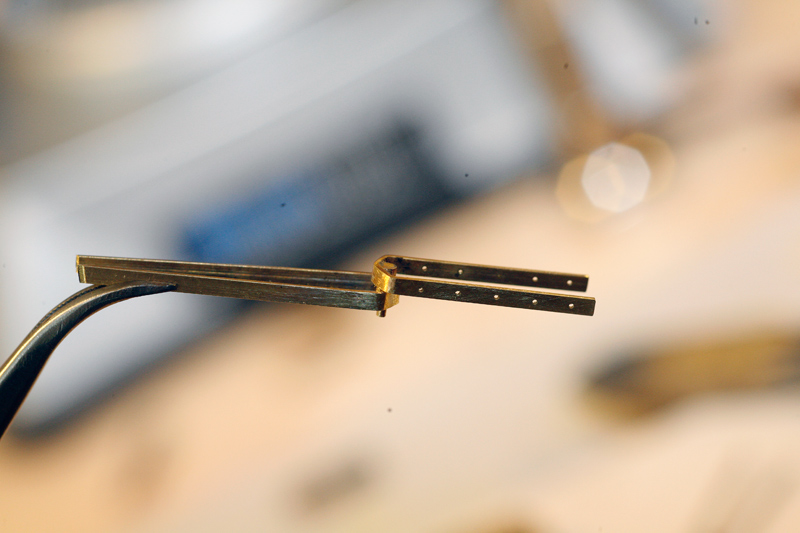
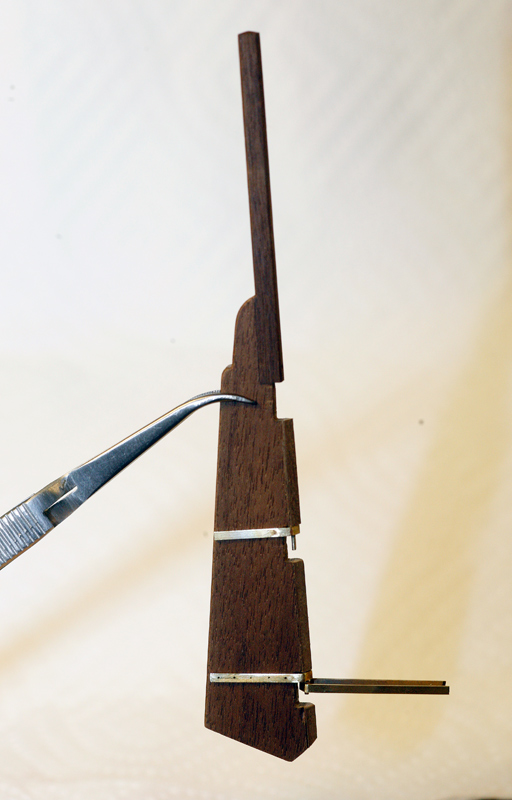
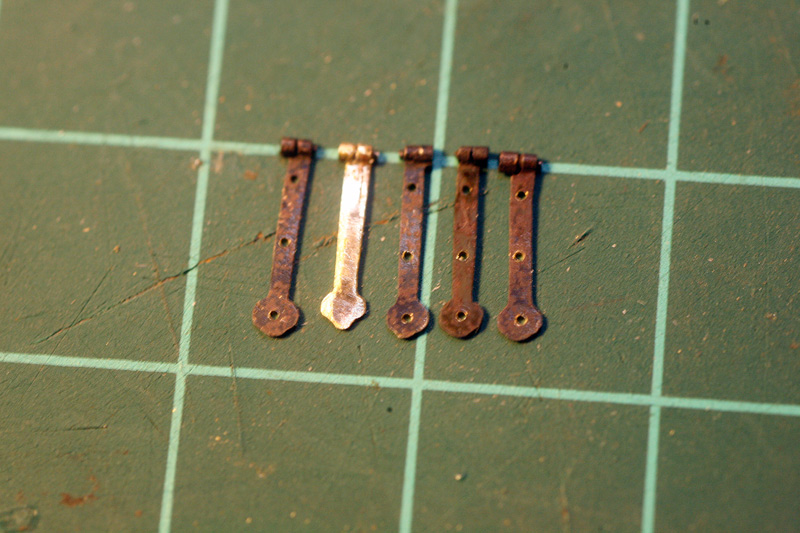
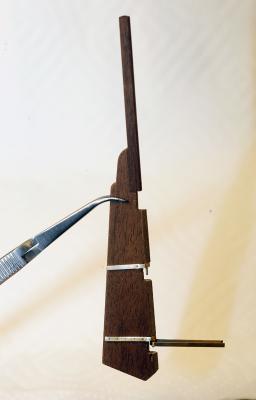
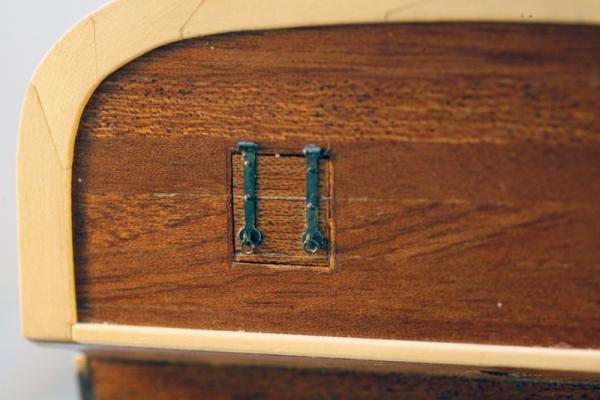
Not a whole lot of progress in the last several days. Work interfered again. I have not decided what to do about my door hinges yet, I found some thin black tape at an art store as well as some brass foil. One of those should work. In the meantime I have continued on my journey to complete the stern and rudder. Earlier I discovered the kit parts had predrilled holes that didnt look right when installed; the holes were huge and the spacing bothered me. Some research in "Fully Framed" and "Arming and Fitting" gave me some idea of what I needed to do to make my own. I had grand plans of forming the gudgeons and pintles out of solid bar and soldering on the straps. Experience and tooling (read "lack there of") had other plans. It just wasnt working for me, so I adapted. I made a jig and bent them out of strips and soldered some tube in place to accept the pins. I also learned the rudder was set too far back of the stern post. I fit everything up based on the instructions - I swear, I WILL learn one day, promise! I dont have material to fashion a new rudder, but I did have some material left over from the rudderhead. It changes the shape of the rudder slightly and is probably not correct, but I think the installation will look better with a smaller gap. I still need to re-shape the pockets for the pins on the pintles and refinish the rudder. Kit Pintles New Pintle. Needs more cleanup and to be blackened. I think I will reinforce the attachment with bolts like I used on the port hinges; a hammered over bit of wire and lightly ( ) epoxied in. Mated with a gudgeon Mocked up on the rudder.


-
Ron, I discovered your build a few days ago and have been taking time every evening to catch up, still have a few pages to go. Great job! I love your willingness to carve into a finished piece to correct it. So many things to comment on but I will limit myself to two; Love your ebony stain, where did you learn about it? Do you have any idea what the tea is for? Does the tannic acid play a part like I suspect? And you oven, the only thing I see missing is a bird on the rotisserie. This is another one of those builds I will be checking in on to see progress but also "How did he do that again?" Sam
-
Mark, just getting caught up with your log. I am really liking the look of that Swiss Pear! The planking looks pretty awesome also. Right now I can only dream of retirement at 49. I am envious! Sam
-
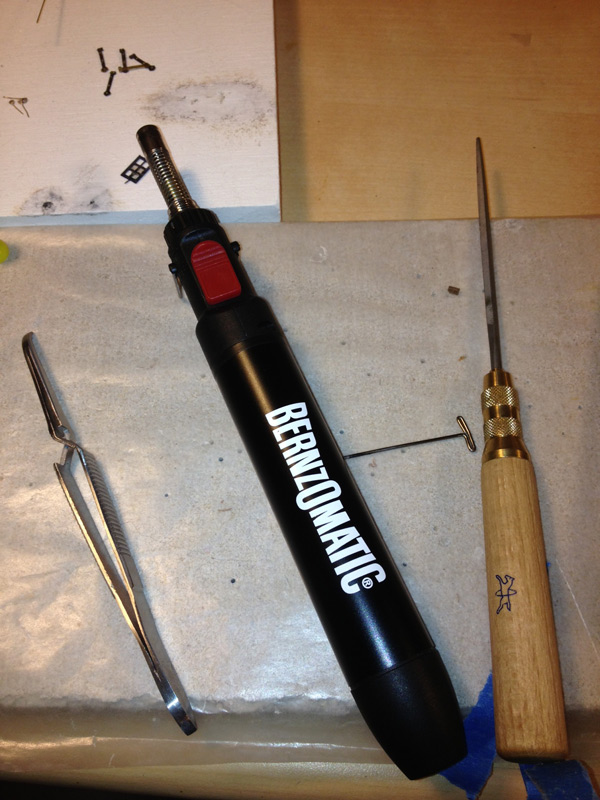
Hey all, thank you! Looking at it through magnifiers and work lights its more noticeable, but under regular light and from even a foot away its not really noticeable. So Robbyn, Mark I guess it really isnt as noticeable as it felt when I was posting. Not nearly as grumpy with myself anymore. Amazing what a good nights sleep, a Beatles cover band and a couple of drinks will do for your outlook! Done whining. Brian, just blocking, sorry. One day maybe. There is a company called Gilderfluke that make a really cool series of robotic controllers that are not much more than a med priced kit. That would be quite and exercise in miniature animation. Not this build though, not even the next, who knows perhaps the third I will let my inner DisNerd out. In the mean time I may have solved my itty-bitty solder cutting dilemma. A friend reminded me what happens when solder drips on a concrete floor, it spatters out in all directions and makes little tiny bits-o-solder. I took one of the FA's favorite glass pie tins - SHhh! dont tell her - I cleaned it several times when I was done. Left it on a black garbage can to warm up and dripped solder on it with a big torch from about 6' off the ground. It worked, but not like electrical solder. Next I tried putting the dish in the freezer till it was cold to the touch and ran to the garage and tried it again. this time I got a whole bunch of little wirey like bits that look like they just might do the trick. My only concern is will the oxidation I see affect the joint? I am thinking the flux should take care of that. The blob in the upper left corner is from the first attempt and measures about .5" across. The pieces in the center are from the 2nd attempt and are in the neighborhood of .010". All in all I used about 3" or so of .031" dia. solder. Thats it for now, Sam

-
Wow Rich, You have been cruising right along there. Looks good. good to see your back and dont worry, your secret of the laptop is safe here. How are he kit sales to work with? I will be there one day...soon... Sam
-
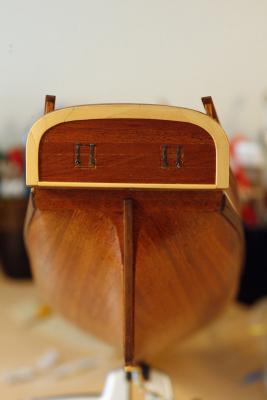
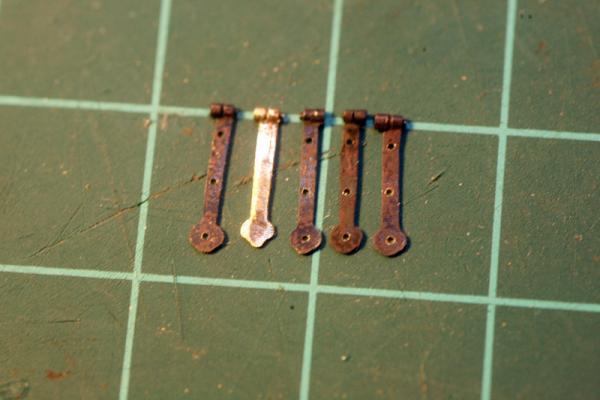
Russ, Thank you very much. I am pleased with the actual hinges and the rings too - it only took me all 16 of the blanks I made to get 4 that I felt were acceptable! I can accept that what I have is the best I can do at this level of experience. What I was really annoyed with was my sloppiness with the epoxy. I was (still am a little bit for that matter) having visions of being 7 and building my first model plane and getting cement all over the canopy. It really doesnt show in the pictures, so maybe it isnt all that bad since the close-ups usually magnify everything. I am probably just being obsessive. (Me? never! ) I am also a little underwhelmed by the plainness of the transom at this point. I had read that usually the builder would attempt to blend the stern gun ports. So I went with that idea. But now, when I look at the stern from across the room all I see is the hinges with no apparent reason for them being there. I am starting to wonder if I should have gone with a more contrasty wood for the frame work around the lid. Too late to do much about that now. Ok, not so grumpy now, time to start playing with door hinges and paper like stuff. Sam
-
Thanks Robyn. More options to think about, nice, looks like a trip to Jo-anns fabric this week. More experimenting. got my gun port hinges on. And, well, they look kind of sloppy. They are ok from a distance but...... I got sloppy with the epoxy. Even the tiniest bit seemed to oooz everywhere. Literally the tiniest bit on the end of the bolts was too much. I made the bolts with .019 wire heated and rounded over, thought they looked pretty good off the ship. Set them through the holes in the hunges and then put a tin dab of epoxy on and t=set them into place, still oozed out. &$^$^&$* Not sure I will get them out, they are embedded almost a quarter of an inch in. Gonna try to rub some wax over them and see if that doesnt help blend everything in. grumpy now.... Fingers crossed! Sam
-
Thanks Russ, wont the tape peel up over time? Mark, (Mtaylor) mentioned recommended black foil, that gives me a couple of options to play with. Sam
-
Door hinges
src replied to src's topic in Discussion for a Ship's Deck Furniture, Guns, boats and other Fittings
Mark, black foil.... Theatrical supply places sell a foil that is black, its used for blocking light and probably a whole lot more. I dont recall how think it is, have to look and see if we still have any at work. Hadnt thought about pounding it thinner either, thanks sam -
Door hinges
src replied to src's topic in Discussion for a Ship's Deck Furniture, Guns, boats and other Fittings
Its safe, you can come out now Mark. Any thoughts on something thin enough for these hinges? At 1:51 scale even .005 sheet is looking thick to me. Sam -
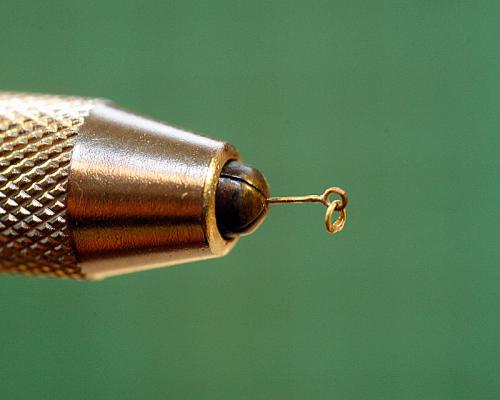
Rich, Sorry to hear about your laptop, thats no fun. I will keep an eye out for you. Edwin, your welcome, but I cant take credit for it, I found it on MSW 1.0 BGC -"Before the Great Crash." Cant remember where I saw that here first. Progress has been slow this week. Been making rings for my gun ports. I started out with 0.019 wire and that was just way to big. picked up some .012 wire, that was better visually, but working with it has been a bit of a challenge. Even with my little pencil torch at its lowest setting I have to keep the flame almost 1.5" away or things get hot so quickly I have melted the wire more than a couple of times. I think I averaged 4 failures to every success. I may need to look into a new torch, but my build budget for the year is getting low, have to see. Cutting off a small enough piece of solder is a challenge also, regardless I have 4 sets of rings I am more or less happy with. Today i hape to blacken them as well as re-blackening my hinges and maybe even get them installed Then I have to see about making the little "leather" thingies that the rope passes through. Haven't figured that out yet, maybe try taking my smallest brass tube, .031x.006 wall and try to file it into shape. I have also been noodling on how to make some hinges for my door. Even my thinest brass sheet, .005" looks thick laid on the face of the door. Its possible that hinges just are not in the future for this build, again we will see. Need to do some more shaping and re-blacken. the left hand hinge came out visibly larger than the others so I made another. Managed to get 4 semi-decent rings soldered up Even this little torch wants to melt the microscopic wire if I am not careful. Thats it for now, as always comment and criticisms always welcome Sam

-
Popeye, thanks for the link to the rope. Madchemist, so the fumes are NOT cyanide? You mean something I read on the interwebs was WRONG?!?!?! My world is crumbling. sigh..... Sam
-
Robbyn, Your details are looking great!. You keep raising the bar for those of us still on our first builds. Sam Oh, and where is this Syren Rope of chucks I keep hearing about? I dont see it on the main page anywhere.
-
Door hinges
src replied to src's topic in Discussion for a Ship's Deck Furniture, Guns, boats and other Fittings
Scott, good information on the blacksmith, who knows, you may hear from me one day in the future. Where I work we build theme park attractions and every once in a while run into something we cant fabricate in-house. Sam -
Door hinges
src replied to src's topic in Discussion for a Ship's Deck Furniture, Guns, boats and other Fittings
Thanks everybody. I too love the "useless" trivia that comes up here and elsewhere. I hadnt heard of the HL hinge before, should have installed some of those when I was with my ex....... Religion comes up in a lot of period construction, a very common common door style, at least herre in the States is something called "Bible and Cross" I learned it as "Book and Cross" It looks like sometime this week I will have to see if I can file a couple of brass strips into the right shape and make a couple of hinges. Sam -
Door hinges
src replied to src's topic in Discussion for a Ship's Deck Furniture, Guns, boats and other Fittings
Hadnt thought about opening inwards. "T" hinges then. Something like this I suppose: http://dckitchensjoinery.bttradespace.com/our-galleries/jobs-portfolio/gallery-item?mediaId=942C8F8A2EA31FB4E040BB0A462B3FBC -
What kind of hinge would have been used n an 18 century door? I replaced the white metal door on my Enterprise and got to thinking the other night, a door needs a handle and some hinges. I based the door on the kit part and left the "casing" proud like a modern door. Making the knob was easy enough, but I am not sure what the hinges should look like. I have looked through Antscherl's "Fully framed series I and II as well as Lavery's "arming and Fitting" They made no mention of door hinges that I could find. I even looked through the three how too books I have and found nothing. Lots of information on gun port hinges and rudder hinges but nothing about door hinges. I am tempted to just cut three bits of brass wire and blacken them to represent the hinge barrel. Then I saw on another build a mention of "L" hinges. This sounds correct for what I am trying to do but the only thing I found online was this reproduction hinge : http://www.houseofantiquehardware.com/surface-mounted-hinges-forged-iron?utm_source=froog&utm_medium=cse-nc&utm_campaign=gdf&partner=froog&gdftrk=gdfV22090_a_7c472_a_7c4382_a_7cR_d_08AH_d_AH3BQ&gclid=CLPKp5uuvrgCFe1_QgodSScA_Q That hinge is designed to mount to the face of the door and the case, my case is proud by about a 64th". I am thinking of making the "L" portion and soldering it to some wire but I wanted to get some input from some more experienced people. I am not sure if the arm of the hinge should span just the stile or al the way on to the the rails also. Sam

-
Brain, I am so sorry to hear that. Family first as always, the build will be there waiting for you. Sam
-
Thanks Robbyn, I am going to limit myself to just one pat though, dont want to get a swollen head. Sam
-
Rich, Just getting caught up with your build. Your guns look good. Have you decided, in or out on the install?? Sam
-
Robbyn, nice work!, Sam
-
Brian, Just getting caught up. Hull looks great. gonna be watching what you do with your blocks. Sam PS, Welcome back Alfalfa!
-
Brian, Wayne, Michaelpsutton2, Thanks for all the info. this weekend I hope to be able to look into this a bit further. Sorry I took so long to respond, life has been.....busy lately. Sam
-
Russ, Brian, ZyXuz, Thank you!! Brian, dont sell yourself short, I have seen your work, you may still. sam