src
-
Posts
2,300 -
Joined
-
Last visited
Content Type
Profiles
Forums
Gallery
Events
Everything posted by src
-
Yikes! My gudgeons are sweating!!
src replied to src's topic in Metal Work, Soldering and Metal Fittings
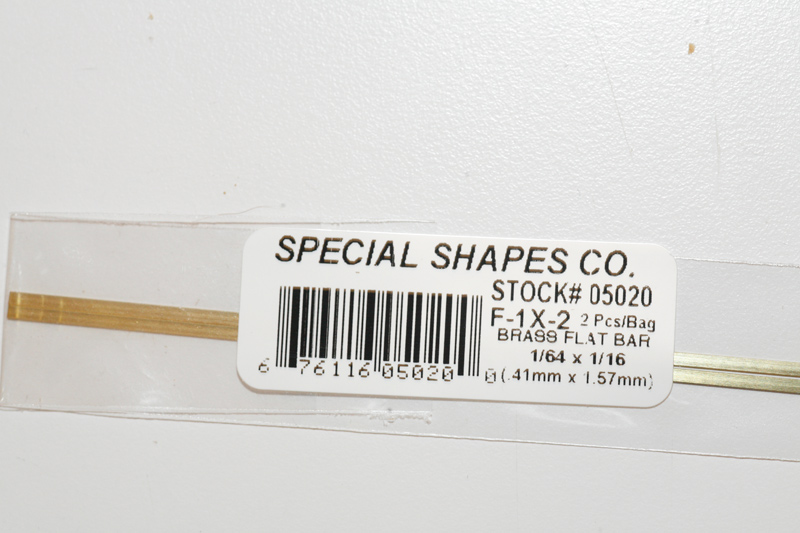
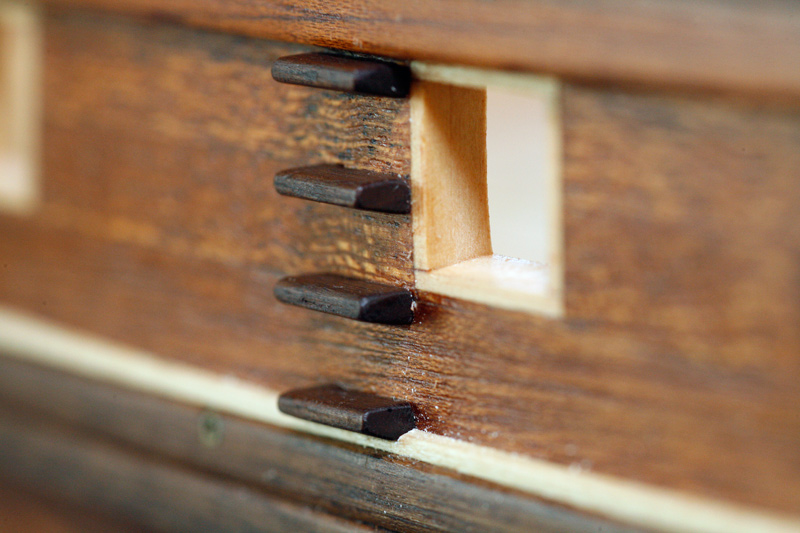
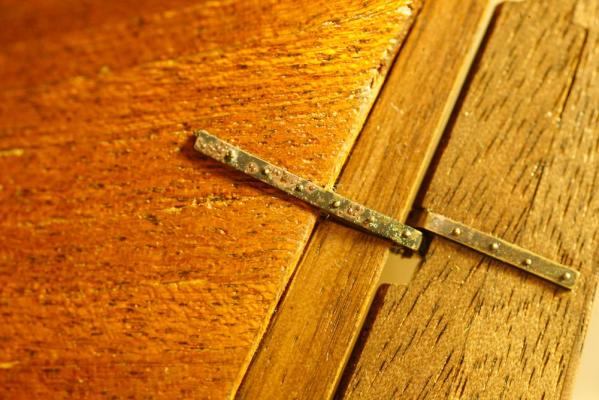
Hi Druxey, thanks for getting back to me. I used 1/64x1/16 brass strips from K&S. I annealed, formed, silver soldered then filled with a #6 jewelers file and scrubbed with a nylon brillo pad where I could. Cleaned with Soap and water with distilled water, rinsed with distilled water. soaked in muratic acid then rinsed in distilled water. Blackened in Blacken-It diluted about 50-50 with distilled water. Glued on with 5 minute epoxy as well as "nailing" with blackened nails and some epoxy. Sam
-
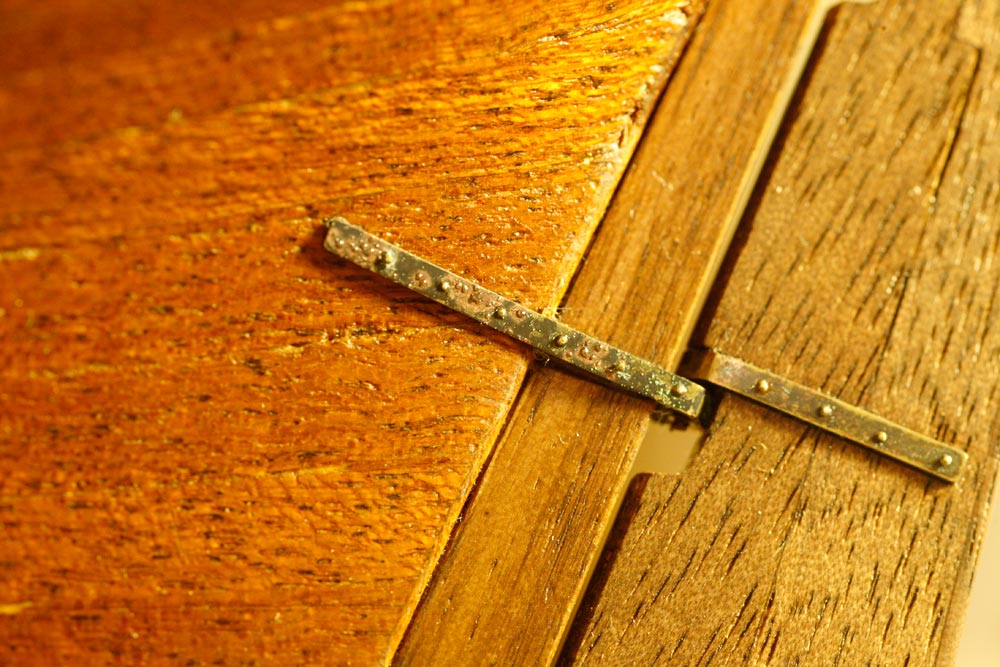
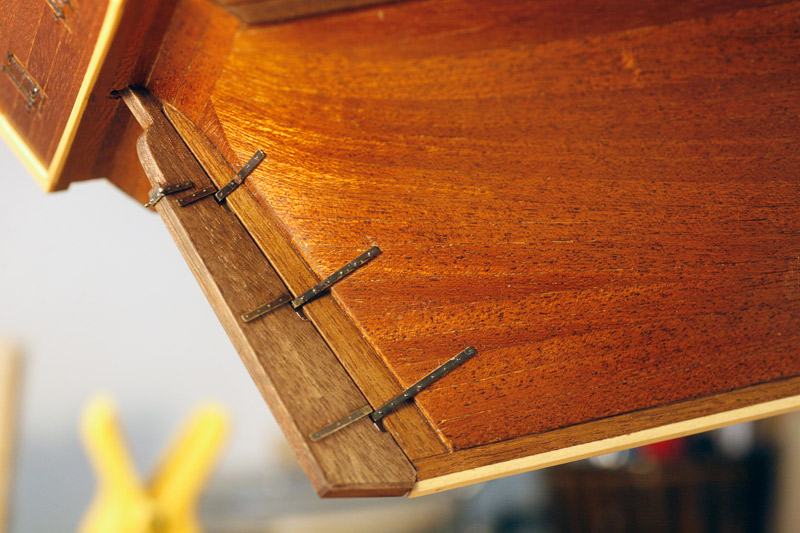
Can anybody tell me what is happening here? I finished installing my pintles and gudgeons a couple of weeks ago. Had a bit of a issue with the blackening rubbing off when I oiled over them. I am ok with the rudder pintles, it looks weathered, the gudgeons came out differently. My plan has been to go back and touch up the gudgeons and try to match them to the pintles. Work has kept me from sitting down and working on the problem till this morning. Now I see what appears to be sweat on the gudgeons as well as some green corrosion starting. Anybody have any idea what the "sweat" is a and what I need to do about it? It is hard to see in the photo but in the areas where the blackening has rubbed/flaked off there is little tiny drops of what looks like water or glycerin. I will try to get a better photo. for now there is this one.
-
Hmmm Interesting idea. Like the others it sounds like a recipe for disaster but then I am not a real big fan of CA myself; I use it but very sparingly. There are a couple of chemists here, if they dont respond here in a couple of days try searching the user names, at least one of them has chemist in his name. Give him a PM, I have not interacted with him but he seems like a very friendly decent person.
-
Edwin, I missed you somehow, thanks for stopping by and the kind words, I've been enjoying the journey. Sjors, Thank You! Dont tell the Foreman but I borrowed a couple of the Gnomes, hope you dont mind. Russ, Robbyn, Thanks!! I had started out with brass pins in mind, then looked at my Fumbling Fat Fingers and thought to myself, "Self, you're never gonna get these steps lined up and spaced correctly this way." In my mind at least a mortice gave me some adjustability left and right. Looking back at it, I could have used the cad program to do the layout and pin locations then used a straight edge to keep everything even. Ah well, this kept me busy for a few hours (days) and kept Captain Grumpy banished to the cornfield. Sam
-
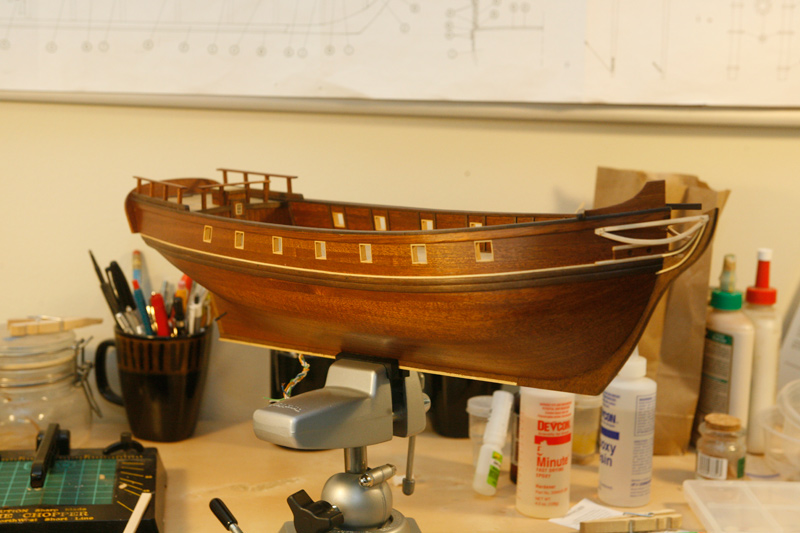
John and Rich thank you !! Been slow here, that evil nasty four lettered word WORK has interfered with play time again, gonna be busy till the end of November it looks like. Which is good, just limits playtime. I have found time to make my entry steps. As of right now I have just done four between the wales. The spacing I used would put a fifth right on the joint of the two lower wales. I looked at a tighter spacing but it looked cramped to me. Since I have already put several coats of oil on I didnt really trust a simple butt joint, even scraping I was concerned that I wouldnt get a nice strong adhesion. I chose to mortice the steps into the hull. The instructions called for 1.5mm x 4mm planks but that left me nothing for a tenon so I dug up some of the scrap 2mm caprail material. 2mm looked really thick so I tapered the edge. That left me with a more narrow face and a reasonable tenon. It was also, to my eye at least, hinted at the shape in "Fully Framed". I drew up a template on some address labels in a cad program I have here, I really miss AutoCad, Cadintosh is just a toy compared to ACad. But it was free, you get what you pay for I guess and once it was drawn up it really helped keep everything lined up and spaced properly. I could have drawn them up at work but it was Saturday and I was on a roll. I managed to fit all the starboard steps in about an hour, the port steps took me more than 3 for some reason. They are done though. When I got down to the fourth step I realized I had a problem, the taper didnt work with the upper wale so I made a second set with a "More Different Kind of Taper' Found another use for my true sander A nice little taper to clean up the parts Drew up a pattern in "Cadentosh" Chopped some mortices Oiled and glued in with a More Different Kind of taper on the lower step Thats it for now. Sam


-
Sjors, I go away for a few days. come back to a celebration and string everywhere!! looks good. ummm.......Whats a "Gasbag"?? Sam
-
Making small nails with round head
src replied to Aleksei Domanov's topic in Metal Work, Soldering and Metal Fittings
Brilliant! I wish I had seen this when I was making the bolt heads for my pintles and gudgeons last month. Next time. Thanks for sharing Sam -
Sjors, if your rigging looked any better I would be wondering if you could walk on water. Sam
-
Robbyn, yes I think they want to be clear of the water, I dont know how much something small like that would affect performance, an engineer could tell us I am sure. My best guess is they would have been mortised and then through bolted into the hull, even then the constant beating of the water would tear them apart. I think I now I need to go one higher. Sjors, Thank you! Yes I am not sure if I can look at the steps that close together, I could thin them down of course. My only source of reference with scale drawings is "Fully framed II" That shows a 12" rise and much more detailed steps. I will stick with the simple steps from the kit since I havent done any elaborate molding anywhere else. Next Build.... Brian, The difference in average heights crossed my mind but but my couple of reference books showed a larger spacing. I think if I were to make a more "accurate" step they would not look so cramped. I am sure Constructo has simplified the steps as they have everything els on this kit. As far as aging Admirals go, I wonder. People were more active then, my guess is an "old" man of 50 back then was probably more fit then a lot of mid 20's men today. I certainly wasnt there then so i dont really know. In the end, as Sjors and many others have pointed out here and elsewhere, I have to look at her when she is done. Sam
-
Robbyn, I am, I just try not to let it go to my head and know I can always do better. Most, not all, of my grumbling is my way of reminding myself where I would like to improve on my next build. Sam
-
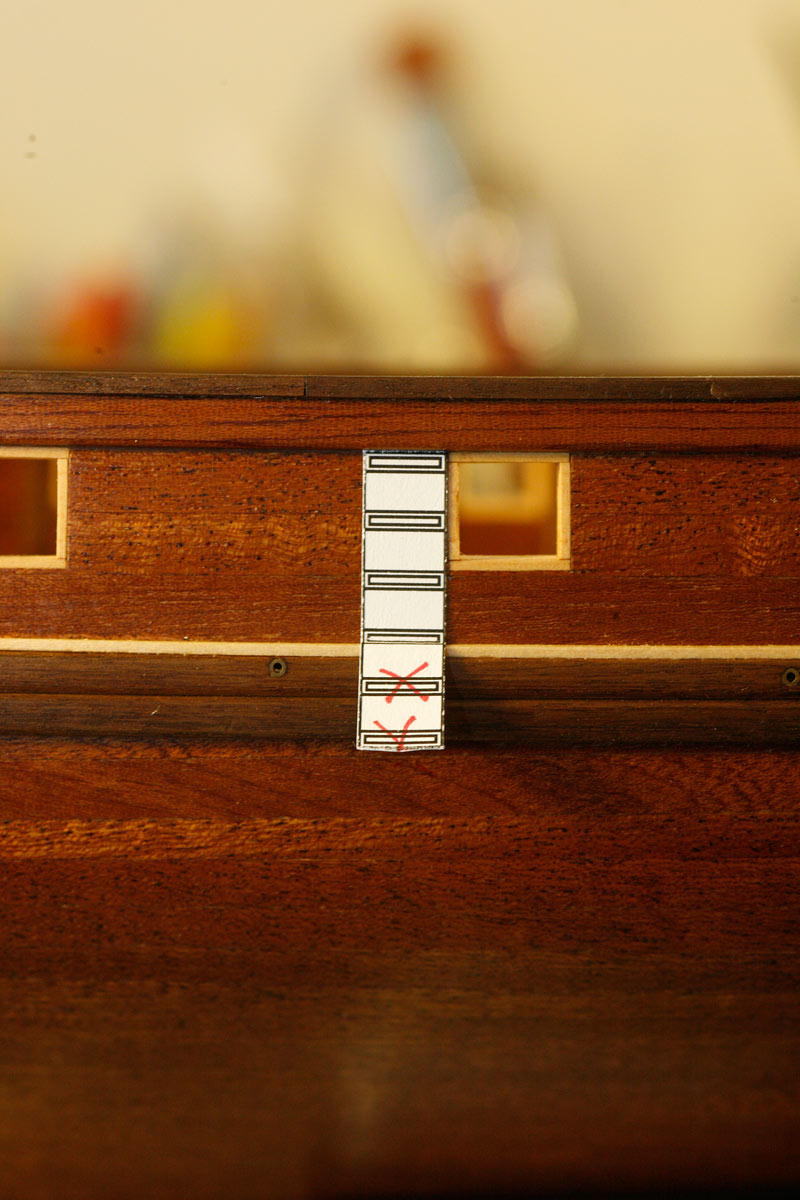
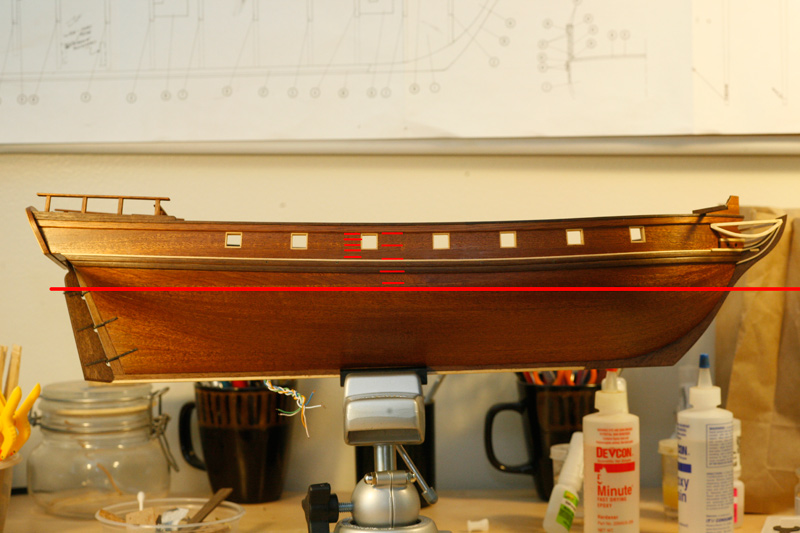
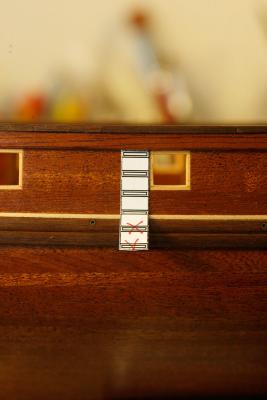
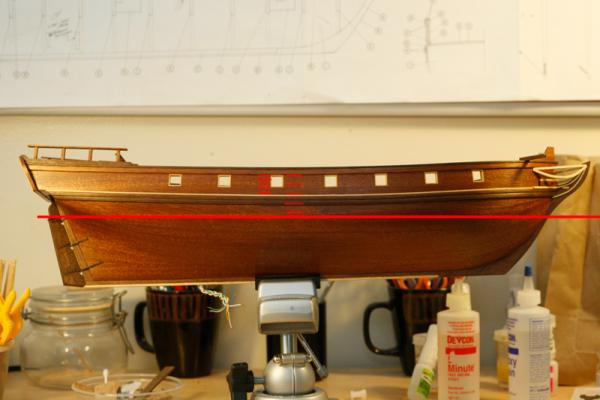
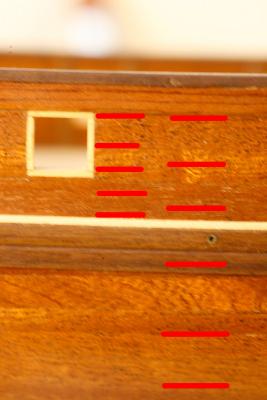
Sjors, Thank you!! Always a pleasure to see a new face. No apology needed, there are so many great builds here you can never see them all. I am always pleasantly surprised when somebody new finds my humble little offering. Work has kept me busy for the last couple of weeks so no real progress has been made. I have not wanted to work on the rudder and feel rushed so its sits the way it was last week. I have had a minute here and there to work on some simple things like the entry steps. Got a question if somebody can help. The instructions call for 5 entry steps between the upper and lower wales. the space between is 18.5mm or 3.1 feet, Thats 7.25" rise, seems a bit close to me. The picture below shows about where I think the water line would be, the plans dont show a water line. The red lines on the left are an approximation of the kit spacing. The lines on the right are my best guess and scale out at about 12" rise. I am strongly leaning towards the right but not sure how far down to go. Feel free to edit my photo if there is a better way to approach this Edit: the above pic really doesnt show up well, this is a little better: In honor of todays visiter and since I never posted a picture of the finished door, an extra picture.
-
Sjors, Looks GOOD! Hope mine looks 1/2 as good when I get there. And yes, keep the Gnomes busy. idle gnomes are bad. Sam
-
Robbyn, Not sure if I understand the situation correctly but your disk idea may not work, I would be concerned that when you hit the metal going through your predrilled holes you may follow the old holes in the metal. Your best bet might be the JB Weld others mentioned. at work we use a product called PolyGem to work all sorts of "magic." I undersand there is a consumer version used here call Sculpy. That ma be another option. Edit - looks like we replied over each other and you have a solution Sam
-
Rich, 1) There is a joke there some where I am sure!! 2) Yes! "Dont Mess With Texas!" As much as I want to see updates, I am kind of hopeing there wont be any for a bit since that will mean you got the job! sam
-
Rich, Thats great news!! Well, the job interview part is great news, trapped, unarmed in a restroom with two armed POS's outside? Not so much. At least nobody got hurt. Isnt this a great site? So many people you have never met and most likely never will pulling for you! Good luck Sam
-
John Thank you, all my grumbling aside I am enjoying the process. Robbyn, a triple WOW, thank you!!!
-
John, Thank you! Always a pleasure to see new faces. I grumble a lot about things, but I am enjoying this. Sam
-
Sjors, I see you are feeling better, that can be a real bugger to get over. But once again I can no longer keep up with your build log.....sigh.... Far more important that you are feeling well again, and able to travel! enjoy your get together and the museum. Sam ummmm...is it too soon to say this.....PICTURES?
-
Rich, your build looks great! She is really coming alive. Hope your interview went (goes?) well. One last word......... BACON! Sam
-
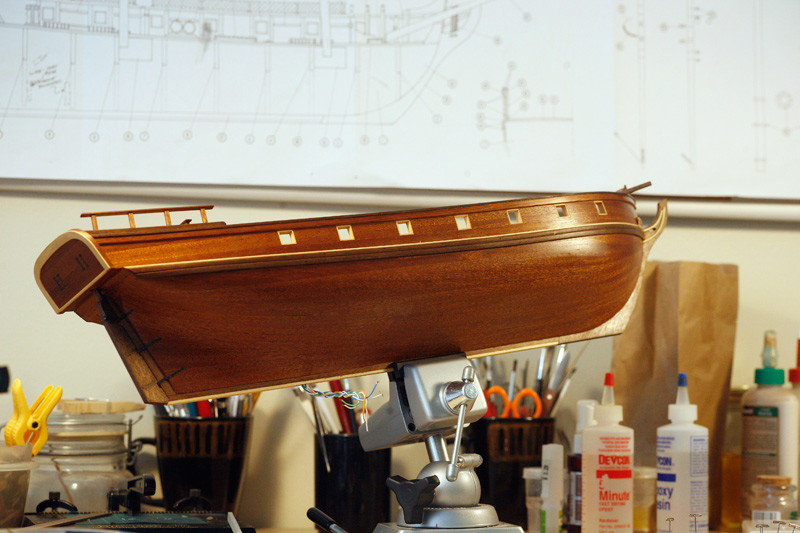
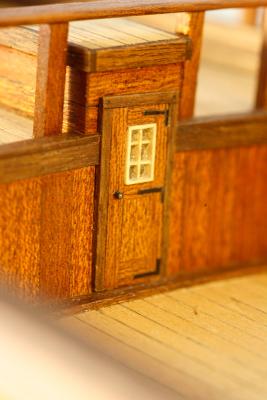
Just a quick update. Havent worked on the rudder anymore, working this weekend so it most likely wont happen till next week. Mounted the "Head Rails" and the cabin door, ended up making the hinges with black tape. looks ok from normal viewing distance. I still have to sand and oil the Head Rails. Assuming all goes reasonably well at work I will most likely do something mindless like the steps on the hull. Sam

-
Robbyn, "Whatever are you complaining about? Its beautiful" Sound familiar? Seriously, I know how you feel. Extend your building break like others have mentioned then sneak up on her and just take an open eyed look, try to leave the emotion out of it. Try to look at it from another's perspective, I think you will be very pleasantly surprised. I have been captain grumps with my build too, but fortunately we have people here who make us take a second and look again and see what we have done really isnt as bad as we first thought. I think your doing a great job. Hang in there! Sam
- 773 replies
-
- 1
-

-
- san francisco ii
- artesania latina
- (and 1 more)
-
Hey all, thank you for the kind words! Russ, yea I dont want to go too far with it. I really like the aged look on the rudder pintles. Like I mentioned I was Captain grumpy when I first saw it happening, but stepped back and took a breath and looked again, it works well with the "patina" from the rubbed oil on the hull. I would like to know what caused it though; one, to avoid it in the future and two to duplicate it when I want too. I may have left the gudgeons in a couple of minutes longer than the pintles. I didnt write down the time or the temperature when I did either. Just soaked till it looked "right." Rich I will probably give ole Edison a run for his money when it comes time to do the rigging. Robbyn, its my furniture and cabinet making background, I cant help it it just gnaws at me. If I can get the rudder closer in tone and the steel closer in appearance I will be satisfied. Had the gudgeons worn more than the pintles I would have been fine with it, I could have said the rudder had been replaced at some point. Brian, no shame. Wood finishing is the one thing in this hobby that I have a fair amount of experience with. I have a couple of thoughts for the gudgeons that I will try tonight, then a bit of airbrushing if that doesnt work. But that requires a trip to the hobby store which may have to wait till the weekend or longer, we are entering our busy season at work and will be swamped till the end of November. Robbyn, if your life isnt crazy enough anymore you and your new husband are welcome to come out and show us what real overacheivers can do!!!! Sam
-
Brian, try it you never know what you may not accomplish..... Well, shipped my rudder last night after mounting the last of the "bolts" Overall it looked ok. Then I oiled the rudder..... some of the blackening rubbed off. I was Captain Grump-o-licious for a minute till I stopped and really looked at it. The way the blackening rubbed of gave a very aged appearance that I started to really like. Then I excitedly oiled the hinges on the hull....and... different results. Not sure what I am going to do now. No matter how much I have rubbed at them, the blackening wont rub off. I think I will either try to strip the linseed oil and duplicate the effect with an airbrush or just go for an oil rubbed bronze/back with the airbrush. Maybe just use a gun blue touch up pen. Got some 'sperimenting to do it looks like. I think I may need to add a yellow/amber glaze to the rudder to bring it closer in color to the keel and stern. Probably should have done that before I mounted the pintles.


-
Rich, The best trips always require the most unwinding/cleanup when you get back. Sounds like you found the solution to the rings, great! My build is slow, posting an update in a minute here. Stop by whenever you get a chance, no rush. Sam