HOLIDAY DONATION DRIVE - SUPPORT MSW - DO YOUR PART TO KEEP THIS GREAT FORUM GOING! (Only 13 donations so far - C'mon guys!)
×

.jpg.1f80adf1a9b14a937cfcf2ca6af0f0d4.jpg)
WalrusGuy
-
Posts
1,007 -
Joined
-
Last visited
Content Type
Profiles
Forums
Gallery
Events
Everything posted by WalrusGuy
-
.thumb.jpg.62d1d69fed1f32364417cb1f9cdeb009.jpg)
Understanding the purpose of serving rope
WalrusGuy replied to WalrusGuy's topic in Masting, rigging and sails
Thanks Jim! I'm going to bookmark the site. -
Understanding the purpose of serving rope
WalrusGuy replied to WalrusGuy's topic in Masting, rigging and sails
Ohh I understand now, thanks! One more question, do all sailing ships have served ropes, or is it specific for different eras? -
There's also some methods of using paper. Here is a topic where it is discussed. I might be trying this for my next model after seeing Rob's spectacular work in that thread.
-
Understanding the purpose of serving rope
WalrusGuy replied to WalrusGuy's topic in Masting, rigging and sails
Thanks for the reply Druxey! So is the standing rigging only served? Are they served throughout the entire rope? -
Dug myself a bit of a rabbit hole looking at Chuck's store page after finding his serving rope machine. Tried doing some research into serving line but I could not understand much of the nautical terminology. Being very new to this hobby, why serve rope? Is it just to have a different colored thread?
-
Looking real good! Btw have you tried using hot water to soak the planks? That's what I've been doing for planking. You could try that and see if it makes a difference. You can also try steaming them. I'm still a complete newbie at this since I've only done two planking jobs so far so hopefully someone else can point you in a better direction.
-
Loving the shipyard and drawings! Might need to make some now No need to worry about the wrong bulkhead, you can strengthen it with some horizontal pieces when carrying out the framing. All of it will be hidden after the planking. Other than the small mishap it is looking really nice and crisp!
-
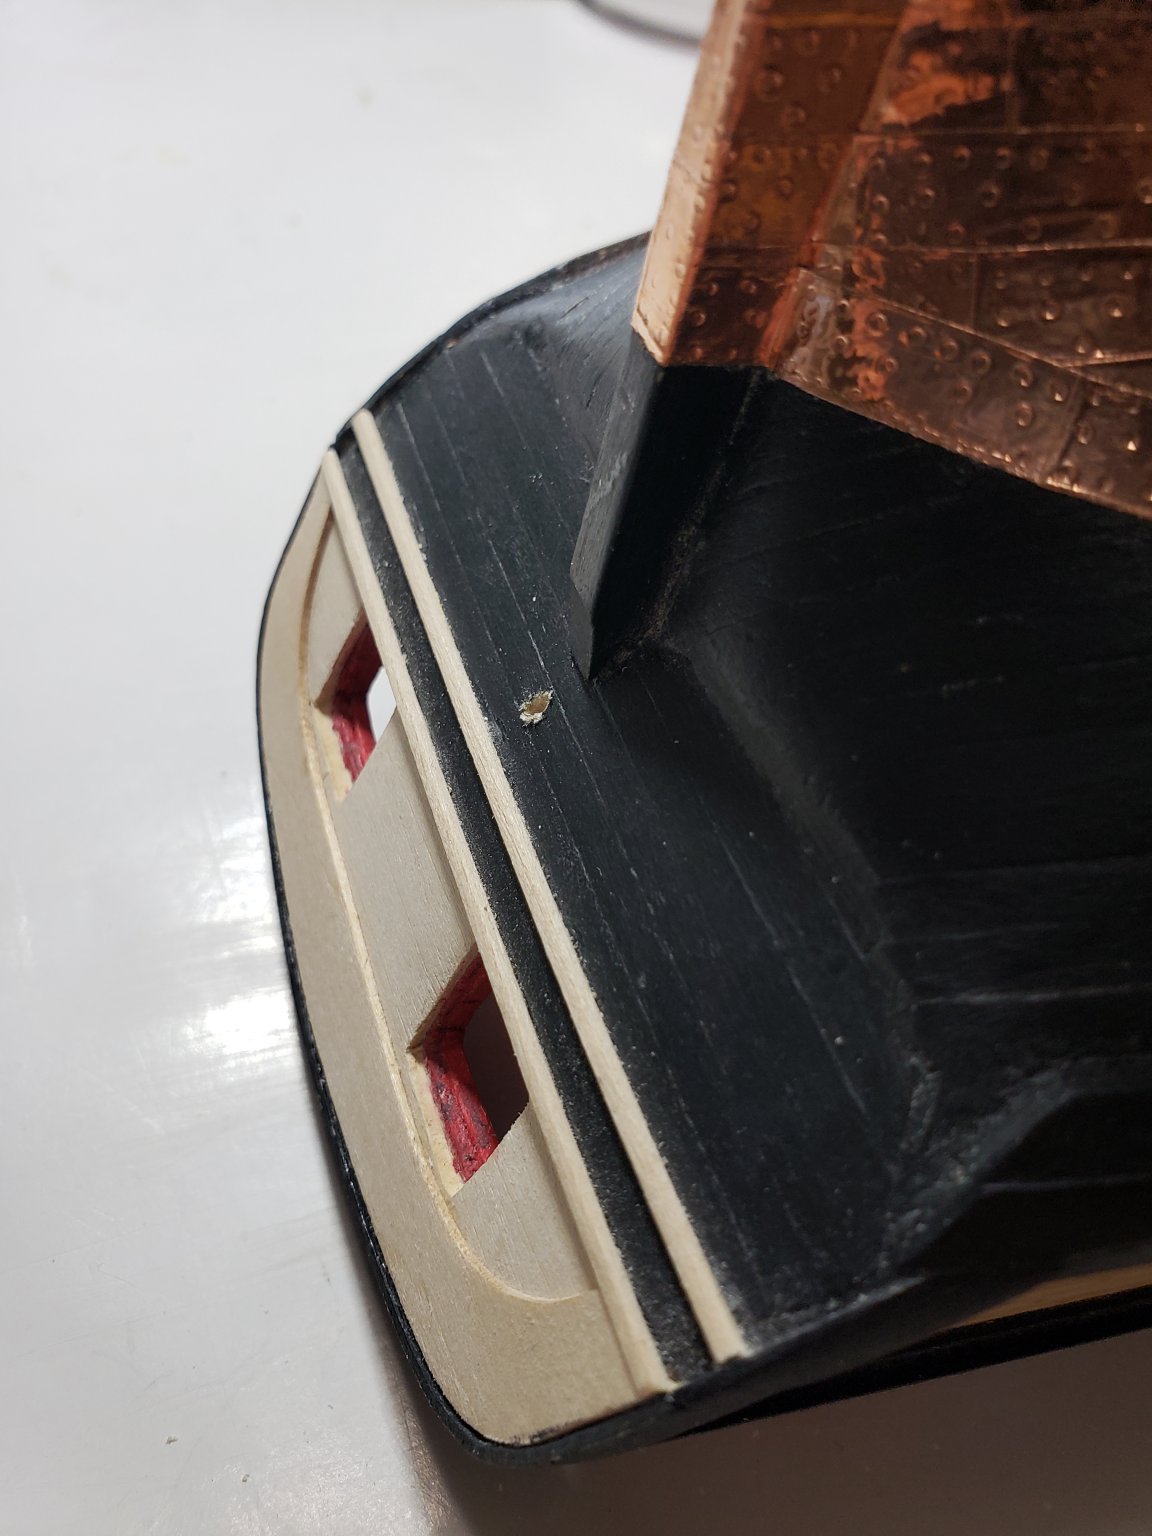
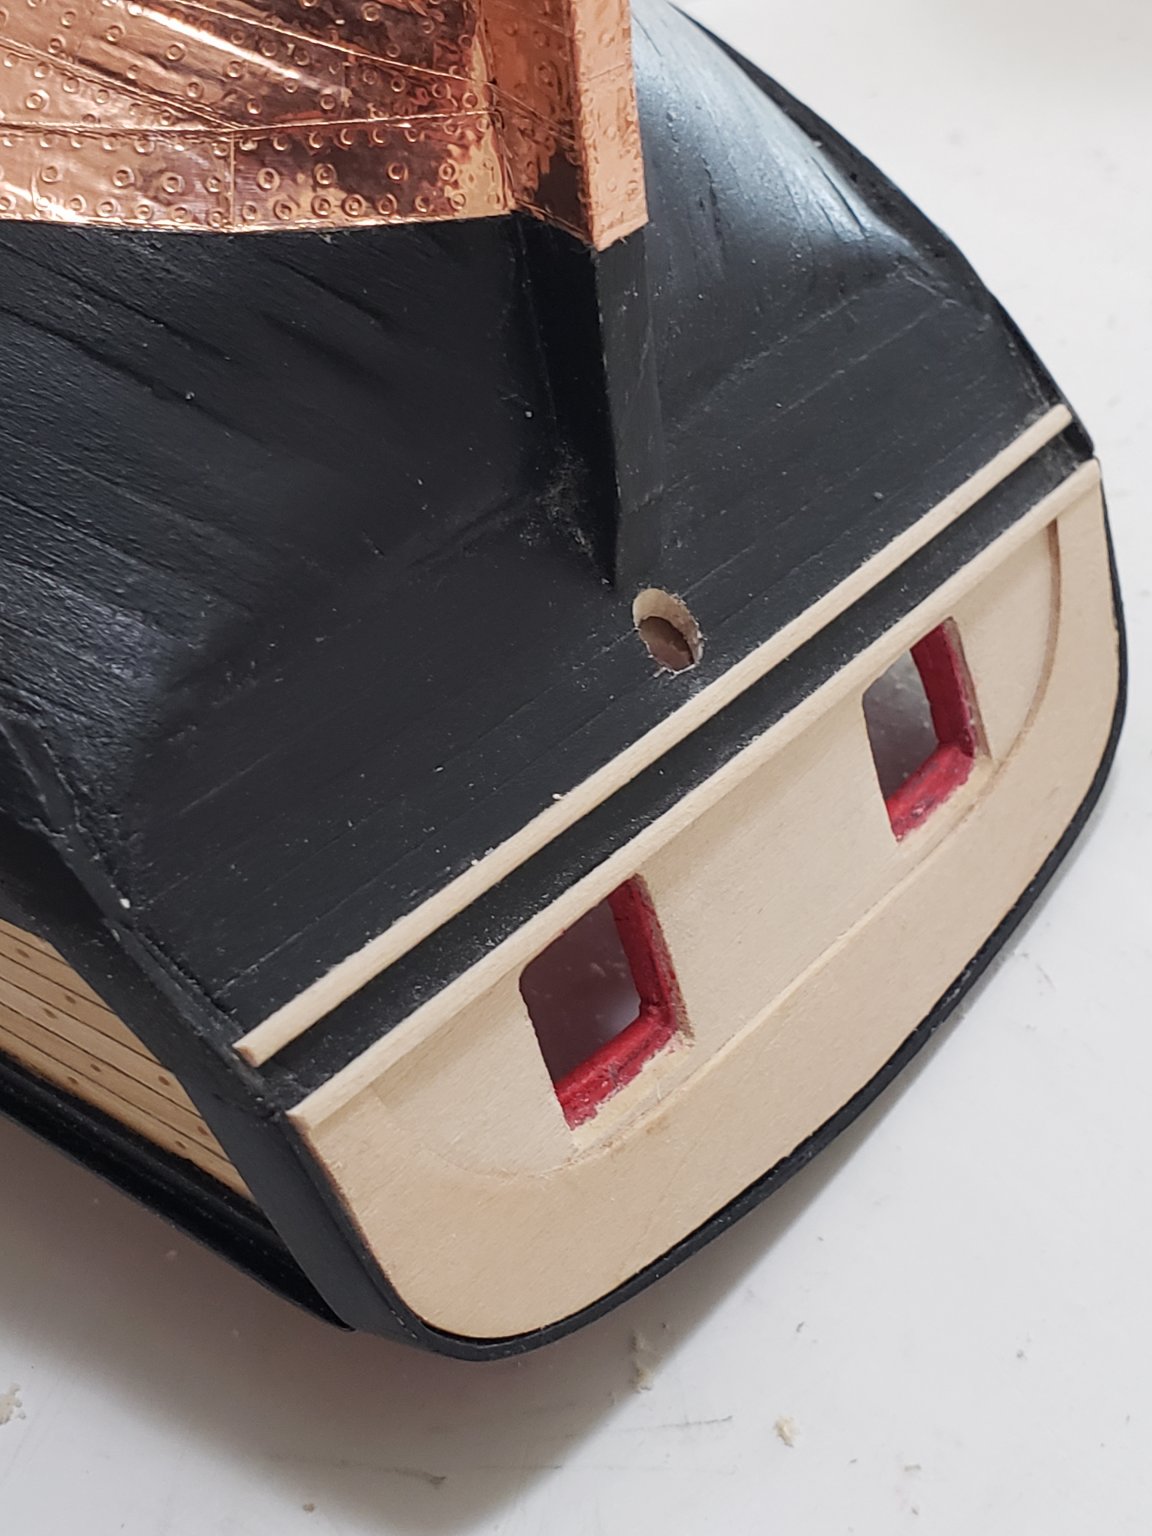
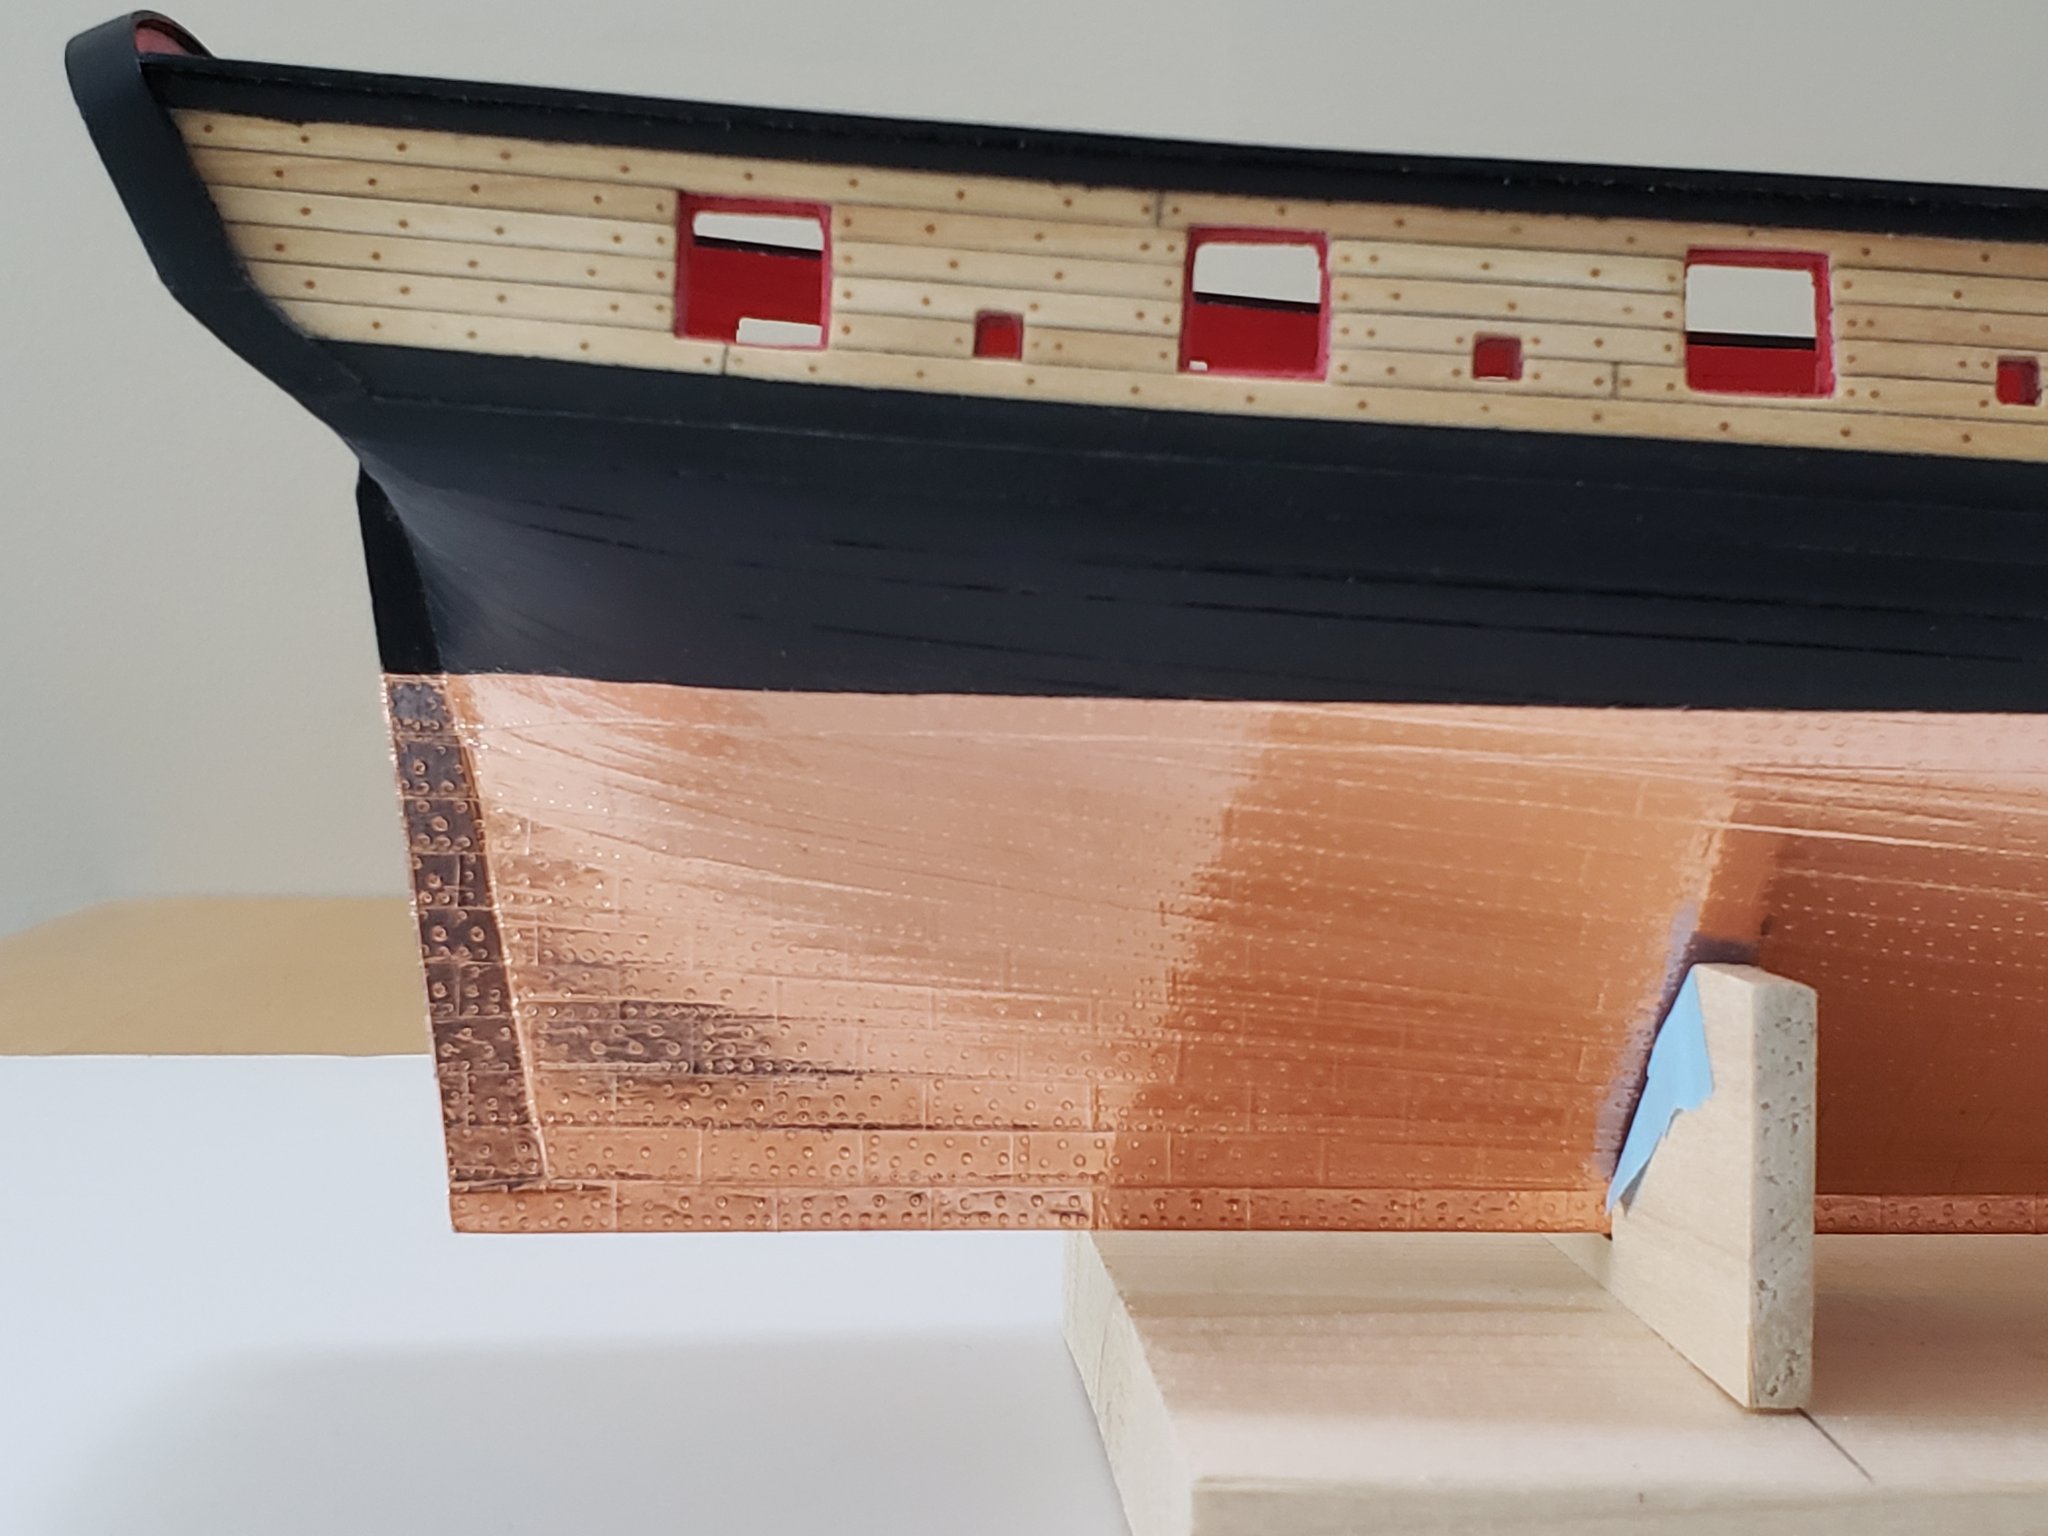
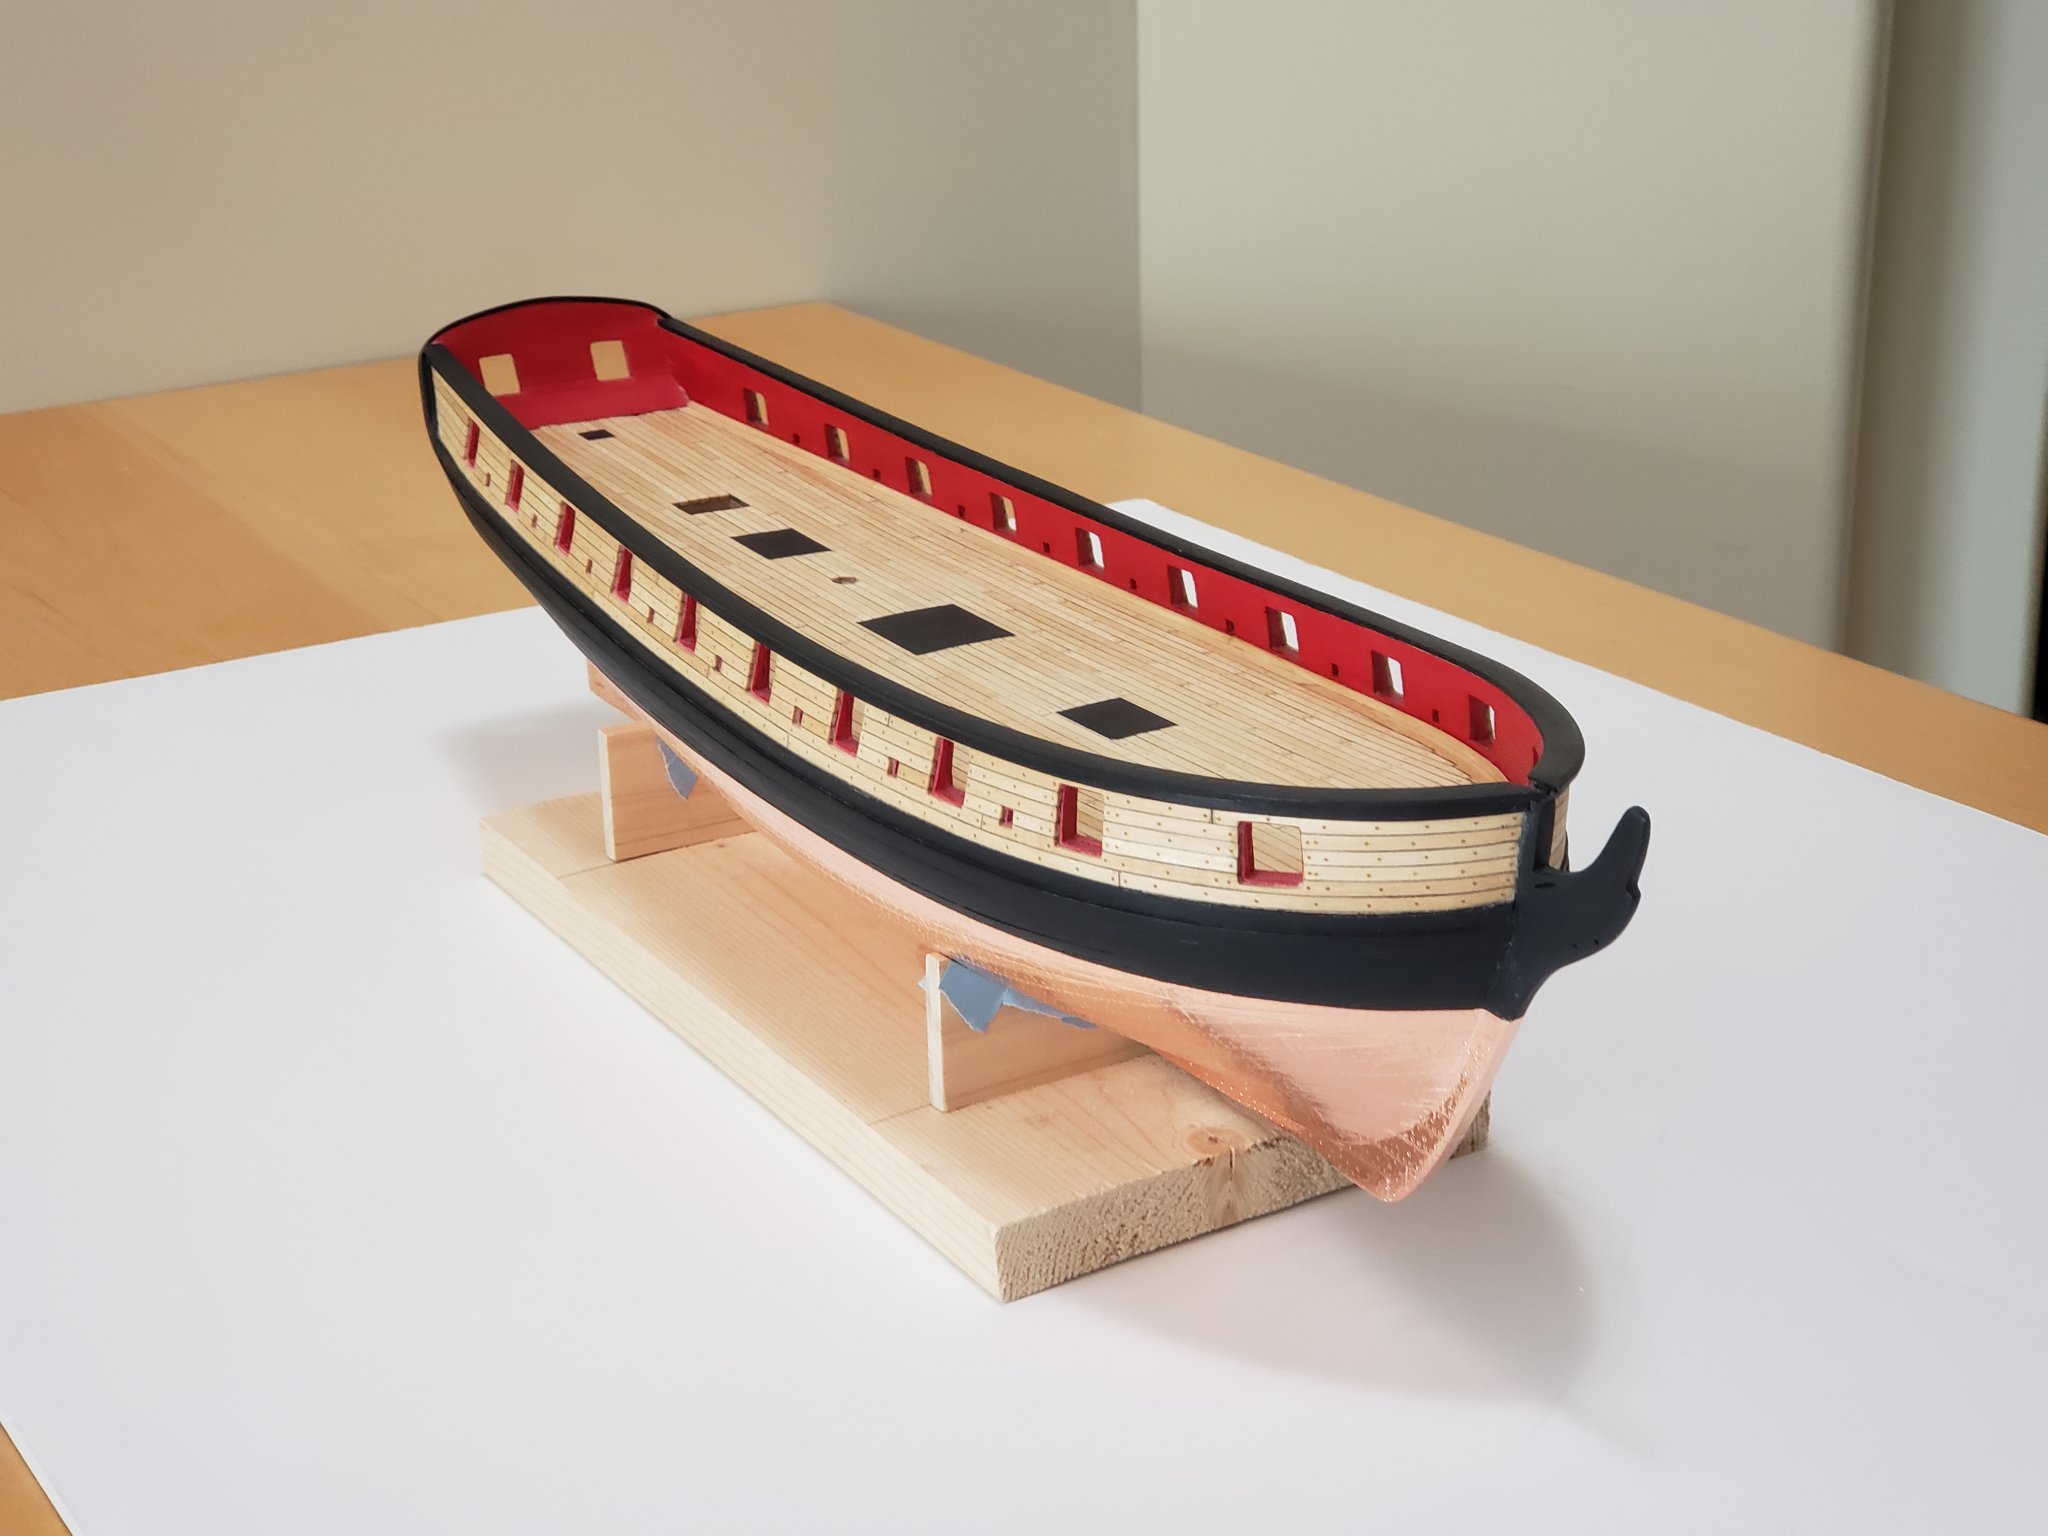
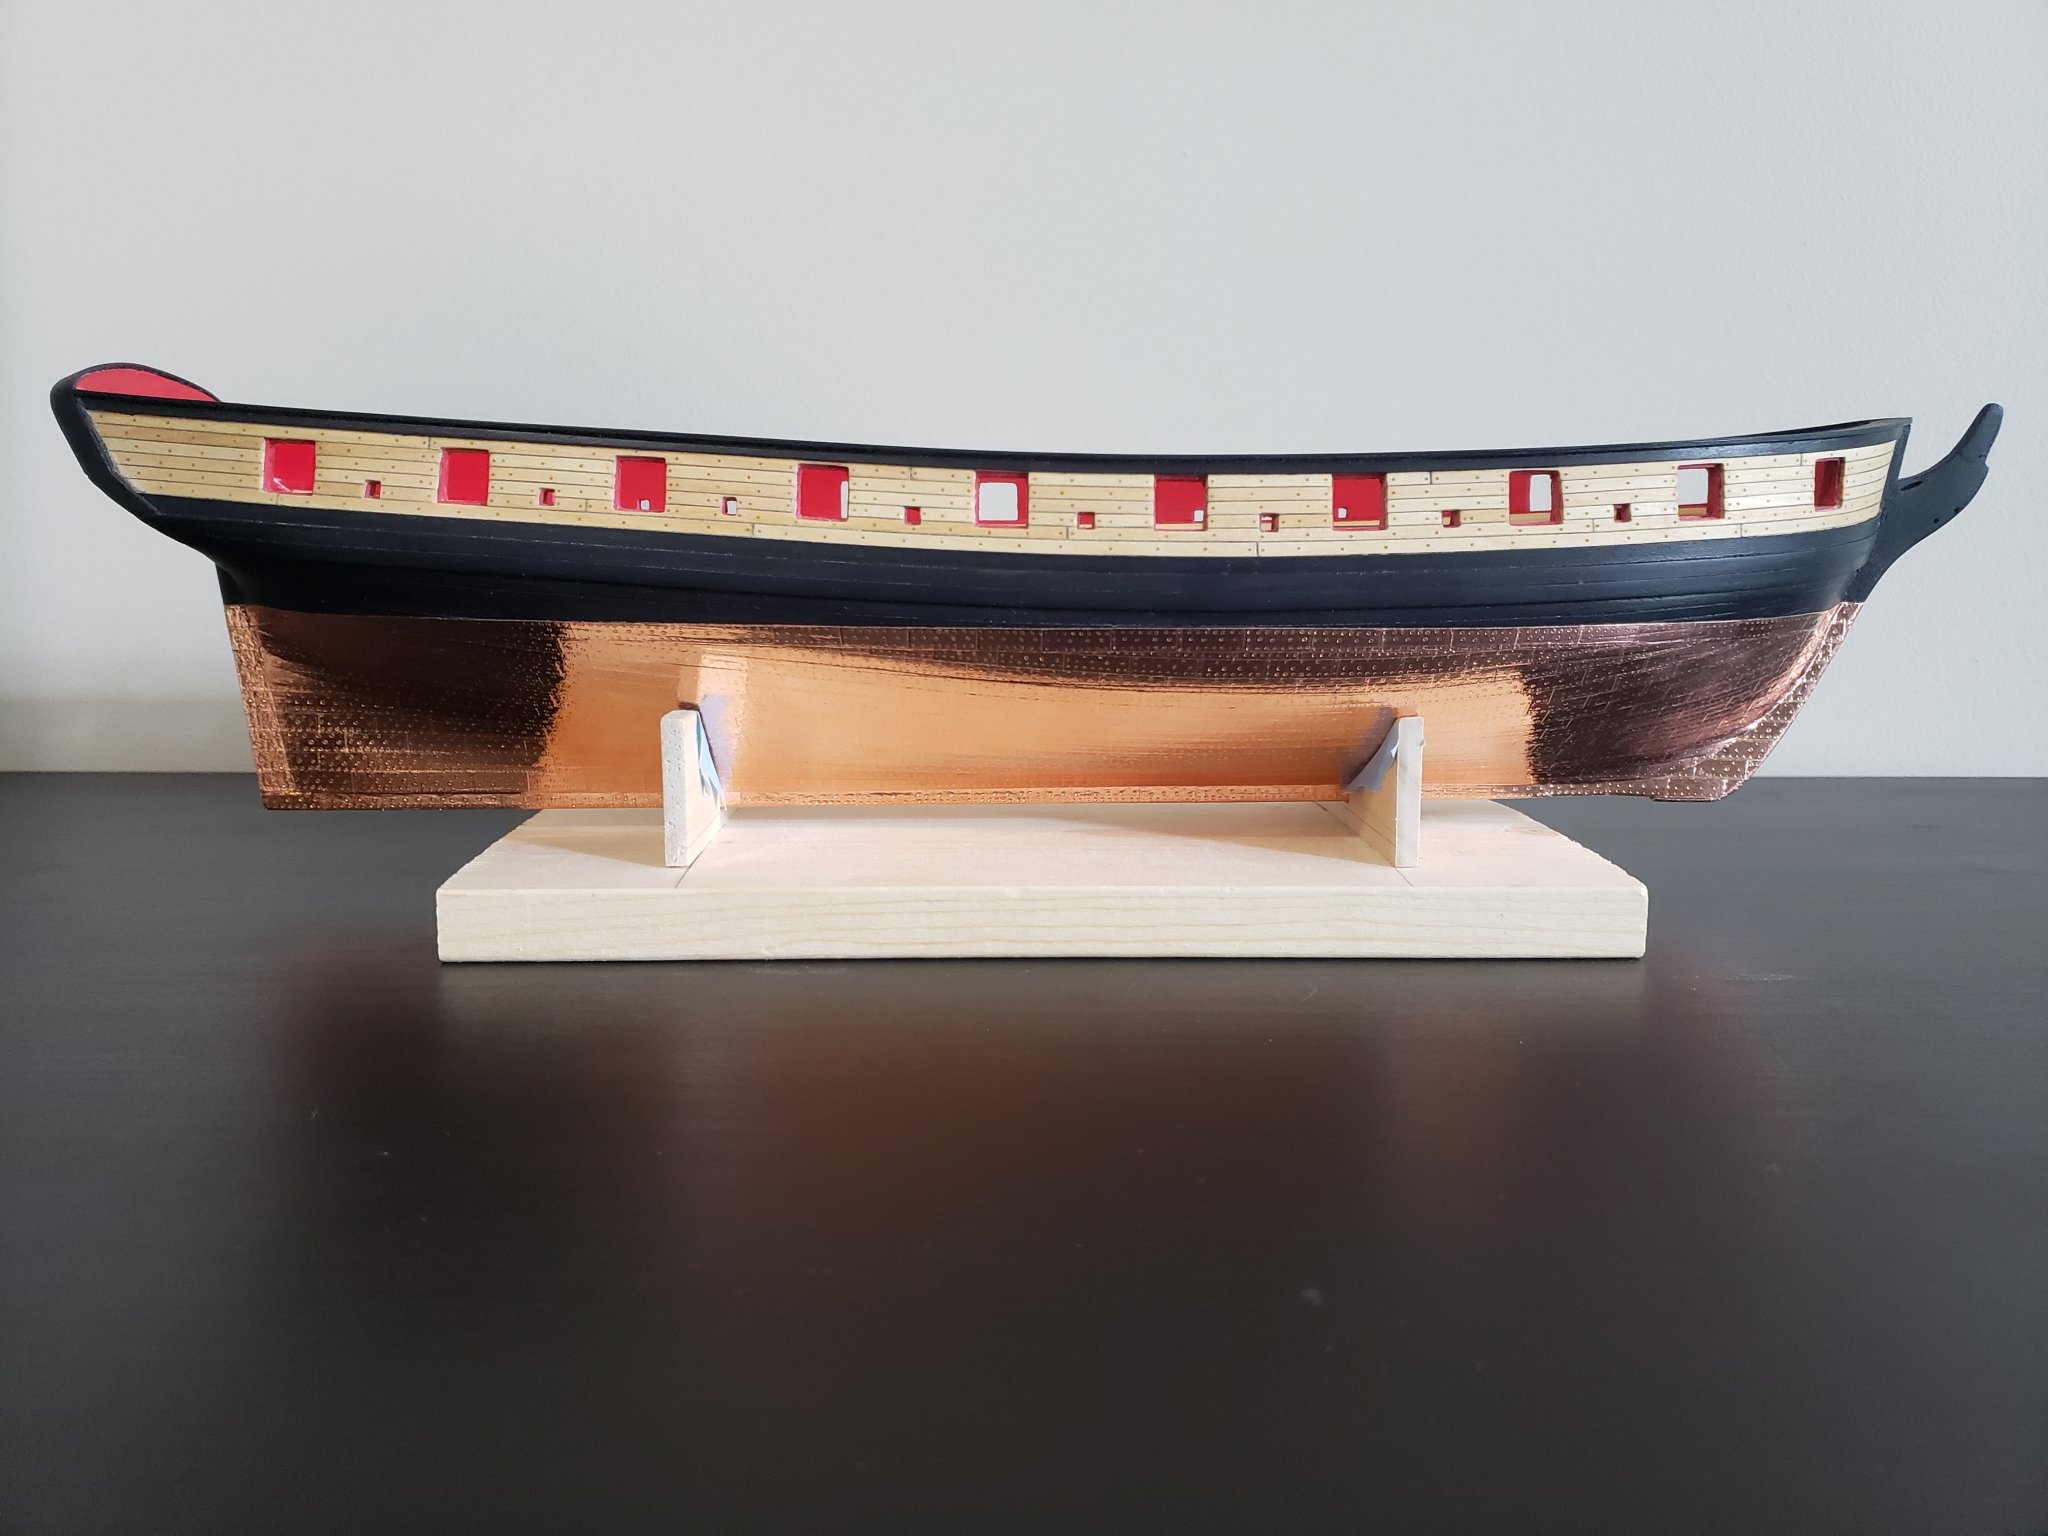
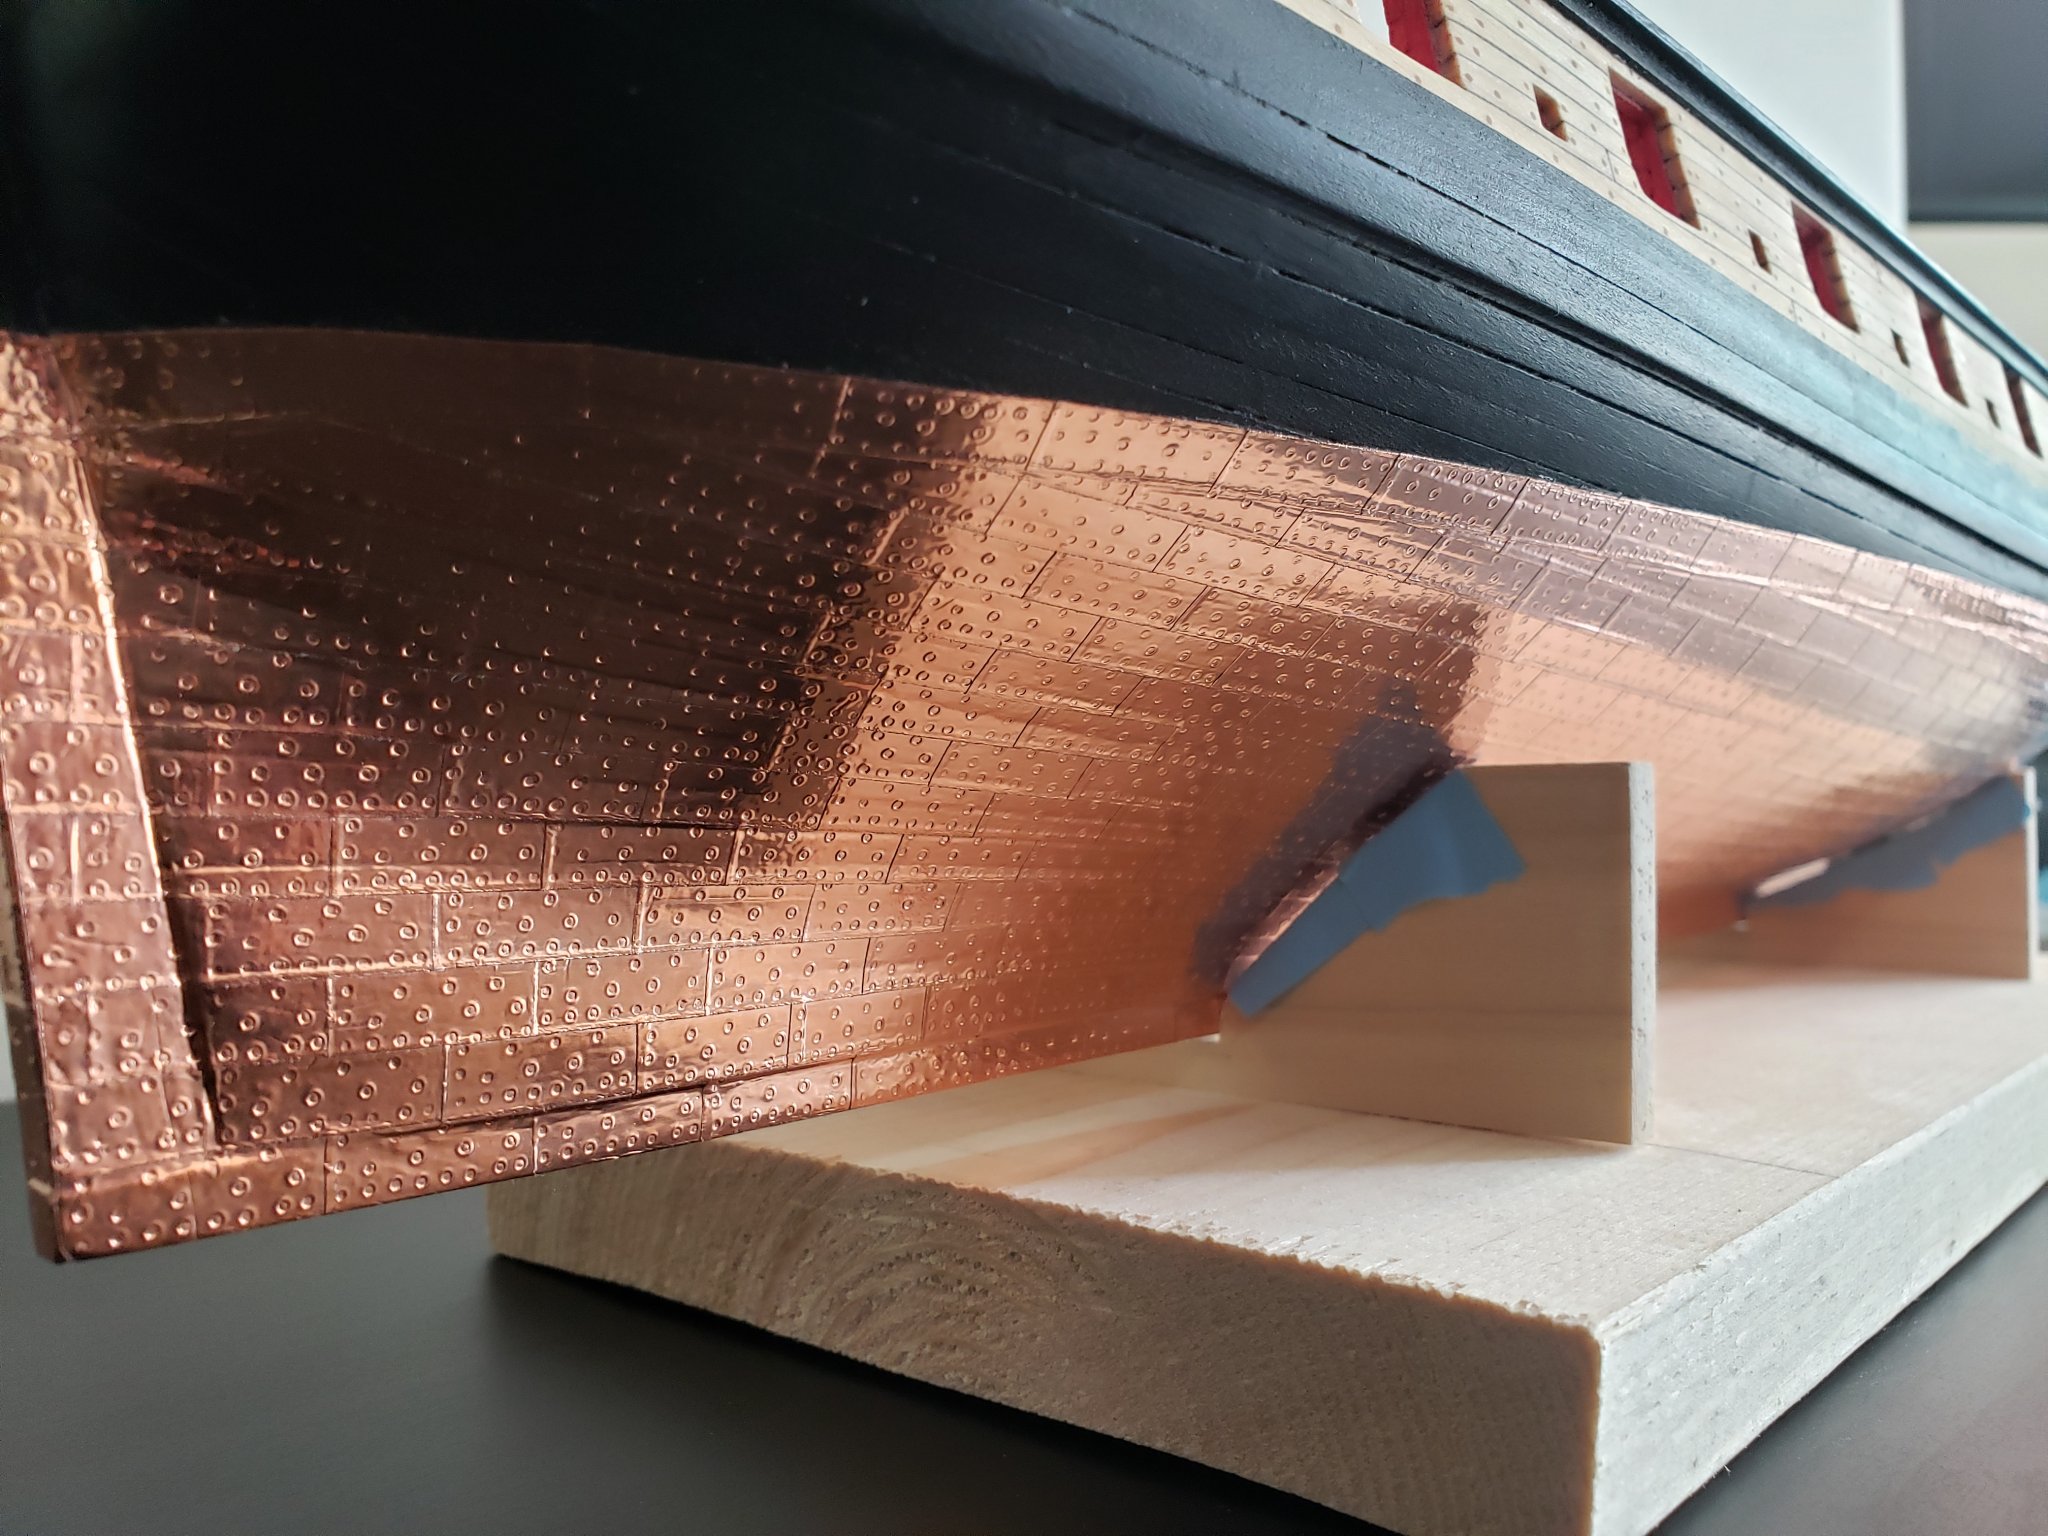
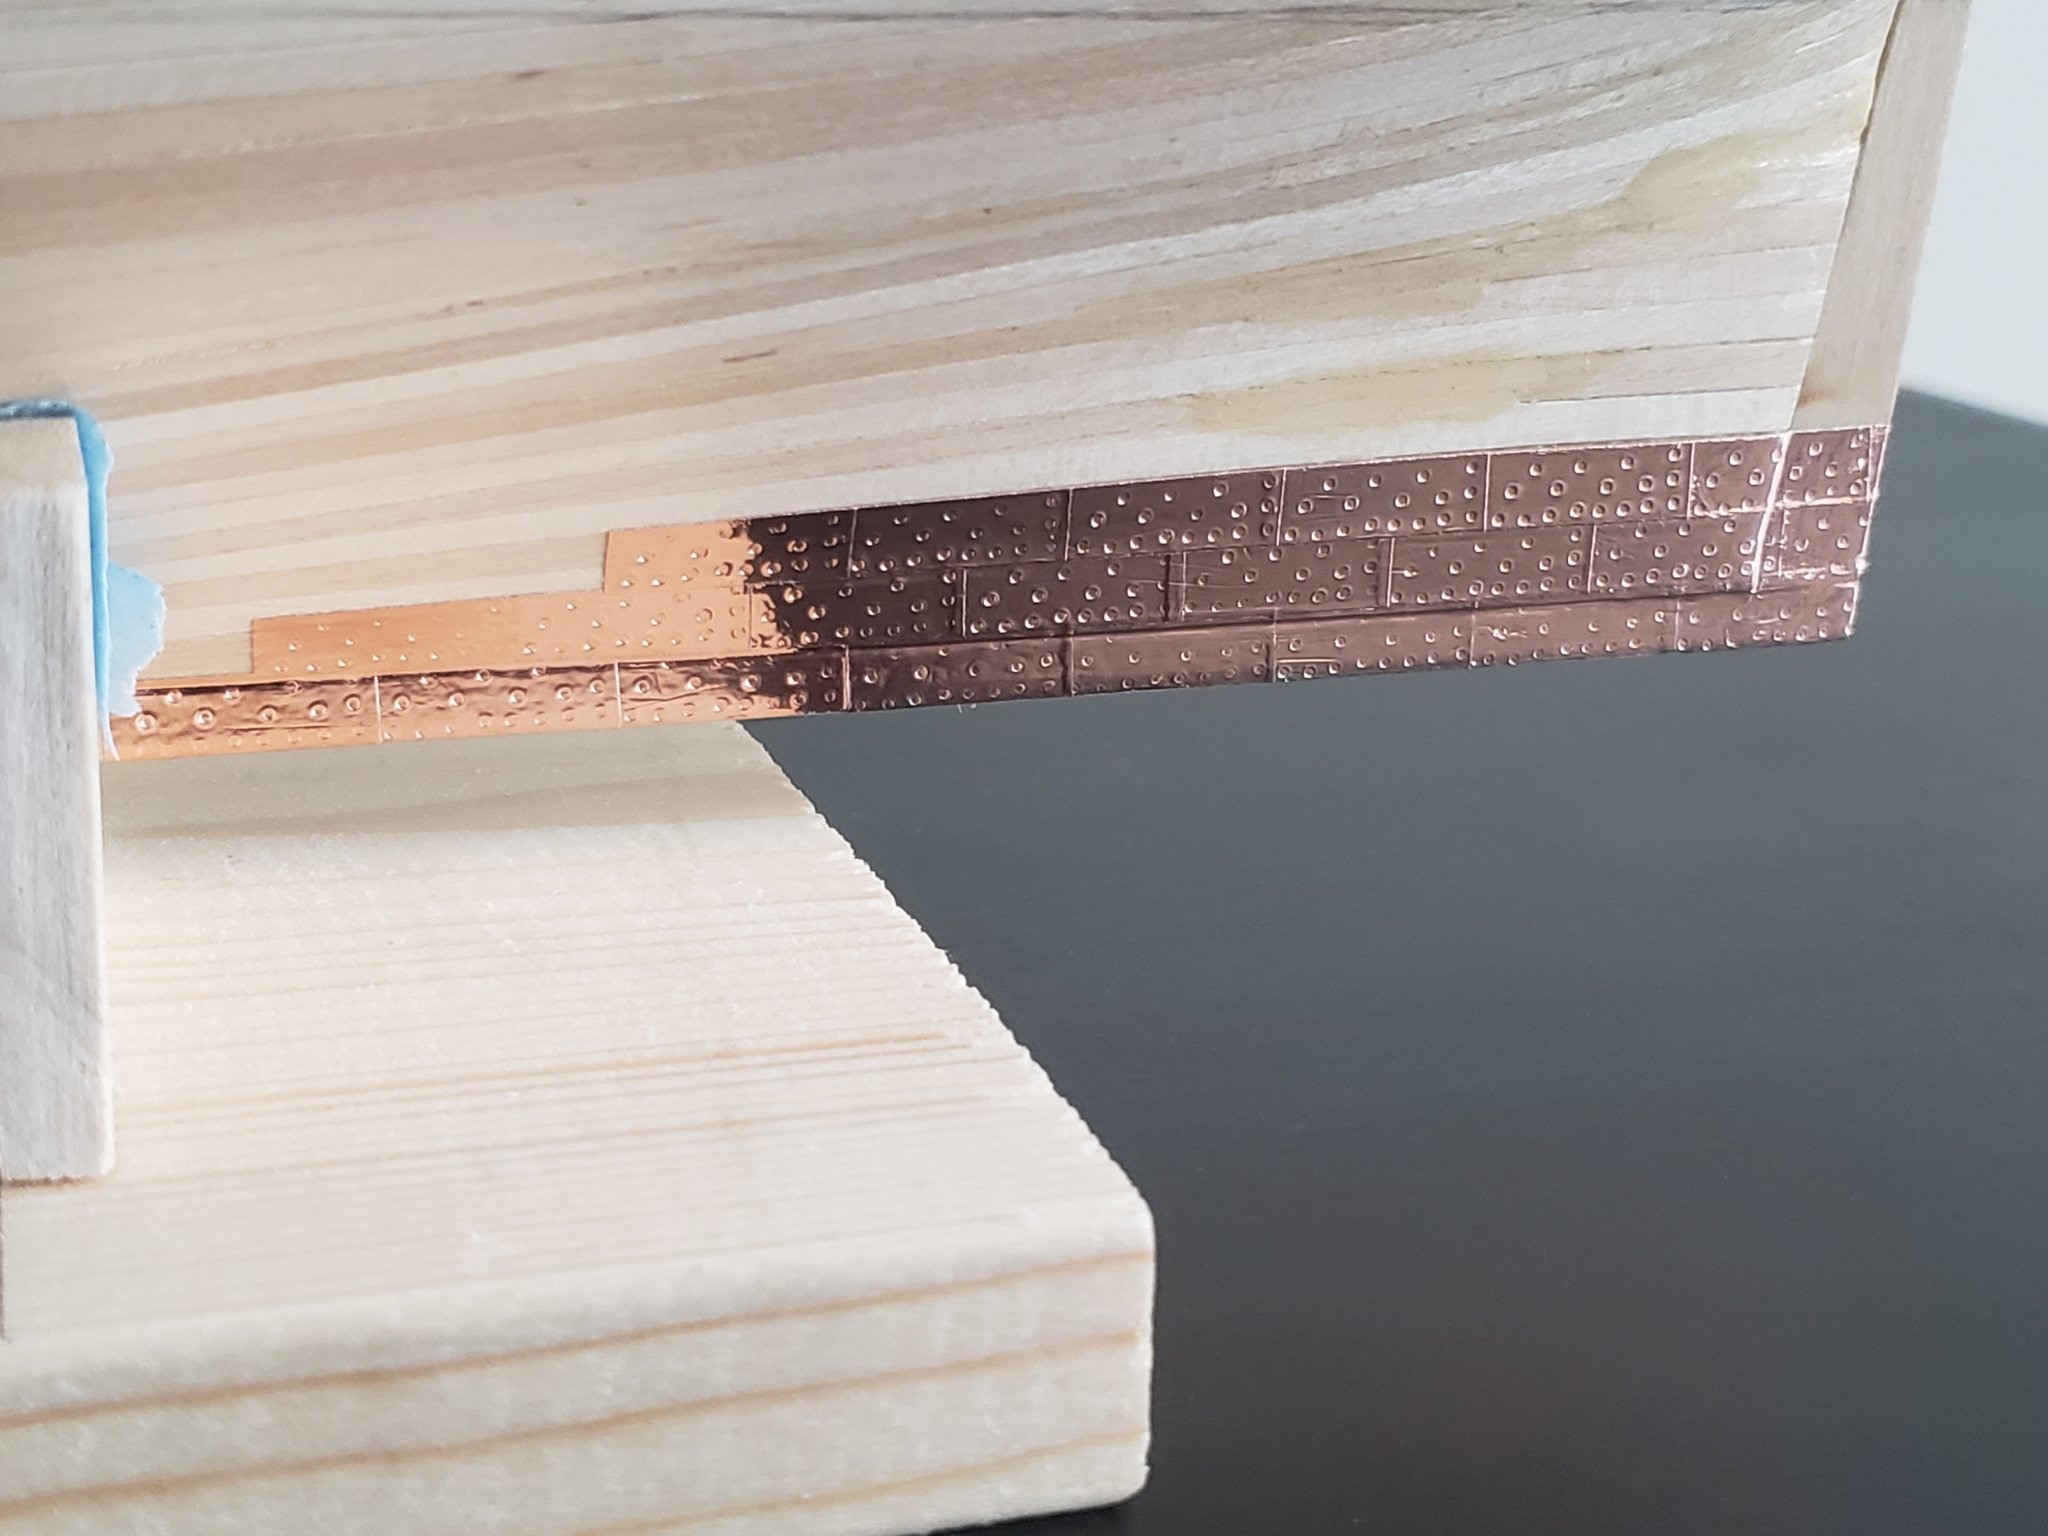
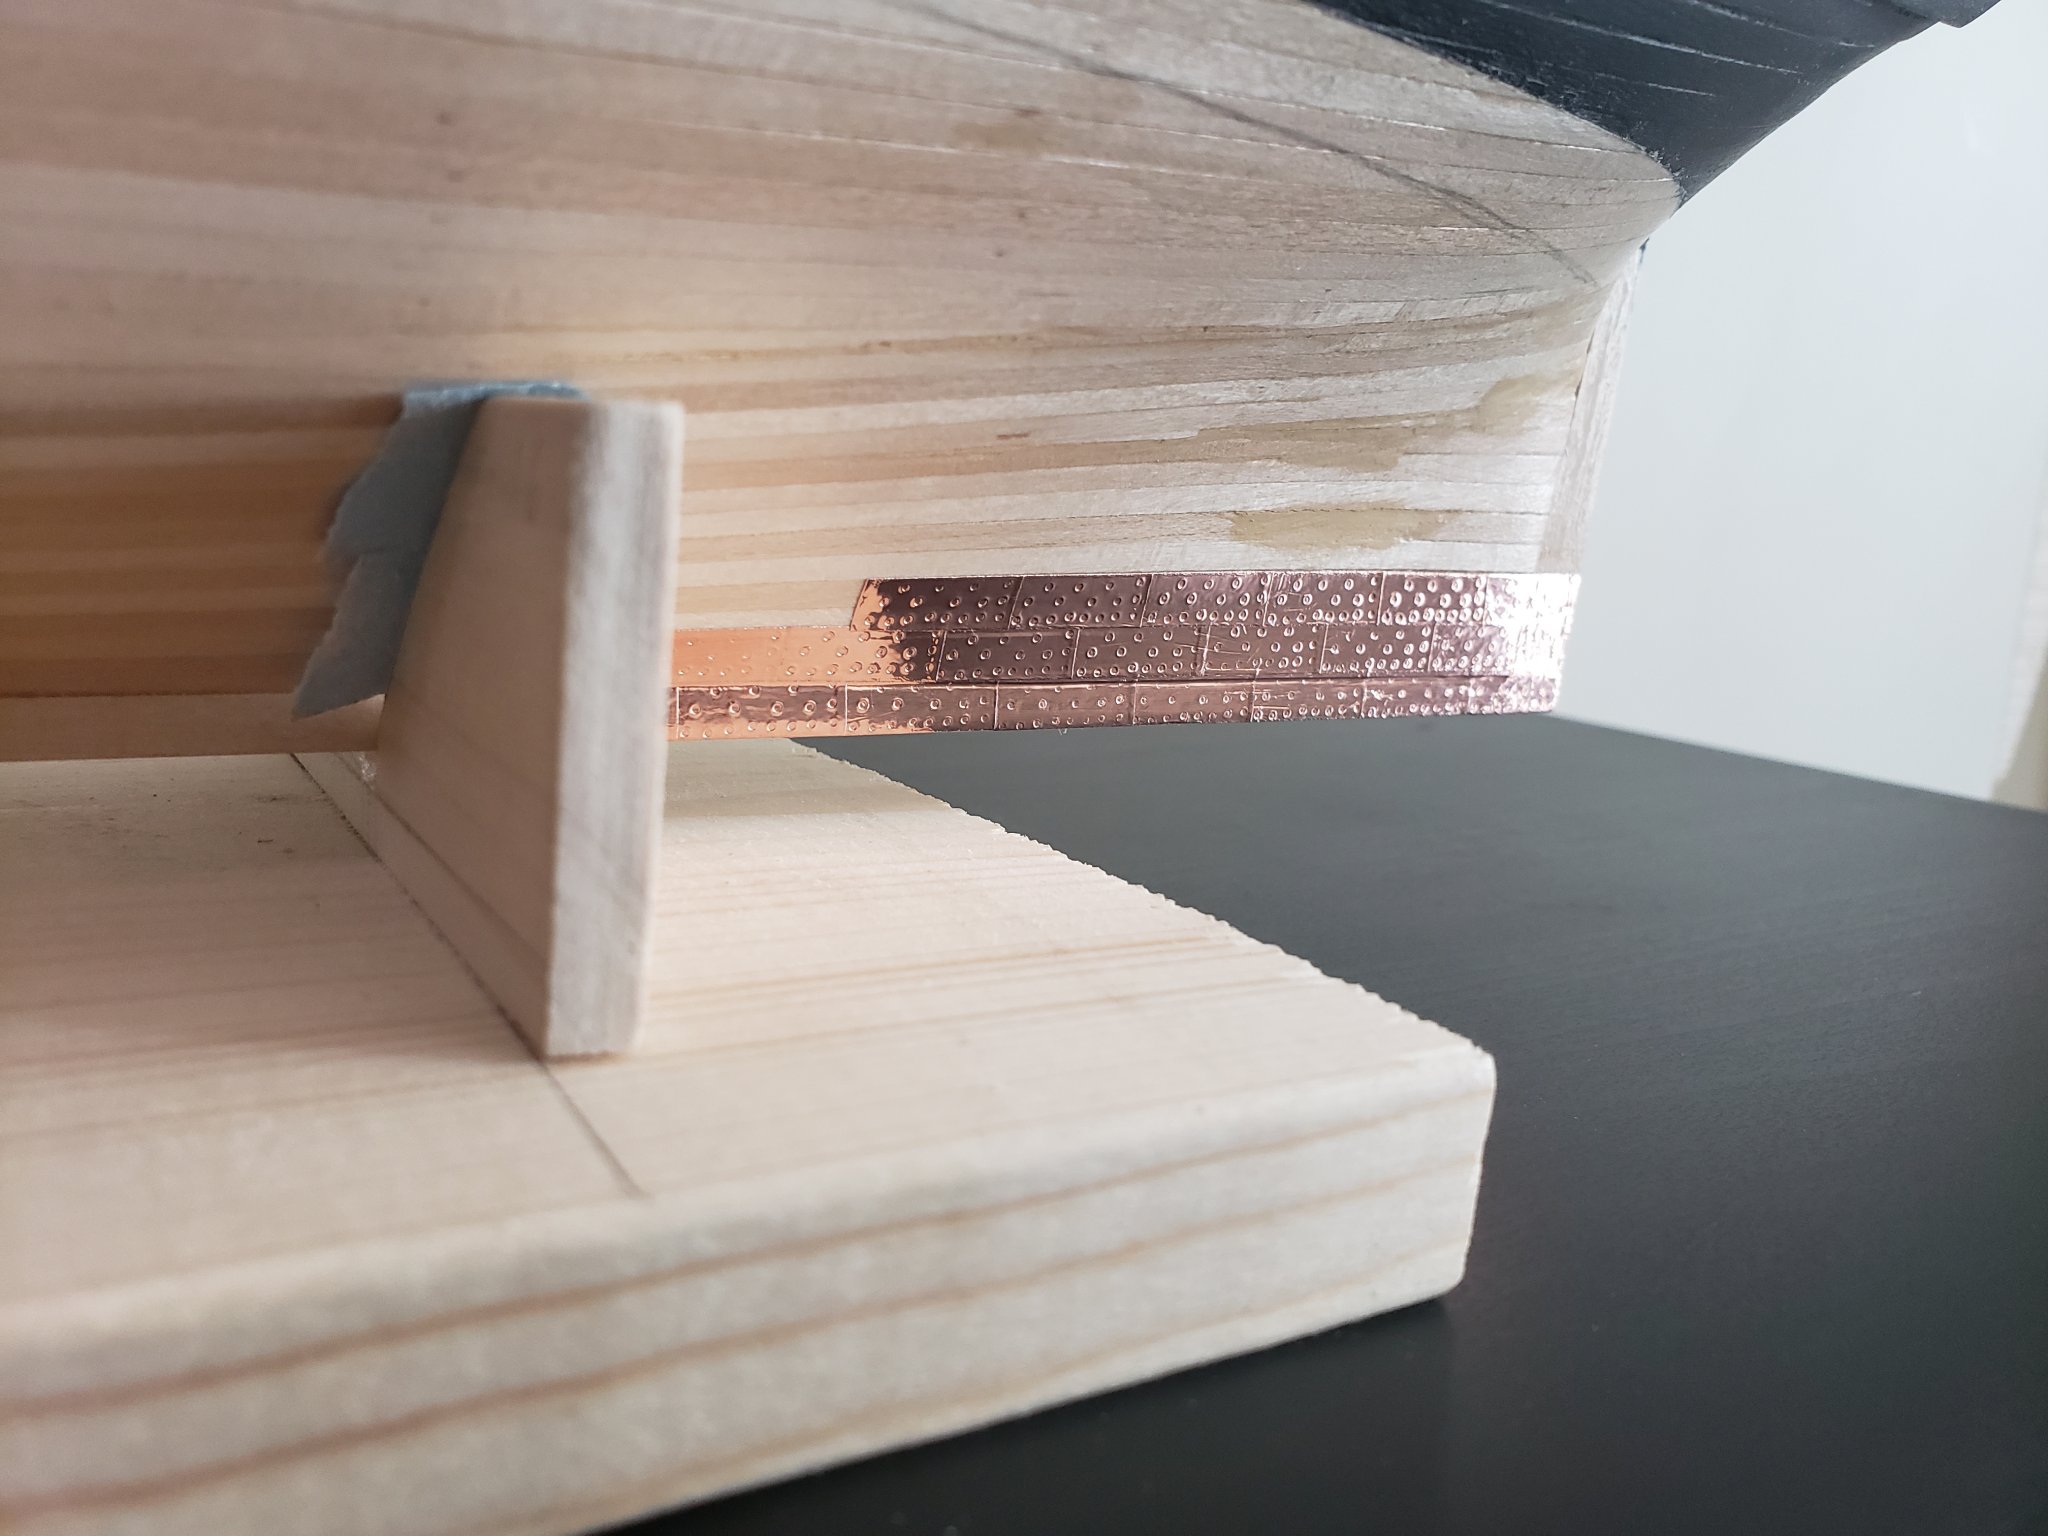
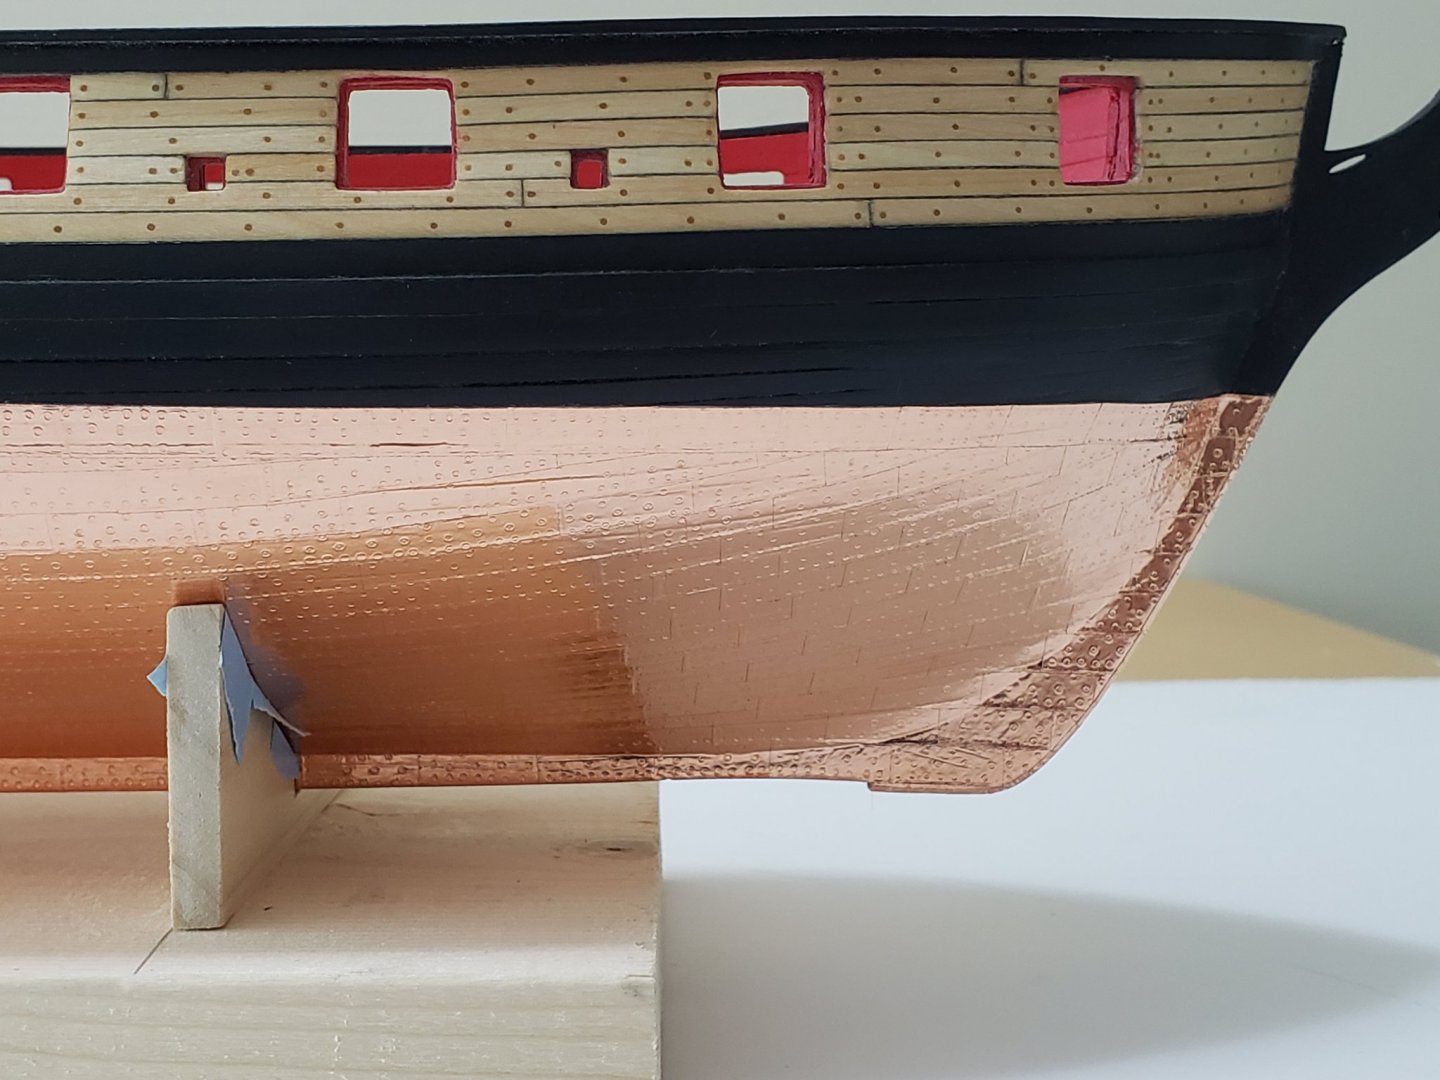
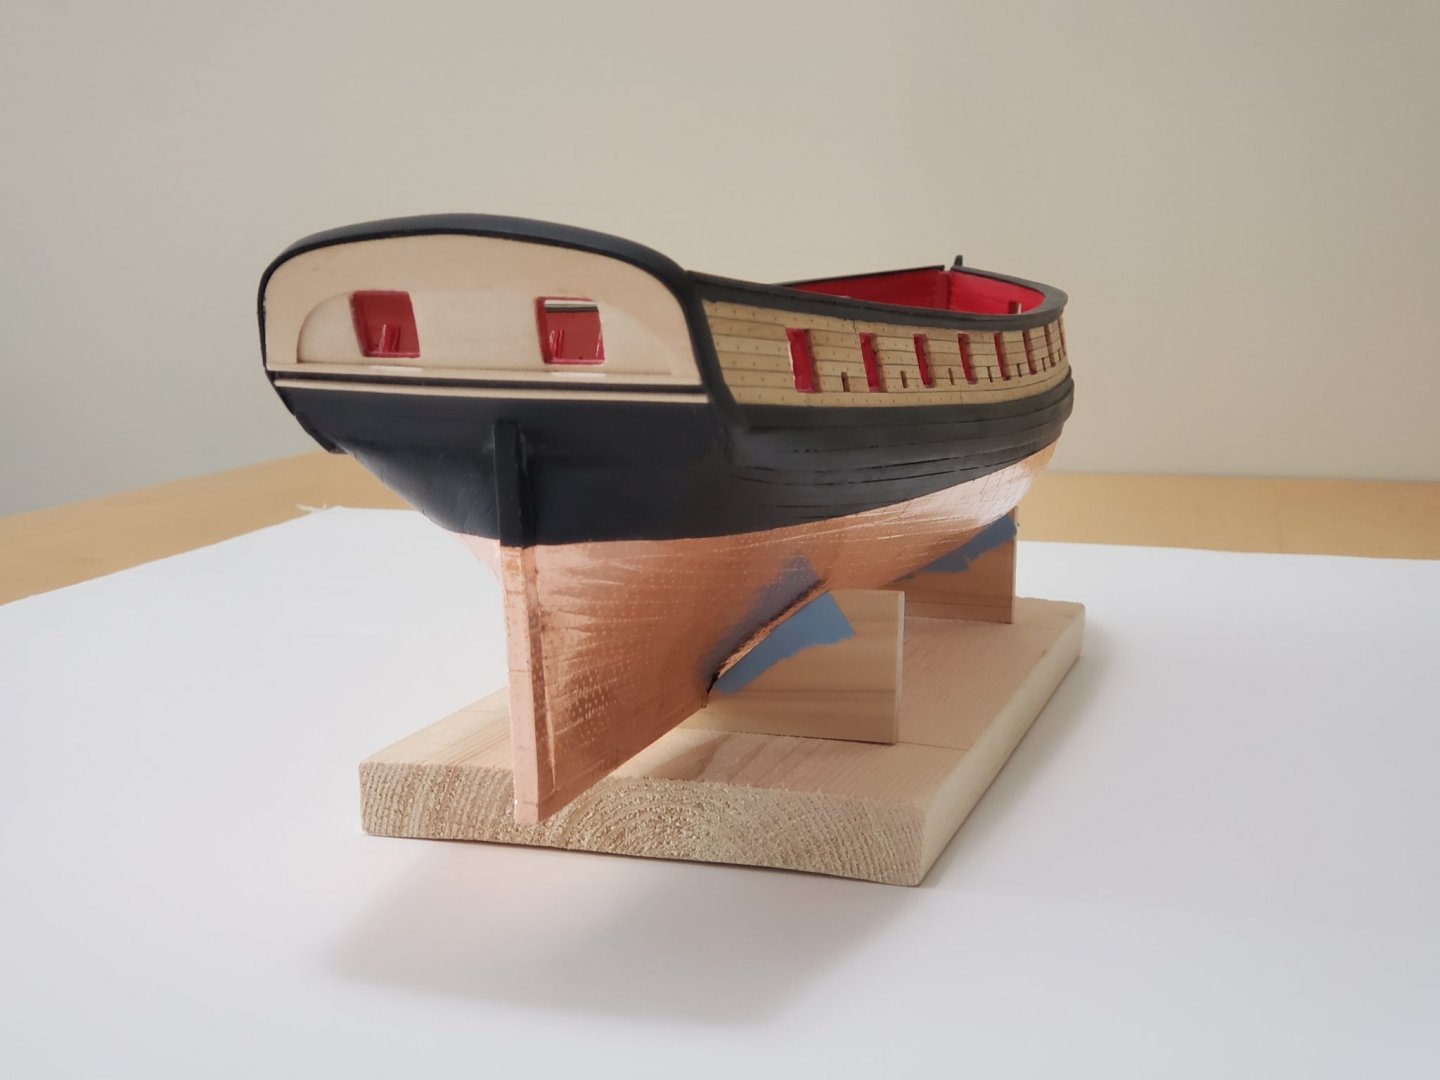
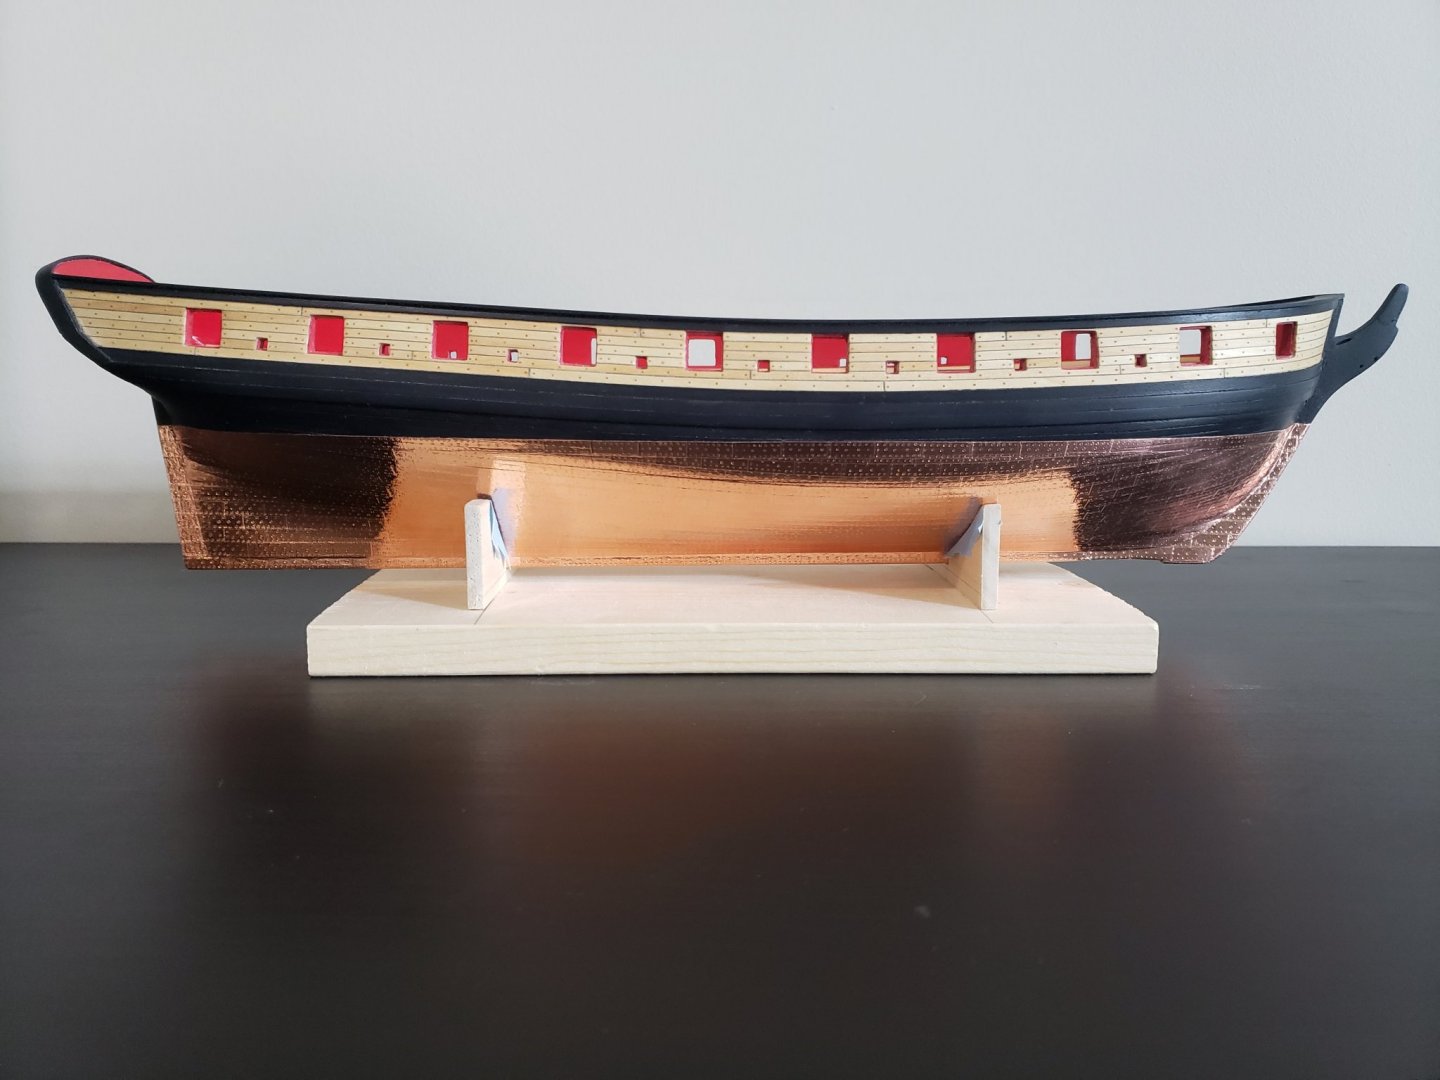
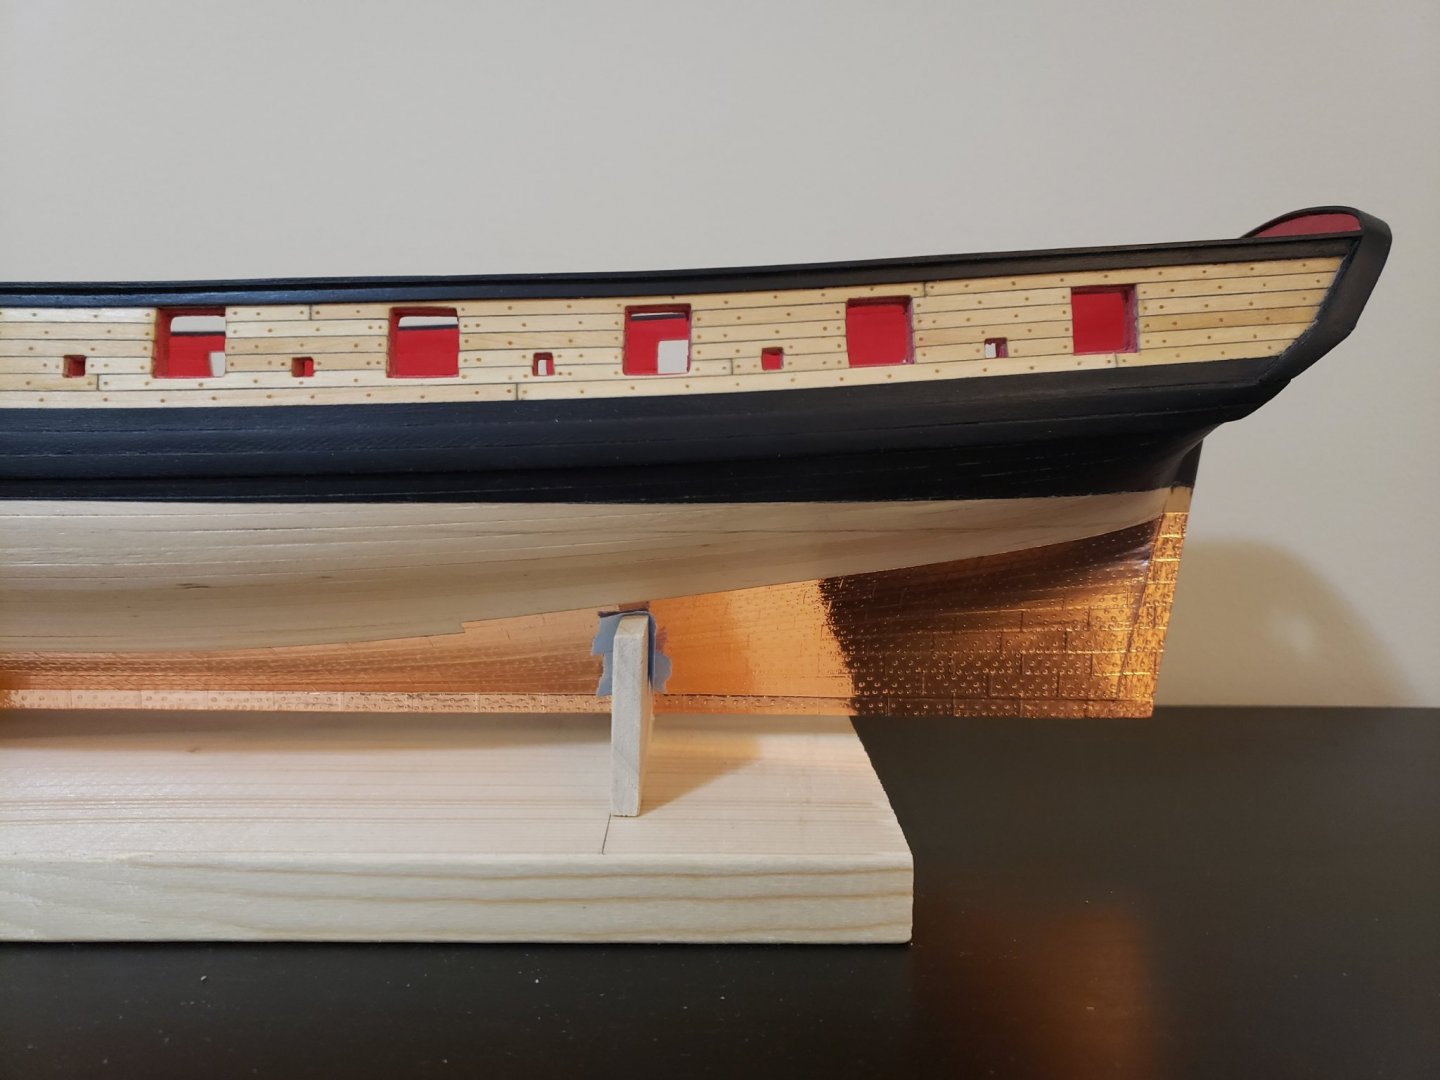
Thanks Patrick! Took a day break before moving on with the build, and made some small bits of progress. First the false keel was installed. I applied tung oil on one side before gluing it in. I am not 100% happy with how it turned out at the forward part since I can see a very small gap. This was due to me not sanding the surface completely flat before copper plating. I don't think I will touch it though since it will hardly be seen when the model is on the cradle for display. I also started working on the rudder. For now I just sanded it into shape by bevelling the forward side and tapering towards the top and the aft-most edge: Before I proceed with the plating and painting, I think I will drill a hole (only partway) for the tiller. I looked ahead at the instructions and it seems like the tiller is only supported by a pin, so the hole will be relatively small. And lastly, I drilled the hole on the hull for the rudder. I started with a pilot hole a very small drill bit (forgot to take a photo of the first small hole) from the outboard side then followed by one inboard. After this initial hole, the drillbits lined up with both holes when I started to gradually increase their size. I also used a pin vise for this so it is easier to control than an electric drill. Here are some photos for the 2nd smallest drillbit used (might help in seeing the location I started it from): I gradually increased the size up to 5/32" and sanded it smooth with a needle file: I will paint the hole black and red for the outboard and inboard sections, respectively.


- 950 replies
-
- 11
-

-
- syren
- model shipways
- (and 1 more)
-
I saw on a YouTube video (on furniture making) that adding fabric softener to the water can soften the grains in the wood. I'm not sure if it carries over to the small scale but I did use this technique for a 90 degree bend in my Syren model. Hope this helps!
- 29 replies
-
- 1
-
-
- constructo
- prince
- (and 1 more)
-
To add sails or not? What is your preference?
WalrusGuy replied to Bill97's topic in Masting, rigging and sails
Rob, would you still recommend plain white copy paper for models of scale 1:64? If it's too thin for this scale, which material would you suggest instead? I am thinking of adding sails to my next model (Pickle) once I finish the Syren. -
Thanks all for the likes and nice comments! 😀 I was on the same boat Justin, but after you get the swing of things it definitely gets easier and a bit faster. Oh also another tip which helped me not to drain me too much was to work on both sides at once as opposed to finishing one side then the other. If I had done the latter it would feel like I would need to do the whole thing again and the thought would mentally exhaust me. But again, this might be different for every person. I also stamped about 3 feet worth of strip every time before switching sides so that the stamping and cutting would not feel as tedious. Seeing the pile of confetti increase as the plates were added were equally if not more satisfying than the plating itself 😄 Thanks for the idea! I didn't think of listening to audiobooks. Will keep this in mind once I reach another long and tedious task.
-
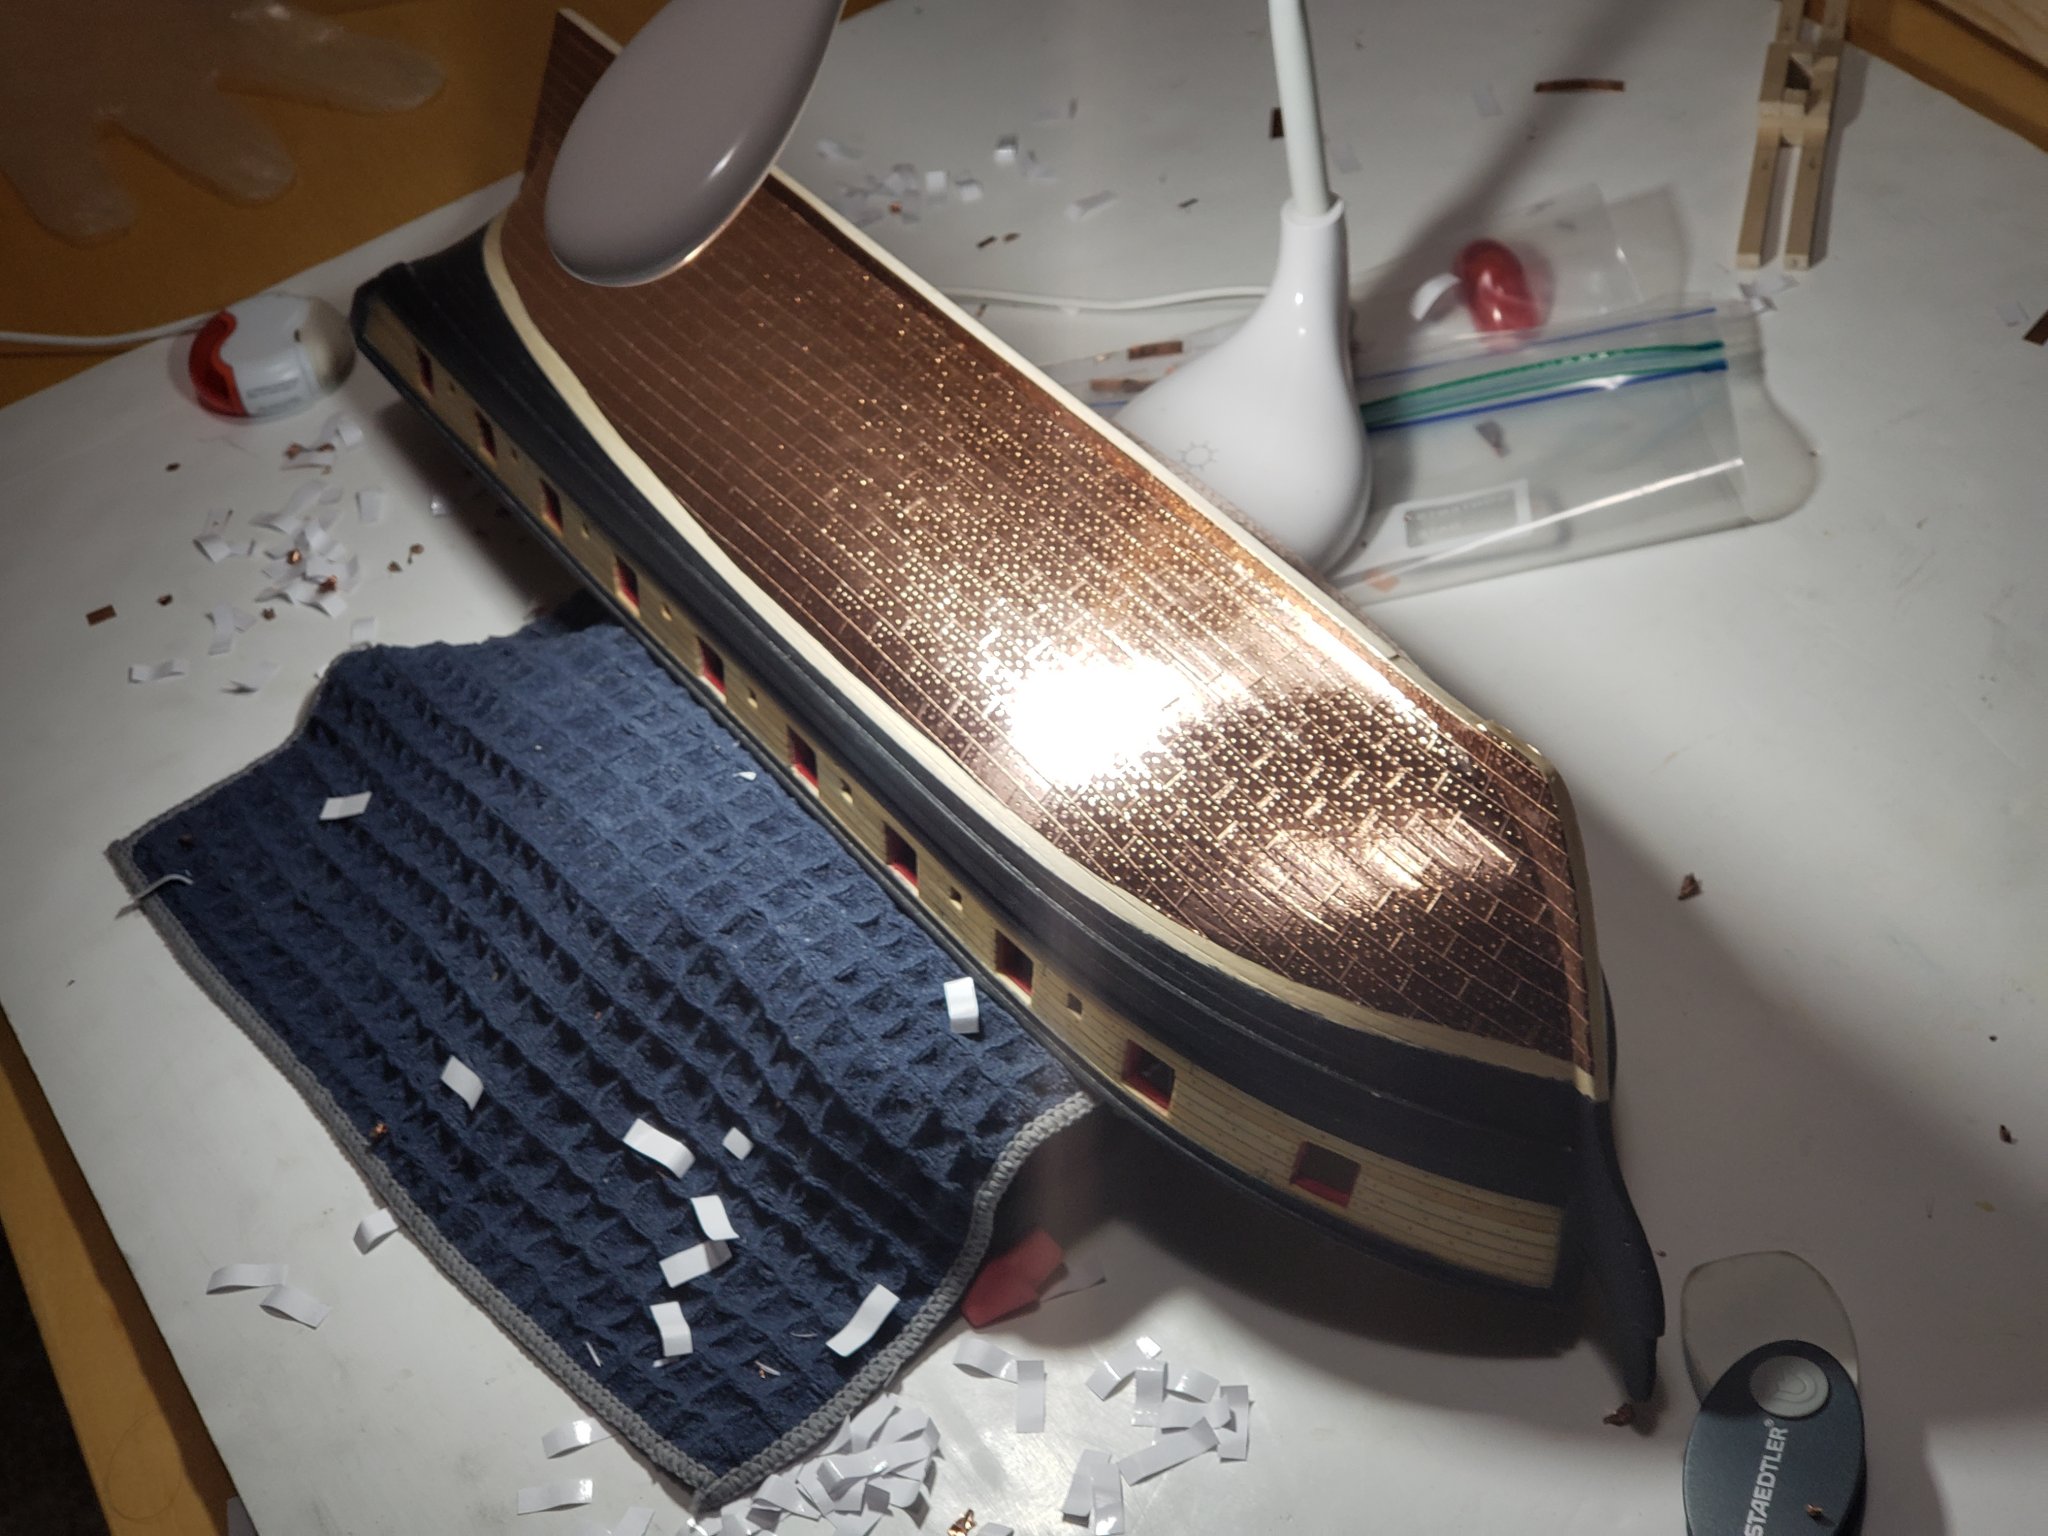
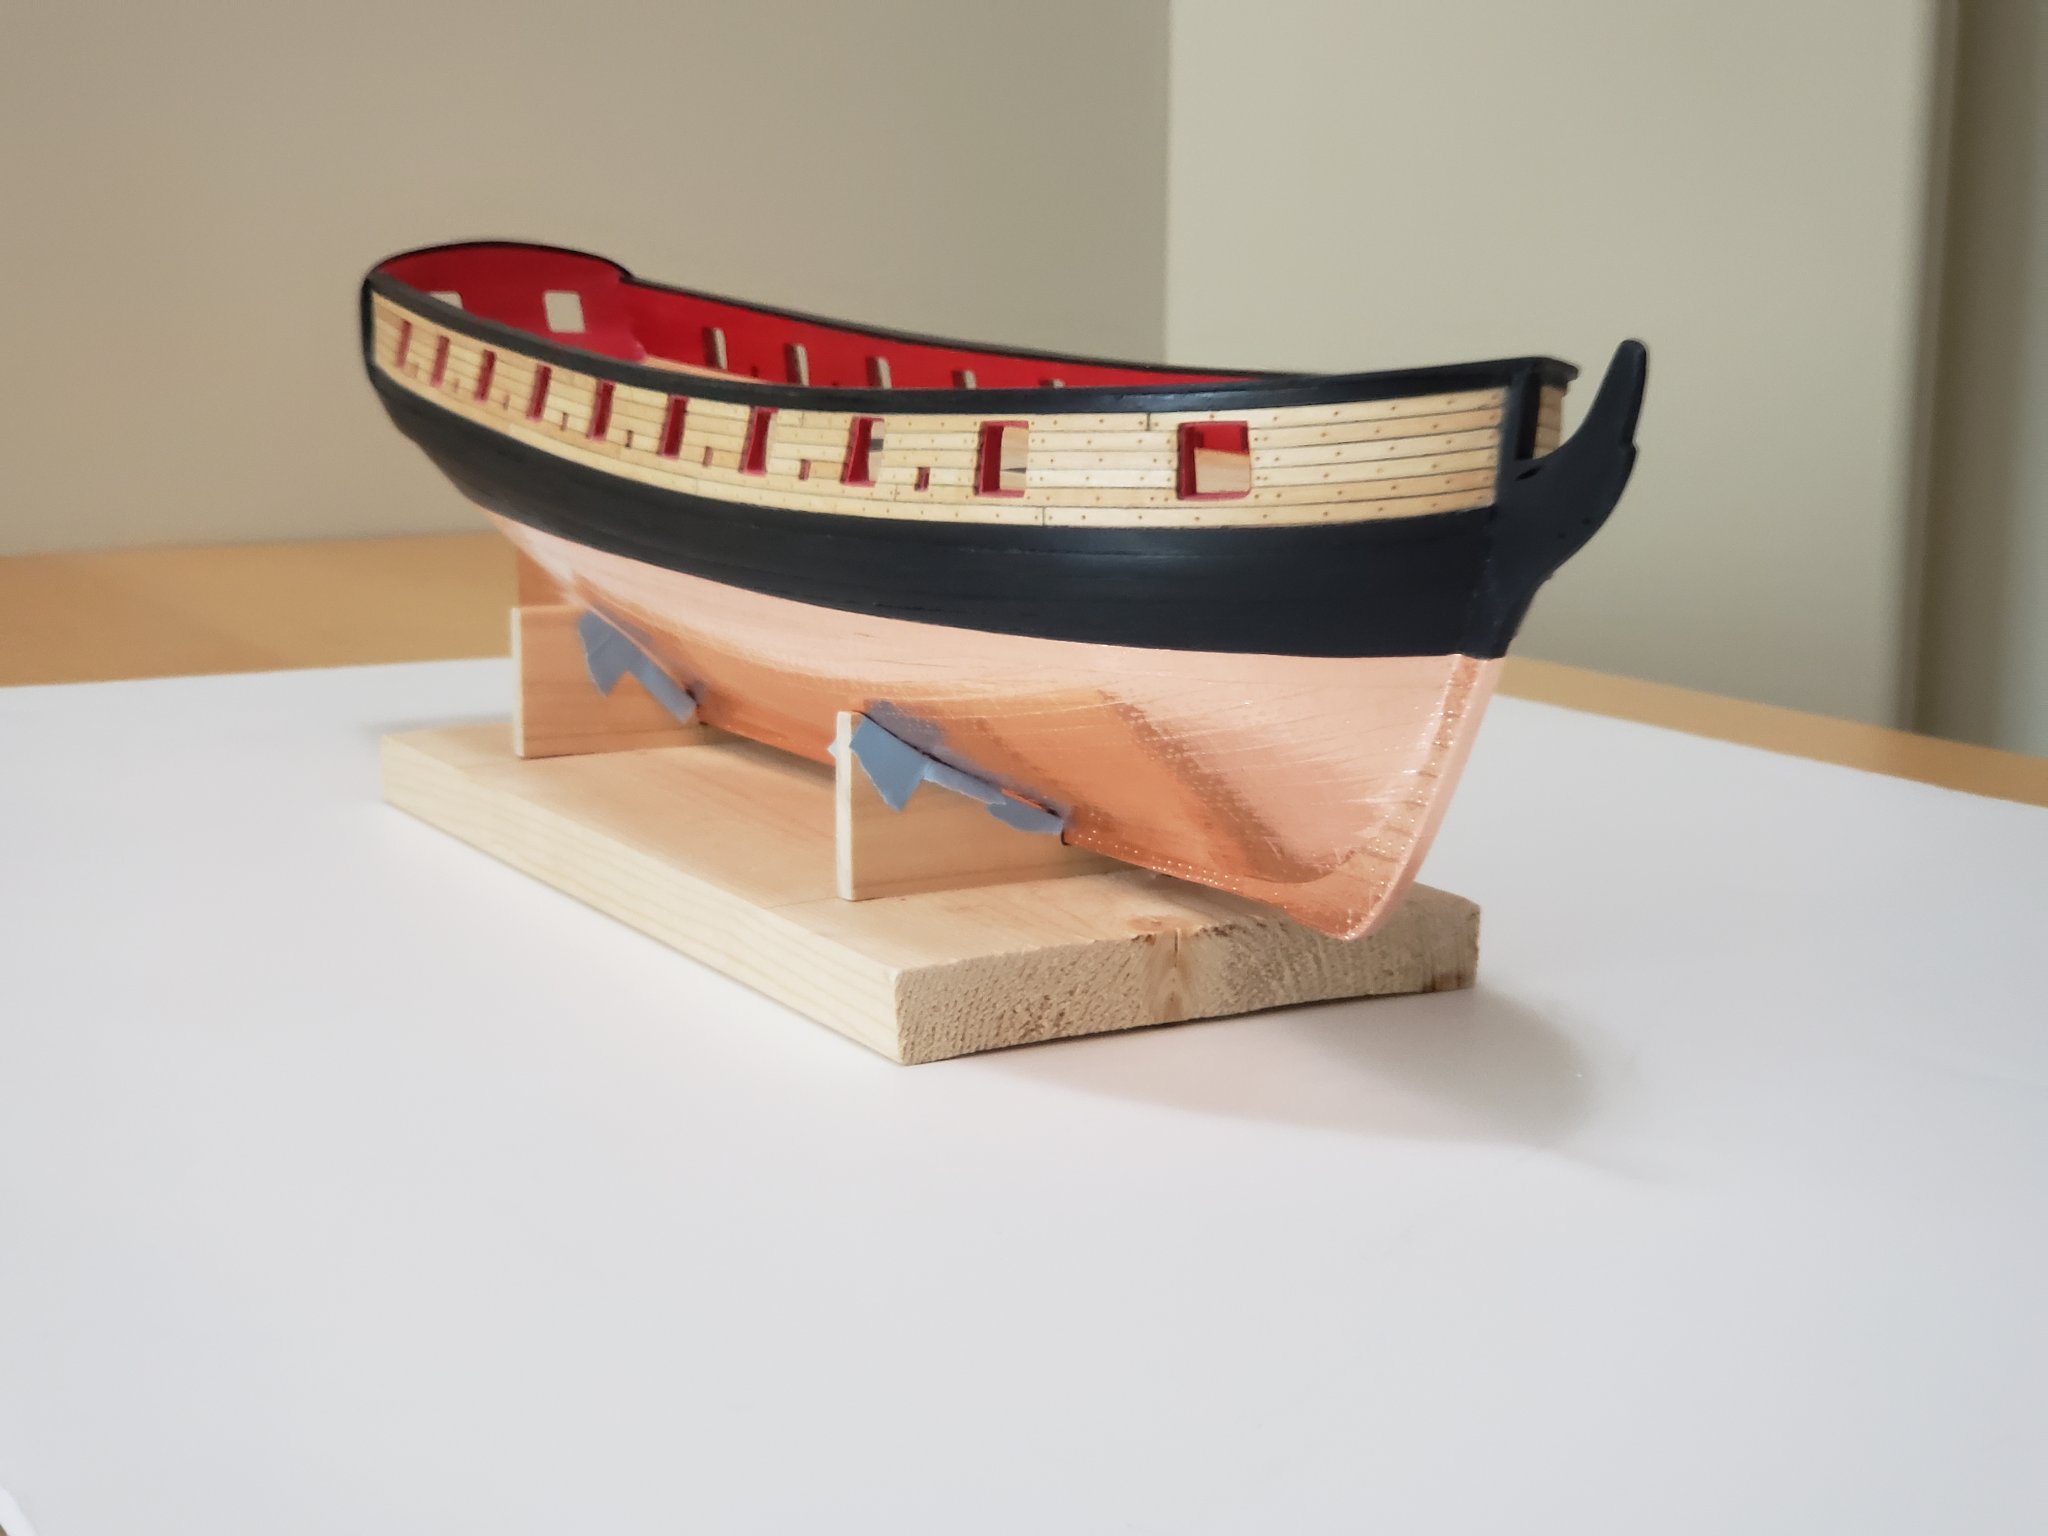
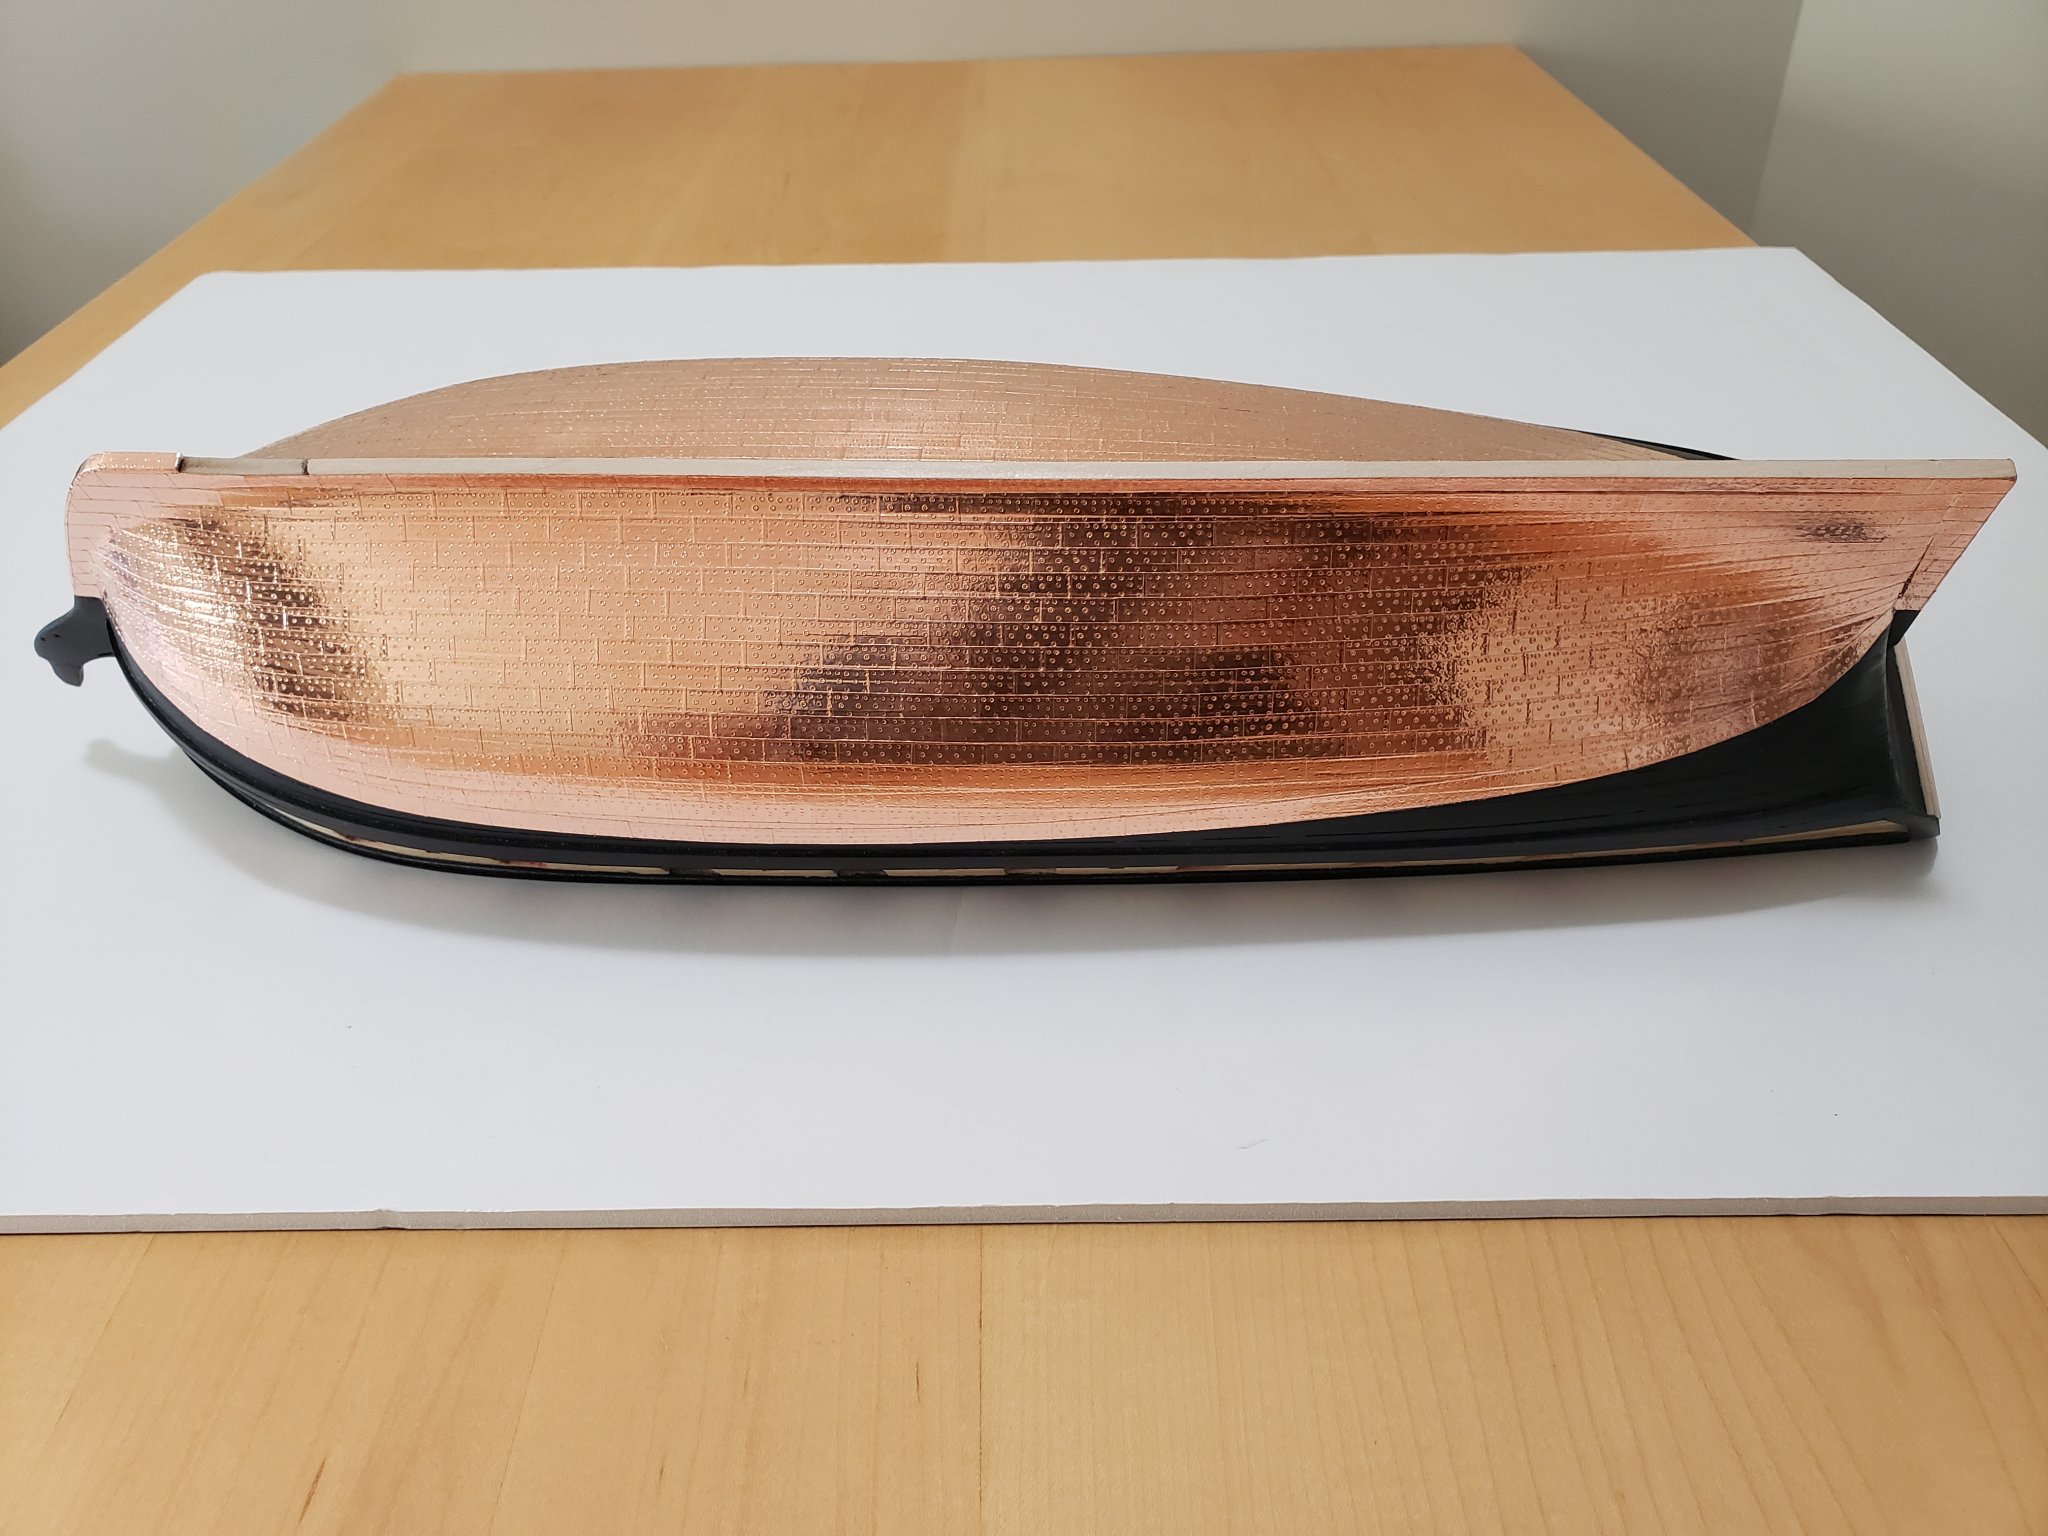
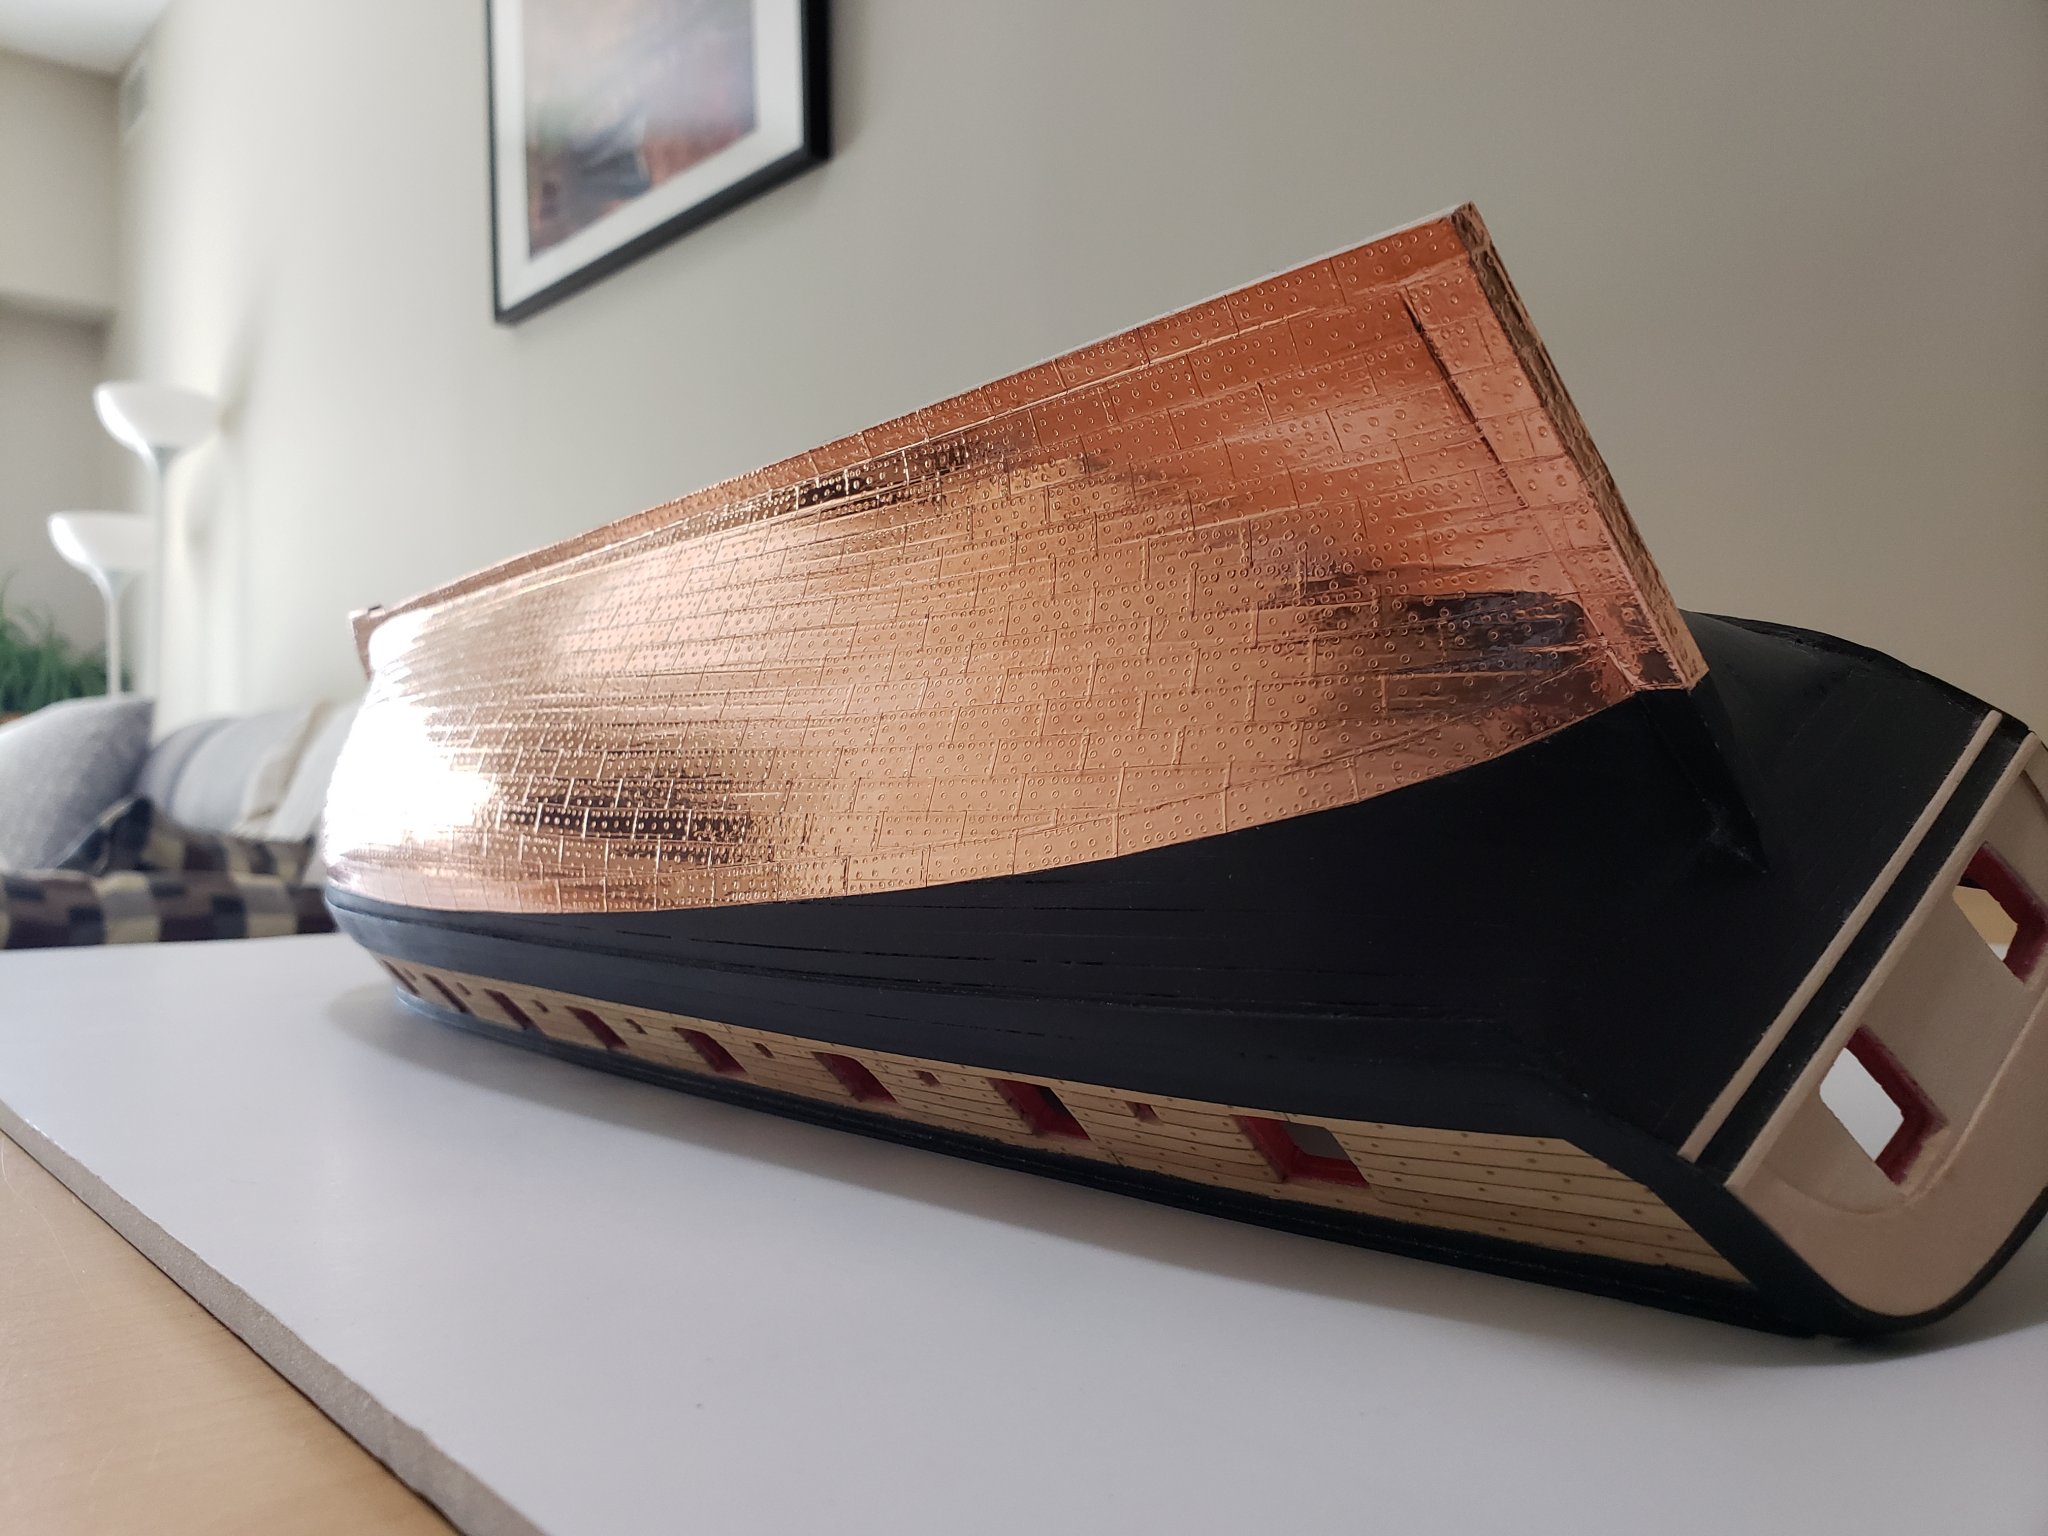
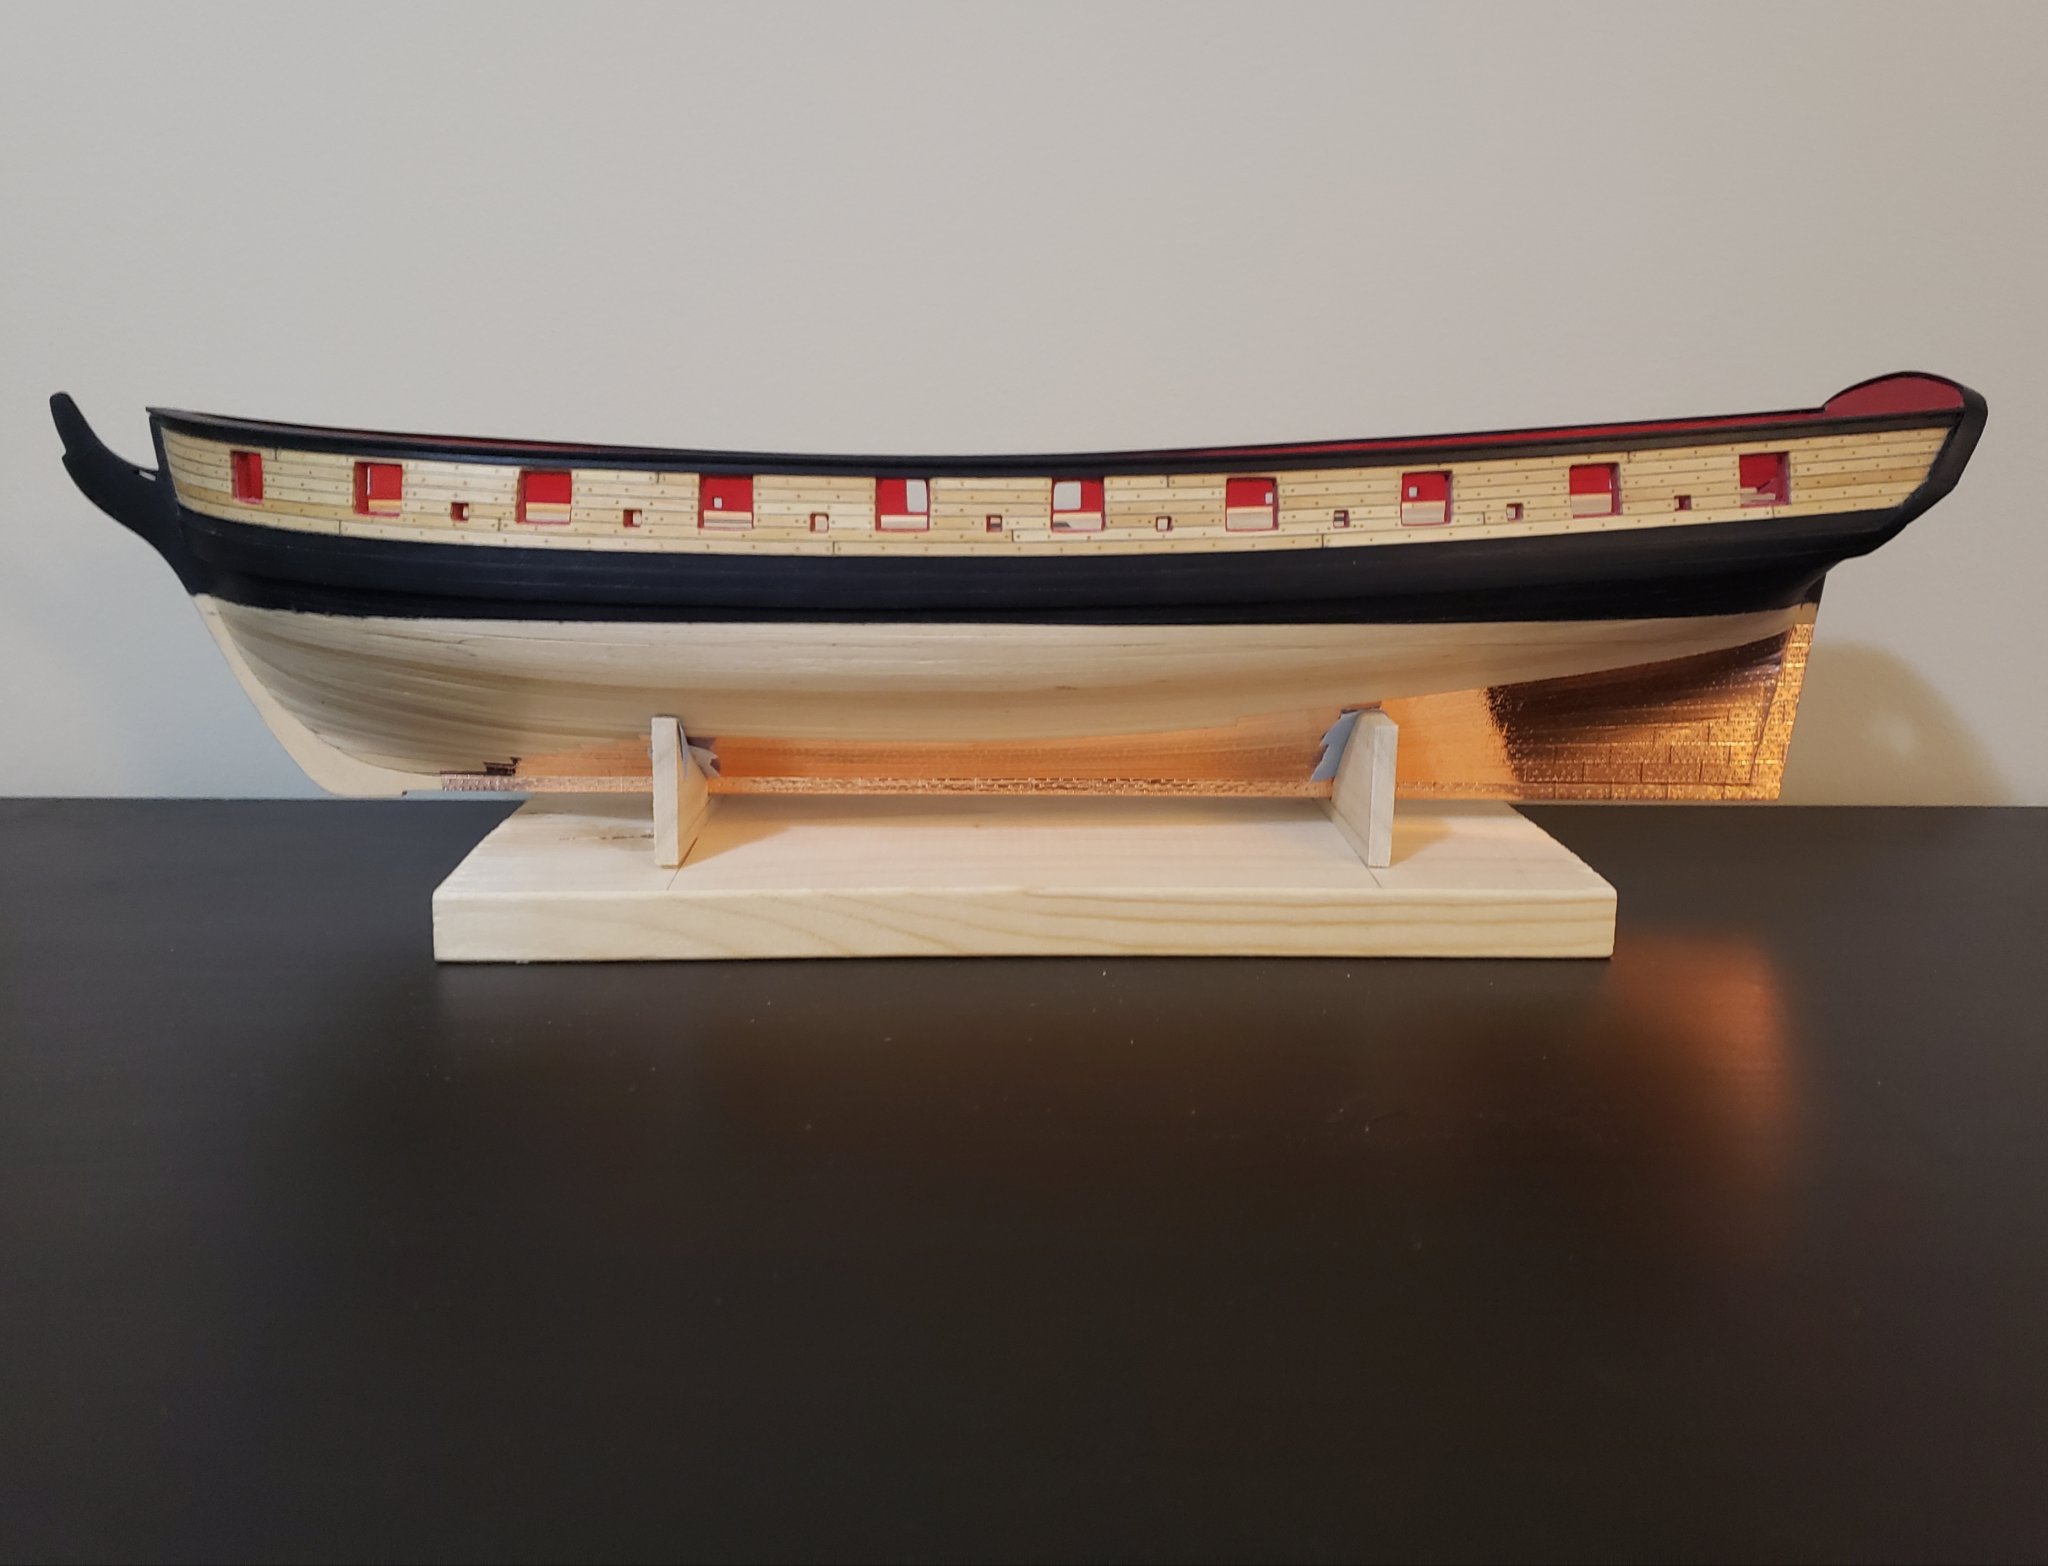
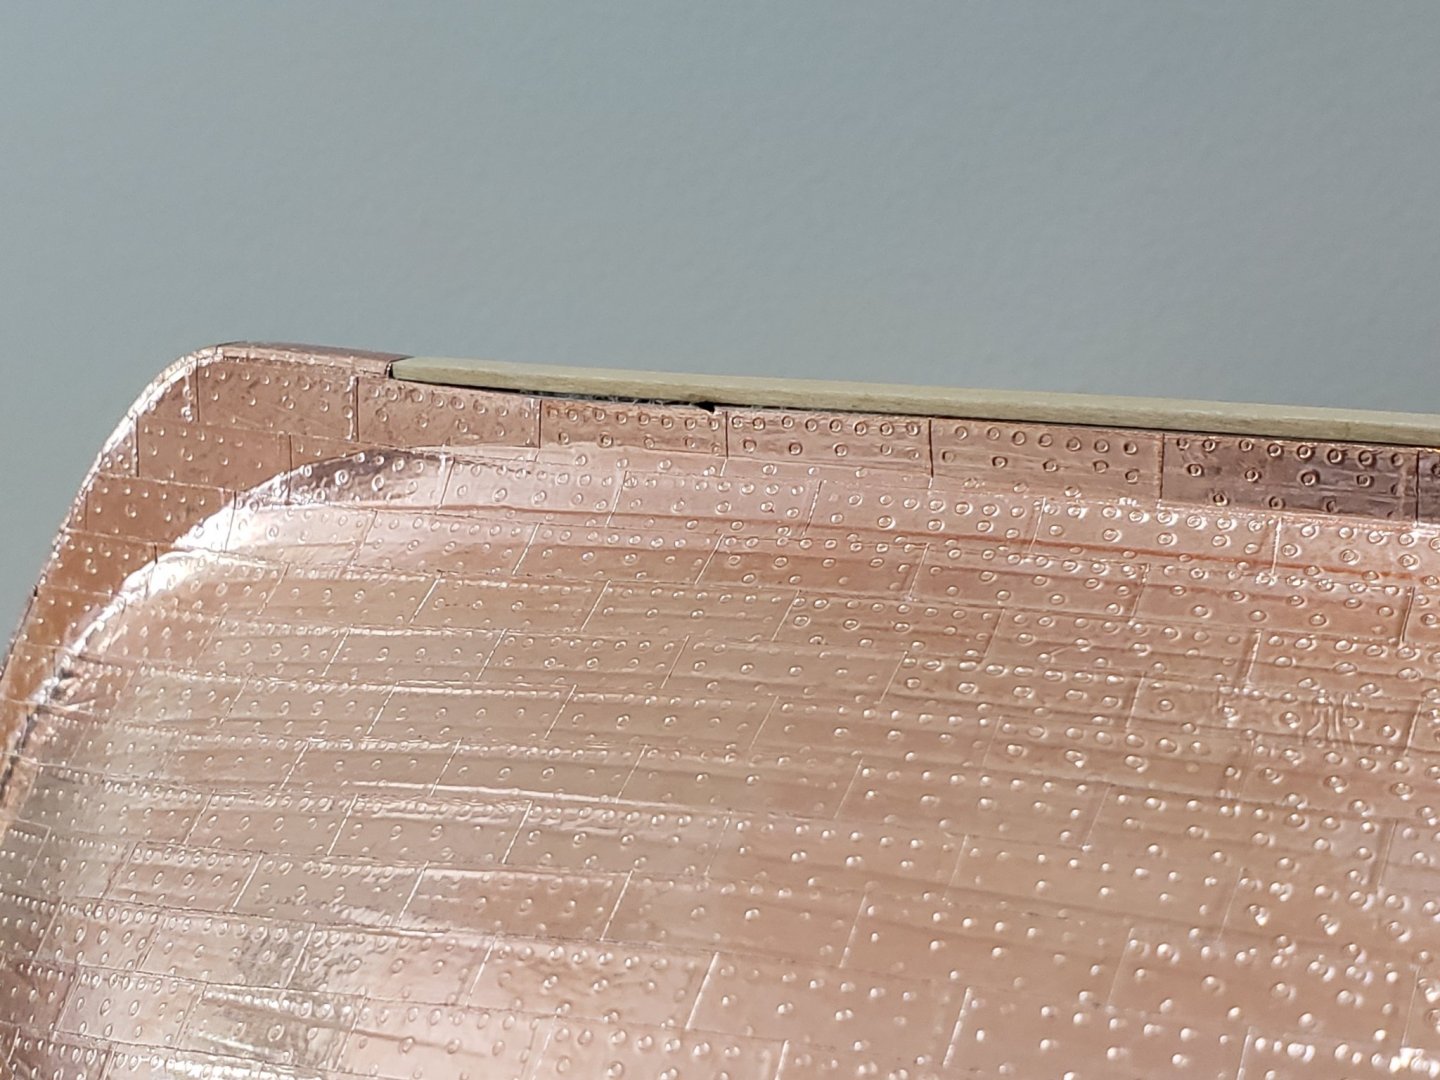
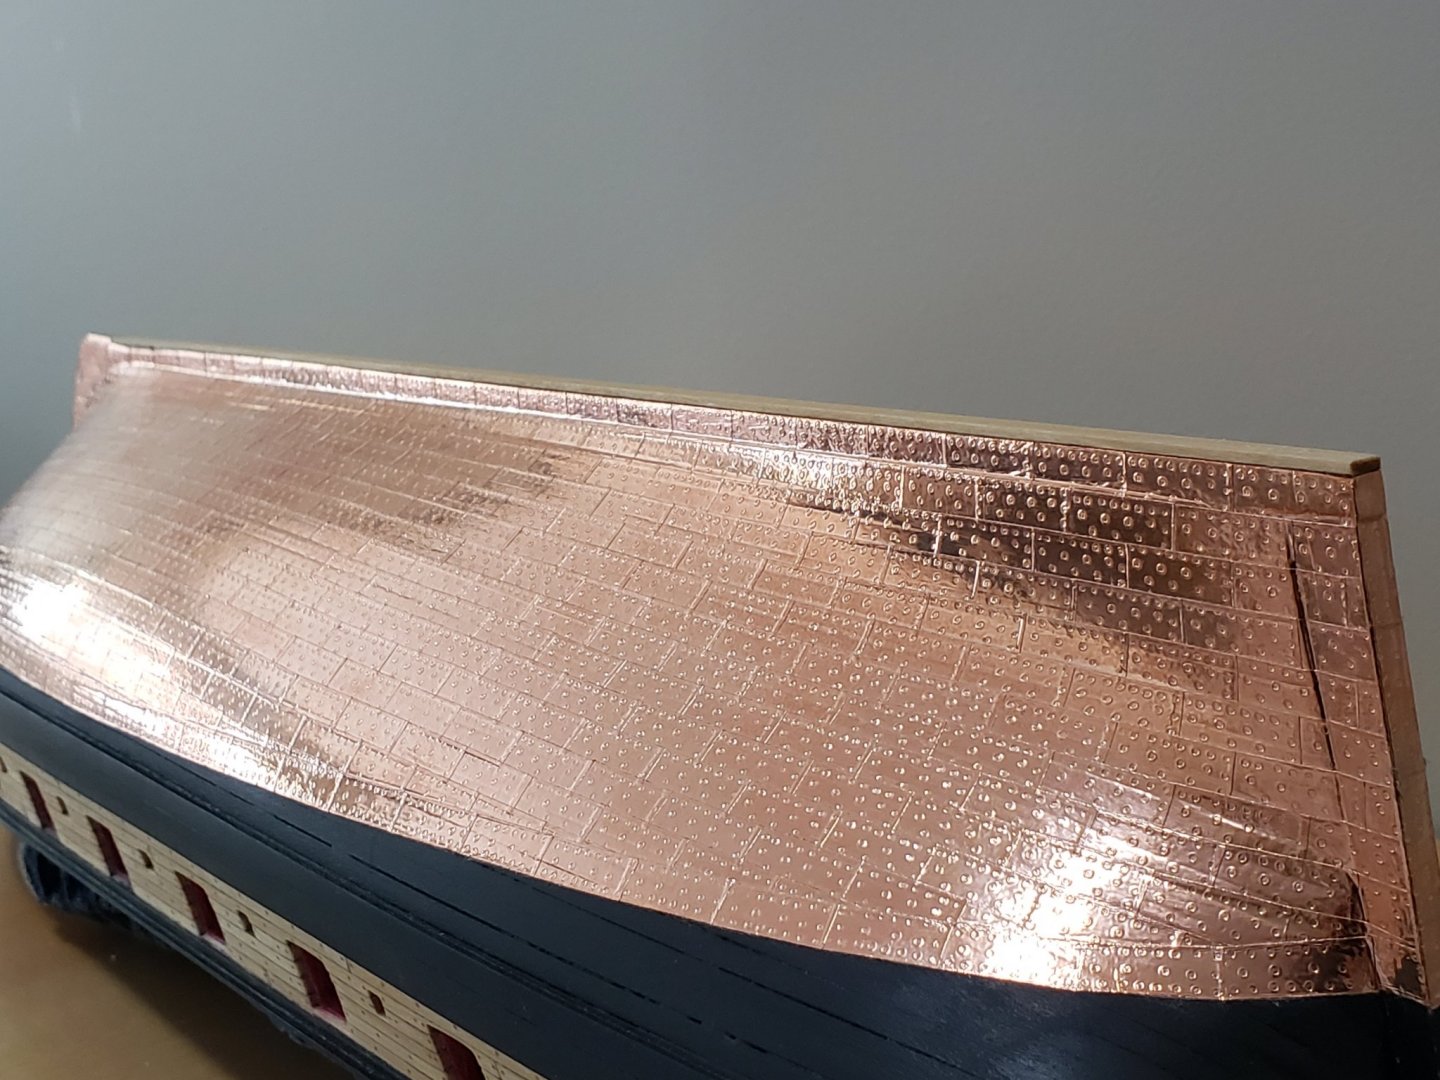
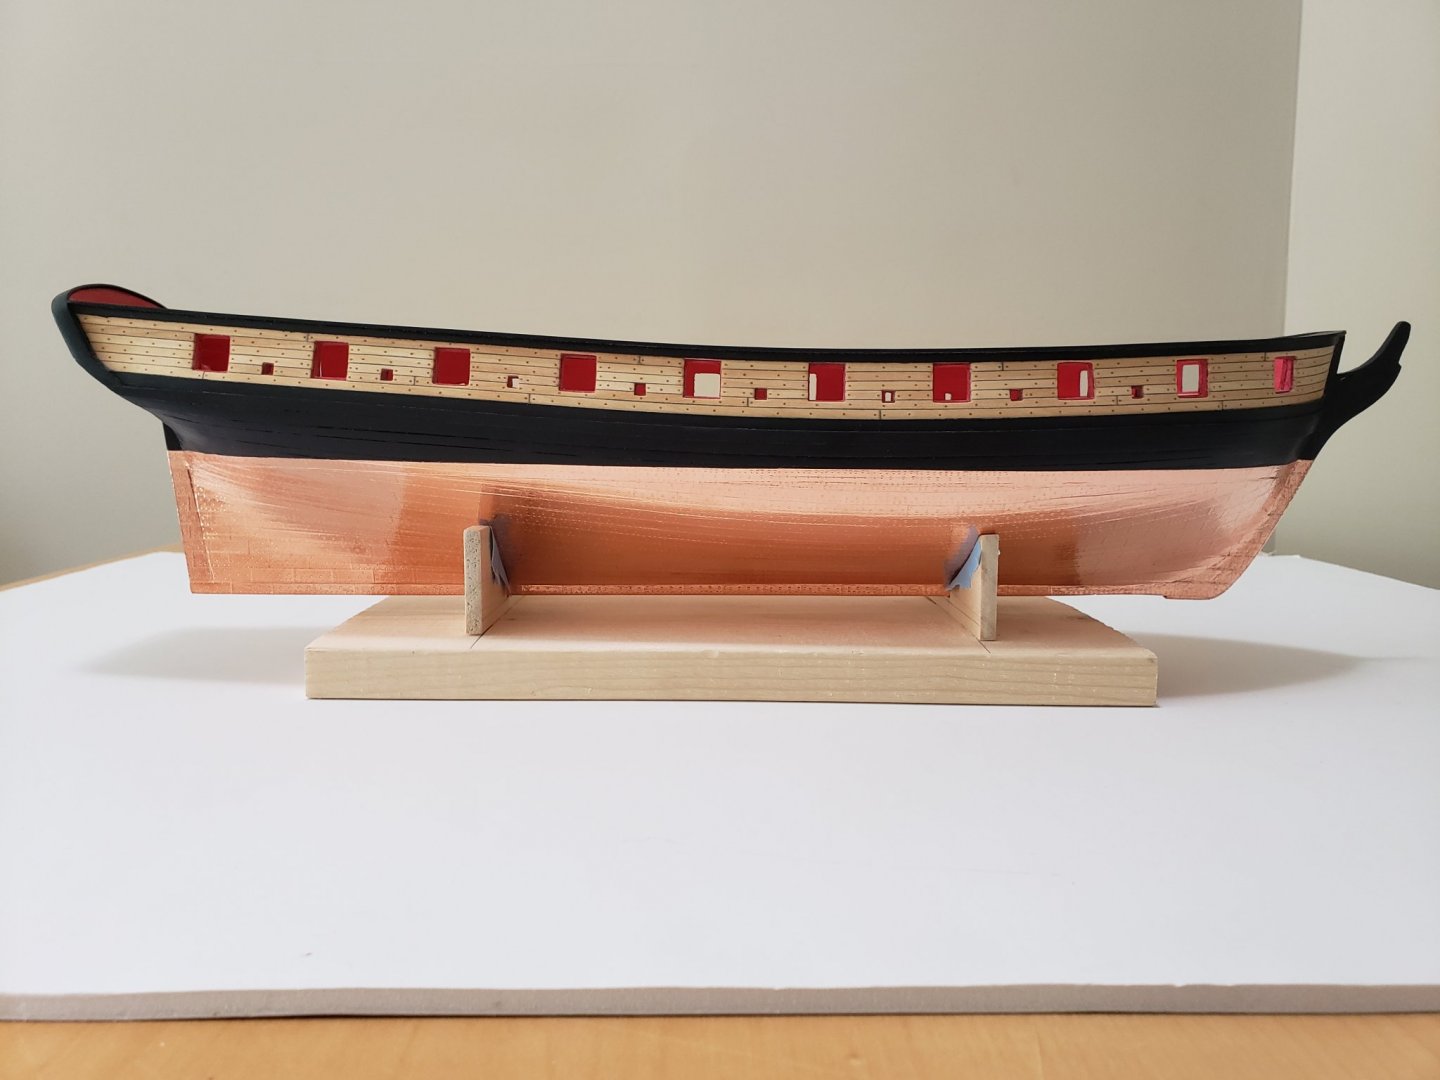
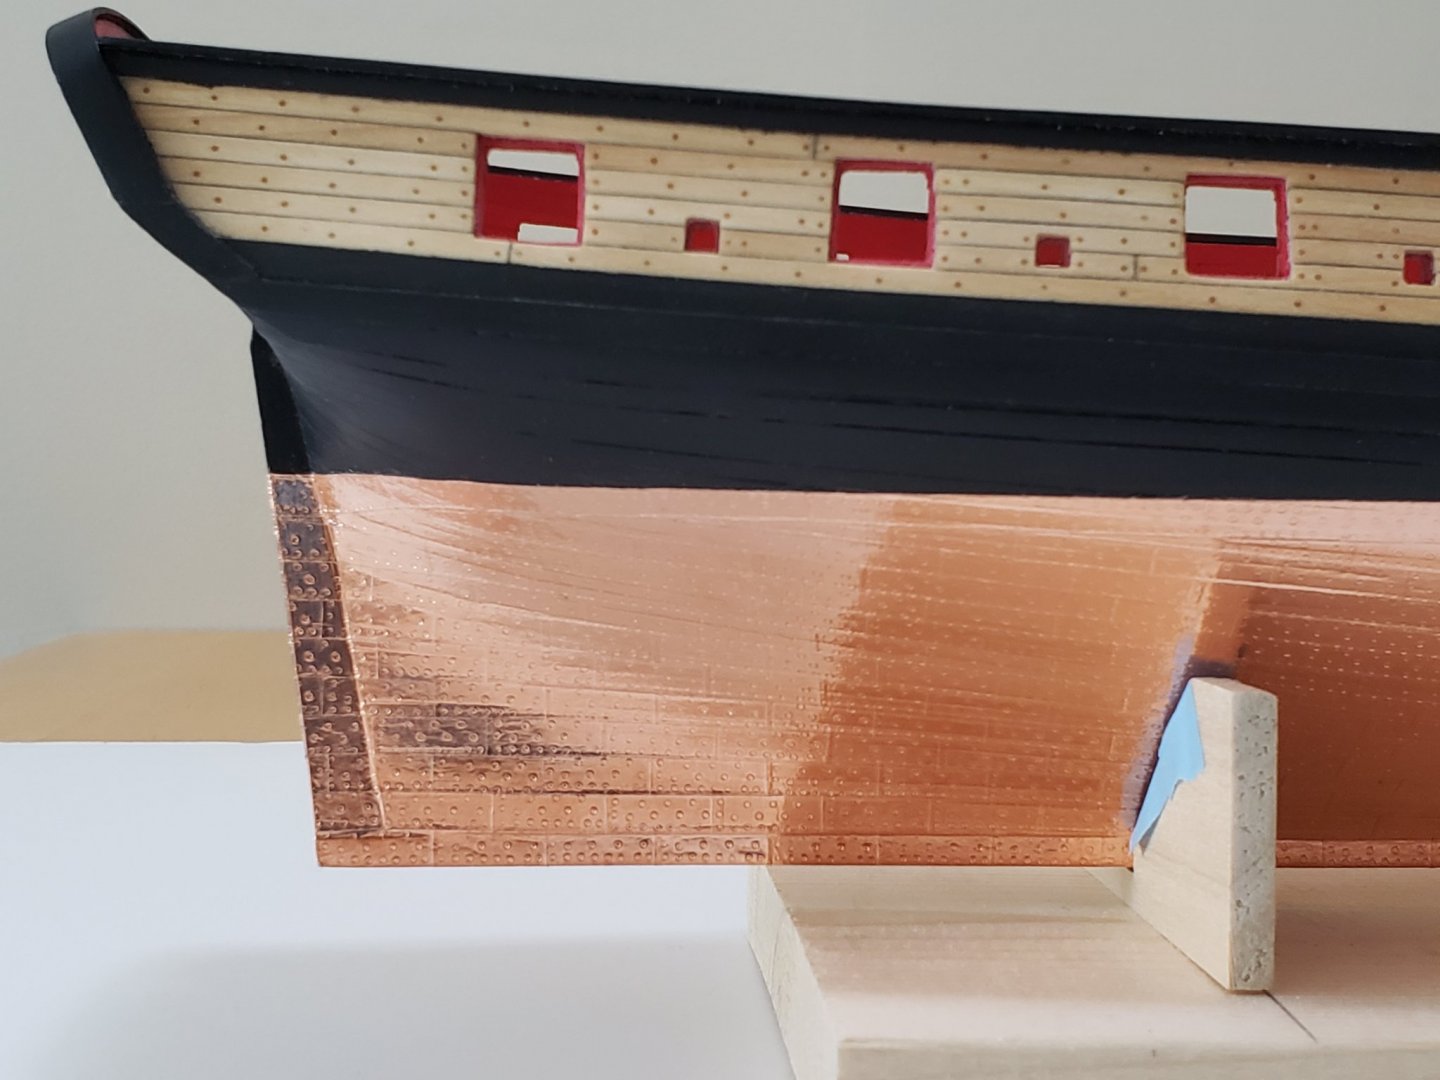
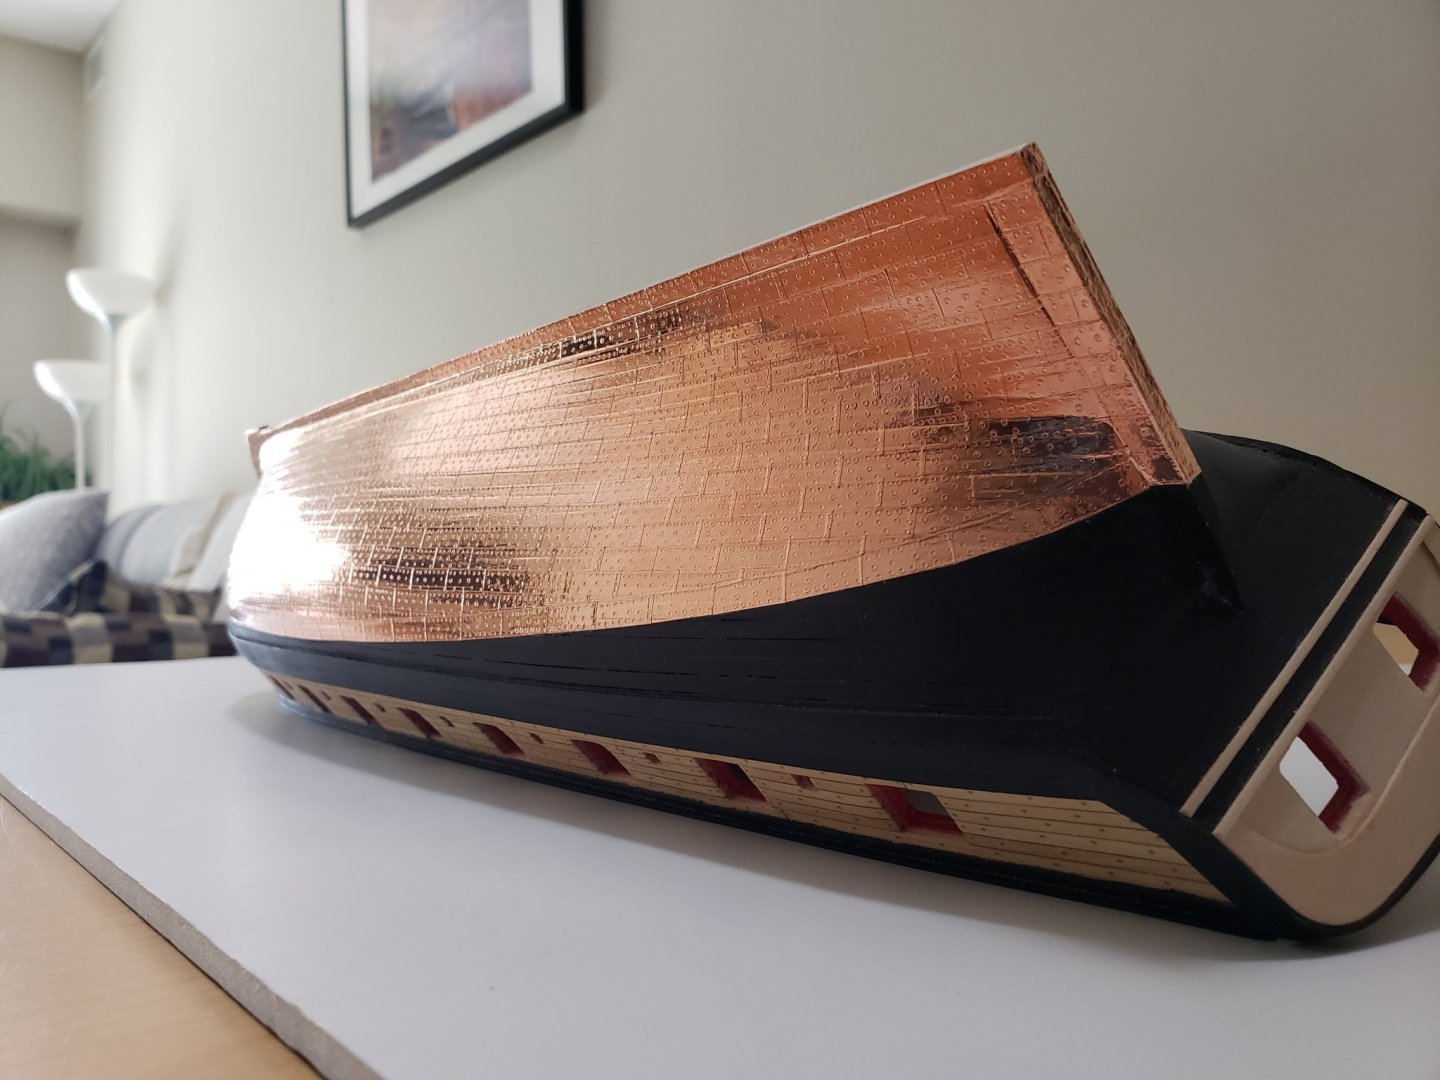
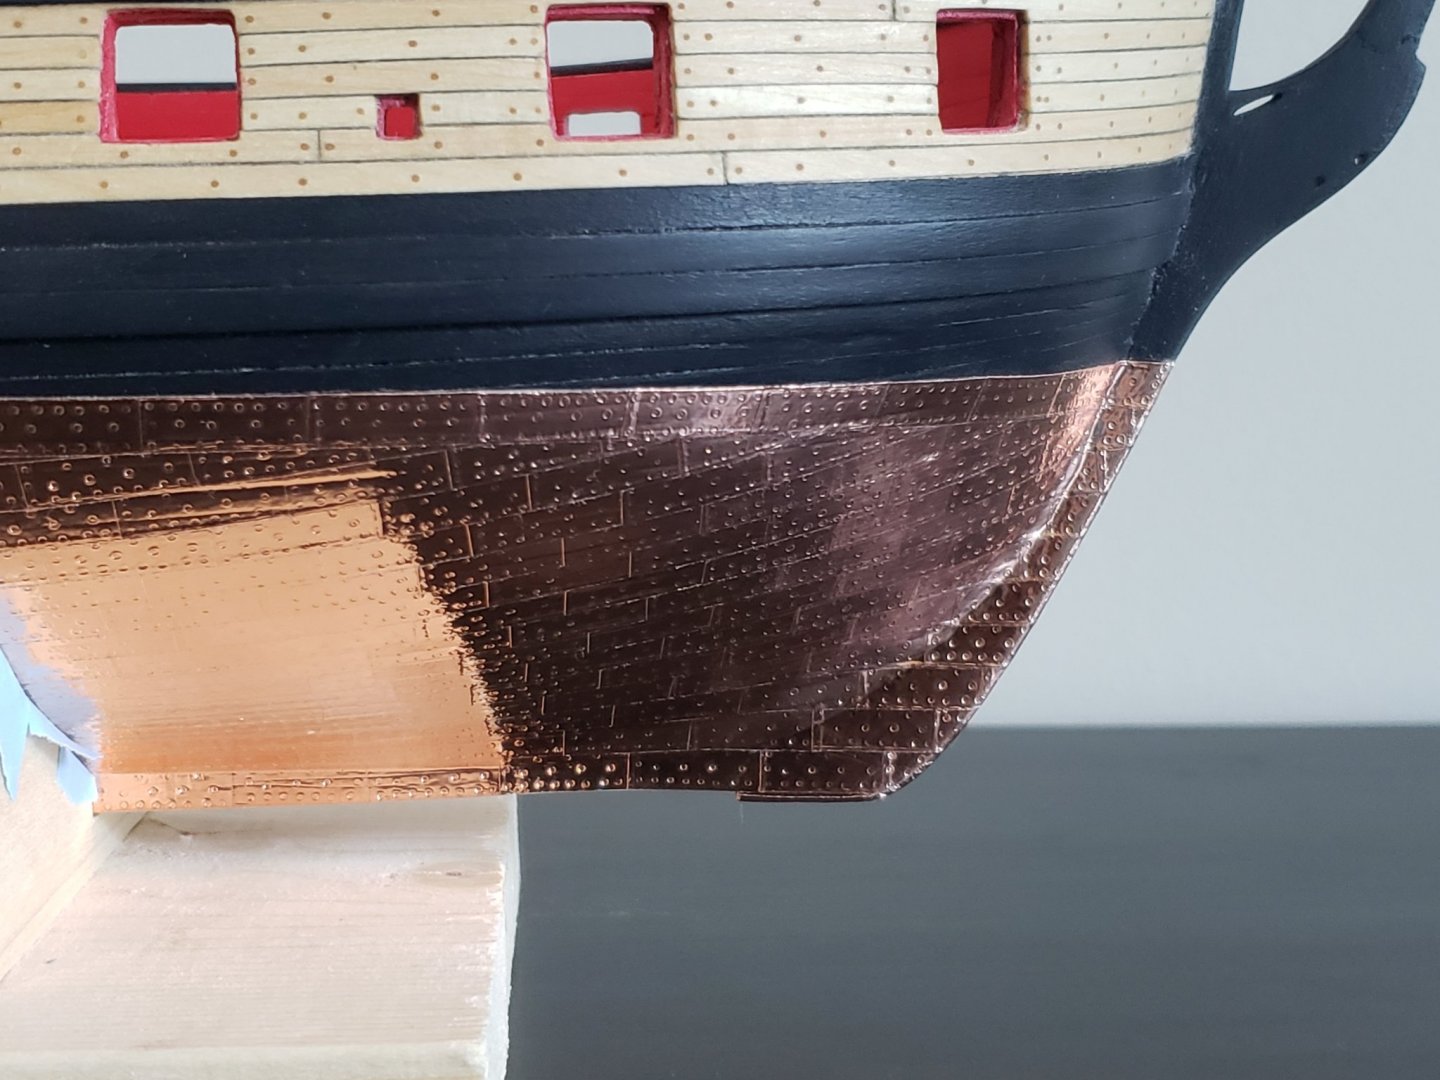
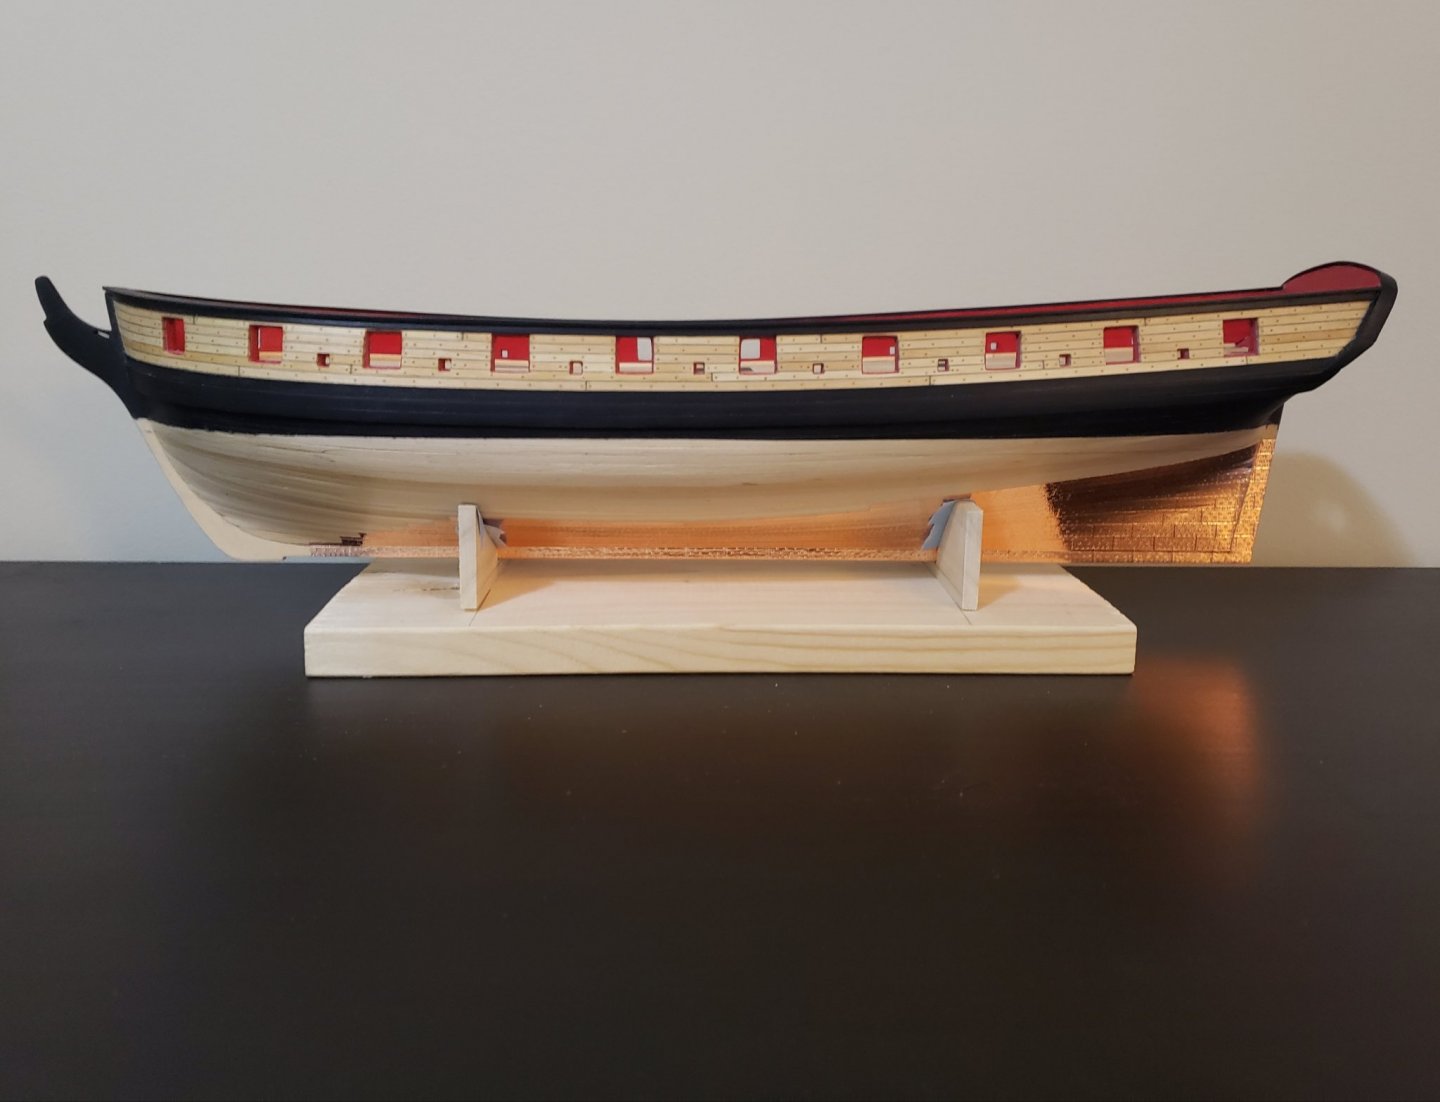
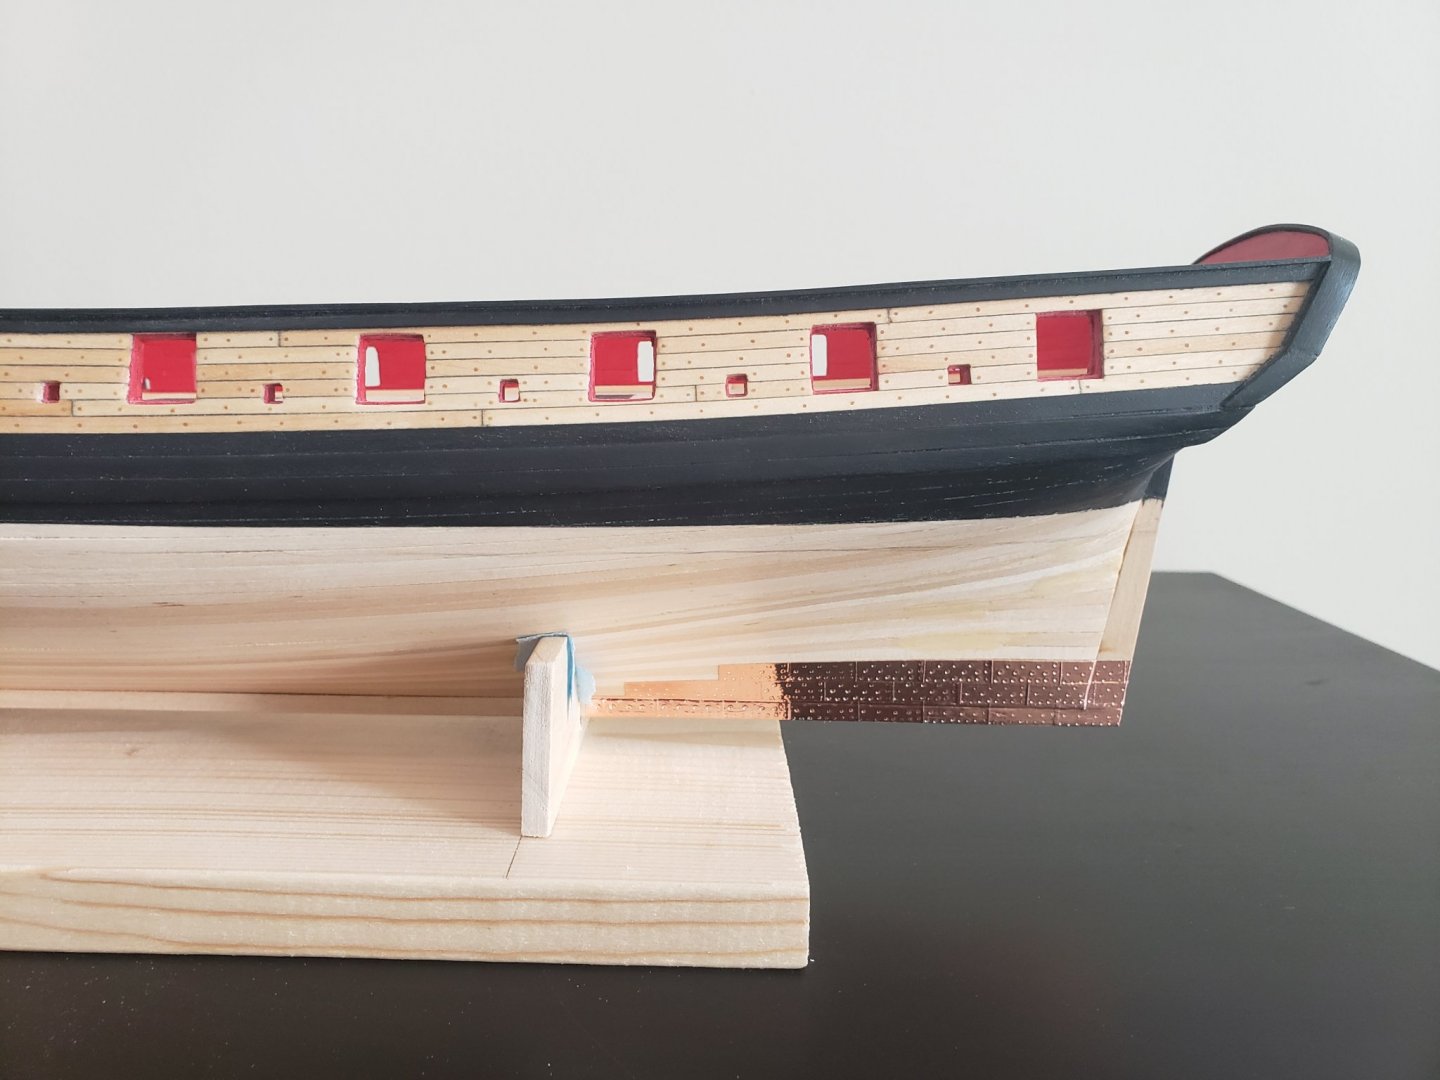
Copper plating is finally complete. This was by far the most satisfying part of the build. Especially with the last plate being installed. Overall, it was not too bad, especially after I became very proficient in removing the backing from the tape. I feel like the first row was the most important since all copper plates will follow the shape, so definitely take your time with this! Also the shape naturally came out by making sure the plates overlap the same distance throughout all plates. Another note, make sure that the planks are completely smooth and any gaps between the planks are filled in. I did not 100% do this and I can slightly see some plank lines that are under some plates. To anyone who is copper plating, I highly recommend listening to a podcast. Some podcasts I discovered and also recommend are No Such Thing as a Fish and Reply All. One episode from Reply All which I whole heatedly recommend is called "Long Distance" (Episodes 102 and 103). Listening to podcasts made time fly by and also made copper plating very enjoyable. Here are photos showing different angles: Some other photos with a dark table which I think helps show the pattern more. Photo with the deck: Bonus photo of the messy work area 😄 Crazy how different it looks with different lightings and backgrounds...


- 950 replies
-
- 19
-
-

-
- syren
- model shipways
- (and 1 more)
-
Thanks Patrick! I am just having a minor issue of making sure each plate is completely centered in relation to the alternating rows (below and above). I guess once all the plates are on it will be difficult to see each individual plate centered between two. I hope this does not bother me in the future 😬
- 950 replies
-
- 1
-
-
- syren
- model shipways
- (and 1 more)
-
Slowly making some more progress: I have been alternating putting the plates 3 rows at a time then switching sides:


- 950 replies
-
- 17
-
-
- syren
- model shipways
- (and 1 more)
-
The start is looking great! Good luck with your build!
-
Thanks Dirk! I have been reading your build in steps prior to making any progress on my model and it has helped a lot! I also made the third stamp. After getting the process ingrained, I am also enjoying it, but at the same time am looking forward to when it is finished 😄
- 950 replies
-
- 2
-
-
- syren
- model shipways
- (and 1 more)
-
Thanks Voyageur!! Thanks Will. I found that there is another method of using a ponce wheel which might be much easier than the method I used. I couldn't find any around the house so I just went ahead with the steel wire method. I could not imagine using syringe needles, looks very daunting to set up... Maybe for a future build 😅
-
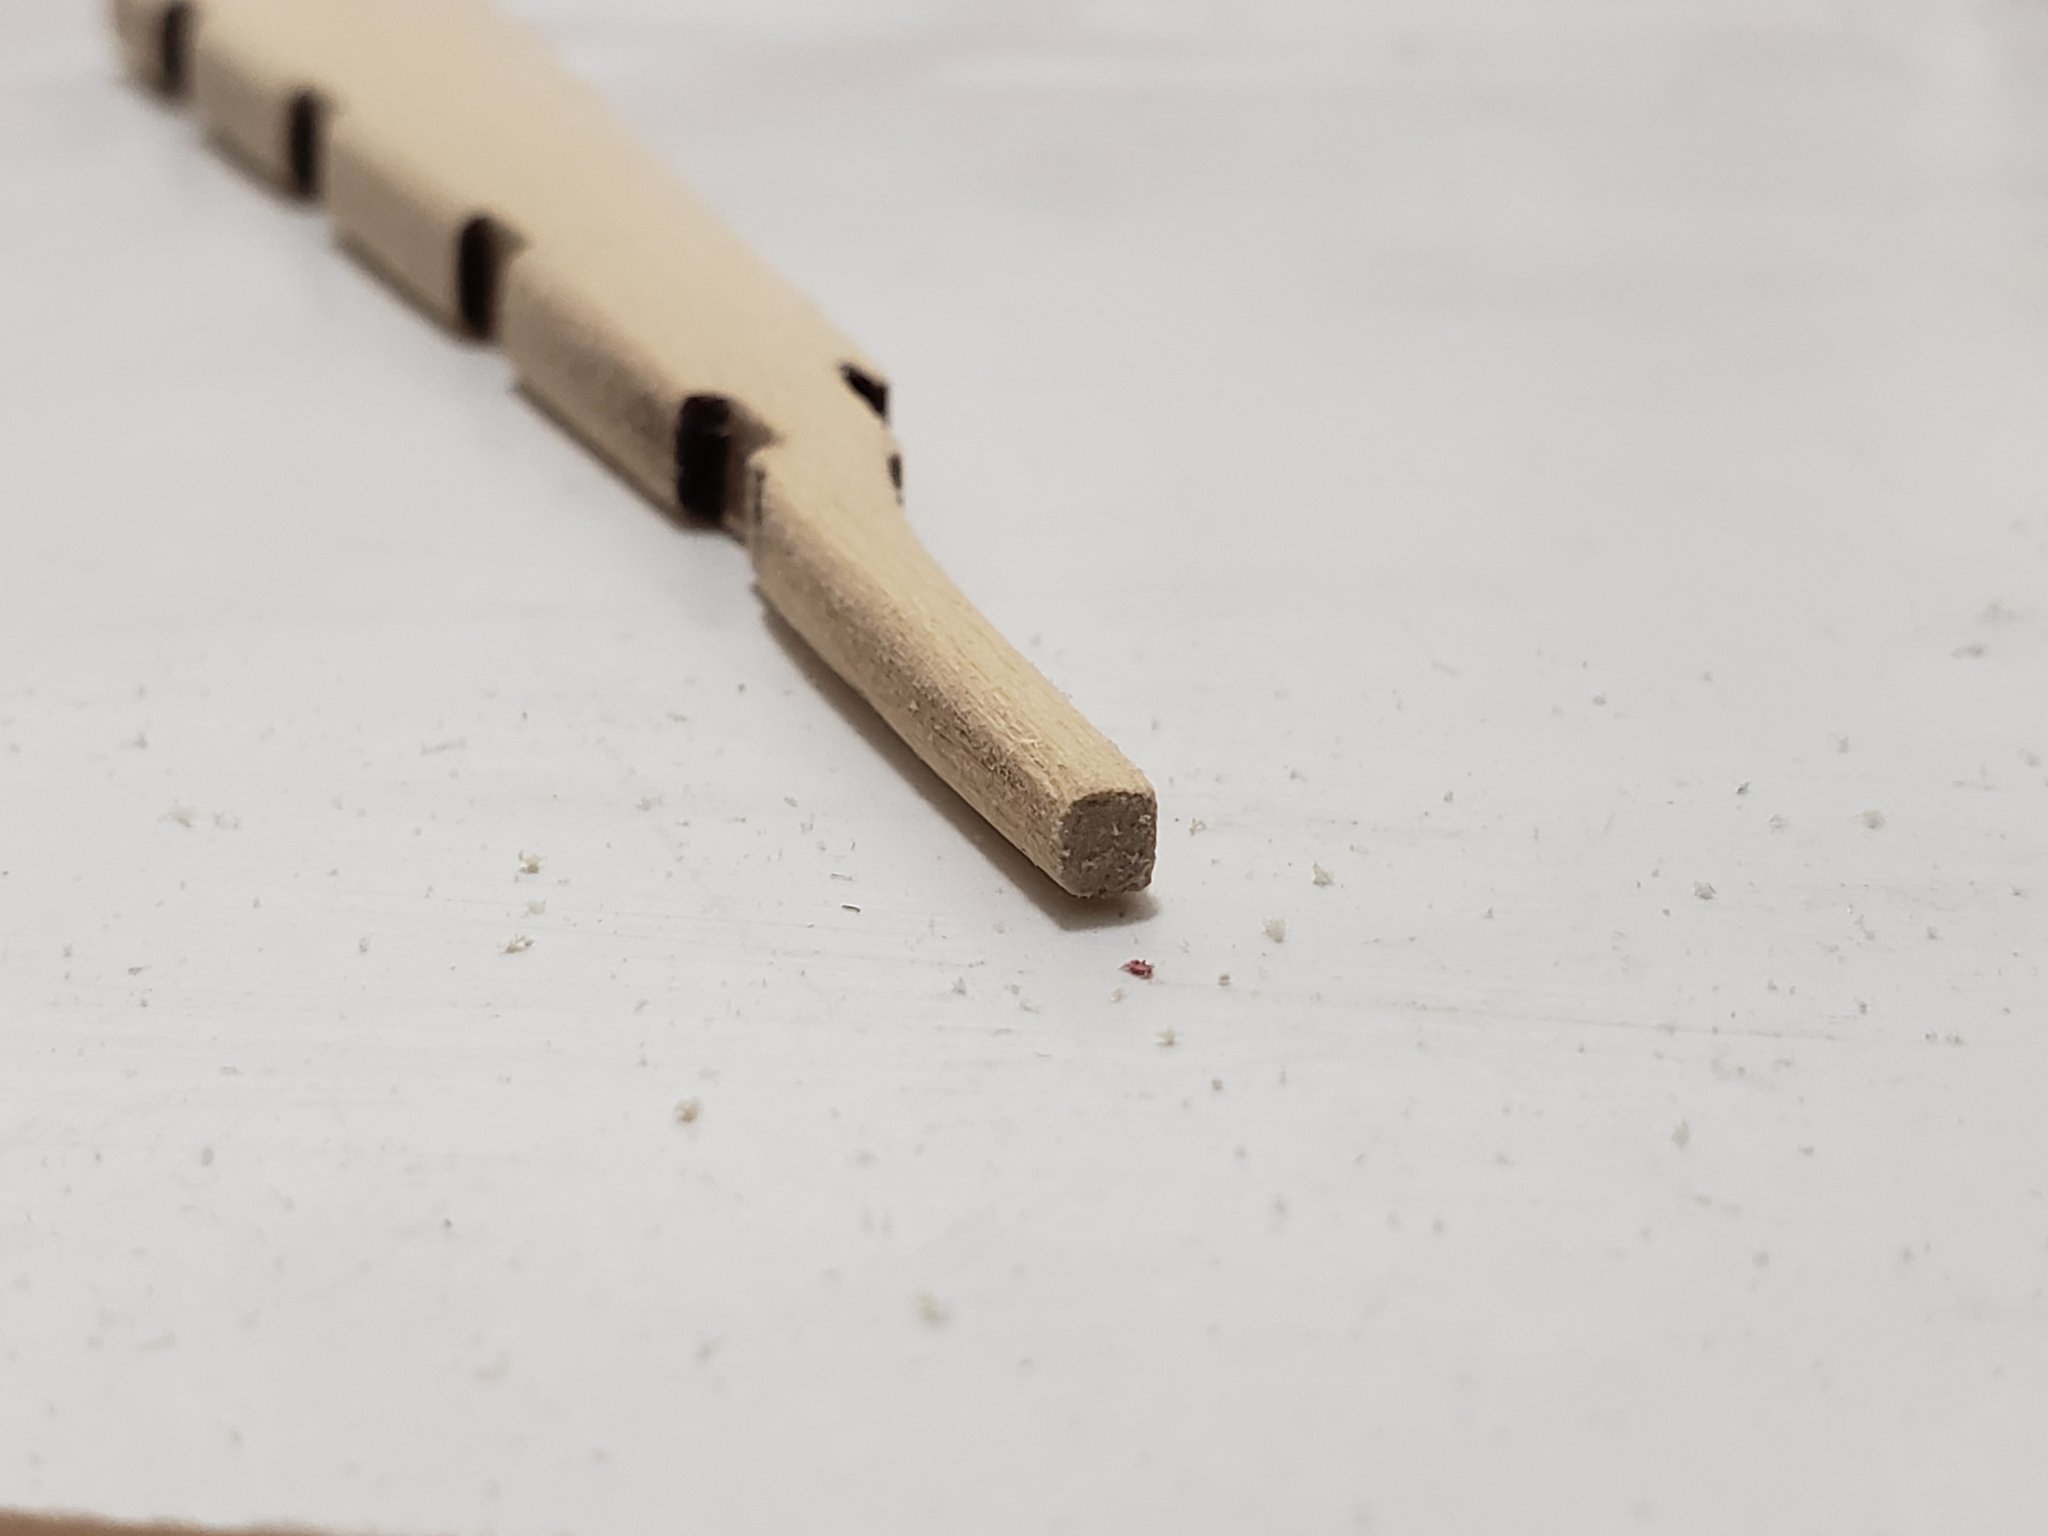
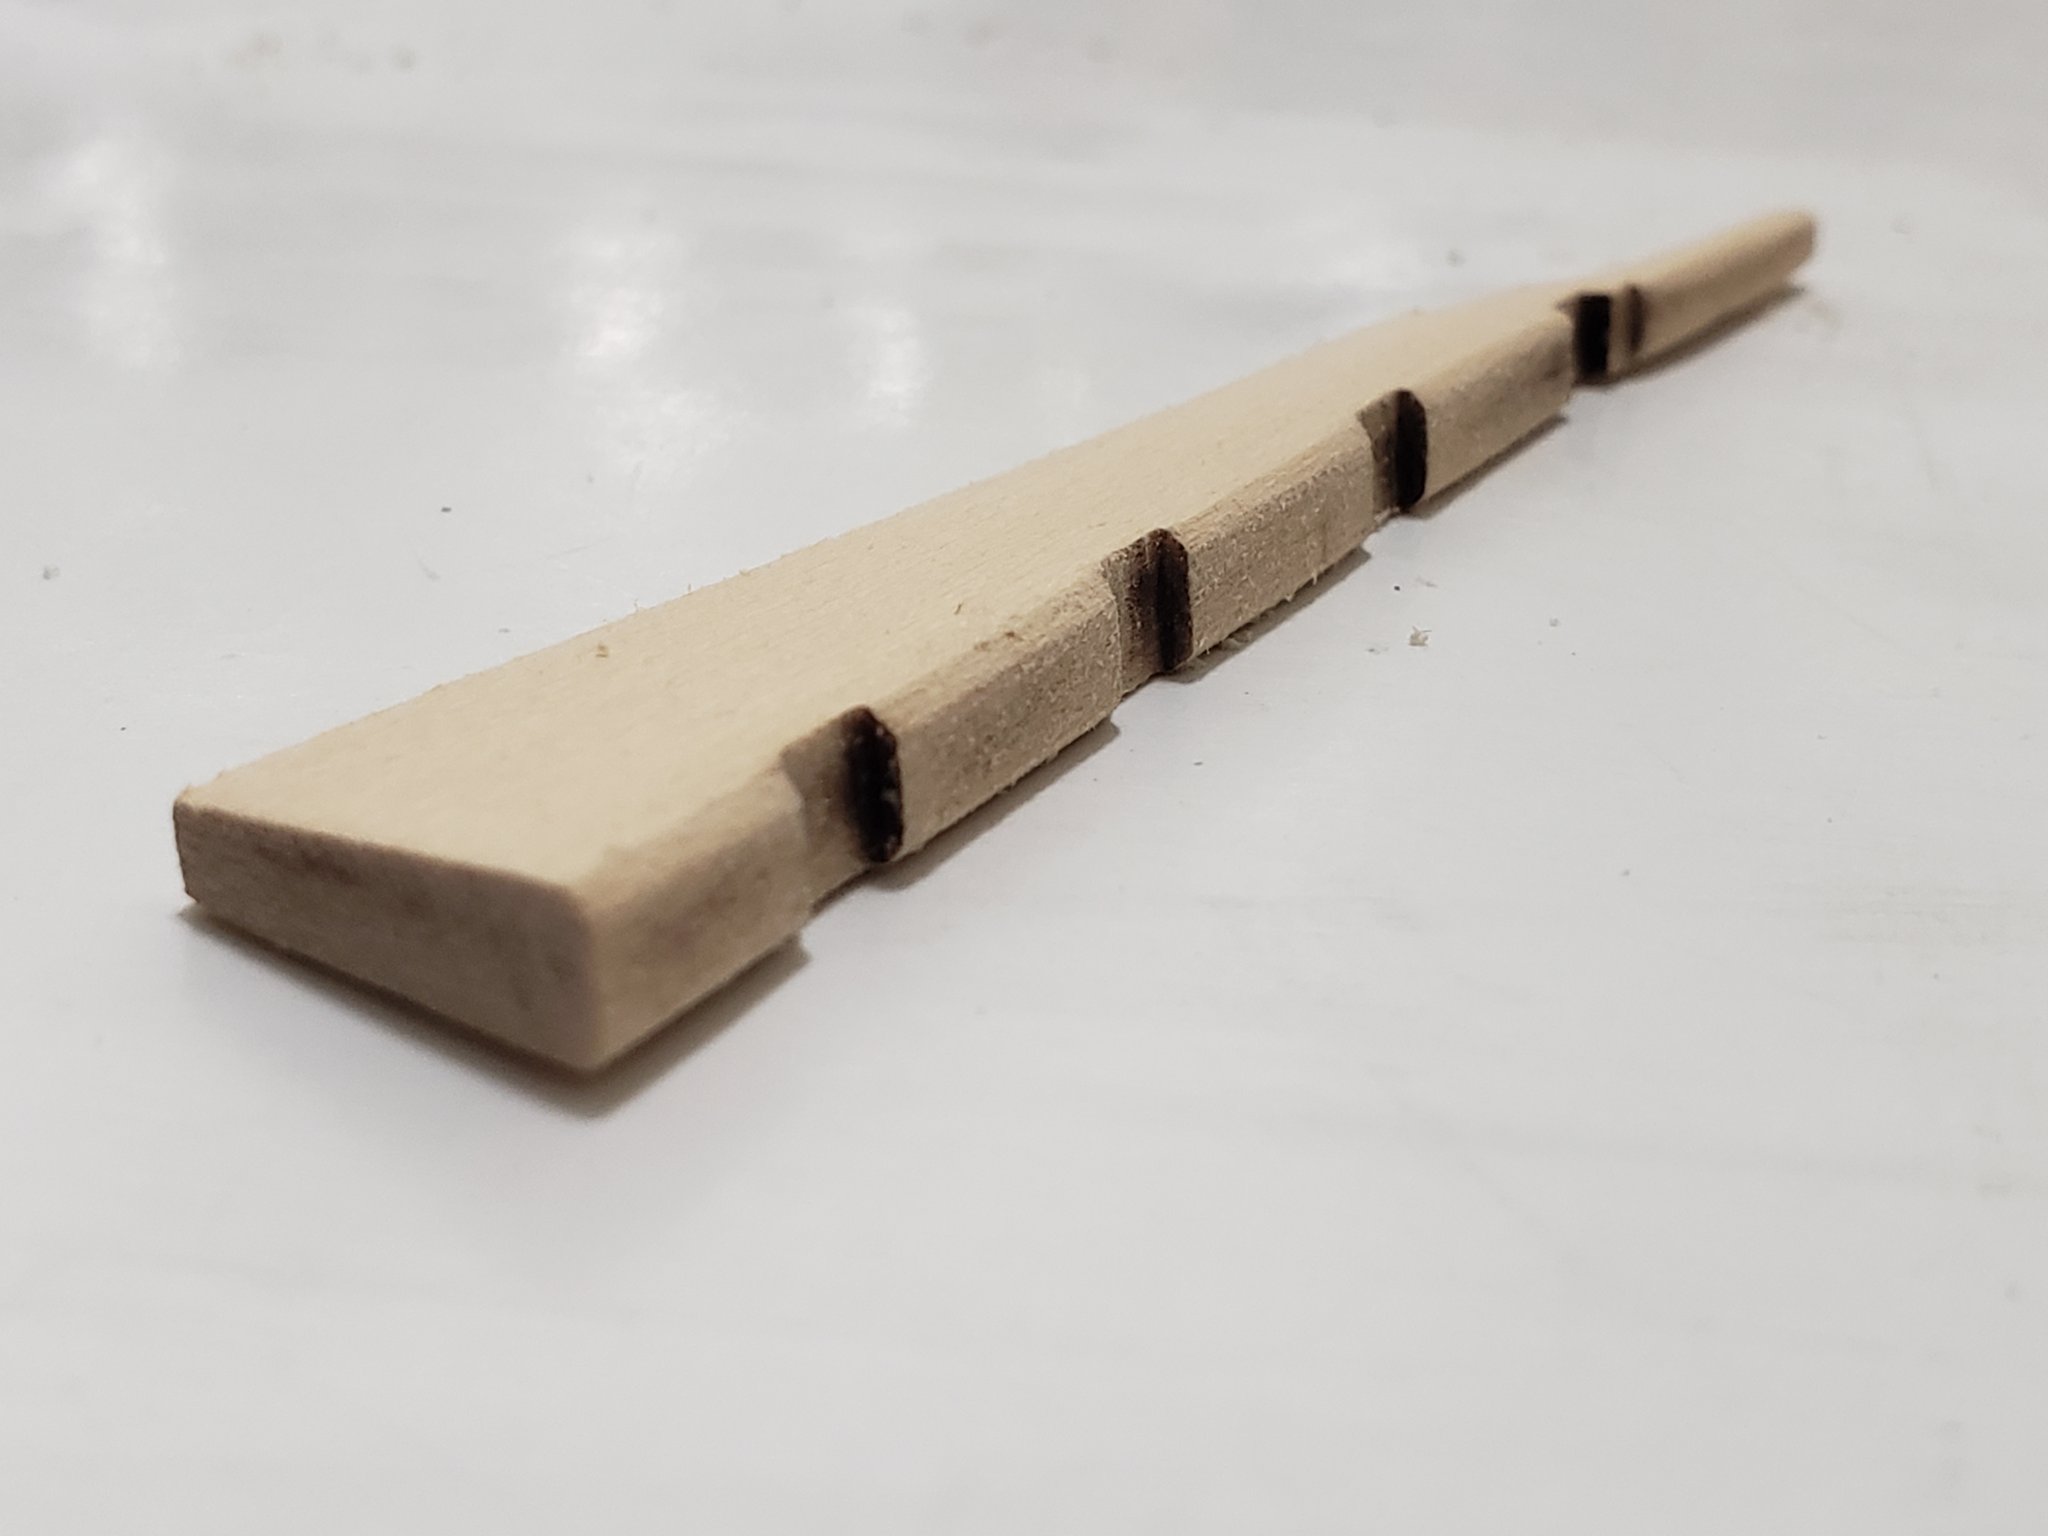
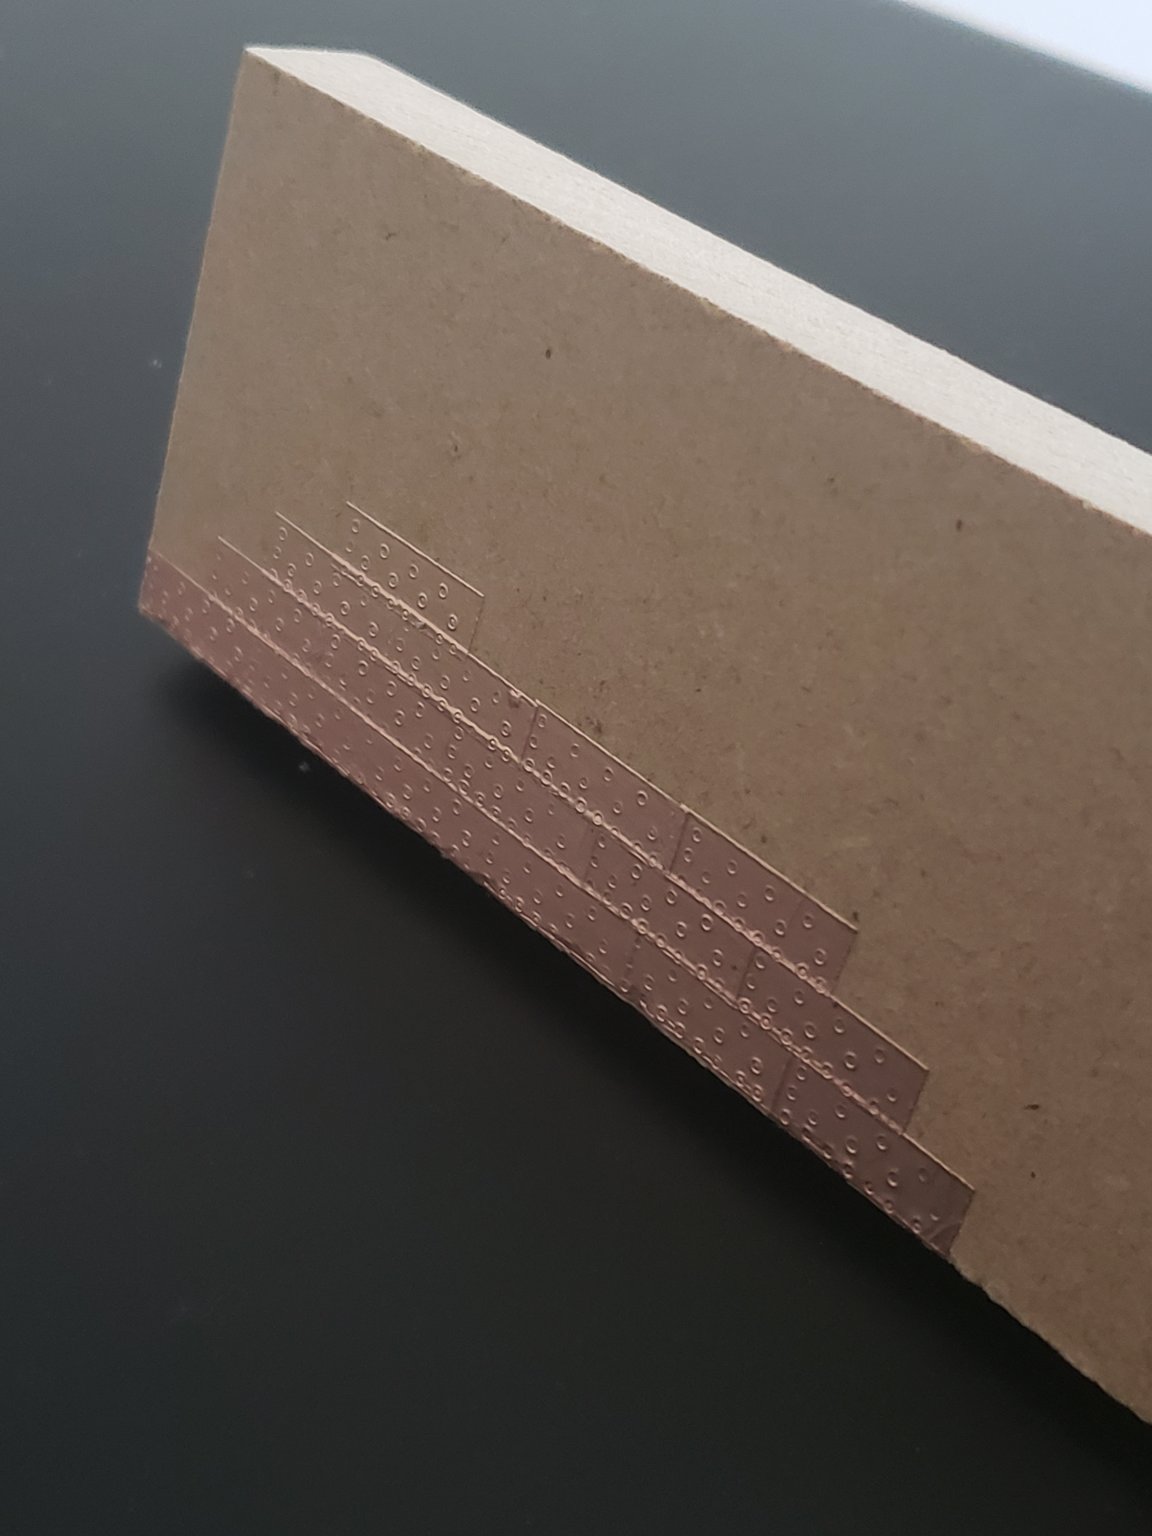
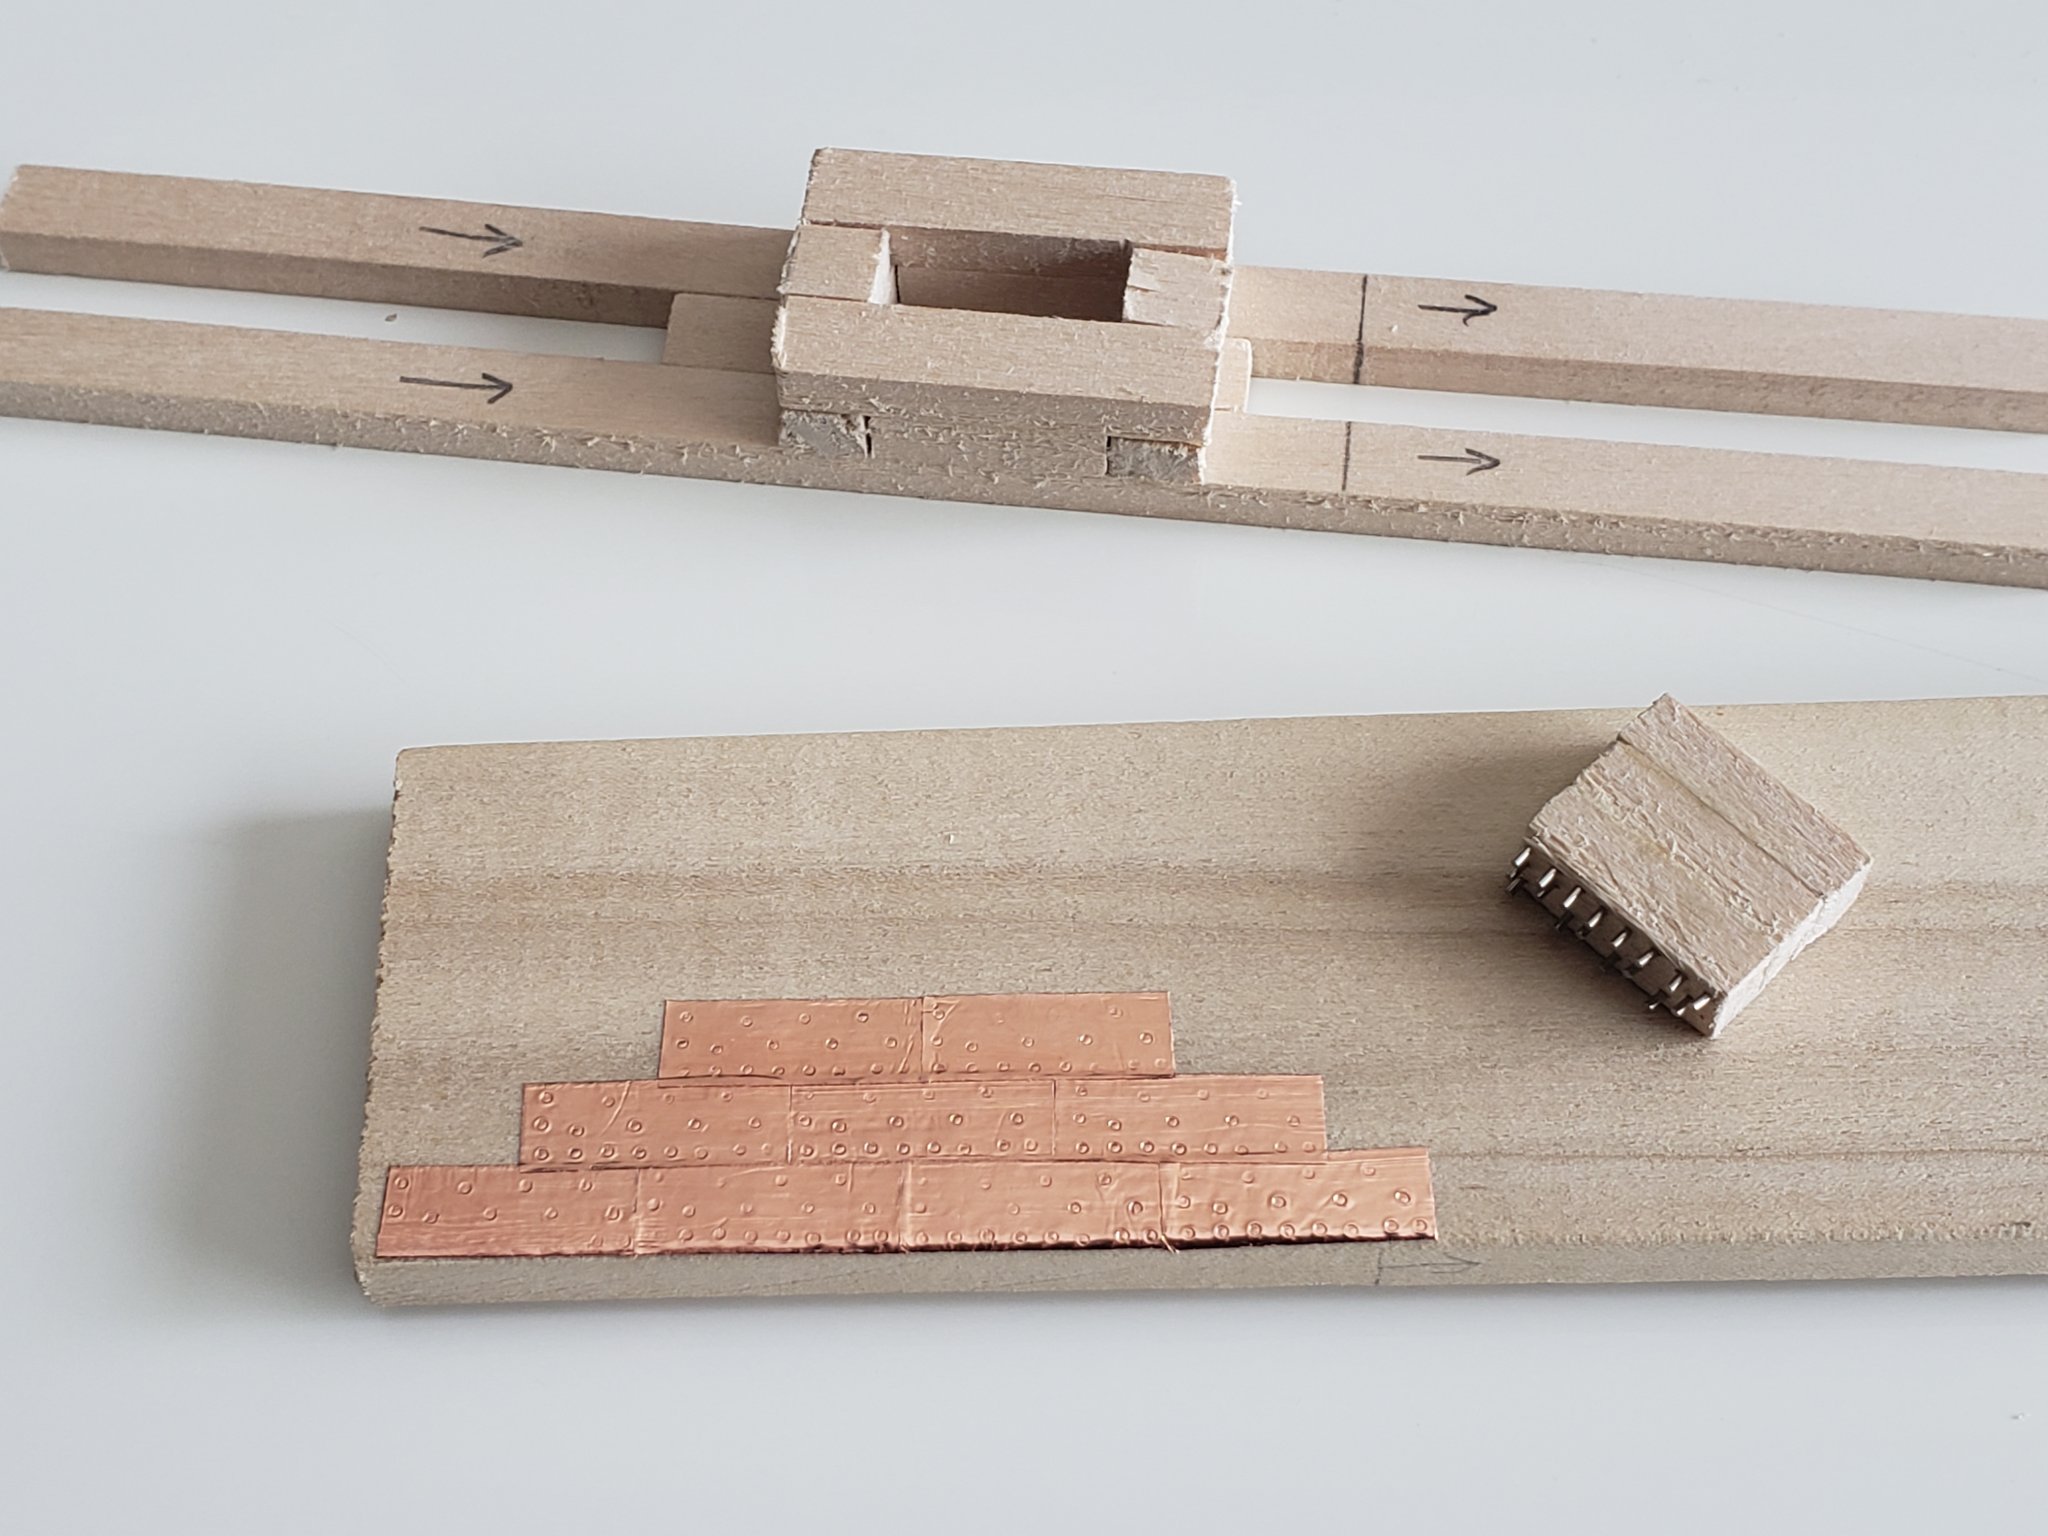
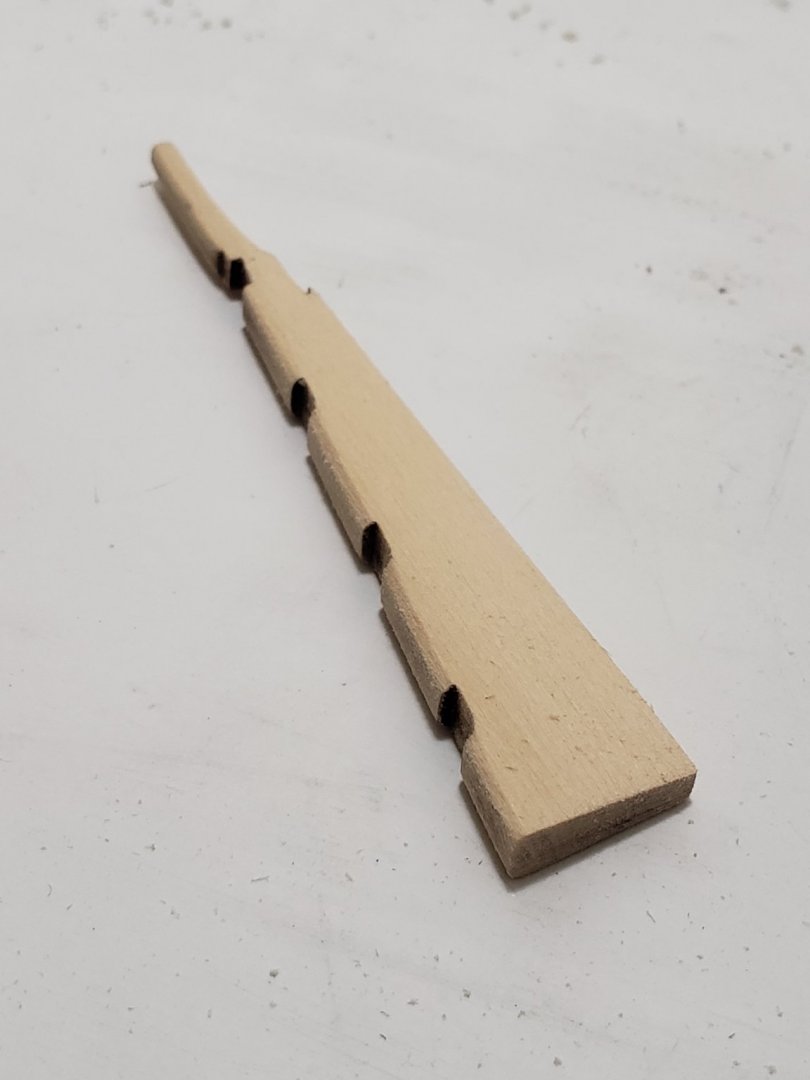
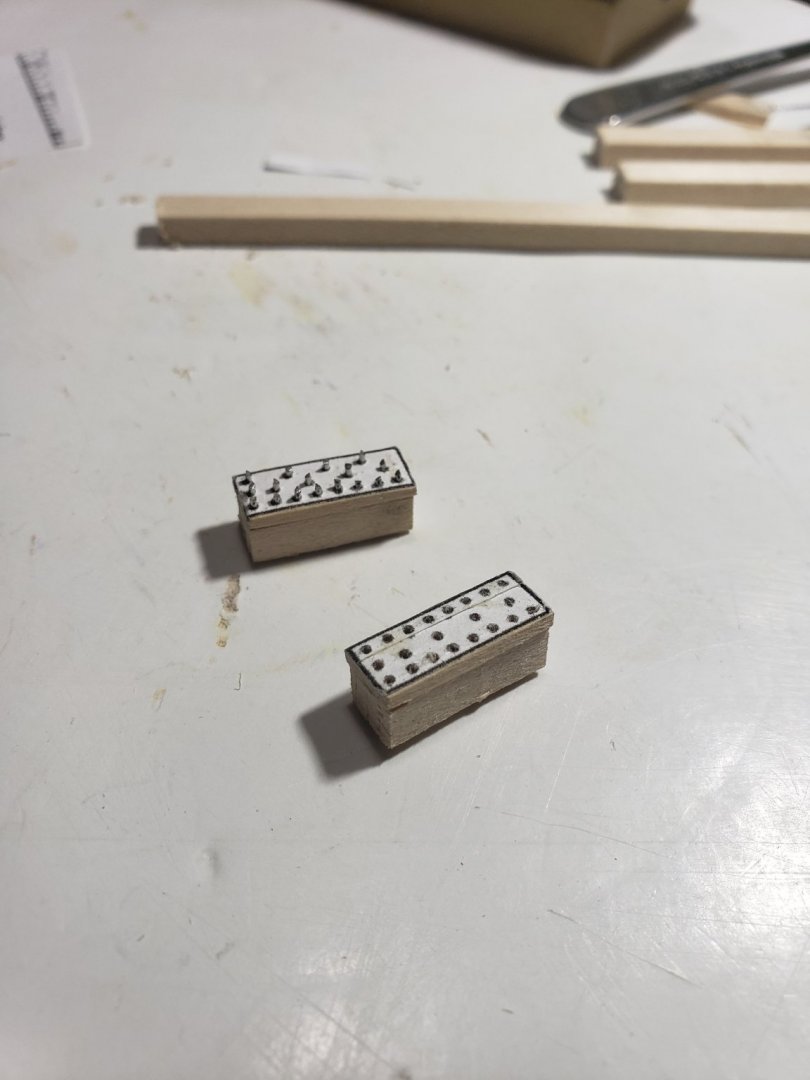
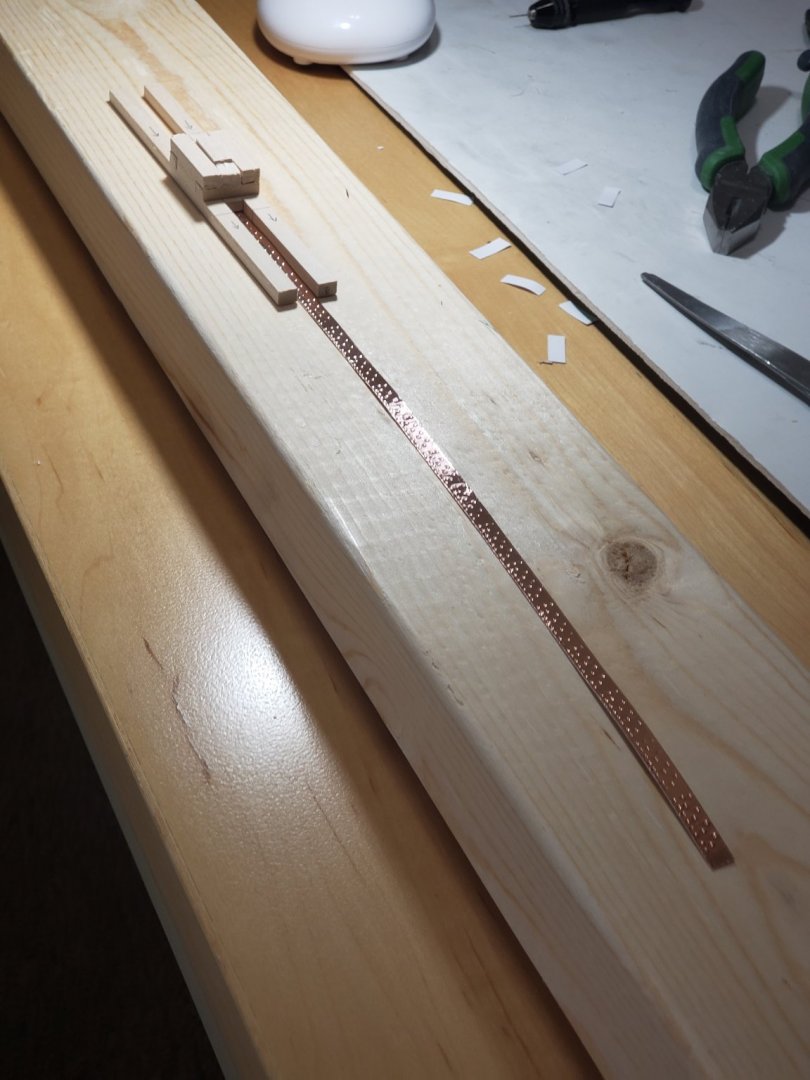
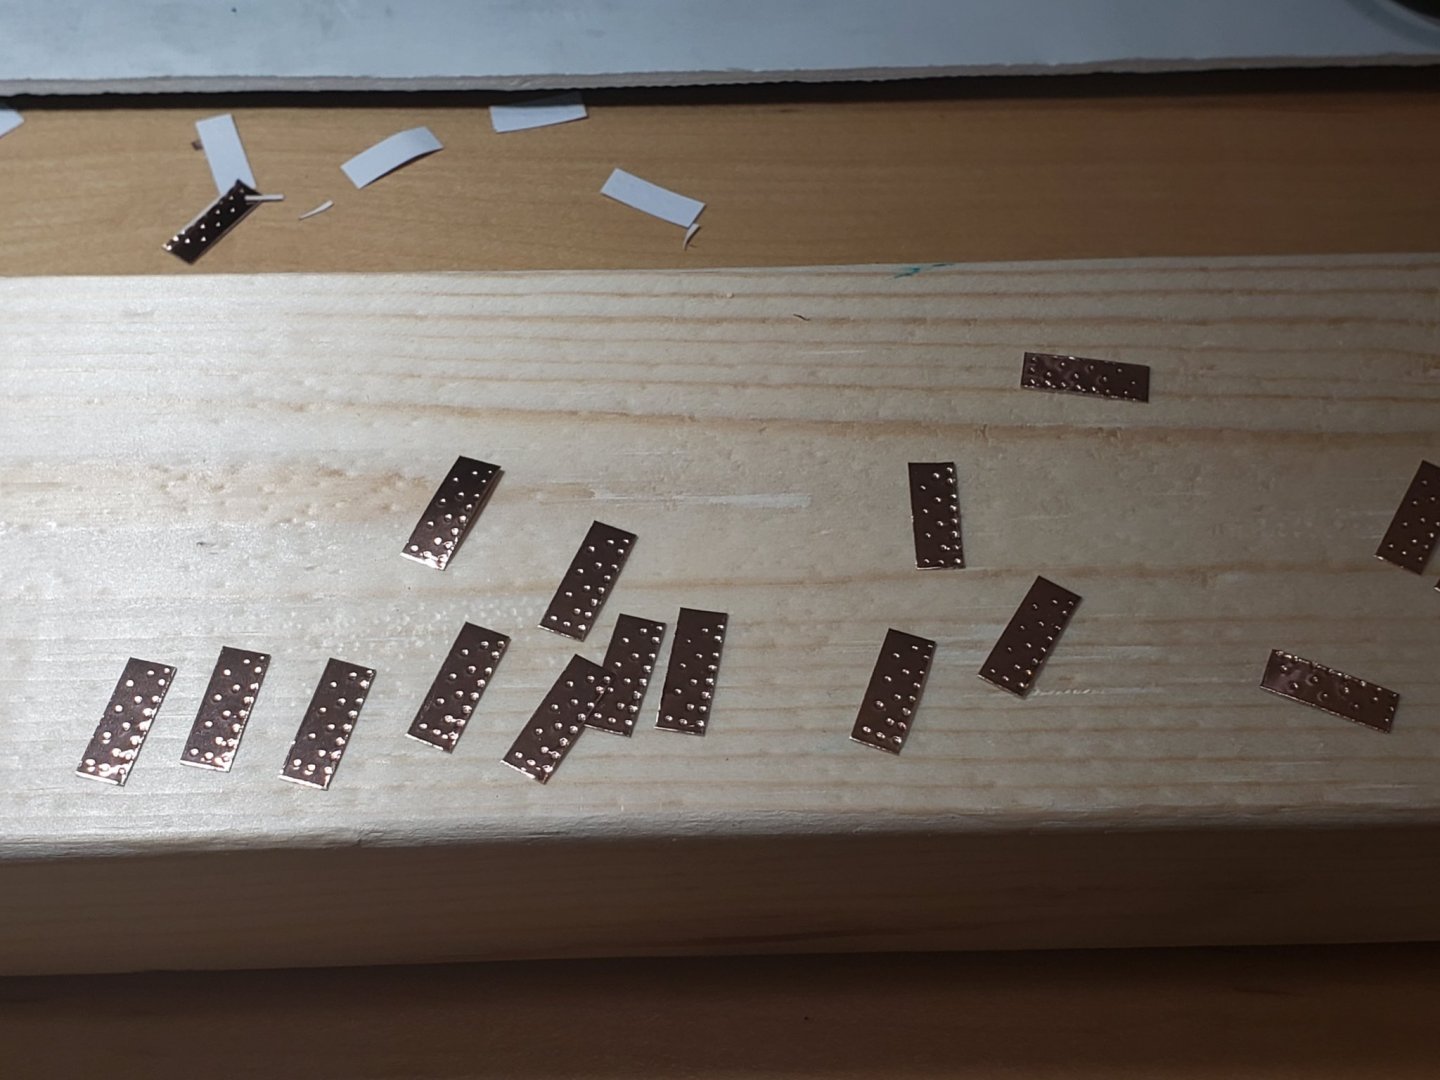
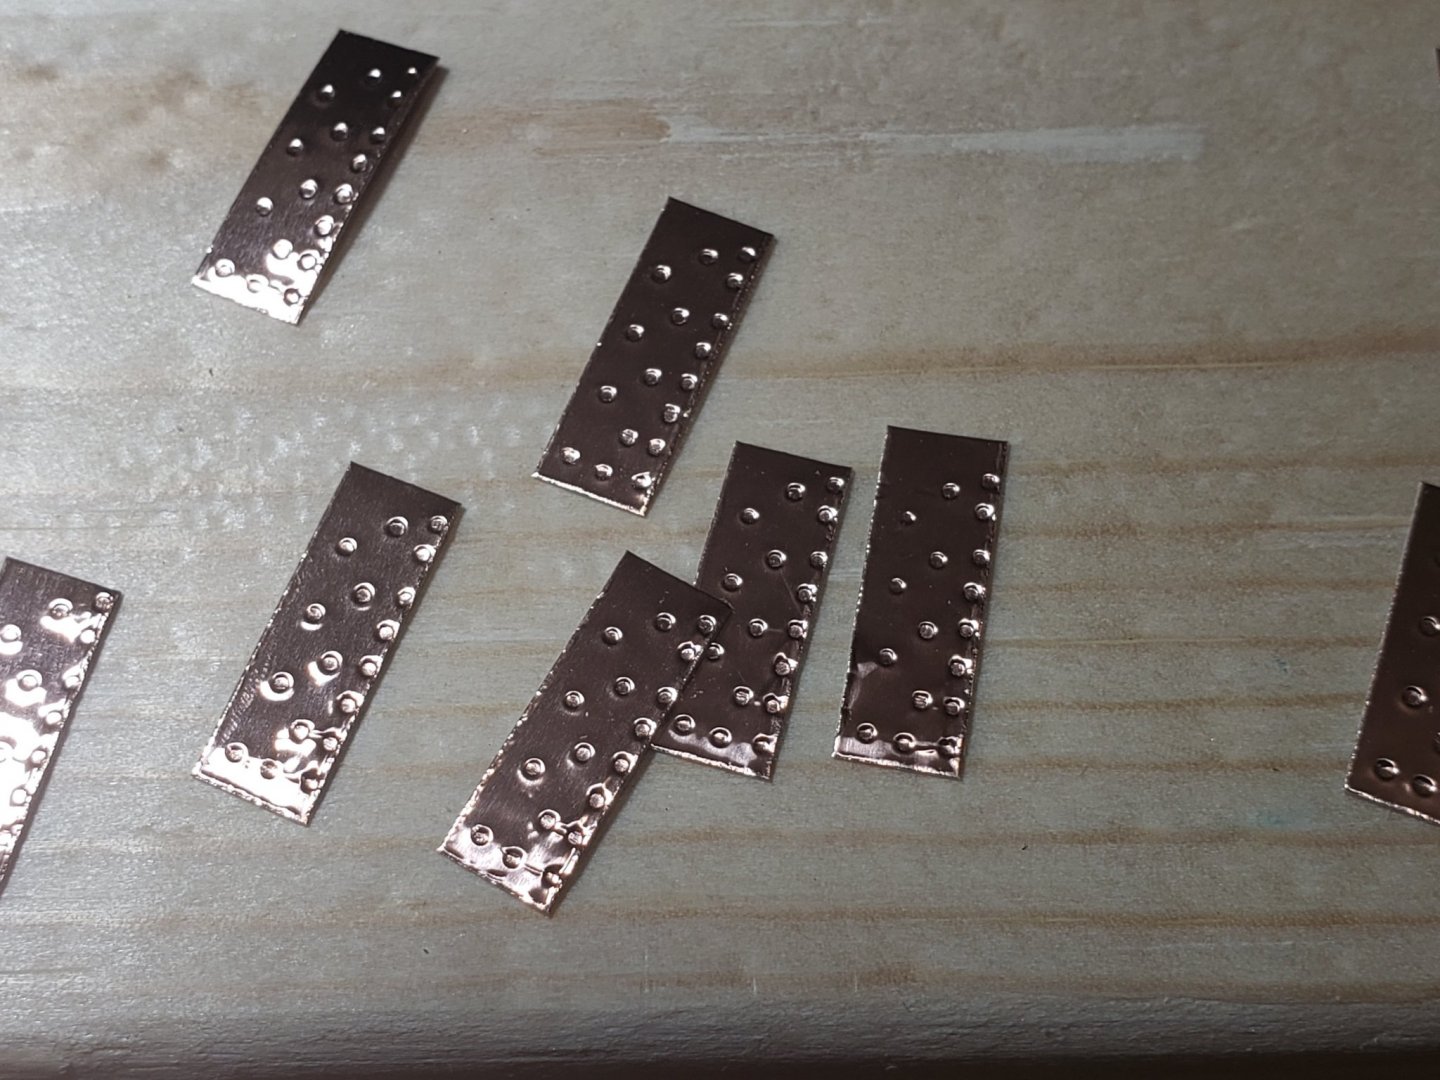
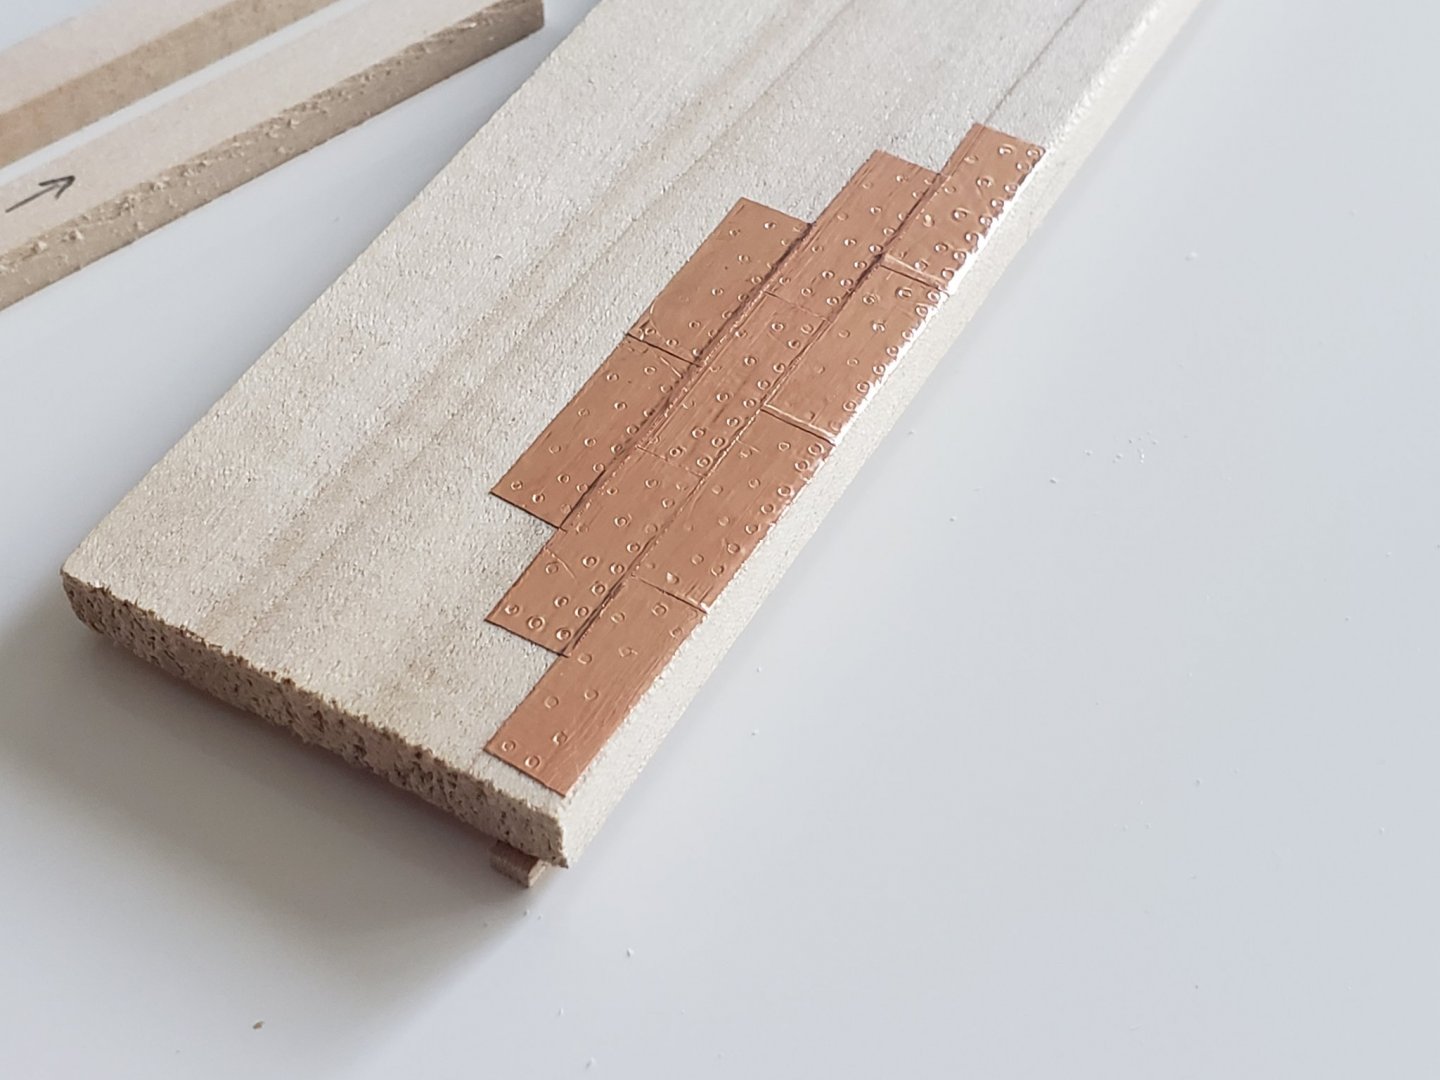
Making the stamp: As I mentioned earlier, I forgot to detail how I made my stamp. I did not use any powertools, just the bare minimum (coping saw and pin vise). I took a thin piece of wood (about 1-2mm) having the same dimensions as the copper plate and stuck the nail template on it. This way I can drill using my hand held pin vise without much angular deviation in the drill bit (ie. making it easier to go directly vertically). I used 0.55mm drill bit. Also before drilling, I used a sharp pointy object (the metal part of a compass) to indent the nail pattern on the wood so that the drill bit can stay in position. I then very lightly glued the edges to a thicker piece of block. Holes were then drilled through the already made holes into the thicker block making sure I am drilling it as vertically as possible. There was some slight deviation but all the holes from the other side did not cross each other. Next, 0.6mm steel wire was pushed from the template side of the stamp and cut off close to the template paper. Here is a photo of what I mean: The 0.6mm wire could fit in the 0.55mm hole since I used basswood which is soft. This also makes the wire snug. The most time consuming part was to file the metal so that it becomes flat with the thin piece of wood containing the template. The thin piece was then removed. This is why it was glued very lightly. This results in a fairly consistent nail pattern. Some copper plating progress: Here are some starting stages of the copper plating. Took me about 1.5 hours to stamp and glue the plates... I have a feeling this will take a loooong while. It was hard to take good photos since they are so shiny. Having a dark background helps a bit. From the closeup, there are some few scratch marks/lines. As I put more plates down, these scratches and lines reduced. I hope it gets better as I fill the hull up. Also I am thinking of switching sides after every 20 plates or so. This way I can see if they align symmetrically to the other side and make small adjustments if required.


- 950 replies
-
- 14
-
-
- syren
- model shipways
- (and 1 more)
-
Thanks so much Voyageur! I started the coppering the hull, and seems like it will take forever... Need to find good podcasts to listen to haha. Will post some photos in a bit. Ok I might leave mine to age naturally then, I really like the look of yours. I will make the final decision once all the plates are stuck. Yeaup you were right, I did one more practice run and figured out how to remove the backing effectively. Here is the process in case it helps someone: So I took a hobby knife and took half the backing out by sliding it through the tape. Then I placed the tape (copper face down) on a flat surface and took the pointy end of the knife to hold the copper in place. The knife was placed at the very edge using my right hand. My left hand (the one wearing gloves) can then peel the backing off, making sure I put a bit of downward pressure on the backing as I pull it. This way the copper plate remains flat on the table. Then I switch over the knife to my left hand and use tweezers to take the copper and stick on the hull. Hope this can help someone! Thanks Patrick! Once I attempted sticking it on the hull, my techniques improved. Maybe because I am very nervous if I screw this part up 😅. That reminds me, I forgot to post how I made my stamp. Will also add that to my next post.. Thanks Will! I also went through your build log and it's coming along very nice! Looking forward to see how she progresses.
- 950 replies
-
- 1
-
-
- syren
- model shipways
- (and 1 more)
-
Thanks for the tips Robin! I forgot to mention that I had sealed the hull with two coats of Minwax Sanding Sealer with a bit of sanding with 600 grit sandpaper after each coat. Which method for tarnishing the copper did you end up using for yours? I really like the look of your copper plates. And yes, I also have 2 strips in mine, so wanted to practice a bit until I get the hang of it before attempting it on the hull. I tried another batch of samples. Here are some pics. I put more pressure on the stamp this time around so the nails are more prominent. For the second practice trial above, I had used a hobby knife to hold the copper strip and positioned to glue it, but it was a bit hard to position it well. I will try using tweezers to see if it works better. Also there are some lines apparent where the plates overlap each other. Would you be knowing how to solve this? After looking at yours it is very hard to see any lines in the plates due to the overlap.


- 950 replies
-
- 7
-
-
- syren
- model shipways
- (and 1 more)
-
Making minor progress on the copper plating. I finished making the jig and stamp for the starboard side. I am still trying to learn the technique of removing the backing from the tape. This is very tricky because it folds very easily and damages the plate. I tried using Robin's technique but failed miserably, maybe because of my big fingers, so it was hard to handle the copper. I found that using a hobby knife to start to remove the backing works fairly well, but even then, it ends up folding after I try to remove it more. Another issue I am facing is it is very tricky to line the plate up perfectly, especially when using gloves. Here is a sample of the coppering. There are a few scratches because of the wood I used to burnish the plates. Also some of the nail indentation is barely visible after burnishing them. Next attempt I will be using an eraser or similar soft material to burnish the copper. I'll make sure to practice a bit more before attempting the real thing. Lastly, I am not loving the look of the shiny copper, so I am thinking of trying to dull it down a bit using Dirk's technique of salt and vinegar.

- 950 replies
-
- 8
-
-
- syren
- model shipways
- (and 1 more)
-
Sills are looking good!! Nice smooth line. Some of my sills and lintels kept shifting when sanding, just need to be careful not to apply too much pressure. The whole frame is very fragile up until the planking.
-
Thanks guys! 🙂 The oil really is a magic potion. It's a night and day difference (in person and in photos) before and after the oil was applied. I have not mentioned this enough but I would not have reached this far without this amazing forum. So much useful advice, tips and guidance have been provided throughout my build. Other build logs have also helped tremendously. The encouraging words motivate me to progress through. Many thanks!
- 950 replies
-
- 2
-
-
- syren
- model shipways
- (and 1 more)
-
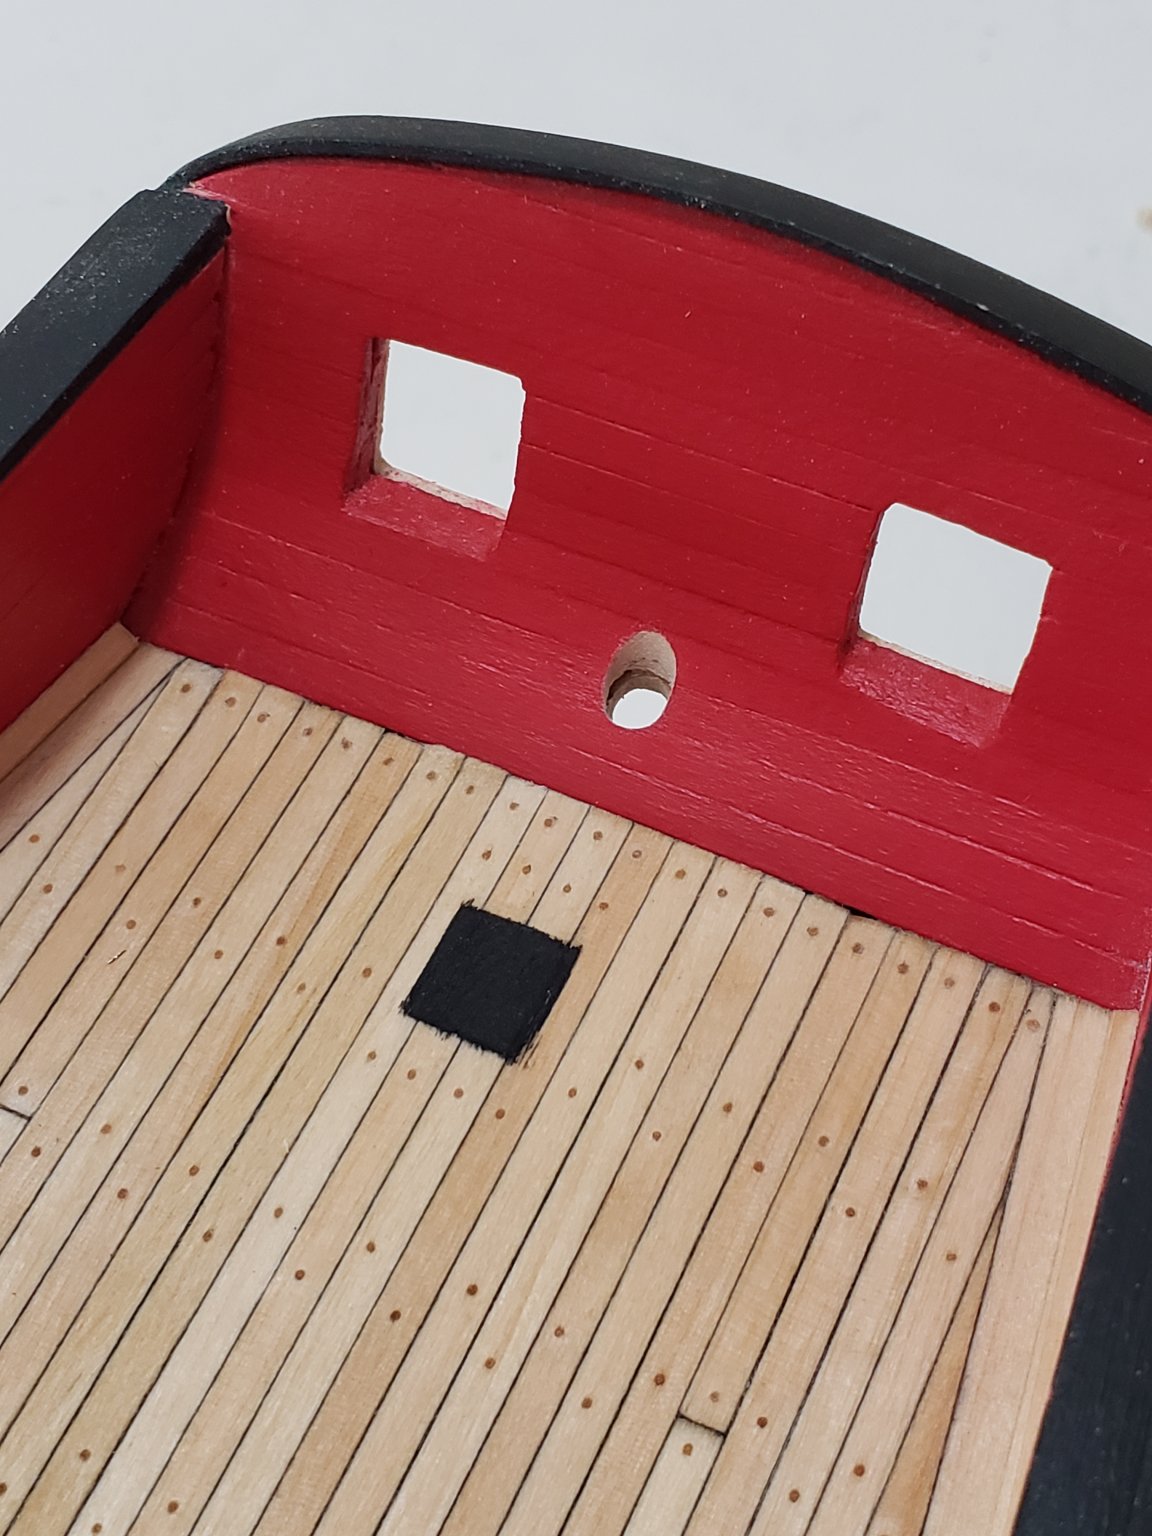
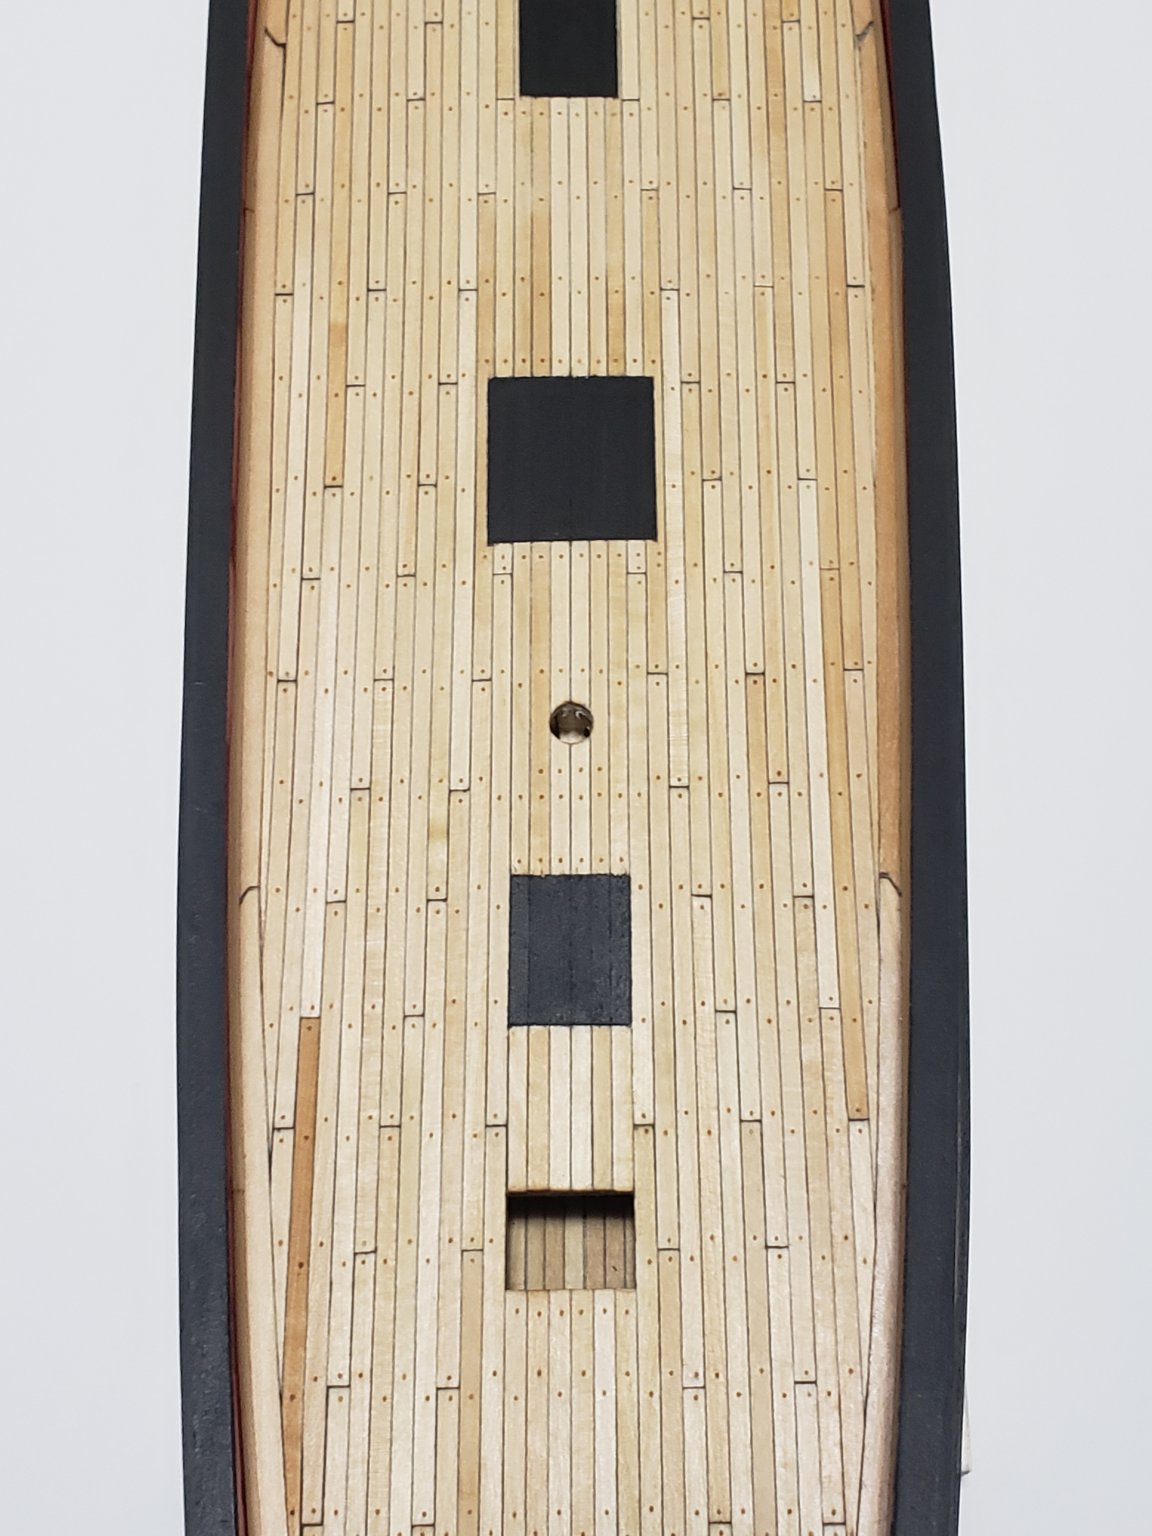
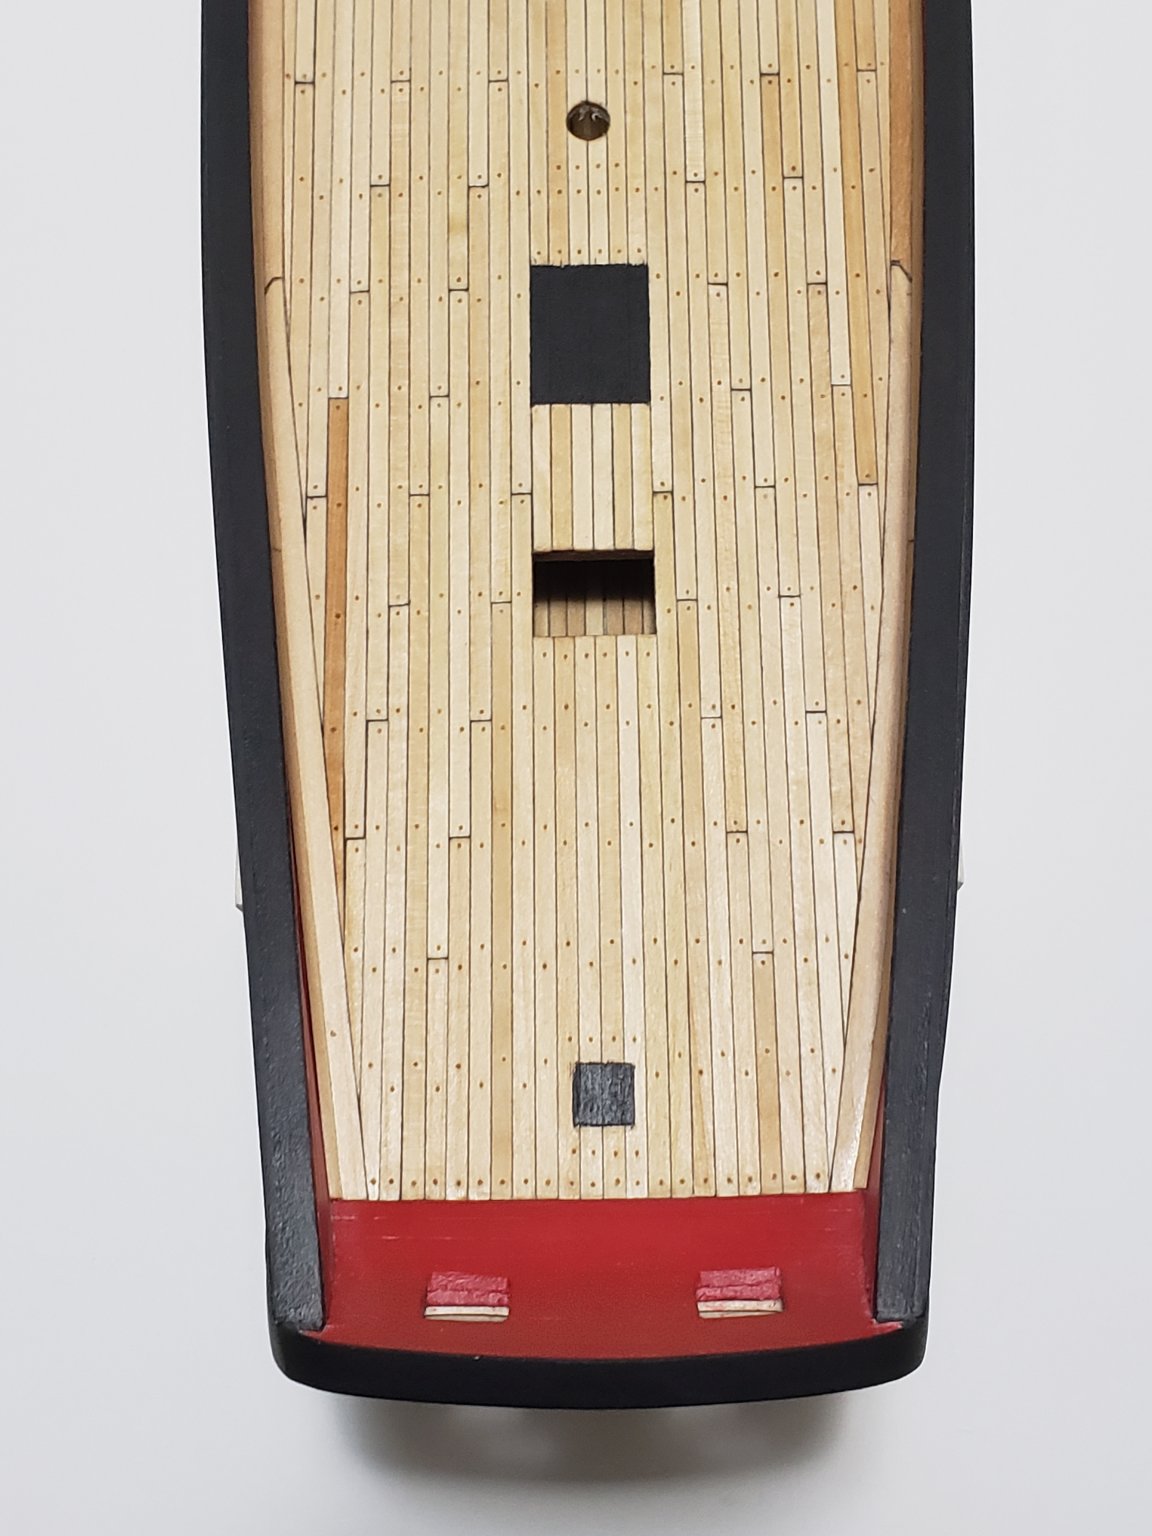
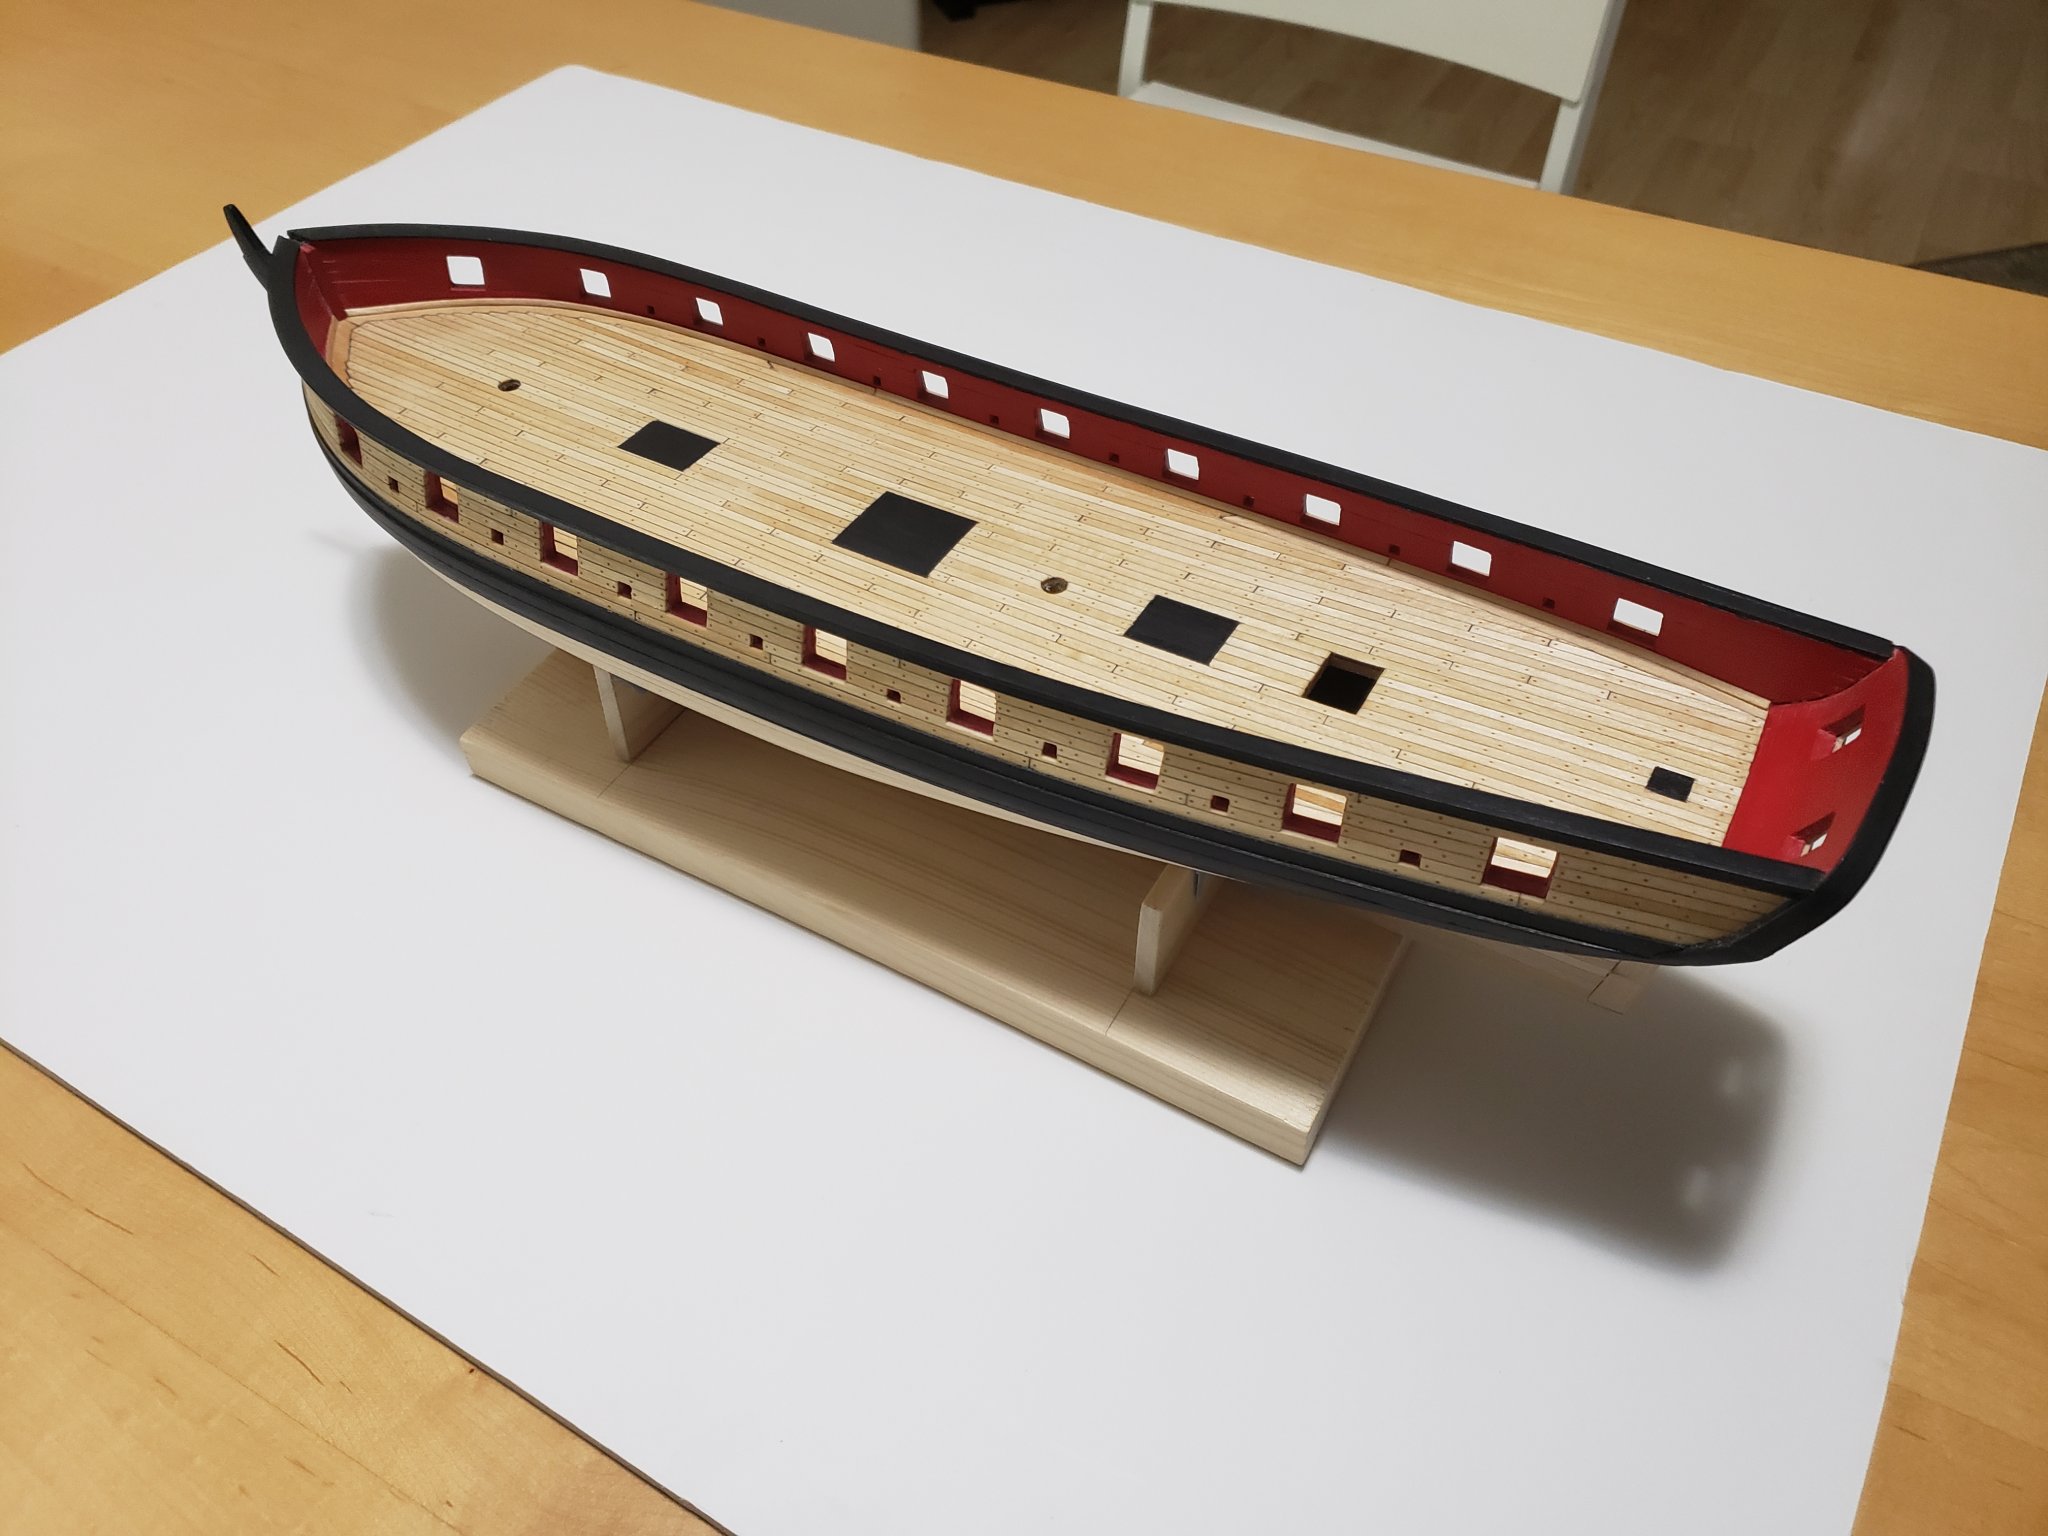
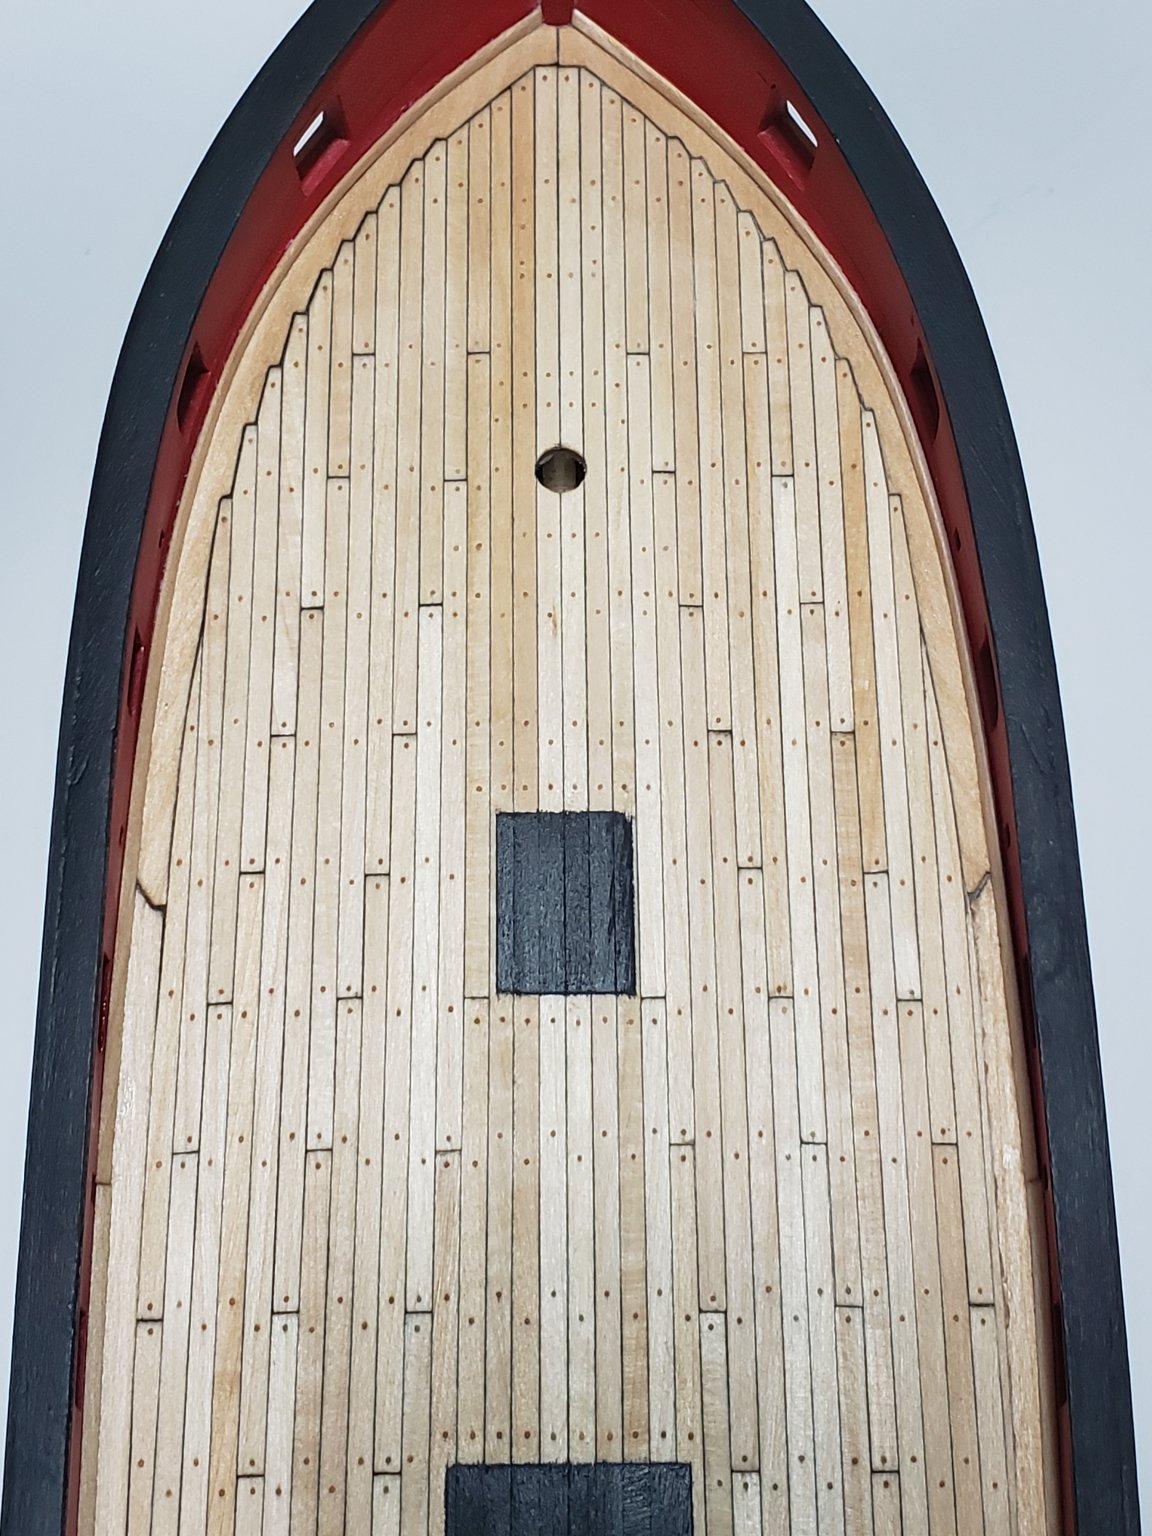
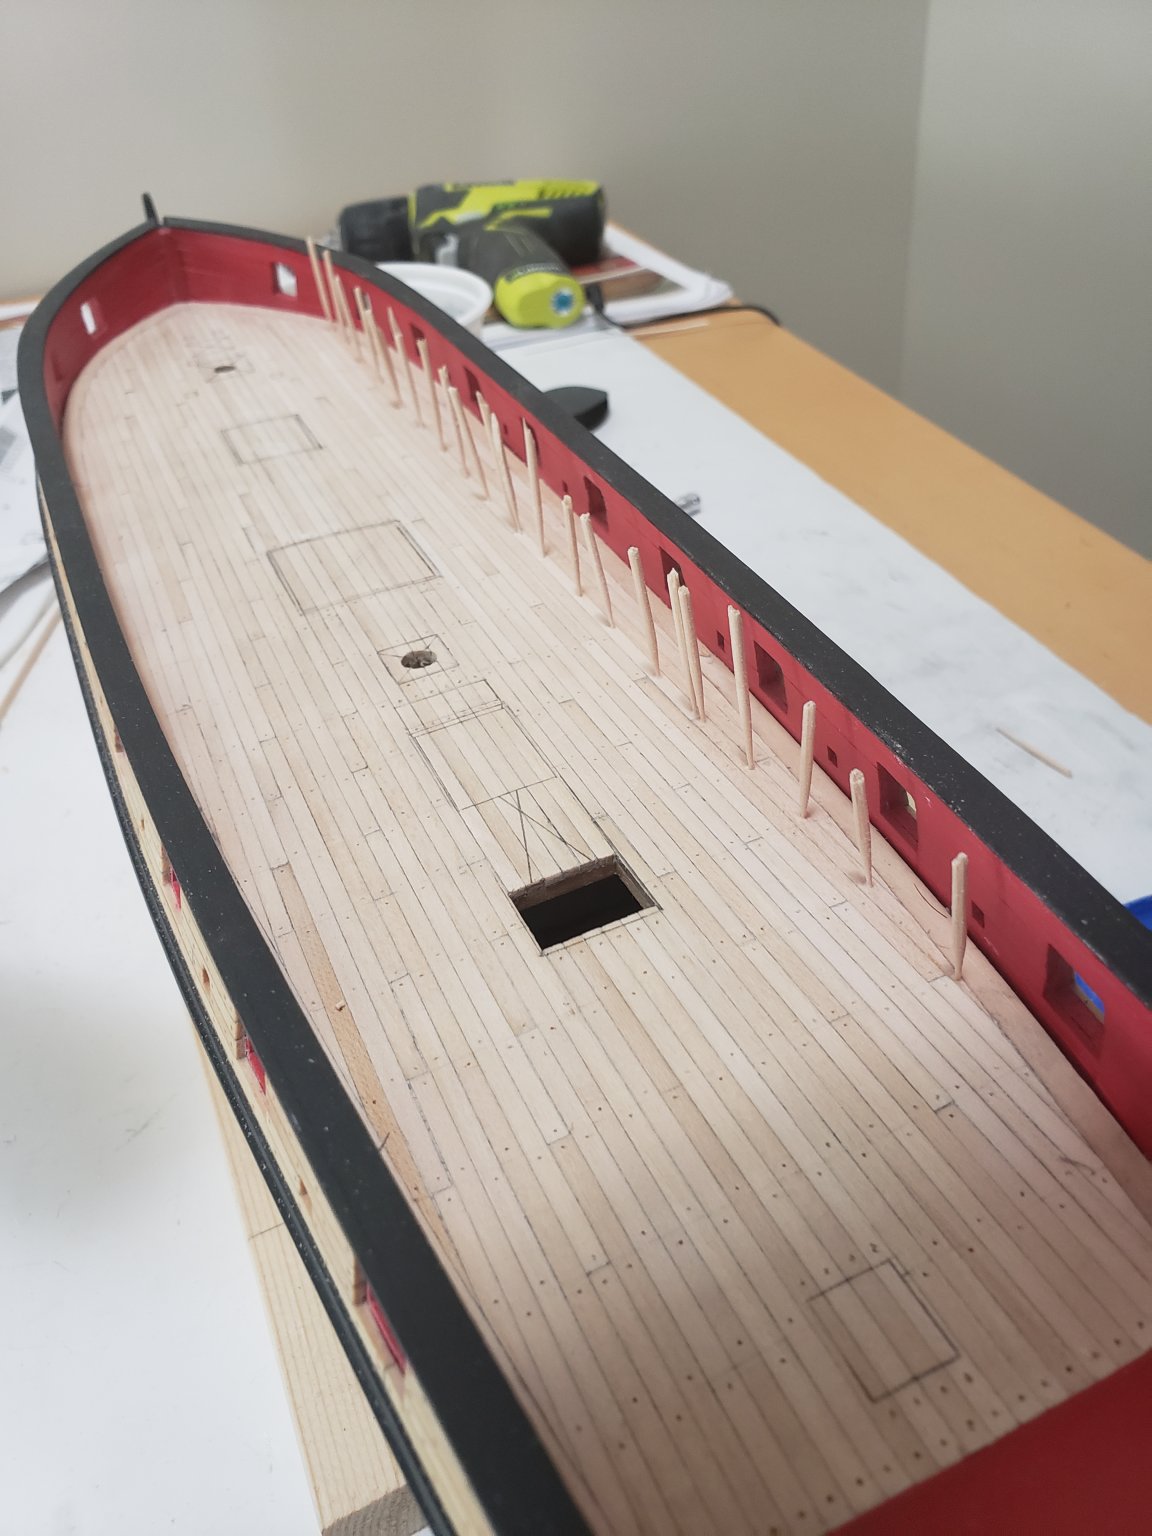
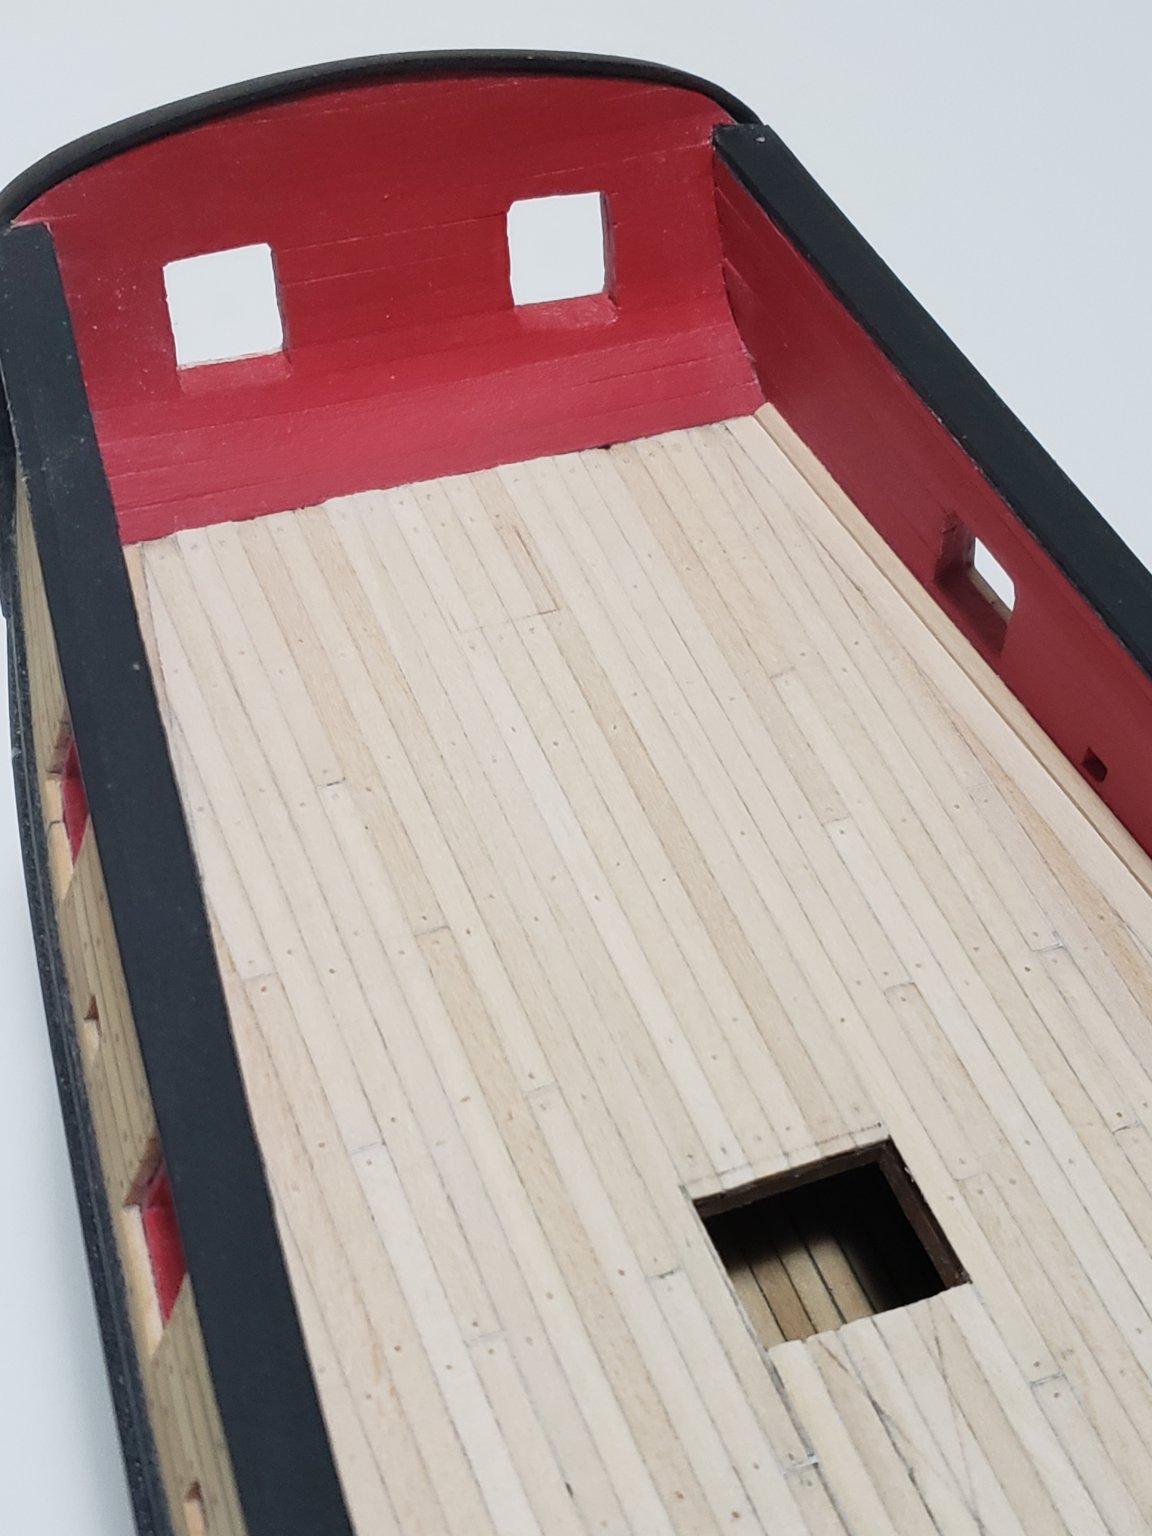
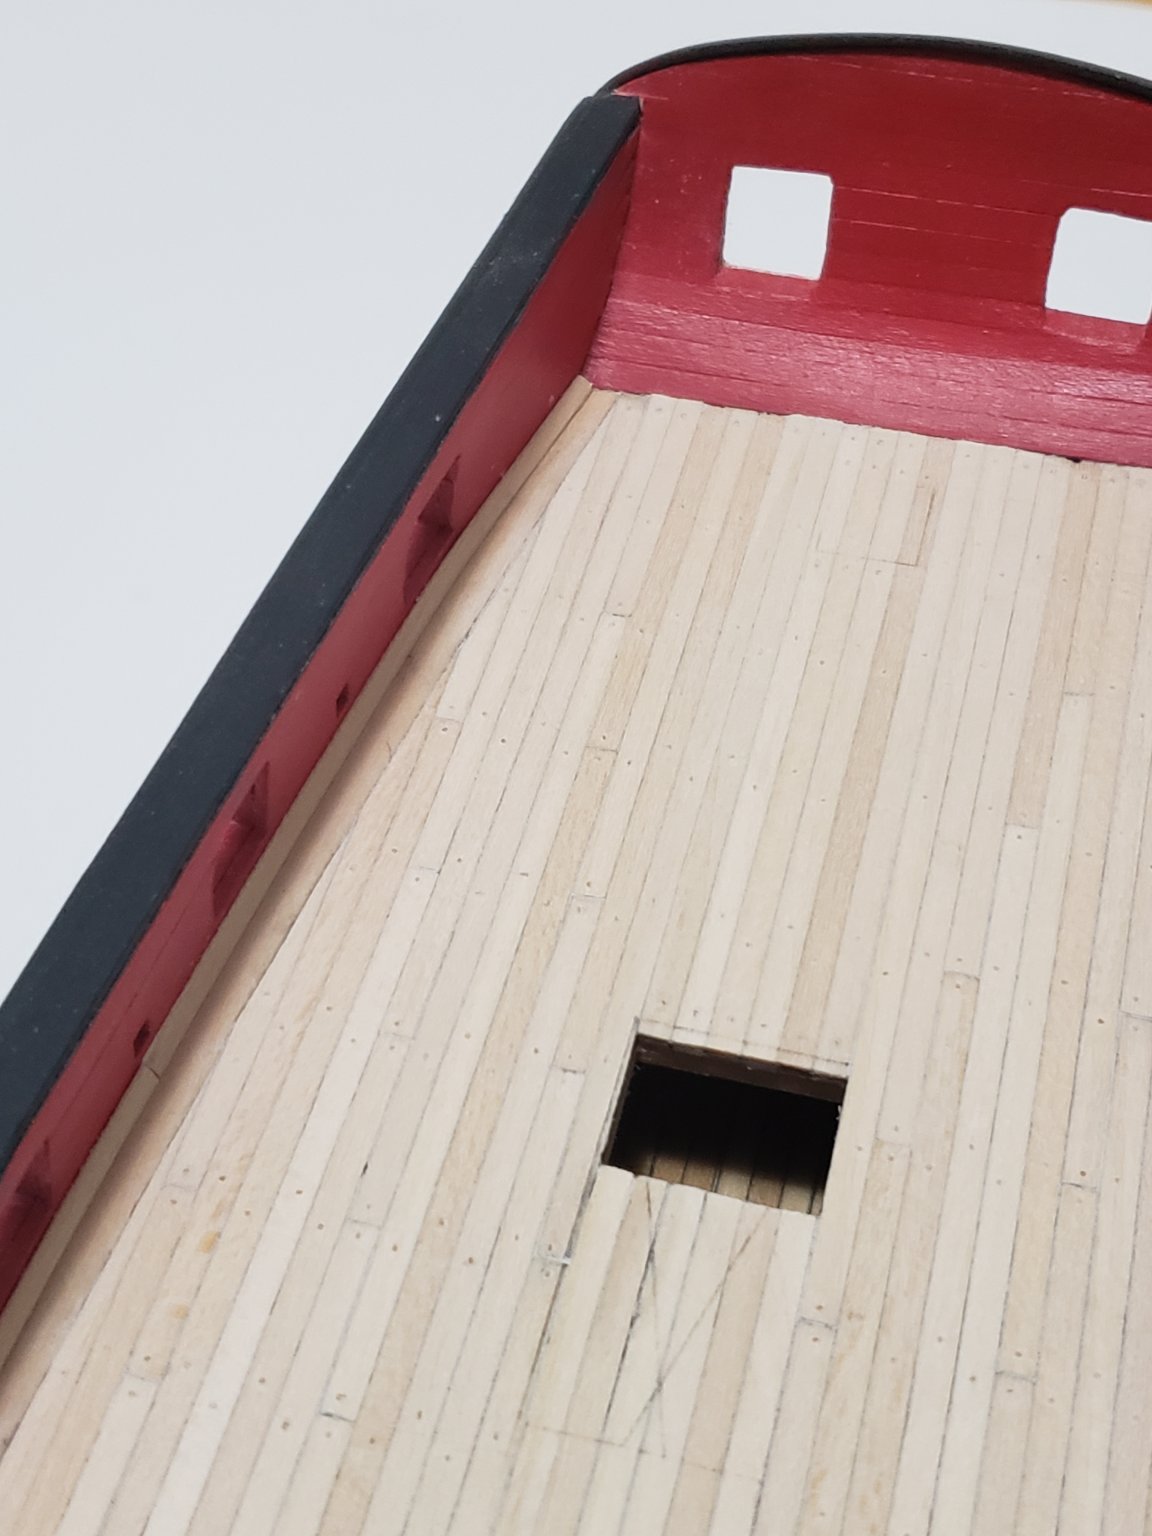
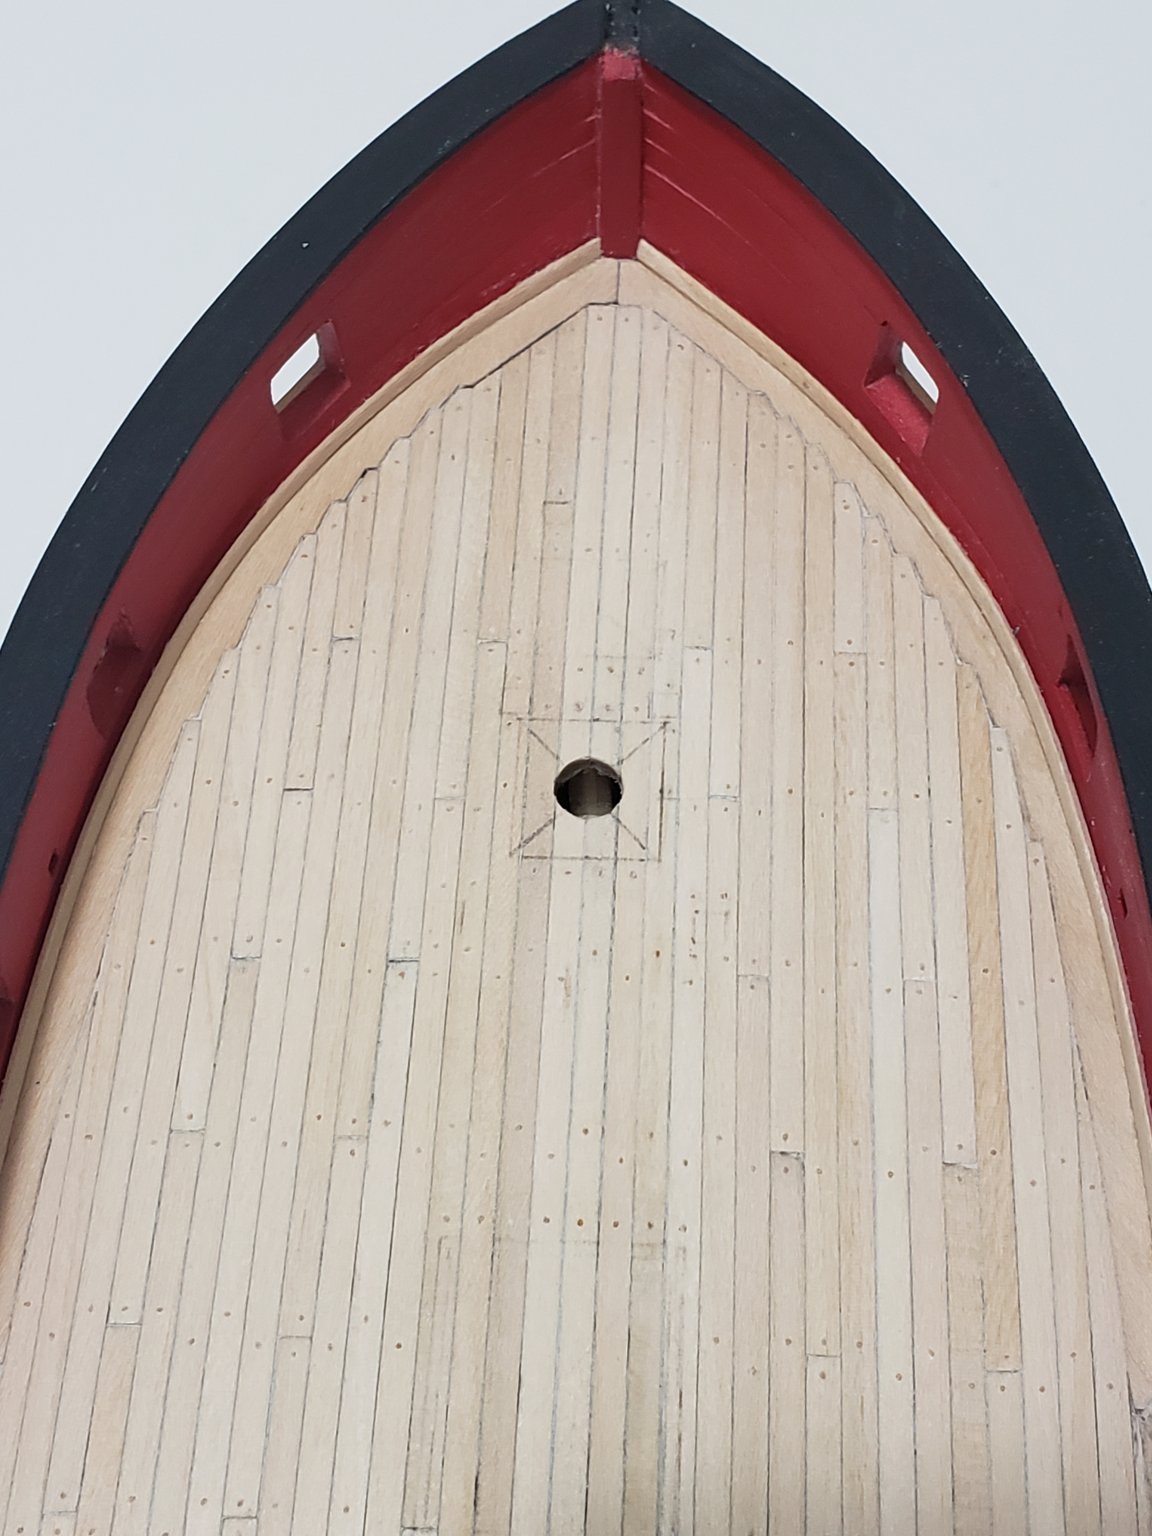
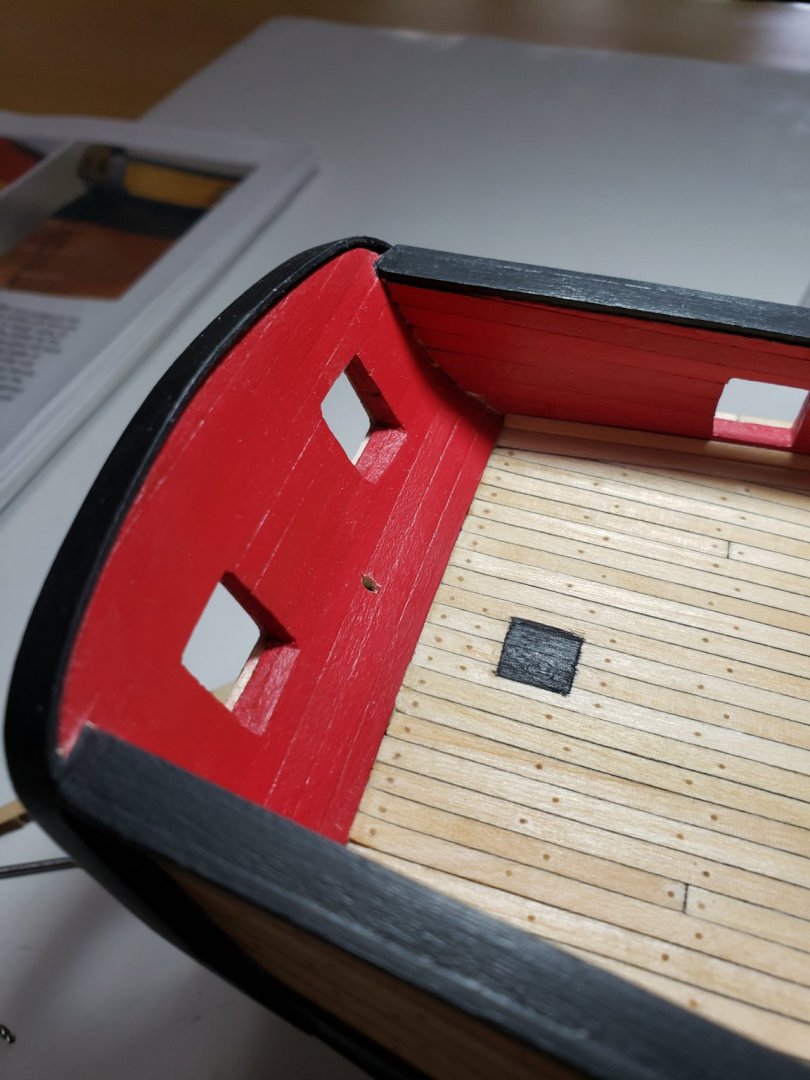
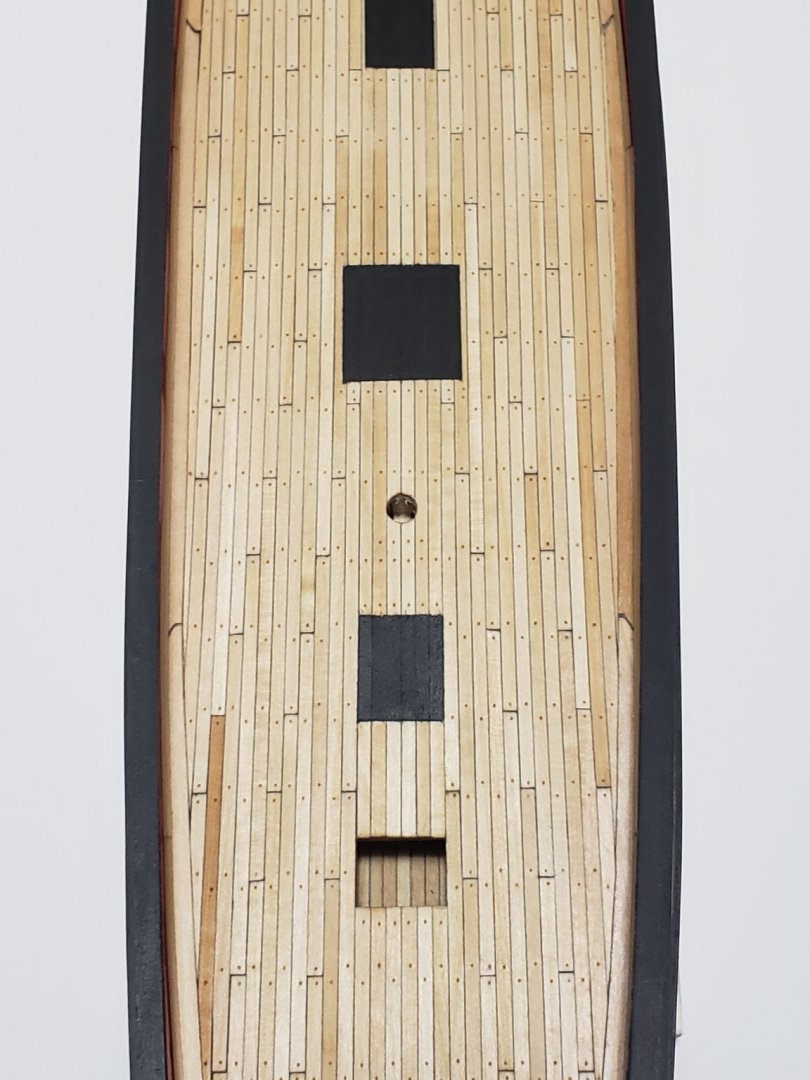
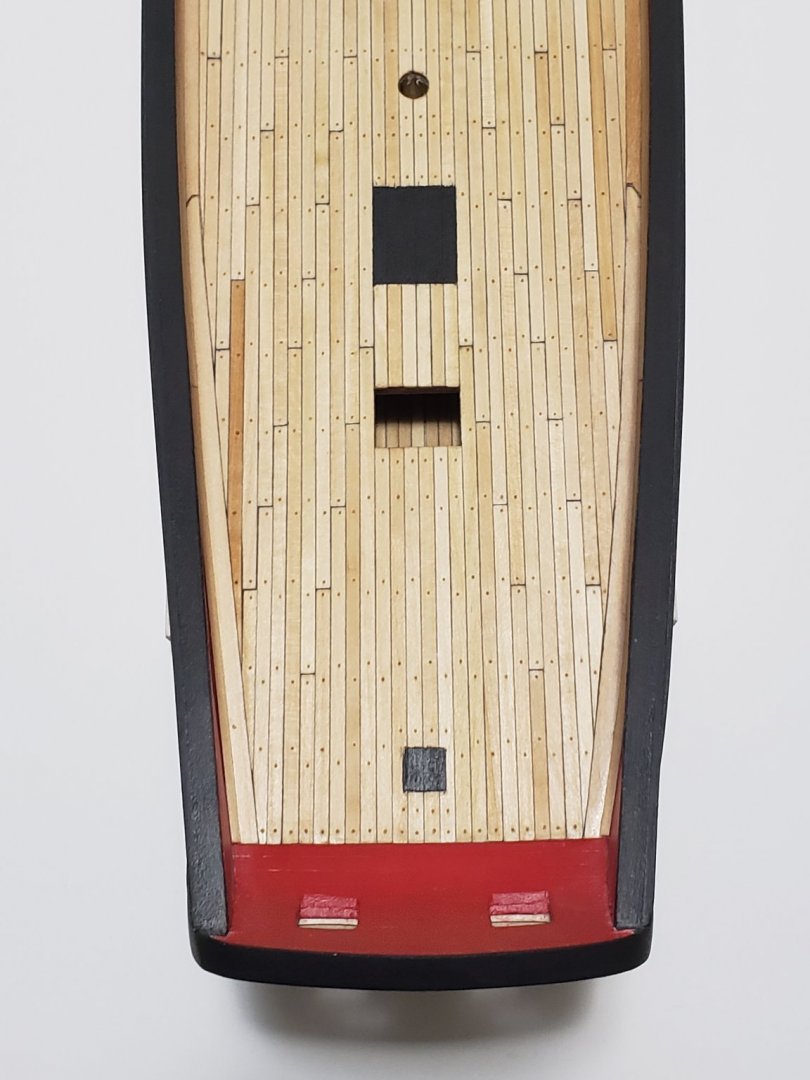
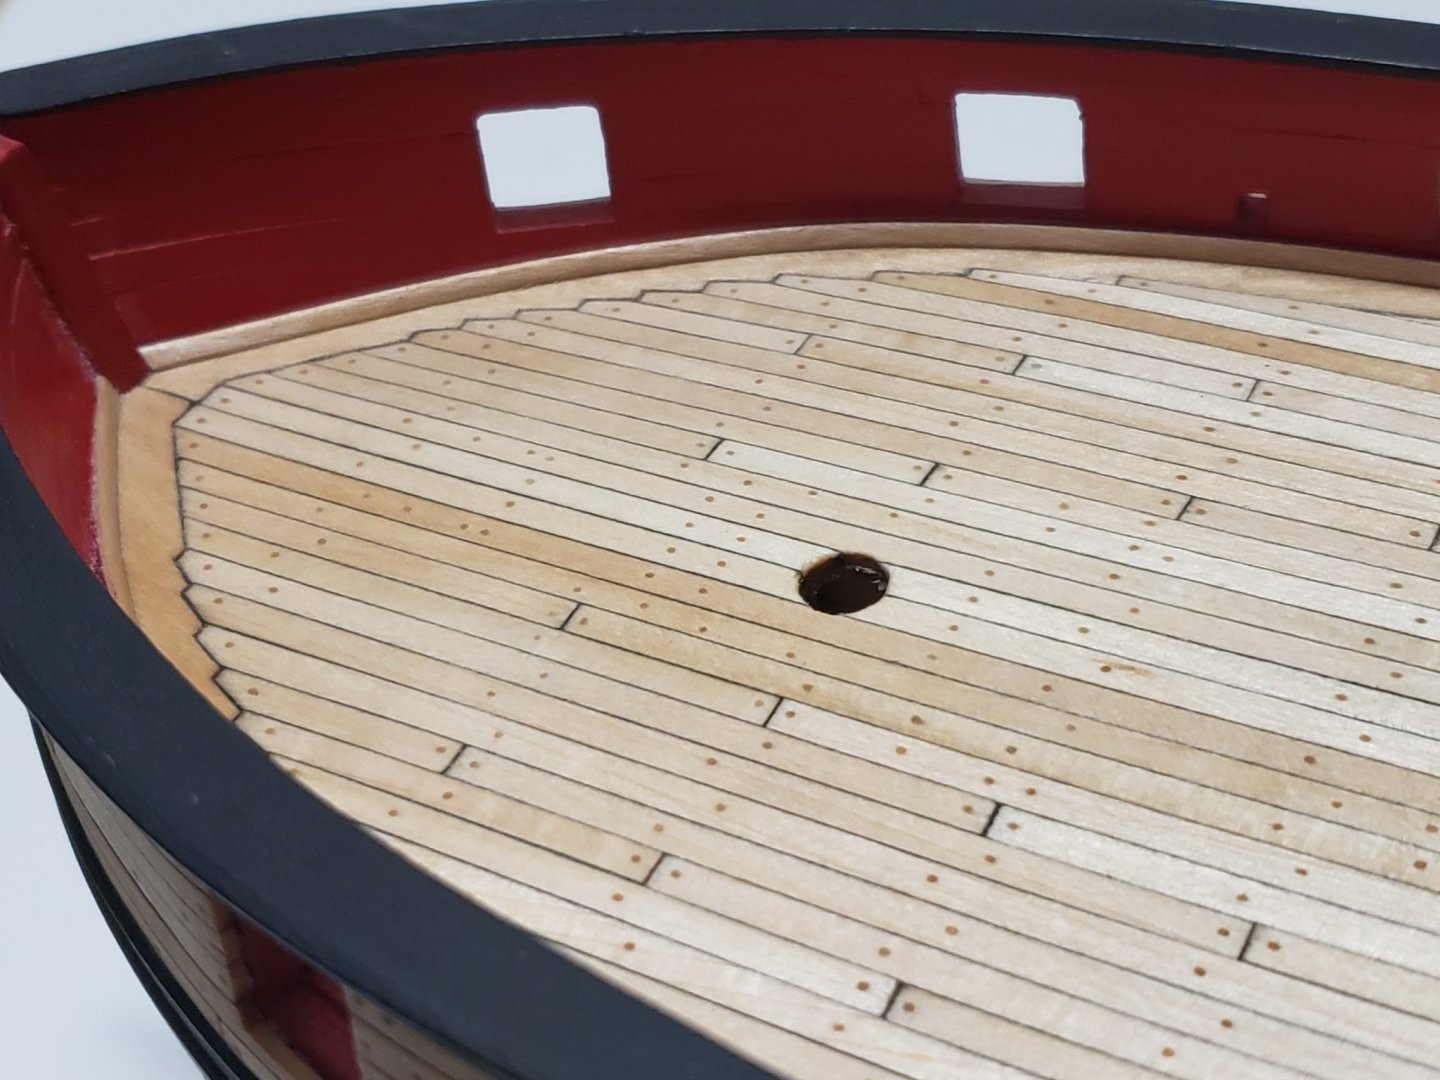
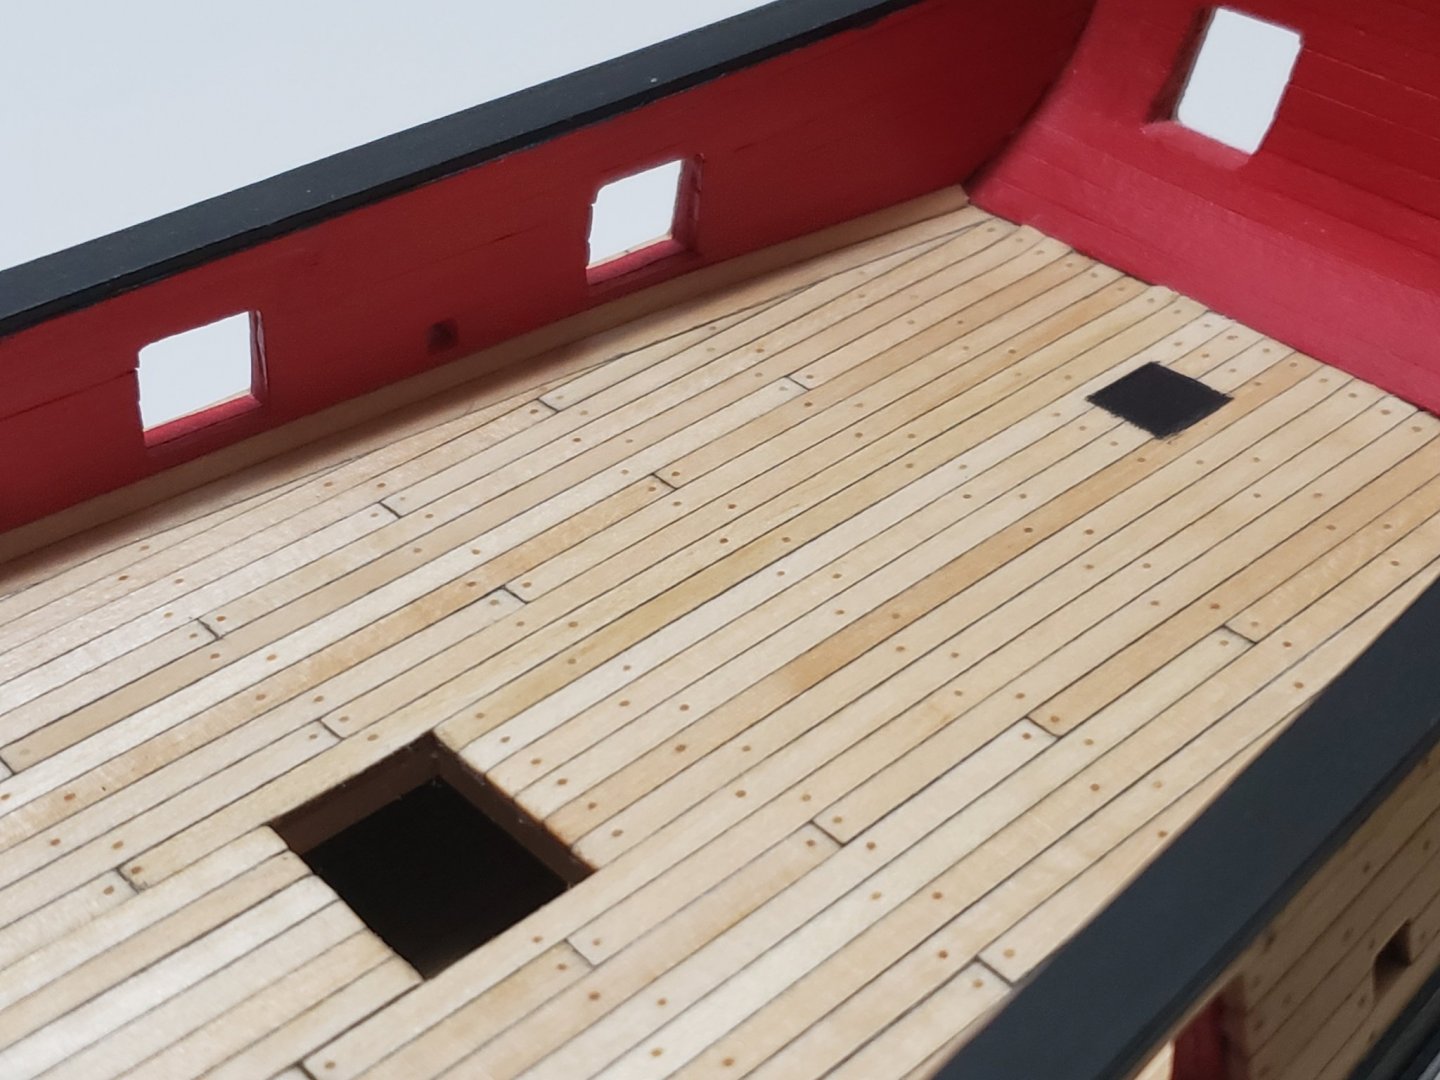
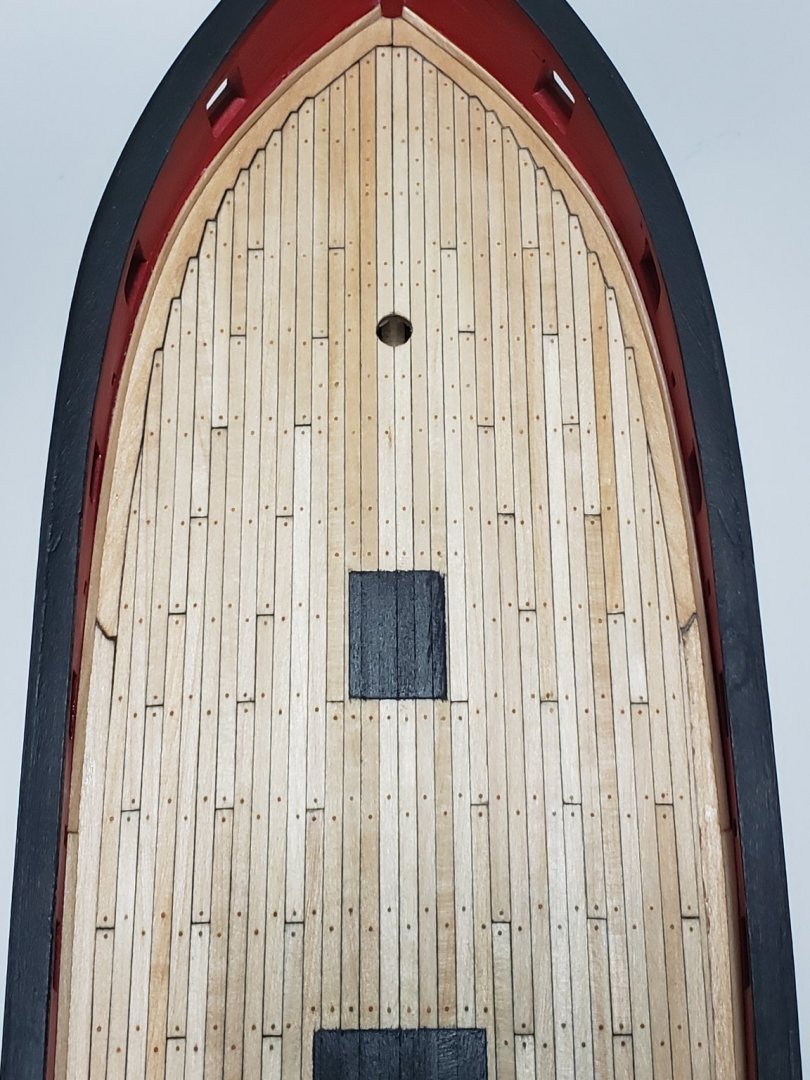
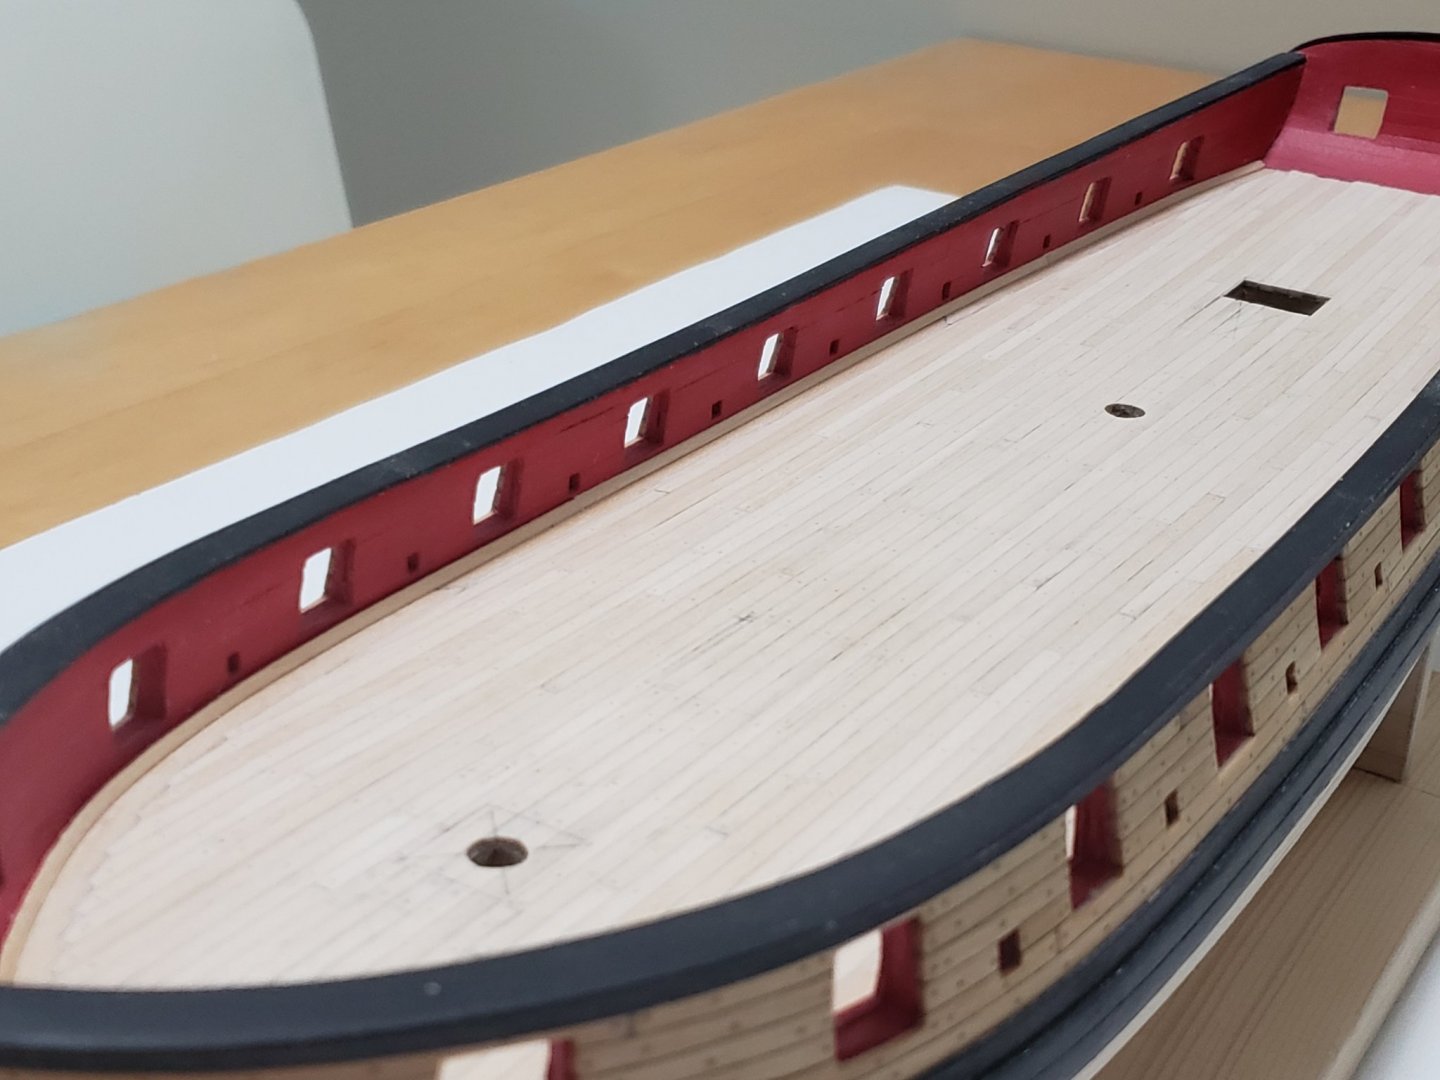
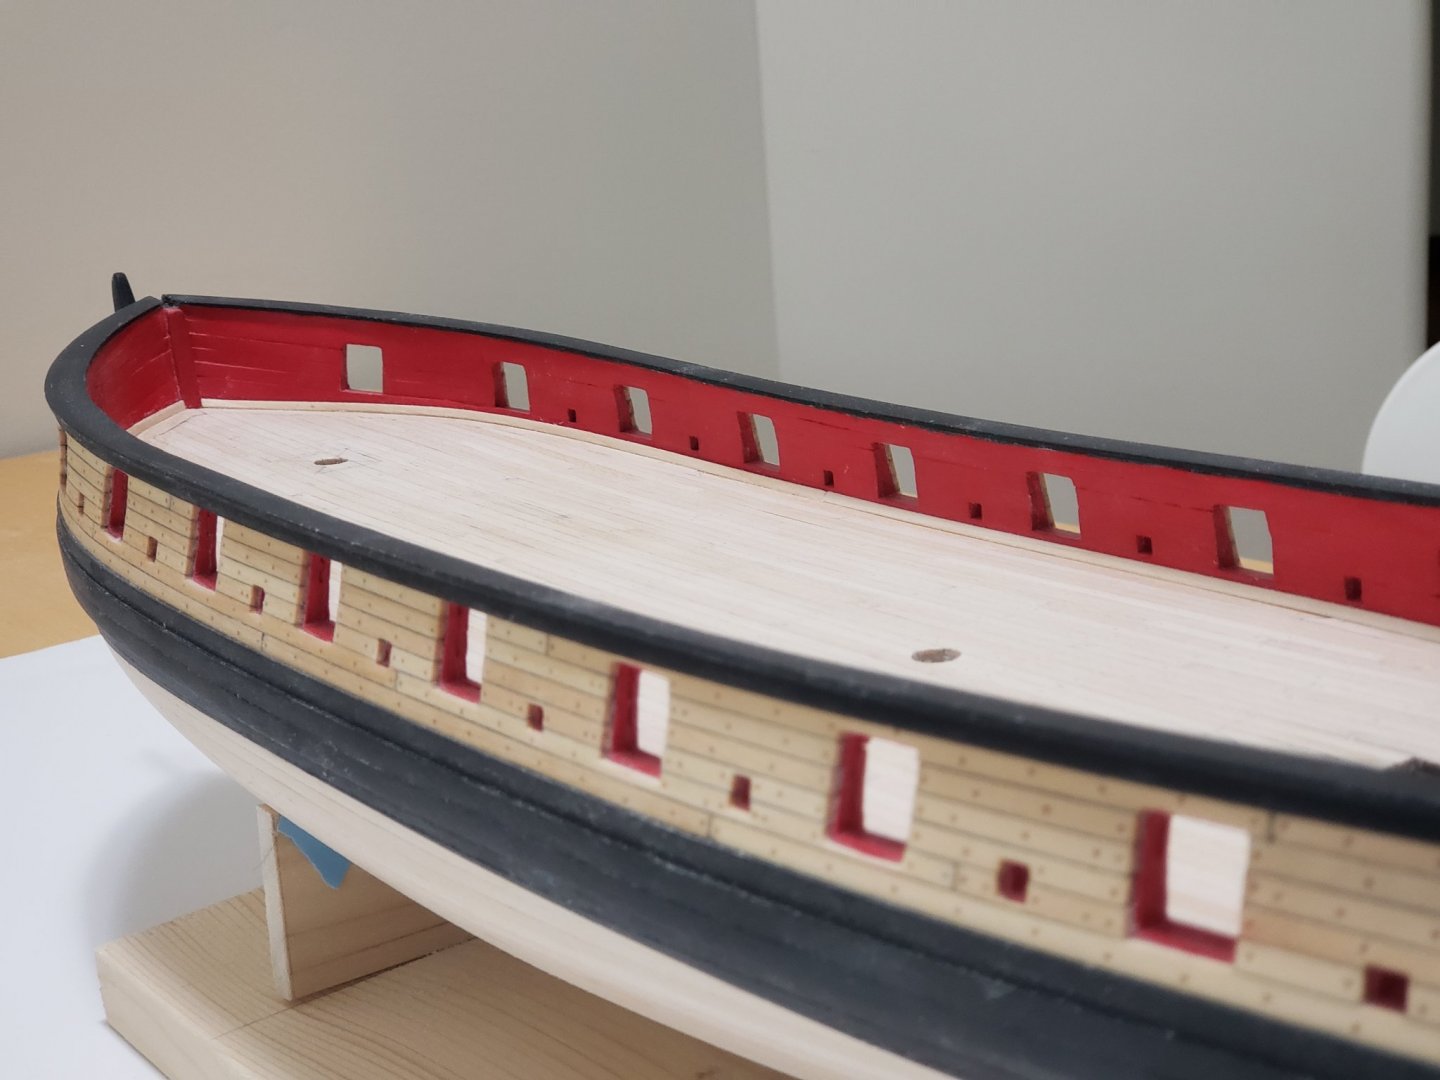
I decided to apply tung oil to the whole deck. I did this after reading a post (shown here). The area where the fittings will be glued will need to be sanded lightly, then PVA glue can offer a strong bond. Made things much easier since I did not have to put masking tape, but lets see if this works well for me as well. Anyways some photos: Some from overhead in case it helps someone to see the layout of the nails: Another shot from further away: This marks the end of Chapter 7. Now the copper plating, the bit I've been nervous about since the start...

- 950 replies
-
- 13
-
-
- syren
- model shipways
- (and 1 more)
-
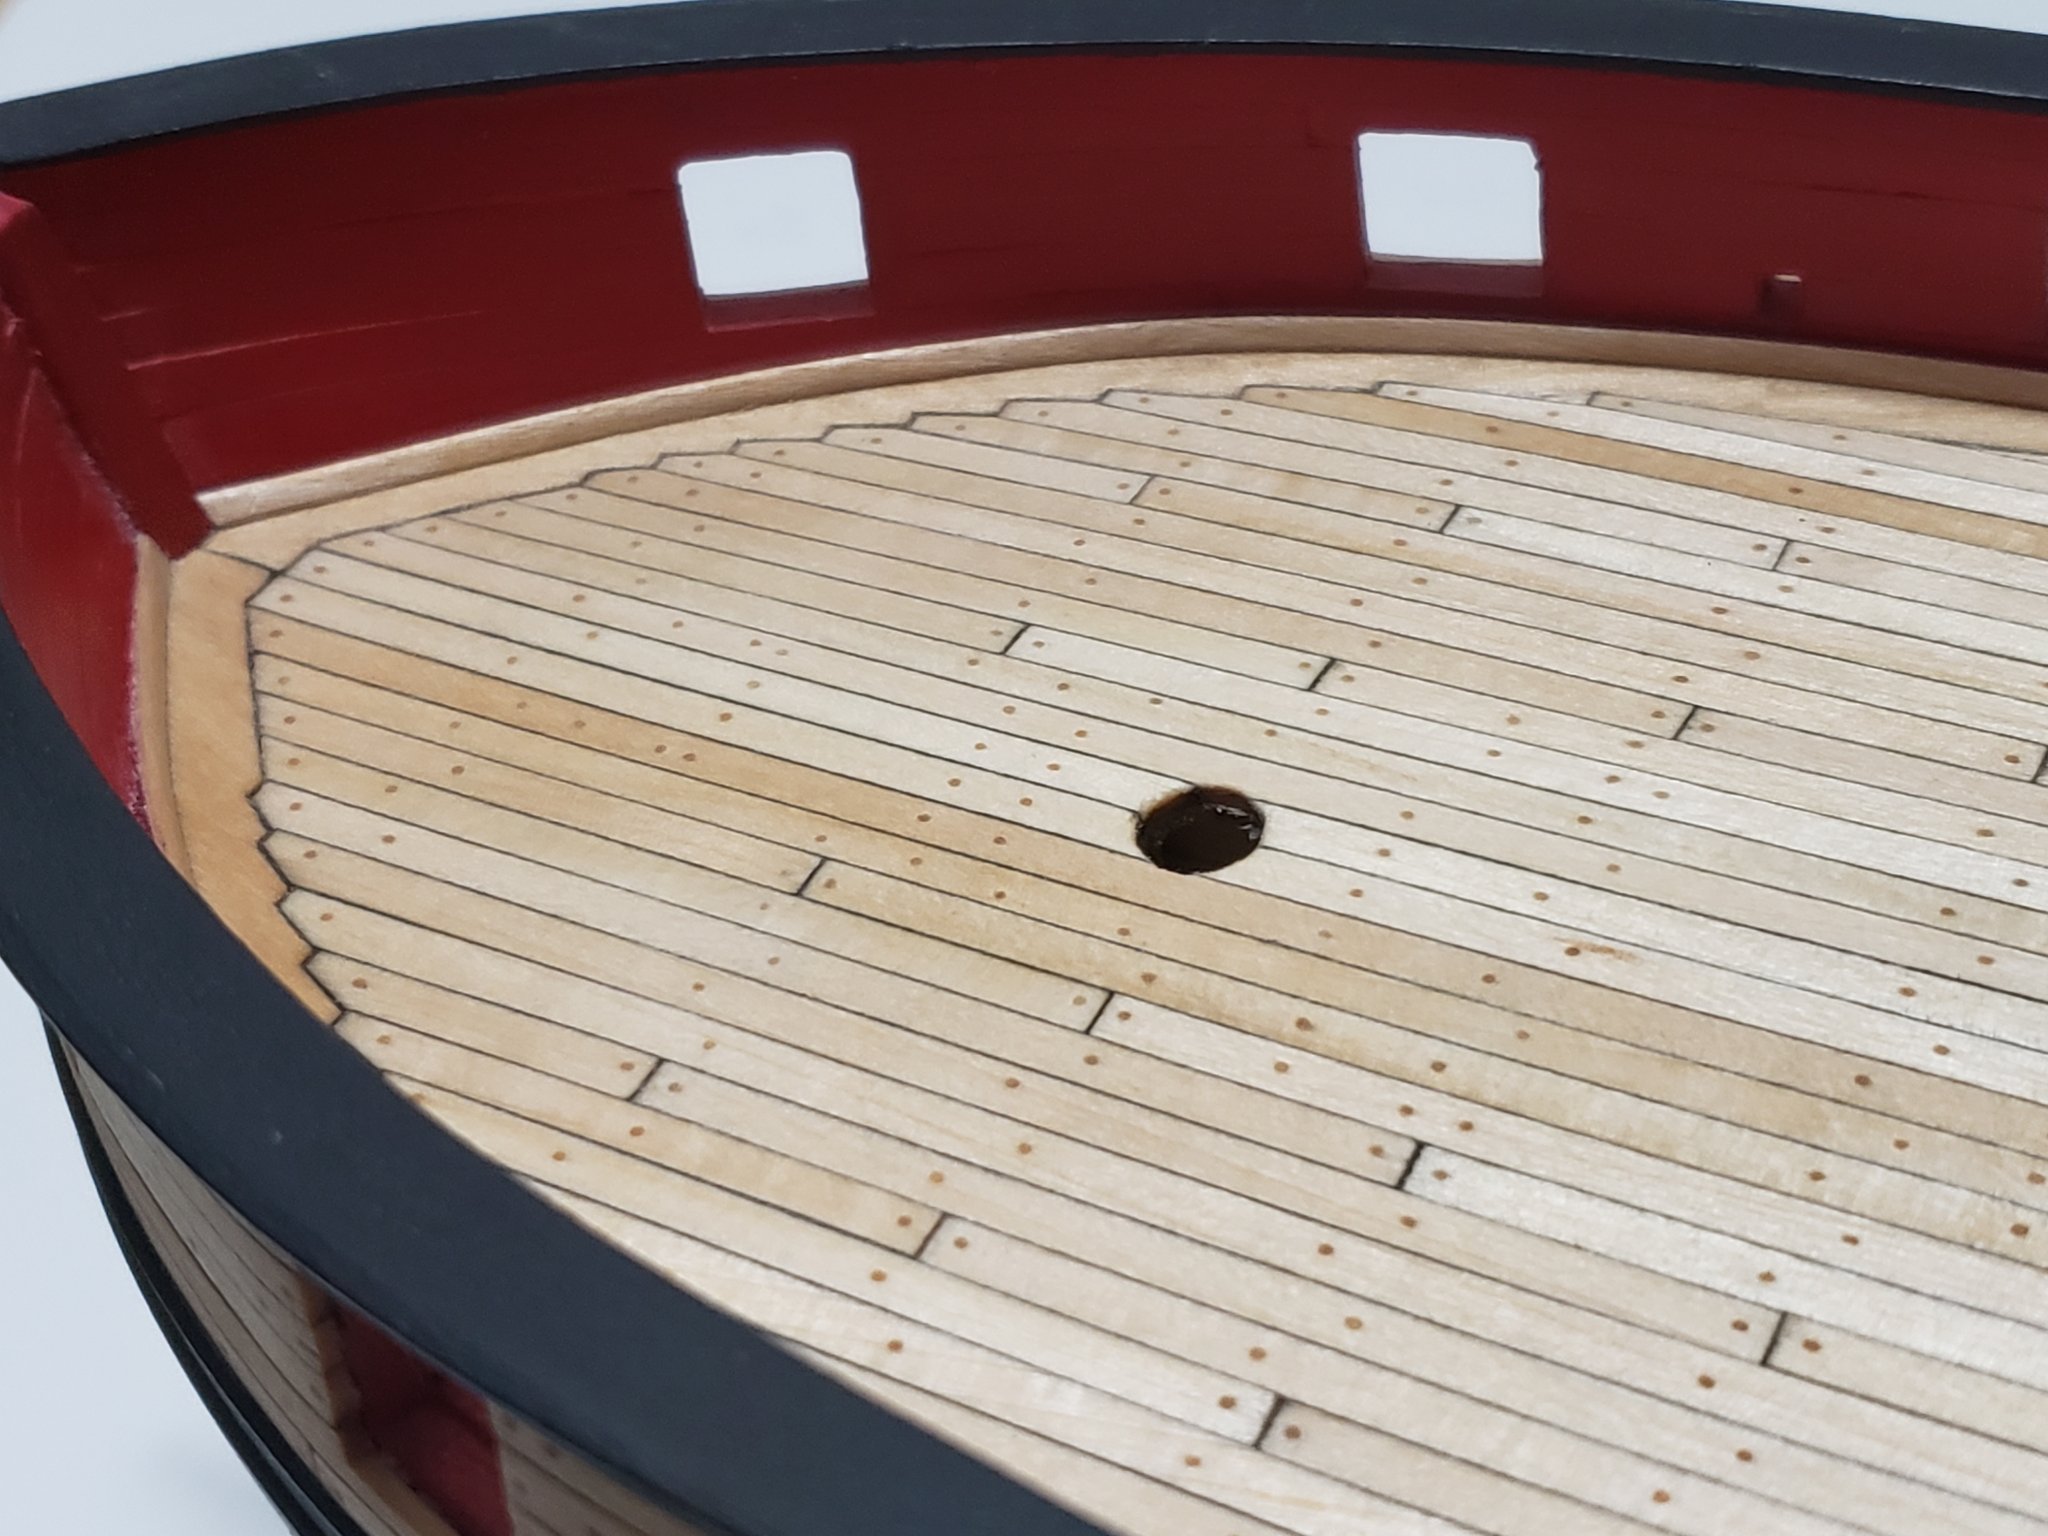
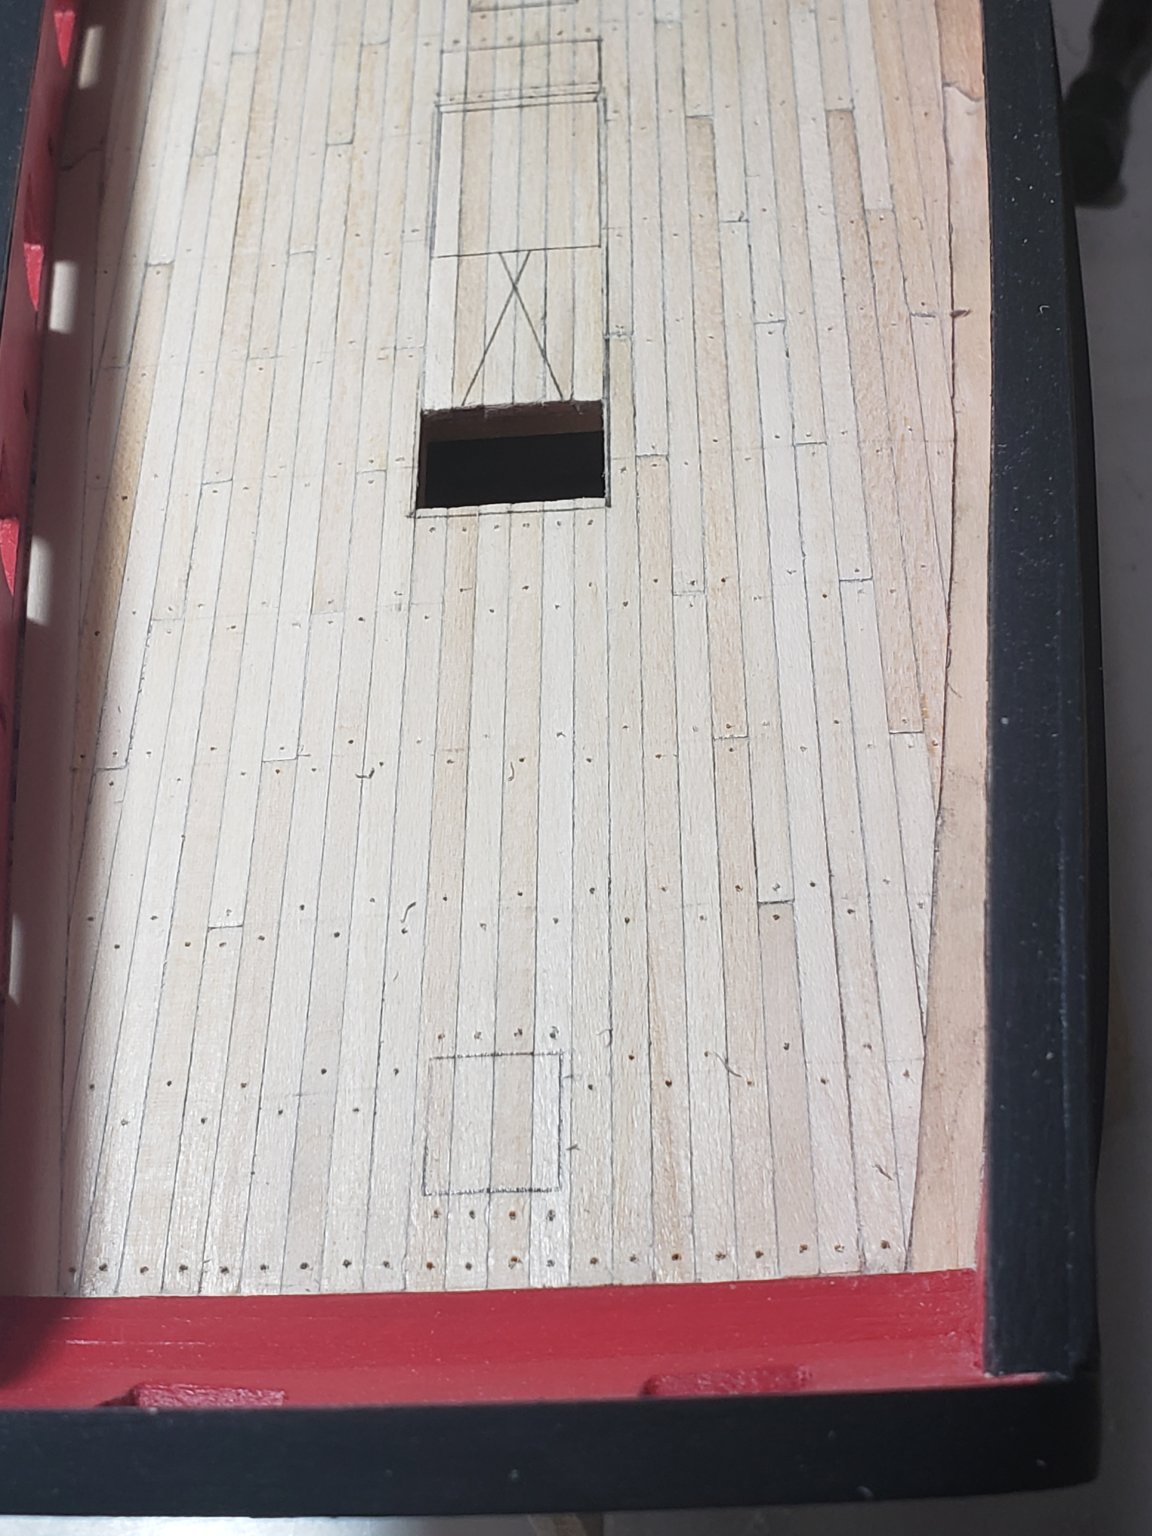
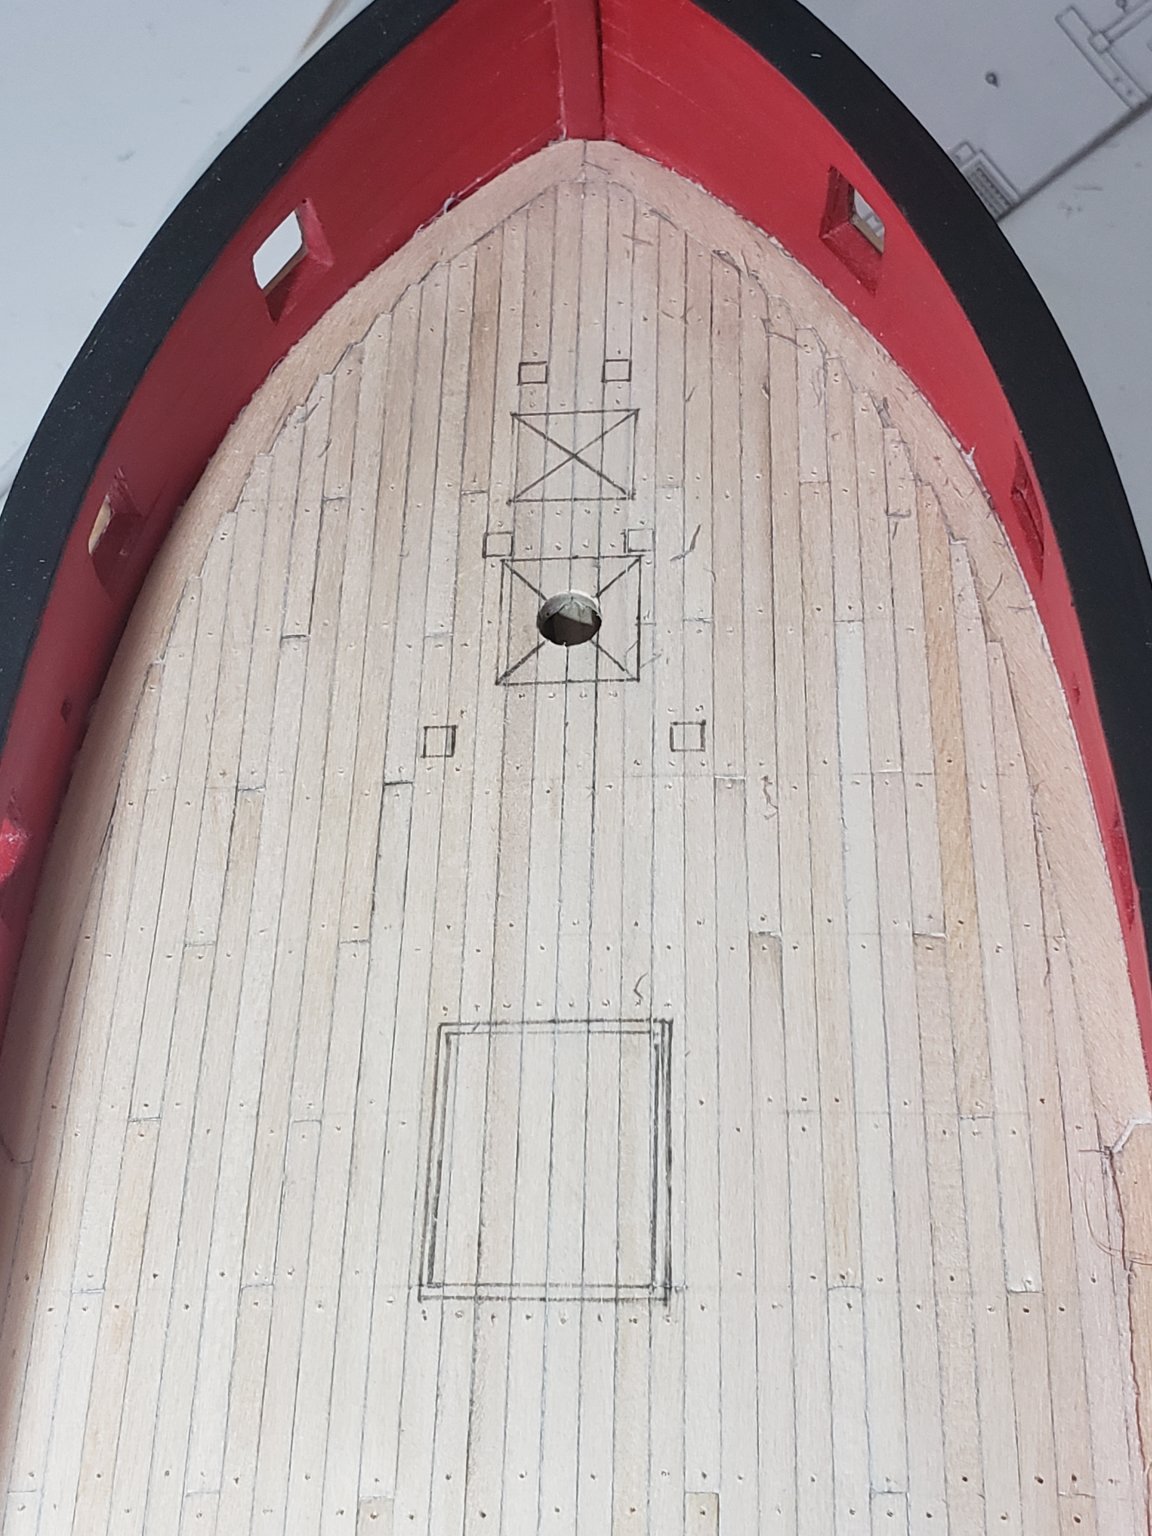
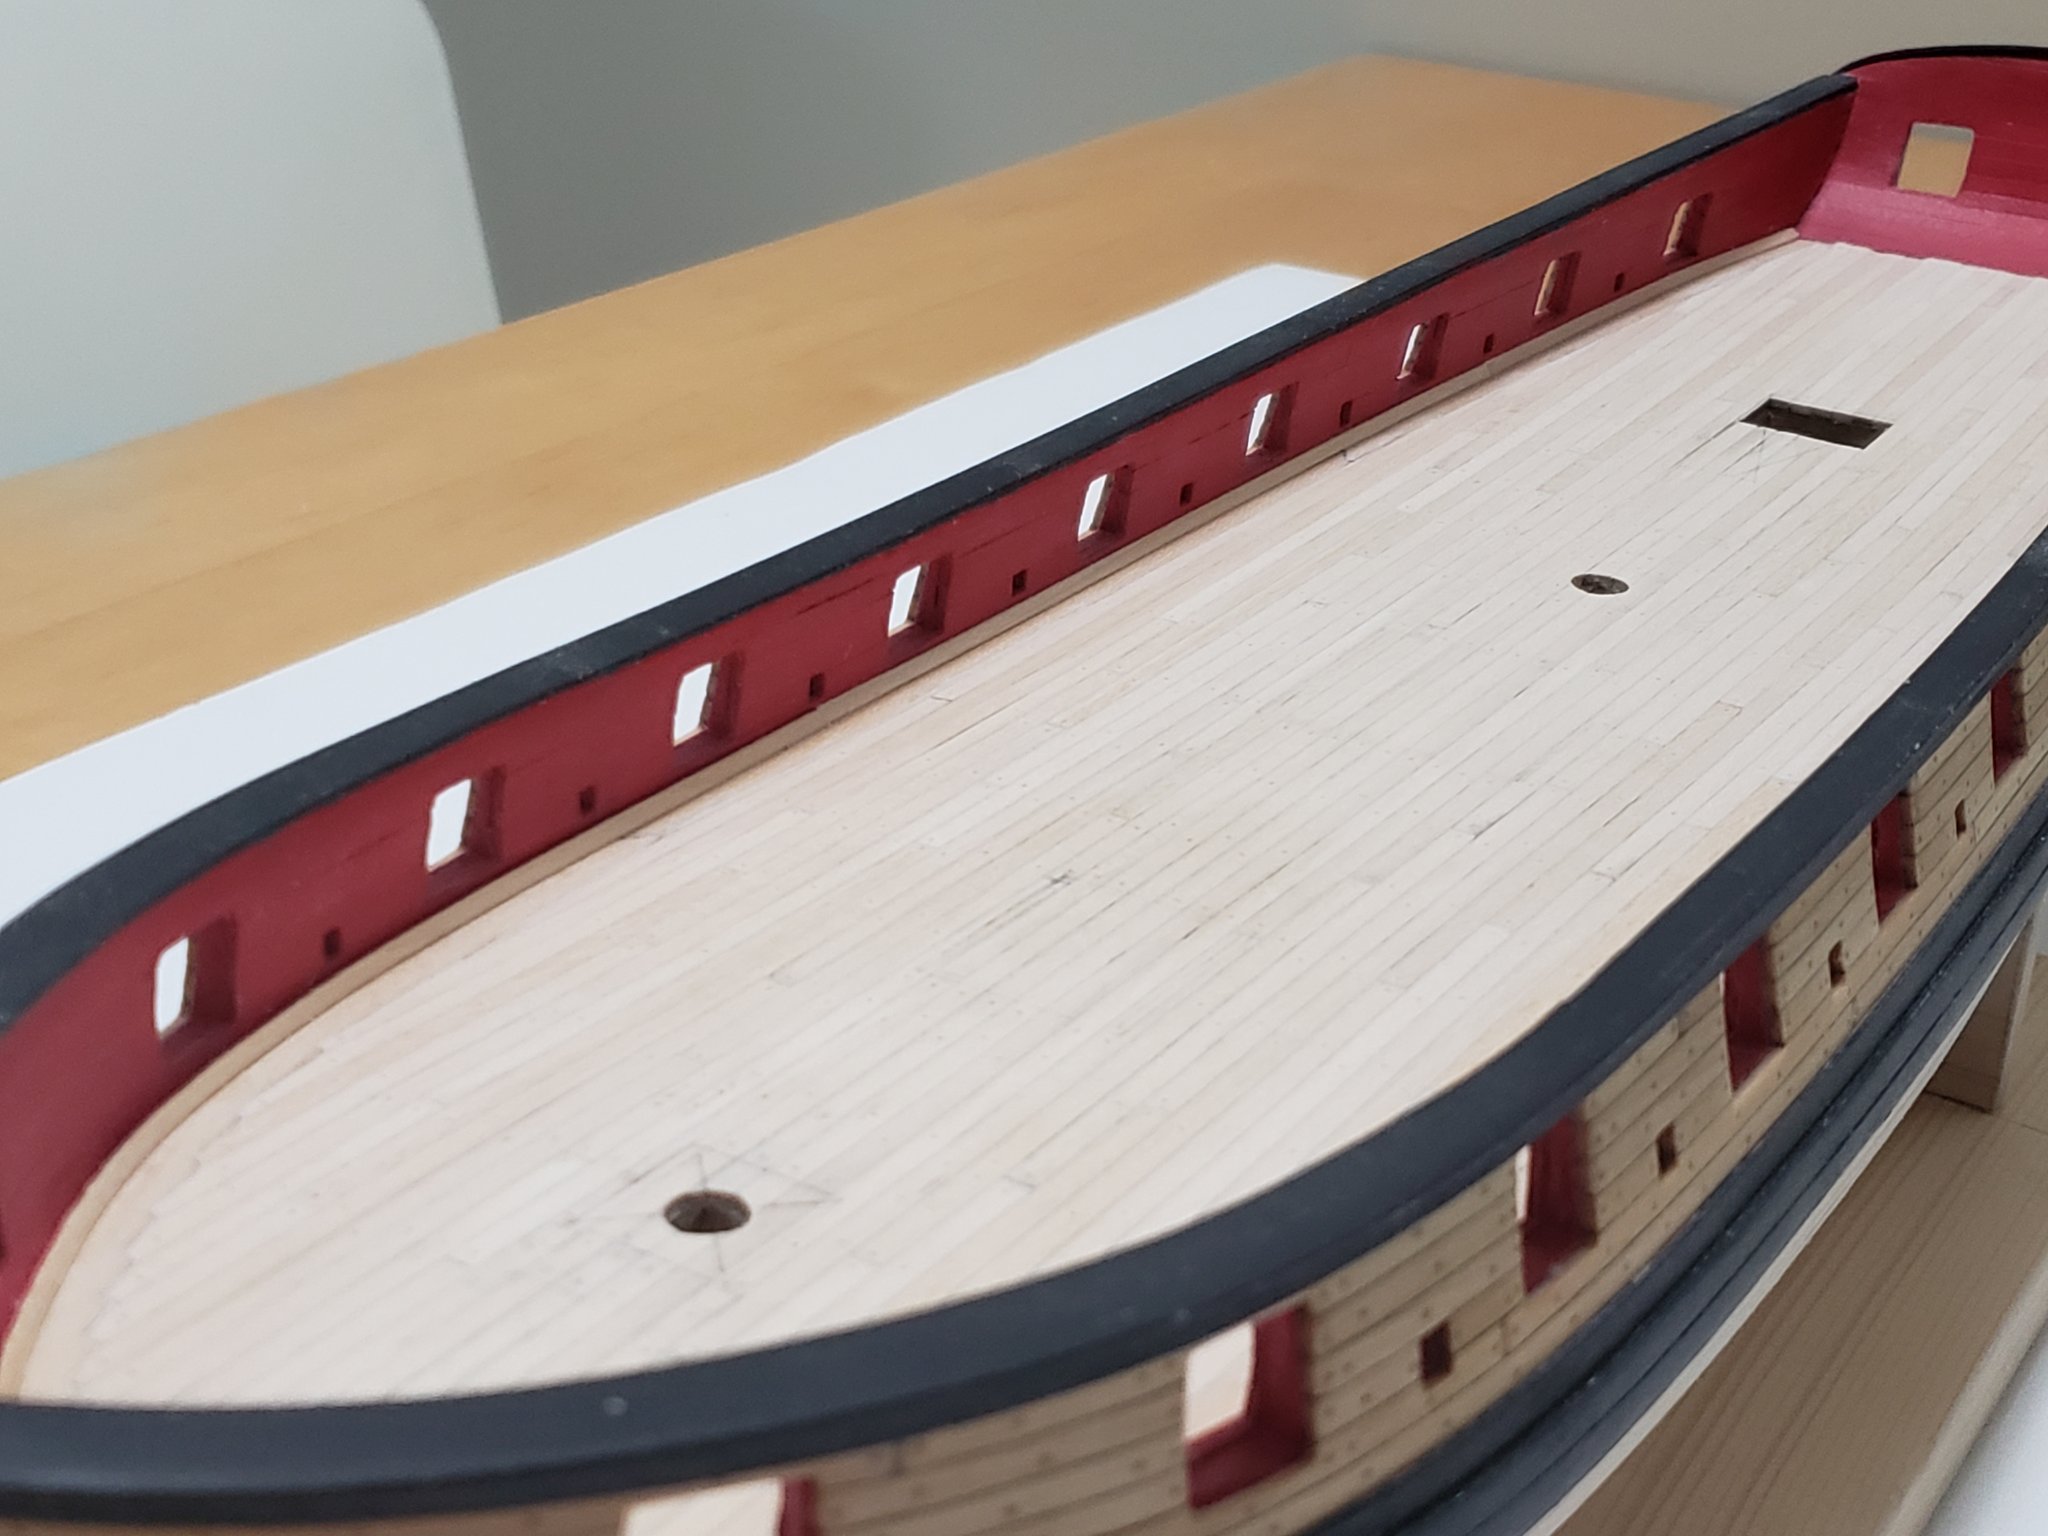
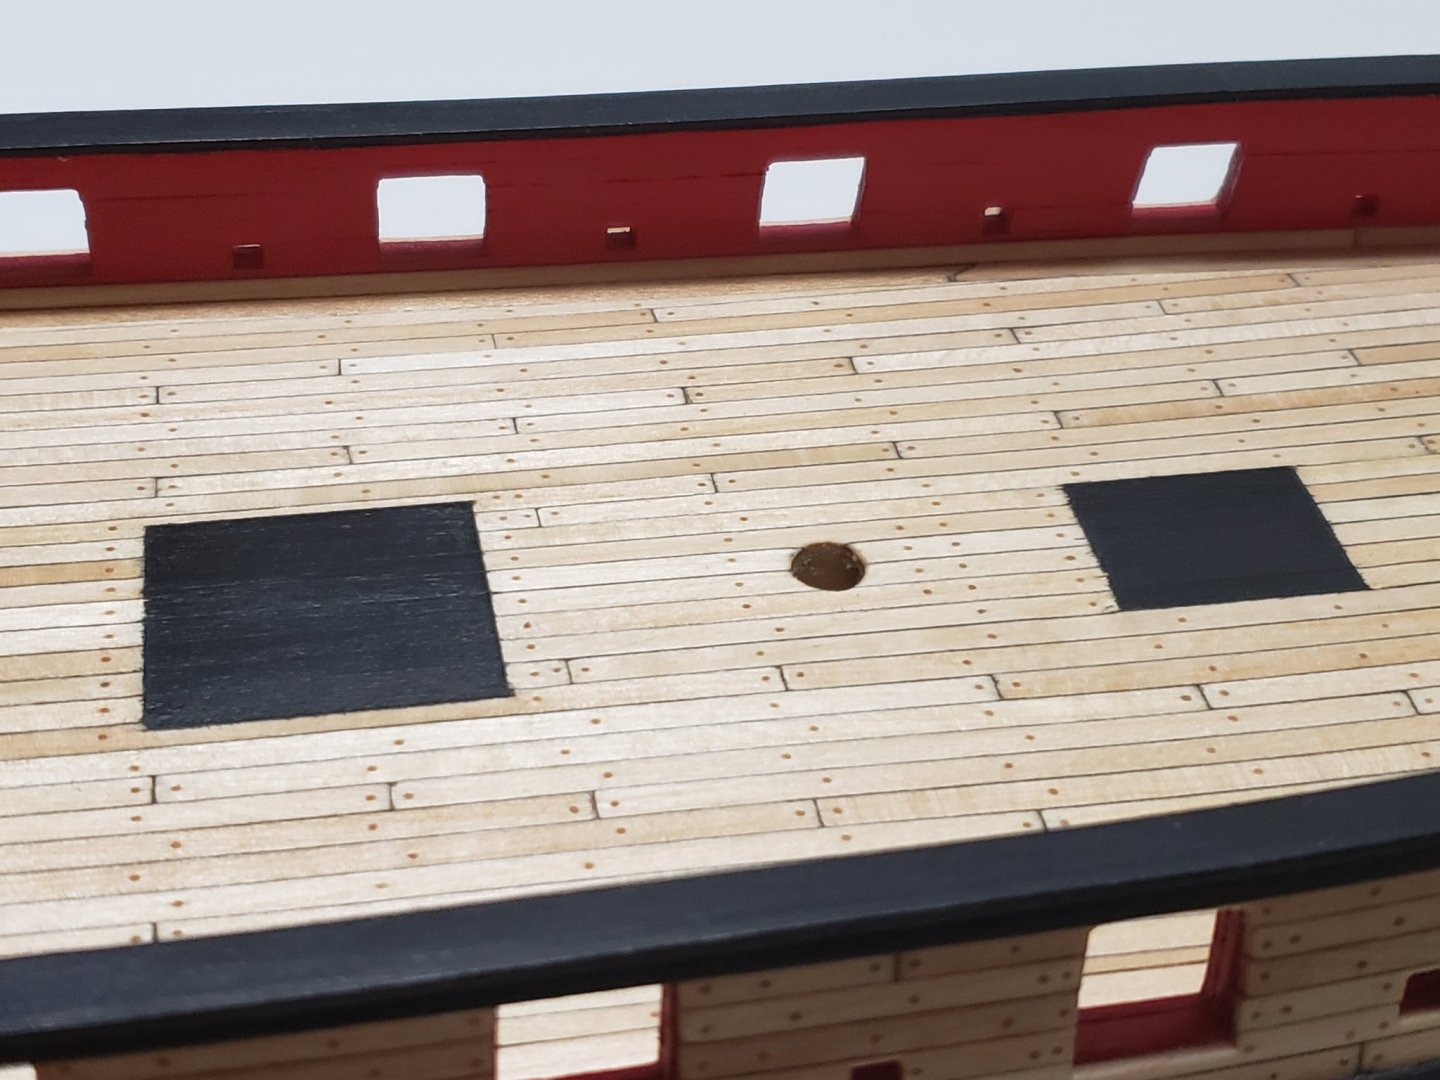
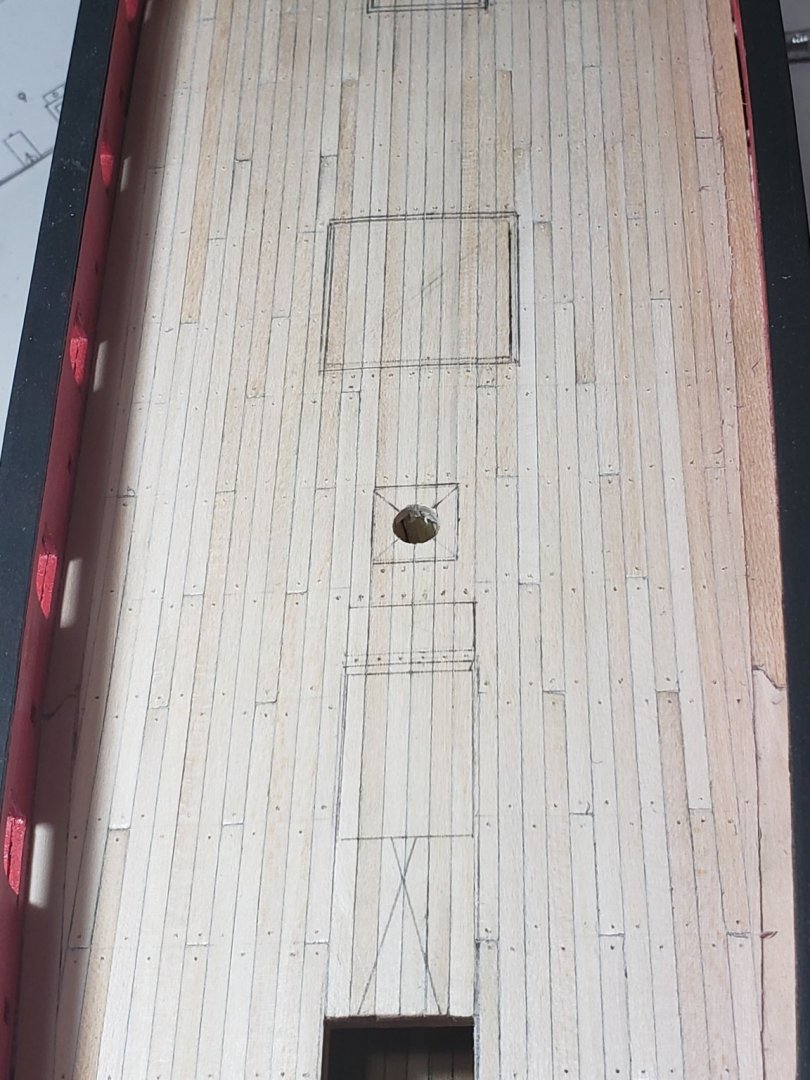
Thanks everyone! After many many hours of treenailing, it is finally completed. I am glad to have finished this part, it seemed to never end... First I drilled 0.5 mm (the exterior hull planking had 0.55mm), then inserted the toothpicks after sanding each one to be thinner and pointier and dipping them in watered down white glue. Some progress photos: After clipping the toothpicks with a nailcutter and then sanding them down, I installed the waterways: I installed the waterways in 3 sections per side, mainly because the wood kept breaking when I bent them; the smaller pieces seemed more manageable. The butt joint between these were places below the sweep ports since holes will be drilled here in the future, thereby hiding the seams. Next I will be painting the areas under the gratings black, then applying tung oil. I am thinking on putting masking tape where the fittings will be installed before applying tung oil so that glue can penetrate easily through the exposed wood, but I am not sure if this is a good technique. Or do you think I should just apply tung oil everywhere?


- 950 replies
-
- 8
-
-
- syren
- model shipways
- (and 1 more)