HOLIDAY DONATION DRIVE - SUPPORT MSW - DO YOUR PART TO KEEP THIS GREAT FORUM GOING! (Only 13 donations so far - C'mon guys!)
×

.jpg.1f80adf1a9b14a937cfcf2ca6af0f0d4.jpg)
WalrusGuy
-
Posts
1,007 -
Joined
-
Last visited
Content Type
Profiles
Forums
Gallery
Events
Everything posted by WalrusGuy
-
.thumb.jpg.62d1d69fed1f32364417cb1f9cdeb009.jpg)
To add sails or not? What is your preference?
WalrusGuy replied to Bill97's topic in Masting, rigging and sails
What paper do you use for the sails? Saw you mentioned IMV but I am not sure what that is. Google results show printer paper. Is that what you prefer to use? -
For mine I used a sanding block. It's rigid so it helps in fairing.. I just stapled sanding paper onto a old whiteboard eraser.
-
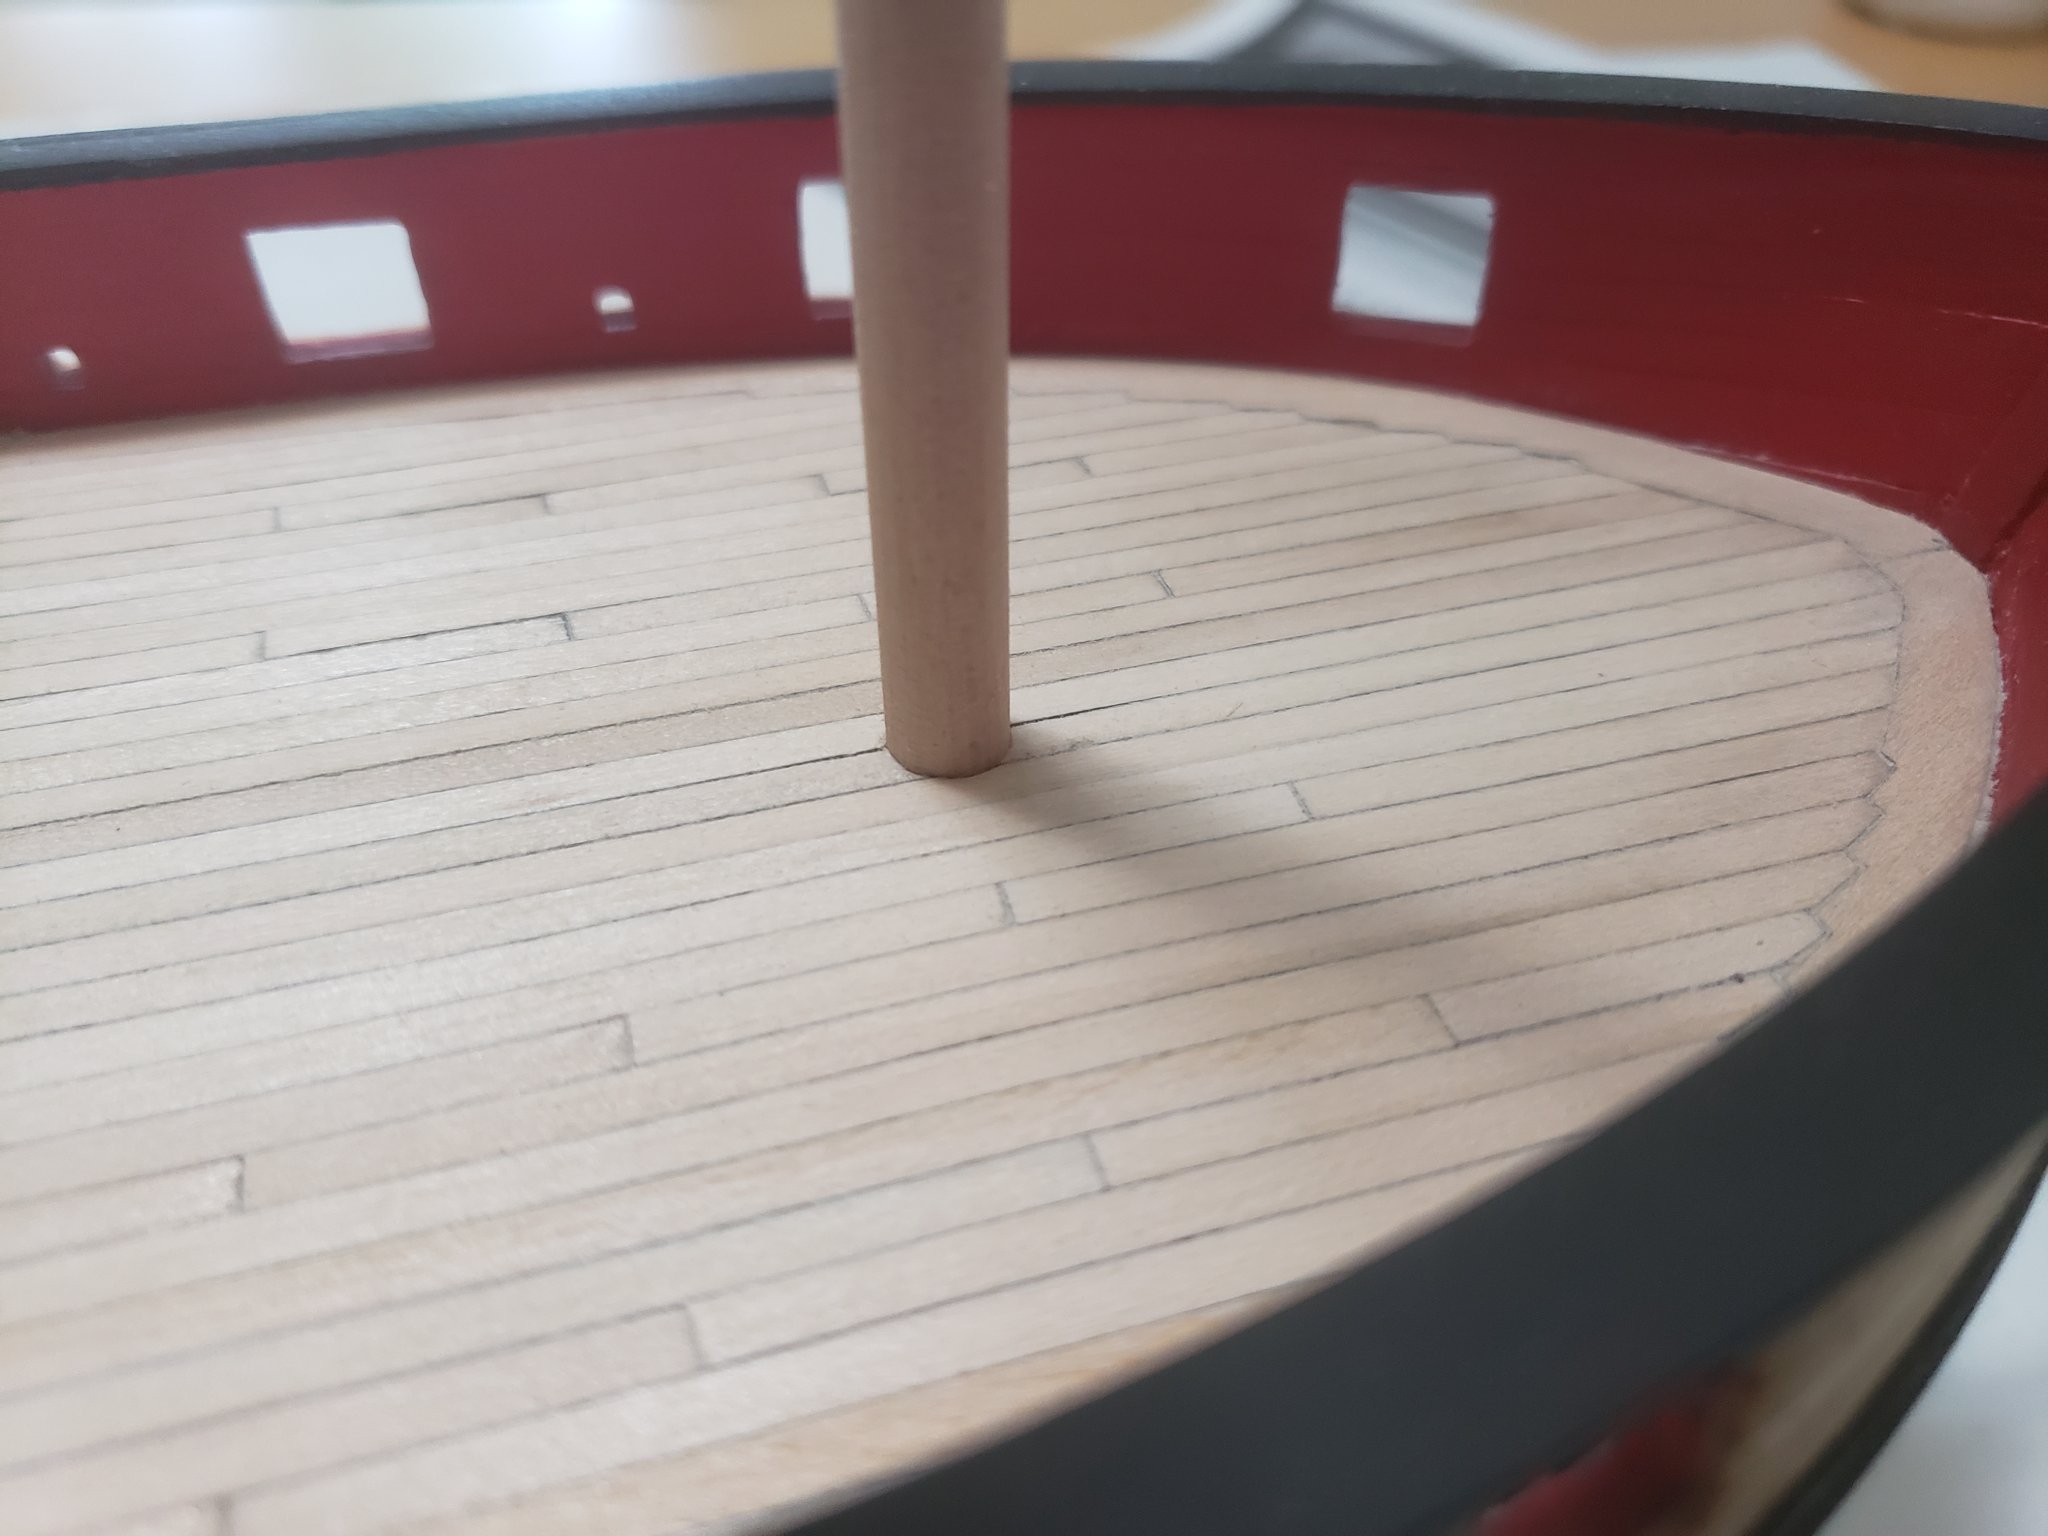
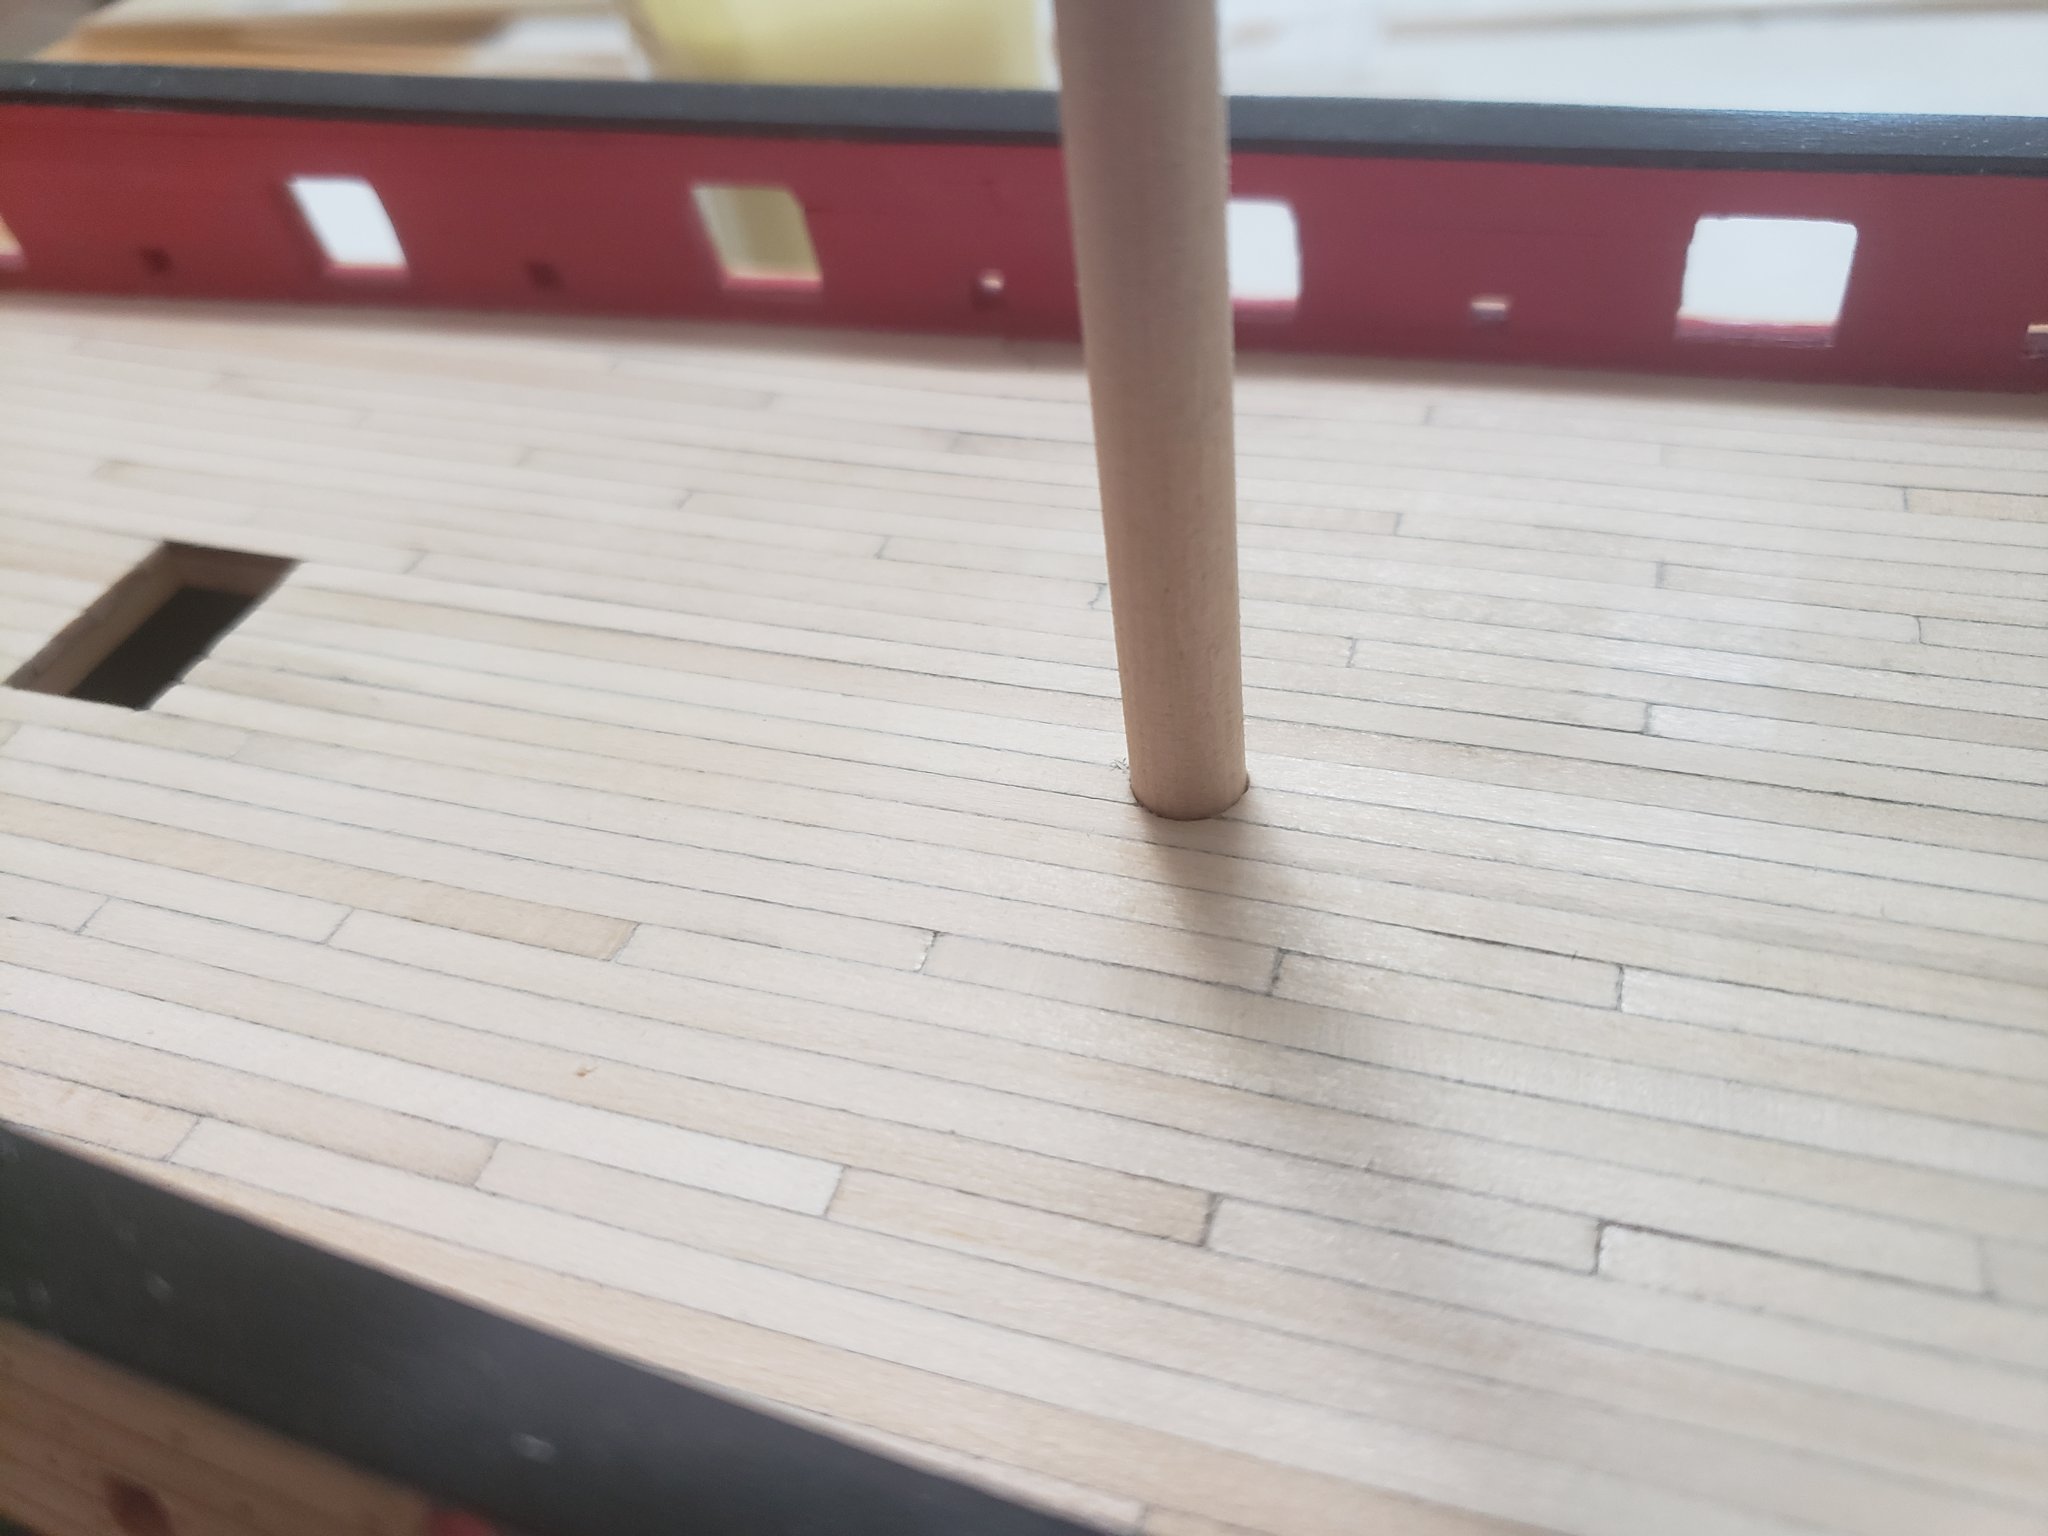
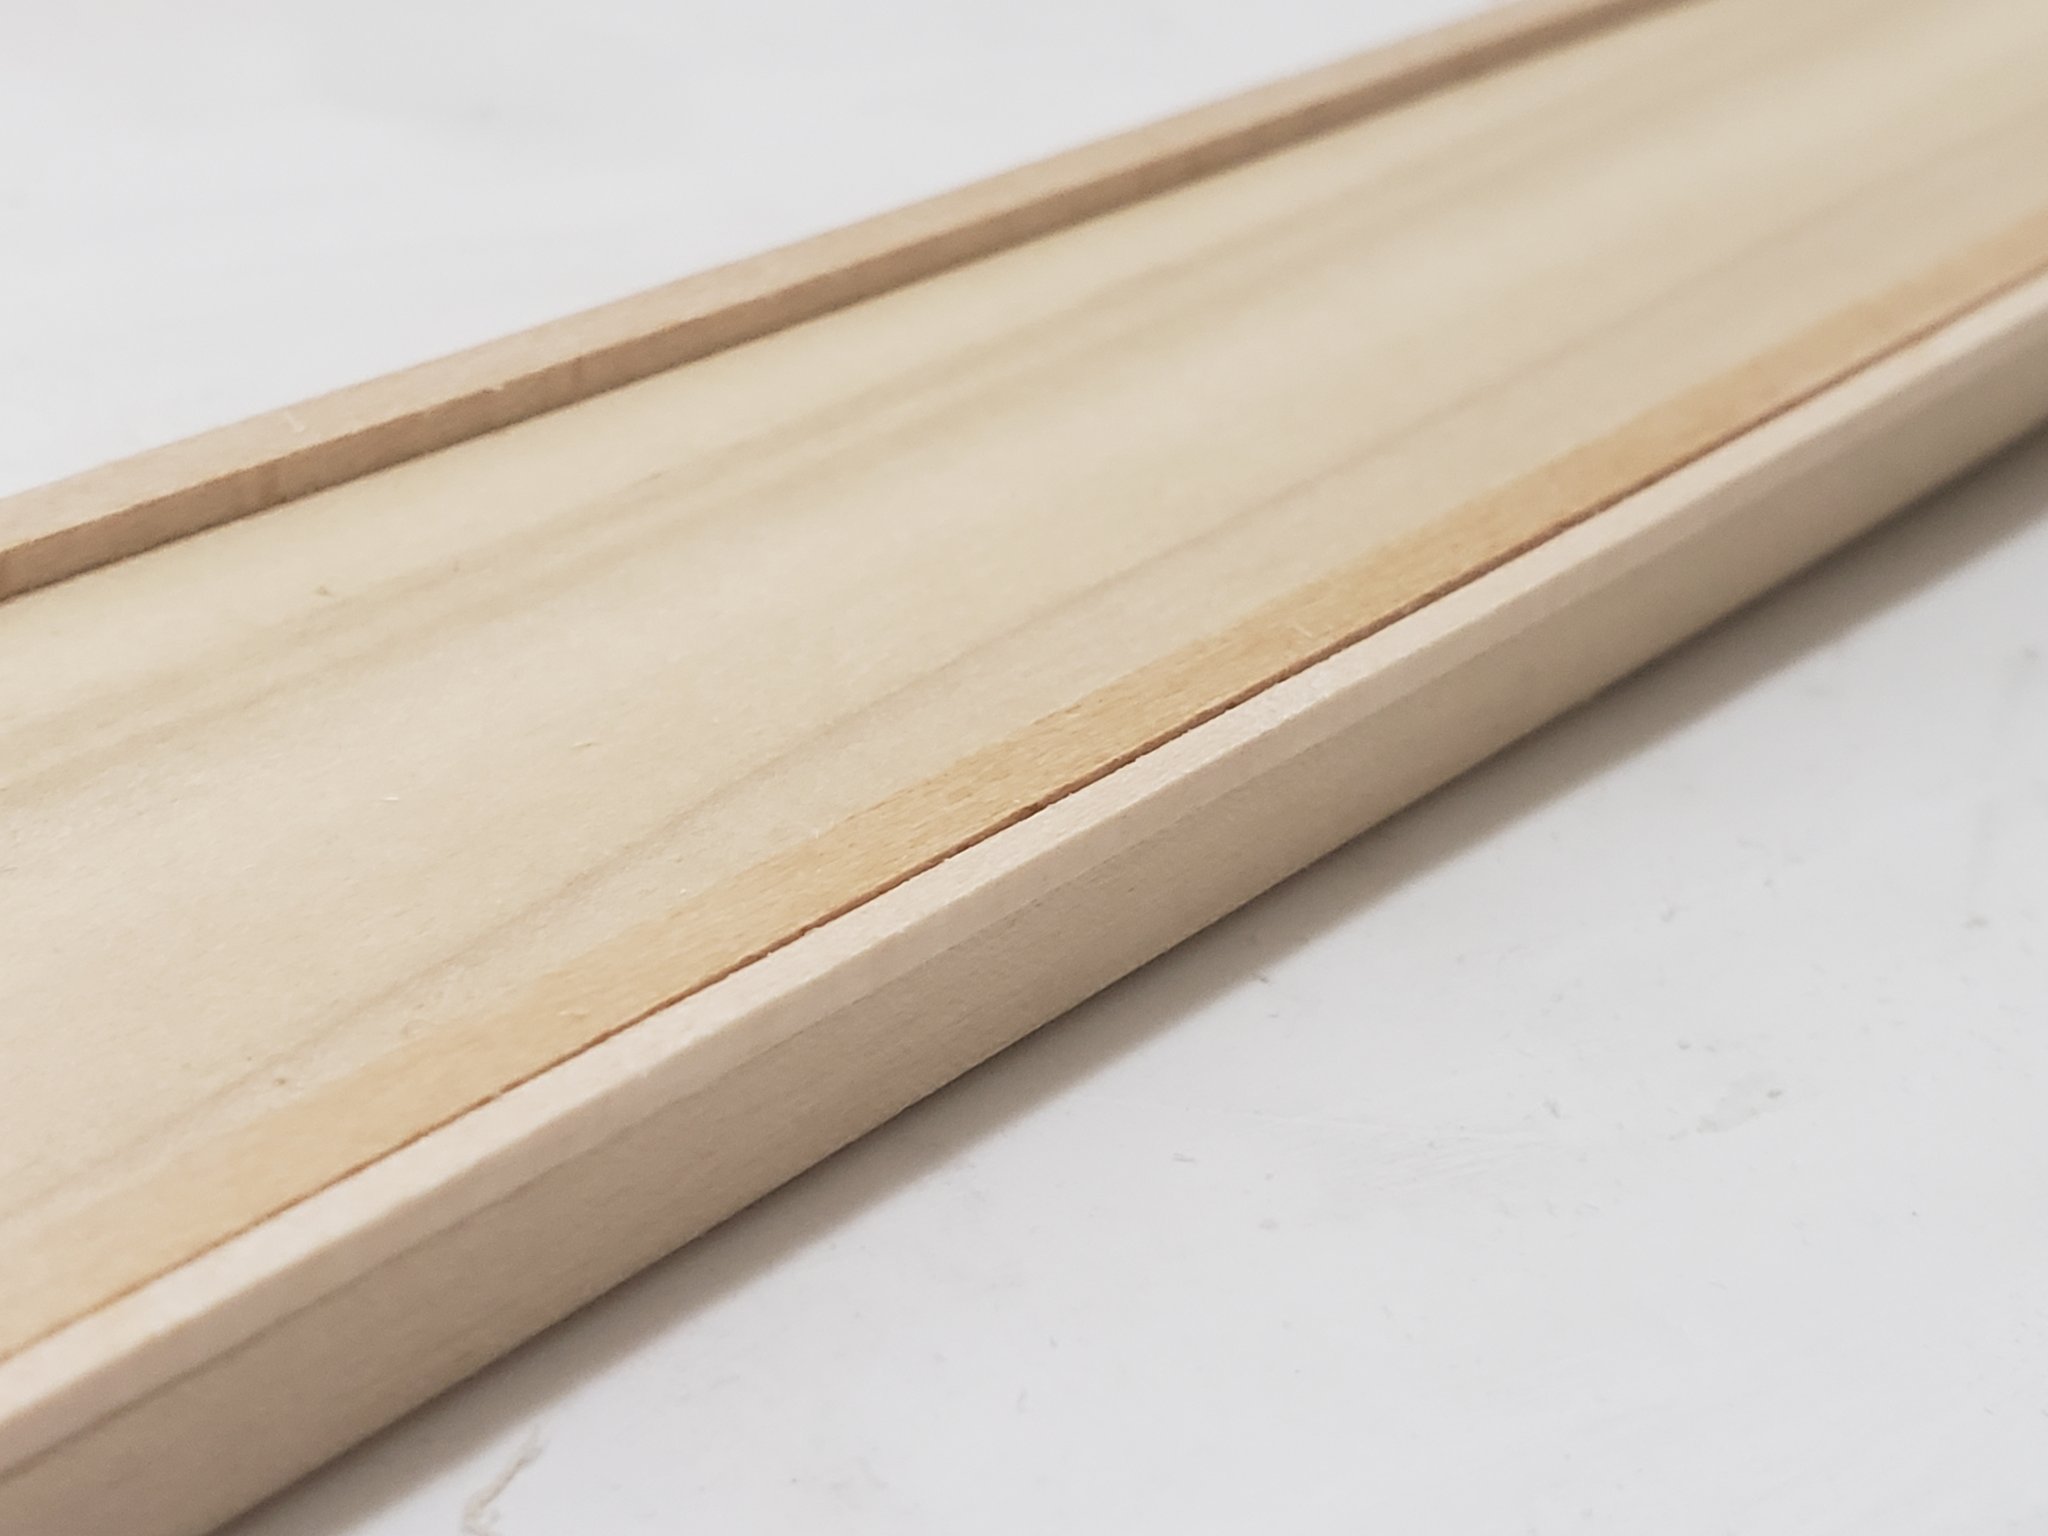
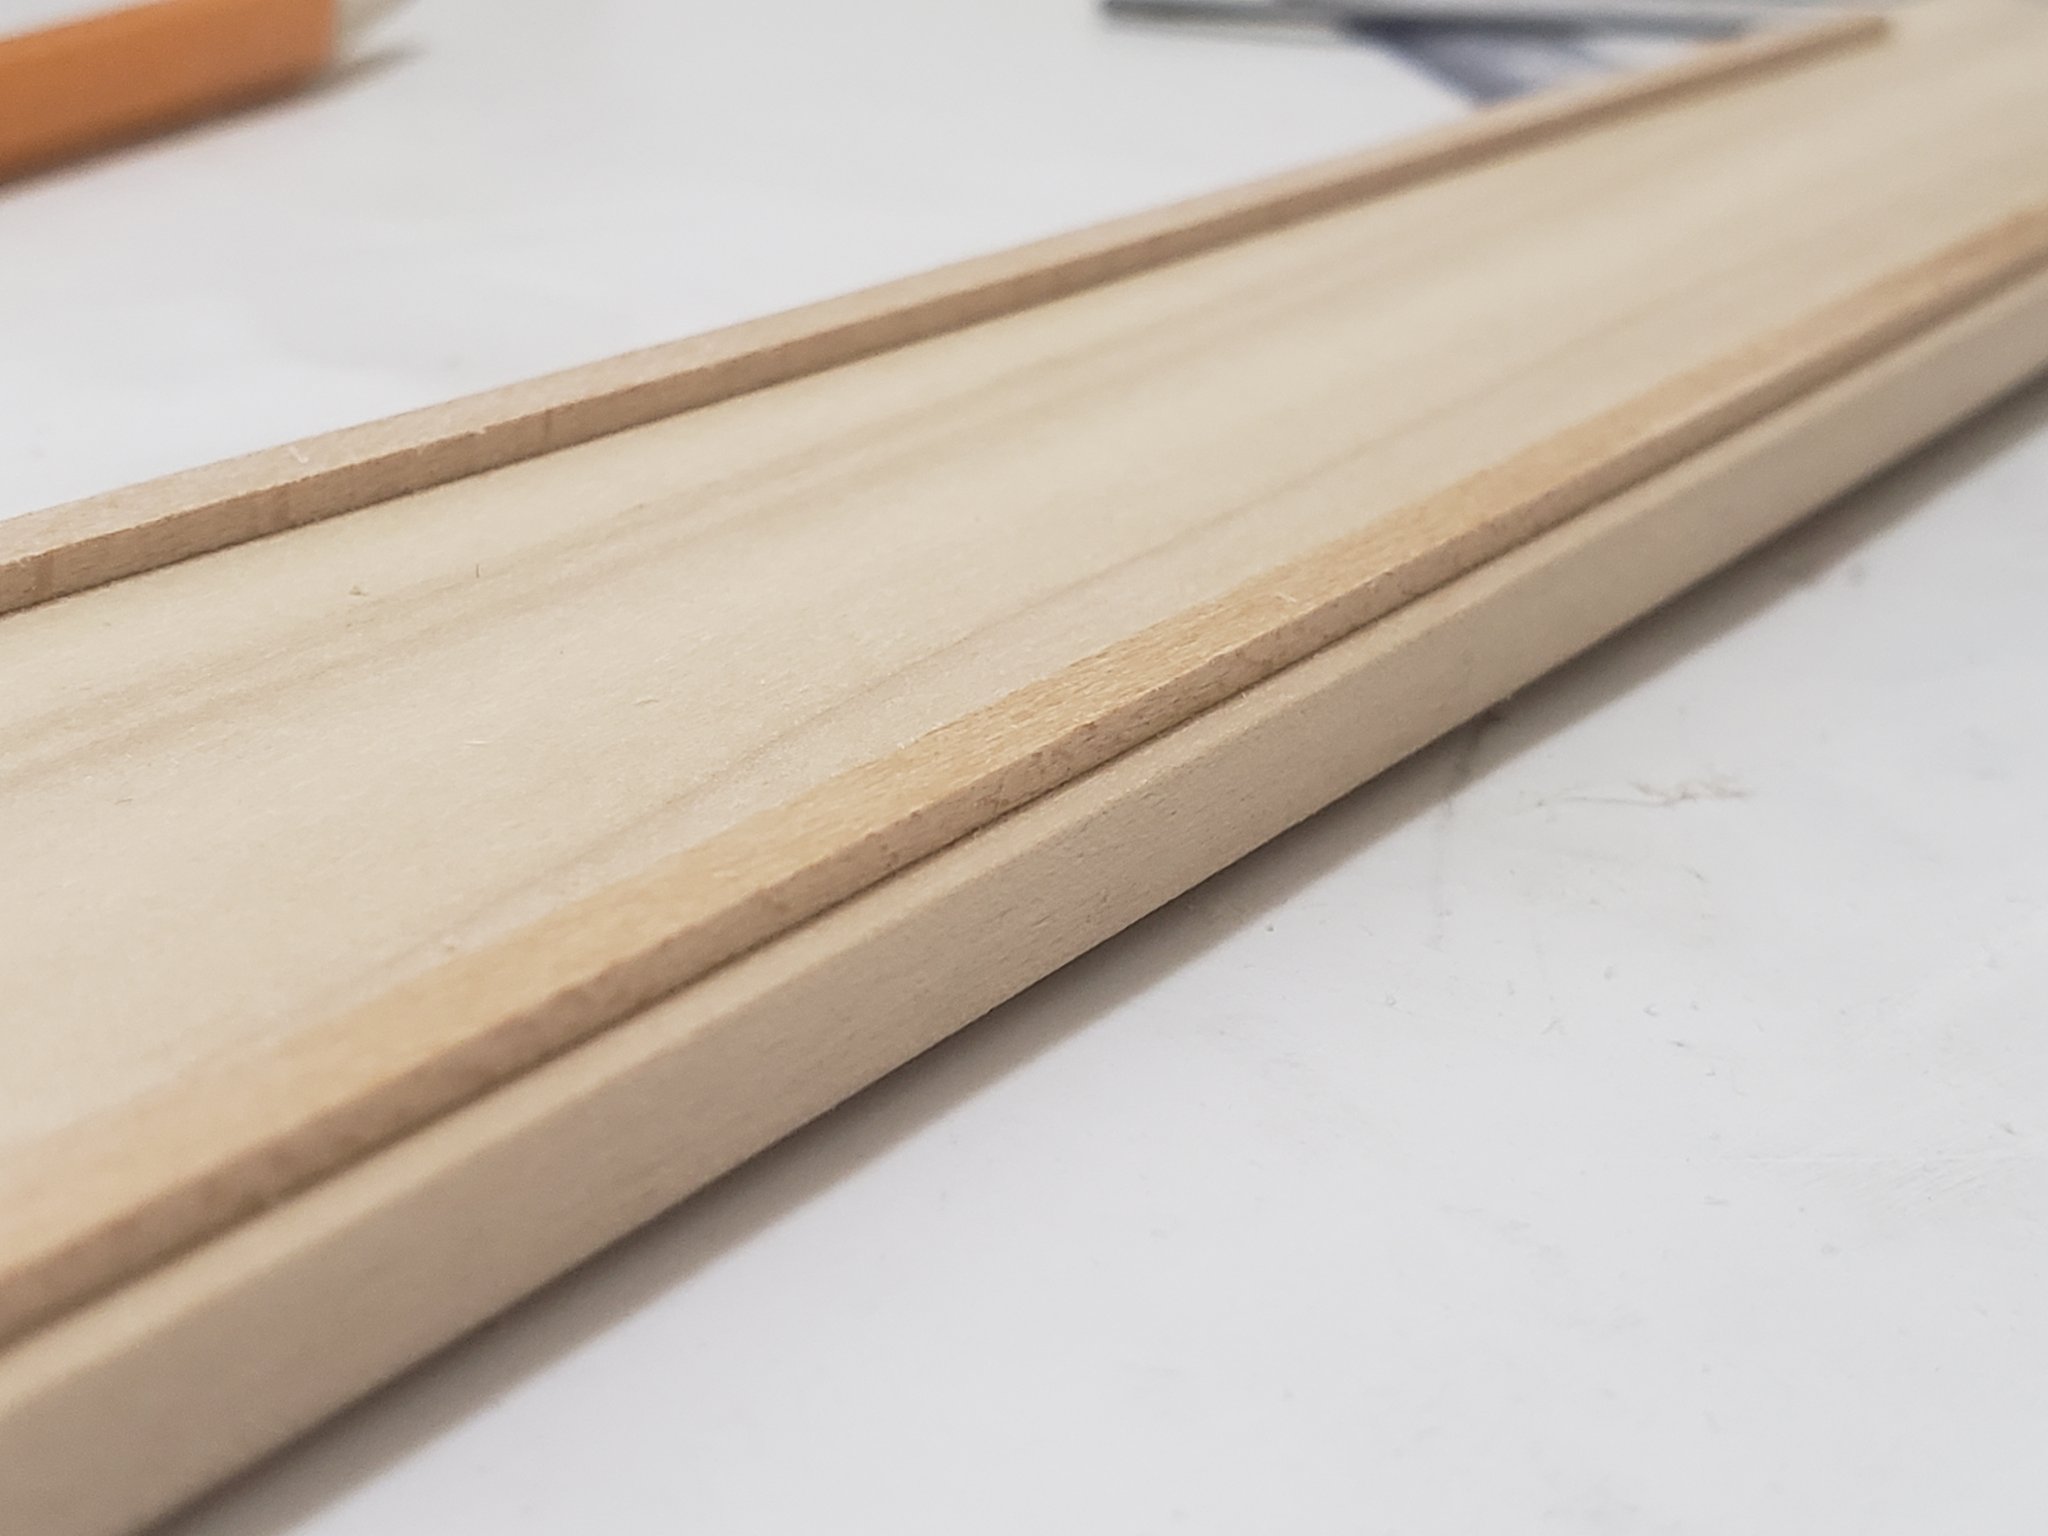
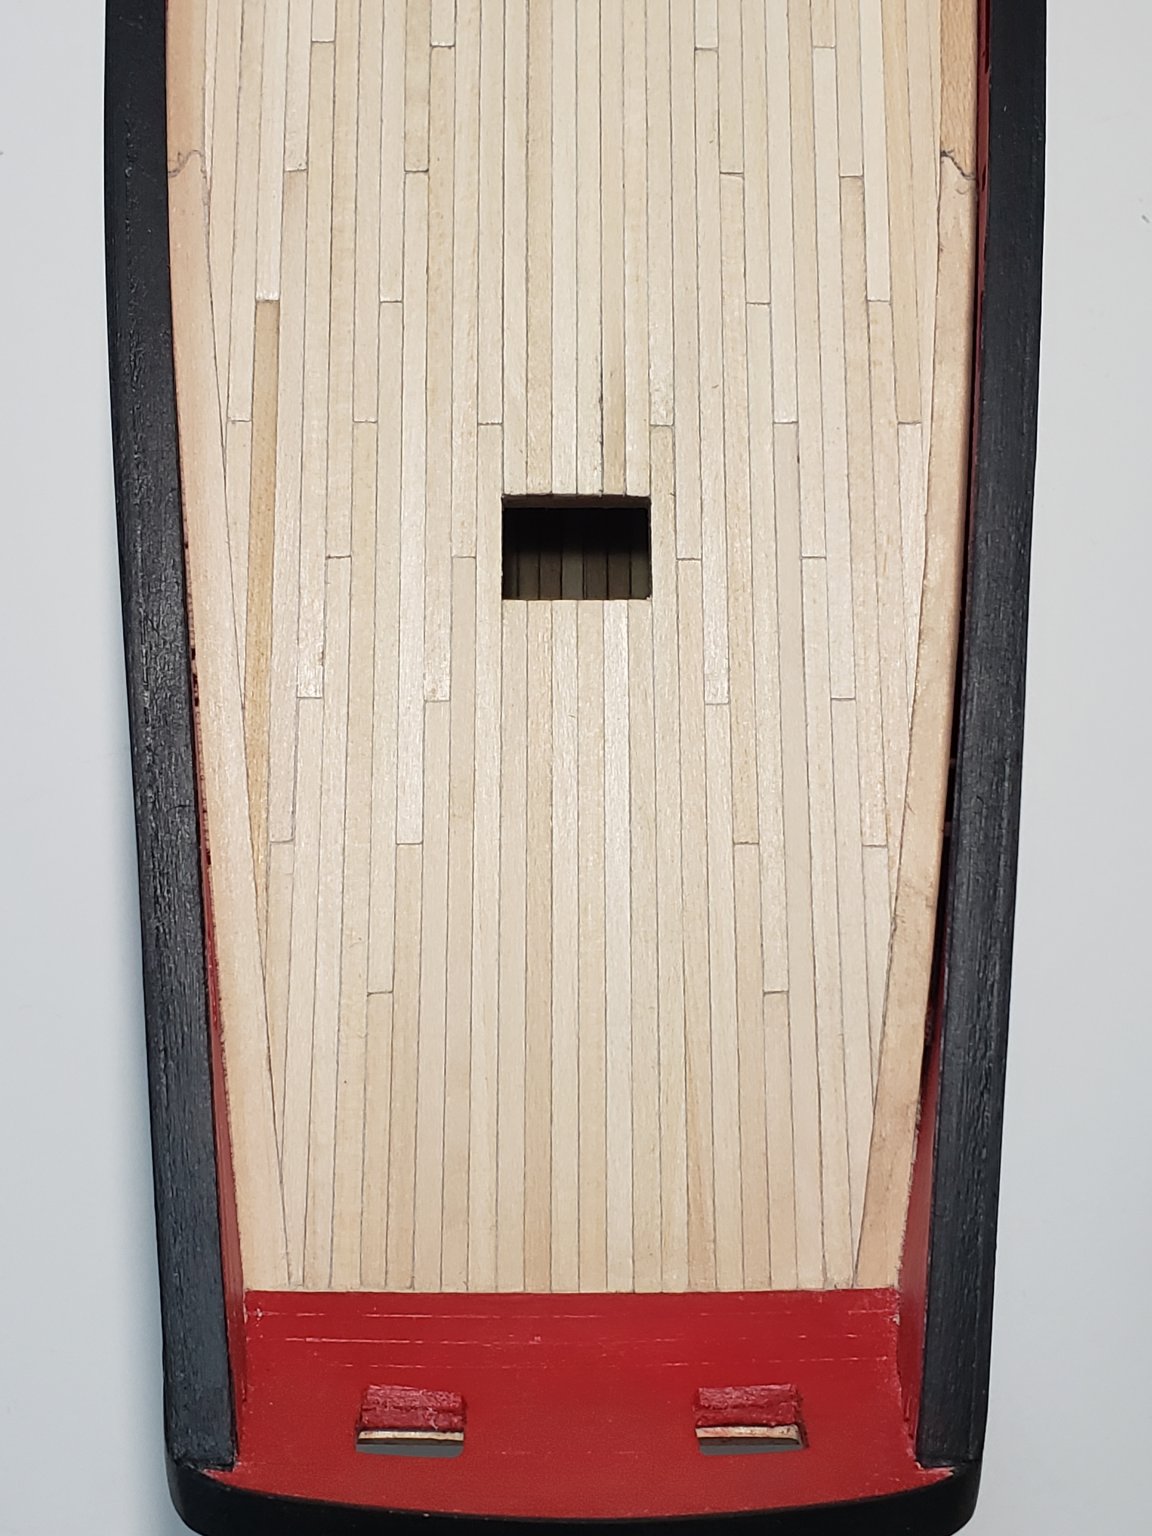
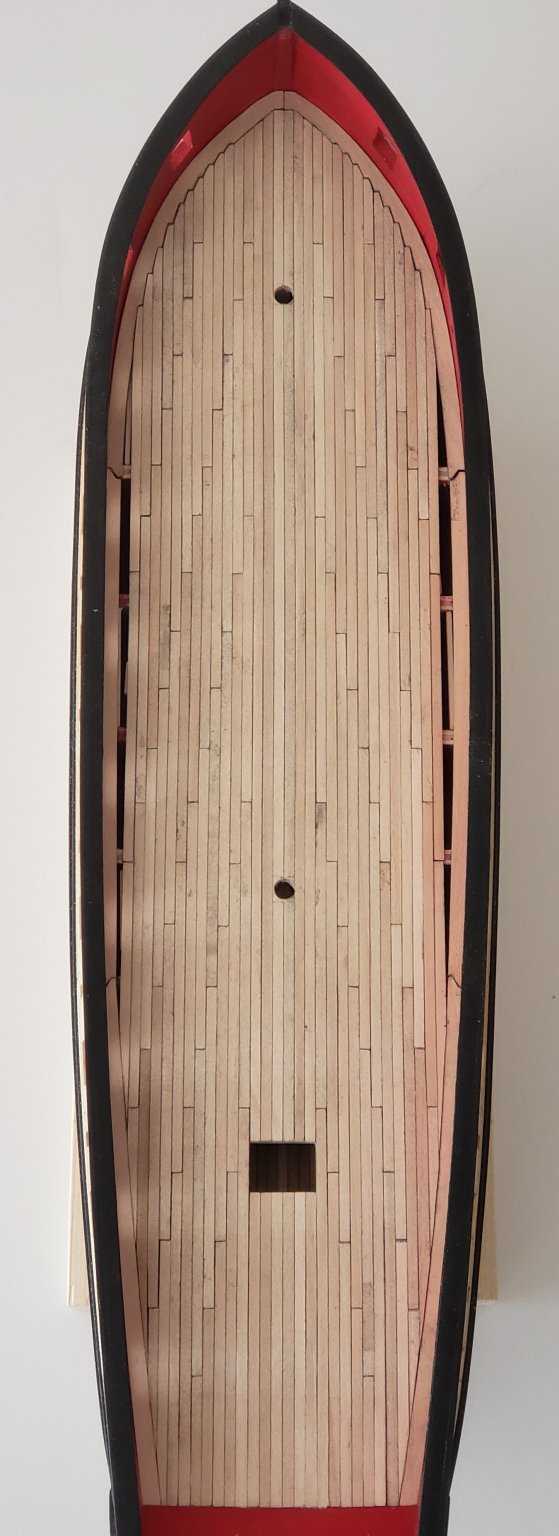
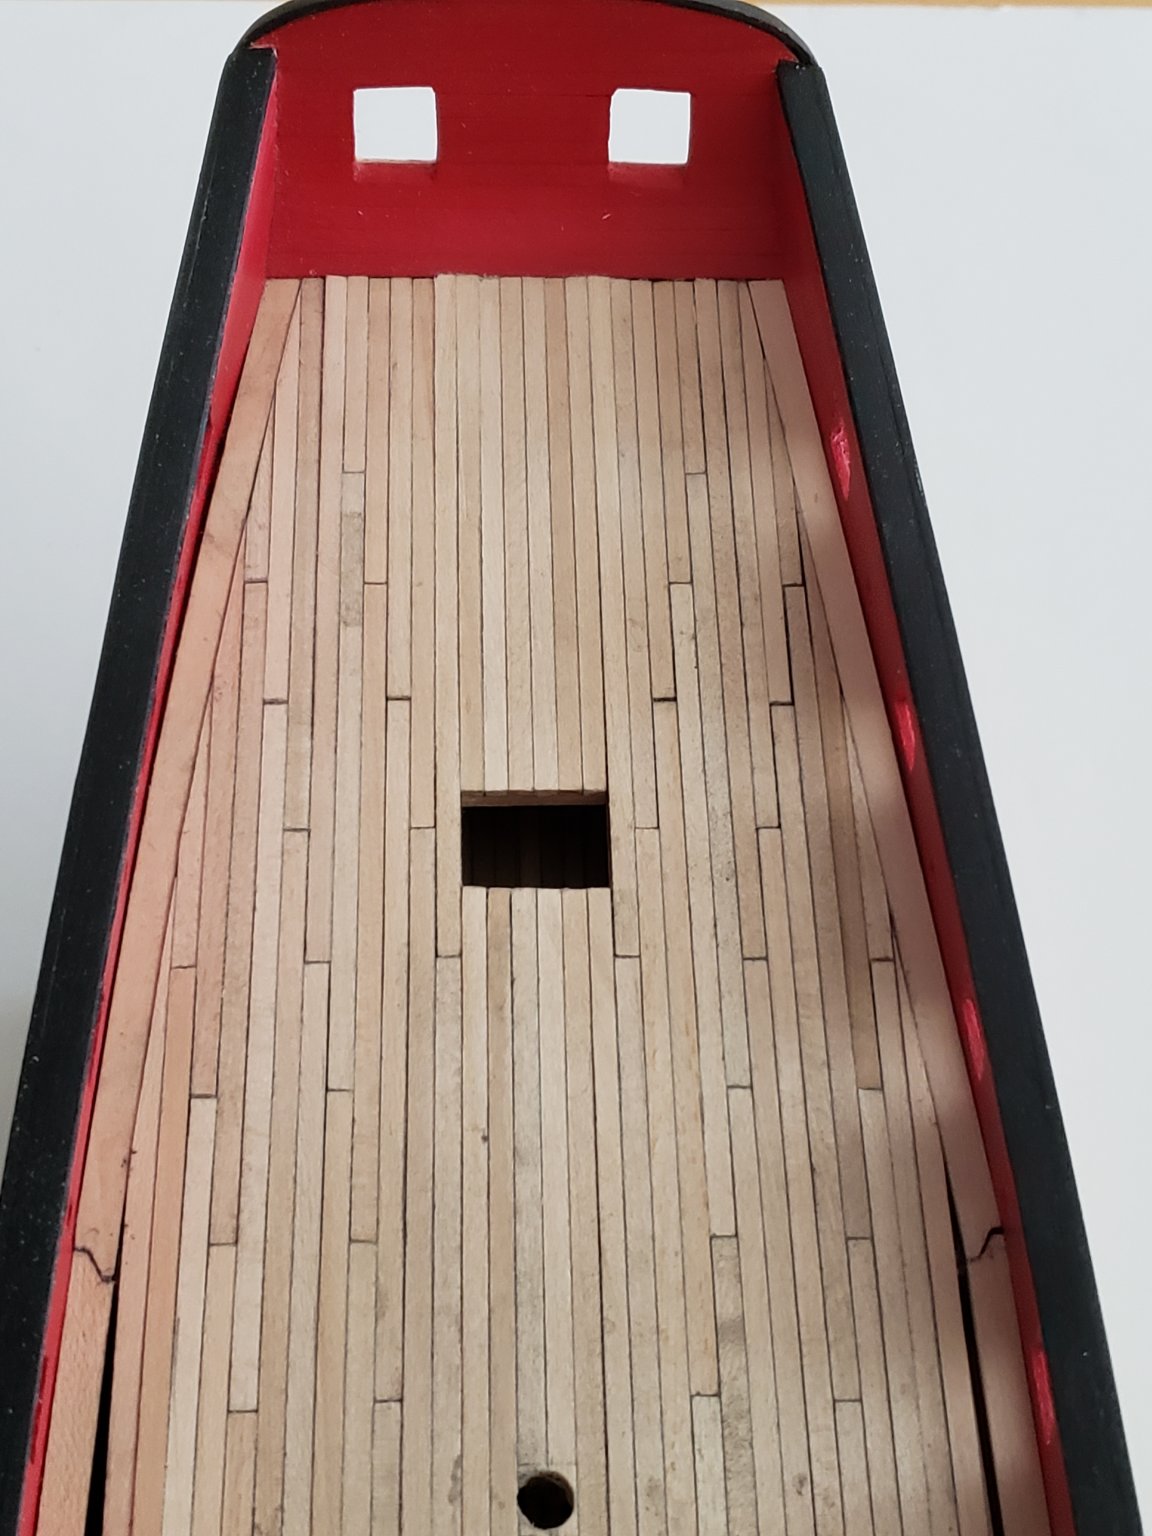
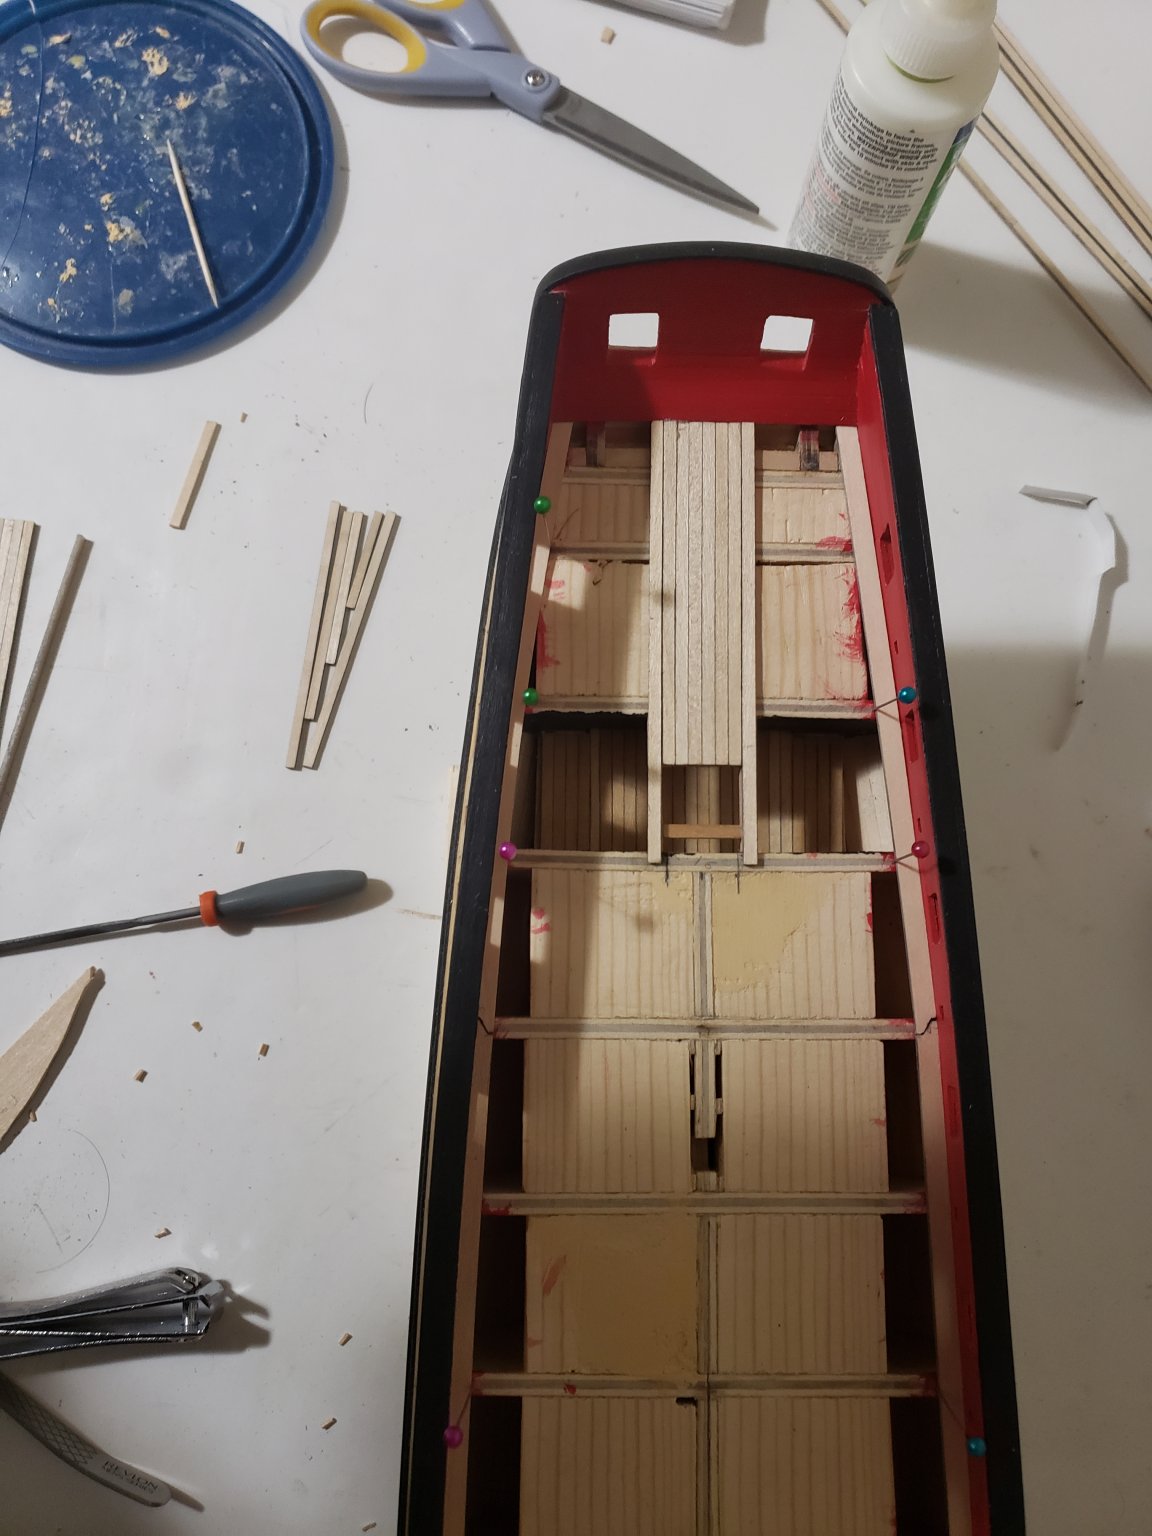
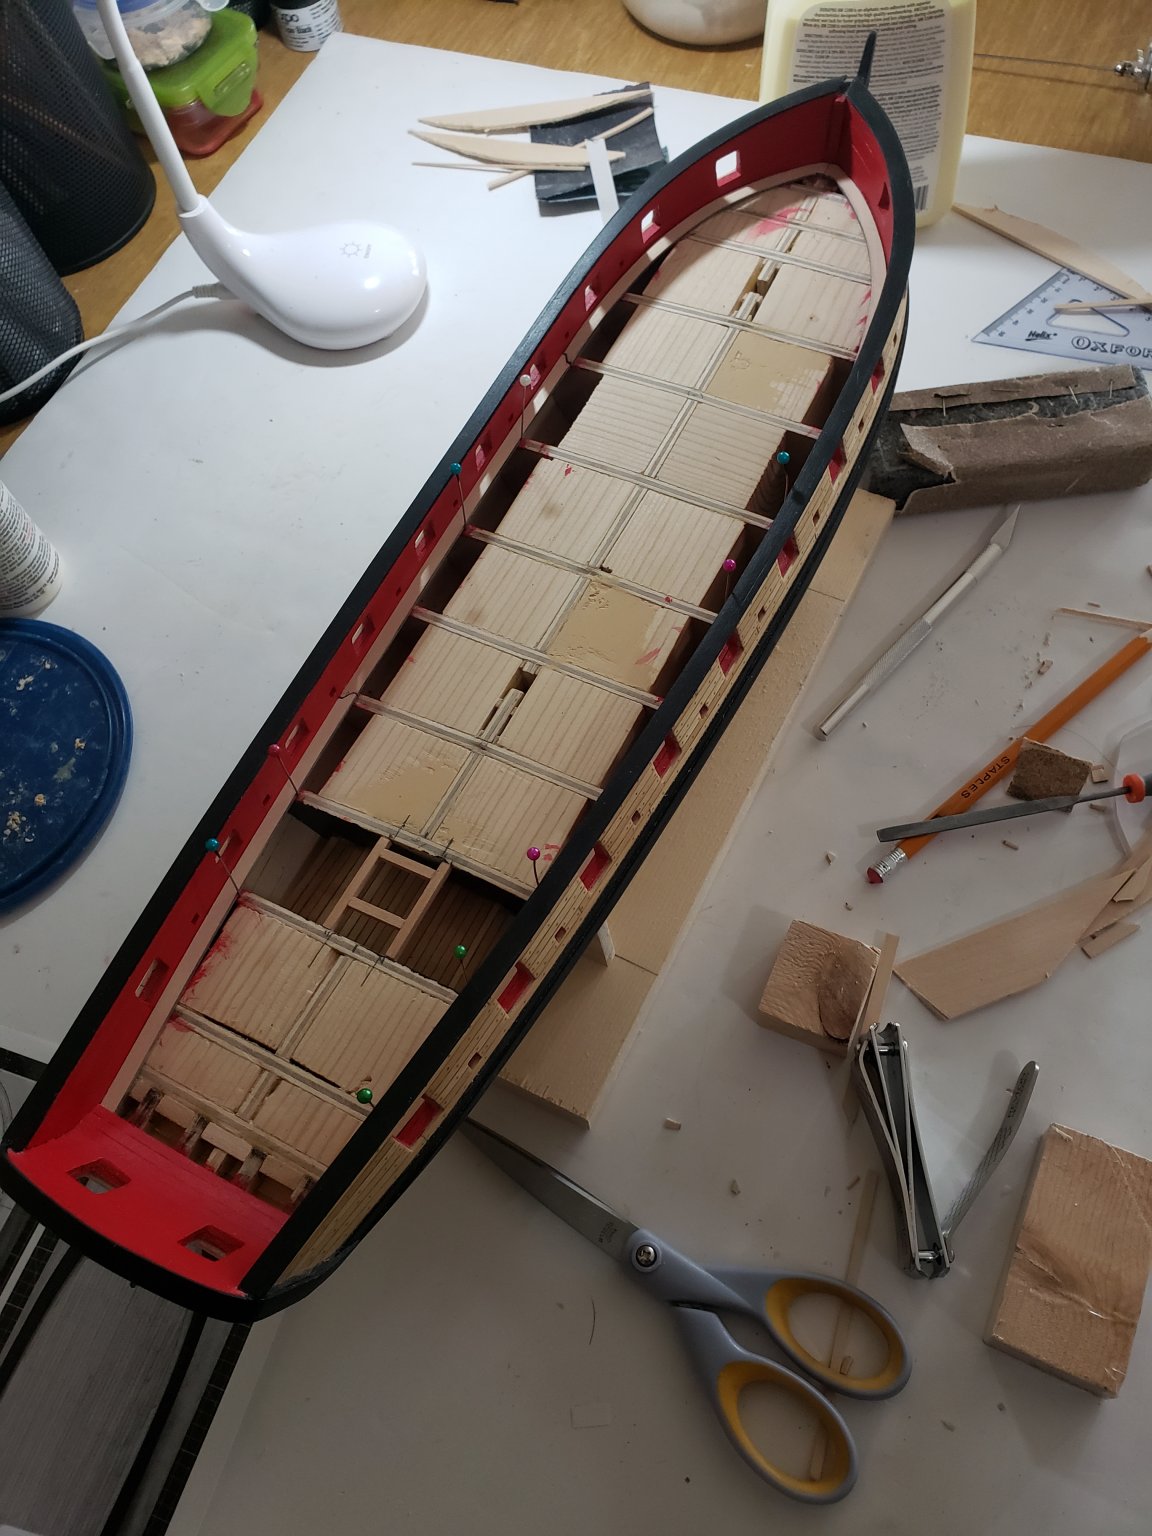
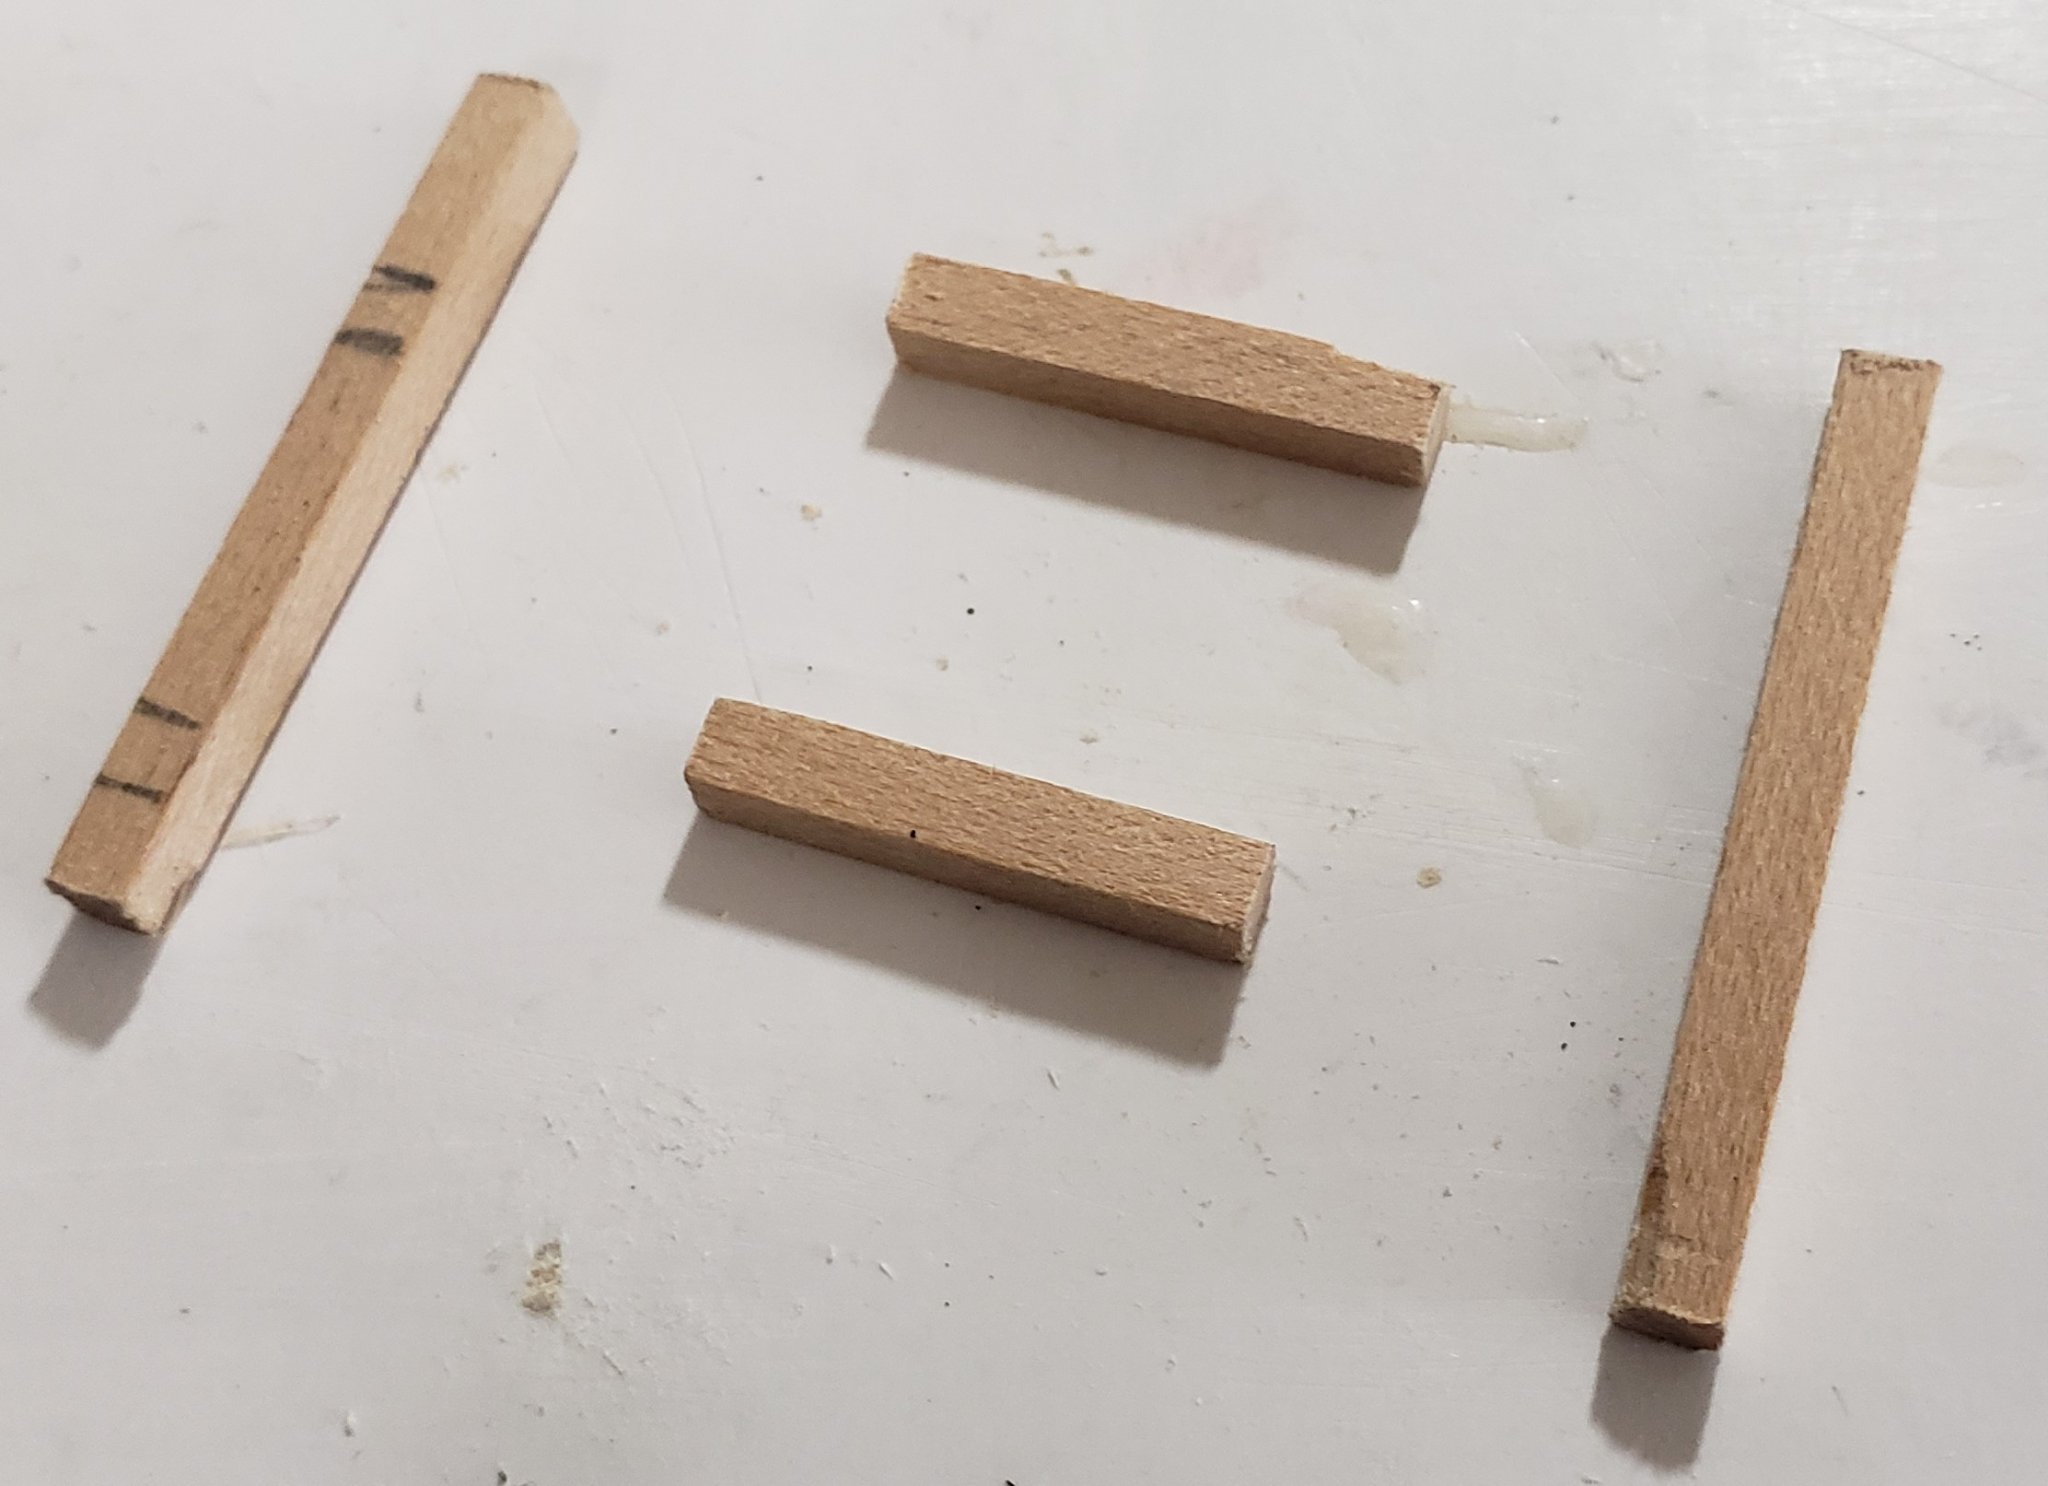
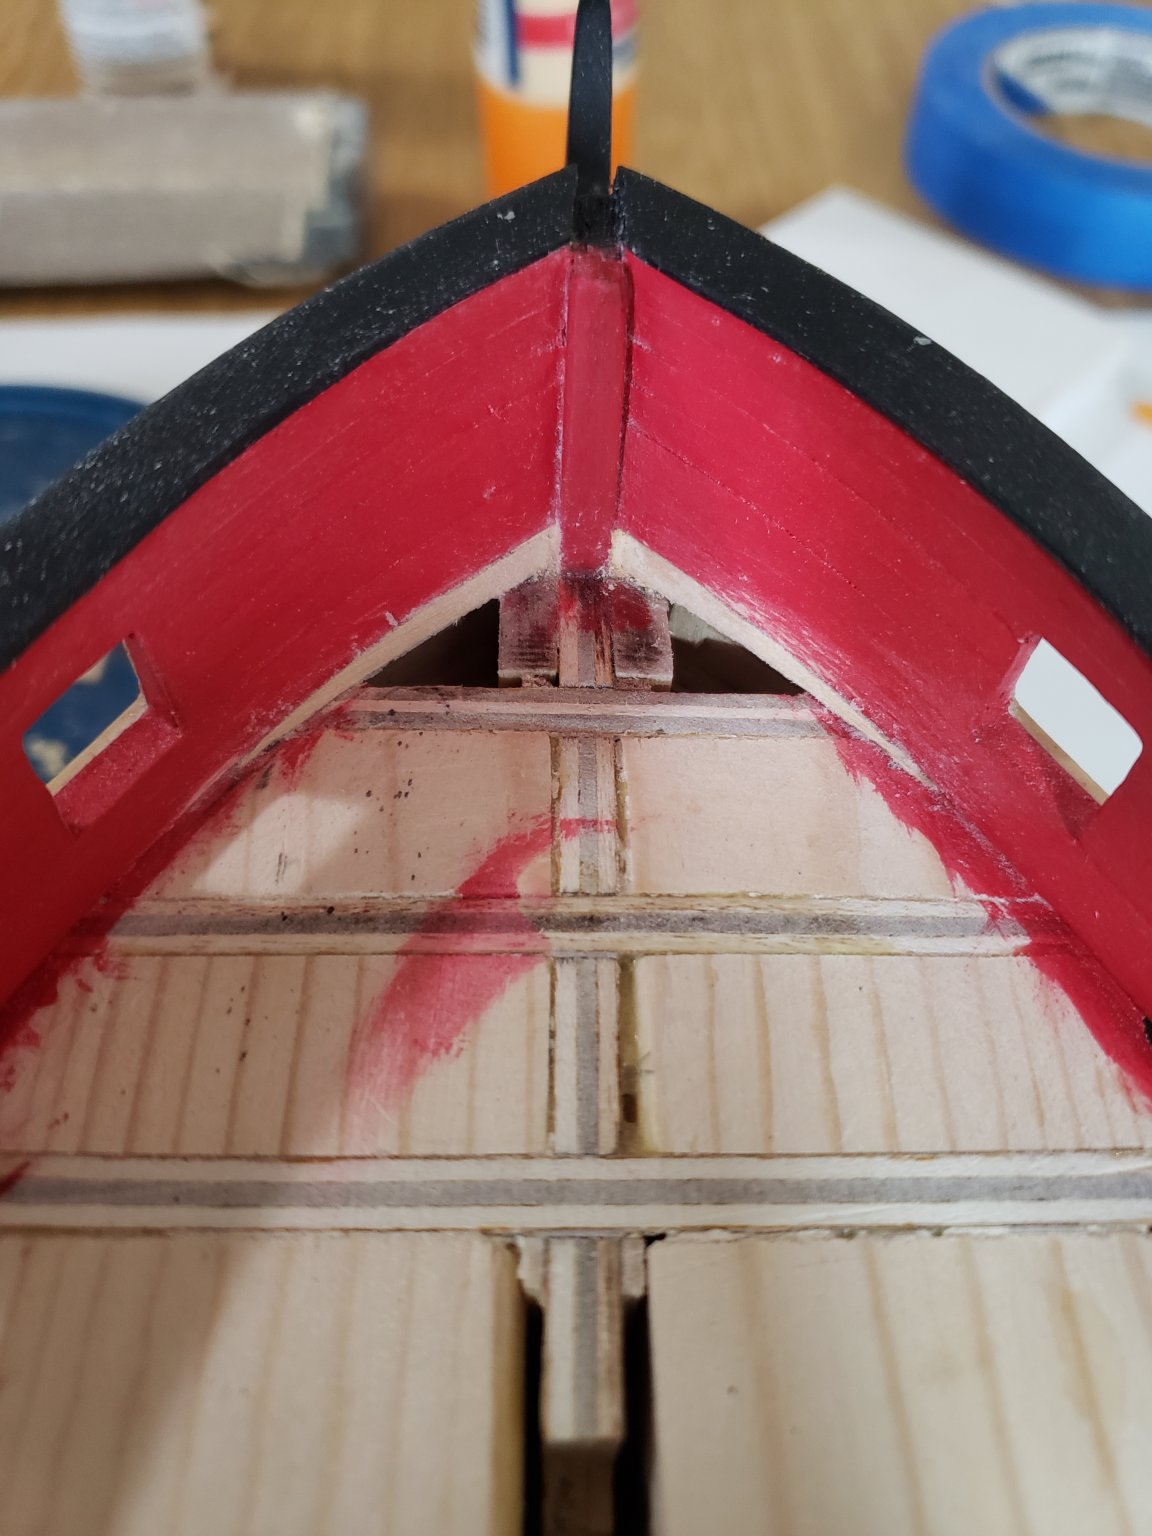
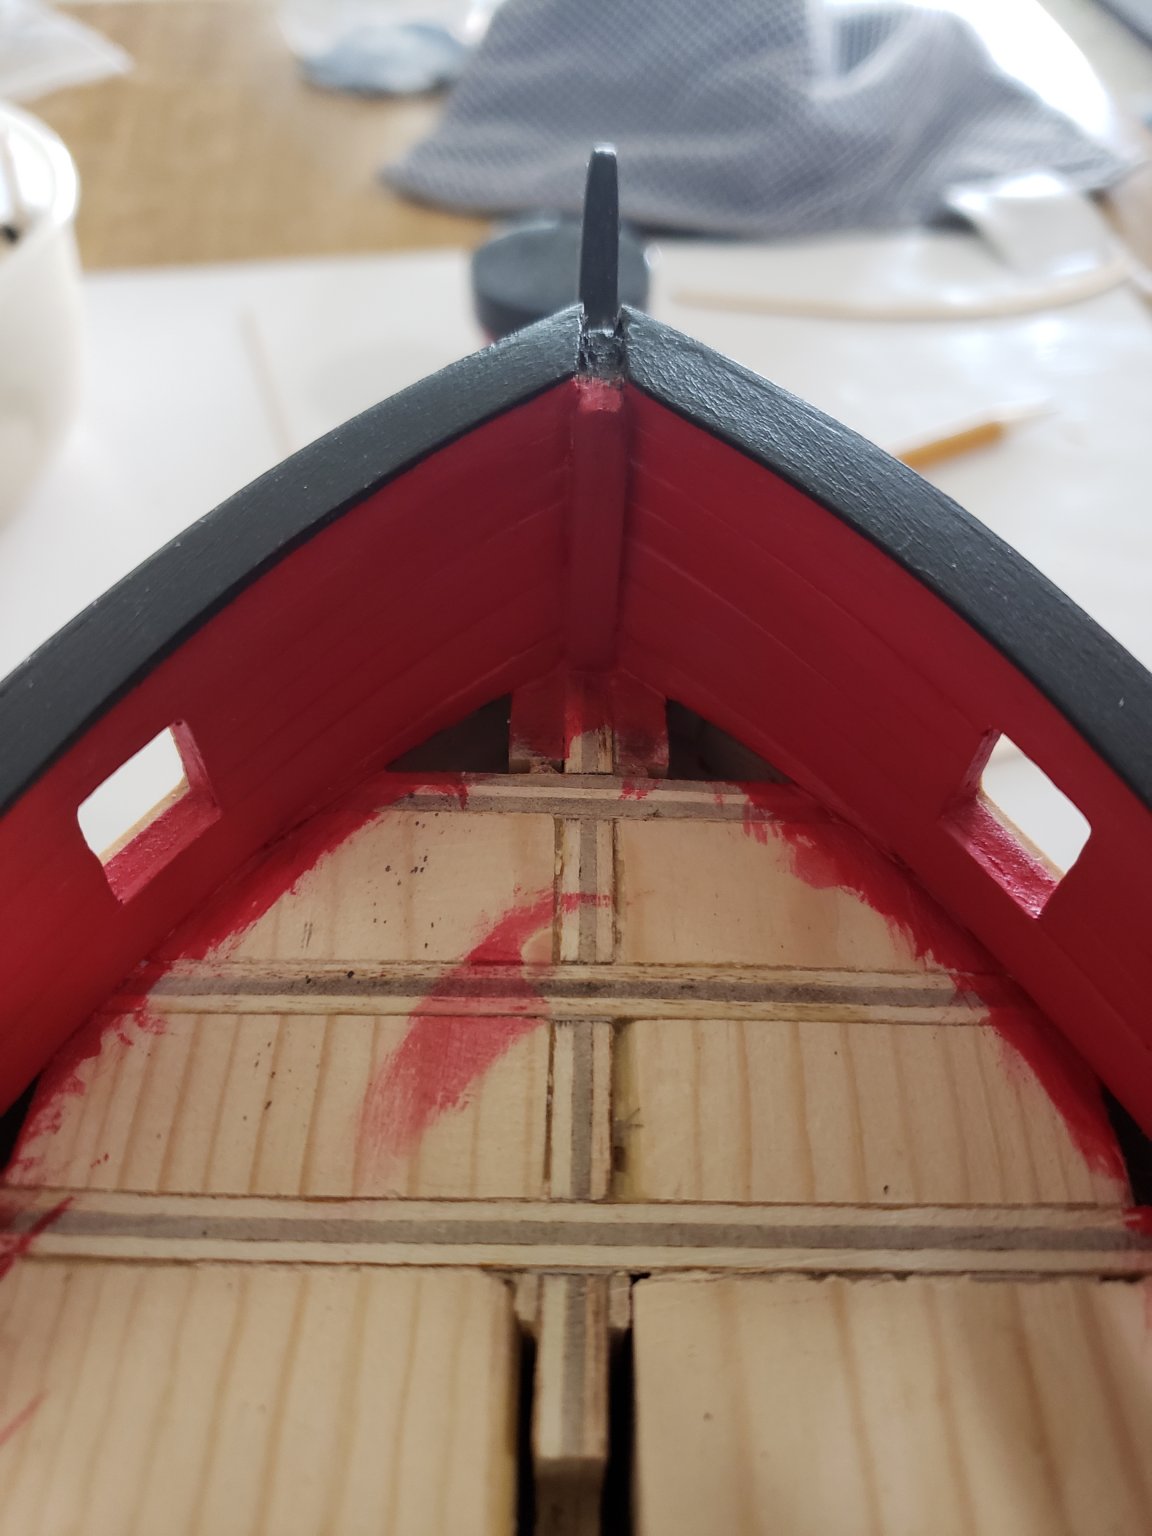
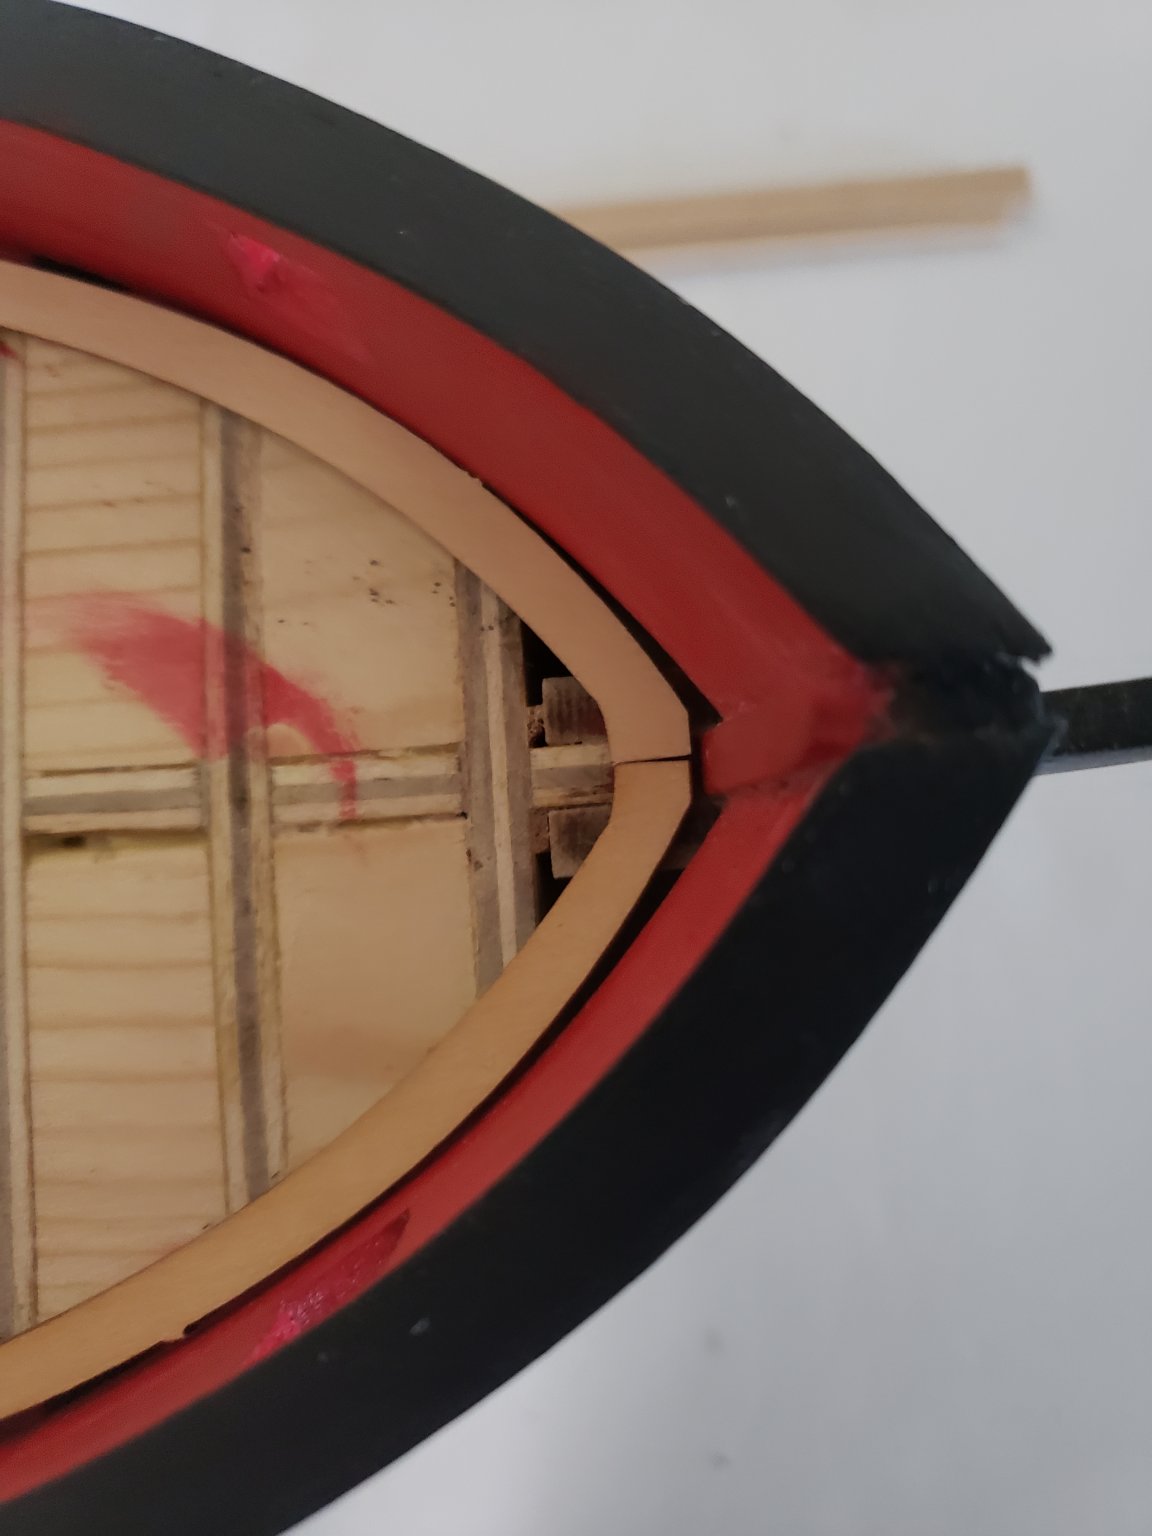
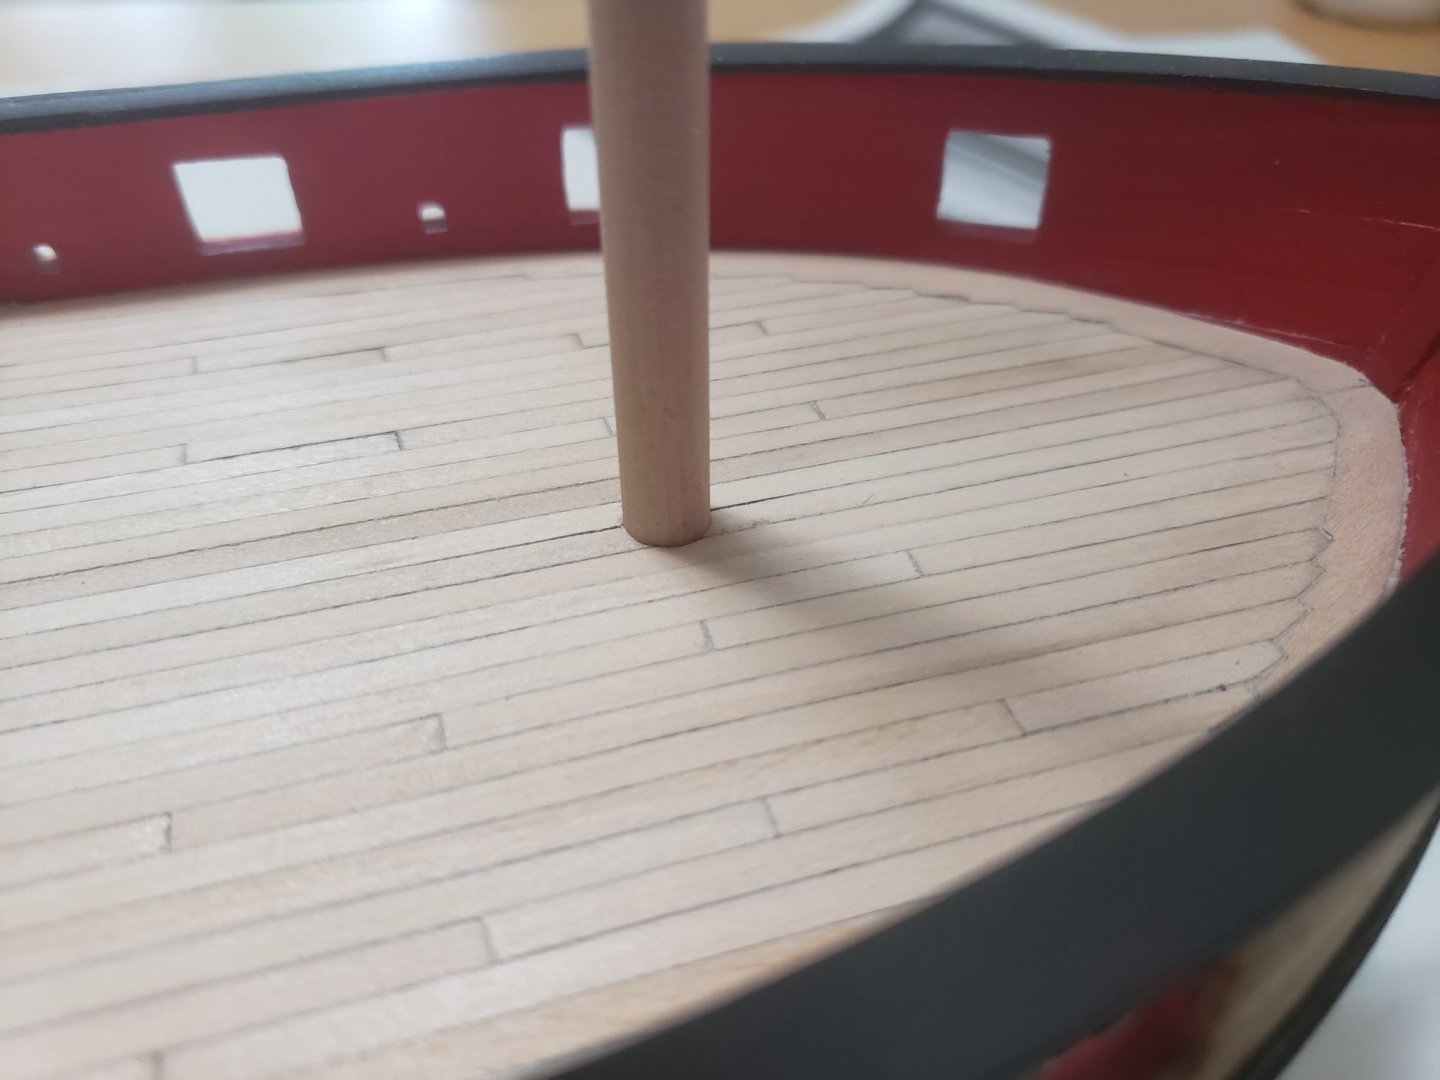
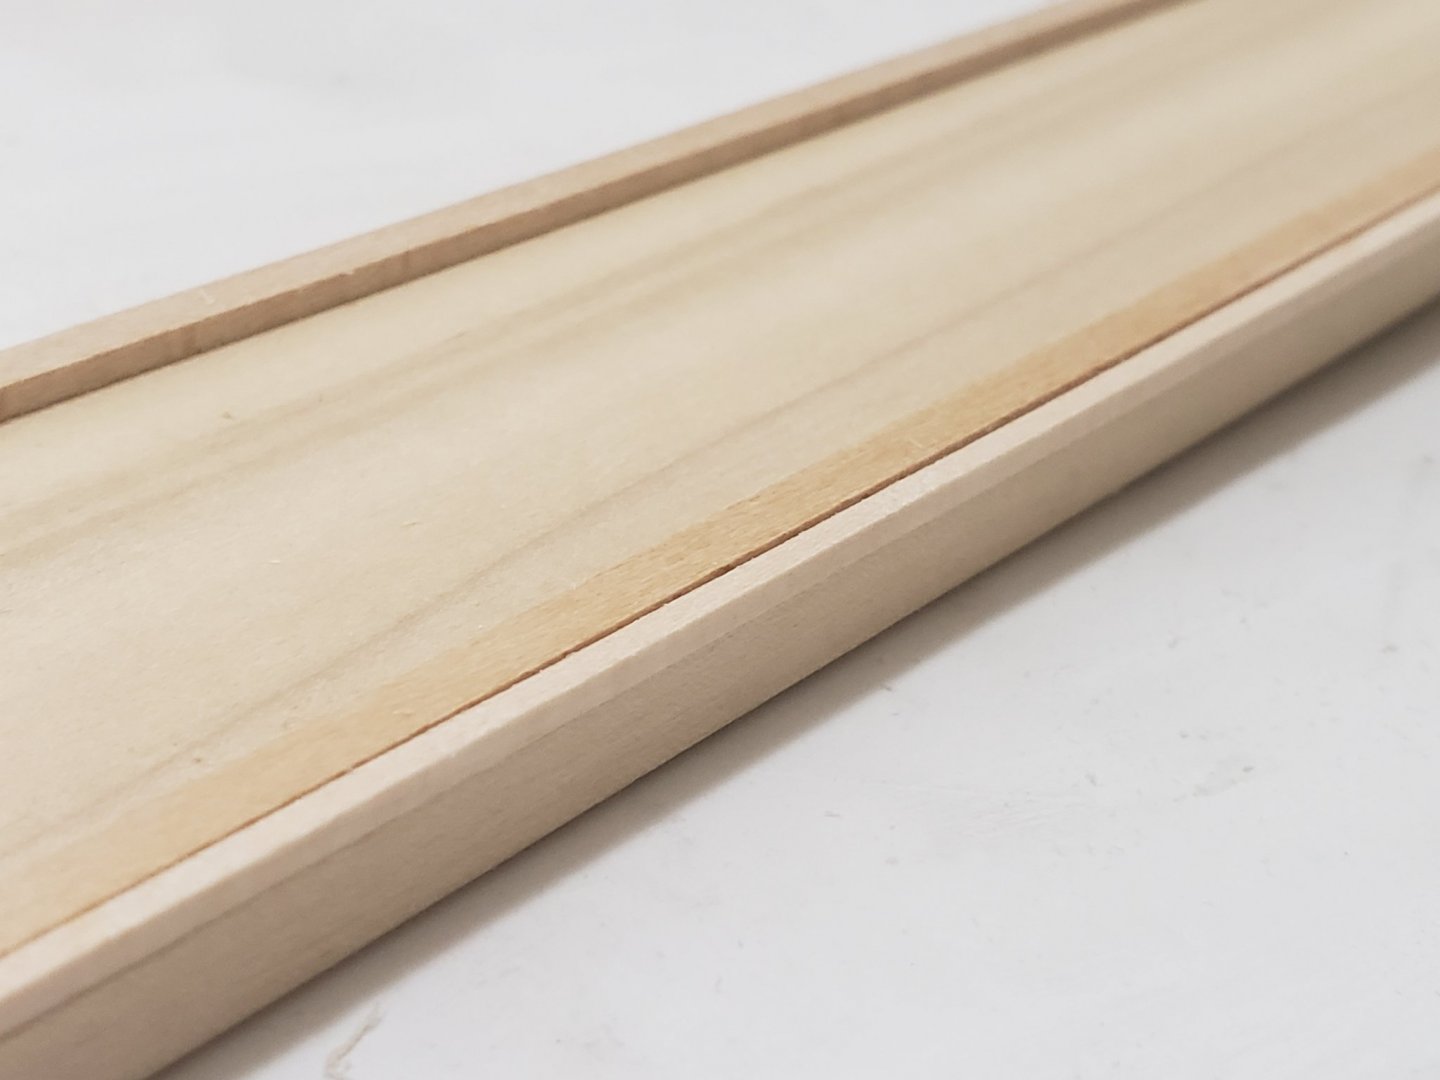
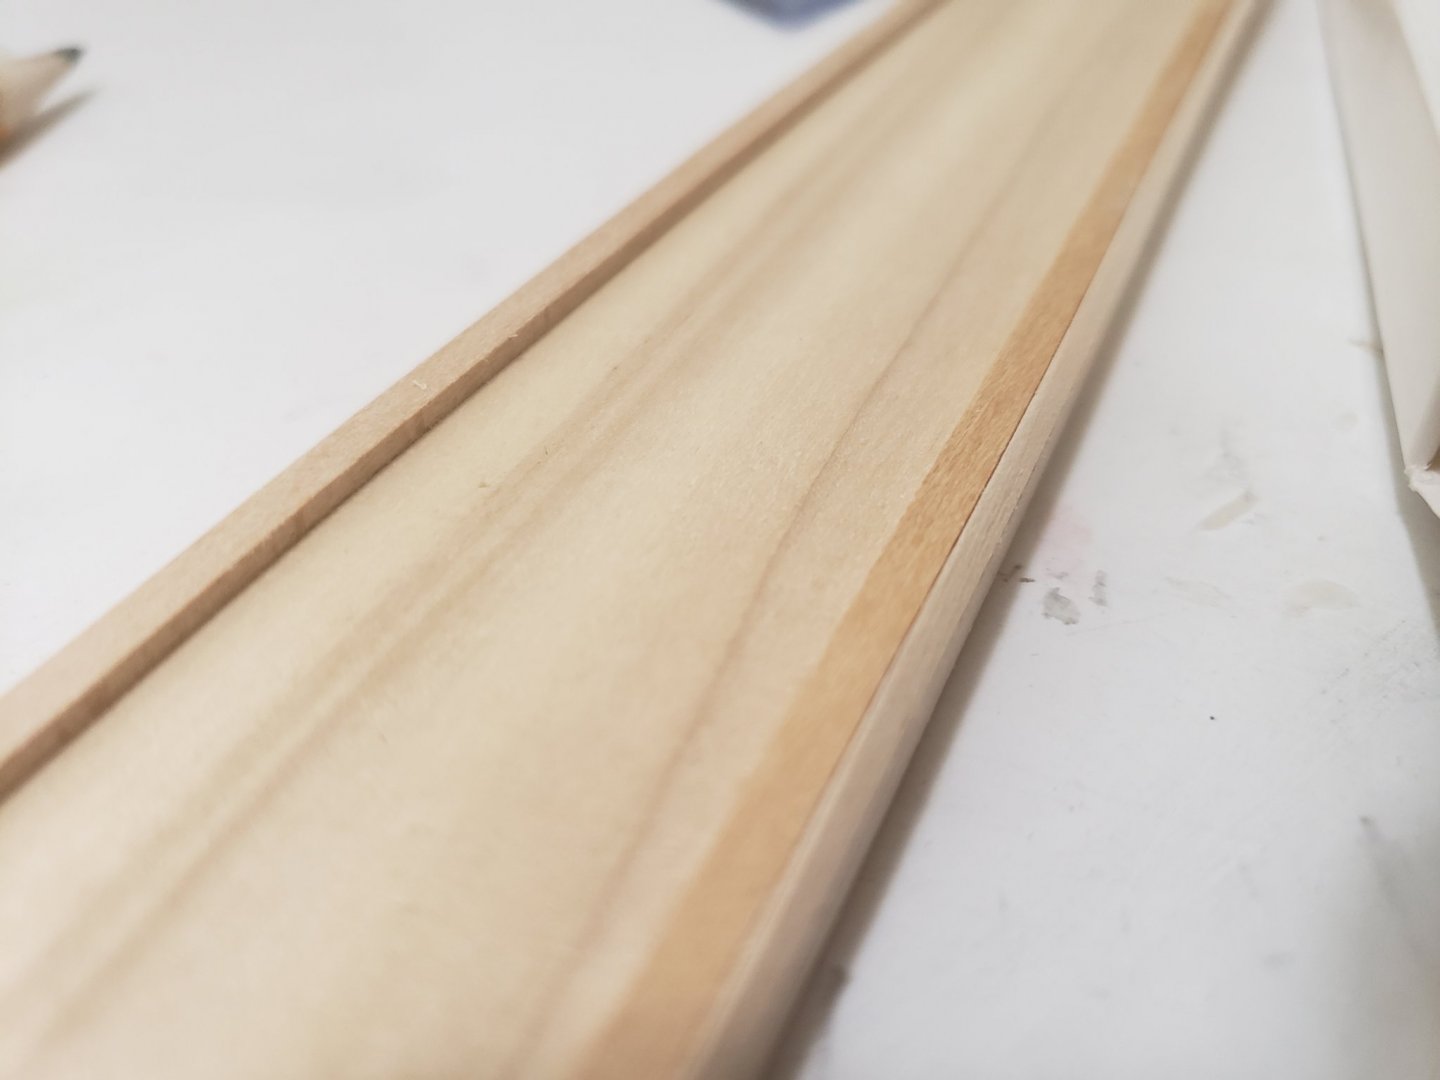
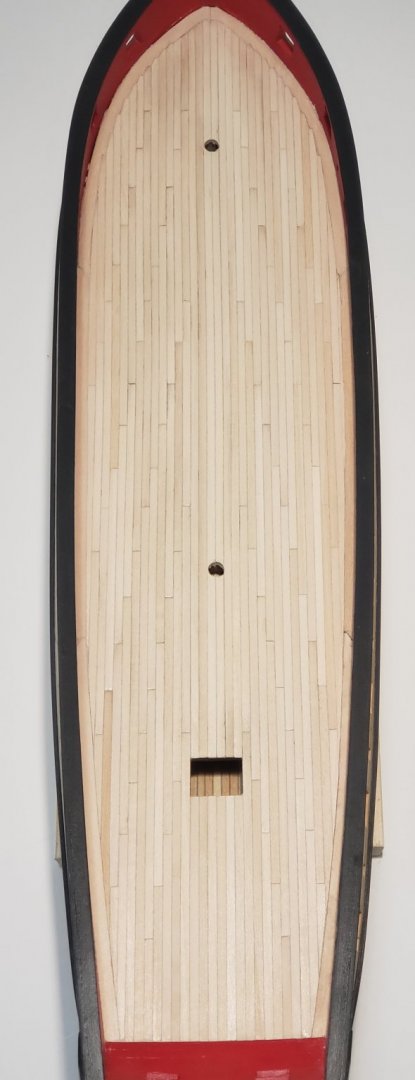
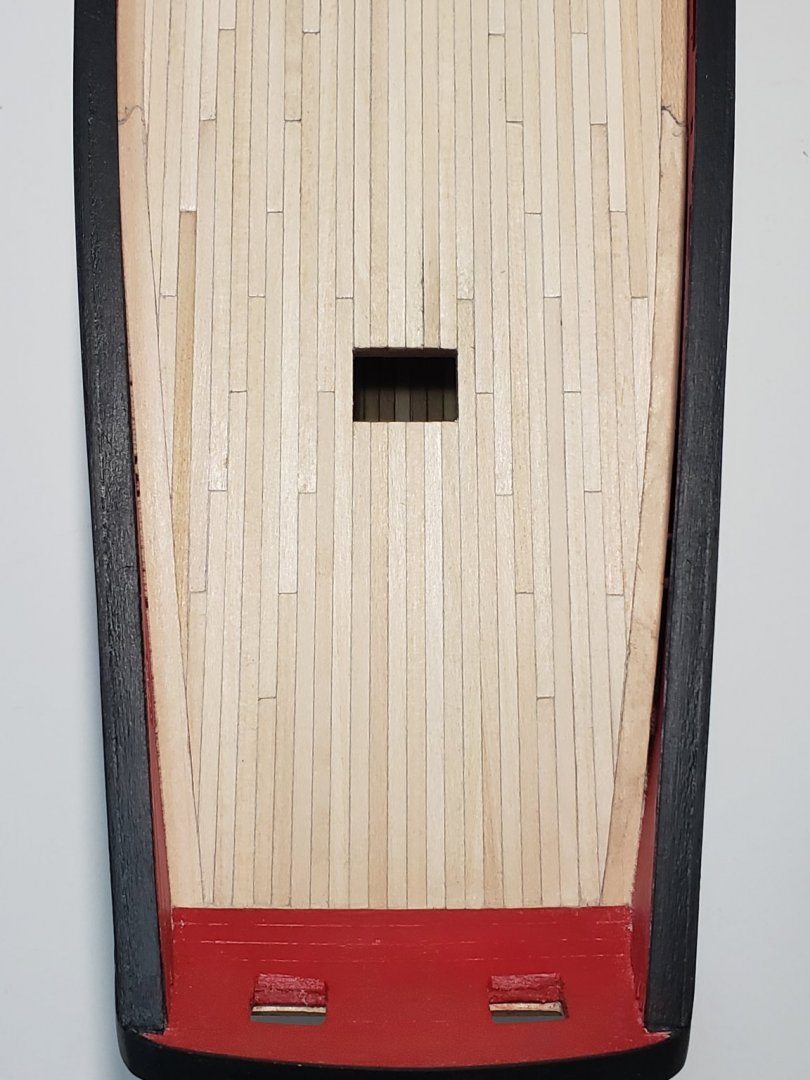
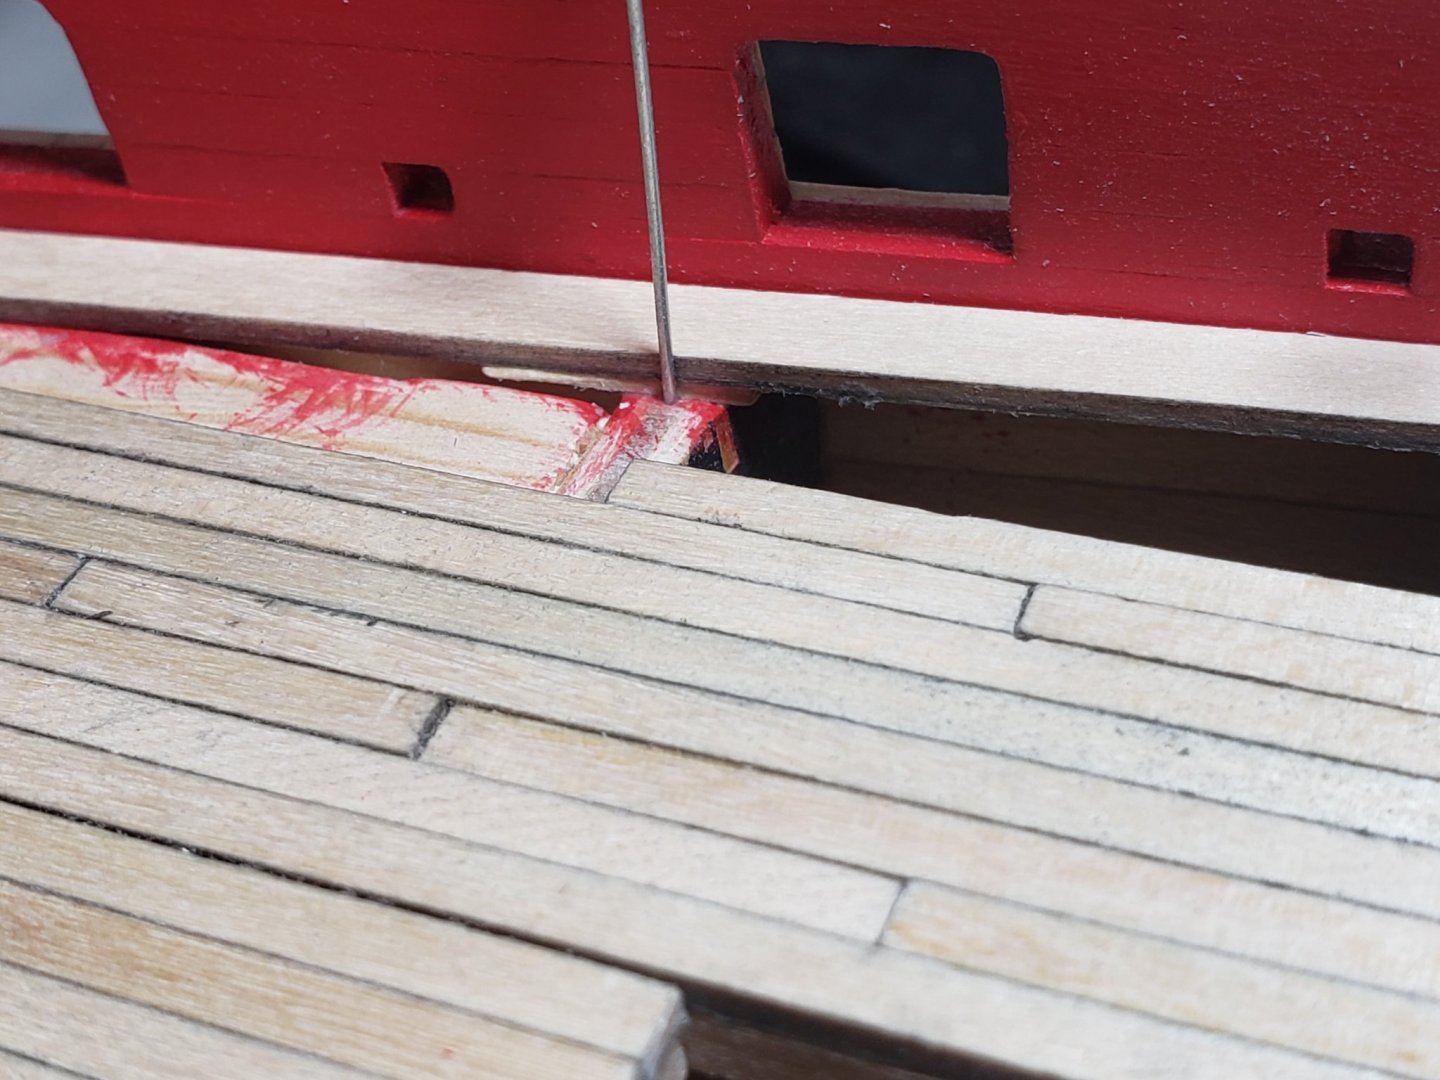
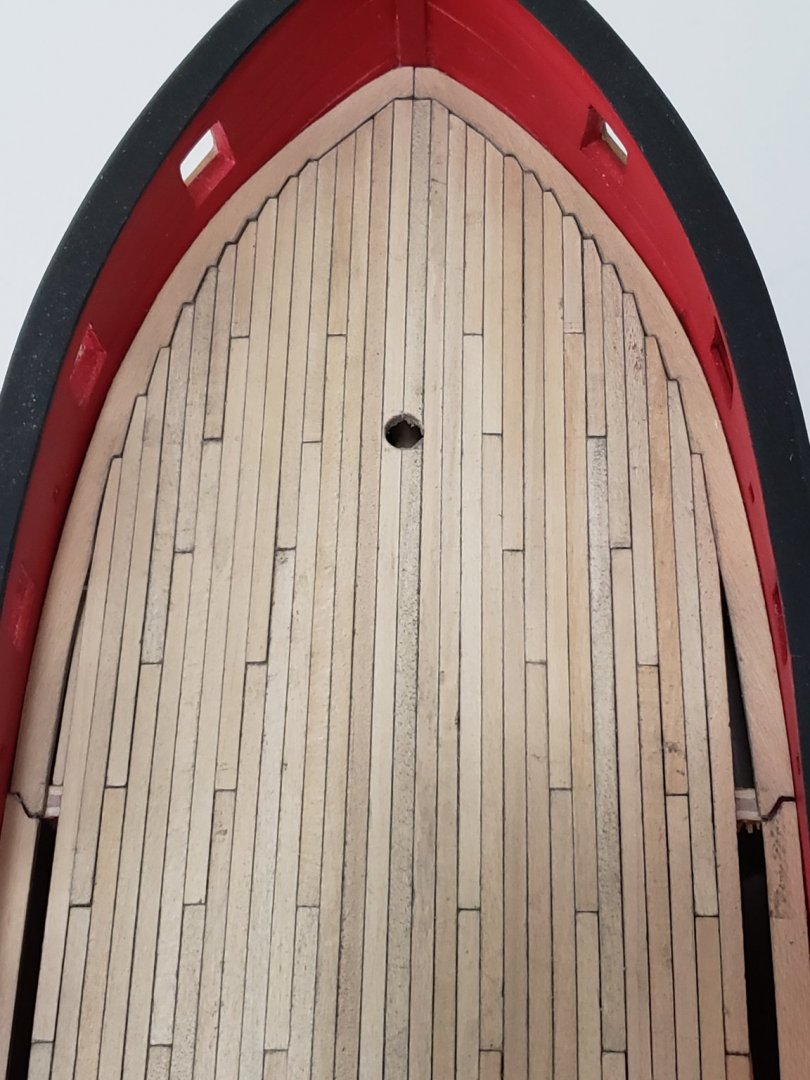
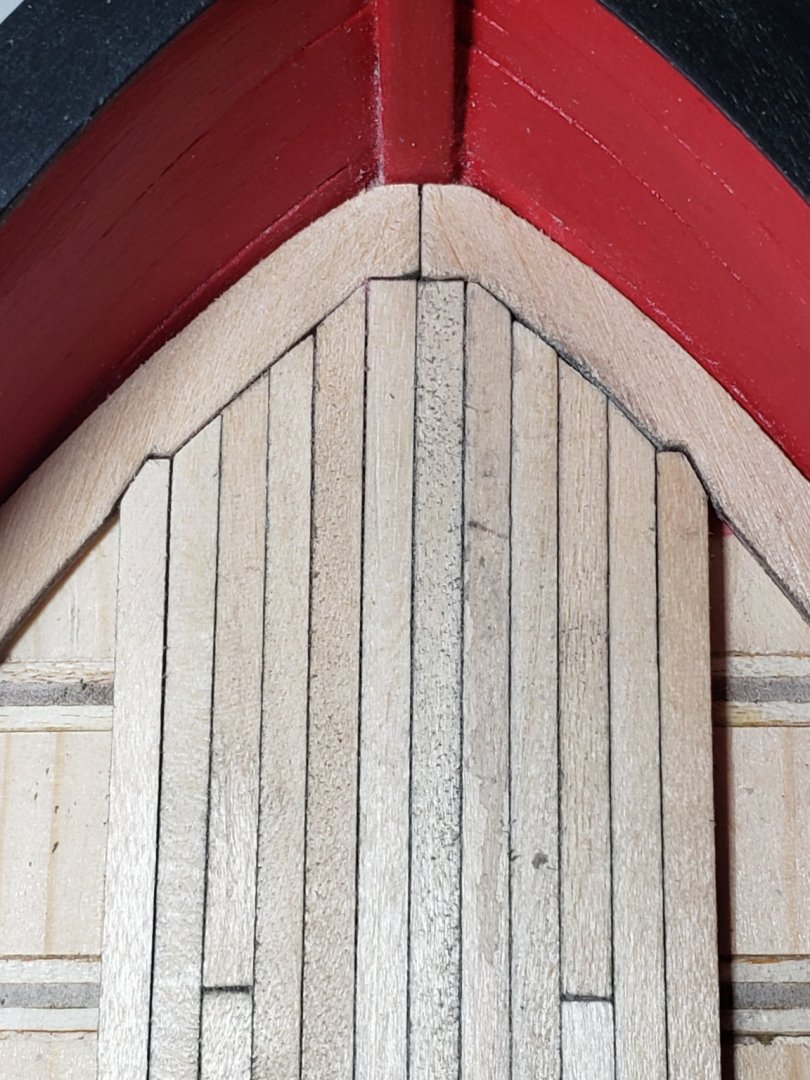
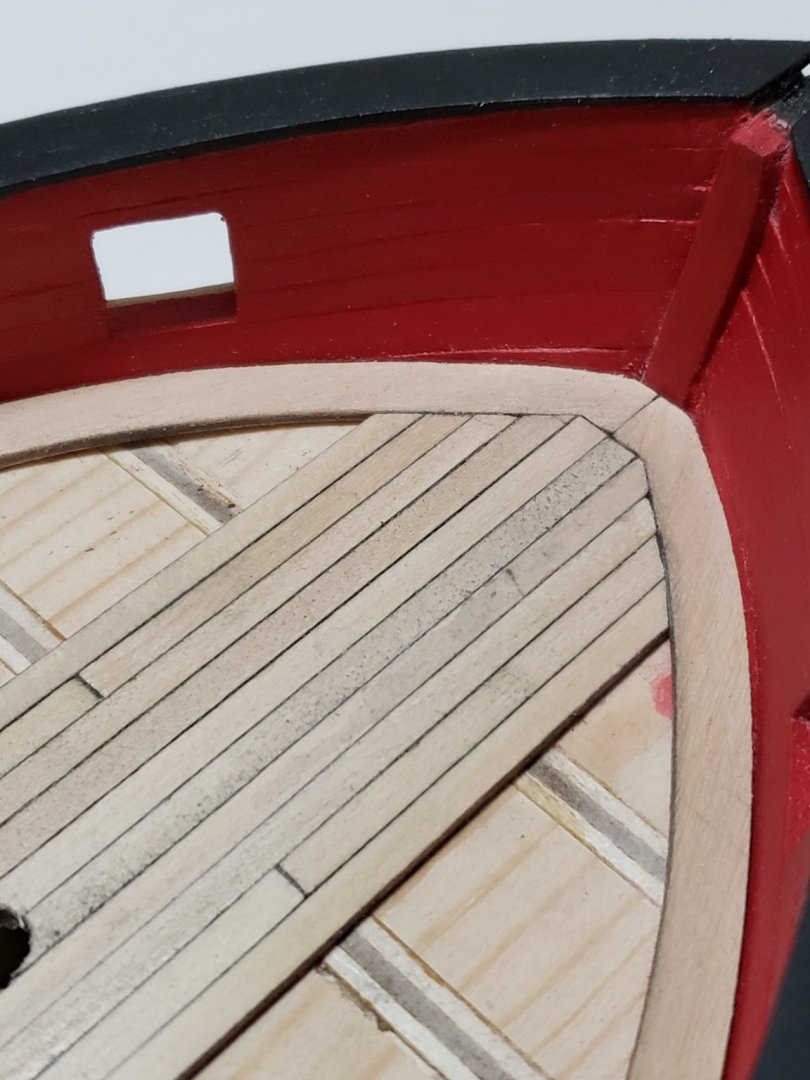
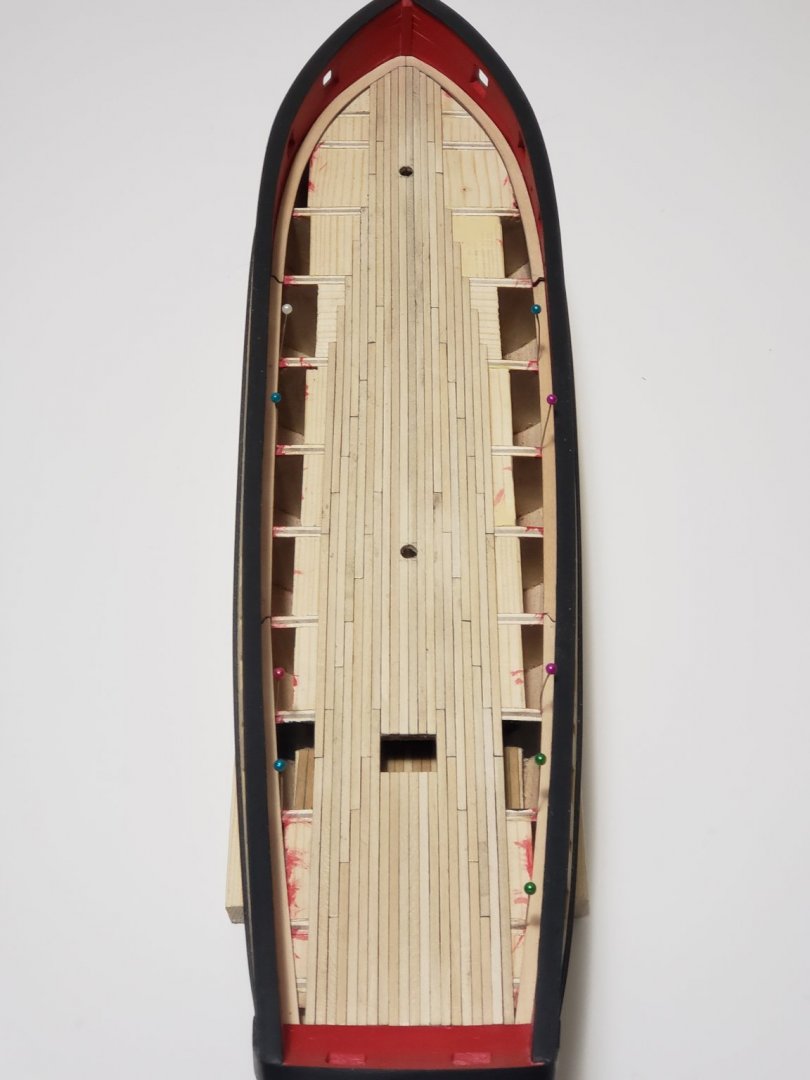
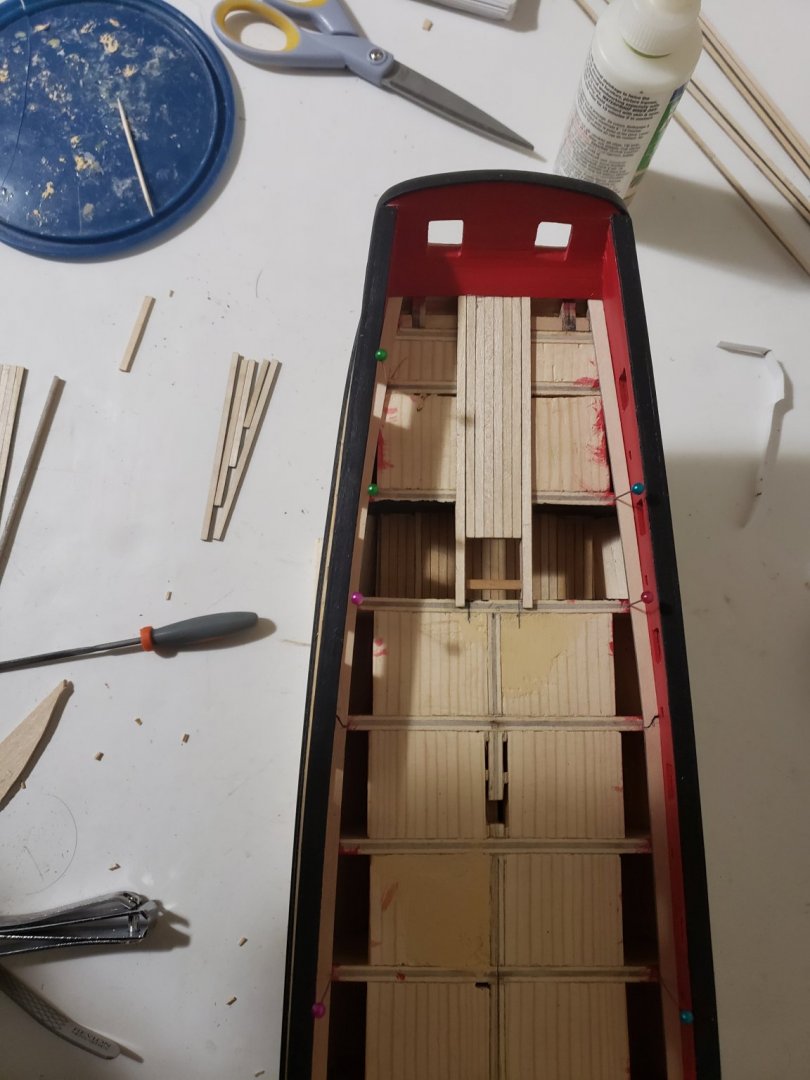
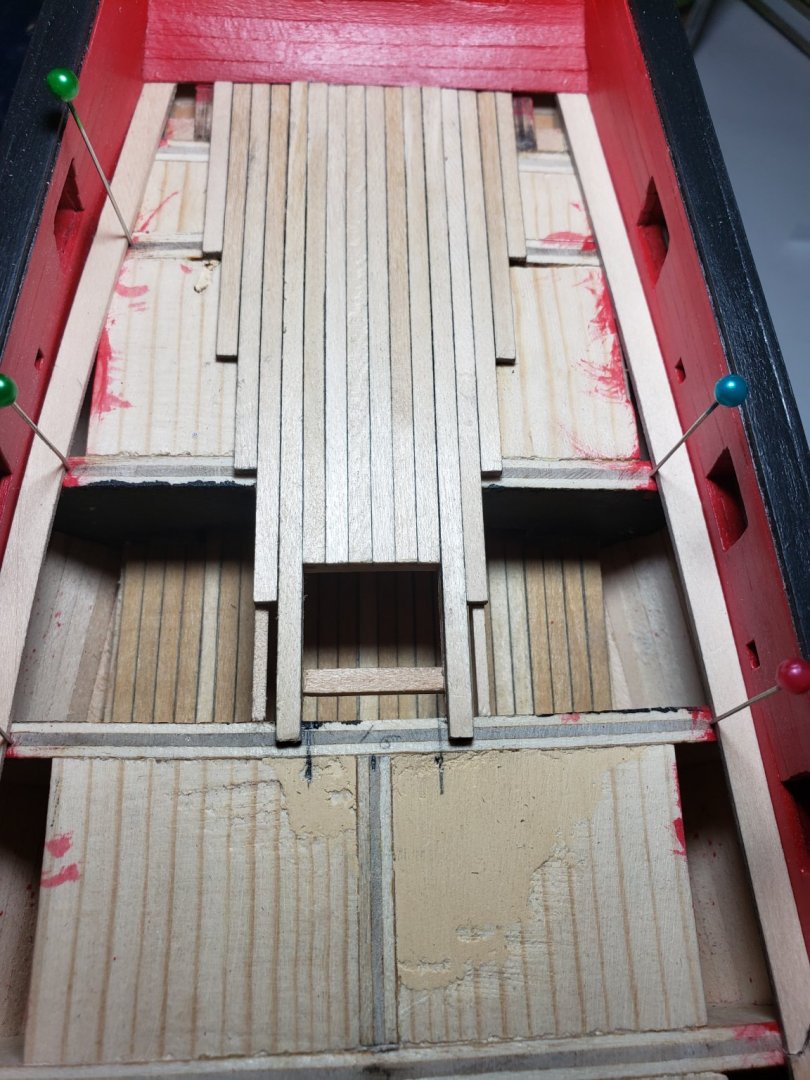
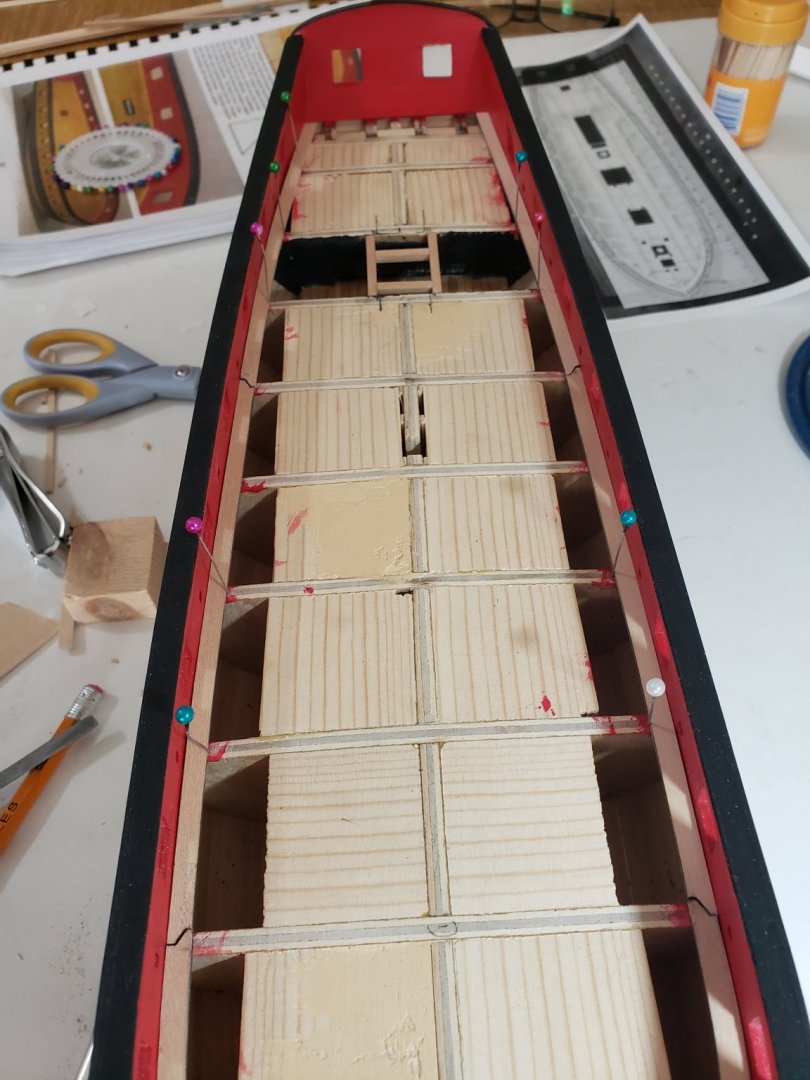
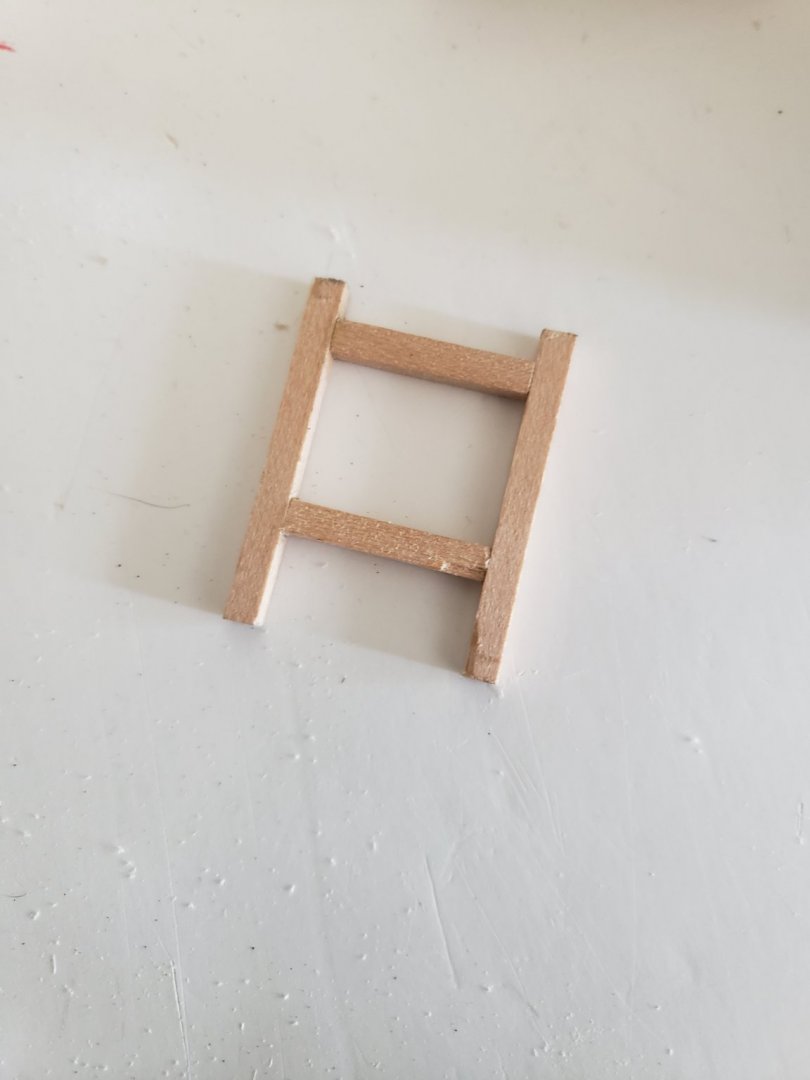
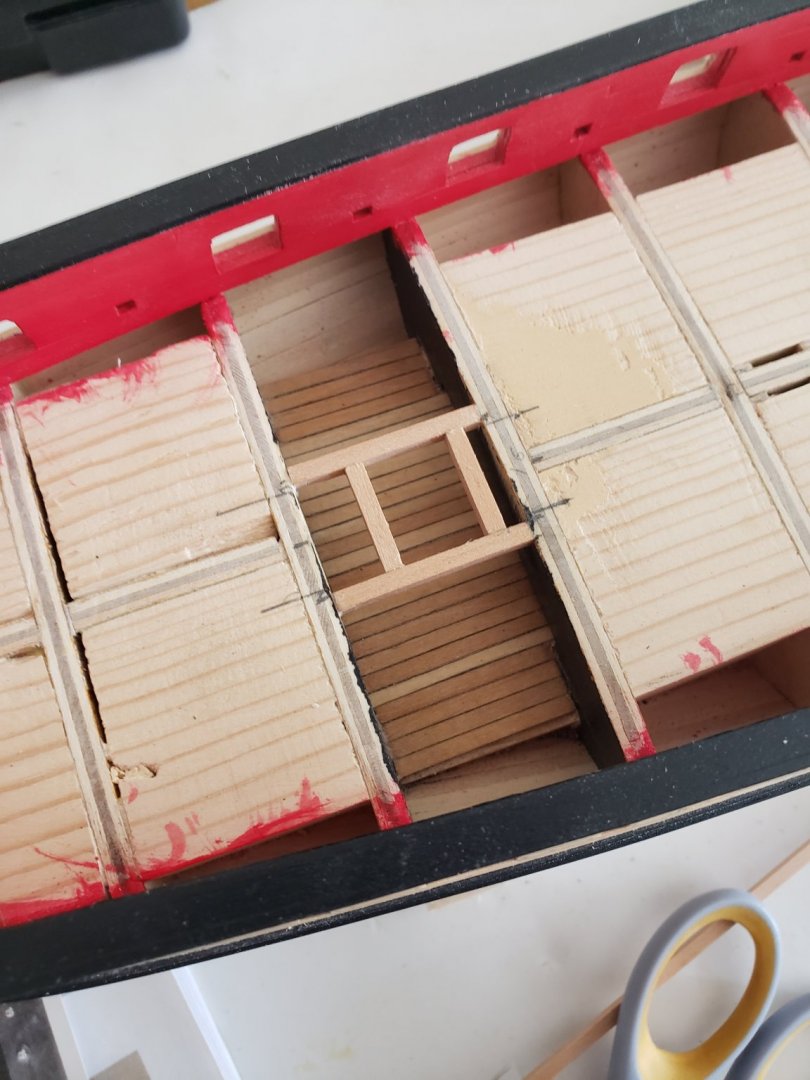
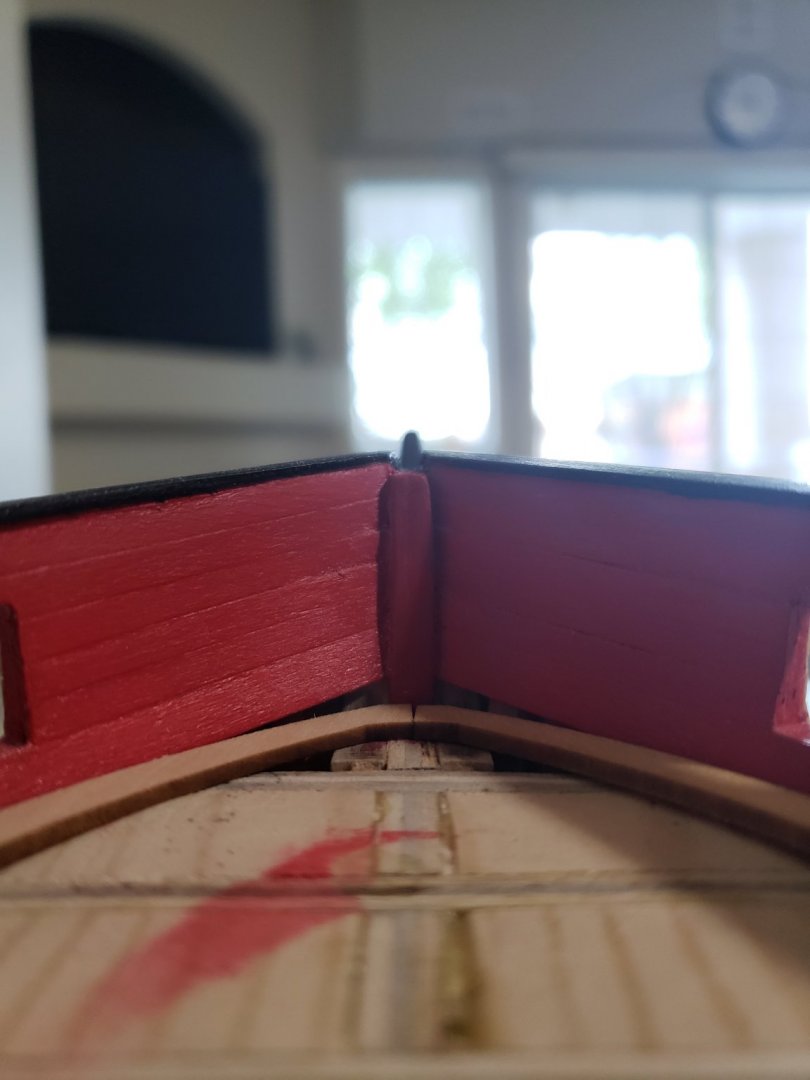
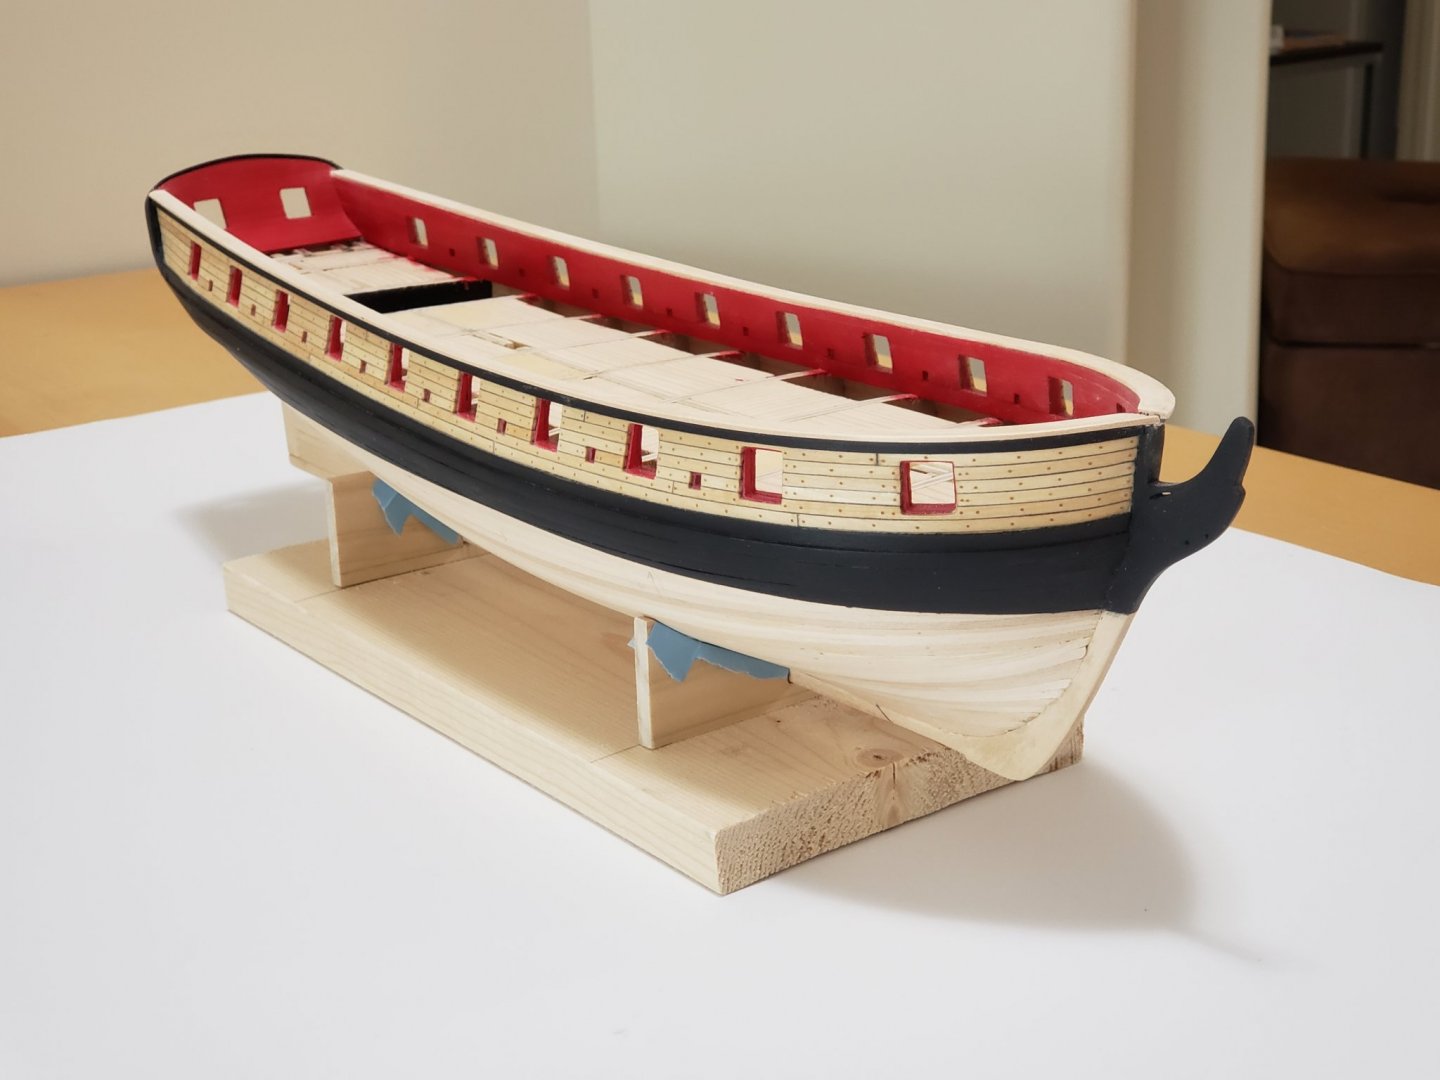
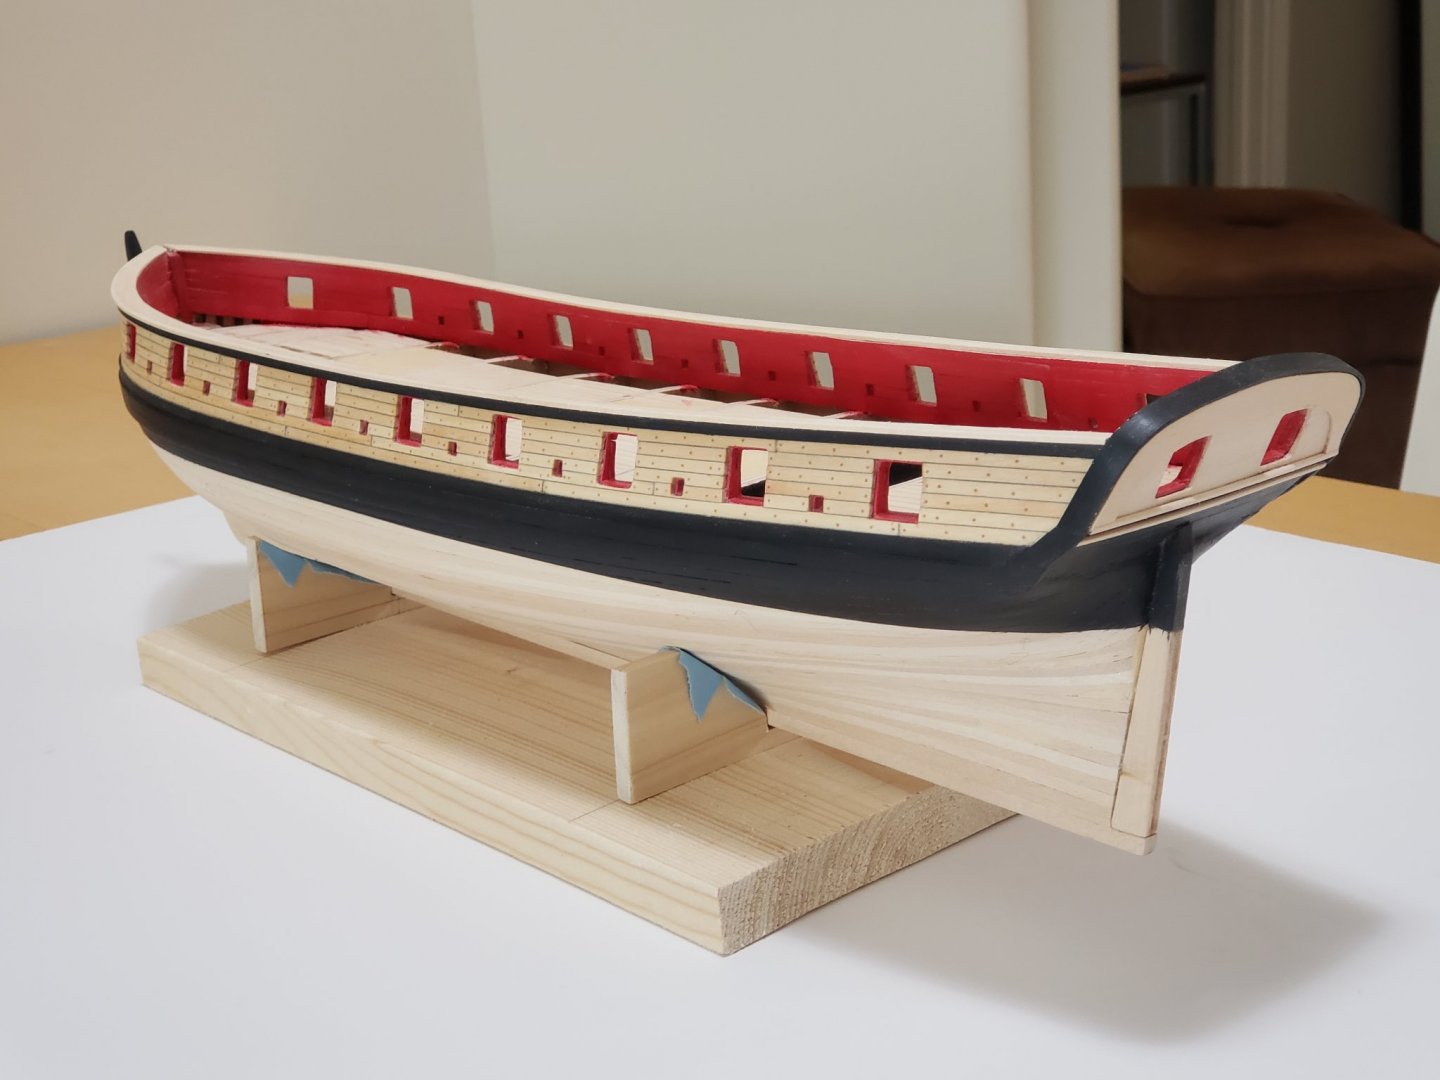
Thanks so much for the kind words Hamilton, Voyageur, and Richard. Much appreciated And thanks all for the likes! Made some small bits of progress: 1) I was not able to find brass (or any metal) L section of the correct dimensions, so I made my own jig to make the waterways. I used Robin's idea with a bit of a twist. One of the supplied 1/8 x 1/16 inch basswood strips was stuck on a scrap piece of wood having a sharp 90 deg edge. I stuck the basswood strip 1/16 inch away from the edge using the 1/16 x 1/16 inch strip as a guide. I'll be installing the waterway once I finish the nailing. Jig without the 1/16" x 1/16" strip: Jig with 1/16" x 1/16" strip unsanded: Jig with 1/16" x 1/16" strip being sanded: 2) The 1/4" mast holes were widened to 5/16" using a needle file, and that way saved a couple of $$ from buying a drillbit . The dowel fits perfectly in both holes: 3) Lastly, I marked the locations of the fittings and holes for the nails. The drilling will commence tomorrow. This is one item I am not looking forward to do, but am looking forward to complete... The areas beneath the the gratings will be painted black after the toothpicks are glued and sanded down.


- 950 replies
-
- 9
-

-
- syren
- model shipways
- (and 1 more)
-
Hope all is well and a false alarm. Silver lining is you can spend more time in the shipyard 😄 The head rail is looking real good, been reading that this is one of the most trickiest areas but looks like you got a good start! Also don't know if I mentioned this but am loving the look of the pearwood!
-
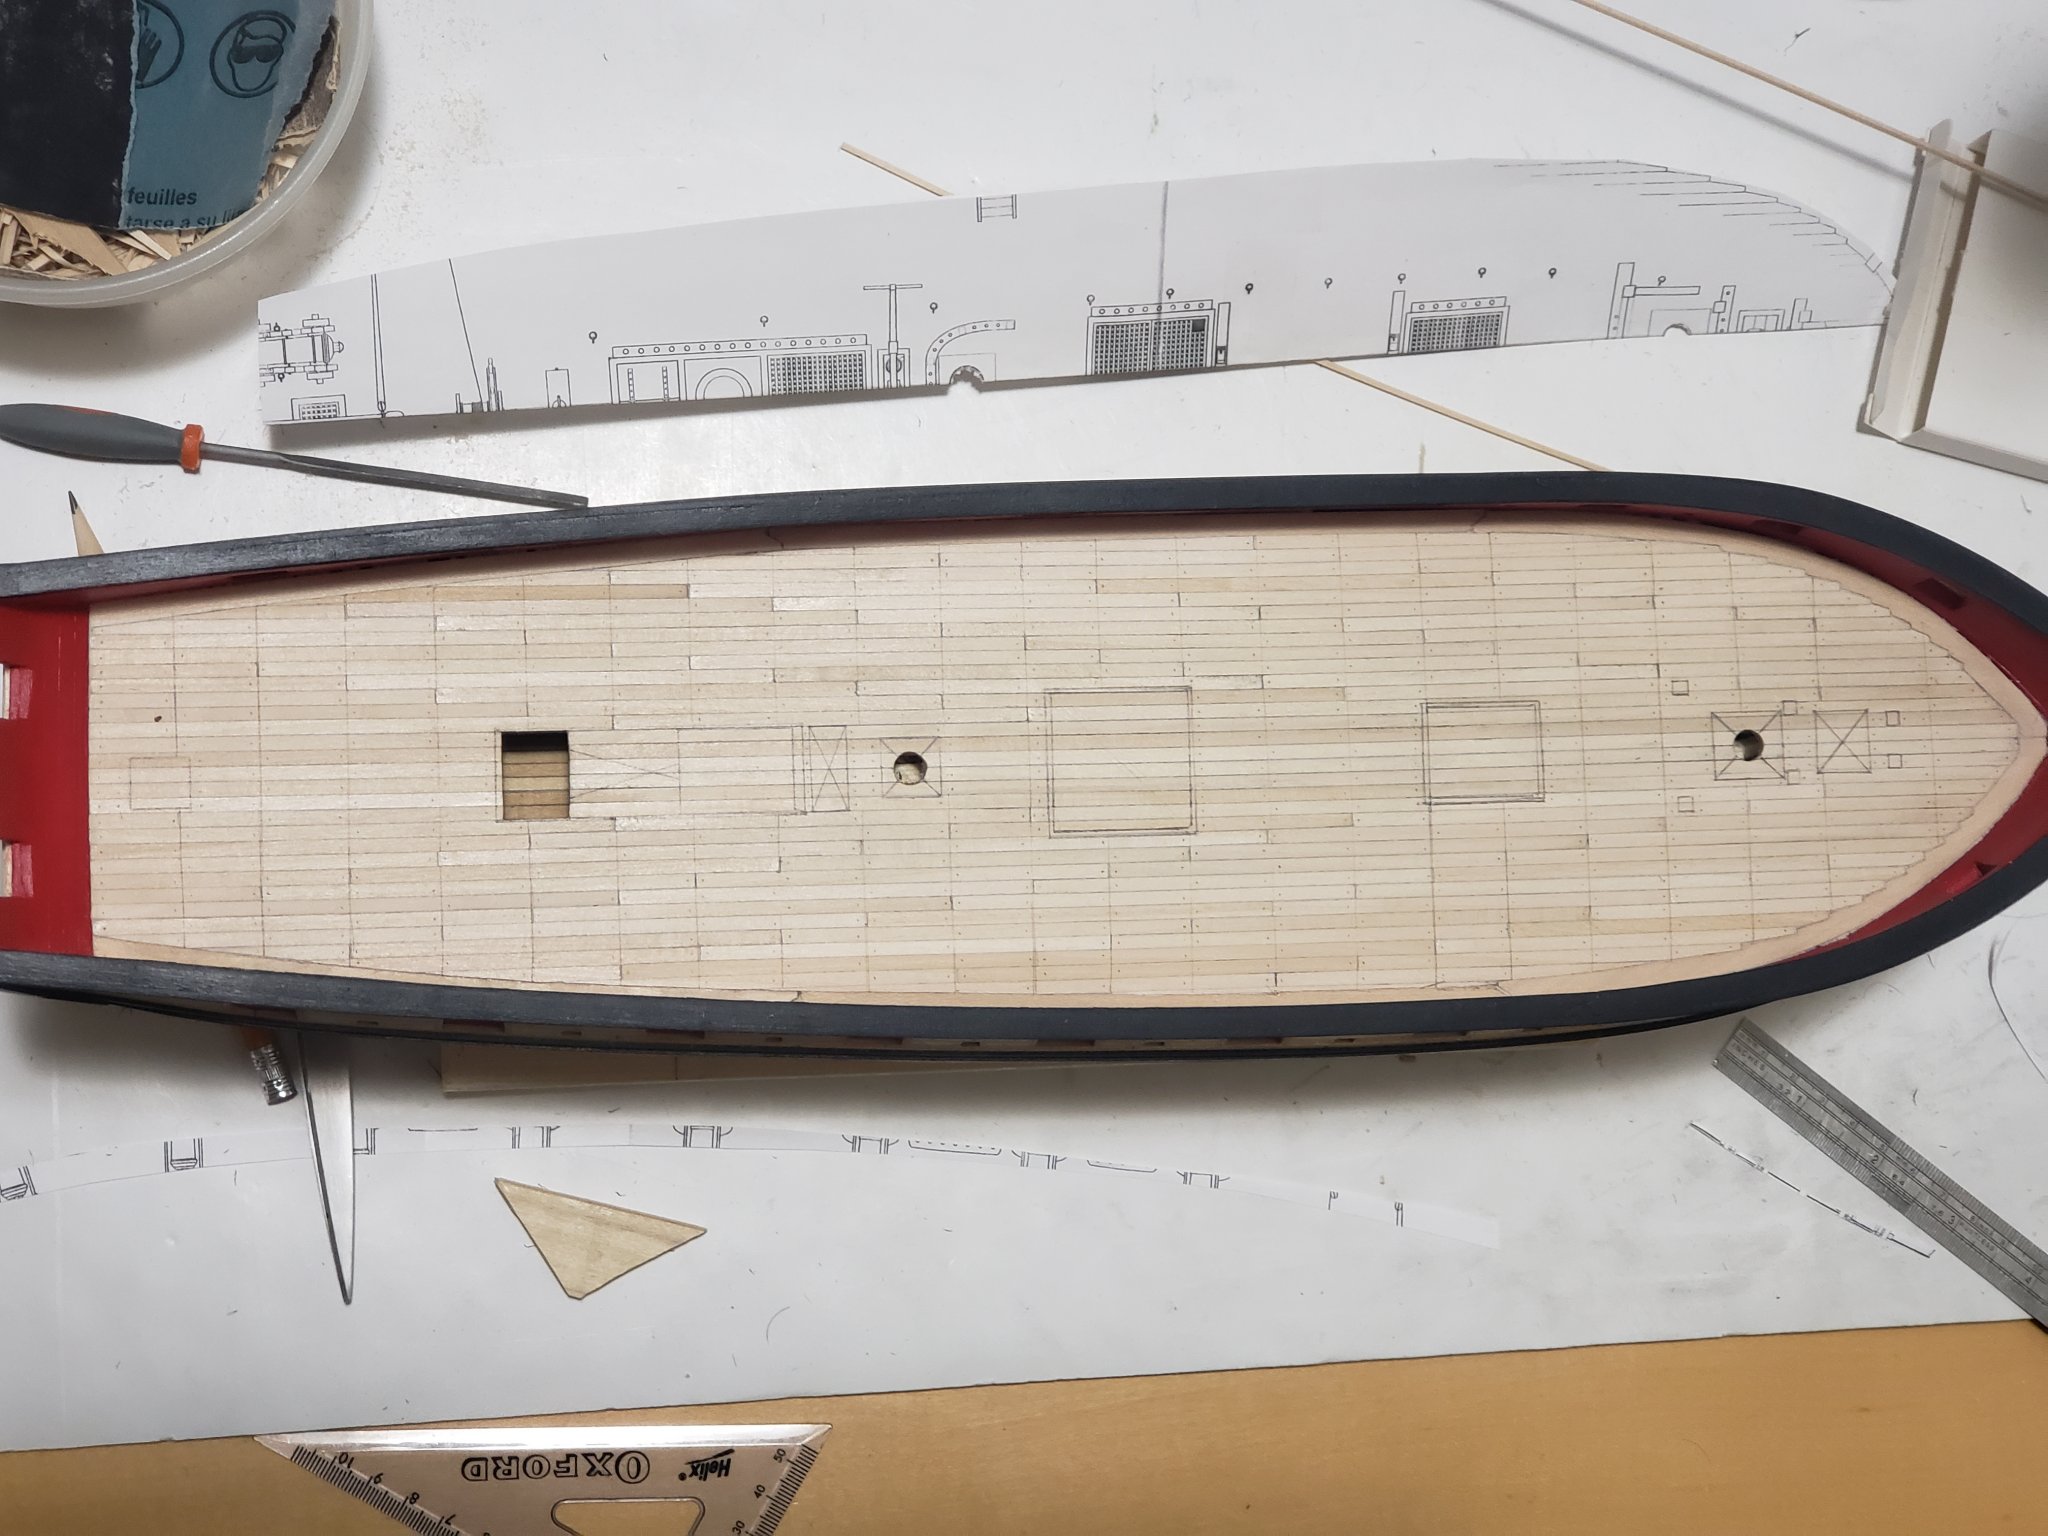
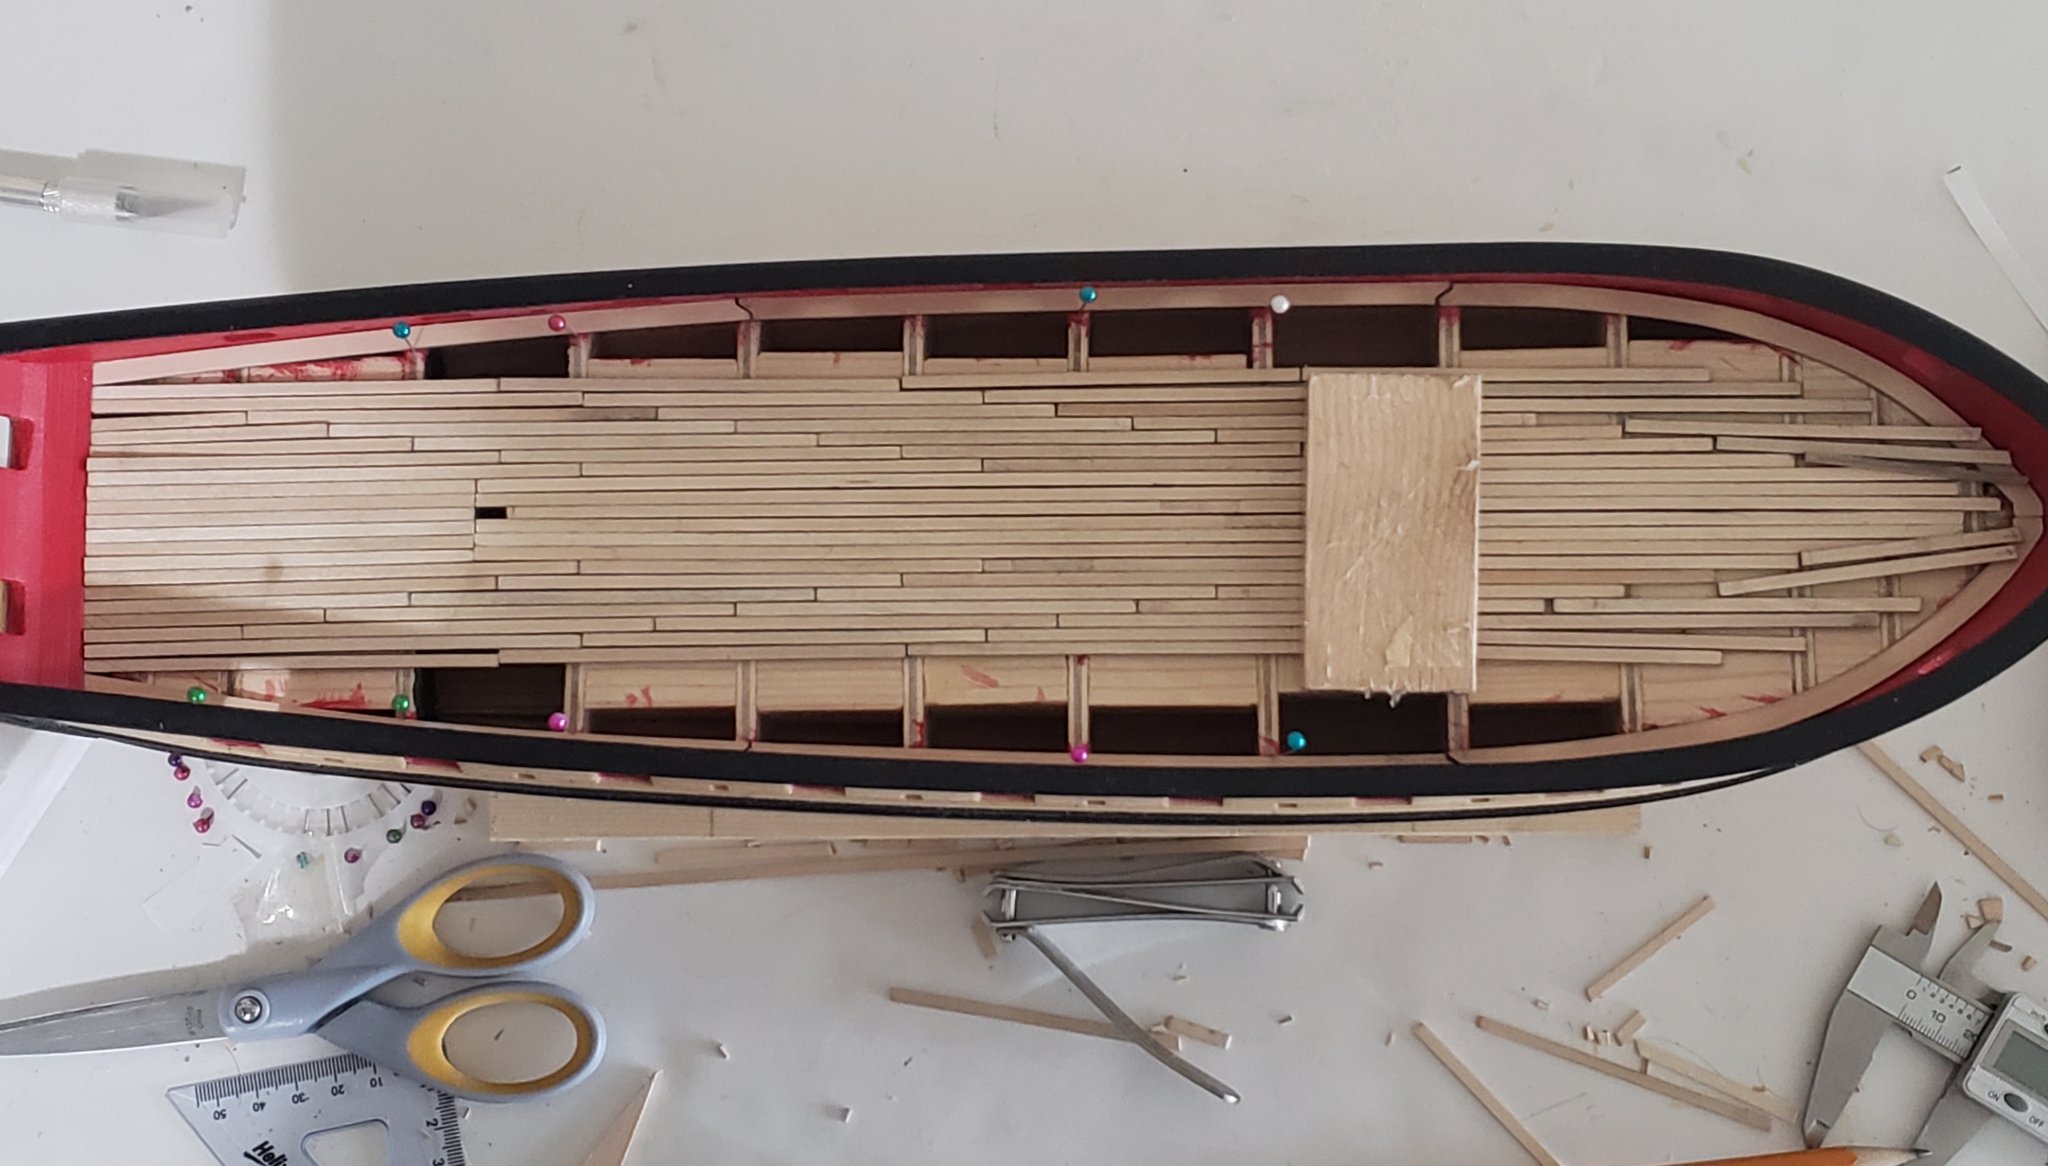
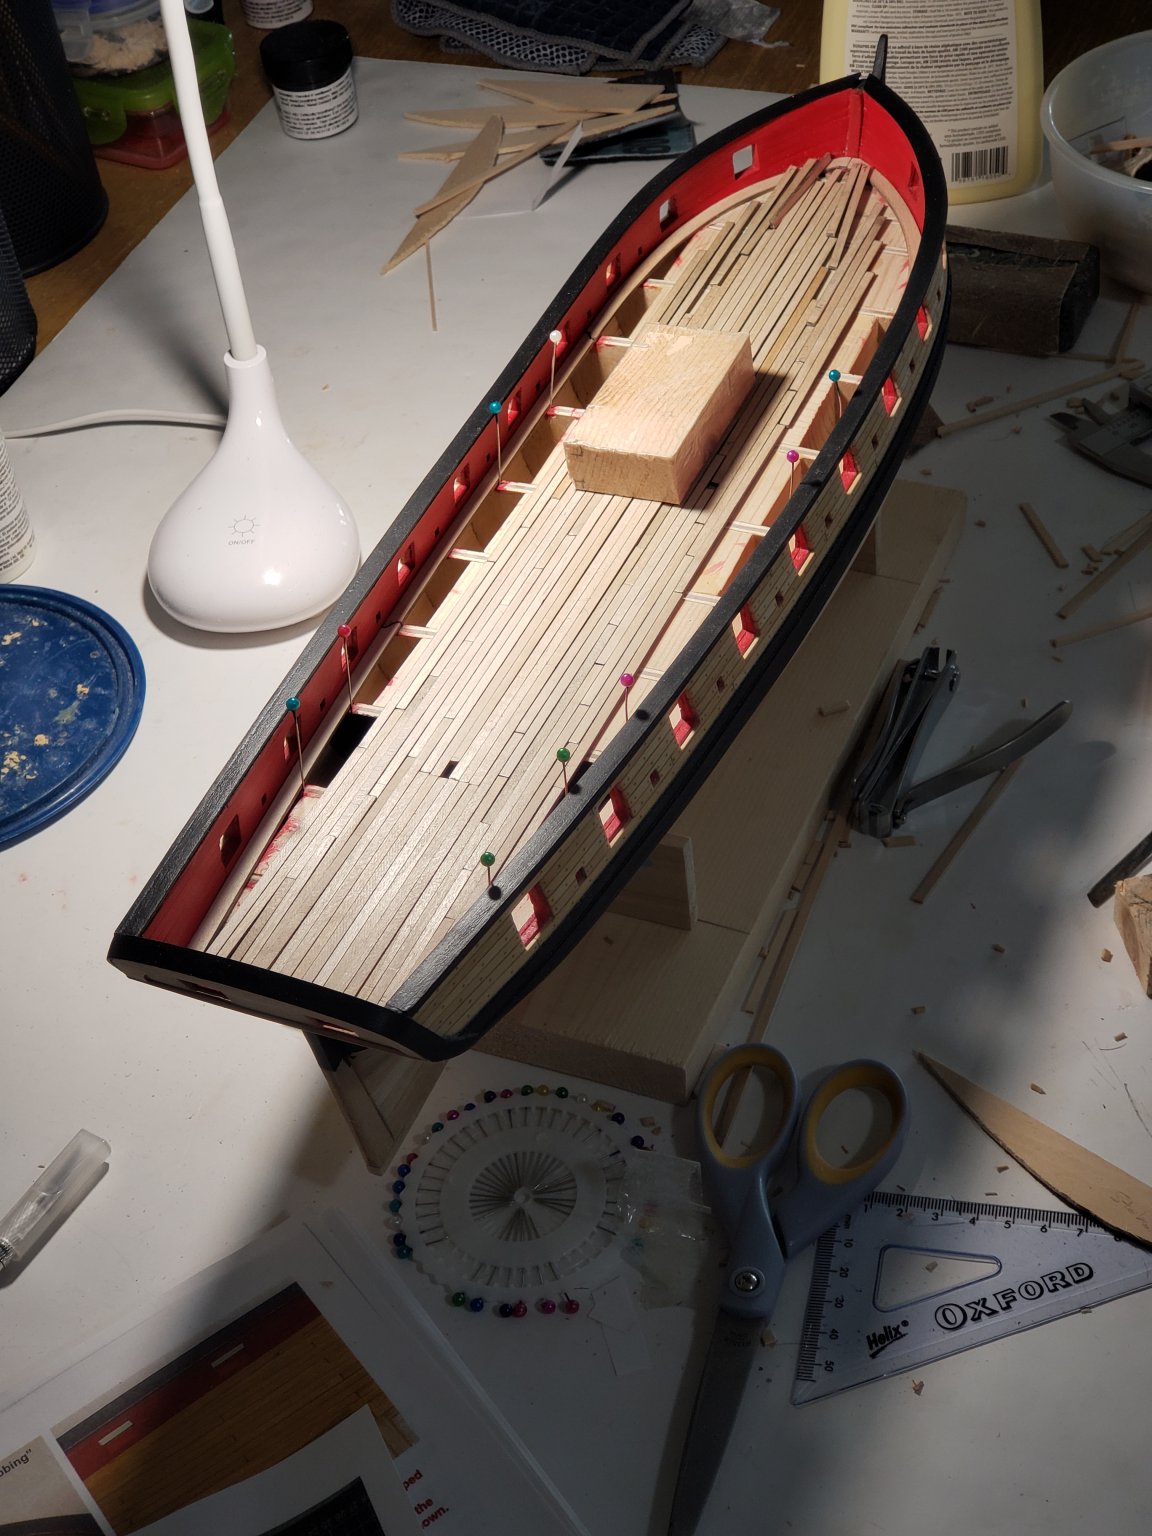
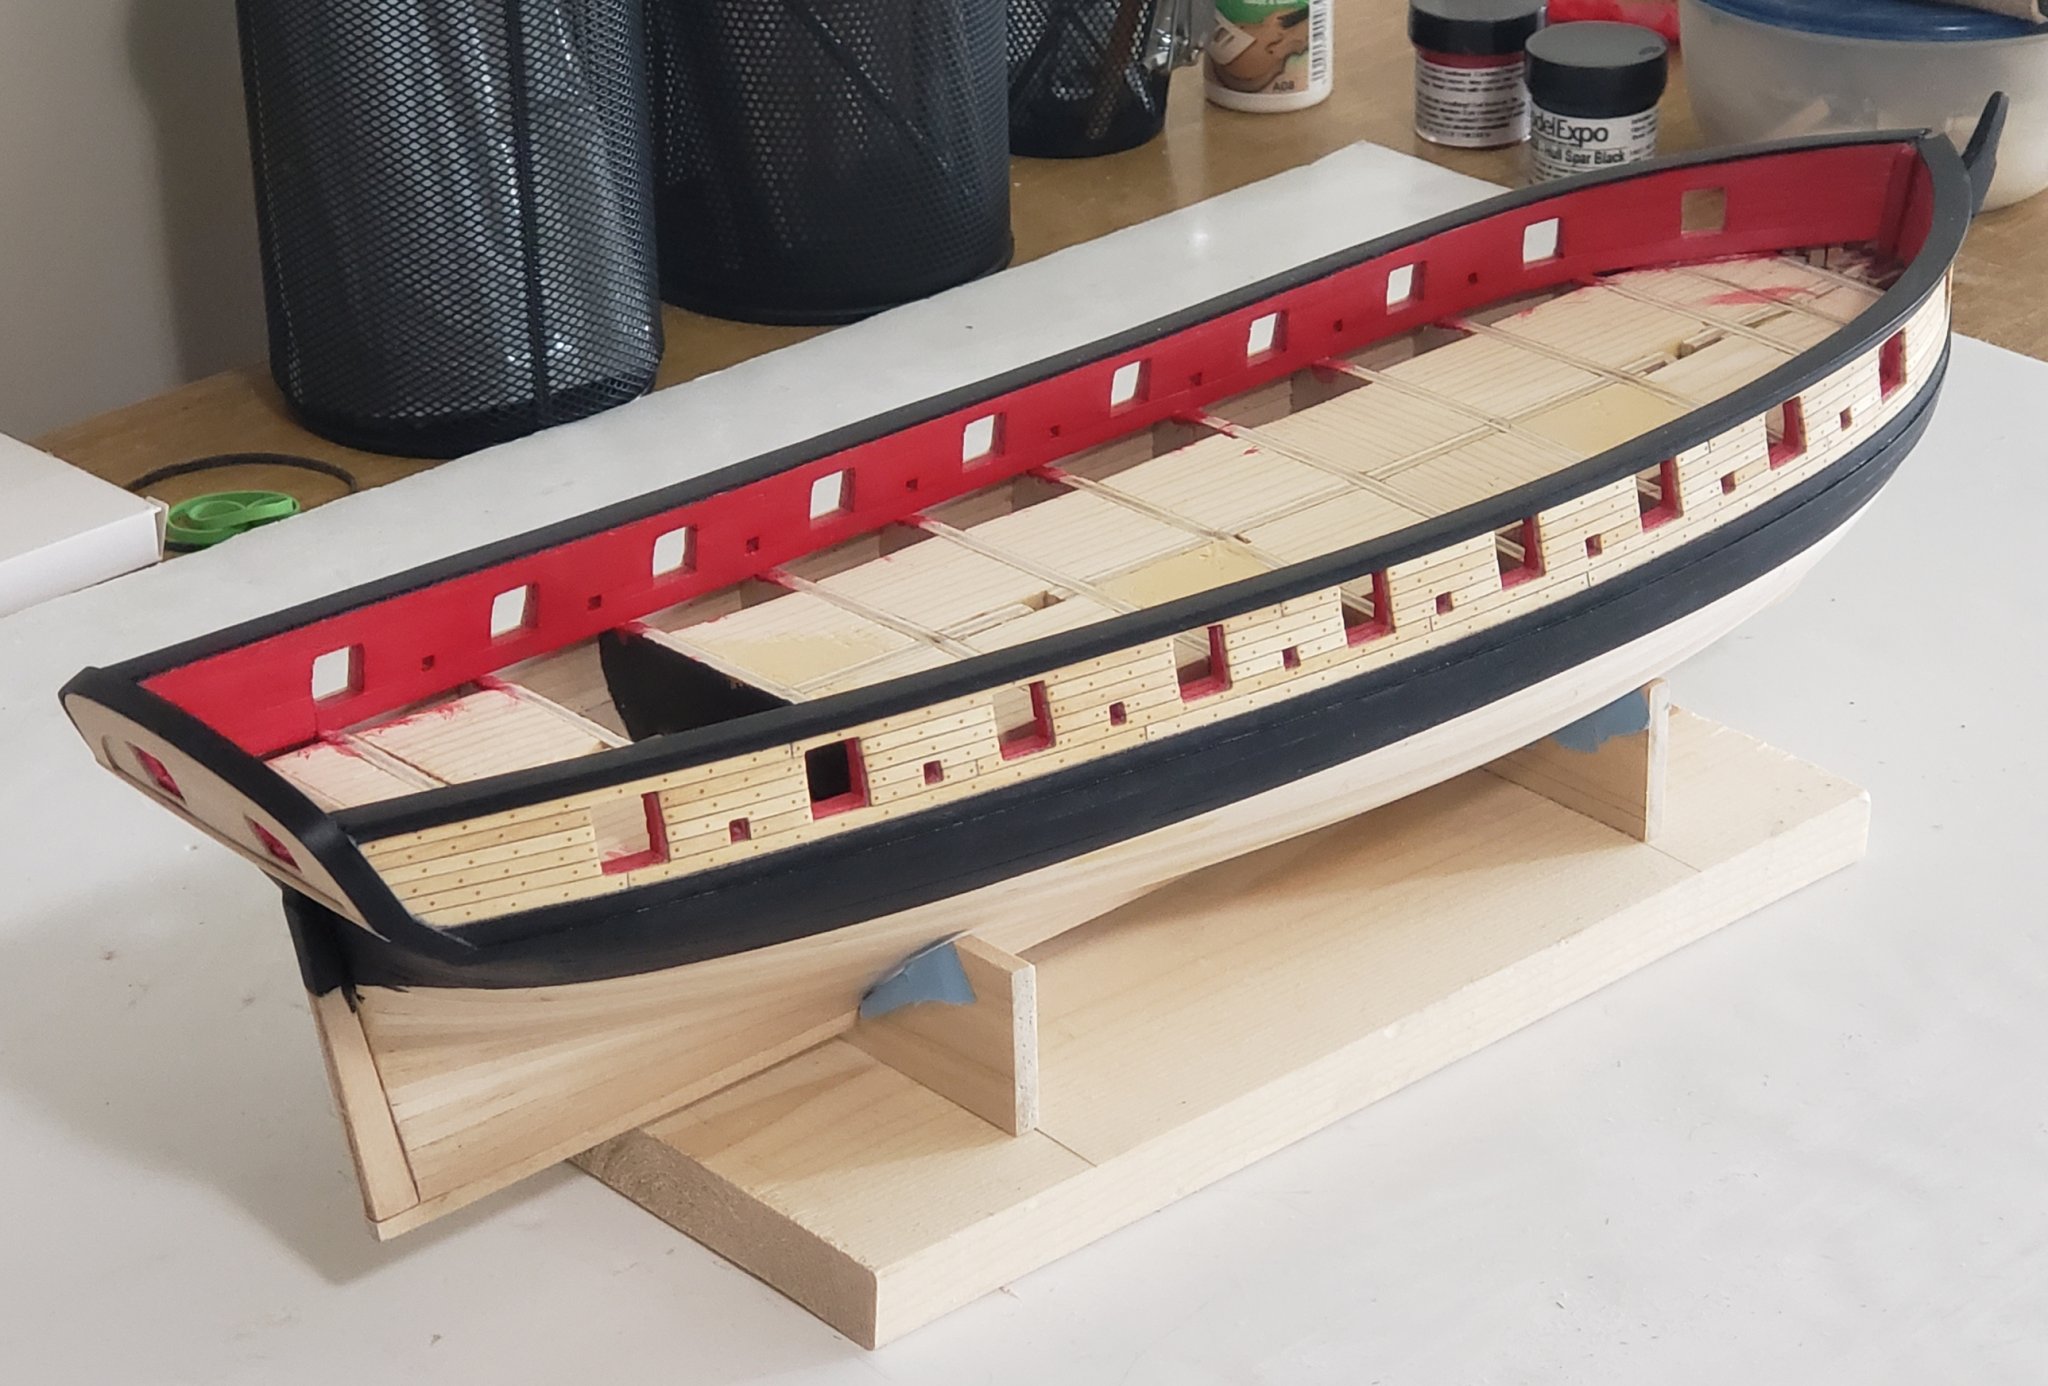
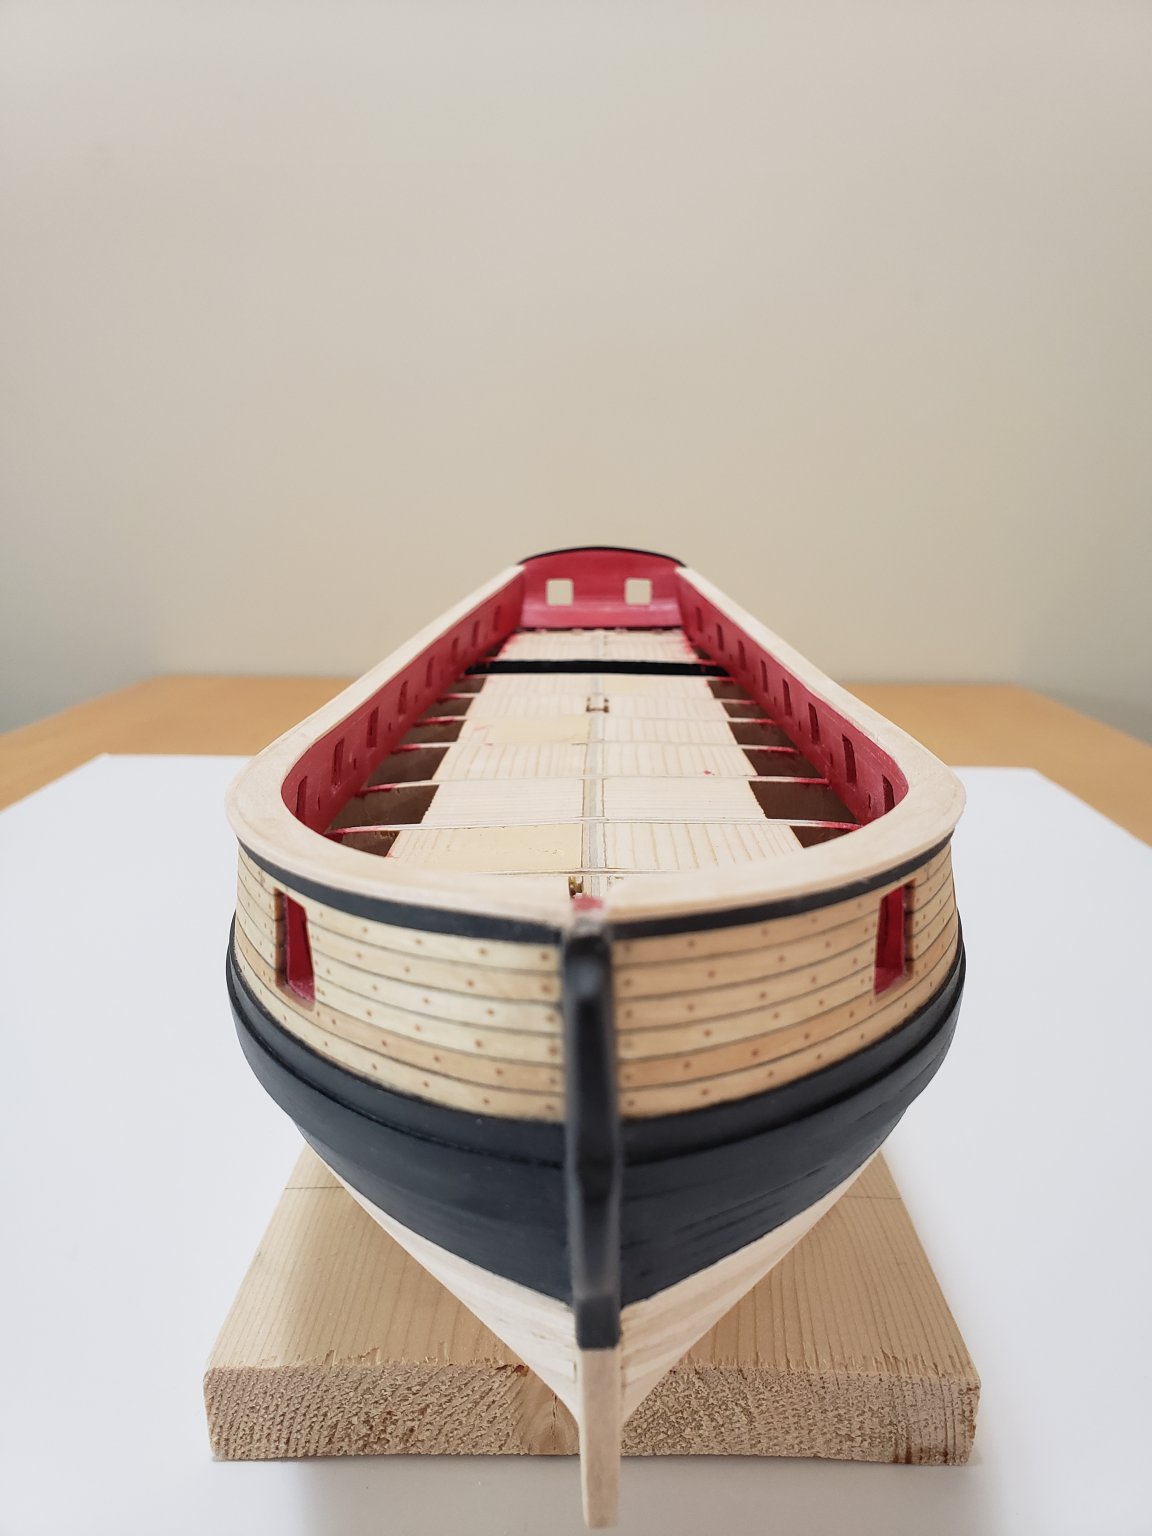
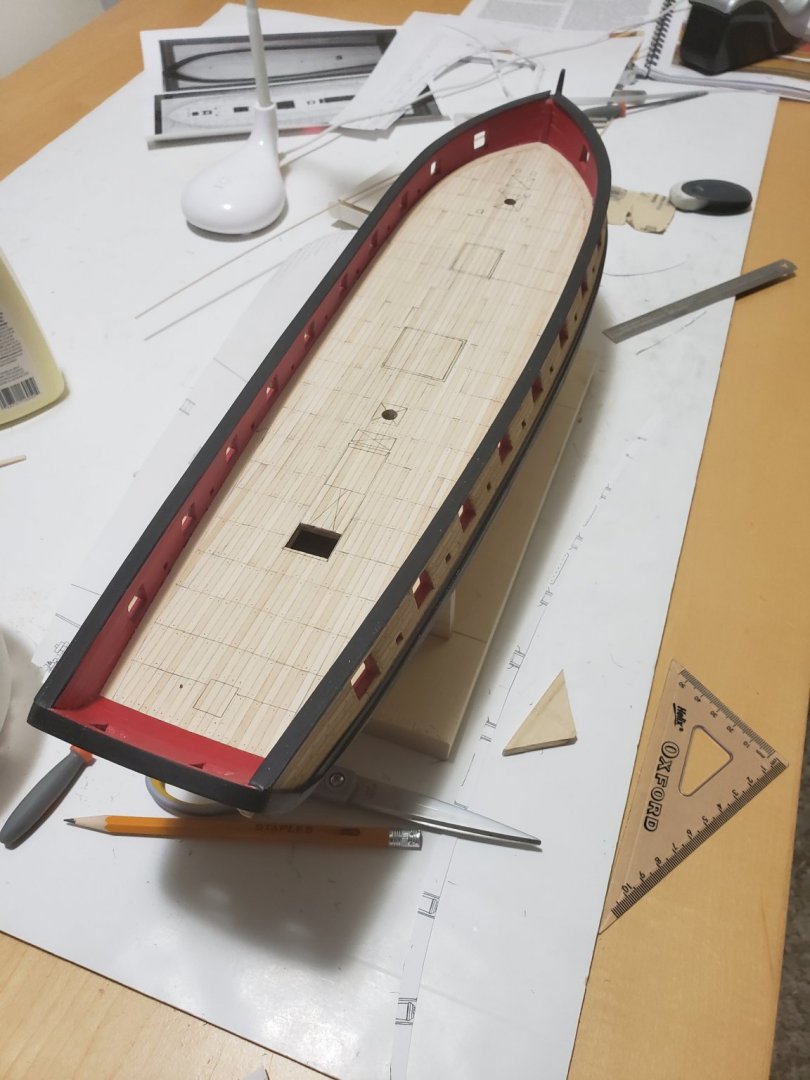
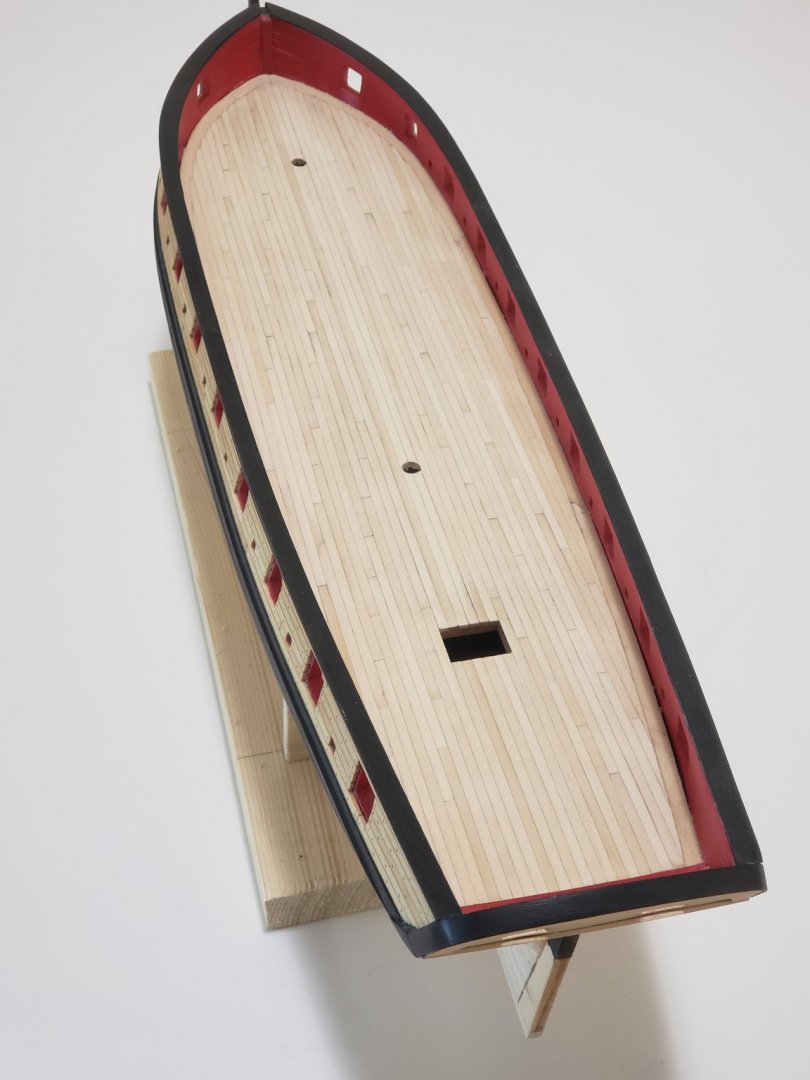
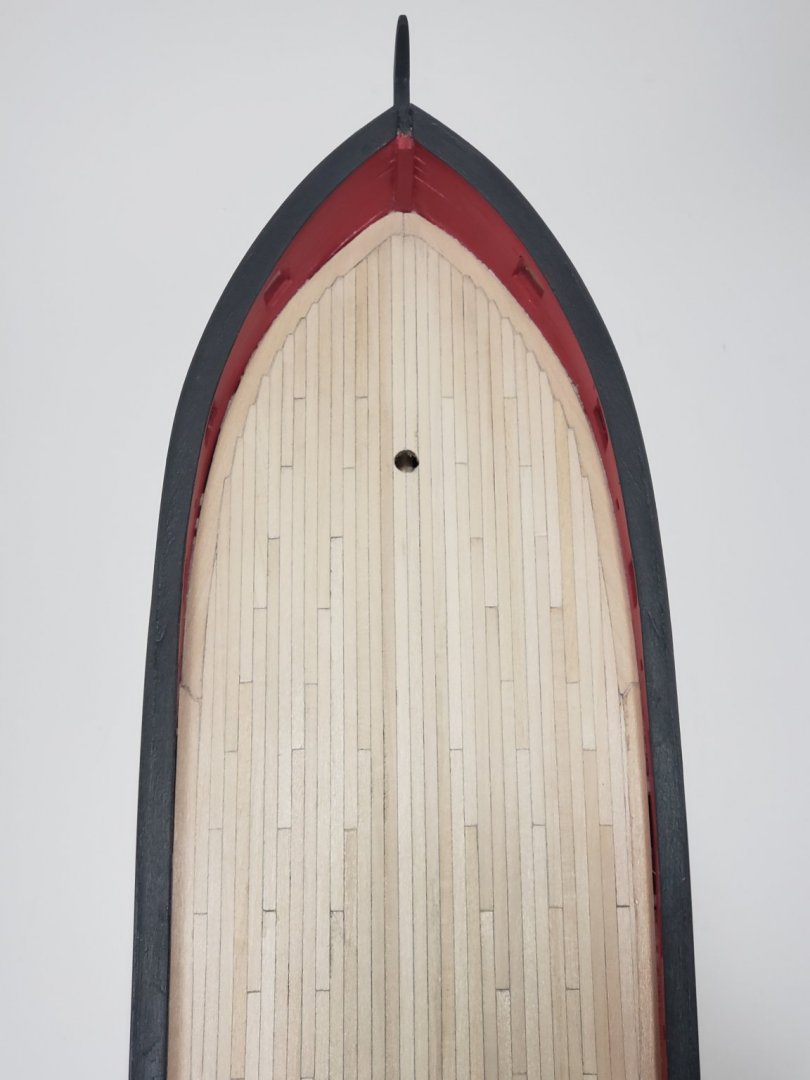
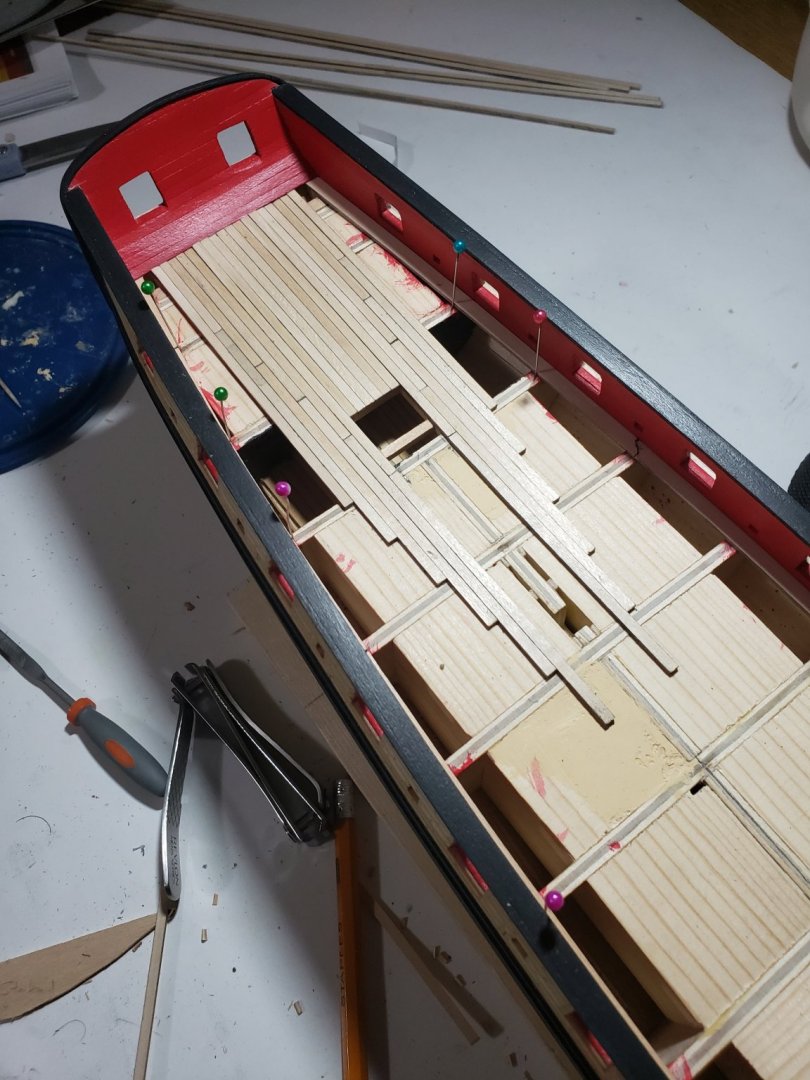
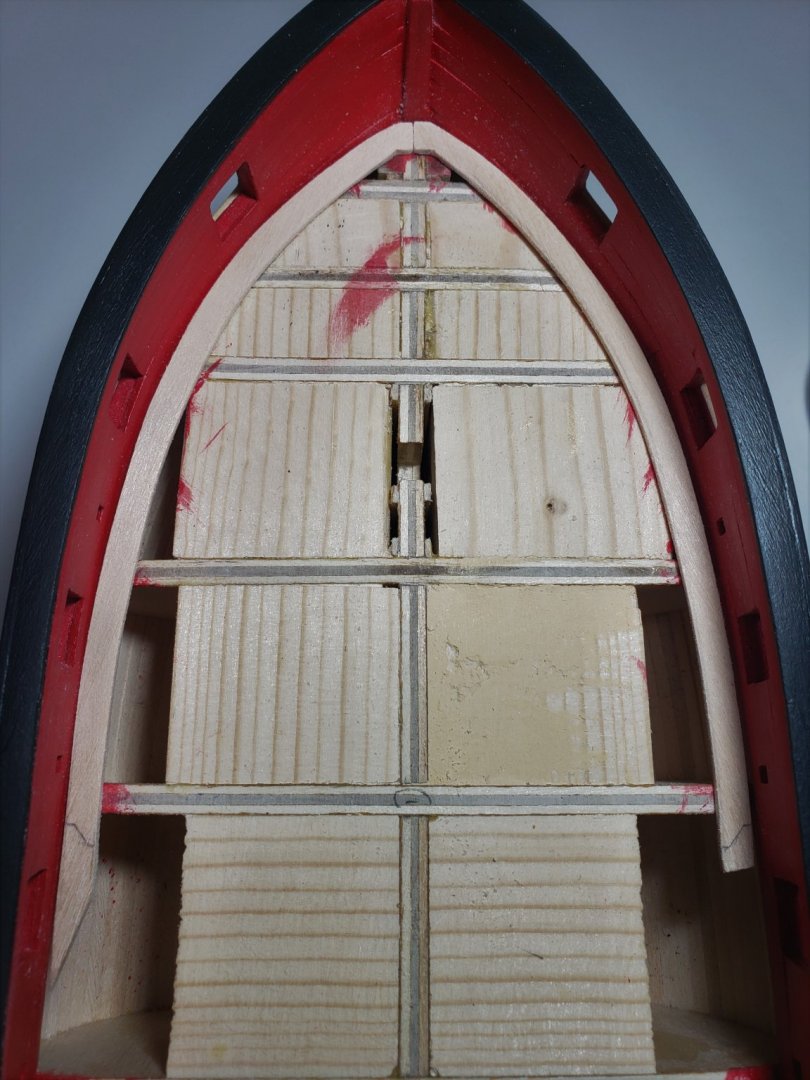
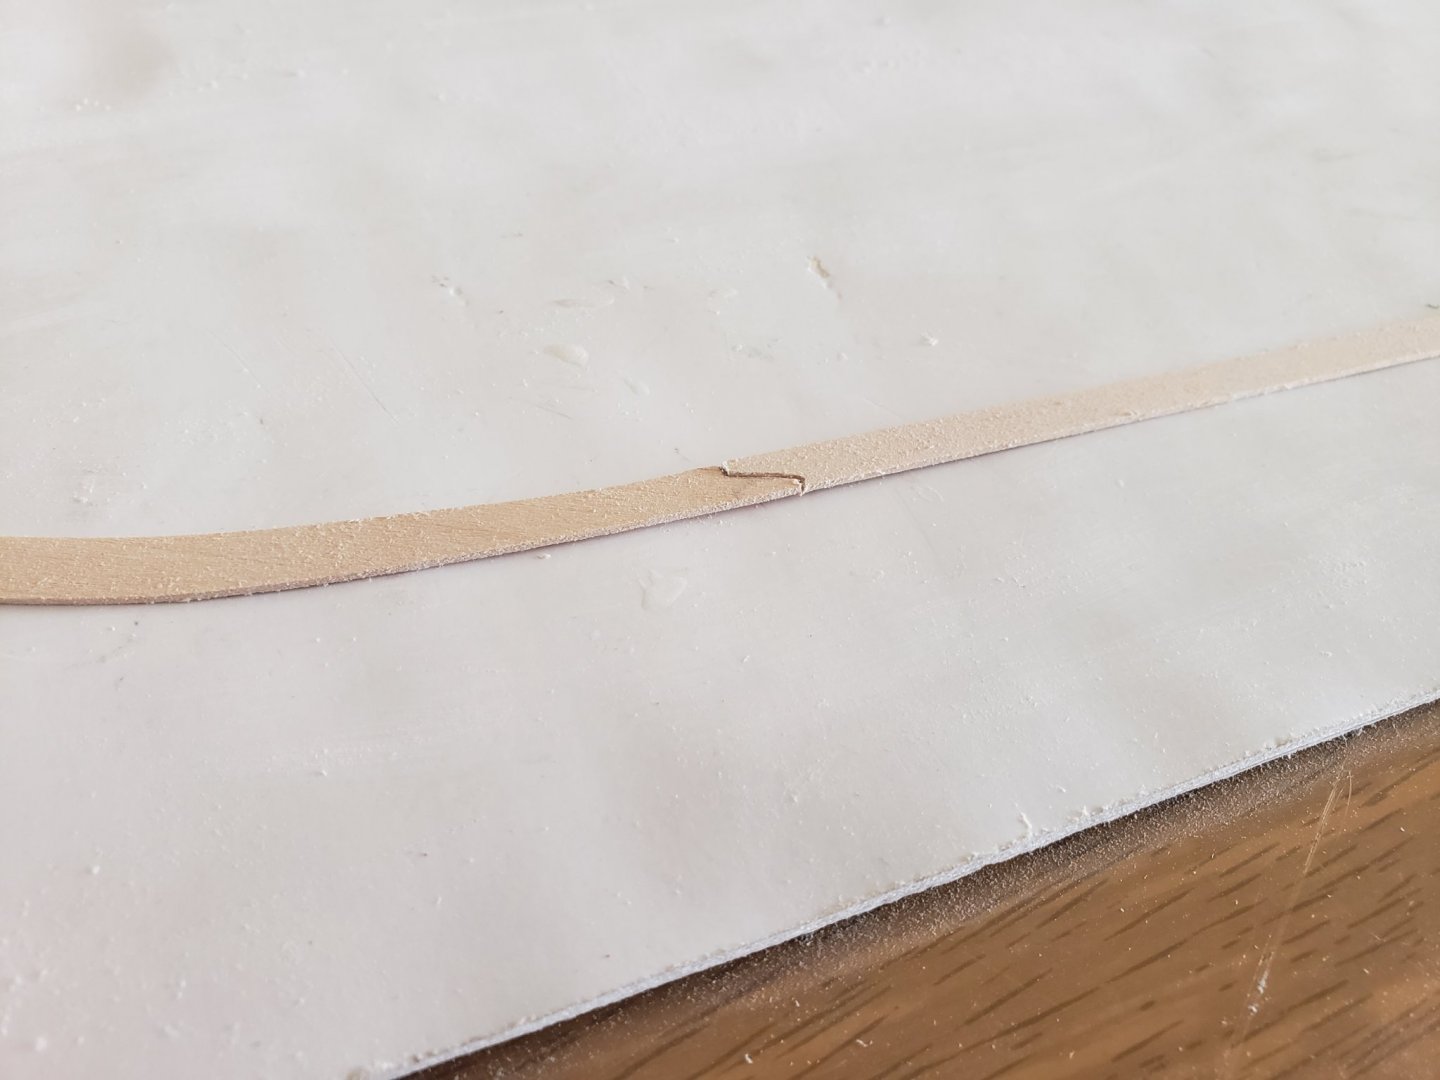
The decking is finally finished and sanded smooth. The decking color will darken slightly once I apply tung oil after finishing the nails and waterway. For the nails I am thinking of using toothpicks again, but slightly smaller than 0.55mm which was used on the hull planking. Edit: forgot to mention, I did not use tracing paper for the last couple of planks. I just roughly shaped the planks then sanded to fit.
- 950 replies
-
- 13
-
-
- syren
- model shipways
- (and 1 more)
-
Ohh yea I did not think of that, thanks! Will need to search the hardware store to see if I can get the right size Thanks Justin. Yes it was very scary... 😬
-
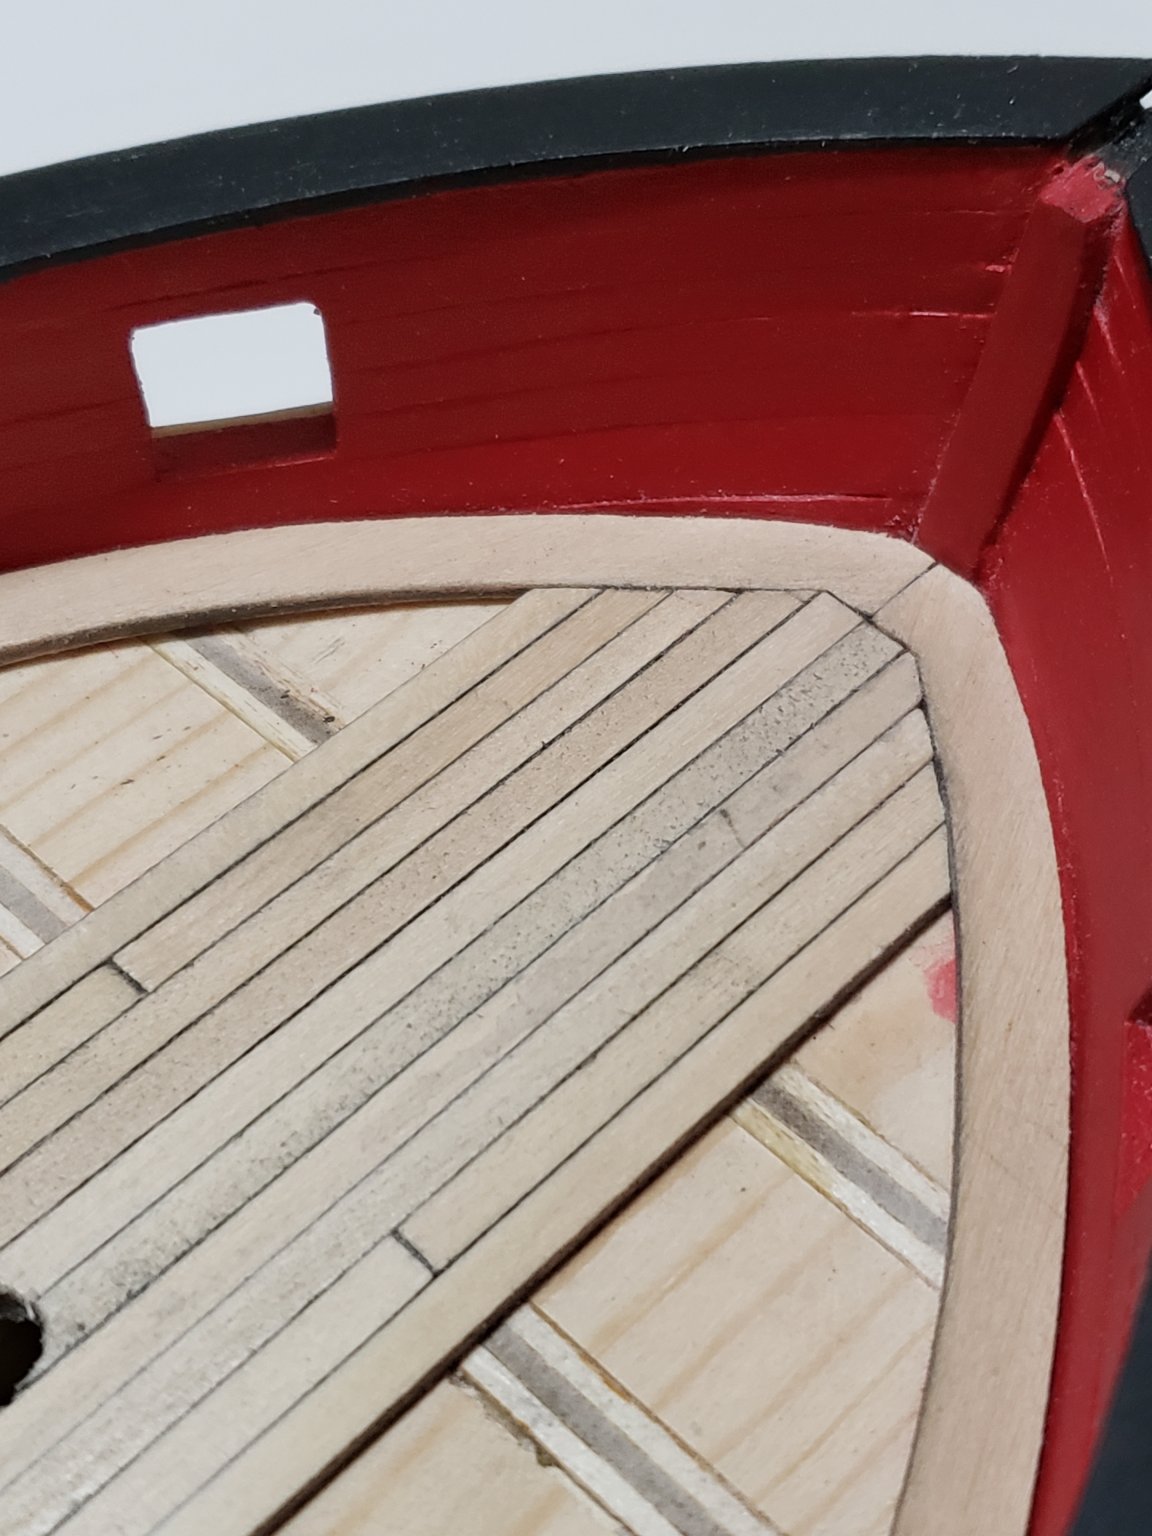
Thanks so much Robin! The photo helps I'll try that out once I finish with the decking and nails. And yes I opted to go with making the planks flush with the margin plank at the stern. Main reason being that I used straight strips of planks for the margin planks, so wasn't sure how I would go about making the notches since I was cutting them outside the ship. This would straighten the strip and I could get the notch cut out wrong. What I should have done is cut out the shape from a sheet of basswood like how I did for the bow to make it easier to cut the notches out. But from what I gather (please correct me if I'm wrong), both ways were used for the stern at the time.
-
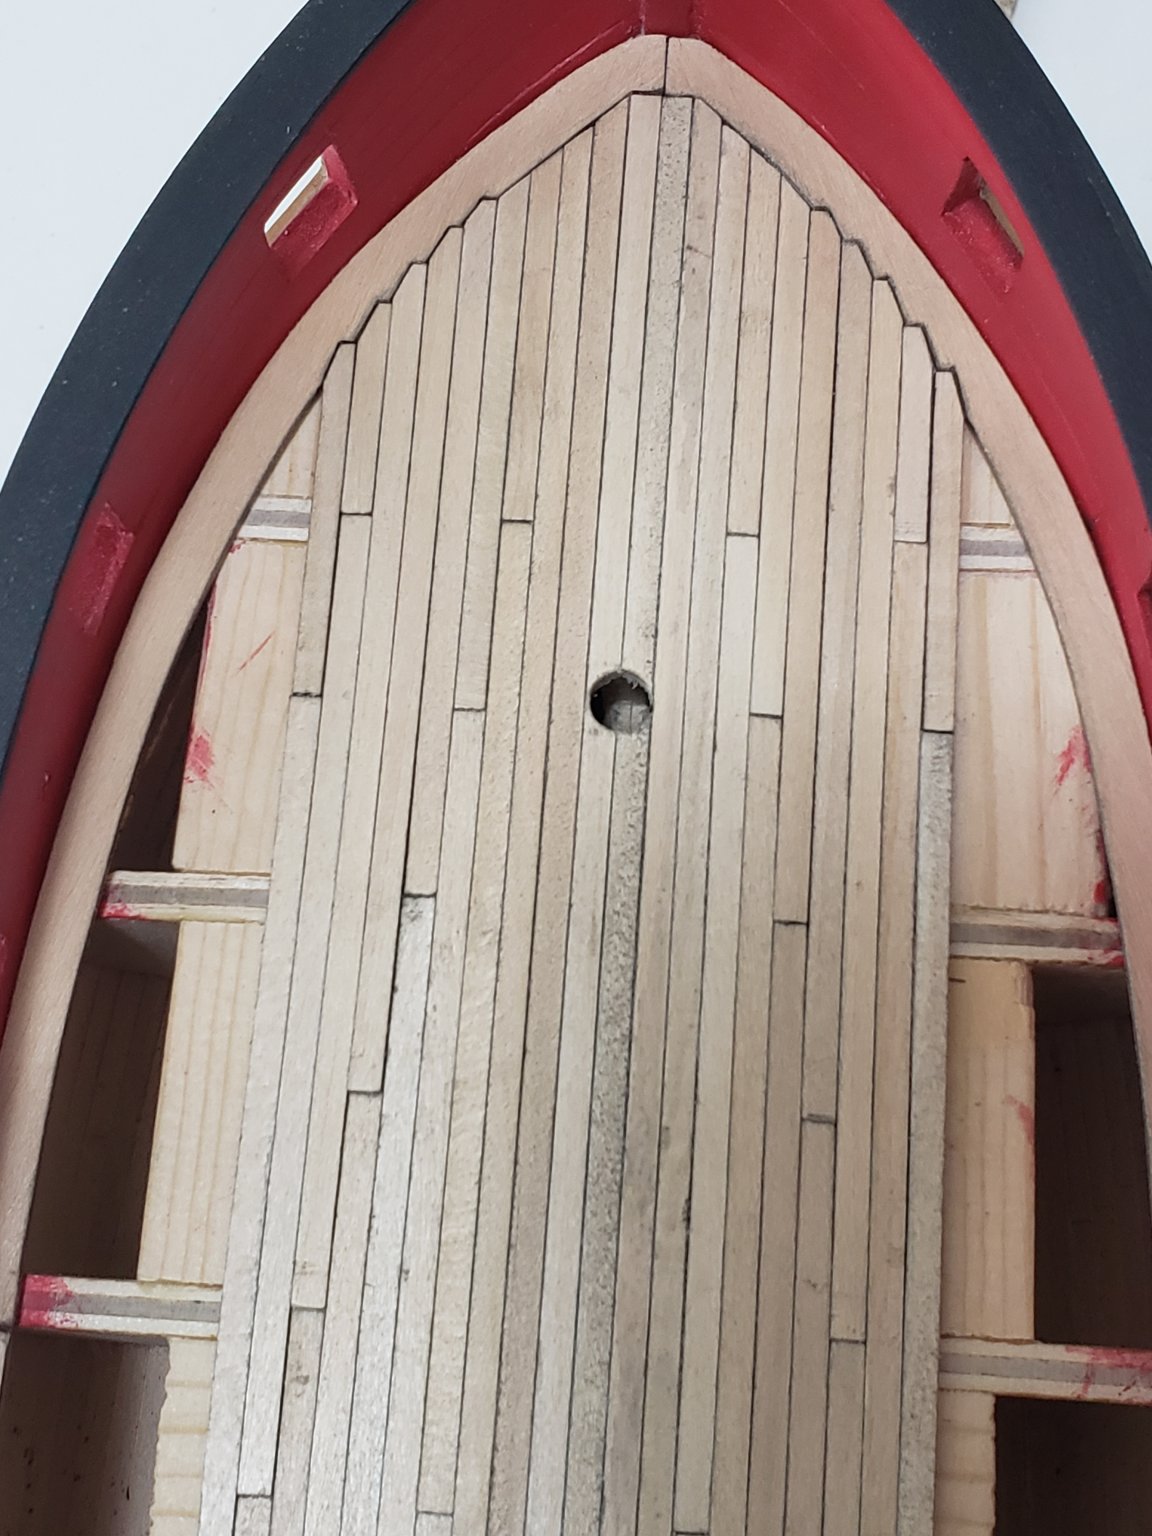
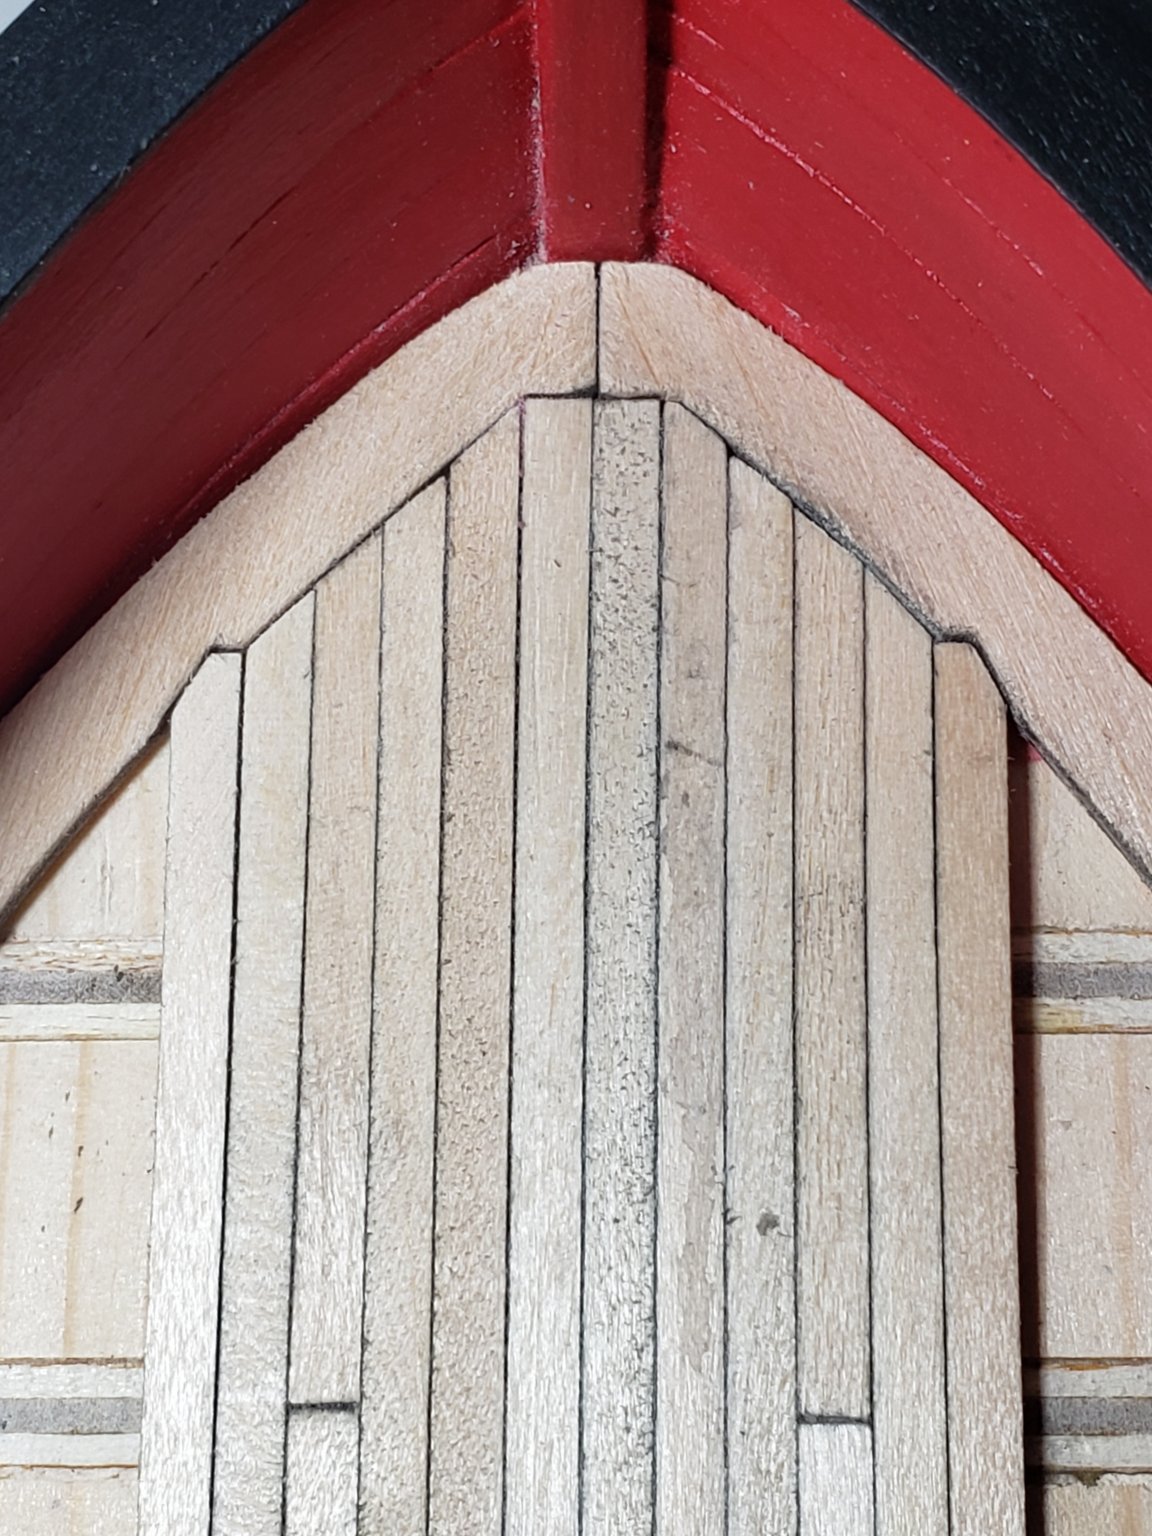
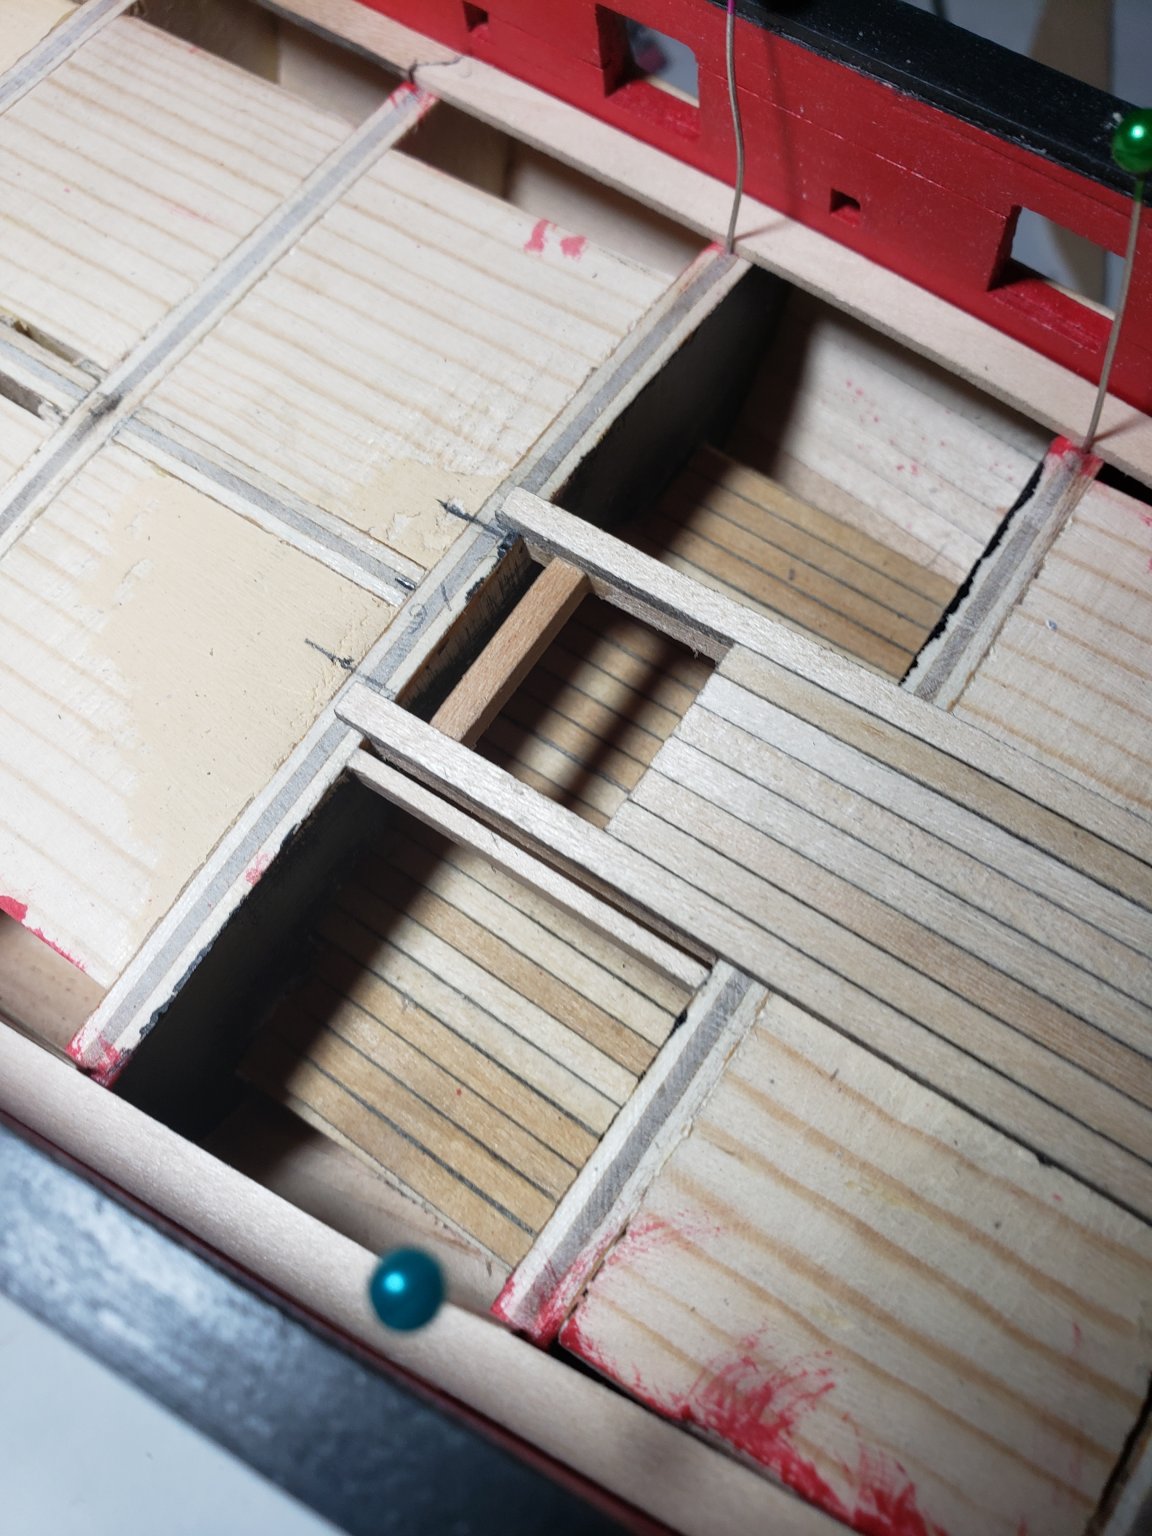
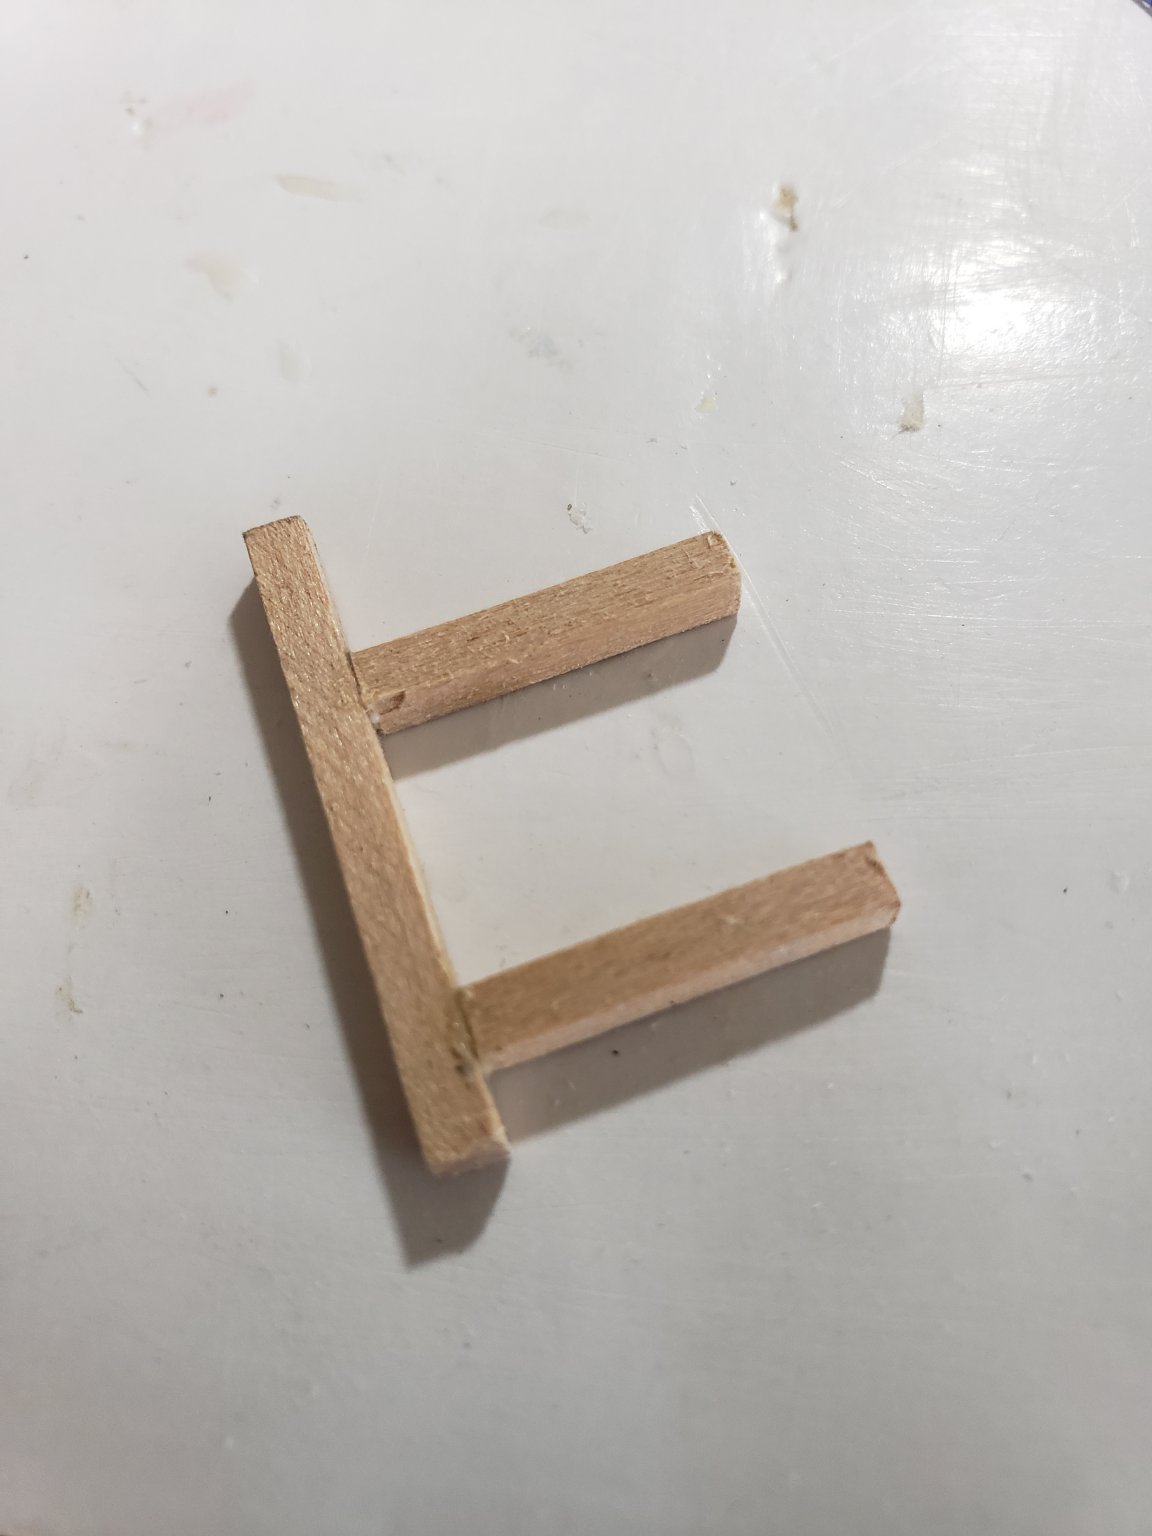
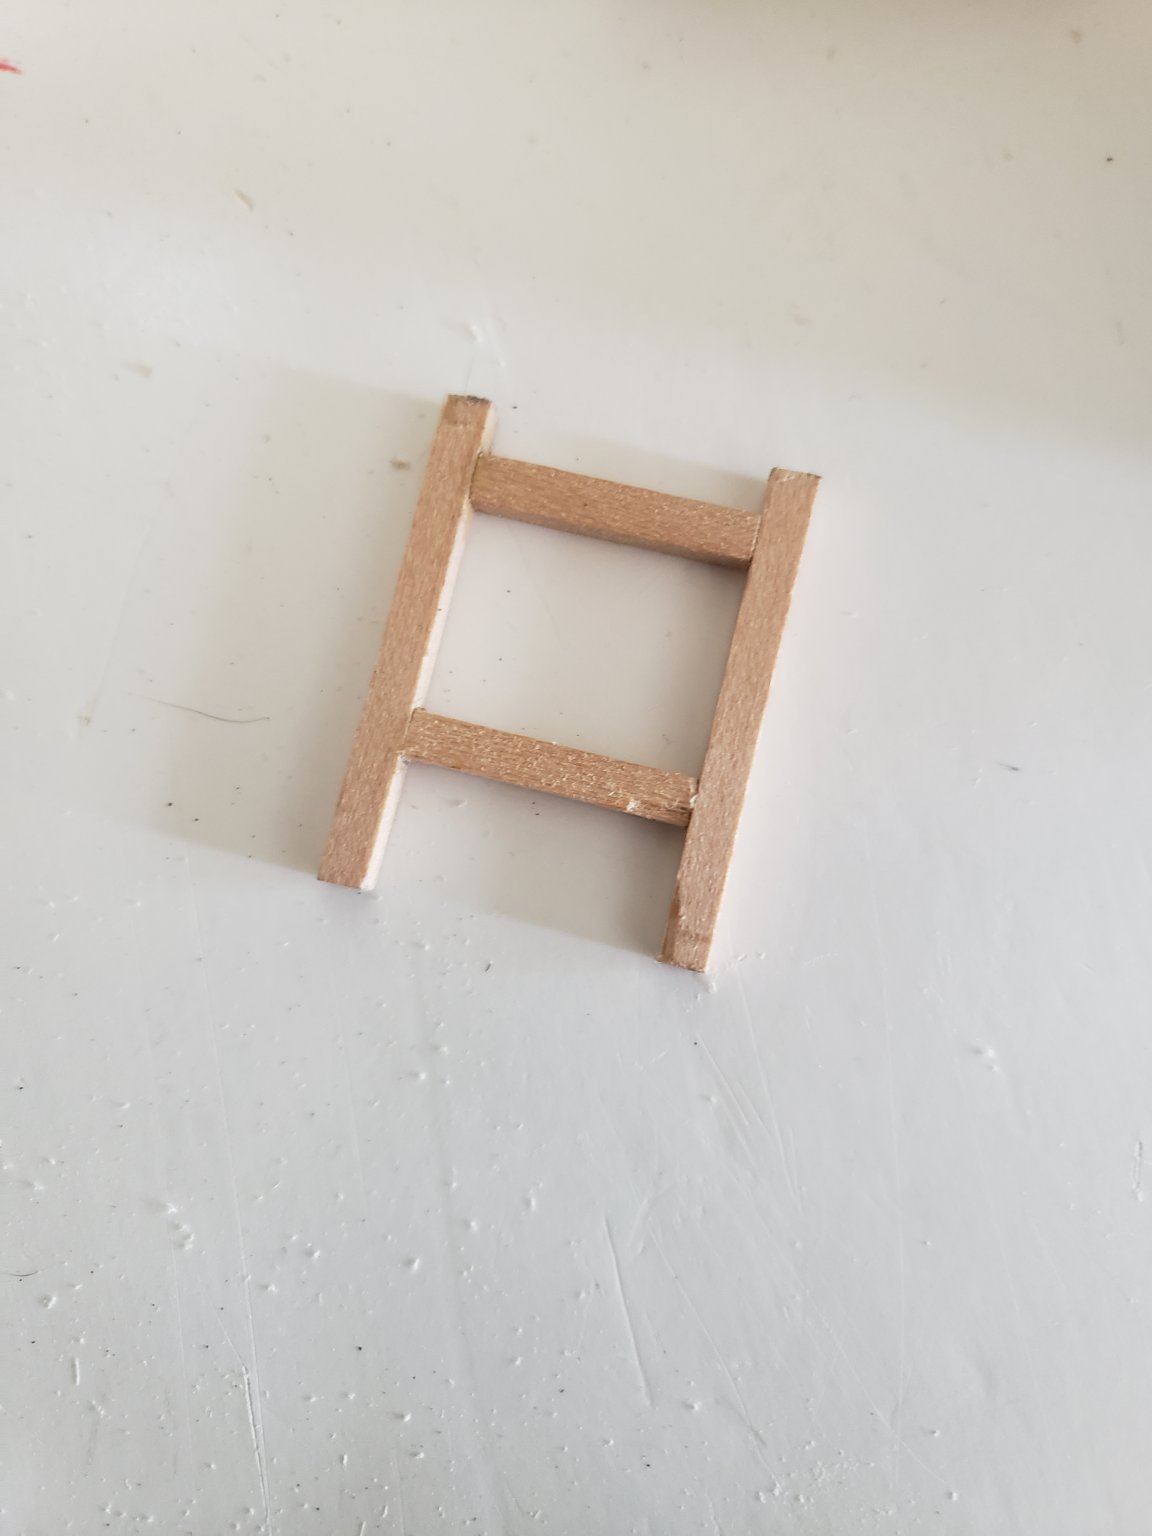
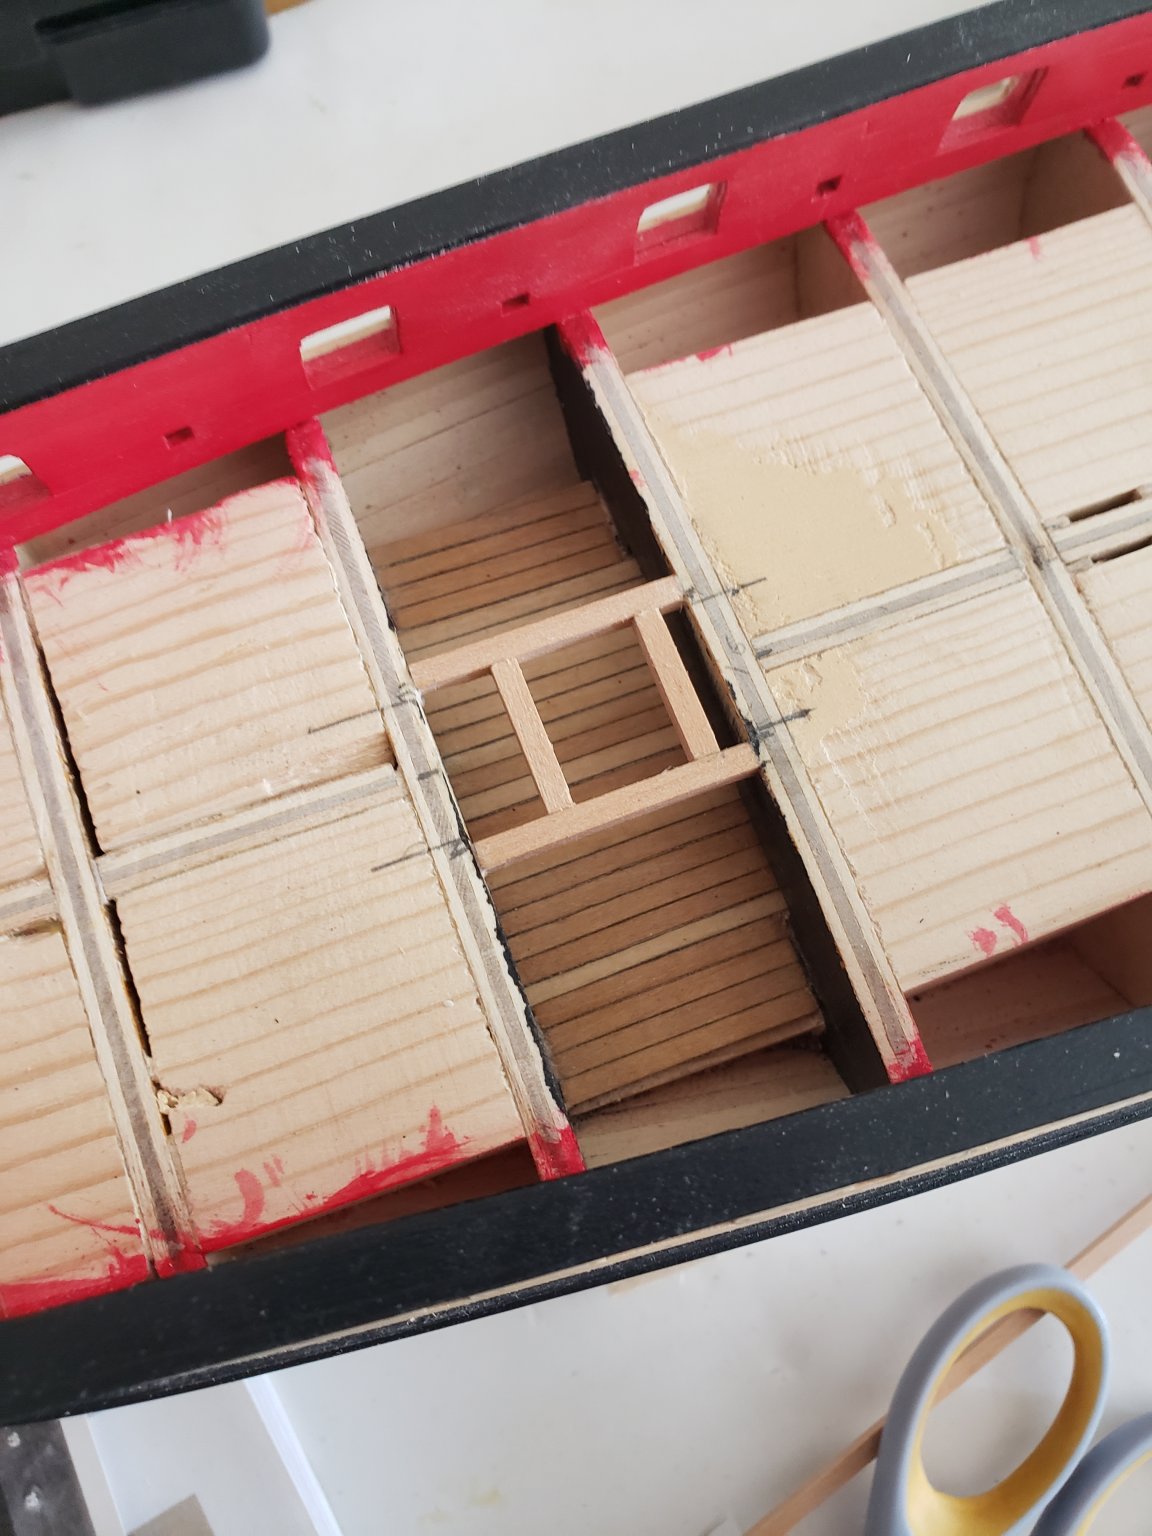
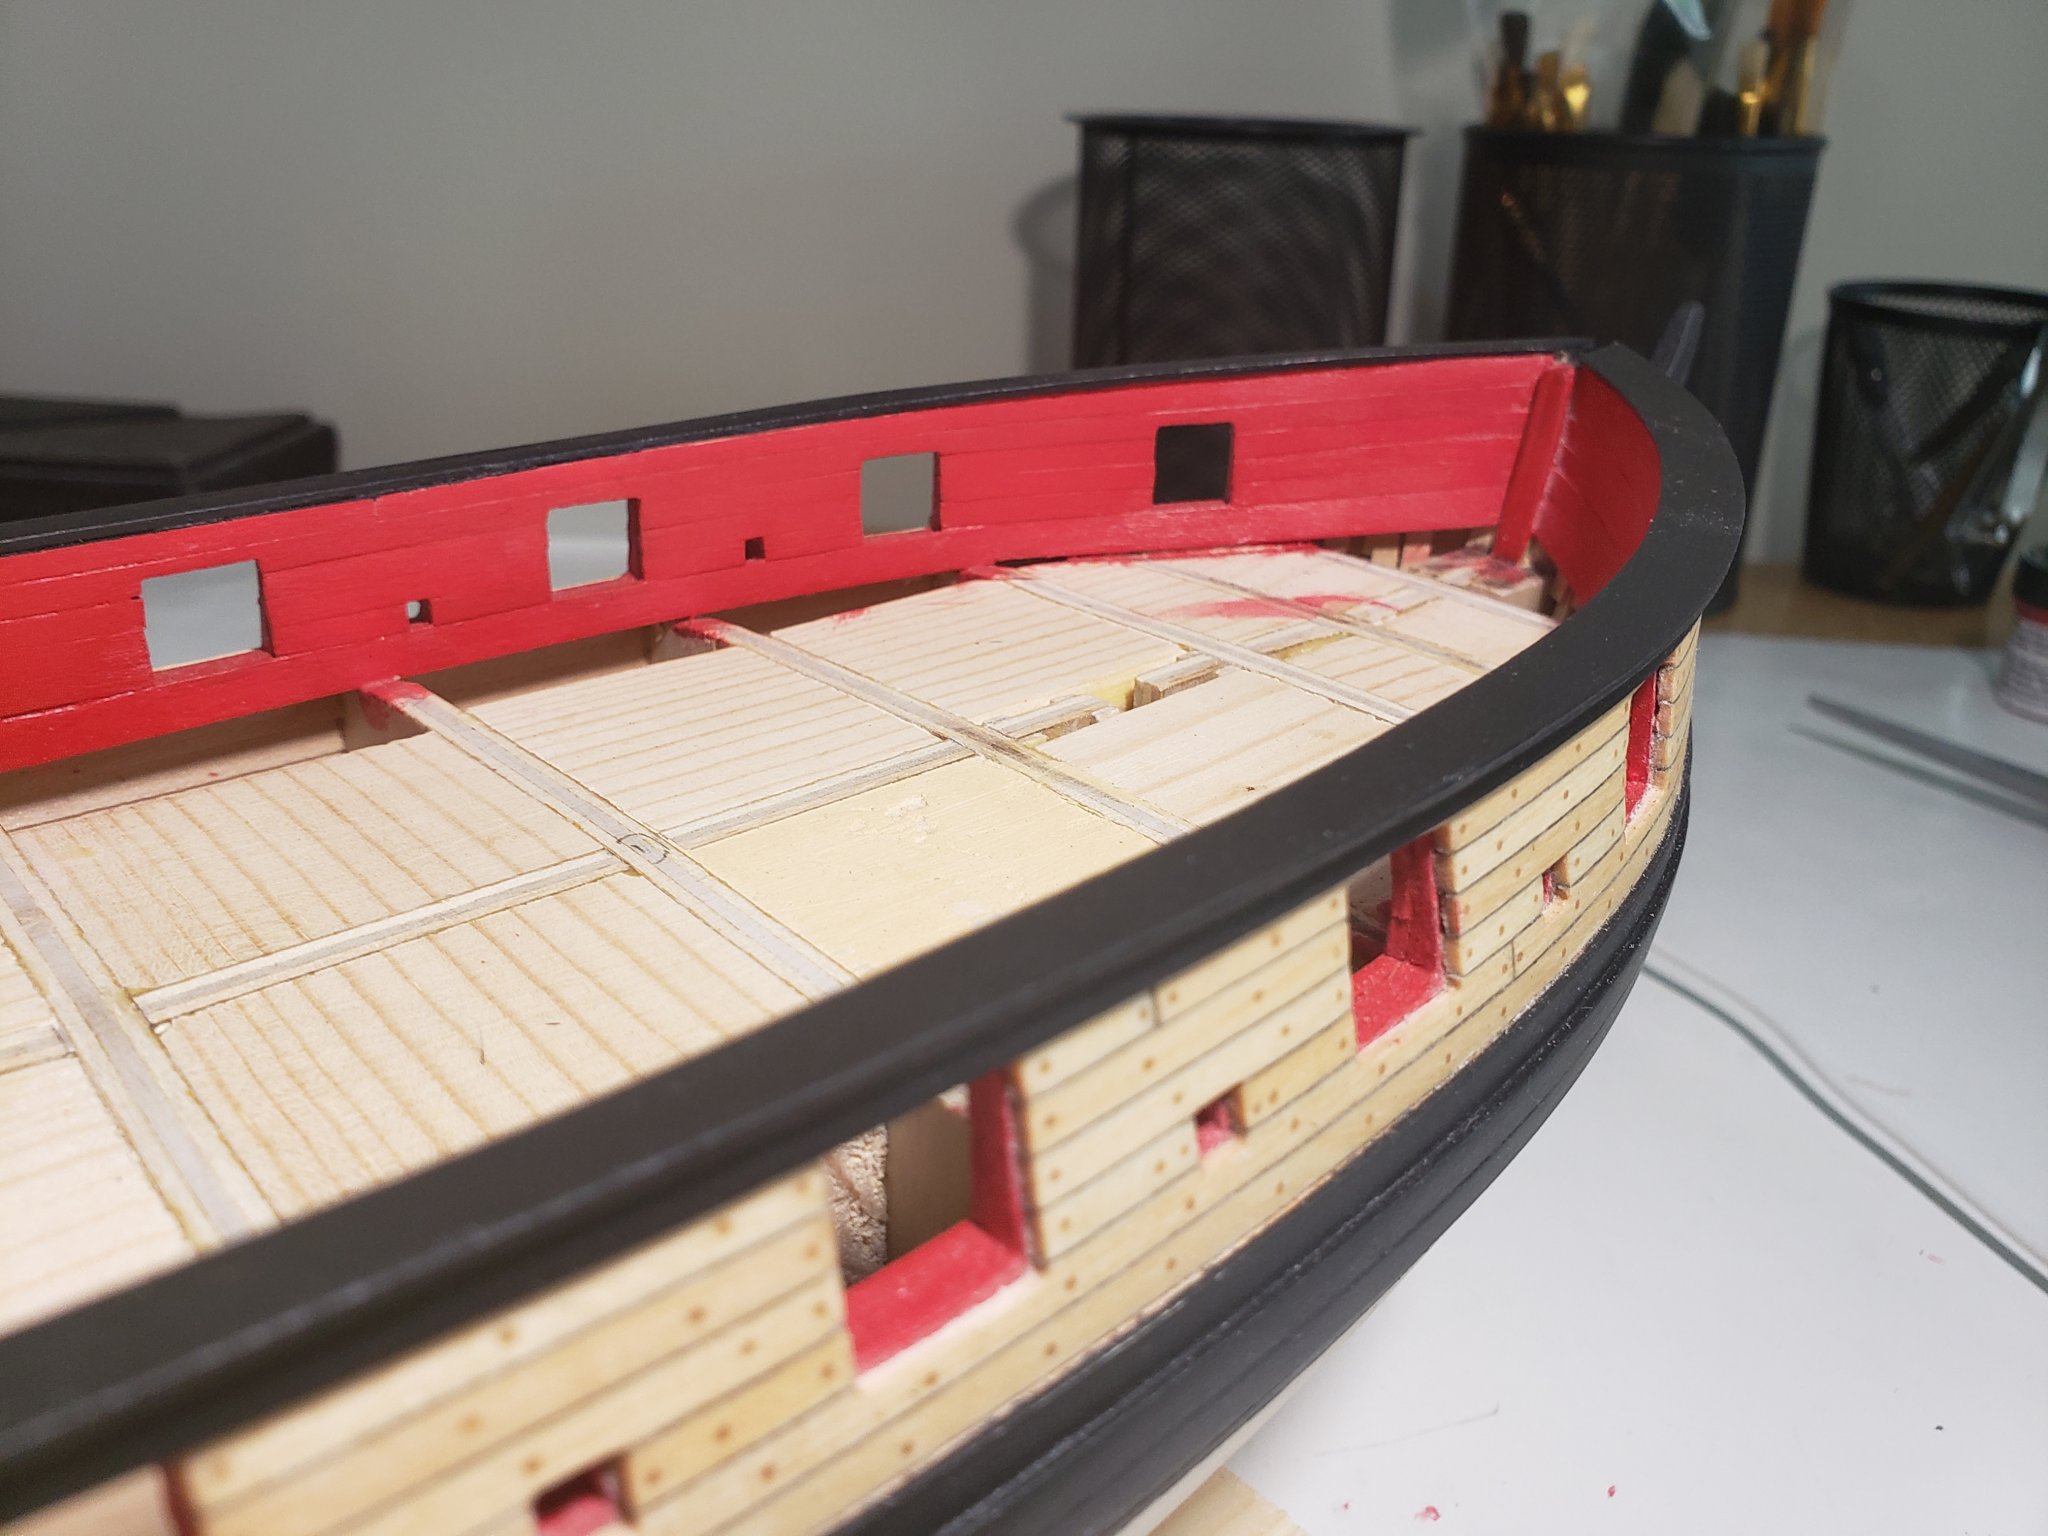
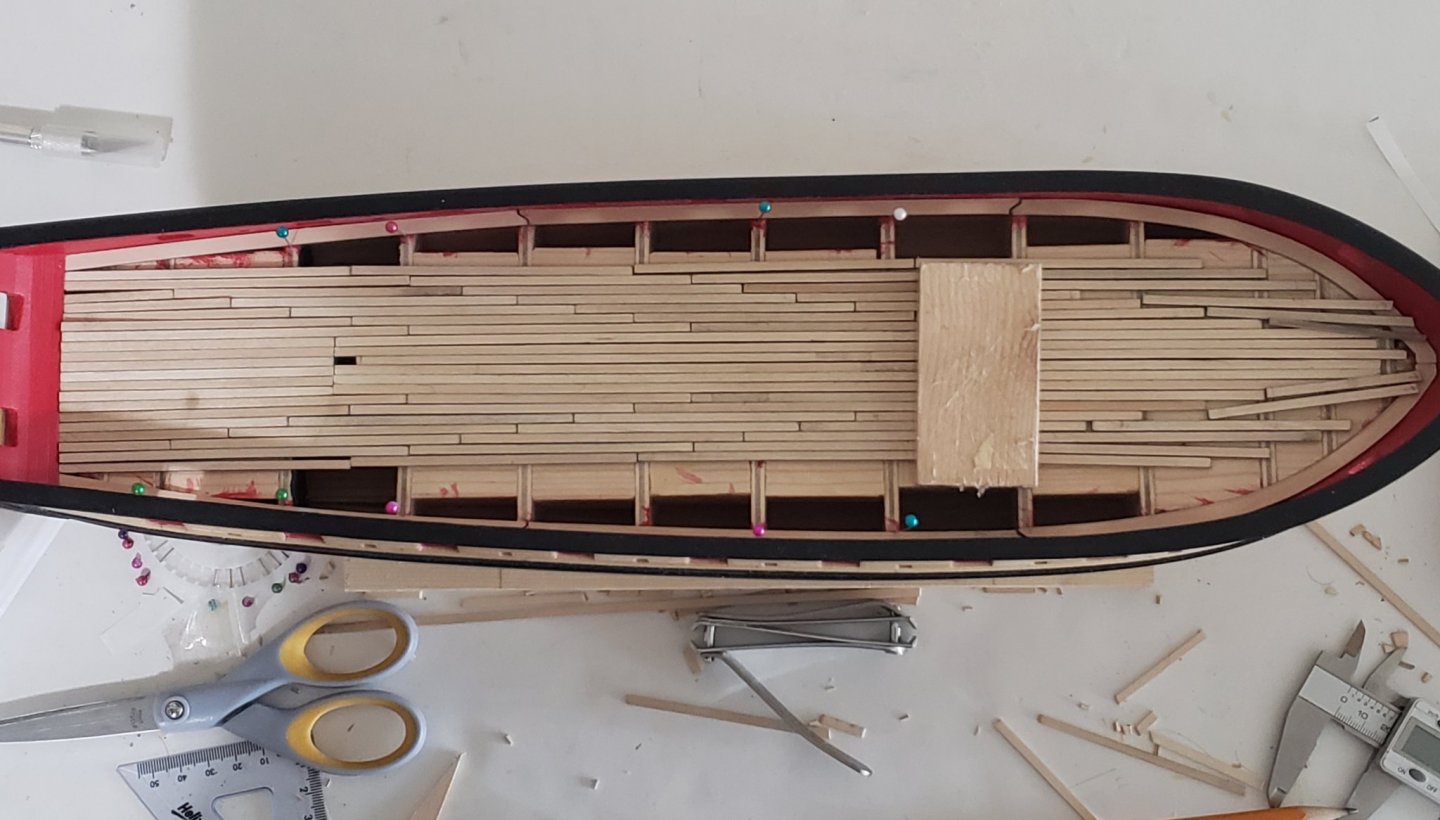
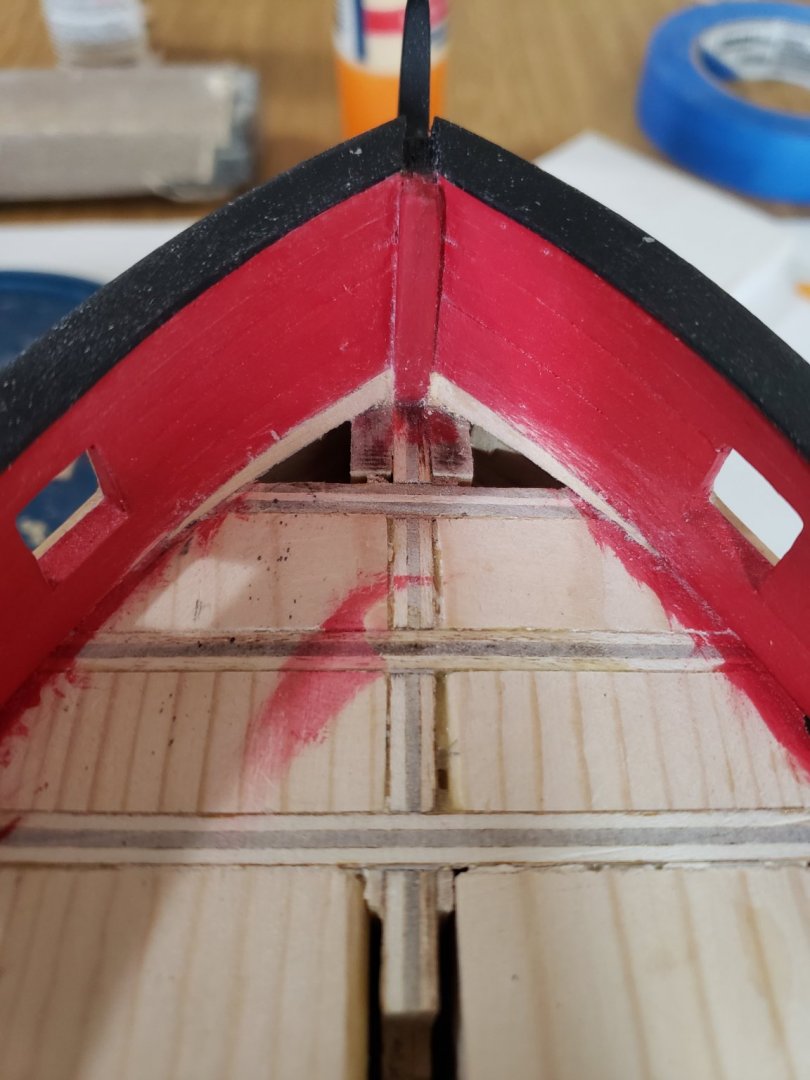
Most of the decking is now complete. I needed to glue small strips of wood underneath some sections of the margin planks to combat the wavyness where too much material was sanded. Here is an example: While progressing through the decking, I first installed the margin planks near the stern which were held in place by putting pins on their edges. The decking planks were then installed from the stern towards the bow. The bow margin planks were glued in last, but prior to the last three nibbed planks. The notches were shaped before installing it in. I must say, the nibbing part was the most satisfying part of the build so far. Glad I did not skip this. Only thing, I was on the edge of my seat for every notch, scared of messing the margin plank up. I think for the last plank or two of the decking I will need to buy some tracing paper to get the shape right. My first couple of tries in guessing the shape did not go so well. Since I am progressing towards the end of Chapter 7, does anyone have any advice on how to shape the triangular profile of waterway? I am not too sure on how I can achieve a consistent triangular profile throughout the entire strip.


- 950 replies
-
- 12
-
-
- syren
- model shipways
- (and 1 more)
-
Thanks guys Did not have any tracing paper laying around so I assumed the tip of the nibbed plank to be about half the plank width then drew a line to where it meets the margin plank and cut it out with a hobby knife. Maybe I should not have been so lazy and purchased some over the weekend 😅 Some more nibbing progress. Not sure why, but I am having more trouble cutting out the joggling pattern on the starboard margin plank than the portside one.


- 950 replies
-
- 10
-
-
- syren
- model shipways
- (and 1 more)
-
Thanks for the compliment Voyageur. Means a lot! I started the joggling pattern at the bow. Only finished the first pair so far. Was not as bad as I had thought, but still many more to do. Hoping the other ones go as smoothly as this first pair.
- 950 replies
-
- 8
-
-
- syren
- model shipways
- (and 1 more)
-
Those things happen to try and test us. Good thing most of it is intact!
- 60 replies
-
- 2
-
-
- victory
- billing boats
- (and 1 more)
-
Thanks Patrick! After adding some more strips, what I thought would cause the planks to go wavy completely disappeared, or is very hard to tell. Still need to sort out the edges since I can clearly see the misalignment of the margin plank with reference to the red planks. Anyways, more decking progress photos below. Decided not to be lazy and took photos in a more cleaner environment. Note, the mast holes drilled were 1/4" diameter since I do not have a 5/16" drill bit. Need to add that to the shopping list.. Next I will be sorting out the edges so I can stick the margin planks. Also as you may notice, I conveniently left the nibbing for next time 😅
- 950 replies
-
- 11
-
-
- syren
- model shipways
- (and 1 more)
-
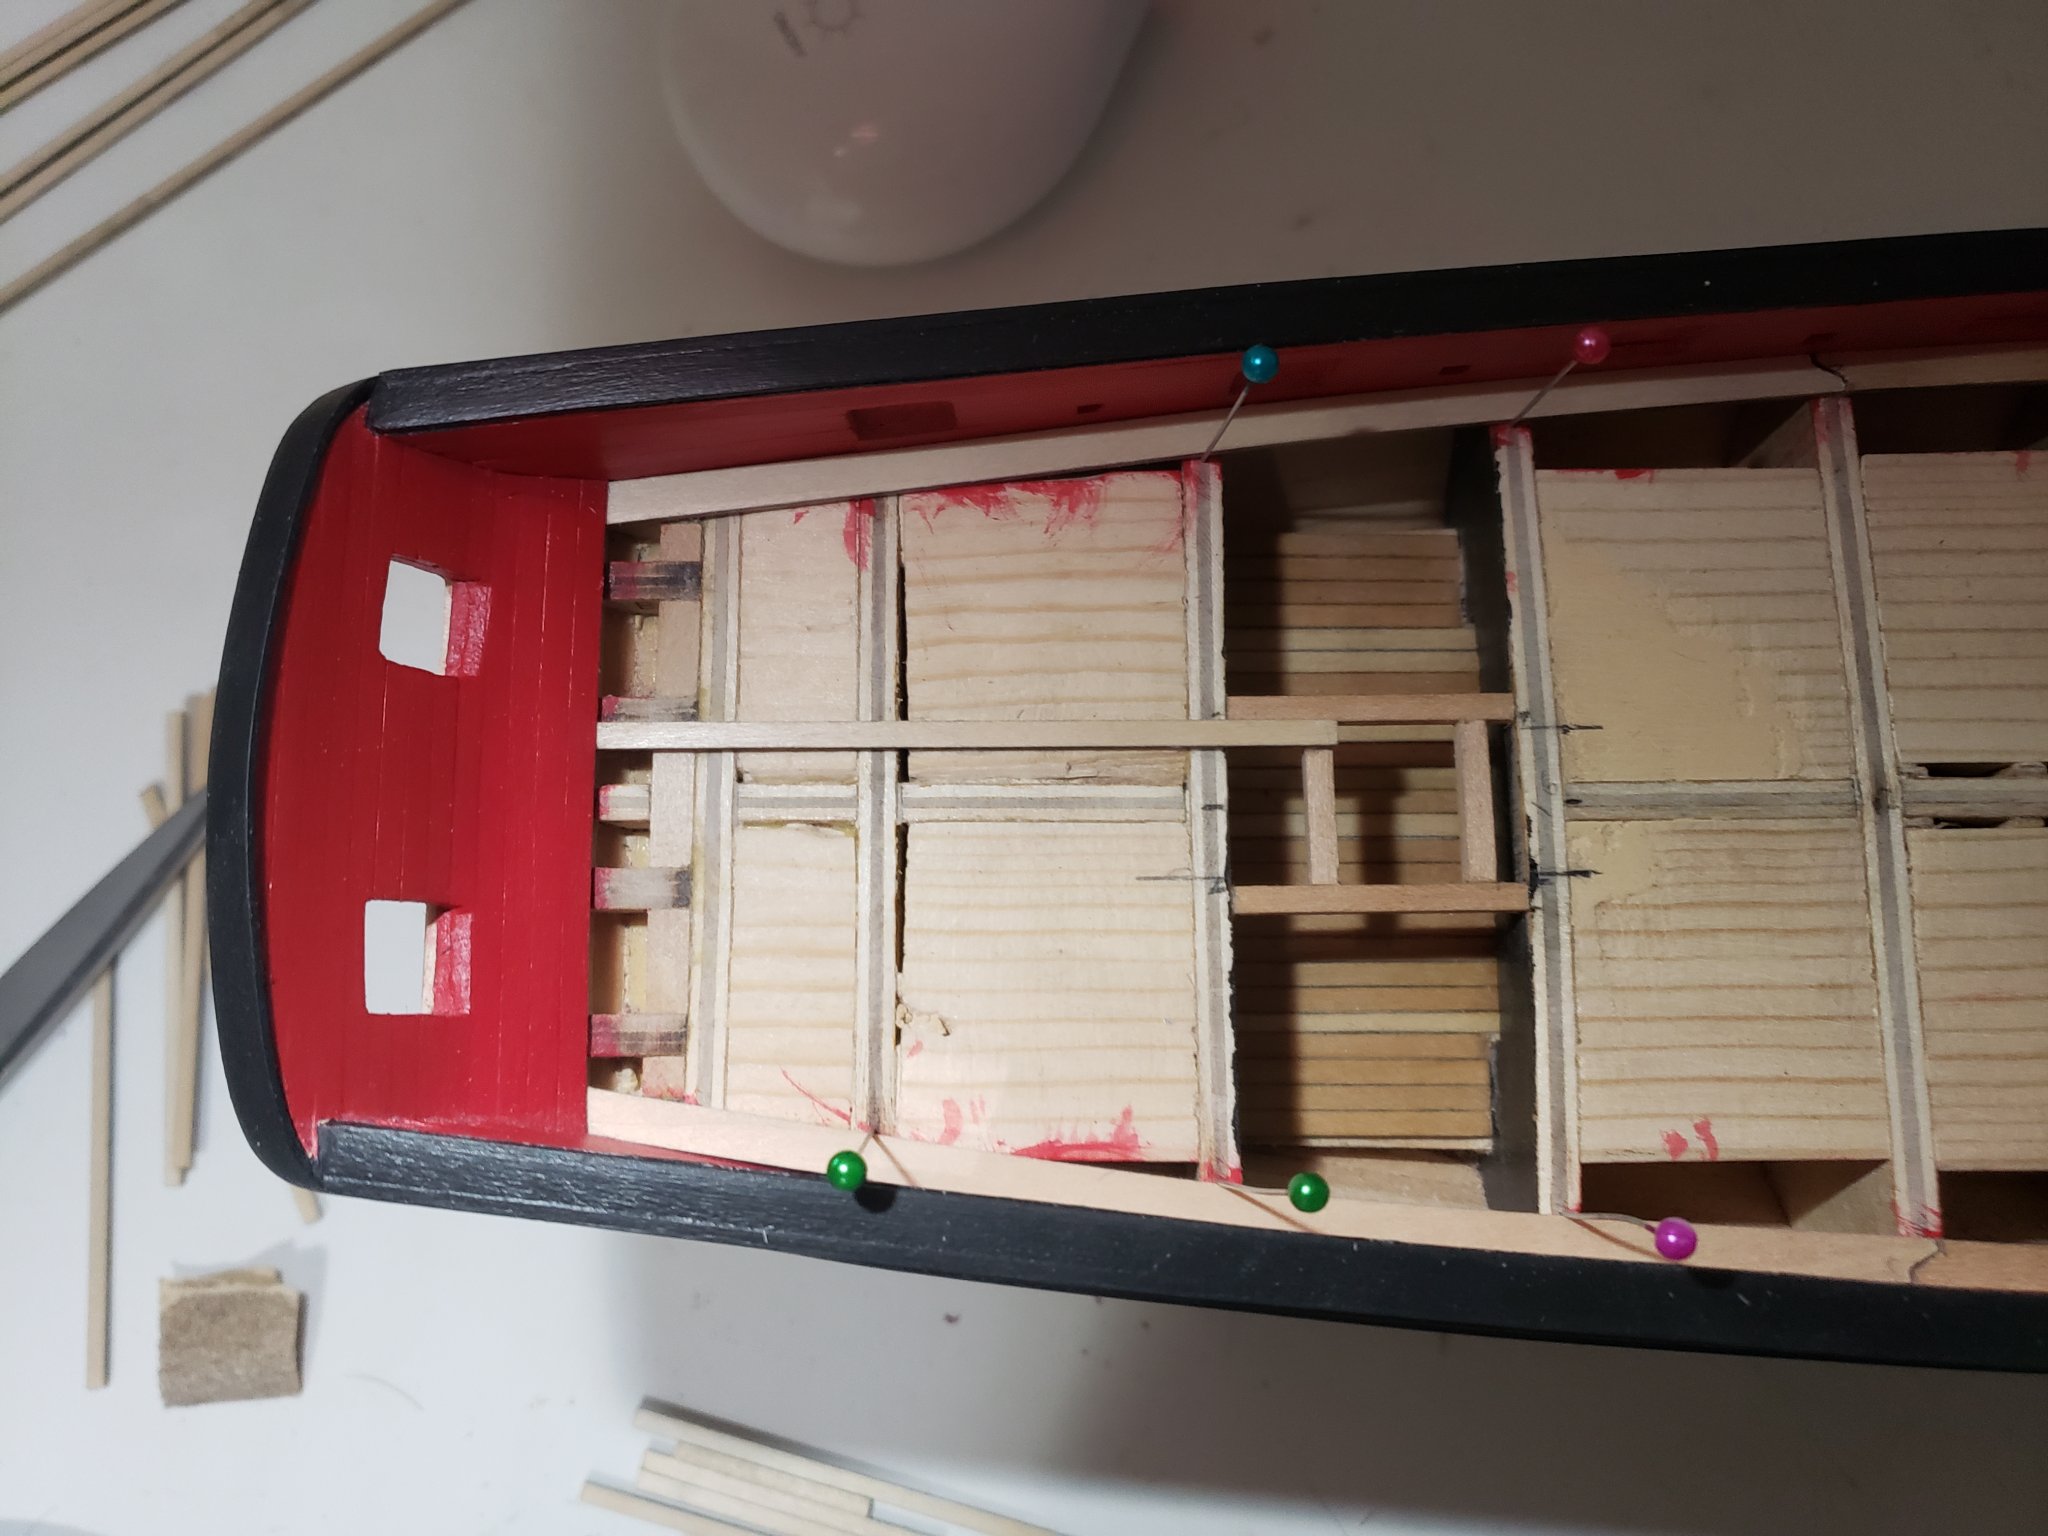
Thanks so much Robin . I am thinking the same for the bulkheads to cure the wavyness. I might also add some filler if I sanded some too much during the early stages of the build. And just to keep things relatively simple for now I will choose to glue fittings onto the deck. Thanks again for all the assistance/advice you've provided throughout my build! It's much much appreciated. So, after much hesitation, I had to eventually pullout the bandaid ie. starting to glue the deck planks. I don't know why, but this seems to be more nerve-wrecking than the hull planking for me. Maybe because if I start gluing at a slight angle, I might mess everything... But I think the start went well as you'll see. I started gluing the stern plank closest to the edge as shown here. The reason being, I could match the angle to that of the companionway framing and also since I already knew (from dry fitting) that 6 planks fit perfectly between the framing. This way it could 'touch' the inner edge of the frame. The next plank's edge was hovering in the gap, so I cut out a small frame to support it, and same on the symmetric side: Here is how it sits right now. The planks will eventually be sanded smooth to get rid of the unsightly uneven surface which is most prominent where the decking meets the red planks. Still a bit intimidated of the nibbing part at the bow. I hope that also goes smoothly once I inevitably reach that stage.


- 950 replies
-
- 8
-
-
- syren
- model shipways
- (and 1 more)
-
Some more decking progress. Again, nothing has been glued yet. I am thinking now to stick the decking by working my way up from the stern to the bow. I might also glue the margin planks at the stern only, and leave cutting the notches at the bow for later on (nervous about the nibbing 😅). Also the waviness of the bulkheads I mentioned in my previous post is most apparent at the edges, so gluing the deck planks in the middle should hopefully be fine...

- 950 replies
-
- 7
-
-
- syren
- model shipways
- (and 1 more)
-
Thanks Voyageur! All margin planks were dry-fitted and held in position using pins on the side. Following Robin's advice, the scarf joints were cut out and positioned to be over bulkheads for a more rigid fit. I might skip additional framing on the sides where the filler blocks do not extend depending on how everything fits. I began decking by followed Dirk's and Peter's deck layout shown here and here, respectively, and printed some photos for guidance. Also I started arranging the decking strips at the stern since I felt it was easiest. The 6 middle planks fit perfectly in the companionway spacing and went from there out. Nothing has been glued yet. I had a couple of questions in case anyone has the answers to them: 1) Some modelers have gaps in the decking to accommodate furniture where the wood underneath the decking shown in the gaps is painted black; whereas others fill the entire deck (except for mast holes) with planks. The latter is shown in the instructions. Are there any benefits/drawbacks to either of these? I am thinking of planking everything since it seems a bit easier. 2) Also realized some of my bulkheads are not in level with others, causing some planks to have a wavy effect. Does anyone know how I can solve this? I remember back when I glued the bulkheads I was wary of this. I just hope it sorts out and the decking is nice and leveled, fingers crossed 🤞


- 950 replies
-
- 9
-
-
- syren
- model shipways
- (and 1 more)
-
Wow thanks for the tips Robin! Also since the scarf joints are not yet cut out, I can change the position so they lie on a bulkhead. I may also add some strips at the gaps for extra decking framework. As for the notches, I'll try to work on the bow margin strip without it glued in position then go from there. Another small update, finished with the companionway framing. I first cut and sanded the 1/8" strips to the right length before assembling it outside the hull. To get the right distance to attach the perpendicular strips, I placed the longer one on the framing plan and made marks on where to attach them. I used a set square to align the planks to make sure they are completely perpendicular. The lines I made on the bulkheads were a bit off, so I used a paper to measure the distance between the red planks and the frame strips to make sure it is in the middle.


- 950 replies
-
- 8
-
-
- syren
- model shipways
- (and 1 more)
-
I'm beyond impressed with all the details going into this build. Looks fantastic! In fact, 'fantastic' may be well of an understatement. Looking forward to your next step
-
I managed to get the margin plank at the bow completed. I used Robin's technique of using a paper to get the correct curve which was then traced to the sheet and then cut and sanded smooth. I think the result is much better than with the laser-cut margin planks resulting in very minor gaps at the edges. I still got to cut out the scarf joints which I will do later on. Dry-fitting the margin planks: I think I am going to leave gluing them until much later after I have cut out the notches to accept the other planks. This might make it easier to rectify any mistakes. If anyone suggests I should glue it first, I would be happy to oblige. It's my first time doing this type of decking, so as always, any advice is welcome!

- 950 replies
-
- 15
-
-
- syren
- model shipways
- (and 1 more)
-
The triangular pieces worked very well to fill the gap. Here are some photos: Now onto cutting my own margin planks. Also I should mention, since I don't think I have mentioned this before: this model has really taught me a lot, and has introduced me into some scratchbuilding, which itself I find is very rewarding. It's great experience before I attempt to dive into something larger/more complicated. And as you all know, the instructions are top notch!

- 950 replies
-
- 8
-
-
- syren
- model shipways
- (and 1 more)
-
Thanks guys! This is definitely helpful. I'm going to first glue in the filler triangular strip then make my own margin planks and will update with the results.
- 950 replies
-
- 3
-
-
- syren
- model shipways
- (and 1 more)
-
I ran into a bit of a problem/inconvenience when dry-fitting the laser-cut margin planks. 1) They do not fit perfectly as shown here. It will be hard to bend to fit, and sanding might leave an unsightly shape, so I am thinking of making my own using the same method I used to create the cap rails at the bow. Getting the correct shape to cut out might be a bit of a problem since I can not trace it as easily as before. 2) I will need to use filler/add one more small plank below the planking since there is a gap between the margin plank and the first red plank. I should have checked the fit before painting the planks red. Also as always, suggestions are more than welcome!

- 950 replies
-
- 7
-
-
- syren
- model shipways
- (and 1 more)
-
Thanks Richard! Yes most of the heavy lifting is done. Only hard major stuff left are the decking and copper plating, then onto the fun stuff 😄
-
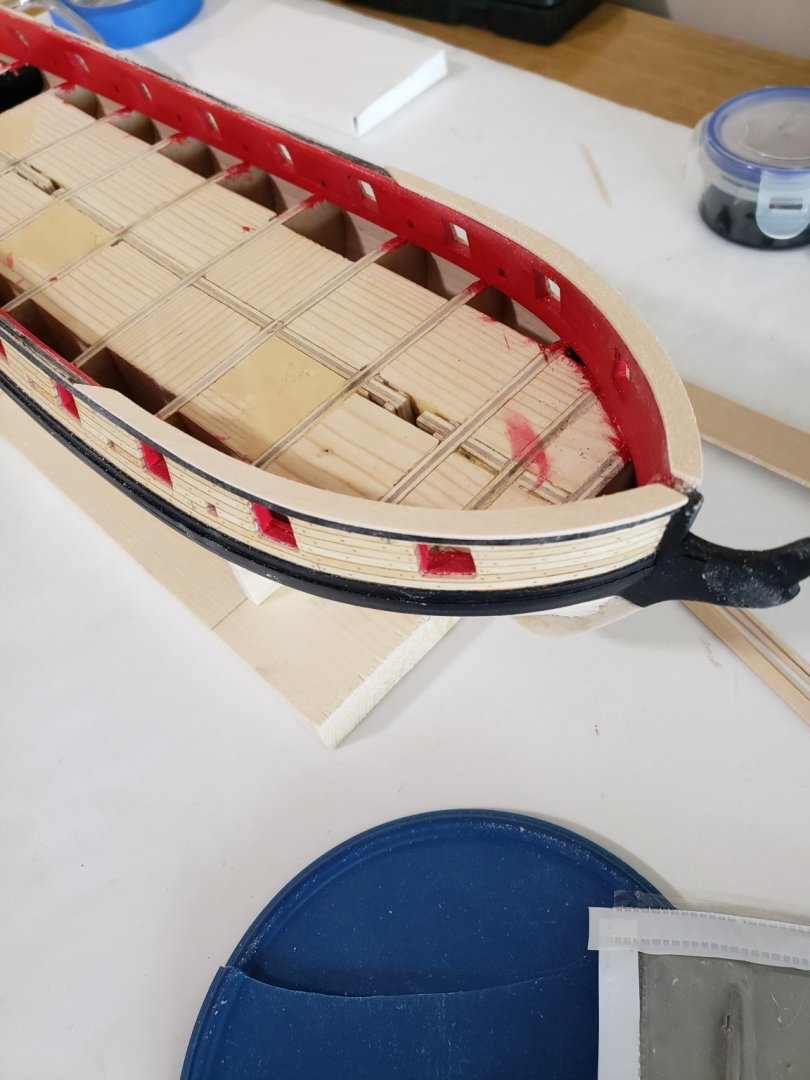
Finished painting the cap rail, and can now move on to decking. There was again very minor bleed through the tape, but not very noticeable.


- 950 replies
-
- 10
-
-
- syren
- model shipways
- (and 1 more)
-
Thanks for the nice words Kurt! I tried making some scarf joints. I don't think they were necessary but wanted some practice before working on the deck. I could not get both wood strips to lay completely flat when taking the photo, so they look uneven, but they fit nicely. Here are some photos of the cap rails fully installed and ready for the black paint:

- 950 replies
-
- 9
-
-
- syren
- model shipways
- (and 1 more)
-
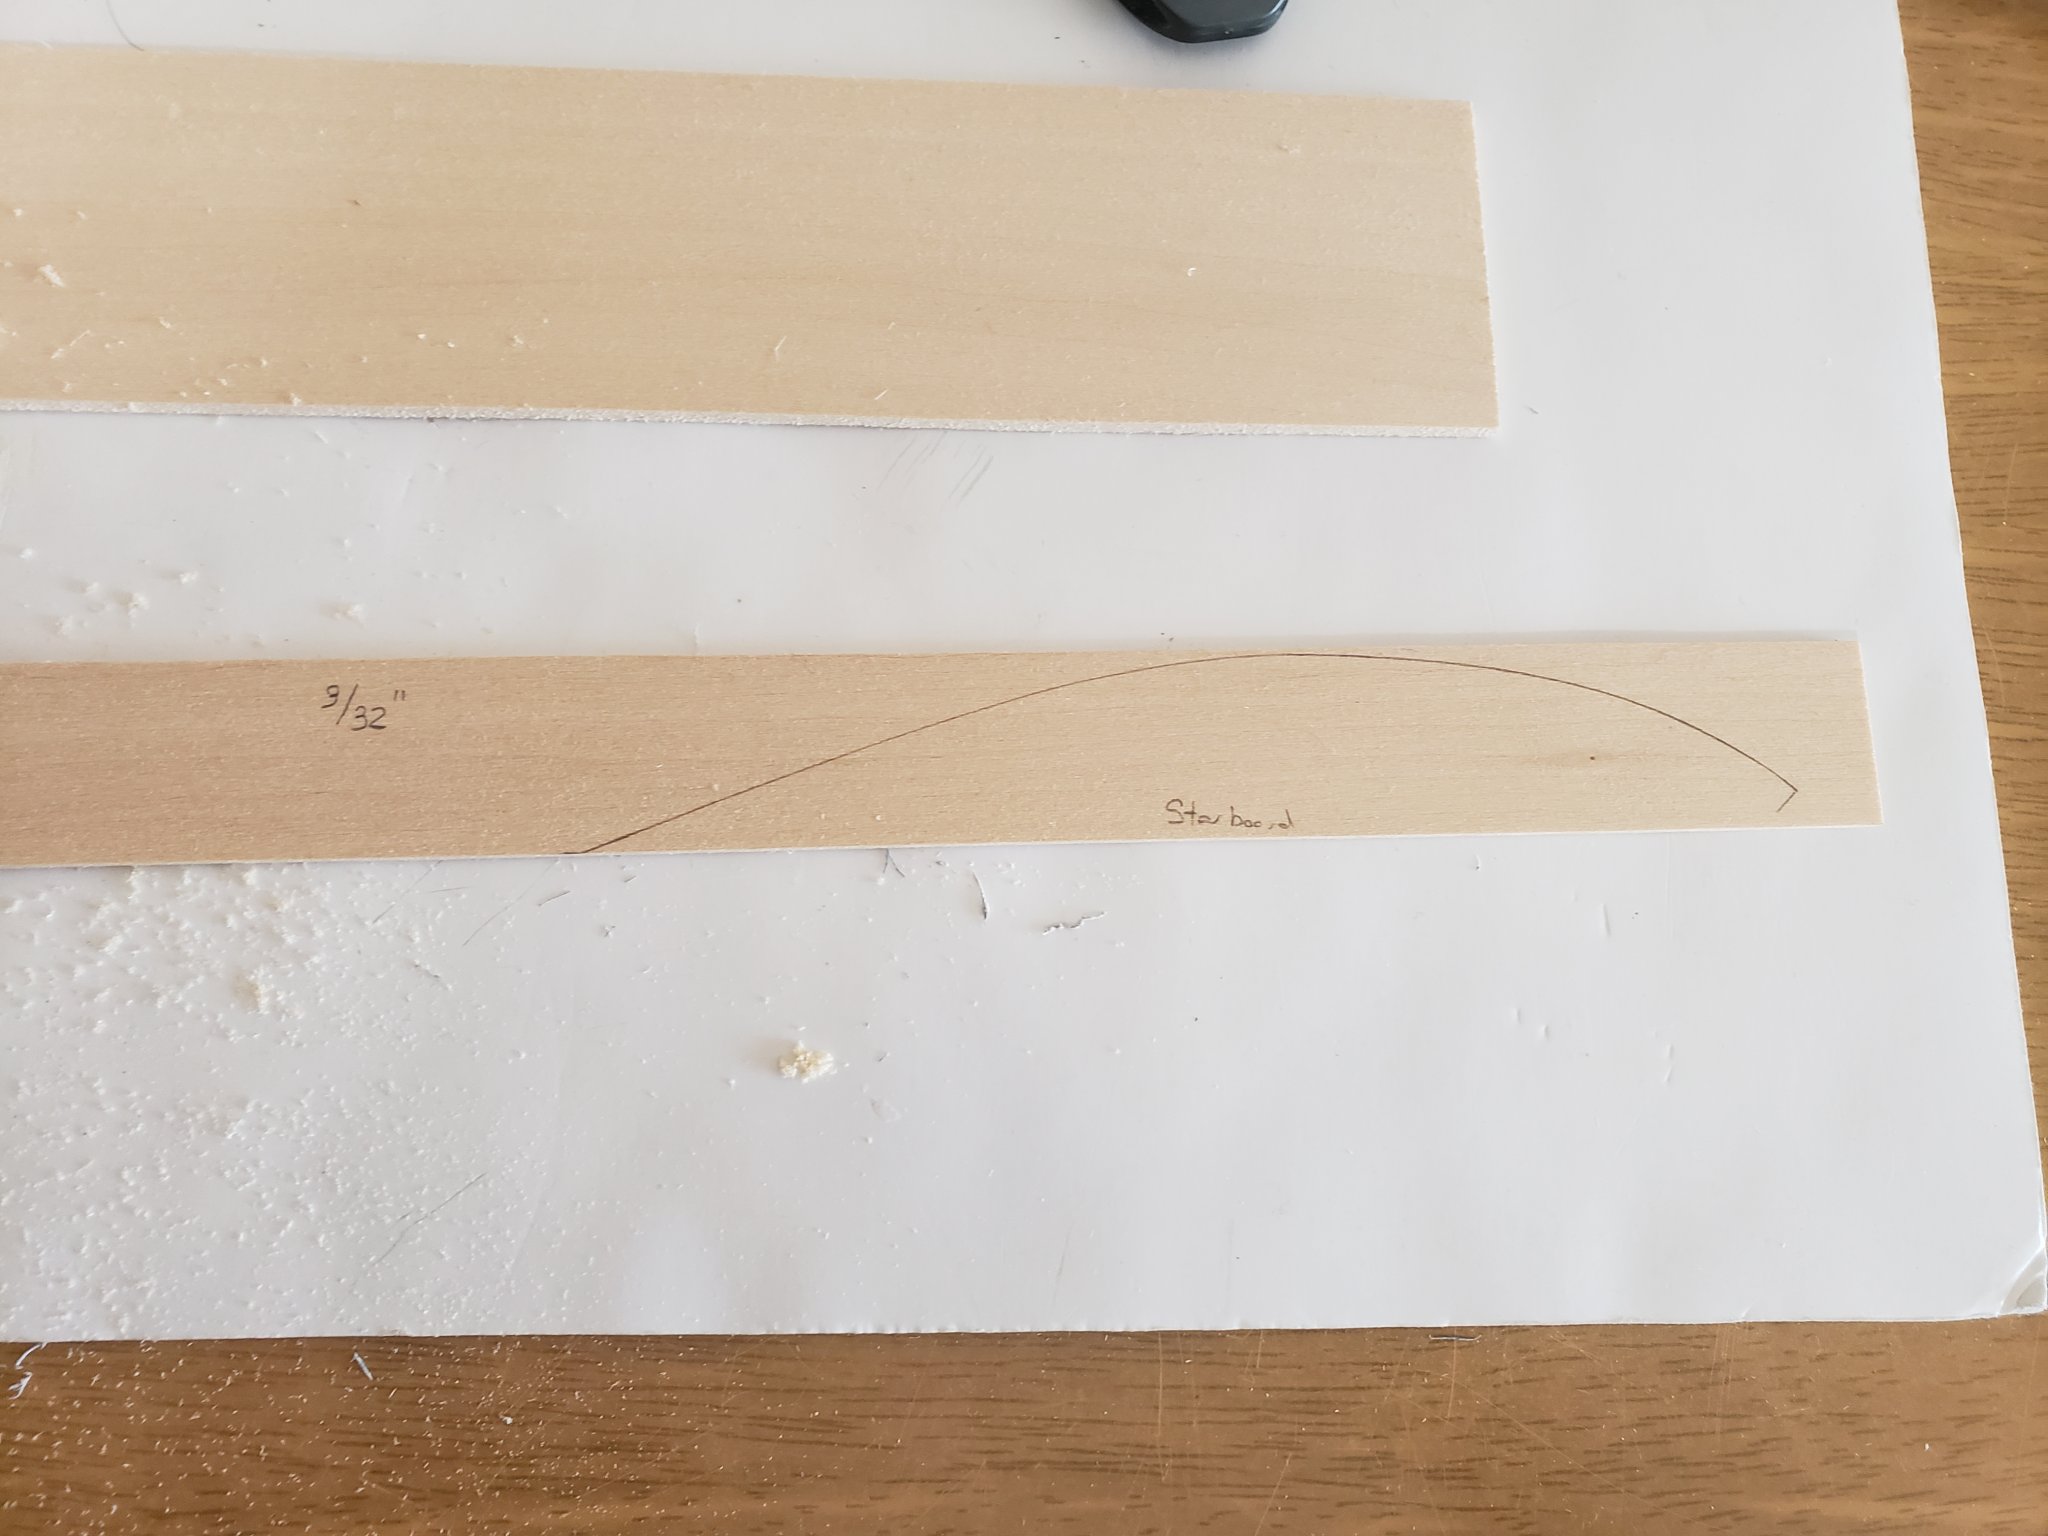
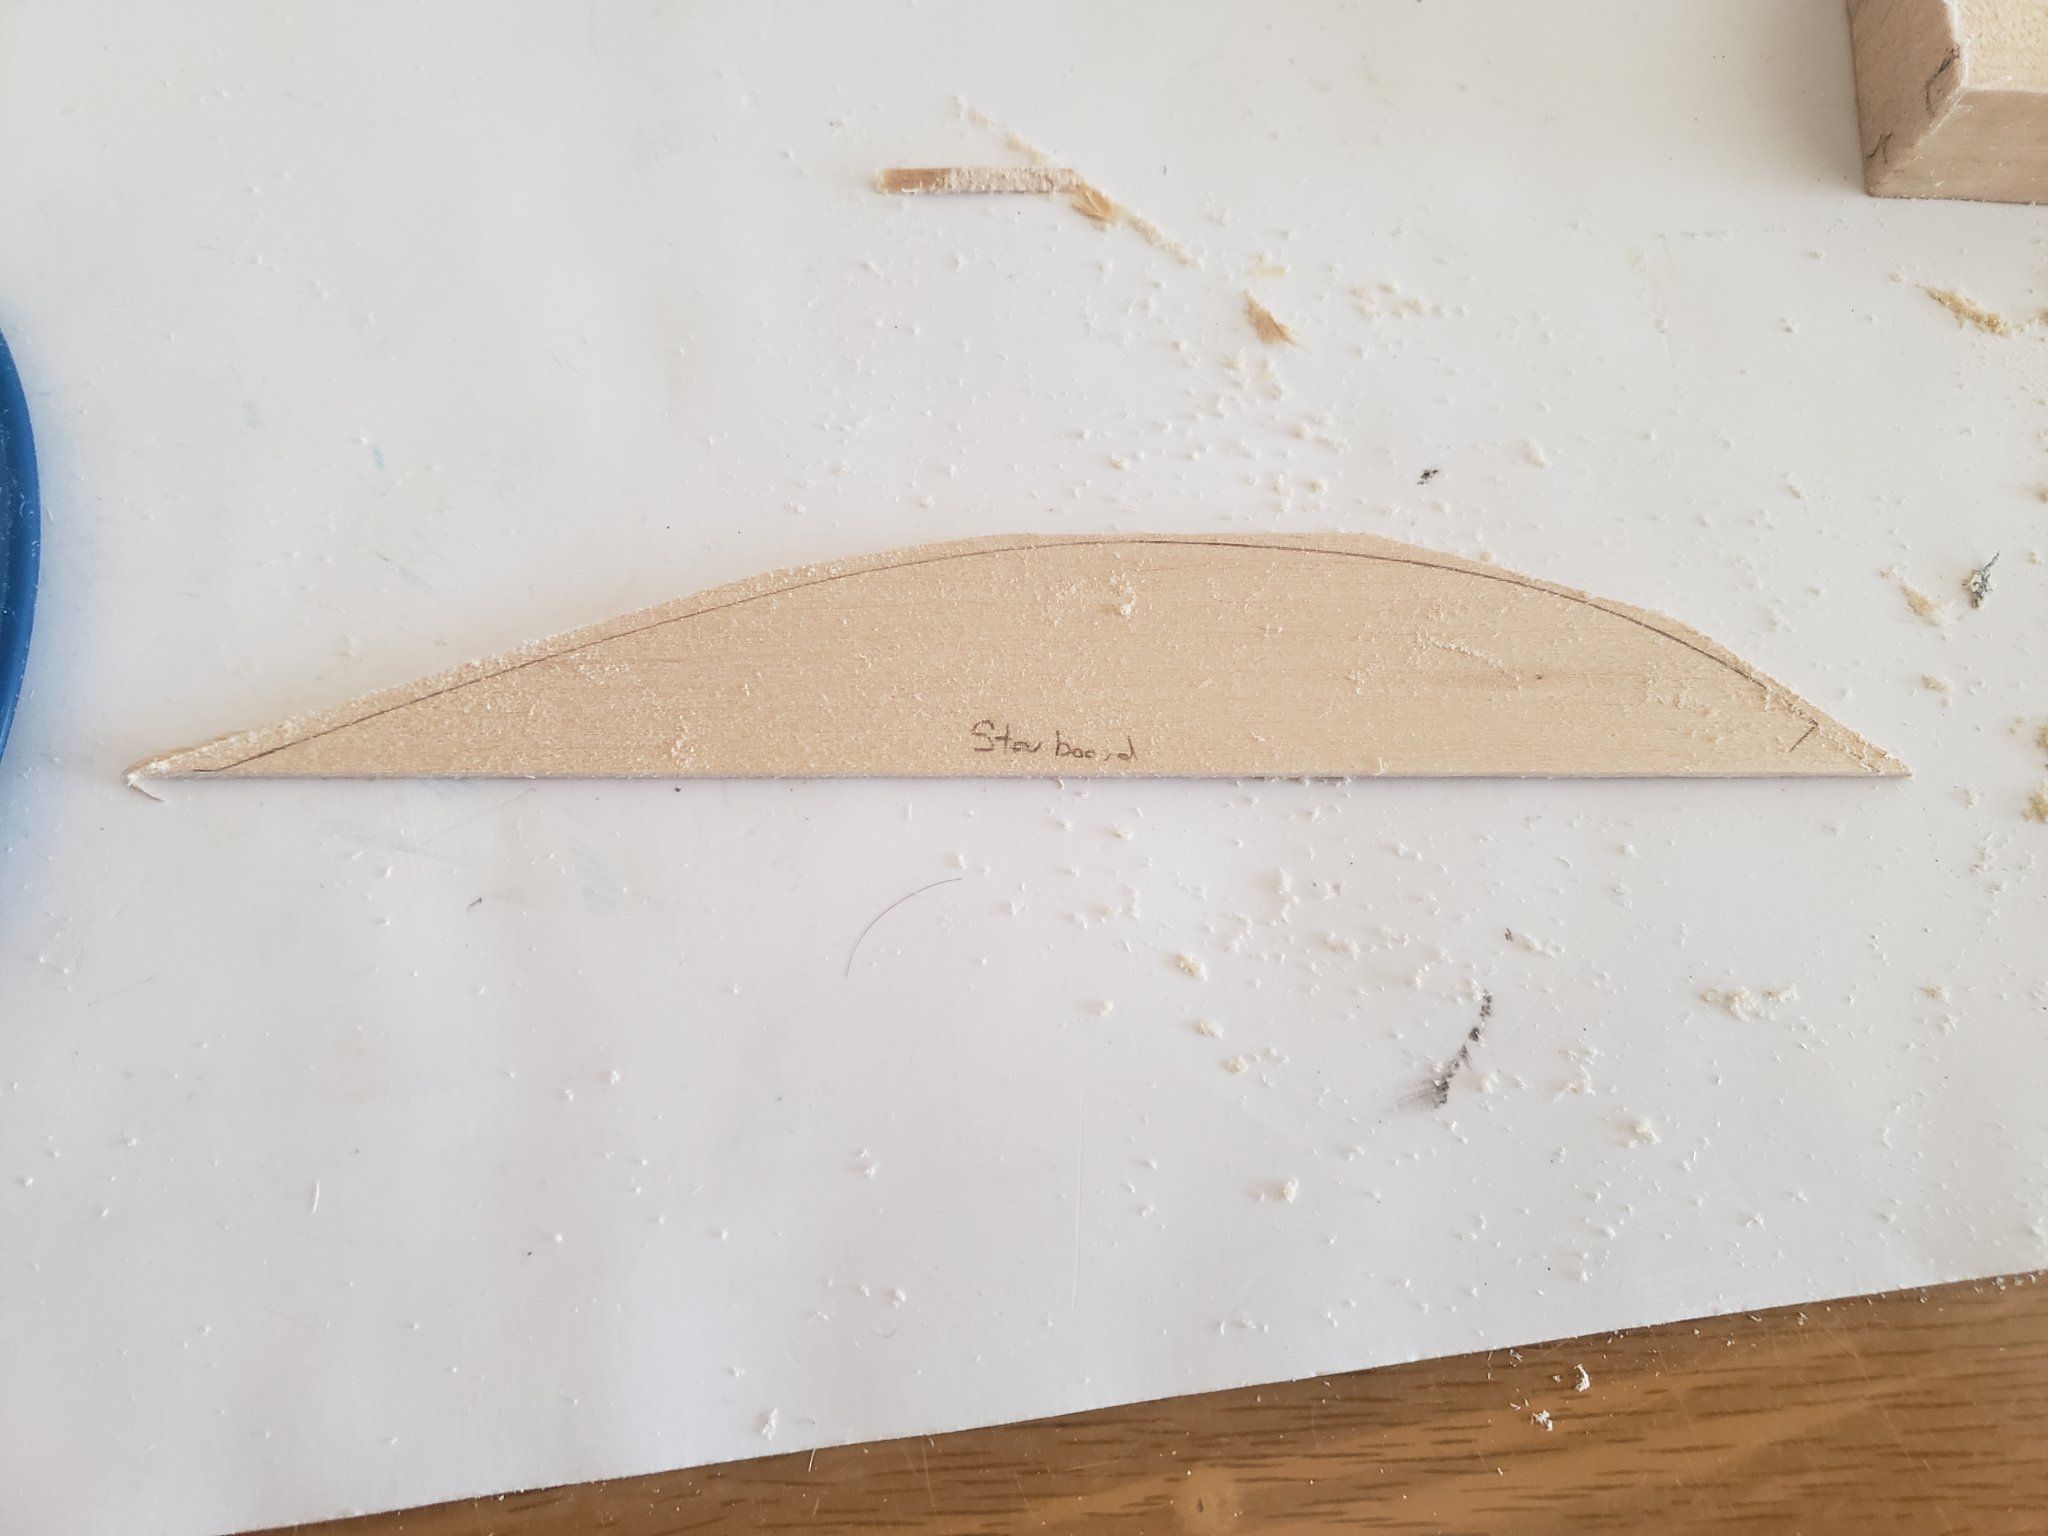
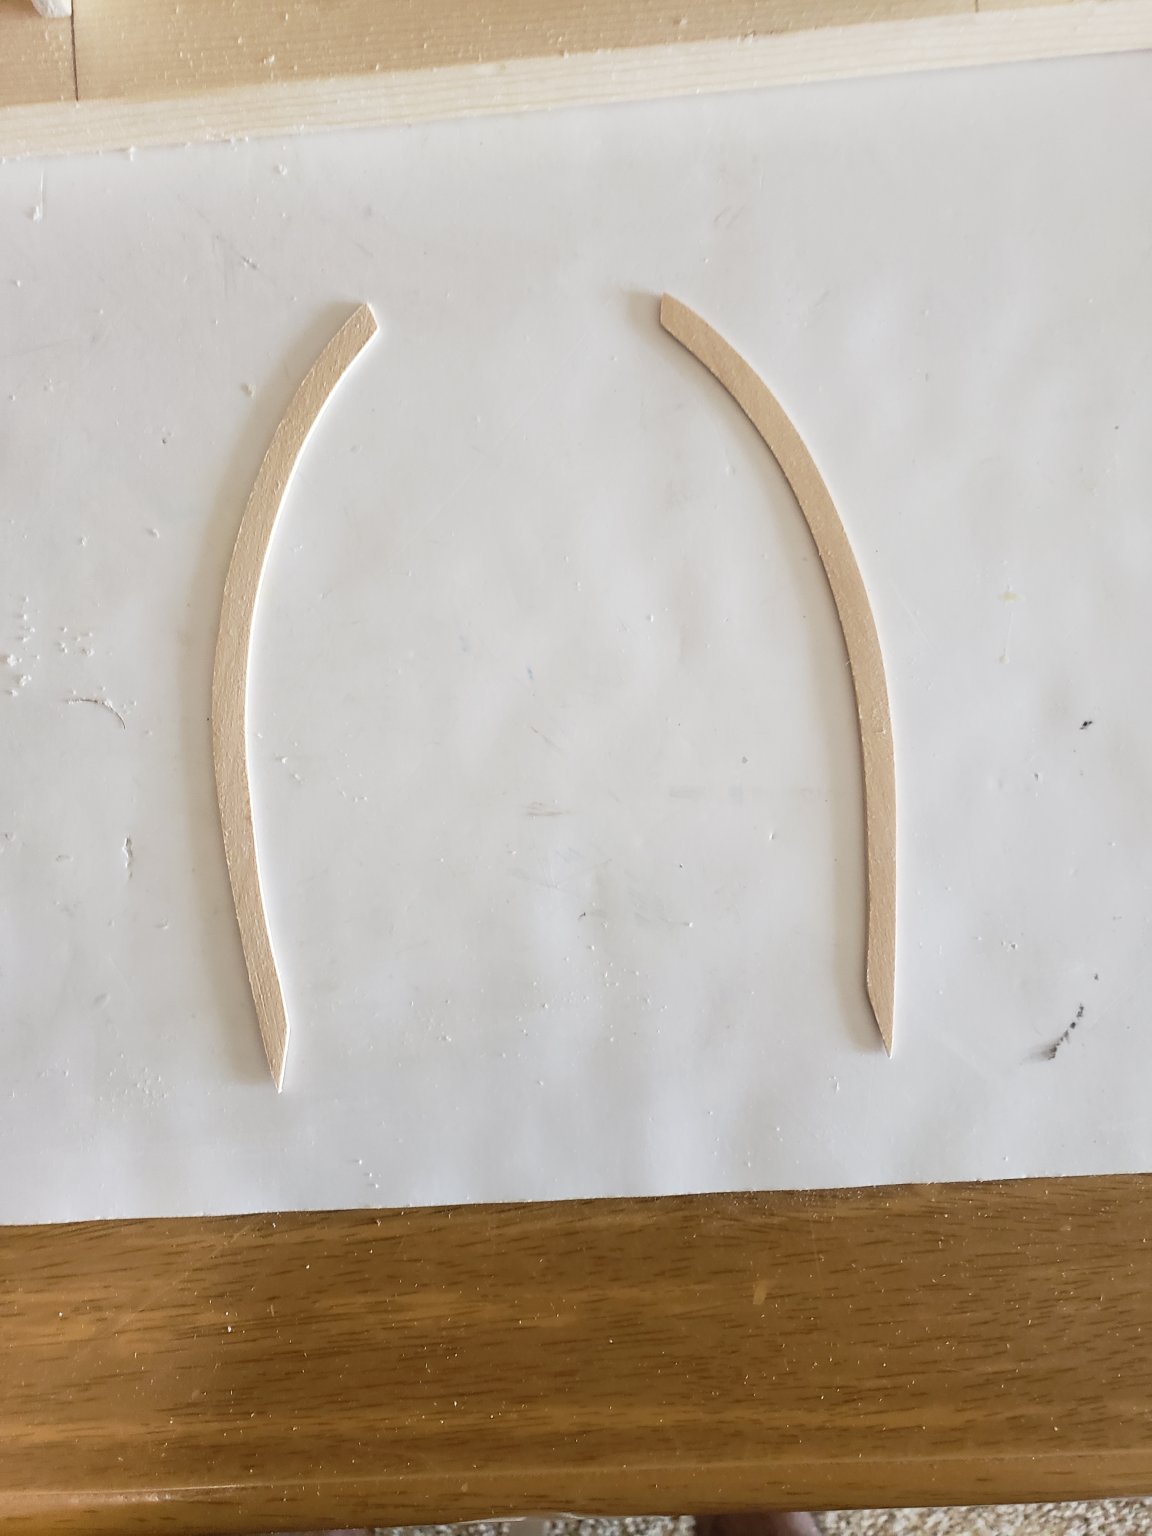
Thanks Robin, Mugje, and Voyageur! And thank you all for the likes! Started working on the cap rails today. I used a 3/32" thick and 1" wide sheet (the caprails will be sanded down to 3/64" prior to installation) where the outside curve of the bow was traced. Reason I used such a thick sheet is because my local hobby store did not have any of the thinner ones in stock, so I had to improvise. Otherwise I'd have to wait a couple of weeks... Anyways, using a coping saw, the outer curve was cut, then sanded smooth. Then to get a profile of the interior curve, I used a compass setting the width to 3/16" which was then cut and sanded smooth. Dry fitting the caprails:

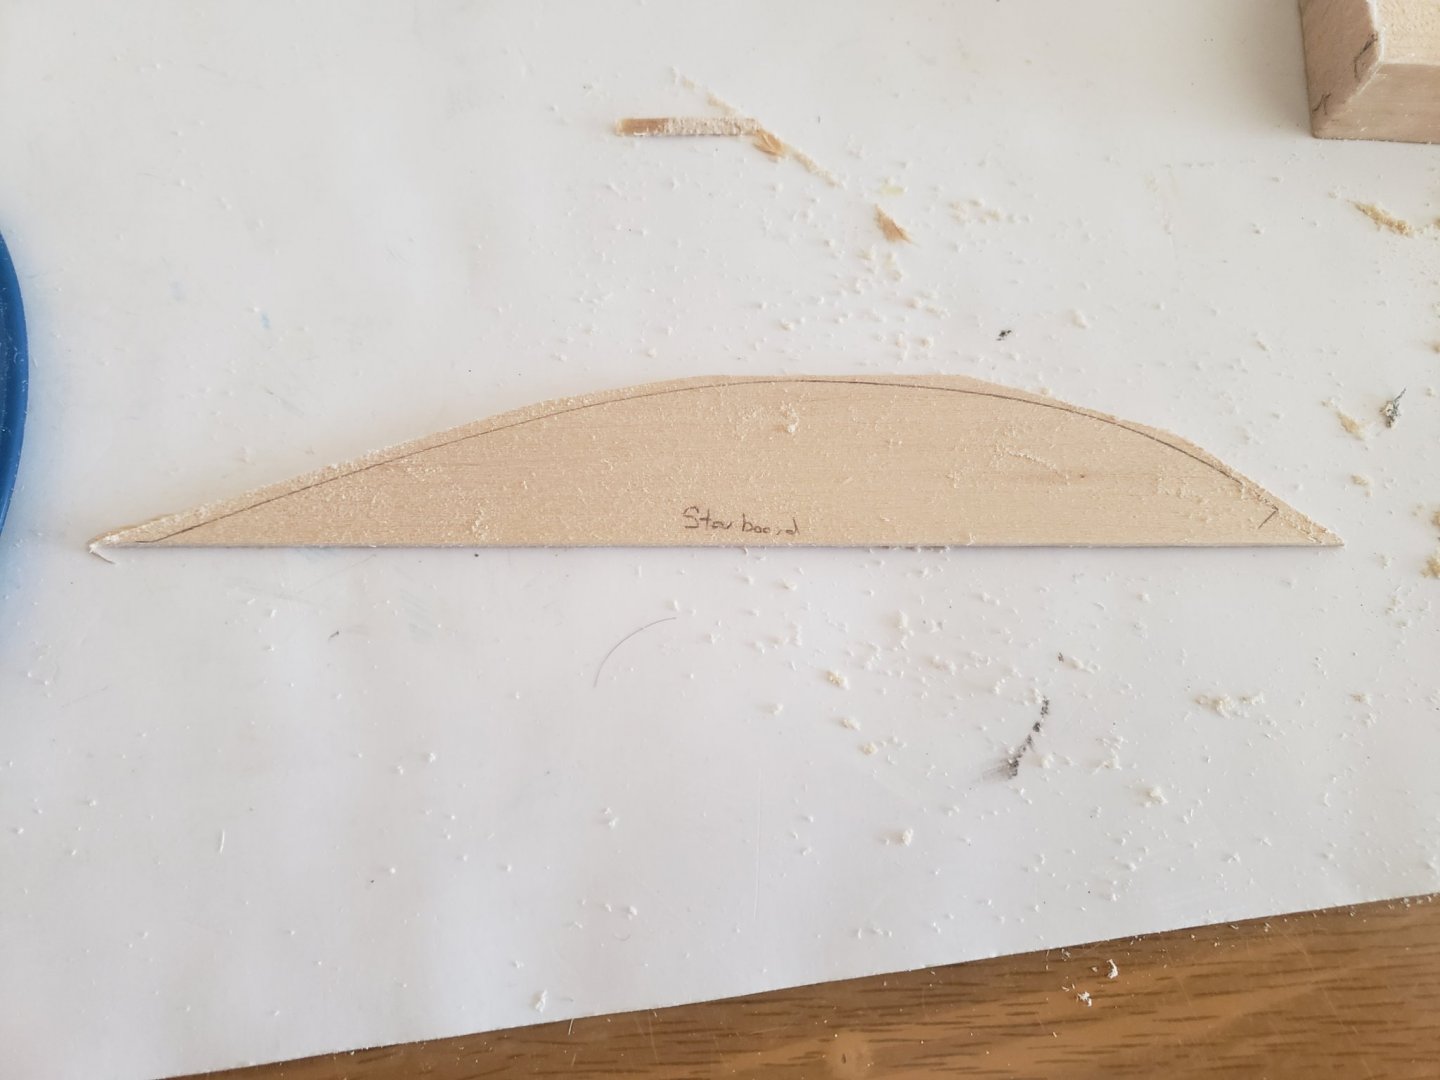
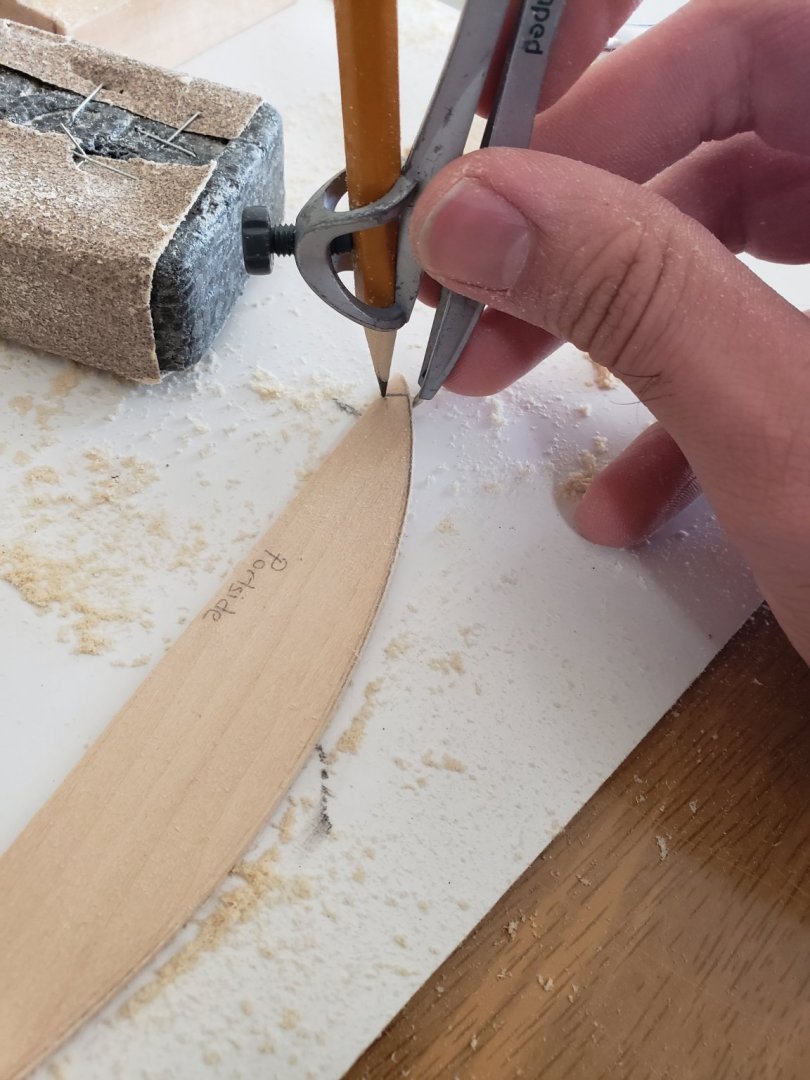

- 950 replies
-
- 10
-
-
- syren
- model shipways
- (and 1 more)